Multiplayer Games
Andrew Mulholland
and
Teijo Hakala
p. cm.
ISBN 1-55622-868-6 (pbk.)
1. Computer games--Programming. I. Hakala, Teijo. II. Title.
QA76.76.C672 M85 2001
795.8'15--dc21 2001046789
CIP
© 2002, Wordware Publishing, Inc. All Rights Reserved 2320 Los Rios Boulevard
Plano, Texas 75074
No part of this book may be reproduced in any form or by any means without permission in writing from
Wordware Publishing, Inc.
Printed in the United States of America
ISBN 1-55622-868-6 10 9 8 7 6 5 4 3 2 1 0109
OpenGL is a registered trademark of Silicon Graphics, Inc. Windows is a registered trademark of Microsoft Corporation.
Other product names mentioned are used for identification purposes only and may be trademarks of their respective companies.
All inquiries for volume purchases of this book should be addressed to Wordware Publishing, Inc., at the above address. Telephone inquiries may be made by calling:
Theory Introduction . . . 1
Chapter 1 Creating Windows Applications in Visual Studio . . . 3
Introduction . . . 3
Windows Messaging System . . . 3
Creating a Window. . . 4
Sending Information to Your Window . . . 8
Introduction to Static Link Libraries . . . 9
Creating a Static Link Library . . . 10
Using a Static Link Library . . . 13
Final Notes . . . 14
Chapter 2 Internet-Based Database Systems . . . 15
Introduction. . . 15
Installing MySQL. . . 16
Linux Specific . . . 16
Windows Specific . . . 17
Overview of MySQL . . . 18
Creating a Database in MySQL . . . 18
Adding Tables to a Database. . . 19
Adding Data to Tables . . . 22
Viewing Data in a Table . . . 24
Adding Extra Fields to Tables . . . 28
Updating Data in a Field . . . 30
Ordering Output . . . 36
Retrieving the Last Data Entered . . . 38
Limiting Output Data . . . 40
Deleting Data from a Table . . . 40
Deleting Tables and Databases . . . 43
Relational Databases . . . 46
Creating Our Relational Database . . . 47
Player Data . . . 48
Payment Info . . . 50
Notes . . . 52
Rel Friends . . . 53
Rel Enemies . . . 55
Adding Relational Data . . . 57
Manipulating the Friend and Enemy Relational Tables . . . 70
Message Buffer System . . . 364
CreateTCPServer and CreateUDPServer Functions. . . 399
ENGINE_ProcessInput Function . . . 555
ENGINE_UpdatePlayers Function . . . 561
ENGINE_UpdateBullets Function . . . 565
ENGINE_CheckBulletCollisions Function . . . 566
ENGINE_CheckFlagCollisions Function . . . 567
Handling Player Messages . . . 569
ENGINE_AddBullet Function . . . 571
Game Server . . . 572
Running the Server on Unix . . . 573
Main Function . . . 573
Daemon_init Function . . . 573
Summary . . . 574
Appendix A Byte Ordering Functions . . . 575
htons Function (Unix, Win32) . . . 575
htonl Function (Unix, Win32) . . . 575
ntohs Function (Unix, Win32) . . . 575
ntohl Function (Unix, Win32) . . . 576
Appendix B NetLib.h . . . 577
Index . . . 585
With Internet technology developing rapidly, Internet gaming has become ever more popular, while documentation on how to actually make Internet games remains inadequate.Developer’s Guide to Multiplayer Gamesprovides in-depth coverage of all the major topics associated with online game programming, as well as giving you easy-to-follow, step-by-step tutorials on how to create your own fully functional network library, back-end MySQL database, and complete, working online game!
The book contains two main areas. The first is dedicated to explaining practical theory on how to utilize MySQL, Perl, sockets, and basic Windows dialog pro-gramming. The second section consists of five extensive tutorials, leading you through the stages of creating a working online game that you can both learn from and expand upon.
After reading this book, you will have a solid knowledge of online game pro-gramming and you will also be able to start making your own online games. Also note that the companion CD-ROM contains all the source code from the book and a ready-to-use version of the network library you will create in the tutorial section.
We hope you enjoy reading and learning from this book as much as we have enjoyed writing it!
Andrew Mulholland is currently working as lead programmer at a software development company in Scotland. He is also an undergraduate at the University of Abertay in Dundee studying com-puter games technology. His e-mail address is andrew@dreamcircle.co.uk.
Teijo Hakala is currently studying software engi-neering at Jyväskylä Polytechnic in Finland and specializes in network design, programming, and optimization. He also has a wide variety of work experience with computer technology. His e-mail address is teijo@dreamcircle.co.uk.
xiv
Andrew Mulholland
The theory section of this book is full of practical information that will help you understand how to make functional online games. We recommend that you read this section thoroughly before attempting the tutorial section, as there is a lot of knowledge that will benefit you here.
This section first covers the basics of dialog-based Windows programming, which we will utilize in the tutorial section to create our login and lobby system for the sample online game. Then we cover how to use MySQL and Perl to create a back-end database for your game, allowing you to interact with game data directly from a web browser. Then we give an introduction to TCP/IP and sockets, followed by how to get started with sockets programming. Finally, we learn about different ways to send data, and how to modify the behavior of our sockets.
First, let’s look at how to create dialog-based Windows applications…
Creating Windows
Applications in
Visual Studio
Introduction
The most essential knowledge anyone can have is the basics. If you already know how to create dialog-based Windows applications, skip past this chapter. If not, this chapter will give you a quick and easy introduction to it so that you will find the rest of this book more accessible.
The reason for learning this is to be able to create our server applications for the Microsoft Windows operating system.
Windows Messaging System
Windows controls everything by the use of its messaging system. This is a funda-mental idea to grasp if you wish to create any Windows-based applications. Within this messaging system, tasks to be processed by the operating system are stored in a queue. For example, when a user clicks a button in a window, a message is
added to the queue and is then sent to the appropriate window to inform it that the button has been pressed.
When the operating system creates a window, the window continually checks for messages being sent to it. If it receives a relevant message, it will react accordingly; otherwise, it will send it back to the operating system to be reprocessed.
Each window created is assigned a unique handle that is used to control and determine which messages are relevant to that window. In code, this is defined as the HWND, or window handle. The main reason behind this system is to allow for multi-tasking and multithreading. This means that the operating system can run more than one application in one instance, even though a processor can only han-dle one task at a time.
There is a lot more to windows than this, but this should give you a reasonable overview of how the system works.
Creating a Window
Load Microsoft Visual Studio and select File, New…
The following dialog box should now be visible in the center of the screen.
Select the Projects tab at the top of the dialog and then choose the Win32 Applica-tion opApplica-tion on the main display. Select the locaApplica-tion for your project, enter your project’s name, and click OK.
Next, select the type of project you wish to create. Leave it on the default option (An empty project) and click the Finish button. A project information box appears; simply click OK in this box.
Now we are working with the Visual Studio main interface. Currently, ClassView is active, but we are interested in FileView so select this tab.
FileView lists all of the C and C++ source and header files that are active in your project. Currently we do not have any files in our project so we need to add our main C++ source file.
Select File, New… as you did before, but this time select the Files tab instead of Projects. The following dialog will be visible.
Select C++ Source File as shown in Figure 1-3 and type in the filename as main.cpp. Click the OK button to add this empty file to your project.
You now have your main source file in your project, and it is visible in the Visual Studio editor.
There are two main items required in a standard Windows program: the entry point to your program, which is named WinMain, and the Windows callback proce-dure (commonly named WndProc), which is used to keep your Windows
application up to date.
For what we require though, it is best to take the dialog approach, making it even simpler to design and code. First, we need to add our dialog. Click File, Figure 1-2
New… again, but this time select Resource Script. Type in the filename as resource and click OK.
Once this is done, you will notice another tab has appeared between the ClassView and FileView tabs. This tab is called ResourceView and allows you to visually create and edit dialogs for use within your program.
Once you select the ResourceView tab, you will be presented with the resource editor. Right-click on resource.rc in the main view and then left-click on the Insert option. You will then be presented with the Insert Resource dialog box.
Select Dialog and click New. Now you will see a sample dialog box in front of you. For now, we will not do much to it except change the name of the title bar and its identifier that I will explain after the code below.
Double-click on the sample dialog box that Visual Studio created. Now a dialog properties box can be seen. All we are interested in here is the ID, which will probably be set to Idd_Dialog1, and the Caption, which should be Dialog. Let’s change the ID to Idd_Client and the Caption to Window Example.
OK, now it’s time to go back and do some code. We have our dialog template that we can call from our code so let’s use it. Here is the code required to make your dialog appear on the screen:
// Simple Windows Code #include <windows.h> #include "resource.h"
LRESULT CALLBACK
ClientDlgProc(HWND DialogWindow, UINT Message, WPARAM wParam, LPARAM lParam) {
// Process Messages
Figure 1-4
switch(Message) {
case WM_INITDIALOG: return FALSE;
case WM_COMMAND: switch(wParam) {
case IDCANCEL:
EndDialog(DialogWindow, FALSE); return FALSE;
default: break; }
break;
default: break; }
return FALSE; }
int APIENTRY
WinMain(HINSTANCE hInstance, HINSTANCE hPrevInstance, LPSTR lpCmdLine, int nCmdShow) {
DialogBox((HINSTANCE) hInstance, MAKEINTRESOURCE(IDD_CLIENT), NULL, (DLGPROC) ClientDlgProc);
return 0; }
The OK button on the dialog can be pressed but will have no action, whereas the Cancel button will close the dialog.
NOTE If you get an error and it tells you it can’t find afxres.h, you need to install MFC support for Visual Studio, which comes with the Visual Studio package.
If you have never seen Windows code before, the code above may look complex and a little confusing. Welcome to the world of Windows! It’s not that bad, honest.
Let’s start with the WinMain function. This is simply the point at which Win-dows starts executing your code. Do not worry about the variables that are passed in; they are controlled by Windows and are beyond the scope of this book.
The main issue here is the DialogBox function and callback procedure
template for our dialog. The third parameter is of no interest to us so we set it to NULL, but the final one is. This is a pointer to the update function for the dialog. Each dialog you create requires this update function (basically the same idea as a Windows procedure). In this update function is where you set the actions for but-tons and other useful tools. So we set this update function to our callback function for the dialog (ClientDlgProc). For example, the identifier for the Cancel button is Idcancel. As you can see in the code, there is a Case statement for the Cancel but-ton so when it is clicked, it will close the dialog window. Other butbut-tons can be easily added to the template using the toolbox on the template editor. Just remem-ber that each button must contain a unique ID so you can reference it from within your code.
Sending Information to Your Window
As well as being useful for debugging, being able to update information to a win-dow is essential knowledge that can be used in many situations, such as displaying how many players are connected to the game server.
First you have to add a static text string to the dialog window. To do this you need to go back to the template editor by selecting the ResourceView tab as before. Then you simply double-click on the Idd_Client text as seen below to bring up your dialog in the main area.
Next, select theAabutton from the Controls toolbox and place it somewhere on your dialog as shown in Figure 1-6. Now double-click on the text you added to the dialog box to display its properties.
The dialog box shown in Figure 1-7 will now be visible on the screen. All we need to change here is the ID. Change the text Idc_Static to Idc_Serverstatus. This will give it more meaning when it comes to adding it into the code.
Now we have some text, and we want to be able to set it to a value from within our code. For example, if we want the text to read “Server Online,” add the fol-lowing lines of code after the line that contains “case WM_INITDIALOG”:
SendDlgItemMessage(DialogWindow,IDC_SERVERSTATUS, WM_SETTEXT,NULL,(long)"Server Online");
Therefore, when the dialog box is initialized, Windows will send a message to the dialog box to tell it to update the Idc_Serverstatus text with the string you sup-plied in the function. In this case, it would update the text from “Static” to “Server Online.”
The first parameter is the handle to the dialog, which is the first variable that is passed into the dialog update procedure. The second is the identifier for what you want to change or update. Next comes the command that you wish to send. There are many commands and the best way to figure out how they work is just to experiment with them. For now we are using WM_SETTEXT, which tells Windows to change a static text string in a dialog box. The fourth parameter is not used for the WM_SETTEXT command so we simply set it to NULL. The final parameter is used to declare the string with which we want to update the static text, in this case “Server Online.” Also, note that the string must be type-cast to a long.
TIP Also try experimenting with editable text. It works on the same principles dis-cussed above, and you simply send a WM_GETTEXT message to retrieve what the user entered.
Introduction to Static Link Libraries
Later, when we create our online tutorial game, we will be using static link librar-ies to encapsulate all our network and graphics code, which will make it easier to reuse the code for future projects. In addition to the reusability factor, static link libraries also protect your source code, but allow others to use the functionality of your code.
a program, rather just a collection of functions that we can use from within our programs. The library is created using standard C/C++ source and header files, but the output is a library rather than a Windows executable.
When you compile your library, the compiler will generate a library file with the extension .lib. To use the functions in your library, you are required to include it in your project and include the header file that was used to create the library (which contains all the external variables, types, and function prototypes).
The easiest way to use your library is to create Lib and Include folders for your library and include those directories in the Visual Studio directory settings that are explained in the tutorial to follow.
Creating a Static Link Library
First, the best thing to do is to create a directory structure on your hard drive for the library to be stored in. From our experience, we recommend the structure shown in Figure 1-8.
n Examples All example programs that display how to use your library are stored in this folder. This is probably one of the most useful things that can accompany your library since the source code is not visible to any other pro-grammer using it.
n Formats This is where you store any file formats specific to your static link library (i.e., your own 3D model format).
n Include This stores the entire collection of C/C++ header files that are needed to use your library. This is one of the directories that you must set up in Visual Studio to make your library work.
n Lib This is where you actually store your complete library file and the other directory required by Visual Studio. It is a good idea to include both the release and debug versions of your library here so that it is possible to debug and create final release applications with the libraries.
n Source All source code related to your library must be kept in this folder. n Tools Any programming tools that are used alongside your library are stored
Now that we have our structure, we need to create a static link library project. This is done by selecting File, New… in Visual Studio. The dialog box in Figure 1-9 should now be visible.
Select the Win32 Static Library option and enter a name for your library. Next, select the location and press the OK button.
In the dialog box that appears, leave both the Pre-Compiled header and MFC support options unchecked as we will not be using either in this book, and click Finish. A project information box is now visible, but simply click OK here.
Next, we need to add our source and header files to the project as you did when creating the window. Remember that this time we do not require the WinMain or Update procedure, just functions that we wish to reuse. Let’s call the source file library.cpp and the header file library.h for this example.
If you now press F7, it will build your library and put it in the Release or Debug folder depending on your project configuration. The library will have the same name as your project. For example, if your project is named gamephysics, your library will be named gamephysics.lib.
It is a good idea to make Visual Studio automatically copy your header file and library to the correct directories in your structure to assure that you are always using the latest version. Selecting Project, Settings from the main menu makes the dialog box in Figure 1-10 (shown on the following page) visible.
Set the Output file name for your library to whatever you wish to call your library and choose where you want it to go relative to the directory your source files are in. This must be done for both release and debug configurations. In the previous dialog the debug settings are currently active.
TIP It is a good idea to have both debug and release versions of your library. Call your release version the correct name (i.e., GamePhysics.lib) and add a suffix to the debug version (i.e., GamePhysicsDebug.lib) to distinguish them easily.
Now the library file is created in the correct directory in our structure when the project is built. We also want to copy our header file to the Include directory of our structure.
As can be seen in Figure 1-11, you simply add a Post-build command that tells the compiler to copy the header file(s) to the Include directory.
Figure 1-10
We have now covered the basics on how to create a static link library. The most important thing to remember is to prototype all functions and make all the global variables external that you wish to be accessible outside of your library. In the next section, we will discuss how to set up Visual Studio to find your library.
Using a Static Link Library
Once you have built your library and it is in the correct directories, you need to tell Visual Studio where to look for it. Select Tools, Options… from the main Visual Studio menu to open the Options dialog box.
If the Directories tab is unselected, select it now to display a list of directories like the one in Figure 1-12. Only the top three should be visible unless you have previously added other static libraries.
You must now add the Include directory of your library for the Include files and the Lib directory for the Library files. You select which one you wish to add by changing the top-right pull-down box.
Now Visual Studio is able to find and recognize your static link library. To use it in a program you have written, you must first load your project into Visual Studio, then select Project, Settings...
Next, select the Link tab and add your library name before kernel32.lib. Also, remember to include the header file for your library in your main code.
Final Notes
Here we have provided the basics of creating dialog-based applications in Visual Studio. The best thing to do is experiment by creating dialogs, adding buttons, and making the buttons set strings to different values when you press them. Also, learn to use editable text as this is highly useful and allows the user to put feed-back into your program.
If you are interested in learning more, there are entire books written on Win-dows programming and there is also an excellent resource available on the Internet (http://msdn.microsoft.com), but the quick introduction provided here will give you enough knowledge to understand the concepts used in this book.
Internet-Based
Database Systems
Introduction
This chapter covers how to create a stable and fast database system for your game server. In later chapters you will find out about ways to access it from sockets and the Internet.
Although it is possible to store player information on the player’s local machine, in reality it makes much more sense to store the data on the server for many reasons. The first and most important reason is to avoid players running “hacks” on their computer to change their character data in the game or even backing the data up to another file. If the data is stored on the server, it makes it impossible for the player to run a local game hack that will modify the character data. Another reason for this is to allow players to play from different locations and machines without having to copy their character data to another computer.
First, we will cover the installation of MySQL, an excellent, stable, and free database system, on both the Linux and Windows operating systems.
Installing MySQL
Linux Specific
First, you need to install a version of the Linux operating system and set up the Apache web server as well as Perl 5. If you do not already have a copy of Linux, we would recommend Red Hat version 6.2 or greater (http://www.redhat.com/). Next, you need to download the file mysql-3.23.36-pc-linux-gnu-i686.tar.gz (a newer version may be available but this chapter is based on this version) from http://www.mysql.com/Downloads/MySQL-3.23/mysql-3.23.36-pc-linux-gnu-i686.tar.gz or simply copy it off the CD-ROM supplied with the book.
Once you have this file, if it is not already on your Linux machine/server, you need to upload it. When working with Linux, ensure that you are logged in as the root user or some of the topics covered in this chapter may not work correctly. It does not matter where you place this file on your Linux machine as long as you keep a note of where it is.
Go to Linux and change to the directory to which you copied or uploaded the file. Next, you need to enter the following list of commands to unpack and install MySQL:
shell> groupadd mysql
shell> useradd -g mysql mysql shell> cd /usr/local
shell> gunzip < /path/to/mysqlVERSIONOS.tar.gz | tar xvf -shell> ln -s mysql-VERSION-OS mysql
shell> cd mysql
shell> scripts/mysql_install_db shell> chown -R mysql /usr/local/mysql shell> chgrp -R mysql /usr/local/mysql shell> bin/safe_mysqld --user=mysql &
That’s all there is to installing MySQL on Linux. The last command you entered started the MySQL daemon that controls all the connections to your database and all the operations you are going to perform on it.
For the next part, you want to be able to access the MySQL console. To do this, type the following from the /usr/local/mysql directory:
Windows Specific
Assuming you have a working version of Microsoft Windows 9x/NT on your com-puter, you first need to download from http://www.mysql.com/Downloads/
MySQL-3.23/mysql-3.23.36-win.zip or copy from the companion CD the mysql-3.23.36-win.zip file.
Unzip the file to a temporary folder (i.e., C:\temp\mySQL) using a program such as WinZip (http://www.winzip.com). (There is an evaluation version of WinZip on the CD-ROM.)
Next, go to the temporary directory where you extracted the files and double-click on setup.exe to begin the MySQL setup program.
Follow the simple installation through; select the directory you wish to install to, then just select the typical installation option and MySQL will be installed to your computer.
Finally, you need to be able to access the MySQL console. To do this, go to the directory in which you installed MySQL and then go into the bin directory. The MySQL daemon will automatically be running so simply double-click on MySQL.exe to bring up the console window.
The console window should appear as shown in Figure 2-1.
NOTE If for some reason the MySQL daemon is not running, you will want to be able to start it manually. To do this go to the directory which you installed MySQL into, and then go into the bin directory. Here you will find a file called mysqld.exe. Double-click this file to start the MySQL daemon running. If you are running Windows NT, use the mysqld-nt.exe file instead. Also, if you wish the daemon to start every time you load Windows, simply add it to your start up folder in your Start menu.
Overview of MySQL
SQL is an acronym for structured query language. This means it accepts com-mands in an easy to understand and structured format. We will be using the console mode on MySQL to create our databases and tables that are contained within it. Later in this chapter we are going to cover how to access them from outside the console.
A database is structured as shown in Figure 2-2. You have several records of data per table and several tables per database.
The first thing we need to do is create the database, as it is the foundation of the complete system.
Creating a Database in MySQL
This is the easy part. You need to give your database a name; in this example, we are going to use the name gamedata, as this database is going to store some basic information about an online game.
So to create our gamedata database we would enter the following command at the prompt in the MySQL console:
mysql> CREATE DATABASE gamedata;
If everything has gone according to plan, it will inform you that the query was OK and that one row was affected.
We now have our database in the system. We can view all the databases that have been created in MySQL by typing the following command:
mysql> SHOW DATABASES;
The console should now display a list of database names that are on the system; you should also see your gamedata database there. Figure 2-3 shows what the console should be displaying.
The final thing we must do is select which database we wish to work with. This is done with the following command:
mysql> USE gamedata;
Now we will move on to how to add your tables into the database.
Adding Tables to a Database
Before adding tables to your database, it is a good idea to decide what data you wish to contain within your tables. The most common types of data used in tables are integers (int), strings (varchar), and time stamps (timestamp). Each table should have a unique identifier, or an integer that is automatically incremented by MySQL every time a record of data is added to the table.
We will start with a simple example. Let’s say we have to store several play-ers’ character data in a database. For this we must store the following information about the character for each player:
n Character Name n X Position on the Map n Y Position on the Map n Current Experience Level
on relational databases). First we must make sure we are using the gamedata data-base that we created previously. To make sure of this, type the following
command:
mysql> USE gamedata;
Now that is done, we can enter the following command to create our database that we will call playerinfo. Note that it is fine to use the Return key to make it clearer as the statement will only end when you add the semicolon.
mysql> CREATE TABLE playerinfo ( mysql> id INT AUTO_INCREMENT, mysql> name VARCHAR(30), mysql> xpos INT,
mysql> ypos INT, mysql> exp INT,
mysql> PRIMARY KEY(id));
When you enter this, the console should look as follows.
This command will create the playerinfo table that can hold our information and give it a unique identifier that will automatically increment every time a new record of data is added into the table.
The Primary_Key() command is used to optimize the database for searching for a particular variable in a table. Since we will be looking for the ID of a player most, it makes sense to set this to the primary key for the table.
Next, it is a good idea to check that your table has been created correctly. It is easy to correct a mistake at this stage, but becomes much more difficult once you start adding data and using the system.
To check that our table now exists in the database, we want to use the follow-ing command:
mysql> SHOW TABLES;
When you press Return, the following console screen should now be visible.
As you can see from the preceding figure, MySQL tells us that there is only one table in the gamedata database now, which is our playerinfo table. More tables can be added to the database, as we will see later in the relational databases section.
Another useful command is the Describe command, which allows us to see all the data in a table. This command can be used to check that our table was created the way we wanted it to be. The command is called as follows:
mysql> DESCRIBE playerinfo;
Once you press Return, the following will be displayed on the MySQL console.
As you can see from this screen, the first column denotes the names of the fields we entered — id, name, xpos, ypos, and exp. The next column tells us the type. This is the one we should check carefully as the database will obviously not work as you would hope if you try to place a string into integer storage. Take note Figure 2-5
also that the id field is never NULL as it will always be automatically assigned a unique integer value by MySQL every time data is added to the table. The final column specifies any special cases you have assigned to the fields; in this case, we have asked the id field to be assigned a unique number so auto_increment appears in this column.
That’s all there is to adding standalone tables that do not interact with each other. We will find out later in this chapter how to add tables that interact with each other using the unique ID system. Next, however, we will cover how to add data into the table we have created from the MySQL console and also from differ-ent types of files.
Adding Data to Tables
Data can be added directly into tables from the MySQL console, although there are many other ways to add in data, which we will cover later in this chapter.
To add data to a table directly from the console, we use the MySQL Insert command. Let’s say we want to add the following information into the table we created in the last section, playerinfo.
Name: Jeff Henderson X Position: 14 Y Position: 35 Experience: 1431
To insert this into our table we would use the following syntax:
mysql> INSERT INTO playerinfo VALUES mysql> (NULL,’Jeff Henderson’,14,35,1431);
This would be displayed on the MySQL console as follows.
Notice that the first data we enter into the table is a NULL. This is to tell MySQL to automatically assign that data. Since we also have an Auto_Increment setup for the first column of data, it will automatically change that NULL into a unique inte-ger for the data we are entering. The rest is straightforward; first, we tell MySQL what table we wish to insert data into (in this case, playerinfo), followed by the values we wish to insert into the table. We can also add more than one segment of information at once by simply placing a comma after each complete set of data. Let’s assume we want to add another three players into the database and their information is as follows:
Name: Sandra Smith X Position: 21 Y Position: 86 Experience: 4563
Name: John Brooke X Position: 10 Y Position: 5 Experience: 231
Name: Jennifer West X Position: 13 Y Position: 73 Experience: 5400
The console command and screenshot should look as follows:
mysql> INSERT INTO playerinfo VALUES mysql> (NULL,’Sandra Smith’,21,86,4563), mysql> (NULL,’John Brooke’,10,5,231), mysql> (NULL,’Jennifer West’,13,73,5400);
If everything has gone according to plan, we should now have four records of data in our playerinfo table in the gamedata database.
Viewing Data in a Table
We can easily view all the information within a table by using the Select command. You can select any data you want from a table and even specify conditions (for example, only select entries that have more than 1,000 experience points). This is one of the most useful commands to us, and we will be using it extensively in Chapter 3 and in our tutorial game.
To select all the data from our table, we would use the following Select command:
mysql> SELECT * FROM playerinfo;
This selects all the fields and records from our playerinfo table. Therefore, the output from the console should contain four records of information and display all the data from each of the records. Figure 2-9 shows the expected output.
As you can see from the figure, all the data has been entered into the table cor-rectly. Also, note how the id field has been incremented automatically for each record as we intended.
Let’s now say we only want to display the name and experience data. Again, we want all the records, but we only want to select the correct fields, which in this case are name and exp. To do this we would again use the Select command, but instead of using the “*” wildcard, we specify the fields we wish to display.
mysql> SELECT name,exp FROM playerinfo;
The preceding command will select all the name and experience fields from the playerinfo table. Therefore, our expected output will be a four-row list of names and experience levels. This should look as follows.
As we mentioned before, we can also use a Where command after Select, to add conditions the data must satisfy before it is selected. Let’s say for example, we only wanted to see the players that had more that 1,000 experience points. We would use the following statement to retrieve this information from the table:
mysql> SELECT * FROM playerinfo WHERE exp > 1000;
When we execute this command by pressing Enter, MySQL will attempt to select all the data for the players that have an experience level greater than 1,000. This means that only Jeff, Sandra and Jennifer should be visible. Figure 2-11 shows the expected output.
Figure 2-10
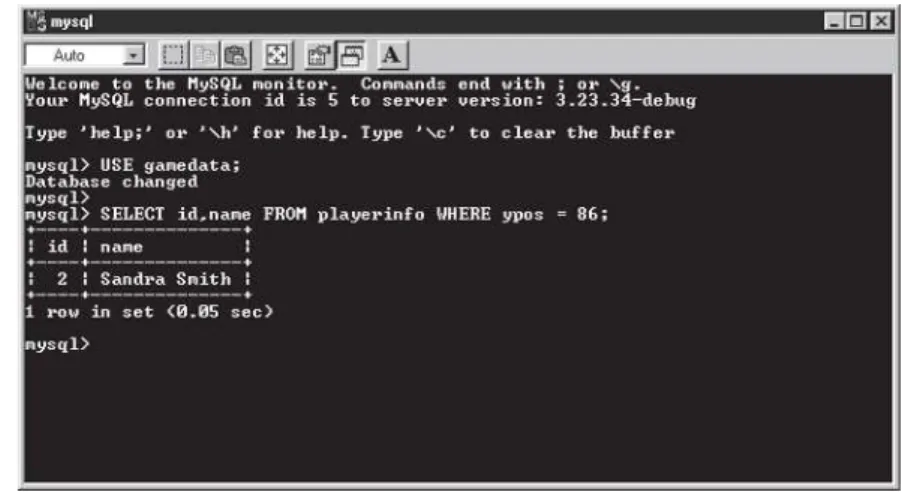
As well as comparing if a value is greater than a given number, we can also check if it is less than or simply equal to it. Let’s get the player’s ID and name from the table if his or her y position is equal to 86. We would use the following command to do this:
mysql> SELECT id,name FROM playerinfo WHERE ypos = 86;
As Sandra Smith is the only player with a y position of 86, she is the only person who should now be displayed in the console. We should only be able to see her ID and name as that is all we asked to select from the table. Figure 2-12 shows the expected output.
In addition to numeric comparisons, we can also compare strings of text. There are two useful methods for doing this. The first is a straight comparison, to check if one string of text is exactly equal to another. Let’s say we want to see the ID, x position, and y position for John Brooke. We would use the following command to select this information from the table.
mysql> SELECT id,xpos,ypos FROM playerinfo WHERE name = “John Brooke”;
Figure 2-13 shows what will happen when we execute the command. As you can see, the id and coordinates for John Brooke are now visible.
The other method is to use the MySQL Like command that allows you, for exam-ple, to select all names starting with a specific letter. If we wanted to select all the players from the table whose names started with the letter “J,” we would use the following syntax:
mysql> SELECT * FROM playerinfo WHERE name LIKE “J%”;
When executed, this command would produce the following output on the console.
As you can see from the command, the “J%” tells MySQL to select all the names starting with “J.” The percentage sign in this case is used as a wildcard and can be used in many combinations to produce useful results. Another example of the Like command would be to select any name (string) that contains a certain letter or phrase.
Let’s try to select any name that contains the letter “S” anywhere, not just the start. To do this we would simply place the wildcard (%) at either side of the letter, Figure 2-13
making the location where it finds the letter irrelevant. We would therefore use the following command to accomplish this:
mysql> SELECT * FROM playerinfo WHERE name LIKE “%S%”;
The only name which does not contain the letter “S” is John Brooke, so the other three names should be visible as shown here.
Adding Extra Fields to Tables
Let’s say now that we want to add an extra field into our table that will store the date and time the player last logged in to the game. For this data, we use the timestamp storage type in the database. To add a field we use the Alter command. With this command we can add fields and also modify existing fields if we wish, for example, to change the data type. We use the syntax below to add a field to hold the time and date of the players last login:
mysql> ALTER TABLE playerinfo ADD lastlogin TIMESTAMP;
Here is how it would look when we execute it from the MySQL console. Figure 2-15
Now, if we use the Describe command on the playerinfo table, we notice that the lastlogin field has been added to the end of the table. To describe the table we use the following command:
mysql> DESCRIBE playerinfo;
When we execute this, we should see the output from the console as shown in Figure 2-17. Note the new row at the end, which is our new timestamp field.
We can also use the Alter command to change the data type of a field. Let’s say we have decided to allow the players to have 50 characters in their name instead of the 30 we allocated when we first created the table. To accomplish this we again use the Alter command, but instead of Add we use the Modify command as shown here:
mysql> ALTER TABLE playerinfo MODIFY name VARCHAR(50);
When we execute the command in the console, we should see that our four rows of data have been affected. The data has not actually changed, although the stor-age space for the field has. Figure 2-18 shows the expected console output. Figure 2-17
We can again describe the table to check that our changes have gone as planned. Figure 2-19 shows the expected console output from the Describe command.
As you can see from the console output, the type for the name field is varchar(50) instead of our original varchar(30).
Updating Data in a Field
Now that we have a timestamp in our table, we wish to set it to the time and date the player last logged in. This value will change each time they login. Up to this point we have had no control of the data after it has been added into a table. Now we are going to learn how to update the data from the console without affecting the rest of the data in the record. In later chapters, we will also learn how to update information remotely both from the Internet (Perl) and from applications (sockets).
In the last section, when we added the timestamp to the table, the four records we previously added to the table’s timestamps will be set to the time we added the timestamp field to the table. This can be seen in Figure 2-20.
Figure 2-19
A timestamp is a single large integer that represents the date and time. The first four digits represent the year. The next two represent the month and the two after that represent the day of the month. The next four digits are for the time in 24-hour format. The final two digits represent the seconds. Figure 2-21 shows a summary.
The reasoning for this structure is to allow for easy comparison with other timestamps and easy storage in the database. With this method of storage, it is simple to use basic integer comparisons, such as greater than or less than, to find out if a timestamp is before or after another timestamp or a specific date and/or time. Another feature of the timestamps is if you specify the data in MySQL as NULL for a timestamp, MySQL automatically places the system date and time in the database, which can be very useful to us, as you will see in the example to follow.
Now that we have our timestamp field in our table, let’s try updating the values in our four existing entries. To update information in a table, we use the MySQL Update command. Now we will update Jeff Henderson’s timestamp to be the cur-rent system time. Simply updating the timestamp field with NULL does this. The syntax for this function is:
mysql> UPDATE playerinfo SET lastlogin = NULL WHERE name = “Jeff Henderson”;
First we will tell MySQL that we wish to update a table. Then we specify the table name, which in this case is our playerinfo table. Then we must tell it what to update. Here we tell it to set the lastlogin field to NULL (which means set it to the current date and time). If we excluded the Where from the end of the com-mand, it would simply update all the lastlogin fields for all the entries (records) in the table. So we want to specify which record we wish to update, which in this case is Jeff Henderson’s record. When we execute the command, we should see that one row was found and one row was changed. You can see the expected out-put in Figure 2-22.
Now, when we select all the data from the table, we notice that Jeff Henderson’s lastlogin date and time has been set to the time when we executed the command. See Figure 2-23 for the expected output.
In addition to automatically setting the date and time with MySQL, we can manu-ally set it simply by inputting the correct integer, as long as we ensure it is in the correct format. Let’s manually set Sandra Smith’s lastlogin date to the following:
14th March 1999 at 3:35pm (and no seconds)
To do this, we again use the Update command, but we do not set the timestamp to NULL. The integers we require for this are as follows:
Year: 2001 Month: 03 Day: 14 Hour: 15 Minutes: 35
Figure 2-22
Seconds: 00
Therefore, our integer is: 20010314153500. We then put this into the command as follows:
mysql> UPDATE playerinfo SET lastlogin = “20010314153500” WHERE name = “Sandra Smith”;
Our expected output from the execution of this command can be seen in Figure 2-24. Notice that one row (record) was matched and changed.
This time when we select all the records from the table, we can see that Sandra’s information has been updated to the date and time we specified. See the expected output in Figure 2-25.
Note that when you are updating information in a table, you can use any of the Where cases that we have discussed before in the chapter, so we could, for Figure 2-24
example, set all the experience levels to 1,000 for people whose names start with “J” like this:
mysql> UPDATE playerinfo SET exp = 1000 WHERE name LIKE “J%”;
When executed, this command will update all the players with a name starting with “J” and set their experience levels to 1,000. In our table, we have three play-ers whose names start with “J,” so you can see from Figure 2-26 that there are three matching rows (records) and that three were changed (updated).
Now, if we select the data, you will see in Figure 2-27 that Jeff, John, and Jennifer all have an experience level of 1,000.
It is also possible to check more than one field when updating or selecting infor-mation from a table. For example, if you wanted to display the inforinfor-mation of all the players whose x coordinate lies between the values of 10 and 20, you would use the following command:
Figure 2-26
mysql> SELECT * FROM playerinfo WHERE xpos > 10 AND xpos < 20;
We can also use this method with the Update command. If we wanted to set the experience level to 500 for all the players with an x coordinate greater than 10 and less than 20, we would use the following command:
mysql> UPDATE playerinfo SET exp = 500 WHERE xpos > 10 AND xpos < 20;
When we execute this command, we will see that two rows (records) have been updated. This can be seen in Figure 2-28.
The two records that were updated were Jeff’s and Jennifer’s. Their x coordinates lie between the parameters we specified, hence they were updated with the new information. The expected output can be seen in Figure 2-29. Notice Jeff’s and Jennifer’s experience levels are now both set to 500.
Figure 2-28
As you can see, there are many different ways you can update segements of data within the table. You will see many more examples of this in the tutorial game that we develop.
Ordering Output
Another useful service MySQL provides is the ability to easily sort outputted data. It is possible to sort data both in ascending and descending order — the default is ascending. To sort data we use the Order By command. This is used in conjunction with the Select command to produce ordered output. Let’s look at a simple example. We want to view all the data in the table, but we wish to sort the names in alphabetical order. We use the following command to do this:
mysql> SELECT * FROM playerinfo ORDER BY name;
This command will retrieve all the data from the playerinfo table and display it in ascending order (alphabetical). Figure 2-30 shows the expected output from the MySQL console.
Let’s now do the same again but display the names in reverse alphabetical order, that is, in descending order. This is done with the following command:
mysql> SELECT * FROM playerinfo ORDER BY name DESC;
The command is the same as before, except we add DESC onto the end to tell MySQL that we wish to use descending ordering instead of ascending. If every-thing has gone according to plan, the names should be in exactly the opposite order from ascending ordering. Figure 2-31 shows the expected output from the console.
The final part to ordering is ordering multiple fields at once. For example, if we were to order the experience field, we can see that two of the experience values are 500; therefore, the order will be based on the order they are stored in the table. Let’s say now that we want to order the table by the player’s experience level, but if the experience level is the same as another, we wish to order the table by the player’s x position. To do this is relatively simple; all we do is add another parameter onto the Order By command as follows:
mysql> SELECT * FROM playerinfo ORDER BY exp,xpos;
You can order by as many fields as you wish; just add them in order and follow each field name by a comma. We can see the expected output from the command in Figure 2-32.
The Order By command is also particularly useful when used with timestamp fields; it allows you to easily see, for example, the people who login to the game the most or least. Another example of its use would be to find out which ten peo-ple have the most experience.
Figure 2-31
Retrieving the Last Data Entered
This is where our id field becomes useful. To retrieve the last data entered, we will first select the maximum id value from the table and store it in a temporary variable within MySQL. (Later, when using Perl and sockets, we will discover other ways to get around this.) To select the maximum ID and store it in a variable (in this case, maxid) from the table, we use the following command:
mysql> SELECT @maxid:=MAX(id) FROM playerinfo;
This will utilize MySQL’s Max function to get the value from the id field with the largest value. The last record we added to the field will have the largest id value. Also notice that we assign the value to a local variable. We declare variables using the @ symbol. Figure 2-33 shows what we expect from the MySQL console.
Now, we have the value of the maximum ID in our local variable maxid. We can now use this local variable to retrieve the rest of the data for that player as follows:
mysql> SELECT * FROM playerinfo WHERE id = @maxid;
Notice that instead of specifying a number for the ID, we are using our local vari-able maxid to represent the number. Now, when we execute this command, the console will display the final entry that was added to the table, which in this case is “Jennifer.” Figure 2-34 on the following page shows our expected console output.
This Max command in association with the timestamp field lastlogin can be used to easily find which player was the last to login. Here is the command we would use to retrieve the player’s timestamp who was the last to login:
mysql> SELECT @lastlogin:=MAX(lastlogin) FROM playerinfo;
Note that if two players have the same timestamp, MySQL will select both of the players, but it is unlikely that two players will login at exactly the same second in time. If this does occur, we can simply select one or the other.
Now we have the timestamp for the player who logged in last stored in the lastlogin local variable. We can now retrieve the rest of the player’s data by carry-ing out a search based on the timestamp we have in our local variable as follows:
mysql> SELECT * FROM playerinfo WHERE lastlogin = @lastlogin;
This will retrieve all the information for the player who logged in last. In our data-base, both Jeff and Jennifer logged in last at exactly the same date, time, and second as you can see in Figure 2-35. Thus, MySQL has selected both of these players.
Figure 2-34
Limiting Output Data
There is a useful parameter you can include when using the Select command to limit the amount of records MySQL selects from the parameters you specify. For example, you could select all the names that begin with the letter “J,” but then limit the output to two records. This is done as follows by using the Limit parameter:
mysql> SELECT * FROM playerinfo WHERE name LIKE “J%” LIMIT 2;
As you can see, the Select command is used the same as before, but this time we simply add the Limit parameter to the end to limit the output from MySQL to a specified amount of records, which in this case is two. Figure 2-36 shows our expected output from the MySQL console.
Deleting Data from a Table
Deleting data from a table in MySQL is a simple process, but it is easy to delete more information than you intended if you make a mistake in the command you enter.
First, we will look at how to delete a single item of data. For this we use the same idea as searching, except MySQL will delete all the entries it finds instead of displaying them. We will first delete by the users name. Let’s try to delete Jeff Henderson from our table, but leave all the other entries untouched. In MySQL we use the Delete From command, and specify parameters to avoid deleting all the data from the table. We can use the following syntax to delete Jeff from our table:
mysql> DELETE FROM playerinfo WHERE name = “Jeff Henderson”;
When we execute this command, MySQL informs us that one row (record) was affected by the command. In this case, the record has been deleted. This can be seen in Figure 2-37.
If we now select all the data from the table, you will notice the absence of Jeff’s record in the following figure.
We can also delete from any other field, such as id. This is very useful when we are working with the Internet; you will see why in the following chapter about Perl and the Internet. However, to delete by the id field, we use exactly the same syntax as before, using the Delete From command. We use the following syntax to delete John Brooke from the database, who has an ID number of 3:
mysql> DELETE FROM playerinfo WHERE id = 3;
When we execute this command, again we will see on the MySQL console that one row has been affected.
Figure 2-37
Again, when we now select all the data from the table, we can see we only have two entries remaining. Here is our expected output from the Select command.
Finally, we will cover how to delete all the information from a table. Use this com-mand carefully as it is not possible to restore your data once it is deleted. Note that when you delete all the information from a table, the table itself still exists; therefore, it is possible to add new information to it.
To delete all the information from a table, you again use the Delete From com-mand, but this time we do not specify any parameters. As you can see, it could be easy to unintentionally execute this command, which is why we must be careful with our use of it. The command to delete all the information from the playerinfo table is as follows:
mysql> DELETE FROM playerinfo;
Notice the command is the same as before, but without the parameters. When we execute the command this time, it will say that zero rows were affected; however, Figure 2-39
it will have deleted all of the data. Figure 2-41 shows the expected output from the console when we execute the command.
We can check that all the data has been deleted successfully by selecting all the information from the table. If everything has gone according to plan, when we select the data, MySQL will report that the table is an empty set, meaning that the table contains no records. This can be seen in the following figure.
Deleting Tables and Databases
To delete a table from MySQL, we utilize the Drop command. Therefore, to delete our playerinfo table we simply use the following command:
mysql> DROP TABLE playerinfo;
When we execute this command, we should expect the following output from the MySQL console.
Figure 2-41
We can now check that the table has been deleted correctly by using the Show Tables command, which we discovered earlier in this chapter. Here is the com-mand to do this again:
mysql> SHOW TABLES;
When we execute this command, we will see that MySQL informs us we have an empty set. This means that our database no longer contains any tables. If we did have more tables, they would still be visible here. Figure 2-44 shows expected output from the console.
If we then want to delete our entire database from the MySQL system, we would again use the Drop command, but this time tell it we wish to drop a database as follows:
mysql> DROP DATABASE gamedata;
Figure 2-43
When executed, this command removes everything associated with the gamedata database, including all data and tables from within the database. Figure 2-45 shows what we expect the console output to be.
Now we can check that our database was deleted correctly by viewing all the data-bases in the MySQL system. To view the datadata-bases, we use the Show Datadata-bases command as we did earlier in this chapter. This is done as follows:
mysql> SHOW DATABASES;
When we execute this, MySQL will display what databases are currently active in the system. If our database has been deleted correctly, it simply should not be shown here. In the following figure, we can see the expected output from the console.
As you can see, only the mysql and test databases remain on the system. Figure 2-45
This completes our basic knowledge of creating, using, and deleting a simple data-base. In the next section, we will go into depth on how to create relational
databases, which are very useful, especially for game development. In addition, we will learn how to input information into the database from files and find out how to back up and restore databases to and from files.
Relational Databases
A relational database is a way of storing data that relates to other data without actually duplicating the data. Earlier in this chapter, we added an id field which assigned a unique integer value to each new record of data that was added to a table. This is the key part to using relational databases. Rather than copy the data, we simply place the two IDs in a special relation table for the data we wish to relate.
Now we will plan and create a relational database. We will also be using this technique in the second section of the book, when we create our tutorial online game.
Let’s say we wish to create a database to hold the data for players in an online game for which a monthly fee must be paid. As well as holding the player’s game data, we also wish to store information as to when he made payments to his account. In addition, we wish to be able to keep a list of friends and enemies that the player makes in the online game. The user can modify whom his friends and enemies are, so the lists will be dynamic. Finally, we also wish to be able to store an unlimited amount of notes about the player. Here is our plan for the tables we would like to include in the database to hold this data in an efficient manner.
n Player Data This table is used to hold the player’s actual game data. Here we store the player’s name, the coordinates in the game, and the date and time when he last logged into the game. In addition, when a player is added, he is assigned a unique ID by MySQL.
n Payment Info Each time a player makes a payment into his online account it is recorded in this table. Each entry is again assigned a unique ID so it can be easily manipulated from the Internet. Next, we enter the ID of the player who is making the payment, followed by the date the payment was made, how it was paid (i.e., Visa, Switch, check, etc.), and the amount that was paid. n Notes Each note is assigned a unique ID. Next, we add the player’s ID to
denote to whom the note is relevant. Finally, we have the actual note itself, which will be a simple string of text.
n Rel Friends This is the first of our dedicated relation tables. This table relates a player’s ID to a friend’s ID. This way, it is easy for us to make a player have an unlimited amount of friends.
n Rel Enemies This final table works in the same way as the Rel Friends table. It simply relates the player’s ID to an enemy’s ID.
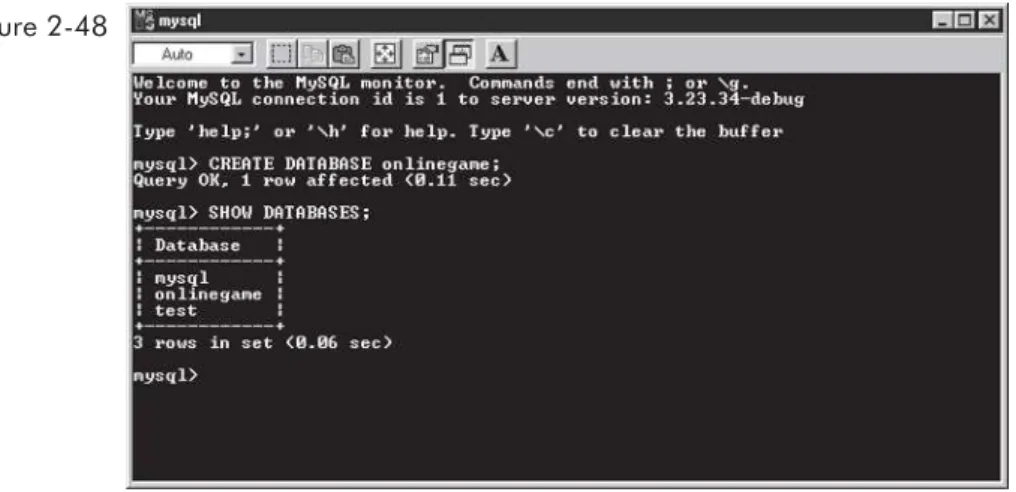
Creating Our Relational Database
When it comes to creating our relational database, we do it in the same manner as earlier in the chapter. First, we must create a database to store our tables of infor-mation. Let’s call the database onlinegame. As before, we create the database as follows from the MySQL console:
mysql> CREATE DATABASE onlinegame;
When we execute this command, MySQL will inform us that the query was OK. Now we can check that it was created by using the Show Databases command as follows:
mysql> SHOW DATABASES;
Now that our database has been created, we can start adding tables to hold our data. It does not make any difference in what order we add the tables into the data-base, so we will just add them in the same order as we explained them earlier. First though, we must tell MySQL that we wish to use the onlinegame database as follows:
mysql> USE onlinegame;
Now we can move on to adding in our tables.
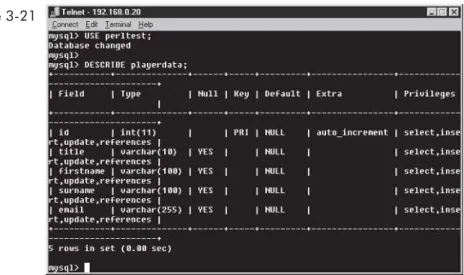
Player Data
Adding our table information is done in the same way we discussed earlier in the chapter. The player’s name will be a 50-character string, the coordinates will be integers, and the lastlogin time will be a timestamp so we can store the date and time in it. We can create this table using the following command:
mysql> CREATE TABLE playerdata ( mysql> id INT auto_increment, mysql> name VARCHAR(50), mysql> xpos INT,
mysql> ypos INT,
mysql> lastlogin TIMESTAMP, mysql> PRIMARY KEY(id));
Now is a good time to use the Describe command so we can check that our table has been created as we intended. We use the following syntax to do this:
mysql> DESCRIBE playerdata;
When we execute the command, the following can be seen displayed on the MySQL console.
Be sure to check on this screen that the Type column is correct; a mistake at this stage can be corrected, but if left unnoticed it can be fatal to your game.
The final check we will do for our first table is to make sure it has been added to the database. This is done by using the Show Tables command as follows:
mysql> SHOW TABLES;
We should now see that our first table is part of our database. Figure 2-51 shows the expected output.
Figure 2-49
Payment Info
The id field for this table will be a standard unique id field. The playerid field, on the other hand, will be a reference to a player’s ID that can be used to find the appropriate player in the playerdata table. Next, we wish to store the payment date as a timestamp. The payment type will be a string, whereas the amount paid will be a simple integer value.
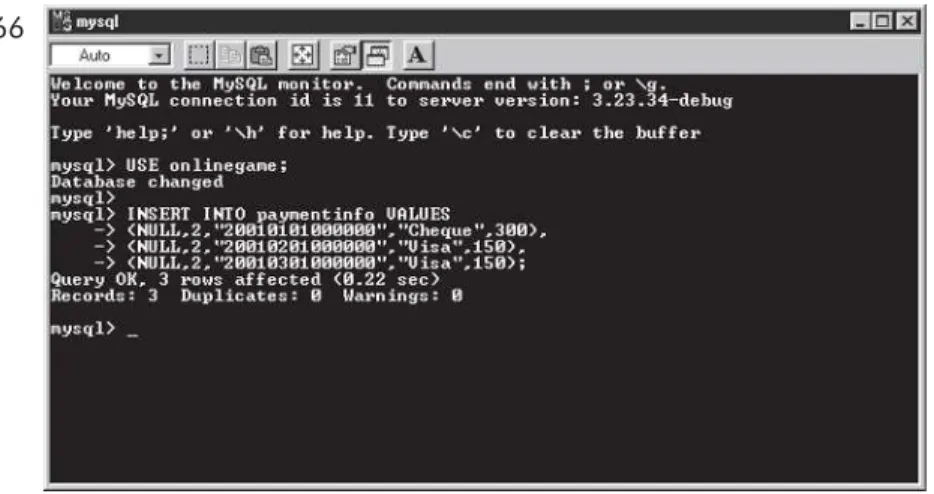
mysql> CREATE TABLE paymentinfo ( mysql> id INT auto_increment, mysql> playerid INT,
mysql> datepaid TIMESTAMP, mysql> type VARCHAR(100), mysql> amount INT, mysql> PRIMARY KEY(id));
When we enter this table description and execute it in the MySQL console, we expect the following output.
Figure 2-51
Now is the time to check our table for correctness. When we use the Describe command as before, we can check that the fields in our table have been created accurately. Here is the command we use to describe this new table:
mysql> DESCRIBE paymentinfo;
When we execute this command, we expect to see the following output in the MySQL console.
Finally, if we use the Show Tables command again, we can check that we now have two tables in our database as can be seen in the following figure.
Now we have both the playerdata table and the paymentinfo table in our database. Next, we shall add the notes table, so we can attach several notes to each player in the database.
Figure 2-53
Notes
This table is very simple and only contains three fields. The first is our unique id, which is standard to all our tables in a relational database. The second holds the player’s ID number, so we know which player the note is for. The final field is the note itself, which is a 255-character string. The command to create the notes table is as follows:
mysql> CREATE TABLE notes ( mysql> id INT auto_increment, mysql> playerid INT,
mysql> note VARCHAR(255), mysql> PRIMARY KEY(id));
Here is how this will look once we enter it into the console.
After our table is created, again we must check it for any mistakes. For this we must describe our notes table as follows:
mysql> DESCRIBE notes;
When we execute this, we should see in the console that our table has been cre-ated correctly. Figure 2-56 on the following page shows the expected output from the MySQL console.
Our final check is to show the tables in the database to confirm that we now have three tables. We use the Show Tables command again as follows:
mysql> SHOW TABLES;
When we then execute this command, we should see that the console now dis-plays the three tables we created as part of the onlinegame database. Our expected output can be seen in the following figure.
Next we will add our two relational tables so we can assign friends and enemies to players in the database.
Rel Friends
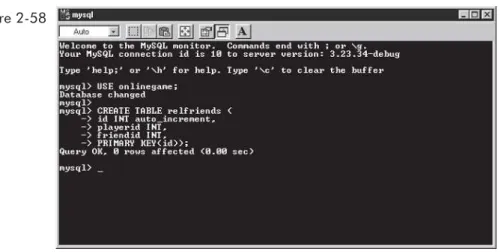
All this table must do is keep note of who each player is friends with. Therefore, we simply match up IDs of who is friends with whom. As is standard, this table must first have the unique id field, followed by an ID for a player, and then an ID for the person with whom that player is friends. This allows us to make a single player friends with many people in the database and also keep track of them easily. To create our relfriends table, we use the following command:
mysql> CREATE TABLE relfriends ( mysql> id INT auto_increment, mysql> playerid INT,
mysql> friendid INT, mysql> PRIMARY KEY(id));
Figure 2-56
When we enter this into the console, it should look as follows.
Our next check is to ensure that our table has been created with the correct fields. As before, we use the Describe command to do this:
mysql> DESCRIBE relfriends;
Figure 2-59 shows the expected output from the console when we execute this command.
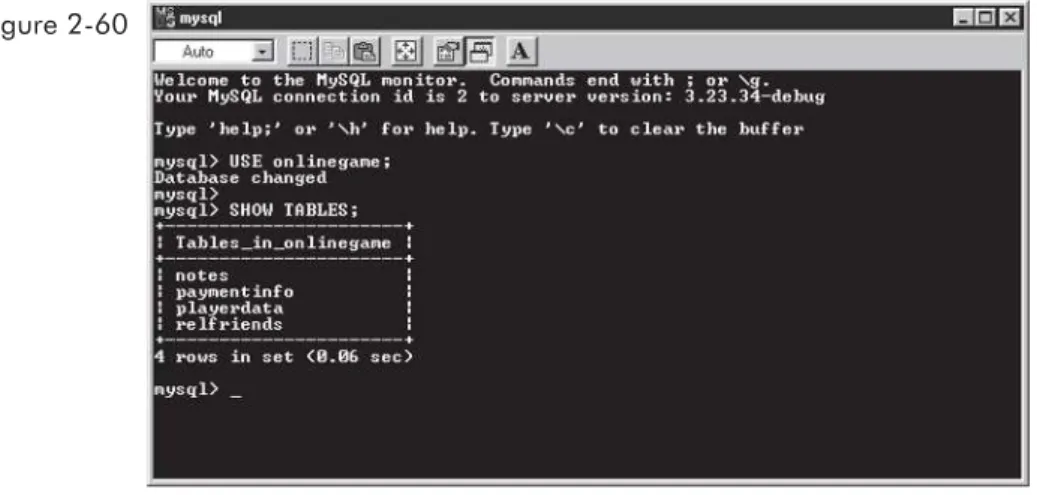
Again, our final check is to make certain that our table has been added correctly to our onlinegame database. For this we use the Show Tables command again:
mysql> SHOW TABLES;
When we execute this command, the console should display all the tables our database now contains, including our relfriends table. Our expected output can be seen in the following figure.
Figure 2-58
Rel Enemies
The final table we must add to our database is similar to the relfriends table. This table simply keeps track of who a player is enemies with in the database. We cre-ate this table in the same way as the relfriends table. Here is the command we use to create this table:
mysql> CREATE TABLE relenemies ( mysql> id INT auto_increment, mysql> playerid INT,
mysql> enemyid INT, mysql> PRIMARY KEY(id));
Figure 2-61 shows how the information will look when we enter it in the MySQL console.
Our first check is again to see that all the fields were created as we intended them to be. Again, we utilize the Describe command to accomplish this:
Figure 2-60
mysql> DESCRIBE relenemies;
When we execute this command, we expect to see the following information in the MySQL console.
Our final check for our database is to see that all our tables are now in the data-base. To check this, we again use the Show Tables command:
mysql> SHOW TABLES;
When we execute this, we can now see that all the tables in our original database plan are part of the onlinegame database in MySQL. Figure 2-63 shows the expected output from the MySQL console.
Figure 2-62
Adding Relational Data
The first thing we must do is add some players into our playerdata table. For now, we will use the console to input the data, although later in this chapter you will find out how to use other programs and files to input the data. Let’s start by add-ing data for five imaginary players for this online game. Here is the data for the players we wish to add:
Name: Andrew Smith X-pos: 12
Y-pos: 23
Last Login: 23rd May 2001
Name: Sally Rannor X-pos: 17
Y-pos: 9
Last Login: 14th June 2001
Name: Pete Dakkar X-pos: 5
Y-pos: 31
Last Login: 1st December 2000
Name: Louise Jennings X-pos: 17
Y-pos: 14
Last Login: 19th January 2001
Name: Fred Warran X-pos: 9
Y-pos: 5
Last Login: 12th July 2001
To add this data, we must use the Insert command to enter the data into our playerdata table. Here is the command we use to add the correct data:
mysql> INSERT INTO playerdata VALUES
mysql> (NULL,”Andrew Smith”,12,23,”20010523000000”), mysql> (NULL,”Sally Rannor”,17,9,”20010614000000”), mysql> (NULL,”Pete Dakkar”,5,31,”20001201000000”), mysql> (NULL,”Louise Jennings”,17,14,”20010119000000”), mysql> (NULL,”Fred Warran”,9,5,”20010712000000”);