i
ABSTRAK
Salah satu teori fisika yang sering dipraktekkan adalah teori gerak lurus
beraturan. Uji coba pengukuran yang dilakukan di laboratorium fisika masih
menggunakan cara yang konvensional, yaitu dengan menggunakan stopwatch
sebagai alat untuk mengukur waktu tempuh dari objek yang bergerak lurus
beraturan.
Pada tugas akhir ini dirancang dan direalisasikan suatu alat pengukur
kecepatan menggunakan gelombang ultrasonik dengan mikrokontroler. Alat ukur
ini terbagi dalam tiga bagian yaitu bagian pemancar, bagian penerima dan bagian
pengolah data berupa mikrokontroler yang kemudian akan menampilkan
kecepatan dari suatu sasaran/objek yang bergerak lurus beraturan dalam satuan
cm/s.
Dari hasil percobaan dan pengujian yang dilakukan, alat pengukur
kecepatan dengan mikrokontroler ini memberikan kesalahan rata-rata terendah
ii
ABSTRACT
One of physic teory that is often be practiced are the teory of straight
movement. The measurement in physic laboratory are still use a conventional
method, using a stopwatch to measure the time of a object which move in straight
line.
In this final project will design and realized a device which measure the
velocity using a ultrasonic wave with microcontroller. This dev
ice divided into three section that are transmitter section, receiver section
and data proccessing section which will showing a velocity from the object who
move straight on cm/s.
From the experiment, the result are the device which measure the velocity
v
DAFTAR ISI
ABSTRAK ... i
ABSTRACT ... ii
KATA PENGANTAR ...iii
DAFTAR ISI ... v
DAFTAR GAMBAR ... viii
DAFTAR TABEL ... ix
BAB I
PENDAHULUAN ... 1
1.1
Latar Belakang ... 1
1.2
Identifikasi Masalah ... 1
1.3
Tujuan ... 2
1.4
Pembatasan Masalah ... 2
1.5
Sistematika Penulisan ... 2
BAB II LANDASAN TEORI ... 3
2.1
Mikrokontroler AT89C2051 ... 3
2.1.1 Mode Pengalamatan ... 6
2.1.1.1 Pengalamatan Langsung (Direct Addresing)... 6
2.1.1.2 Pengalamatan Tak Langsung (Indirect Addresing) ... 6
2.1.1.3 Instruksi-Instruksi Register ... 7
vi
2.1.1.5 Konstanta Segera (Immediate Constants) ... 8
2.1.1.6 Pengalamatan Terindeks (Indexed Addresing)... 8
2.1.2 Instruksi-Instruksi Dalam AT89C2051 ... 8
2.1.3 Pewaktu CPU ... 14
2.2 Seven Segment ...14
2.2.1 Cara Kerja Seven Segment ...14
2.3 Gelombang Ultrasonik ...16
2.4 Transduser ultrasonik ...17
2.4.1 Transduser Mekanik ...18
2.4.2 Transduser Elektromekanik ... 18
2.5 Efek Doppler ... 22
BAB III
PERANCANGAN DAN REALISASI ... 24
3.1
Pendahuluan ... 24
3.2
Rancangan Perangkat Keras Sistem ... 25
3.3
Transduser Ultrasonik ... 26
3.4
Rangkaian Pemancar... 27
3.5
Rangkaian Penerima ... 29
3.6
Rangkaian Sistem Mikrokontroler AT89C2051... 31
3.7
Rangkaian Catu Daya ... 33
3.8 Diagram Alir ... 34
3.8.1 Penjelasan Diagram Alir ... 35
vii
BAB IV PERCOBAAN DAN PENGUKURAN ...38
4.1
Percobaan Dan Pengukuran ...38
4.2
Pembahasan ... 41
BAB V KESIMPULAN DAN SARAN …………...42
5.1
Kesimpulan ………...…...42
5.2
Saran ………...……...42
DAFTAR PUSTAKA ...44
LAMPIRAN A
•
Foto Alat Pengukur Kecepatan Dengan Mikrokontroler ...A-1
LAMPIRAN B
•
Skema Rangkaian Alat Pengukur Kecepatan Dengan Mikrokontroler B-1
LAMPIRAN C
•
Listing Program ...C-1
LAMPIRAN D
viii
DAFTAR GAMBAR
Gambar 2.1 Diagram Blok AT89C2051...… 4
Gambar 2.2 Konfigurasi Pin AT89C2051 ...…... 5
Gambar 2.3 Hubungan Kekristal ...14
Gambar 2.4 Clock Eksternal ………...14
Gambar 2.5 Penampil Seven Segment ………...15
Gambar 2.6 Transduser Kumparan Bergerak...19
Gambar 2.7 Transduser Elektrostatik ………...…...20
Gambar 2.8 Transduser Piezoelektrik ………...21
Gambar 2.9 Permukaan Gelombang Yang Dipancarkan Sumber Bergerak …...23
Gambar 3.1 Diagram Blok Sistem ………...24
Gambar 3.2 Skematik Diagram Pengukuran Transduser Ultrasonik ...26
Gambar 3.3 Diagram Blok Rangkaian Pemancar ...27
Gambar 3.4 Rangkaian Pemancar Ultrasonik ...28
Gambar 3.5 Diagram Blok Rangkaian Penerima ...29
Gambar 3.6 Rangkaian Penerima Ultrasonik ………...29
Gambar 3.7 Rangkaian Sistem Mikrokontroler AT89C2051 ...…...31
Gambar 3.8 Rangkaian Power Supply ...…...33
Gambar 3.9 Pengukuran Selang Waktu ...39
ix
DAFTAR TABEL
Tabel 2.1 Daftar Instruksi Aritmatika Mikrokontroler AT89C2051 ...9
Tabel 2.2 Daftar Instruksi Logik Mikrokontroler AT89C2051 ...11
Tabel 2.3 Instruksi-Instruksi Lompatan …………...13
Tabel 2.4 Instruksi-Instruksi Lompatan ………..…...13
Tabel 2.5 Tampilan Angka Pada Seven Segment ………...15
A-1
Foto 1 : Bagian Atas dari Alat
A-2
MCUV. ASM ; - - Di s p l a y Po r t & RAMs - - ;
Di s Da t EQU P1 PS1 BI T P3 . 0 PS2 BI T P3 . 1 PS3 BI T P3 . 2 PS4 BI T P3 . 3 d g 1 EQU 0 8 h d g 2 EQU 0 9 h d g 3 EQU 0 Ah d g 4 EQU 0 Bh
APa r 2 EQU 0 Ch APa r 1 EQU 0 Dh SPa r 2 EQU 0 Eh SPa r 1 EQU 0 Fh MPa r 2 EQU 1 0 h MPa r 1 EQU 1 1 h DPa r 2 EQU 1 2 h DPa r 1 EQU 1 3 h
RBa k 2 EQU 1 4 h RBa k 1 EQU 1 5 h
J 1 _ 2 EQU 1 6 h J 1 _ 1 EQU 1 7 h J 2 _ 2 EQU 1 8 h J 2 _ 1 EQU 1 9 h
p 5 0 ms EQU 2 0 h FLAG EQU 2 1 h Sd h 5 BI T FLAG. 0 ; - - Ot h e r s Po r t & RAMs - - ; SOu t BI T P3 . 4
SI n BI T P3 . 5 Bu t t o n BI T P3 . 7
; -o r g 0 0 h
j mp mu l a i o r g 0 Bh
j mp T0 _ Ve c t
; -mu l a i :
; - - I n i s i a l i s a s i Va r & Po r t mo v SP, # 2 2 h
mo v Di s Da t , # 0 FFh s e t b PS1
s e t b PS2 s e t b PS3 s e t b PS4 s e t b SOu t s e t b SI n mo v d g 4 , # 1 0 h mo v d g 3 , # 1 0 h mo v d g 2 , # 1 0 h mo v d g 1 , # 1 0 h
; - - I n i s i a l i s a s i Ti me r mo v TMOD, # 5 1 h
MCUV. ASM ; - - - Te mb a k a n Pe r t a ma
mo v TH0 , # 0 0 h mo v TL0 , # 0 0 h mo v TH1 , # 0 0 h mo v TL1 , # 0 0 h c l r TF0
s e t b TR1 s e t b TR0 mo v b , # 4 0 a mb i l _ f r e k : c p l SOu t n o p n o p n o p n o p n o p n o p n o p n o p n o p
d j n z b , a mb i l _ f r e k ;
t u n g g u :
mo v a , TL1 j n z d a p a t
j n b TF0 , t u n g g u c l r TR1
c l r TR0 j mp u l a n g d a p a t :
c l r TR0 c l r TR1
; - - - Si mp a n J a r a k - 1 mo v J 1 _ 2 , TH0
mo v J 1 _ 1 , TL0
; - - - Tu n g g u 5 0 0 ms c l r Sd h 5
mo v TH0 , # 0 3 Ch mo v TL0 , # 0 B0 h mo v p 5 0 ms , # 1 0 s e t b TR0
s e t b ET0 s e t b EA d l y 5 0 0 ms :
c a l l s h o w7 s
j n b Sd h 5 , d l y 5 0 0 ms
; mo v R0 , # 1 0 ; 1 ( R0 = x ) ; d l y 5 0 0 ms _ 1 :
; mo v R1 , # 1 0 0 ; x ( R1 = y ) ; d l y 5 0 0 ms _ 2 :
; mo v R2 , # 2 4 5 ; y * x ( R2 = z ) ; d j n z R2 , $ ; 2 * z * y * x
; d j n z R1 , d l y 5 0 0 ms _ 2 ; 2 * y * x ; d j n z R0 , d l y 5 0 0 ms _ 1 ; 2 * x
; - - - Te mb a k a n Ke d u a mo v TH0 , # 0 0 h
mo v TL0 , # 0 0 h mo v TH1 , # 0 0 h mo v TL1 , # 0 0 h c l r TF0
MCUV. ASM mo v b , # 4 0
a mb i l _ f r e k 2 : c p l SOu t n o p n o p n o p n o p n o p n o p n o p n o p n o p
d j n z b , a mb i l _ f r e k 2 ;
t u n g g u 2 :
mo v a , TL1 j n z d a p a t 2
j n b TF0 , t u n g g u 2 c l r TR1
c l r TR0 j mp u l a n g d a p a t 2 :
c l r TR0 c l r TR1
; - - - Hi t u n g J a r a k - 2 mo v d p h , TH0
mo v d p l , TL0 mo v DPa r 2 , # 0 mo v DPa r 1 , # 1 2 5 c a l l d i v _ i n t
mo v MPa r 2 , # 0 mo v MPa r 1 , # 2 c a l l mu l _ i n t mo v J 2 _ 2 , d p h mo v J 2 _ 1 , d p l
; - - - Hi t u n g J a r a k - 1 mo v d p h , J 1 _ 2
mo v d p l , J 1 _ 1 mo v DPa r 2 , # 0 mo v DPa r 1 , # 1 2 5 c a l l d i v _ i n t
mo v MPa r 2 , # 0 mo v MPa r 1 , # 2 c a l l mu l _ i n t mo v J 1 _ 2 , d p h mo v J 1 _ 1 , d p l
; - - Ce k Ma n a Ya n g Be s a r mo v a , J 2 _ 2
c l r c
s u b b a , J 1 _ 2 j c J 2 _ Le b i h _ Ke c i l j n z J 2 _ Le b i h _ Be s a r
mo v a , J 2 _ 1 c l r c
s u b b a , J 1 _ 1 j c J 2 _ Le b i h _ Ke c i l j n z J 2 _ Le b i h _ Be s a r
MCUV. ASM mo v d g 4 , # 0
mo v d g 3 , # 0 mo v d g 2 , # 0 mo v d g 1 , # 0 j mp u l a n g
J 2 _ Le b i h _ Ke c i l : mo v d p h , J 1 _ 2 mo v d p l , J 1 _ 1 mo v SPa r 2 , J 2 _ 2 mo v SPa r 1 , J 2 _ 1 c a l l s u b b _ i n t j mp Ub a h _ Ke De s i ma l
J 2 _ Le b i h _ Be s a r : mo v d p h , J 2 _ 2 mo v d p l , J 2 _ 1 mo v SPa r 2 , J 1 _ 2 mo v SPa r 1 , J 1 _ 1 c a l l s u b b _ i n t
Ub a h _ Ke De s i ma l : ; - - Ka l i 2 Du l u mo v MPa r 2 , # 0 mo v MPa r 1 , # 2 c a l l mu l _ i n t
; - - Ya n g a k a n d i t a mp i l k a n
mo v RBa k 2 , d p h ; Rb - Rs - Pl - St mo v RBa k 1 , d p l
; Amb i l Ri b u a n mo v DPa r 2 , # 0 0 3 h mo v DPa r 1 , # 0 E8 h
c a l l d i v _ i n t ; Rb - Rs - Pl - St / 1 0 0 0 = Rb mo v d g 4 , d p l ; Ge t <Rb >
; Amb i l r a t u s a n mo v MPa r 2 , # 0 0 3 h mo v MPa r 1 , # 0 E8 h
c a l l mu l _ i n t ; Rb * 1 0 0 0 mo v SPa r 2 , d p h
mo v SPa r 1 , d p l mo v d p h , RBa k 2 mo v d p l , RBa k 1
c a l l s u b b _ i n t ; Rb - Rs - Pl - St - Rb * 1 0 0 0 = Rs - Pl - St
mo v RBa k 2 , d p h ; Rs - Pl - St mo v RBa k 1 , d p l
mo v DPa r 2 , # 0 mo v DPa r 1 , # 1 0 0
c a l l d i v _ i n t ; Rs - Pl - St / 1 0 0 = Rs mo v d g 3 , d p l ; Ge t <Rs >
; Amb i l Pu l u h a n mo v MPa r 2 , # 0 mo v MPa r 1 , # 1 0 0
c a l l mu l _ i n t ; Rs * 1 0 0 mo v SPa r 2 , d p h
mo v SPa r 1 , d p l mo v d p h , RBa k 2 mo v d p l , RBa k 1
c a l l s u b b _ i n t ; Rs - Pl - St - Rs * 1 0 0 = Pl - St
MCUV. ASM
mo v DPa r 2 , # 0 mo v DPa r 1 , # 1 0
c a l l d i v _ i n t ; Pl - St / 1 0 = Pl mo v d g 2 , d p l ; Ge t <Pl > ; Amb i l Sa t u a n
mo v MPa r 2 , # 0 mo v MPa r 1 , # 1 0
c a l l mu l _ i n t ; Pl * 1 0 mo v SPa r 2 , d p h
mo v SPa r 1 , d p l mo v d p h , RBa k 2 mo v d p l , RBa k 1
c a l l s u b b _ i n t ; Pl - St - Pl * 1 0 = St
mo v d g 1 , d p l ; Ge t <St >
j mp u l a n g
; -T0 _ Ve c t :
p u s h p s w c l r TR0
mo v TH0 , # 0 3 Ch mo v TL0 , # 0 B0 h s e t b TR0
d j n z p 5 0 ms , T0 _ Ve c t _ En d c l r TR0
c l r ET0 c l r EA s e t b Sd h 5 T0 _ Ve c t _ En d : p o p p s w r e t i
; -d l y _ k e y :
; - - De l a y Sa mp a i To mb o l Di l e p a s p u s h 0 h
p u s h 1 h d k _ u l a n g :
mo v R0 , # 2 0 0 d l y _ k e y _ :
c a l l s h o w7 s
d j n z R0 , d l y _ k e y _ j n b Bu t t o n , d k _ u l a n g p o p 1 h
p o p 0 h r e t
; -s h o w7 -s :
; - - Ta mp i l k a n An g k a Ke Di s p l a y p u s h a c c
p u s h 0 h
mo v d p t r , # d b 7 s ; - - Sh o w Di g i t - 4 mo v a , d g 4
mo v c a , @a +d p t r mo v Di s Da t , a c l r PS4
c a l l d l y 7 s s e t b PS4
MCUV. ASM mo v a , d g 3
mo v c a , @a +d p t r mo v Di s Da t , a c l r PS3
c a l l d l y 7 s s e t b PS3
; - - Sh o w Di g i t - 2 mo v a , d g 2
mo v c a , @a +d p t r mo v Di s Da t , a c l r PS2
c a l l d l y 7 s s e t b PS2
; - - Sh o w Di g i t - 1 mo v a , d g 1
mo v c a , @a +d p t r mo v Di s Da t , a c l r PS1
c a l l d l y 7 s s e t b PS1 p o p 0 h p o p a c c r e t d l y 7 s :
; - - De l a y Ta h a n mo v R0 , # 1 0 0 d j n z R0 , $ r e t
d b 7 s :
; - - Da t a Ba s e Ko mb i n a s i Se g me n ; - g f e d c b a
d b 1 1 0 0 0 0 0 0 b ; 0 d b 1 1 1 1 1 0 0 1 b ; 1 d b 1 0 1 0 0 1 0 0 b ; 2 d b 1 0 1 1 0 0 0 0 b ; 3 d b 1 0 0 1 1 0 0 1 b ; 4 d b 1 0 0 1 0 0 1 0 b ; 5 d b 1 0 0 0 0 0 1 0 b ; 6 d b 1 1 1 1 1 0 0 0 b ; 7 d b 1 0 0 0 0 0 0 0 b ; 8 d b 1 0 0 1 0 0 0 0 b ; 9 d b 1 0 0 0 1 0 0 0 b ; A d b 1 0 0 0 0 0 1 1 b ; B d b 1 1 0 0 0 1 1 0 b ; C d b 1 0 1 0 0 0 0 1 b ; D d b 1 0 0 0 0 1 1 0 b ; E d b 1 0 0 0 1 1 1 0 b ; F
d b 1 1 1 1 1 1 1 1 b ; Bl a n k ( 1 7 )
; - - - ; a d d _ i n t :
; [ DPH: DPL] + [ APa r 2 : APa r 1 ] - > [ DPH: DPL] p u s h a c c
mo v a , APa r 1 a d d a , d p l mo v d p l , a mo v a , APa r 2 a d d c a , d p h mo v d p h , a p o p a c c
r e t
MCUV. ASM ; [ DPH: DPL] - [ SPa r 2 : SPa r 1 ] - > [ DPH: DPL] p u s h a c c
c l r c mo v a , d p l s u b b a , SPa r 1 mo v d p l , a mo v a , d p h s u b b a , SPa r 2 mo v d p h , a p o p a c c
r e t
; - - - ; mu l _ i n t :
; [ DPH: DPL] X [ MPa r 2 : MPa r 1 ] - > [ DPH: DPL] p u s h a c c
p u s h b
mo v a , d p l mo v b , MPa r 1 mu l a b
x c h a , d p l p u s h b
mo v b , MPa r 2 mu l a b
p o p b a d d a , b x c h a , d p h mo v b , MPa r 1 mu l a b
a d d a , d p h mo v d p h , a p o p b
p o p a c c r e t
; - - - ; d i v _ i n t :
; [ DPH: DPL] / [ DPa r 2 : DPa r 1 ] - > [ DPH: DPL] p u s h a c c
p u s h b p u s h 2 h p u s h 3 h p u s h 4 h
mo v r 2 , # 1 6 c l r a
mo v r 3 , a mo v r 4 , a d i _ l o o p :
MCUV. ASM s u b b a , DPa r 2
j c d i _ s ma l l e r mo v r 4 , a mo v r 3 , b o r l d p l , # 1 d i _ s ma l l e r :
d j n z r 2 , d i _ l o o p p o p 4 h
p o p 3 h p o p 2 h p o p b p o p a c c r e t
1
Pin Configuration
PDIP/SOIC 1 2 3 4 5 6 7 8 9 10 20 19 18 17 16 15 14 13 12 11 RST/VPP (RXD) P3.0 (TXD) P3.1 XTAL2 XTAL1 (INT0) P3.2 (INT1) P3.3 (TO) P3.4 (T1) P3.5 GND VCC P1.7 P1.6 P1.5 P1.4 P1.3 P1.2 P1.1 (AIN1) P1.0 (AIN0) P3.7Features
• Compatible with MCS-51™ Products
• 2K Bytes of Reprogrammable Flash Memory – Endurance: 1,000 Write/Erase Cycles • 2.7V to 6V Operating Range
• Fully Static Operation: 0 Hz to 24 MHz • Two-level Program Memory Lock • 128 x 8-bit Internal RAM
• 15 Programmable I/O Lines • Two 16-bit Timer/Counters • Six Interrupt Sources
• Programmable Serial UART Channel • Direct LED Drive Outputs
• On-chip Analog Comparator
• Low-power Idle and Power-down Modes
Description
The AT89C2051 is a low-voltage, high-performance CMOS 8-bit microcomputer with 2K bytes of Flash programmable and erasable read only memory (PEROM). The device is manufactured using Atmel’s high-density nonvolatile memory technology and is compatible with the industry-standard MCS-51 instruction set. By combining a versatile 8-bit CPU with Flash on a monolithic chip, the Atmel AT89C2051 is a power-ful microcomputer which provides a highly-flexible and cost-effective solution to many embedded control applications.
The AT89C2051 provides the following standard features: 2K bytes of Flash, 128 bytes of RAM, 15 I/O lines, two 16-bit timer/counters, a five vector two-level interrupt architecture, a full duplex serial port, a precision analog comparator, on-chip oscillator and clock circuitry. In addition, the AT89C2051 is designed with static logic for opera-tion down to zero frequency and supports two software selectable power saving modes. The Idle Mode stops the CPU while allowing the RAM, timer/counters, serial port and interrupt system to continue functioning. The power-down mode saves the RAM contents but freezes the oscillator disabling all other chip functions until the next hardware reset.
Rev. 0368E–02/00
8-bit
Microcontroller
with 2K Bytes
Flash
AT89C2051
2
AT89C2051
3
Pin Description
VCC
Supply voltage.
GND Ground.
Port 1
Port 1 is an 8-bit bi-irectional I/O port. Port pins P1.2 to P1.7 provide internal pullups. P1.0 and P1.1 require exter-nal pullups. P1.0 and P1.1 also serve as the positive input (AIN0) and the negative input (AIN1), respectively, of the on-chip precision analog comparator. The Port 1 output buffers can sink 20 mA and can drive LED displays directly. When 1s are written to Port 1 pins, they can be used as inputs. When pins P1.2 to P1.7 are used as inputs and are externally pulled low, they will source current (IIL) because of the internal pullups.
Port 1 also receives code data during Flash programming and verification.
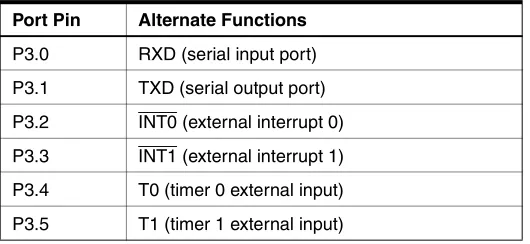
Port 3
Port 3 pins P3.0 to P3.5, P3.7 are seven bi-irectional I/O pins with internal pullups. P3.6 is hard-wired as an input to the output of the on-chip comparator and is not accessible as a general purpose I/O pin. The Port 3 output buffers can sink 20 mA. When 1s are written to Port 3 pins they are pulled high by the internal pullups and can be used as inputs. As inputs, Port 3 pins that are externally being pulled low will source current (IIL) because of the pullups. Port 3 also serves the functions of various special features of the AT89C2051 as listed below:
Port 3 also receives some control signals for Flash pro-gramming and verification.
RST
Reset input. All I/O pins are reset to 1s as soon as RST goes high. Holding the RST pin high for two machine cycles while the oscillator is running resets the device.
Each machine cycle takes 12 oscillator or clock cycles.
XTAL1
Input to the inverting oscillator amplifier and input to the internal clock operating circuit.
XTAL2
Output from the inverting oscillator amplifier.
Oscillator Characteristics
XTAL1 and XTAL2 are the input and output, respectively, of an inverting amplifier which can be configured for use as an on-chip oscillator, as shown in Figure 1. Either a quartz crystal or ceramic resonator may be used. To drive the device from an external clock source, XTAL2 should be left unconnected while XTAL1 is driven as shown in Figure 2. There are no requirements on the duty cycle of the external clock signal, since the input to the internal clocking circuitry is through a divide-by-two flip-flop, but minimum and maxi-mum voltage high and low time specifications must be observed.
Figure 1. Oscillator Connections
Note: C1, C2 = 30 pF ± 10 pF for Crystals
= 40 pF ± 10 pF for Ceramic Resonators
Figure 2. External Clock Drive Configuration Port Pin Alternate Functions
AT89C2051
4
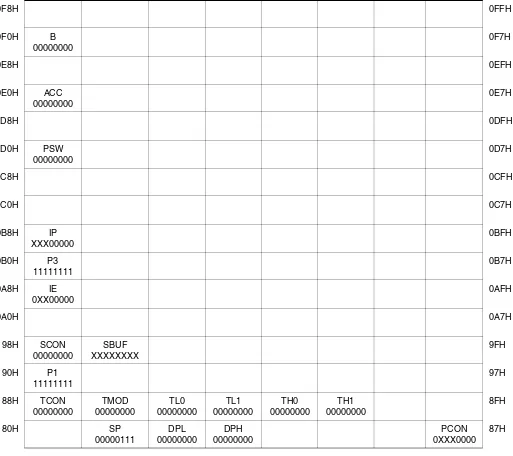
Special Function Registers
A map of the on-chip memory area called the Special Func-tion Register (SFR) space is shown in the table below. Note that not all of the addresses are occupied, and unoc-cupied addresses may not be implemented on the chip. Read accesses to these addresses will in general return
random data, and write accesses will have an indetermi-nate effect.
User software should not write 1s to these unlisted loca-tions, since they may be used in future products to invoke new features. In that case, the reset or inactive values of the new bits will always be 0.
Table 1. AT89C2051 SFR Map and Reset Values
0F8H 0FFH
0F0H B
00000000
0F7H
0E8H 0EFH
0E0H ACC
00000000
0E7H
0D8H 0DFH
0D0H PSW
00000000
0D7H
0C8H 0CFH
0C0H 0C7H
0B8H IP
XXX00000
0BFH
0B0H P3
11111111
0B7H
0A8H IE
0XX00000
0AFH
0A0H 0A7H
98H SCON
00000000
SBUF XXXXXXXX
9FH
90H P1
11111111
97H
88H TCON
00000000
TMOD 00000000
TL0 00000000
TL1 00000000
TH0 00000000
TH1 00000000
8FH
80H SP
00000111
DPL 00000000
DPH 00000000
PCON 0XXX0000
AT89C2051
5
Restrictions on Certain Instructions
The AT89C2051 and is an economical and cost-effective member of Atmel’s growing family of microcontrollers. It contains 2K bytes of flash program memory. It is fully com-pati bl e with the MCS-51 arc hitec tur e, and c an be programmed using the MCS-51 instruction set. However, there are a few considerations one must keep in mind when utilizing certain instructions to program this device. All the instructions related to jumping or branching should be restricted such that the destination address falls within the physical program memory space of the device, which is 2K for the AT89C2051. This should be the responsibility of the software programmer. For example, LJMP 7E0H would be a valid instruction for the AT89C2051 (with 2K of memory), whereas LJMP 900H would not.
1. Branching instructions:
LCALL, LJMP, ACALL, AJMP, SJMP, JMP @A+DPTR These unconditional branching instructions will execute correctly as long as the programmer keeps in mind that the destination branching address must fall within the physical boundaries of the program memory size (locations 00H to 7FFH for the 89C2051). Violating the physical space limits may cause unknown program behavior.
CJNE [...], DJNZ [...], JB, JNB, JC, JNC, JBC, JZ, JNZ With these conditional branching instructions the same rule above applies. Again, violating the memory boundaries may cause erratic execution.
For applications involving interrupts the normal interrupt service routine address locations of the 80C51 family archi-tecture have been preserved.
2. MOVX-related instructions, Data Memory:
The AT89C2051 contains 128 bytes of internal data mem-ory. Thus, in the AT89C2051 the stack depth is limited to 128 bytes, the amount of available RAM. External DATA memory access is not supported in this device, nor is exter-nal PROGRAM memory execution. Therefore, no MOVX [...] instructions should be included in the program.
A typical 80C51 assembler will still assemble instructions, even if they are written in violation of the restrictions men-tioned above. It is the responsibility of the controller user to know the physical features and limitations of the device b e i n g u s e d a n d a d j u s t t h e i n s t r u c t i o n s u s e d correspondingly.
Program Memory Lock Bits
On the chip are two lock bits which can be left unpro-grammed (U) or can be prounpro-grammed (P) to obtain the additional features listed in the table below:
Lock Bit Protection Modes
(1)Note: 1. The Lock Bits can only be erased with the Chip Erase operation.
Idle Mode
In idle mode, the CPU puts itself to sleep while all the on-chip peripherals remain active. The mode is invoked by software. The content of the on-chip RAM and all the spe-cial functions registers remain unchanged during this mode. The idle mode can be terminated by any enabled interrupt or by a hardware reset.
P1.0 and P1.1 should be set to “0” if no external pullups are used, or set to “1” if external pullups are used.
It should be noted that when idle is terminated by a hard-ware reset, the device normally resumes program execution, from where it left off, up to two machine cycles before the internal reset algorithm takes control. On-chip hardware inhibits access to internal RAM in this event, but access to the port pins is not inhibited. To eliminate the possibility of an unexpected write to a port pin when Idle is terminated by reset, the instruction following the one that invokes Idle should not be one that writes to a port pin or to external memory.
Power-down Mode
In the power down mode the oscillator is stopped, and the instruction that invokes power down is the last instruction executed. The on-chip RAM and Special Function Regis-ters retain their values until the power down mode is terminated. The only exit from power down is a hardware reset. Reset redefines the SFRs but does not change the on-chip RAM. The reset should not be activated before VCC is restored to its normal operating level and must be held active long enough to allow the oscillator to restart and stabilize.
P1.0 and P1.1 should be set to “0” if no external pullups are used, or set to “1” if external pullups are used.
Program Lock Bits
LB1 LB2 Protection Type
1 U U No program lock features.
2 P U Further programming of the Flash is disabled.
AT89C2051
6
Programming The Flash
The AT89C2051 is shipped with the 2K bytes of on-chip PEROM code memory array in the erased state (i.e., con-tents = FFH) and ready to be programmed. The code memory array is programmed one byte at a time. Once the array is programmed, to re-program any non-blank byte, the entire memory array needs to be erased electrically.
Internal Address Counter: The AT89C2051 contains an internal PEROM address counter which is always reset to 000H on the rising edge of RST and is advanced by apply-ing a positive goapply-ing pulse to pin XTAL1.
Programming Algorithm: To program the AT89C2051, the following sequence is recommended.
1. Power-up sequence:
Apply power between VCC and GND pins Set RST and XTAL1 to GND
2. Set pin RST to “H” Set pin P3.2 to “H”
3. Apply the appropriate combination of “H” or “L” logic levels to pins P3.3, P3.4, P3.5, P3.7 to select one of the programming operations shown in the PEROM Pro-gramming Modes table.
To Program and Verify the Array:
4. Apply data for Code byte at location 000H to P1.0 to P1.7.
5. Raise RST to 12V to enable programming.
6. Pulse P3.2 once to program a byte in the PEROM array or the lock bits. The byte-write cycle is self-timed and typically takes 1.2 ms.
7. To verify the programmed data, lower RST from 12V to logic “H” level and set pins P3.3 to P3.7 to the appropiate levels. Output data can be read at the port P1 pins. 8. To program a byte at the next address location, pulse
XTAL1 pin once to advance the internal address counter. Apply new data to the port P1 pins.
9. Repeat steps 5 through 8, changing data and advancing the address counter for the entire 2K bytes array or until the end of the object file is reached.
10.Power-off sequence: set XTAL1 to “L” set RST to “L” Turn VCC power off
Data Polling: The AT89C2051 features Data Polling to indicate the end of a write cycle. During a write cycle, an attempted read of the last byte written will result in the com-plement of the written data on P1.7. Once the write cycle has been completed, true data is valid on all outputs, and
the next cycle may begin. Data Polling may begin any time after a write cycle has been initiated.
Ready/Busy: The Progress of byte programming can also be monitored by the RDY/BSY output signal. Pin P3.1 is pulled low after P3.2 goes High during programming to indi-cate BUSY. P3.1 is pulled High again when programming is done to indicate READY.
Program Verify: If lock bits LB1 and LB2 have not been programmed code data can be read back via the data lines for verification:
1. Reset the internal address counter to 000H by bringing RST from “L” to “H”.
2. Apply the appropriate control signals for Read Code data and read the output data at the port P1 pins.
3. Pulse pin XTAL1 once to advance the internal address counter.
4. Read the next code data byte at the port P1 pins. 5. Repeat steps 3 and 4 until the entire array is read. The lock bits cannot be verified directly. Verification of the lock bits is achieved by observing that their features are enabled.
Chip Erase: The entire PEROM array (2K bytes) and the two Lock Bits are erased electrically by using the proper combination of control signals and by holding P3.2 low for 10 ms. The code array is written with all “1”s in the Chip Erase operation and must be executed before any non-blank memory byte can be re-programmed.
Reading the Signature Bytes: The signature bytes are read by the same procedure as a normal verification of locations 000H, 001H, and 002H, except that P3.5 and P3.7 must be pulled to a logic low. The values returned are as follows.
(000H) = 1EH indicates manufactured by Atmel (001H) = 21H indicates 89C2051
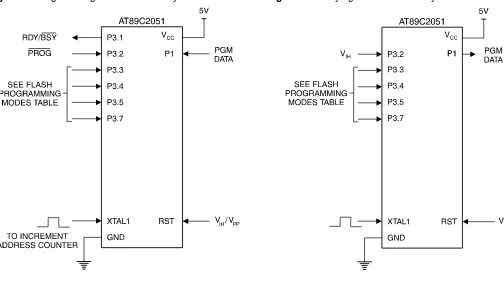
Programming Interface
Every code byte in the Flash array can be written and the entire array can be erased by using the appropriate combi-nation of control signals. The write operation cycle is self-timed and once initiated, will automatically time itself to completion.
AT89C2051
7 Notes: 1. The internal PEROM address counter is reset to 000H on the rising edge of RST and is advanced by a positive pulse at
XTAL 1 pin.
2. Chip Erase requires a 10 ms PROG pulse.
3. P3.1 is pulled Low during programming to indicate RDY/BSY.
Figure 3. Programming the Flash Memory Figure 4. Verifying the Flash Memory
Flash Programming Modes
Mode RST/VPP P3.2/PROG P3.3 P3.4 P3.5 P3.7
Write Code Data(1)(3) 12V L H H H
Read Code Data(1) H H L L H H
Write Lock Bit - 1 12V H H H H
Bit - 2 12V H H L L
Chip Erase 12V H L L L
Read Signature Byte H H L L L L
(2)
AT89C2051
8
Note: 1. Only used in 12-volt programming mode.
Flash Programming and Verification Waveforms
Flash Programming and Verification Characteristics
TA = 0°C to 70°C, VCC = 5.0 ± 10%Symbol Parameter Min Max Units
VPP Programming Enable Voltage 11.5 12.5 V
IPP Programming Enable Current 250 µA
tDVGL Data Setup to PROG Low 1.0 µs
tGHDX Data Hold after PROG 1.0 µs
tEHSH P3.4 (ENABLE) High to VPP 1.0 µs
tSHGL VPP Setup to PROG Low 10 µs
tGHSL VPP Hold after PROG 10 µs
tGLGH PROG Width 1 110 µs
tELQV ENABLE Low to Data Valid 1.0 µs
tEHQZ Data Float after ENABLE 0 1.0 µs
tGHBL PROG High to BUSY Low 50 ns
tWC Byte Write Cycle Time 2.0 ms
tBHIH RDY/BSY\ to Increment Clock Delay 1.0 µs
AT89C2051
9 Notes: 1. Under steady state (non-transient) conditions, IOL must be externally limited as follows:
Maximum IOL per port pin: 20 mA
Maximum total IOL for all output pins: 80 mA
If IOL exceeds the test condition, VOL may exceed the related specification. Pins are not guaranteed to sink current greater than the listed test conditions.
2. Minimum VCC for Power-down is 2V.
Absolute Maximum Ratings*
Operating Temperature ... -55°C to +125°C *NOTICE: Stresses beyond those listed under “Absolute Maximum Ratings” may cause permanent dam-age to the device. This is a stress rating only and functional operation of the device at these or any other conditions beyond those indicated in the operational sections of this specification is not implied. Exposure to absolute maximum rating conditions for extended periods may affect device reliability.
Storage Temperature ... -65°C to +150°C Voltage on Any Pin
with Respect to Ground ...-1.0V to +7.0V Maximum Operating Voltage ... 6.6V DC Output Current... 25.0 mA
DC Characteristics
TA = -40°C to 85°C, VCC = 2.0V to 6.0V (unless otherwise noted)
Symbol Parameter Condition Min Max Units
VIL Input Low-voltage -0.5 0.2 VCC - 0.1 V
VIH Input High-voltage (Except XTAL1, RST) 0.2 VCC + 0.9 VCC + 0.5 V
VIH1 Input High-voltage (XTAL1, RST) 0.7 VCC VCC + 0.5 V
VOL Output Low-voltage(1) (Ports 1, 3)
IOL = 20 mA, VCC = 5V IOL = 10 mA, VCC = 2.7V
0.5 V
VOH Output High-voltage (Ports 1, 3)
IOH = -80 µA, VCC = 5V ± 10% 2.4 V
IOH = -30 µA 0.75 VCC V
IOH = -12 µA 0.9 VCC V
IIL Logical 0 Input Current (Ports 1, 3)
VIN = 0.45V -50 µA
ITL Logical 1 to 0 Transition Current (Ports 1, 3)
VIN = 2V, VCC = 5V ± 10% -750 µA
ILI Input Leakage Current (Port P1.0, P1.1)
0 < VIN < VCC ±10 µA
VOS Comparator Input Offset Voltage VCC = 5V 20 mV
VCM Comparator Input Common Mode Voltage
0 VCC V
RRST Reset Pull-down Resistor 50 300 KΩ
CIO Pin Capacitance Test Freq. = 1 MHz, TA = 25°C 10 pF
ICC Power Supply Current Active Mode, 12 MHz, VCC = 6V/3V 15/5.5 mA
Idle Mode, 12 MHz, VCC = 6V/3V P1.0 & P1.1 = 0V or VCC
5/1 mA
AT89C2051
10
External Clock Drive Waveforms
External Clock Drive
Symbol Parameter
VCC = 2.7V to 6.0V VCC = 4.0V to 6.0V
Units
Min Max Min Max
1/tCLCL Oscillator Frequency 0 12 0 24 MHz
tCLCL Clock Period 83.3 41.6 ns
tCHCX High Time 30 15 ns
tCLCX Low Time 30 15 ns
tCLCH Rise Time 20 20 ns
AT89C2051
11 ()
Shift Register Mode Timing Waveforms
AC Testing Input/Output Waveforms
(1)Note: 1. AC Inputs during testing are driven at VCC - 0.5V for a logic 1 and 0.45V for a logic 0. Timing measurements are made at VIH min. for a logic 1 and VIL max. for a logic 0.
Float Waveforms
(1)Note: 1. For timing purposes, a port pin is no longer floating when a 100 mV change from load voltage occurs. A port pin begins to float when 100 mV change frothe loaded VOH/VOL level occurs.
Serial Port Timing: Shift Register Mode Test Conditions
VCC = 5.0V ± 20%; Load Capacitance = 80 pFSymbol Parameter
12 MHz Osc Variable Oscillator
Units
Min Max Min Max
tXLXL Serial Port Clock Cycle Time 1.0 12tCLCL µs
tQVXH Output Data Setup to Clock Rising Edge 700 10tCLCL-133 ns
tXHQX Output Data Hold after Clock Rising Edge 50 2tCLCL-117 ns
tXHDX Input Data Hold after Clock Rising Edge 0 0 ns
AT89C2051
12
AT89C2051 TYPICAL ICC - ACTIVE (85°C)
0 5 10 15 20
0 6 12 18 24
FREQUENCY (MHz) I
C C m A
Vcc=6.0V
Vcc=5.0V
Vcc=3.0V
AT89C2051 TYPICAL ICC - IDLE (85°C)
0 1 2 3
0 3 6 9 12
FREQUENCY (MHz) I
C C m A
Vcc=6.0V
Vcc=5.0V
Vcc=3.0V
AT89C2051
TYPICAL ICC vs. VOLTAGE- POWER DOWN (85°C)
0 5 10 15 20
3.0V 4.0V 5.0V 6.0V
Vcc VOLTAGE I
C C µ A
Notes: 1. XTAL1 tied to GND for ICC (power-down) 2. P.1.0 and P1.1 = VCC or GND
AT89C2051
13
Ordering Information
Speed (MHz)
Power
Supply Ordering Code Package Operation Range
12 2.7V to 6.0V AT89C2051-12PC AT89C2051-12SC
20P3 20S
Commercial (0°C to 70°C) AT89C2051-12PI
AT89C2051-12SI
20P3 20S
Industrial (-40°C to 85°C) 24 4.0V to 6.0V AT89C2051-24PC
AT89C2051-24SC
20P3 20S
Commercial (0°C to 70°C) AT89C2051-24PI
AT89C2051-24SI
20P3 20S
Industrial (-40°C to 85°C)
AT89C2051
14
Packaging Information
1.060(26.9) .980(24.9) PIN
1
.280(7.11) .240(6.10)
.090(2.29) MAX
.005(.127) MIN
.015(.381) MIN
.022(.559) .014(.356) .070(1.78)
.045(1.13)
.325(8.26) .300(7.62)
0 15REF
.430(10.92) MAX .014(.356)
.008(.203) .110(2.79) .090(2.29) .150(3.81) .115(2.92) SEATING
PLANE .210(5.33)
MAX
.900(22.86) REF
0.299 (7.60) 0.291 (7.39) 0.020 (0.508)
0.013 (0.330)
0.420 (10.7) 0.393 (9.98) PIN 1
.050 (1.27) BSC 0.513 (13.0) 0.497 (12.6)
0.012 (0.305) 0.003 (0.076)
0.105 (2.67) 0.092 (2.34)
0 8REF
0.035 (0.889) 0.015 (0.381)
0.013 (0.330) 0.009 (0.229)
20P3, 20-lead, 0.300" Wide, Plastic Dual Inline Package (PDIP)
Dimensions in Inches and (Millimeters)
JEDEC STANDARD MS-001 AD
20S, 20-lead, 0.300" Wide, Plastic Gull WIng Small Outline (SOIC)
© Atmel Corporation 2000.
Atmel Corporation makes no warranty for the use of its products, other than those expressly contained in the Company’s standard war-ranty which is detailed in Atmel’s Terms and Conditions located on the Company’s web site. The Company assumes no responsibility for any errors which may appear in this document, reserves the right to change devices or specifications detailed herein at any time without notice, and does not make any commitment to update the information contained herein. No licenses to patents or other intellectual prop-erty of Atmel are granted by the Company in connection with the sale of Atmel products, expressly or by implication. Atmel’s products are not authorized for use as critical components in life suppor t devices or systems.
Atmel Headquarters
Atmel Operations
Corporate Headquarters
2325 Orchard Parkway San Jose, CA 95131 TEL (408) 441-0311 FAX (408) 487-2600Europe
Atmel U.K., Ltd.
Coliseum Business Centre Riverside Way
Camberley, Surrey GU15 3YL England
TEL (44) 1276-686-677 FAX (44) 1276-686-697
Asia
Atmel Asia, Ltd. Room 1219
Chinachem Golden Plaza 77 Mody Road Tsimhatsui East Kowloon
Hong Kong
TEL (852) 2721-9778 FAX (852) 2722-1369
Japan
Atmel Japan K.K.
9F, Tonetsu Shinkawa Bldg. 1-24-8 Shinkawa
Chuo-ku, Tokyo 104-0033 Japan
TEL (81) 3-3523-3551 FAX (81) 3-3523-7581
Atmel Colorado Springs
1150 E. Cheyenne Mtn. Blvd. Colorado Springs, CO 80906 TEL (719) 576-3300FAX (719) 540-1759
Atmel Rousset
Zone Industrielle 13106 Rousset Cedex France
TEL (33) 4-4253-6000 FAX (33) 4-4253-6001
Fax-on-Demand
North America: 1-(800) 292-8635 International: 1-(408) 441-0732Web Site
http://www.atmel.com
BBS
1-(408) 436-4309
Printed on recycled paper. Marks bearing ® and/or ™ are registered trademarks and trademarks of Atmel Corporation.
Semiconductor Components Industries, LLC, 2004 1 Publication Order Number:
LM358, LM258, LM2904,
LM2904A, LM2904V,
NCV2904
Single Supply Dual
Operational Amplifiers
Utilizing the circuit designs perfected for Quad Operational Amplifiers, these dual operational amplifiers feature low power drain,
a common mode input voltage range extending to ground/VEE, and
single supply or split supply operation. The LM358 series is equivalent to one−half of an LM324.
These amplifiers have several distinct advantages over standard operational amplifier types in single supply applications. They can operate at supply voltages as low as 3.0 V or as high as 32 V, with quiescent currents about one−fifth of those associated with the MC1741 (on a per amplifier basis). The common mode input range includes the negative supply, thereby eliminating the necessity for external biasing components in many applications. The output voltage range also includes the negative power supply voltage.
Features
•
Short Circuit Protected Outputs•
True Differential Input Stage•
Single Supply Operation: 3.0 V to 32 V•
Low Input Bias Currents•
Internally Compensated•
Common Mode Range Extends to Negative Supply•
Single and Split Supply Operation•
ESD Clamps on the Inputs Increase Ruggedness of the Device without Affecting Operation•
Pb−Free Packages are Available•
NCV Prefix for Automotive and Other Applications Requiring Site and Control ChangesPDIP−8 N, AN, VN SUFFIX
CASE 626
1 8
SOIC−8 D, VD SUFFIX
CASE 751
1 8
PIN CONNECTIONS
VEE/Gnd
Inputs A
Inputs B Output B Output A VCC
− − + + 1 2 3 4 8 7 6 5 (Top View)
See general marking information in the device marking section on page 11 of this data sheet.
DEVICE MARKING INFORMATION
See detailed ordering and shipping information in the package dimensions section on page 10 of this data sheet.
LM358, LM258, LM2904, LM2904A, LM2904V, NCV2904
http://onsemi.com
Single Supply Split Supplies
VCC
VEE/Gnd 3.0 V to VCC(max)
1 2
VCC
1 2 VEE
1.5 V to VCC(max)
1.5 V to VEE(max)
Output
Bias Circuitry Common to Both
Amplifiers
VCC
VEE/Gnd
Inputs
Q2
Q3 Q4 Q5
Q26 Q7
Q8 Q6
Q9
Q11
Q10
Q1 2.4 k Q25 Q22 40 k
Q13 Q14
Q15 Q16
Q19
5.0 pF
Q18
Q17
Q20
Q21
2.0 k
Q24 Q23 Q12
[image:35.612.83.536.54.492.2]25
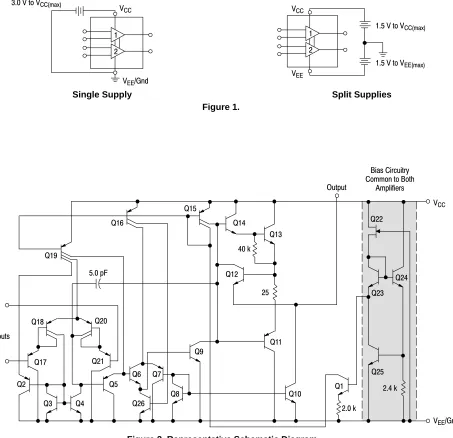
Figure 1.
LM358, LM258, LM2904, LM2904A, LM2904V, NCV2904
http://onsemi.com MAXIMUM RATINGS (TA = +25°C, unless otherwise noted.)
Rating Symbol Value Unit
Power Supply Voltages Single Supply Split Supplies
VCC VCC, VEE
32
±16
Vdc
Input Differential Voltage Range (Note 1) VIDR ±32 Vdc
Input Common Mode Voltage Range (Note 2) VICR −0.3 to 32 Vdc
Output Short Circuit Duration tSC Continuous
Junction Temperature TJ 150 °C
Thermal Resistance, Junction−to−Air (Note 3) RJA 238 °C/W
Storage Temperature Range Tstg −55 to +125 °C
ESD Protection at any Pin Human Body Model Machine Model
Vesd
2000 200
V
Operating Ambient Temperature Range
LM258 LM358 LM2904/LM2904A LM2904V, NCV2904 (Note 4)
TA
−25 to +85 0 to +70 −40 to +105 −40 to +125
°C
Maximum ratings are those values beyond which device damage can occur. Maximum ratings applied to the device are individual stress limit values (not normal operating conditions) and are not valid simultaneously. If these limits are exceeded, device functional operation is not implied, damage may occur and reliability may be affected.
1. Split Power Supplies.
2. For Supply Voltages less than 32 V the absolute maximum input voltage is equal to the supply voltage. 3. RJA for Case 846A.
LM358, LM258, LM2904, LM2904A, LM2904V, NCV2904
http://onsemi.com
ELECTRICAL CHARACTERISTICS (VCC = 5.0 V, VEE = GND, TA = 25°C, unless otherwise noted.)
LM258 LM358
Characteristic Symbol Min Typ Max Min Typ Max Unit
Input Offset Voltage
VCC = 5.0 V to 30 V, VIC = 0 V to VCC −1.7 V, VO] 1.4 V, RS = 0
VIO mV
TA = 25°C − 2.0 5.0 − 2.0 7.0
TA = Thigh (Note 5) − − 7.0 − − 9.0
TA = Tlow (Note 5) − − 7.0 − − 9.0
Average Temperature Coefficient of Input Offset Voltage
VIO/T − 7.0 − − 7.0 − V/°C
TA = Thigh to Tlow (Note 5)
Input Offset Current IIO − 3.0 30 − 5.0 50 nA
TA = Thigh to Tlow (Note 5) − − 100 − − 150
Input Bias Current IIB − −45 −150 − −45 −250
TA = Thigh to Tlow (Note 5) − −50 −300 − −50 −500
Average Temperature Coefficient of Input Offset Current
IIO/T − 10 − − 10 − pA/°C
TA = Thigh to Tlow (Note 5)
Input Common Mode Voltage Range (Note 6), VCC = 30 V
VICR 0 − 28.3 0 − 28.3 V
VCC = 30 V, TA = Thigh to Tlow 0 − 28 0 − 28
Differential Input Voltage Range VIDR − − VCC − − VCC V
Large Signal Open Loop Voltage Gain AVOL V/mV
RL = 2.0 k, VCC = 15 V, For Large VO Swing, 50 100 − 25 100 −
TA = Thigh to Tlow (Note 5) 25 − − 15 − −
Channel Separation CS − −120 − − −120 − dB
1.0 kHz ≤ f ≤ 20 kHz, Input Referenced
Common Mode Rejection CMR 70 85 − 65 70 − dB
RS≤ 10 k
Power Supply Rejection PSR 65 100 − 65 100 − dB
Output Voltage−High Limit TA = Thigh to Tlow (Note 5)
VOH V
VCC = 5.0 V, RL = 2.0 k, TA = 25°C 3.3 3.5 − 3.3 3.5 −
VCC = 30 V, RL = 2.0 k 26 − − 26 − −
VCC = 30 V, RL = 10 k 27 28 − 27 28 −
Output Voltage−Low Limit VOL − 5.0 20 − 5.0 20 mV
VCC = 5.0 V, RL = 10 k, TA = Thigh to Tlow (Note 5)
Output Source Current IO+ 20 40 − 20 40 − mA
VID = +1.0 V, VCC = 15 V
Output Sink Current IO−
VID = −1.0 V, VCC = 15 V 10 20 − 10 20 − mA
VID = −1.0 V, VO = 200 mV 12 50 − 12 50 − A
Output Short Circuit to Ground (Note 7) ISC − 40 60 − 40 60 mA
Power Supply Current (Total Device) TA = Thigh to Tlow (Note 5)
ICC mA
VCC = 30 V, VO = 0 V, RL = ∞ − 1.5 3.0 − 1.5 3.0
VCC = 5 V, VO = 0 V, RL = ∞ − 0.7 1.2 − 0.7 1.2
5. LM258: Tlow = −25°C, Thigh = +85°C LM358: Tlow = 0°C, Thigh = +70°C
LM2904/LM2904A: Tlow = −40°C, Thigh = +105°C LM2904V & NCV2904: Tlow = −40°C, Thigh = +125°C
NCV2904 is qualified for automotive use.
6. The input common mode voltage or either input signal voltage should not be allowed to go negative by more than 0.3 V. The upper end of the common mode voltage range is VCC − 1.7 V.
LM358, LM258, LM2904, LM2904A, LM2904V, NCV2904
http://onsemi.com
ELECTRICAL CHARACTERISTICS (VCC = 5.0 V, VEE = Gnd, TA = 25°C, unless otherwise noted.)
LM2904 LM2904A LM2904V, NCV2904 Characteristic Symbol Min Typ Max Min Typ Max Min Typ Max Unit
Input Offset Voltage
VCC = 5.0 V to 30 V, VIC = 0 V to VCC −1.7 V, VO] 1.4 V, RS = 0
VIO mV
TA = 25°C − 2.0 7.0 − 2.0 7.0 − − 7.0
TA = Thigh (Note 8) − − 10 − − 10 − − 13
TA = Tlow (Note 8) − − 10 − − 10 − − 10
Average Temperature Coefficient of Input Offset Voltage
VIO/T − 7.0 − − 7.0 − − 7.0 − V/°C
TA = Thigh to Tlow (Note 8)
Input Offset Current IIO − 5.0 50 − 5.0 50 − 5.0 50 nA
TA = Thigh to Tlow (Note 8) − 45 200 − 45 200 − 45 200
Input Bias Current IIB − −45 −250 − −45 −100 − −45 −250
TA = Thigh to Tlow (Note 8) − −50 −500 − −50 −250 − −50 −500
Average Temperature Coefficient of Input Offset Current
IIO/T − 10 − − 10 − − 10 − pA/°C
TA = Thigh to Tlow (Note 8)
Input Common Mode Voltage Range (Note 9), VCC = 30 V
VICR 0 − 24.3 0 − 24.3 0 − 24.3 V
VCC = 30 V, TA = Thigh to Tlow 0 − 24 0 − 24 0 − 24
Differential Input Voltage Range VIDR − − VCC − − VCC − − VCC V
Large Signal Open Loop Voltage Gain AVOL V/mV
RL = 2.0 k, VCC = 15 V, For Large VO Swing, 25 100 − 25 100 − 25 100 −
TA = Thigh to Tlow (Note 8) 15 − − 15 − − 15 − −
Channel Separation CS − −120 − − −120 − − −120 − dB
1.0 kHz ≤ f ≤ 20 kHz, Input Referenced
Common Mode Rejection CMR 50 70 − 50 70 − 50 70 − dB
RS≤ 10 k
Power Supply Rejection PSR 50 100 − 50 100 − 50 100 − dB
Output Voltage−High Limit TA = Thigh to Tlow (Note 8)
VOH V
VCC = 5.0 V, RL = 2.0 k, TA = 25°C 3.3 3.5 − 3.3 3.5 − 3.3 3.5 −
VCC = 30 V, RL = 2.0 k 22 − − 22 − − 22 − −
VCC = 30 V, RL = 10 k 23 24 − 23 24 − 23 24 −
Output Voltage−Low Limit VOL − 5.0 20 − 5.0 20 − 5.0 20 mV
VCC = 5.0 V, RL = 10 k, TA = Thigh to Tlow (Note 8)
Output Source Current IO+ 20 40 − 20 40 − 20 40 − mA
VID = +1.0 V, VCC = 15 V
Output Sink Current IO−
VID = −1.0 V, VCC = 15 V 10 20 − 10 20 − 10 20 − mA
VID = −1.0 V, VO = 200 mV − − − − − − − − − A
Output Short Circuit to Ground (Note 10) ISC − 40 60 − 40 60 − 40 60 mA
Power Supply Current (Total Device) TA = Thigh to Tlow (Note 8)
ICC mA
VCC = 30 V, VO = 0 V, RL = ∞ − 1.5 3.0 − 1.5 3.0 − 1.5 3.0
VCC = 5 V, VO = 0 V, RL = ∞ − 0.7 1.2 − 0.7 1.2 − 0.7 1.2
8. LM258: Tlow = −25°C, Thigh = +85°C LM358: Tlow = 0°C, Thigh = +70°C
LM2904/LM2904A: Tlow = −40°C, Thigh = +105°C LM2904V & NCV2904: Tlow = −40°C, Thigh = +125°C
NCV2904 is qualified for automotive use.
9. The input common mode voltage or either input signal voltage should not be allowed to go negative by more than 0.3 V. The upper end of the common mode voltage range is VCC − 1.7 V.
LM358, LM258, LM2904, LM2904A, LM2904V, NCV2904
http://onsemi.com
CIRCUIT DESCRIPTION
The LM358 series is made using two internally compensated, two−stage operational amplifiers. The first stage of each consists of differential input devices Q20 and Q18 with input buffer transistors Q21 and Q17 and the differential to single ended converter Q3 and Q4. The first stage performs not only the first stage gain function but also performs the level shifting and transconductance reduction functions. By reducing the transconductance, a smaller compensation capacitor (only 5.0 pF) can be employed, thus saving chip area. The transconductance reduction is accomplished by splitting the collectors of Q20 and Q18. Another feature of this input stage is that the input common mode range can include the negative supply or ground, in single supply operation, without saturating either the input devices or the differential to single−ended converter. The second stage consists of a standard current source load amplifier stage.
[image:39.612.326.544.73.220.2]Each amplifier is biased from an internal−voltage regulator which has a low temperature coefficient thus giving each amplifier good temperature characteristics as well as excellent power supply rejection.
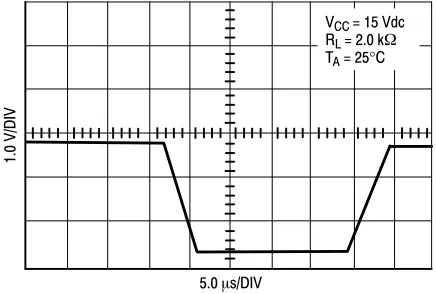
Figure 3. Large Signal Voltage Follower Response
5.0 s/DIV
1.0 V/DIV
VCC = 15 Vdc
RL = 2.0 k
TA = 25°C
AVOL
, OPEN LOOP
VOL
TAGE GAIN (dB)
V , INPUT
VOL
TAGE (V)
[image:39.612.62.548.384.549.2]I
Figure 4. Input Voltage Range Figure 5. Large−Signal Open Loop Voltage Gain
18 16 14 12 10 8.0 6.0 4.0 2.0 0 20
0 2.0 4.0 6.0 8.0 10 12 14 16 18 20 VCC/VEE, POWER SUPPLY VOLTAGES (V)
120 100 80 60 40 20 0 −20
1.0 10 100 1.0 k 10 k 100 k 1.0 M f, FREQUENCY (Hz)
Negative
Positive
VCC = 15 V
VEE = Gnd
LM358, LM258, LM2904, LM2904A, LM2904V, NCV2904
http://onsemi.com
VOR
, OUTPUT
VOL
TAGE RANGE (V
[image:40.612.60.311.53.211.2]) pp VO , OUTPUT VOL TAGE (mV)
[image:40.612.308.547.54.211.2]Figure 6. Large−Signal Frequency Response Figure 7. Small Signal Voltage Follower Pulse Response (Noninverting)
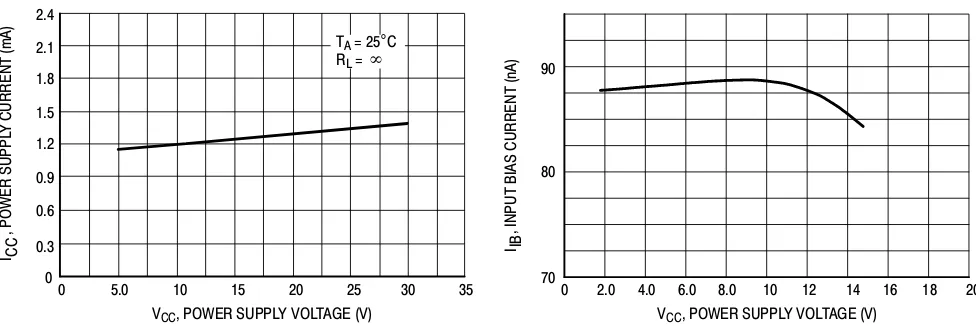
Figure 8. Power Supply Current versus Power Supply Voltage
Figure 9. Input Bias Current versus Supply Voltage 14 12 10 8.0 6.0 4.0 2.0 0
1.0 10 100 1000 f, FREQUENCY (kHz)
550 500 450 400 350 300 250 200 0
0 1.0 2.0 3.0 4.0 5.0 6.0 7.0 8.0 t, TIME (ms)
2.4 2.1 1.8 1.5 1.2 0.9 0.6 0.3 0
0 5.0 10 15 20 25 30 35
VCC, POWER SUPPLY VOLTAGE (V) VCC, POWER SUPPLY VOLTAGE (V)
90
80
70
0 2.0 4.0 6.0 8.0 10 12 14 16 18 20
I , POWER SUPPL
Y
CURRENT
(mA)
CC I , INPUT
BIAS CURRENT
(nA)
IB
RL = 2.0 k
VCC = 15 V
VEE = Gnd
Gain = −100 RI = 1.0 k
RF = 100 k
Input Output
TA = 25°C
RL = R
VCC = 30 V
VEE = Gnd
[image:40.612.60.548.283.446.2]LM358, LM258, LM2904, LM2904A, LM2904V, NCV2904
http://onsemi.com R1 2 1 R1 TBP R1 + R2R1 R1 + R2 1
eo
e1
e2
eo = C (1 + a + b) (e2 − e1) R1 a R1
b R1 R CR − + 1/2 LM358 + − − + R 1/2 LM358 + − R1 R2 VO Vref Vin VOH VO VOL
VinL =
R1
(VOL − Vref)+ Vref VinH = (VOH − Vref) + Vref
H =
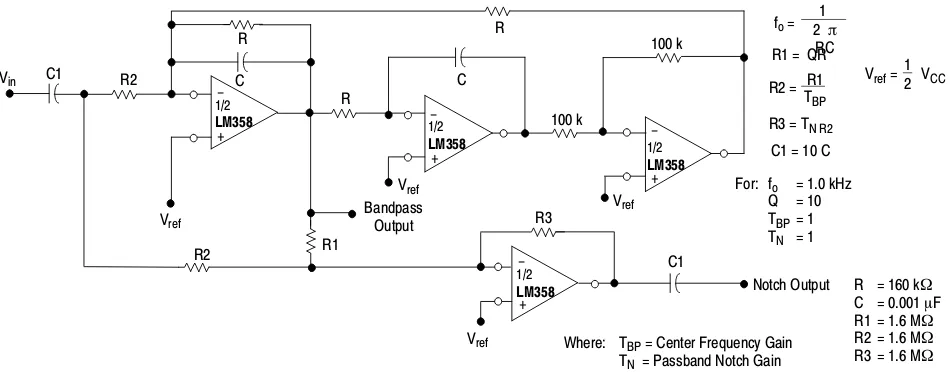
R1 + R2 (VOH − VOL) R1 − + − + − + R C R2 R3 C1 100 k R C R C1 R2 100 k Vin Vref Vref Vref Vref Bandpass Output
fo = 2
RC R1 = QR R2 = R3 = TN R2
C1 = 10 C 1
Notch Output
Vref= VCC
Hysteresis 1/2 LM358 1/2 LM358 1 C R
VinL VinH
Vref 1/2 LM358 1/2 LM358 1/2 LM358 1/2 LM358
TBP = Center Frequency Gain
TN = Passband Notch Gain
R C R1 R2 R3 For: − + fo Q TBP TN
= 1.0 kHz = 10 = 1 = 1
= 160 k
= 0.001 F = 1.6 M
= 1.6 M
= 1.6 M
Where: MC1403 1/2 LM358 − + R1 VCC VCC VO 2.5 V R2 50 k 10 k Vref
Vref = VCC 2
5.0 k
R C R C +
1/2
LM358
−
VO
2 RC 1 For: fo = 1.0 kHz
R = 16 k
C = 0.01 F VO = 2.5 V (1 +R1R2)
1
VCC
fo =
[image:41.612.73.546.52.489.2]Figure 10. Voltage Reference Figure 11. Wien Bridge Oscillator
[image:41.612.308.525.56.194.2]Figure 12. High Impedance Differential Amplifier Figure 13. Comparator with Hysteresis
[image:41.612.321.546.289.437.2] [image:41.612.68.543.509.698.2]LM358, LM258, LM2904, LM2904A, LM2904V, NCV2904
http://onsemi.com
2 1
[image:42.612.333.553.50.321.2]Vref=12VCC
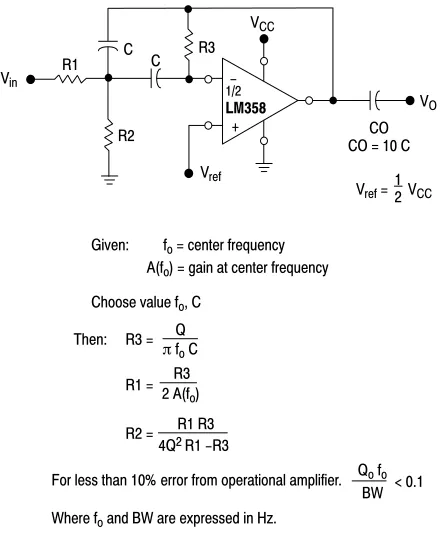
Figure 15. Function Generator Figure 16. Multiple Feedback Bandpass Filter
For less than 10% error from operational amplifier.
If source impedance varies, filter may be preceded with voltage follower buffer to stabilize filter parameters.
Where fo and BW are expressed in Hz.
Qo fo
BW < 0.1 Given: fo = center frequency
A(fo) = gain at center frequency
Choose value fo, C
Then: R3 = Q
fo C
R3 R1 = 2 A(f
o)
R1 R3 4Q2 R1 −R3 R2 =
+ −
+ −
− +
Vref= VCC
Vref
f = R1 + RC 4 CRf R1
R3 = R2 R1 R2 + R1
R2 300 k 75 k
R3 R1 C
Triangle Wave Output
Square Wave Output
VCC
R3 R1
R2
Vref Vin
C C
VO
CO CO = 10 C
Rf
if,
1/2
LM358
Vref
1/2
LM358
1/2
LM358
[image:42.612.63.328.218.345.2]LM358, LM258, LM2904, LM2904A, LM2904V, NCV2904
http://onsemi.com ORDERING INFORMATION
Device Operating Temperature Range Package Shipping†
LM358D SOIC−8 98 Units/Rail
LM358DR2 SOIC−8 2500 Tape & Reel
LM358DR2G SOIC−8
(Pb−Free)
2500 Tape & Reel
LM358DMR2
0°C to +70°C Micro8 4000 Tape & Reel
LM358DMR2G
0°C to +70°C
Micro8 (Pb−Free)
4000 Tape & Reel
LM358N PDIP−8 50 Units/Rail
LM358NG PDIP−8
(Pb−Free)
50 Units/Rail
LM258D SOIC−8 98 Units/Rail
LM258DR2 SOIC−8 2500 Tape & Reel
LM258DR2G
−25°C to +85°C (Pb−Free)SOIC−8 2500 Tape & Reel
LM258DMR2 Micro8 4000 Tape & Reel
LM258N PDIP−8 50 Units/Rail
LM2904D SOIC−8 98 Units/Rail
LM2904DR2 SOIC−8 2500 Tape & Reel
LM2904DR2G SOIC−8
(Pb−Free)
2500 Tape & Reel
LM2904DMR2
40°C to +105°C
Micro8 2500 Tape & Reel
LM2904DMR2G −40°C to +105°C Micro8
(Pb−Free)
2500 Tape & Reel
LM2904N PDIP−8 50 Units/Rail
LM2904ADMR2 Micro8 4000 Tape & Reel
LM2904AN PDIP−8 50 Units/Rail
LM2904VD SOIC−8 98 Units/Rail
LM2904VDG SOIC−8
(Pb−Free)
98 Units/Rail
LM2904VDR2 SOIC−8 2500 Tape & Reel
LM2904VDMR2 −40°C to +125°C Micro8 4000 Tape & Reel
LM2904VN PDIP−8 50 Units/Rail
NCV2904DR2* SOIC−8 2500 Tape & Reel
NCV2904DMR2* Micro8 4000 Tape & Reel
*NCV2904 is qualified for automotive use.
LM358, LM258, LM2904, LM2904A, LM2904V, NCV2904
http://onsemi.com PDIP−8 N SUFFIX CASE 626 SOIC−8 D SUFFIX CASE 751 MARKING DIAGRAMSx = 2 or 3
A = Assembly Location WL, L = Wafer Lot YY, Y = Year WW, W = Work Week
PDIP−8 AN SUFFIX CASE 626 SOIC−8 VD SUFFIX CASE 751 PDIP−8 VN SUFFIX CASE 626 1 8 LMx58N AWL YYWW 1 8 LM2904AN AWL YYWW 1 8 LM2904N AWL YYWW 1 8 LM2904VN AWL YYWW ALYW LMx58 1 8 ALYW 2904 1 8 ALYW 2904V 1 8 Micro8 DMR2 SUFFIX CASE 846A x58 AYW 1 8 2904 AYW 1 8 904A AYW 1 8 904V AYW 1 8
*This diagram also applies to NCV2904
*
LM358, LM258, LM2904, LM2904A, LM2904V, NCV2904
http://onsemi.com
PACKAGE DIMENSIONS
PDIP−8 N, AN, VN SUFFIX
CASE 626−05 ISSUE L
NOTES:
1. DIMENSION L TO CENTER OF LEAD WHEN FORMED PARALLEL.
2. PACKAGE CONTOUR OPTIONAL (ROUND OR SQUARE CORNERS).
3. DIMENSIONING AND TOLERANCING PER ANSI Y14.5M, 1982.
1 4
5 8
F
NOTE 2 −A−
−B−
−T−
SEATING PLANE
H
J
G
D K
N C
L
M
M
A
M
0.13 (0.005) T B M
DIM MIN MAX MIN MAX INCHES MILLIMETERS
A 9.40 10.16 0.370 0.400
B 6.10 6.60 0.240 0.260
C 3.94 4.45 0.155 0.175
D 0.38 0.51 0.015 0.020
F 1.02 1.78 0.040 0.070
G 2.54 BSC 0.100 BSC
H 0.76 1.27 0.030 0.050
J 0.20 0.30 0.008 0.012
K 2.92 3.43 0.115 0.135
L 7.62 BSC 0.300 BSC
M −−− 10 −−− 10
LM358, LM258, LM2904, LM2904A, LM2904V, NCV2904
http://onsemi.com
PACKAGE DIMENSIONS
SOIC−8 D, VD SUFFIX CASE 751−07 ISSUE AB 1.52 0.060 7.0 0.275 0.6 0.024 1.270 0.050 4.0 0.155
ǒ
mm inchesǓ
SCALE 6:1*For additional information on our Pb−Free strategy and soldering details, please download the ON Semiconductor Soldering and Mounting Techniques Reference Manual, SOLDERRM/D.
SOLDERING FOOTPRINT* SEATING PLANE 1 4 5 8 N J
X 45_
K
NOTES:
1. DIMENSIONING AND TOLERANCING PER ANSI Y14.5M, 1982.
2. CONTROLLING DIMENSION: MILLIMETER. 3. DIMENSION A AND B DO NOT INCLUDE
MOLD PROTRUSION.
4. MAXIMUM MOLD PROTRUSION 0.15 (0.006) PER SIDE.
5. DIMENSION D DOES NOT INCLUDE DAMBAR PROTRUSION. ALLOWABLE DAMBAR PROTRUSION SHALL BE 0.127 (0.005) TOTAL IN EXCESS OF THE D DIMENSION AT MAXIMUM MATERIAL CONDITION. 6. 751−01 THRU 751−06 ARE OBSOLETE. NEW
STANDARD IS 751−07.
A B S D H C 0.10 (0.004) DIM A
MIN MAX MIN MAX INCHES 4.80 5.00 0.189 0.197 MILLIMETERS
B 3.80 4.00 0.150 0.157 C 1.35 1.75 0.053 0.069 D 0.33 0.51 0.013 0.020 G 1.27 BSC 0.050 BSC H 0.10 0.25 0.004 0.010 J 0.19 0.25 0.007 0.010 K 0.40 1.27 0.016 0.050 M 0 8 0 8 N 0.25 0.50 0.010 0.020 S 5.80 6.20 0.228 0.244
−X− −Y− G M Y M 0.25 (0.010) −Z− Y M
0.25 (0.010) Z S X S
M
LM358, LM258, LM2904, LM2904A, LM2904V, NCV2904
http://onsemi.com PACKAGE DIMENSIONS Micro8 DMR2 SUFFIX CASE 846A−02 ISSUE F S B M0.08 (0.003) T A S DIM MIN MAX MIN MAX
INCHES MILLIMETERS
A 2.90 3.10 0.114 0.122
B 2.90 3.10 0.114 0.122
C −−− 1.10 −−− 0.043
D 0.25 0.40 0.010 0.016
G 0.65 BSC 0.026 BSC
H 0.05 0.15 0.002 0.006
J 0.13 0.23 0.005 0.009
K 4.75 5.05 0.187 0.199
L 0.40 0.70 0.016 0.028
NOTES:
1. DIMENSIONING AND TOLERANCING PER ANSI Y14.5M, 1982.
2. CONTROLLING DIMENSION: MILLIMETER. 3. DIMENSION A DOES NOT INCLUDE MOLD FLASH,
PROTRUSIONS OR GATE BURRS. MOLD FLASH, PROTRUSIONS OR GATE BURRS SHALL NOT EXCEED 0.15 (0.006) PER SIDE.
4. DIMENSION B DOES NOT INCLUDE INTERLEAD FLASH OR PROTRUSION. INTERLEAD FLASH OR PROTRUSION SHALL NOT EXCEED 0.25 (0.010) PER SIDE.
5. 846A−01 OBSOLETE, NEW STANDARD 846A−02.
−B− −A−
D K
G
PIN 1 ID
8 PL 0.038 (0.0015) −T− SEATING PLANE C
H J L
8X 8X
6X SCALE 8:1
ǒ
inchesmmǓ
1.04 0.041 0.38 0.015 5.28 0.208 4.24 0.167 3.20 0.126 0.65 0.0256
*For additional information on our Pb−Free strategy and soldering details, please download the ON Semiconductor Soldering and Mounting Techniques Reference Manual, SOLDERRM/D.
SOLDERING FOOTPRINT*
ON Semiconductor and are registered trademarks of Semiconductor Components Industries, LLC (SCILLC). SCILLC reserves the right to make changes without further notice to any products herein. SCILLC makes no warranty, representation or guarantee regarding the suitability of its products for any particular purpose, nor does SCILLC assume any liability arising out of the application or use of any product or circuit, and specifically disclaims any and all liability, including without limitation special, consequential or incidental damages. “Typical” parameters which may be provided in SCILLC data sheets and/or specifications can and do vary in different applications and actual performance may vary over time. All operating parameters, including “Typicals” must be validated for each customer application by customer’s technical experts. SCILLC does not convey any license under its patent rights nor the rights of others. SCILLC products are not designed, intended, or authorized for use as components in systems intended for surgical implant into the body, or other applications intended to support or sustain life, or for any other application in which the failure of the SCILLC product could create a situation where personal injury or death may occur. Should Buyer purchase or use SCILLC products for any such unintended or unauthorized application, Buyer shall indemnify and hold SCILLC and its officers, employees, subsidiaries, affiliates, and distributors harmless against all claims, costs, damages, and expenses, and reasonable attorney fees arising out of, directly or indirectly, any claim of personal injury or death associated with such unintended or unauthorized use, even if such claim alleges that SCILLC was negligent regarding the design or manufacture of the part. SCILLC is an Equal Opportunity/Affirmative Action Employer. This literature is subject to all applicable copyright laws and is not for resale in any manner.
PUBLICATION ORDERING INFORMATION
N. American Technical Support: 800−282−9855 Toll Free USA/Canada
Japan: ON Semiconductor, Japan Customer Focus Center 2−9−1 Kamimeguro, Meguro−ku, Tokyo, Japan 153−0051 Phone: 81−3−5773−3850
LM358/D
Micro8 is a trademark of International Rectifier.
LITERATURE FULFILLMENT:
Literature Distribution Center for ON Semiconductor P.O. Box 61312, Phoenix, Arizona 85082−1312 USA Phone: 480−829−7710 or 800−344−3860 Toll Free USA/Canada Fax: 480−829−7709 or 800−344−3867 Toll Free USA/Canada Email: [email protected]
1
BAB I
PENDAHULUAN
1.1 Latar Belakang
Perkembangan bidang ilmu fisika sudah sangat maju. Kemajuan-kemajuan
tersebut tidak lepas dari peranan laboratorium sebagai sarana penunjang dalam
pengembangan teori-teori fisika yang telah ada.
Salah satu teori fisika yang sering dipraktekkan adalah teori gerak lurus
beraturan. Uji coba pengukuran yang dilakukan di laboratorium fisika masih
menggunakan cara yang konvensional, yaitu dengan menggunakan stopwatch
sebagai alat untuk mengukur waktu tempuh dari objek ya ng bergerak lurus
beraturan, kemudian waktu tempuh tersebut akan membagi jarak tempuh untuk
mendapatkan kecepatan dari objek yang bergerak lurus beraturan.
Untuk itu diperlukan suatu alat untuk mengukur kecepatan dari benda
yang bergerak lurus beraturan yang bersifat portable, dan memiliki tingkat
keakuratan yang tinggi.
1.2 Identifikasi Masalah
Bagaimana merancang dan merealisasikan suatu alat pengukur kecepatan
2
1.3 Tujuan
Tugas akhir ini bertujuan untuk merancang dan merealisasikan suatu alat
yang dapat mengukur kecepatan suatu benda. Alat ini dapat mengukur kecepatan
dari sasaran/benda yang bergerak lurus beraturan.
1.4 Pembatasan Masalah
Perancangan dan perealisasian alat pengukur kecepatan ini dibatasi :
•