⢠Table of Contents
⢠Index
⢠Reviews
⢠Reader Reviews
⢠Errata
Practical mod_perl
By Stas Bekman, Eric Cholet
Publisher: O'Reilly Date
Published: May 2003 ISBN: 0-596-00227-0 Pages: 924
Mod_perl embeds the popular programming language Perl in the Apache web server, giving rise to a fast and powerful web programming environment. Written for Perl web developers and web administrators, Practical mod_perl is an extensive guide to the nuts and bolts of the powerful and popular combination of Apache and mod_perl. From writing and debugging scripts to keeping your server running without failures, the techniques in this book will help you squeeze every ounce of power out of your server. True to its title, this is the practical guide to mod_perl.
[ Team LiB ]
⢠Table of Contents
⢠Index
⢠Reviews
⢠Reader Reviews
⢠Errata
Practical mod_perl
By Stas Bekman, Eric Cholet
Publisher: O'Reilly Date
Published: May 2003 ISBN: 0-596-00227-0 Pages: 924
Copyright
Preface
What You Need to Know
Who This Book Is For
How This Book Is Organized
Reference Sections
Filesystem Conventions
Apache and Perl Versions
Typographic Conventions
Command Interpreter Program (Shell) Conventions
Installing Perl Modules
How to Contact Us
Acknowledgments
Part I: mod_perl Administration
Chapter 1. Introducing CGI and mod_perl
Section 1.1. A Brief History of CGI
Section 1.2. The Apache 1.3 Server Model
Section 1.3. The Development of mod_perl 1.0
Section 1.4. Apache 1.3 Request Processing Phases
Section 1.5. References
Section 2.5. Preparing the Scripts Directory
Section 2.6. A Sample Apache::Registry Script
Section 2.7. A Simple mod_perl Content Handler
Section 2.8. Is This All We Need to Know About mod_perl?
Section 2.9. References
Chapter 3. Installing mod_perl
Section 3.1. Configuring the Source
Section 3.2. Building mod_perl (make)
Section 3.3. Testing the Server (make test)
Section 3.4. Installation (make install)
Section 3.5. Installation Scenarios for Standalone mod_perl
Section 3.6. Building mod_perl with Other Components
Section 3.7. Installing mod_perl with the CPAN.pm Interactive Shell
Section 3.8. Installing mod_perl on Multiple Machines
Section 3.9. Installation into a Nonstandard Directory
Section 3.10. How Can I Tell if mod_perl Is Running?
Section 3.11. General Notes
Section 3.12. References
Chapter 4. mod_perl Configuration
Section 4.1. Apache Configuration
Section 4.2. mod_perl Configuration
Section 4.3. The Startup File
Section 4.4. Apache Configuration in Perl
Section 4.5. Validating the Configuration Syntax
Section 4.6. The Scope of mod_perl Configuration Directives
Section 4.7. Apache Restarts Twice
Section 4.8. Enabling Remote Server Configuration Reports
Section 4.9. Tips and Tricks
Section 4.10. Configuration Security Concerns
Section 4.11. General Pitfalls
Section 4.12. References
Chapter 5. Web Server Control, Monitoring, Upgrade, and Maintenance
Section 5.1. Starting the Server in Multi-Process Mode
Section 5.2. Starting the Server in Single-Process Mode
Section 5.3. Using kill to Control Processes
Section 5.4. Using apachectl to Control the Server
Section 5.5. Validating Server Configuration
Section 5.6. Setuid root Startup Scripts
Section 5.7. Preparing for Machine Reboot
Section 5.8. Upgrading a Live Server
Section 5.9. Three-Tier Server Scheme: Development, Staging, and Production
Section 5.10. Web Server Monitoring
Section 5.11. Server Maintenance Chores
Section 5.12. References
Chapter 6. Coding with mod_perl in Mind
Section 6.2. Exposing Apache::Registry Secrets
Section 6.3. Namespace Issues
Section 6.4. Perl Specifics in the mod_perl Environment
Section 6.5. CHECK and INIT Blocks
Section 6.6. Apache::Registry Specifics
Section 6.7. Transition from mod_cgi Scripts to Apache Handlers
Section 6.8. Loading and Reloading Modules
Section 6.9. Handling the "User Pressed Stop Button" Case
Section 6.10. Handling Server Timeout Cases and Working with $SIG{ALRM}
Section 6.11. Generating Correct HTTP Headers
Section 6.12. Method Handlers: The Browse and See, Browse and View Example
Section 6.13. References
Part II: mod_perl Performance
Chapter 7. Identifying Your Performance Problems
Section 7.1. Looking at the Big Picture
Section 7.2. Asking the Right Questions
Section 7.3. References
Chapter 8. Choosing a Platform for the Best Performance
Section 8.1. Choosing the Right Operating System
Section 8.2. Choosing the Right Hardware
Section 8.3. References
Chapter 9. Essential Tools for Performance Tuning
Section 9.1. Server Benchmarking
Section 9.2. Perl Code Benchmarking
Section 9.3. Process Memory Measurements
Section 9.4. Apache::Status and Measuring Code Memory Usage
Section 9.5. Code Profiling Techniques
Section 9.6. References
Chapter 10. Improving Performance with Shared Memory and Proper Forking
Section 10.1. Sharing Memory
Section 10.2. Forking and Executing Subprocessesfrom mod_perl
Section 10.3. References
Chapter 11. Tuning Performance by Tweaking Apache's Configuration
Section 11.1. Setting the MaxClients Directive
Section 11.2. Setting the MaxRequestsPerChild Directive
Section 11.3. Setting MinSpareServers, MaxSpareServers, and StartServers
Section 11.4. KeepAlive
Section 11.5. PerlSetupEnv
Section 11.6. Reducing the Number of stat( ) Calls Made by Apache
Section 11.7. Symbolic Links Lookup
Section 11.8. Disabling DNS Resolution
Section 11.9. Response Compressing
Section 11.10. References
Chapter 12. Server Setup Strategies
Section 12.6. The Squid Server and mod_perl
Section 12.7. Apache's mod_proxy Module
Section 12.8. mod_rewrite Examples
Section 12.9. Getting the Remote Server IP in the Backend Server in the Proxy Setup
Section 12.10. Frontend/Backend Proxying with Virtual Hosts
Section 12.11. HTTP Authentication with Two Servers and a Proxy
Section 12.12. When One Machine Is Not Enough for Your RDBMS DataBase and mod_perl
Section 12.13. Running More than One mod_perl Server on the Same Machine
Section 12.14. SSL Functionality and a mod_perl Server
Section 12.15. Uploading and Downloading Big Files
Section 12.16. References
Chapter 13. TMTOWTDI: Convenience and Habit Versus Performance
Section 13.1. Apache::Registry PerlHandler Versus Custom PerlHandler
Section 13.2. Apache::args Versus Apache::Request::param Versus CGI::param
Section 13.3. Buffered Printing and Better print( ) Techniques
Section 13.4. Interpolation, Concatenation, or List
Section 13.5. Keeping a Small Memory Footprint
Section 13.6. Object Methods Calls Versus Function Calls
Section 13.7. Using the Perl stat( ) Call's Cached Results
Section 13.8. time( ) System Call Versus $r->request_time
Section 13.9. Printing Unmodified Files
Section 13.10. Caching and Pre-Caching
Section 13.11. Caching with Memoize
Section 13.12. Comparing Runtime Performance of Perl and C
Section 13.13. References
Chapter 14. Defensive Measures for Performance Enhancement
Section 14.1. Controlling Your Memory Usage
Section 14.2. Coding for a Smaller Memory Footprint
Section 14.3. Conclusion
Section 14.4. References
Chapter 15. Improving Performance Through Build Options
Section 15.1. Server Size as a Function of Compiled-in Features
Section 15.2. mod_status and ExtendedStatus On
Section 15.3. DYNAMIC_MODULE_LIMIT Apache Build Option
Section 15.4. Perl Build Options
Section 15.5. Architecture-Specific Compile Options
Section 15.6. References
Chapter 16. HTTP Headers for Optimal Performance
Section 16.1. Date-Related Headers
Section 16.2. Content Headers
Section 16.3. Content Negotiation
Section 16.4. HTTP Requests
Section 16.5. Avoiding Dealing with Headers
Section 16.6. References
Part III: Databases and mod_perl
Chapter 17. Databases Overview
Section 17.1. Volatile Databases
Section 17.2. Non-Volatile Databases
Section 17.3. References
Chapter 18. mod_perl Data-Sharing Techniques
Section 18.1. Sharing the Read-Only Data in and Between Processes
Section 18.2. Sharing Data Between Various Handlers
Section 18.3. References
Chapter 19. DBM and mod_perl
Section 19.1. mod_perl and DBM
Section 19.2. Resource Locking
Section 19.3. Flawed Locking Methods
Section 19.4. Locking Wrappers Overview
Section 19.5. Tie::DB_Lock
Section 19.6. Examples
Section 19.7. References
Chapter 20. Relational Databases and mod_perl
Section 20.1. Persistent Database Connections with Apache::DBI
Section 20.2. Improving Performance
Section 20.3. DBI Debug Techniques
Section 20.4. References
Part IV: Debugging and Troubleshooting
Chapter 21. Error Handling and Debugging
Section 21.1. Warnings and Errors Explained
Section 21.2. Debugging Code in Single-Server Mode
Section 21.3. Tracing System Calls
Section 21.4. Tracing mod_perl-Specific Perl Calls
Section 21.5. Debugging Perl Code
Section 21.6. Analyzing Dumped core Files
Section 21.7. Hanging Processes: Detection and Diagnostics
Section 21.8. Useful Debug Modules
Section 21.9. Looking Inside the Server
Section 21.10. References
Chapter 22. Troubleshooting mod_perl
Section 22.1. Configuration and Startup
Section 22.2. Code Parsing and Compilation
Section 22.3. Runtime
Section 22.4. Shutdown and Restart
Chapter 23. Getting Help and Online Resources
Section 23.1. How to Report Problems
Section 23.2. Mailing List Etiquette
Section 23.3. Resources
Section 24.3. What's New in mod_perl 2.0
Section 24.4. Installing mod_perl 2.0
Section 24.5. Configuring mod_perl 2.0
Section 24.6. Resources
Chapter 25. Programming for mod_perl 2.0
Section 25.1. Migrating to and Programming with mod_perl 2.0
Section 25.2. New Apache Phases and Corresponding Perl*Handlers
Section 25.3. I/O Filtering
Part VI: Appendixes
Appendix A. mod_perl Recipes
Section A.1. Emulating the Authentication Mechanism
Section A.2. Reusing Data from POST Requests
Section A.3. Redirecting POST Requests
Section A.4. Redirecting While Maintaining Environment Variables
Section A.5. Handling Cookies
Section A.6. Sending Multiple Cookies with the mod_perl API
Section A.7. Sending Cookies in REDIRECT Responses
Section A.8. CGI::params in the mod_perlish Way
Section A.9. Sending Email from mod_perl
Section A.10. mod_rewrite in Perl
Section A.11. Setting PerlHandler Based on MIME Type
Section A.12. Singleton Database Handles
Section A.13. Terminating a Child Process on Request Completion
Section A.14. References
Appendix B. Apache Perl Modules
Section B.1. Development-Stage Modules
Section B.2. Modules to Aid Debugging
Section B.3. Control and Monitoring Modules
Section B.4. Server Configuration Modules
Section B.5. Authentication-Phase Modules
Section B.6. Authorization-Phase Modules
Section B.7. Access-Phase Modules
Section B.8. Type Handlers
Section B.9. Trans Handlers
Section B.10. Fixup Handlers
Section B.11. Generic Content-Generation Modules
Section B.12. Application-Specific Content-Generation Modules
Section B.13. Database Modules
Section B.14. Toolkits and Frameworks for Content-Generation and Other Phases
Section B.15. Output Filters and Layering Modules
Section B.16. Logging-Phase Handlers
Section B.17. Core Apache Modules
Section B.18. Other Miscellaneous Modules
Appendix C. ISPs Providing mod_perl Services
Section C.1. Users Sharing a Single Web Server
Section C.2. Users Sharing a Single Machine
Section C.3. Giving Each User a Separate Machine (Colocation)
Section C.4. Giving Each User a Virtual Machine
Appendix D. The Template Toolkit
Section D.1. Fetching and Installing the Template Toolkit
Section D.2. Overview
Section D.3. Typical Uses
Section D.4. Template Toolkit Language
Section D.5. Processing Templates
Section D.6. Apache/mod_perl Handler
Section D.7. Apache::Template Module
Section D.8. Hangman Application
Section D.9. References
Appendix E. The AxKit XML Application Server
Section E.1. Installing and Configuring AxKit
Section E.2. Your First AxKit Page
Section E.3. Dynamic Content
Section E.4. More XPathScript Details
Section E.5. XSLT
Section E.6. Putting Everything Together
Section E.7. More Reasons to Use AxKit
Appendix F. HTTP Status Codes
Section F.1. HTTP/1.0 Status Codes
Section F.2. HTTP/1.1 Status Codes
Section F.3. References
Colophon
Copyright
Copyright © 2003 O'Reilly & Associates, Inc.
Printed in the United States of America.
Published by O'Reilly & Associates, Inc., 1005 Gravenstein Highway North, Sebastopol, CA 95472.
O'Reilly & Associates books may be purchased for educational, business, or sales promotional use. Online editions are also available for most titles (http://safari.oreilly.com). For more information, contact our corporate/institutional sales department: (800) 998-9938 or [email protected].
Nutshell Handbook, the Nutshell Handbook logo, and the O'Reilly logo are registered trademarks of O'Reilly &
Associates, Inc. Many of the designations used by manufacturers and sellers to distinguish their products are claimed as trademarks. Where those designations appear in this book, and O'Reilly & Associates, Inc. was aware of a trademark claim, the designations have been printed in caps or initial caps. The association between the image of a Thoroughbred horse and the topic of mod_perl is a trademark of O'Reilly & Associates, Inc.
[ Team LiB ]
Preface
mod_perl is an Apache module that builds the power of the Perl programming language directly into the Apache web server. With mod_perl, CGI scripts run as much as 50 times faster, and you can integrate databases with the server, write Apache modules in Perl, embed Perl code directly into Apache configuration files, and even use Perl in server-side includes. With mod_perl, Apache is not only a web server, it is a complete programming platform.
Getting mod_perl running is easy. Tweaking mod_perl and Apache for the best performance and reliability is much more difficult. This book is about building mod_perl, using it, programming with it, and optimizing it.
What You Need to Know
To use this book effectively, you need to be familiar with the day-to-day details of running a web server, and you need to know the Perl programming language. We expect that you have already programmed in the Perl programming language. Having written simple CGI scripts and having experience with setting up the Apache web server are definite pluses. Knowing your way around the operating system is another plus, but not a requirement.
Most examples in the book were done on the Linux operating system, but the examples and discussions should apply equally well to other operating systems, especially other Unix flavors. There is a dedicated section on installing mod_perl on Windows machines in Chapter 2.
[ Team LiB ]
Who This Book Is For
This book is not solely about mod_perl web development. It covers two main topics: server administration and programming under mod_perl.
At first, you might think these two topics are unrelated. But in real life, the programmer often needs to know how to build and maintain the server, and the administrator ends up doing much of the programming and tweaking himself.
In this book, administrators will learn:
How to build and configure the server, with emphasis on improving server performance while keeping memory usage low.
How to make sure the server is operating nonstop and, in case of malfunction, how to get it back online in no time.
How to maximize performance by using multiple servers and additional tools such as proxies.
How to choose the right machine and components. Often the most expensive machine isn't much faster than a cheaper one with more carefully chosen components.
How to allow users to run custom scripts on a mod_perl server.
As for programmers, the good news is that you can be a capable mod_perl programmer while knowing very little about it. But most of us don't want to stop at being simply capable: we want to develop code that's robust, scalable, and blindingly fast. Here's a taste of the sort of things we cover in this book:
In CGI, it's often hard to find what's wrong with a CGI script that returns a nondescriptive error message to your browser. You can try the error_log file, but with a complex script you have to use the -d switch and call the Perl debugger, which can be difficult for CGI scripts that can't be run from the shell. In Chapter 22, we'll show you how you can run the script in debug mode and control it.
Alas, mod_perl is picky about coding styleâfor example, it doesn't like it when you forget to close a file after opening it. But if you ask nicely, it might enter a special mode where it will clean up for you. In Chapter 6, we'll show you how to keep mod_perl happy and keep the error_log file small.
As you may already know, mod_perl is very fast. But with a little effort you can make it even faster. The idea is simple: the more memory (RAM) you have, the more requests you will be able to serve. However, you may be able to serve more requests using the same amount of RAM, thanks to memory sharing. For more information, see Chapter 10.
With mod_perl, you never need to reinvent the wheel. If you need a so-called "shelf solution," this book includes quite a few copy-and-paste scenarios to inspire you.
Many programmers use mod_perl in conjunction with databases. We start with the simplest and most basic databases (flat files), continue to Database Management (DBM) implementations, and finally do an in-depth study of relational databases with SQL.
How This Book Is Organized
This book has four parts:
Part I: mod_perl Administration
Part I of this book focuses on the administration of mod_perl: getting it installed, configuring mod_perl and your web site as a whole, performing upgrades, and doing maintenance.
Chapter 1 Chapter 2 Chapter 3 Chapter 4 Chapter 5 Chapter 6
Part II: mod_perl Performance
Part II of the book is about how to use mod_perl to its fullest: it covers choosing a hardware platform, writing code, configuring the operating system, and configuring the Apache/mod_perl server itself.
Chapter 7 Chapter 8 Chapter 9 Chapter 10 Chapter 11 Chapter 12 Chapter 13 Chapter 14 Chapter 15 Chapter 16
Part III: Databases and mod_perl
Part III tackles how to integrate databases with mod_perl in the most effective and efficient manner.
Chapter 17 Chapter 18 Chapter 19 Chapter 20
Part IV: Debugging and Troubleshooting
Part IV of the book discusses how to uncover errors in mod_perl code and how to correct them.
Chapter 21 Chapter 22 Chapter 23 Part V
Part V covers the aspects of the new mod_perl 2.0.
Chapter 24 Chapter 25 Part VI
Part VI contains the following useful appendixes:
Appendix A Appendix B Appendix C Appendix D Appendix E Appendix F
Reference Sections
At the end of almost every chapter in this book, we include lists of resources that give further detail on relevant topics. The references are usually either URLs or book references. Unfortunately, URLs tend to change or disappear over time, so if you read this book some time after it has been published and some of the URLs aren't valid anymore, try to use a search engine such as Google to find the updated link. If you still can't find the listed resource, try to look it up in the Internet archive: http://www.archive.org/.
Many chapters refer to the Request For Comments documents (RFCs), which are mirrored by hundreds of Internet sites all around the world and are easy to find. A good starting point is http://www.rfc-editor.org/.
[ Team LiB ]
Filesystem Conventions
Throughout the book, unless mentioned otherwise, we assume that all the sources are downloaded and built in the directory /home/stas/src/. If you follow the same convention, you need only to replace stas with your username.
As you will learn in Chapter 12, most mod_perl users run one plain Apache server and one mod_perl-enabled Apache server on the same machine. We usually install these into the directories /home/httpd/httpd_docs and
Apache and Perl Versions
We have used mod_perl 1.26 and Apache 1.3.24 in most of the examples in this book. You should be able to reproduce all the presented examples with these or later versions of mod_perl and Apache.
We have tested all the examples with Perl 5.6.1. However, most of the examples should work the same under all Perl versions between 5.005_03 and 5.8.0.
At the time of this writing, Apache 2.0 is very young and mod_perl 2.0 is still in development. See Part V for
information on mod_perl 2.0. While much of this book should apply to both mod_perl 1.x and mod_perl 2.0, the code has been tested only on mod_perl 1.26.
[ Team LiB ]
Typographic Conventions
The following typographic conventions are used in this book:
Italic
Used for filenames, command names, directory names, and Unix utilities. It is also used for email addresses, URLs, and new terms where they are defined.
Constant Width
Used for code examples and for function, method, variable, and module names.
Command Interpreter Program (Shell) Conventions
When you type a command and press the Enter key to execute this command, it's usually interpreted by some kind of command interpreter program, known as a shell. In this book we will use this term when we refer to a command interpreter program.
If you are running your web server on some Unix flavor, it is likely that you are using the C-style shell (e.g., csh or
tcsh) or the Bourne-style shell (e.g., sh, ksh, or bash) for starting programs from the command line. In most examples in this book, it doesn't matter which shell program is used. In places where a different syntax should be used for different shell programs, we will say so.
The following command-line conventions are used in this book:
panic% command
panic% is a shell prompt when you are logged on as a non-root user, usually yourself.
panic# command
panic# is a shell prompt when you are logged on as root. It implies that you have to become a root user to run the command. One of the ways to switch to root mode is to execute the su utility and supply the root user password.
[ Team LiB ]
Installing Perl Modules
mod_perl and all the various Perl modules and helper utilities mentioned in this book are available via FTP and HTTP from any of the sites on the Comprehensive Perl Archive Network (CPAN) at http://cpan.org/. This is a list of several hundred public FTP and HTTP sites that mirror each others' contents on a regular basis.
You can search for and install Perl modules in two ways:
Manually, by going to http://search.cpan.org/, finding the module, then downloading, building, and installing it. You can also browse the modules by categories or authors at http://cpan.org/.
Automatically, by using Andreas Koenig's CPAN shell or (on MS Windows systems) the Perl Package Manager (PPM). These tools allow you to search for available modules and install them with a single command.
Manual Installation
When you download a module manually, it's best to find the one closest to you. You can find a list of CPAN mirrors at
http://mirror.cpan.org/.
You can download the source packages with your browser, or, if you know the URL of the package, you can use any command tool to do that for you. In this book, we usually use the lwp-download perl script (which is bundled with the
libwww-perl package, by Gisle Aas) as a client. You can use any other utility to download the files from the Internet. Once you've downloaded the Perl module you want, you'll need to build and install it. Some modules are 100% Perl and can just be copied to the Perl library directory. Others contain some components written in C and need to be compiled.
Let's download the CPAN shell package, which we will use shortly:
panic% lwp-download http://www.cpan.org/authors/id/ANDK/CPAN-1.60.tar.gz Saving to 'CPAN-1.60.tar.gz'...
115 KB received in 2 seconds (56.3 KB/sec)
Prerequisites Needed to Install Perl Modules on Windows
While Unix operating systems include standard utilities such as tar, gzip, and make, Windows systems don't. For this reason, you will have to go through some extra steps to ensure that you can install modules from the CPAN under Windows.
We assume here that you are using the ActivePerl distribution from ActiveState.
The first utility needed is make. On Windows, such a utility (called nmake) is distributed by Microsoft for free. You can download a self-extracting archive from ftp://ftp.microsoft.com/Softlib/MSLFILES/nmake15.exe. When you run this executable, you will have three files: readme.txt, nmake.err, and nmake.exe. Copy these files into a directory in your
PATH,[1] such as C:\Windows\System, C:\Windows, or even C:\Perl\bin. You will now be able to replace any use of
make in the examples in this book with nmake.
[1] To see your PATH, run echo %PATH% from the command line.
Some examples, and the use of CPAN.pm, also require command-line utilities such as tar or gzip. There are a number of projects that have ported such tools to Windowsâfor example, GnuWin32 (http://gnuwin32.sourceforge.net/) and UnixUtils (http://unxutils.sourceforge.net/). These toolkits allow you to use standard Unix utilities from your Windows command line.
Another option is Cygwin (http://www.cygwin.com/), which puts a Unix layer on top of Windows. This allows you to use many Unix-specific applications, but these must run from the Cygwin shell. If you use Cygwin, you should use the normal Unix steps discussed in this book, not any Windows-specific ones.
There is another downside of Windows: compilation tools aren't included. This means that some modules that use C extensions (e.g., mod_perl) can't be installed in the normal way, and you have to get precompiled distributions of them. In such cases, it is a good idea to follow the PPM instructions given later in this Preface, which should allow you to install binary versions of some of the modules discussed here.
Building a Perl Module
CPAN-1.60/lib/CPAN/ CPAN-1.60/lib/CPAN/Nox.pm CPAN-1.60/lib/CPAN/Admin.pm CPAN-1.60/lib/CPAN/FirstTime.pm CPAN-1.60/lib/Bundle/ CPAN-1.60/lib/Bundle/CPAN.pm CPAN-1.60/lib/CPAN.pm CPAN-1.60/Todo CPAN-1.60/ChangeLog CPAN-1.60/t/ CPAN-1.60/t/loadme.t CPAN-1.60/t/vcmp.t CPAN-1.60/MANIFEST CPAN-1.60/Makefile.PL CPAN-1.60/cpan CPAN-1.60/README
Or, if you are using a GNU tar utility, you can unpack the package in one command:
panic% tar zxvf CPAN-1.59.tzr.gz
Once the archive has been unpacked, you'll have to enter the newly created directory and issue the perl Makefile.PL,
make, make test, and make install commands. Together, these will build, test, and install the module:
panic% cd CPAN-1.60 panic% perl Makefile.PL Checking if your kit is complete... Looks good
Writing Makefile for CPAN panic% make
cp lib/CPAN/Nox.pm blib/lib/CPAN/Nox.pm cp lib/Bundle/CPAN.pm blib/lib/Bundle/CPAN.pm cp lib/CPAN/Admin.pm blib/lib/CPAN/Admin.pm cp lib/CPAN.pm blib/lib/CPAN.pm
cp lib/CPAN/FirstTime.pm blib/lib/CPAN/FirstTime.pm cp cpan blib/script/cpan
/usr/bin/perl -I/usr/lib/perl5/5.6.1/i386-linux -I/usr/lib/perl5/5.6.1 -MExtUtils::MakeMaker -e "MY->fixin(shift)" blib/script/cpan Manifying blib/man3/CPAN::Nox.3
Manifying blib/man3/Bundle::CPAN.3 Manifying blib/man3/CPAN::Admin.3 Manifying blib/man3/CPAN.3
Manifying blib/man3/CPAN::FirstTime.3 panic% make test
PERL_DL_NONLAZY=1 /usr/bin/perl -Iblib/arch -Iblib/lib -I/usr/lib/perl5/5.6.1/i386-linux -I/usr/lib/perl5/5.6.1 -e 'use Test::Harness qw(&runtests $verbose); $verbose=0; runtests @ARGV;'
t/*.t
t/loadme...ok t/vcmp...ok All tests successful.
Files=2, Tests=31, 3 wallclock secs ( 1.22 cusr + 0.91 csys = 2.13 CPU)
Become root if you need to install the module on the whole system:
panic% su <root password> panic# make install
Installing /usr/lib/perl5/man/man3/CPAN::Nox.3 Installing /usr/lib/perl5/man/man3/Bundle::CPAN.3 Installing /usr/lib/perl5/man/man3/CPAN::Admin.3 Installing /usr/lib/perl5/man/man3/CPAN.3 Installing /usr/lib/perl5/man/man3/CPAN::FirstTime.3 Writing /usr/lib/perl5/5.6.1/i386-linux/auto/CPAN/.packlist
Appending installation info to /usr/lib/perl5/5.6.1/i386-linux/perllocal.pod
A simpler way to do the same thing is to use Andreas Koenig's wonderful CPAN shell (recent Perl versions come bundled with this module). With it, you can download, build, and install Perl modules from a simple command-line shell. The following illustrates a typical session in which we install the Apache::VMonitor module:
panic% perl -MCPAN -e shell
cpan shell -- CPAN exploration and modules installation (v1.60) ReadLine support enabled
cpan> install Apache::VMonitor
Running install for module Apache::VMonitor
Running make for S/ST/STAS/Apache-VMonitor-0.6.tar.gz Fetching with LWP:
http://cpan.org/authors/id/S/ST/STAS/Apache-VMonitor-0.6.tar.gz Fetching with LWP:
http://cpan.org/authors/id/S/ST/STAS/CHECKSUMS
Checksum for /root/.cpan/sources/authors/id/S/ST/STAS/Apache-VMonitor-0.6.tar.gz ok Apache-VMonitor-0.6/
Apache-VMonitor-0.6/README Apache-VMonitor-0.6/Makefile.PL Apache-VMonitor-0.6/MANIFEST Apache-VMonitor-0.6/CHANGES Apache-VMonitor-0.6/VMonitor.pm
CPAN.pm: Going to build S/ST/STAS/Apache-VMonitor-0.6.tar.gz Checking for Apache::Scoreboard...ok
Checking for GTop...ok Checking for Time::HiRes...ok Checking for mod_perl...ok Checking if your kit is complete... Looks good
Writing Makefile for Apache::VMonitor cp VMonitor.pm blib/lib/Apache/VMonitor.pm Manifying blib/man3/Apache::VMonitor.3 /usr/bin/make -- OK
Running make test
No tests defined for Apache::VMonitor extension. /usr/bin/make test -- OK
Running make install
Installing /usr/lib/perl5/site_perl/5.6.1/Apache/VMonitor.pm Installing /usr/lib/perl5/man/man3/Apache::VMonitor.3
Writing /usr/lib/perl5/site_perl/5.6.1/i386-linux/auto/Apache/VMonitor/.packlist Appending installation info to /usr/lib/perl5/5.6.1/i386-linux/perllocal.pod /usr/bin/make install UNINST=1 -- OK
cpan> exit
Notice that the CPAN shell fetches the CHECKSUMS file and verifies that the package hasn't been tampered with.
The latest CPAN module comes with a small utility called cpan, which you can use to start the CPAN shell:
panic% cpan
cpan shell -- CPAN exploration and modules installation (v1.60) ReadLine support enabled
Using the Perl Package Manager
If you are using ActivePerl on Windows, or the Perl/Apache/mod_perl binary distribution discussed in Chapter 2, you will have access to a handy utility called ppm. This program installs Perl modules from archives separate from the CPAN that contain precompiled versions of certain modules.
For first-time configuration, do the following:
C:\> ppm
PPM interactive shell (2.1.5) - type 'help' for available commands.
PPM> set repository theoryx5 http://theoryx5.uwinnipeg.ca/cgi-bin/ppmserver?urn:/PPMServer PPM> set repository oi http://openinteract.sourceforge.net/ppmpackages/
PPM> set save PPM> quit C:\>
C:\> ppm
PPM> install Some::Module PPM> quit
C:\>
It's as easy as that! Alternatively, you might want to do it directly:
C:\> ppm install Some::Module
[ Team LiB ]
How to Contact Us
Please address comments and questions concerning this book to the publisher:
O'Reilly & Associates, Inc. 1005 Gravenstein Highway North Sebastopol, CA 95472
(800) 998-9938 (in the United States or Canada) (707) 829-0515 (international/local)
(707) 829-0104 (fax)
To comment or ask technical questions about this book, send email to:
For more information about books, conferences, Resource Centers, and the O'Reilly Network, see the O'Reilly web site at:
http://www.oreilly.com
The web page for this book lists errata, examples, or any additional information. You can access this page at:
http://www.oreilly.com/catalog/pmodperl/
This book also has a companion web site at http://www.modperlbook.org/. Here you will find all the source code for the code examples in this book. You will also find announcements, errata, supplementary examples, downloads, and links to other sources of information about Apache, Perl, and Apache module development.
Acknowledgments
Many people have contributed to this book over the long period while it was in the works.
First things first. This book wouldn't exist without Doug MacEachern, creator of mod_perl. Doug's preliminary overview of mod_perl 2.0 was used as the basis of Chapter 24 and Chapter 25.
We're also greatly indebted to many people who contributed chapters or appendixes to this book. Andreas Koenig contributed Chapter 16, with helpful corrections, additions, and comments from Ask Björn Hansen, Frank D. Cringle, Mark Kennedy, Doug MacEachern, Tom Hukins, and Wham Bang. Matt Sergeant contributed Appendix E, with helpful comments from Robin Berjon. Andy Wardley contributed Appendix D.
We cannot thank enough the following reviewers, who have reviewed huge portions of the book (or the whole book) and provided good advice: Andreas Koenig, Ged Haywood, Gunther Birznieks, Issac Goldstand, Mark Summerfield, Paul Wilt, Per Einar Ellefsen, Philippe M. Chiasson, and Robin Berjon. Thank you, guys. Without you, this book wouldn't be nearly as useful as it is now.
The following people also contributed much to the book: Aaron Johnson, Ask Björn Hansen, Brian Ingerson, David Landgren, Doug MacEachern, Ed Philips, Geoff Young, Pat Eyler, Perrin Harkins, Philippe Bruhat, Rafael Garcia-Suarez, Stéphane Payrard, Tatsuhiko Miyagawa, and Ken Williams. Thank you all for taking time to improve the book.
Since the book is loosely based on the mod_perl guide, we must acknowledge the following people who have indirectly contributed to the book by helping with the guide (about 200 names!): Aaron Johnson, Ajay Shah, Alexander Farber, Andreas J. Koenig, Andreas Piesk, Andrei A. Voropaev, Andrew Ford, Andrew McNaughton, Anthony D. Ettinger, Artur Zambrzycki, Ask Björn Hansen, Barrie Slaymaker, Bill Moseley, Boris Zentner, Brian Moseley, Carl Hansen, Chad K. Lewis, Chris Nokleberg, Chris Winters, Christof Damian, Christophe Dupre, Cliff Rayman, Craig, Daniel Bohling, Daniel Koch, Daniel W. Burke, Darren Chamberlain, Dave Hodgkinson, Dave Rolsky, David Harris, David Huggins-Daines, David Landgren, David Mitchell, DeWitt Clinton, Dean Fitz, Doug Bagley, Doug Kyle, Doug MacEachern, Drew Taylor, Ed Park, Ed Phillips, Edmund Mergl, Edwin Pratomo, Eric Cholet, Eric Strovink, Evan A. Zacks, Ewan Edwards, Frank Cringle, Frank Schoeters, Garr Updegraff, Ged Haywood, Geoff Crawshaw, Geoffrey S. Young, Gerald Richter, Gerd Knops, Glenn, Greg Cope, Greg Stark, Gunther Birznieks, Hailei Dai, Henrique Pantarotto, Honza Pazdziora, Howard Jones, Hunter Monroe, Ilya Obshadko, Ime Smits, Issac Goldstand, James Furness, James G. Smith, James W. Walden, Jan Peter Hecking, Jason Bodnar, Jason Rhinelander, Jauder Ho, Jay J, Jean-Louis Guenego, Jeff Chan, Jeff Rowe, Jeffrey W. Baker, Jens Heunemann, Jie Gao, Joao Fonseca, Joe Schaefer, Joe Slag, John Armstrong, John Deighan, John Hyland, John Milton, John Walker, Jon Orwant, Jonathan Peterson, Joshua Chamas, Karl Olson, Kavitha, Kees Vonk, Ken Williams, Kenny Gatdula, Kevin Murphy, Kevin Swope, Lance Cleveland, Larry Leszczynski, Leslie Mikesell, Lincoln Stein, Louis Semprini, Lupe Christoph, Mads Toftum, Marc Lehmann, Marcel Grunauer, Mark Mills, Mark Summerfield, Marko van der Puil, Marshall Dudley, Matt Sergeant, Matthew Darwin, Michael Blakeley, Michael Finke, Michael G. Schwern, Michael Hall, Michael Rendell, Michael Schout, Michele Beltrame, Mike Depot, Mike Fletcher, Mike MacKenzie, Mike Miller, Nancy Lin, Nathan Torkington, Nathan Vonnahme, Neil Conway, Nick Tonkin, Oleg Bartunov, Owen Williams, Pascal Eeftinck, Patrick, Paul Buder, Paul Cotter, Pavel Shmidt, Per Einar Ellefsen, Perrin Harkins, Peter Galbavy, Peter Haworth, Peter J. Schoenster, Peter Skov, Philip Jacob, Philip Newton, Radu Greab, Rafael Garcia-Suarez, Ralf Engelschall, Randal L. Schwartz, Randy Harmon, Randy Kobes, Rauznitz Balazs, Rex Staples, Rich Bowen, Richard A. Wells, Richard Chen, Richard Dice, Richard More, Rick Myers, Robert Mathews, Robin Berjon, Rodger Donaldson, Ron Pero, Roy Nasser, Salve J. Nilsen, Scott Fagg, Scott Holdren, Sean Dague, Shane Nay, Stephane Benoit, Stephen Judd, Steve Fink, Steve Reppucci, Steve Willer, Surat Singh Bhati, Terry West, Thomas Klausner, Tim Bunce, Tim Noll, Todd Finney, Tom Brown, Tom Christiansen, Tom Hughes, Tom Mornini, Tuomas Salo, Tzvetan Stoyanov, Ulrich Neumerkel, Ulrich Pfeifer, Vivek Khera, Ward Vandewege, Wesley Darlington, Will Trillich, Yann Kerhervé, and Yann Ramin. Thank you all!
[ Team LiB ]
Part I: mod_perl Administration
The first part of this book is about mod_perl administration. Here you'll find everything you need to do to get mod_perl running, from installation to configuration to the nuances of programming in a mod_perl environment.
Chapter 1 is an introduction to mod_perl and how it works within the Apache framework.
Chapter 2 is a whirlwind description of how to get started with mod_perl quickly. Most programmers aren't satisfied just reading a book; they want to start programming right away. This chapter helps you build a working mod_perl environment with minimal fuss.
Chapter 3 contains everything we left out of Chapter 2.
Chapter 4 is about how to configure mod_perl for your specific needs.
Chapter 5 covers how to run a mod_perl-enabled server and keep it running smoothly.
Chapter 6 contains the essential information for programming under mod_perl.
Chapter 1. Introducing CGI and mod_perl
This chapter provides the foundations on which the rest of the book builds. In this chapter, we give you:
A history of CGI and the HTTP protocol.
An explanation of the Apache 1.3 Unix model, which is crucial to understanding how mod_perl 1.0 works.
An overall picture of mod_perl 1.0 and its development.
An overview of the difference between the Apache C API, the Apache Perl API (i.e., the mod_perl API), and CGI compatibility. We will also introduce the Apache::Registry and Apache::PerlRun modules.
An introduction to the mod_perl API and handlers.
[ Team LiB ]
1.1 A Brief History of CGI
When the World Wide Web was born, there was only one web server and one web client. The httpd web server was developed by the Centre d'Etudes et de Recherche Nucléaires (CERN) in Geneva, Switzerland. httpd has since become the generic name of the binary executable of many web servers. When CERN stopped funding the development of
httpd, it was taken over by the Software Development Group of the National Center for Supercomputing Applications (NCSA). The NCSA also produced Mosaic, the first web browser, whose developers later went on to write the Netscape client.
Mosaic could fetch and view static documents[1] and images served by the httpd server. This provided a far better means of disseminating information to large numbers of people than sending each person an email. However, the glut of online resources soon made search engines necessary, which meant that users needed to be able to submit data (such as a search string) and servers needed to process that data and return appropriate content.
[1] A static document is one that exists in a constant state, such as a text file that doesn't change.
Search engines were first implemented by extending the web server, modifying its source code directly. Rewriting the source was not very practical, however, so the NCSA developed the Common Gateway Interface (CGI) specification. CGI became a standard for interfacing external applications with web servers and other information servers and generating dynamic information.
A CGI program can be written in virtually any language that can read from STDIN and write to STDOUT, regardless of whether it is interpreted (e.g., the Unix shell), compiled (e.g., C or C++), or a combination of both (e.g., Perl). The first CGI programs were written in C and needed to be compiled into binary executables. For this reason, the directory from which the compiled CGI programs were executed was named cgi-bin, and the source files directory was named cgi-src. Nowadays most servers come with a preconfigured directory for CGI programs called, as you have probably guessed,
cgi-bin.
1.1.1 The HTTP Protocol
Interaction between the browser and the server is governed by the HyperText Transfer Protocol (HTTP), now an official Internet standard maintained by the World Wide Web Consortium (W3C). HTTP uses a simple request/response model: the client establishes a TCP[2] connection to the server and sends a request, the server sends a response, and the connection is closed. Requests and responses take the form of messages. A message is a simple sequence of text lines.
[2] TCP/IP is a low-level Internet protocol for transmitting bits of data, regardless of its use.
HTTP messages have two parts. First come the headers, which hold descriptive information about the request or response. The various types of headers and their possible content are fully specified by the HTTP protocol. Headers are followed by a blank line, then by the message body. The body is the actual content of the message, such as an HTML page or a GIF image. The HTTP protocol does not define the content of the body; rather, specific headers are used to describe the content type and its encoding. This enables new content types to be incorporated into the Web without any fanfare.
HTTP is a stateless protocol. This means that requests are not related to each other. This makes life simple for CGI programs: they need worry about only the current request.
1.1.2 The Common Gateway Interface Specification
If you are new to the CGI world, there's no need to worryâbasic CGI programming is very easy. Ninety percent of CGI-specific code is concerned with reading data submitted by a user through an HTML form, processing it, and returning some response, usually as an HTML document.
In this section, we will show you how easy basic CGI programming is, rather than trying to teach you the entire CGI specification. There are many books and online tutorials that cover CGI in great detail (see
http://hoohoo.ncsa.uiuc.edu/). Our aim is to demonstrate that if you know Perl, you can start writing CGI scripts almost immediately. You need to learn only two things: how to accept data and how to generate output.
Sometimes CGI programs can generate a response without needing any input data from the client. For example, a news service may respond with the latest stories without asking for any input from the client. But if you want stories for a specific day, you have to tell the script which day's stories you want. Hence, the script will need to retrieve some input from you.
To get your feet wet with CGI scripts, let's look at the classic "Hello world" script for CGI, shown in Example 1-1.
Example 1-1. "Hello world" script
#!/usr/bin/perl -Tw
print "Content-type: text/plain\n\n"; print "Hello world!\n";
We start by sending a Content-type header, which tells the client that the data that follows is of plain-text type. text/plain
is a Multipurpose Internet Mail Extensions (MIME) type. You can find a list of widely used MIME types in the mime.types
file, which is usually located in the directory where your web server's configuration files are stored.[3] Other examples of MIME types are text/html (text in HTML format) and video/mpeg (an MPEG stream).
[3] For more information about Internet media types, refer to RFCs 2045, 2046, 2047, 2048, and 2077, accessible
from http://www.rfc-editor.org/.
According to the HTTP protocol, an empty line must be sent after all headers have been sent. This empty line indicates that the actual response data will start at the next line.[4]
[4] The protocol specifies the end of a line as the character sequence Ctrl-M and Ctrl-J (carriage return and
newline). On Unix and Windows systems, this sequence is expressed in a Perl string as \015\012, but Apache also honors \n, which we will use throughout this book. On EBCDIC machines, an explicit \r\n should be used instead.
Now save the code in hello.pl, put it into a cgi-bin directory on your server, make the script executable, and test the script by pointing your favorite browser to:
http://localhost/cgi-bin/hello.pl
It should display the same output as Figure 1-2.
Figure 1-2. Hello world
A more complicated script involves parsing input data. There are a few ways to pass data to the scripts, but the most commonly used are the GET and POST methods. Let's write a script that expects as input the user's name and prints this name in its response. We'll use the GET method, which passes data in the request URI (uniform resource indicator):
http://localhost/cgi-bin/hello.pl?username=Doug
include the following HTML code:
<a href="/cgi-bin/display.pl?section=news">News</a><br> <a href="/cgi-bin/display.pl?section=stories">Stories</a><br> <a href="/cgi-bin/display.pl?section=links">Links</a><br>
Another approach is to use an HTML form, where the user fills in some parameters. The HTML form for the "Hello user" script that we will look at in this section can be either:
<form action="/cgi-bin/hello_user.pl" method="POST"> <input type="text" name="username">
<input type="submit"> </form>
or:
<form action="/cgi-bin/hello_user.pl" method="GET"> <input type="text" name="username">
<input type="submit"> </form>
Note that you can use either the GET or POST method in an HTML form. However, POST should be used when the query has side effects, such as changing a record in a database, while GET should be used in simple queries like this one (simple URL links are GET requests).[5]
[5] See Axioms of Web Architecture at http://www.w3.org/DesignIssues/Axioms.html#state.
Formerly, reading input data required different code, depending on the method used to submit the data. We can now use Perl modules that do all the work for us. The most widely used CGI library is the CGI.pm module, written by Lincoln Stein, which is included in the Perl distribution. Along with parsing input data, it provides an easy API to generate the HTML response.
Our sample "Hello user" script is shown in Example 1-2.
Example 1-2. "Hello user" script
#!/usr/bin/perl
use CGI qw(:standard);
my $username = param('username') || "unknown";
print "Content-type: text/plain\n\n"; print "Hello $username!\n";
Notice that this script is only slightly different from the previous one. We've pulled in the CGI.pm module, importing a group of functions called :standard. We then used its param( ) function to retrieve the value of the username key. This call will return the name submitted by any of the three ways described above (a form using either POST, GET, or a
hardcoded name with GET; the last two are essentially the same). If no value was supplied in the request, param( )
returns undef.
my $username = param('username') || "unknown";
$username will contain either the submitted username or the string "unknown" if no value was submitted. The rest of the script is unchangedâwe send the MIME header and print the "Hello $username!" string.[6]
[6] All scripts shown here generate plain text, not HTML. If you generate HTML output, you have to protect the
incoming data from cross-site scripting. For more information, refer to the CERT advisory at
http://www.cert.org/advisories/CA-2000-02.html.
As we've just mentioned, CGI.pm can help us with output generation as well. We can use it to generate MIME headers by rewriting the original script as shown in Example 1-3.
Example 1-3. "Hello user" script using CGI.pm
#!/usr/bin/perl
use CGI qw(:standard);
my $username = param('username') || "unknown";
use CGI qw(:standard); print header("text/plain");
print "The passed parameters were:\n"; for my $key ( param( ) ) {
print "$key => ", param($key), "\n"; }
Now issue the following request:
http://localhost/cgi-bin/hello_user.pl?a=foo&b=bar&c=foobar
Separating key=value Pairs
Note that & or ; usually is used to separate the key=value pairs. The former is less preferable, because if you end up with a QUERY_STRING of this format:
id=foo®=bar
some browsers will interpret ® as an SGML entity and encode it as ®. This will result in a corrupted
QUERY_STRING:
id=foo®=bar
You have to encode & as & if it is included in HTML. You don't have this problem if you use ; as a separator:
id=foo;reg=bar
Both separators are supported by CGI.pm, Apache::Request, and mod_perl's args( ) method, which we will use in the examples to retrieve the request parameters.
Of course, the code that builds QUERY_STRING has to ensure that the values don't include the chosen separator and encode it if it is used. (See RFC2854 for more details.)
The browser will display:
The passed parameters were: a => foo
b => bar c => foobar
Now generate this form:
<form action="/cgi-bin/hello_user.pl" method="GET"> <input type="text" name="firstname">
<input type="text" name="lastname"> <input type="submit">
</form>
If we fill in only the firstname field with the value Doug, the browser will display:
The passed parameters were: firstname => Doug
lastname =>
If in addition the lastname field is MacEachern, you will see:
The passed parameters were: firstname => Doug
lastname => MacEachern
These are just a few of the many functions CGI.pm offers. Read its manpage for detailed information by typing perldoc CGI at your command prompt.
We used this long CGI.pm example to demonstrate how simple basic CGI is. You shouldn't reinvent the wheel; use standard tools when writing your own scripts, and you will save a lot of time. Just as with Perl, you can start creating really cool and powerful code from the very beginning, gaining more advanced knowledge over time. There is much more to know about the CGI specification, and you will learn about some of its advanced features in the course of your web development practice. We will cover the most commonly used features in this book.
on the core functionality of your code.
1.1.3 Apache CGI Handling with mod_cgi
The Apache server processes CGI scripts via an Apache module called mod_cgi. (See later in this chapter for more information on request-processing phases and Apache modules.) mod_cgi is built by default with the Apache core, and the installation procedure also preconfigures a cgi-bin directory and populates it with a few sample CGI scripts. Write your script, move it into the cgi-bin directory, make it readable and executable by the web server, and you can start using it right away.
Should you wish to alter the default configuration, there are only a few configuration directives that you might want to modify. First, the ScriptAlias directive:
ScriptAlias /cgi-bin/ /home/httpd/cgi-bin/
ScriptAlias controls which directories contain server scripts. Scripts are run by the server when requested, rather than sent as documents.
When a request is received with a path that starts with /cgi-bin, the server searches for the file in the /home/httpd/cgi-bin directory. It then runs the file as an executable program, returning to the client the generated output, not the source listing of the file.
The other important part of httpd.conf specifies how the files in cgi-bin should be treated:
<Directory /home/httpd/cgi-bin> Options FollowSymLinks Order allow,deny Allow from all </Directory>
The above setting allows the use of symbolic links in the /home/httpd/cgi-bin directory. It also allows anyone to access the scripts from anywhere.
mod_cgi provides access to various server parameters through environment variables. The script in Example 1-5 will print these environment variables.
Example 1-5. Checking environment variables
#!/usr/bin/perl
print "Content-type: text/plain\n\n"; for (keys %ENV) {
print "$_ => $ENV{$_}\n"; }
Save this script as env.pl in the directory cgi-bin and make it executable and readable by the server (that is, by the username under which the server runs). Point your browser to http://localhost/cgi-bin/env.pl and you will see a list of parameters similar to this one:
SERVER_SOFTWARE => Server: Apache/1.3.24 (Unix) mod_perl/1.26 mod_ssl/2.8.8 OpenSSL/0.9.6
GATEWAY_INTERFACE => CGI/1.1 DOCUMENT_ROOT => /home/httpd/docs REMOTE_ADDR => 127.0.0.1
SERVER_PROTOCOL => HTTP/1.0 REQUEST_METHOD => GET QUERY_STRING =>
HTTP_USER_AGENT => Mozilla/5.0 Galeon/1.2.1 (X11; Linux i686; U;) Gecko/0 SERVER_ADDR => 127.0.0.1
SCRIPT_NAME => /cgi-bin/env.pl
SCRIPT_FILENAME => /home/httpd/cgi-bin/env.pl
Your code can access any of these variables with $ENV{"somekey"}. However, some variables can be spoofed by the client side, so you should be careful if you rely on them for handling sensitive information. Let's look at some of these environment variables.
SERVER_SOFTWARE => Server: Apache/1.3.24 (Unix) mod_perl/1.26 mod_ssl/2.8.8 OpenSSL/0.9.6
The SERVER_SOFTWARE variable tells us what components are compiled into the server, and their version numbers. In this example, we used Apache 1.3.24, mod_perl 1.26, mod_ssl 2.8.8, and OpenSSL 0.9.6.
GATEWAY_INTERFACE => CGI/1.1
SERVER_PROTOCOL => HTTP/1.0
The SERVER_PROTOCOL variable reports the HTTP protocol version upon which the client and the server have agreed. Part of the communication between the client and the server is a negotiation of which version of the HTTP protocol to use. The highest version the two can understand will be chosen as a result of this negotiation.
REQUEST_METHOD => GET
The now-familiar REQUEST_METHOD variable tells us which request method was used (GET, in this case).
QUERY_STRING =>
The QUERY_STRING variable is also very important. It is used to pass the query parameters when using the GET method.
QUERY_STRING is empty in this example, because we didn't pass any parameters.
HTTP_USER_AGENT => Mozilla/5.0 Galeon/1.2.1 (X11; Linux i686; U;) Gecko/0
The HTTP_USER_AGENT variable contains the user agent specifications. In this example, we are using Galeon on Linux. Note that this variable is very easily spoofed.
Spoofing HTTP_USER_AGENT
If the client is a custom program rather than a widely used browser, it can mimic its bigger brother's signature. Here is an example of a very simple client using the LWP library:
#!/usr/bin/perl -w use LWP::UserAgent;
my $ua = new LWP::UserAgent;
$ua->agent("Mozilla/5.0 Galeon/1.2.1 (X11; Linux i686; U;) Gecko/0"); my $req = new HTTP::Request('GET', 'http://localhost/cgi-bin/env.pl'); my $res = $ua->request($req);
print $res->content if $res->is_success;
This script first creates an instance of a user agent, with a signature identical to Galeon's on Linux. It then creates a request object, which is passed to the user agent for processing. The response content is received and printed.
When run from the command line, the output of this script is strikingly similar to what we obtained with the browser. It notably prints:
HTTP_USER_AGENT => Mozilla/5.0 Galeon/1.2.1 (X11; Linux i686; U;) Gecko/0
So you can see how easy it is to fool a naïve CGI programmer into thinking we've used Galeon as our client program.
SERVER_ADDR => 127.0.0.1 SCRIPT_NAME => /cgi-bin/env.pl
SCRIPT_FILENAME => /home/httpd/cgi-bin/env.pl
The SERVER_ADDR, SCRIPT_NAME, and SCRIPT_FILENAME variables tell us (respectively) the server address, the name of the script as provided in the request URI, and the real path to the script on the filesystem.
Now let's get back to the QUERY_STRING parameter. If we submit a new request for http://localhost/cgi-bin/env.pl? foo=ok&bar=not_ok, the new value of the query string is displayed:
QUERY_STRING => foo=ok&bar=not_ok
This is the variable used by CGI.pm and other modules to extract the input data.
Keep in mind that the query string has a limited size. Although the HTTP protocol itself does not place a limit on the length of a URI, most server and client software does. Apache currently accepts a maximum size of 8K (8192)
characters for the entire URI. Some older client or proxy implementations do not properly support URIs larger than 255 characters. This is true for some new clients as wellâfor example, some WAP phones have similar limitations.
Larger chunks of information, such as complex forms, are passed to the script using the POST method. Your CGI script should check the REQUEST_METHOD environment variable, which is set to POST when a request is submitted with the
POST method. The script can retrieve all submitted data from the STDIN stream. But again, let CGI.pm or similar modules handle this process for you; whatever the request method, you won't have to worry about it because the key/value parameter pairs will always be handled in the right way.
[ Team LiB ]
1.2 The Apache 1.3 Server Model
Now that you know how CGI works, let's talk about how Apache implements mod_cgi. This is important because it will help you understand the limitations of mod_cgi and why mod_perl is such a big improvement. This discussion will also build a foundation for the rest of the performance chapters of this book.
1.2.1 Forking
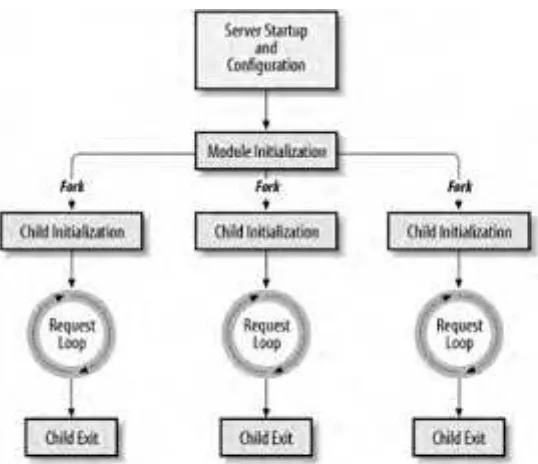
Apache 1.3 on all Unix flavors uses the forking model.[7] When you start the server, a single process, called the parent process, is started. Its main responsibility is starting and killing child processes as needed. Various Apache configuration directives let you control how many child processes are spawned initially, the number of spare idle processes, and the maximum number of processes the parent process is allowed to fork.
[7] In Chapter 24 we talk about Apache 2.0, which introduces a few more server models.
Each child process has its own lifespan, which is controlled by the configuration directive MaxRequestsPerChild. This directive specifies the number of requests that should be served by the child before it is instructed to step down and is replaced by another process. Figure 1-3 illustrates.
Figure 1-3. The Apache 1.3 server lifecycle
When a client initiates a request, the parent process checks whether there is an idle child process and, if so, tells it to handle the request. If there are no idle processes, the parent checks whether it is allowed to fork more processes. If it is, a new process is forked to handle the request. Otherwise, the incoming request is queued until a child process becomes available to handle it.
The maximum number of queued requests is configurable by the ListenBacklog configuration directive. When this number is reached, a client issuing a new request will receive an error response informing it that the server is unreachable.
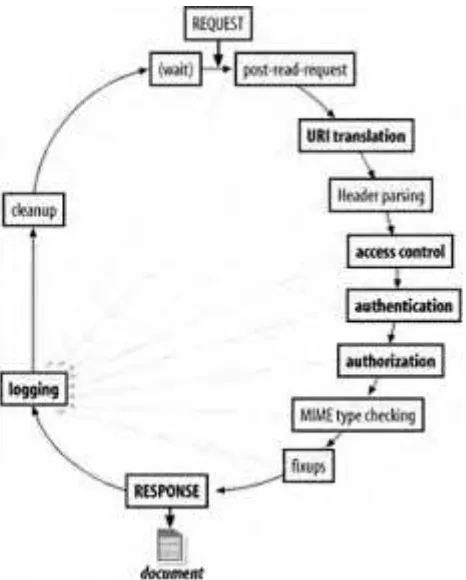
This is how requests for static objects, such as HTML documents and images, are processed. When a CGI request is received, an additional step is performed: mod_cgi in the child Apache process forks a new process to execute the CGI script. When the script has completed processing the request, the forked process exits.
1.2.2 CGI Scripts Under the Forking Model
One of the benefits of this model is that if something causes the child process to die (e.g., a badly written CGI script), it won't cause the whole service to fail. In fact, only the client that initiated the request will notice there was a problem.
time a Perl CGI script is run, a new process is forked, and a new Perl interpreter is loaded. This Perl interpreter lives for the span of the request's life, and when the script exits (no matter how), the process and the interpreter exit as well, cleaning up on the way. When a new interpreter is started, it has no history of previous requests. All the variables are created from scratch, and all the files are reopened if needed. Although this detail may seem obvious, it will be of paramount importance when we discuss mod_perl.
1.2.3 Performance Drawbacks of Forking
There are several drawbacks to mod_cgi that triggered the development of improved web technologies. The first problem lies in the fact that a new process is forked and a new Perl interpreter is loaded for each CGI script invocation. This has several implications:
It adds the overhead of forking, although this is almost insignificant on modern Unix systems.
Loading the Perl interpreter adds significant overhead to server response times.
The script's source code and the modules that it uses need to be loaded into memory and compiled each time from scratch. This adds even more overhead to response times.
Process termination on the script's completion makes it impossible to create persistent variables, which in turn prevents the establishment of persistent database connections and in-memory databases.
Starting a new interpreter removes the benefit of memory sharing that could be obtained by preloading code modules at server startup. Also, database connections can't be pre-opened at server startup.
[ Team LiB ]
1.3 The Development of mod_perl 1.0
Of the various attempts to improve on mod_cgi's shortcomings, mod_perl has proven to be one of the better solutions and has been widely adopted by CGI developers. Doug MacEachern fathered the core code of this Apache module and licensed it under the Apache Software License, which is a certified open source license.
mod_perl does away with mod_cgi's forking by embedding the Perl interpreter into Apache's child processes, thus avoiding the forking mod_cgi needed to run Perl programs. In this new model, the child process doesn't exit when it has processed a request. The Perl interpreter is loaded only once, when the process is started. Since the interpreter is persistent throughout the process's lifetime, all code is loaded and compiled only once, the first time it is needed. All subsequent requests run much faster, because everything is already loaded and compiled. Response processing is reduced to simply running the code, which improves response times by a factor of 10-100, depending on the code being executed.
But Doug's real accomplishment was adding a mod_perl API to the Apache core. This made it possible to write complete Apache modules in Perl, a feat that used to require coding in C. From then on, mod_perl enabled the programmer to handle all phases of request processing in Perl.
The mod_perl API also allows complete server configuration in Perl. This has made the lives of many server administrators much easier, as they now benefit from dynamically generating the configuration and are freed from hunting for bugs in huge configuration files full of similar directives for virtual hosts and the like.[8]
[8] mod_vhost_alias offers similar functionality.
To provide backward compatibility for plain CGI scripts that used to be run under mod_cgi, while still benefiting from a preloaded Perl interpreter and modules, a few special handlers were written, each allowing a different level of proximity to pure mod_perl functionality. Some take full advantage of mod_perl, while others do not.
mod_perl embeds a copy of the Perl interpreter into the Apache httpd executable, providing complete access to Perl functionality within Apache. This enables a set of mod_perl-specific configuration directives, all of which start with the string Perl. Most, but not all, of these directives are used to specify handlers for various phases of the request.
It might occur to you that sticking a large executable (Perl) into another large executable (Apache) creates a very, very large program. mod_perl certainly makes httpd significantly bigger, and you will need more RAM on your production server to be able to run many mod_perl processes. However, in reality, the situation is not as bad as it first appears. mod_perl processes requests much faster, so the number of processes needed to handle the same request rate is much lower relative to the mod_cgi approach. Generally, you need slightly more available memory, but the speed
improvements you will see are well worth every megabyte of memory you can add. Techniques that can reduce memory requirements are covered in Chapter 10.
According to http://netcraft.com/, as of January 2003, mod_perl has been used on more than four million web sites. Some of these sites have been using mod_perl since its early days. You can see an extensive list of sites that use mod_perl at http://perl.apache.org/outstanding/sites.html or http://perl.apache.org/outstanding/success_stories/. The latest usage statistics can be viewed at http://perl.apache.org/outstanding/stats/.
1.3.1 Running CGI Scripts with mod_perl
Since many web application developers are interested in the content delivery phase and come from a CGI background, mod_perl includes packages designed to make the transition from CGI simple and painless. Apache::PerlRun and
Apache::Registry run unmodified CGI scripts, albeit much faster than mod_cgi.[9]
[9]Apache::RegistryNG and Apache::RegistryBB are two new experimental modules that you may want to try as
well.
The difference between Apache::Registry and Apache::PerlRun is that Apache::Registry caches all scripts, and Apache::PerlRun
doesn't. To understand why this matters, remember that if one of mod_perl's benefits is added speed, another is persistence. Just as the Perl interpreter is loaded only once, at child process startup, your scripts are loaded and compiled only once, when they are first used. This can be a double-edged sword: persistence means global variables aren't reset to initial values, and file and database handles aren't closed when the script ends. This can wreak havoc in badly written CGI scripts.
Whether you should use Apache::Registry or Apache::PerlRun for your CGI scripts depends on how well written your existing Perl scripts are. Some scripts initialize all variables, close all file handles, use taint mode, and give only polite error messages. Others don't.
global variables. Consider the following script:
use CGI;
$q = CGI->new( );
$topsecret = 1 if $q->param("secret") eq 'Muahaha'; # ...
if ($topsecret) {
display_topsecret_data( ); }
else {
security_alert( ); }
This script will always do the right thing under mod_cgi: if secret=Muahaha is supplied, the top-secret data will be displayed via display_topsecret_data( ), and if the authentication fails, the security_alert( ) function will be called. This works only because under mod_cgi, all globals are undefined at the beginning of each request.
Under Apache::Registry, however, global variables preserve their values between requests. Now imagine a situation where someone has successfully authenticated, setting the global variable $topsecret to a true value. From now on, anyone can access the top-secret data without knowing the secret phrase, because $topsecret will stay true until the process dies or is modified elsewhere in the code.
This is an example of sloppy code. It will do the right thing under Apache::PerlRun, since all global variables are
undefined before each iteration of the script. However, under Apache::Registry and mod_perl handlers, all global variables must be initialized before they can be used.
The example can be fixed in a few ways. It's a good idea to always use the strict mode, which requires the global variables to be declared before they are used:
use strict; use CGI;
use vars qw($top $q); # init globals $top = 0; $q = undef; # code
$q = CGI->new( );
$topsecret = 1 if $q->param("secret") eq 'Muahaha'; # ...
But of course, the simplest solution is to avoid using globals where possible. Let's look at the example rewritten without globals:
use strict; use CGI;
my $q = CGI->new( );
my $topsecret = $q->param("secret") eq 'Muahaha' ? 1 : 0; # ...
The last two versions of the example will run perfectly under Apache::Registry.
Here is another example that won't work correctly under Apache::Registry. This example presents a simple search engine script:
use CGI;
my $q = CGI->new( ); print $q->header('text/plain'); my @data = read_data( ) my $pat = $q->param("keyword"); foreach (@data) {
print if /$pat/o; }
The example retrieves some data using read_data( ) (e.g., lines in the text file), tries to match the keyword s