ENTERPRISE ANDROID™
INTRODUCTION . . . xix
CHAPTER 1 Developing for Android Tablets and Smartphones . . . 1
CHAPTER 2 The Relational Model and SQLite . . . 39
CHAPTER 3 Android Database Support . . . 59
CHAPTER 4 Content Providers . . . 83
CHAPTER 5 REST, Content Providers, Concurrency, Networking, and Sync Adapters . . . 115
CHAPTER 6 Service Development . . . 167
CHAPTER 7 Mobile and the Cloud . . . 205
CHAPTER 8 Complex Device-Based Data: Android Contacts . . . 245
CHAPTER 9 Generic Data Synchronization: Project Migrate and the WebData API . . . 265
CHAPTER 10 WebData Applications . . . 283
CHAPTER 11 Building Human Interfaces for Data . . . 305
CHAPTER 12 Security . . . 325
Enterprise Android
™
PROGRAMMING ANDROID DATABASE
APPLICATIONS FOR THE ENTERPRISE
Zigurd Mednieks
G. Blake Meike
Indianapolis, IN 46256 www.wiley.com
Copyright © 2014 by John Wiley & Sons, Inc., Indianapolis, Indiana
Published simultaneously in Canada
ISBN: 978-1-118-18349-6 ISBN: 978-1-118-22747-3 (ebk) ISBN: 978-1-118-24046-5 (ebk)
Manufactured in the United States of America
10 9 8 7 6 5 4 3 2 1
No part of this publication may be reproduced, stored in a retrieval system or transmitted in any form or by any means, electronic, mechanical, photocopying, recording, scanning or otherwise, except as permitted under Sections 107 or 108 of the 1976 United States Copyright Act, without either the prior written permission of the Publisher, or authorization through payment of the appropriate per-copy fee to the Copyright Clearance Center, 222 Rosewood Drive, Danvers, MA 01923, (978) 750-8400, fax (978) 646-8600. Requests to the Publisher for permission should be addressed to the Permissions Department, John Wiley & Sons, Inc., 111 River Street, Hoboken, NJ 07030, (201) 748-6011,
fax (201) 748-6008, or online at http://www.wiley.com/go/permissions.
Limit of Liability/Disclaimer of Warranty: The publisher and the author make no representations or warranties with respect to the accuracy or completeness of the contents of this work and specifi cally disclaim all warranties, including without limitation warranties of fi tness for a particular purpose. No warranty may be created or extended by sales or promotional materials. The advice and strategies contained herein may not be suitable for every situation. This work is sold with the understanding that the publisher is not engaged in rendering legal, accounting, or other professional services. If professional assistance is required, the services of a competent professional person should be sought. Neither the publisher nor the author shall be liable for damages arising herefrom. The fact that an organization or Web site is referred to in this work as a citation and/or a potential source of further information does not mean that the author or the publisher endorses the information the organization or Web site may provide or recommendations it may make. Further, readers should be aware that Internet Web sites listed in this work may have changed or disappeared between when this work was written and when it is read.
For general information on our other products and services please contact our Customer Care Department within the United States at (877) 762-2974, outside the United States at (317) 572-3993 or fax (317) 572-4002.
Wiley publishes in a variety of print and electronic formats and by print-on-demand. Some material included with standard print versions of this book may not be included in e-books or in print-on-demand. If this book refers to media such as a CD or DVD that is not included in the version you purchased, you may download this material at
http://booksupport.wiley.com. For more information about Wiley products, visit www.wiley.com. Library of Congress Control Number: 2013936843
To Maija and Charles
—
Zigurd Mednieks
To Jerry Meike, my inspiration for writing a book...
and a lot more
—
G. Blake Meike
To Norah and Claire, my girls
—
Laird Dornin
To Zhengfang
ABOUT THE AUTHORS
ZIGURD MEDNIEKS is a consultant to leading OEMs, enterprises, investors, and entrepreneurial ventures creating Android-based systems and software. Previously, he was Chief Architect at D2 Technologies, a voice-over-IP (VoIP) technology provider. There he led engineering and product-defi nition work for products that blend communication and social media in purpose-built embedded systems and on the Android platform.
Zigurd is a 25-year veteran of user interface, telephony, and social media product creation in the computing and telecommunications industries. He has authored and co-authored books about Android software development, and written book chapters on telephony and inter-process communication. His fi rst book, C Programming Techniques for the Macintosh, co-authored with Terry Mednieks, was published in 1986. Information about Zigurd can be found at zigurd.com.
G. BLAKE MEIKE is a passionate engineer and code poet with more than 20 years of experience. He has spent much of his time working with Java, building systems as large as Amazon’s massively scalable Auto Scaling service and as small as a pre-Android OSS/Linux- and Java-based platform for cell phones. He is co-author of the bestselling Programming Android and has taught nearly a thousand people the art of writing Android apps that aren’t toys.
LAIRD DORNIN graduated from Williams College in 1997 with a Bachelor of Arts degree in
Computer Science. Laird began his career at Sun Microsystems working on the Java JDK (RMI) and the forward-looking Jini Technology out of Sun Labs. From there he moved to SavaJe Technologies and helped to build a full-featured Java SE mobile operating system that shipped in 2006 and pro-vided the platform for “Device of the Show” at JavaOne. Again at Sun Microsystems, Laird contin-ued working on SavaJe OS to integrate the WebKit browser library to provide a full-featured mobile browser. Laird is an author of two books on Android programming and now works as an architect for a major wireless carrier.
ABOUT THE TECHNICAL PROOFREADER
JIM FITZGERALD has worked in many facets of the technology industry. His humble beginnings in Silicon Valley as a software engineer for Hewlett-Packard eventually led him to positions in marketing and sales before graduate school brought him back to software development and project management. He has programmed in many different languages and operating systems, from old mainframes to Windows desktops, and currently spends his time in Android and Windows mobile environments. While he considers himself more of a frontend guy, he will admit to dabbling with PHP and writing a lot of PL/SQL in the past when pressed.
When not investigating how technical things work, Jim spends his time as a bibliophile, avid artist and photographer, collecting far more books, paint brushes, and lenses than he can hope to use. Jim has a undergraduate BS degree from California Polytechnic, and a MS degree from Yale University.
EXECUTIVE EDITOR Robert Elliott
SENIOR PROJECT EDITOR Kevin Kent
TECHNICAL EDITOR Maija Mednieks
PRODUCTION EDITOR Christine Mugnolo
COPY EDITOR Kezia Endsley
EDITORIAL MANAGER Mary Beth Wakefi eld
FREELANCER EDITORIAL MANAGER Rosemarie Graham
ASSOCIATE DIRECTOR OF MARKETING David Mayhew
MARKETING MANAGER Ashley Zurcher
BUSINESS MANAGER Amy Knies
PRODUCTION MANAGER Tim Tate
VICE PRESIDENT AND EXECUTIVE GROUP PUBLISHER
Richard Swadley
VICE PRESIDENT AND EXECUTIVE PUBLISHER Neil Edde
ASSOCIATE PUBLISHER Jim Minatel
PROJECT COORDINATOR, COVER Katie Crocker
PROOFREADER Nancy Carrasco
TECHNICAL PROOFREADER Jim Fitzgerald
INDEXER John Sleeva
COVER DESIGNER Ryan Sneed
COVER IMAGE
©iStockphoto.com/Iaroslav Neliubov
I WANT TO THANK the editors at Wiley who have the vision to publish books about Android in the enterprise; our agent, Carole Jelen, for bringing this project to us; and my co-authors who brought the concept of a book about data-oriented apps to life. I also thank Maija Mednieks and Jim Fitzgerald, the technical editor and technical proofreader, for their exacting attention to making sure our examples work.
—Zigurd Mednieks
I WOULD LIKE TO THANK my co-authors, Zigurd, Laird, and Zane, for making this book way bigger than the sum of its parts. Bob Elliott and Kevin Kent were incredibly patient with us; and the rest of the editors, Maija Mednieks, Christine Mugnolo, Kezia Endsley, and Jim Fitzgerald, kept us honest and intelligible. Marakana Inc., my employer, gave me time to work on it. A special shout out to L. Carl Pedersen for taking the time to explain SQL. As always, a project like this would be impossible without the support of my wife, Catherine. You and me, babe, ‘til the wheels fall off.
—G. Blake Meike
I NEED TO THANK my sweetie, Norah, for being so patient with all the long weekends and late nights working on this ambitious project. You’ve been amazing for this, and for carrying another far more important project—our new son.
Thanks to my parents—we’ve missed trips to NH!
I’d like to thank Kevin and Robert for all their excellent support on this project. I’m excited that we managed to cover so many popular topics to create a comprehensive picture of end-to-end enterprise Android development. Thanks to Jim and Maija, our reviewers; this book contained a lot of material to cover. Thanks to my brother, Chris, and to Nathan Babb for reviewing parts of the manuscript.
Finally, thanks to my co-authors for collaborating to bring this project to completion.
—Laird Dornin
I’D LIKE TO THANK Kevin and Robert for their support on this project.
CONTENTS
INTRODUCTION xix
CHAPTER 1: DEVELOPING FOR ANDROID TABLETS
AND SMARTPHONES 1
A
ndroid Is a Java Operating System
2
Your Tools and Your First Android App
2
Prerequisites and Getting Ready 2
Toolchain Test Drive 4
One Code-Base for All Types of Devices
4
Getting Started with the Code Framework Example 5
Automatically Adapting to Screen Size 10
Components, Views, and Lifecycle
11
Destroying and Re-Creating Components 11
The MainActivity Class 12
Activity: The Basic Unit of User Interaction 12
Fragment: A Tool for Organizing Code and UI 17
The PickFragment Class 18
The ItemFragment Class 22
The ItemDetailFragment Class 25
Tying Together Activities, Fragments,
and the Action Bar
25
The TabbedActivity Class 25
A Main.xml File for Large Tablets 28
A Main.xml and a Subsidiary Activity for Smaller Screens 29
The TabActivity Class 30
The Android Task and Process Model
33
Starting Dalvik Instances 34
Death, but No Transfi guration 34
Tasks Span Applications and Processes 35
Multiprocessing, Security, and Lifecycle
35
The Process and User ID as Security Boundary 36
Databases and the Relational Model
40
The History of the RDBMS 41
The Relational Model 41
Other DBMS Features 43
The SQL Language 45
Introduction to SQLite
48
SQLite from the Command Line 49
An Example SQLite Database 53
Summary 58
CHAPTER 3: ANDROID DATABASE SUPPORT 59
SQL in Java: The SQLiteDatabase Class
60
Basic SQL Embedding 60
Syntactic SQL 61
Creating a Database: The SQLiteOpenHelper Class 67
Managing a Database 71
Cursors, Loaders, and Adapters
73
Cursors 74
Adapters and View Binders 76
Loaders 79
Summary 81
CHAPTER 4: CONTENT PROVIDERS 83
Using a Content Provider
84
URIs as Names for Virtual Datasets 84
Content Resolvers: The Link between Clients and Providers 85
Content Observers: Completing the Loop 87
IPC: System-Wide Accessibility 89
The Contract: URIs and Types
90
Authority 91
Virtual Table URIs 93
Return Value MIME Types 94
Permissions 94
Publishing the Contract 95
Implementing the Content Provider
95
Creating the Content Provider 96
Return Types and the URI Matcher 97
Writing the Database 98
Database Queries 101
CONTENTS
Permissions and Registration
106
Content Providers and Files
109
Summary 114
CHAPTER 5: REST, CONTENT PROVIDERS, CONCURRENCY,
NETWORKING, AND SYNC ADAPTERS 115
Basic REST
116
Why REST? 117
REST over HTTP 118
An Example REST API 120
Contact Representation 120
Contact Methods and URIs 122
Contact Transactions 122
Android Networking
125
The Apache Libraries 125
The java.net Libraries 126
Permissions 128
Considering Concurrency and Lifecycles
128
The Android Concurrency Architecture 128
A Naive Request 129
An Architecture for Robust Networking
131
Approach 1: Service-Centric 131
Approach 2: ContentProvider-Centric 133
Approach 3: SyncAdapter-Centric 135
REST within Android 135
The restfulCachingProviderContacts Project: An Example Client 136
Adding a Contact 138
Using Sync Adapters
143
Android Account Management 144
Creating a Sync Adapter 155
Summary 165
CHAPTER 6: SERVICE DEVELOPMENT 167
A Choice for Service Development
168
The Lifecycle of a Request 168
Three-Tier Service Architecture 169
Service Development Background 169
Building a RESTful Service for Contacts
172
A Conservative Software Stack 172
Writing the Examples: Spring Contacts Service
and Its Synchronization Variant 175
Code Example: Spring Sync Contacts Service 195
Cloud Performance and Scalability
206
The Scale of Mobile 207
Persistence in the Cloud: From SQL to NoSQL 208
Database File Format 211
NoSQL Persistence 213
Design Considerations for Scalable Persistence
215
To SQL or Not to SQL? 215
Looking at Popular Cloud Providers
218
Amazon AWS 218
Google App Engine 219
Joyent: Hosted MongoDB+node.js 219
Red Hat OpenShift 220
Exploring the Code Examples
220
The Contacts DAO Interface (Again) 221
Writing the Code: Amazon Contacts Service 221
Writing the Code: Google App Engine Contacts 235
Summary 243
CHAPTER 8: COMPLEX DEVICE-BASED DATA:
ANDROID CONTACTS 245
PIM Databases: Fossils from Smartphone Pre-History
246
Android’s Contacts Provider
246
The ContactsContract API
246
A Contacts Provider Explorer
247
Code for Exploring a Database 249
Source Code for a Contacts Provider Explorer 249
Summary 262
CHAPTER 9: GENERIC DATA SYNCHRONIZATION:
PROJECT MIGRATE AND THE WEBDATA API 265
Introducing WebData and Project Migrate
266
How Project Migrate Works 266
How Project Migrate Streamlines the Mobile Connection
to the Enterprise 267
The WebData API in Detail 268
The WebData API RESTful Protocol 269
Project Migrate in Detail
279
The Migrate Project Android WebData Client 279
CONTENTS
The WebData Content Provider Android API
281
Android Built-In Provider APIs 281
The Migrate Provider API 281
Summary 281
Service-Side Advantages 282
Client Advantages 282
CHAPTER 10: WEBDATA APPLICATIONS 283
The Migrate Client
284
Creating a Migrate Project
285
Step 1: Importing the Project 285
Step 2: Enabling the Project as a Migrate Client 285
Step 3: Defi ning the Information to Be Managed by Migrate 286
Step 4: Generating the Contacts Contract 287
Interfacing with the Migrate REST Proxy
291
Step 5: Starting a Local Migrate Service 296
Step 6: Publishing Your Application’s Schema 296
Setting Up a Device
298
Step 1: Installing the Migrate Client 298
Step 2: Adding a WebData Account 299
Step 3: Turning on Synchronization 299
Step 4: Running the Application 300
Step 5: Confi guring an Account in Migrate Contacts (Optional) 300
Future Directions: MigrateClinic
300
Summary 303
CHAPTER 11: BUILDING HUMAN INTERFACES FOR DATA 305
Modularity and Flexibility Compared
with a “Cookbook” Approach
306
Overview of Modules 306
Layout Changes 307
Direct Manipulation
308
The TabbedActivity Class 308
The TabbedPagedFragment Class 319
Navigation 320
Multitasking in a Small-Screen Environment 320
The Android Task Model 320
Tasks and the Conventional Process Model 321
Modifying Task Behavior 321
Navigation in Tablets 323
Platform Security
326
Keeping Handsets Safe
327
Avoiding Malicious Applications 327
Understand Malware Mechanics: The Malware Genome 330
Writing Secure Applications
331
Hacking Targets 331
Ingredients of a Secure Application 332
Example Code: Protecting RESTful Invocations 353
Preventing Piracy 365
Summary 366
INTROD
UCTION
MANY ENTERPRISE-ORIENTED APPLICATIONS fi t a broad template: They access data using one or more RESTful APIs. They present the data to the user. They may enable the user to modify the data, and update the data on servers. Enterprise Android is a book about those applications.
WHO THIS BOOK IS FOR
If you are an experienced Java or JavaScript coder, you may have some ideas about how RESTful apps should work. You can correctly think of Android as a Java OS: You write apps in Java and deploy them to an environment that, in some ways, very closely resembles a Java VM. These apps communicate with RESTful APIs to fetch data to present to the user.
But, as with many aspects of Android software development, it pays to look at how Android is designed before wading in. This book was created to give you a substantial head start at applying your experience with RESTful applications and APIs to creating Android apps that are effi cient, versatile, and responsive. You will avoid the pitfalls of assuming Android programming is like web programming or client Java programming using Oracle’s class libraries, and be able to do it using Android APIs effectively on the fi rst try.
If you are a beginning Android programmer, and do not have signifi cant experience with iOS or Java, or if you are unsure that RESTful applications are what you need to learn about, you should start with a general introduction to Android. Beginners will appreciate a book like Reto Meier’s excellent Professional Android 4 Application Development (John Wiley & Sons, 2012) or the online tutorials at developer.android.com, which are much improved compared to the early days of Android.
If you are interested in expanding your development horizon beyond device programming by push-ing into service-side development, this book builds competence handlpush-ing application data on both sides of the network.
WHAT THIS BOOK COVERS
This book starts with the basics of creating an Enterprise-oriented Android app that can run on handsets and tablets. But it’s not a beginner’s book. You should, at least, read the online tutorials at Google’s Android Developer’s site before reading this book.
Android uses SQLite, and this book covers SQL and SQLite in enough depth that you will understand how data is stored in SQLite databases in Android systems.
Android wraps SQLite in database classes, and this book covers those classes in depth, as well.
Enabling you to implement an end-to-end observer pattern is a key element of this book. Your data resides in a database behind a RESTful API on your servers. Locally, it is likely to be stored in a SQLite database inside a ContentProvider component. This book shows you how to make sure the data you present to the user is consistent and up to date.
Simplicity is important, too. JSON is a simple way to represent data with simplicity and fl exibility where, otherwise, a complex database design might be required. This book shows you how to use JSON with SQLite to maintain simplicity in your implementation. It also shows you a complex Android data-base and ContentProvider interface, implemented with a conventional approach to datadata-base design.
You will create and deploy a server for your front end as you use the examples in this book. In particular, Chapters 5 and 6 come together at the end of Chapter 6 to form an end-to-end example of the techniques covered in this book. You’ll deploy this service on Amazon and Google cloud resources in Chapter 7.
One thing you won’t spend much time on is loading indicators. A networked app should be as respon-sive as a “local” app. Create, update, and delete (CRUD) should not be interposed between the user and the data the user wants. A very important part of this book explains how to keep CRUD off the net-work and out of the user’s way, using a lightweight but powerful synchronization protocol. The book completes this approach by introducing an open source framework that encapsulates this approach.
The book concludes with an in-depth tour of Android security.
HOW THIS BOOK IS STRUCTURED
This book is called Enterprise Android because it is about acquiring, presenting, and updating data on devices and using cloud resources, which is the core of most enterprise applications.
This book starts with a brisk-paced introduction to Android programming that puts you on track to make an application for displaying data. This is about as fast an introduction as can be, so don’t be surprised if you need to go to the online tutorials in the Android documentation to go deeper on some basics.
Following this introduction, you will be immersed in the core subject matter of this book: data. The book progresses from the bottom up: how to store data locally, how to make queries, how to get it and serve it from REST APIs, how the observer pattern is implemented in Android idioms, how to update it, and how to make this all happen with or without connectivity and with the best apparent performance. Later in the book, more UI programming oriented toward presenting data is covered. The book closes with a chapter on security.
WHAT YOU NEED TO USE THIS BOOK
INTRODUCTION
NOTE Database code in Android has been very stable for several versions of the Android OS. Mostly due to the way we cover user interface for database apps, this book assumes you will run your programs on Android 4 or later versions. You can expect most of this book to remain current for future version of Android.
To run the service examples in the book, you’ll need to download the packages in each chapter, including the following: Apache Tomcat, ant, MySQL, and the cygwin toolkit. You’ll also need an Amazon AWS account with manager privileges and a Google account.
CONVENTIONS
To help you get the most from the text and keep track of what’s happening, you’ll see a number of conventions throughout the book.
WARNING Warnings like this one hold important, not-to-be forgotten informa-tion that is directly relevant to the surrounding text.
NOTE Notes offer tips, hints, tricks, and asides to the current discussion.
As for styles in the text:
➤ New terms and important words are highlighted when they are introduced.
➤ Keyboard strokes appear like this: Ctrl+A.
➤ Filenames, URLs, and code within the text appear like so: persistence.properties.
➤ Code appears in two different ways:
We use a monofont type with no highlighting for most code examples.
We use bold to emphasize code that’s particularly important in the present context.
SOURCE CODE
To fi nd the source code via the Wrox site, locate the book’s title (either by using the Search box or by using one of the title lists) and click the Download Code link on the book’s detail page to obtain all the source code for the book.
NOTE Because many books have similar titles, you may fi nd it easiest to search by ISBN; this book’s ISBN is 978-1-118-18349-6
Alternately, you can go to the main Wrox code download page at http://www.wrox.com/dynamic/ books/download.aspx to see the code available for this book and all other Wrox books.
ERRATA
We make every effort to ensure that there are no errors in the text or in the code. However, no one is perfect, and mistakes do occur. If you fi nd an error in one of our books, like a spelling mistake or faulty piece of code, we would be very grateful for your feedback. By sending in errata you may save another reader hours of frustration and at the same time you will be helping us provide even higher quality information.
To fi nd the errata page for this book, go to http://www.wrox.com and locate the title using the Search box or one of the title lists. Then, on the book details page, click the Book Errata link. On this page you can view all errata that has been submitted for this book and posted by Wrox editors.
NOTE A complete book list including links to each book’s errata is also available at www.wrox.com/misc-pages/booklist.shtml.
If you don’t spot “your” error on the Book Errata page, go to www.wrox.com/contact/techsupport .shtml and complete the form there to send us the error you have found. We’ll check the information and, if appropriate, post a message to the book’s errata page and fi x the problem in subsequent edi-tions of the book.
P2P.WROX.COM
INTRODUCTION
At http://p2p.wrox.com you will fi nd a number of forums that will help you not only as you read this book, but also as you develop your own applications. To join the forums, just follow these steps:
1. Go to p2p.wrox.com and click the Register link. 2. Read the terms of use and click Agree.
3. Complete the required information to join as well as any optional information you wish to provide and click Submit.
4. You will receive an e-mail with information describing how to verify your account and com-plete the joining process.
NOTE You can read messages in the forums without joining P2P, but in order to post your own messages, you must join.
Once you join, you can post new messages and respond to messages other users post. You can read messages at any time on the web. If you would like to have new messages from a particular forum e-mailed to you, click the Subscribe to this Forum icon by the forum name in the forum listing.
Devel
oping for Android
Tablets and Smartphones
WHAT’S IN THIS CHAPTER? ➤ Getting your tools set up ➤ Testing your tools setup
➤ What a modern Android application looks like
➤ Introducing a concise application framework that works on all sizes of Android devices
➤ Exploring Android component lifecycles and the Android task model
WROX.COM CODE DOWNLOADS FOR THIS CHAPTER
Please note that all the code examples in this chapter are available at https://github.com/ wileyenterpriseandroid/Examples.git and as a part of the book’s code download at www.wrox.com on the Download Code tab. At various points throughout the book, the authors refer to the “Examples” directory using a pseudo-variable called, “CODE”. Readers can either explicity set this value as a shell variable or can just keep in mind that the variable refers to the book example code directory.
This book is about best practices in handling data for enterprise application across the client and RESTful backend services, and this chapter gets you through the basics at a brisk pace while providing a framework, which is the starting point for the example code in this book. The advice in this chapter, especially the advice to pay attention to Android component lifecycles, will enable you to complete an Android coding project effi ciently, without having to know everything about Android, and with a minimum of grief.
Many Android books were written before there were Android tablet devices, and before the APIs central to creating good UIs for those devices were a mainstream concern for Android developers. This chapter starts by assuming your apps will run on both tablets and handsets and provides a framework that embodies the best practices for doing so.
This chapter also covers tools — and knowledge resources for the tools — that you need to follow the code examples in this book.
This isn’t a beginner’s book. If this is your fi rst time programming Android applications, use the information resources listed here for fi lling in the gaps in your knowledge of and experience with Java and Android programming.
ANDROID IS A JAVA OPERATING SYSTEM
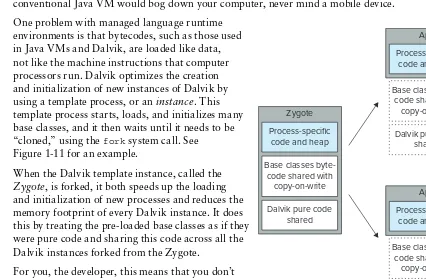
Almost all applications and all system services in Android are coded in Java (and other JVM languages). Code is compiled to Java bytecode before being translated into Dalvik bytecode, which, in turn, runs in the Android managed runtime environment. These characteristics make Android at once familiar and strange: If you have used Java or a similar managed language before, you will fi nd Android code fairly easy to read. You will fi nd the tools for Android programming familiar. Many aspects of Android’s managed language run time are identical to Java. Android relies on Java base classes, and wouldn’t work if the semantics of the Android runtime environment were not very similar to those of a standard Java runtime environment.
If you come to this book not having written Android-specifi c code, you have probably never written code for an operating system like Android. Android uses managed language runtime concepts in ways you may fi nd unfamiliar, especially in the ways Android implements modularity and memory management. In many ways, Android is the most sophisticated environment for interactive Java programs ever created.
WARNING Pay close attention to the basics of Android application program-ming and follow the key practices described in this chapter. If you try to impose your coding practices from server Java or MIDlets, or attempt to thwart the way the Android system works with applications, bugs and frustration will result.
YOUR TOOLS AND YOUR FIRST ANDROID APP
This section covers setting up your programming tools. You will run your fi rst example application, which is a user interface framework.
Prerequisites and Getting Ready
You can use any of the three major operating systems for PCs to develop Android software: Linux, Mac OS, or Windows. You will need three independent pieces to assemble your toolchain for creating Android applications: The Java JDK, Eclipse, and the Android SDK. All three of these pieces work on all three operating systems.
Your Tools and Your First Android App
❘
3Follow the instructions at the URL to install the tools you need. If you follow the instructions correctly, you will install a toolchain consisting of the three pieces listed previously.
Java and Java Knowledge
The fi rst piece of the tool set you need is the Java Development Kit, or JDK. The JDK provides both a Java runtime environment, which is needed by Eclipse, and some tools for creating Android applications.
Java is a cross-platform runtime environment and is the key to developing Android software on any of the top three personal computer operating systems.
You will write your Android programs in Java, even though the runtime environment in the Android operating system is internally substantially different from Java runtime environments. Although you don’t need to know the details of the way your programming tools are implemented using Java, you have to know Java to write Android programs. There are numerous tutorials on the web and books to help you learn Java. One free resource for learning Java is Oracle’s Java Tutorials site:
http://docs.oracle.com/javase/tutorial/java/index.html
Eclipse and Eclipse Knowledge
Eclipse is the integrated development environment (IDE) you will be using. An IDE is an all-in-one software development tool that enables you to create source code with correct syntax and style, run that code, and examine and debug it if you need to fi nd out why it isn’t working correctly. As you create Android software, you will spend most of your time using the Eclipse IDE.
Eclipse is a Java program and it uses the Java run time in the JDK you installed to run on your personal computer. Eclipse is widely used for many kinds of programming, including creating Java-based server software for the kinds of applications described in this book.
The use of Eclipse is one of the reasons Android was born with a mature toolchain. You write Android programs using the Java language, and most of the toolchain for writing “normal” Java programs can be applied to Android.
Eclipse enables you to edit your code while providing quick access to documentation. It enhances productivity through automatic completion of symbols and automatic formatting. It helps you fi nd syntax errors, and it performs static analysis that fi nds potential runtime errors. It also enables you to inspect running applications, stop them, single-step across code that corresponds to lines of source code, inspect variables, examine unhandled exceptions, and perform dozens of other operations that will improve your productivity in creating Android applications.
Th
e Android SDK and Resources for Android Tools Knowledge
The third part of your toolchain is the Android Software Development Kit (SDK). The SDK is documented in Google’s online documentation for Android developers at http://developer .android.com/index.html.
The SDK turns the Eclipse IDE into an IDE that can create Android programs. The SDK provides plugins for Eclipse and many external components that are used to create Android applications and diagnose problems in Android software. Eclipse can be adapted to many purposes with plugins. In fact, Eclipse is made almost entirely of plugins. The set of plugins you started with when you installed Eclipse make Eclipse suitable for creating Java programs. For the purposes of this book, you will mostly work in the Eclipse IDE, and all you need to do at this point is to confi gure Eclipse to use the Android plugins and to be able to locate other programs installed with the SDK. You will be prompted to do so when you start Eclipse after the Android SDK is installed.
Now you have all the tools for general Android programming, and for this chapter. Later in this book, other tools specifi c to topics introduced in those chapters will be added to your toolchain.
Toolchain Test Drive
You can test that your toolchain is installed correctly by creating a new Android project, and selecting an example from the SDK as the basis of your project. You should be able to run your project in an Android Virtual Device (AVD).
Directions for creating a project are here:
http://developer.android.com/training/basics/firstapp/creating-project.html
Directions for running a project are here:
http://developer.android.com/training/basics/firstapp/running-app.html
By doing this, you have created an Android project in Eclipse, and created and run an Android application, even though you have not written any code yet. If you are successful in doing this, you can be confi dent your toolchain and the software it depends on have been correctly installed. The next section describes how to download and use the example code in this chapter to create another Android project. But you might want to explore your toolchain at this point.
NOTE One thing you might want to do is create more Android projects based on the example code using the option in the New Project wizard to select example applications.
ONE CODE-BASE FOR ALL TYPES OF DEVICES
One Code-Base for All Types of Devices
❘
5than use boilerplate. There are two related approaches we adhere to in the examples in this book because we assume that enterprise deployments will be for a controlled set of mobile devices:
➤ Develop a single code-base for tablets and handsets.
➤ Develop for the latest APIs, as of this writing, and encourage the use of the
back-compatibility support classes provided with the Android SDK to enable back-compatibility for a range of earlier versions of Android, if needed.
You will use a design pattern in which you allow the Android system to select different layouts based on screen size and pixel density and write code that is largely independent of the choice the system made. This technique makes your apps more robust by not duplicating the mechanisms Android uses to make decisions about display geometry.
Following this pattern simplifi es your tasks in publishing software, makes the example code as concise as possible, and enables you to publish a single version for many kinds of devices.
Getting Star
ted with the Code Framework Example
Here you will perform a further check that you have installed your toolchain correctly and import the example code for this chapter. Later, you will examine the code in this example, and run it in order to see what it does.
You can obtain the example code as an archive at www.wrox.com and https://github.com/
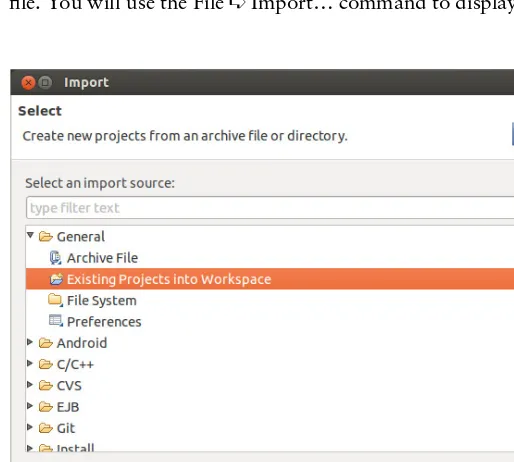
wileyenterpriseandroid/Examples.git. The fi rst thing you do to use example code is to extract the project folder from the archive into your workspace folder. Then, import the project from the archive fi le. You will use the File ➪ Import… command to display the Import dialog box as in Figure 1-1.
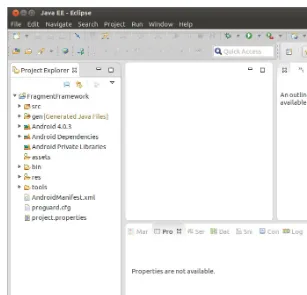
Select General and Existing Projects into Workspace. Pressing Next will display the Import dialog box shown in Figure 1-2. Select the folder you extracted, and press Finish. Depending on the platform you are using, the project name may differ from what you see in the screen shot in Figures 1-2 and 1-3.
FIGURE 1-2
You should now see the example project in your Eclipse Project Explorer window, as shown in Figure 1-3.
One Code-Base for All Types of Devices
❘
7FIGURE 1-3
FIGURE 1-4
Pressing Yes displays the Android Virtual Device (AVD) Manager. If you got here from the error dialog box indicating no AVDs have yet been created, you will see an empty list of AVDs, as in the Figure 1-5. Press the button labeled New....
WARNING If you are using a Windows system for compiling and running the examples from this book, and depending on the version of the Android SDK you are using, you may need to pick a different device to emulate due to limitations on memory size of emulators on Windows.
One Code-Base for All Types of Devices
❘
9When you press OK, you will return to the AVD Manager and see that an AVD named nexus7 now exists in the previously empty list, as shown in the Figure 1-7. Press the button labeled Start....
FIGURE 1-7
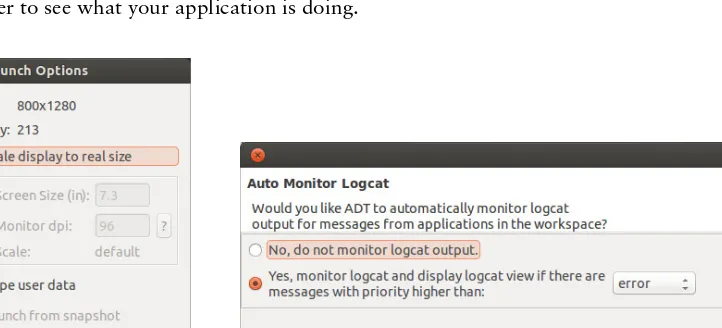
Pressing the Start button launches the AVD. First, it may want some more information from you about how it should be rendered. The Launch Options dialog box shown in Figure 1-8 can be used to scale the display of an AVD. We won’t do that, so press the Launch button.
And now…still no emulator. If you are using a fresh installation of the SDK, you may encounter the dialog box in Figure 1-9. This dialog box lets you enable the logcat view, provided by the Android SDK plugins in the Eclipse IDE. Select the Yes option here. You will need logcat a bit later in this chapter to see what your application is doing.
Now you have done it! The emulator will launch. Android will start up on the emulator, and the example application will start up in Android, as shown in Figure 1-10.
If you encountered a problem at any step here, you may need to reinstall your toolchain. If you previously validated the installation of your toolchain through to the steps where you launch an Android application, you will not encounter some of the steps here, which happen only once upon a fi rst use after a new installation.
You now have running an example application that confi gures itself to different screen sizes.
Automatically Adapting to Screen Size
You can see the results of the design pattern example in this chapter by creating an AVD for a small Android device and a larger tablet style Android device (see Figure 1-10).
FIGURE 1-10
Components, Views, and Lifecycle
❘
11This is a typical UI design pattern. This framework will speed your way past the obligatory parts of Android application development so you can get to the parts most useful to the enterprise application developer.
But, before you adapt this framework to the kinds of applications that use local and networked data resources, you’ll fi rst take a look at this code in greater detail and see how it embodies many of the Android features that users expect and that conform to Android best-practices for a broad class of Android applications.
COMPONENTS, VIEWS, AND LIFECYCLE
The example code in this chapter contains all the objects needed for a minimal, but typical, Android application. Since this book is about enterprise Android applications, this minimal framework application includes a fi eld for entering search terms, a list for the results of the search/ query, and places where search results and information about those results are displayed.
Most of the classes used in this minimal application framework are components or Android widgets from the View class hierarchy.
Components are the large-scale building blocks of Android applications:
➤ You create a subclass of Activity for every major grouping of interactive functionality that is distinctive enough for the user to notice that something different is displayed on the screen.
➤ Fragments are used to organize interactive code within an activity. On big screens, multiple fragments might be visible at the same time, while on smaller screens, a single fragment is usually contained in each activity.
➤ You will subclass Service for code that performs long-running processing and that has no interactive elements. Service components are an important part of the code in subsequent chapters.
Components have lifecycles. You may be familiar with the concepts of components with lifecycles from the J2ME MIDlet lifecycle, where apps that are paused should release resources. But the Android component and lifecycle is far richer and more powerful. The Android lifecycle enables large, complex apps to fi t in small heap sizes.
Destroying and Re-creating Components
Every instance of every component in an Android application can be destroyed, releasing the memory it used. The lifecycle methods in components enable them to save their state before they are destroyed, as well as to initialize themselves when fi rst created, and to restore their state when they are re-created.
There are no workarounds. If you attempt to subvert component destruction by keeping a reference to a component, all you have done is create a memory leak.
The MainActivity Class
The code in this subclass of Activity (Listing 1-1) shows how to implement lifecycle handling for Android. Each lifecycle method is logged, which means you are aware of what happens when this Activity instance is no longer on the display, and you know when the Android system decides to destroy an instance of this Activity.
In your Eclipse IDE, you can use the logcat view to display this logging information. Normally, this view appears at the bottom of your screen.
Activity: The Basic Unit of User Interaction
Even though there is no code in Listing 1-1 for interacting with the users, you can call an activity the basic unit of user interaction because it represents a screen-full of user interaction.
In a subsequent section, you will see how user interaction is handled by the Fragment subclasses in this application.
The Activity class is the basis of the card-stack metaphor of user interaction in Android, and navigating between activities is an important part of user interaction. This Activity subclass is the main activity of this application. This is where the application starts when users touch the application’s icon, and this is the bottom of the application’s back-stack.
LISTING 1-1: MainActivity.java
package com.enterpriseandroidbook.fragmentframework;
import android.app.ActionBar;
import android.content.res.Configuration; import android.os.Bundle;
import android.util.Log;
/**
* @author zigurd *
*/
public class MainActivity extends TabbedActivity {
// String for logging the class name
private final String CLASSNAME = getClass().getSimpleName();
Components, Views, and Lifecycle
❘
13The code shown in this example for the lifecycle methods is here to help you visualize the application lifecycle. Visualizing the application lifecycle is important because it is easy to ignore. You will want to see what the Android OS is doing to your application by way of the component lifecycle in order to plan your application implementation to most readily adapt to the component lifecycle.
The code for the onCreate method that follows shows that the parent class’s method should fi rst be called, and then code specifi c to the subclass added. In this case, that code logs the method call, and it logs whether the method was called to create this Activity instance the fi rst time, or whether a previous instance existed and the state of that instance should be restored. (More about that after you see some of the other lifecycle methods.) The bulk of the work performed during the onCreate call is factored out into the doCreate method. It loads the layout, sets up the action bar, and initializes the tabs in the action bar.
@Override
protected void onCreate(Bundle savedState) { super.onCreate(savedState);
// To keep this method simple doCreate(savedState);
// If we had state to restore, we note that in the log message if (L) Log.i(CLASSNAME, "onCreate" +
(null == savedState ? " Restored state" : "")); }
@Override
protected void onRestart() { super.onRestart();
// Notification that the activity will be started if (L) Log.i(CLASSNAME, "onRestart");
// Notification that the activity is starting if (L) Log.i(CLASSNAME, "onStart");
// Notification that the activity will interact with the user if (L) Log.i(CLASSNAME, "onResume");
}
protected void onPause() { super.onPause();
// Notification that the activity will stop interacting with the user if (L) Log.i(CLASSNAME, "onPause" + (isFinishing() ? " Finishing" : ""));
} @Override
protected void onStop() { super.onStop();
// Notification that the activity is no longer visible if (L) Log.i(CLASSNAME, "onStop");
}
The code for the onDestroy method that follows next logs when this method is called. The method name onDestroy causes some confusion. What is being destroyed? In fact what happens at this point is that the Android system “destroys,” or sets to null, its reference to this instance of this subclass of Activity, so it can be garbage-collected. You may think that thwarting this destruction is possible by simply holding a reference to this Activity instance. That won’t work: The Android system will create a new instance of this Activity after it has “destroyed” this one, whether a reference to it is being held or not. You could prevent this now-useless instance from being garbage-collected, but it is a zombie, wreaking havoc in the heap. Note that the onDestroy method tests and logs whether the activity is “fi nishing” — meaning that this instance of Activity won’t be re-created because it is done, not because it was destroyed to recover memory space.
@Override
protected void onDestroy() { super.onDestroy();
// Notification the activity will be destroyed if (L) Log.i(CLASSNAME, "onDestroy"
// Are we finishing?
+ (isFinishing() ? " Finishing" : "")); }
The code for the onSaveInstanceState method that follows next logs when it is called. Note that a Bundle object is passed to this method. This Bundle object enables you to attach serializable objects implementing the Parcelable interface. The Bundle object itself implements the Parcelable interface, so it and all the objects it holds references to can be serialized and stored — or “persisted” in Java parlance.
This is where the Bundle object that’s passed to the onCreate method comes from. If you added objects to it, they will be there when the onCreate and onRestoreInstanceState are called.
@Override
protected void onSaveInstanceState(Bundle outState) { super.onSaveInstanceState(outState);
saveState(outState);
// Called when state should be saved
if (L) Log.i(CLASSNAME, "onSaveInstanceState");
}
@Override
Components, Views, and Lifecycle
❘
15protected void onRestoreInstanceState(Bundle savedState) { super.onRestoreInstanceState(savedState);
if (null != savedState) restoreState(savedState);
// If we had state to restore, we note that in the log message if (L) Log.i(CLASSNAME, "onRestoreInstanceState" +
(null == savedState ? " Restored state" : "")); }
/////////////////////////////////////////////////////////////////////////////// // The minor lifecycle methods - you probably won't need these
///////////////////////////////////////////////////////////////////////////////
// If we had state to restore, we note that in the log message if (L) Log.i(CLASSNAME, "onCreate" +
(null == savedState ? " Restored state" : ""));
// Notification that resuming the activity is complete if (L) Log.i(CLASSNAME, "onPostResume");
// Notification that user navigated away from this activity if (L) Log.i(CLASSNAME, "onUserLeaveHint");
}
/////////////////////////////////////////////////////////////////////////////// // Overrides of the implementations ComponentCallbacks methods in Activity ///////////////////////////////////////////////////////////////////////////////
@Override
public void onConfigurationChanged(Configuration newConfiguration) { super.onConfigurationChanged(newConfiguration);
// This won't happen unless we declare changes we handle in the manifest if (L) Log.i(CLASSNAME, "onConfigurationChanged");
}
@Override
public void onLowMemory() {
// No guarantee this is called before or after other callbacks
if (L) Log.i(CLASSNAME, "onLowMemory"); }
/////////////////////////////////////////////////////////////////////////////// // App-specific code here
///////////////////////////////////////////////////////////////////////////////
/**
* This is where we restore state we previously saved. * @param savedState the Bundle we got from the callback */
private void restoreState(Bundle savedState) { // Add your code to restore state here
}
/**
* Add this activity's state to the bundle and/or commit pending data */
private void saveState(Bundle state) {
// Add your code to add state to the bundle here }
/**
* Perform initializations on creation of this Activity instance * @param savedState
*/
private void doCreate(Bundle savedState) { setContentView(R.layout.main);
if (null != savedState) restoreState(savedState);
ActionBar bar = getActionBar(); bar.setDisplayShowTitleEnabled(false);
bar.setNavigationMode(ActionBar.NAVIGATION_MODE_TABS);
// Initialize the tabs (Fails silently if the tab fragments don't exist) int names[] = {R.string.item, R.string.detail };
int fragments[] = { R.id.content_frag, R.id.detail_frag }; initializeTabs(0, names, fragments);
}
}
The preceding code contains the method implementations for the lifecycle methods onRestart, onStart, onResume, onPause, and onStop. These callbacks are, like the other important lifecycle methods in this example, logged to illustrate when they are called. These methods inform you when this activity is becoming visible or is obscured by other activities on the screen. You may fi nd it useful to observe these logging messages in the logcat view in the Eclipse IDE, and follow along with the diagrams in the Android documentation covering the activity lifecycle in order to see when
Components, Views, and Lifecycle
❘
17the state transitions in those diagrams occurs. See http://developer.android.com/training/ basics/activity-lifecycle/starting.html.
Note that you are not required to use the Bundle object to save state. There are three fundamental ways to save state in Android:
➤ Recover state — If your state is the result of a database query, you can save the query in the bundle (or even recover the query if it is, for example, based on the time of day) and re-run it.
➤ Save state in a database — If your state is in a database, locally, on the client device on which your app is running, you can read it from that database if your components are re-created.
➤ Put it in the bundle — You can, as described previously, save your state in the Bundle object.
In most non-trivial applications, some combination of these methods for saving state is used. The need to save state in Android applications has an infl uence on how they are designed. A data model that lives primarily in a SQLite database is a convenient way to minimize the state your application needs to preserve. Putting that database in a ContentProvider object removes it from the Activity object. The ContentProvider API enables a simple implementation of the observer pattern, and it puts your application on track with a design pattern that will be elaborated throughout this book, where local databases are synched to a network database.
Fragment: A Tool for O
rganizing Code and UI
In Android versions prior to Honeycomb, the typical Android application implementation placed the code for interacting with user interface widgets in subclasses of Activity. When Google’s partners introduced tablet computers using the Android OS, Google responded by redesigning the user interface — and the APIs developers use to create a user interface — around a new class called Fragment.
Fragment is not a subclass of Activity, nor is it a subclass of View. Like an activity, a fragment can contain the code that handles user interaction. A fragment can be laid out like an Android widget, but it isn’t a widget. A fragment is a container for code that interacts with the users.
The Fragment class includes lifecycle methods, but it isn’t an Android component. The lifecycle methods in Fragment exist as a way for the Activity containing the fragment to propagate lifecycle events into the fragments contained in that activity. That is, individual fragment instances are never destroyed, but the Activity instances that contain them are destroyed.
In the chapter’s example, the three most important things you will fi nd are:
➤ Code for handling user interactions with Android widgets.
➤ Lifecycle method overrides, as in the Activity example, that enable logging, so you can see when these methods are called relative to the activity lifecycle.
In addition to these aspects of this Fragment subclass, you will see some code for putting example data into a list.
The PickFragment Class
The code in Listing 1-2 looks very much like an Activity subclass would look if you were not using Fragment. But, unlike an Activity, the fragment’s lifecycle is tied to the lifecycle of the Activity in which it is contained. In a large-screen layout, that means that all the Fragment objects in an Activity have their lifecycle methods called when the corresponding lifecycle methods of the Activity are called.
LISTING 1-2: PickFragment.java
package com.enterpriseandroidbook.fragmentframework;
import android.app.Activity; import android.app.Fragment;
import android.content.res.Configuration; import android.os.Bundle;
import android.util.Log;
import android.view.LayoutInflater; import android.view.Menu;
import android.view.MenuInflater; import android.view.View;
import android.view.ViewGroup; import android.widget.AdapterView;
import android.widget.AdapterView.OnItemClickListener; import android.widget.ArrayAdapter;
import android.widget.ListView;
public class PickFragment extends Fragment implements OnItemClickListener {
// String for logging the class name
private final String CLASSNAME = getClass().getSimpleName();
// Turn logging on or off
private static final boolean L = true;
public void onAttach(Activity activity) { super.onAttach(activity);
// Notification that the fragment is associated with an Activity if (L)
Log.i(CLASSNAME, "onAttach " + activity.getClass().getSimpleName()); }
public void onCreate(Bundle savedInstanceState) { super.onCreate(savedInstanceState);
// Tell the system we have an options menu this.setHasOptionsMenu(true);
Components, Views, and Lifecycle
❘
19// Factor this out of methods that get saved state private void restoreState(Bundle savedInstanceState) { // TODO Auto-generated method stub
}
The onCreate method calls attachAdapter and setOnItemClickListener, initializing this fragment.
@Override
public View onCreateView(LayoutInflater inflater, ViewGroup container, Bundle savedInstanceState) {
}
// Notification that the containing activiy and its View hierarchy exist if (L)
Log.i(CLASSNAME, "onActivityCreated"); }
// ///////////////////////////////////////////////////////////////////////////// // Overrides of the implementations ComponentCallbacks methods in Fragment // /////////////////////////////////////////////////////////////////////////////
// This won't happen unless we declare changes we handle in the manifest if (L)
// No guarantee this is called before or after other callbacks if (L)
Log.i(CLASSNAME, "onLowMemory"); }
Components, Views, and Lifecycle
❘
21// ///////////////////////////////////////////////////////////////////////////// // Menu handling code
// /////////////////////////////////////////////////////////////////////////////
public void onCreateOptionsMenu(Menu menu, MenuInflater inflater) { inflater.inflate(R.menu.search_menu, menu);
The attachAdapter method is used to attach an ArrayAdapter to the ListView object in this fragment. The ArrayAdapater contains test values for this application.
/**
* Attach an adapter that loads the data to the specified list *
* @param list */
private void attachAdapter(final ListView list) {
// Make a trivial adapter that loads an array of strings ArrayAdapter<String> numbers = new ArrayAdapter<String>(list .getContext().getApplicationContext(),
android.R.layout.simple_list_item_1, new String[] { "one", "two", "three", "four", "five", "six" });
// Implementation of the OnItemClickListener interface
// ///////////////////////////////////////////////////////////////////////////
The onItemClick method implements the onItemClickListener interface. This means that the onItemClick method is called whenever an Android item has been clicked. In this case, the whole fragment is full of one ListView, and clicking on an item in the list causes some data to be loaded into the fragments on the right side of the screen, or, in the case of small screens, in a separate Activity.
@Override
public void onItemClick(AdapterView<?> arg0, View view, int position, long id) {
// As an example of sending data to our fragments, we will create a // bundle
// with an int and a string, based on which view was clicked Bundle data = new Bundle();
The ItemFragment Class
When you run this application on a large-screen device, the ItemFragment object appears next or below the PickFragment object and displays the data corresponding to what the user selected in the PickFragment object, in Listing 1-3.
Like all the other classes that might need to respond to lifecycle methods, the methods are implemented and logged here, so you can readily see when they are called.
LISTING 1-3: ItemFragment.java
package com.enterpriseandroidbook.fragmentframework;
import android.app.ActionBar.Tab;
import android.app.ActionBar.TabListener; import android.app.Activity;
import android.app.Fragment;
import android.app.FragmentTransaction; import android.content.res.Configuration; import android.os.Bundle;
import android.util.Log;
import android.view.LayoutInflater; import android.view.View;
import android.view.ViewGroup; import android.widget.EditText; import android.widget.FrameLayout;
public class ItemFragment extends Fragment implements TabListener, TabbedActivity.SetData {
// String for logging the class name
private final String CLASSNAME = getClass().getSimpleName();
//Turn logging on or off private final boolean L = true;
public void onAttach(Activity activity) { super.onAttach(activity);
// Notification that the fragment is associated with an Activity
if (L) Log.i(CLASSNAME, "onAttach " + activity.getClass().getSimpleName()); }
public void onCreate(Bundle savedInstanceState) { super.onCreate(savedInstanceState);
// Notification that
Log.i(CLASSNAME, "onCreate"); }
public View onCreateView(LayoutInflater inflater, ViewGroup container, Bundle savedInstanceState) {
Components, Views, and Lifecycle
❘
23return content;
}
public void onStart() { super.onStart();
Log.i(CLASSNAME, "onStart"); }
public void onresume() { super.onResume();
Log.i(CLASSNAME, "onResume"); }
public void onPause() { super.onPause();
Log.i(CLASSNAME, "onPause"); }
public void onStop() { super.onStop();
Log.i(CLASSNAME, "onStop"); }
public void onDestroyView() { super.onDestroyView();
Log.i(CLASSNAME, "onDestroyView"); }
public void onDestroy() { super.onDestroy();
Log.i(CLASSNAME, "onDestroy"); }
public void onDetach() { super.onDetach();
Log.i(CLASSNAME, "onDetach"); }
////////////////////////////////////////////////////////////////////////////// // Minor lifecycle methods
//////////////////////////////////////////////////////////////////////////////
public void onActivityCreated() {
// Notification that the containing activiy and its View hierarchy exist Log.i(CLASSNAME, "onActivityCreated");
}
/////////////////////////////////////////////////////////////////////////////// // Overrides of the implementations ComponentCallbacks methods in Fragment ///////////////////////////////////////////////////////////////////////////////
@Override
public void onConfigurationChanged(Configuration newConfiguration) { super.onConfigurationChanged(newConfiguration);
// This won't happen unless we declare changes we handle in the manifest if (L) Log.i(CLASSNAME, "onConfigurationChanged");
}
@Override
public void onLowMemory() {
// No guarantee this is called before or after other callbacks if (L) Log.i(CLASSNAME, "onLowMemory");
}
/////////////////////////////////////////////////////////////////////////////// // Implementation of TabListener
///////////////////////////////////////////////////////////////////////////////
The following three methods implement the TabListener interface. They are passed a
FragmentTransaction object, which aggregates all the actions taken when navigating between fragments. Here, you simply show or hide the fragment.
@Override
public void onTabReselected(Tab tab, FragmentTransaction ft) { // TODO Auto-generated method stub
} @Override
public void onTabSelected(Tab tab, FragmentTransaction ft) { ft.show(this);
} @Override
public void onTabUnselected(Tab tab, FragmentTransaction ft) { ft.hide(this);
}
/////////////////////////////////////////////////////////////////////////////// // Implementation of SetData
///////////////////////////////////////////////////////////////////////////////
The following is the setData method, which implements the SetData interface. This interface tells this fragment what data it should display.
@Override
public void setData(Bundle data) { // Display the number
EditText t = (EditText) getActivity().findViewById(R.id.editText1);
Tying Together Activities, Fragments, and the Action Bar
❘
25int i = data.getInt("place"); t.setText(Integer.toString(i)); }
}
The ItemDetailFr
agment Class
The ItemDetail fragment class is similar enough to the ItemFragment class that it does not merit displaying the listing in this chapter. You can fi nd it in the fi le ItemDetailFragment .java in this chapter’s downloadable fi les available at www.wrox.com and https://github.com/ wileyenterpriseandroid/Examples.git.
TYING TOGETHER ACTIVITIES, FRAGMENTS,
AND THE ACTION BAR
The Android APIs provide you with infi nite ways to design your user experiences. Your challenge is to fi nd a consistent path through those infi nite choices that can be considered “typical.” One typical approach is to combine the Activity, Fragment, and ActionBar classes, along with the View class hierarchy and tabs to provide a user experience that resembles other well-designed Android applications. The TabbedActivity class in Listing 1-4 glues together the use of Activity, Fragment, and ActionBar.
The TabbedActivity Class
The TabbedActivity class is an abstract subclass of Activity. The other Activity subclasses in this application framework extend TabbedActivity, and if you go on to use this framework, the Activity subclasses you add to this framework will also likely extend this class.
As an abstract parent class of the concrete classes in this framework, TabbedActivity provides some capabilities inherited by those subclasses, specifi cally:
➤ Enabling tabs in the action bar to select among fragments
➤ Enabling the app to load data into fragments
➤ Abstracting whether the user interface is on one large screen, or divided across two smaller screens
LISTING 1-4: TabbedActivity.java
package com.enterpriseandroidbook.fragmentframework;
import android.app.ActionBar; import android.app.ActionBar.Tab;
import android.app.ActionBar.TabListener;