Digital Library Digital Library
Bulletins 4000 - Agriculture
9-2003
Successful field pea harvesting Successful field pea harvesting
Glen Riethmuller Ian Pritchard
Follow this and additional works at: https://researchlibrary.agric.wa.gov.au/bulletins
Part of the Agriculture Commons, Agronomy and Crop Sciences Commons, and the Soil Science Commons
Recommended Citation Recommended Citation
Riethmuller, G, and Pritchard, I. (2003), Successful field pea harvesting. Department of Primary Industries and Regional Development, Western Australia, Perth. Bulletin 4569.
This bulletin is brought to you for free and open access by the Agriculture at Digital Library. It has been accepted for inclusion in Bulletins 4000 - by an authorized administrator of Digital Library. For more information, please contact [email protected].
Successful Field Pea
Harvesting
Bulletin No. 4569 ISSN 1326-415X September 2003
Successful Field Pea
Harvesting
Glen Riethmuller, Dryland Research Institute, Department of Agriculture, Merredin;
Ian Pritchard, Centre for Cropping Systems, Department of Agriculture, Northam.
September 2003
Contents
Introduction. ... 5
Background. ... 5
Harvest Preparation. ... 6
When to start. ... 7
Desiccation. ... 8
Choose Your Speed. ... 9
Direction. ... 10
Harvest methods. ... 10
Windrowing. ... 12
Other general comments. ... 13
Handling Dirt. ... 13
Harvester field operation. ... 14
Field Trials. ... 16
Windrowing trials. ... 19
Harvestaire lifters. ... 21
Plucker type fronts. ... 23
Phillips pea pick-up. ... 24
Experimental Program. ... 25
Introduction
Many thousands of hectares of field peas are harvested trouble free each year. Growers experience together with recent machinery innovations and modifications have solved the majority of harvesting difficulties. Optimum harvesting conditions are in a crop of uniform density on a level soil surface with the machine either working into or across the direction that the crop has been laid by the wind.
To make harvest easier the receival standard for moisture in pulses has been lifted to 14 per cent, which allows harvest to begin sooner when the crop is the range of 14 to 15 per cent moisture. Harvesting at higher moisture levels has a wide range of advantages for growers, grain handlers (CBH), buyers and end users of our pulse crops.
Background
Successful field pea harvesting depends on several management decisions made before and at the start of the season - it is inviting trouble to wait until the end of the season to think about harvest.
Many of the problems encountered at harvest are the result of poor paddock preparation as even the most efficient harvesters cannot overcome:
• poor paddock selection, (mountain goat country)
• low sowing rate, (find the filed pea plant) or
• an uneven paddock surface.(trench warfare)
Harvest preparation
Preparation for harvest starts at the previous season’s harvest through paddock selection and stubble handling, and continues through sowing and spraying of the field pea crop.
Paddock Selection
Probably the most important step in reducing difficulties at harvest time, is to select a paddock with a low weed burden, particularly broad-leaved weeds, and which is relatively even and free of stones, sticks and large soil clods. Broad-leaved weeds such as wild radish and mustard decrease yield by competition and increase harvest losses.
Stubble Handling
If stubble is retained from the previous crop, ensure that it is properly managed. The best way to reduce clumping from stubble is to cut the previous crop short and chop and spread everything that goes through the harvester evenly out the back. Chaff spreaders are available to fit most modern harvesters.
Sowing
Sowing should
• Aim to establish a ‘mat’ of 40 to 50 field pea plants per square metre and
• Leave the soil surface level and clean.
If the soil surface is left relatively smooth after seeding, the harvester front can be set at an exact height without having to worry about the different pick-up height between the seeding furrows.
Seed Drill
Your choice of seed drill can have a significant effect on how level the paddock is after sowing. Disc seed drills tend to leave the paddock flatter than tined machines since rocks are not dug up and soil ridges are lower.
Harrowing immediately after sowing reduces ridge height and the trailing of weldmesh, chain, rotary harrows or even wire rope immediately after sowing may also be useful in levelling the soil surface.
Rolling
Both rubber-tyred and steel rollers can be used successfully, with the choice depending largely on soil conditions. The heavier steel rollers probably do a better job in levelling heavier soil types and pushing small rocks and sticks into the soil surface, but should not be used immediately after rain as this could smear or seal the soil surface. The lighter rubber-tyred rollers work well on sandier surface soils.
Field peas may be rolled immediately after sowing or from the three to five node stage up to the 10 to 12 node stage (20 to 30 cm in height). To cause the least amount of damage from post-emergent rolling, roll when the field peas are limp, say in mid-afternoon. Crops should not be rolled for two weeks before or after applying a post-emergent herbicide.
Retaining cereal stubble with the field pea crop means that the field pea crop must be rolled to anchor the cereal stubble in the ground to reduce the amount of cereal stubble and sand harvested with the field peas.
When to start
With the lifting of the moisture receival standard to 14 per cent for field peas, they will be one of the first if not the first crop ready to harvest. Harvesting should start as soon as the majority of the pods are dry and the seeds hard. Do not wait for the odd green pod, plant or patch to hay off.
The aim is to lift the crop into the harvester as a mat, like rolling up a carpet. Efficient operation depends on the make and model of the harvester as the angle of the front varies from machine to machine and will require a different arrangement for best performance. The “angle of attack” will also depend on whether lifters, a plucker, or simply a finger
tine reel set well forward and down is used. In all situations a gentle pick-up system should be used to reduce shedding losses.
The crop conditions will affect how the harvester operates with a marked difference between early morning (damp) and mid afternoon (dry and brittle).
Desiccation
From a practical point of view, both croptopping and desiccation of field peas can be regarded as the same thing. Occasionally, a field pea crop can be well past the stage where it would be considered for croptopping for ryegrass control but still be ripening unevenly or have troublesome broad-leaf weeds growing up through the crop. At this stage, deciding on the timing of chemical application is relatively easy, as the field pea crop is virtually ready to harvest.
Desiccation can occur once the seeds have reached 30 per cent moisture. This is difficult to assess so a rule of thumb would be to desiccate or swath once the lower 75 per cent of pods are brown, seeds are firm and shells thin and leathery.
The crop will still have green tips. Desiccating earlier will result in smaller seeds, reduced yield and an increased proportion of green immature seeds in the sample. Harvest can usually begin 6 to 10 days after desiccation, depending on weather conditions after desiccation. Most desiccation trials have used high rates of diquat (Reglone“), but paraquat (Gramoxone“) has been known to do the job to at more economic rates.
There are many advantages to harvesting as early as possible.
Increased Yield.
• Grain losses are reduced because pods are tougher and less prone to shattering.
• The crop stands more erect and flows better into the harvester.
Improved Grain Quality.
• Delaying harvest, particularly if the weather is wet, reduces germination rate, increases disease carry-over and results in discoloured and brittle seeds.
• Quality is also improved if grading and associated handling are done at the higher moisture content.
Less Pea Weevil.
• Pea weevil damage and carry-over is reduced. Up to 90 per cent of harvest losses and damage attributed to pea weevil may be prevented by early harvest and immediate fumigation.
Less Machinery Wear.
• Less wear and tear on headers due to less soil and dust contamination.
Choose your speed
Excessive speed causes large harvest losses and excessive dirt entering the harvester. Generally speeds greater than 8 kph are not recommended, regardless of the type of harvester front used. Floating flexible cutter bars may be the one exception, since the knife follows very closely to the contour of the ground, which also makes driving relatively easy.
The cost of speed
Harvest speed 6 kph 8 kph
Hectares/hour 4.1 5.5
Time to harvest 40 ha1 9 hrs 45 mins 7 hrs 16 mins
Harvest efficiency2 100% 95%
Paddock yield3 40 t 38 t
1 Based on a 9.1 m front and 75% field efficiency.
2 A 5% harvest loss attributed to an increase in speed.
3 A 1 t/ha yield.
Direction
The direction of the crop lay depends on the wind direction at the critical stage of crop growth. If the seedbed has been left level the harvester may either work into or across the direction that the crop has been laid by the wind. This alone can reduce the front-end losses by as much as 30 per cent when compared with harvesting in the same direction as the crop has lain. However, this is not a option if the paddock surface has been left excessively ridged due to seeding (see Harvest Preparation). Working across the lay also restricts the use of PTO headers as they cannot work up and back.
Harvest methods
Crop Lifters
Crop lifters are probably the cheapest and most widely used method for field pea harvesting.
Some of the advantages of crop lifters are:
• They can be fitted to both open and older closed front harvesters.
• They can cut through tough weeds like radish.
• Harvest can start earlier then pluckers since the vines are cut, not pulled.
• Harvest may be slightly faster then pluckers.
Some of the disadvantages of crop lifters are:
• They require high driver concentration for comb height.
• Rocks and sticks may damage the lifters.
• Most commercial brands will not fit on double-density knife guards.
The tine reel should be adjusted so that the tine angle is perpendicular to (at right angles to) the top of the crop lifter and the axis of the reel should be positioned above the front tip of the lifter. This allows the reel to bring the crop up the lifter with a gentle lifting action. If the reel is too far back it will push the crop down when the lifter is trying to lift the crop.
Plucker Type Fronts
The main difference between harvesting with a plucker type front as opposed to crop lifters is that the plucker fronts lift and pull the crop off rather than cutting the crop with a knife.
They range in price depending on type but all are more expensive than lifters.
Some of the advantages of pluckers are:
• They are generally easier on the driver because less concentration on comb height is needed than with lifters.
• They are less likely to bring larger rocks, soil and sticks into the header.
• There may be less harvest loss in uneven or thin crops.
• They may be able to handle an uneven soil surface better than lifters.
Some of the disadvantages of pluckers are:
• They may have to travel at slower ground speeds than lifters.
• They may be less efficient if lots of tough weeds are present.
• There may be less opportunity to harvest early because green vines may not pull out of the ground.
Cylinder Pluckers
The cylinder or barrel plucker is one of the simplest forms of plucker. The reel is replaced with a cylinder that has fixed tines extending out from it. It has height control wheels at the ends and rotates in the opposite direction to the ground wheels.
Cylinder pluckers are the least expensive type of plucker as there are less moving parts but the lifting action may not be as gentle as with belt pluckers. This is because the diameter of the cylinder is larger than the diameter of the front section of belt pluckers, so the cylinder type tends to throw the peas forwards before lifting.
Windrowing
Windrowing with a swather
Another option for harvesting field peas is windrowing with a swather but it requires a self-propelled swather with a finger tine reel and lifters. Ideally, it should also be fitted with end coulters to avoid crop build-up around the front ends.
Unlike most crops, which are swathed green, field pea windrows tend to blow around, as they are light and fluffy. This can be true even when the swaths are rolled with a canola roller.
The use of lifters on the front of the swather prevents small rocks and sticks being moved into the windrow but should a larger rock or stump be brought into the windrow, the swather driver can warn the following harvester driver on the two- way radio. In this way risk of damage to the harvester can be reduced and the speed of harvest can be quite high at 10 to 12 km per hour.
The moisture condition of the crop is important since if the crop is too dry it can shatter in the windrow and if the crop is too moist the harvester will have trouble threshing the crop.
Windrowing with a stubble rake
Some farmers have found raking the field peas into a windrow with a stubble rake, such as the Wilkins stubble rake, to be reasonably successful. A canola pick-up front can be used but it is best to add a coulter to the inside edge to cut vines from the side of the windrow next to the bulk crop.
Some advantages are:
• More suitable for rocky soil where breaking rigid lifters could be a problem.
• Lower costs if a rake can be borrowed or hired.
• Saves harvester time in a thin crop as several rake runs can be added together.
• A PTO header could be used to pick up the swath as it can work round and round.
The main disadvantages are:
• Field losses might be higher if the crop is very dry and pods shatter.
• Soil clods and sticks might be raked into the windrow.
Other general comments
In certain situations, finger tine reels have been used without crop lifters. The reel setup is important as it must be in front of the knife with the tines angled backwards and turning faster than ground speed. The finger or pick-up reel tines also need to get very close to the ground without touching it and the harvest direction should be at right angles to the lay of the crop. This may be popular with contractors who do not know the paddock conditions.
This method has some advantages such as:
• Being able to harvest with less soil thrown onto the table than with lifters.
• Less risk of picking up sticks that can damage the harvester compared to lifters.
The main disadvantage is that it may not be as efficient as lifters regarding field losses.
Handling dirt
Despite all due care, more dirt will be picked up when harvesting field peas than with cereals because of the generally lower harvest height of field peas.
To reduce the amount of debris entering the harvester, a number of options are possible:
Table Height
Operate the harvester with the table as high off the ground as possible to reduce the pick up of dirt, while keeping harvest losses to a minimum.
Crop Lifters
Adjust any crop lifters to have light soil pressure to prevent digging into the soil, which can cause soil clods to splash onto the table.
Screens
Fit screens or perforated bases under the platform auger and/
or the broad elevator. Beware of modifying the broad elevator with non-genuine parts as it is a structural member on most modern machines. This removes most of the dirt before it enters the harvester, reducing the abrasive effect on the threshing system. Screens or perforated bases can also be fitted to the clean grain elevator, repeat elevator and the out-loading auger to remove additional soil from the sample. Make sure that these are regularly cleaned. These screens can also remove small or cracked grain and volunteer cereals.
Harvester field operation
The key to good harvesting efficiency is to get the drum or rotor speed and concave clearance correct before adjusting the cleaning area.
Start with a low concave clearance and a slow drum speed then:
• If the seed is damaged, increase the concave clearance.
• If threshing is not complete, increase the drum or rotor speed.
FIGURE 1
Screens fitted to clean grain elevator and repeat elevator
• To increase the harvester capacity, increase the drum or rotor speed and concave clearance.
• If the sample is very clean and some seed is going over the top sieve, reduce the fan speed.
• If there is excessive trash in the repeat elevator or the bottom sieve is overloaded, reduce the top sieve opening.
• If there is unthreshed material or chaff in the grain sample, reduce the bottom sieve opening.
• Harvester settings will depend on crop foliage and seed moisture, but the following table may be a useful starting guide as well as reading the header operator’s manual.
*Drum or rotor speed should be kept to a minimum without significantly reducing the harvesting capacity. As a guide, to reduce pulse seed damage, the peripheral speed of the drum should not be greater than 12 metres per second (20 to 30 metres per second for cereals). The drum speed will be different for each drum diameter according to the following formula.
Drum speed (rpm) =
60,000x peripheral drum speed (m/s) 3.14 drum or rotor diameter (mm)
Harvesters have a range of drum or rotor diameters so this will have to be checked in order to start at around the correct rotational speed.
Suggested harvester settings for field peas
Component Field Peas
Reel speed 1.1 x ground speed
Spiral or table auger clearance 7 - 12 mm (standard)
Drum speed * 300 - 600 rpm
Concave clearance 10 - 25 mm (start at 10 mm)
Fan speed 60 - 75% (start at 75%)
Top sieve 20 - 25 mm (start at 25 mm)
Bottom sieve 10 - 15 mm (start at 15 mm)
Field trials
Selecting a relatively flat paddock free of large sticks, stones and large soil clods at seeding is the first, and probably most important step in making harvesting trouble-free.
The second is how level the paddock is after sowing. The choice of seeder and whether the paddock is rolled or not has a significant effect on how level the paddock is after sowing.
Several methods of seeding and harvesting have been trialed on farms with the following results.
Disc seeders (Figure 2) tend to leave the paddock flatter than tined machines since rocks are not disturbed and soil ridges are lower. The problem with the ridged surface from the tined machine, if it were used for field peas, is that the tips of crop
FIGURE 2
John Stone’s seeder with press wheels Drum or rotor diameters and rotational speed for a
selection of harvesters
Make Model Drum or rotor Drum or rotor
diameter speed for (mm) 12 mps (rpm)
Case IH 2388 762 300
Cat Lexion 480 600 380
Claas 116CS 450 510
Gleaner R70/72 635 360
John Deere CTS 660 350
Massey Ferguson 860 560 410
New Holland TR98 432 530
lifters would hit the inter-row mound and either dig in or flick soil into the front of the harvester. Pick-up reels would also tend to scoop soil into the front and plucker type fronts could flick clods of soil forwards up onto the peas in front, which could then be brought into the harvester. A potential disadvantage of disc seeders is if the soil is fairly dry or hard soil penetration can be a problem.
Tined machines can be used successfully. Mick Quartermaine from Katanning uses trailing Agmaster harrows, which are quite aggressive and shift soil across the sown furrows leaving the ground quite flat. The use of harrows is necessary in heavier soils where the roller on its own may not be enough to flatten the soil surface after seeding. Rolling after rain can help crush soil clods and can give a flatter seedbed, but heavier steel rollers may seal the soil surface, so should not be used after rain.
Mick rolls the ground with a rubber tyred roller immediately after sowing (Figure 3). The roller pictured weighs about 1.5 tonnes and is made up of twenty-inch truck tyres, combined to give a width of seven metres. Sump oil was included in the centre for extra weight.
FIGURE 3
Mick Quartermaine’s tyre roller
Rolling should ideally be done immediately after sowing. There are various types and configurations of rollers. A hydraulic folding steel roller from Canada, which is 12.2 metres wide, is also now available in Western Australia.
Field pea paddocks can also be rolled any time after the four node stage of field pea development until just prior to flowering.
Rolling post emergent although not as good as rolling at seeding, appears to work well when done mid afternoon when the plants are limp, as there is less crop damage. If the soil is dry / hard however, the roller is less effective at pushing rocks and sticks into the soil.
Field peas have been rolled when about 30 centimetres high.
Although this did help flatten the soil, it also damaged the plants. The plants stood up again a few days later, and there appeared to be no yield penalty for this very late rolling compared to the unrolled sections of this paddock but it may have increased disease levels and could result in yield penalties in a wet growing season.
The choice of seeding techniques and the use of harrows and rolling determine pre-emergent chemical application options.
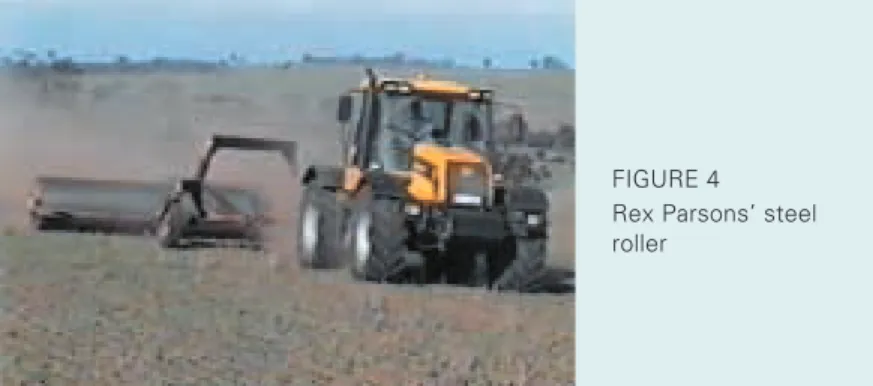
Mobile herbicides, such as Diuron, if applied to press wheel furrows left by the seeder, can concentrate the Diuron in the A heavier steel roller (Figure 4) used by Rex Parsons at Jerramungup weighs about two tonne and can be filled with water to make it heavier. This heavy roller is better than a rubber tyre roller at pushing rocks and sticks into the ground, but there is clearly a limit to what even it can do, as large rocks will still be a problem.
FIGURE 4 Rex Parsons’ steel roller
furrows, causing damage to the emerging field pea seedlings.
To avoid this, Diuron may be applied before seeding, so that the seeding machinery pushes the soil and the chemical away from the bottom of the furrow.
Windrowing trials
Swather
Contractor Scott Crosby (Figures 5 and 6) has had success in the Great Southern region swathing when the crop is ripe, directly in front of the harvester. This reduced the risk of the windrow being blown away.
FIGURE 5 Swathing peas
FIGURE 6
Swath pick-up with
Scott also found the moisture condition of the crop was important since if the crop was too dry it would shatter in the windrow and if the crop was too moist the harvester had trouble threshing the crop. Generally though, he found achieving suitable moisture for both operations was not a great problem.
Stubble rake
Raking the field peas into a windrow with a stubble rake, such as the Wilkins stubble rake (Figure 7), has been reasonably successful. The rake was set at two-thirds open, travelling at a slow speed (8.5 kph), to produce a continuous windrow without gaps. The rake was set as low as possible so as to pick up most of the pea crop, while not low enough to bring rocks into the windrow.
FIGURE 7
Wilkins rake in a field pea crop
FIGURE 8
Picking up windrows
A canola pick-up front (Figure 8) can then be used but it is best to add a coulter to the inside edge to cut vines from the side of the windrow adjacent the bulk crop. The front was as low as possible without picking up stones and the belt speed was at maximum speed to maintain a continual flow into the header, thus reducing build-up of the swath in front of the pick-up.
Harvestaire lifters
Figure 9 shows a pea-harvesting front on a machine owned by John Stone of Borden It has Harvestaire lifters on an open front with a table auger. These lifters have to be set so that the tip of the lifter is as low to the ground as possible to avoid a build up of vines around the tip.
Since his lifters do not fit on double density knife guards, John has replaced every second guard with a single density guard to avoid blockages around the lifter mounting. The Harvestaire lifters are fragile and have not withstood robust conditions.
FIGURE 9 John Stone’s Harvestaire lifters
Heaslip lifters
Figure 10is a belt or draper type front on Ian Shadbolt’s harvester at Muckinbudin. Ian uses the relatively expensive Heaslip lifters that float on the ground surface since they are hinged at the knife. The tip of the lifter is spring-loaded to allow travel over obstructions such as stumps or rocks without damaging the lifter. On the other hand, many growers find this tip hinges back, which then causes blockages requiring lots of reversing.
This lifter does however have a very good wear surface on the tip and can get under very low vines. The spacing of 300 mm is very good for medium to dense crops, but light crops may need more closely spaced lifters.
John Deere lifters
These lifters (Figure 11), like the Heaslip lifters, also hinge at the knife to follow the ground contour. Ian Reid is using them successfully on a belt type front at his farm near Pingrup.
FIGURE 10
FIGURE 12
Chris Quartermaine’s barrel plucker FIGURE 11
Plucker type fronts
Sund raking pick-up front
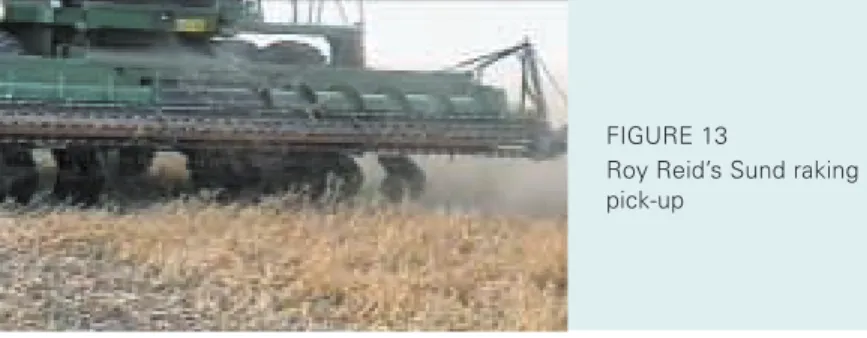
The Sund make of plucker (Figure 13) has been available for a long time worldwide. It has light steel curved finger tines that gently rake the crop up and allows soil and small stones to fall through the finger tines. The harvester’s normal reel-speed regulator controls the speed of the raking action as it uses the same hydraulic motor. The original knife does not have to be removed. The maximum width of front is currently 8.2 metres and this may be one of the disadvantages as it may be less that the harvester’s normal front. As with other plucker fronts, ground speed is reduced relative to crop lifters.
There are a number of Sund machines working in the Great Southern region and, in most cases, farmers have chosen to mount the Sund front permanently on a false front. This allows
FIGURE 14 Phillips pea pick-up FIGURE 13
Roy Reid’s Sund raking pick-up
them to quickly connect and disconnect the front. However, the experience of one farmer has been that mounting the Sund pick-up on a belt or draper type front is not successful as the increased depth of the draper front puts the heavy Sund pick-up out too far in front of the machine.
Phillips pea pick-up
This is a relatively new pick-up made in Merredin, Western Australia and is a development from the Swathmaster pick-up design from Canada. It was tested in 2000 for the first time in a field pea crop near Merredin and was also tried by Rex Parsons at Jerramungup and Greg Tyrill at Esperance.
It has a twin roller, multi-belt design that can be fitted onto harvester fronts without removing the knife. It can also be fitted on fronts up to 9.1 metres wide. The belt drive is via twin hydraulic motors connected in parallel to the normal harvester reel hydraulics.
The belt speed varies with the crop type and maturity, but is generally faster than for canola crops. The adjustable finger pick-up is positioned as close to the ground as possible, without increasing stone pick up. The pick-up speed should match the ground speed of the harvester. The pick-up is height self- adjusting and is independent of the broad elevator, so the pick-up follows the ground variations.
FIGURE 15
Floating flexible cutter bar - a flexi-front
Maintenance is low with daily greasing required on wheels and swivels, but only annual adjustments on belt tension.
Floating flexible cutter bars
Floating flexible cutter bars or flexi-fronts have a floating knife that can bend along their length to follow the ground contour and stay very close to the ground without the extreme driver concentration needed with conventional fronts. They are ideal for short crops or crops which lay on the ground like field peas (Figure 15). The knife floats on skid plates and the pressure on the ground is adjustable. They need lifters as well but may allow shorter lifters to be used since the knife is closer to the ground. One word of caution: set the reel height carefully, because if the knife flexes upward it may catch the tines of the reel.
Most major harvester manufacturers now make a flexible knife front, but they can be up to 20 per cent more expensive than a standard open front. A flexible knife cannot be fitted to a standard front so the complete flexi-front has to be purchased.
The ideal time to consider a flexi-front is when buying a new harvester.
Experimental program
As part of a project looking at ways of reducing wind erosion in field pea stubbles, comparisons between harvester front types were carried out at the Dryland Research Institute Merredin between 1988 and 1990.
In 1988 the harvesting efficiency of simple pea crop lifters and a plucker front was compared. This trial showed no significant differences in losses between the two systems. A Knuckey belt type pick-up was included in 1989 to compare with the crop lifters. This trial showed considerable differences at the 95 per cent confidence level, between the belt pick-up and the crop lifters. In a 1.2 t/ha crop, the belt pick-up was found to have an average seed loss of 28 kg/ha, (2.2 per cent), while the crop lifters averaged a loss of 82 kg/ha, (7.0 per cent).
For the 1990 season, trial plots were planted with two varieties, Wirrega and Dundale, at three plant densities of 30, 45 and 60 plants per square metre. Three different types of pea harvesting fronts were used to harvest the plots: Heaslip pea lifters, the Knuckey belt pick-up as used in 1988, and the tine plucker constructed in 1989. There were important differences between each front regardless of crop variety or crop density. The belt pick-up had the lowest front losses at 32 kg/ha (2.5 per cent of the yield), the lifters were next with 47 kg/ha (3.6 per cent), and the tine plucker lost 65 kg/ha (five per cent). The Wirrega plots had much lower front losses at 40 kg/ha (three per cent) than the Dundale plots at 56 kg/ha (4.3 per cent) regardless of the front type. The front losses were not affected by crop density.
Analysis of the crop yields showed no real difference between the two varieties with a mean yield of 1.3 tonne per hectare.
As you would expect, there were large differences in the yields at the different crop densities. The 30 plants per square metre plots had a mean yield of 1073 kg/ha, the 45 plants per square metre plots had a mean yield of 1305 kg/ha and the 60 plants per square metre plots had a mean yield of 1473 kg per hectare.
The main conclusion from this trial is that the belt type pick- up is better at harvesting field peas than crop lifters. To give an idea of the economic benefits of reducing the front losses, the saving between the pick-up and the lifters was $108/ha in 1989 and $30/ha in 1990 based on field peas worth $200 per tonne.
The comparison trials were done with a harvester ground speed of 4 kph so the loss figures appear low compared to the front losses in the paddock.
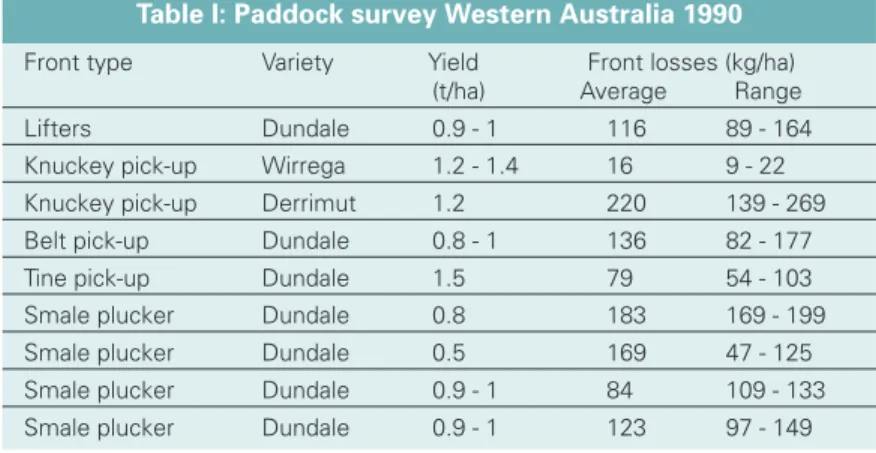
Paddock evaluation of fronts
Table 1 shows the level of harvest front losses you can expect in the paddock. The influence of front type is fairly small compared to the influence of crop type and growth and the paddock condition. For versatility and handling a wide range of harvesting conditions, pick-up or plucker fronts tend to give better results. With the pick-up or plucker fronts ground clearance is less important than with fronts with lifters, allowing the harvester to go faster and making night harvesting easier.
The disadvantage of the pick-up or plucker fronts is their cost compared with crop lifters, so to justify the extra cost of the pick-up or plucker a large area of field peas needs to be harvested.
Table I: Paddock survey Western Australia 1990 Front type Variety Yield Front losses (kg/ha)
(t/ha) Average Range
Lifters Dundale 0.9 - 1 116 89 - 164
Knuckey pick-up Wirrega 1.2 - 1.4 16 9 - 22
Knuckey pick-up Derrimut 1.2 220 139 - 269
Belt pick-up Dundale 0.8 - 1 136 82 - 177
Tine pick-up Dundale 1.5 79 54 - 103
Smale plucker Dundale 0.8 183 169 - 199
Smale plucker Dundale 0.5 169 47 - 125
Smale plucker Dundale 0.9 - 1 84 109 - 133
Smale plucker Dundale 0.9 - 1 123 97 - 149
The best way of reducing losses is to prepare the paddock beforehand and have a smooth surface for the harvester to work over, and to harvest across the lay of the crop. Other simple additions like a front height indicator and dragging a chain to reduce static electricity and dust clinging to the harvester will help to improve harvest efficiency.
The experimental program was conducted by Ed Blanchard, Agricultural Engineer, formerly Department of Agriculture Western Australia, Dryland Research Institute, Merredin.
Further reading
Pritchard I. (1993) Growing field peas. Department of Agriculture, Bulletin 4239.
Riethmuller G. P. (1996) Harvest loss estimation. Department of Agriculture, Farmnote 104/96. http://www.agric.wa.gov.au/
agency/pubns/farmnote/1996/f10496.htm 50
0
Lifters Knuckey pick-up
Knuckey pick-up
Belt pick-up
Tine pick-up
Smale plucker
Smale plucker
Smale plucker
Smale plucker 100
150 200 250
Harvest front losses (kg/ha)
Notes
Notes
Notes