C# 3.0
Jack Purdum
C# 3.0
Acknowledgments ... xi
Introduction ... xxi
Part I: Getting Started
Chapter 1: Getting Started ...3
Chapter 2: Understanding Objects ...19
Part II: Understanding C# Syntax
Chapter 3: Understanding Data Types ...53
Chapter 4: Understanding C# Statements ...75
Chapter 5: Understanding Reference Data Types ...99
Chapter 6: Making Decisions in Code ...135
Chapter 7: Statement Repetition Using Loops ...153
Chapter 8: Arrays ...175
Part III: Writing Your Own Classes
Chapter 9: Designing Classes ... 207
Chapter 10: Designing and Writing Custom Classes ... 233
Chapter 11: Exception Handling and Debugging ... 271
Chapter 12: Generics ... 299
Part IV: Storing Data
Chapter 13: Using Disk Data Files ... 329
Chapter 14: Using Databases ... 395
Chapter 15: Inheritance and Polymorphism ... 443
Appendix A: Exercise Solutions ... 465
C# 3.0
Jack Purdum
Wiley Publishing, Inc.
10475 Crosspoint Boulevard Indianapolis, IN 46256
www.wiley.com
Copyright © 2007 by Wiley Publishing, Inc., Indianapolis, Indiana
ISBN: 978-0-470-26129-3
Manufactured in the United States of America
10 9 8 7 6 5 4 3 2 1
Library of Congress Cataloging-in-Publication Data:
Purdum, Jack J. (Jack Jay)
Beginning C# 3.0 : an introduction to object oriented programming / Jack Purdum. p. cm.
Includes index.
ISBN 978-0-470-26129-3 (paper/website)
1. Object-oriented programming (Computer science) 2. C# (Computer program language) I. Title. QA76.64.P88 2008
005.13'3—dc22
2008011056
No part of this publication may be reproduced, stored in a retrieval system or transmitted in any form or by any means, electronic, mechanical, photocopying, recording, scanning or otherwise, except as permitted under Sections 107 or 108 of the 1976 United States Copyright Act, without either the prior written permission of the Publisher, or authorization through payment of the appropriate per-copy fee to the Copyright Clearance Center, 222 Rosewood Drive, Danvers, MA 01923, (978) 750-8400, fax (978) 646-8600. Requests to the Publisher for permission should be addressed to the Legal Department, Wiley Publishing, Inc., 10475 Crosspoint Blvd., Indianapolis, IN 46256, (317) 572-3447, fax (317) 572-4355, or online at http://www.wiley.com/go/permissions.
Limit of Liability/Disclaimer of Warranty: The publisher and the author make no representations or warranties with respect to the accuracy or completeness of the contents of this work and specifically disclaim all warranties, including without limitation warranties of fitness for a particular purpose. No warranty may be created or extended by sales or promotional materials. The advice and strategies contained herein may not be suitable for every situation. This work is sold with the understanding that the publisher is not engaged in rendering legal, accounting, or other professional services. If professional assistance is required, the services of a competent professional person should be sought. Neither the publisher nor the author shall be liable for damages arising herefrom. The fact that an organization or Website is referred to in this work as a citation and/or a potential source of further information does not mean that the author or the publisher endorses the information the organization or Website may provide or recommendations it may make. Further, readers should be aware that Internet Websites listed in this work may have changed or disappeared between when this work was written and when it is read.
For general information on our other products and services please contact our Customer Care Department within the United States at (800) 762-2974, outside the United States at (317) 572-3993 or fax (317) 572-4002.
Trademarks: Wiley, the Wiley logo, Wrox, the Wrox logo, Wrox Programmer to Programmer, and related trade dress are trademarks or registered trademarks of John Wiley & Sons, Inc. and/or its affiliates, in the United States and other countries, and may not be used without written permission. All other trademarks are the property of their respective owners. Wiley Publishing, Inc. is not associated with any product or vendor mentioned in this book.
Acquisitions Editor
Chris Webb
Development Editor
Ed Connor
Technical Editor
Caleb Jenkins
Production Editor
William A. Barton
Copy Editor
S. B. Kleinman
Editorial Manager
Mary Beth Wakefield
Production Manager
Tim Tate
Vice President and Executive Group Publisher
Richard Swadley
Vice President and Executive Publisher
Joseph B. Wikert
Project Coordinator, Cover
Lynsey Stanford
Proofreaders
Jeremy Bagai, Josh Chase, David Fine, Word One
Indexer
No book is written without massive work by others. Ed Connor, Chris Webb, and a group of editorial people too numerous to mention have all made this a better book.
A large group of other people also contributed to this book, providing everything from encouragement and support to ideas for examples. First, thanks to my students who served as guinea pigs for virtually everything used in this text. Others who played various roles include Tom Bangert, Jay Crannell, Issy Cwynar,
Acknowledgments xi
Introduction xxi
Part I: Getting Started
1
Chapter 1: Getting Started
3
A Short History of Object-Oriented Programming (OOP)
4
Installing C#
5
Downloading C# Express
5
Installing C# Express
6
A Test Program Using C# Express
8
Creating a Project
8
The C# Integrated Development Environment
10
Adding an Object to a Windows Form
12
Running the Program
16
Summary
17
Chapter 2: Understanding Objects
19
Understanding Objects
19
Everyday Use of Objects
20
How Many Properties, How Many Methods?
22
What Do I Do After I’ve Defined a Class?
23
Developing a Program Plan
30
Where to Start?
30
Creating a Simple Application Using Objects
32
Using the Program Steps to Create a Program Plan
33
Using C# to Implement Our Program Plan
35
Adding Program References to Your Project
37
Adding a New Item to the Project
38
Setting the Project Properties
40
Adding Objects to the frmMain Object
41
Constructing the User Interface Object
45
The btnDisplayOutput Click Event Code
46
Critique of the btnDisplayOutput Click Event Code
48
Summary
49
Part II: Understanding C# Syntax
51
Chapter 3: Understanding Data Types
53
Integer Data Types
54
Range of Integer Data Types
54
Which Integer Should You Use?
56
Sequence of Steps to Create a New Project
57
Designing the User Interface
58
Code for the Process Step
58
Variable Naming Rules and Conventions
59
Using the TryParse() Method
60
Floating-Point Data Types
63
Floating-Point Precision
65
Which Floating-Point Data Type Should You Use?
67
Monetary Values: The Decimal Data Type
67
Using Intellisense to Locate Program Errors
68
The Boolean Data Type
70
Summary
72
Exercises
73
Chapter 4: Understanding C# Statements
75
Basic Building Blocks of a Programming Language
76
Operands and Operators
76
Expressions
77
Statements
77
Operator Precedence
78
Overriding the Default Precedence Order
79
Defining Variables
80
Defining a Variable from the Compiler’s Point of View
80
Using a Variable in a Program
83
The Bucket Analogy
85
Types of Program Errors
86
Syntax Errors
86
Semantic Errors
87
The Visual Studio Debugger
87
The Debugging Process
87
Making Repetitious Debugging Easier
88
Using the Debugger
88
Defensive Coding
93
Use Program Comments
93
Use Meaningful Variable Names
95
Avoid Magic Numbers
95
Summary
96
Exercises
97
Chapter 5: Understanding Reference Data Types
99
String Variables
100
Defining a String Reference Variable
100
Why Reference Types are Different From Value Types
103
Reference Variable Rules
104
Reference Type Variables Versus Value Type Variables
105
Why Do Reference Variables Work the Way They Do?
105
Pass by Value versus Pass by Reference
106
A Little Efficiency Gain
106
Using String Variables
107
String Manipulation
108
Strings and Escape Sequences
121
Verbatim String Literals
122
DateTime Reference Objects
123
DateTime and ToString() Conversions
123
Summary 134
Exercises 134
Chapter 6: Making Decisions in Code
135
Relational Operators
136
Using Relational Operators — The if Statement
136
The if-else Statement
140
Shorthand for Simple if-else: The Ternary Operator
141
Style Considerations for if and if-else Statements
142
Nested if Statements
144
RDC
145
Cascading if Statements
146
Logical Operators
147
The switch Statement
150
Chapter 7: Statement Repetition Using Loops
153
Program Loops
153
Good Loops, Bad Loops
154
The for Loop
155
Nested for Loops
162
while Loops
165
Why Have More Than One Type of Loop?
166
do-while Program Loops
167
The continue Statement
171
Summary 172
Exercises 173
Chapter 8: Arrays
175
What is an Array?
175
Some Array Details
177
The Listview Object
183
Arrays are Objects
187
Multidimensional Arrays
189
Initializing Arrays
193
Variations for Initializing an Array
193
Initializing Multidimensional Arrays
195
Initializer Lists for Objects
195
Collections 198
ArrayList Objects
200
Summary 203
Exercises 203
Part III: Writing Your Own Classes
205
Chapter 9: Designing Classes
207
Class Design
208
Adding a Class to a Project
208
Scope
209
Visualizing Scope
213
Why Does C# Support Scope?
214
Designing a Program
215
The Five Program Steps
215
UML Light
219
Access Specifiers
219
UML Methods
222
Think Like a User
224
The clsDates Design
225
namespace Modifier
227
Class Organization
227
User Interfaces Versus User Interfaces
231
Summary 232
Exercises 232
Chapter 10: Designing and Writing Custom Classes
233
Constructors 233
Default Constructors
234
Non-Default Constructors
234
Constructor Overloading
235
Property Methods
237
Getters and Setters
238
What to Do if an Error Occurs in a Property Method
242
Class Design for Deck-of-Cards Program
244
UML Class Diagram
245
Designing a Card Game Using clsCardDeck
256
Summary 269
Exercises 270
Chapter 11: Exception Handling and Debugging
271
Overview
271
Bugs
272
Program Errors
273
Data Validation
273
Limit User Input
274
Exception Handling
282
try-catch Statement Blocks
283
Program Debugging
288
The Nature of the Beast
289
The Visual Studio Debugger
291
Single-Stepping Through the Program
294
Scaffold Code
296
Defensive Coding
297
Chapter 12: Generics
299
What are Generics?
299
Recursion
305
Data Problems
305
What are Generics?
306
Generics Versus ArrayLists
306
Using a Generic Class
314
Generic Quicksort
315
Using Generics with Constraints and Interfaces
319
Interfaces
319
Why Use an Interface?
320
Using an Interface
322
Summary 326
Exercises 326
Part IV: Storing Data
327
Chapter 13: Using Disk Data Files
329
Directories 329
The DriveInfo Class
330
Directory Class
330
DirectoryInfo Class
331
File Namespace
337
FileInfo Class
338
Types of Files
339
Textual Versus Binary Data Files
339
Reading the Data
349
Sequential Versus Random Access Files
350
Sequential Files
350
Random Access Files
351
frmMain
356
Navigating the Records
363
Delete a Record
364
clsRandomAccess 364
Serialization and Deserialization
382
To Serialize or Not to Serialize
388
MDI, Menus, and File Dialogs
388
Adding a Menu
389
Adding a File Open Dialog
390
Summary 394
Exercises 394
Chapter 14: Using Databases
395
What is a Database?
395
The Structure of a Database
396
Designing Fields for a Database Table
397
Using Your Own Databases
400
ADO.NET
401
Using SQL
402
The SELECT Statement
402
The WHERE Predicate
403
The ORDER BY Clause
403
Aggregates
404
Creating a New Database
406
Creating a New Table (CREATE TABLE)
408
Adding Records to a Table (INSERT INTO)
413
Edit a Record (UPDATE)
416
Delete a Record (DELETE)
421
Database Queries
421
Binding a DataGridView Object to a Database
423
Using a DataGridView Object Without Data Binding
426
Using LINQ
432
LINQ Query Keywords
432
Namespaces and References for LINQ
435
Summary 441
Exercises 442
Chapter 15: Inheritance and Polymorphism
443
What is Inheritance?
443
An Inheritance Example
444
Base Classes are Not Derived Classes
459
Abstract Classes
459
Polymorphism 460
Sending the Snow-Removal Message
462
Summary 463
Exercises 463
Appendix A: Exercise Solutions
465
Over the past 25 years I ’ ve written 15 books on various programming topics. You might wonder why so many . . . Didn ’ t I get it right the first time? Well, no, I didn ’ t . . . not really. When I wrote my first book over 25 years ago, object - oriented programming (OOP) was obscure at best and unknown to most. Like so many others, I had to go through the OOP learning process before I could appreciate what OOP was all about. I have a feeling that there are a lot of people out there who still feel that way.
Each time I teach a programming class, I learn new and better ways to explain things. When I look out across a classroom filled with students and it looks like a still - life painting, it ’ s time to back off, retool, and try a different approach to whatever concept it is I ’ m trying to teach. Every class I ’ ve taught has offered new perspectives on how I teach and how students learn. Changing my examples and the techniques I use to teach programming concepts is one of the reasons I came back to teaching after so many years away . . . I missed the learning experience.
A number of the books I wrote were concerned with languages other than C#, but that too provides for an enriching experience for me as an instructor. The strengths and weaknesses of a language can be appreciated only if you ’ ve grappled with some other less - than - perfect languages. The fact that
programming languages continue to evolve supports the conclusion that I ’ m not the only one who is still learning. After all this time, the one thing that I have learned with absolute certainty is that whatever I know today will likely be out of date tomorrow.
Perhaps the real question you should be asking yourself is, Why should I buy this book instead of someone else ’ s book? Good question . . . and a really short answer won ’ t work. A number of factors come into play, but only one really makes a difference. I have absolutely no doubt that there are
programmers out there who can write better code than I can. When I had my own software company, my lead programmer, Tim, could code circles around me. He was an amazing coder. But if you asked Tim to explain something, he fell back toward the end of the line. Indeed, there were times when I thought he fell off the planet.
The thing that makes this book different from many others is the fact that I ’ ve tried the techniques, examples, and approach to teaching the various programming concepts on literally thousands of students. I know what works and what doesn ’ t. I ’ ve suffered through many deer - in - the - headlights examples, refined and reworked them to the point where I can actually see some students have an epiphany during the class. So many authors today are, no doubt, brilliant coders, but they haven ’ t had to stumble through the bad examples and teaching methods that simply don ’ t work. What works for you, the writer, rarely works for everyone else. Writing good code does not necessarily equate to writing good books. Some charmed people are capable of both (I think P.J. Plauger, Jon Bentley, Brian Kernighan, and Steve McConnell are examples), but they are rare and far between. Alas, you ’ ve noticed I did not place myself on the list. However, what I may lack in coding skills is (I think) overcome by my teaching experience. Obviously, you ’ ll be the final judge.
Who This Book is For
The book assumes no prior programming experience. That does not mean, however, that the book is “ dumbed down ” in any way. I build slowly, placing you on solid ground before the next topic is
introduced. I encourage you to write your own programs and do the exercises at the end of each chapter. If you try to take shortcuts, you ’ re actually shortchanging yourself. You should type in every line of code in this book yourself and experiment with it. Do so and you will pick up the language twice as fast and with greater understanding than if you don ’ t do the examples. (You can download the code from the Wrox website. Details are provided later.) You can learn programming only by writing programs and I encourage you to do so at every possible opportunity.
If you have some programming experience, that ’ s fine too. This book will likely be an easy read for you. However, I still think you will learn some things along the way. If you have never programmed
before . . . perfect! You don ’ t have the bad programming baggage so many bring to the experience when they learn a new language.
I think this is the perfect book for someone who knows a programming language but learned that language before object - oriented programming techniques came into existence. I think there are a lot of “ old - timers ” like myself who would like to retrain themselves in OOP techniques and gain a full appreciation of what OOP brings to the table. I believe this books suits that need perfectly.
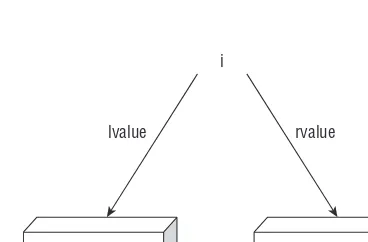
Unlike other books, I don ’ t recommend skipping chapters if you already know a programming language or have some other prior programming experience. If you ’ re familiar with symbol tables, lvalues and rvalues, and the Bucket Analogy, good — but it won ’ t hurt you to read about them again from a different perspective. No shortcuts, remember.
What This Book Covers
This text begins with a non - programming - language introduction to object - oriented programming. The goal of that chapter is to present the concept of objects first and then ease into how objects may be viewed in C#.
Throughout the book I have tried to use common, easily understood examples to introduce new programming concepts. I have covered most of the C# programming language, although there are a few less common topics that I have not covered. I do not feel these omissions are important to the task at hand, which is to teach you OOP using C#. When you have completed this book, you should feel comfortable writing complex OOP programs of your own design.
How This Book is Structured
The sequencing of the chapters was dictated by what I use when I teach this class to freshmen
Each chapter has several exercises at the end of it. You are encouraged to work through those examples before you progress to the next chapter. As I said earlier, you can only learn programming by writing programs. It ’ s easy to get lulled into a false sense of security by reading code and saying, “ Yeah, I got that. ” Perhaps . . . perhaps not. Writing your own programs is the only way to know for sure.
What You Need to Use This Book
All the examples in this book were written using Visual Studio 2008 ’ s C# Express edition. Instructions in Chapter 1 tell you how to download and install C# Express from Microsoft at no charge. It is an
incredible piece of software and has most of the functionality of the full Visual Studio. There are some nice tools missing from the Express edition, but there is enough there for you to experience most of what Visual Studio and C# have to offer. Chances are, after you ’ ve used C# for a while, you ’ ll want to spring for the entire Visual Studio package. I think you ’ ll find it worthwhile.
You should use a Pentium - based system (although emulators also exist for the Mac and Linux and they appear to work well) with at least 1G of memory and 1G (or more) of hard disk space. After those requirements, the system you use is pretty much a matter of taste.
Conventions
To help you get the most from the text and keep track of what ’ s happening, we ’ ve used a number of style conventions throughout the book. What follows is a list of the book ’ s style conventions. (I also use a number of programming conventions, and these are introduced as needed throughout the text.)
Try It Out
The Try it Out is an exercise you should work through, following the text in the book.
1.
They usually consist of a set of steps.2.
Each step has a number.3.
Follow the steps through with your copy of the database.How it Works
After each Try it Out , the code you ’ ve typed will be explained in detail.
Boxes like this one hold important, not - to - be forgotten information that is directly relevant to the surrounding text.
As for styles in the text:
We italicize new terms and important words when we introduce them.
We show keyboard strokes like this: Ctrl+A.
We show file names, URLs, and code within the text like so: persistence.properties . We present code in two different ways:
We use a monofont type with no highlighting for most code examples.
We use gray highlighting to emphasize code that ’ s particularly important in the present context.
Also, Visual Studio ’ s code editor provides a rich color scheme to indicate various parts of code syntax. That ’ s a great tool to help you learn language features in the editor and to help prevent mistakes as you code. While this text does not use the colors that are available, it should in no way detract from the readability of the source code found in the book.
Source Code
As you work through the examples in this book, you may choose either to type in all the code manually or to use the source code files that accompany the book. All the source code used in this book is available for download at http://www.wrox.com . Once at the site, simply locate the book ’ s title (either by using the Search box or by using one of the title lists) and click the Download Code link on the book ’ s detail page to obtain all the source code for the book.
Because many books have similar titles, you may find it easiest to search by ISBN; this book ’ s ISBN is 978 - 0 - 470 - 26129 - 3.
Once you download the code, just decompress it with your favorite compression tool. Alternately, you can go to the main Wrox code download page at http://www.wrox.com/dynamic/books/download .aspx to see the code available for this book and all other Wrox books.
Errata
We make every effort to ensure that there are no errors in the text or in the code. However, no one is perfect, and mistakes do occur. If you find an error in one of our books, like a spelling mistake or faulty piece of code, we would be very grateful for your feedback. By sending in errata you may save another reader hours of frustration and at the same time you will be helping us provide even higher - quality information.
To find the errata page for this book, go to http://www.wrox.com and locate the title using the Search box or one of the title lists. Then, on the book details page, click the Book Errata link. On this page you can view all errata that have been submitted for this book and posted by Wrox editors. A complete book list, including links to each book ’ s errata, is also available at www.wrox.com/misc - pages/ booklist.shtml .
❑
❑
❑
If you don ’ t spot “ your ” error on the Book Errata page, go to www.wrox.com/contact/techsupport .shtml and complete the form there to send us the error you have found. We ’ ll check the information and, if appropriate, post a message to the book ’ s errata page and fix the problem in subsequent editions of the book.
p2p.wrox.com
For author and peer discussion, join the P2P forums at p2p.wrox.com . The forums are a Web - based system for you to post messages relating to Wrox books and related technologies and to interact with other readers and technology users. The forums offer a subscription feature to e - mail you topics of interest of your choosing when new posts are made to the forums. Wrox authors, editors, other industry experts, and your fellow readers are present on these forums.
At http://p2p.wrox.com you will find a number of different forums that will help you not only as you read this book, but also as you develop your own applications. To join the forums, just follow these steps:
1.
Go to p2p.wrox.com and click the Register link.2.
Read the terms of use and click Agree.3.
Complete the required information to join, as well as any optional information you wish to provide, and click Submit.4.
You will receive an e - mail with information describing how to verify your account and complete the joining process.You can read messages in the forums without joining P2P, but in order to post your own messages you must join.
Once you join, you can post new messages and respond to messages other users post. You can read messages at any time on the Web. If you would like to have new messages from a particular forum e - mailed to you, click the Subscribe to this Forum icon by the forum name in the forum listing.
Getting Star ted
Chapter 1: Getting Started
1
Getting Star ted
Welcome to the world of object - oriented programming and C#! The primary goal of this book is to use the C# programming language from Microsoft to teach you object - oriented programming, or OOP. This book assumes that you have no prior programming experience in any language and that you know nothing about OOP.
If you do have programming experience and some familiarity with OOP, that ’ s fine. Having that experience makes things easier for you. However, I still encourage you to read the book from start to finish for a number of reasons. First, this book represents the distillation of 25 years of programming and teaching experience. I have a good idea of what works and what doesn ’ t work when it comes to explaining complex topics so that they ’ re easy to understand. Reading each chapter gives you the tools to understand the next chapter. Second, I may introduce topics in one chapter and then rely heavily on those topics in a much later chapter. In other words, the process used to learn OOP and C# is one that introduces new topics based upon ones that were introduced earlier. Obviously, it ’ s important to master the earlier content before tackling the later content. Finally, the programming examples I use also build on concepts presented in earlier program examples. It will be easier for you to understand the later program examples if you ’ ve experimented with those programs introduced earlier in the book.
One more thing: You cannot learn programming by just reading about it. You have to dig in and start programming yourself. For that reason, there are exercises at the end of each chapter designed to help you hone your programming skills. The learning process is even more interesting if you try to create your own programs based upon some real problems you ’ d like to solve. Don ’ t worry if things don ’ t fall together instantly on the first try. You should plan to make a ton of “ flat - forehead ” mistakes . . . you know, the kind of mistake where, upon discovering it, you pound the heel of your hand into your forehead and say: “ How could I make such a stupid mistake! ” Not to worry . . . we ’ ve all been there. Such mistakes are just part of the process of becoming a
In this chapter, you will learn about
Downloading Visual Studio .NET ’ s C# Express
Installing C# Express
Testing C# Express to ensure it was installed correctly
With that in mind, let ’ s get started.
A Shor t Histor y of Object - Oriented
Programming (OOP)
Many people believe that OOP is a product of the 1980s and the work done by Bjarne Stroustrup in moving the C language into the object - oriented world by creating the C++ language. Actually, SIMULA 1 (1962) and Simula 67 (1967) are the two earliest object - oriented languages. The work on the Simula languages was done by Ole - John Dahl and Kristen Nygaard at the Norwegian Computing Center in Oslo, Norway. While most of the advantages of OOP were available in the earlier Simula languages, it wasn ’ t until C++ became entrenched in the 1990s that OOP began to flourish.
C was the parent language of C++ and it was often said that C was powerful enough to shoot yourself in the foot multiple times. C++, on the other hand, not only was powerful enough to shoot yourself in the foot, but you could blow your entire leg off without too much difficulty. Most programmers admit that C++ is a very powerful language and it is still in widespread use today. However, with that power comes a lot of complexity. Language developers wanted a simpler and perhaps less complex language for OOP development.
The next step in the development of OOP started in January of 1991 when James Gosling, Bill Joy, Patrick Naughton, Mike Sheradin, and several others met in Aspen, Colorado, to discuss ideas for the Stealth Project. The group wanted to develop intelligent electronic devices capable of being centrally controlled and programmed from a handheld device. They decided that OOP was the right direction to go with the development language, but felt that C++ was not up to the job. The result was the Oak programming language (named after an oak tree outside Gosling ’ s window), which eventually morphed into the Java programming language. (Oak had to be renamed because the team discovered that a language by that name already existed.)
Java quickly grew in popularity, spurred by the growth of the World Wide Web. In both cases this rapid growth was in part due to the fact that the “ guts ” necessary to run Java programs on the Web quickly became an integral part of various web browsers. With the improved Web functionality augmented by Java, the Web hit light speed.
To many programmers, C# is Microsoft ’ s answer to Java. Some would even say that C# is the result of Microsoft ’ s stubbornness in refusing to promote a language it did not develop. That sentiment is a bit too harsh. Microsoft had good reasons for developing C#, not the least of which was that it wanted what are known as type - safe programs that run in a managed environment. You ’ re not ready to appreciate exactly what that means right now, but it will become clear as you learn C#.
❑
❑
Suffice it to say that C# provides you with a robust object - oriented programming language and an impressive set of tools to tackle almost any programming task. Whether you wish to develop desktop, distributed, web, or mobile applications, C# can handle the task.
As you become familiar with C#, you will appreciate its relatively few keywords, its crisp syntax, and its easy - to - use development environment. You ’ ll discover that pieces of programs you write in C# can be reused in other programs. Finally, you might appreciate the fact that there are many job opportunities for programmers who know C#. (In fact, in the writer ’ s locality as this text is being written, there are more job openings for C# programmers than in any other language.)
Installing C#
If you have already purchased and installed Visual Studio 2008 and C#, you can skip this section. If you haven ’ t installed C#, this section tells you how to download and install the C# Express version of Visual Studio. C# Express is a modified version of C# that is available from Microsoft at no charge. While the Express version of C# is missing some features found in the commercial version of Visual Studio, you should be able to compile and run all the sample programs in this book using C# Express. Once you are convinced that you should do all your development work in C# (and you will be), you can purchase the full version of Visual Studio.
Downloading C# Express
At the time that this book is being written, you can go to: http://msdn2.microsoft.com/en - us/ express/future/bb421473.aspx to download C# Express. The web page looks similar to what is shown in Figure 1 - 1 . As you can see if you look closely at the figure, the book was written using Visual C# Express Edition Beta 2. (By the time you read this book, it is quite likely that the “ Beta 2 ” part of the title will have changed.) Now click the IMG file link to download the file.
Depending upon the speed of your Internet connection, the file should be saved on your system within a few minutes.
Installing C# Express
After the download completes, click the executable file that was supplied (the file was named
vcssetup.exe when I installed it, but it could change). You should see a screen similar to that shown in Figure 1 - 2 , the C# Express Edition installation screen.
Figure 1 - 2
Selecting the Installation Options
Click the Next button to proceed to the next phase of the installation. In short order you will see a screen similar to the one in Figure 1 - 3 , showing Visual C# Expression Edition installation options. This screen presents a number of installation options from which to pick. Unless you have some disk space
Microsoft SQL Server and its associated tools are also useful, especially if you plan to do any web development in the future. Unless you have some severe disk space constraints, you should install all the components. You can always uninstall components later if you need to.
Once you ’ ve decided on which components you wish to install, click the Next button and go fix yourself a sandwich . . . it ’ s going to take a while for things to get installed.
Figure 1 - 3
While I was working through the installation process, the install software sensed that some of the Windows software on my system was outdated. I was asked if I wanted to install the updates and patches that had come out since I last updated my system. Because the list also included several patches to Visual Studio, I said yes. It took almost two hours to download and update my software. However, when the updates were finished, the C# Express installer picked up right where it had left off and the installation continued without a hitch. While it does take some time, you should update your software if the installer offers you that option.
A Test Program Using C# Express
While things may appear to have been installed properly, you can ’ t be certain until you actually write a program and try to run it. That ’ s the purpose of this section of the chapter. The program is about as simple as we can make a program while remaining confident that the installation was successful.
After you double - click the C# Express icon on your desktop, you should see a C# Express startup screen similar to the one shown in Figure 1 - 4 .
Figure 1 - 4
Creating a Project
Move the cursor to the upper left - hand side of the screen and select the File menu option from the main program menu bar. Your screen should look like what is shown in Figure 1 - 5 .
In Figure 1 - 6 you are given a number of predefined project templates from which to choose. These templates define the types of programs that you can develop with C#. When you select one of
the templates, Visual Studio creates that type of project for you as well as writing some stub code for you.
Figure 1 - 5
Stub codes are predefined pieces of code that Visual Studio writes for you as a background process. From the templates shown in Figure 1 - 6 , select the Windows Application template. You should also type in the name you wish the program to have. I have typed in TestProgram for our example. Click OK after you ’ ve entered the program name you wish to use.
The C# Integrated Development Environment
You should now see something like Figure 1 - 7 on your screen. Figure 1 - 7 shows you where you ’ ll be spending a lot of your programming time as you read this book. It ’ s called the Integrated Development Environment, or IDE, because virtually every programming tool you need to write C# programs is available to you there.
Properties Window Toolbar Window
Solution Explorer Window Source Window
Run Icon
Figure 1 - 7
The Major IDE Windows
The IDE shown in Figure 1 - 7 divides the screen into three windows. The left window shows the Visual Studio Toolbox, which, by default, shows some of the objects Visual Studio makes available to you. If you look closely you can see that the Toolbox presents a smorgasbord of objects you can use in your programs, including textboxes, labels, buttons, and other controls you will find useful as you develop your programs.
The middle window is referred to as the Source window and currently shows an unadorned Visual Studio form object. As presented in Figure 1 - 7 , the form has no other objects placed on it . . . yet. That is, you haven ’ t added any other objects (such as textboxes or buttons) from the Toolbox onto the form. You will change this later in this chapter.
The right side of the IDE currently shows two subwindows. The subwindow on top shows the Solution Explorer. Simply stated, the Solution Explorer shows the current development state of your project. It shows the forms the program has and its references, plus other information that we ’ ll discuss in later chapters.
Below the Solution Explorer window is the Properties window. The purpose of the Properties window is to show you the properties associated with the object currently in focus in the Source window. If you look closely at the form in the Source window in Figure 1 - 7 , you ’ ll notice that it has a couple of small white boxes along its edge. These are called sizing boxes and their purpose is to enable you to alter the size of the objects to which they are attached. However, the sizing boxes also show which object in the Source window currently has the attention, or focus , of Visual Studio. Whatever object has the focus in the Source window is also the object that the Properties window displays. In Figure 1 - 7 the properties shown in the Properties window apply to the form shown in the Source window. Visual Studio always maintains this relationship between the object in focus in the Source window and the information displayed in the Properties window.
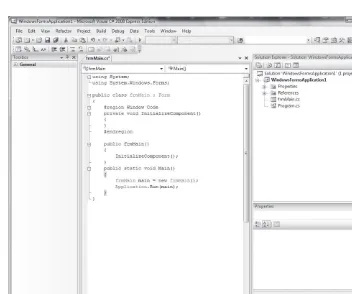
Using the Source Code Window
The code associated with clicking the source code icon shown in Figure 1 - 8 is shown in Figure 1 - 9 . When you click the source code icon, notice that another tab is added at the top of the Source window. One tab has form1.cs (Design) on it, while the other tab has form1.cs. The first tab is for the view of the form in the design mode. (The design mode is shown in Figure 1 - 7 .) The second tab is the source code mode and shows you the code for the program under development. Even though you haven ’ t written any code yourself, Visual Studio has already written some for you behind your back! You can see the TestProgram C# source code in Figure 1 - 9 .
Figure 1 - 9
It ’ s not necessary that you understand the code shown in Figure 1 - 9 at this time. All you ’ re trying to do at this point is write a very short program to see if the installation was done correctly. However, you will be spending a lot of time in the source code window as you write your own programs.
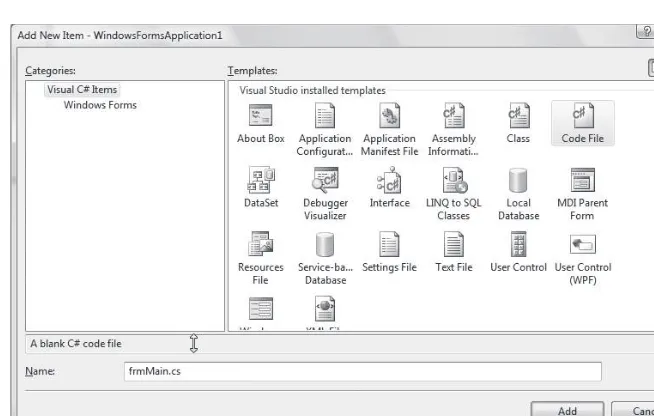
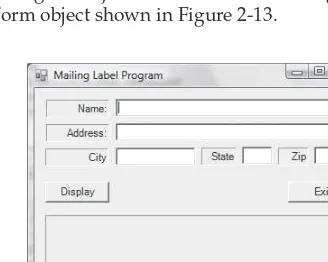
Adding an Object to a Windows Form
A form with nothing on it isn ’ t terribly interesting. Let ’ s change the form so that, when the program runs, it displays the message, “ My first program. ” You need to add a label to the form object shown in the Source window in Figure 1 - 7 to hold your program message. There are two ways to add a label object to a form. First, as shown in Figure 1 - 10 , you can click the label object in the Toolbox and, while holding the left mouse button down, drag the label over to the form and release the mouse button. Second, you can simply double - click the label object in the Toolbox. The mouse double - click causes Visual Studio to place a label object near the upper left - hand corner of the form shown in the Source window.
Changing the Text of a Label Object
After you position the label object on the form, you can set the text for the label. One of the things that Visual Studio does automatically is size the label to be just big enough to accommodate the label ’ s text. Given the default font size used by Visual Studio, the default height for a label is 13 pixels. (A pixel is one dot, or point of light, on the screen of your display device.) If you change the font size of the label object, the height of the label is automatically adjusted for you.
Actually, I am not a big fan of automatic sizing of labels. For that reason, I turn off the auto - sizing feature. To turn off auto - sizing, change the AutoSize property from True , as shown in Figure 1 - 11 , to False . You may have to scroll down in the Property window to be able to see the AutoSize property displayed in the Properties window. Click the down arrow at the right end of the textbox to display the choices you have for the property. In this case you can choose only True or False . Select False . The auto - sizing of the label object is now turned off.
After you set AutoSize to False , you can resize the label object in the Source window by clicking the white sizing boxes that appear on the ends and corners of the label object. In Figure 1 - 12 , I have increased the width of the label by clicking the middle sizing box on the right edge of the label object and dragging the edge to the right until I got the desired size. I then released the left mouse button to end up with the label object shown in Figure 1 - 12 .
Figure 1 - 11
Figure 1 - 12
(Figure 1 - 13 is only large enough to show the last word typed into the Text property in the Property window. When you look at the label in the Source window, all three words appear in the label object.)
By default, the text of a label object is positioned so it appears in the upper left - hand corner of the label. If AutoSize is set to True , you can ’ t position the text with the label object; it ’ s set for you automatically. However, because you turned off auto - sizing, you can position the text within the label wherever you wish. Figure 1 - 14 shows how to do this using the TextAlign property. If you look closely at Figure 1 - 14 , you can see that TextAlign is currently set to TopLeft . There are nine positions where you can place the text in a label that you can resize. You want to right - justify your text in the center of the label object. If you look where the cursor is positioned in Figure 1 - 14 , clicking that box right - justifies the text in the label object.
Figure 1 - 13
After you have positioned the text within the label at the right place, the form should look like what is shown in Figure 1 - 15 . Notice how the text in the label object is now centered.
Figure 1 - 15
Running the Program
This is all that you want to do at the present time to test your C# installation. If you can run the program at this point, it ’ s pretty certain that you have installed C# correctly. There are two simple ways to run a program. The easiest is to press the F5 key. If you do that, the program should appear on the screen in a few moments with our message centered in the label object.
The second way is to click the Run Program icon. If you look carefully at Figure 1 - 15 , right below the Window menu option near the top of the form you can see a small triangle. (On your screen, it appears green. The Run icon is also labeled in Figure 1 - 7 .) Click that green triangle and the program begins execution.
Summar y
In this chapter you learned how object - oriented programming got its start over four decades ago. This chapter also showed you how to download and install Visual Studio ’ s C# Express Edition. Finally, you wrote a simple program to test the installation to make sure it was done correctly. So, now what?
You could immediately proceed to the next chapter and start reading. Not a good idea. Now that you have a simple program up and running, this is the perfect time to experiment a little. For example, your program doesn ’ t have any text in the program ’ s title bar. Surely C# provides a property that enables you to change the title bar. (Hint: It does provide such a property!) Play around with some of the other properties and see what they do. For example, change the foreground property and see what happens. Each chapter in this book has a set of exercises at the end of the chapter that you should do before reading the next chapter. I realize that you ’ re anxious to move on to the next chapter, but resist the temptation and do the exercises. They ’ ll help crystallize what you ’ ve learned in the current chapter and better prepare you for the content of the next chapter. You can find the solutions in Appendix A .
2
Understanding Objects
As you learned in Chapter 1 , programming with objects has been around for over four decades. However, it ’ s only in the last 15 years or so that object - oriented programming has become the norm rather than the exception. In this chapter I present a simple example of how objects might be used in an everyday situation. You then expand on the concepts presented in that example to an actual program you build using Visual Studio .NET and the objects it provides for you.
In this chapter, you will learn:
What an object is
What the term state means with respect to objects
What a class is
What it means to instantiate an object
What properties are
What methods are
How to use some of the objects provided by Visual Studio .NET
Understanding Objects
Suppose you are the personnel manager for a company and you need to hire someone to fill an important position. After sifting through dozens of r é sum é s, you select one candidate to call for a face - to - face interview at your company offices. You call her (let ’ s say her name is Issy) on the phone and chat for a few minutes and confirm that she appears to be the right person for the job. You (we ’ ll pretend your name is Jack) make arrangements for Issy to fly to your location, stating that you will meet her at the airport. Figure 2 - 1 shows arranging a job interview.
❑
❑
❑
❑
❑
❑
However, since the two of you have never met before, you start asking a few questions so you can recognize each other at the airport. Issy says she ’ s short with blonde hair and that she will be wearing a black business suit and carrying a tan leather briefcase. You then describe yourself as six feet tall with brown hair and say that you ’ ll be wearing a gray suit. You then set a date and time for the flight and everything ’ s ready for the interview.
Everyday Use of Objects
Perhaps without realizing it, both of you used objects in the course of your conversation. (An object is just a simplification of something that you wish to use in your program. In this example, you are creating a list of properties that will be used to describe a person object.) First, you implicitly created a person class during the phone call. A class is a template used to describe an object. As such, a class is an abstraction or simplification of some object you observe in the real world. You can break a class down into two basic components: 1. those properties that describe the object, and 2. those methods , or actions, that you wish to associate with the object.
Class Properties
The class properties are the data that you want to record and associate with an object. If you wanted to create a class person object, a list of properties might include those shown in Table 2 - 1 .
Candidate Recruiter
Figure 2 - 1
Table 2-1: clsPerson Properties
It ’ s important to notice that, prior to the phone conversation, the properties list for the class person named Issy is virtually empty. In fact, all you were able to fill in from her r é sum é were her name and gender. However, after the phone conversation you were able to fill in almost all of the properties for the class person object named Issy . (You might scare her away if you tried to fill in the Build and
eyeColor properties over the phone.)
While you were filling in a class person object named Issy , she was doing the same thing for a class person object named Jack . Prior to the phone call, the class person object Issy created to be associated with the name Jack may have been totally empty, because Issy had no idea who might be calling her about a job interview. However, the dialog on the phone enabled each party to fill in at least some of the property values for the other. From Issy ’ s point of view, her class person object went from a totally nondescript object to (at least) a partially identifiable object after the phone call was completed. By changing the values of the class properties, you are able to change the state of the object. The state of an object is determined by the values of the properties used to describe the object. In our example, the properties used to describe the state of a class person object are those shown in Table 2 - 1 .
While people don ’ t change their names very often, it happens occasionally. Likewise, people do gain and lose weight, dye their hair, wear tinted contacts, change clothes, and alter their accessories. If any of these property values change, the state of the object also changes. Just keep in mind that anytime the value of a property changes, the state of the object — by definition — also changes.
Class Methods
Just as there are property values that define the state of an object, there are usually class methods that act on the properties. For a class person object, you would want that object to be able to talk, wave his or her arms, walk, change clothes, and so forth. In short, the class methods determine the behaviors the object is capable of performing. Methods are used to describe whatever actions you wish to associate with the object. Methods often are used to manipulate the data contained within the object.
We can depict the phone conversation between Issy and Jack as objects of the person class as shown in Figure 2 - 2 .
If you think about it, a class property may be viewed as a noun: a person, place, or thing. Class methods, on the other hand, often behave like verbs, denoting some kind of action to be taken on the data.
How Many Properties, How Many Methods?
One question that you must grapple with as a programmer is how many properties and methods you should have in a class. For example, in our class person object, you could also include a photograph of the person, fingerprints, a retinal scan, blood type, DNA sample, dental records, plus hundreds of other things that may be part and parcel of a person object. Likewise, you can create methods to simulate talking, running, writing, walking, digestion, elimination, sleeping, dreaming, and a bunch of other actions humans are capable of doing. So where do you stop? What is the proper number of properties and methods?
Classes Are Simplifications of Objects
Keep in mind that for every property and method you add, you are going to have to write program code to implement that property or method. As a general rule, the less code a program has, the fewer things there are to go wrong. From a programmer ’ s perspective, writing less code is a good thing, provided the code accomplishes the task at hand. In other words, when you design a class, you need to strike a balance between minimizing the code you write and fulfilling the design goals for the class.
Simply stated, the proper number of properties and methods in a class is the minimal number of properties and methods that gets the job done. The number of properties and methods in a person class the FBI needs to find criminals is going to be vastly different from the number of properties and methods in the person class you might create to write an address book to keep track of your friends. You ’ ll also
Properties:
Person Object for Issy Person Object for Jack
find that if you omit unnecessary details in a class, there ’ s a greater likelihood that you can reuse that same class code in some other project. This code reuse is one of the main advantages of object - oriented programming. The more generic the object is, the easier it is to reuse the object. In a sense, therefore, you might want to define your classes as the minimal abstraction necessary to describe an object in a way that fulfills your needs.
Always keep in mind that if there is a simple way and a complex way to accomplish the same goal, simple is almost always the best choice. Some programmers get a kick out of writing really clever code that no one else can understand. That ’ s probably okay, as long as no one else has to work with their code. In a commercial setting, however, clever, obfuscated code is rarely a good thing. Given alternatives, stick with the code that is easily understood.
What Do I Do After I ’ ve Defined a Class?
As mentioned earlier, a class is a template for an object. In that sense, a class is like a cookie cutter that enables you to shape specific cookie objects. By this release of Visual Studio, Microsoft has buried within the .NET Framework about 4,000 available classes. This means you have about 4,000 cookie cutters already hanging on the wall ready for you to use. (We ’ ll use some of these classes later in this chapter.) Part of your job as a fledgling programmer is to learn about those classes that already exist. After all, there ’ s no reason for you to reinvent the wheel.
Visual Studio as an IDE
As pointed out in Chapter 1, Visual Studio is an IDE that incorporates numerous programming tools. Prior to the advent of IDEs, programmers had separate programs for writing the course code (an editor), compiling the program (a
compiler), assembling the program (an assembler), and combining the program into an executable program (a linker). With an IDE, all of these disparate functions are combined into a single package.
A huge part of the functionality of Visual Studio comes from the .NET Framework, including all those cookie cutters. As you write your code, components within the IDE combine your code with elements from the .NET Framework and produce Microsoft Intermediate Language (MSIL) code. It is this MSIL code, passed through the Common Language Runtime (CLR) component of Visual Studio, that actually gets your program to run.
Rather than make the distinction between each of the “pieces” that comprise Visual Studio when some specific function is performed, you simply say something like: “Visual Studio takes your code and” . . . whatever. If a situation arises where the distinction is important, use the proper nomenclature. For now, just remember that, as an IDE, Visual Studio is composed of a lot of different components acting in concert to make your life easier.
to cut specific shapes out of cookie dough, a class is used to carve out chunks of memory that are used to hold objects of that class. Until you ’ ve used the class template to actually carve out an object, that object does not yet exist.
⫹ ⫽
Class
Template
Cookie Cutter of clsDiamond
Cookie Dough
Instances of clsDiamond Memory Objects
Figure 2 - 3
The relationship between a class and the objects you can instantiate from that class is depicted in Figure 2 - 3 . The class is depicted as a diamond - shaped cookie cutter. I ’ ve named the class clsDiamond . You can think of the properties of clsDiamond as holding the values that determine the exact shape of the cookie cutter. In other words, the state of the properties make the class look like a diamond rather than some other shape (e.g., a spade). To get an object of the class, you must press the cookie cutter (class template) into the cookie dough (computer memory) in order to get an actual cookie (object). An object is an instance of a class. An object, therefore, is something that you can actually use in a program. Just as you can ’ t eat a cookie cutter, you can ’ t directly use a class. You must use the class to instantiate an object of the class in memory before you can use it in your program.
Naming Objects
Throughout this text, I have adopted a convention under which you prefix the name of certain objects with a specific combination of letters. For example, use cls before class names, txt before the names of textbox objects, btn before button objects, and so on. You will discover other examples as you read this text. This convention is a form of what is called Hungarian notation, but not its “pure” form. At the extreme, Hungarian notation prefixed every data item with its data type, such as iHatSize for an integer variable, cLetter for a character variable, fWage for a floating-point variable, objMyData for a data object, plus many other similar variations. This notation has lost followers simply because what it brought to the table in terms of code clarity wasn’t worth the effort. So why do I continue to use a modified version of Hungarian notation?
Instantiating an Object of a Class
To help explain what is taking place with these statements, consider the simplified memory map of your computer system shown in Figure 2 - 4 .
A second reason is the way Visual Studio looks at your program data as you type in program code. For example, if you have three textboxes in your program, all prefixed with txt, Visual Studio knows about these objects and can open up a small “look-ahead” window the instant it sees you type in that prefix. You can then select the appropriate textbox object in the window, press the Tab key, and Visual Studio fills in the rest of the object’s name for you. If you didn’t prefix the textbox names with txt and you couldn’t recall anything about the object (even its name) other than it’s a textbox object, the names would be scattered throughout the look-ahead window, thus making the look-ahead feature less useful.
Because I find this look-ahead feature a real time-saver, I tend to use prefixes for objects in our program examples. If you don’t feel it’s worth the effort, feel free to use your own style.
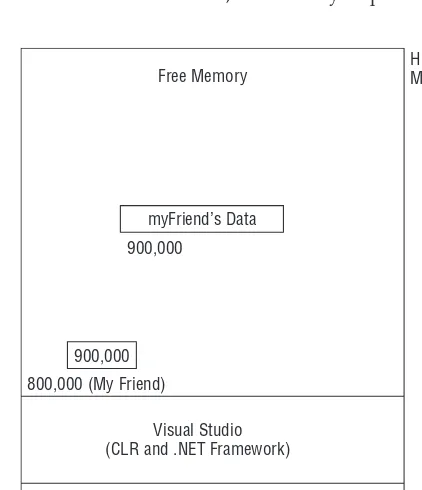
Free Memory
Windows Operating System Visual Studio (CLR and .NET Framework)
Your Program 800,000 (My Friend)
null
High Memory
Low Memory Figure 2 - 4
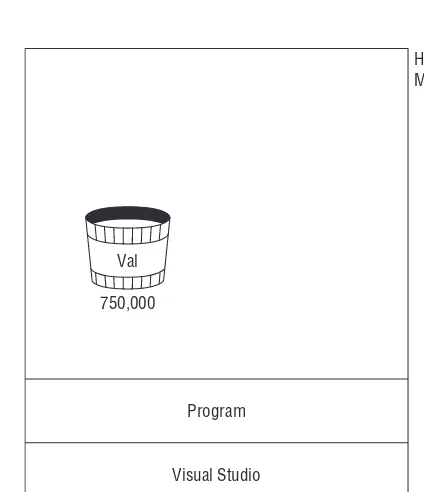
Now consider the following program statement:
Simply stated, this statement says: “ Go to the cookie cutter wall and look for a cookie cutter named clsPerson . When you ’ ve found it, take it down from the wall and label it myFriend . ” The end result is that .NET asks the Windows operating system for four bytes of memory where it can store the variable named myFriend . Assume that the Windows Memory Manager finds four bytes of free storage at memory address 800,000. For the moment, you haven ’ t done anything with the memory at this address, so its current value is null . (The word null means the variable has nothing useful currently stored in it.) What you have at this point is a cookie cutter named myFriend just waiting around at memory address 800,000 for something useful to happen. Things start to happen with the next program statement:
myFriend = new clsPerson();
Words that have special meaning in a programming language are called keywords . The new keyword in C# means that you want to set aside enough memory to hold a clsPerson object. Let ’ s further assume that it takes 2,000 bytes of memory to hold the data associated with a clsPerson object. (.NET figures out how many bytes it needs for an object by examining the program code of the class.) If you verbalize what is happening with this programming statement, you might say: “ Hey, Windows! It ’ s me . . . Visual Studio. My programmer wants to create a clsPerson object. Do you have 2,000 bytes of free memory available for such an object? ” The Windows Memory Manager then looks through its table of available memory and probably finds 2,000 bytes of free memory somewhere in the system. Assume the
2,000 - byte memory block starts at address 900,000. The Windows Memory Manager then sends a message back to Visual Studio and says: “ Hey, VS! It ’ s me . . . the Windows Memory Manager. I found 2,000 bytes of free memory at address 900,000. ” Visual Studio says “ Thanks, ” and proceeds to set things up to use the clsPerson object named myFriend .
When Visual studio is finished with the statement, the memory map now looks like the one shown in Figure 2 - 5 .
Free Memory
Windows Operating System Visual Studio (CLR and .NET Framework) 800,000 (My Friend)
900,000
900,000
myFriend’s Data
High Memory
Notice what ’ s happened. The value associated with the variable myFriend has changed from null to that of the memory address where the data associated with myFriend is stored. You have now carved out a clsPerson object that you can access via the variable named myFriend . The purpose of the myFriend variable is to tell us where to find the data associated with the myFriend object. The correct programming term is that you have instantiated a clsPerson object referenced by the variable myFriend . An instantiated object is an object that you can use in your program.
Repeating our two programming statements (I ’ ll explain the purpose of the slashes in the statements below in Chapter 4 ):
clsPerson myFriend; // Grab a specific cookie cutter from the wall // and name it myFriend
myFriend = new clsPerson();// Use the cookie cutter to make a clsPerson // cookie and refer to it as myFriend
The first statement means that you intend to create an object of clsPerson and refer to that object using the variable named myFriend . The second statement says you carried through with your intent and instantiated an object of a clsPerson type and associated it with myFriend . You reference the object ’ s data for the remainder of the program using the variable named myFriend . Using our cookie cutter analogy, the cookie cutter (that is, the reference) is found at memory address 800,000, but the cookie itself (that is, the object ’ s data) is found at memory address 900,000.
You can combine the two statements into a single statement if you wish:
clsPerson myFriend = new clsPerson();
The interpretation is exactly as before. You have simply collapsed the two statements into one. Because programmers prefer less code to more code, you will see the abbreviated form used more often.
I Have an Object . . . Now What?
You now have instantiated an object of the clsPerson type. The obvious question is: “ So what? ” At the present time, the object named myFriend is fairly nondescript. None of the information presented in Table 2 - 1 has been filled in for the myFriend object. What you need to do is change the faceless myFriend object into one that has some meaningful information in it. You can change the object by changing the information contained in the properties defined within it. From Table 2 - 1 , you might do the following:
myFriend.Name = “Issy”; myFriend.Gender = “F”; myFriend.Height = 59; myFriend.Build = “Petite”; myFriend.hairColor = “Blonde”; myFriend.eyeColor = “Blue”;
myFriend.Clothing = “Business casual”;
myFriend.Accessories = “Tan leather briefcase”;