Storytelling for
Multimedia Journalists
and by Focal Press
2 Park Square, Milton Park, Abingdon, Oxon OX14 4RN
Focal Press is an imprint of the Taylor & Francis Group, an informa business
© 2015 Taylor & Francis
The right of Duy Linh Tu to be identified as author of this work has been asserted by him in accordance with sections 77 and 78 of the Copyright, Designs and Patents Act 1988. All rights reserved. No part of this book may be reprinted or reproduced or utilised in any form or by any electronic, mechanical, or other means, now known or hereafter invented, including photocopying and recording, or in any information storage or retrieval system, without permission in writing from the publishers.
Notices
Knowledge and best practice in this field are constantly changing. As new research and experience broaden our understanding, changes in research methods, professional practices, or medical treatment may become necessary.
Practitioners and researchers must always rely on their own experience and knowledge in evaluating and using any information, methods, compounds, or experiments described herein. In using such information or methods they should be mindful of their own safety and the safety of others, including parties for whom they have a professional responsibility. Product or corporate names may be trademarks or registered trademarks, and are used only for identification and explanation without intent to infringe.
Library of Congress Cataloging-in-Publication Data
Tu, Duy Linh.
Feature and narrative storytelling for multimedia journalists / Duy Linh Tu. pages cm
vii
ACKNOWLEDGMENTS ... ix
PART I
Modern Multimedia Journalism
... 1
CHAPTER 1 The State of Video ... 3
CHAPTER 2 The Elements of Video ... 13
PART II
Production and Post-Production Techniques
... 25
CHAPTER 3 Understanding Exposure, Composition, and Sequences ... 27
CHAPTER 4 Audio ... 77
CHAPTER 5 Field Production... 91
CHAPTER 6 Post-Production ... 167
PART III
Feature and Narrative Storytelling
... 195
CHAPTER 7 Producing a Feature Video Story ... 197
CHAPTER 8 Producing a Narrative Documentary ... 215
CHAPTER 9 Mobile and Smartphone Photography ... 231
CHAPTER 10 Company Profiles ... 237
ix This book would not have been possible without the generous support and
I
PA RT
3
The State of Video
Much of the Midwest was still frozen from the Polar Vortex of 2013 when my col-league Abbey Adkison and I pulled into a parking garage a few blocks from the
Chicago Sun-Times building. We were 4 months into researching and reporting our Video Now project, a study about the current state of video journalism in the United States (videonow.towcenter.org). The Sun-Times was one of our final stops on a long tour of newsrooms across the country. We had already visited places such as the Detroit Free Press, The Seattle Times, Frontline, and Mashable—a diverse selection of newspapers, digital properties, and documentary producers—to see how these organizations were staffing their teams, what kinds of videos they were producing, and how they were attempting to make money from news video.
We were particularly interested in visiting the Chicago Sun-Times. The paper had notoriously fired its entire photography staff in May 2013. At the time, management of the paper issued a statement hinting at future investments in video journalism.
“The Sun-Times business is changing rapidly and our audiences are consis-tently seeking more video content with their news,” the paper said in the press release. “We have made great progress in meeting this demand and are focused on bolstering our reporting capabilities with video and other multi-media elements. The Chicago Sun-Times continues to evolve with our digitally savvy customers, and as a result, we have had to restructure the way we man-age multimedia, including photography, across the network.”
The layoffs had set off a wave of anger and disbelief from journalists and the public, especially on social media. But, for most in the journalism business, this move seemed inevitable. Newspapers, having had suffered a decade of mas-sive job losses and shrinking advertising revenue, now needed a new stream of income. Video was one hope. In 2013, a typical banner ad on a news Web site could earn the publication one or two dollars per one thousand views. But a 15- or 30-second video pre-roll ad could make twenty or thirty times that much.
By the time we arrived at their offices on N. Orleans Street, the Sun-Times
a three-person team of video producers. Dustin is young, as are the other members of his production team. They are all in their twenties or thirties, an important fact to consider when discussing how and what kinds of news vid-eos are made. While Dustin and his team grew up watching news on local or network TV, they now consume most of their videos online. And video online is nothing like the evening news on TV.
“It is always rolling around in my head. Where is the next frontier for documen-tary film? And where’s the next frontier for documendocumen-tary TV?” Dustin told us.
“I really strongly believe that’s online. The thing that’s even more liberating about online and encouraging and interesting is that you’re not tied to a half-hour/
Figure 1.1
How is video produced today? The Tow Center’s
Video Now report can be viewed at videonow. towcenter.org.
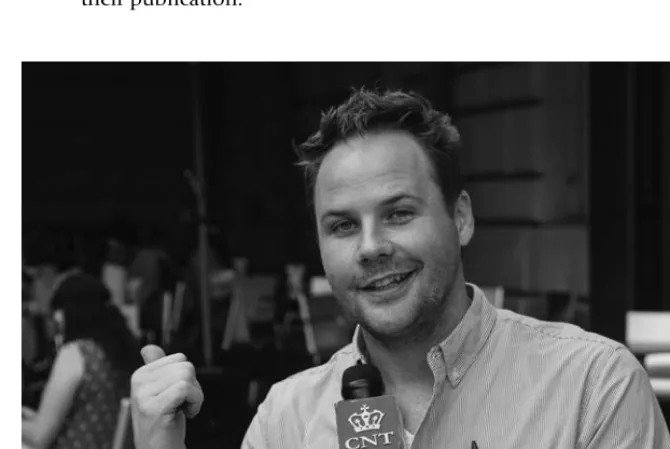
Figure 1.2
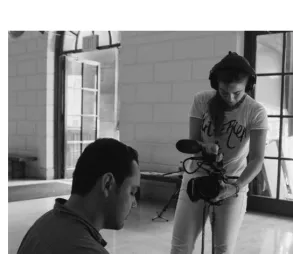
Executive Producer Dustin Park leads a new team of video journalists after the
hour model that is built into broadcast TV. You can produce a 5-minute, rich piece that’s not going to take you months and months to do. But you can put a lot into that and make it look good and do great storytelling.”
We spent two days in Chicago with Dustin, producers Peter Holderness and Jessica Koscielnia, and an intern. We observed their production processes and interviewed them and their bosses about video strategy. Like other newspa-pers we had visited in throughout the country, the Sun-Times’ newsroom had been divided into two camps of video producers:
1. Mobile Reporters. Traditionally print-focused reporters had been outfitted with iPhones capable of shooting and uploading HD video from the field. These reporters contributed raw footage or lightly edited video pieces to go along with their text stories. Most importantly, the reporters uploaded these stories almost immediately from the field. They did not wait until the end of the day to publish.
2. Video Producers. Dustin’s core team was focused on producing videos, and shot some photography. They produced packages, live shows, and several weekly sports, news, and political shows. These producers were experienced shooters and editors, and the content that they created, in most cases, had very high production value. Their stories tended to be more feature-length, and less breaking news in nature. These stories could take days or weeks to produce.
Figure 1.3
We saw a similar set up when we visited other newsrooms such as TheSeattle Times, the Detroit Free Press, and the Washington Post. The newspaper industry, at least in 2014, seemed to be going with this two-prong approach: fast and mobile, or deep and highly produced.
Another observation we made during our research was that newspapers were very comfortable trying out various formats, ranging from raw video uploads to long-form documentaries. There is no time limit online and this has given editors a chance to play with style, length, and format.
“We do the raw clip. We do what I describe the uber clip, which is a little more fully formed package. Then we do the mid-sized, the 3- to 5-minute piece. And then we do the massive long-form stuff that is 45 minutes or a series. I think a video needs to be as long as a video needs to be to tell the story,” said Kathy Kieliszewski, Director of Photo and Video at the Detroit Free Press.
WHO IS THIS BOOK FOR?
When I graduated from Columbia Journalism School in 1999 with a concen-tration in broadcast journalism, the news industry was much like it had been for many decades. There were four major TV networks, a few cable outlets, and the local news stations. At the time, the Internet was nearly non-existent in terms of producing news video.
A recent graduate like me, even from a respected program with a strong alu-mni network, had a long journey ahead before making it into the journalism
Figure 1.4
Big Leagues. I would have to work my way up from small TV markets in Iowa to mid-sized markets such as Milwaukee. Finally, after many years of hard work combined with a lot of luck, I might end up in a major market such as New York, L.A., or Chicago.
My job description as a broadcast journalist was just as well-defined as my career path. As a TV news producer, I found stories, directed camera opera-tors to shoot, soundmen to record audio, and video ediopera-tors to put my sto-ries together in large, expensive AVID editing suites. There was even a driver to shuttle me around. At Columbia Journalism School, I had been taught to report, shoot, and edit my own stories. So, it was a shock when, at my first TV job, I had all these people working with me.
At the time, I was not overly concerned with the economics of the newsroom— the journalism industry was making a lot of money. Even so, it seemed strange to me that it took so many people to put together a 90-second story. Almost everything about the job of a video producer has changed since 1999.
Much has been written and discussed about the Internet and its disruptive effect on media, especially the business of journalism. News operations have shuttered bureaus, and newsrooms have seen their staffs cut in record num-bers. According to the Poynter Institute, more than 18,000 editorial news jobs were cut from 2000 to 2012 (source: www.poynter.org/latest-news/ business-news/the-biz-blog/216617/asne-census-finds-2600-newsroom-jobs-were-lost-in-2012/). News organizations have had to reconfigure their busi-ness and production models quickly, iterating strategies constantly. By the time this book is published, the industry will mostly likely have seen even greater challenges and changes come and go.
Another common topic of discussion in online newsrooms is the effect of this new age of journalism on the day-to-day life of a reporter. Journalists are being asked to do much more than ever before, with fewer resources. Those who have survived the many waves of layoffs are being retrained to blog and tweet, to take photos, and to produce video. There are no longer print-only reporters, nor are there massive video production teams, as there had been when I graduated from Columbia. A journalist, these days, works in several media and produces content that is published on several platforms.
way through cover-to-cover, or readers may choose to jump to specific sections as needed. When possible, practice lessons and additional resources relating to material covered in the book have been made available online.
The structure of this book is based on the video curriculum that I have devel-oped and taught at the Columbia Journalism School over the past decade. Many of the lessons and examples come from the courses that I still teach today. Throughout the book, I spotlight examples of excellent feature and nar-rative storytelling by multimedia journalists. In some cases, I have made avail-able notes, raw material, and behind-the-scenes footage from my own projects.
Much of Feature and Narrative Storytelling for Multimedia Journalists is focused on skills development: production, shooting, audio recording, and editing. While I will demonstrate these techniques on specific hardware and soft-ware, this text is not about using any specific name-brand tools. You may use this book regardless of the make of your camera or the manufacturer of your editing software. However, I do advise that readers, if possible, shoot with large-sensor video cameras with manual exposure and audio controls. These cameras will provide greater flexibility and creative control in the field.
The second part of this book is focused on reporting and storytelling tech-niques. As Kathy Kieliszewski told me for the Video Now report: there are many ways to tell a story, and there are many forms of video. This text will focus on two specific types of video stories: video features (or shorter-form work) and narratives (longer documentaries). I also present information on the mobile video techniques used by journalists in modern newsrooms.
Figure 1.5
The bulk of this book is focused on high-end production of video stories, but it is vital that modern journalists also understand the importance of being able to produce in a Web-connected, mobile environment. I have also writ-ten this book with the assumption that many readers will be freelancers or independent journalists and I have dedicated a space towards social media, promotion, and distributing your projects online.
Whether you are a journalism student looking to produce high-quality video stories, a writer hoping to learn new skills, or a photographer looking to jump into video production, Feature and Narrative Storytelling for Multimedia Journalists has been written for you.
ORGANIZATION
This book has been organized into three main sections: defining modern mul-timedia journalism; principles of reporting, production, and post-production; and feature and narrative storytelling techniques. Also included in the book are detailed sections on social media and mobile production. The technical train-ing program is based on my own experiences in the field and those of my col-leagues. The reporting and storytelling sections are based directly on the video curriculum that I use at the Columbia Graduate School of Journalism. The mobile instruction portion of this book is based on the curriculum I devel-oped to train working journalists through the journalism school’s Continuing Education Program. The skills and techniques I cover in this text have been used personally, and have been taught to thousands of students for over a decade.
Figure 1.6
Hopefully, this textbook will give you the fundamental skills for producing high-quality video stories and documentary films. However, reading this book alone will not be enough to make you a great (or even competent) video sto-ryteller. You must go out and practice—shoot daily and produce stories weekly. You must also network and find colleagues to work with and to learn from.
Throughout my career, I have been lucky enough to have met and work with some of the best video producers in the world. For this textbook, I asked some of the best editors, shooters, audio recordists, and editors in the field to give practi-cal advice for new shooters and their answers are featured in each chapter. As you begin to produce your own work, build your network of trusted shooters, editors, colleagues, and friends. They will be your most valuable assets in the business.
The companion Web site of the book features additional editorial content, as well as video tutorials related to the chapters in the book. The Web site is often updated and can be used as a reference guide for years.
Figure 1.7
Kathy Kieliszewski, Director of Photography and Video,
Detroit Free Press.
Q&A with the Experts: Kathy Kieliszewski, Director of Photography and Video, Detroit Free Press
How did you get started in video?
I made my first piece of “multi-media” in 1986 with an eight-track player, a cassette tape, a vinyl record and a bunch of still pictures cut out of teen magazines.
In my high school, we had a pretty extensive video production program and we were required to research, shoot, script, and edit packages that aired on the local cable access. Some were ok, most were not, but it helped propel me toward Michigan State Univer-sity and the broadcast journalism department.
since I had already done that in high school. So, I switched gears and fol-lowed the photojournalism track.
When the Free Press began producing video stories, I felt like I had come full circle. My high school TV production teacher, Ms. Zappa, would have been proud.
What kinds of stories work best for video?
Narrative stories with great characters, great visuals, and plenty of emotion, moments, and surprises.
What three tips would you give videographers in terms of finding and reporting video-worthy stories?
1. Find the focus. To use a newspaper term, what’s the nut graf? Without a clear focus or nut graf, you don’t have a story.
2. You can never have too many opportunities to gather b-roll. 3. Show, don’t tell.
How do you get someone to open up to you on camera? How do you get them to “forget” that the camera is there?
While setting up for the interview, just talk with a subject about everyday things not necessarily related to the story. Distracting them with pleasant chatter as you prepare for the interview and then transitioning into the inter-view naturally will loosen your subject up. Never say, “Ok, we are going to start the interview now.” Nothing will drain the color from a camera-shy per-son’s face faster than that.
Sit eye-level with them, to the side of the camera, so that you can look at each other. The more you treat this as a conversation and less like an interview, the more likely the subject will be able to forget about the camera.
What are your best three interviewing tricks?
1. Don’t ask questions. Have a conversation.
2. When you can, get your subject to show you rather than tell you. 3. Be quiet and listen.
What is in your gear bag? What gear does your team use at the Free Press?
n iPhone
n Canon 5D Mark III, Mark II or 6D
n Variety of lenses (preferably image stabilized) n Rode shotgun mics
n Sennheiser shotgun mic n Sennheiser wireless mic n Headphones
n Tripod!
n We also have a Lite Panel kit for interviews, GoPros for fun stuff, sliders,
What kind of video works best for the Web?
It’s all about content. A 45-second clip of something exclusive or emotional will do just as well as a 9-minute piece on people illegally parking in hand-icap parking spaces. I often use myself as a barometer for what I think will do well and subsequently, decide to commit resources to it. I literally have to think, “Damn, I’d watch that.”
Knowing your audience is really key, too. Some things are universal: the tur-key that chases a lady every time she tries to leave her house is Web video gold. Other things are very specific to your community. If you have a politi-cian that everyone loves to hate, that may draw an audience. If you are taking people to the bottom of Lake Huron to see a never before seen shipwreck, you will draw an audience. If you have a large sports fan base, a sports col-umnist talking about draft picks or a new head coach might be a huge traffic driver.
The longer form documentary pieces have to be incredibly compelling, filled with rich characters, emotion, and a strong narrative to engage people for any length of time. Even with that, the success of that video depends on how actively it is promoted from the Web site and beyond.
What advice would you give to new video producers?
13
THIS IS NOT TV
When I started my journalism career, the roles and job descriptions of jour-nalists were clear. Writers wrote for newspapers and magazines, radio produc-ers produced radio, and video people worked on local TV or at the networks. The concept of the multimedia journalist had not yet been born. These days, journalists are required to write, shoot photos, analyze data, create graphics, and produce video as regular functions of their jobs.
For as much as the job descriptions of journalists have changed, the style in which video content is produced at many publications has not. Only recently have papers such as the Washington Post begun to think of producing video specifically for a Web audience, rather than trying to mimic television-style reports. Digital-first companies like Vice have shown that online news videos can be very successful, if they are produced with an aesthetic and sensibil-ity different than local TV news. Vice has nearly five million subscribers on YouTube, while most Web news videos get only hundreds or a few thou-sand views. So, how is Web video different than what we see on local TV newscasts?
The evening TV news was, and is, typically 30 minutes long, and about 8 of these minutes are reserved for commercials. This leaves just 22 minutes for TV reporters to give viewers the news of the day: politics, entertainment, business, sports, and, of course, weather. This premium on time has created the 90–120 second news story format, also called packages. It is rare to have a story go longer than a couple of minutes, and these stories have a style and form that have become so recognizable and cliché.
Now, video producers are competing against social media, video games, apps, and big entertainment sites for their viewers’ attention. Video producers must now present video stories that are compelling and unique enough to cut through the many distractions available online. Otherwise, their stories will be lost or buried.
Figuring out how to tell a Web-first video story has taken the journalism industry a lot of trial and error to figure out. I worked for an ill-fated dotcom in the early 2000s as a video producer. My online job was the same as it had been at the TV news network: I produced 60- to 90-second video packages that mimicked local TV news. That was over a decade ago, and it has only been within the past couple years that video producers have begun to change their style of storytelling: more cinematic videography, more in-depth char-acter development, no standups from reporters, and no anchors back at the studio.
Today, the Internet has matured and the public’s online news consumption habits have become distinct from what they are offline. People want news as fast or as in-depth as possible. Now, most news breaks or comes to us in the form of social media—on Twitter, Facebook, Instagram, or any other num-ber of social platforms. By the time the local TV newscast starts at 6 PM, it is already hours behind the cycle. Online video producers must work at a much more accelerated schedule.
Another problem with following the local TV news format is that not all sto-ries are best told in video form. Some stosto-ries should be 400 words. Some
Figure 2.1
should be 140-character tweets. Some stories should be a single photo. Some should be data-driven multimedia extravaganzas. And, of course, some should be video. All these formats are possible online, but on TV, video is the only option. For decades, television producers have been forced to present all the news stories of the day, but they were not always using the best medium to tell these stories.
These days, video producers must produce fast, breaking news video or com-pelling in-depth video stories that provide more context or experience than print stories. This increases the chances that a reader will spend time watch-ing and sharwatch-ing the video online. The traditional TV news production cycle is neither fast enough to compete with Twitter (immediate, not at 6 PM), nor is it in-depth enough (only 90 seconds!) to compete with many of the docu-mentary films appearing on the Web. This book will tackle how to produce these opposite modes of storytelling: mobile video, with its speed and imme-diacy; and narrative video, with its compelling and engaging story arcs. We begin with long-form.
VIDEO-WORTHINESS
What makes a story video-worthy? This is one of the fundamental questions video producers must ask themselves constantly. For many years, I had a dif-ficult time clearly and concisely answering this question for my graduate stu-dents. I know a good video story when I see it, but what are the elements of that story that make it better told in video than in any other medium? At lunch one day, I asked my good friend and fellow professor Bob Sacha how he identified video-worthy stories.
“Motion and emotion,” Bob said over a bowl of bibim bop at the Korean restaurant near my office. His answer was short and simple. And it is abso-lutely right.
Video works best when it features motion; it must demonstrate action in the camera (variety in shots and angles) and by the characters. Video does not work well when it is interview-based. The “talking head” video is often dull and tedious. Unless your sources are powerful politicians or popular celebri-ties, viewers will not want to watch them talk. They want to see videos with people in action. Chefs should be cooking, not talking about it. Athletes should be training or competing. Activists should be rallying their communi-ties. Video stories should be active.
Figure 2.2a
A teacher is interviewed about using technology in education. This interview is important, but the shot is dull.
Figure 2.2b
An active shot of a teacher lecturing to his class.
to her father after he has returned from military service is compelling video. A team lifting their coach after a victory is a compelling scene. Videographers must look for opportunities to capture and demonstrate emotion in their videos.
If a story has either motion or emotion, then it is video-worthy. Ideally, a video story has both. If it has neither, it is most likely best told in another medium.
time to approximate action. This generic type of video does not present new information, action, or emotion, nor does it advance the story. Local TV news video is plagued by wallpaper, shots of sources walking aimlessly down hall-ways, office workers typing at their keyboards, and scientists looking at bea-kers in unnamed laboratories. Even worse, video producers will also insert music into the stories to evoke mood, rather than finding the real emotion in their characters. While there is nothing inherently wrong with using music in your video stories, music should be used to enhance emotion, not create it.
TYPES OF VIDEOS
The Internet has opened up numerous opportunities for video producers to create and distribute their stories. Sites such as YouTube and Vimeo have pro-vided video journalists with powerful distribution channels that can reach millions of potential viewers. These online platforms have also allowed for the production of video in forms and styles that were not possible before. Unlike TV, Web video goes well beyond the 90-second story. While it is too early to say what types of videos work best online, some forms have emerged to be very popular and successful on the Web.
Web video comes in many flavors:
1. Traditional, broadcast-style videos. Some newsrooms still mimic local TV-style reporting and production. TV networks with online properties
Figure 2.3
often repurpose their broadcast stories and repost these entire packages on the Web. These stories are not modified for a digital audience.
2. Raw video. Raw video clips are often shot and uploaded by print reporters using smartphones. Surveillance footage and user-generated content are used by news sites to enhance text stories.
3. Explainer video. Explainer videos tackle complicated topics such as health care reform or conflict in the Middle East. They typically feature motion graphics or an on-camera host explaining complex issues. These videos are usually only a few minutes in length. They are not traditional news stories or narratives, but they provide highly valuable news information.
4. Interactive media. Video can be integrated into rich multimedia presentations. For example, the New York Times and the Guardian both use video to enhance larger, complex projects. In these pieces, videos work jointly with other media and do not generally stand alone.
5. Short feature videos. Short feature videos typically feature interesting or newsworthy individuals or take a deeper look into specific topics. While these videos may have some news value, these are not breaking news stories. The shelf life of short features is much longer than that of breaking news stories. Viewers watch these videos months or years after their publication.
Figure 2.4
Figure 2.5
Raw video can be uploaded quickly and can provide great news value for your audience.
Figure 2.6
News outlets such as the
Washington Post regularly produce animated explainer videos.
Figure 2.7
The Seattle Times produced “Sea Change,” an in-depth multimedia project about ocean acidification.
Figure 2.8
Kevin, the lead character from a film about children with deadly sun allergies, can only play outside when completely covered.
In the early days of the Web, the conventional wisdom of newsrooms was to keep video stories under 2 minutes. In the past few years, organizations such as Vice, Frontline, and MediaStorm have shown that online audiences have developed a big appetite for feature-length documentaries. Vice consistently gets millions of views for their films. Traditional news outlets such as the New York Times and Time Magazine
Figure 2.9
Josh, a main character from the film deepsouth, sits in an abandoned building.
In this book, we start off with feature and narrative storytelling techniques. We then move into mobile video. Although explainer videos are a power-ful storytelling technique, they will not be covered in this text. Producing explainer videos requires a great understanding of design and animation that that is beyond the scope of this edition. We will be ignoring the techniques and style of TV news, a format that does not work well online.
Thinking Visually
One of the biggest challenges of becoming a video journalist is learning to think visually. What does this mean? A video producer must understand the compo-nents of video, and must be able to capture the elements needed to tell a com-pelling visual story. For print stories, reporting can be done in the field, on the telephone, or online. For video stories, all elements must be captured in the field, and video journalists must be able to identify the best visual components for the story. Video journalists need to identify and acquire interviews, b-roll or action, and natural sound efficiently and with careful attention to high production values.
Interviewing a source for a video story is very different than interviewing a source for print. There are production issues that you must be concerned about: lighting, location, environmental noise, and your sources’ comfort and presence on camera. Casting the right characters for your video story and shooting them in the appropriate location are an important part of the production process.
Q&A with the Experts: Bob Sacha, Filmmaker
As my colleague Bob Sacha said: video works when there is motion and emo-tion. Motion or action is often referred to as b-roll. Interviews and voiceovers are called a-roll. The roots of these terms go back many years to the early days of television when the news was shot on rolls of film. Video students and new video producers will often take this to mean that the a-roll is more important than the b-roll. That is, in fact, backwards.
The action of your story should be your main focus. Your interviews are undoubtedly important, but a-roll alone will only result in boring talking head videos. Understanding how to shoot real action and strong visual sequences is a major challenge and the primary goal of video production. As mentioned earlier, too many visual clichés have been established to replace real motion in TV news. Video journalists resort too quickly to using generic images in their stories. For example, local TV stories of crime will often feature generic images of poor urban areas. This is journalistically unsound, but also, the visuals give the viewer no true insight into the causes or solutions to crime.
Finding a story and reporting it thoroughly is the primary challenge of jour-nalists in any medium. But for video jourjour-nalists, finding a video-worthy story and reporting it takes a deep understanding of how visuals come together to tell a story. This can take years to master. The first step of learning how to pro-duce video is understanding how to shoot authentic action and sequences.
What do you do?
I’m an award-winning filmmaker who is also passionate about teaching and learning new things.
How did you get started in video?
I’ve always loved photography, films, and radio. I started as a photojournal-ist at newspapers, then magazines, working my way up to LIFE and National Geographic. About 10 years ago, the world of magazines started to shrink and video for the Web was a wide-open empty space that no one wanted to visit when I started. So I jumped in.
What kinds of stories work best for video?
My mantra for video stories is to find stories that have motion and emotion. I’m not a fan of the talking head video. I’d rather spend my time on Facebook than watch someone talking on screen.
What three tips would you give videographers in terms of finding and reporting video-worthy stories?
Figure 2.10
Bob Sacha, filmmaker.
action”), and look for a conflict or complication or unanswered question that you will resolve. Simplify or answer your question by the end of your video.
How do you get someone to open up to you on camera? How do you get them to forget that the camera is there?
To get the subject to forget you and the gear, you need to be focused on the subject. This means using your gear needs to be intuitive. Don’t interview someone but rather have a conversation with your subject. If they give you a bad answer, it’s because you asked a bad question. So think about asking smart questions.
What are your best three interviewing tricks?
Listen, listen, listen. Follow your gut: if you’re interested, it’s likely the audi-ence will be interested, too. Stack your questions in twos and threes. Listen like an editor: if the answer isn’t complete, circle back and ask the question again.
When you are in the field, what is in your gear bags?
Lectrosonics wireless microphone transmitter and receiver with a Tram micro-phone and a vampire clip. I have a Sennheiser shotgun micromicro-phone on top of the camera all the time. I also carry spare batteries and extra cards, a Clif Bar, plus a pen and a small notebook.
How do you organize your material in post-production?
I sync interviews and transcribe all of them with the time code every minute. I organize footage by keywords and in bins. I also have a wow bin for the best shots. Staying organized is super critical for editing. I name all my sequences and bins.
You produce for a lot of different organizations. In general, what works best for Web video?
I’m always looking for compelling, emotional stories with a universal connection.
What overall advice would you give to new video producers?
Production and Post-Production
Techniques
II
27 Video cameras come in all shapes, sizes, and prices. They all boast different
options and feature sets. It would be impossible to cover the entire range of cameras on the market in this textbook. Rather, we will focus on understand-ing the core fundamentals of usunderstand-ing any video camera to produce professional footage: sensor sizes, video file formats, lenses, exposure, composition, color management, audio, and process or sequence shooting. As a video producer, you must thoroughly understand these concepts to capture usable footage. With practice, you will be able to use these concepts to produce creative, com-pelling, and beautiful video.
Understanding Exposure,
Composition, and Sequences
Figure 3.1
Sensors. Video cameras are often referred to by the size of their sensor (full-frame, APS-C, Super 35mm, 2/3", 1/3", and so on). The sensor is an ele-ment of the camera that captures the light or image coming through the lens. The sensor converts light into digital information that the camera stores on memory cards or hard drives. The size and quality of the cam-era’s sensor affects the quality of the image recorded. Typically, large sen-sors can capture more light, improving the camera’s low light performance. The sensor’s size can also affect other properties of the image, such as depth-of-field.
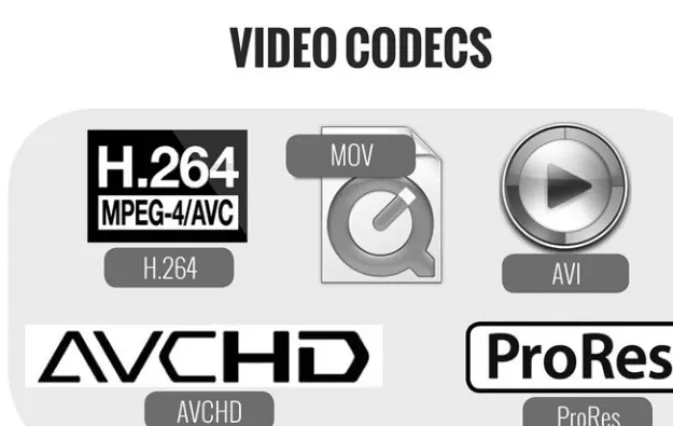
Video file formats. Like film stock and analog tape formats, digital video file formats, called codecs, can change from camera to camera. H.264, H.265, and AVCHD are some commonly used codecs today. Codecs record video at varying quality and file sizes, and not all codecs will work with all edit-ing systems. It is important to understand which codec your camera uses to avoid compatibility problems in post-production. Certain codecs provide bet-ter color depth and image reproduction than others, important factors when deciding which cameras to use for your projects. Codecs are modified and improved regularly. It is important to read the technical specifications of your cameras before you use them. Some broadcast outlets will not accept video that was not shot on an approved codec.
Figure 3.2
A comparison of various sensor sizes.
UNDERSTANDING EXPOSURE
Cameras, at their most basic level, record light as an image. A sequence of images creates the appearance of motion in the video file. The level at which light is transmitted and captured onto a sensor is referred to as exposure.
Properly exposed shots produce clear and detailed footage. Under-exposing shots results in dark or completely black images. Over-exposing shots creates blown out images that lack information or detail. Videographers must learn to properly expose their images or risk recording unusable video.
Stops of light. Exposure is often measured in stops, a unit of relative bright-ness. Adding a stop of light doubles the brightness of the image. Reducing the exposure of your shot by a stop makes the image half as bright. This is an important concept to remember as you learn to properly expose your foot-age. Lower-end cameras and smartphones typically only offer an automatic exposure mode. In this case, the camera will attempt to properly expose your footage for you. In some situations, auto-exposure will result in unwanted results.
It is best to manually expose your footage to get the proper exposure for all of your shots. If available, use your camera in manual exposure mode. There are some situations when you may want to turn your camera to automatic exposure mode, but in general, videographers use the manual settings of their cameras for greater creative control.
Figure 3.3
Understanding various video codecs is important for capturing and editing footage.
contain no image data.
Figure 3.4b
This image is under-exposed. The primary subject is too dark to see.
Figure 3.5
Figure 3.6
Using auto-exposure may result in poorly exposed subjects.
Figure 3.7
The iPhone’s default video app does not allow manual exposure.
Shutter speed, ISO, and aperture are settings used to adjust exposure on your camera. Lower-end and consumer cameras may not allow you to change these settings. When possible, use a camera that gives you full manual control of shutter speed, ISO, and aperture. There are apps on smartphones that allow for some manual exposure control.
shutter stays in the closed position until it is triggered to open. When the shutter opens, light passes through and hits the sensor. This light is then recorded as still images or video footage. The shutter then closes again to stop the flow of light. This motion is very much like the blinking of a human eye.
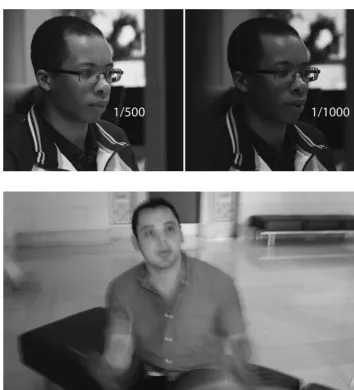
Shutter speed is measured in fractions of a second: 1/60, 1/125, 1/500, 1/1000, and so on. A smaller fraction (for example, 1/1000 of a second) means that the shutter opens and closes more quickly. This lets in less light and results in a darker image. The greater the fraction (for example, 1/60 of a second) means that the shutter stays open for a longer amount of time. This produces a brighter image. When the speed of the shutter is decreased from, for example, 1/1000 to 1/500, the image has gained one stop of light. The image is now twice as bright as it was before. This is because the shutter remains open twice as long at 1/500 of a second than it does at 1/1000 of a second.
Still photographers change their shutter speed depending on various edito-rial goals and shooting conditions. When shooting video, you should set your shutter speed at this ratio: 1/(2 × the frame rate). For example, if you are shooting at 24 frames per second (fps), your shutter speed should be set to 1/48. This number is based on the 180 Degree Shutter Rule, a convention dat-ing back to the old days of film projectors. This ratio creates footage that most
Figure 3.8
closely mimics the motion blurring seen in cinema. A faster shutter speed will result in footage that appears to stutter. A slower shutter speed will result in blurry or ghosting images. Occasionally, videographers will use different shut-ter speeds to get specific visual effects. But, in general, this should be avoided.
ISO. The ISO metric was named after the International Standards Organization, the group that developed the standard for measuring the speed, or light sensi-tivity, of film. While we shoot digital video these days, we still use the term film speed, or ISO, to discuss sensitivity to light. Note: some cameras use the term “gain” in place of ISO. If you have ever used a film camera, you will remember load-ing it with film rated at 200, 400, or 800 ISO. This was the film’s speed. Higher
Figure 3.9
The image on the right was shot at a shutter speed of 1/1000, twice as fast as the image on the left shot at a shutter speed of 1/500.
Figure 3.10
film speed means that the film is more sensitive to light and can produce usable images even in lower light conditions.
In the digital world, we still use ISO settings as a way to change the brightness of the image. Instead of using physical film, the camera’s sensor and software determines the ISO setting. Manufacturers are constantly improving ISO per-formance in their cameras. These days, high-end video cameras can go up to nearly 500,000 ISO and still provide a clean image.
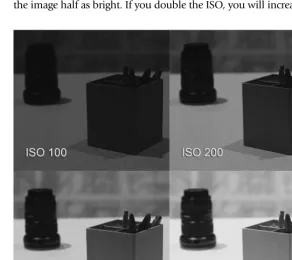
How does ISO affect the brightness and quality of your image? Like in the days of film, as you increase the ISO, you increase the brightness of the image. One major trade off is that images tend to get grainier or lower quality as you increase the ISO. In situations that require shooting in a dimly lit environ-ment, you may need to increase your ISO substantially. As you increase the ISO on the camera, you will be able to see the image get brighter. But if you push the ISO setting too high, your image may become too grainy. Higher-end cameras tHigher-end to have better ISO performance. This means that, even at high ISO settings, the sensor can preserve the quality of the image.
ISOs work in the same proportion as shutter speeds in terms of stops of light. Remember, a stop is a measure of relative brightness. Adding a stop of light will double the brightness of your image. Decreasing exposure by a stop will make the image half as bright. If you double the ISO, you will increase the exposure of
Figure 3.11
the image by one stop, therefore doubling the brightness of your footage. For example, an image shot at 200 ISO will be twice as bright as an image shot at 100 ISO. If that image is shot at 400 ISO, then it will be twice as bright as the image shot at 200 ISO and four times as bright as the image shot at 100 ISO.
The third way to manipulate exposure is in the lens. The aperture of the lens is the opening through which light travels to reach the sensor. The aperture of the lens is like the iris of the human eye. As the aperture increases in size, more light travels through to the sensor. This results in a brighter image. As the aperture closes, less light reaches the sensor. In this case, a darker image is produced.
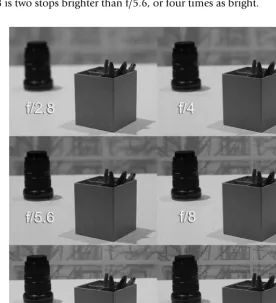
In photography and videography, aperture is measured by its f-number or
f-stop. Common f-stops are: f/1.4, f/2, f/2.8, f/4, f/5.6, f/8, f/11, f/16, and so on. These numbers, based on a ratio between the lens’s focal length and diame-ter of the aperture opening, can be confusing to new shoodiame-ters. But you must learn how aperture works to be able to control light. Like shutter speed and ISO, f-stops can be used to calculate and adjust the exposure of your image. For example, f/2.8 is a stop brighter than f/4, meaning that it is twice as bright. F/2.8 is two stops brighter than f/5.6, or four times as bright.
Figure 3.12
Still photographers manipulate shutter speed, ISO, and aperture to achieve proper exposure. Videographers typically set their shutter speed (using the 180 Degree Shutter Rule) once, but adjust ISO and aperture constantly during shooting. Remember that ISO settings can have effects on your image other than exposure. Higher ISOs will result in grainier footage, and push-ing the ISO too high can result in unusable video. Changpush-ing the aperture of the lens can change the exposure of the image, but it can also change the
depth-of-field.
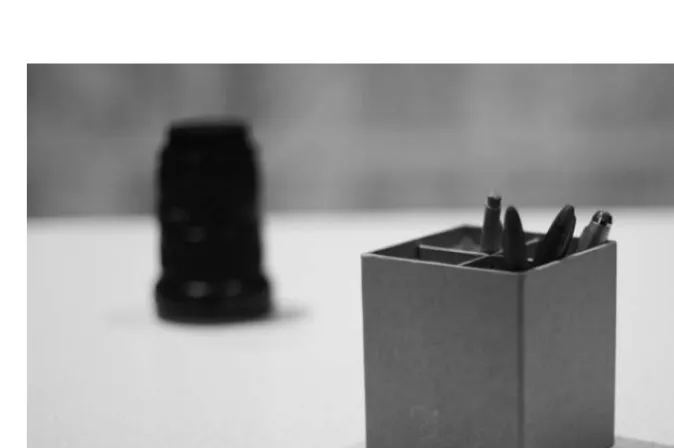
Depth-of-field. Depth-of-field refers to the distance between the closest and far-thest objects in an image that appear to be in acceptable focus. In Figure 3.13, you will see that the box is in focus while the camera lens behind it appears soft or out of focus. If I increase the f-stop to f/16, the lens is now in focus. As a rule, increasing the f-stop will result in a greater depth-of-field, or area of acceptable focus. If you shoot at a higher f-stop, more of your image from foreground to background will be in focus. As noted earlier, increasing the f-stop will also make the aperture smaller. Making the aperture smaller decreases the amount of light that passes through to the sensor. This results in a darker image. To compensate for this loss of light, you must increase the ISO to achieve proper exposure.
When you want to decrease the depth-of-field, you must decrease the f-stop (or make the f-number smaller). Decreasing the depth-of-field allows you to
Figure 3.13
highlight a specific element in your shot, while blurring the other objects in front and behind it. This is often called shooting with shallow depth-of-field. By decreasing your f-stop, you will also increase the amount of light that can pass through the lens and strike the sensor. This will result in a brighter image. In some cases, a wider aperture will result in over-exposed footage. To reduce the brightness of light in the image, you must reduce the ISO to achieve proper exposure. The important thing to remember is that if you increase light by one stop with your ISO setting, you must decrease it by one stop of light with your aperture. The reverse is also true. This is a common interplay between ISO and aperture that videographers must manage while they shoot.
Neutral density (ND) filter. Occasionally, reducing your ISO and closing your aperture still results in an image that is too bright or over-exposed. This may happen if you shoot in bright or sunny locations. In these cases, you must use a neutral density, or ND, filter to reduce the amount of light hitting the sensor. Neutral density filters act much like sunglasses for your camera, but they have theoretically have no effect on the quality and color of your footage. Some cameras have built-in ND filters of varying strength. If your camera does not have ND filters, I recommend that you purchase ND filters to be placed over your lenses.
Zebra lines. Some cameras feature zebra lines to help shooters determine proper exposure. These lines will appear on areas of your footage that are becoming
Figure 3.14
over-exposed. Although you should aim to properly expose all of your footage, it is more important to avoid over-exposing your shots than under-exposing them. Over-exposed footage contains no data and cannot be recovered in post-production. Slightly under-exposed footage is salvageable with some color correction.
Figure 3.15
ND filters can reduce light when shooting in bright locations.
High contrast situations. There will be situations where not all areas of the foot-age will be properly exposed. For example, you may have a person in an inter-view with a window in the shot. In this case, it is important to expose for the person or main subject of your shot. This may cause you to over-expose the
Exercise
1. Set your camera to shoot at 24, 25, or 30 frames per second (depending on your preference).
2. Set your shutter speed to the appropriate setting (1/48 for 24fps, 1/50 for 25fps, and 1/60 for 30fps).
3. Set your camera on a tripod and shoot a scene with your ISO set at 800.
4. Adjust your aperture until you get a properly exposed image. What f-stop are you using?
5. Now, set your ISO to 1600. Adjust your aperture until you get a properly exposed image. What f-stop are you using?
6. Finally, set your ISO at 3200. Adjust your aperture until you get a properly exposed image. What f-stop are you using?
window. If you expose for the window in the shot, your source will be too dark. You must always be sure to properly expose for the main subject of your shot.
It is difficult to shoot in areas with high contrasting lights and darks. For example, if you are shooting outdoors, the areas in the shade will be signifi-cantly darker than the areas not shaded by a tree. Exposing for the area that is shaded will cause the other areas of your shot to be over-exposed. Conversely, exposing for the uncovered area of your shot will make the area under the tree very dark.
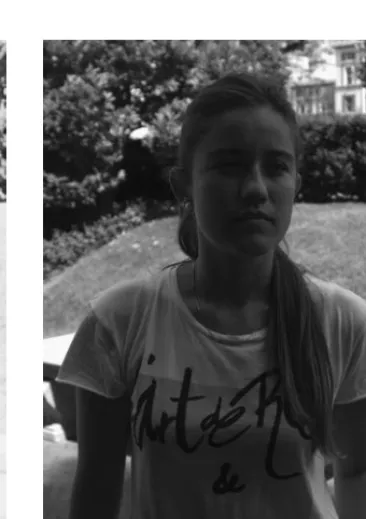
Figure 3.16a
The subject is properly exposed, but the background is blown out.
Figure 3.16b
The background is properly exposed, but the subject is under-exposed.
Figure 3.17
Shooting at dawn or at the end of the day will result in soft golden colors in your footage.
Exercise
Repeat this exercise in 10 different locations, both indoors and out. Place an object in the middle of your shot. For example, you can use a flower vase or a book. Move your subject from location to location and adjust your ISO and aperture so that your subject is properly exposed. Start with the proper shut-ter speed for your frame rate, pick a beginning ISO (800 is a good start), and then adjust your aperture to achieve proper exposure. Which situations gave you the most evenly exposed footage?
White balance. White balancing a camera ensures that you are capturing footage with the proper colors. Cameras determine proper color reproduc-tion based on the light source illuminating your shot. Light sources can be natural such as the sun, or artificial such as fluorescent or incandescent lights.
COMPOSITION
With the advent of inexpensive video cameras and smartphones, nearly every-one has some experience shooting video these days. However, most people do not know how to shoot professional-quality video. Professional-quality footage means that the video has been properly exposed and composed.
Composing an image requires the thoughtful and active application of compo-sitional rules when framing a shot. Haphazardly shot or un-composed foot-age looks amateurish and can often be confusing to the viewer.
From a very early age, we are taught how to read and write. We are taught grammar and the elements of sentence construction: nouns, verbs, adverbs, subjects, objects, and so on. Sentences, paragraphs, essays, and books are compositions of words and punctuation to create greater meaning. Similarly, images and shots need to be carefully composed to give your footage more value.
Unfortunately, very little instruction about visual composition is pro-vided in our school systems. It can be difficult to articulate in words what makes a good shot. Good-looking images are built on solid compositional techniques, just as good writing is based on strong grammar and style. Composition rules range from the very basic to highly sophisticated. We will focus on the basic fundamentals of composition. As you become a more experienced shooter, you will be able to experiment with your own visual style and voice.
The goal of composing any image is to make sense of the objects or infor-mation in your frame. Composing images takes active decision-making. Most untrained shooters simply point and shoot. As a professional videographer,
Figure 3.18
you must work to help the viewer understand the images they are watching. This may require you to spend a considerable amount of time contemplat-ing your shots before you hit record. You may need to walk around, kneel down, climb on a ladder, and shoot from a position that is not naturally comfortable.
Camera placement. The first step in creating a visual composition is deciding on camera placement. Where you put your camera, where it is pointed, and how high or low it sits all affect your composition. Most amateur videogra-phers shoot almost exclusively at eye-level. Videogravideogra-phers jokingly call this 5′7′′ disease. To achieve a variety of shots, you must think creatively.
n Get low. Shooting from any height other than eye-level will present
an interesting perspective for the viewer. Most people do not crouch down or bring their eyes to table- or floor-level. These shots can produce interesting results.
n Shoot from the hip. There is the popular image on TV and in the
movies of camera operators holding cameras on their shoulders. While this is a common shooting posture, there is no rule that says you have to shoot only in this position. Move your camera to hip-level or directly in front of your chest for a different perspective. Shooting your subject from below will make your subject seem larger. Holding your camera lower can be more comfortable and stable.
Figure 3.19
Figure 3.20b
n Get high. Shooting from above can also give your footage a unique
perspective. Shoot on apple boxes, chairs, and ladders. If it is safe, shoot from windows and rooftops. Footage shot from up high can give your viewer a better sense of the size of a location. Shooting a person or object from up high can make your subject seem smaller.
n Point-of-view (POV). Point-of-view shots represent the vantage point
of a particular character in your story. For example, if you are shooting a discussion between two characters, you might want to shoot the first character at eye-level, positioning yourself directly behind the second character. This creates the effect of watching the scene from the second character’s point-of-view.
Figure 3.20c
A videographer shooting from a high angle for an interesting shot.
Figure 3.20d
Creating order. A photographer friend once told me that composition is sim-ply making visual sense of the chaos around us. Careful composition creates order in your footage. To compose an image well, you must force yourself to think about the goals of each shot. What do you want your viewer to focus on? What is of importance? Actively composing your image requires you to decide what to highlight in your shot and what to diminish.
Once you have decided on the camera’s vantage point, you must then choose which elements or objects to keep in the frame and which to leave out. There are many compositional rules you can use to help you achieve better shots. These techniques may force you to frame your shot in different ways—by moving the camera forward or backwards, panning left or right, or tilting up and down.
There are many compositional techniques, but we will focus on the most basic and effective ones for non-fiction videography:
n Rule of Thirds
n Environmental Framing n Lines
n Selective Focus (Shallow Depth-of-Field) n Close Ups
Rule of Thirds. Inexperienced photographers and videographers have a ten-dency of centering their images. This technique creates dull or flat results in your footage. The Rule of Thirds, a classic compositional technique used in photography, graphic arts, and design, can be used to increase tension and energy in your images.
The Rule of Thirds is executed by dividing your frame into nine equal seg-ments with two lines running vertically and two lines running horizontally, similar to a tic-tac-toe board. Rather than placing the primary subject of your image squarely in the center of the frame, the subject should be moved to one of the points where the horizontal and vertical lines intersect. Any of these four intersecting points can be used.
Exercise
Figure 3.22
These grid lines show that the source falls on the upper-right third of the image.
Figure 3.23a
Figure 3.23d
The subject is in the lower-right third of the frame.
Figure 3.23c
The Rule of Thirds is one of the most basic compositional techniques used in photography and video. However, it requires the shooter to actively frame the shot in a specific way that enhances the image. Note that your subject can be large or small in the frame, as long as your subject remains at one of the intersecting points.
Figure 3.24a
The Rule of Thirds can be applied to wide shots.
Figure 3.24b
Environmental framing. Environmental framing is a compositional technique that involves using environmental elements such as doorways, mirrors, plants, people, light, and shapes to highlight the primary subject of your shot. We use picture frames to highlight our favorite photos or works of art. We use spotlights to draw attention to the lead singers during a performance. We can apply these same principals when we compose our footage.
Using environmental shapes to isolate your images is an effective way to make your footage more compelling. Structures such as doorways, fences, tunnels, and windows are stationary and readily available in most situations. As a videographer, you have to actively look for these opportunities. This may require walking around and analyzing your environment at length before you start shooting. An untrained shooter points and shoots where it is conve-nient; a professional videographer takes time to compose. Placing your sub-jects within an architectural frame draws the viewer’s eye to the subject. This helps to create a shot that is less visually complicated and much easier for the viewer to understand.
Exercise
Go to 10 different locations. Select a primary subject that you want to shoot. This can be a person or any object. Frame your shot with your subject at one of the four intersection points. Does this result in a more dynamic image?
Figure 3.25
Lines. Video works in two dimensions. That is to say: the frame of your shot has a width and a height. One goal of the videographer is to create depth, or the illusion of a third dimension in your footage. Lines and patterns naturally existing in the environment can be used to create depth. They can also be used to draw the viewer’s eye to your primary subject.
Shooting a building straight on (at a 90 degree angle) will result in a very flat image. Instead, position your camera at a smaller angle in relation to the building to create an image with greater perceived depth. By shooting flat objects on an angle, you can create lines that appear to head towards a vanishing point. Shooting a street from the side does not connote depth, but shooting it from a low angle down will create a greater sense and appearance of three dimensions.
Exercise
Go to 10 different locations and find opportunities for environmental frames. These can be mirrors, windows, openings in walls or fences, the curved han-dle of a coffee cup, or anywhere where an object creates a frame. Most loca-tions will provide several architectural frames. Position your camera so that the opening in the frame completely surrounds the subject of your shot. Record a few seconds of each shot. How long did it take you to find these frames? Did you have to place your camera higher or lower than you nor-mally would?
Figure 3.26a
Lines help draw the viewer’s eye towards the primary subject of your shot, and they can lead your viewer to look at a particular portion of the image. This technique, like the Rule of Thirds and architectural framing, can be used to highlight your subject and eliminate visual confusion or noise for the viewer.
Figure 3.26b
This shot of a building shows depth and gives the viewer more environmental information.
Figure 3.27
Exercise
Go to 10 different locations and find opportunities for shooting lines. These can be fences, rows of buildings, computer monitors, parking meters, and so on. There are lines everywhere in any environment. Position your camera and compose your shot to produce an image with depth. Record a few seconds of each shot. How long did it take you to find these lines and execute these shots? Did you have to reposition your camera many times to achieve greater depth?
Selective focus (shallow depth-of-field). Earlier, we discussed the concept of depth-of-field. Depth-of-field is the distance between the closest and farthest objects in an image that appear to be in acceptable focus. Controlling depth-of-field can help you to isolate the primary subject of your shot by blurring out elements of less importance. Increasing your f-stop makes your aperture smaller and results in a great depth-of-field. Conversely, decreasing your f-stop will result in a wider aperture and a shallower depth-of-field.
New shooters can initially have a hard time understanding how to control depth-of-field. If you do get confused, think about the human eye. If you cannot see something far away, you will tend to squint, effectively reducing the aperture of your eyes. This increases your eyes’ depth-of-field. When you do this, you can see at a further distance. Your lens works in the same way: smaller apertures result in a longer depth-of-field. Wider apertures (smaller f-stop) reduce the depth-of-field.
Note: As mentioned earlier, when you adjust your aperture, you may need to adjust your ISO as well to maintain proper exposure.
Look at Figures 3.28a, 3.28b, and 3.28c. You will see that, although the two people in the shot stay in the same position, changing the aperture will allow
Figure 3.28a
you to focus on the person in the front, the person in the back, or both. Along with aperture, sensor size affects your depth-of-field. Bigger sensors produce footage with shallower depth-of-field.
Shallow depth-of-field can work great for shooting objects that stay still, such as buildings, plants, and street signs. However, if you are shooting moving objects, it is best that you do not make your shots too shallow and risk losing focus. When shooting on an APS-C, Super 35mm, or larger sensor camera,
Figure 3.28b
The aperture and focus have been set to isolate the subject in the background.
Figure 3.28c
do not shoot wider than f/5.6. Shooting at f/4 or f/2.8 or wider will produce footage that goes in and out of focus too much. When you are starting to learn how to shoot video, it is best to shoot with greater depth-of-field. Start shooting at f/8 or higher.
There are many free or inexpensive online and mobile depth-of-field cal-culators available. These tools will help you to calculate how much focus-ing area you have at certain apertures usfocus-ing different cameras. For example, when shooting on a full-frame sensor camera at an aperture of f/5.6 with a 50mm lens with my subject 10 feet away from me, I only have a depth-of-field of 4.28 feet. If I change my f-stop to f/11, my depth-of-depth-of-field increases to 9.6 feet, meaning that a larger portion of my image will likely stay in focus. Using depth-of-field calculators is a great way to begin to understand the relationship between aperture and its effect on depth-of-field. But the best
Figure 3.29
CLOSE UPS
The term close up is a relative one. One videographer’s close up may appear to be a medium shot to another shooter. But, in general, in a close up, the pri-mary subject of your shot fills more than half of your entire frame. Close ups provide great detail: the wrinkles on someone’s hand, the detail of flowers, the texture of sand. By filling the frame with your primary subject, you are eliminating all other confusing or unnecessary elements. Close ups are a sim-ple but very effective compositional technique that produces great footage.
Getting close enough for a close up can be surprisingly difficult for a new shooter. Moving close to someone with a camera takes discipline. When we shoot family vacation photos or iPhone videos, we tend to stand at least 8 feet or more away from our subjects. Getting any closer can feel like an invasion of personal space. A videographer will often have to get within inches of his subject. While you can zoom on your camera to get closer, this is not always a preferred technique. We will discuss how to shoot close ups in more detail in Chapter 5: Field Production.
way to understand any of these camera concepts is to go out and shoot as much as possible.
Exercise
Line up five objects on a table, placing each object about 1 foot behind the previous object. Position your camera about 2 feet in front of the first object on the table. Focus on the front object and adjust your aperture so that the other objects are out of focus. Then adjust your ISO so that your shot is prop-erly exposed.
Adjust your aperture until only the first and second objects are in focus. Did the image get darker? Did you have to adjust your ISO? Adjust your aperture until the first, second, and third objects are in focus, but the other objects are not. What are your aperture and ISO settings? Repeat this exercise until all objects are in focus. What are your aperture and ISO settings? You should see a relation between increasing depth-of-field and increasing ISO.
Exercise
UNDERSTAND FOCAL LENGTHS
The focal length of a lens is the distance between the lens and the camera’s sensor when the image is focused to infinity. Focal length is measured in millimeters, such as 24mm, 35mm, 85mm, and so on. Lenses with a fixed focal length are called prime lenses. Zoom lenses have adjustable focal lengths. Zoom lenses feature minimum and maximum focal lengths such as 24–70mm, 24–105mm, 70–200mm, and so on.
The focal length of the lens affects the field of view (also known as the angle of view), or what is visible in the frame of your shot. A shorter focal length results in a wider field of view, whereas a longer focal length results in a nar-rower field of view. When you zoom in on your subject, you are decreasing your field of view and limiting the elements in your frame. This creates the illusion that you are physically closer to your image.
Using different focal lengths can dramatically affect your image in ways other than simply magnifying your subject. Wide-angle lenses (such as 24mm or shorter) give your shots a wide field of view, but they also exaggerate the fore-ground of your shot. Normal lenses (such as a 50mm lens) present an angle of view that looks natural or “normal” to the human eye. Telephoto lenses (85mm and longer) give a narrower angle of view and compress the fore-ground and backfore-ground in your shot.
Figures 3.32a, 3.32b, and 3.32c are images of the same scene, but each was shot with a different lens: a wide-angle lens (24mm), a normal lens
Figure 3.30
Figure 3.31a
A shorter focal length (24mm) creates a wider field-of-view.
Figure 3.31b
A longer focal length (105mm) creates a narrower field-of view.
Figure 3.32a
This image was shot at a focal length of 24mm.
Figure 3.32b
This image was shot at a focal length of 50mm.
foreground object. In the 105mm shot, the background object seems much closer to the foreground object. In the 50mm shot, the foreground and background objects seem to be the same relative size as they would appear to the human eye.
having a conversation, then the person in the background will appear to be much smaller than the person in the foreground. This may make the foreground subject seem much more impressive or powerful. If you shoot the same scene with a normal or telephoto lens, the two people will appear to be more proportionally balanced. Wide-angle lenses can also make shots very dramatic, and ultra-wide angle lenses can make your images appear skewed.
Figure 3.32c
This image was shot at a focal length of 105mm.
Figure 3.33a