Red Hat Linux 6.0
The Official Red Hat Linux
Getting Started Guide
Copyright © 1999 Red Hat Software, Inc.
Red Hat is a registered trademark and the Red Hat Shadow Man logo, RPM, the RPM logo, and Glint are trademarks of Red Hat Software, Inc.
Linux is a registered trademark of Linus Torvalds.
Motif and UNIX are registered trademarks of The Open Group. Alpha is a trademark of Digital Equipment Corporation.
SPARC is a registered trademark of SPARC International, Inc. Products bearing the SPARC trademarks are based on an architecture developed by Sun Microsystems, Inc.
Netscape is a registered trademark of Netscape Communications Corporation in the United States and other countries.
Windows is a registered trademark of Microsoft Corporation.
All other trademarks and copyrights referred to are the property of their respective owners. Revision: GSG-6.0-HTML-RHS (04/99)
Red Hat Software, Inc. 2600 Meridian Parkway Durham, NC 27713 P. O. Box 13588
Research Triangle Park, NC 27709 (919) 547-0012
[email protected] http://www.redhat.com
While every precaution has been taken in the preparation of this book, the publisher assumes no responsibility for errors or omissions, or for damages resulting from the use of the information contained herein.
Contents
Introduction ... 4
1.1 A Note About Conventions ... 6
1.2 The Root of the Matter... 7
1.3 How to Quit... 10
1.4 From Console Mode ... 11
1.5 X Marks the Spot... 11
1.6 A Brand New You ... 13
1.7 Shutting Down... 19
1.8 Pulling Yourself Up by the Boot ... 21
1.9 A Good ``Man'' Is Easy to Find ... 24
1.10 What is Rescue Mode?... 26
2 You Are Here ... 29
2.1 Finding Yourself With pwd... 29
2.2 Getting From Here to There: cd... 30
2.3 Looking Around With ls... 34
2.4 A Larger Picture of the Filesystem ... 39
2.5 ``Washing'' the Window... 41
2.6 Using cat... 42
2.7 Using Redirection ... 43
2.8 Appending Standard Output ... 45
2.9 Redirecting Standard Input... 46
2.10 Pipes... 46
2.11 Stringing Commands Together... 47
2.12 Ownership and Permissions... 48
2.13 Fun with Numbers in chmod... 53
3 Managing Files and Directories... 56
3.1 Shell Collecting ... 56
3.2 Locating Files and Directories... 57
3.3 Command History and Tab Completion... 57
3.4 Identifying and Working with File Types ... 58
3.5 Copying, Moving and Renaming Files and Directories ... 62
4 What Do I Do Now? ... 65
4.2 The X Window System ... 65
4.3 Configuring Your Red Hat Linux System For Sound ... 68
4.4 World Wide Web... 70
Introduction
Welcome to Red Hat Linux 6.0!At Red Hat Software, we believe we offer the best Linux distribution on the market. We hope you'll agree that the time and the money you spent for Red Hat Linux was well spent, indeed.
Recently, Linux has gained quite a bit of attention from the national and international media. What began as a ``hacker's hobby'' several years ago has been embraced as a powerful and economical computer operating system.
If you count yourself among the many Linux users who are discovering Red Hat Linux for the first time, this book is for you!
Inside, you'll find valuable tips which will help you get acquainted with your new desktop environment and with the way your Red Hat Linux system works. You'll be able to learn some basics and you'll find pointers to places where you can turn for more information.
The Newbie's Guide to Red Hat Linux
Are you rattled by terms like root and user account? The following is for you!
The second part of the Red Hat Linux Getting Started Guide, this ``newbie's guide'' will help you gain a toehold on the basics of your new Linux system -- from creating a new account to working with files in a non-graphical environment.
There's nothing wrong with a little hand-holding -- and that's what you'll find in these remaining chapters.
Here's a glimpse of what you can find:
• Chapter 1: Welcome to Linux -- Learn how to create your own user account to maximize your system's safety. You'll also find out how to shut down your system, create rescue disks and more.
• Chapter 2: You Are Here -- Learn how to navigate through your system at the shell prompt, how to combine commands and see how everything fits together.
• Chapter 3: Managing Files and Directories -- Here, you'll learn more about the powerful
shell you're using, how to save yourself time and frustration when you're typing in commands and how to rename, copy, delete and move files and directories.
• Chapter 4: What Do I Do Now? -- Looking for pointers to more information about your Red Hat Linux system? Here, you'll find tips about where you can find plenty of documentation and help. You can also learn more about your X Window System and how to work with other system tasks.
More to Come
As Linux evolves, so does the support you'll find for Red Hat Linux. The Red Hat Linux Getting Started Guide is part of that support -- and evolution. In coming editions, expect to find more essential information to help you get the utmost from your Red Hat Linux system.
That's also where you come in.
Send in Your Feedback
If you'd like to make suggestions about the Red Hat Linux Getting Started Guide, please mention this guide's identifier:
GSG-6.0-HTML-RHS (04/99)
That way we'll know exactly which version of the guide you have. You can send mail to:
A Thousand Thanks
This guide is the definition of a group project, since so many provided valuable assistance, from offering suggestions and sharing knowledge to proofreading.
Thank you to Edward C. Bailey, the documentation department's manager. Ed was there from concept to ``when the rubber hit the road,'' offering his expert advice on style and substance.
Red Hat Software's support team -- particularly Stephen Smoogen and Eric Rahn Nolen (``Thor'') were more than generous in offering their time and advice.
And to the engineers, who build the best Linux distribution, a big ``thank you''! It is their work which makes Red Hat Linux so worthwhile.
And, of course, thank you to Linus Torvalds and the thousands of Linux developers around the world. Ultimately, this is their operating system -- and it is a wonder.
Congratulations!
As a new Red Hat Linux user, you've successfully installed one of today's most advanced computer operating systems.
What began in 1991 as a hobby for a young Finnish student named Linus Torvalds has ballooned from a ``hacker's darling'' into an important tool for both home and business users.
Just six years ago, there were an estimated 100,000 users. Today, about 12 million users worldwide depend on Linux to manage finances, use and control Internet services, create artwork and more. That number is rapidly growing; every day, new users are discovering the power and potential of Linux. This free, UNIX-like operating system is a multitasking, multi-user environment that has superior memory management, great security features, and more.
In other words, power and, once you become more comfortable with Linux, ease of use.
Tip:
Linux is most frequently pronounced with the short ``i'' and the accent on
the first syllable, as in ``LIH-nucks''.
What do you do next? Relax.
In the chapters that follow, we hope to show you the basics of how to get the most out of your new system. If you're interested, we will also show you the roads to take which can lead you to becoming a Linux guru.
1.1 A Note About Conventions
At the time you installed your Red Hat Linux system, you were given the option of working entirely in a graphical environment, such as GNOME, or logging in from console mode, which is non-graphical. If you're like many new Linux users, you're familiar with graphical environments such as Microsoft Windows, Apple Macintosh or IBM's OS/2.
So it's a fairly safe bet that you chose to work in a graphical environment when you installed Red Hat Linux 6.0.
You'll find plenty of opportunities to ``point and click'' on applications -- either on your desktop or from the menu at the bottom of your desktop. But we're going to spend much of our time working from the ``shell prompt.''
Why? Because at the same time you accomplish tasks, you can learn a little more about how your Red Hat Linux system works.
Tip:
Unlike a graphical presentation, a ``shell prompt'' is the way you can type
commands directly to the ``shell.'' You need a shell to use Linux, because it's
the tool you use to interact with your operating system. You'll find more
information about your shell in Chapter
3
.
Figure 1: The GNOME footprint on the panel
There are plenty of ways to get a shell prompt, depending on the kind of graphical environment you're using, such as GNOME. Depending on the environment chosen, just by right- or left-clicking in a blank space on your desktop, you'll see a reference to xterm.
By ``dragging'' your cursor over that item you will open a shell prompt window. Other times, you'll find you can get a shell prompt window through the menu on your desktop.
In addition to xterm, other references which will give you the shell prompt include: • terminal emulator window
• GNOME terminal • Color Xterm
We'll use GNOME as our example.
To begin, take your cursor to the GNOME footprint on the panel at the bottom of the desktop.
Once the menu pops up, ``drag'' the cursor to the Utilities section of the menu by holding down the mouse button while raising the mouse to the Utilities folder.
Once the cursor is over the folder, a new menu pops up to the right of the Utilities folder. Here, in the first entries of this new submenu, there is a choice of terminal windows: Regular xterm, Color xterm and GNOME terminal (as shown in Figure 2). To get a shell prompt, position the cursor over the terminal window of your choice, and release the mouse button.
Figure 2: Shell prompt menus in Utilities
Tip:
Of the choices in the
Panel
->
Utilities
menu, the GNOME terminal
offers the ability to set background color and other preferences most easily.
Now, it's time to take your first steps.
1.2 The Root of the Matter
When your Red Hat Linux system starts, you'll see an array of messages speeding past you on the screen. Many of these messages simply tell you what services are starting on your computer.
Tip:
Want to read those startup messages more closely? At a shell prompt,
type
dmesg | more. You'll be able to read the file one screen at a time. To
move forward, press the
[Spacebar]; to quit, press
[Q].
Finally, we'll come to ``the login prompt'' (as shown in Figure 3). You'll find:
Login:
Password:
Figure 3: A sample screen of the graphical login prompt
In detail, that is the password you were asked to choose to log in to your root account. When you log in -- either in the root account or other accounts -- you're introducing yourself to the system. The root account, unlike all other accounts for your system, has access to everything. Also known as the
superuser, the root account can control everything the system does. Go ahead and login; at the Login: prompt just type:
root
and press [Enter] or the [Tab] key.
Tip:
Case matters. Linux, like UNIX, makes a distinction between uppercase
and lowercase letters. So
rootis not the same as
Root. In fact, as far as Linux
is concerned, they're two different accounts.
Don't worry about mistakes when you log in; you can always use the [Delete] key to start over. When you're asked, type in the password you chose when you installed Red Hat Linux. You won't see your password on the screen as you type; that's just one of the security features of your Linux system.
Tip:
Be sure to type commands exactly as you see them -- spaces, dashes and
all. To Linux, an extra space or letter can make all the difference in the world.
When you're finished typing in your password, press [Enter].
Figure 4: A sample GNOME desktop
There's plenty of space to fill up, not just on your current desktop but on numerous desktops -- four by default.
Tip:
To learn specifics about GNOME, including applications and navigation,
turn to the GNOME User's Guide section of this manual.
But for now, let's just concentrate on your current desktop.
Go ahead and look around. You can begin by double-clicking with the left mouse button on the file folder called Home Directory on the desktop.
From the panel on the bottom, left-click once with your mouse, and you can begin to investigate some of the applications which have been included with your environment.
From here, you can find ways to customize your workspace, search for files, write letters or other documents, start spreadsheets and more.
But before you get too daring...
While you're logged into the root account, avoid the temptation to make any changes to files or directories unless you know exactly what you're doing!
Here's why: Whenever the system recognizes you as the root account you're allowed to do just about anything: change configuration files, make new directories, create and manage accounts for users who are allowed to use your computer and more.
That kind of power comes with a price, and tinkering around with configuration files, accounts and directories can easily lead to disaster.
So how are you supposed to operate safely?
By creating a user account, which we'll cover shortly. With a user account, you can work and play with the assurance that you're not damaging your system.
1.3 How to Quit
When you're finished looking around for the first time, you can log out to quit your session (see Figure
5).
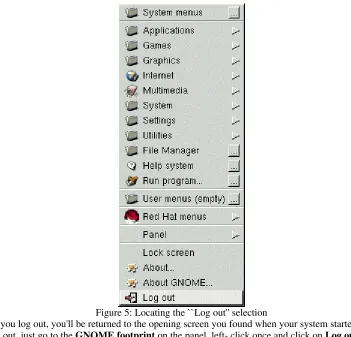
Figure 5: Locating the ``Log out'' selection
When you log out, you'll be returned to the opening screen you found when your system started. To log out, just go to the GNOME footprint on the panel, left- click once and click on Log out. You'll be presented with a box, asking you whether you want to log out. Click once on Yes. After a few moments, you'll be returned to the log in screen.
Summary:
At Login - type
rootAt Password - type
yourrootpasswordTo
1.4 From Console Mode
When you were installing Red Hat Linux 6.0, you were given the option of starting from a graphical or console -- non-graphical -- screen.
If you chose not to automatically start your computer in a graphical environment, you'll find a somewhat daunting, almost blank screen which will show you something like
Red Hat Linux release 6.0 Kernel 2.2 on an i686 login:
You can log in by typing root at the Login: prompt. Then, when Password: appears, type the password you chose at the time you installed Red Hat Linux 6.0.
Tip:
Just like the graphical login screen, don't expect to see your password
``echoed'' when you type in your password. Making sure that your password
isn't seen is just one of Linux's many security features.
Now, you'll find a single shell prompt, which will appear similar to:
[root@localhost root]#
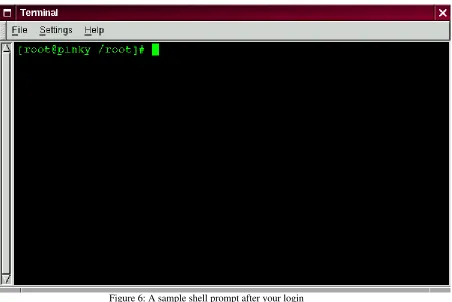
Figure 6: A sample shell prompt after your login
This tells you that you're logged in as root and in the directory called root (as shown in Figure 6). You can exit at any time simply by typing logoff or exit.
Tip:
You can also press the
[Ctrl]and
[D]keys at the same time to return
you to the login prompt.
1.5 X Marks the Spot
If you didn't install X at that time, and you wish to use the X Window System, your best bet is to return to the CD at this time and re-install Red Hat Linux 6.0. (Sigh...)
Certainly, there are other ways of installing X, but if you're fairly new to Red Hat Linux, and if you're starting out with a brand new installation, you'll find it takes less time -- and frustration -- to simply redo the installation.
Figure 7: Starting the X Window System from the prompt
If you did install the X Window System -- but didn't choose to start GNOME automatically you're still ready to go.
At the shell prompt, type:
startx
and the X Window System will begin (refer to Figure 7).
Please Note: You're logged into the system as the root account, also known as superuser. There's a reason the root account is known as superuser: In this account, you can make changes to just about anything. Unless you know what you're doing, you can easily harm your system by mistakenly changing settings.
Although you may be tempted to modify files or directories, you should resist making any changes until you've created a user account.
To log out of X, bring your mouse cursor to the GNOME panel, then left-click on the GNOME footprint. A menu of applications, utilities, games and other programs will pop up.
``Drag'' your cursor to the item labeled Log out (as shown in Figure 5).
Tip:
You can ``drag'' your cursor by keeping the mouse button depressed with
your finger while moving the cursor to your selected item. Once the cursor is
over the item on the menu, releasing the mouse button will start the program.
Now, a separate window will appear, asking you to confirm your decision to log out. Click on Yes, and you'll be returned to the console.
You now will be back at your original shell prompt, so if you are done for the day, you should log out here too.
Summary:
At the prompt, type
startx; to exit --
GNOME panel
->
Log out
1.6 A Brand New You
Now, let's create a ``user account.''
If you're familiar with MS-DOS or, to a lesser extent, Windows 98, you might be a little befuddled by the requirement of creating a user account.
After all, if you can navigate the system and use programs in your root account, you might think that having two accounts on a single machine is excessive.
Nothing could be further from the truth. Here's why:
Linux is a multi-tasking, multi-user system, which means it can safely and securely accommodate many users at one time, performing plenty of tasks each user requires. But only one account can be root -- capable of changing the way the operating system works.
Because ``rooting around'' can easily lead to havoc, it's important to safeguard against accidents. That's why just about every Linux user -- even if they're the system administrator -- has their own user account.
Once you're logged in as root, you have two ways to conveniently add a user to the system: from the within X and from the shell prompt.
Both methods are quick and painless.
Let's say that the account you want to choose is called ``billy.'' From X:
One of the most powerful tools you can use for system administration is Linuxconf. You can use Linuxconf for adding and manipulating accounts, monitoring system activities and plenty of other system features.
Figure 8: Finding the Users accounts entry in Linuxconf
accounts -- turn to the ``System Configuration with Linuxconf'' chapter in the Red Hat Linux Installation Guide.
Tip:
You can learn more about Linuxconf by visiting the official Linuxconf
website:
http://www.solucorp.qc.ca/linuxconf/
.
One of the easiest ways to access Linuxconf is from the shell prompt. At the prompt, type:
linuxconf
We want to add an account, so let's scroll about a third of the way down the menu in the left panel, to the entry marked Users accounts. If the entry has a + next to it, go ahead and click on the ``+''. Now, the menu will expand to show entries in the User accounts listing (as shown in Figure 8). The subentries will look like the following:
|
-Users accounts |
Normal |
User accounts |
Group definitions |
Change root password
Left-click with your mouse button on the User accounts entry, under Normal.
In the right panel, you'll now see a box of the current user accounts (as shown in Figure 9).
Figure 9: The Users accounts in Linuxconf
Toward the bottom of the right panel, click on the Add button, between the Quit and Help buttons. Now, we'll see a dialog called User account creation. In here, we're going to fill in: Login name; Full name and group.
Make sure the button is indented next to the statement The account is enabled.
Figure 10: Adding a user in Linuxconf
Tip:
Everyone's account belongs to at least one group. Groups are used to
determine file access permissions. Unless you specify a group, the default
group for your user account will be the login name you choose (for example, a
group called
billy
).
When you're finished, your entries should look like the following:
Login name...billy
Full name...Bilbo Baggins
group (opt)...billy
Now, just click on the button marked Accept.
We're almost finished. Next, we've got to come up with a password.
Figure 11: Creating a user account's password in Linuxconf
For both your root and user account, your passwords should be unique and easy enough for you to remember. (Passwords can't protect very well if they're jotted down on a piece of paper and taped to the monitor!)
What's both unique and easy to remember? Passwords which both numbers and letters. Here's an example:
• Weak passwords: airplane, icecream, california • Better passwords: a!rpl8ne, !cec73am, c8Li70r&ia
One more thing: Passwords must be at least six characters -- upper and lowercase letters and/or numbers -- in length.
Once you decide on a password that you feel comfortable you'll remember, type it in the box provided. You won't see the password, except in a series of asterisks (as shown in Figure 11).
Then, click on the Accept button.
You'll be asked to retype the password for verification. Again, you won't see your password as you type it.
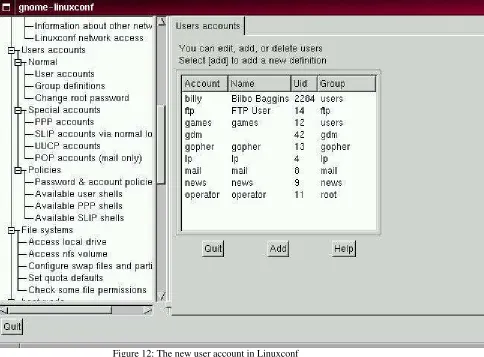
When you've finished, you'll see the account listed in the accounts panel (see Figure 12 for an example).
Figure 12: The new user account in Linuxconf
For additional security, you should change your passwords every now and then. From your user account, you can change your password by clicking on the account name, then clicking on the box marked Passwd at the bottom.
Tip:
Now that you've created your user account, you might want to reconsider
whether your root account's password is secure enough. You can change this
password easily, from within Linuxconf, by clicking on the
Change root
password
item.
To learn more about how to modify your account or perform other account procedures, turn to the System Configuration chapter in the Red Hat Linux Installation Guide.
From the shell prompt:
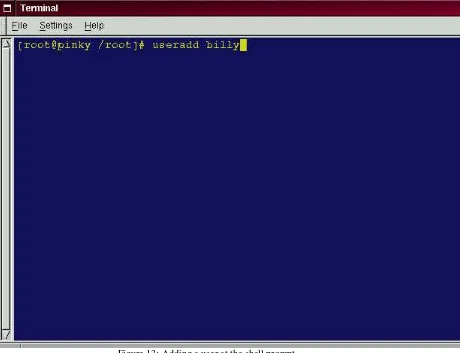
At the prompt, type useradd billy. It should look like this:
[root@localhost root]# useradd billy [root@localhost root]#
Figure 13: Adding a user at the shell prompt
Looks like nothing's changed, right? Wrong. Although you've got the same prompt, an entry has already been made for the new account. Now, it's time to specify a password.
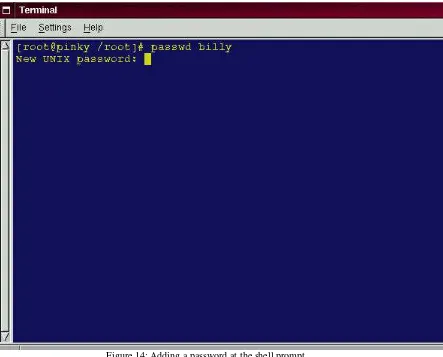
At the prompt, type passwd billy. It should look like this:
[root@localhost root]# passwd billy [root@localhost root]#
(See Figure 14.)
Remember that the password must be easy to recall and a unique mixture of letters, symbols and/or numbers.
Figure 14: Adding a password at the shell prompt
From now on, whenever you want to add a user, change account information or change account passwords -- including the root password -- either useradd or linuxconf will fit the bill. Make sure you're logged in as the root user, however.
Tip:
If you find yourself switching around frequently between the root
account and your user account, it can become confusing to know which
account you're actually logged into. You can always tell you're in the root
account you see the word
[rootat the start of the shell prompt or the hash
mark (#) at the end. If you see (for example)
[billy, or the dollar sign ($),
you're working in your user account.
Regardless of the method you choose -- from the shell prompt or from Linuxconf -- your new user account's ``login directory'' will be placed in a subdirectory of /home.
To finish up and try out your new account, log out from your root account. You'll be taken back to the login screen.
Now, you can log in to your new user account.
Summary:
From X
-- In a terminal emulation window, type
linuxconf.
Scroll to
User Accounts
->
Normal
->
User Accounts
. Click on
Add
.
From
the shell prompt
-- type
useradd (accountname); at the shell prompt again,
type
passwd accountname. Type and re-type password.
1.7 Shutting Down
At present, though, you can't simply turn off your computer when you're finished. You can always log out from your account, which will return you to your login screen, but if you want to completely shut off your machine, you've got a couple more steps to take.
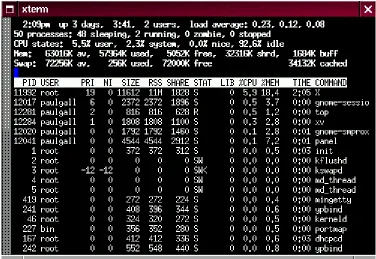
Figure 15: The command `top' shows you running processes
Here's why: Even though you may not be typing, listening to music or browsing with Netscape, your machine is still working on a variety of processes in the background. (A process is a program which is being executed. Multiple processes are running all the time on your system.)
Tip:
Curious to take a peek? Just go to a shell prompt and type
top. You'll see
the processes that are currently running (see Figure
15
). To quit this view, type
[Q]
.
(To learn more about the top command, type
man topat the shell prompt; to
move forward a screen, press the
[Spacebar]; to move back a screen, press
[B]; to quit, press
[Q]. You'll learn more about these ``man pages'' later in this
chapter.)
Like a faithful assistant, your Linux system is carrying out tasks silently all the time. You can't just turn out the lights and lock the door on your assistant. Instead, you've got to give them time to put away their work and make sure everything's in its proper place before saying ``good night.''
To shutdown or reboot while you're in GNOME, exit from your X session (panel -> Log out). Once you're at the login screen, left-click on Options, and select Halt or Reboot.
Figure 16: The shutdown command at the shell prompt At the shell prompt, you can reboot or halt your system from your root account. To reboot from the prompt, type:
shutdown -r now
(See Figure 16.)
Or, if you want to exit from your system and turn off your machine, type:
shutdown -h now
The -r option stands for ``reboot,'' while the -h option means ``halt.'' Stating now means that you want to perform this action immediately.
Please Note: Remember to save your work and exit from any applications which may be running before you perform a shutdown from the shell prompt, because you could lose work.
If you choose to halt the system, you'll see a list of messages about which services are stopping; then, you'll see:
The system is halted
Now everything's put away and it's safe to turn off your computer.
Tip:
Try substituting
+5for
now; you'll find that you've just commanded your
assistant to put everything away and stop working in five minutes.
You can learn more about the shutdown command by typing:
man shutdown
at a shell prompt. You'll be presented with a ``man page,'' which will tell you about this command. To go forward a screen, press the [Spacebar]; to go back a screen, press [B]; and to quit, press
[Q].
Summary:
To shutdown or reboot from GNOME, from the log in screen, go
to
Options
->
Halt
or
Reboot
. From the shell prompt: Log in as root, and type
shutdown -r now
(to reboot) or
shutdown -h now(to halt).
1.8 Pulling Yourself Up by the Boot
There are a number of reasons you should make a boot diskette: it can help you recover from a system failure, it can help you test a new kernel you've downloaded and compiled and it can help you share your computer with more than one operating system.
Tip:
You can always use a copy of the boot diskette to form the first half of a
rescue disk set. You'll need a boot diskette and a rescue diskette to enter
rescue mode. To read more about rescue mode, see later in this chapter.
You were given the opportunity to make a boot disk when you installed Red Hat Linux. If you chose not to make a boot disk at installation, here's your chance to start from scratch.
For now, we'll make boot disks from the shell prompt while we're in an X session.
Go to the shell prompt: In GNOME, for example, left-click on the GNOME footprint on the panel, go to Utilities in the menu and click on one of the items marked xterm or on the GNOME terminal item. Now, make sure you're logged in as root. At the shell prompt, if you see something like
[billy@localhost billy], for example, type:
[billy@localhost billy] su Password: yourrootpassword [root@localhost billy]#
This will allow you to change from your regular user account to the root account.
Please Note: when you're in the root account, you are commander in chief of everything on your system, so be careful.
Tip:
The command
sumeans substitute users, which lets you log into
temporarily log in as another user.
Briefly, we'll find the Linux kernel version; then, we'll use the mkbootdisk command to make a bootable floppy from the kernel.
Put a standard diskette in the floppy drive.
Tip:
In Linux, the floppy drive is referred to as
/dev/fd0.
Figure 17: Changing directories to /lib/modules
Now, at the prompt, type:
cd /lib/modules
(Shown in figure 17.) Now, type:
ls
The command ls will list the contents of a directory. (You can learn more about the cd and ls
commands in Chapter
2
). For now, just type the commands as you see them.)Here, you can find the kernel version of your Red Hat Linux system. The kernel is the heart of any Linux system. Your kernel version will be something similar to:
2.2.x-yy
(there will be several numbers after 2.2, as in 2.2.2-0.1 or 2.2.5-1).
Now that you've found the kernel version, you can tell the mkbootdisk command which kernel to copy to your floppy. (If you don't tell mkbootdisk where to copy the kernel, it will default to copying to the floppy in /dev/fd0.)
Just type:
mkbootdisk --device /dev/fd0 2.2.5-1
Then press [Enter].
Tip:
If your screen becomes a little crowded with commands and ``command
not founds,'' you can always start with a clean slate by typing
clearat the
prompt.
You're done.
number; then type
mkbootdisk --device /dev/fd0 kernel.number.
To clean the display, type
clear.
1.9 A Good ``Man'' Is Easy to Find
As you investigate your new system, you're bound to have questions about commands and system services. One of the easiest ways to find out about how to use many commands or some applications is through the man command.
The word man stands for ``manual'', a series of online ``pages'' which can tell you the purpose of many commands. In a highly condensed format, man pages provide a summary of a command's purpose, the options available and the syntax which is used to issue the command.
If you count yourself among the ``newbies'' to Linux, you might not find man pages as useful as someone who's more accustomed to their terse delivery of information. But man pages can help steer you toward the proper way to use commands on your system. Even at this point, you can gain insight into your system by familiarizing yourself with the man pages. You'll certainly want to know how to use them eventually.
There are several ways to view the man pages: from GNOME's Help Browser, from an application called xman or from the shell prompt.
Figure 18: Man page index in GNOME's Help Browser GNOME's Help browser:
To start GNOME's Help Browser, go to Panel Help system. The GNOME Help Browser will start. On the first page, you'll find links to the man pages and to other helpful documentation.
which you'll find at the official GNOME website:
www.gnome.org.
For more
information about man pages, take a look at the
Finding Documentation
chapter in the Official Red Hat Linux Installation Guide.
From xman:
Depending on your window manager, there will be different ways to access the graphical presentation of the man pages through the menus. (Window managers literally manage how the windows in your X session are presented.)
A quick way to start the manual browser, however, is to go to a shell prompt and type:
xman
which will start the X Window System manual browser. When the menu appears, click on Manual Page. From here, you'll have a number of options from which to find a man page: You can
alphabetically display all the man pages on your system; search for them by command or by the section in which they appear.
To see the scope of help available, bring up your manual browser, then click on Manual Page then, under Options, click on Display Directory. Here, you'll find the complete list of man pages available to you.
From the shell prompt:
If you're not in an X session, you can still read the man pages by typing
man pagename
at the shell prompt. To scroll forward through the document, press [Space]; to scroll back, press
[B]. To quit the document, press [Q].
Figure 19: Reading a man page at the shell prompt
Of course, like any good help system, the man command has its own man page. At the prompt, type
man man
Sometimes, just viewing the man page on the screen isn't enough; you may want to have a printed copy in front of you. Although you could send the page to a printer, because of certain text formatting in the man pages, you'd likely end up with a document filled with ``garbage,'' symbols which didn't translate from your screen to the printer.
Before you print, then, you may have to ``strip'' the formatting from the page, which you can do with the col command. (As you might guess, there's a man page for col, also.)
For example, to print a man page for the man, type:
man man | col -b | lpr
In detail, the above command ``sends'' the output of the manual page entry through the col filter, which helps format the output for the printer. Then, the output from col is sent to the printer. This is called piping, and you can learn more about it in Chapter 2.
1.10 What is Rescue Mode?
Rescue mode is a term used to describe a method of booting a small Linux environment completely from diskettes.
What follows in this section may help you recover from a problem at some point. A copy of these instructions is also available as rescue.txt on your Red Hat Linux 6.0 CD-ROM.
As the name implies, rescue mode is there to rescue you from something. In normal operation, your Red Hat Linux system uses files located on your system's hard drive to do everything -- run programs, store your files, and more.
However, there may be times when you are unable to get Linux running completely enough to access its files on your system's hard drive. By using rescue mode, it's possible to access the files stored on your system's hard drive, even if you can't actually run Linux from that hard drive.
Normally, you'll need to get into rescue mode for one of two reasons:
You are unable to boot Linux, and you'd like to fix it.
You are having hardware or software problems, and you want to get a few
important files off your system's hard drive.
Let's take a closer look at each these scenarios.
Unable to boot Linux
-- Many times this is caused by the installation of another operating system after you've installed Red Hat Linux. Some other operating systems assume that you have no other operating systems on your computer, and overwrite the Master Boot Record (or MBR) that originally contained the LILO bootloader. If LILO is overwritten in this manner, you're out of luck -- unless you can get into rescue mode.
Hardware/software problems
-- There can be as many different situations under this category as there are systems running Linux. Things like failing hard drives and forgetting to run LILO after building a new kernel are just two things than can keep you from booting Red Hat Linux. If you can get into rescue mode, you might be able to resolve the problem -- or at least get copies of your most important files.
What do you need to get into rescue mode?
To get into rescue mode, you'll need a rescue disk set. These are two diskettes that contain the files necessary to boot into rescue mode.
If you elected to make a boot diskette while you were installing Red Hat Linux, you're halfway there! The first diskette in a rescue disk set is this boot diskette.
Now on to the second diskette...
The second diskette is called the rescue diskette. It is produced by writing an image file onto a diskette. The image file is called rescue.img, and is located in the images directory on the first Red Hat Linux CD-ROM.
To gain access to this file, you'll first need to mount your Red Hat Linux CD-ROM.
Start by inserting the CD-ROM in your system's CD-ROM drive. You'll need to do this while logged in as root.
mkdir /mnt/cdrom
Now, type:
mount /dev/cdrom /mnt/cdrom
You may get an error message from the first command saying that the file exists. That's fine; we just want to make sure that there is a /mnt/cdrom directory on your system. The second command should issue an informational message that /dev/cdrom is being mounted read-only.
Please Note: Some systems may not recognize /dev/cdrom. If this is your case, you'll have to replace /dev/cdrom in the command with the appropriate device name for your CD-ROM. Next, issue the following command (again, while logged in as root):
cd /mnt/cdrom/images
then type:
ls
to list the contents of the images directory.
You should see a file named rescue.img. This is the rescue diskette image file. Next, put a diskette in your first diskette drive, and enter the following command:
dd if=rescue.img of=/dev/fd0 bs=1440k
Your system's diskette drive should start writing to the diskette. After a minute or so, the dd command will complete, and you'll get your shell prompt back.
Wait for your diskette drive's access light to go out, and that's it!
You now have a rescue disk set. Label this diskette something like ``Red Hat Linux 6.0 rescue diskette'' and store it someplace safe.
Let's hope you never have to use it.
If you should ever need to use rescue mode, here's how.
Boot your system with the boot diskette in the first diskette drive. At the LILO Boot: prompt, enter the word rescue. You will see the usual kernel messages as the Linux kernel starts up.
Eventually, it will ask you to insert the next diskette, and press [Enter]. Remove the boot diskette, insert the rescue diskette, and press [Enter].
The rescue diskette will be read into memory. After a minute or so, you should see the shell prompt. That's it -- you're in rescue mode!
Now what?
When it comes to rescue mode, that's a bit like asking, ``how long is a piece of string?'' What you require depends a great deal on what your system's problem is, your level of Linux expertise, and several variables we haven't even thought of yet. So we can't give you explicit instructions. But we can tell you what programs you have access to while in rescue mode.
Here's the list:
familiarizing yourself them through the man pages. (You may not have that luxury if you have to use these commands...)
You've worked with some pretty useful commands for your Red Hat Linux system so far. You may not have known much about where those files were in the directory, however.
2 You Are Here
Let's say you want to buy a pair of sneakers at a nearby shopping mall. You may not be familiar with the mall, but that shouldn't be a problem.
Why not? Because of the maps, which you can usually find near all the major entrances to the mall. The same can be said for your Red Hat Linux system: Navigation's easy once you know where you're going.
Tip:
Make sure you've logged into your user account! Remember that unless
you like to live on the wild - and dangerous - side, using a root account for all
your activities is toying with disaster. If you haven't created your user account
yet, turn to Chapter
1
and do it now. Really... no kidding...
2.1 Finding Yourself With
pwdSooner or later (probably sooner), when you start looking through directories, you're bound to ask, ``Where the heck am I?'' And you won't be speaking philosophically.
DOS can answer that question just by showing you at the prompt like:
C:GAMES\Quake\ID1>
Your Linux system, by default, just shows your current directory.
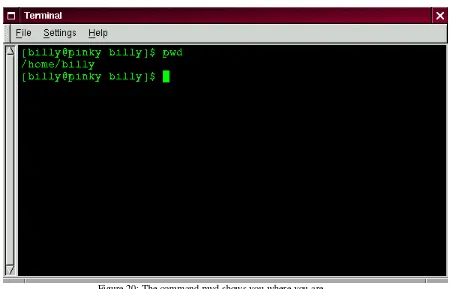
Figure 20: The command pwd shows you where you are Try this: open an xterm window. You'll see something like:
[billy@localhost billy]
Now type:
pwd
What do you see? Something like
The command pwd stands for print working directory. When you typed pwd, you were asking your Linux system, ``where am I?'' Your system responded by ``printing'' the directory you're in to the monitor (as shown in Figure 20).
Seems easy, right? It ought to be; you'll be using pwd plenty as you look around. (Even Linux gurus depend on this little command.)
2.2 Getting From Here to There:
cdWhenever you want to change directories, all you've got to do is type:
cd
Go ahead, try it. In an xterm window, type:
cd
That didn't do much, did it? That's because you didn't tell your system where you wanted to go. Whether you're going to a store in a mall or to visit relatives across the country, you've got to know how to get from one point to another. That is, you'll need to know the path to follow.
As with anything in life, the path -- or, pathname -- is basically the set of directions that takes you from one point to another. In the case of your Linux system (and in the DOS/Windows world, as well), you state a path to take you from one directory or file to another.
Let's try it again. Open an xterm window. Find yourself first with the pwd command. When you type your commands, your window will look like:
[billy@localhost billy] pwd /home/billy
[billy@localhost billy]
Now that you see where you are, you can start to give your system the path to follow. Well, almost...
Try typing:
cd home
What happened? You know there's a directory called home, and you typed in the path. So what does this ``no such file or directory'' mean?
It means your path is incomplete. Try typing:
cd /home
Figure 21: Absolute pathnames state out the full path The difference, of course, was adding the forward slash.
Let's take a second to look at the reason adding a slash made all the difference.
When you saw you were in /home/billy, you were looking at the full path -- or the absolute path from the root directory. You can think of the billy directory as being located two directories ``down'' from the root, which is the topmost level of your system.
So when you typed:
cd /home
you were actually saying ``go to the root directory, then go to the directory called home, which is one directory below the root.'' You specified an absolute path to get to the home directory (see, for example, Figure 21).
Now, if you type:
cd /
you'll end up with a prompt that looks like:
[billy@localhost /]
That single forward slash means you're at the root. When you're at the root, you can't go any higher on your system (the same is true in DOS/Windows).
To get back to your login directory from the root directory by using the absolute path, just type:
cd /home/billy
You're home.
Using the absolute path is just one way to move around. Another method of getting from one point to another is by using the relative path (as in Figure 1).
Let's go back to the root directory:
cd /
Now, let's move back to your login directory using relative pathnames:
cd home/billy
Notice that the / is missing? That's because the root directory is the parent of the home directory, which means that the home directory is one step down from the root directory. Since home is the parent of the directory called billy, these two directories are separated with a /.
cd ..
The relative path describes the directory you want to cd to in terms which are relative to your current directory.
Figure 22: Relative pathnames are `relative' to your current position
When you typed cd .., you were saying ``go up one directory.'' The next directory up, from your login directory, was home.
Tip:
When speaking of directories which hold other directories, you can refer
to them as
parent directories
. In our case,
homeis the parent directory of
billy.
Using two dots (..) when you cd is the same as stating you want to go to the parent of your current working directory. Try using a single dot. Type:
cd .
What happened? Not much. That's because using a single dot (.) is the same as specifying your current working directory.
The differences between absolute and relative paths can sometimes be pretty striking.
Getting back to our shopping mall analogy, if you were to give directions by using an absolute path, you might say something like:
``Get your car keys. Get in the car. Start the car. Pull out of the driveway. Drive to the corner...'' ...And so on, until you're finally standing inside your favorite shoe store in the shopping mall. When you're using a relative path, you're saying something like:
``The store's a couple miles from here, in the shopping mall.''
That's quite an exaggeration, but you get the idea: As long as you know where you want to go in relation to where you are, you can use relative paths.
Tip:
A path is absolute if the first character is a
/; otherwise, it's a relative
path.
You're now in the home directory, the parent of your login directory. Type:
cd ..
and you'll find yourself at the root directory.
cd home/billy
Doesn't look much different from absolute paths, does it? Notice, though, that there's no forward slash in front of home. In essence, you were saying, ``go one directory down, to home, then go to billy, in the home directory.''
Tip:
Whenever you want to quickly jump back to your login directory just
type
cd ~anywhere in the system.
That wasn't much of a demonstration. Try this: from your login directory, type:
cd ../../etc/X11
Now, you're in the directory X11, which is where you'll find configuration files and directories related to the X Window System.
Please Note: You can always type pwd to find out where you are in the directory tree. And you can get back to your login directory with the cd ~ command.
Take a look at your last cd command. What you were really telling your system was, ``go up to the parent directory, then up to that directory's parent directory (which is the root directory), then go to the
etc directory and from there, to the X11 directory.''
Using an absolute path would also get you to the X11 quickly. Type:
cd /etc/X11
and you're there.
Tip:
Always make sure you know which working directory you're in before
you state the relative path to the directory or file you want to get to. You don't
have to worry about your position in the filesystem, though, when you state
the absolute path to another directory or file.
Now that you're starting to get the hang of changing directories, see what happens when you change to root's login directory.
cd /root
Oops... You're not logged in as root, so you're ``denied permission'' to access that directory. Denying access to the root and other users' accounts (or login directories) is one way your Linux system prevents accidental or malicious tampering. You'll find out more about file ``ownership'' and permissions later in this chapter.
Really want to change to the root login? Then you've got to use the su command. Type this series of commands:
[billy@localhost billy] su root Password: (your root password) [root@localhost billy]# cd /root [root@localhost /root]#
Figure 23: Becoming root Now, when you cd to root's login directory, you'll be granted access. When you're done being root, just type exit at the prompt.
[root@localhost /root]# exit exit
[billy@localhost billy]
Summary:
To change directories using absolute pathnames, type
cd/directory/directory
; to change directories using relative pathnames,
type
cd directoryto move one directory below,
cd directory/directoryto move two directories below, etc.; to jump from anywhere on the filesystem
to your login directory, type
cd ~; to change to the parent of the directory
you're in, type
cd ..Use
.to refer to your current directory.
2.3 Looking Around With
lsNow that you know how to move around, it's time to take a look at what's in the directories. But first, let's make sure you've got something you can look for in your login directory before we go any further.
You can start by creating an empty file. To do so, you can use a utility called touch at the shell prompt. Try it; type:
touch foo.bar
Now, in your login directory, you've got an empty file called foo.bar. You'll see it in a couple minutes.
Let's also create a new directory, using the mkdir command. At the prompt, type:
Now, you've created a directory called tigger in your login directory. From root, your new directory's absolute pathname would be /home/yourlogin/tigger, and your directory is the parent of tigger. (You can learn more about creating -- and removing -- files and directories in Chapter 3.)
Now, you're ready to go.
In the DOS world, using the dir command will display the contents of a directory. The same can be said of Linux -- with some notable exceptions.
In Linux, dir won't fully display the contents of directories, and doesn't have the power or flexibility of the list command -- ls.
In your login directory, for example, type:
dir
Now, in the same xterm window, type:
ls
Looks the same (see Figure 24). You see, among other contents, your new file, foo.bar and the new directory, tigger.
Figure 24: The dir and ls commands seem similar
But here the similarities end. Where dir shows you the contents of your directory, it doesn't actually show you everything. Even using the ls command, by itself, won't show you all the files in your directory. To see everything, you've got to call upon an option or two.
For example, in the same window that you'd used to type the dir and ls commands, now type:
ls -a
Quite a difference. When you added the -a option, you were specifying that you wanted to list all the files in the directory (see Figure 25).
In fact, there are a multitude of options available with the ls command.
Tip:
If you want to see all the options of the
lscommand, you can read the
man page by typing
man lsat a shell prompt. If you want to print the man
page, type
man ls | col -b | lprat the prompt.
Figure 25: The ls command with the -a option
When you typed ls -a, you probably noticed the files that begin with dots. These are called hidden files or, appropriately enough, dot files.
Hidden files are mostly configuration files which set preferences in programs, window managers, shells and more. The reason they're ``hidden'' is to help prevent any accidental tampering by the user.
Whenever a filename starts with a dot (.), it's a hidden file, and ls won't list it.
Viewing all the files can give you plenty of detail, but there's more you can uncover, simply by adding more than one option.
If we want to see the size of a file or directory, when it was created and more, we can just add the ``long'' option (-l) to our ls -a command.
Try it. Type:
ls -al
There's quite a bit more detail now. You can see the file creation date, its size, ownership, permissions and more.
You don't have to be in the directory whose contents you want to view, either. Let's see what's in the /etc directory by typing:
ls -al /etc
Here, you'll get plenty of information about the contents of the /etc directory.
If you want to add color to your listing, just include the --color option.
ls -al --color /etc
To some, adding --color does more than add a splash of color; it gives a clue about the types of files in a directory. For example, directories might all be a royal blue, program files would be green, and so on.
If you like what you see, here's how you can display the listing in color all the time. Briefly, we'll be adding one line to the .bashrc file in our login directory.
The .bashrc file is used by your shell when you login (an example .bashrc file is shown in Figure
26).
Figure 26: The .bashrc file
Remember that any changes you make to configuration files can cause you a world of grief if you've made a mistake and you don't have a backup copy of that file.
To make a backup copy, make sure you're in your login directory and in an xterm window, type:
cd
to get to your login directory. Then copy the .bashrc file, keeping it in the same directory, but with a name like .bashrc2.
cp .bashrc .bashrc2
When you type the above command, what you're saying is, ``make a copy of the .bashrc file and name that copy .bashrc2.''
Now, you have a backup copy of the unmodified .bashrc file in your login directory. If you make a mistake or have trouble, you can replace your .bashrc file by typing:
cp .bashrc2 .bashrc
at the shell prompt.
If you need to type this command, you'll be saying, ``make a copy of the file .bashrc2 and name that copy .bashrc.'' The copy command here will overwrite the original .bashrc file -- and you'll still keep a copy of the original (and untouched) .bashrc file with the name of .bashrc2.
Now that we're prepared, we'll open .bashrc with Pico, a simplified text editor. (A text editor is a utility program that can create or modify files.) From an xterm window, type:
pico .bashrc
You should see something like this:
# .bashrc
# User specific aliases and functions
fi
It's a pretty short file. Those hash marks (#) are comments. Any text after them is ignored by the shell, but they are put there to help guide anyone who's editing or modifying files.
Bring your cursor under the line #User specific aliases and functions and type:
alias ls="ls -al --color"
So the full file ought to look something like this:
# .bashrc
# User specific aliases and functions
alias ls="ls -al --color"
# Source global definitions if [ -f /etc/bashrc ]; then . /etc/bashrc
fi
See Figure 27 for an example in Pico.
Figure 27: Adding an alias for the ls command to the .bashrc file
Double-check for any typos then, when you're satisfied with the changes, exit by pressing the [Ctrl]
and [X] keys. You'll see, at the bottom of your editor screen, a message reading:
Save modified buffer (ANSWERING "No" WILL DESTROY CHANGES)?
Press [Y] for ``yes.'' Now, another message will appear at the bottom:
File Name to write: .bashrc
You won't be able to see your changes take effect until you close your xterm window and open a new xterm. Once you do that, you'll see your modifications take effect.
Here's a short list of some popular options with ls. Remember, you can view the full list by reading the ls man page (man ls).
• -a -- all. Lists all the files in the directory, including the hidden files (.filename). The .. and . at the top of your list refer to the parent directory and the current directory, respectively. • -l -- long. Lists details about contents, including permissions (modes), owner, group, size,
creation date, whether the file is linked to somewhere else on the system and where its link points.
• -F -- file type. Adds a symbol to the end of each listing. These symbols include / to indicate a directory; @ to indicate a symbolic link to another file; * to indicate an executable file. • -r -- reverse. Lists the contents of the directory from back to front.
• -R -- recursive. This recursive option lists the contents of all directories (below the current directory) recursively.
• -S -- size. Sorts files by their size.
A little later in this chapter, when we introduce you to pipes and I/O redirection, you'll discover that there are other ways to view the contents of a directory.
Summary:
To see the contents of a directory, type
lsat a shell prompt;
typing
ls -awill display all the contents of a directory; typing
ls -a --colorwill display all the contents categorized by color.
2.4 A Larger Picture of the Filesystem
Every operating system has a method of storing its files and directories so that it can keep track of additions, modifications and other changes.
In Linux, every file is stored on the system with a unique name, in directories which can also hold other files and directories -- or, subdirectories.
You might think of the system as a tree-like structure, in which directories ``branch off.'' Those directories may contain -- or be the ``parent'' of -- other directories which may hold files or directories of their own.
There wouldn't be a tree without a root, and the same is true for the Linux filesystem. No matter how far away the branches, everything is connected to the root, which is represented as a single forward slash (/).
It might seem confusing to have several references to ``root'' - the root account, the root account's login directory and the root directory (/), but think of it this way: The root login, who is the system
administrator, is just as important to keeping things together in the system as the system's root (/).
Tip:
Even though there are other Linux distributions, your Red Hat Linux
system is likely to be compatible with them. The reason is because of the
Filesystem Hierarchy Standard (also known as FHS). These guidelines help to
standardize the way system programs and files are stored on all Linux
systems. You can read more about the FHS at its website:
http://www.pathname.com/fhs/
As long as we're logged into our user account -- which will help prevent disastrous mistakes -- let's take a look around.
The first stop on this tour ought to be the root directory, which will give us a larger picture of where things are.
At the shell prompt, then, let's type:
cd /
[billy@localhost /]
Now, let's see which directories ``branch off'' root by typing:
ls
Doesn't look like much, does it? Well, it's a little like viewing the tip of an iceberg. These are the parent directories of other directories, in which there may be other directories... and so on.
Figure 28: Getting of view of the directories from root Here are just a few of the directories we're likely to find:
etc lib sbin
usr var
There are more, but let's take a look in the /etc directory.
[billy@localhost /] cd etc [billy@localhost /etc] ls
Here, among other type of files and directories, we'll find configuration files, which are files that help make programs work for our system, store our program and system settings and more.
Among the directories in here, you'll see /etc/X11, which also contains directories and configuration files for the X Window System.
In the directory /etc/skel, you'll find skeleton user files, which are used to populate newly created user accounts with standard, commonly used files.
That sounds a little gothic, perhaps, but here's what it means. When we were logged in as root, one of our first tasks was to create an account for ourselves.
When our user account was created, files were taken from /etc/skel and placed into the new account. These files helped to ``flesh out'' the account (skeleton... flesh... get it?).
Let's look around a little in /usr. From our current location in /etc/skel, we can type:
[billy@localhost /skel] cd /usr [billy@localhost /usr] ls
Figure 29: The ls command in /usr
In /usr/man we'll find the system manual pages; other documentation which isn't covered by man pages will be found in /usr/doc.
In /usr/X11R6, we'll find files related to the X Window System, including configuration and documentation files.
Although we may think of something more literary when we hear the word ``libraries,'' in /usr/lib
we'll find files which are considered libraries for our system. In this context, libraries are files containing commonly-used snippets of code which can be shared by many programs.
Red Hat Linux uses the RPM (the Red Hat Package Manager) technology of software installation and upgrades. Using RPM, either from the shell prompt or through GnoRPM, is both a safe and convenient way to upgrade or install software.
(For more on using GnoRPM, see its chapter in the Red Hat Linux Installation Guide.)
However, once you become more comfortable with your system, there may be times when you'll want to install software that may not be available in RPM format. To minimize collisions with RPM-managed files, the best place to put such software is in /usr/local.
2.5 ``Washing'' the Window
After even one ls command in an xterm window, things might start feeling a little crowded. We can always exit from the terminal window and open a new one, but here's a quicker way to wipe the slate clean.
Just type:
clear
at the shell prompt. The clear command does just as advertised: it clears the terminal screen. Sometimes, you may accidentally open a program file or some other non-text file in a terminal window. Once you close the file, you could find that the text you're typing doesn't match with the output on the monitor.
In such cases, you simply have to type:
reset
Summary:
To clear clutter in a console or
xtermwindow type
clear; to
return an
xtermwindow to its default display properties, type
reset.
2.6 Using
catThere's a handy utility which can help you keep short lists, gather those lists together and, at the same time, show you a little of the power behind your Red Hat Linux system.
The utility is called cat, short for ``concatenate,'' which means that it strings files together.
But cat can also perform a quick demonstration of two important terms: standard input and standard output.
Standard input and standard output direct input and output (often referred to as I/O) to the user. If a program reads from standard input, it will, by default be reading from the keyboard. If a program writes to standard output, by default it will be writing to the screen.
Let's start cat to see what this means. At the shell prompt, type:
cat
The cursor moves to a blank line. Now, in that blank line, let's type:
stop at sneaker store
and press the [Enter] key. Suddenly, your screen looks like:
[billy@localhost billy] cat stop by sneaker store
stop by sneaker store
Figure 30: cat demonstrates standard input and standard output
To quit cat now, just move the cursor to a blank line by pressing [Enter] then press the [Ctrl]
and [D] keys at the same time.
Summary:
Standard input is often text which is entered from the keyboard.
Standard output is the place where information is sent, such as your terminal
(as shown in Figure
30
).
2.7 Using Redirection
Now that we have a handle on what standard input and standard output are, it's time to expand a little. Redirection means causing the shell to change what it considers standard input or where the standard output is going.
We used cat before to demonstrate the idea behind standard input and standard output. Now, let's use
cat to see how standard output can be redirected.
To redirect standard output, we'll use the > symbol. Placing > after the cat command (or after any utility or application that writes to standard output) will direct its output to the filename following the symbol.
Let's try it. In an xterm window type:
[billy@localhost billy] cat > sneakers.txt buy some sneakers
then go to the coffee shop then buy some coffee
Figure 31: Redirecting the output to a file
Now press [Enter] to go to an empty line, and use the [Ctrl] and [D] keys to quit cat. Notice the difference (see Figure 31)? For one thing, there are no double entries. That's because the standard output from cat was redirected. That redirection was to a brand new file you made called
sneakers.txt.
You can find the file in your login directory (may we suggest using ls if you want to see it listed?). You can even use cat to read the file, by typing:
cat sneakers.txt
at the prompt.
Tip:
Be careful when you redirect the output to a file, because you can easily
overwrite an existing file! Make sure the name of the file you're creating
doesn't match the name of a pre-existing file, unless you want to replace it.
[billy@localhost billy] cat > home.txt bring the coffee home
take off shoes put on sneakers make some coffee relax!
Now, on an empty line, use the [Ctrl] and [D] keys again to quit cat. We can check the file again by typing:
cat home.txt
at the prompt.
Let's use cat again to join home.txt with sneakers.txt and redirect the output of both files to a brand new file we'll call saturday (you'll find an example in Figure 32).
[billy@localhost billy] cat sneakers.txt home.txt > saturday
That's it.
Figure 32: Joining files and redirecting the output Now it's time to check our handiwork. Type:
[billy@localhost billy] cat saturday
and you should see something like this:
[billy @localhost billy] cat saturday buy some sneakers
then go to the coffee shop then buy some coffee
bring the coffee home take off shoes
put on sneakers make some coffee relax!
[billy @localhost billy]
You can see that cat has added home.txt where sneakers.txt left off.
alternative to using a text editor like
pico.
Summary:
By using the output redirection symbol (
>) you can send the output
to a file instead of the terminal. The
catutility can be used along with output
redirection to join files together into a single, unified file with one filename.
2.8 Appending Standard Output
There's a neat twist to output redirection which allows you to add new information to the end of an existing file. Similar to when you used the > symbol, you tell your shell to send the information somewhere other than standard output.
However, when you use >>, you're adding information, rather than replacing it.
The best explanation is a demonstration, so let's take two files which have already already been created -- sneakers.txt and home.txt -- and join them by using the append output symbol. We want to add the information in home.txt to the information already in sneakers.txt, so we type:
cat home.txt >> sneakers.txt
Now let's check the file by typing:
cat sneakers.txt
And there it is -- with the contents of home.txt at the end.
What we were saying when we typed that command was, ``append the output from the file home.txt
to the file sneakers.txt.''
By appending the output, we've saved ourselves a step or two (and a bit of disk clutter) by using existing files, rather than creating a new file.
Compare the results of the files sneakers.txt and saturday now, and you'll see that they're identical. To make your comparison, just type:
cat sneakers.txt; cat saturday
The contents of both files will be displayed - first sneakers.txt, then saturday (as shown in Figure 33).