⢠Table of Contents ⢠Index
⢠Reviews
⢠Reader Reviews ⢠Errata
⢠Academic
BSD Hacks
By
Dru Lavigne
Publisher : O'Reilly Pub Date : May 2004
ISBN : 0-596-00679-9 Pages : 300
Looking for a unique set of practical tips,
tricks, and tools for administrators and power
users of BSD systems? From hacks to
customize the user environment to
networking, securing the system, and
⢠Table of Contents ⢠Index
⢠Reviews
⢠Reader Reviews ⢠Errata
⢠Academic
BSD Hacks
By
Dru Lavigne
Publisher : O'Reilly Pub Date : May 2004
ISBN : 0-596-00679-9 Pages : 300
Credits
About the Author
Contributors
Acknowledgments
Preface
Why BSD Hacks?
How to Use this Book
How This Book Is Organized
Conventions Used in This Book
Using Code Examples
We'd Like to Hear from You
Chapter 1. Customizing the User Environment
Section 0. Introduction
Section 2. Useful tcsh Shell Configuration File Options
Section 3. Create Shell Bindings
Section 4. Use Terminal and X Bindings
Section 5. Use the Mouse at a Terminal
Section 6. Get Your Daily Dose of Trivia
Section 7. Lock the Screen
Section 8. Create a Trash Directory
Section 9. Customize User Configurations
Section 10. Maintain Your Environment on Multiple Systems
Section 11. Use an Interactive Shell
Section 12. Use Multiple Screens on One Terminal
Chapter 2. Dealing with Files and Filesystems
Section 12. Introduction
Section 13. Find Things
Section 14. Get the Most Out of grep
Section 15. Manipulate Files with sed
Section 16. Format Text at the Command Line
Section 17. Delimiter Dilemma
Section 18. DOS Floppy Manipulation
Section 19. Access Windows Shares Without a Server
Section 20. Deal with Disk Hogs
Section 21. Manage Temporary Files and Swap Space
Section 22. Recreate a Directory Structure Using mtree
Section 23. Ghosting Systems
Chapter 3. The Boot and Login Environments
Introduction
Section 24. Customize the Default Boot Menu
Section 25. Protect the Boot Process
Section 26. Run a Headless System
Section 27. Log a Headless Server Remotely
Section 28. Remove the Terminal Login Banner
Section 29. Protecting Passwords With Blowfish Hashes
Section 30. Monitor Password Policy Compliance
Section 31. Create an Effective, Reusable Password Policy
Section 32. Automate Memorable Password Generation
Section 33. Use One Time Passwords
Section 34. Restrict Logins
Chapter 4. Backing Up
Section 35. Back Up FreeBSD with SMBFS
Section 36. Create Portable POSIX Archives
Section 37. Interactive Copy
Section 38. Secure Backups Over a Network
Section 39. Automate Remote Backups
Section 40. Automate Data Dumps for PostgreSQL Databases
Section 41. Perform Client-Server Cross-Platform Backups with Bacula
Chapter 5. Networking Hacks
Introduction
Section 42. See Console Messages Over a Remote Login
Section 43. Spoof a MAC Address
Section 44. Use Multiple Wireless NIC Configurations
Section 45. Survive Catastrophic Internet Loss
Section 46. Humanize tcpdump Output
Section 47. Understand DNS Records and Tools
Section 48. Send and Receive Email Without a Mail Client
Section 49. Why Do I Need sendmail?
Section 50. Hold Email for Later Delivery
Section 51. Get the Most Out of FTP
Section 52. Distributed Command Execution
Section 53. Interactive Remote Administration
Chapter 6. Securing the System
Introduction
Section 54. Strip the Kernel
Section 55. FreeBSD Access Control Lists
Section 56. Protect Files with Flags
Section 57. Tighten Security with Mandatory Access Control
Section 58. Use mtree as a Built-in Tripwire
Section 59. Intrusion Detection with Snort, ACID, MySQL, and FreeBSD
Section 60. Encrypt Your Hard Disk
Section 61. Sudo Gotchas
Section 62. sudoscript
Section 63. Restrict an SSH server
Section 64. Script IP Filter Rulesets
Section 65. Secure a Wireless Network Using PF
Section 66. Automatically Generate Firewall Rules
Section 67. Automate Security Patches
Section 68. Scan a Network of Windows Computers for Viruses
Introduction
Section 69. Tune FreeBSD for Different Applications
Section 70. Traffic Shaping on FreeBSD
Section 71. Create an Emergency Repair Kit
Section 72. Use the FreeBSD Recovery Process
Section 73. Use the GNU Debugger to Analyze a Buffer Overflow
Section 74. Consolidate Web Server Logs
Section 75. Script User Interaction
Section 76. Create a Trade Show Demo
Chapter 8. Keeping Up-to-Date
Introduction
Section 77. Automated Install
Section 78. FreeBSD from Scratch
Section 79. Safely Merge Changes to /etc
Section 80. Automate Updates
Section 81. Create a Package Repository
Section 82. Build a Port Without the Ports Tree
Section 83. Keep Ports Up-to-Date with CTM
Section 84. Navigate the Ports System
Section 85. Downgrade a Port
Section 86. Create Your Own Startup Scripts
Section 87. Automate NetBSD Package Builds
Section 88. Easily Install Unix Applications on Mac OS X
Chapter 9. Grokking BSD
Introduction
Section 89. How'd He Know That?
Section 90. Create Your Own Manpages
Section 91. Get the Most Out of Manpages
Section 92. Apply, Understand, and Create Patches
Section 93. Display Hardware Information
Section 94. Determine Who Is on the System
Section 95. Spelling Bee
Section 96. Leave on Time
Section 97. Run Native Java Applications
Section 98. Rotate Your Signature
Section 99. Useful One-Liners
Section 9.13. Fun with X
Credits
About the Author
Contributors
About the Author
Dru Lavigne is the author of ONLamp.com's FreeBSD Basics column and has been an avid BSD user since FreeBSD 2.2.1. As an IT instructor, she specializes in networking, routing, and
Contributors
The following people contributed their hacks, writing, and inspiration to this book:
John Richard, known locally as JR, is a system administrator in Kingston, Ontario, Canada. His trademark in the field is his insistence on a FreeBSD box as the primary firewall on a network. He has enjoyed working with the author in the past at a private college in Kingston. In his spare time, he experiments with FreeBSD and rides his Harley-Davidson.
[Hack #64]
Joe Warner is a Technical Analyst for Siemens Medical Solutions Health Services Corporation and has been using FreeBSD as a server and desktop since October of 2000. Joe has lived in Salt Lake City, Utah for most of his life and enjoys *BSD, computing, history, and The Matrix.
[Hacks #35 and #59]
Dan Langille (http://www.langille.org/) runs a consulting group in Ottawa, Canada. He has fond memories of his years in New Zealand, where the climate is much more conducive to year-round mountain biking. He lives in a house ruled by felines.
[Hack #41]
Robert Bernier's professional career has included
passion for all things open source. Today, Robert teaches at the local community college and writes for a number of IT publications based in North America and Europe.
[Hack #12]
Kirk Russell ([email protected]) is a kernel tester at QNX Software Systems (http://www.qnx.com/).
[Hack #36]
Karl Vogel is a system administrator for the C-17 Program Office. He's worked at Wright-Patterson Air Force Base for 22 years and has a BS in Mechanical & Aerospace
Engineering from Cornell University.
[Hack #32]
Howard Owen discovered computers by reading about Conway's "Life" in Life magazine. It took many years from that discovery to the time he could actually make a living with the godforsaken things. Once that happened, however, Howard turned into a "major geek." He has worked as a sysadmin, systems engineer, and systems architect. He is currently employed by IBM in Silicon Valley supporting Linux, but he still runs FreeBSD and OpenBSD at home.
[Hacks #61 and #62]
Daniel Harris is a student and occasional consultant in West Virginia. He is interested in computer networking,
documentation, and security; he also enjoys writing, armchair politics, and amateur radio.
[Hack #55]
analysis for a hospital in Texas. His primary tool for data integration is a PostgreSQL database server running on
FreeBSD. Andrew has been using FreeBSD at both work and home for four years. Andrew has a BS in Education and a BBA in Accounting from the University of Texas at Austin.
[Hacks #17 2.6, #40, #44, and #68]
Jim Mock is a FreeBSD admin and developer turned Mac OS X user and developer. He's a FreeBSD committer, as well as an OpenDarwin committer, and he currently maintains 50+ DarwinPorts. Jim is also a member of the DarwinPorts Port Manager team. He can be reached at [email protected] or through his personal site at http://soupnazi.org/.
[Hack #88]
Avleen Vig is a systems administrator at EarthLink (http://www.earthlink.net/), where he maintains the
company's web, mail, news, and other Internet services for over 8 million users. He spends his spare time with his
newborn son, contributing to the various Internet and Unix communities, and enjoying life. After seizing the day in 2001 and moving to LA from London, he's waiting to see where life will take him next.
[Hack #69]
Alexandru Popa is a CCNA studying for a CCNP, and is actively involved in the FreeBSD community in his spare time. At the time of this writing, he was studying Computer Science at the Politechnica University of Bucharest. He also maintains cvsup.ro.freebsd.org out of a basement in a
deserted building, using a large hamster array for power. He can be contacted at [email protected].
Jens Schweikhardt is a German software engineer and Internet wizard who is constantly looking for interesting things to do. As a seven-time IOCCC winner, he is well-known for taking C compilers to their limits. He contributes to Unix standardization and, of course, to God's Own
Operating System. When not hacking, Jens has been caught writing romantic poetry and riding his Italian Moto Guzzi around the Swabian hills and valleys. If he were given one modest wish, it would be clear skies when he goes
stargazing with his telescope.
[Hack #78]
Matthew Seaman is 38 years old and a former scientist and academic (Oxford University postgraduate). He is now a specialist in computer system administration, network architecture, and infrastructure design.
[Hacks #49, #50, and #97]
Nathan Rosenquist first tried FreeBSD in 1996, and has
been using Unix ever since. During the day, he can be found developing Perl-based web applications and business
automation software. He lives in Shadow Hills, California with his girlfriend Carrie and their dog Nutmeg.
[Hack #39]
[Hacks #14, #15, and #16]
Sebastian Stark ([email protected]) works as a system administrator at the Max Planck Institute for Biological Cybernetics in Germany. He manages a bunch of
workstations, as well as a computer cluster that is used for machine-learning research.
[Hack #52]
Marlon Berlin ([email protected]) studies linguistics,
comparative literature, and mathematics in Berlin. He works for DNS:NET, a German ISP, as a systems developer.
[Hack #52]
David Maxwell ([email protected]) is a NetBSD Developer and member of the NetBSD Security-Officer team. He
attended Unix Unanimous in Toronto since the first meeting in the early `80s, and still visits when he can. He was an avid Amiga user, and relishes a good (or bad) pun when he can muster one. David currently works at Integrated Device Technology, Inc. (IDT).
[Hacks #10, #53, #73, #75, and #76]
Julio Merino Vidal is studying Informatics Engineering at the UPC University of Barcelona, Spain. He has been a NetBSD developer since November 2002, working on the NetBSD Packages Collection (http://www.pkgsrc.org/) and
translating the web site to Spanish. He also maintains his own free software projects, including Buildtool
(http://buildtool.sourceforge.net/). You can contact him at
Jan L. Peterson ([email protected]) is a professional system administrator with 16 years of experience working with multiple Unix versions (and the occasional Windows machine). Laid off from his last job when the company was acquired by a direct competitor, he has spent the last couple of years as a consultant. More about Jan can be found at
http://www.peterson.ath.cx/~jlp/.
[Hack #74]
Michael Vince was born in 1977. His initial interest in computers was video games, but he soon ventured into many other areas, such as programming, Unix, the Web, and networks. Having completed a Diploma in Computer Systems and a CCNA, he is an IT administrator for software companies and has been involved in large software projects that put his development skills to good use. A tech news junkie, he is always interested in the future of computing. He also enjoys staying up late solving difficult problems that require complex regular expressions in Perl, going to the gym, and hanging out in cafes. He is currently working on a software product called Ezmin.
[Hack #64]
Daniel Carosone has been involved with NetBSD as a user, advocate, and developer for over 10 years. He is a member of the NetBSD Security Officer team, which provides
leadership for security matters within the project and coordinates responses to public incidents and
vulnerabilities. He is Chief Technologist for e-Secure,
specializing in security consulting and management services to financial, government, and telecommunications
[Hack #60]
Aaron Crandall, BSEE, has used OpenBSD since 2.7. He currently works for the Oregon Graduate Institute running computers as a part-time Master's student. He's built and given away more OpenBSD firewalls than he can count. Contact him at [email protected].
[Hack #45]
chromatic is the Technical Editor of the O'Reilly Network. In practice, that means he edits ONLamp.com (open source administration and development) and, occasionally, books like this one. Outside of work, he enjoys cooking and
somehow produces a whole slew of weird software hacks like SDL Parrot, tiny mail tools, and that Perl 6 thing. Wade through the disarray of his web site at
http://wgz.org/chromatic/.
[Hack #92]
Brett Warden, BSEE, specializes in Perl programming and embedded systems. He lives in the Northwest with his wife, son, and two antisocial cats. He's currently keeping an eye out for contracting and permanent positions. You can find a collection of odd projects at http://www.wgz.org/bwarden/.
Acknowledgments
I would like to thank the many BSD and open source users who so willingly shared their experiences, ideas, and support. You serve as a constant reminder that BSD is more than an
operating systemit is a community.
I would also like to thank all of my students and the readers of the FreeBSD Basics column. Your questions and feedback fuel my curiosity; may this book return that favor.
Thanks to David Lents and Rob Flickenger for reviews and
advice. Special thanks to Jacek Artymiak for his invaluable input from the OpenBSD and NetBSD perspectives. And finally,
Preface
"What was it about UNIX that won my heart? . . . UNIX is mysterious when you first approach. A little intimidating, too. But despite an unadorned and often plain
presentation, the discerning suitor can tell there's lot going on under the surface."
Thomas Scoville,
http://unix.oreilly.com/news/unix_love_0299.html
When the above-mentioned article was first published, I was still very much a BSD newbie. My spare hours were spent struggling with kernel recompiles, PPP connectivity (or lack thereof), rm and chmod disasters, and reading and rereading every bit of the then available documentation. Yet, that article gave voice to my experience, for, like the quoted author, I had stumbled upon operating system love. In other words, I was discovering how to hack on BSD.
Since then, I've learned that there is an unspoken commonality between the novice Unix user and the seasoned guru. It doesn't matter whether you've just survived your first successful
installation or you've just executed a complex script that will save your company time and money, the feeling is the same. It's the excitement of venturing into unknown territory and discovering something new and wonderful. It's that sense of accomplishment that comes with figuring something out for yourself, with finding your own solution to the problem at hand.
Why BSD Hacks?
The term hacking has an unfortunate reputation in the popular press, where it often refers to someone who breaks into
systems or wreaks havoc with computers. Among enthusiasts, on the other hand, the term hack refers to a "quick-n-dirty" solution to a problem or a clever way to do something. The term hacker is very much a compliment, praising someone for being creative and having the technical chops to get things done. O'Reilly's Hacks series is an attempt to reclaim the word, document the ways people are hacking (in a good way), and pass the hacker ethic of creative participation on to a new generation of hackers. Seeing how others approach systems and problems is often the quickest way to learn about a new technology.
BSD Hacks is all about making the most of your BSD system.
How to Use this Book
One of the beauties of Unix is that you can be very productive with surprisingly little knowledge. Even better, each new trick you learn can shave minutes off of your day. We've arranged the chapters in this book by subject area, not by any suggested order of learning. Skip around to what interests you most or solves your current problem. If the current hack depends on information in another hack, we'll include a link for you to follow.
How This Book Is Organized
To master BSD, you'll have to understand several topics. We've arranged the hacks loosely into chapters. They are:
Chapter 1Customizing the User Environment
Though modern BSDs have myriad graphical applications and utilities, the combined wisdom of 35 years of
command-line programs is just a shell away. This chapter demonstrates how to make the most of the command line, customizing it to your needs and preferences.
Chapter 2Dealing with Files and Filesystems
What good is knowing Unix commands if you have no files? You have to slice, dice, and store data somewhere. This chapter explains techniques for finding and processing information, whether it's on your machine or on a server elsewhere.
Chapter 3The Boot and Login Environments
The best-laid security plans of administrators often go out the window when users enter the picture. Keeping the bad guys off of sensitive machines requires a two-pronged approach: protecting normal user accounts through good password policies and protecting the boxes physically. This chapter explores several options for customizing and
Chapter 4Backing Up
After you start creating files, you're bound to run across data you can't afford to lose. That's where backups come in. This chapter offers several ideas for various methods of
ensuring that your precious data will persist in the face of tragedy.
Chapter 5Networking Hacks
Unless you're a die-hard individualist, you're likely
connected to a network. That fact presents several new opportunities for clever hacks as well as mystifying failures. This chapter illuminates ways to take advantage of your network connection.
Chapter 6Securing the System
Security is as much a mindset as it is a process. Knowing the tools at your disposal will help. This chapter delves into multiple tools and ideas for increasing the security of your systems, whether keeping out the bad guys or staying on top of updates.
Chapter 7Going Beyond the Basics
Chapter 8Keeping Up-to-Date
No bragging about BSD is complete without mentioning the ports or packages system that keeps thousands of
applications right at your fingertips. Keeping up-to-date could never be easier, could it? This chapter tackles the subject of installing and updating software, including the core system.
Chapter 9Grokking BSD
Conventions Used in This Book
This book uses the following typographical conventions:
Italic
Indicates new terms, URLs, email addresses, filenames, pathnames, and directories.
Constant width
Indicates commands, options, switches, variables,
attributes, functions, user and group names, the contents of files, and the output from commands.
Constant width bold
In code examples, shows commands or other text that should be typed literally by the user.
Constant width italic
Shows text that should be replaced with user-supplied values.
Color
the text.
This icon signifies a tip, suggestion, or general note.
This icon indicates a warning or caution.
The thermometer icons, found next to each hack, indicate the relative complexity of the hack:
Using Code Examples
This book is here to help you get your job done. In general, you may use the code in this book in your programs and
documentation. You do not need to contact us for permission unless you're reproducing a significant portion of the code. For example, writing a program that uses several chunks of code from this book does not require permission. Selling or
distributing a CD-ROM of examples from O'Reilly books does require permission. Answering a question by citing this book and quoting example code does not require permission.
Incorporating a significant amount of example code from this book into your product's documentation does require
permission.
We appreciate, but do not require, attribution. An attribution usually includes the title, author, publisher, and ISBN, for
example: "BSD Hacks by Dru Lavigne. Copyright 2004 O'Reilly Media, Inc., 0-596-00679-9."
If you feel your use of code examples falls outside fair use or the permission given here, feel free to contact us at
We'd Like to Hear from You
Please address comments and questions concerning this book to the publisher:
O'Reilly Media, Inc.
1005 Gravenstein Highway North Sebastopol, CA 95472
(800) 998-9938 (in the United States or Canada) (707) 829-0515 (international or local)
(707) 829-0104 (fax)
We have a web page for this book, where we list errata,
examples, and any additional information. You can access this page at:
http://www.oreilly.com/catalog/bsdhks
To comment or ask technical questions about this book, send email to:
For more information about our books, conferences, Resource Centers, and the O'Reilly Network, see our web site at:
Chapter 1. Customizing the User
Environment
Section 0. Introduction
Section 1. Get the Most Out of the Default Shell
Section 2. Useful tcsh Shell Configuration File Options
Section 3. Create Shell Bindings
Section 4. Use Terminal and X Bindings
Section 5. Use the Mouse at a Terminal
Section 6. Get Your Daily Dose of Trivia
Section 7. Lock the Screen
Section 8. Create a Trash Directory
Section 9. Customize User Configurations
Section 10. Maintain Your Environment on Multiple Systems
Section 11. Use an Interactive Shell
Hack 0 Introduction
Users of open source (http://opensource.org) Unix operating systems are an interesting breed. They like to poke under the surface of things, to find out how things work, and to figure out new and interesting ways of accomplishing common computing tasks. In short, they like to "hack."
While this book concentrates on the BSDs, many of the hacks apply to any open source operating system. Each hack is simply a demonstration of how to examine a common problem from a slightly different angle. Feel free to use any of these hacks as a springboard to your own customized solution. If your particular operating system doesn't contain the tool used in the solution, use a tool that does exist, or invent your own!
This chapter provides many tools for getting the most out of your working environment. You'll learn how to make friends with your shell and how to perform your most common tasks with just a few keystrokes or mouse clicks. You'll also uncover tricks that can help prevent command-line disasters. And,
above all, you'll discover that hacking BSD is fun. So, pull your chair up to your operating system of choice and let's start
Hack 1 Get the Most Out of the Default Shell
Become a speed daemon at the command line.
For better or for worse, you spend a lot of time at the command line. If you're used to administering a Linux system, you may be dismayed to learn that bash is not the default shell on a BSD system, for either the superuser or regular user accounts.
Take heart; the FreeBSD superuser's default tcsh shell is also brimming with shortcuts and little tricks designed to let you breeze through even the most tedious of tasks. Spend a few moments learning these tricks and you'll feel right at home. If you're new to the command line or consider yourself a terrible typist, read on. Unix might be a whole lot easier than you think.
NetBSD and OpenBSD also ship with the C shell as their default shell. However, it is not always the same tcsh, but often its simpler variant,
csh, which doesn't support all of the tricks provided in this hack.
However, both NetBSD and OpenBSD provide a tcsh package in their respective package collections.
1.2.1 History and Auto-Completion
tcsh uses the up and down arrow keys to scroll through your command history. If there is a golden rule to computing, it should be: "You should never have to type a command more than once." When you need to repeat a command, simply press your up arrow until you find the desired command. Then, press Enter and think of all the keystrokes you just saved yourself. If your fingers fly faster than your eyes can read and you whiz past the right command, simply use the down arrow to go in the other direction.
The Tab key was specifically designed for both the lazy typist and the terrible speller. It can be painful watching some people type out a long command only to have it fail because of a typo. It's even worse if they haven't heard about history, as they think their only choice is to try typing out the whole thing all over again. No wonder some people hate the command line!
Tab activates auto-completion. This means that if you type enough letters of a recognizable command or file, tcsh will fill in the rest of the word for you. However, if you instead hear a beep when you press the Tab key, it means that your shell isn't sure what you want. For example, if I want to run sockstat and type:
% so
then press my Tab key, the system will beep because multiple commands start with so. However, if I add one more letter:
% soc
and try again, the system will fill in the command for me:
1.2.2 Editing and Navigating the Command Line
There are many more shortcuts that can save you keystrokes. Suppose I've just finished editing a document. If I press my up arrow, my last command will be displayed at the prompt:
% vi mydocs/today/verylongfilename
I'd now like to double-check how many words and lines are in that file by running this command:
% wc mydocs/today/verylongfilename
I could pound on the backspace key until I get to the vi portion of the command, but it would be much easier to hold down the Ctrl key and press a. That would bring me to the very beginning of that command so I could replace the vi with wc. For a
mnemonic device, remember that just as a is the first letter of the alphabet, it also represents the first letter of the command at a tcsh prompt.
I don't have to use my right arrow to go to the end of the command in order to press Enter and execute the command. Once your command looks like it should, you can press Enter. It doesn't matter where your cursor happens to be.
command:
% wc mydocs/today/verylongfilename
If I hold down Ctrl and press e, the cursor will jump to the end of the command, so I can type in the rest of the desired
command. Remember that e is for end.
Finally, what if you're in the middle of a long command and
decide you'd like to start from scratch, erase what you've typed, and just get your prompt back? Simply hold down Ctrl and
press u for undo.
If you work in the Cisco or PIX IOS systems, all of the previous tricks work at the IOS command line.
Did you know that the cd command also includes some built-in shortcuts? You may have heard of this one: to return to your home directory quickly, simply type:
% cd
That's very convenient, but what if you want to change to a different previous directory? Let's say that you start out in the
/usr/share/doc/en_US.ISO8859-1/books/handbook directory,
directory structure one directory at a time. If that's the case, it would probably take you longer to pick each piece out of the history than it would be to just type the command manually.
Fortunately, there is a very quick solution. Simply type:
% cd
-Repeat that command and watch as your prompt changes
between the first and the second directory. What, your prompt isn't changing to indicate your current working directory? Don't worry, [Hack #2] will take care of that.
1.2.3 Learning from Your Command History
Now that you can move around fairly quickly, let's fine-tune some of these hacks. How many times have you found yourself repeating commands just to alter them slightly? The following scenario is one example.
Remember that document I created? Instead of using the history to bring up my previous command so I could edit it, I might have found it quicker to type this:
% wc !$
wc mydocs/today/verylongfilename
19 97 620 mydocs/today/verylongfilename
% vi mydocs/today/verylongfilename
it replaced the !$ in my new command with the very long filename from my previous command.
The ! (or bang!) character has several other useful applications for dealing with previously issued commands. Suppose you've been extremely busy and have issued several dozen commands in the last hour or so. You now want to repeat something you did half an hour ago. You could keep tapping your up arrow until you come across the command. But why search yourself when ! can search for you?
For example, if I'd like to repeat the command mailstats, I could give ! enough letters to figure out which command to pick out from my history:
$ !ma
! will pick out the most recently issued command that begins with ma. If I had issued a man command sometime after
mailstats command, tcsh would find that instead. This would fix it though:
% !mai
If you're not into trial and error, you can view your history by simply typing:
If you're really lazy, this command will do the same thing:
% h
Each command in this history will have a number. You can specify a command by giving ! the associated number. In this example, I'll ask tcsh to reissue the mailstats command:
% h
165 16:51 mailstats
166 16:51 sockstat
167 16:52 telnet localhost 25
168 16:54 man sendmail
% !165
1.2.4 Silencing Auto-Complete
% ls -l b
then hold down the Ctrl key while I press d:
backups/ bin/ book/ boring.jpg
ls -l b
I'll be shown all of the b possibilities in my current directory, and then my prompt will return my cursor to what I've already typed. In this example, if I want to view the size and
permissions of boring.jpg, I'll need to type up to here:
% ls -l bor
before I press the Tab key. I'll leave it up to your own imagination to decide what the d stands for.
1.2.5 See Also
Hack 2 Useful tcsh Shell Configuration File
Options
Make the shell a friendly place to work in.
Now that you've had a chance to make friends with the shell, let's use its configuration file to create an environment you'll enjoy working in. Your prompt is an excellent place to start.
1.3.1 Making Your Prompt More Useful
The default tcsh prompt displays % when you're logged in as a regular user and hostname# when you're logged in as the
superuser. That's a fairly useful way to figure out who you're logged in as, but we can do much better than that.
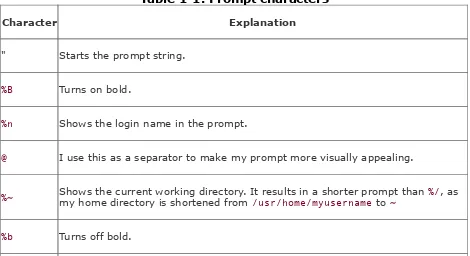
Each user on the system, including the superuser, has a .cshrc file in his home directory. Here are my current prompt settings:
dru@~:grep prompt ~/.cshrc
if ($?prompt) then
set prompt = "%B%n@%~%b: "
That isn't the default tcsh prompt, as I've been using my
deeply within man cshrc, so here's a quick way to zero in on it:
dru@~:man cshrc
/prompt may include
Here I've used the / to invoke the manpage search utility. The search string prompt may include brings you to the right section, and is intuitive enough that even my rusty old brain can remember it.
If you compare the formatting sequences shown in the manpage to my prompt string, it reads as follows:
set prompt = "%B%n@%~%b: "
That's a little dense. Table 1-1 dissects the options.
Table 1-1. Prompt characters
Character Explanation
" Starts the prompt string.
%B Turns on bold.
%n Shows the login name in the prompt.
@ I use this as a separator to make my prompt more visually appealing.
%~ Shows the current working directory. It results in a shorter prompt than my home directory is shortened from /usr/home/myusername to ~ %/, as
: Again, this is an extra character I use to separate my prompt from the cursor.
" Ends the prompt string.
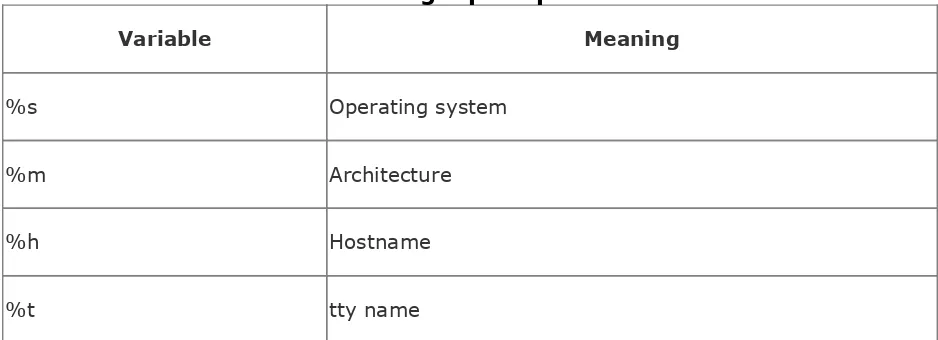
With this prompt, I always know who I am and where I am. If I also needed to know what machine I was logged into (useful for remote administration), I could also include %M or %m
Switching to the Superuser
The superuser's .cshrc file (in /root, the superuser's home directory) has an identical prompt string. This is very fortunate, as it reveals something you might not know about the su command, which is used to switch users. Right now I'm logged in as the user dru and my prompt looks like this:
dru@/usr/ports/net/ethereal:
Watch the shell output carefully after I use su to switch to the root user:
dru@/usr/ports/net/ethereal: su
Password:
dru@/usr/ports/net/ethereal:
Things seem even more confusing if I use the whoami command:
dru@/usr/ports/net/ethereal: whoami
dru
However, the id command doesn't lie:
dru@/usr/ports/net/ethereal: id
uid=0(root) gid=0(wheel) groups=0(wheel), 5(operator)
It turns out that the default invocation of su doesn't actually log you in as the superuser. It simply gives you superuser privileges while retaining your original login shell.
If you really want to log in as the superuser, include the login (-l) switch:
dru@/usr/ports/net/ethereal: su -l
Password:
root@~: whoami
root@~: id
uid=0(root) gid=0(wheel) groups=0(wheel), 5(operator)
I highly recommend you take some time to experiment with the various formatting sequences and hack a prompt that best
meets your needs. You can add other features, including customized time and date strings and command history numbers [Hack #1], as well as flashing or underlining the prompt.
1.3.2 Setting Shell Variables
Your prompt is an example of a shell variable. There are dozens of other shell variables you can set in .cshrc. My trick for finding the shell variables section in the manpage is:
dru@~:man cshrc
/variables described
As the name implies, shell variables affect only the commands that are built into the shell itself. Don't confuse these with environment variables, which affect your entire working environment and every command you invoke.
If you take a look at your ~/.cshrc file, environment variables are the ones written in uppercase and are preceded with the
You can also enable a shell variable by using the set command at your command prompt. (Use unset to disable it.) Since the variable affects only your current login session and its children, you can experiment with setting and unsetting variables to your heart's content. If you get into trouble, log out of that session and log in again.
If you find a variable you want to keep permanently, add it to your ~/.cshrc file in the section that contains the default set
commands. Let's take a look at some of the most useful ones.
If you enjoyed Ctrl-d from [Hack #1], you'll like this even better:
set autolist
Now whenever you use the Tab key and the shell isn't sure what you want, it won't beep at you. Instead, the shell will show you the applicable possibilities. You don't even have to press Ctrl-d first!
The next variable might save you from possible future peril:
set rmstar
I'll test this variable by quickly making a test directory and some files:
dru@~:mkdir test
dru@~:cd test
Then, I'll try to remove the files from that test directory:
dru@~/test:rm *
Do you really want to delete all files? [n/y]
Since my prompt tells me what directory I'm in, this trick gives me one last chance to double-check that I really am deleting the files I want to delete.
If you're prone to typos, consider this one:
set correct=all
This is how the shell will respond to typos at the command line:
dru@~:cd /urs/ports
CORRECT>cd /usr/ports (y|n|e|a)?
Pressing y will correct the spelling and execute the command. Pressing n will execute the misspelled command, resulting in an error message. If I press e, I can edit my command (although, in this case, it would be much quicker for the shell to go with its correct spelling). And if I completely panic at the thought of all of these choices, I can always press a to abort and just get my prompt back.
set implicitcd
Hack 3 Create Shell Bindings
Train your shell to run a command for you whenever you press a mapped key.
Have you ever listened to a Windows power user expound on the joys of hotkeys? Perhaps you yourself have been known to gaze wistfully at the extra buttons found on a Microsoft
keyboard. Did you know that it's easy to configure your
keyboard to launch your most commonly used applications with a keystroke or two?
One way to do this is with the bindkey command, which is built into the tcsh shell. As the name suggests, this command binds certain actions to certain keys. To see your current mappings, simply type bindkey. The output is several pages long, so I've included only a short sample. However, you'll recognize some of these shortcuts from [Hack #1].
Standard key bindings
"^A" -> beginning-of-line
"^B" -> backward-char
"^E" -> end-of-line
"^F" -> forward-char
"^L" -> clear-screen
"^P" -> up-history
"^U" -> kill-whole-line
Arrow key bindings
down -> history-search-forward
up -> history-search-backward
left -> backward-char
right -> forward-char
home -> beginning-of-line
end -> end-of-line
The ^ means hold down your Ctrl key. For example, press Ctrl and then l, and you'll clear your screen more quickly than by typing clear. Notice that it doesn't matter if you use the uppercase or lowercase letter.
1.4.1 Creating a Binding
One of my favorite shortcuts isn't bound to a key by default:
complete-word-fwd. Before I do the actual binding, I'll first check which keys are available:
"^G" -> is undefined
"\305" -> is undefined
"\307" -> is undefined
<snip>
Although it is possible to bind keys to numerical escape
sequences, I don't find that very convenient. However, I can very easily use that available Ctrl-g. Let's see what happens when I bind it:
dru@~:bindkey "^G" complete-word-fwd
When I typed in that command, I knew something worked because my prompt returned silently. Here's what happens if I now type ls -l /etc/, hold down the Ctrl key, and repeatedly press g:
ls -l /etc/COPYRIGHT
ls -l /etc/X11
ls -l /etc/aliases
ls -l /etc/amd.map
directory until I find the exact one I want. Even better, if I know what letter the file starts with, I can specify it. Here I'll cycle through the files that start with a:
ls -l /etc/a
ls -l /etc/aliases
ls -l /etc/amd.map
ls -l /etc/apmd.conf
ls -l /etc/auth.conf
ls -l /etc/a
Once I've cycled through, the shell will bring me back to the letter a and beep.
If you prefer to cycle backward, starting with words that begin with z instead of a, bind your key to complete-word-back
instead.
When you use bindkey, you can bind any command the shell understands to any understood key binding. Here's my trick to list the commands that tcsh understands:
dru@~ man csh
/command is bound
key, specify it. Here's how to see the current binding for Ctrl-g:
dru@~:bindkey "^G"
"^G" -> complete-word-fwd
1.4.2 Specifying Strings
What's really cool is that you're not limited to just the
commands found in man csh. The s switch to bindkey allows you to specify any string. I like to bind the lynx web browser to Ctrl-w:
dru@~:bindkey -s "^W" "lynx\n"
I chose w because it reminds me of the World Wide Web. But why did I put \n after the lynx? Because that tells the shell to press Enter for me. That means by simply pressing Ctrl-w, I have instant access to the Web.
Note that I overwrite the default binding for Ctrl-w. This permits you to make bindings that are more intuitive and useful for your own purposes. For example, if you never plan on doing
whatever ^J does by default, simply bind your desired command to it.
There are many potential key bindings, so scrolling through the output of bindkeys can be tedious. If you only stick with "Ctrl letter" bindings, though, it's easy to view your customizations with the following command:
As with all shell modifications, experiment with your bindings first by using bindkey at the command prompt. If you get into real trouble, you can always log out to go back to the defaults. However, if you find some bindings you want to keep, make them permanent by adding your bindkey statements to your
.cshrc file. Here is an example:
dru@~:cp ~/.cshrc ~/.cshrc.orig
dru@~:echo 'bindkey "^G" complete-word-fwd' >> ~/.cshrc
Notice that I backed up my original .cshrc file first, just in case my fingers slip on the next part. I then used >> to append the
echoed text to the end of .cshrc. If I'd used > instead, it would have replaced my entire .cshrc file with just that one line. I don't recommend testing this on any file you want to keep.
Along those lines, setting:
set noclobber
will prevent the shell from clobbering an existing file if you forget that extra > in your redirector. You'll know you just prevented a nasty accident if you get this error message after trying to redirect output to a file:
1.4.3 See Also
man tcsh
Hack 4 Use Terminal and X Bindings
Take advantage of your terminal's capabilities.
It's not just the tcsh shell that is capable of understanding bindings. Your FreeBSD terminal provides the kbdcontrol
command to map commands to your keyboard. Unfortunately, neither NetBSD nor OpenBSD offer this feature. You can,
however, remap your keyboard under X, as described later.
1.5.1 Creating Temporary Mappings
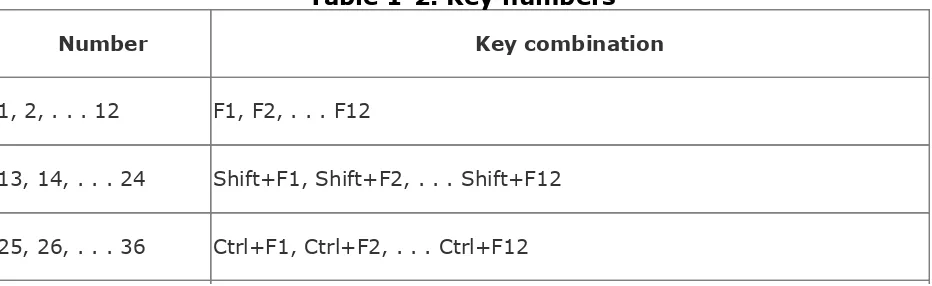
Let's start by experimenting with some temporary mappings. The syntax for mapping a command with kbdcontrol is as follows:
kbdcontrol -f number "command"
Table 1-2 lists the possible numbers, each with its associated key combination.
Table 1-2. Key numbers
Number Key combination
1, 2, . . . 12 F1, F2, . . . F12
13, 14, . . . 24 Shift+F1, Shift+F2, . . . Shift+F12
37, 38, . . . 48 Shift+Ctrl+F1, Shift+Ctrl+F2, . . . Shift+Ctrl+F12
49 Home
50 Up arrow
51 Page Up
52 Numpad - (Num Lock off)
53 Left arrow (also works in editor)
54 Numpad 5 (without Num Lock)
55 Right arrow
56 Numpad + (without Num Lock)
57 End
58 Down arrow (affects c history)
59 Page Down
60 Ins
61 Del
62 Left GUI key (Windows icon next to left Ctrl)
63 Right GUI key (Windows icon next to right Alt)
64 Menu (menu icon next to right Ctrl)
depending upon your keyboard. My Logitech keyboard has a key with a Windows icon next to the left Ctrl key; that is the left GUI key. There's another key with a Windows icon next to my right Alt key; this is the right GUI key. The next key to the right has an icon of a cursor pointing at a square containing lines; that is the Menu key.
Now that we know the possible numbers, let's map lynx to the Menu key:
% kbdcontrol -f 64 "lynx"
Note that the command must be contained within quotes and be in your path. (You could give an absolute path, but there's a nasty limitation coming up soon.)
If I now press the Menu key, lynx is typed to the terminal for me. I just need to press Enter to launch the browser. This may seem a bit tedious at first, but it is actually quite handy. It can save you from inadvertently launching the wrong application if you're anything like me and tend to forget which commands you've mapped to which keys.
Let's see what happens if I modify that original mapping somewhat:
% kbdcontrol -f 64 "lynx www.google.ca"
kbdcontrol: function key string too long (18 > 16)
1.5.2 Shell Bindings Versus Terminal Bindings
Before going any further, I'd like to pause a bit and compare shell-specific bindings, which we saw in [Hack #3], and the terminal-specific bindings we're running across here.
One advantage of using kbdcontrol is that your custom bindings work in any terminal, regardless of the shell you
happen to be using. A second advantage is that you can easily map to any key on your keyboard. Shell mappings can be
complicated if you want to map them to anything other than "Ctrl letter".
However, the terminal mappings have some restrictions that don't apply to the tcsh mappings. For example, shell mappings don't have a 16 character restriction, allowing for full
pathnames. Also, it was relatively easy to ask the shell to press Enter to launch the desired command.
Terminal bindings affect only the current user's terminal. Any other users who are logged in on different terminals are not affected. However, if the mappings are added to rc.conf (which only the superuser can do), they will affect all terminals. Since bindings are terminal specific, even invoking su won't change the behavior, as the user is still stuck at the same terminal.
1.5.3 More Mapping Caveats
There are some other caveats to consider when choosing which key to map. If you use the tcsh shell and enjoy viewing your history [Hack #1], you'll be disappointed if you remap your up and down arrows. The right and left arrows can also be
mapped to your GUI terminal. By default, F10 to F12 are unmapped.
If you start experimenting with mappings and find you're stuck with one you don't like, you can quickly return all of your keys to their default mappings with this command:
% kbdcontrol -F
On the other hand, if you find some new mappings you absolutely can't live without, make them permanent. If you have superuser privileges on a FreeBSD system you physically sit at, you can carefully add the mappings to /etc/rc.conf. Here, I've added two mappings. One maps lynx to the Menu key and the other maps startx to the left GUI key:
keychange="64 lynx"
keychange="62 startx"
Since the superuser will be setting these mappings, the mapped keys will affect all users on that system. If you want to save your own personal mappings, add your specific kbdcontrol
commands to the end of your shell configuration file. For
example, I've added these to the very end of my ~/.cshrc file, just before the last line which says endif:
% kbdcontrol -f 64 "lynx"
1.5.4 Making Mappings Work with X
This is all extremely handy, but what will happen if you try one of your newly mapped keys from an X Window session? You can press that key all you want, but nothing will happen. You won't even hear the sound of the system bell beeping at you in
protest. This is because the X protocol handles all input and output during an X session.
You have a few options if you want to take advantage of keyboard bindings while in an X GUI. One is to read the
documentation for your particular window manager. Most of the newer window managers provide a point and click interface to manage keyboard bindings. My favorite alternative is to try the
xbindkeys_config application, which is available in the ports collection [Hack #84] :
# cd /usr/ports/x11/xbindkeys_config
# make install clean
This port also requires xbindkeys:
# cd /usr/ports/x11/xbindkeys
# make install clean
Rather than building both ports, you could instead add this line to
/usr/ports/x11/xbindkeys_config/Makefile:
This will ask the xbindkeys_config build to install both ports.
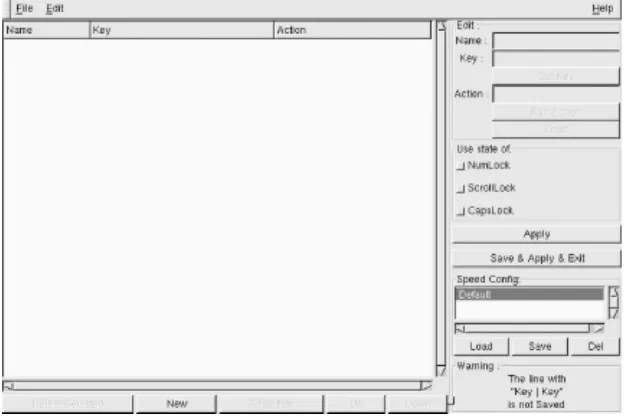
Once your builds are complete, open an xterm and type:
% xbindkeys --defaults ~/.xbindkeysrc
% xbindkeys_config
The GUI in Figure 1-1 will appear.
Figure 1-1. The xbindkeys_config program
will autofill for you. Associate your desired Action:, then press the Save & Apply & Exit button.
Any keyboard mappings you create using this utility will be saved to a file called ~/.xbindkeysrc.
1.5.5 See Also
man kbdcontrol
man atkbd
The xbindkeys web site
Hack 5 Use the Mouse at a Terminal
Use your mouse to copy and paste at a terminal.
If you're used to a GUI environment, you might feel a bit out of your element while working at the terminal. Sure, you can learn to map hotkeys and to use navigational tricks, but darn it all, sometimes it's just nice to be able to copy and paste!
Don't fret; your mouse doesn't have to go to waste. In fact, depending upon how you have configured your system, the mouse daemon moused may already be enabled. The job of this daemon is to listen for mouse data in order to pass it to your console driver.
Of course, if you're using screen [Hack #12], you can also take advantage of its copy and paste mechanism.
1.6.1 If X Is Already Installed
If you installed and configured X when you installed your
system, moused is most likely started for you when you boot up. You can check with this:
% grep moused /etc/rc.conf
moused_type="auto"
moused_enable="YES"
Very good. moused needs to know three things:
The mouse port (in this example, /dev/psm0, the PS/2 port)
The type of protocol (in this example, auto)
Whether to start at boot time
If you receive similar output, you're ready to copy and paste.
To copy text, simply select it by clicking the left mouse button and dragging. Then, place the mouse where you'd like to paste the text and click the middle button. That's it.
To select an entire word, double-click anywhere on that word. To select an entire line, triple-click anywhere on that line.
1.6.1.1 Configuring a two-button mouse
What if you don't have three mouse buttons? As the superuser, add the following line to /etc/rc.conf (assuming it's not already there):
This flag tells moused to treat the second, or right, mouse
button as if it were the third, or middle, mouse button. Now you can use the right mouse button to paste your copied text.
To apply that change, restart moused:
# /etc/rc.d/moused restart
Stopping moused.
Starting moused:.
Test your change by copying some text with the left mouse button and pasting with the right mouse button.
1.6.2 If X Is Not Installed
You can achieve the same results on a system without X
installed. You'll have to add the lines to /etc/rc.conf manually, though.
The example I've given you is for a PS/2 mouse. If you're using another type of mouse, read the "Configuring Mouse Daemon" section of man moused. It gives explicit details on figuring out what type of mouse you have and what type of protocol it
understands. It even includes a section on configuring a laptop system for multiple mice: one for when on the road and one for when the laptop is attached to the docking station.
A serial mouse physically plugged into COM1 would be
/dev/cuaa0. You may have to experiment with the type, as
auto doesn't work with all serial mice. Again, the manpage is your best reference.
1.6.3 See Also
man moused
Documentation on enabling mouse support in NetBSD at
http://www.netbsd.org/Documentation/wscons/
Documentation on enabling mouse support in OpenBSD at
Hack 6 Get Your Daily Dose of Trivia
Brighten your day with some terminal eye candy.
As the saying goes, all work and no play makes Jack a dull boy. But what's a poor Jack or Jill to do if your days include spending inordinate amounts of time in front of a computer screen? Well, you could head over to http://www.thinkgeek.net/ to stock up on cube goodies and caffeine. Or, you could take advantage of some of the entertainments built into your operating system.
1.7.1 A Fortune a Day
Let's start by configuring some terminal eye candy. Does your system quote you a cheery, witty, or downright strange bit of wisdom every time you log into your terminal? If so, you're receiving a fortune:
login: dru
Password:
Last login: Thu Nov 27 10:10:16 on ttyv7
"You can't have everything. Where would you put it?"
If you're not receiving a fortune, as the superuser type
/stand/sysinstall. Choose Configure, then Distributions, and select games with your spacebar. Press Tab to select OK, then exit out of sysinstall when it is finished.
Then, look for the line that runs /usr/games/fortune in your ~/.cshrc file:
% grep fortune ~/.cshrc
/usr/games/fortune
If for some reason it isn't there, add it:
% echo '/usr/games/fortune' >> ~/.cshrc
Don't forget to use both greater-than signs; you don't want to erase the contents of your .cshrc file! To test your change, use the source shell command, which re-executes the contents of the file. This can come in handy if you've updated an alias and want to take advantage of it immediately:
% source ~/.cshrc
Indifference will be the downfall of mankind, but who cares?
If you'd also like to receive a fortune when you log out of your terminal, add this line to the end of your .logout file. If you
don't have one, and there isn't one by default, you can create it and add this line in one step:
Note that this time I used only one greater-than sign, as I was creating the file from scratch. If the file already exists, use two greater-than signs to append your new line to the end of the existing file.
Believe it or not, fortune comes with switches, some of which are more amusing than others. I'll leave it to you to peruse man fortune.
1.7.2 Pursuing Trivia
I'm a trivia buff, so I love using the calendar command.
Contrary to logic, typing calendar won't show me this month's calendar (that's the job of cal). However, I will get an instant dose of trivia, related to the current date:
% calendar
Nov 27 Alfred Nobel establishes Nobel Prize, 1895
Nov 27 Friction match invented, England, 1826
Nov 27 Hoosac Railroad Tunnel completed, 1873, in NW Massachusetts
Nov 28 Independence Day in Albania and Mauritania
Nov 28 Independence from Spain in Panama
Nov 28 Proclamation of the Republic in Chad
Cool. I had forgotten it was the anniversary of the Hoosac tunnel, an event that put my hometown on the map.
It's an easy matter to automate the output provided by
calendar. If you want to see your trivia when you log in or log out, simply add a line to your .cshrc or .logout file. Because the line you add is really just a path to the program, use the output of the which command to add that line for you:
% echo `which calendar` >> .cshrc
Again, don't forget to append with >>, or have noclobber set in your .cshrc file [Hack #2].
1.7.3 Sundry Amusements
Of course, there are several other date and time related mini-hacks at your disposal. Here are two you might enjoy.
1.7.3.1 The current time
Ever wonder what time it is while you're working on the
terminal? Sure, you could use date, but the output is so small and boring. Try this the next time you want to know what time it is:
% grdc
I've been known to add /usr/games/grdc to my ~/.logout.
When I log out, my terminal displays the time until I press Ctrl-c and log in again. That's sort of a built-in password proteCtrl-cted screen saver for the terminal.
1.7.3.2 The phase of the moon
Have you ever read man pom? It has one of the more useful descriptions I've seen:
The pom utility displays the current phase of the moon. Useful for selecting software completion target dates and predicting managerial behavior.
Sounds like Dilbert had a hand in that one. If I add the line
/usr/games/pom to my ~/.cshrc, I'll learn a bit about
astronomy when I log in:
% pom
The Moon is Waxing Gibbous (53% of Full)
There's a one-liner to promote water cooler conversation.
1.7.4 Adding Some Color to Your Terminal
Have you ever tried this command?
0 8 grey
1 blue 9 lightblue
2 green 10 lightgreen
3 cyan 11 lightcyan
4 red 12 lightred
5 magenta 13 lightmagenta
6 brown 14 yellow
7 white 15 lightwhite
Gee, that reminds me of my old DOS days when I discovered
ansi.sys. Yes, your terminal is capable of color and you're
looking at your possible color schemes! (It likely looks much more exciting on your terminal, since it's not in color in this book.)
If you see some colors that appeal to you, add them to your terminal. For example, this command will set the foreground color to yellow and the background color as blue:
% vidcontrol yellow blue
% vidcontrol -b red
These settings affect only your own terminal. If you want, add the desired vidcontrol lines to your ~/.cshrc file so your settings are available when you log into your terminal.
If you have problems finding your cursor, try:
% vidcontrol -c blink
or:
% vidcontrol -c destructive
Changing the cursor affects all virtual terminals on the system. If other users complain about your improvement, this will bring things back to normal:
% vidcontrol -c normal
1.7.5 See Also
man fortune
man calendar
Hack 7 Lock the Screen
Secure your unattended terminal from prying eyes.
If you work in a networked environment, the importance of locking your screen before leaving your workstation has
probably been stressed to you. After all, your brilliant password becomes moot if anyone can walk up to your logged in station and start poking about the contents of your home directory.
If you use a GUI on your workstation, your Window Manager probably includes a locking feature. However, if you use a terminal, you may not be aware of the mechanisms available for locking your terminal.
As an administrator, you may want to automate these mechanisms as part of your security policy. Fortunately, FreeBSD's screen locking mechanism is customizable.
1.8.1 Using lock
FreeBSD comes with lock (and it's available for NetBSD and OpenBSD). Its default invocation is simple:
% lock
Key: 1234
Again: 1234
time now is Fri Jan 2 12:45:02 EST 2004
Key:
Without any switches, lock will request that the user input a key which will be used to unlock the terminal. This is a good thing, as it gives the user an opportunity to use something
other than her login password. If the user tries to be smart and presses Enter (for an empty password), the lock program will abort.
Once a key is set, it is required to unlock the screen. If a user instead types Ctrl-c, she won't terminate the program. Instead, she'll receive this message:
Key: lock: type in the unlock key. timeout in 10:59 minutes
Did you notice that timeout value of 15 minutes? At that time, the screen will unlock itself, which sorta diminishes the
usefulness of locking your screen. After all, if you run into your boss in the hall, your 5-minute coffee break might turn into a 25-minute impromptu brainstorming session.
To lock the terminal forever, or at least until someone types the correct key, use the -n switch. If the system is a personal
workstation, -v is also handy; this locks all of the virtual
terminals on the system, meaning a passerby can't use Alt-Fn to switch to another terminal.
As an administrator, you can assist users in using the desired switches by adding an alias to /usr/share/skel/dot.cshrc [Hack #9]. This alias removes the timeout and locks all terminals:
1.8.2 Using autologout
If you use the tcsh shell, you also have the ability either to lock your session or to be logged out of your session automatically after a set period of inactivity. As an administrator, you can set your policy by adding a line to /usr/share/skel/dot.cshrc.
Do be aware, though, that a user can edit her own ~/.cshrc file, which will negate your customized setting.
The autologout variable can accept two numbers. The first number represents the number of minutes of inactivity before logging out the user. The second number represents the
number of minutes of inactivity before locking the user's screen. Once the screen is locked, the user must input the password to unlock it. If the screen is not unlocked in time, the user will be logged out once the shell has been idle for the logout period of minutes.
The manpage is pretty vague on how to set those two numbers. For example, if you try:
set autologout = 30 15
users will receive this error message when they try to log in:
That's a deceptive error message, as this variable does accept numerals. The correct invocation is to enclose the two numbers between parentheses:
set autologout = (30 15)
This particular setting will log out a user after 15 minutes of inactivity. The user will know this happened as the terminal will resemble:
%
Password:
After 30 minutes of inactivity (or 15 minutes after the screen was locked), the user will be logged out and see this:
%
Password:auto-logout
1.8.3 Enforcing Logout
What if you do want to enforce a logout policy that users can't change in their shell configuration files? Consider using idled, which can be installed from /usr/ports/sysutils/idled or built from source. This utility was designed to log out users either after a configured period of inactivity or after they've been logged in for a certain amount of time.
Once you've installed idled, copy the template configuration file:
# cd /usr/local/etc/
# cp idled.cf.template idled.cf
Open /usr/local/etc/idled.cf using your favorite editor. You'll find this file to be well commented and quite straightforward. You'll be able to configure the time before logout as well as when the user will receive a warning message. In addition, you can refuse logins, set session timeouts, and provide for exemptions.
1.8.4 See Also
man lock
man tcsh man idled
man idled.cf
Hack 8 Create a Trash Directory
Save "deleted" files until you're really ready to send them to the bit bucket.
One of the first things Unix users learn is that deleted files are really, really gone. This is especially true at the command line where there isn't any Windows-style recycling bin to rummage through should you have a change of heart regarding the fate of a removed file. It's off to the backups! (You do have backups, don't you?)
Fortunately, it is very simple to hack a small script that will send removed files to a custom trash directory. If you've never
written a script before, this is an excellent exercise in how easy and useful scripting can be.
1.9.1 Shell Scripting for the Impatient
Since a script is an executable file, you should place your scripts in a directory that is in your path. Remember, your path is just a list of directories where the shell will look for commands if you don't give them full pathnames. To see your path:
% echo $PATH
PATH=/sbin:/bin:/usr/sbin:/usr/bin:/usr/games:/usr/local/sbin:/usr/
In this output, the shell will look for executables in the bin
subdirectory of dru's home directory. However, it won't look for executables placed directly in my home directory, or /home/dru. Since bin isn't created by default, I should do that first:
% cd
% mkdir bin
As I create scripts, I'll store them in /home/dru/bin, since I don't have permission to store them anywhere else.
Fortunately, no one else has permission to store them in my bin directory, so it's a good match.
The scripts themselves contain at least three lines:
#!/bin/sh
# a comment explaining what the script does
the command to be executed
The first line indicates the type of script by specifying the program to use to execute the script. I've chosen to use a Bourne script because that shell is available on all Unix systems.
Your script should also have comments, which start with the #
character. It's surprising how forgetful you can be six months down the road, especially if you create a lot of scripts. For this reason, you should also give the script a name that reminds you of what it does.
the actual command(s) to execute. This can range from a
simple one-liner to a more complex set of commands, variables, and conditions. Fortunately, we can make a trash script in a simple one-liner.
1.9.2 The Code
Let's start with this variant, which I found as the result of a Google search:
% more ~/bin/trash
#!/bin/sh
# script to send removed files to trash directory
mv $1 ~/.trash/
You should recognize the path to the Bourne shell, the
comment, and the mv command. Let's take a look at that $1. This is known as