Also inside:
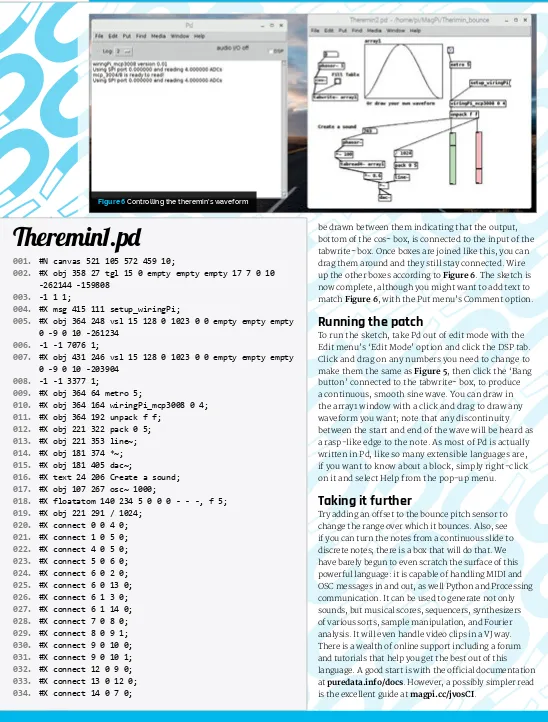
PAGE 26
Welcome
EDITORIAL
Editor: Lucy Hattersley [email protected] Features Editor: Rob Zwetsloot [email protected] Sub Editors: Phil King and Jem RobertsDESIGN
Critical Media: criticalmedia.co.uk Head of Design: Dougal Matthews Designers: Mike Kay and Lee Allen Illustrator: Sam Alder
PUBLISHING
For advertising & licensing: Publishing Director: Russell Barnes[email protected] | +44 (0)7904 766523 Director of Communications: Liz Upton CEO: Eben Upton
The MagPi magazine is published by Raspberry Pi (Trading) Ltd., 30 Station Road, Cambridge, CB1 2JH. The publisher, editor, and contributors accept no responsibility in respect of any omissions or errors relating to goods, products or services referred to or advertised in the magazine. Except where otherwise noted, content in this magazine is licensed under a Creative Commons Attribution-NonCommercial-ShareAlike 3.0 Unported (CC BY-NC-SA 3.0). ISSN: 2051-9982.
WELCOME TO
THE OFFICIAL
MAGAZINE
t all started with a Tado. I won this quirky home thermostat in a competition, along with free setup. Since then, I’ve fitted smart lights, energy-measuring sockets, built my own internet doorbell, and – of course – set up a Raspberry Pi AIY Projects intelligent home speaker.
I love DIY. The only thing better than DIY is ‘smart DIY’, where you get the double satisfaction of a job-well-done that uses your tech skills.
Our Home Automation feature (page 16) has more information about installing stuff around the house than you’ll ever need. From smart lighting and energy-monitored wall sockets, right up to automatic garage doors and temperature-controlled fish tanks.
Doing your own home automation isn’t just more rewarding; it’s also the smarter move. When you make your own home automation projects, you control the data they acquire and you know exactly what’s going on in your system. Plus, you get to fix any faults without the expensive repair bills.
So don’t just buy smart kit for your home that sucks up all your information; make it yourself and keep your home secure. That’s what this issue is all about!
Lucy Hattersley
Editor
I
CONTRIBUTORS
Alex Bate, Brian Beuken, Harry H. Cheng, Mike Cook, Kylie Cooper, David Crookes, PJ Evans, Hailey R. Falk, Nicola King, Lars Noodén, Ben Nuttall, Matt Richardson, Richard Smedley, Clive Webster
GET IN TOUCH
THIS MONTH:
[email protected]
FIND US ONLINE
raspberrypi.org/magpi
This magazine is printed on paper sourced from sustainable forests and the printer operates an environmental management system which has been assessed as conforming to ISO 14001.
DISTRIBUTION
Seymour Distribution Ltd 2 East Poultry Ave London
EC1A 9PT | +44 (0)207 429 4000
SUBSCRIPTIONS
Raspberry Pi PressMann Enterprises, Unit E, Brocks Business Centre, Haverhill, CB9 8QP magpi.cc/subscribe
16
HOME AUTOMATION
Where DIY becomes D-I-Wooooah!
34
COCKTAIL MAKER
Time for some sophisticated boozing
38
MAGNETIC THEREMIN
Music and science in perfect harmony
60
UPCYCLING
Don’t throw that away – we have a plan…
NSYNTH
06
RASPBERRY FIELDS
Join the digital making party this summer! Google makes a synth
raspberrypi.org/magpi
4 June 2018
Contents
Issue 70 June 2018
raspberrypi.org/magpi
COVER FEATURE
16
IN THE NEWS
>
PI 101: REMOTE ACCESS VIA SSH
36
Connect to your Pi remotely using SSH
>
MAKE A MAGNETIC THEREMIN
38
Use a magnetic bounce controller to make eerie music
>
BUILD A TWEETING BABBAGE
44
The Raspberry Pi bear can become a tweeting machine
>
REMOTE CONTROL MINECRAFT
50
Use tmux to access and maintain a Minecraft server
>
CREATE ANALYSIS GRAPHS
52
Analyse robot performance data the easy way
>
MAKE GAMES IN C PART 6
54
Speed up the game you’ve built so far
TUTORIALS
10
08
Kickstart this robot
PIMECHA
DIY SMART HOME
YOUR PROJECTS
Contents
>
NEWS
06
>
TECHNICAL FAQ
58
>
BOOK REVIEWS
80
>
FINAL WORD
98
REGULARS
>
WEATHER STATION KIT
70
>
SUPER TINYTENDO CASE
72
>
DIDDYBORG V2
74
>
HACKABLE PI SWITCH CAP
76
>
ASTROBOX TOUCH
78
REVIEWS
COMMUNITY
>
BRAZILIAN ART INTERVIEW
84
Felipe uses the Pi to make art, and more, in Brazil
>
THE MONTH IN RASPBERRY PI
86
Big events galore this month in Pi!
>
CHRIS AVILES PROFILE
90
We talk to the teched-up teacher
>
EVENTS
92
What events are happening this month
>
YOUR LETTERS
94
Excellent answers to wonderful questions Half Honda, half Tesla, all Pi-powered
Bring new life to old tech
60
UPCYCLE WITH PI
Turn an old film camera into a digital one
Care for a drink?
COCKTAIL MACHINE
34
A toddler-friendly Pi project
ENZO’S ACTIVITY BOARD
32
THE BIG
FEATURE
28
THERMAL POLAROID
30
TESLONDA
We’ve got seven NanoSound DAC Pro
raspberrypi.org/magpi
6 June 2018
News
and magical brews by visiting The Cauldron. These techno-wizards use molecular mixology and responsive ‘magic’ wands to create (non-alcoholic) cocktails, bringing “the magic from fantasy books to life”. See thecauldron.io for a taster.
Elsewhere, drop in on the Museum in a Box, which shrinks entire “museum collections and expert knowledge” into a handheld box. You’ll be able to experience some of the most exotic places on earth without moving a yard. See museuminabox.org for a preview.
For more inspiration, there will be a fantastic range of projects built by hobbyists just like you, using the Raspberry Pi, Arduino, micro:bit, and other technologies. If you’re still in need of a creative
kick-start, check out the quick-fire
talks given by young makers from CoderDojos, Code Clubs, Raspberry Jams, and other groups.
Once you’ve got an idea for a project, you can browse the vendor stalls for that perfect bit of kit for your next build.
FEATURE
RASPBERRY
FIELDS
FESTIVAL
oin us for the first annual
Raspberry Fields, a festival of digital making held over the weekend of 30 June and 1 July in Cambridge.
Organised by the Raspberry Pi Foundation, the weekend will be packed full of fun, exciting, thought-provoking and informative shows, projects, demonstrations, and talks.
For example, you’ll be able to recreate your favourite potions
A weekend to celebrate digital making
Image c
ourtes
y
o
f Cambridge
Junction,
www
.junction.c
o.uk
News
If all that sounds a little exhausting, you can see how fast your heart is beating in the Heart of Raspberry Pi chill-out zone. Here you’ll be able to place your own heartbeat alongside hundreds of others in sealed jars that light up the room.
With many more shows, stalls, events, and acts still to be announced, Raspberry Fields is sure to be a brilliant and memorable day out, whichever day you attend. And of course there will
RASPBERRY FIELDS FESTIVAL
be the obligatory face-painting, food, music, and generally loads of interactive fun to be had!
How to attend
You can book your tickets now, from the Cambridge Junction website: magpi.cc/KxVqJc. Tickets are free for under 16s, and £5 for everyone else. Every attendee will need a ticket, so please book now to avoid disappointment.
You can book a ticket to visit on either Saturday 30 June or on
When we said we wanted ‘quick-fire talks’…
Y
FREE
For under 16s, £5 otherwise
30 JUNE
Opens at 10:30
1 JULY
Opens at 10:00
BOOK
Tickets from:
magpi.cc/KxVqJc
KEY FACTS
Sunday 31 July. The gates open at 10:30am on Saturday and at 10:00am on Sunday.
There are many easy ways to get to Cambridge Junction – it’s less than ten minutes’ walk from Cambridge railway station, and there’s a secure car park at the neighbouring PureGym Cambridge Leisure Park if you’re driving.
raspberrypi.org/magpi
8 June 2018
News
B Components’ latest creation is a fully customisable, fully controllable humanoid robot capable of natural motion via its 17 digital servo motors.
Measuring 370×448 mm (H×W), PiMecha “is designed to allow learning from basic to advanced robotics,” says SB Components director Gajender Singh, adding that it “also enables students to learn Python programming.”
If your Python skills aren’t so polished, there’s also a graphical control system. Each of the 17 servos is shown in
place on a silhouette of PiMecha, allowing you to easily create very lifelike motions.
The Kickstarter page
(magpi.cc/nDQJbv) shows videos of PiMecha strutting his funky
stuff, doing press-ups, walking,
and even turning cartwheels.
Mod my bot
While PiMecha’s dancing is impressively smooth, Gajender reveals that “as of now, audio sensing is not enabled by us.” However, “because the Raspberry
Pi holds endless possibilities,” PiMecha owners can add
audio sensing “easily”.
For all your customisable robot needs
S
THE PI-POWERED ROBOT
PIMECHA
Some other potential upgrades
are offered as part of Pledge
bundles – the 4-inch LCD screen and Raspberry Pi Camera, for example.
Upgrading PiMecha in other ways is also possible, as Gajender
confirms that “PiMecha also
allows for connecting IR and ultrasonic detecting, for obstacle detection and distance measuring respectively.”
Agent of Shield
At the heart of the robot is the PiMecha Shield, governing not only the 17 servos but also managing
the battery. Gajender reveals that you can connect the PiMecha Shield “either by using the GPIO stack [header] or by using the USB connection.”
PiMecha’s Kickstarter campaign is looking to raise a modest £25 000 by Sunday 17 June. The cheapest Pledge option is for an unassembled PiMecha with no Pi for £299; a pre-assembled PiMecha with a Pi 3B+ is listed at £339. PiMecha is compatible with most Raspberry Pi models, including the Pi Zero.
Should PiMecha achieve its funding goal, robots should start shipping in September 2018.
PiMecha also allows for connecting IR
and ultrasonic detecting, for obstacle
detection and distance measuring
LeftA Pi for brains and 17 digital motor servos make for a sophisticated humanoid robot
8 June 2018
raspberrypi.org/magpi
10 June 2018
News
agenta, a Google research project to ‘make music and art using machine learning’, has collaborated with Google Creative Lab to create a musical instrument that uses AI to create entirely new sounds.
The project is a hardware implementation of the previously announced NSynth algorithm. This ‘neural audio synthesis’ algorithm
doesn’t blend different input
sounds – instead it analyses the sonic characteristics of the sources to ‘birth’ an entirely new sound.
AI instrument gets a body
M
NSYNTH
SUPER
10 June 2018 raspberrypi.org/magpi
The NSynth Super takes the NSynth algorithm and implements it in an easy-to-use hardware form. Each of the four corner dials allows you to select one of four instruments, and then you can set the level of combination by dragging your
finger across the touchscreen
‘sound map’.
oolest Projects UK was “the same level of mind-blowing” as any Coolest Projects International show, says Rosa Langhammer, CoderDojo’s general manager, outreach and engagement.
Held on Saturday 28 April in London, the event “had over 40 projects,” says Rosa, “presented with enthusiasm and confidence by each of the project presenters… In total we had over 500
people attend.”
It’s these presenters that make Coolest Projects events so special – they’re CoderDojo Ninjas, aged 7–17, showing off their self-made projects.
Among some brilliant projects and presentations, Rosa
First Coolest Projects show in UK “mind-blowing”
C
COOLEST PROJECTS
UK
particularly loved ten-year-old Ayve’s ‘Voice O’Tronik’, which “responded to voice commands such as ‘move arms’ or ‘roll eyes’.”
Rosa was equally impressed by Ayve’s “confidence and depth of knowledge” when presenting Voice O’Tronik, which was written in Python and uses the Google Cloud Speech API.
“Coolest Projects is absolutely not possible to run without project presenters (Ninjas), parents, and volunteers,” Rosa acknowledges. “So to each and every person who contributed: thank you!”
Coolest Projects North America take place in Santa Ana, California on Sunday 23 September. Head to
magpi.cc/izcDmt to register your project or book your ticket.
Hardware category winner Ayve demonstrates her creation: the Voice O’Tronik
The custom PCB and bill of materials are open-source, as is the code, but assembly requires advanced soldering skills – see the GitHub page at magpi.cc/kUvRKn and Andrew Back’s build guide for RS-Online at magpi.cc/uNBJqG. You can see the NSynth Super in action at nsynthsuper.withgoogle.com.
NSYNTH SUPER / COOLEST PROJECTS
News
NOW TRENDING
The stories we shared
that flew around the world
OPENCAT – A ROBOTICIST’S BEST FRIEND?
magpi.cc/mDwiYD
Chinese roboticist Rongzhong Li has created a robot cat, initially from modelling sticks and a Raspberry Pi beginner kit. The latest version is slightly more sophisticated, with voice commands handled by Alexa.
WEBOS COMES TO RASPBERRY PI
magpi.cc/JwocXK
A new version of the legendary Palm creation webOS has been launched for the Raspberry
Pi. Aiming to be ‘web-centric and usability-focused’, the new webOS Open Source Edition is free to download and use.
SOFI THE ROBOT FISH
magpi.cc/sOzulD
Fortunately in no way related to OpenCat, SoFi has been developed by MIT researchers to study marine
life up close, using its fish-eye lens and the internal
Raspberry Pi 2. ypically, software-defined
radio (SDR) requires
specific hardware, but a
German research group from the Technische Universität Darmstadt has found a way to use just a Raspberry Pi 3B+.
Matthias Schulz, Nexmon SDR project lead, tells us, “Broadcom 802.11ac WiFi chips can be turned into general-purpose SDRs and as soon as the Raspberry Pi 3 B+ was
released, I was happy to find such
a chip on such a widespread and cheap platform.”
He says that the 2.4 GHz band is the most interesting, as “there are many communication systems
All you need is a Raspberry Pi
T
WITHOUT THE SDR
SDR
using this band, such as Bluetooth, ZigBee, remote-controlled toy cars, drones.”While Matthias admits that currently, the Nexmon SDR is a proof of concept requiring more development, “the WiFi chip should generally support both SDR-like signal transmissions and receptions.”
The Nexmon SDR project is all open-source, and the code is on GitHub: magpi.cc/MsDyJU. Matthias reminds us that “the transmission of wireless signals is generally regulated,” so ensure you have the correct licence “to build and operate custom wireless devices.”
AboveNexmon SDR doesn’t need any extra hardware for software-defined radio, just a Raspberry Pi B3+
raspberrypi.org/magpi
12 June 2018
News
12 June 2018 raspberrypi.org/magpi
he winners of PA Consulting Group’s annual Raspberry Pi Competition were announced at
the grand final in late April, with three schools
each winning £1000.
This year’s theme was sustainability: ‘to invent something that will help save the planet’. With more than 100 schools applying, there was plenty for the judges – including the BBC’s Rory Cellan-Jones – to consider.
PA Consulting’s Raspberry Pi Competition co-ordinator John O’Neill explains that the projects “are aligned to curriculum activities, so they can help [students] achieve educational goals” as well as being “collaborative and fun”.
For example, students of Ysgol Deganwy school, Conwy, made ‘Recycle Michael’, which reads the barcode of a piece of rubbish and tells you which recycling bin to place it in.
John confirms that the judges “could imagine Recycle Michael being scaled up to appear in offices
and home across the country.”
Next year’s Raspberry Pi Competition will be revealed in September 2018 – you can register your interest now at magpi.cc/nZUmQe.
PA Consulting’s annual Raspberry Pi
challenge roundup
T
SUSTAINABILITY COMPETITION
WINNERS ANNOUNCED
AboveThe students from Ysgol Deganwy school receiving their £1000 prize for winning the Primary School Award category
OMPASS, the ‘spatial data’ system of the City of Saint Paul, Minnesota, might pull in “just under 3TB” of data from 32 live databases, but the system can run on a car-mounted Raspberry Pi 3.
Big data, small hardware
C
TOWN
PLANNING
ON A PI
At GITA 2018, GIS Systems Developer Bob Basques demonstrated how COMPASS overcomes the typical problems of old data or datasets too large to download in the field.
Bob tells us that using a Raspberry Pi allows field workers “to have similar access to the subset of data and tools they need for their job as they would in the office.”
As COMPASS links to data sources, Bob clarifies that “any
of them can break, and the interface just keeps chugging on.”
Bob tells us that COMPASS is built on the GeoMoose open-source project (geomoose.org). Fellow GIS Systems Developer Jim Klassen adds, “We’ve been basically bucking the system for years with our open-source approach. The problem is, the stuff just keeps working.”
The City of Saint Paul currently uses seven COMPASS-loaded Raspberry Pis. Try using the system yourself at magpi.cc/IHOwGb.
Above COMPASS is a sophisticated data visualisation tool that can run on a dash-mounted Raspberry Pi
News
adio frequency engineer Carl Turner decided to test the Raspberry Pi Zero W’s wireless performance, and we’re pretty sure he was impressed by the tiny antenna’s design.
Carl tells us, “There was a lot of buzz about the new antenna. With its small size, and unique design, I was curious about how well it performed.” As senior RF Engineer at Laird Technologies, Carl decided to use Laird’s antenna test chamber to test the Pi Zero W’s wireless antenna.
Carl wrote up his findings on Embedded Computing
Design (magpi.cc/MsYQZP), noting that while he had his doubts about such a small antenna, “overall, I am impressed with the quality of the radiation pattern.”
Comparing the Pi Zero W’s tiny antenna with that of a WiFi router, Carl found that “the Zero W only
concedes 2.25 dB of antenna efficiency while reducing
the maximum antenna dimension by 8×.”
It’s a trap-ezoid!
Carl doesn’t attribute the surprising performance to the trapezoidal shape of the Pi Zero W’s antenna, as while “interesting… the shape of the antenna by itself is somewhat irrelevant.” Instead, he praises
“that the sleek custom design efficiently fits the
limited space”, which “demonstrates the engineering
expertise and design effort” that allows the antenna
to perform well.
Independent RF engineer tests
wireless Pi performance
R
“ DEMONSTRATES
ENGINEERING
EXPERTISE”
PI ZERO W
WIRELESS
ANTENNA
AboveA close-up of the Pi Zero W’s “interesting” trapezoidal wireless antenna
The Pi Zero W is the tiny dot at the centre of this professional-grade antenna test chamber
Images c
ourtes
y
o
f
Jason Olson, Lair
d
Technol
ogies
he Raspberry Pi is an ideal match for home automation projects. It’s got a small footprint, has GPIO pins for input and output, and you can code it yourself.
There’s also a huge range of ideas, projects, and products designed to help you automate your home. Home automation is one of the most popular project areas and new ideas crop up on a daily basis.
All of this makes home automation one of the most exciting areas of Raspberry Pi. We all want to live in the home of the future, where things get done for us smartly and quickly by computers.
In this feature we look at all the different options
available to you, from home sockets, through to controlling lights, doors, and doorbells. We look at installing smart CCTV systems with automatic face detection, as well as automating the sensing and controlling of temperature.
Armed with a Raspberry Pi, and a good idea, you can transform everyday items around the house into smart internet-connected gizmos.
Practical projects that take your home into the future
T
HOME AUTOMATION
WITH RASPBERRY PI
Armed with a Raspberry Pi,
and a good idea, you can
transform everyday items
DOORS AND
DOORBELLS
Use switches with a Raspberry Pi to turn standard doors and doorbells into smart devices. These can send alerts to your mobile phone when a door is opened (or doorbell pushed)
BUTTON PUSHERS
Write code that presses any button in your home with these nifty button pushers
raspberrypi.org/magpi
16 June 2018
POWER SOCKETS
Adding code-controlled power sockets around the home enables
you to turn devices on (or off) and
measure energy usage
INTELLIGENT CAT FLAPS
Make life easier for your kitty by building a smart face-detection
cat flap. It’s a good way to
experiment with face detection and door opening
SMART CCTV
Security cameras are much more intelligent when you use Raspberry Pi face detection
Feature
ontrolling mains devices with a Raspberry Pi can be surprisingly tricky. You really don’t want to get involved with mains electricity unless you know what you’re doing, and internet-connected sockets are locked down to their own apps, deterring the wily hacker. Energenie’s Pi-motes provide a simple and elegant solution, allowing control of Energenie radio-controlled sockets using
a simple add-on that fits straight on to the Pi’s GPIO
header. A few lines of Python later and you’re safely and easily commanding your home appliances.
What makes Energenie’s range of home automation
gizmos interesting is their affordability, and the
embracing of the Raspberry Pi community. The Pi-mote range allows control of Energenie’s sockets and more from any Raspberry Pi.
For this tutorial we’re going to be using the second-generation Pi-mote which allows for two-way
communication and control of more devices. Although we’re only going to be sending data, it may be well worth getting this version of the Pi-mote for
future-proofing your projects. The following instructions are
not suited to the original Pi-mote.
POWER UP
First of all, get your Energenie device and plug it into something interesting. We recommend a power socket
for maximum effect. Other things, such as custard,
may yield disappointing results. Now plug your mains device of choice into the remote-control socket, such as a lamp or fan.
With Energenie’s remote-controlled sockets and Pi-mote, switching
a mains appliance on and off with a Raspberry Pi has never been easier
C
CONTROL
POWER SOCKETS
WITH PYTHON
YOU’LL NEED
Two-way Pi-mote & Remote Control Sockets
magpi.cc/mDZSlS
Lamp, fan, or other suitable
mains device
Spare power socket
CHOOSE THE RIGHT DEVICE
Only certain appliances work well with these sockets. A TV will just go into standby mode, but an LED light strip is perfect.
The device is a simple relay
that controls the flow of electricity, but that doesn’t mean it’s not
dangerous. No fingers!
Pi-mote is a simple add-on, like a HAT, that enables your Pi to
talk via RF radio to the sockets The target appliance needs to be one that requires
no further interaction, like a light or electric fan
raspberrypi.org/magpi
18 June 2018
Feature
PJ EVANS
PJ runs the Milton KeynesRaspberry Jam at The National Museum of Computing, where he also volunteers. His garage
door has an API.
One of the great things about home automation is
that it rarely requires any significant horsepower from
the processor, so these are great projects for any older Raspberry Pi devices you have lying around and are especially suited to the Zero W. Everything will work with your overclocked 3B+, but it may be overkill.
PLUG IN
The Pi-mote connects like a HAT, but only has 26 connectors, so it’s important to attach it correctly.
(Bonus: this means it’s compatible with the first
generation of Pi boards.) Line up the Pi-mote so the antenna runs parallel with the GPIO header, with the Pi-mote covering the main Pi board, and connect to
the first 26 pins of the GPIO. Now get yourself to a
command line and we’re ready to go.
Although the Pi-mote uses SPI to communicate with your Pi, the software does not use the hardware implementation. If you have previously enabled SPI,
disable it now using raspi-config. If you are working
from a clean image or haven’t the faintest idea what we’re talking about, carry on.
Although Energenie has official software for Python,
it is based on a project by David Whale who has been making constant improvements, so we’re going to be brave and use his code.
We’ll use Git to download the latest version. If Git is not already installed, run the following command:
sudo apt install git
Now let’s download the code to your home directory:
cd
git clone https://github.com/whaleygeek/ pyenergenie
SWITCH ON
Place the socket into learning mode by pressing and
holding the green button for five seconds until it starts to flash. Now run:
sudo python ~/pyenergenie/src/setup_tool.py
Select ‘Legacy Learn Mode’ from the main menu. When prompted for the house code, press ENTER, then 1 for the device index. As soon as you press ENTER
again, your lamp/fan/powered-hamster-wheel should
spring to life and then turn off again. CTRL+C will bring you back to the menu; pressing it again will quit the program. Your socket is now trained to be device 1.
To use the socket in your own apps, there is a gotcha. The ‘energenie’ Python library and the support in gpiozero are for the older board and will not work here. Instead, reference the energenie library used by the code you’ve just downloaded. It lives in ~/pyenergenie/src/energenie. To get you
started, create a new file in ~/pyenergenie/src/ called testlight.py and add the following code:
import energenie, time energenie.init()
device = energenie.Devices.MIHO008((None, 1)) device.turn_on()
time.sleep(1) device.turn_off() energenie.finished()
Save and run as follows:
sudo python ~/pyenergenie/src/testlight.py
Your light should switch on then off. Now you have the
building blocks for your own cool automation projects.
GET THE
We’ve looked at controlling sockets in the tutorial,but our Pi-mote is a two-way device. Energenie
also offers remote-control sockets that relay usage
information back to the Raspberry Pi. With a little code, you can start monitoring electrical usage around the home.
Many electricity suppliers offer monitoring
solutions, such as the CurrentCost range of products (currentcost.com). These combine a home display with a Bluetooth-connected sensor attached around the main feed to the meter. With a bit of tinkering,
you can hook the receiver’s data stream to a
Raspberry Pi and get consumption data for the entire house, all without going anywhere near the actual supply (magpi.cc/UmBiUE).
If you’re really serious or need some
industrial-grade kit, OpenEnergyMonitor (openenergymonitor.org) has you covered. It
provides a range of professional devices that monitor power, solar PV, heat pumps, and more.
Although many other projects exist, some involve a form of direct connection to the mains
supply. Unless you’re a qualified electrician, we
would not recommend these. Try to keep all your personal electrons in roughly the same place.
This little circuit adds a two-way radio to the Raspberry Pi for sending commands and receiving data
Feature
Detecting the opening of any
kind of door is made easy
using security reed switches
dding sensors to household items like doors and doorbells is straightforward and safe. Once the sensor is triggered, the resulting actions are only limited by your imagination. Want a door opening to switch on a lamp, trigger the washing machine, and send a text message to the cat? Go for it!
Anything that opens and closes can be easily detected using inexpensive home-security reed switches. Connecting these switches to a Raspberry Pi is about as
Detecting doors opening and
doorbells ringing are building
blocks for a lot of fun
A
MONITOR
DOORS
AND DOORBELLS
simple as it can be. Doorbells are a little more tricky, but there are a few options we can explore.We’re often a bit absent-minded about leaving the garage door open. Your humble writer also uses noise-cancelling headphones, and regularly leaps out of the seat as someone taps him on the shoulder. The solution is to monitor both doors.
Detecting the opening of any kind of door is made easy using security reed switches. These are commonly found as part of alarm systems. Best of all, they are very cheap. You will have two parts, one wired and one not. The unwired part is a simple magnet. This should be connected to the window itself rather than the frame; that’s where the wired part goes. Inside is a simple reed contact switch. Normally the switch is
open, so no electricity flows through. When the magnet
comes close (typically within a few centimetres), the switch closes. So, the switch opening equals the door or window being opened. You can now react as you please.
Such is the elegant nature of this project that we don’t even need a physical circuit to monitor these
YOU’LL NEED
Wired Security Reed Switches
magpi.cc/ cdqwOm
Door or window (or anything that opens) Doorbell
A very simple circuit. We
don’t even need a resistor
This is just to make connection easy when prototyping
The wired section contains a reed switch which is changed by the presence of the magnet inside
the second section
raspberrypi.org/magpi
20 June 2018
types of switches – we can connect them directly to the GPIO. That said, don’t go around sticking sensors
to all your door frames just yet; let’s prototype first. Off-the-shelf security reed switches typically
come with bare wire endings and are quite short, so you may need to extend them. Use a breadboard or solder on some connectors to make it suitable for connection to the GPIO. We found some spare jumper-jerkies and soldered the wires together for testing, but used a 3.5 mm stereo plug and socket for
the final project.
Our switches are not polarity-sensitive, so choose one wire and connect it to any ground (GND) pin of the GPIO. Connect the second wire to GPIO17 (physical pin 11). Why 17? Why not? You can use any available switchable GPIO pin you wish.
Now, in your favourite code editor, create door.py and add the code from the listing.
The script expects the door to be closed when starting, so place the magnet alongside the switch and start the script.
python door.py
Move the magnet away from the switch. If all is well, ‘Open’ will appear on the screen. Move it back and you’ll see ‘Closed’.
MONITOR ALL THE THINGS
You now have everything you need to detect anything that can open inside a frame. What you do next is up to you. For the garage door, our code waits until it
has been open for over five minutes and then uses
Pushover (an email-to-mobile alerting service for
iOS and Android) to deliver alerts. For the office, the
immediate opening of the door triggers an LED light
on our desk, hooked up to a different GPIO port.
DING, DONG!
To incorporate doorbells into your project, use a simple switch like the reed switches. Pressing the doorbell will cause the GPIO input to report ‘false’ (as we are using pull-up resistors) and you can react as you wish. If you have a wired-in doorbell and want to detect whether someone is at the door, you can also piggyback onto the existing circuit, but check what kind of voltages are in use as you might fry your Pi. Alternatively, wireless door chimes can be easily and safely hacked to detect activation, meaning you can put the Raspberry Pi wherever you wish within range.
Ever since the launch of the Pi
Camera Module and PiNoIR, the
Raspberry Pi has seen its fair share of camera projects. With their diminutive size, low cost, and frugal power requirements, Raspberry Pi devices are the perfect candidates for home security camera projects.
Whether it’s pet cams, baby
monitoring, wildlife or good
old-fashioned security, there’s something
out there for you.
As well as many 3D-printable
cases, there’s a wide range of
professionally made options to ensure watertight operation and even
standard cases like the official Pi Zero case offer a housing for the Pi Camera Module. It’s also straightforward to
take a standard CCTV housing and adapt it to the Raspberry Pi, as there tends to be lots of space.
For software you’re spoilt for
choice. Simple time-lapse recording can be done from the command line,
and more complex operations can be provided by dedicated operating systems such as motionEyeOS. For the more advanced user, image-recognition packages such as OpenCV have a
steep learning curve but offer a level of technology and AI not seen in
off-the-shelf CCTV packages.
Here are three online examples that may interest you:
How I set up a CCTV camera with Raspberry Pi Zero W and
motionEyeOS image for home surveillance – magpi.cc/hhutzr
Smart Security Camera: CCTV with OpenCV Face Detection –
magpi.cc/YweRuh
Multiple security camera setup using Raspberry Pi –
magpi.cc/HEjuIL
door.py
import RPi.GPIO as GPIO, time
# Use Pin 11 (GPIO17) GPIO.setmode(GPIO.BCM)
GPIO.setup(17, GPIO.IN, pull_up_down=GPIO.PUD_UP) # Default door state
isDoorOpen = False
# What was the previous state? (For detecting a change) lastDoorState = False
# Loop forever
print("Monitoring")
while True:
BUILD A SMART CCTV SYSTEM
Feature
art of the fun of home automation is taking something that you wouldn’t normally
associate with the internet, such as a coffee
machine, toaster or Great Aunt Hilda, and making it better. There’s plenty of opportunity to add in sensors all over the house.
The sensor used in this project is amazingly accurate and very inexpensive – ours was less than £2. It uses the 1-Wire data protocol, which is well supported by Python.
Adding a temperature sensor and
a Raspberry Pi to your tropical
tank could save fishy lives
P
MAKE A
SMART
FISH TANK
Our project will take regular temperature readings with the ability to raise alerts as required. The sensor works just as well out of water, so can be used for any environmental monitoring purpose. Please note, although waterproof, it is not suitable for a marine (i.e. saltwater) tank.
The data line requires a pull-up resistor to work correctly, so let’s build a simple circuit (see left). The wire screening of the sensor does not need to be connected, just the three wires: power, ground, and data.
WIRE UP 1-WIRE
Support for 1-Wire now needs to be enabled in
Raspbian. We can use the raspi-config app to do this.
sudo raspi-config
Select Interfacing Options, then 1-Wire, then Enable. You can now exit. There’s no need to reboot.
Each sensor has a unique device ID and we need to discover ours to check it’s working. First, let’s tell the operating system that we’re going to be using 1-Wire and in particular the thermistor.
sudo modprobe w1-gpio sudo modprobe w1-therm
You should not see any response from these commands. That’s no problem.
YOU’LL NEED
This newly released OS transforms thePi into an Internet
of Things gateway capable of controlling a wide range of devices, including wireless lights (requires USB
add-on). It also provides
an infrastructure for devices to communicate with each other over the internet.
iot.mozilla.org
Connect to Pin 1 (3.3 V), Pin 6
(GND), and Pin 7 (GPIO4) as shown
The sensor can live within the filtration system, but make sure the Raspberry
Pi doesn’t get wet!
A 4.7 k Ω resistor ‘pulls
up’ the data line, creating a
steady data stream Connect the three lines (power, data and ground) to
the GPIO, leaving enough
space for a resistor
The sensor used
in this project is
amazingly accurate
raspberrypi.org/magpi
22 June 2018
cd /sys/bus/w1/devices/ ls
You’ll see a directory that starts with ‘28-’; that’s our device. Change directory (tip: type in cd 28- then hit TAB to fill out the rest) and enter the following:
cat w1_slave
Press ENTER and check the output. Look at the second line; the last part will start ‘t=’. The following number is the current temperature × 1000, the maximum accuracy.
79 01 ff ff 7f ff ff ff 2a : crc=2a YES 79 01 ff ff 7f ff ff ff 2a t=23562
In this example, the temperature is 23.562ºC.
A SNAKE IN THE TANK?
To use Python with the sensor, we need to install a library written by Timo Furrer:
sudo apt-get install python-w1thermsensor
Create a file called temp.py and add the following:
from w1thermsensor import W1ThermSensor
sensor = W1ThermSensor()
W1ThermSensor.DEGREES_C, W1ThermSensor.DEGREES_F, W1ThermSensor.KELVIN])
print(temperature_in_celsius)
Note: So the 1-Wire modules load automatically, any Python code using W1ThermSensor must be run as root by using sudo.
sudo python temp.py
THE GOLDILOCKS LOOP
Now we can create a temperature monitor that checks every 15 minutes. A tropical aquarium needs to
remain between 21ºC and 27ºC to avoid the fish taking
strike action.
from w1thermsensor import W1ThermSensor from time import sleep
sensor = W1ThermSensor() upperThreshold = 27 lowerThreshold = 21
while(True):
temperature = sensor.get_temperature() print('Current temperature: ' + str(temperature))
if (temperature > upperThreshold ): print('Too hot')
elif (temperature < lowerThreshold ): print('Too cold')
else:
print('Just right') sleep(900)
When it is too hot or too cold, you can add code to trigger alerts such as emails and SMS messages using services such as Twillio, or even make a sound or illuminate a sign.
As it turned out, after a few months of running this code, the new heater failed as well. This time we were alerted as soon as the temperature went out of range. Unfortunately, we were on holiday at the time so had to contact a neighbour to ask them to go to
our house and switch off the offending device. So, to
complete the loop, we’ve added an Energenie remote control socket:
if (temperature > upperThreshold): print('Too hot')
# Shut down the heater energenie.init()
device = energenie.Devices. MIHO008((None, 1))
device.turn_off() energenie.finished()
Now, when the temperature goes out of range, the
fish are instantly saved from an unwelcome spa day.
Keep an eye on the tank at mrpjevans.com/fish.
CHECK OUT:
ANDROID
THINGS
Buildprofessional-grade IoT controllers
and devices using the Android OS. A development package is now available for the Raspberry Pi. The website features a wealth of information on making your own
IoT devices. version of Windows 10 is optimised for ARM processors and is designed for building commercial
IoT devices. As well a host of tools for IoT
development, some interesting Windows technologies such as Cortana are also included. Take a look at The MagPi issue #48 (magpi.cc/48).
magpi.cc/fcLsNm
Here’s the assembled test circuit. For final installation,
DIGITAL HOME
PROJECTS
THE TEA-TIME KLAXON
Your writer has a teenager.
It likes to sit in its room with
headphones studying (read: gaming) for long periods of
time. Any yelling of “DINNER!”
goes unheard. James West had a similar problem, so he came up with a novel solution.
magpi.cc/XnQavf
SMART LIGHTS
ON THE CHEAP
Smart lights are refreshingly inexpensive projects. With the optional £25 gateway, the
whole ZigBee network becomes
accessible to your Raspberry Pi. Our friends at Pimoroni have an excellent tutorial on controlling your lights in Python.
magpi.cc/eSrhME
PUSHING THE LIMITS
Some devices require human interaction to work. This fun device is an internet-connected button-pusher. Now, from anywhere in
the world, you can start the coffee
machine. Using Prota OS, your Raspberry Pi can trigger it too.
magpi.cc/DfawIo
BE ENVIRONMENTALLY
FRIENDLY
The Enviro pHat from Pimoroni is an all-singing, all-dancing collection of sensors measuring temperature, pressure, light colour, and motion.
It even has analogue inputs. Specially sized for the Pi Zero, it’s
ideal for monitoring projects in small spaces.
magpi.cc/AZrQwO
raspberrypi.org/magpi
24 June 2018
KITTYCAM –
SMART CATS!
‘Smart’ cat flaps are nothing
new, and work by detecting
the cat’s identification
microchip to allow entry.
Tomomi Imura’s solution
takes things a stage further
with a PIR detector plus
actual cat facial recognition
to power a cat-cam!
magpi.cc/wAeqvn
IFTTT
An essential for anyone wanting
to automate processes, IFTTT (‘If This Then That’) allows you
to create behaviours by linking
together different technologies and services. It makes adding
voice control using Alexa or others a breeze.
ifttt.com
DON’T FORGET THE CAR
Many modern vehicles come with GSM radios and can relay data to the cloud. This project accesses data from a Nissan LEAF, which it can then use to trigger events. Arrive home and get the tea on with a MicroBot Push?
magpi.cc/BYMAlS
COUNT YOUR
CHICKENS
A very popular post from the Raspberry Pi archives
that set off of a wave of
automated chicken coops across the world. When your chickens need to be locked in every night, why not automate it?
magpi.cc/NlleLU
PINGIN’ IN THE RAIN
There are many automated garden irrigation projects to be investigated. This one, by
Ben Fino, uses an API call to a
weather service to determine whether it has rained recently. Others use rain detectors to record rainfall duration to prevent unnecessary wastage.
magpi.cc/lroEhD
WHOLE-HOUSE
SURVEILLANCE
A full CCTV rig is normally an expensive proposition and typically locked down to the
manufacturer’s services. Julian Silver’s ambitious project uses four Pi Zeros
with Pi Cameras governed by a Pi 3 which records all the incoming streams.
magpi.cc/FuUFKl
Feature
Tutorial
WALKTHROUGH
SUBSCRIBE TODAY
FROM JUST £4
raspberrypi.org/magpi
26 June 2018
Pricing
Rolling Subscription
£4 a month
Quick and easy to set up
No long-term commitment
Subscribe for a year:
£55
(UK)
£80
(EU)
£90
(USA)
£95
(Rest of World)
Subscription benefits:
FREE!
Delivery to your door
E
XCLUSIVE!
Raspberry Pi offers and discounts
NO OBLIGATION!
Leave any time
*magpi.cc/subscribe
SAVE
35%
UP TO
* Leave any time applies to Rolling Subscription only
MODMYPI
VOUCHER
£5 FREE!
Tutorial
Subscribe in print for
12 months today and
you’ll receive:
Pi Zero W
Pi Zero W case
with three covers
USB and HDMI
converter cables
Camera Module
connector
JOIN FOR 12 MONTHS
AND GET A
SUBSCRIBE ON
APP STORES
PI ZERO W
STARTER KIT
FROM
£2.29
WORTH
£20
raspberrypi.org/magpi
28 June 2018
any people remember their
first car, but very few will keep hold of it for decades. Then again, not everyone is like Jim Belosic, a vehicle modder who saw great potential in his 1981 Honda Accord. Rather than sell it, he decided to bring it into the 21st century. And that meant fitting it with an electric motor from a salvaged Tesla Model S P85.
“I’ve been wrenching on something since I can remember,” Jim says. “So turning the Accord into an electric car seemed like a good way of keeping it around for the nostalgia. I also figured that if I want to be able to modify cars in the future, I’d better learn
Projects
SHOWCASE
Jim Belosic and Michael Mathews have turned a Honda Accord
into a hot rod gasser – powered by electricity and a Raspberry Pi.
David Crookes
gets up to speed
> The car is will be licensed for others one of these switches. Power switch functionality comes via Petroblock’s PowerBlock. Keyed input allows for proper boot and shutdown to ensure file integrity
TESLONDA
The car is still driven using the accelerator and brake pedals, but the Pi makes use of data from the Tesla motor’s custom controller provided by HSR Motors
M
The Pi 3, which is wired directly to a 5 V DC-to-DC converter, displays on a Raspberry Pi 7-inch touchscreen with a resolution set
at 800×600
JIM BELOSIC
& MICHAEL MATHEWS
Jim is the CEO and co-founder of the digital marketing platform ShortStack, and Michael is one of the lead software engineers at the company. Both love modding cars.
magpi.cc/uRHPfq
everything I can about these kinds of vehicles now.”
The work involved replacing the steering and suspension system and moving to a straight-axle front end to accommodate the battery pack. Jim also added some drag-race tyres. “It gave the car a ton of character,” he says. But what makes the car rather special for us is Jim’s integration of a Raspberry Pi 3. This was carried out by his car-modding and software-developing friend, Michael Mathews.
Motor monitoring
As well as powering the electronic dash, the Raspberry Pi allows for feedback and configuration of the
motor hardware. It can constantly monitor the temperature levels of the batteries and motor to ensure the car is not being overexerted, and it can be used for both traction control and to change the voltage and amperage levels to the motor.
Projects
TESLONDA
>STEP-01
Booting up
When the Teslonda’s Raspberry Pi 3 boots, it opens with a fun 1980s-style video-game sequence. The
theme fits the 1981 vintage of the Honda Accord.
“It needed to look fun,” says Michael.
>STEP-02
High scores
There’s a high score table of the fastest 0 to 60. “I did some research on what early 1980s digital dashboards looked like and found my inspiration – a Mitsubishi Cordia 1982 digital dash.”
>STEP-03
Dashing dash
The dash shows the speed, gear, voltage, amp, temperature, power, and more. “I wanted the driving experience to feel like you’re at the arcade. There’s also a ‘Continue?’ countdown when the Tesla motor
is turned off.”
LET’S GO, MR DRIVER
One main goal was to make it semi-portable so that it could be stuffed into another project without much rework. “I also wanted to allow any device to connect to it via WiFi through a web server, and it needed the ability to monitor, control, and log data on the back end through a web app,” Michael continues.
Canvas frames
To achieve all of this, Michael grabbed a pencil and paper to draw his desired UI and design flow. He opted to use the Chromium browser in its kiosk mode running an accelerated
Canvas, and he wanted the back end to listen to data from the motor’s controller for incoming messages using a Node.js server via a WebSocket. At first, he had problems with the visual performance since he was getting below 20 frames per second and heavy spikes of lag.
He solved this by using a ‘frame’ to only get the back end to send the most updated data rather than every single message. He also minimised browser reflows, and enabled Canvas acceleration by turning on every relevant flag
on Chromium. By making sure Canvas would only draw when something updated, and erased only what was dirty, he could maintain 45 to 60 fps on the dash.
The result is amazing. Turn the car on, flick a switch to activate the dash, and the Pi 3 boots with a fantastic display that’s reminiscent of a 1980s arcade game. It shows the speed, battery voltage, charge, and temperature, among other attributes. “I’ll soon be hooking up a GPS to assist with logging, acceleration, and G-force readings as well,” Michael reveals. “And that’s the only problem: I now want to do so much more.”
The Pi 3 boots with a fantastic
display that’s reminiscent of a
1980s arcade game
The Teslonda is a cross between a 1981 Honda Accord, a Tesla Model S P85, and a 1960s gasser-style dragster. And it’s extremely quick
raspberrypi.org/magpi
30 June 2018
ith this amazing Pi-infused camera, there’s certainly no shaking like a Polaroid picture. Instead, Tim Jacobs has
done away with film entirely, so
rather than instantly output white-bordered glossy pictures as per the original, it prints the results on the kind of thermal paper typically used for receipts.
Not only does this make for cheaper photography – “instant
Tim rewired this flash connector to allow a USB serial adapter to be plugged in, enabling communication with the Pi Zero without having to disassemble the camera
Projects
SHOWCASE
When Tim Jacobs sought to save money by creating an instant camera
using inexpensive thermal paper, he didn’t realise saving time was
also a priority.
David Crookes
reports
> A Polaroid
paper fits 300
to 400 images
Tim Jacobs is a coding and electronics guru who has created a large number of software and hardware projects. This is his first serious Pi project.
magpi.cc/OejcSh
film is hugely expensive: more than £1 per shot,” Tim explains
– it retains the original premise thought up by scientist Edwin Land,
who unveiled the first commercial
instant camera back in 1948.
For Tim, however, it was a chance to finally put a long-held
idea of his own into practice. “The noise that thermal printers make when they spit out receipts reminds me of instant cameras and
I’d always wanted to use one for that purpose,” he says.
Using Linux
To achieve his dream, Tim bought
the smallest thermal printer he
could find (an LESHP model with
built-in Bluetooth and support
for USB and RS232). He also made
use of an old Polaroid camera, a
Raspberry Pi Zero, and a £1.99 webcam (“the printer is only 384
THERMAL PAPER
POLAROID
raspberrypi.org/magpi
30 June 2018
To make room for the printer, everything within the front mechanism had to be gutted. The project involved a lot of drilling and cutting
Projects
THERMAL PAPER POLAROID
>STEP-01
Strip it down
The Polaroid needs to be gutted, but there’s only one screw in sight. “The number of intricate interlocking injection-moulded parts boggles the mind,” says Tim. Even the lens had to go.
>STEP-02
Prepare the components
The printer and webcam were also stripped, the
latter being focus-fixed to two metres. Before using
the Pi, Tim considered (then rejected) reprogramming the ARM Cortex M0 chip on board the thermal printer.
>STEP-03
Assemble the camera
The thermal print head took ten hours to fit; the
webcam and Pi much less time. Some of the Pi’s GPIO pins were wired to the shutter switches, and the camera works with a single button press.
TRANSFORM A
POLAROID CAMERA
pixels wide so, in terms of image
quality, a better camera wouldn’t
make much difference”). From
that point on, “it was 90 percent
experimenting and 10 percent shoving it into a pretty case.”
Before getting close to assembling the camera, Tim wanted to make sure he could actually get the printer
to work with Linux. “It couldn’t have been easier, it almost felt like
cheating,” he laughs. Getting it to print images directly from the
webcam without mangling was more
difficult, though. “It consumed
more than an entire roll of paper.”
But he persevered and eventually proved successful. He could then turn his attention to the Raspberry Pi Zero, a decision based on the
small size of the computer and the large size of the community.
“Almost every problem you encounter will have been solved
and documented by someone already,” he says. “Besides, when
it comes to small Linux boards, Raspberry Pi is king.”
Boot times
Tim’s main challenge was to reduce the boot time so that the camera would be ready to take a shot within seconds of it being picked up. Ideally, he wanted to be able to put the processor to sleep
and have it wake instantaneously;
with the Raspberry Pi unable to do this, however, he sought to shave many seconds off the boot time instead. He found that shooting, converting, and printing was also
slow, initially taking 40 seconds from boot to result.
To solve this, he used buildroot to create a custom, bare-bones Linux image that contained everything
the camera needed and nothing it did not, cross-compiling it into a minimal image. It took a long
time to crack, but he managed to get the boot time down to just two seconds. Little tricks also sought to
save small amounts of time, such as disabling the HDMI splash screen and preventing kernel messages
being dumped to the serial port
when the Raspberry Pi was booted.
When the components were placed into a dismantled Polaroid
camera bought off eBay, it worked a treat. A USB hub was used to
connect the webcam and printer and the process of assembly ensured that, from the outside, it looked like a normal camera. “There was cutting, drilling, and gluing dappled with the occasional bout
of soldering,” he explains. It was
then ready to take a shot. “The only thing it lacks is the row of metal
teeth that would let people tear off the picture after taking it. I’ll have
to add that sometime.”
When it comes to small Linux
boards, Raspberry Pi is king
raspberrypi.org/magpi
32 June 2018
hat do you do when your toddler keeps pressing all the buttons they can
find in the house? As a skilled
maker – known for creating the MagicMirror2 framework (magicmirror.builders) – Michael Teeuw opted to create a high-tech activity board based around a Raspberry Pi 3 for his two-year-old son Enzo.
Activity boards can create visual, tactile, and auditory stimulation
for young children. Michael had seen other activity boards on the
maker scene and, over the period of approximately one year, he built
his own version complete with light
effects, audio, an eight-digit display,
and plenty of buttons and switches. “Every few weeks I added
something new,” recalls Michael.
“Enzo was there all along the way. It was fun to see him discover the new additions whenever I added them. You’ll be surprised how quickly a
two-year-old picks things up.”
Child’s play
Enzo has already figured out how
to turn the rotary encoder knob – lit up impressively by a NeoPixel ring – to switch between his favourite TV cartoon characters shown on the screen. “Every input
(buttons, switches, rotary encoder, slider pot) creates a different
Projects
SHOWCASE
Inspired by his young son’s interest in bright
lights and buttons, Michael Teeuw decided to
build a child-friendly activity board.
Nicola King
finds out more…
> It uses a Pi 3 and Arduino Nano
> The UI is run using MagicMirror2 > Different
inputs result in
different effects
> NeoPixel LEDs light the way!
> Toddler-friendly and easy to use
Quick
Facts
ENZO’S
ACTIVITY
BOARD
W
Enzo turns the NeoPixel-lit knob to switch between TV cartoon characters shown on the screen
MICHAEL TEEUW
A Netherlands-based maker, Michael builds things both for work and pleasure.
michaelteeuw.nl
A classic eight-digit display can be used as a countdown timer
Projects
ENZO’S ACTIVITY BOARD
Above Lit up like a Christmas tree, the board is placed at toddler height in a storage unit
light effect,” explains Michael. “Combinations of different inputs result in different effects. So for every action, there is something
for Enzo to enjoy. It will probably take some time before Enzo has
discovered all the combinations.”
Giving Enzo’s Activity Board a classic mission-control look,
the eight-digit display acts as a countdown timer which can be started by toggling one of the two main switches. “Whenever
it reaches zero, the activity board will self-destruct. But for now, the
self-destruction sequence isn’t
fully implemented yet!”
Magic Mirror
Driven by the Raspberry Pi, the Activity Board’s central display
shows a user interface that makes it more than just a box with lights and buttons. “It allows me
to add features in the future,” says Michael, “and is an easy
>STEP-01
Bits and pieces
Laying out all the components – buttons, switches, screen, NeoPixels, etc. – on a piece of paper enabled Michael to
visualise the final board layout and see
how much space was required.
>STEP-02
Cut the front panel
A transparent panel was required for the front of the Activity Board, so Michael created a bespoke design using the Fusion 360 package, then laser-cut it from a 4 mm acrylic sheet and engraved it.
>STEP-03
Wire it all up
After mounting the front panel on a wooden box, the screen was connected to the Raspberry Pi, while all the inputs were wired to an Arduino Uno-based control board.
BUILDING AN ACTIVITY BOARD
way to add sound effects to the project.” Rather than using the Raspberry Pi’s own audio output, he elected to add an Adafruit Speaker Bonnet.
For the UI, the Raspberry Pi runs
a default MagicMirror2 installation
with a custom module. “This module’s node-helper reads out the serial input and sends it to the MagicMirror front end (which is a web application running
on Electron).”
This user interface responds to the input it receives from an
Arduino Nano-based control
board which handles all the input
(buttons, switches etc.) and output (NeoPixel LEDs, digital display).
“The lights and input are
all controlled by [the Arduino board], which sends a serial JSON
command to the Raspberry Pi
whenever there is new input,”
reveals Michael. This separation
of tasks means that the Activity
Every input (buttons, switches,
rotary encoder, slider pot)
creates a different light effect
Board’s light effects can still
function without the Raspberry Pi. Young Enzo helped his father throughout the build process. “His enthusiasm for every update I showed him helped a lot in
finishing the project.” As Enzo gets older, Michael
plans to expand the functionality of the board by adding new user
interfaces. “Hopefully, one day he’ll be able to add his own UI.” Michael tells us he is still
fine-tuning the software. “Like every
piece of code, both the embedded
code as well as the MagicMirror2 module contains some bugs. It’s up to Enzo to discover the bugs