5
Managing Databases,
Tables, and Indexes
In the first four chapters of the book, you were provided with the information necessary to install and use MySQL and design relational databases that could be implemented in MySQL. You were also provided with a foundation in the principles of SQL and the relational model. From all this information, you should now have the background you need to begin creating databases and adding the objects that those databases should contain.
The first step in setting up a MySQL database is to create the actual database object, which serves as a container for the tables in that database. The database acts as a central point of administration for the tables in the database. The actual data is stored in the tables, which provide a structured organization for the data and maintain the integrity of that data. Associated with each table is a set of indexes that facilitate access to the data in the tables.
In this chapter, you learn how to create and manage the database object, the tables in the database, and the indexes associated with the tables. To provide you with the information necessary to perform all these tasks, the chapter covers the following topics:
❑ How to create a database and specify a character set and collation name for that database. You also learn how to modify database properties and remove a database from your system.
❑ The information necessary to create a table, define columns in that table, add constraints to the table, create indexes on the table, and specify the type of table to be created.
❑ Information about the various types of indexes that you can add to a table, how to add indexes to a table, and how to remove an index from a table.
❑ How to retrieve information about databases and tables so that you can see what databases and tables exist and how those databases and tables are configured.
Managing Databases
that when you add a database to MySQL, a corresponding subdirectory is automatically added to the data directory. Any tables added to the database appear as files in the subdirectory. If you then remove a database, the corresponding subdirectory and files are also deleted.
As you can see, the first step in setting up a database in MySQL is to create the database object and, subsequently, the corresponding subdirectories. From there, you can modify the database definition or delete the database. This section discusses each of these tasks.
Creating Databases
Creating a database in MySQL is one of the easier tasks that you’re likely to perform. At its most basic, a database definition statement requires only the keywords CREATE DATABASE, followed by the name of the new database, as shown in the following syntax:
<database definition>::=
CREATE DATABASE [IF NOT EXISTS] <database name> [[DEFAULT] CHARACTER SET <character set name>] [[DEFAULT] COLLATE <collation name>]
As the syntax shows, very few components of the CREATE DATABASEstatement are actually required. The statement does include several optional elements. The first of these —IF NOT EXISTS— determines how MySQL responds to a CREATE DATABASEstatement if a database with the same name already exists. If a database already exists and the IF NOT EXISTSclause is not used, MySQL returns an error. If the clause is used, MySQL returns a warning, without returning any errors. Regardless of whether the clause is included in the statement, the effect on the database is the same: If a database with the same name exists, no new database is created.
The next optional components of the CREATE DATABASEstatement are the CHARACTER SETclause and the COLLATEclause. You can specify either one of the two clauses or both. (The DEFAULTkeyword is optional in either case and has no effect on the outcome.) The CHARACTER SETclause specifies the default character set to use for a new database, and the COLLATEclause specifies which default collation to use. Acharacter set is a collection of letters, numbers, and symbols that create the values in a database. For example, A, B, C, a, b, c, 1, 2, 3, >, +, and * are all part of a character set. Acollationis a named sorting order used for a specified character set. Collations define the way in which values made up of a particular character set are compared, sorted, and grouped together. Most character sets have one or more collations associated with them. For example, some of the collations associated with the default character set,
latin1, include latin1_bin, latin1_general_ci, and latin1_swedish_ci, which is the default collation. If you do not specify the CHARACTER SETor COLLATIONclause, the database uses the default MySQL character set or collation.
You can view the character sets and collations available in your system by executing the SHOW CHAR-ACTER SETand SHOW COLLATIONstatements in the mysql client utility. Also note that character sets and collations affect only string data (letters, numbers, and symbols), as opposed to all numerical data or data related to dates and times.
CREATE DATABASE BookSales;
When you execute the statement, a database named BookSales is added to your system. The database uses the default character set and collation because you specified neither.
When you create databases and tables in Windows, all names are converted to lowercase. Because Windows filenames and directory names are case insensitive, it follows that case is not a factor when specifying database and table names. In Linux and other Unix-like operating systems, the case is preserved. Because filenames and directory names are case sensitive, you must specify the correct case when referencing database and table names.
In the next example, the CREATE DATABASEstatement specifies the character set and collation:
CREATE DATABASE BookSales DEFAULT CHARACTER SET latin1 DEFAULT COLLATE latin1_bin;
In this example, the CHARACTER SETclause specifies the latin1character set, and the COLLATEclause specifies the latin1_bincollation. In both cases, you use the DEFAULTkeyword, but it isn’t required. Executing the statement creates a database named BookSales, which uses the specified character set and collation.
In the Try It Out sections in Chapter 4, you created a data model for the DVDRentals database. In the Try It Out examples in this chapter, however, you create the database based on that model. Later in the chapter, you create the tables in the DVDRentals database.
Try It Out
Creating the DVDRentals Database
To create the database, follow these steps:
1.
Open the mysql client utility, type the following command, and press Enter:CREATE DATABASE DVDRentals;
You should receive a message indicating that your statement executed successfully.
2.
In order to create tables or execute any statements in the context of the new database, you should switch over to that new database by using the following command:use DVDRentals
You should receive a message indicating the database change.
How It Works
Modifying Databases
There might be times when you want to change the character set or collation used for your database. To do this, you can use an ALTER DATABASEstatement to specify the new settings. As you can see from the following syntax, the ALTER DATABASEstatement is similar to the CREATE DATABASEstatement:
ALTER DATABASE <database name>
[[DEFAULT] CHARACTER SET <character set name>] [[DEFAULT] COLLATE <collation name>]
In this statement, you must specify the ALTER DATABASEkeywords and the name of the database, along with the CHARACTER SETclause, the COLLATEclause, or both. For either clause, simply specify the name of the character set and collation. For example, to change the character set to latin1for the BookSales database, use the following ALTER DATABASEstatement:
ALTER DATABASE BookSales CHARACTER SET latin1;
As you can see, the statement specifies only a CHARACTER SETclause, which means the current collation remains the same.
Use caution when changing the character set for a database. In some cases, changing the character set can result in the database no longer supporting all the characters stored as data in the database.
Deleting Databases
Deleting a database from your system is merely a matter of executing a DROP DATABASEstatement. The following syntax shows the components that make up the statement:
DROP DATABASE [IF EXISTS] <database name>
The statement requires only the DROP DATABASEkeywords and the name of the database. In addition, you can specify the IF EXISTSclause. If you specify this clause and a database with that name doesn’t exist, you receive a warning message rather than an error. Now take a look at an example of the DROP DATABASEstatement:
DROP DATABASE BookSales;
This example removes the BookSales database from the system. When you remove a database, you also remove the tables in that database and any data contained in the table. As a result, you want to be extremely cautious whenever you execute the DROP DATABASEcommand.
Managing Tables
Creating Tables
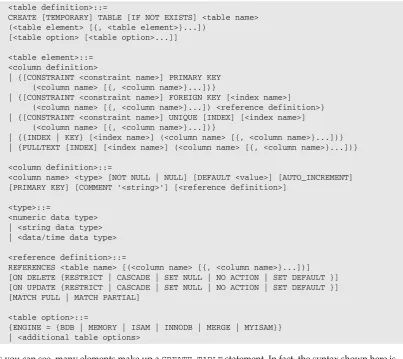
To create a table in MySQL, you must use the CREATE TABLEstatement to define the columns in the table and configure the appropriate constraints on the table. The CREATE TABLEstatement is one of the most complex SQL statements in MySQL. It contains numerous components and provides many options for defining the exact nature of a particular table. The following syntax represents the elements that make up a CREATE TABLEstatement:
<table definition>::=
CREATE [TEMPORARY] TABLE [IF NOT EXISTS] <table name> (<table element> [{, <table element>}...])
[<table option> [<table option>...]]
<table element>::= <column definition>
| {[CONSTRAINT <constraint name>] PRIMARY KEY (<column name> [{, <column name>}...])}
| {[CONSTRAINT <constraint name>] FOREIGN KEY [<index name>] (<column name> [{, <column name>}...]) <reference definition>} | {[CONSTRAINT <constraint name>] UNIQUE [INDEX] [<index name>]
(<column name> [{, <column name>}...])}
| {{INDEX | KEY} [<index name>] (<column name> [{, <column name>}...])} | {FULLTEXT [INDEX] [<index name>] (<column name> [{, <column name>}...])}
<column definition>::=
<column name> <type> [NOT NULL | NULL] [DEFAULT <value>] [AUTO_INCREMENT] [PRIMARY KEY] [COMMENT ‘<string>’] [<reference definition>]
<type>::=
<numeric data type> | <string data type> | <data/time data type>
<reference definition>::=
REFERENCES <table name> [(<column name> [{, <column name>}...])] [ON DELETE {RESTRICT | CASCADE | SET NULL | NO ACTION | SET DEFAULT }] [ON UPDATE {RESTRICT | CASCADE | SET NULL | NO ACTION | SET DEFAULT }] [MATCH FULL | MATCH PARTIAL]
<table option>::=
{ENGINE = {BDB | MEMORY | ISAM | INNODB | MERGE | MYISAM}} | <additional table options>
As you can see, many elements make up a CREATE TABLEstatement. In fact, the syntax shown here is not the CREATE TABLEstatement in its entirety. As you move through the chapter, other elements are introduced and some elements, which are beyond the scope of this book, are not discussed at all. Still, this chapter covers all the essential components, so by the end of the chapter, you should have a fairly comprehensive foundation on how to create a table definition.
Now take a closer look at the CREATE TABLEsyntax. The best place to begin is at the first section:
<table definition>::=
This section represents the entire CREATE TABLEstatement, with individual components being explained later in the syntax. The first line of the actual statement requires only the keywords CREATE TABLE, followed by the name of the new table. This line also contains two optional components. The first —
TEMPORARY— indicates that this is a temporary table used only during the current session by the current user. A temporary table exists only as long as the session is open or the table is explicitly dropped. The second optional element is the IF NOT EXISTSclause. You’ve seen this clause before in the CREATE DATABASEstatement. When you include it in your CREATE TABLEstatement, a warning is generated, rather than an error, if a table by the same name already exists when you execute this statement.
The next line of syntax allows you to define the individual table elements, as represented by the <table element>placeholder. A table element is an individual object that is defined on a table, such as a col-umn or PRIMARY KEYconstraint. Each CREATE TABLEstatement includes one or more table elements. If more than one table element exists, they are separated by commas. Regardless of how many table elements exist, they are all enclosed in a set of parentheses.
The last line in the first section of syntax allows you to define individual table options. Table options are options that apply to the table as a whole. For example, you can define the type of table that you want to create. All table options are optional; however, you can define as many as are necessary.
As you can see from the first section of syntax, a CREATE TABLEstatement can be as simple or as com-plicated as you need to make it. The only required elements are the CREATE TABLEclause and at least one table element enclosed in parentheses, as shown in the following syntax:
CREATE TABLE <table name> (<table element>)
Because a table element is a required component, take a look at the next section of syntax:
<table element>::= <column definition>
| {[CONSTRAINT <constraint name>] PRIMARY KEY (<column name> [{, <column name>}...])}
| {[CONSTRAINT <constraint name>] FOREIGN KEY [<index name>] (<column name> [{, <column name>}...]) <reference definition>} | {[CONSTRAINT <constraint name>] UNIQUE [INDEX] [<index name>]
(<column name> [{, <column name>}...])}
| {{INDEX | KEY} [<index name>] (<column name> [{, <column name>}...])} | {FULLTEXT [INDEX] [<index name>] (<column name> [{, <column name>}...])}
A table element can represent one of many different options. The most commonly used option is the one represented by the <column definition>placeholder, which, as the name suggests, allows you to define a column to include in your table definition. You are likely, though, to use the other options with regularity. For this reason, the following sections examine each of these options individually.
Creating Column Definitions
A column definition is one type of table element that you can define in a table definition. You must create a column definition for each column that you want to include in your table. The following syntax provides you with the structure that you should use when creating a column definition:
<column definition>::=
As you can see, only two elements are required in a column definition: the column name (represented by the <column name>placeholder) and the data type (represented by the <type>placeholder). The name can be any acceptable identifier in MySQL, and the database can be any of the supported data types. Each additional element of the column definition is optional and, along with data types, they are discussed individually in the following sections.
Defining Data Types
As you recall from earlier chapters, a data type is a constraint placed on a particular column to limit the type of values that you can store in that column. MySQL supports three categories of data types, as rep-resented by the following syntax:
<type>::=
<numeric data type> | <string data type> | <data/time data type>
Whenever you add a column to your table, you must define the column with a data type that is in one of these three categories. Each category of types has its own specific characteristics, and each places restric-tions on the type of data that you can include in a particular column. Take a closer look at each category to better understand the characteristics of each.
Numeric Data Types
As the name suggests, numericdata types are concerned with numbers. If you have a column that will con-tain nothing but numbers, chances are that you want to configure that column with a numeric data type.
You can divide numeric data types into two categories, as the following syntax suggests:
<numeric data type>::=
<integer data type> [(<length>)] [UNSIGNED] [ZEROFILL]
| <fractional data type> [(<length>, <decimals>)] [UNSIGNED] [ZEROFILL]
Each of the two categories of integer data types supports several options. The first of these is represented by the <length>placeholder, which indicates the maximum number of displayed characters for a particular column. You can specify that the length be anywhere from 1 to 255. The fractional data types also include the
<decimals>placeholder. This value indicates the number of decimal places to be displayed for a value in the column. You can specify that the number of decimal places be anywhere from 0 to 30; however,
<decimals>must always be at least two less than <length>.
The next option available for the numeric data types is UNSIGNED. When this option follows a numeric data type, no negative values are permitted in the column. If you specify ZEROFILL, zeros are added to the beginning of a value so that the value is displayed with the number of characters represented by the
<length>placeholder. For example, if you define <length>as 4 and you specify ZEROFILL, the number 53 displays as 0053. ZEROFILLis most useful when used in conjunction with a specified length. In addition, UNSIGNEDis assumed when you specify ZEROFILL, even if UNSIGNEDisn’t explicitly specified. In other words, you can’t use ZEROFILLfor negative numbers.
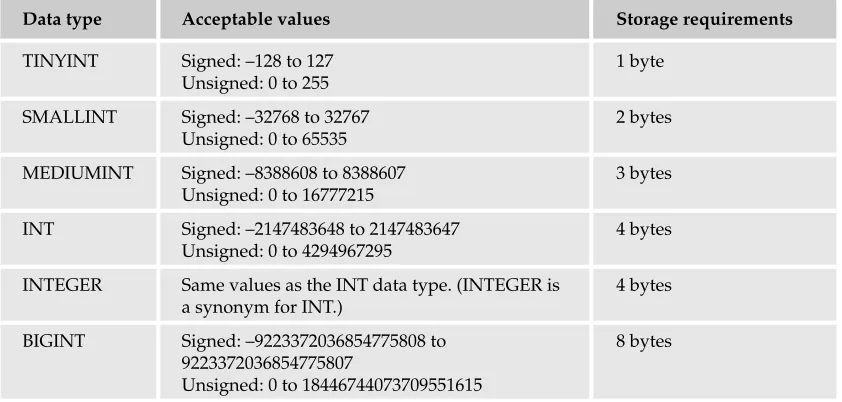
<integer data type>::=
TINYINT | SMALLINT | MEDIUMINT | INT | INTEGER | BIGINT
Each of these data types specifies not only that whole numbers must be stored in the column, but also that the numbers stored must fall within a specific range of values, as shown in the following table.
Data type Acceptable values Storage requirements
TINYINT Signed: –128 to 127 1 byte
Unsigned: 0 to 255
SMALLINT Signed: –32768 to 32767 2 bytes
Unsigned: 0 to 65535
MEDIUMINT Signed: –8388608 to 8388607 3 bytes
Unsigned: 0 to 16777215
INT Signed: –2147483648 to 2147483647 4 bytes
Unsigned: 0 to 4294967295
INTEGER Same values as the INT data type. (INTEGER is 4 bytes a synonym for INT.)
BIGINT Signed: –9223372036854775808 to 8 bytes
9223372036854775807
Unsigned: 0 to 18446744073709551615
The range of acceptable values for each integer data type has nothing to do with the <length> place-holder. Whether you were to specify a length of 2 or 20, the stored value would be the same, as would be the value limitations. As the table demonstrates, signed values are different from unsigned values. If a column doesn’t require negative values, using the UNSIGNEDoption increases the upper end of the range of stored values, although the storage requirements remain the same. For example, a value in a TINYINT
column requires 1 byte of storage whether the column is signed or unsigned.
Now take a look at an example of a CREATE TABLEstatement that includes two column definitions, one that uses the SMALLINTdata type and one that uses the INTdata type. The following statement creates a table named Inventory:
CREATE TABLE Inventory (
ProductID SMALLINT(4) UNSIGNED ZEROFILL, Quantity INT UNSIGNED
);
The next column defined in this statement is the Quantity column. This column is defined with an INT
data type, and it is also unsigned. As a result, negative numbers are not allowed in this column, which means that acceptable values can fall in the range of 0 to 4294967295.
Another thing to notice about this CREATE TABLEstatement is that the column definitions are enclosed in parentheses and separated by a comma. All table elements, including column definitions, are treated in this manner.
Now take a look at the fractional data types, which are shown in the following syntax:
<fractional data type>::=
FLOAT | DOUBLE | DOUBLE PRECISION | REAL | DECIMAL | DEC | NUMERIC |FIXED
The fractionaldata types, unlike the integer data types, support the use of decimals. In fact, that is the key characteristic of these data types, which are described in the following table:
Data type Description
FLOAT An approximate numeric data type that uses 4 bytes of storage. The data type supports the following values:
–3.402823466E+38 to –1.175494351E–38 0
1.175494351E–38 to 3.402823466E+38
DOUBLE An approximate numeric data type that uses 8 bytes of storage. The data type supports the following values:
–1.7976931348623157E+308 to –2.2250738585072014E–308 0
2.2250738585072014E–308 to 1.7976931348623157E+308
DOUBLE PRECISION Synonym for the DOUBLE data type
REAL Synonym for the DOUBLE data type
DECIMAL An exact numeric data type whose range storage requirements depend on the <length> and <decimals> values specified in the column definition
DEC Synonym for the DECIMAL data type
NUMERIC Synonym for the DECIMAL data type
FIXED Synonym for the DECIMAL data type
As described in the table, there are only three basic fractional data types: FLOAT, DOUBLE, and DECIMAL. The rest are synonyms for the DOUBLEand DECIMALdata types.
values are stored as numeric data and are subject to errors caused by numbers being rounded, which is why they’re referred to as approximatenumeric types. Generally numbers are rounded according to the column <length>and <decimals>specifications, which can sometimes result in imprecise results.
The DECIMALdata type, which is referred to as an exactnumeric data type, gets around the issue of round-off errors by storing the values as strings, with the <length>and <decimals>specifications determining storage requirements and range. You should use the DECIMALdata type when you require values to be completely accurate, such as when you’re storing information about money. The drawback to using the DECIMALdata type is that there are trade-offs in performance compared to the approximate numeric types. For this reason, if you plan to store values that don’t require the accuracy of the DECIMAL
type, use FLOATor DOUBLE.
Now take a look at a table definition that uses the DECIMALand FLOATdata types. The following CREATE TABLEstatement creates a table named Catalog:
CREATE TABLE Catalog (
ProductID SMALLINT, Price DECIMAL(7,2), Weight FLOAT(8,4) );
As you can see, the table includes a DECIMALcolumn (named Price) and a FLOATcolumn (named Weight). The Price column contains a <length>value of 7 and a <decimals>value of 2. As a result, the values display with up to 7 characters and 2 decimal places, such as 46264.45 and 242.90.
Because of the storage requirements for DECIMALvalues, positive DECIMALvalues (as opposed to nega-tive values) receive one extra character to display values. For example, a DECIMALcolumn that has a
<length>value of 7 and a <decimals>value of 2 can actually have up to eight numeric characters — plus one character for the decimal point — for positive numbers, but only seven characters — plus one character for the negative sign and one for the decimal point — for negative numbers. FLOATand
DOUBLEvalues do not operate in the same way.
The second column in the preceding example is configured with the FLOATdata type. In this case, the total display can be eight characters long, with four characters to the right of the decimal point. The implication in this case is that the Weight value does not have to be as exact as the Price value, so you don’t have to worry about errors caused by values that have been rounded.
String Data Types
The string data types provide a great deal of flexibility for storing various types of data from individual bits to large files. String data types are normally used to store names and titles and any value that can include letters and numbers. MySQL supports four categories of string data types, as shown in the following syntax:
The character data types are the ones that you probably use the most often. As the following syntax shows, there are two types of character data types:
<character data type>::=
CHAR (<length>) [BINARY | ASCII | UNICODE] VARCHAR (<length>) [BINARY]
The CHARdata type is a fixed-length character data type that can store up to 255 characters. The <length>
placeholder specifies the number of characters stored. Although the actual value can be made up of fewer characters than the amount specified, the actual storage space is fixed at the specified amount. Take a look at an example to demonstrate how this works. The following table definition includes a column definition for the Category column:
CREATE TABLE Catalog (
ProductID SMALLINT, Description VARCHAR(40), Category CHAR(3), Price DECIMAL(7,2) );
The Category column is defined with the CHAR(3)data type. As a result, the column can store zero to three characters per value, but the storage amount allotted to that value is always three bytes, one for each character.
The CHARdata type is an appropriate data type to use when you know how many characters most values in a column will consist of and when the values are made up of alphanumeric characters, as opposed to all numerals. If you don’t know how many characters each value will be, you should use a VARCHARdata type. The VARCHARdata type also allows you to specify a maximum length; however, storage requirements are based on the actual number of characters, rather than on the <length>value.
Return to the preceding example. Notice that the Description column is configured with the VARCHAR(40)
data type. This means that the values can be of varying length, up to 40 characters long. As a result, the amount of actual storage ranges between zero bytes and 40 bytes, depending on the actual value. For example, a value of “Bookcase” requires fewer bytes than a value of “Three-piece living room set.”
The VARCHARdata type, like the CHARdata type, can store up to 255 characters. Along with the flexibility offered by VARCHAR, compared to CHAR, comes a performance cost. CHARcolumns are processed more efficiently than VARCHARcolumns, yet CHARcolumns can result in wasted storage. Generally, for columns with values that vary widely in length, the VARCHARdata type might often be your best choice.
If you return again to the <character data type>syntax, you’ll see that the CHARdata type allows you to specify the BINARY, ASCII, or UNICODEattribute, and the VARCHARdata type allows you to specify the BINARYattribute. The three attributes result in the following effects:
In addition to string data types, MySQL supports four types of binary data types, as shown in the fol-lowing syntax:
<binary data type>::=
TINYBLOB | BLOB | MEDIUMBLOB | LONGBLOB
Binary data types support the storage of large amounts of data, such as image and sound files. These types are useful when you expect values to grow large or to vary widely. The four binary data types are identical except for the maximum amount of data that each one supports. The following table shows the maximum size of values permitted in a column configured with one of these data types.
Data type Maximum size
TINYBLOB/TINYTEXT 255 characters (355 bytes)
BLOB/TEXT 65,535 characters (64 KB)
MEDIUMBLOB/MEDIUMTEXT 16,777,215 characters (16 MB)
LONGBLOB/LONGTEXT 4,294,967,295 characters (4 GB)
The text data types are also included in the table because they are similar to the binary data types and because the maximum size limitations are the same. The text data types are discussed later in this section.
The binary data types do not take any arguments. As with data in a VARCHAR column, the storage used for binary data varies according to the size of the value, but you do not specify a maximum length. When defining a column with a binary data type, you simply type the name of the data type in the column definition. For example, the following table definition includes a BLOBcolumn named Photo:
CREATE TABLE Inventory (
ProductID SMALLINT UNSIGNED, Name VARCHAR(40),
Photo BLOB,
Quantity INT UNSIGNED );
The Photo column can store binary data up to 64 KB in size. The assumption in this case is that a photo can be taken of the product and saved in a small enough file to fit into this column. If you anticipate that the photos might be larger, you should step this up to MEDIUMBLOB.
The text data types are very similar to the binary data types and, as the following syntax shows, have a direct counterpart to each of the four binary data types:
<text data type>::=
TINYTEXT | TEXT | MEDIUMTEXT | LONGTEXT
case sensitive. Text columns are treated according to their character sets, and sorting is based on the col-lation for that character set.
The following CREATE TABLEstatement provides an example of a TEXTcolumn named DescriptionDoc:
CREATE TABLE Catalog (
ProductID SMALLINT UNSIGNED, Name VARCHAR(40),
DescriptionDoc TEXT CHARACTER SET latin1 COLLATE latin1_bin );
As you can see, the DescriptionDoc column includes a CHARACTER SETand COLLATEclause. The latin1
character set and the latin1_bincollation are specific to the values in the DescriptionDoc column. The advantage of this is that you can use a character set and collation that differ from that of the table, database, or server.
Now take a look at the list data types, which are the last set of string data types. As the following syntax shows, the list data types include ENUMand SET:
<list data type>::=
{ENUM | SET} (<value> [{, <value>}...])
The ENUMdata type allows you to specify a list of values that you can use in a column configured with that type. When you insert a row in the table, you can also insert one of the values defined for the data type in the column. The column can contain only one value, and it must be one of the listed values. ASETdata type also specifies a list of values to be inserted in the column. Unlike the ENUMdata type, in which you can specify only one value, the SETdata type allows you to specify multiple values from the list.
The following table definition illustrates how you can configure an ENUMcolumn and a SETcolumn:
CREATE TABLE Orders (
OrderID SMALLINT UNSIGNED, BikeModel VARCHAR(40),
BikeColor ENUM(‘red’, ‘blue’, ‘green’, ‘yellow’), BikeOptions SET(‘rack’, ‘light’, ‘helmet’, ‘lock’) );
Notice that the list of values follows the data type. The values are enclosed in single quotes and separated by commas, and all values are enclosed in parentheses. For an ENUMdata type, you can specify up to 65,535 values. For a SETdata type, you can specify up to 64 values.
Date/Time Data Types
The final category of data types is the date/time data types, which are shown in the following syntax:
<date/time data type>::=
The date/time data types allow you to specify columns that contain data specific to dates and times. The date/time data types support the ranges and formats shown in the following table:
Data type Format Range
DATE YYYY-MM-DD 1000-01-01 through 9999
TIME HH:MM:SS –838:59:59 to 838:59:59
DATETIME YYYY-MM-DD HH:MM:SS 1000-01-01 00:00:00 through 9999
YEAR YYYY 1901 to 2155 (and 0000)
TIMESTAMP YYYY-MM-DD HH:MM:SS 1970-01-01 00:00:00 to partway through 2037
The date/time data types are handy if you want to store specific types of date information. For example, if you want to record only the date and not the year, you would use the DATEdata type. The values that you entered in this column would have to conform to the format defined by that data type. However, of particular interest is the TIMESTAMPdata type, which is slightly different from the other data types. When you configure a column with this data type, a row, when inserted or updated, is automatically provided a value for the TIMESTAMPcolumn that is based on the current time and date. This provides a handy way to record each transaction that occurs in a particular table.
Now take a look at a table that uses time/date data types. The following table definition includes a YEAR
column and a TIMESTAMP:
CREATE TABLE BookOrders (
OrderID SMALLINT UNSIGNED, BookID SMALLINT UNSIGNED, Copyright YEAR,
OrderDate TIMESTAMP );
The Copyright column allows you to add a value to the column that falls in the range of 1901 to 2155; however, you’re restricted from adding any other types of values. The OrderDate column automatically records the current data and time when a particular row is inserted or updated, so you don’t have to insert any values in this column.
Defining a Column’s Nullability
Up to this point, the focus has been on identifying only the required elements of a CREATE TABLE state-ment and the column definitions. As a result, the column definitions have included only the column names and the data types assigned to those columns. The next component of the column definition examined in this chapter is the column’s nullability, which is specified through the NULLand NOT NULLkeywords.
A column’s nullability refers to a column’s ability to accept null values. Recall from Chapter 1 that a null value indicates that a value is undefined or unknown. It is not the same as zero or blank, but instead means that the value is absent. When you include NOT NULLin your column definition, you’re saying that the column does not permit null values. In other words, a specific value must always be provided for that column. On the other hand, the NULLoption permits null values. If neither option is specified,
Now take a look at a table definition that specifies the nullability of its columns. The following example creates the Catalog table and includes two NOT NULLcolumns:
CREATE TABLE Catalog (
ProductID SMALLINT UNSIGNED NOT NULL, Name VARCHAR(40) NOT NULL
);
You must provide a value for both the ProductID column and the Name column. Whenever you insert rows in the table or update rows in this table, you cannot use NULLas a value for either of those columns. In general, whenever you configure a column as NOT NULL, you must supply a value other than NULL
to the column when inserting and modifying rows. There are, however, two exceptions to this rule. If you configure a column with the TIMESTAMPdata type or if you use the AUTO_INCREMENToption, then inserting NULLautomatically sets the value of the column to the correct TIMESTAMPvalue or the
AUTO_INCREMENTvalue. (The AUTO_INCREMENToption is discussed later in the chapter.) But other than these two exceptions, a NOT NULLcolumn cannot accept a null value.
Defining Default Values
Situations might arise in which you want a column to use a default value when inserting or updating a row, if no value is provided for a column. This is useful when a value is often repeated in a column or it is the value most likely to be used in that column. MySQL allows you to assign default values through the use of a DEFAULTclause. For example, the following table definition includes a column defined with a default value of Unknown:
CREATE TABLE AuthorBios (
AuthID SMALLINT UNSIGNED NOT NULL, YearBorn YEAR NOT NULL,
CityBorn VARCHAR(40) NOT NULL DEFAULT ‘Unknown’ );
In this CREATE TABLEstatement, the CityBorn column is configured with the VARCHARdata type and the NOT NULLoption. In addition, the column definition includes a DEFAULTclause. In that clause, the keyword DEFAULTis specified, followed by the actual default value, which in this case is Unknown. If you insert a row in the table and do not specify a value for the CityBorn column, the value Unknown is automatically inserted in that column.
You can also specify a default value in a column configured with a numeric data type. In the follow-ing table definition, the NumBooks column is configured with the SMALLINTdata type and a default value of 1:
CREATE TABLE AuthorBios (
AuthID SMALLINT UNSIGNED NOT NULL, YearBorn YEAR NOT NULL,
NumBooks SMALLINT NOT NULL DEFAULT 1 );
You can also specify NULLas a default value. The column, though, must permit null values in order to specify it as a default.
If you do not assign a default value to a column, MySQL automatically assigns a default to the column. If a column accepts null values, the default is NULL. If a column does not accept null values, the default depends on how the column is defined:
❑ For columns configured with the TIMESTAMPdata type, the default value for the first TIMESTAMP
column is the current date and time. The default values for any other TIMESTAMPcolumns in the table are zero values in place of the date and time.
❑ For columns configured with a date/time data type other than TIMESTAMP, the default values are zero values in place of the date and time.
❑ For columns configured with the AUTO_INCREMENToption, the default value is the next number in the incremented sequence of numbers. (The AUTO_INCREMENToption is discussed later in the chapter.)
❑ For numeric columns that are not configured with the AUTO_INCREMENToption, the default value is 0.
❑ For columns configured with the ENUMdata type, the default value is the first value specified in the column definition.
❑ For columns configured with a string data type other than the ENUMtype, the default value is an empty string.
As you can see, the rules for defaults in NOT NULLcolumns are more complex than for columns that permit null values. As a result, you might consider defining defaults on any columns whose default value you want to control.
Most relational database management systems (RDBMSs) do not automatically assign default values to all columns. For these systems, trying to insert a value in a column for which you defined no default and null values are not permitted results in an error. As you can see with MySQL, all columns are assigned a default value.
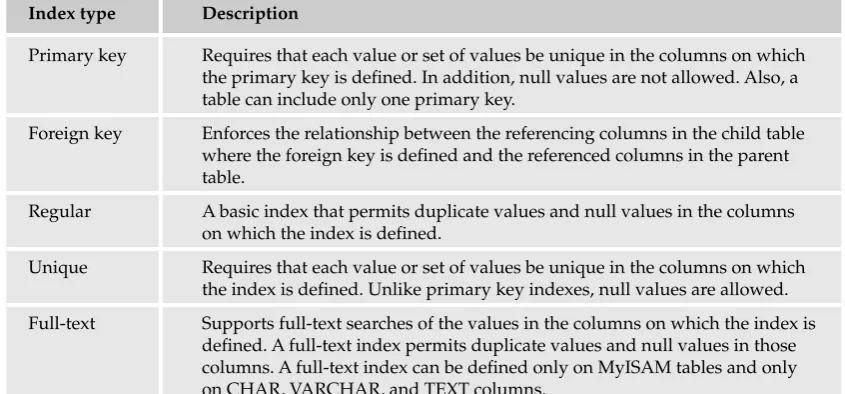
Defining Primary Keys
In Chapter 4, when you were learning how to create a data model, you were introduced to the concept of primary keys and how they ensure the uniqueness of each row in a table. A primary key is one or more columns in a table that uniquely identify each row in that table. For nearly any table you create, you should define a primary key for that table.
The easiest way to define a single-column primary key is to specify the PRIMARY KEYoption in the column definition, as shown in the following example:
CREATE TABLE Orders (
OrderID SMALLINT UNSIGNED NOT NULL PRIMARY KEY, ModelID SMALLINT UNSIGNED NOT NULL,
In this table definition, the primary key for the Orders table is defined on the OrderID column. You only need to add the PRIMARY KEYclause to the column definition. In order to define a column as a primary key, the column must be configured as NOT NULL. If you do not explicitly specify the NOT NULLoption,
NOT NULLis assumed. In addition, a table can have only one primary key, which you can define in the column definition or as a separate constraint, as shown in the following syntax:
[CONSTRAINT <constraint name>] PRIMARY KEY (<column name> [{, <column name>}...])
When you define a primary key as a separate constraint, you’re including it as a table element in your table definition, as you would other table elements, such as column definitions. For example, you can define the same primary key that is shown in the preceding example as a table element. The following table definition for the Orders table removes the PRIMARY KEYclause from the OrderID column definition and uses a PRIMARY KEYconstraint:
CREATE TABLE Orders (
OrderID SMALLINT UNSIGNED NOT NULL, ModelID SMALLINT UNSIGNED NOT NULL, ModelDescrip VARCHAR(40),
PRIMARY KEY (OrderID) );
As you can see, the PRIMARY KEYconstraint is added as another table element, just like the three columns. The table element needs to include only the keywords PRIMARY KEYand the name of the primary key column, enclosed in parentheses. If you were creating a primary key on more than one column, you would include both of those column names in the parentheses, as shown in the following table definition:
CREATE TABLE Orders (
OrderID SMALLINT UNSIGNED NOT NULL, ModelID SMALLINT UNSIGNED NOT NULL, ModelDescrip VARCHAR(40),
PRIMARY KEY (OrderID, ModelID) );
Notice that the PRIMARY KEYconstraint now specifies the OrderID column and the ModelID column. As a result, the primary key for the Orders table will be created on these two columns, which means that no two value pairs can be alike, although values can be repeated in individual columns. Any time that you plan to define a primary key on two or more columns, you must use the table-level constraint. You cannot define a primary key on multiple columns at the column level, as you can when you include only one column in the primary key.
Defining Auto-Increment Columns
CREATE TABLE Catalog (
ProductID SMALLINT UNSIGNED NOT NULL AUTO_INCREMENT, Name VARCHAR(40) NOT NULL,
PRIMARY KEY (ProductID) );
In this example, the ProductID column is configured with the SMALLINTdata type and is configured as the primary key (through the use of a PRIMARY KEYconstraint). The column definition also includes the NOT NULLoption and the AUTO_INCREMENToption. As a result, whenever you add a new row to the Catalog table, a new number is automatically assigned to the ProductID column. The number is incre-mented by 1, based on the highest value existing in that column. For example, if a row exists with a ProductID value of 1347, and this is the highest ProductID value in the table, the next row inserted in the table is assigned a ProductID value of 1348.
You can use the AUTO_INCEREMENToption only on a column configured with an integer data type and the NOT NULLoption. In addition, the table must be set up as a primary key or with a unique index, and there can be only one AUTO_INCREMENTcolumn per table. (Unique indexes are discussed later in the chapter.) Also, the AUTO_INCREMENETcolumn cannot be defined with a default value.
Defining Foreign Keys
In Chapter 4, you learned how tables in a relational database form relationships with each other in order to associate data in a meaningful way and to help ensure data integrity. When you created your data model, you showed these relationships by connecting related tables with lines that indicated the type of relationship. In your final data model, you found that the most common type of relationship was the one-to-many, which was represented by a line that had three prongs on the manyside of the relationship.
In order to implement these relationships in MySQL, you must define foreign keys on the referencing tables. You define the foreign key on the column or columns in the table that references the column or columns in the referenced table. The referencing table, the table that contains the foreign key, is often referred to as the childtable, and the referenced table is often referred to as the parenttable.
The foreign key maintains the consistency of the data between the child table the parent table. In order to insert a row in the child table or to update a row in that table, the value in the foreign key column must exist in the referenced column in the parent table.
For example, suppose you have a table that tracks sales for a bookstore. One of the columns in the table stores the IDs for the books that have sold. Data about the books themselves is actually stored in a separate table, and each book is identified in that table by its ID. As a result, the book ID column in the sales table references the book ID column in the books table. To associate the data in these two columns, the book ID column in the sales table is configured as a foreign key. Because of the foreign key, no book ID can be added to the sales table that doesn’t exist in the books table. The sales table, then, is the child table, and the books table is the parent table.
<reference definition>::=
REFERENCES <table name> [(<column name> [{, <column name>}...])] [ON DELETE {RESTRICT | CASCADE | SET NULL | NO ACTION | SET DEFAULT }] [ON UPDATE {RESTRICT | CASCADE | SET NULL | NO ACTION | SET DEFAULT }]
As you can see from the syntax, the clause includes several required elements: the REFERENCESkeyword, the name of the referenced (parent) table, and at least one column in that table, enclosed in parentheses. The syntax also includes an optional ON DELETEclause and an optional ON UPDATEclause. The ON DELETEclause specifies how MySQL treats related data in the child table when a row in the parent table is deleted. The ON UPDATEclause specifies how MySQL treats related data in the child table when a row in the parent table is updated. For each clause, five options are available. You can specify only one option for each clause. These options are described in the following table:
Option Description
RESTRICT If the child table contains values in the referencing columns that match values in the referenced columns in the parent table, rows in the parent table cannot be deleted, and values in the referenced columns cannot be updated. This is the default option if an ON DELETE or ON UPDATE clause is not specified.
CASCADE Rows in the child table that contain values that also exist in the referenced columns of the parent table are deleted when the associated rows are deleted from the parent table. Rows in the child table that contain values that also exist in the referenced columns of the parent table are updated when the associated values are updated in the parent table.
SET NULL Values in the referencing columns of the child table are set to NULL when rows with referenced data in the parent table are deleted from the parent table or when the referenced data in the parent table is updated. To use this option, all referencing columns in the child table must permit null values.
NO ACTION No action is taken in the child table when rows are deleted from the parent table or values in the referenced columns in the parent table are updated.
SET DEFAULT Values in the referencing columns of the child table are set to their default values when rows are deleted from the parent table or the referenced columns of the parent table are updated.
When you define a foreign key, you can include an ON DELETEclause, an ON UPDATEclause, or both. If you include both, you can configure them with the same option or with different options. If you exclude one or both, the RESTRICToption is assumed in either case, which means that updates and deletes are limited to rows with nonreferenced values. In addition, when defining a foreign key, the referencing columns must have data types compatible with the referenced columns. For integer data types, the size and signed/unsigned status must be the same. The length of a string data type, however, doesn’t have to be the same. It’s generally a good idea to configure the referencing and referenced columns with the same data type and type-related options.
CREATE TABLE Orders (
OrderID SMALLINT UNSIGNED NOT NULL PRIMARY KEY,
ModelID SMALLINT UNSIGNED NOT NULL REFERENCES Models (ModelID), ModelDescrip VARCHAR(40)
);
In this example, the ModelID column is configured with a SMALLINTdata type (unsigned), a NOT NULL
option, and a REFERENCESclause, which specifies the name of the parent table (Models) and the name of the referenced column (ModelID) in the parent table. As a result, the ModelID column of the Orders table can include only values that are listed in the ModelID column of the Models table.
You can also define this foreign key as a separate table element by adding a FOREIGN KEYconstraint to your table definition. The following syntax shows how to define a FOREIGN KEYconstraint:
[CONSTRAINT <constraint name>] FOREIGN KEY [<index name>]
(<column name> [{, <column name>}...]) <reference definition>
As the syntax indicates, you must include the keywords FOREIGN KEY, the name of the referencing columns in the child table, enclosed in parentheses, and a reference definition. The reference definition is the same definition used in a column definition to add a foreign key. To illustrate this, rewrite the last example table definition, but this time use a FOREIGN KEYconstraint to define the foreign key:
CREATE TABLE Orders (
OrderID SMALLINT UNSIGNED NOT NULL PRIMARY KEY, ModelID SMALLINT UNSIGNED NOT NULL,
ModelDescrip VARCHAR(40),
FOREIGN KEY (ModelID) REFERENCES Models (ModelID) ON DELETE CASCADE ON UPDATE CASCADE
);
In this example, the FOREIGN KEYconstraint is added as a table element, along with the column defini-tions. The same column (ModelID) is being configured as a foreign key that references the ModelID column of the Models table. The only difference between this example and the last example is that the reference definition in the last example includes an ON DELETEclause and an ON UPDATEclause, both of which are configured with the CASCADEoption. As a result, the child table reflects changes to the par-ent table.
If you want to define a foreign key on more than one column, you must use a FOREIGN KEYconstraint, rather than adding a referencing definition to the column definition. In addition, you must separate the column names by commas and enclose all the column names in parentheses.
Defining Table Types
When you were first introduced to the table definition syntax earlier in the chapter, one of the last ele-ments in that syntax was the <table option>placeholder. For each table definition, you can include one or more table options.
One of the table options that is especially important when learning about MySQL is the one that allows you to define the type of table that you create in your table definition. Recall from Chapter 3 that MySQL allows you to create six different types of tables, which are shown in the following syntax:
ENGINE = {BDB | MEMORY | ISAM | INNODB | MERGE | MYISAM}
To define a table type, you must include an ENGINEclause at the end of your table definition, after the parentheses that enclose your table elements. For example, the following table definition specifies the
InnoDBtable type:
CREATE TABLE AuthorBios (
AuthID SMALLINT UNSIGNED NOT NULL, YearBorn YEAR NOT NULL,
CityBorn VARCHAR(40) NOT NULL DEFAULT ‘Unknown’ )
ENGINE=INNODB;
In this definition, an ENGINEclause is added after the last column definition and closing parentheses. Notice that you simply specify the ENGINEkeyword, the equal sign, and one of the seven table types. Each table type in MySQL supports a specific set of functionality and serves specific purposes. In addition, each type is associated with a related storage engine (handler) that processes the data in that table. For example, the MyISAMengine processes data in MyISAMtables. The following table discusses each of the six types of tables.
Table type Description
BDB A transaction-safe table that is managed by the Berkeley DB (BDB) handler. The BDB handler also supports automatic recovery and page-level locking. The BDB handler does not work on all the operating systems on which MySQL can oper-ate. For the most part, InnoDB tables have replaced BDB tables.
MEMORY A table whose contents are stored in memory. The data stored in the tables is available only as long as the MySQL server is available. If the server crashes or is shut down, the data disappears. Because these types of tables are stored in memory, they are very fast and are good candidates for temporary tables. MEM-ORY tables can also be referred to as HEAP tables, although MEMMEM-ORY is now the preferable keyword.
InnoDB A transaction-safe table that is managed by the InnoDB handler. As a result, data is not stored in a .MYD file, but instead is managed in the InnoDB tablespace. InnoDB tables also support full foreign key functionality in MySQL, unlike other tables. In addition, the InnoDB handler supports automatic recovery and row-level locking. InnoDB tables do not perform as well as MyISAM tables.
ISAM A deprecated table type that was once the default table type in MySQL. The MyISAM table type has replaced it, although it is still supported for backward compatibility. Eventually, ISAM tables will no longer be supported.
MERGE A virtual table that is made up of identical MyISAM tables. Data is not stored in the MERGE table, but in the underlying MyISAM tables. Changes made to the MERGE table definition do not affect the underlying MyISAM tables. MERGE tables can also be referred to as MRG_MyISAM tables
MyISAM The default table type in MySQL. MyISAM tables, which are based on and have replaced ISAM tables, support extensive indexing and are optimized for com-pression and speed. Unlike other table types, BLOB and TEXT columns can be indexed and null values are allowed in indexed columns. MyISAM tables are not transaction safe, and they do not support full foreign key functionality.
You can use the TYPEkeyword to specify the table type, rather than the ENGINEkeyword. However,
TYPEhas been deprecated in MySQL, which means that it will eventually be phased out. If you use
TYPE, you receive a warning about its deprecated state, but the table is still created.
Creating Tables in the DVDRentals Database
Now that you have learned how to create a table in MySQL, it’s time to try it out for yourself. The following three Try It Out sections walk you through the steps necessary to create the tables in the DVDRentals database. The tables are based on the final database design that you developed in Chapter 4. The tables are divided into three categories that correspond to the following Try It Out sections. The first group of tables acts as lookup tables in the database. They must be developed before you create tables that reference the lookup table. The second category of tables holds data about the people who will participate somehow in the database system. These include the movie participants, the employees, and the customers. The last group includes the tables that contain foreign keys. You must create this group of tables last because they contain columns that reference other tables. In addition, you must create these tables in a specific order because of how they reference each other.
In this Try It Out, you create the six lookup tables that are part of the DVDRentals database, which you created in the Try It Out section earlier in the chapter. These tables include the Roles, MovieTypes, Studios, Ratings, Formats, and Status tables. As you work your way through this exercise, you should reference the data model that you created in Chapter 4. From there, you can compare the SQL statement that you use here to that model.
Try It Out
Creating the Lookup Tables
Follow these steps to create the six lookup tables:
1.
Open the mysql client utility, type the following command, and press Enter:use DVDRentals
You should receive a message indicating that you switched to the DVDRentals database.
2.
To create the Roles table, type the following CREATE TABLEstatement at the mysql command prompt, and then press Enter:CREATE TABLE Roles (
RoleID VARCHAR(4) NOT NULL, RoleDescrip VARCHAR(30) NOT NULL, PRIMARY KEY (RoleID)
)
You should receive a message indicating that the statement executed successfully.
3.
To create the MovieTypes table, type the following CREATE TABLEstatement at the mysql command prompt, and then press Enter:CREATE TABLE MovieTypes (
MTypeID VARCHAR(4) NOT NULL, MTypeDescrip VARCHAR(30) NOT NULL, PRIMARY KEY (MTypeID)
)
ENGINE=INNODB;
You should receive a message indicating that the statement executed successfully.
4.
To create the Studios table, type the following CREATE TABLEstatement at the mysql command prompt, and then press Enter:CREATE TABLE Studios (
StudID VARCHAR(4) NOT NULL, StudDescrip VARCHAR(40) NOT NULL, PRIMARY KEY (StudID)
)
ENGINE=INNODB;
You should receive a message indicating that the statement executed successfully.
5.
To create the Ratings table, type the following CREATE TABLEstatement at the mysql command prompt, and then press Enter:CREATE TABLE Ratings (
RatingID VARCHAR(4) NOT NULL, RatingDescrip VARCHAR(30) NOT NULL, PRIMARY KEY (RatingID)
)
ENGINE=INNODB;
You should receive a message indicating that the statement executed successfully.
6.
To create the Formats table, type the following CREATE TABLEstatement at the mysql command prompt, and then press Enter:CREATE TABLE Formats (
FormID CHAR(2) NOT NULL,
FormDescrip VARCHAR(15) NOT NULL, PRIMARY KEY (FormID)
)
ENGINE=INNODB;
You should receive a message indicating that the statement executed successfully.
CREATE TABLE Status (
StatID CHAR(3) NOT NULL,
StatDescrip VARCHAR(20) NOT NULL, PRIMARY KEY (StatID)
)
ENGINE=INNODB;
You should receive a message indicating that the statement executed successfully.
How It Works
In this exercise, you created the six lookup tables in the DVDRentals database. The table definitions should be consistent with the final data model that you created in Chapter 4 for the DVDRentals database. In addition, the six tables are very similar. Take a look at one of them, and review the code that you used to create the table. You used the following CREATE TABLEstatement to create the Roles table:
CREATE TABLE Roles (
RoleID VARCHAR(4) NOT NULL, RoleDescrip VARCHAR(30) NOT NULL, PRIMARY KEY (RoleID)
)
ENGINE=INNODB;
The statement begins with the CREATE TABLEstatement, which identifies the name of the new table (Roles). The table definition then includes three table elements, which are separated by commas and enclosed in parentheses. The first two table elements are column definitions. The RoleID column defi-nition creates a column that is configured with a VARCHARdata type. The data type permits up to four characters. In addition, the column does not permit null values. You use a VARCHARdata type for the RoleID column, rather than a CHARdata type because MySQL converts CHARdata types to VARCHAR
data types whenever more than three characters are specified for the value length andthere are other varying-length columns in the table (which is the case for the RoleDescrip column). Otherwise, you would use CHAR(4)because the values in the column have a fixed length of four characters.
The second column defined in the Roles table definition is the RoleDescrip column, which is configured with a VARCHARdata type and a maximum length of 30 characters. This column also does not permit null values. The last table element in the CREATE TABLEstatement is the PRIMARY KEYconstraint, which defines a primary key on the RoleID column. As a result, this column uniquely identifies each role in the table.
The last component of the Roles table definition is the ENGINEtable option, which species that the table type is InnoDB. You specify this table type because InnoDBis the only type that supports transactions and foreign keys, both of which are important to the DVDRentals database.
Once you create the six lookup tables, you can create the three tables that contain the people (explained in the following Try It Out). Because these tables do not contain foreign keys that reference other tables, you could have created these three tables first. In fact, you could have created the nine tables in any order, as long as all referenced (parent) tables are created before the referencing (child) tables. You grouped the tables together in the manner you did just to keep similar types of tables together in order to make explanations simpler.
Try It Out
Creating the People Tables
The following steps describe how to create the three tables that contain people:
1.
To create the Participants table, type the following CREATE TABLEstatement at the mysql command prompt, and then press Enter:CREATE TABLE Participants (
PartID SMALLINT NOT NULL AUTO_INCREMENT PRIMARY KEY, PartFN VARCHAR(20) NOT NULL,
PartMN VARCHAR(20) NULL, PartLN VARCHAR(20) NULL )
ENGINE=INNODB;
You should receive a message indicating that the statement executed successfully.
2.
To create the Employees table, type the following CREATE TABLEstatement at the mysql command prompt, and then press Enter:CREATE TABLE Employees (
EmpID SMALLINT NOT NULL AUTO_INCREMENT PRIMARY KEY, EmpFN VARCHAR(20) NOT NULL,
EmpMN VARCHAR(20) NULL, EmpLN VARCHAR(20) NOT NULL )
ENGINE=INNODB;
You should receive a message indicating that the statement executed successfully.
3.
To create the Customers table, type the following CREATE TABLEstatement at the mysql command prompt, and then press Enter:CREATE TABLE Customers (
CustID SMALLINT NOT NULL AUTO_INCREMENT PRIMARY KEY, CustFN VARCHAR(20) NOT NULL,
CustMN VARCHAR(20) NULL, CustLN VARCHAR(20) NOT NULL )
ENGINE=INNODB;
How It Works
As with the previous exercise, this exercise adds several tables to the DVDRentals database. Except for the names of the tables and columns, the table definitions are nearly identical. As a result, this explanation covers only one of these definitions to understand how the statements work. The following CREATE TABLEstatement is the one you used to create the Participants table:
CREATE TABLE Participants (
PartID SMALLINT NOT NULL AUTO_INCREMENT PRIMARY KEY, PartFN VARCHAR(20) NOT NULL,
PartMN VARCHAR(20) NULL, PartLN VARCHAR(20) NULL )
ENGINE=INNODB;
The Participants table definition includes four table elements, separated by commas and enclosed in paren-theses. All four table elements are column definitions. The first column definition defines the PartID column, which is configured with the SMALLINTdata type, the NOT NULLoption, and the AUTO_INCREMENToption. The column is also defined as the primary key. As a result, values in the column uniquely identify each row in the table, null values are not allowed, and the values inserted in the column are generated automatically.
The remaining three columns are configured with the VARCHARdata type and are assigned a length of 20 characters. Null values are not allowed in the PartFN column, but they are allowed in the PartMN columns and the PartLN columns. The columns are set up this way to allow for actors and other movie participants who are known by only one name. (Cher comes to mind as one example.) The other two tables — Employees and Customers — are different in this respect because a last name is required. This, of course, is a business decision, and the business rules collected for this project would dictate which names are actually required. In the case of these three tables, a middle name is not required for any of them.
As with the six lookup table that you created in the previous exercise, all three of the tables in this exercise have been created as InnoDBtables. To support foreign key functionality, all tables participating in relationships must be configured as InnoDBtables.
Now that you’ve created all the referenced tables in the DVDRentals database, you’re ready to create the referencing tables, which are each configured with one or more foreign keys. The order in which you create these remaining four tables is important because dependencies exist among these four tables. For example, you must create the DVDs table before you create the DVDParticipant and Transactions tables because both these tables reference the DVDs table. In addition, you must create the Orders table before you create the Transactions table because the Transactions table references the Orders table. The following Try It Out shows you how to create all the necessary foreign key tables.
Try It Out
Creating the Foreign Key Tables
The following steps describe how to create the four referencing tables:
CREATE TABLE DVDs (
DVDID SMALLINT NOT NULL AUTO_INCREMENT PRIMARY KEY, DVDName VARCHAR(60) NOT NULL,
NumDisks TINYINT NOT NULL DEFAULT 1, YearRlsd YEAR NOT NULL,
MTypeID VARCHAR(4) NOT NULL, StudID VARCHAR(4) NOT NULL, RatingID VARCHAR(4) NOT NULL, FormID CHAR(2) NOT NULL, StatID CHAR(3) NOT NULL,
FOREIGN KEY (MTypeID) REFERENCES MovieTypes (MTypeID), FOREIGN KEY (StudID) REFERENCES Studios (StudID), FOREIGN KEY (RatingID) REFERENCES Ratings (RatingID), FOREIGN KEY (FormID) REFERENCES Formats (FormID), FOREIGN KEY (StatID) REFERENCES Status (StatID) )
ENGINE=INNODB;
You should receive a message indicating that the statement executed successfully.
This table definition is based on MySQL version 4.1 or later. This statement will not work for versions earlier than 4.1.
2.
To create the DVDParticipant table, type the following CREATE TABLEstatement at the mysql command prompt, and then press Enter:CREATE TABLE DVDParticipant (
DVDID SMALLINT NOT NULL, PartID SMALLINT NOT NULL, RoleID VARCHAR(4) NOT NULL,
PRIMARY KEY (DVDID, PartID, RoleID),
FOREIGN KEY (DVDID) REFERENCES DVDs (DVDID),
FOREIGN KEY (PartID) REFERENCES Participants (PartID), FOREIGN KEY (RoleID) REFERENCES Roles (RoleID)
)
ENGINE=INNODB;
You should receive a message indicating that the statement executed successfully.
3.
To create the Orders table, type the following CREATE TABLEstatement at the mysql command prompt, and then press Enter:CREATE TABLE Orders (
OrderID INT NOT NULL AUTO_INCREMENT PRIMARY KEY, CustID SMALLINT NOT NULL,
EmpID SMALLINT NOT NULL,
FOREIGN KEY (CustID) REFERENCES Customers (CustID), FOREIGN KEY (EmpID) REFERENCES Employees (EmpID) )
You should receive a message indicating that the statement executed successfully.
4.
To create the Transactions table, type the following CREATE TABLEstatement at the mysql command prompt, and then press Enter:CREATE TABLE Transactions (
TransID INT NOT NULL AUTO_INCREMENT PRIMARY KEY, OrderID INT NOT NULL,
DVDID SMALLINT NOT NULL, DateOut DATE NOT NULL, DateDue DATE NOT NULL, DateIn DATE NOT NULL,
FOREIGN KEY (OrderID) REFERENCES Orders (OrderID), FOREIGN KEY (DVDID) REFERENCES DVDs (DVDID) )
ENGINE=INNODB;
You should receive a message indicating that the statement executed successfully.
How It Works
Because you created the DVDs table first, that is the first table reviewed. The following CREATE TABLE
statement creates a table definition that includes 14 table elements:
CREATE TABLE DVDs (
DVDID SMALLINT NOT NULL AUTO_INCREMENT PRIMARY KEY, DVDName VARCHAR(60) NOT NULL,
NumDisks TINYINT NOT NULL DEFAULT 1, YearRlsd YEAR NOT NULL,
MTypeID VARCHAR(4) NOT NULL, StudID VARCHAR(4) NOT NULL, RatingID VARCHAR(4) NOT NULL, FormID CHAR(2) NOT NULL, StatID CHAR(3) NOT NULL,
FOREIGN KEY (MTypeID) REFERENCES MovieTypes (MTypeID), FOREIGN KEY (StudID) REFERENCES Studios (StudID), FOREIGN KEY (RatingID) REFERENCES Ratings (RatingID), FOREIGN KEY (FormID) REFERENCES Formats (FormID), FOREIGN KEY (StatID) REFERENCES Status (StatID) )
ENGINE=INNODB;
As you can see, the DVDs table definition includes nine columns. Each column is configured with a data type appropriate to that column. Any column defined as a foreign key is configured with a data type identical to the referenced column. In addition, every column is configured with the NOT NULLoption, which means that null values are not permitted. The first column, DVDID, is defined as the primary key and includes the AUTO_INCREMENToption, so unique values are automatically assigned to that column.
Of particular interest in this table definition is the NumDisks column definition, which includes a
for the NumDisks column is set to 1, unless otherwise specified. This was done because most DVDs come with one disk, although some include more.
The table definition also includes five FOREIGN KEYconstraints, one for each referencing column. In each case, the constraint specifies the referencing column, the referenced table, and the referenced column. For example, the first FOREIGN KEYconstraint specifies the MTypeID column as the referencing column, the MovieTypes table as the referenced table, and the MTypeID column in the MovieTypes table as the refer-enced column.
The other three tables that you defined in this exercise include column and foreign key definitions similar to what you’ve seen in the DVD table definition and the table definitions in the previous two exercises. In addition, all four tables are defined as InnoDBtables to support transactions and foreign key functionality. The DVDParticipant table definition includes an element that you have not seen, so that definition is worth a closer look:
CREATE TABLE DVDParticipant (
DVDID SMALLINT NOT NULL, PartID SMALLINT NOT NULL, RoleID VARCHAR(4) NOT NULL,
PRIMARY KEY (DVDID, PartID, RoleID),
FOREIGN KEY (DVDID) REFERENCES DVDs (DVDID),
FOREIGN KEY (PartID) REFERENCES Participants (PartID), FOREIGN KEY (RoleID) REFERENCES Roles (RoleID)
)
ENGINE=INNODB;
In this table definition, a composite primary key is defined on the DVDID, PartID, and RoleID columns, all of which are configured as individual foreign keys. As this table demonstrates, primary keys can consist of multiple columns, and those columns can also be configured as foreign keys. Because the three columns, when taken as a whole, uniquely identify each row in the table, you do not have to create an additional column in order to create a primary key. The table, as it exists here, is complete.
Once you create the four remaining tables in the DVDRentals database, you can begin adding the data necessary to populate the tables. As you learned earlier in this chapter, the data must exist in the refer-enced columns before you can insert it in the referencing columns. What this means is that the lookup tables and the tables that contain people’s names must be populated before the other tables. Chapter 6 provides more detail on how you insert data in your tables, but for now, the focus switches to modifying table definitions.
Modifying Tables
It is not uncommon to find that, after creating a table, you want to modify the table definition. Fortunately, MySQL allows you to change a number of table elements after creating a table. For example, you can add columns, alter existing columns, add PRIMARY KEYand FOREIGN KEYconstraints, or remove columns and constraints.
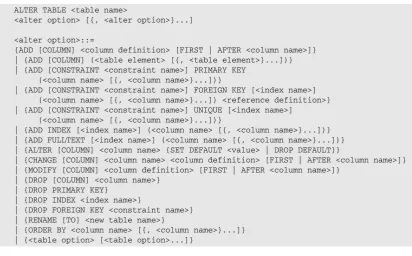
ALTER TABLE <table name>
<alter option> [{, <alter option>}...]
<alter option>::=
{ADD [COLUMN] <column definition> [FIRST | AFTER <column name>]} | {ADD [COLUMN] (<table element> [{, <table element>}...])} | {ADD [CONSTRAINT <constraint name>] PRIMARY KEY
(<column name> [{, <column name>}...])}
| {ADD [CONSTRAINT <constraint name>] FOREIGN KEY [<index name>] (<column name> [{, <column name>}...]) <reference definition>} | {ADD [CONSTRAINT <constraint name>] UNIQUE [<index name>]
(<column name> [{, <column name>}...])}
| {ADD INDEX [<index name>] (<column name> [{, <column name>}...])} | {ADD FULLTEXT [<index name>] (<column name> [{, <column name>}...])} | {ALTER [COLUMN] <column name> {SET DEFAULT <value> | DROP DEFAULT}}
| {CHANGE [COLUMN] <column name> <column definition> [FIRST | AFTER <column name>]} | {MODIFY [COLUMN] <column definition> [FIRST | AFTER <column name>]}
| {DROP [COLUMN] <column name>} | {DROP PRIMARY KEY}
| {DROP INDEX <index name>}
| {DROP FOREIGN KEY <constraint name>} | {RENAME [TO] <new table name>}
| {ORDER BY <column name> [{, <column name>}...]} | {<table option> [<table option>...]}
The basic elements of the ALTER TABLEstatement are the ALTER TABLEkeywords, the name of the table that you want to modify, and one or more alter options. If you chose more than one option, you must separate the options with a comma. Each of the alter options maps directly to a table definition option, except that you must also include an action keyword such as ADD, ALTER, or DROP. In addition, several of the alter options include additional elements that help to define the option. Take a look at an example to help illustrate this concept. Suppose that you create the following table:
CREATE TABLE Books (
BookID SMALLINT NOT NULL, BookName VARCHAR(40) NOT NULL,
PubID SMALLINT NOT NULL DEFAULT ‘Unknown’ )
ENGINE=INNODB;
As you can see, the table definition creates a table named Books, the table contains three columns, and the PubID column contains a default value of Unknown. Now suppose that you want to modify the table to include a primary key, foreign key, and an additional column. The following ALTER TABLE
statement modifies the table accordingly:
ALTER TABL