Beekeeping
Basics
College of Agricultural Sciences Cooperative Extension
Beekeeping
Basics
Beekeeping Basics ... 1
Contents
Original guide prepared by Clarence H. Collison, former extension entomologist. Major updates and revisions prepared by Maryann Frazier, senior extension associate, Penn State, and Dewey Caron, professor of entomology and applied ecology/extension entomologist, University of Delaware. Contributions made by Ann Harmon and Dennis VanEnglesdorp. Front cover photos courtesy of Maryann Frazier; back cover photo courtesy of Steve Williams. Diseases of Adult Bees ... 46Parasitic Mites ... 48
Pests... 54
Protecting Honey Bees from Pesticides ... 61
Honey Production and Processing ...62
Forms of Honey ... 62
Honey Removal and Processing ... 66
Marketing... 72
Pollination ...73
Moving Bees ... 73
When to Move Bees on to the Crop ... 74
Colony Strength ... 74
Number of Colonies Needed ... 75
Competitive Plants ... 75
Colony Distribution ... 75
Effect of Weather ... 75
Crop Characteristics and Needs ... 75
Pollination Contracts ... 77
Handling Beeswax and Pollen Trapping ...78
Rendering Beeswax ... 78
Trapping Pollen from Colonies ... 79
Floral Sources ...80
Glossary ...82
Appendix ...89
A. Summary of Current Best Management Practices... 89
B. Apiary Inspection and Extension Services in the Mid-Atlantic ... 90
C. Chemicals Approved for Legal Use in Honey Bee Colonies ... 91
D. Sources of Information and Assistance for Beekeepers ... 94
E. Beekeeping Supply Companies ... 98
Introduction ...2
The Colony and Its Organization ...3
Queen ... 3
Drones ... 4
Workers ... 5
Laying Workers ... 5
Bee Development ... 5
Brood ... 6
Beekeeping Equipment ...7
The Hive ... 7
Ancillary Equipment ... 11
Protective Clothing ... 12
Starting with Bees ...13
Package Bees ... 13
Nucleus Colonies ... 16
Buying Established Colonies ... 17
Collecting Swarms ... 17
Taking Bees out of Walls and Buildings ... 18
Selecting the Right Type of Bee for Your Operation ... 19
Apiary Location ... 20
Beekeeping in the Urban/Suburban Setting ... 21
Handling Bees ... 23
Colony Management ...25
Early Spring Management of Overwintered Colonies ... 25
Swarm Management ... 27
Late Spring and Summer Management ... 30
Fall Management ... 31
Summary of Management Practices throughout the Year ... 39
Managing Maladies ...41
Diseases, Parasites, and Pests and Their Control ... 41
Brood Diseases ... 41
Mid-Atlantic Apiculture Research and Extension
Introduction
Beekeeping can be a fascinating hobby, a profitable sideline, or a full-time occupation. You may want to keep bees for the delicious fresh honey they pro-duce, for the benefits of their valuable services as pollinators, or perhaps simply for the enjoyment of learning more about one of nature’s most interesting insects.
Almost anyone can keep bees. Honey bees normally only sting to defend themselves or their colony; when colonies are handled properly and precautions are taken, stinging is not a major problem. Most beekeepers develop a tolerance for bee venom over time and have reduced sensitivity to pain and swelling. However, the few people who react strongly to bee stings and pollen or who are unable to get over fears of stings should avoid contact with bees.
Most beekeepers in the Mid-Atlantic region are hobbyists. Beekeeping is generally considered a minor industry. However, because of its interrela-tionship with agriculture and dependency of grow-ers of several commodities on honey bee pollination, beekeeping is much more important than merely the value of the beeswax and honey produced annually.
The Colony and Its Organization ... 3
The Colony and Its Organization
Figure 1. Three types of honey bees normally found in a honey bee colony: worker, queen, and drone. (Courtesy of the U.S. Department of Agriculture)
Honey bees are social insects, which means that they live together in large, well-organized family groups. Social insects are highly evolved insects that engage in a variety of complex tasks not practiced by the multitude of solitary insects. Communication, complex nest construction, environmental control, defense, and division of the labor are just some of the behaviors that honey bees have developed to exist successfully in social colonies. These fascinat-ing behaviors make social insects in general, and honey bees in particular, among the most fascinating creatures on earth.
A honey bee colony typically consists of three kinds of adult bees: workers, drones, and a queen (Figure 1). Several thousand worker bees cooperate in nest building, food collection, and brood rearing. Each worker has a definite task to perform, related to its adult age. But surviving and reproducing take the combined efforts of the entire colony. Individual bees (workers, drones, and queens) cannot survive without the support of the colony.
In addition to thousands of worker adults, a colony normally has a single queen and several hundred drones during late spring and summer. The social structure of the colony is maintained by the presence of the queen and workers and depends on an effective system of communication. The distribution of chemical pheromones among mem-bers and communicative “dances” are responsible for controlling the activities necessary for colony survival. Labor activities among worker bees depend primarily on the age of the bee but vary with the needs of the colony. Reproduction and colony strength depend on the queen, the quantity of food
stores, and the size of the worker force. As the size of the colony increases up to a maximum of about 60,000 workers, so does the efficiency of the colony.
Queen
Each colony has only one queen, except during and a varying period following swarming preparations or supersedure. Because she is the only sexually developed female, her primary function is reproduc-tion. She produces both fertilized and unfertilized eggs. Queens lay the greatest number of eggs in the spring and early summer. During peak production, queens may lay up to 1,500 eggs per day. They gradually cease laying eggs in early October and produce few or no eggs until early next spring (January). One queen may produce up to 250,000 eggs per year and possibly more than a million in her lifetime.
A queen is easily distinguished from other members of the colony. Her body is normally much longer than either the drone’s or worker’s, especially during the egg-laying period when her abdomen is greatly elongated. Her wings cover only about two-thirds of the abdomen, whereas the wings of both workers and drones nearly reach the tip of the abdomen when folded. A queen’s thorax is slightly larger than that of a worker, and she has neither pollen baskets nor functional wax glands. Her stinger is curved and longer than that of the worker, but it has fewer and shorter barbs. The queen can live for several years—sometimes for as long as 5, but average productive life span is 2 to 3 years.
The second major function of a queen is produc-ing pheromones that serve as a social “glue” unify-ing and helpunify-ing to give individual identity to a bee colony (Figure 2, next page). One major phero-mone—termed queen substance—is produced by her mandibular glands, but others are also impor-tant. The characteristics of the colony depend largely on the egg-laying and chemical production capabili-ties of the queen. Her genetic makeup—along with that of the drones she has mated with—contributes significantly to the quality, size, temperament, and productivity of the colony.
drones in flight. Because she must fly some distance from her colony to mate (nature’s way of avoiding inbreeding), she first circles the hive to orient herself to its location. She leaves the hive by herself and is gone approximately 13 minutes. The queen mates, usually in the afternoon, with seven to fifteen drones at an altitude above 20 feet. Drones are able to find and recognize the queen by her chemical odor (pheromone). If bad weather delays the queen’s mating flight for more than 20 days, she loses the ability to mate and will only be able to lay unfertil-ized eggs, which result in drones.
After mating, the queen returns to the hive and begins laying eggs in about 48 hours. She releases several sperm from the spermatheca each time she lays an egg destined to become either a worker or queen. If her egg is laid in a larger drone-sized cell, she normally does not release sperm, and the resulting individual becomes a drone. The queen is constantly attended and fed royal jelly by the colony’s worker bees. The number of eggs the queen lays depends on the amount of food she receives and the size of the worker force capable of preparing beeswax cells for her eggs and caring for the larva that will hatch from the eggs in 3 days. When the queen substance secreted by the queen is no longer adequate, the workers prepare to replace (super-sede) her. The old queen and her new daughter may both be present in the hive for some time following supersedure.
New (virgin) queens develop from fertilized eggs or from young worker larvae not more than 3 days old. New queens are raised under three different circumstances: emergency, supersedure,
or swarming. When an old queen is accidentally killed, lost, or removed, the worker bees select younger worker larvae to produce emergency queens. These queens are raised in worker cells modified to hang vertically on the comb surface (Figure 3). When an older queen begins to fail (decreased production of queen substance), the colony prepares to raise a new queen. Queens produced as a result of supersedure are usually better than emergency queens since they receive larger quantities of food (royal jelly) during devel-opment. Like emergency queen cells, supersedure queen cells typically are raised on the comb surface. In comparison, queen cells produced in preparation for swarming are found along the bottom margins of the frames or in gaps in the beeswax combs within the brood area.
Drones
Drones (male bees) are the largest bees in the colony. They are generally present only during late spring and summer. The drone’s head is much larger than that of either the queen or worker, and its compound eyes meet at the top of its head. Drones have no stinger, pollen baskets, or wax glands. Their main function is to fertilize the virgin queen during her mating flight, but only a small number of drones perform this function. Drones become sexually ma-ture about a week after emerging and die instantly upon mating. Although drones perform no useful work for the hive, their presence is believed to be important for normal colony functioning.
Figure 3. Emergency queen cell built by workers by modifying an existing worker cell to accommodate the larger size of the queen. (Courtesy Maryann Frazier) Figure 2. Queen surrounded by attendant workers.
The Colony and Its Organization ... 5
While drones normally rely on workers for food, they can feed themselves within the hive after they are 4 days old. Since drones eat three times as much food as workers, an excessive number of drones may place an added stress on the colony’s food supply. Drones stay in the hive until they are about 8 days old, after which they begin to take orientation flights. Flight from the hive normally occurs between noon and 4:00 p.m. Drones have never been observed tak-ing food from flowers.
When cold weather begins in the fall and pollen/nectar resources become scarce, drones usually are forced out into the cold and left to starve. Queenless colonies, however, allow them to stay in the hive indefinitely.
Workers
Workers are the smallest bodied adults and consti-tute the majority of bees occupying the colony. They are sexually undeveloped females and under normal hive conditions do not lay eggs. Workers have specialized structures, such as brood food glands, scent glands, wax glands, and pollen baskets, which allow them to perform all the labors of the hive. They clean and polish the cells, feed the brood, care for the queen, remove debris, handle incoming nectar, build beeswax combs, guard the entrance, and air-condition and ventilate the hive during their initial few weeks as adults. Later as field bees they forage for nectar, pollen, water, and propolis (plant sap).
The life span of the worker during summer is about 6 weeks. Workers reared in the fall may live as long as 6 months, allowing the colony to survive the winter and assisting in the rearing of new genera-tions in the spring before they die.
Laying Workers
When a colony becomes queenless, the ovaries of several workers develop and workers begin to lay unfertilized eggs. Normally, development of the workers’ ovaries is inhibited by the presence of brood and the queen and her chemicals. The pres-ence of laying workers in a colony usually means the colony has been queenless for several weeks. However, laying workers also may be found in normal “queenright” colonies during the swarming season and when the colony is headed by a poor queen. Colonies with laying workers are recognized easily: there may be anywhere from five to fifteen eggs per cell (Figure 4) and small-bodied drones are reared in worker-sized cells. In addition, laying workers scatter their eggs more randomly over the brood combs, and eggs can be found on the sides of the cell instead of at the base, where they are placed by a queen. Some of these eggs do not hatch, and many of the drone larvae that do hatch do not survive to maturity in the smaller cells.
Bee Development
All three types of adult honey bees pass through three developmental stages before emerging as adults: egg, larva, and pupa. The three stages are collectively labeled brood. While the developmental stages are similar, they do differ in duration (see Table 1). Unfertilized eggs become drones, while fertilized eggs become either workers or queens. Nutrition plays an important part in caste develop-ment of female bees; larvae destined to become workers receive less royal jelly and more a mixture of honey and pollen compared to the copious amounts of royal jelly that a queen larva receives.
Table 1. Developmental stages of the three castes of bees.
DEVELOPMENTAL DURATION OF STAGES
STAGE QUEEN WORKER DRONE
Days
Egg 3 3 3
Larval stage 5 1⁄
2 6 6
1⁄ 2
Pupal stage 7 1⁄
2 12 14
1⁄ 2
Total
developmental time 16 21 24
Figure 7. Honey bee pupae changing from the larval to adult form. (Courtesy Scott Camazine)
Brood
EGGS
Honey bee eggs are normally laid one per cell by the queen. Each egg is attached to the cell bottom and looks like a tiny grain of rice (Figure 5). When first laid, the egg stands straight up on end. However, during the 3-day development period the egg begins to bend over. On the third day, the egg develops into a tiny grub and the larval stage begins.
LARVAE
Healthy larvae are pearly white in color with a glistening appearance. They are curled in a “C” shape on the bottom of the cell (Figure 6). Worker, queen, and drone cells are capped after larvae are approximately 6, 51⁄
2, and 6 1⁄
2 days old, respectively.
During the larval stage, they are fed by adult worker (nurse) bees while still inside their beeswax cells. The period just after the cell is capped is called the prepupal stage. During this stage the larva is still grub-like in appearance but stretches itself out lengthwise in the cell and spins a thin silken cocoon. Larvae remain pearly white, plump, and glistening during the prepupal stage.
PUPAE
Within the individual cells capped with a beeswax cover constructed by adult worker bees, the prepupae begin to change from their larval form to adult bees (Figure 7). Healthy pupae remain white and glisten-ing durglisten-ing the initial stages of development, even though their bodies begin to take on adult forms. Compound eyes are the first feature that begin to take
on color; chang-ing from white to brownish-purple. Soon after this, the rest of the body begins to take on the color of an adult bee. New workers, queens, and drones emerge approximately 12, 71⁄
2, and 14 1⁄
2
days, respectively, after their cells are capped.
BROOD PATTERNS
Healthy brood patterns are easily recognized when looking at capped brood. Frames of healthy capped worker brood normally have a solid pattern with few cells missed by the queen in her egg laying. Cappings are medium brown in color, convex, and without punctures (Figure 8). Because of developmental time, the ratio should be four times as many pupae as eggs and twice as many as larvae; drone brood is usually in patches around the margins of brood nest.
Figure 6. Cells with healthy worker larvae. (Courtesy Dewey Caron)
Figure 5. Cells with fertilized eggs laid by the queen. (Courtesy
Maryann Frazier) Figure 8. Comb of sealed worker brood with drone cells in the lower corners. (Courtesy Maryann Frazier)
LARVA
Beekeeping Equipment ... 7
Beekeeping Equipment
Equipment needs vary with the size of your opera-tion, number of colonies, and the type of honey you plan to produce. The basic equipment you need are the components of the hive, protective gear, smoker and hive tool, and the equipment you need for handling the honey crop.
The hive is the man-made structure in which the honey bee colony lives. Over the years a wide variety of hives have been developed. Today most beekeepers in the United States use the Langstroth or modern ten-frame hive. A typical hive consists of a hive stand, a bottom board with entrance cleat or reducer, a series of boxes or hive bodies with sus-pended frames containing foundation or comb, and inner and outer covers (Figure 9, next page, includes dimensions for those wishing to construct their own hives). The hive bodies that contain the brood nest may be separated from the honey supers (where the surplus honey is stored) with a queen excluder.
The Hive
HIVE STAND
The hive stand, actually an optional piece of equip-ment, elevates the bottom board (floor) of the hive off the ground. In principle, this support reduces dampness in the hive, extends the life of the bottom board, and helps keep the front entrance free of grass and weeds. Hive stands may be concrete blocks, bricks, railroad ties, pallets, logs, or a com-mercially produced hive stand. A hive stand may support a single colony, two colonies, or a row of several colonies.
BOTTOM BOARD
The bottom board serves as the floor of the colony and as a takeoff and landing platform for foraging bees. Since the bottom board is open in the front, the colony should be tilted forward slightly to prevent rainwater from running into the hive. Bottom boards available from many bee supply dealers are revers-ible, providing either a 7⁄
8- or 3⁄
8-inch opening in front.
HIVE BODIES
The standard ten-frame hive body is available in four common depths or heights. The full-depth hive body, 95⁄
8 inches high, is most often used for brood
rearing. These large units provide adequate space with minimum interruption for large solid brood areas. They also are suitable for honey supers. However, when filled with honey, they weigh over 60 pounds and are heavy to handle.
The medium-depth super, sometimes called the Dadant or Illinois super, is 65⁄
8 inches high. While
this is the most convenient size for honey supers, it cannot be cut efficiently from standard-sized lumber. An intermediate size (75⁄
8 inches) between the
full- and medium-depth super is preferred by some beekeepers, especially those who make their own boxes.
The shallow-depth super, 51⁄
16 inches high, is the
lightest unit to manipulate (about 35 pounds when filled with honey). This size has the greatest cost of assembly per square inch of usable comb space.
Section comb honey supers, 45⁄
8 inches high,
hold either basswood section boxes or plastic rings and section holders. Section comb honey production is a specialized art requiring intense management and generally is not recommended for beginners.
Some beekeepers prefer eight-frame hive bodies. These were mostly homemade, but one U.S. bee supplier is now selling eight-frame boxes as English garden hive boxes. Beekeepers rearing queens and/ or selling small starter colonies (nucs) prefer to use a three- or five-frame nuc box usually with standard deep frames. These can be purchased from bee supply dealers and are constructed from wood or cardboard, the latter for temporary use only.
Figure 9. Equipment and dimensions for a standard Langstroth hive.
ILLUSTRATIONBYPETERKAUFFMAN 71/4"
145/8"
Outer Telescoping Cover
3 pieces 71/4" X 3/4" X 181/8" (top)
2 pieces 213/4" X 3/4" X 2" (sides)
2 pieces 163/8" X 3/4" X 2" (ends)
Inner Cover
2 pieces 1/2" X 3/4" X 161/8"
2 pieces 1/2" X 3/4" X 181/4"
2 pieces 6" X 3/8" X 193/4"
1 piece 41/8" X 3/8" X 193/4"
Section Comb Super
2 pieces 193/4" X 3/4" X 45/8" (sides)
2 pieces 145/8" X 3/4" X 45/8" (ends)
Shallow Extracting Super
2 pieces 193/4" X 3/4" X 53/4" (sides)
2 pieces 145/8" X 3/4" X 53/4" (ends)
Queen Excluder
2 pieces 193/4" X 3/4" X 53/4" (sides)
2 pieces 145/8" X 3/4" X 53/4" (ends)
Full Depth Hive Body
2 pieces 193/4" X 3/4" X 95/8" (sides)
2 pieces 145/8" X 3/4" X 95/8" (ends)
Bottom Board
3 pieces 71/8" X 3/4" X 153/8" (floor)
2 pieces 23/8" X 3/4" X 22" (sides)
1 piece 23/8" X 3/4" X 145/8" (end)
Hive Stand
1 piece 3" X 3/4" X 145/8" (back end)
2 pieces 3" X 3/4" X 251/16" (sides)
1 piece 53/16" X 3/4" X 161/8" (front end)
213/4"
193/4"
193/4"
193/4"
193/4"
193/4"
22"
22" 251/16"
45°
161/8" 513/16" 153/8" 145/8"
23/8" 145/8"
145/8" 145/8"
95/8" 1/2" 53/4" 161/8"
165/8"
Beekeeping Equipment ... 9
full-depth and a medium or shallow for the brood area (Figure 10). However, using hive bodies similar in size permits the interchange of combs between the two hive bodies. Beekeepers who wish to avoid heavy full-depth hive bodies may elect to use three shallow hive bodies for the brood nest. This approach is certainly satisfactory, but it is also the most expen-sive and time consuming in assembly since it requires three boxes and thirty frames instead of two boxes and twenty frames.
FRAMES AND COMBS
The suspended beeswax comb held within a frame is the basic structural component inside the hive. In a man-made hive, the wooden or plastic beeswax comb is started from a sheet of beeswax or plastic foundation. After the workers have added wax to draw out the foundation, the drawn cells are used for storage of honey and pollen or used for brood rearing.
Frames are 175⁄
8 inches long and either 9 1⁄
8, 7
1⁄
4,
61⁄ 4, or 5
3⁄
8 inches high to fit the various hive-body
depths. Each frame consists of a top bar, two end bars, and a bottom bar. Top bars may be either grooved or wedged; bottom bars are split, solid, or grooved. Some types may have advantages over others, but the choice is generally a personal prefer-ence that includes consideration of cost. Top bars are suspended on ledges or rabbets in the ends of the hive body. V-shaped metal strips or metal frame spacers are often nailed on the recess for reinforce-ment. A popular commercial end bar has shoulders to help ensure correct bee space between adjacent frames and side of the box.
The comb foundation consists of thin sheets of beeswax imprinted on each side with patterns of worker-sized cells (Figure 11). Two basic types of comb foundations are distinguished by their relative thickness: thin surplus foundation is used to pro-duce section comb honey, chunk honey, or cut-comb honey; a thicker, heavier foundation should be used in the brood chamber and in frames for producing extracted honey. Thicker foundations often are reinforced with vertically embedded wires, thin sheets of plastic, metal edges, or nylon threads. When deciding whether to invest in plastic beeswax foundation in plastic frames versus pure beeswax foundation in wooden or plastic frames, initial cost, assembly time, durability, and length of expected use are all factors you should consider. Plastic foundation and frames are becoming increasingly popular.
When using beeswax foundation in wooden frames, securing the foundation within the frame with either metal support pins or horizontal wires is necessary. The thin wedge of the top bar secures wire hooks extending from one side of the vertically wired foundation to help secure the foundation, ensuring that it remains in the center of the frame for proper drawing by the bees. Combs may be strengthened further by embedding horizontal wires (28 or 30 gauge) into the foundation with an electric current from a small transformer or by using a spur wire embedder. This activity is time consuming and difficult to master, but only a well-supported foundation results in well-drawn combs.
Figure 11. A sheet of comb founda-tion suspended in a wooden frame. (Courtesy Dewey Caron)
Frames with new foundation should only be given to rapidly growing colonies such as a package, swarm, or colony split (division) or to established colonies during a major nectar flow. Workers build beeswax combs of six-sided cells by adding wax to the cell base imprints on the sheet of foundation. When foundation is given to colonies during a nectar dearth, the bees will often chew holes in the foundation, thus resulting in poorly drawn finished combs.
Beeswax is produced by four pairs of glands on the underside of the worker’s abdomen. As wax is secreted and exposed to the air, it hardens into flat wax scales. To produce comb, the bees remove the wax scales from the underside of the abdomen with spines located on their middle legs. The wax scale is then passed to the mouthparts where it is manipu-lated until pliable and ready to be formed into six-sided cells.
QUEEN EXCLUDER
The primary functions of the queen excluder are to confine the queen and her brood and to store pollen in the brood nest. It is an optional piece of equip-ment and is used by less than 50 percent of beekeep-ers. Many beekeepers refer to queen excluders as “honey excluders” because at times workers are reluctant to pass through the narrow openings of the excluder to store nectar in the supers above until all available space in the brood chambers is used up. To minimize this problem, allow the bees to begin storing nectar in the supers before installing the excluder. Nectar stored in drawn comb will entice the bees to pass through the excluder. Never put supers of foundation above a queen excluder.
An excluder is constructed of a thin sheet of perforated metal or plastic with openings large enough for workers to pass through. Other designs consist of welded round-wire grills supported by wooden or metal frames.
Frames of honey in the super directly above the brood chamber or comb sections act as a natural barrier to keep the queen confined to the brood nest. Properly timing the reversal of brood chambers in the spring with supering during a surplus nectar flow will serve the same purpose as a queen excluder. For this reason, queen excluders are sometimes used with the addition of the first supers (but again, installed only after some nectar has been stored in the supers)
and then removed. Since beeswax combs used for brood darken with use, a queen excluder can help ensure separation of brood combs from honey combs to avoid unnecessarily darkening honey.
Queen excluders also are used to separate queens in a two-queen system, to raise queens in queenright colonies, and for emergency swarm prevention. An excluder also may help in finding the queen. If you place an excluder between two hive bodies, after 3 days you will be able to determine which hive body contains the queen by locating where eggs are present.
INNER COVER
The inner cover rests on top of the uppermost super and beneath the outer telescoping cover. It prevents the bees from gluing down the outer cover to the super with propolis and wax. It also provides an air space just under the outer cover for insulation. During summer, the inner cover protects the interior of the hive from the direct rays of the sun. During winter, it prevents moisture-laden air from directly contacting cold surfaces. The center hole in the inner cover may be fitted with a Porter bee escape to aid in removing bees from full supers of honey.
OUTER COVER
An outer telescoping cover protects hive parts from the weather. It fits over the inner cover and the top edge of the uppermost hive body. The top is normal-ly covered with a sheet of metal to prevent weather-ing and leakweather-ing. Removal of the outer cover, with the inner cover in place, disturbs few bees within the hive and allows the beekeeper to more easily smoke the bees prior to colony manipulation.
Beekeeping Equipment ... 11
OTHER PIECES OF HIVE EQUIPMENT
In addition to the basic hive components, adding other pieces of equipment is possible. A few bee-keepers like to use the slatted bottom board, others a different English-style cover. Beekeeping offers much room for creativity and individualization.
PLASTIC HIVE EQUIPMENT
The basic parts of the hive traditionally have been made out of pine, cypress, or redwood. Today all hive components are available in plastic. Plastic hive components and plastic frames that snap together are durable, strong, lightweight, easy to assemble, and require little maintenance. While plastic frames and foundation are becoming increasingly popular, plastic hive covers, bottom boards, and hive bodies have not proved to be as useful because plastic does not breathe and does not allow easy moisture ventilation. Plastic also warps easily, and some types let in too much light, which makes drawing foundation difficult.
PAINTING THE HIVE PARTS
All parts of the hive exposed to the weather should be protected with paint. Do not paint the inside of the hive; the bees will varnish it with propolis (a mix of plant sap and wax). The only purpose in painting is to preserve the wood. Most beekeepers use a good latex or oil-based, exterior, white paint. A light color is desirable because it prevents heat buildup in the hive during summer. Although white is a traditional color, various combinations of colors will help reduce drift between colonies.
SUPPLIERS
New bee equipment is generally “knocked down” or unassembled when purchased, but you can also purchase assembled equipment for a higher price and shipping fee. Assembly directions are furnished by bee supply dealers and are usually easy to follow. Novice beekeepers are strongly encouraged to seek the help of a more experienced beekeeper in assem-bling the hive components for the first time. Begin-ners should purchase their equipment early so that they can put together and paint hives before the bees arrive. Sheets of foundations should not be installed in the frames until needed because storage tempera-tures and handling may cause the wax to stretch and warp, resulting in poorly drawn combs.
Some beekeepers find they can save money by making their own equipment or by purchasing used equipment. With both approaches, the equip-ment must be a standard size. When constructing beekeeping equipment, a thorough understanding of bee space is a necessity. You can consult readily available construction plans, such as those supplied on page 8, or use commercial pieces as a pattern. Many beekeepers find they can economically make covers, hive bodies, and bottom boards, but frames are more difficult and time consuming. Success depends on availability and cost of materials, proper woodworking equipment, and the beekeeper’s woodworking skills.
Purchasing used equipment can present prob-lems and is not recommended for the beginner. Initially you may have problems simply locating a source of used equipment and determining its value or worth. In addition, secondhand equipment may be of non-standard dimensions or contaminated with pathogens that cause various bee diseases, despite considerable time in storage. Always ask for an inspection certificate indicating that the state apiary inspector examined the hives and did not find any evidence of disease.
For additional information and sources on beekeeping equipment and supplies, see the list of dealers in the appendix or consult local and regional beekeeping newsletters, your local county extension office, national and regional beekeeping publications, or the MAAREC Web site (maarec.cas.psu.edu).
Ancillary Equipment
SMOKER
A bee smoker and hive tool are essential for working bees. The smoker consists of a metal fire pot and grate with bellows attached. The size of the smoker is a matter of individual preference. The 4 x 7 inch size is probably the most widely used. Plan to purchase/use a smoker with a heat shield around the firebox to avoid burning clothing or yourself if you intend to support the smoker between your legs as you work a colony. Some beekeepers like the model with a hook to hang the smoker over the open hive body as they inspect it, thus keeping the smoker handy at all times.
include burlap, corn cobs, wood shavings, pine needles, cardboard, punk wood, bark, sumac bobs, cotton rags, dry leaves, and bailer twine. An alter-native liquid smoke is available that you mix with water and spray onto the bees with a mister-type applicator.
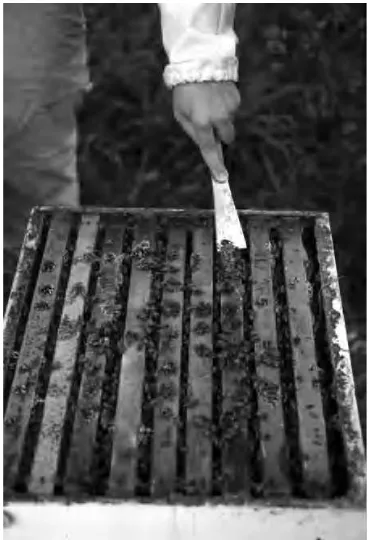
HIVE TOOL
The hive tool is a metal bar essential for prying apart frames in a brood chamber or honey super, separating hive bodies, and scraping away wax and propolis (Figure 12). Holsters to hold hive tools are available, but many beekeepers prefer to hold the hive tool in the palm of their hand to keep it acces-sible and to keep their fingers free for lifting boxes and frames. The hive tool should be cleaned from time to time to remove propolis, wax, and honey. This may be done simply by stabbing the tool into the ground or by burning it in the hot fire pot of a smoker. Both cleaning methods help prevent the spread of bee diseases. A screwdriver or a putty knife are poor substitutes for a sturdy hive tool and may cause frame/hive body damage.
Protective Clothing
You should wear a bee veil at all times to protect your face and neck from stings. Three basic types of veils are available: those that are open at the top to fit over a hat, completely hatless veils, and veils that form part of a bee suit. A wire or fabric veil that stands out away from the face worn over a wide-brim, lightweight hat that fits securely offers the best protection. Veils without hats, although lightweight and fold easily for transport, do not always fit as securely on the head as they should. The elastic band that fits around your head often works up-ward, allowing the veil to fall against your face and scalp as you bend over to work with bees.
A wide variety of coveralls (bee suits) is avail-able to beekeepers in a wide price range. The most expensive bee suits are not always the best or easiest to use. Coveralls are useful to avoid getting propolis on your clothing and greatly reduce stings if main-tained properly and laundered regularly. Coveralls or shirtveils (long-sleeved shirts) made especially for beekeepers with attached, removable veils are popular.
White or tan clothing is most suitable when working bees. Other colors are acceptable, but bees react unfavorably to dark colors, fuzzy materials, and clothing made from animal fiber. Windbreakers and coveralls made from ripstop nylon fabric are excellent for working bees, although they may be too hot to use in the summer.
Beginners who fear being stung should wear canvas or leather gloves. Many experienced bee-keepers find gloves cumbersome and decide to risk a few stings for the sake of easier handling. Form-fitting gloves (such as those suitable for lab work or household chores) reduce stings and sticky fingers from honey and propolis. Ankles with dark socks and open wrists are areas vulnerable to stings. Angry bees often attack ankles first because they are at the level of the hive entrance. You should secure your pant legs with string or rubber bands or tuck them inside your shoes or socks. Secure open shirtsleeves with Velcro, rubber bands, or wristlets to reduce stings to these sensitive areas.
You should avoid using after-shave lotions, perfumes, and colognes when working with bees because such odors may attract curious bees. Regularly launder clothing and gloves used in inspection to eliminate sting/hive odors that might attract/irritate bees.
Starting with Bees ... 13
Starting with Bees
You should order packages in January or Febru-ary to ensure timely delivery in early spring (April). If you are installing packages on drawn combs containing honey and pollen, you can do so in early April; if you are installing them on comb foundation, then you should have them arrive in late April or early May. Beekeepers in northern areas may wish to delay shipments for a couple of weeks. Package bees could die if installed on foundation in temperatures below 57°F (14°C) because too few bees will be able to break cluster and move to syrup feeders. Bees clustered on combs of honey, on the other hand, do not have to break cluster in order to eat.
Standard wooden shipping cages measure about 6 x 10 x 16 inches with wire screen on the long sides for ventilation. A can containing a food supply of 50 percent sugar syrup is positioned in the middle of the cage. A few small holes in the bottom of the can allow the bees to withdraw the syrup. A young mated queen is housed in a separate cage that is suspended at the top of the package next to the feeder can. Two or three worker bees (attendants) commonly are caged with the queen to care for her. Queen cages usually are supplied with a food source of sugar candy. A mite treatment strip may also be suspended from the top of the cage or stapled to the back of the queen cage. Packages are braced several inches apart to protect them from crowding and overheating during shipment (Figure 13).
You can obtain packages from a local beekeeper or supply dealer who has purchased them in bulk from a reputable package producer, or you can order them directly from the producer and have them shipped by U.S. mail. You should alert officials at the post office about the expected date of arrival and should request immediate notification.
Upon arrival, you should inspect package bees for unusual numbers of dead bees. Some bee mortal-ity is normal, but when dead bees accumulate more than a 1⁄
2 inch in the bottom of the shipping cage or
when queens are dead on arrival, you should file a damage claim with the postal clerk immediately, noting the condition of the package. You should then send this statement to the package producer so that losses may be replaced.
Figure 13. Three-pound packages ready to be installed into hives. (Courtesy Maryann Frazier)
There are several different ways of getting started in beekeeping: buying package bees; purchasing a nucleus (nuc) colony; buying established colonies; collecting swarms; and taking bees out of tree and/ or wall cavities. We recommend novices start with either a package(s) or nucleus colony(ies). However, you should be careful when purchasing nucs (and established colonies) because you might be buying other beekeepers’ problems such as disease or non-standard equipment. Collecting swarms and trans-ferring bees is more difficult and not recommended for the beginner without the assistance of a more experienced beekeeper. The best time to start with bees is in the spring or early summer.
Package Bees
Package bees are perishable, so handle them with care. Before installing, protect them from wind and cold but do not put them in a heated area. If packages arrive when the temperature is below 45°F (18°C) and are to be transported in an open truck, cover them with burlap or paper while in transit. If transported in a closed truck or car, no extra protec-tion is needed.
You should try to install packages as soon as possible after their arrival, although you can delay installation for up to 48 hours with little difficulty. Feed the bees as soon as you get them and continue feeding until they are installed. Spray or sprinkle the cage screen with 50 percent sugar syrup, preferably in a room where the temperature is around 70°F (21°C). Avoid brushing the syrup onto the screen, as this may injure the bees’ mouthparts. After feeding the bees, store them in a cool, dry, and preferably dark place, such as a basement, porch, or garage. Storage temperature should be between 50° (10°C) and 60°F (15°C). The bees will recluster around their queen and become quiet. Package bees soon die if they are stored where the temperature is above 80°F (26°C) or if they are left standing in the sun.
Before the packages arrive, the hives to be used should be assembled, in place, and ready to receive them. Ideally, package bees should be installed in late afternoon or early evening, when there is little opportunity for flight. On cool days, package bees may be put into hives at any time. If the bees are well fed, they are much easier to install.
Start your installation by opening the empty hive and removing five or six middle frames. Insert an entrance reducer to provide the smallest hive opening. Then close the entrance completely by placing some green grass in the small opening. This will keep the bees in the hive until they settle down. The temporary grass entrance plug can be removed after installation is completed.
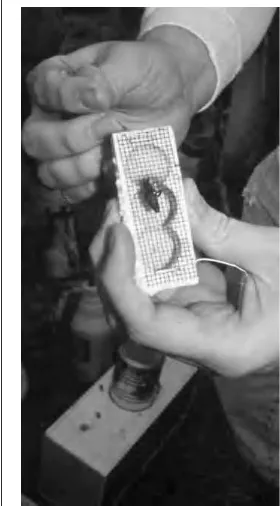
Now with your hive ready to receive the pack-age bees, remove the square piece of wood that covers the top, the feeder can, and the queen cage (Figure 14). Check to make sure the queen is alive. Remove the cork or any other covering from the candy end of the queen cage and make a small hole through the candy using either a nail or toothpick-sized twig (Figure 15). Take care that you do not injure the queen. The hole should be small enough to prevent the bees from coming out immediately, but large enough so the bees can release their queen in 24 to 48 hours.
There are several different ways to install or transfer the bees from the mailing cage to the hive.
Figure 14. A full-depth hive body with middle frames removed to receive a package of bees. Sugar syrup feeder and queen cage are removed from the package before shaking the bees from the package into the empty space. (Courtesy Dewey Caron)
Starting with Bees ... 15
One method is to place the mailing cage in the open space left after removing the middle frames, allow-ing the bees to exit by themselves. The first step in this type of installation is to wedge the queen cage between the top bars of the two combs (Figure 16) next to the mailing cage. Place the queen cage with the candy end up, so dead worker bees within the cage do not block the exit hole. Bees should have maximum access to the screen face of the queen’s cage so that they can feed her and receive her chemical pheromones. Shake about a handful or two of bees around the queen cage to expedite movement of the bees from the package to the combs. During cool weather, shake more bees on the queen cage to prevent the queen from becoming chilled. Then place the package in the open space and close the hive. Return to the hive in 4 or 5 days to remove the empty mailing and queen cages and replace the frames.
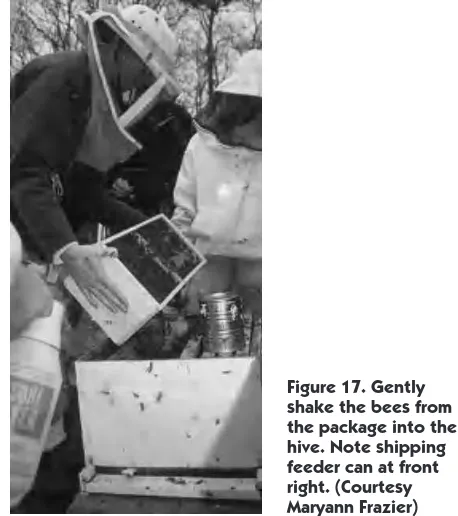
A better way to install packages is by shaking. Prepare the hive as described previously. Just before opening the package, sprinkle both sides of the screened shipping cage with sugar syrup so the bees’ wings become wet. Knock the bees to the bottom of the cage by jarring a corner of the package against the ground or hive. As you remove the feeder can, sprinkle the bees through the top open-ing. (Do not overdo the sprinkling in cool weather.) Remove the queen cage, inspect the queen, and place the cage aside but not in direct sunlight. Gently shake the bees out of the package into the open space left by the removal of the middle frames (Figure 17). While the bees will fall out fairly readily, you still should jar the package against the ground
Figure 16. The queen cage, sugar candy end upward, is wedged between two frames. (Courtesy Maryann Fazier)
two or three times, collecting any remaining bees in one corner of the package before reshaking remain-ing bees into the hive. If the bees’ wremain-ings are damp with syrup, there will be little flying. Leave the mailing cage beside the entrance, touching the bottom board overnight so any remaining bees can escape. With the hive tool, gently level the pile of bees on the bottom board. You can position the queen cage, with cork removed from the candy end, between two frames as previously described (Figure 16). An alternative is to directly release the queen. To direct release a queen, first sprinkle a little syrup on the queen through the queen cage screen. Next, lower the queen cage into the hive close to one of the exposed combs. Remove the screen with your hive tool and let the queen crawl onto the comb or among the bees. Carefully replace the previously removed combs to avoid injuring the bees and the queen. Replace the inner and outer covers
FEEDING PACKAGES SYRUP
One of the most important considerations in devel-oping a strong colony from a package is to supply plenty of food until a strong nectar flow begins. Unless you install your packages on drawn combs containing sufficient honey and pollen (taken from existing colonies or from storage), you should plan to feed the bees immediately upon installation and continue feeding them until they are able to fend for
themselves. This is critically important when install-ing packages on foundation.
There are several efficient ways of feeding sugar syrup to your colonies. One of the easiest methods of getting food to colonies hived from packages is to invert a feeder can or plastic jar over the hole in the inner cover. You can make this feeder by punching ten to fifteen small nail holes in the lid of a jar or can with removable lid (such as coffee can or clean paint can). Do not leave the hive top and feeder can exposed—place an empty hive body on top of the hive body with the bees to enclose the feeder and replace the outer cover (see “Feeding Honey Bees” in the next section for more information on feeding). Leave the hive alone for at least 4 to 5 days, except to refill the feeder as needed. After 7 to 9 days, examine the hive briefly to see if the queen is accepted and laying. Use smoke sparingly during this inspection, and handle the bees and equipment gently. If either the shipping or queen cage remain in the colony, you should remove these at this time. Check a frame or two for eggs and larvae. If you find a colony without a queen (no eggs or larvae and no visible sign of the queen) you should give it another queen without delay to avoid losing the entire colony. If obtaining a new queen immediately is impossible, the only practical recourse is to combine it with a queenright package or colony.
You can also install package bees in a hive body above a double screen placed on top of an estab-lished strong colony. The warmth of the estabestab-lished colony on the bottom improves the development of the new colony. Hive the package by shaking the bees from the shipping container and direct release the queen (as described previously). You need to provide an entrance to the rear of the hive for the new colony and feed it sugar syrup as you would other hives established from packages.
During the first 21 days after installation, a package bee colony experiences about a 35 percent loss in population. This loss occurs because new adult workers require 21 days to develop, during which time the older bees of the existing population die. After this period, the rate of emergence of young workers begins to exceed the rate of death of older bees and the population grows. About 4 weeks after installation the population is completely restored. Some beekeepers compensate for the initial shrink-age in packshrink-age bee colony size by giving each package a frame or two of capped brood from an
established colony. The capped brood helps increase the population of young bees and stimulates growth of the colony. Likewise, beekeepers with colonies that have sufficient capped honey frames provide packages with one or two drawn frames containing honey to stimulate more rapid package develop-ment. The major disadvantage when giving package bees brood and honey is the possibility of spreading disease/mites to the new colony.
Newly hived package bees are very susceptible to nosema disease, which often leads to queen supersedure or queenlessness. Feeding fumagillin medicated syrup to newly installed packages is highly recommended (see “Nosema” in the section “Managing Maladies”).
About 11⁄
2 to 2 months after installation, when
the package bee colony requires additional space, you should place another hive body of frames on top of the brood chamber, either as a super for surplus honey or for brood chamber expansion.
Nucleus Colonies
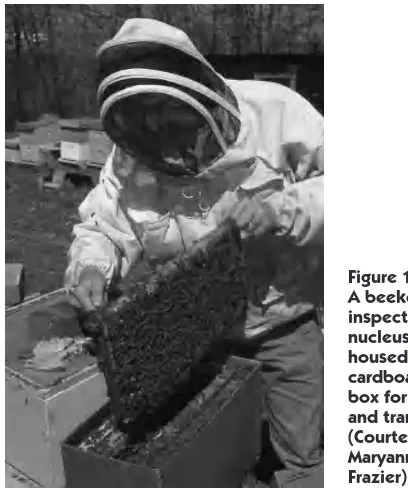
A nucleus colony, or nuc, is essentially a smaller hive, sometimes in a smaller box, consisting of bees in all stages of development, as well as food, a laying queen, and enough workers to cover from three to five combs (Figure 18). When placed into a full-sized hive body and given supplemental feeding, the nuc usually expands rapidly into a
Starting with Bees ... 17
Figure 19. A typical honey bee swarm. (Courtesy Maryann Frazier)
strong colony. When started in early spring, these hives may produce surplus honey in their first year under favorable weather and nectar flow conditions. The advantages of starting with a nuc rather than a package include faster colony development due to the presence of brood and no break in the queen’s laying cycle; ease of establishing the unit in your own equipment; and a chance to inspect the nuc before purchasing. Sales of nucs have increased tremendously over the past few years and are making inroads into the well-established package bee businesses.
While nucleus colonies are initially more expen-sive than packages, their potential financial returns at season’s end more than make up for the increased purchase price. The biggest disadvantage in pur-chasing a nuc is the potential of disease and/or mite transmission. Inspection and certification of nucs for sale is not required and depending on how they were handled before sale, disease may occur among some nucleus colonies after they are purchased. Bees that are diseased and have been fed antibiotic drugs may appear healthy, but the combs will be contami-nated with disease-causing organisms. If the buyer does not continue the drug feeding program, it will be only a matter of time until the disease reappears (see “American foulbrood”). You should only purchase nucs from reputable beekeepers. Check with your local or state beekeeping association to identify beekeepers that have a good reputation for producing high-quality, disease-free nucs.
The strength of nucs varies a great deal from source to source based partly on number of frames, bee stock, and environmental conditions during the time the nuc was made up. Population differences may also be due to how long the nuc has been made up and/or the lack of well-defined guidelines for making up nucs. One beekeeper may provide one frame of brood in a five-frame nuc box, while another will provide three. Before purchasing nucs, be sure price reflects the strength of the nucleus colonies.
Buying Established Colonies
Purchasing established colonies is not recommended for beginners, but experienced beekeepers may find this a practical means to increase their number of colonies. Problems associated with buying used equipment and bees include determining the true
market value, the potential of acquiring disease, and getting equipment that is highly variable in condi-tion and possibly not of standard dimensions.
While financial returns from an established colony can be realized in the first season, beginners usually are not adequately experienced to manage a full-strength colony. Purchasing smaller units such as packages or nucs in the spring allows a beginner to grow in confidence and managerial skills as the colony size increases during the season.
Collecting Swarms
Collecting honey bee swarms in the spring is an excellent way to replace winter losses, strengthen weak colonies, or start new ones. Primary swarms are valuable; they may contain as many as 25,000 bees plus the queen. In comparison, a 3-pound package will number approximately 10,500 bees. Three considerations to keep in mind before attempt-ing to collect a swarm are (1) how long the swarm has been there, (2) where the swarm is located, and (3) its size.
(Figures 20 and 21). When a swarm settles in a very high tree or on any other inaccessible structure, it is best to leave it there. Such swarms may be an after-swarm with one or more virgin queens and their successful capture can be very difficult. Sometimes you can knock these high swarms into a bucket at the end of a long pole and then lower it to a collecting box. The success rate, however, is very low.
Once you have successfully captured a swarm, you can introduce the swarm into your own equip-ment by either shaking or dumping the bees into an open hive with several frames removed or simply by shaking it in front of the hive (Figure 22). If you were successful in getting the queen with the rest of the swarm, the bees will adopt the hive. Using drawn combs is better than foundation when introducing swarms to an empty hive, but one or two drawn combs, preferably with pollen, brood, and/or honey (from a disease-free colony), combined with founda-tion also works.
Instead of waiting for swarms to simply appear, you can try baiting swarms. Pheromone lures (available from beekeeping supply companies) placed in special light-weight bait hives or empty hive bodies (with or without drawn comb) can be used to lure swarms. Place trap boxes in exposed locations 8–15 feet off the ground (with entrance reduced to keep birds and squirrels out) and check weekly during the swarm season (April–June, depending on your location) so you can transfer any swarms into a standard hive in a timely fashion.
Taking Bees out of Walls and Buildings
Honey bee colonies and their combs can be trans-ferred from a tree or wall into a hive. Because of the amount of work involved and the difficulty of obtaining good combs, you should not consider this method a convenient or easy way of obtaining bees unless you have no other alternative. In many situations, the beekeeper is providing a service for homeowners and should charge for it.
The best way of removing a colony from a wall is to remove the siding or other exterior coverings to completely expose the colony. Then cut out the combs and brush or vacuum the bees from the interior of the wall. If exposing the colony is impos-sible, you may try to trap the majority of the bees out of the tree or wall. The first step in trapping bees
Figure 20. To collect a swarm hanging from a tree limb, shake the limb with a quick, sharp snap of the wrist two or three times so that the cluster falls into the box. (Courtesy Maryann Frazier)
Figure 21. Swarms collected in light-weight box with a tight-fitting lid are easy to transport back to the apiary. (Courtesy Maryann Frazier)
Starting with Bees ... 19
is to close up all flight holes except one. Place a cone of window screen about 6 inches long, with an opening 1⁄
4 inch to 3⁄8 inch in diameter at the apex
over the open flight hole. Near the flight hole place a weak hive consisting of two or three frames of brood and bees with a queen or queen cell. In principle, the bees from the colony in the wall can leave freely through the screen cone but cannot return to the old nest, so they will enter the new hive prepared for them. It will take about a month for the brood in the old combs to hatch. By this time, most of the bees will be in the new hive. Keep in mind that com-pletely trapping all of the bees or the queen is impossible.
After most activity from the old hive has ceased, remove the screen cone and leave the new hive in position for a week or longer. If no honey flow is in progress, the bees from the strong hive will rob out the old combs in the wall or tree. After the robbing has ceased, seal off the entrance to the old nest so that future swarms cannot establish themselves in the same location.
Remove the hive on the platform in the evening when all the bees are inside. To avoid the possibility of the hive bees returning to their original location, move the hive at least 3 miles away.
Selecting the Right Type of Bee for
Your Operation
New beekeepers face the sometimes difficult deci-sion of which strain or race of bee to order, and from whom to order them, when obtaining packages and queens.
Honey bees in the United States are a hetero-geneous blend of several races introduced from Europe, the Middle East, and Africa. Currently, there are three major races: Italians, Caucasians, and Carniolans. However, those now present in the United States are not the same as the original races they were named after. Many strains of the original races and a couple of hybrids have been developed through interbreeding and selection.
To determine which race or strain of bees would best suit your operation, first consider the advan-tages and disadvanadvan-tages of each. Over time you may want to try queens and packages from different queen breeders and suppliers to learn more about the behavior and productivity of each strain under your local conditions.
Italian bees are the most popular race in the United States. First introduced in 1859, they basi-cally replaced the original black or German bee brought over by early colonists. The Italian bee is light yellowish or brown with alternating stripes of brown and black on the abdomen. Those with three abdominal bands (workers) are sometimes called leather-colored Italians; those with five bands are sometimes called goldens or cordovan queens. Italian bees tend to start brood rearing early in the spring and continue until late fall, which results in a large population throughout the active season. Large colonies can collect a considerable amount of nectar in a relatively short period, but they also require more honey for maintenance during the fall/winter than do the dark races. Most strains of Italian bees are considered to be quiet and gentle on the combs. Disadvantages include weaker orientation compared to other races, which results in more bees drifting from one colony to another, and a strong inclination to robbing, which can aid in the spread of disease. The Italians are considered good housekeepers and are comparatively resistant to European foulbrood (EFB)—the major reason why they replaced black bees. The lighter color of the Italian queen makes finding her in the hive easier compared to queens of the other two races. Italian bees produce brilliant white cappings, which are ideal for producing comb honey.
Caucasian bees are sometimes described as the gentlest of all honey bees. They are dark colored to black with grayish bands on the abdomen. They tend to construct burr comb and use large amounts of propolis to fasten combs and reduce the size of the entrance. Some of the newer strains, however, use less propolis. Because they propolize excessively, they are not considered suitable for producing comb honey. Caucasians are inclined to drifting and robbing but not excessive swarming. Colonies normally do not reach full strength before midsum-mer, and they conserve their honey stores somewhat better than the Italians do. They also forage at somewhat lower temperatures and under less favorable climatic conditions than do Italian bees and are reported to show some resistance to EFB. Caucasians are available but not common.
the first pollen becomes available. As a result, their major disadvantage is excessive swarming. Due to their small overwintering cluster size, they are very economical in their food consumption, even under unfavorable climatic conditions, and overwinter well. They are not inclined to robbing, have a good sense of orientation, and are quiet on the combs. They are becoming more common. Some of the stock is identified as new world Carniolan and considered the better Carniolan strain by some beekeepers.
Hybrid bees have been produced by crossing several lines or races of honey bees. Initially, planned crosses frequently resulted in a line of very prolific bees that exhibit what is called hybrid vigor. With controlled matings, this vigor can be main-tained. Commercial hybrids (Midnite and Starline) are produced by crossing inbred lines that have been developed and maintained for specific characteris-tics such as gentleness, productivity, or wintering.
Buckfast bees are a hybrid selected over a long period of time from many strains of bees from southwestern England. They have been shown to be more resistant to tracheal mites and better suited to the cool climate of that region. The stock has been imported into this country (eggs, semen, and adult queens via Canada) and they are easily available here in the United States.
The destructive presence of parasitic mites and drug-resistant diseases has led researchers and queen breeders to search for mite- and disease-resistant bees. Some of these stocks can now be purchased as queens. Interest in stock selected for more northern regions has also increased in popular-ity. One selection is the Buckeye strain from Ohio. Another is the West Virginia selection. The State of West Virginia, in an effort to improve the plight of beekeepers by reducing tracheal mite losses, has arranged for a queen breeder in an isolated area of Canada to supply a U.S. queen breeder with breeder queens obtained from Buckfast Abbey in England. These bees have demonstrated excellent resistance to tracheal mites and display all the traits of truly superior bees under West Virginia conditions.
Other groups of stock such as Russian, SMR, or Hybrid (sometimes Minnesota hybrid) are bees selected for greater mite resistance and/or improved hygienic behavior (hive cleaning—specifically, dead/ dying brood removal), a trait that results in bees ridding their colony more quickly of potential harmful pathogens. As with any stock, querying
your potential supplier is best if you are uncertain about the claims made concerning the characteristics of the stock. Checking on the experience of other beekeepers that have used the stock is not a bad idea.
If you use hybrid bees or bees of a selected stock in your operation, be sure to requeen regularly. Allowing natural queen replacement usually leads to loss of hybrid vigor and sometimes causes colonies to be quite defensive and thus more difficult to manage.
Apiary Location
Both beginners and established beekeepers should select each apiary site carefully. Throughout the foraging season, nectar and pollen sources must be within a short distance (roughly 1 mile) of the hives. Pollen is essential for brood rearing, and nectar (honey) is the bees’ basic source of energy. While bees can be kept virtually anywhere, large concen-trations of floral sources (and populous colonies) are needed to produce large honey crops.
Bees also need a source of fresh water so they can dilute honey, regulate hive temperature, liquefy crystallized honey, and raise brood. If a water supply is not available within 1⁄
4 mile of the hives,
you can provide a tank or pan of water with a floating board or crushed rock for the bees to land on. The water source does not need to be “pure.”
Bees are less irritable and easier to handle when located in the open where they can get plenty of sunshine. Shade from trees retards the flight of workers and hinders finding the queen and seeing eggs within the cells. A southern or easterly exposure gives colonies maximum sunshine throughout the day. The apiary is best situated near natural wind protection such as hills, buildings, or evergreens (Figure 23). Other requirements are dry ground and good air drainage. Avoid windy, exposed hilltops or sites near the bank of a river that might potentially flood. You should also avoid apiary locations in heavily shaded woods or in a damp bottom land since excess moisture and less sunshine retard the flight of the bees and encourage development of such bee diseases as nosema and EFB.
Starting with Bees ... 21
equipment and heavy supers of honey any distance will be necessary. Hives should be secluded from traffic, constant noise, and disturbance from animals and children. To discourage vandalism, placing colonies near a dwelling or area frequently visited yet screened from view if possible (a vegetative corral) is advisable.
Safety from pesticide applications that can affect colonies directly or the bees’ forage is also important. Acquaint yourself with the pesticides commonly used in the area, and place colonies away from fields or other areas that are routinely treated with pesticides.
When selecting sites for outyards (apiary sites away from your residence), make inquiries to deter-mine how many other beekeepers are operating in the area. A location can easily become overstocked with bees, which results in a poor honey crop for everyone. Beekeepers tend to neglect out-apiaries that are located too far from home. Increasing energy costs and efficient use of time should be included in each apiary site decision. Many farmers do not ob-ject to beekeepers locating outyards on some unused piece of farmland, but obviously you should obtain permission before considering any site owned by someone else. Outyards are usually “rented” with payment of harvested honey.
Beekeeping in the
Urban/Suburban Setting
Since legal problems with bees most often occur in cities and suburbs, beekeepers should manage bees so that they do not bother neighbors. You can take several precautions to decrease the chances of your colonies becoming a public nuisance.
Maintaining gentle colonies is imperative in highly populated areas. Keeping colonies with bees that try to sting each time they are examined, or that consistently hover around the bee veil even after the colony is closed, is not advisable in the urban setting. Selecting hybrid strains that have been bred for gentleness and requeening on a regular schedule will certainly help. If a colony becomes too defensive, requeening with a new queen will likely change colony temperament in a month or so.
Providing a source of water near the hives will stop a lot of unnecessary complaints. Otherwise, the bees may get their water from the neighbor’s swimming pool, dripping water faucet, birdbath, children’s wading pool, or hanging wash. Once they have become accustomed to a watering place, they will continue to use it throughout the season, and correcting problems after they develop is not always possible short of moving the bees.
Most colonies have a basic flight pattern as they leave and return to the hive. People and animals passing through this flight path could be stung. Bees also spot cars, clothing, and buildings in the vicinity of the hive by releasing their body waste in flight. Spotting from a single colony is generally not serious, but several colonies flying in one direction may make a car or house unsightly in a short time. If possible, do not allow hives to face children’s play areas, neighbors’ clotheslines, houses, and so forth. Planting a hedge (vegetative corral) or building a fence at least 6 feet high forces the bees to fly above head level and thus reduces the chance of encoun-ters with pedestrians. Fences and hedges also keep colonies out of view, which helps reduce vandalism and concern by the neighbors who might have unfounded, but to them very real, fears related to bee stings.
When manipulating and examining hives, keep your neighbors foremost in mind. Weather and time of day influence the disposition of a colony. Colonies kept in the shade tend to be more defensive. Work the bees on warm, sunny days, when the field force