Troubleshoot and
Optimize Windows 8
®Inside Out
1005 Gravenstein Highway North Sebastopol, California 95472
Copyright © 2012 by Mike Halsey
All rights reserved. No part of the contents of this book may be reproduced or transmitted in any form or by any means without the written permission of the publisher.
ISBN: 978-0-7356-7080-8
1 2 3 4 5 6 7 8 9 QG 6 5 4 3 2 1
Printed and bound in the United States of America.
Microsoft Press books are available through booksellers and distributors worldwide. If you need support related to this book, email Microsoft Press Book Support at [email protected]. Please tell us what you think of this book at http://www.microsoft.com/learning/booksurvey.
Microsoft and the trademarks listed at http://www.microsoft.com/about/legal/en/us/ IntellectualProperty/Trademarks/EN-US.aspx are trademarks of the Microsoft group of companies. All other marks are property of their respective owners.
The example companies, organizations, products, domain names, email addresses, logos, people, places, and events depicted herein are fictitious. No association with any real company, organization, product, domain name, email address, logo, person, place, or event is intended or should be inferred.
This book expresses the author’s views and opinions. The information contained in this book is provided without any express, statutory, or implied warranties. Neither the authors, O’Reilly Media, Inc., Microsoft Corporation, nor its resellers, or distributors will be held liable for any damages caused or alleged to be caused either directly or indirectly by this book.
Acquisitions and Developmental Editor: Kenyon Brown Production Editor: Holly Bauer
Editorial Production: Octal Publishing, Inc. Technical Reviewer: Todd Meister
Copyeditor: Bob Russell, Octal Publishing, Inc. Indexer: Angela Howard
Contents at a Glance
Troubleshooting a Windows 8 Installation . . 447
Part 1: Preventing Problems
Chapter 1Finding Your Way Around Windows 8 . . . . 3
Chapter 2
Repairing Windows 8 in 30 Minutes
or Less . . . . 13
Part 5: Using Advanced Utilities
Windows 8 Editions and Features
by Edition . . . . 629
Working Safely with Windows 8
Encryption . . . . 513
Chapter 32
Table of Contents
What do you think of this book? We want to hear from you!
Microsoft is interested in hearing your feedback so we can continually improve our books and learning resources for you . To participate in a brief online survey, please visit:
How Big Should Partitions Be? . . . 32
Method 2: Encrypting a Hard Disk or Partition without Hardware Support . . . 71
Method 3: Encrypting a USB Flash Drive or External Hard Disk . . . 71
Administering Your TPM Chip. . . 72
Enabling BitLocker . . . 73
Why Use BitLocker? . . . 75
What do you think of this book? We want to hear from you!
Microsoft is interested in hearing your feedback so we can continually improve our books and learning resources for you . To participate in a brief online survey, please visit:
Table of Contents ix
Table of Contents xi
Table of Contents xiii
Part 1: Creating a Windows Pre-Installation Environment Startup Disc . . . 393
Introduction
When you buy a new television set or games console, you just expect to be able to plug it in and for it to work without incident, every day of every year, until it dies. This has never been the way with computers because of the flexibility we demand of them. Each one needs to be customizable in an almost limitless number of ways, with dizzying combina-tions of hardware, software, and opcombina-tions.
With each and every one of those changes adding or modifying files within the core oper -ating system, it’s inevitable that you’ll eventually encounter a problem. When this happens, the sheer number of combinations of software, hardware, updates, settings, customization options, and plug-ins can make diagnosing and repairing the problem extremely complex. How do you repair a problem in an operating system that’s made up of thousands of files and that has an extremely complex structure and format?
That’s where this book comes in. Think of it as an introduction, a complete guide, and a master class all in the one volume, not just to the structure of the operating system and its related files, but also to what commonly goes wrong, why this happens, and how you can set about the sometimes complex process of troubleshooting a problem to begin with.
Beginning with the assumption that preventing problems from occurring is the best start-ing point, Troubleshoot and Optimize Windows 8 Inside Out guides you through the techni-cal maze of Microsoft’s latest operating system, all the while explaining the how’s and why’s of troubleshooting in ways that are relevant and make sense.
Who This Book Is For
Assumptions About You
You have already have been repairing or supporting computers and users in some fash-ion, be this privately (within your friends and family circle), for a business or organization (either formally or informally), or within an enterprise environment. You are also keen to expand your skills and knowledge and broaden and deepen your technical understanding of Windows 8 and how it works and interacts with hardware, software, and the Internet.
This book touches on some IT professional subjects that are covered in more detail else-where and for which there are sometimes Microsoft certification qualifications, but you will not need prior knowledge or understanding of these subjects. I focus on techniques and topics that are likely to appeal to readers who have already mastered the many basics of the Windows operating system.
How This Book Is Organized
This book gives you a comprehensive look at the features within the Windows 8 operating system that you will need to prevent, mitigate, diagnose, and repair problems and errors. This book is structured with a logical approach to troubleshooting.
Part 1, “Preventing Problems,” examines the ways in which Windows 8 computers can be installed and configured so as to prevent problems from occurring or to minimize the impact of those problems.
Part 2, “Applying Easy Technical Fixes,” details the many ways in which problems and errors can be repaired quickly and simply, sometimes by remotely giving instruction to the user.
Part 3, “Using Advanced Technical Fixes,” details the process of how you set about diagnos-ing and troubleshootdiagnos-ing complex problems., what to look for in the operatdiagnos-ing system, and what tools and utilities exist to help with this.
Part 4, “Disaster Recovery,” assumes that a significant problem has already occurred that needs to be fixed quickly but cannot be easily addressed from within the operating system itself.
Features and Conventions Used In This Book xxi
Features and Conventions Used In This Book
This book uses special text and design conventions to make it easier for you to find the information you need.For your convenience, this book uses abbreviated commands. For example, “Click Home, Insert, Insert Cells” means that you should click the Home tab on the ribbon, then click the Insert button, and then finally click the Insert Cells command.
Boldface type Boldface indicates text that you type.
Initial Capital Letters
The first letters of the names of tabs, dialog boxes, dialog box ele -ments, and commands are capitalized. Example: the Save As dialog box.
Italicized type Italicized type indicates new terms.
Plus sign (+) in text Keyboard shortcuts are indicated by a plus sign (+) separating key names. For example, Ctrl+Alt+Delete means that you press the Ctrl, Alt, and Delete keys at the same time.
Design Conventions
INSIDE OUT
This statement illustrates an example of an “Inside Out” headingThese are the book’s signature tips . Here, you get the straight scoop on what’s going on with the software—inside information about why a feature works the way it does .
You’ll also find handy workarounds to deal with software problems.
Caution
!
Note
Notes offer additional information related to the task being discussed .
Your Companion eBook
With the eBook edition of this book, you can do the following:
• Search the full text
• Copy and paste
To download your eBook, please see the instruction page at the back of this book.
Support and Feedback
The following sections provide information on errata, book support, feedback, and contact information.
Errata & Support
We’ve made every effort to ensure the accuracy of this book and its companion content. Any errors that have been reported since this book was published are listed on our Micro-soft Press site at oreilly.com:
http://go.microsoft.com/FWLink/?Linkid=260982
If you find an error that is not already listed, you can report it to us through the same page.
If you need additional support, email Microsoft Press Book Support at [email protected].
We Want to Hear from You
At Microsoft Press, your satisfaction is our top priority and your feedback our most valuable asset. Please tell us what you think of this book at
http://www.microsoft.com/learning/booksurvey
The survey is short, and we read every one of your comments and ideas. Thanks in advance for your input!
Stay in Touch
Acknowledgments
It is sometimes very difficult to write books, even when you know the subject matter back -ward, for-ward, and every direction in between. Writing a troubleshooting and optimizing book presents further problems when you want to make sure you have all the bases cov-ered. I would like then to dedicate this edition to all the people who have swelled my mail-bag in recent years with an enormously wide assortment of Windows-related issues and other computer problems, errors, and crashes. You’re all in here, somewhere. :)
PART 1
Preventing Problems
Chapter 1
Finding Your Way Around Windows 8 . . . .3
Chapter 2
Repairing Windows 8 in 30 Minutes
or Less . . . .13
Chapter 3
Preventing Problems Before They Occur . . . . .27
Chapter 4
Using the Basic Windows Utilities . . . .45
Chapter 5
Optimizing Windows 8 Security . . . .63
Chapter 6
Optimizing Backup and Restore . . . .81
Chapter 7
Performing Maintenance on Windows 8 . . . 103
Chapter 8
Managing Users in Windows 8 . . . . 115
Chapter 9
Managing Hardware . . . . 131
Chapter 10
C
W
hen Microsoftintroducedthenew Start screen in Windows 8, the change was always going to be extremely significant for IT professionals, enthusiasts, and people who work with the administrative and management tools in Windows.The changes aren’t limited to the new Start screen. When you visit the desktop, you will notice that the Start menu is gone completely, and seemingly nothing has been introduced to replace it.
I want to start this book, therefore, with an introduction to where you can find all the tools and utilities that you’ve been accustomed to using for years and that you’ll commonly need when you’re troubleshooting and optimizing Windows, your software, and your hardware.
Finding the Desktop
C
hap
ter
1
Figure 1-1 The desktop in Windows 8
So, what’s new or changed on the desktop? Well, for starters, there’s no Start menu, though some third-party utilities are available to either switch it back on or replace it with some-thing else entirely.
Using the New Charms
The epresent Start button in the lower-left corner that has been a part of so many ver-sions of Windows has been replaced by the new Windows 8 charms. You can access the charms, which appear from the right side of your screen, from both the Start screen and on the desktop. To reveal the charms, use one of the following three methods:
● On touch devices, from the right edge of the screen, swipe inward with your finger.
● Move your mouse to the “hot corners” in the upper- or lower-right corner of your
screen.
C
The rest of the taskbar in Windows 8 hasn’t changed at all from Windows 7. If you have already been using Windows 7, you should be instantly familiar with it.
You can “pin” program icons to the taskbar, but not apps. To pin program icons, right-click an icon on the Start screen, and then from the option menu that appears at the bottom of your screen, select Pin To Taskbar.
INSIDE OUT
Accessing desktop program propertiesIf you need to access the Properties for a desktop program—a task you would previ-ously have done in the Start menu by right-clicking the program’s icon—you can still do this from the All Apps view in the Start screen . With a program’s icon visible,
right-click it, and you will be able to open its file location. Here, you can right-right-click on the
program icon to access its properties .
Jumplists still exist and work in the same way as in Windows 7. I always thought that Jumplists were one of best features of Windows 7. You access them by clicking and swiping up from a taskbar icon with your mouse or by right-clicking the icon.
In Jumplists, you can access commonly used features within a program or run a second instance of that program. Many jumplists also contain lists of recently accessed files, and you can pin files to Jumplists so that they will always appear.
Additionally, you can pin websites to the taskbar by dragging their icon from the Internet Explorer address bar onto the taskbar, and many websites have some features and functions programmed in so that their Taskbar Jumplist will contain specific parts of the website or functions directly from the Windows desktop.
INSIDE OUT
Be careful which icon you place first on the taskbarWith the Start menu gone, there’s still a reflex urge to move your mouse to the lower-left corner of the screen to open it. My best advice is to ensure that the first icon on the
taskbar is something that opens quickly, such as File Explorer, because you’ll be
C
hap
ter
1
Accessing the Action Center and Notification Area
At the far right of the taskbar, you will see the white flag icon for the Action Center (see Figure 1-2), which is the central location for all Windows 8 messages and notifications regarding troubleshooting, security, maintenance, and backup.
Figure 1-2 The Action Center and other icons on the taskbar
I will refer to the Action Center many times throughout this book, but you’ll know if there is a message waiting for you because the flag icon will display a small red and white notifica -tion cross; a subtle but eye-catching change.
To the left of the Action Center is a small up arrow. Click this up arrow to open the notifica -tions area “bucket,” which is perhaps better known as the system tray. Any running software that has its own tray icon can be found here.
If you have a touch-screen, then Windows 8 will add the on-screen keyboard icon to the system tray, as well.
Finding the Full Control Panel
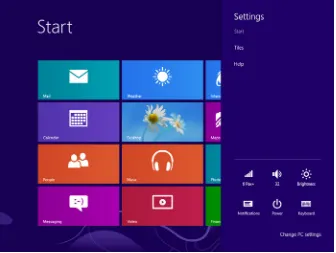
When it comes to administration, probably the first thing you’ll look for in Windows 8 is the Control Panel. There are many aspects of your computer’s administration that you can only configure in the desktop Control Panel, but Windows 8 now offers an alternative way by which you can quickly configure common system settings. To take advantage of this, click the Settings charm. This displays just a few settings. If what you need to access is not there, click the Change PC Settings link to open the new PC Settings panel.
C
hap
ter
1
Finding the Full Control Panel 7
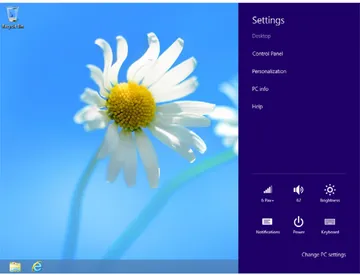
To access the full Control Panel, open the charms from the desktop. Next, click the Settings charm. Links appear at the upper-right corner of the screen (see Figure 1-3) for Control Panel, Personalization, PC Info (which is the System screen in the Control Panel), and Help.
Figure 1-3 Opening Settings from the desktop reveals a Control Panel link
C
hap
ter
1
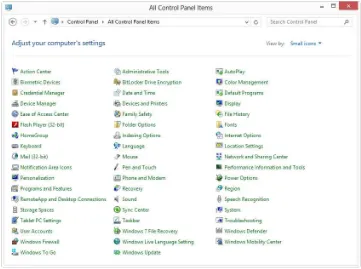
Figure 1-4 The full Control Panel in Windows 8
Finding the Computer Management and
Administrative Tools
In Windows Vista and Windows 7, it’s well known that if you wanted to open the Computer Management console—where you would work with tools such as the Disk Manager, Task Scheduler, and Event Viewer—you would right-click the Computer link in the Start menu, and then select Manage.
C
hap
ter
1
Finding the Computer Management and Administrative Tools 9
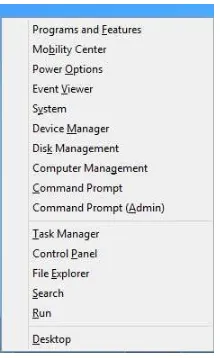
You can access these, both from the desktop and the Start screen, by moving your mouse to the lower left of the screen and right-clicking. They are also available by pressing Windows logo key+X.
Figure 1-5 The new Administration menu
This menu contains links to the common Management tools in Windows in addition to some features that were in the Start menu that were always considered useful.
These include the Command Prompt (also with a separate Run As Administrator link because you cannot right-click in this menu), the Run dialog, and more.
The best news is that this menu is user-configurable, so you can add additional links to it.
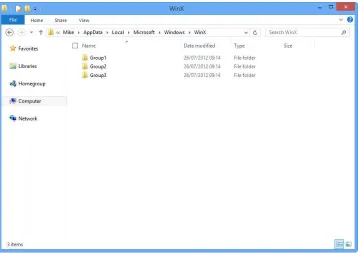
In File Explorer you can navigate to C:\Users\Your Username\AppData\Local\Microsoft\ Windows\WinX. Note that in the View tab on the ribbon in File Explorer, you will need to select the Show Hidden Items check box to display the AppData folder.
C
hap
ter
1
Figure 1-6 Modifying the Administrator menu options
Some software exists to allow you to customize this menu, but security that Microsoft has introduced prevents it from being changed manually by the user.
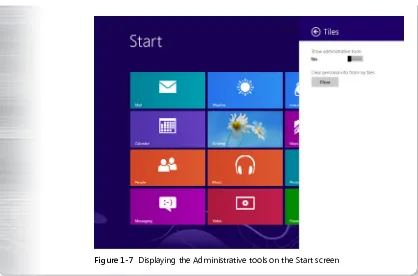
INSIDE OUT
Displaying the Administrative Tools on the Start screenIf you want, you can show all the Administrative tools in Windows 8 as tiles on the Start Screen . To do this, follow these instructions:
1. On the Start screen, click the Settings charm .
2. At the upper right of the screen, click Tiles .
3. An option appears to turn the Administrative Tools links on and off, as shown in
C
hap
ter
1
Searching in Windows 8 11
Figure 1-7 Displaying the Administrative tools on the Start screen
Searching in Windows 8
Another thing that has changed significantly in Windows 8 is search. With the Start menu gone, there’s no longer a search box, but in many ways search has been made much easier to use than previously.
You can open search from the aforementioned Administration menu or by clicking the Search charm, but by far, the easiest way to use search in Windows 8 is to open the Start screen, which you can do at any time by pressing the Windows logo key on your keyboard, and then typing your search query.
C
hap
ter
1
INSIDE OUT
Search in File ExplorerIt is worth noting that a search box in File Explorer still exists and operates in the same way as in Windows 7, prioritizing content from the current view . If you are in the Administrative tools view, for example, and execute a search, then the tools and utilities there will be prioritized in the search results .
Summary
It’s easy to see that the introduction of the new Start screen has created a learning curve for existing Windows users, enthusiasts, and IT professionals. It’s good to see, however, that Microsoft have taken into account the things that administrators will want to do with Windows and built in new tools to help. You’ll discover that the addition of the customiz-able Administration menu is probably going to be the most useful difference.
C
hap
ter
2
C h A P T E R 2
Repairing Windows 8 in 30 Minutes
or Less
What Can Often Go Wrong with Windows . . . .15 What to Look For . . . .15 Fixing Common Startup Problems . . . .17
Fixing Common Security Problems . . . .21 Fixing Common Configuration Problems . . . .21
Refreshing Windows 8 . . . .22
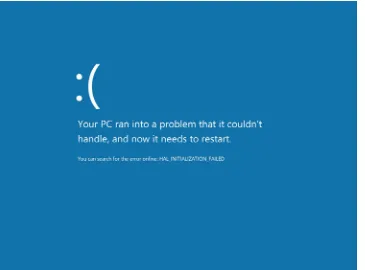
O
neofthebiggestprobleMs with computers in general (and Microsoft Windows does not enjoy any immunity here) is that historically things always break at the least appropriate time and they always take far too long to repair.When Microsoft moved Windows to a new operating system kernel—the core code of the operating system (OS)—with Windows Vista, it based it upon the stable and reliable one that it had been using for Windows Server since the days of NT. The unreliable, buggy, and crash-prone kernel from Windows 98, ME, and XP was jettisoned forever, and from that point forward, Windows became a much more stable and robust product.
C
hap
ter
2
Figure 2-1 The Blue Unhappy Emoticon of Death
The simple fact remains, though, that Microsoft Windows is the most open and supported computing platform on the planet. People can count how many apps (applications) exist in the Android app store for Google’s open tablet and smartphone OS, but nobody in the world is brave enough to count how many programs, apps, peripherals and pieces of inter-nal (and exterinter-nal) hardware exist for Windows.
It is this openness that is the biggest strength of Windows, and conversely, its biggest weak-ness. The problem Microsoft faces is keeping an OS that already contains billions of lines of computer code stable and reliable while maintaining compatibility with hardware and software that won’t usually have gone through any kind of testing and certification process, and that can interact with other hardware and software in unpredictable ways.
So, when Windows does fail, the problem is how do you get it back up and running just as it was before (but without the bugs and problems, obviously), as quickly as possible?
C
hap
ter
2
What to Look for 15
What Can Often Go Wrong with Windows
As I just mentioned in the introduction, the most common problems that arise in Windows are caused by the software that you install and the hardware that you plug into your computer. If you ran Windows completely on its own, with no external hardware and no additional software, or perhaps only using official Microsoft software such as its Office suite, then you’d possibly never encounter a single problem (Windows Update issues notwithstanding).
It is the third-party ecosystem and especially Windows Update that causes the most prob-lems in Windows, and even Windows 8 on ARM processors won’t be completely immune to this. And this is despite most tablets not supporting external hardware and the OS only supporting new apps. ARM Processors are new to Windows computers. Until recently, they had been used primarily for smartphones and tablets running Apple’s iOS and Google’s Android OS. ARM processors are incompatible with the Intel chips found in desktop PCs, which is why a separate version of Windows 8 has been released for them.
The three main areas where you might experience problems are the following:
● Startup problems
● Security problems
● Configuration problems
I will discuss how you can quickly fix each of these in a short while.
What to Look for
The first question to ask yourself when you encounter a problem with Windows 8 is “What’s changed?” Something unique and different will always have happened to cause the prob-lem. If a computer was perfectly stable every day for the last three weeks doing the same job in the same way, it’s not going to fail just for that. Something will always have changed and the first job is to determine and diagnose what this change is.
This leads to several questions:
● Have you just performed a Windows Update? (This should always be the first
question.)
● Have you installed new hardware?
● Have you installed new software?
C
hap
ter
2
● Have you updated any of your software?
● Are you using two software applications at the same time in a way that you don’t
normally do?
● Are you trying to perform several complex jobs at the same time?
● Has there been an interruption to the power supply recently?
● Have you been eating or drinking at the computer?
● Has anybody else used your computer?
If we continue going down the list, we eventually get to “Did you remember to plug it in?”, “Is there a power outage in your neighborhood?”, and “Are you confusing your PC with the microwave after a particularly heavy night out?”
It is at this point that we reach the oldest question in technical support. And if I had a bet on how quickly this phrase would appear in this book, I’d probably have guessed correctly and won a dollar. Of course, that question is, “Have you tried turning it off and on again?”
You might be amazed at just how often this fixes problems, but let’s have a look at why this is. The simple reason behind why a restart fixes many problems is that every single prob -lem with a computer or with Windows 8 is caused by a human being. For something to go wrong, someone first has to be doing something on the computer. If you leave a computer on its own all the time, then, assuming that there’s no poorly written software or hardware drivers running in the background, it is very unlikely something will go wrong.
When you restart a computer, whatever it is that you were doing before, you’re now no longer doing. Any software that you were running will probably have been closed; any hardware you were using will probably now be inactive; and you are effectively starting with a clean slate.
C
hap
ter
2
Fixing Common Startup Problems 17
Fixing Common Startup Problems
Since\ the introduction of Startup Repair in Windows Vista, the OS can sometimes do a rea-sonable job of fixing itself. If you can’t start your copy of Windows 8, try restarting it a few times; Startup Repair should automatically run.
Startup Repair is a utility that sits on a hidden system partition that is created when Win-dows 8 is first installed. It will run a series of checks on the components that start the oper -ating system and reset everything to its default configuration.
Startup Repair is by no means perfect, but if somebody calls you to say that her computer won’t start, ask her how many times she has tried. Usually you need to attempt to start Windows three times before Startup Repair will run.
If this doesn’t happen, you will need to enter the Startup Repair options manually. You access these from the boot menu. To start this, press F8 at startup, after the BIOS or UEFI screen.
INSIDE OUT
Windows Fast Start and the boot menuUnless you already have a dual-boot system on your computer, it can be extremely
difficult to get the boot menu in Windows 8 to appear at all. It is always wise to cre -ate a recovery drive or a system repair disc, and I will show you how to cre-ate these in Chapter 6, “Optimizing Backup and Restore .”
C
hap
ter
2
When the boot menu opens, select the Troubleshoot option from the first screen, as shown in Figure 2-2.
Figure 2-2 Selecting Troubleshoot from the boot menu
The Troubleshoot window opens and presents two very interesting new features in Win-dows 8, Refresh Your PC and Reset Your PC (see Figure 2-3). You should only use the latter option if you want to wipe all your user accounts, programs, apps, hardware drivers, and files off the computer. You might want to do this, for instance, if you’re selling it or giving it to a friend.
C
hap
ter
2
Fixing Common Startup Problems 19
The Refresh Your PC option is the new way to restore a system image of Windows, com-plete with all your current settings, files, and apps intact. This isn’t to be confused with a System Image, which still exists as an option. I’ll discuss both of these in full in Chapter 7, “Performing Maintenance on Windows 8.”
The main difference between System Image and Refresh Your PC is that the image required to refresh a copy of Windows 8 already exists without any user involvement.
INSIDE OUT
The differences between Refresh Your PC and System Image, explainedWhen you create a system image of Windows 8, you are taking a snapshot of that
installation, complete with programs, apps, settings and configuration options as it
exists at that time . Restoring the system image will restore Windows 8 exactly as it was at that moment .
A refresh image is different in that it takes a snapshot of your installed programs, apps, and your user accounts, but not your program settings . This means that after restoring from a refresh image, you will need to change your custom options in your software, set up email accounts in Microsoft Outlook, and make other changes that Refresh Your PC doesn’t save .
What it will do, as I said, is restore an image of the OS while keeping your current apps, set-tings, and files intact. What it won’t do is restore any of your desktop software, which will be wiped.
INSIDE OUT
Creating a custom refresh imageYou can create a custom refresh image with the following simple command at the Command Prompt, which you will need to be running as an Administrator .
recimg -CreateImage C:\<Folder>
Here, C:\<Folder> is the location on your hard disk where you want the image to be located .
C
hap
ter
2
One of the best things about Refresh Your PC is that it’s so easy, even an end user can do it. By this I mean that if you work at a support desk and someone calls to say he can get to the Start screen or desktop, but Windows 8 is malfunctioning, you can talk him through no more than six simple key presses that will kick the process off. This saves valuable time visit-ing the user to repair it yourself. Again, I’ll describe how to do this later in this chapter.
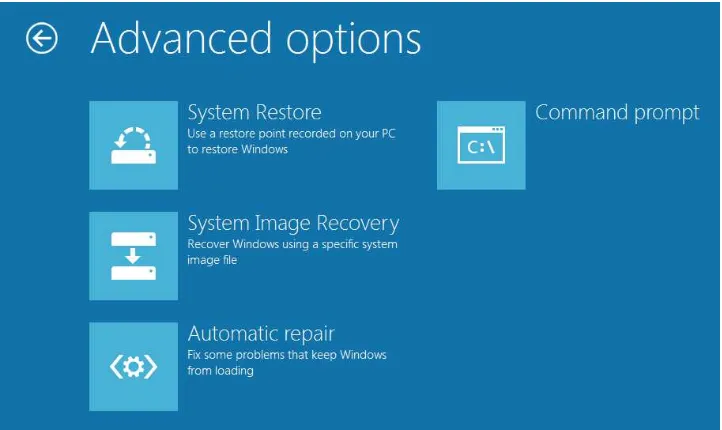
Sometimes, though, you don’t want to have to wait 20 minutes or more for an image to be restored, and just using System Restore will be enough, especially if the problem has occurred after a software or hardware install, a manual driver update, or a Windows Update.
After you click Refresh Your PC, choose the Advanced Options, which opens the menu shown in Figure 2-4. Here, you will see System Restore as well as the System Image Recov-ery option, by which you can restore from a System RecovRecov-ery Disc, just as you can with Windows 7.
Figure 2-4 You can find System Restore in the Advanced Options menu
C
Security problems can be caused by pretty much anything and can include all manner of issues, from Windows reporting that it isn’t genuine (which is normally fixed by a simple reboot) to users being unable to access their files for some reason, or there is some type of encryption such as Microsoft BitLocker in place which has decided to lock you out of your files or even the whole computer
Caution
!
It is normally a good idea when travelling with a BitLocker-encrypted laptop or tablet that you also have with you, but kept separately from the device, a USB pen drive con-taining the encryption key(s) .
Other security problems can be caused by a malware infection, which can be trickier to resolve.
Generally, security problems can usually be solved by refreshing the computer or running a System Restore. After all, if the configuration was worked well earlier, then restoring those settings should work again. And as previously mentioned, if it’s a refresh that you’re sug-gesting, you can sometimes talk the user through performing this on her own.
Fixing Common Configuration Problems
Nine times out of ten, configuration problems are caused by the installation of new soft -ware or updates to existing soft-ware, a new hard-ware device, updates to existing drivers, or by a Windows Update.
If you have a configuration problem on the computer, then you (or any other person using the computer) have just done something that perhaps you shouldn’t have. This can include, for example, updating the computer in a managed environment where the IT department has already determined that Windows Update KB966706 causes a conflict with the bespoke software that’s needed to run weekly reports.
C
hap
ter
2
These actions will usually require being at the computer that’s faulty and will also require the user who encountered the problem to be honest about what he was doing right before it occurred.
Other configuration problems can manifest themselves as USB devices that no longer work. The best way to fix this is to unplug the device and then plug it into a different USB port. This will force Windows to reload the drivers for that device.
INSIDE OUT
My Wi-Fi dongle doesn’t workIt’s not unheard of that after moving a computer or doing work on it, perhaps even just cleaning it or around it, a USB Wi-Fi dongle fails to work . Plugging it in to a
differ-ent USB port usually fixes this problem because these devices can be fussy about what
ports they choose to work in .
Refreshing Windows 8
I’ve talked a bit in this chapter about a new feature called Refresh that can effectively reinstall Windows 8 while keeping all your apps, settings, files intact. Even if you have a custom image set, Refresh will keep your desktop software, as well. But how do you use it and why do I say an IT department can talk a user though it? Let’s have a look at this now, step by step.
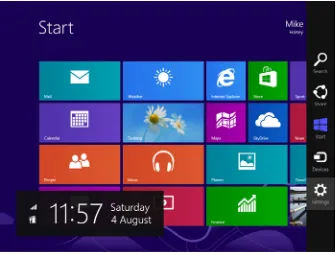
1. Open the Start screen by using one of three methods: swipe in from the right edge of the screen with your finger, move your mouse to the lower right of the screen, or press Windows logo key+C on your keyboard.
C
hap
ter
2
Refreshing Windows 8 23
Figure 2-5 The Start screen with the Charms displayed on the right edge of the screen
C
hap
ter
2
Figure 2-6 The Settings panel on the Start screen
The new PC Settings screen appears,
C
hap
ter
2
Refreshing Windows 8 25
Figure 2-7 The PC Settings window
5. In the right side panel, in the Refresh Your PC Without Affecting Your Files section, click Get Started.
C
hap
ter
2
Figure 2-8 The Refresh Your PC option
6. Click Next to refresh the PC.
Summary
There is always truth in the old system administrator’s adage that the best and quickest way to repair any problem with Windows is to re-image the computer. This can take time, though, and will certainly require the support technician to be present.
The new tools in Windows 8 and the addition of Startup Repair, which you might not have seen before if you are upgrading from Windows XP, are extremely useful, extremely simple and easy to use, and usually extremely quick, as well.
Armed with this knowledge you not only can repair problems more quickly and simply than ever before, but it’s a simple matter to train users, friends, and family to perform these actions themselves, without even needing to contact you.
C
P
reventingprobleMsbeforetheyoccur is always a good idea and can be very simple to achieve; the problem is knowing where to start. You would think that Windows 8 would be set up by default to be incredibly easy to fix when something goes wrong, if it would ever happen. However, I have found it very ironic that for the past decade as Windows has become more reliable, stable, and robust that the number of troubleshooting, repair, and diagnostic tools has increased with each edition.Windows 8 is no exception with tools such as System Restore, image backup (not just one but two types including Refresh Your PC), a reset option, file versioning, automated trouble -shooters, the Action Center, and more. However, as I detailed in the last chapter, the prob-lem is that there are so many hardware and software packages available for the platform that it’s impossible to predict how each will interact with each other and with Windows.
The aim of a good preventative strategy, therefore, isn’t about making sure all the tools exist to help you recover from an emergency; it’s about making sure that problems simply don’t exist in the first instance.
Take an IT Help Desk, for example. These departments are expensive to operate because of the staffing costs. Companies obviously want to keep costs down in departments that don’t directly contribute revenue. So, when small problems occur, such as a keyboard breaking or a printer driver failing to work, each callout requires personal attention from a trained professional, and each one costs time and money, not just for the IT department but also in terms of lost productivity for the person with the problem.
INSIDE OUT
Why spend time configuring and backing up Windows?Windows 8 constantly makes small changes and adjustments to its files and settings as
you work . The more you do, the more changes Windows makes . After a period of time, these changes can cause software or Windows components to misbehave or
malfunc-tion, and they can become extremely difficult to undo. If you back up your copy of
Windows 8 after the changes are entrenched, you preserve potential problems .
The benefit of taking time to back up a clean, unused Windows 8 installation is that when something goes wrong, your backup will be an exact copy of a fully working setup, including all of your software and settings . There will be no need to reinstall everything one piece at a time . Plus, you only need to make the initial backup once .
If you have a desktop PC and access to two or more hard disks, it’s even better if you can split your Windows installation, files, and backups across them. This means that if you have a real catastrophe, such as the physical disk containing your Windows installation fails, you don’t lose your backup copy of Windows, too. You can also use two hard disks to keep identical copies of your files and data; again, just in case a physical disk fails.
Laptops and most PC systems include only one physical disk, however, so you typically won’t have the option of splitting your data across different physical drives. But if the idea of split-ting things up interests you, you might want to purchase a separate USB external hard disk.
INSIDE OUT
Of hard disks, partitions, and deviled eggsThink of a hard disk as one big plate for all the food at a party buffet . No matter how careful you are in laying out the food, it will always end up mixed together; and if somebody spills the garlic mayonnaise, it’ll go over everything .
What you really need are different plates to separate the food (see Figure 3-1) . If you use one long plate that’s split into several compartments, you can put a different treat in each space, safe in the knowledge that these compartments will help keep the garlic
mayonnaise off the chocolate profiteroles.
It’s a similar story with computer hard disks . You can split your hard disk into partitions;
C
hap
ter
3
Upgrading or Performing a Clean Install 29
Figure 3-1 Partitioned and nonpartitioned disks
Upgrading or Performing a Clean Install
Whenever a new version of Windows is released, the biggest question that confronts you is whether you should format the hard disk and start with a clean installation or upgrade the existing copy of Windows in which you already have all your software, drivers, and files working.
I’ve been troubleshooting and repairing Windows installations for many years now, and I’ve seen so many more problems caused by upgrading from one version of Windows to another that I would always recommend performing a format and a clean install.
How to Clean Install Windows 8 to Prevent Problems
INSIDE OUT
Wiping and recreating the Windows 8 System Reserved partitions on installationWhen you install Windows 8 and choose a custom installation, you will be asked on which what physical hard disk you want to install the OS (see Figure 3-2) . If you are wiping out a previous Windows installation, I recommend using the Drive Options link to delete both the Windows partition and the 100-MB System Reserved partition if you have one .
Figure 3-2 Choosing the installation disk in Windows 8
You can now create a new Windows partition on this disk, and the Windows 8 installer will create a new System Reserved partition .
C
hap
ter
3
Upgrading or Performing a Clean Install 31
note
If you have multiple hard disks installed in the computer, it is always wise to open the case and physically unplug all but the primary hard disk . This ensures that the System Reserved partition and Windows 8 are always on the same drive . If they end up on sep-arate drives, you can never remove the drive containing the system partition without preventing Windows 8 from starting .
Upgrading to Windows 8 from XP, Vista, or Windows 7
If you do upgrade from an earlier version of Windows, what can you take with you? For the upgrade to Windows 8, Microsoft has changed again what can and cannot be transferred, so you might find that if you are upgrading from Vista, for example, that it’s simply not worth doing. Table 3-1 presents a synopsis of what can upgrade.
Table 3-1 Items That You Can Upgrade to Windows 8
You Can Transfer
When upgrading from…
Windows 7 Windows Vista Windows XP
Applications Yes No No
Windows settings Yes Yes No
User accounts and files Yes Yes Yes
note
There are so many differences between the 32-bit (x86) and 64-bit (x64) versions of Windows that I would not recommend upgrading . And be aware that Windows will not allow you to move from an x64 OS to an x86 OS .
Caution
!
Whenever you perform a clean install or especially an upgrade of Windows, you must
first ensure that you have a complete and up-to-date backup of all your files, data, and
documents .
How Big Should Partitions Be?
The size of your hard disk and how you intend to use your computer will determine how big you should make your partitions. I would always suggest that you have a minimum three partition structure: one for Windows 8, one for files, and one for a backup copy of Windows.
Your backup partition should be the same size as your Windows 8 partition if you only want to keep a backup copy of Windows 8 on it. It will need to be bigger if you also want to keep files and software installers there, too.
note
If you want to keep a custom system image and a custom refresh image (which I rec-ommend), your backup partition will need to be double the size of your Windows 8 installation .
You can use Table 3-2 as a guide for how large your Windows 8 partition should be. Please note these figures are suggestions only. If you use development software (web, program -ming, or design), you might find you will need more space for your programs.
Table 3-2 Recommended Windows 8 Partition Sizes for Various Use Scenarios
PC Usage Windows 8 Partition Size
Light business 30 GB; Enter 30720 in the partition size box
Light home 30 GB to 50 GB; Enter 30720 or 51200 in the partition size box
Power user 50 GB to 200 GB; Enter 51200 or 204800 in the partition size box
Developer 100 GB; Enter 102400 in the partition size box
Video/photo editor 100 GB to 200 GB; Enter 102400 to 204800 in the partition size box
C
hap
ter
3
What to Do When Windows 8 Is Installed 33
So what do you do about creating partitions for your files and Windows image backup? The best practice advice is this: if you have more than one physical hard disk in your computer, always put the image backup on the secondary drive and probably the files there, as well. This ensures that if the hard disk containing Windows fails, you don’t lose your files or backup, and if the disk containing the files and backup fails, you still have a working copy of Windows.
However, if you are on a single-disk system—which is much more likely, especially given that most new Windows 8 computers these days are either all-in-one affairs, laptops, or tablets—your backup partition should be the same size (perhaps slightly less as you need some extra overhead room for temporary files, downloads, and the like on your main Windows partition) than the Windows 8 partition, and your files partition should occupy all the space you have left.
This is generally fine on a desktop or all-in-one computer which will come with a hard disk of 1 TBor more, but what if you are installing Windows 8 on an Ultrabook or a tab-let that only comes with a 128-GB solid-state drive (SSD)? In this circumstance, I would suggest skipping the backup partition and instead creating a backup image on a DVD, or better still, an external USB hard disk.
INSIDE OUT
Blowing away the OEM restore partitionComputer manufacturers, known as Original Equipment Manufacturers (OEMs), will almost always put a hidden restore partition on your computer . This might currently contain a copy of Windows 7 or even Windows Vista . If you need to reclaim valuable hard disk space and don’t mind deleting the original Windows image that shipped with your computer, you can delete this partition by using the Windows installer .
What to Do When Windows 8 Is Installed
After Windows 8 is installed, you need to complete the following important tasks before you get to the job of installing all your software and using the OS in earnest:
● Windows 8 is the first version of Windows that comes standard with antivirus pro
● Install only software you will definitely use regularly. Skip loading software you will
use only rarely or might not use at all; when you are ready to use it, you might find that it’s been upgraded anyway.
● Try to avoid installing shareware or trial version software. Although many amateur
software authors do write some excellent applications, it rarely goes through the same quality control procedures as commercial packages. Shareware and similar soft-ware can cause problems on a PC.
● Update all the installed software to get any upgrades. This is especially important for
Adobe Acrobat Reader because PDF files are often used to hide viruses.
● Activate your software and enter the required product keys to keep the software
from becoming unusable if you need to restore it from a backup.
For a new installation of Windows 8, I recommend the following series of steps:
1. Run Windows Update to make sure you have the latest updates to the operating system. Do this several times; restart the PC after each update to ensure that your computer is current. You can access Windows Update by searching for it on the Start screen or from PC Settings.
2. Ensure that Windows 8 is activated. If you don’t activate Windows 8, it might become inoperable if you at some point restore from a backup. To activate Windows 8 from Control Panel, click System And Security, and then click System. The option to activate Windows 8 is at the bottom of the window.
3. Modify Windows 8 settings to your preferences (regional settings, for example). Read the following section for details about how to do this.
Caution
!
C
hap
ter
3
Useful Windows 8 Settings to Change 35
Useful Windows 8 Settings to Change
By default, Windows 8 is set up to be efficient and you don’t need to tweak many settings. There are still, however, some that I would recommend you make that can enhance per-formance (the computer’s perper-formance, that is, not the type you get told about in spam emails!) and make the operating system run more smoothly in general.
You access these settings in the desktop Control Panel, as shown in Figure 3-3. To access this, on the Start screen, type the word control to search for it.
Figure 3-3 The desktop Control Panel in Windows 8
To change the virtual memory size, follow these steps:
1. In the Control Panel, click System And Security and then click System.
A new list of options appears.
2. In the blue panel on the left side of the window, click Advanced System Settings.
3. In the System Properties dialog box, click the Advanced tab.
4. In the Performance section, click Settings, as shown in Figure 3-4.
Figure 3-4 The Advanced tab in the System Properties dialog box in Control Panel
5. In the dialog box that appears, click the Advanced tab, and then click the Change button.
C
hap
ter
3
Managing Startup Programs 37
Figure 3-5 Setting the virtual memory page file size
Clearing the Automatically Manage Paging File Size For All Drives option and selecting the Custom Size option instructs Windows to keep this paging file the same size all the time. This can help keep access to your files fast.
The recommended amount of disk space is displayed toward the bottom of the Virtual Memory dialog box (4577 MB in the example in Figure 3-5). Enter the recommended pag-ing file size for your computer in both the Initial Size (MB) text box and Maximum Size (MB) text box, click Set, and then click OK to close the dialog box.
In Control Panel, you can also change regional and language settings and get access to the Device Manager to check that the drivers for all of your hardware are installed.
Managing Startup Programs
This not only makes sense but it also makes it much simpler for users to manage what runs when their computers start; after all, it’s been years now since programs could almost always be found in the Startup folder in the Start menu.
You’ll want to run the Task Manager in More Details mode. To do so, click the More Details button on the lower-left corner of the Task Manager window.
Click the Startup tab to display a list of software that runs when the computer starts, as illustrated in Figure 3-6.
Figure 3-6 The improved Task Manager in Windows 8 now manages Startup software
If you want to disable a program, highlight it, and then in the lower-right corner of the win-dow, click the Disable button. It really couldn’t be any simpler.
C
hap
ter
3
Moving Your Files Away from Windows 39
Moving Your Files Away from Windows
One of the biggest problems with Windows traditionally—well, so far as I am concerned anyway—is that it’s always kept your important files and documents on the same physi -cal partition as your copy of Windows. This can cause all manner of problems if Windows fails (I’ll show you how to recover files from a failed Windows installation in Chapters 28 through 31, in Part IV of this book).
Despite Windows 8 being more stable and reliable than any previous versions of Windows, the thought of keeping my files on the same partition still fills me with dread, and I never recommend that anybody ever do this. This is why earlier in this chapter I recommended creating a separate partition for your files when you install Windows 8.
INSIDE OUT
Why move your files away from Windows 8?Although Windows 8 is a very stable operating system, your PC is still not a consumer electronic device . Windows could become corrupt with little or no notice . If you must
reinstall Windows at some point, you could lose all of your files and data if they are
stored on the same drive or partition where you originally put the operating system . That’s why it is important to separate your data from Windows on your PC .
Now there are several ways to move your files and data away from Windows 8, including the official way, which involves changing all the default store folders for libraries, one at a time. This is a very long and, dare I say, arduous way to do the job when there’s actually a much simpler and quicker way to perform the same task, which I describe in the following:
1. Open File Explorer.
2. At the left side of the Address Bar, click the first arrow, just next to the folder icon, as
Figure 3-7 Using the Address bar in File Explorer
3. On the drop-down menu that appears, click your user name.
4. Select your user folders. I would always recommend Downloads, Favorites, My Documents, My Music, My Pictures, and My Videos.
5. On the ribbon, click Cut.
6. Go to the hard disk or partition on which you want the user folders stored.
C
hap
ter
3
Backing Up Windows 8 41
Caution
!
Be sure to select Cut and not Copy in step 3, which will not move the files; it will simply
duplicate them .
Backing Up Windows 8
When Windows Vista introduced a full image backup system, IT professionals became very excited (well, I did anyway). When this was expanded to include every edition of Windows 7 (not just Professional and above), people became even more excited (even if was just me again).
With Windows 8, there are not one but two ways to create an image backup. I spoke about how to create a custom refresh image in Chapter 1, “Finding Your Way Around Windows 8,” but I would also recommend creating a full image backup, as well.
The reason for this is that if Windows spectacularly fails and you can’t load the refresh option from the boot loader, you will need a full image containing both Windows 8 and the boot loader that you can reinstall from a USB pen drive or from a DVD startup repair disc.
This option has been moved (slightly) in Windows 8, and there is no longer a Backup & Restore option in the Control Panel. It is now called Windows 7 File Recovery, but you can still find it in the Control Panel.
1. In the Control Panel, change the View By setting to Large Icons or Small Icons to show all the Control Panel items.
2. Open the Windows 7 File Recovery window (see Figure 3-8).
Figure 3-8 Using Windows 7 File Recovery
C
hap
ter
3
Backing Up Windows 8 43
Figure 3-9 Creating a system image backup
Windows 8 will automatically select your Windows and System Reserved partitions for backup.
5. Click Next to start the backup process.
INSIDE OUT
Network backup precautionsWindows 8 is now backed up, although it is also advisable to create a refresh image, as well. This can usually be stored on your Files partition if no space exists on your Backup partition for it.
If Windows 8 then fails, you can restore this quickly and simply, which I show you how to do this in Chapter 14, “Easy Ways to Repair Windows 8.”
Summary
Although Windows 8 is very well configured and very robust on a clean install, there are still many things that have not changed since the days of Windows 98. The auto-sizing of the virtual memory Page File, for example, still means that you have a file that will expand and contract all the time. On a mechanical hard disk this can cause problems with file frag -mentation, slowing down file access times, and on a solid-state disk it simply wastes usable space.
C
T
roubleshootingin windows 7 was fairly straightforward. All important messages in the operating system were channeled through the new Action Center, and from there, you could find most of what you needed. With the new user interface (UI) taking center stage in Windows 8, though, most of the tools and utilities you need to diagnose and repair Windows 8 problems are hidden away, and in the case of Windows 8 on ARM processors, some are missing completely.This doesn’t make Troubleshooting any harder for those who are familiar with the desktop, but casual computer users will certainly find things more confusing and complicated.
I want to split this chapter into two sections, therefore, looking first at what you can do in the new UI from the Windows 8 Start screen and then delving into the basic utilities that are available for users who are comfortable with the desktop.
Windows 8 Utilities
The whole point of the new UI, apart from creating a tablet-friendly interface for Windows, is to reduce and simplify. Thus, the PC Settings (Control Panel) includes only the options that most people need, most of the time. There’s nothing in here that anybody could really call an advanced setting.
That having been said, there are still a couple of items here that are useful for maintaining and troubleshooting a healthy computer.
Refresh
This book wouldn’t be complete without mentioning the Refresh option. The Refresh option is located in the General section under PC Settings, as illustrated in Figure 4-1.
Figure 4-1 You can find the Refresh option in the General section in PC settings
Caution
!
If you are talking a user through the process of refreshing Windows, be careful to explain to her the difference between Refresh and Reset .
INSIDE OUT
Why Refresh isn’t suitable for workplace desktop usersC
hap
ter
4
Windows 8 Utilities 47
The upshot of this is that after performing a Refresh you will have to set up your desk-top software again, including entering email account information in Outlook or any other email client .
This makes Refresh an unsuitable option for any user who uses the desktop exclusively in the workplace; unless the user engages apps exclusively or most of the time, a sys-tem image backup is a better option .
Windows Update
Windows Update section in PC Settings, which is enabled by default in Windows 8, is a very simple affair (see Figure 4-2). There’s just one button—Check For Updates—and that’s it.
This isn’t all good news, however, because this means that there will be optional or extra useful updates that users might never see, or pretty essential upgrades for components or software such as Internet Explorer or Windows Live Essentials that users might not see for months until they become mandatory.
However, as a basic way for users to be able to manage Windows Update, I very much doubt that Microsoft could have done a better job of it.
Desktop Utilities
On the Windows 8 desktop, there are many more choices with respect to utilities than were available in Windows 7. These choices are described in the following subsections.
The Action Center
The Action Center is the central location for all important Windows messages. It was devel-oped through feedback from Windows XP users who felt that their software and Windows itself was pestering them too often with pop-up information balloons.
You access the Action Center by clicking the white flag logo (the irony of which has never been lost on me) on the far right of the Windows 8 Taskbar (see Figure 4-3). If there are any messages pending, a pop-up window will appear first, which includes an Open Action Center link.
Figure 4-3 The Action Center Notifications pop-up window on the Windows 8 Desktop
So, rather than pop-up annoying messages on screen, if there are messages waiting for you in the Action Center, the white flag will appear with a red circle and a white cross. It is a small but eye-catching alert.
C
hap
ter
4
Desktop Utilities 49
Some third-party software, especially antivirus packages, will automatically plug themselves into the Action Center, and you can monitor them from there.
All messages in the Action Center display a colored band to their left (see Figure 4-4) that denotes the message’s priority; green indicates that all is well, yellow messages signify that information is available, and red ones designate that something needs your attention.
Figure 4-4 The Action Center in Windows 8
Windows 8 Automatic Maintenance
One new feature in the Action Center is the Automatic Maintenance tool (see Figure 4-5), which pools checking for and installation of software updates, security scans, and system diagnostics into one action that is performed on a daily schedule.
You can even configure Automatic Maintenance to temporarily wake a computer from sleep to perform the tasks (only if it’s plugged into an electric supply).
Figure 4-5 Configuring Automatic Maintenance in Windows 8
As a way of helping keep Windows 8 happy and healthy, this is an excellent idea, and per-forming all the tasks simultaneously also helps reduce battery drain when you are using a laptop or tablet computer.
Action Center Settings
C
hap
ter
4
Desktop Utilities 51
Figure 4-6 Changing the Action Center Settings
What Can You Do in the Action Center?
The Action Center should be your first resource when diagnosing problems within Windows 8. This is because it is not only the central place for diagnostic and maintenance messages from the operating system, it is also a centralized place from which you can control essen-tial Windows 8 features such as the User Account Control security system and Network Access Protection.
You can also view archived Action Center messages from the main Action Center panel. Problems that have occurred with Windows 8 in the past can give you clues to a solution for a current problem.
Figure 4-7 In the Maintenance Section, you can click a link to view the operating system’s reliability history
Windows Update
By the time the first service pack launches for a Windows operating system, there can be 80 or more security and software updates included as a part of it. These updates address issues related to the following:
● Virus and malware attacks
● Hacking attacks
● Other security vulnerabilities
● Windows Product Key cracks
● Faults found in Windows
C
hap
ter
4
Windows Update 53
● Updates for programs and features in Windows 8
● Updated drivers for hardware
● Updates for other Microsoft software supported by Windows Update
● Legacy code updates
Most updates address security vulnerabilities and legacy code. Hundreds of millions of peo-ple worldwide use Windows, so it’s a huge target for hackers and criminals, who regularly exploit software, such as Microsoft Internet Explorer. Legacy code updates—the other larg-est contributor to service packs—cover vulnerabilities that date back to previous versions of Windows and problems caused by maintaining compatibility with them.
For a stand-alone computer or for one on a small, unmanaged network, I recommend turn-ing on automatic Windows updates, as shown in Figure 4-8. This can help prevent problems on your computer by automatically updating Windows components as updates become available.
To access Windows Update, go to the Action Center, or in the Control Panel, look in the System And Security section.
Controlling Windows Update Through Group Policy
Windows Update sometimes causes problems, especially with older, legacy hardware or software for which an update introduces an incompatibility, preventing older software or hardware from working properly or making Windows 8 unstable when software runs.
In the corporate environment or on a small Windows Server network with multiple users, you can disable the Windows Update service and instead use Windows Server features to download and test all updates before they are rolled out across the network.
You can disable Windows Update in corporate environments by using a utility called Group Policy Editor. To access Group Policy Editor, open the Start screen and search for GPEdit.msc (not case-sensitive). The Local Group Policy Editor window appears, as depicted in Figure 4-9.