Microsoft
®Project 2010
Inside Out
Teresa S. Stover
1005 Gravenstein Highway North Sebastopol, California 95472
Copyright © 2011 by Teresa S. Stover
All rights reserved. No part of the contents of this book may be reproduced or transmitted in any form or by any means without the written permission of the publisher.
ISBN: 978-0-7356-2687-4
1 2 3 4 5 6 7 8 9 TG 6 5 4 3 2 1
Printed and bound in Canada.
Microsoft Press books are available through booksellers and distributors worldwide. If you need support related to this book, e-mail Microsoft Press Book Support at [email protected]. Please tell us what you think of this book at http://www.microsoft.com/learning/booksurvey.
Microsoft and the trademarks listed at http://www.microsoft.com/about/legal/en/us/IntellectualProperty/ Trademarks/EN-US.aspx are trademarks of the Microsoft group of companies. All other marks are property of their respective owners.
The example companies, organizations, products, domain names, e-mail addresses, logos, people, places, and events depicted herein are fictitious. No association with any real company, organization, product, domain name, e-mail address, logo, person, place, or event is intended or should be inferred.
This book expresses the author’s views and opinions. The information contained in this book is provided without any express, statutory, or implied warranties. Neither the authors, O’Reilly Media, Inc., Microsoft Corporation, nor its resellers, or distributors will be held liable for any damages caused or alleged to be caused either directly or indirectly by this book.
Acquisitions and Developmental Editors: Juliana Aldous and Kenyon Brown Production Editor: Holly Bauer
Editorial Production: Dessin Designs
Technical Reviewers: Ulhas Samant and Thuy Le Copyeditor: John Pierce
Proofreader: Octal Publishing, Inc. Indexer: Denise Getz
Cover Design Twist Creative • Seattle
Cover Composition: Karen Montgomery
Dedicated to the volunteers, staff, and members of Josephine Community Libraries.
When the county closed its libraries, you all contributed your resources, entrepreneurial spirit, and ingenuity to open them again.
Contents at a Glance
Part 5: Managing Multiple Projects
Chapter 15Part 6: Integrating Project
2010 with Other Programs
Collaborating as a Team by Using
SharePoint . . . . 781
Part 2: Developing the Project Plan
Chapter 3Checking and Adjusting the
Project Plan . . . . 365
Part 3: Tracking Progress
Chapter 11Setting a Baseline and Updating Progress . . 443
Chapter 12
Part 9: Appendixes
Appendix AInstalling Microsoft Project 2010 . . . . 1233
Appendix B
Online Resources for Microsoft
Project 2010 . . . . 1247
Appendix C
Keyboard Shortcuts . . . . 1253
Part 7: Managing Projects
Across Your Enterprise
Participating on a Team Using
Project Web App . . . . 965
Part 8: Customizing and
Managing Project Files
Chapter 28Customizing Your View of Project
Information . . . . 1061
Standardizing Projects by Using
Templates . . . . 1187
Chapter 32
Table of Contents
What do you think of this book? We want to hear from you!
Microsoft is interested in hearing your feedback so we can continually improve our books and learning resources for you . To participate in a brief online survey, please visit:
microsoft .com/learning/booksurvey
Introduction . . . . xxiii
Part 1: Project Fundamentals
Chapter 1:
Introducing Microsoft Project 2010 . . . . 3
Using Project 2010—An Overview . . . .5
Project Standard 2010 . . . .6
Project Professional 2010. . . .6
Project Server 2010. . . .8
Project Web App. . . .8
What’s New in Project 2010 . . . .9
What’s New in Project Standard 2010. . . 10
What’s New in Project Professional 2010 . . . 19
What’s New in Project Server 2010 and Project Web App . . . 22
Using the Project Ribbon . . . 30
Minimizing and Expanding the Ribbon. . . 31
Using Keyboard Shortcuts to Access Commands . . . 31
Finding Lost Commands . . . 32
Learning as You Go . . . 34
Getting Help . . . 34
Joining a Project Forum . . . 41
Working with Indicators and Option Buttons . . . 42
Chapter 2:
Understanding Projects and Project Management . . . . 45
Understanding Project Management Basics. . . 45
What Is a Project? . . . 45
What Is Project Management? . . . 46
Understanding Project Management Stages . . . 49
Initiating and Planning the Project . . . 50
Monitoring and Controlling the Project . . . 51
Part 2: Developing the Project Plan
Chapter 3:
Starting a New Project . . . . 69
What do you think of this book? We want to hear from you!
Microsoft is interested in hearing your feedback so we can continually improve our books and learning resources for you . To participate in a brief online survey, please visit:
Table of Contents xiii
Part 5: Managing Multiple Projects
Building Your Resource List with Outlook . . . 773
Table of Contents xix
Independent Resources . . . 1251 Organizations. . . 1251 Experts and Resources . . . 1251 Blogs and Discussions . . . 1252
Appendix C:
Keyboard Shortcuts . . . . 1253
Keyboard Shortcut Reference Tables . . . 1253 Finding More Keyboard Shortcuts . . . 1255 Using Ribbon KeyTips to Access Commands. . . 1256Index to Troubleshooting Topics . . . . 1257
Introduction
Welcome to Microsoft Project 2010 Inside Out. This book is your comprehensive Project 2010 reference, in which you can learn not only the essentials, but also the intermediate topics and advanced techniques for using Project 2010 like a power user.
Who This Book Is For
This book is designed for intermediate to advanced computer users who manage projects. Depending on where you are on the spectrum of project management experience, this book can help you in the following ways:
● If you are completely new to project management and Project 2010, this book will
give you a solid grounding in the use of Project 2010 as well as basic project man-agement practices and methodologies. It will help you understand the phases of project management, including the controlling factors in the project life cycle.
● If you’re an experienced project manager, this book integrates common project
man-agement practices with the use of the software tool. This helps you see how you can use Project 2010 to carry out the project management functions you’re accustomed to.
● If you’re already an experienced Microsoft Project user, this book will help you better
understand the inner workings of Project 2010 so that you can use it more effectively to do what you need it to do. In many ways, Project 2010 is like an entirely new proj-ect management information system. It departs in several ways from how things were done in previous versions, and it provides many more choices to consider that have an impact on your project throughout its phases. This book also extensively covers the striking new features in Project 2010 and provides the necessary guidance and “gotchas” regarding whether, when, and how to use those features.
Assumptions About You
How To Use This Book
Regardless of your previous experience, this book serves as a facilitator in helping you work with Project 2010 for your project’s processes and phases. Read the chapters and parts you feel are appropriate for your needs right now. Familiarize yourself with the topics available in the other chapters.
Then, as you continue to manage your projects with Project 2010, keep the book within arm’s reach so that you can quickly find the answers to questions and problems as they come up.
As you achieve mastery in one level of knowledge, use this book to help you attain the next level, whether it’s working with multiple projects at one time, customizing Project 2010, or programming Project 2010 functions to automate repetitive activities. This book is your comprehensive Project 2010 reference, in which you can quickly find answers and then get back to work on your project plan, and more importantly, doing the vital work of managing your projects.
How This Book Is Organized
The book is organized into the following parts:
● Part 1: Project Fundamentals (Chapters 1–2) If you want a primer on project
management in general or Project 2010 in particular, read the chapters in this part. Here, you find an overview of Microsoft Project, including what’s new in Project 2010. There’s an overview of project management processes and how Project 2010 facilitates those processes. You also find a discussion of the various kinds of people involved in your project, as well as some keys to successful project management.
● Part 2: Developing the Project Plan (Chapters 3–10) Everything you need to
know about starting a new project and creating a new project plan is found here. You get details about working with the Project 2010 workspace, scheduling tasks, setting up resources and assigning them to tasks, establishing costs, and adjusting the project plan to be an accurate model of your project’s reality.
● Part 3: Tracking Progress (Chapters 11–12) After you create the perfect project
Introduction xxv
● Part 4: Reporting and Analyzing Project Information (Chapters 13–14) Project
2010 provides a wide range of options for setting up and printing views and reports. This part outlines these methods—from simply printing your current view to generat-ing a built-in report to designgenerat-ing and runngenerat-ing your own custom report. This part also describes how you can export data to Microsoft Excel or Microsoft Visio to generate visual reports for analysis, as well as how you can use earned value data to analyze progress and costs.
● Part 5: Managing Multiple Projects (Chapters 15–16) As a project manager,
it’s likely that you’re managing more than one project at a time, working with a collection of smaller projects that feed into a large project, and working with vari-ous groups of resources who contribute to different projects. This part explains the concepts and practices of master projects, subprojects, and resource pools. It also explains how you can exchange information between different project plans; copy or link information; and leverage customized views, reports, groups, and other Project 2010 elements you might have created.
● Part 6: Integrating Project 2010 with Other Programs (Chapters 17–21) Project
2010 is designed to work seamlessly with other programs. You can copy, embed, link, hyperlink, import, and export information. This part describes these methods in detail and also devotes chapters to the specific integration techniques for working with Microsoft Excel, Microsoft Visio, Microsoft Outlook, and Microsoft SharePoint.
● Part 7: Managing Projects Across Your Enterprise (Chapters 22–27) Project
2010 helps to facilitate collaboration in project teams across your enterprise. If you’re using Microsoft Project Professional 2010, Microsoft Project Server 2010, and Micro-soft Project Web App, you and your organization have access to robust features for enterprise project management, portfolio management, and team collaboration. In this part, you learn how to set up and use the enterprise features to standardize and customize Project 2010 and project management processes throughout your organization. Project managers and resource managers can assign tasks, obtain task progress updates, and receive status reports from team members. A chapter each is devoted to the duties and capabilities of different stakeholders in the enterprise proj-ect management structure: the projproj-ect server administrator, the projproj-ect manager, the team member or team lead, the executive or other managing stakeholder, and the portfolio manager.
● Part 8: Customizing and Managing Project Files (Chapters 28–32) With Project
● Part 9: Appendixes This part includes ancillary information you’ll find useful in
your work with Project 2010. For example, there are installation guidelines and a list of online resources to expand your knowledge of Project 2010 and project manage-ment. Also included is a handy keyboard shortcut reference.
Throughout the book, you’ll find tips that provide shortcuts or alternative methods for doing certain tasks. The Inside Out tips give you information about known issues or idio-syncrasies with Project 2010 and possible methods of working around them.
There are also Troubleshooting tips that alert you to common problems and how to avoid or recover from them.
This book is designed so that you can quickly find the answers you need at the time you have the question. The comprehensive table of contents is a good starting point. Another excellent place to start finding your solution is in one of the two indexes at the end of the book. Use the special Troubleshooting index to solve specific problems. Use the master index to help you find the topics you’re looking for when you need them.
Features and Conventions Used in this Book
This book uses special text and design conventions to help you find the information you need more easily.
Text Conventions
Convention Meaning
Commands for navigating
the ribbon When referring to commands on the ribbon, this book points to the tab, group, and button. For example, “On the Task tab, in the Insert group, click the Task button.”
Abbreviated commands
for navigating the ribbon In some cases, you’ll see abbreviated commands. For example, “Click Task, Insert, Task” means click the Task tab on the ribbon, then in the Insert group, click the Task button.
Boldface type Boldface indicates text that you type.
Initial Capital Letters The first letters of the names of tabs, dialog boxes, dialog box elements, and commands are capitalized. Example: the Save As dialog box.
Italicized type Italicized type indicates new terms.
Introduction xxvii
Design Conventions
INSIDE OUT
This statement illustrates an example of an “Inside Out”heading
These are the book’s signature tips . In these tips, you get the straight scoop on what’s going on with the software—inside information about why a feature works the way it does . You’ll also find handy workarounds to deal with software problems .
Sidebar
Sidebars provide helpful hints, timesaving tricks, or alternative procedures related to the task being discussed .
TROUBLESHOOTING
This statement illustrates an example of a “Troubleshooting” problem statement.
Look for these sidebars to find solutions to common problems you might encounter . Troubleshooting sidebars appear next to related information in the chapters . You can also use “Index to Troubleshooting Topics” at the back of the book to look up problems by topic .
Cross-references point you to locations in the book that offer additional information about the topic being discussed .
CAUTION
!
Cautions identify potential problems that you should look out for when you’re com-pleting a task or that you must address before you can complete a task .
Note
About the Companion Content
The companion content for this book includes sample files that you can use as the basis for practicing Project 2010 techniques throughout this book.Additionally, the companion con-tent for this book includes a list of online resources regarding Microsoft Project 2010 and project management. The following table lists the sample files and online resources.
To access and download the companion content, visit:
http://go.microsoft.com/FWLink/?Linkid=218006
Chapter or Topic Content
Chapter 1 01WebDev.mpp
Chapter 3 03WebDev.mpp
03aWebDev.mpp 03RecurringTask.mpp 03Training-WBS.mpp
Chapter 4 04WebDev.mpp
04aWebDev.mpp
Chapter 5 05WebDev.mpp
05aWebDev.mpp
Chapter 6 06WebDev.mpp
Chapter 7 07Resources.mpp
Chapter 8 08Home.mpp
08aHome.mpp 08WebDev.mpp 08aWebDev.mpp 08bWebDev.mpp
Chapter 9 09Costs.mpp
09WebDev.mpp
Chapter 10 10Home.mpp
10WebDev.mpp
Chapter 11 11WebDev.mpp
Chapter 12 12NewBiz.mpp
12ProgressLines.mpp
Introduction xxix
Online Resources Microsoft-Sponsored Resources for Project 2010 Project Desktop Basics
Project Server Basics
Discussion Forums and Social Media Developer Information
Project Certification
Independent Resources for Project 2010 Organizations
Acknowledgments
Work on this book was marked by layers of transition: Microsoft Project transitioning to a new paradigm, Microsoft Press and O’Reilly Media transitioning into a new partnership, me transitioning into a new way of working and thinking.
Thanks go out to Andreea Marinescu for her hard work and enthusiasm while writing the enterprise project management chapters under a tight deadline. I’m especially grateful to Bonnie Biafore for writing several other chapters and for being expert, clone, friend. She assured me that everything would be fine, and as always, she was right.
Much appreciation to Ulhas Samant and Thuy Le for their insightful technical editing. Their comments made this book accurate and more usable. Many thanks go to Brian Kennemer for his technical review of certain chapters.
Thanks to O’Reilly acquisitions editor Kenyon Brown for keeping the train moving steadily forward. I’m grateful for my agent Claudette Moore, with her cheerful encouragement and creative thinking. I’m indebted to John Pierce, copyeditor, and Holly Bauer, production editor. Their professionalism and precision is a world I love to inhabit.
Scott Chapman and Ron Luchansky at Project Hosts graciously provided me with a invalu-able enterprise project management hosted setup.
My friends gave me so much encouragement and always said or did exactly the right thing for me. Thanks to my mom, Song Ai Soon Remhof, and to my brother, Lester Remhof.
Thanks most of all to my wonderful husband and traveling companion through life’s jour-ney, Craig Stover. He knew when to ask the tough questions and when to just empathize. He knew how to prevent procrastination and when to make me stop and get some sleep. He’s my biggest fan—it’s pretty cool when he shows off my books.
Finally, thanks to you, reader and project manager. Your projects can and do change the world. Remember, there’s no end to the incredible things you can do with a well-planned and well-run project.
Support and Feedback
Introduction xxxi
Errata & Support
We’ve made every effort to ensure the accuracy of this book and its companion content. If you do find an error, please report it on our Microsoft Press site at oreilly.com:
1. Go to http://microsoftpress.oreilly.com.
2. In the Search box, enter the book’s ISBN or title.
3. Select your book from the search results.
4. On your book’s catalog page, under the cover image, you’ll see a list of links.
5. Click View, Submit Errata.
You’ll find additional information and services for your book on its catalog page. If you need additional support, please e-mail Microsoft Press Book Support at
Please note that product support for Microsoft software is not offered through the addresses above.
We Want to Hear from You
At Microsoft Press, your satisfaction is our top priority, and your feedback our most valu-able asset. Please tell us what you think of this book at
http://www.microsoft.com/learning/booksurvey
The survey is short, and we read every one of your comments and ideas. Thanks in advance for your input!
Stay in Touch
Let’s keep the conversation going! We’re on Twitter: http://twitter.com/MicrosoftPress.
How to Access Your Online Edition Hosted by Safari
To access your online edition, do the following:
1. Locate your voucher inside the back cover, and scratch off the metallic foil to reveal your access code.
2. Go to http://microsoftpress.oreilly.com/safarienabled.
3. Enter your 24-character access code in the Coupon Code field under Step 1.
(Please note that the access code in this image is for illustration purposes only.)
4. Click the CONFIRM COUPON button.
A message will appear to let you know that the code was entered correctly. If the code was not entered correctly, you will be prompted to re-enter the code.
5. In this step, you’ll be asked whether you’re a new or existing user of Safari Books Online. Proceed either with Step 5A or Step 5B.
Introduction xxxiii
5B. If you are a new user, click the NEW USER – FREE ACCOUNT button under Step 2.
■ You’ll be taken to the “Register a New Account” page.
■ This will require filling out a registration form and accepting an End User Agreement.
■ When complete, click the CONTINUE button.
6. On the Coupon Confirmation page, click the My Safari button.
7. On the My Safari page, look at the Bookshelf area and click the title of the book you want to access.
How to Download the Online Edition to Your Computer
In addition to reading the online edition of this book, you can also download it to your computer. First, follow the steps in the preceding section. After Step 7, do the following:
1. On the page that appears after Step 7 in the previous section, click the Extras tab.
2. Find “Download the complete PDF of this book,” and click the book title.
3. Click Save.
4. Choose Desktop and click Save.
5. Locate the .zip file on your desktop. Right-click the file, click Extract All, and then follow the instructions.
Note
PART 1
Project Fundamentals
CHApTER 1
Introducing Microsoft Project 2010 . . . .3
CHApTER 2
Understanding Projects and
Project Management . . . .45
Using Project 2010—An Overview . . . .5
What’s New in Microsoft Project 2010 . . . .9
Using the Project Ribbon . . . .30
Learning as You Go . . . .34
L
et’s say you are a supremely multitasking product specialist for an up-and-comingstartup company. You handle research, development, material procurement, and mar-keting for your suite of products. On top of all this, you now have the responsibility of managing the project for the launch of your company’s newest product.
On the other hand, we could say that you are an accomplished project management pro-fessional who manages projects for several departments in your organization at any given time. You’re responsible for managing thousands of tasks, hitting hundreds of deadlines, and assigning scores of resources. You need to plan and monitor each project, work with different managers, and make the best use of resources—some of whom might work on only one project and others who might be shared among several of your projects.
As these two scenarios illustrate, project management is a process and a discipline that can be the full focus of your career or one of many aspects of your job description.
Numerous industries rely on sound project management for their success. Here are just a handful:
● Construction
● Filmmaking
● Computer system deployment
● Logistics
● Engineering
● Publishing
● Events planning
● Software development
ChAPTER 1
Ch
ap
te
r 1
Across different industries, there are common project types, for example:
● New business startup
● New product development
● New service rollout
● Computer system deployment
● Training development and delivery
● Website development
● Conference and trade show exhibition
● Office move
● Marketing campaign
Regardless of the size of your organization, the scope of your projects, or even the number of projects you find yourself managing simultaneously, effective project management is vital at the start of a project. This is when you determine what needs to be done, when, by whom, and for how much money. Effective project management is also essential after you kick off the project, when you are continually controlling and managing project details. You frequently analyze the project—tracking the schedule, the budget, resource requirements, and the scope of tasks. In addition, you manage the level of quality in the project, plan for risks and contingencies, and communicate with the members of the project team as well as with upper management or customers.
Using Project 2010—An Overview 5
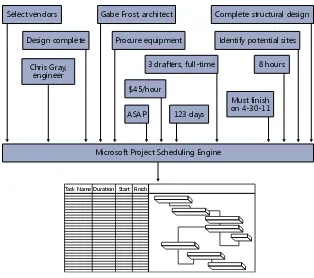
Project 2010 is a specialized database that stores and presents thousands of pieces of data related to your project. Examples of such data include tasks, durations, links, resource names, calendars, assignments, costs, deadlines, and milestones.
These pieces of information interrelate and affect each other in a multitude of ways. Under-lying this project database is the scheduling engine, which crunches the raw project data you enter and presents the calculated results to you, as shown in Figure 1-1. Examples of such calculated results include the start and finish dates of a task, resource availability, the finish date of the entire project, and the total cost for a resource or for the project.
Select vendors Gabe Frost, architect Complete structural design
Figure 1-1 Use Project 2010 as your database of project management information.
You can then manipulate and display this calculated data in various views to analyze the planning and progress of your project. This information helps you make decisions vital to the project’s success.
Ch
ap
te
r 1
Different Project 2010 editions and companion products are available for you and your organization to get the project management features you need.
Project Standard 2010
Microsoft Project Standard 2010 is the basic desktop edition. Project Standard 2010 has all the essential features for individual project management, including the following:
● Task scheduling
● Resource management
● Tracking
● Reporting
● Customization
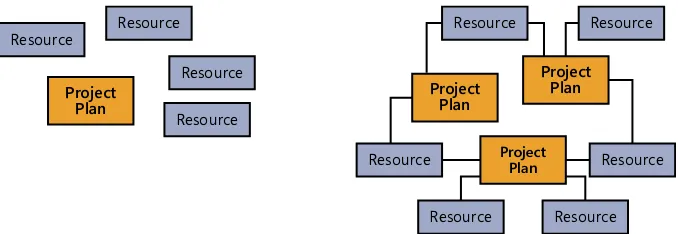
With this substantial tool set, you can start planning, managing, and reporting your project information “straight out of the box”—that is, immediately upon installation. (See Figure 1-2.)
Resource Resource Resource Resource
Figure 1-2 Develop and execute single or multiple project plans with Project Standard 2010.
Project Professional 2010
Project Professional 2010 provides everything that Project Standard 2010 does, with some notable additions. Project Professional includes the Team Planner view, the ability to show deactivated tasks for what-if scenarios, and workgroup collaboration features through Microsoft SharePoint Foundation 2010.
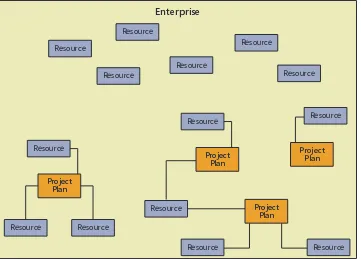
Using Project 2010—An Overview 7
Figure 1-3 Develop and execute project plans across an enterprise with Project Professional.
Project Professional, as connected to Project Server, includes the following features:
● Team collaboration through Project Web App, which is built on Microsoft SharePoint
Server 2010. From Project Professional, the project manager can submit assignments to the organization’s project server, and resources can view and update their assign-ments by using Project Web App, the web-based project management interface.
● Global templates, enterprise fields, and other elements that enable your project
administrator to standardize and customize the use of Project 2010 for the way your enterprise manages projects.
● The ability to choose and manage resources from the pool of a specific group or the
entire company. You can see resource availability across multiple projects and have Project 2010 automatically find resources that will appropriately fill project team requirements.
Ch
ap
te
r 1
For more information about the enterprise project management features provided through Project Professional, see Chapter 22, “Understanding Enterprise Project Management .”
Project Server 2010
Microsoft Project Server 2010 is a separately licensed companion server product that works with Project Professional to provide an enterprise project management solution that includes team collaboration among project managers, resources, and other stakeholders.
Project Server also integrates robust project portfolio management features. These tools provide for proposed project evaluation and selection, workflow capabilities, and business intelligence and analysis across the portfolio projects.
For more information about setting up Project Server and Project Web App, see Chapter 23, “Administering Your Enterprise Project Management Solution .”
For project manager information on enterprise and collaboration features, see Chapter 24, “Managing Enterprise Projects and Resources .”
For portfolio management information, see Chapter 27, “Managing and Analyzing Project Portfolios .”
Project Web App
Microsoft Project Web App is a web-based client application to Project Server. Project Web App provides the user interface for enterprise project management and team collabora-tion funccollabora-tions for project managers, resources, executives, portfolio managers, and other stakeholders.
Resources and other associated stakeholders in the project can view and work with the information held in Project Server. Resources can review their assigned tasks and other project information in Project Web App. In addition, they can add tasks, update progress information, and submit status reports through Project Server. Upon approval, this informa-tion ultimately updates the project plan being maintained by the project manager.
Executives can view high-level project overviews as well as detail information. They can examine projects within a particular program, analyze several projects within a portfolio for resource usage or cost, and make strategic decisions about proposed projects. All informa-tion is gathered, organized, and reported consistently throughout the organizainforma-tion, provid-ing a complete and accurate picture of all projects.
What’s New in Project 2010 9
Project 2010 represents a dramatic step forward in the product’s evolution. This is evident from the introduction of user-controlled scheduling and workgroup collaboration features in the desktop version of the product, all the way to the fully realized project portfolio management system in the enterprise version. The way projects are scheduled has made a sizable shift, and in some cases this new approach is much more than just a departure, because it contradicts the way project managers have used previous versions of Microsoft Project. Many new features provide more flexibility and user control, but with that flexibility is needed knowledge of consequences in various aspects throughout the project life cycle.
This section is the first step, providing an overview of the new features throughout Project 2010. As you gain more experience with the features and processes described in this and succeeding chapters, we hope that you’ll learn how best to approach the product’s new paradigm and tap into the power of the “new Microsoft Project” and use it to your advan-tage as you manage your projects effectively.
As in previous versions of Microsoft Project, there are two editions of Project 2010: Project Standard and Project Professional. Both versions can be used as a standalone desktop proj-ect management application for a single projproj-ect manager, although Projproj-ect Professional has a few more features available than Project Standard. Furthermore, with the implementation of Project Server for enterprise project management, a host of additional features becomes available in Project Professional.
Throughout the different configurations of Project 2010, you’ll see new features and signifi-cant improvements in the following areas:
● Controlling the project schedule
● Analyzing and troubleshooting the schedule
● Collaborating on project details
● Viewing project information
● Working with commands and tools
In Project 2010 enterprise project management, you’ll see additional changes in the follow-ing areas:
● Managing portfolios, including demand management and workflow
Ch
ap
te
r 1
● Tracking project status and timesheets
● Viewing project information, including the use of new business intelligence tools
● Working with commands and tools
● Managing the project server
This section summarizes the new features in Project Standard, Project Professional, Project Server, and Project Web App. Cross-references indicate where these features are explained in detail elsewhere in this book.
What’s New in Project Standard 2010
A major highlight of the new version of Project Standard is the introduction of manually scheduled tasks, which provide more freedom and flexibility when creating a project. New ways to share information, including the use of SharePoint and PDF, provide for better col-laboration among team members. You can highlight and focus on the most important tasks and phases using the new Timeline. Making commands easier to find and use, the Office ribbon is now part of Project 2010. The many Microsoft Project menus and toolbars are now a thing of the past.
Controlling the Project Schedule
You now have more choices when it comes to how tasks are created and scheduled:
● Manually scheduled tasks You can select whether the tasks in a project are
What’s New in Project 2010 11
Ch
ap
te
r 1
Automatically
scheduled tasks Manuallyscheduled tasks
Manually scheduled placeholder tasks
Figure 1-4 Tasks can be automatically or manually scheduled, depending on the needs of the project and the information currently available.
For more information, see “Manually Scheduling Tasks” on page 184 .
● Top-down summary tasks In past versions of Microsoft Project, you could create
a summary task only by making subtasks out of tasks beneath it. You can still do this in Project 2010, but you can also now create a summary task out of the gate. You can insert a summary task above an existing task, or you can create a summary task at the end of the task list. In the latter case, a new subtask is automatically added beneath the new summary task, as shown in Figure 1-5.
Ch
ap
te
r 1
Analyzing and Troubleshooting the Schedule
In Project 2010, tools are at your disposal to help you see why a task is scheduled the way it is and to alert you to possible scheduling conflicts down the road.
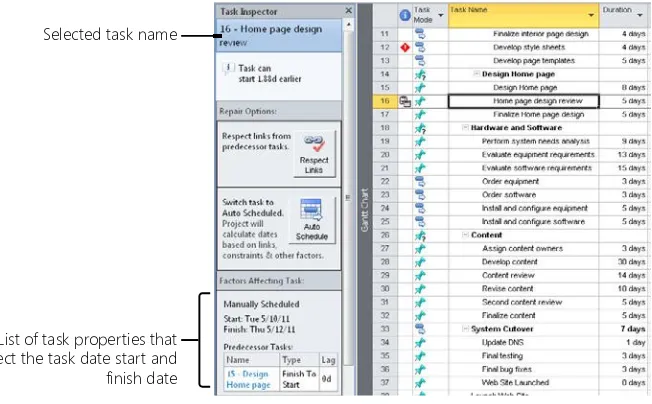
● Task Inspector This tool lists all the scheduling factors that drive how a task is
scheduled, as shown in Figure 1-6. Such factors might include whether the task is manually or automatically scheduled, its duration, any dependency links, date con-straints, resource calendars, overallocated resources, and so on. In some cases, the Task Inspector provides solutions to current or potential scheduling problems.
List of task properties that affect the task date start and finish date Selected task name
Figure 1-6 The Task Inspector lists all schedule “drivers” for a selected task.
For more information, see “Reviewing the Factors That Affect a Task Start Date” on page 240 .
● Schedule warnings and indicators If Project 2010 detects a condition in the
schedule that is causing a current or potential schedule conflict, a visual cue appears in the task information at the point of the problem. You can click that visual cue to get more information, and then use the Task Inspector to see more details and resolve the problem.
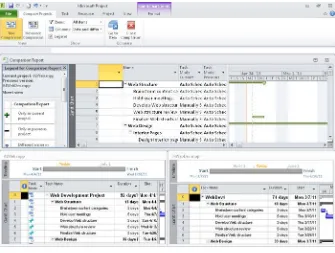
● Compare project versions In previous versions of Microsoft Project, the
What’s New in Project 2010 13
Ch
ap
te
r 1
building a new project and taking input from several sources, or when you’ve based a new project on an existing project and you want to compare detailed information between the two.
Figure 1-7 The Compare Projects report shows differences between two project files. For more information, see “Comparing Project Plans Side by Side” on page 1223 .
Collaborating on Project Details
Project collaboration among team members and other stakeholders is always an essential component to effective project management. Project 2010 adds new functionality with its integration with SharePoint. Project 2010 also lets you copy and paste information between applications and provides additional file formats to add to its set of robust collaboration features.
● Save to SharePoint You can facilitate more collaboration by saving (although not
Ch
ap
te
r 1
For more information, see “Save a project to SharePoint by using Project Standard 2010” on page 789 .
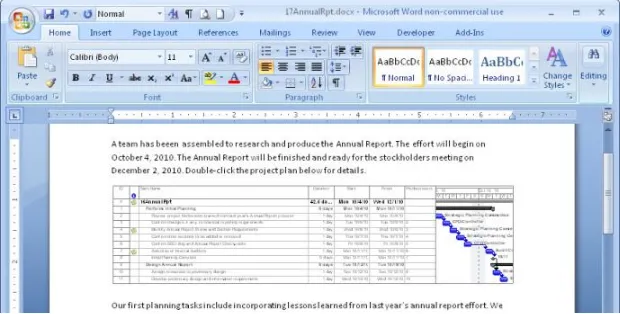
● Enhanced copy and paste to other applications When you copy and paste
infor-mation from Project 2010 into another Microsoft Office application such as Microsoft PowerPoint or Excel, outline levels, column headings, and formatting are maintained as they were in the project file, as shown in Figure 1-8. There’s no longer any guess-work about where and how information is pasted, and no reformatting has to be done. You just paste, and the information looks as it did in your project file.
Figure 1-8 Paste information from Project 2010 into Word, and the outline levels, column headings, and formatting look just as they did in the project plan.
For more information, see “Copying from Project 2010 to Another Application” on page 647 .
● Save to PDF/XPS You can save a project view or report as a PDF (Portable
What’s New in Project 2010 15
Ch
ap
te
r 1
Figure 1-9 Save a view as a PDF or XPS file to ensure that it looks exactly as you intended when your recipients open the file on their computers.
For more information about PDF and XPS, see “Working with Common Cross-Application File Formats” on page 1221 .
● Backward compatibility Project 2010 readily opens files created in previous
ver-sions of Microsoft Project. This means that a converter is not necessary to open files created in earlier versions.
● Scalable 64-bit compatibility support Project 2010 is offered as a 32-bit or 64-bit
installation. The 64-bit compatibility provides improvements in performance, which is particularly helpful for project managers who regularly work with very large projects or complex structures of master projects and subprojects.
Viewing Project Information
The new Timeline lets you see key phases or tasks, keeping you focused on the big picture. If you’re familiar with Excel, you’ll like how text wraps and columns are added in any sheet view. There are new ways to zoom, draw, and color elements in your plan.
● Timeline view You can see the highlights of your entire schedule or review
Ch
ap
te
r 1
Figure 1-10 Use the Timeline to view the highlights or milestones you want to keep at the forefront.
For more information, see “Highlighting Tasks with the Timeline” on page 134 .
● Add new columns quickly Every table throughout Project 2010 includes a blank
column into which you can simply enter data without first defining the column’s data type, as shown in Figure 1-11. This provides for a more intuitive way to add new col-umns, especially columns for custom project information.
What’s New in Project 2010 17
Ch
ap
te
r 1
● Text wrap Row heights now adjust automatically to display the full contents of a
cell, as shown in Figure 1-12. This makes it easy to see all the information in a cell, especially Task Name or Resource Name cells, with minimal column adjustments.
Figure 1-12 Long task names can now easily be accommodated because of text wrapping.
● Zoom slider You can use the Zoom slider in the lower-right corner of the Project
2010 window to zoom the timescale of a time-based chart in or out, as shown in Figure 1-13. This makes working with the Gantt Chart or Resource Usage view so much more convenient.
Figure 1-13 Use the Zoom slider to adjust the timescale to more or less detail.
● Expanded color palette and formatting More colors are now available for bar styles,
font colors, and backgrounds. Gantt chart color schemes can help personalize your proj-ect, and the new drawing tools help you emphasize important schedule details. For more information about the drawing tools, see “Marking Up a Schedule with Drawing Tools” on page 1080 .
Working with Commands and Tools
Like the other Microsoft Office applications, Project 2010 now incorporates the ribbon, Quick Access Toolbar, Backstage view, and context-sensitive right-click menus and toolbars. These all make working with Project 2010 more familiar and intuitive, and allow power users to work even faster.
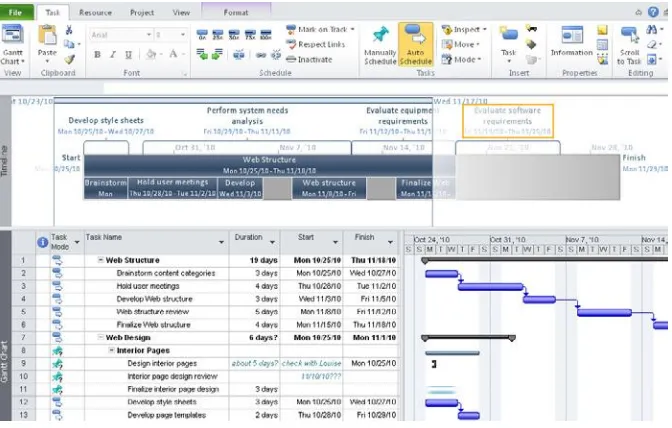
● Ribbon interface Part of what’s known as the Office Fluent user interface, used
Ch
ap
te
r 1
Quick Access
Toolbar Project 2010 ribbon
Task tab Commands Schedule group Tasks group
Figure 1-14 Use the ribbon to find and use Project 2010 commands and tools. For more information about the ribbon, see “Using the Project Ribbon” on page 30 .
● Quick Access Toolbar The Quick Access Toolbar is another aspect of the Fluent
user interface. This toolbar is always present in the upper-left corner of the Project 2010 window, and it can be customized with your most frequently used commands.
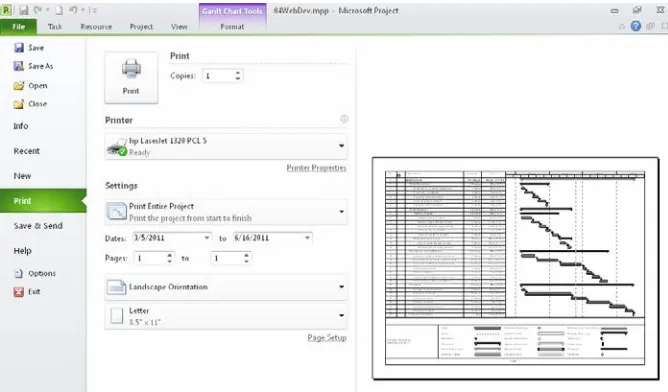
● Backstage view Tools, templates, and program options are available in the new
Backstage view. The Backstage view is where you save and print files, create new project plans or open existing ones, and set your program preferences and options. It’s also where you go to get Help about Project 2010. Figure 1-15 shows the Print Backstage view.
What’s New in Project 2010 19
Ch
ap
te
r 1
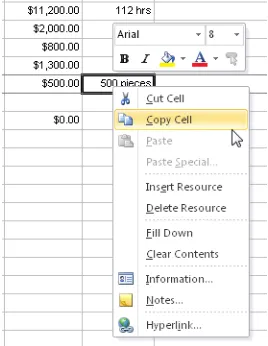
● Context sensitive menus and mini-toolbars You can quickly find the most
com-monly used commands in a particular context with a well-placed right-click on the Project 2010 window. In most places, a menu appears that shows commands that apply to the area or content where you clicked. In some places, a mini-toolbar also appears to provide even more context-sensitive options. (See Figure 1-16.)
Figure 1-16 Right-click an area of the Project 2010 window to see a menu of context-sensitive commands, and sometimes a mini-toolbar.
What’s New in Project Professional 2010
Project Professional 2010 includes all the new features of Project Standard 2010. In addition, Project Professional 2010 includes features for managing resource teams and deactivating tasks.
You can look at your schedule in different ways by using the Team Planner, by synchroniz-ing project workgroup information in SharePoint, and by inactivatsynchroniz-ing and reactivatsynchroniz-ing tasks in Project Professional 2010.
● Team Planner Visually arrange the scheduling and assignment of tasks along a
Ch
ap
te
r 1
INSIDE OUT
Some features from previous versions are discontinued inProject 2010
The following is a list of Project 2007 features that are no longer available in Project 2010 .
● Project guides Previous versions included a set of project guides to help set up tasks and resources, to track progress, or to generate reports . Although these are discontinued, you can use Microsoft Visual Basic for Applications (VBA) to enable any custom project guides you might have created .
● Double-click to enable task splitting Task splitting is still available; you just single-click to enable it instead .
For more information, see “Splitting Tasks” on page 420 .
● Resource availability graphs from the Assign Resources dialog box behave differently You can only see the graph of one resource at a time . However, using the combination view that appears, you can still page through multiple resources assigned to a single task, or see the resources assigned to a different task . For more information, see “Finding the Right Resources for the Job” on page 290 .
● Former add-ins are now built-in features The Copy Picture, Adjust Dates, and Compare Project Versions commands are now built in to Project 2010, and add-ins are no longer needed for these functions .
● Save as Excel PivotTable You cannot save Project 2010 data as an Excel Pivot-Table file . However, you can still create Excel visual reports that use your project data in an Excel PivotTable format . You can export earned value information and see S-curves of this data in Excel . You can also now save Project 2010 data in other Excel formats, including .xlsx and .xlsb .
For more information about visual reports, see “Generating the Right Reports” on page 541 . For more information about saving project information in an Excel file format, see “Saving and Opening with Different File Formats” on page 1214 .
● Add-ins and sample macros Add-ins and sample macros provided with Project 2007 are no longer available . These include the PERT Analysis, Format_Duration, ResMgmt_TaskEntry, Rollup_Formatting, Toggle_Read_Only, and Update_File functions .
What’s New in Project 2010 21
Ch
ap
te
r 1
Figure 1-17 The Team Planner provides another view into your tasks, resources, and assignments.
For more information, see “Reviewing Assignments with the Team Planner .”
● SharePoint integration for workgroup collaboration With Project Standard
2010, you can save a project file to a SharePoint site. Project Professional 2010 takes this further with the ability to publish a project schedule to a SharePoint task list. You can also create projects from a SharePoint task list or convert a list into a Project 2010 schedule. Either way, the schedule information in SharePoint and Project 2010 are synchronized. In addition, you can receive task updates from team members, and those updates are also synchronized.
For more information, see Chapter 21, “Collaborating as a Team by Using SharePoint .”
● Inactive and active tasks You can remove tasks from the active schedule while
Ch
ap
te
r 1
Figure 1-18 Inactivated tasks still show as “ghost” images in your project plan. You can reactivate them later if needed, or just keep them for archival purposes.
For more information about deactivating tasks, see “Changing Project Scope” on page 436 .
What’s New in Project Server 2010 and Project Web App
In Project Server 2010 and Project Web App, a multitude of new features work together to facilitate portfolio analysis and decision making, project scheduling, resource management, and reporting. Built on the Microsoft SharePoint Server 2010 platform, this provides com-plete start-to-finish enterprise project management (EPM) and project portfolio manage-ment (PPM) solutions on a single server, with a familiar and consistent user interface.
Managing Portfolios
Project portfolio management (PPM) encompasses the methods by which an organization
can analyze, prioritize, and maximize proposed projects, and then execute the selected projects while being ever mindful of the overall progress, cost, and resource utilization throughout. The objective of project portfolio management is to achieve the ideal mix of projects that can enable the organization to achieve its strategic goals.
● Integrated project and portfolio management In Project 2007, the portfolio
management features were handled on a separate, add-on server platform. In Project 2010, project portfolio management functionality is now completely integrated with enterprise project management in the Project Web App user interface. The result is a common and interconnected user experience throughout the entire project portfolio management life cycle.
● Demand management system The heart of the project portfolio management
propos-What’s New in Project 2010 23
Ch
ap
te
r 1
execution of selected projects against a defined workflow that ensures the fulfillment of key indicators at identified checkpoints in the project life cycle. Different enterprise project categories can be defined and associated with a workflow, a project, and a template.
● Workflow configuration As a major component of the demand management
system, the workflow defines each step in the life cycle of a project. In fact, the workflow essentially implements the demand management system. The portfolio manager can configure all aspects of the workflow to reflect the characteristics of the organization and to ensure the appropriate level of governance. The workflow typically begins with the initial project proposal and includes all approval steps along the way, through to project selection, execution, and closure. The project manager can track the status of the project in all the steps of the workflow. You can use the Project Web App workflow module to define one or more workflows for the different categories of projects in your organization, as shown in Figure 1-19. New enterprise custom fields provide the flexibility that portfolio managers need to customize their workflows.
Figure 1-19 New in Project Web App is the ability to view the project workflow.
● Business driver definition The identification and prioritization of key business
Ch
ap
te
r 1
Figure 1-20 An organization can define and prioritize business drivers to help analyze which projects will work toward strategic goals.
● Portfolio analysis tools In Project Web App, portfolio managers and executives
can use business drivers, the optimizer, and planning tools to analyze the projects in the portfolio. They can see which projects hit the target for key business drivers and can analyze which projects are best meeting the business drivers for that function, within given cost and resource constraints. They can optimize portfolios based on dif-ferent filters, such as strategic value, financial value, resource utilization, and risk. As shown in Figure 1-21, the views and user interface in Project Web App provide flex-ibility and perspective and, therefore, can improve project portfolio decision making.
Figure 1-21 In Project Server 2010, visibility and reporting of key performance indicators are now available.
What’s New in Project 2010 25
Ch
ap
te
r 1
Planning Projects and Resource Capacity
Project managers can now use Project Web Access to edit projects in ways similar or identi-cal to editing projects in the Project Professional user interface. As a result, updating project information is more intuitive and efficient and can be performed wherever project manag-ers have a web browser and Internet access. In addition, a new resource capacity planning feature set makes it possible to maximize resource utilization across the organization.
● Schedule creation and update Project managers can build a new schedule and
also make simple edits and updates from within Project Web App. In addition, change highlighting and multiple-level undo features are also now available in Project Web App.
● More robust projects in Project Web App Project managers can now create
projects with more than 100 tasks, a previous limitation in Project Server. Project managers can also assign multiple resources, define task hierarchy in outlines, and set dependencies with task links, all working in Project Web App. (See Figure 1-22.)
Figure 1-22 Project managers now have much more scheduling flexibility and power when creating and updating schedules in Project Web App.
● Manual or automatic task scheduling As in the Project 2010 desktop version, in
Ch
ap
te
r 1
● Resource capacity planning Project and portfolio managers can view resource
capacity across the organization, ensuring maximum resource utilization. This pro-vides insight into demand and availability of generic resources over time. Projects can be rescheduled to maximize resource utilization while maintaining the set sched-ule dependencies. What-if scenarios regarding staffing levels can be modeled and compared.
For information about managing project schedules and doing resource capacity planning using Project Server 2010 and Project Web App, see Chapter 24 .
Tracking Project Status and Timesheets
In Project 2010, time and task progress tracking, status reporting, approvals, and Microsoft Exchange Server integration have been improved.
● Time reporting enhancements If teams prefer, task status and timesheet updates
can be unified by enabling single entry-mode through a consistent yet flexible user interface. This can save time for team members as well as project managers.
For more information about submitting task status updates and timesheets, see “Logging Time by Using Timesheets” on page 992 .
● Consolidated approval center The new Approval Center provides a convenient
all-in-one location for managers to approve and incorporate task status and timesheet updates.
● Delegate approvals With the enhanced user delegation features, you can easily
delegate task status and timesheet approvals to another individual, such as a resource manager or team lead.
For more information about approving task status updates and timesheets, see “Exchanging Task Progress Information” on page 948 .
● Exchange Server integration Team members can choose to receive and update
their task status and other notifications through Microsoft Outlook or Outlook Web App. Project tasks are shown as Outlook tasks grouped by project name. No Outlook add-in is required.
What’s New in Project 2010 27
Ch
ap
te
r 1
Viewing Project Information
You can now easily create reports and dashboards through the reporting layer built on the Microsoft Business Intelligence platform through SharePoint Server. Through the Project Web App interface, you can use these tools to better visualize and track key project perfor-mance indicators.
● highly customizable The reporting and dashboard functionality is highly
cus-tomizable. With the ability to set up summary and detail project information exactly as you need, you can more quickly respond to changing conditions in projects and portfolios.
● PerformancePoint Services PerformancePoint, part of the Microsoft Business
Intelligence platform, gives you a dashboard designer with a variety of indicators. (See Figure 1-23). Create different dashboards for different purposes and audiences to help you effectively monitor and present portfolio performance.
Figure 1-23 Use PerformancePoint content to create dashboards that help you or your audience see key project and portfolio status at a glance.
● Office reporting services In addition to PerformancePoint Services, you can use
Excel Services, Visio Services, PowerPivot for Excel 2010, and SQL Reporting Services to publish information from a Microsoft Office application.
● Predefined report templates You can choose from a variety of predefined report
templates that reflect project reporting best practices. Examples include reports on key performance indicator by department, project costs, resource capacity, issues and risks, workflow chart, and more.
Ch
ap
te
r 1
Working with Commands and Tools
With Project Server 2010 built on the SharePoint Server 2010 platform and the adoption of the ribbon in Project Web App, users experience a more consistent user interface as they move between Project Professional 2010, other Microsoft Office applications, and other SharePoint sites to work in Project Web App.
● Built on SharePoint Server 2010 Project Web App uses the familiar SharePoint
Server interface. In addition, SharePoint enterprise search makes it easy to find proj-ect information, including tasks, resources, documents, and more. In addition, teams can be connected and communication enhanced through the use of all the capabili-ties of SharePoint. This includes wikis, blogs, discussion forums, My Sites, document libraries, and more.
● Ribbon interface In Project Web App, the menus and toolbars have been replaced
with the ribbon for easier access and grouping of major functions. As shown in Figure 1-24, commands are logically arranged in tabs and groups that are presented graphi-cally and dynamigraphi-cally, depending on which area of Project Web App you’re working in.
Figure 1-24 Project Web App now uses the ribbon to present commands graphically and dynamically.
For more information about the ribbon, see “Using the Project Ribbon” on page 30 .
● Microsoft Visual Studio Team Foundation Server Through interoperability with
Visual Studio, the world of application development can be easily connected with that of project and portfolio management.
Managing the Project Server
Project server administration functions are simplified in Project Server 2010 and Project Web App. User setup, Project Web App configuration and customization, and security fea-tures are centralized for project and portfolio administration.
● Centralized project server administration The server settings console provides all
What’s New in Project 2010 29
Ch
ap
te
r 1
Figure 1-25 Use the Server Settings page in Project Web App to carry out most project server administrator functions.
● Project access permissions Within the Project Web App Permissions function,
project managers can expand on what the security model allows to create and mod-ify resources and set basic view permissions to better control who has the rights to view or edit projects.
● Delegate users With enhanced delegation, users can identify colleagues to act as
their delegate when needed. The project server administrator no longer needs to set up delegation rights between users.
● Custom enterprise fields Project server administrators and portfolio managers
can use custom enterprise fields to customize enterprise project templates the way they’re needed throughout the organization. With the custom departmental fields, users in specific departments can focus on their own data, filtering out information that doesn’t apply to them. With these custom departmental fields, enterprise project types, resources, and custom fields can be associated with specific departments to maintain the relevancy of project data.
● Administer reporting cubes Through the improved interface for working with
reporting cubes, project server administrators and portfolio managers can easily add, edit, copy, refresh, and delete reporting cubes.
● Enhanced customization and scalability To extend functionality and integrate
Ch
ap
te
r 1
For information about the Project Server Interface, refer to the Project 2010 Software Development Kit (SDK), available on the Microsoft Developer Network (MSDN) at msdn.microsoft.com/en-us/library/ms457477.aspx .
● hosted Project Server solutions Through one of several Microsoft Project
part-ners, you can access and configure web-based hosting for your enterprise project management solution. Through a third-party hosting provider such as Project Hosts, you can speed up enterprise project management deployment for your organization and reduce your IT infrastructure costs.
For more information about third-party hosting partners, see “Analyzing Your Project Server Requirements” on page 1241 .
Using the Project Ribbon
With Project 2010, the Microsoft Office ribbon and Quick Access Toolbar are introduced to the Project user interface. This is a substantial change to the way you access Project 2010 features and tools. If you’ve been working with any other Microsoft Office applications that use the ribbon and Quick Access Toolbar, you have a head start in understanding how com-mands are organized. Instead of arranging comcom-mands in menus and toolbars, the ribbon presents commands graphically and logically organized in tabs and groups, as shown in Figure 1-26. Often the tabs change depending on which view you’re showing. The Quick Access Toolbar shows a handful of the most commonly used commands.
Quick Access Toolbar
Groups
Tabs
Figure 1-26 Use the ribbon to find and use Project 2010 commands and tools.
Using the Project Ribbon 31
The look of the ribbon adjusts according to the resolution of your screen and the size of your Project 2010 window . Narrower screens show all groups, but the buttons might be smaller or moved to a drop-down menu instead of appearing directly on the ribbon .
Minimizing and Expanding the Ribbon
You can hide the ribbon so that only the tab labels are showing, without a tab’s groups or buttons. When you click a tab in the minimized ribbon, the full ribbon appears. After you click a button, the ribbon is minimized again. This is a great way to give yourself more working space in the project plan, either temporarily or after you’re familiar with where commands are on the ribbon.
In the upper-right corner of the Project 2010 window, click the Minimize The Ribbon icon.
To show the full ribbon again, in the upper-right corner of the Project 2010 window, click the Expand The Ribbon icon.
Using Keyboard Shortcuts to Access Commands
Even though menus are gone, you can still quickly apply commands with keyboard short-cuts, called access keys. Every command on the ribbon can be executed by using access keys, which get you to a command in two to four keystrokes. To use access keys to execute a command on the ribbon, follow these steps:
1. Press and release the Alt key.
KeyTips are displayed above each feature in the current view, as shown in Figure 1-27.
KeyTips for Quick Access
Toolbar KeyTips fortabs
Figure 1-27 Press and release the Alt key to show the KeyTips on the ribbon and Quick Access Toolbar.
Minimize The Ribbon
Ch
ap
te
r 1
2. Press the letter shown in the KeyTip that corresponds with the tab you want to use. Do this even if the tab you want is already showing.
The tab you select becomes active, and the KeyTips for the features on that tab appear, as shown in Figure 1-28.
Figure 1-28 KeyTips appear for all features on the selected tab.
3. Press the letter shown in the KeyTip that corresponds with the command you want. Depending on the command, a dialog box might open, a drop-down menu might appear, or the command might be executed.
Note
To cancel the use of the KeyTips, press and release the Alt key or the Esc key .
To use access keys to execute a command on the Quick Access Toolbar, follow these steps:
1. Press and release the Alt key.
2. Press the KeyTip number that corresponds to the command you want. The command is executed.
Note
KeyTips do not work in the Project Web App ribbon . Because Project Web App is a web-based application, when you press the Alt key, it activates the browser menu for the keyboard instead of showing KeyTips in the ribbon .
Finding Lost Commands
Suppose that you used a certain command in earlier versions of Project, and now you can’t find it on the Project 2010 ribbon. Locate it by following these steps:
Using the Project Ribbon 33
Ch
ap
te
r 1
2. In the left pane, click Customize Ribbon or Quick Access Toolbar. A list of commands appears in the Project Options dialog box.
3. In the Choose Commands From box, click All Commands. All commands throughout Project 2010 are listed.
4. Scroll through the list to find the command you want.
5. To find where the command is located on the ribbon, rest the mouse pointer over the command name.
The location of the command appears, including the name of the tab, group, and command.
The commands are listed in alphabetical order. You might need to look in a couple different places if you’re not sure of the exact command name.
You might also try clicking Commands Not In The Ribbon in the Choose Commands From box. If you need to use a command that’s not on the ribbon, you can add it to the Quick Access Toolbar or to a custom group.