eeman
For your convenience Apress has placed some of the front
matter material after the index. Please use the Bookmarks
v
Contents at a Glance
About the Author ...
xv
About the Technical Reviewer ...
xvii
Part 1: Getting Ready
■
...
1
Chapter 1: Putting the ASP.NET Platform in Context
■
...
3
Chapter 2: Pattern and Tools Primer
■
...
9
Part 2: The ASP.NET Platform Foundation
■
...
23
Chapter 3: The ASP.NET Life Cycles
■
...
25
Chapter 4: Modules
■
...
55
Chapter 5: Handlers
■
...
79
Chapter 6: Disrupting the Request Life Cycle
■
...
.105
Chapter 7: Detecting Device Capabilities
■
...
129
Chapter 8: Tracing Requests
■
...
159
Part 3: The ASP.NET Platform Services
■
...
177
Chapter 9: Configuration
■
...
179
Chapter 10: State Data
■
...
217
Chapter 11: Caching Data
■
...
251
Chapter 12: Caching Content
■ CONTENTS AT A GLANCE
Chapter 13: Getting Started with Identity
■
...
297
Chapter 14: Applying ASP.NET Identity
■
...
333
Chapter 15: Advanced ASP.NET Identity
■
...
365
PART 1
CHAPTER 1
Putting the ASP.NET Platform
in Context
The ASP.NET platform was originally developed for use with Web Forms, and support for the MVC framework was added later. The ASP.NET platform is full of rich and useful features, but most guides to the MVC framework assumed that programmers have experience in Web Forms development and already know what the platform is capable of doing. That was a reasonable assumption when the MVC framework was new, but a new generation of ASP.NET developers has jumped right in with MVC without using Web Forms and—by implication—the features that the ASP.NET platform provides.
This book corrects the problem, detailing the features of the ASP.NET platform for the MVC framework developer who has no Web Forms experience (and no desire to acquire any). Throughout this book, I show you how the ASP. NET platform underpins the MVC framework and how you can take advantage of the platform to improve your MVC applications.
You don’t need to know how the ASP.NET platform works to build MVC framework applications, but you will
want to know when you learn just how much functionality is available and how it can help simplify application development, customize the way that the MVC framework operates, and scale up applications to larger numbers of users, both for local and cloud-deployed applications.
Note
■
This book is not an MVC framework tutorial, and I assume you have a basic understanding of MVC and web
application development in general. If you are new to the MVC framework, then start by reading my
Pro ASP.NET MVC 5
book, which is also published by Apress.
What Is the ASP.NET Platform?
ASP.NET was originally synonymous with Web Forms, which aims to make the web application development experience as similar as possible to developing a traditional desktop application and to abstract away the details of HTML and HTTP.
CHAPTER 1 ■ PUTTING THE ASP.NET PLATFORM IN CONTEXT
4
These technologies have disparate natures. The MVC framework is an alternative to Web Forms for building complete web applications (one I assume you are familiar with if you are reading this book). SignalR uses an HTML5 feature called web sockets to enable real-time communication between a browser and a server, and Web API is used to create web services and APIs that deliver JSON or XML content.
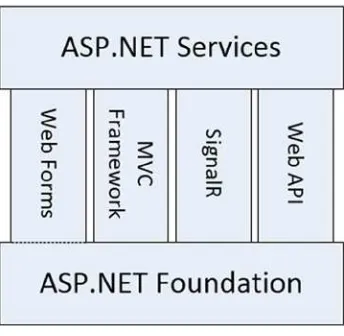
For all their differences, the ASP.NET technologies share some common characteristics, and this is where the ASP. NET platform starts to emerge. Features that are common across ASP.NET—such as the need to receive and process HTTP requests, for example—are implemented in a common foundation, which results in the technology stack shown in Figure 1-1.
Figure 1-1. The ASP.NET foundation
Figure 1-2. The ASP.NET services
The dotted line in the figure illustrates that some of the design decisions made when Web Forms was the only ASP.NET technology are still present in the ASP.NET foundation. For the most part, this just means that there are some odd method names in the foundation API, which I describe in Part 2 of this book.
The ASP.NET platform doesn’t just provide common features to the ASP.NET technology stack; it also provides a set of services that make it easier to write web applications, such as security, state data, and caching, as illustrated by Figure 1-2.
CHAPTER 1 ■ PUTTING THE ASP.NET PLATFORM IN CONTEXT
I have drawn the ASP.NET services as being separate from the ASP.NET foundation, which makes them easier to describe but doesn’t accurately reflect the fact almost all of the services are integrated into the functionality provided by the foundation. This is important because the services rely on the way that the foundation handles HTTP requests in order to provide functionality to services, and it will start to make more sense once I get into the details of the ASP. NET request life cycle in Part 2 of this book.
The ASP.NET platform is the combination of the foundation and the services, and using the ASP.NET platform in MVC framework applications is the topic of this book, as illustrated by Figure 1-3.
Figure 1-3. The relationship between the ASP.NET platform and the MVC framework
Don’t worry if the relationship between the MVC framework, the application components, and the ASP.NET platform don’t make immediate sense. Everything will start to fall into place as you learn about how the platform works and the features it provides.
What Do You Need to Know?
This book is for developers who have experience in web application development using C# and the MVC framework. You should understand the nature of HTTP, HTML, and CSS and be familiar with the basic features of Visual Studio 2013 (although I provide a quick primer for how I use Visual Studio in Chapter 2).
You will find this book hard to follow if you don’t have experience with the MVC framework, although there are plenty of examples that will help fill in the gaps. If you need to brush up on using the MVC framework, then I suggest my
Pro ASP.NET MVC 5 for MVC development and The Definitive Guide to HTML5 for detailed coverage of HTML and CSS.
What’s the Structure of This Book?
CHAPTER 1 ■ PUTTING THE ASP.NET PLATFORM IN CONTEXT
6
Part 1: Getting Ready
Part 1 of this book provides the information you need to get ready for the rest of the book. It includes this chapter and a primer for the tools I use in this book and for the MVC pattern.
Part 2: The ASP.NET Platform Foundation
Part 2 of this book takes you through the foundation features of the ASP.NET platform, starting with the application and request life cycle and onto more advanced topics such as modules and handlers. This part of the book explains in detail how the ASP.NET platform handles requests and passes them to the MVC framework.
Part 3: The ASP.NET Services
Part 3 of this book describes the services that the ASP.NET platform provides to developers for use in MVC framework applications. These services range from hidden gems such as the configuration service to performance optimizations, such as data and content caching. I also describe the new ASP.NET Identity system, which is used to manage user authentication and authorization.
Are There Lots of Examples?
There are loads of examples. I demonstrate every important feature with code examples that you can add to your own projects, and I list the contents of every file in every example so that you get a complete picture of how each feature works. I use two code styles for examples. The first is when I list a complete file, as shown in Listing 1-1.
Listing 1-1. A Complete Listing
using Microsoft.AspNet.Identity;
using Microsoft.AspNet.Identity.EntityFramework; using Microsoft.AspNet.Identity.Owin;
using Microsoft.Owin; using Users.Models;
namespace Users.Infrastructure {
public class AppUserManager : UserManager<AppUser> {
public AppUserManager(IUserStore<AppUser> store) : base(store) {
}
public static AppUserManager Create(
IdentityFactoryOptions<AppUserManager> options, IOwinContext context) {
AppIdentityDbContext db = context.Get<AppIdentityDbContext>();
AppUserManager manager = new AppUserManager(new UserStore<AppUser>(db));
return manager; }
CHAPTER 1 ■ PUTTING THE ASP.NET PLATFORM IN CONTEXT
This listing is taken from Chapter 13—don’t worry about what it does at the moment. I usually start the chapter with complete listings; then, as I make changes to show you different features, I switch to partial listings, such as Listing 1-2.
Listing 1-2. A Partial Listing
...
return HttpContext.GetOwinContext().GetUserManager<AppUserManager>(); ...
This listing is also taken from Chapter 13 and shows a section of the file from Listing 1-1. I highlight the changes that I have made or the statements I want to draw your attention to. Using partial listings helps avoid endless repetitions of files that have small changes and lets me pack in more examples per page and per chapter.
Where Can You Get the Example Code?
All of the example code is contained in the text of this book, but you don’t have to type it in yourself. You can download a complete set of example projects, organized by chapter, without charge from Apress.com.
What Software Do You Need for This Book?
The most important software you need for this book is Visual Studio 2013, which contains everything you need to get started, including a built-in application server for running and debugging MVC applications, an administration-free edition of SQL Server for developing database-driven applications, tools for unit testing, and, of course, a code editor compiler and debugger.
There are several editions of Visual Studio, but I will be using the one that Microsoft makes available free of charge, called Visual Studio Express 2013 for Web. Microsoft adds some nice features to the paid-for editions of Visual Studio, but you will not need them for this book, and all of the figures that you see throughout this book have been taken using the Express edition, which you can download from www.microsoft.com/visualstudio/eng/products/ visual-studio-express-products. There are several versions of Visual Studio 2013 Express, each of which is used for a different kind of development. Make sure that you get the Web version, which supports ASP.NET applications.
I follow a specific approach to creating ASP.NET projects: I don’t use the predefined templates that Microsoft provides, preferring to explicitly add all of the packages that I require. This means more work is required to get set up, but the benefit is that you end up with a much better understanding of how an application fits together. I provide a primer in Chapter 2 that gives an example of what you can expect.
Tip
■
Visual Studio includes NuGet for downloading and installing software packages. I use NuGet throughout this
book. So that you are sure to get the results that I demonstrate, I always specify the version of the NuGet package you
require. If you are in doubt, download the source code for this book from
www.apress.com, which contains complete
projects for each chapter.
Preparing Visual Studio
CHAPTER 1 ■ PUTTING THE ASP.NET PLATFORM IN CONTEXT
8
Tip
■
Microsoft has decided that the top-level menus in Visual Studio should be all in uppercase, which means that the
menu I just referred to is really TOOLS. I think this is rather like shouting, and I will capitalize menu names like Tools is
here throughout this book.
The only other preparation is to disable the Browser Link feature when you create projects. Browser Link works by establishing a connection to the server that is used to receive notifications when the project contents change. In Part 2 of this book, I spend a lot of time talking about how requests are handled, and the extra requests sent by Browser Link skew the results. Disable Browser Link by clicking the button highlighted in Figure 1-4 and deselecting the Enable Browser Link menu item.
Figure 1-4. Disabling Browser Link
Getting Google Chrome
For the majority of the examples in this book, I use Internet Explorer because I know that it is always available on Windows. There are occasions when I use Google Chrome, and you will need to download it from www.google.com/chrome
if you want to re-create the examples.
I use Chrome for two main reasons. The first reason is because it supports simple emulation of mobile devices, which is useful in Chapter 7 when I show you how to detect device capabilities. The second reason is when I show you how to differentiate requests for services like caching in Chapter 12.
Summary
CHAPTER 2
Pattern and Tools Primer
In this chapter, I provide a brief overview of the pattern that the MVC framework follows and demonstrate the process for creating a simple MVC project using Visual Studio 2013. The purpose of this chapter is to refresh your memory about the nature, objectives, and benefits of the MVC pattern and to show you the process I use to create the examples in this book.
This chapter isn’t a tutorial for the MVC framework. As I explained in Chapter 1, you already need to have a basic understanding of MVC framework development in order to benefit from the features and techniques I describe in this book. If you do not have experience with the MVC framework, then read Pro ASP.NET MVC 5, also from Apress, before continuing.
Understanding the MVC Pattern
The term Model-View-Controller has been in use since the late 1970s and arose from the Smalltalk project at Xerox PARC where it was conceived as a way to organize early GUI applications. Some of the details of the original MVC pattern was tied to Smalltalk-specific concepts, such as screens and tools, but the broader concepts are still applicable to applications—and are especially well-suited to web applications.
Interactions with an MVC application follow a natural cycle of user actions and view updates, where the view is assumed to be stateless. This fits nicely with the HTTP requests and responses that underpin a web application.
Further, the MVC pattern enforces a separation of concerns—the domain model and controller logic are decoupled from the user interface, which means that an MVC application will be split into at least three pieces:
• Models, which contain or represent the data that users work with. These can be simple view models, which just represent data being transferred between views and controllers; or they can be domain models, which contain the data in a business domain as well as the operations, transformations, and rules for manipulating that data.
• Views, which are used to render some part of the model as a user interface.
• Controllers, which process incoming requests, perform operations on the model, and select views to render to the user.
In the MVC framework, controllers are C# classes derived from the System.Web.Mvc.Controller class. Each
CHAPTER 2 ■ PATTERN AND TOOLS PRIMER
10
The ASP.NET MVC framework use a view engine, which is the component responsible for rendering a view to generate a response for the browser. The view engine for the MVC framework is called Razor, and you’ll see examples of Razor markup throughout this book. If you don’t like Razor, then you can select one of the many third-party view engines that are available (although I won’t be doing so in this book, not least because I find Razor to be robust and easy to work with).
Models are the definition of the universe your application works in. In a banking application, for example, the model represents everything in the bank that the application supports, such as accounts, the general ledger, and credit limits for customers—as well as the operations that can be used to manipulate the data in the model, such as depositing funds and making withdrawals from the accounts. The model is also responsible for preserving the overall state and consistency of the data—for example, making sure that all transactions are added to the ledger and that a client doesn’t withdraw more money than he is entitled to or more money than the bank has.
Models are also defined by what they are not responsible for: Models don’t deal with rendering UIs or processing requests; those are the responsibilities of views and controllers. Views contain the logic required to display elements of the model to the user—and nothing more. They have no direct awareness of the model and do not directly communicate with the model in any way. Controllers are the bridge between views and the model; requests come in from the client and are serviced by the controller, which selects an appropriate view to show the user and, if required, an appropriate operation to perform on the model.
The MVC framework doesn’t apply any constraints on the implementation of your domain model. You can create a model using regular C# objects and implement persistence using any of the databases, object-relational mapping frameworks, or other data tools supported by .NET.
Understanding the Benefits of the MVC Pattern
Each piece of the MVC architecture is well-defined and self-contained—this is the separation of concerns. The logic that manipulates the data in the model is contained only in the model; the logic that displays data is only in the view, and the code that handles user requests and input is contained only in the controller. This separation is at the heart of the benefits imparted by the MVC pattern—and by implication—the MVC framework.
The first benefit is scale, not in terms of how many users a web application can support but in terms of how complex it can be. Technologies such as Web Forms can be used to build complex applications, of course, but doing so requires detailed planning and attention to detail, and many projects end up as a morass of code that duplicates functionality and markup in multiple places, making extending or fixing the application difficult. It is possible to get into the same kind of mess with the MVC framework, but only by ignoring the MVC pattern. Most developers produce MVC projects that can scale in complexity without much difficulty and that are easy to maintain and extend (and if you do find yourself in a mess, the separation of concerns in an MVC framework application makes it easier to refactor the application back onto a stable footing).
The second benefit is unit testing. The module nature of the MVC framework makes it easy to perform unit testing, aided by the testing support provided by Visual Studio (although many other testing toolkits are available).
The third benefit is flexibility. The separation of concerns makes it relatively easy to respond to changes in requirements throughout the life of the application. This is a hard benefit to quantify and comes in part from the MVC pattern and in part from the convention-over-configuration approach that the MVC framework has adopted, but once the fundamental pieces of an application have been developed, it is a simple task to modify or rearrange them to respond to requests in new ways.
Request
CHAPTER 2 ■ PATTERN AND TOOLS PRIMER
Note
■
If there is one drawback of the MVC framework, it is that there is an initial investment of time required to create
and arrange components in an application before you start seeing results. This is time well spent for large projects but
not for quick and simple prototyping. In these situations, I still use Web Forms because it can be used to create simple
applications in just a few minutes, despite lacking all of the long-term benefits that the MVC framework provides.
Creating the Example Project
In this section, I am going to walk through the process of creating a simple MVC framework application. Not only will this act as a quick primer for how Visual Studio supports MVC development, but it will also allow me to demonstrate the way that I like to create projects. Visual Studio is set up to add default template content to most projects, but I prefer to start with a minimal project and explicitly add the features I require.
Note
■
You will need to have downloaded and installed Visual Studio if you want to create this example yourself.
See Chapter 1 for details.
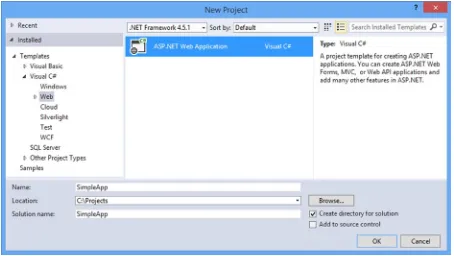
To get started, I created a new Visual Studio project. Select File ➤ New Project to open the New Project dialog window. Navigate through the Templates section to select the Visual C# ➤ Web ➤ ASP.NET Web Application template and set the name of the project to SimpleApp, as shown in Figure 2-2.
CHAPTER 2 ■ PATTERN AND TOOLS PRIMER
12
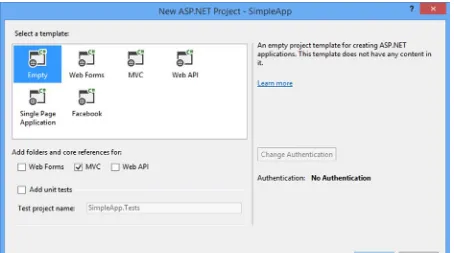
Click the OK button to move to the New ASP.NET Project dialog window. Ensure that the Empty option is selected and check the MVC option, as shown in Figure 2-3. Click the OK button, and Visual Studio will create a new project called SimpleApp.
Figure 2-3. Selecting the ASP.NET project type
Creating the MVC Components
I need three components to create an MVC framework application: the model, the view, and the controller. Most projects start with the model, and for this example, I am going to create a simple model that is stored entirely in memory and is reset each time the application is restarted so that I don’t have to create and configure a database, although in a real project data persistence is usually required.
Right-click the Models folder in the Visual Studio Solution Explorer and select Add ➤ Class from the pop-up menu. Set the name to Votes.cs and click the Add button to create the class file. Edit the contents of the file to match those shown in Listing 2-1.
Listing 2-1. The Contents of the Votes.cs File
using System.Collections.Generic;
namespace SimpleApp.Models {
public enum Color {
CHAPTER 2 ■ PATTERN AND TOOLS PRIMER
public class Votes {
private static Dictionary<Color, int> votes = new Dictionary<Color, int>();
public static void RecordVote(Color color) {
votes[color] = votes.ContainsKey(color) ? votes[color] + 1 : 1; }
public static void ChangeVote(Color newColor, Color oldColor) { if (votes.ContainsKey(oldColor)) {
votes[oldColor]--; }
RecordVote(newColor); }
public static int GetVotes(Color color) {
return votes.ContainsKey(color) ? votes[color] : 0; }
} }
Tip
■
You don’t have to type the example code to see the example projects in this book. The complete source code for
every chapter is available in a free download from
www.apress.com.
My example application will allow users to vote for their favorite color. This isn’t an exciting demonstration, but it will provide me with a simple application that I can use to demonstrate where the ASP.NET framework stops and the MVC framework starts when I extend the project in later chapters.
I have defined an enum of colors that users can vote for and a Votes class that records and reports on the votes for each color. The methods presented by the Votes class are static, and the data, which is stored in a dictionary collection, will be lost when the application is stopped or restarted.
Note
■
Using static data and methods in the
Votesclass means I don’t have to use a technique called
dependency
injection
to provide instances of
Votesto application components that require them. I wouldn’t use the static approach in
a real project because dependency injection is a useful technique that helps create an easy-to-manage code base.
See my
Pro ASP.NET MVC 5
book for details of setting up and using dependency injection. For this chapter, I need a
simple MVC application and don’t have to consider long-term maintenance or testing.
The controller is the component that defines the logic for receiving HTTP requests from the browser, updating the model, and selecting the view that will be displayed to the user.
An MVC framework controller provides one or more action methods that are targeted by individual URLs. The mapping between URLs and action methods is handled through the URL routing feature, and the default routing configuration specifies that requests to the default URL (the / URL) for the application are mapped to the Index action method in a controller called Home.
CHAPTER 2 ■ PATTERN AND TOOLS PRIMER
14
Right-click the Controllers folder in the Visual Studio Solution Explorer and select Add ➤ Controller from the pop-up menu. Select MVC 5 Controller – Empty from the list of options and click the Add button. Set the name to be HomeController and click the Add button to create the Controllers/HomeController.cs file. Edit the new file to match Listing 2-2.
Listing 2-2. The Contents of the HomeController.cs File
using System.Web.Mvc; using SimpleApp.Models;
namespace SimpleApp.Controllers {
public class HomeController : Controller {
public ActionResult Index() {
■
The URL routing system is actually part of the ASP.NET platform rather than the MVC framework, but I described
URL routing in detail in my
Pro ASP.NET MVC 5
book, and I am not going to repeat the information here.
One useful feature of controllers is the ability to define multiple action methods with the same name and then differentiate them through the use of attributes. In the listing, I have applied the HttpPost attribute to the Index action method that takes an argument, which tells the MVC framework that the method should be used to handle HTTP POST requests. HTTP GET requests will be handled by the Index method that takes no arguments.
The goal of an action method is to update the model and select a view to be displayed to the user. I don’t need to update my model when dealing with GET requests, so I just return the result from calling the View method, which selects the default view associated with the action method. I need to update the vote tally when dealing with POST requests, either by registering a new vote or, if the user has voted already, by changing an existing vote. I keep track of whether a user has voted through the Session property, which allows me to maintain state data for the duration of the user’s browser session.
The final component is the view, which generates the HTML that is displayed to the user as the response to an HTTP request. Both of the action methods in the Home controller call the View method without any arguments, which tells the MVC framework to look for a view whose name matches the action method name. The MVC framework will search for an Index view with different file extensions and in different folder locations, one combination of which is
/Views/Home/Index.cshtml. The Views folder is the conventional location of views in an MVC application, the Home
CHAPTER 2 ■ PATTERN AND TOOLS PRIMER
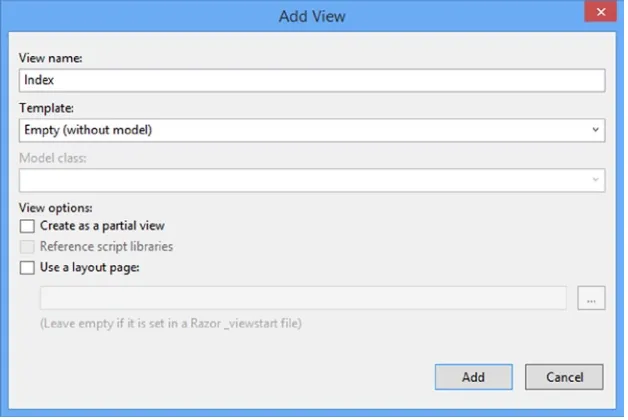
To create the view for the example application, right-click either of the action methods in the HomeController
class and select Add View from the pop-up menu to open the Add View dialog window. Set the Name field to Index, set the Template field to Empty (without model), and ensure that the Create as a partial view and Use a layout page options are not checked, as shown in Figure 2-4.
Figure 2-4. Creating the view
Click the Add button, and Visual Studio will create a file called Index.cshtml in the Views/Home folder. Edit this file so that it matches Listing 2-3.
Listing 2-3. The Contents of the Index.cshtml File
@using SimpleApp.Models @{ Layout = null; }
<!DOCTYPE html> <html>
<head>
<meta name="viewport" content="width=device-width" /> <title>Vote</title>
</head> <body>
@if (ViewBag.SelectedColor == null) { <h4>Vote for your favorite color</h4> } else {
CHAPTER 2 ■ PATTERN AND TOOLS PRIMER
16
@using (Html.BeginForm()) { @Html.DropDownList("color",
new SelectList(Enum.GetValues(typeof(Color))), "Choose a Color") <div>
<button type="submit">Vote</button> </div>
} <div>
<h5>Results</h5> <table>
<tr><th>Color</th><th>Votes</th></tr>
@foreach (Color c in Enum.GetValues(typeof(Color))) { <tr><td>@c</td><td>@Votes.GetVotes(c)</td></tr> }
</table> </div> </body> </html>
An MVC framework view uses a combination of standard HTML elements and Razor annotations to dynamically generate content. I am using a single view to response to HTTP GET and POST requests, so some of the Razor annotations adapt the content to reflect whether the user has already voted; the other annotations generate HTML elements based on the enumeration of colors and the total number of votes.
Testing the Application
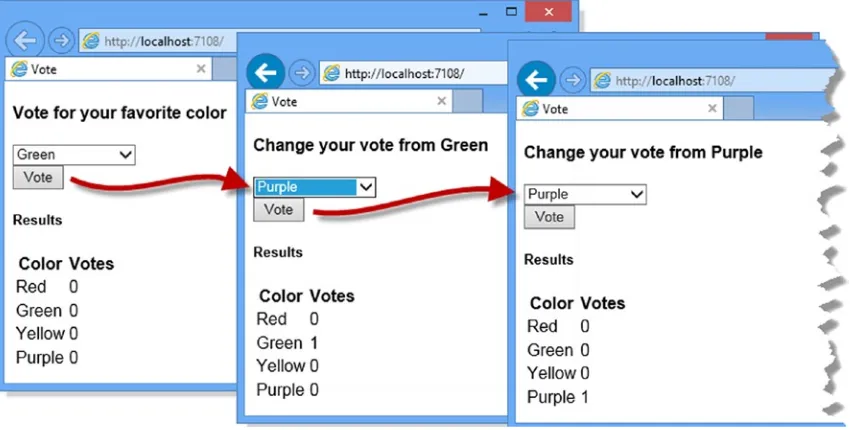
Once you have created the three components in the previous section, you can test them by selecting Start Debugging from the Visual Studio Debug menu. Visual Studio will open a browser window and navigate to the application URL, allowing you to select a color and vote. Figure 2-5 illustrates the voting process.
CHAPTER 2 ■ PATTERN AND TOOLS PRIMER
Note
■
I refer to the Visual Studio
Debugmenu, but it is really the DEBUG menu because Microsoft has adopted an
all-capitals policy to menu names. I think this is an odd thing to do, and I will refer to menu items in mixed case in this book.
Adding Packages to the Project
As I explained earlier in the chapter, I prefer to create a basic Visual Studio project and then explicitly add the features I need. This is less work than you might expect because Visual Studio supports NuGet, which is a package manager that provides access to a wide catalog of packages for .NET application development. The integration into Visual Studio allows for the automatic downloading, installation, and dependency management of packages and has transformed the process of using standard libraries in .NET development.
The NuGet package catalog, which you can browse at www.nuget.org, is extensive and includes many popular open source web application packages. Microsoft has given tacit support to some of these packages by including them in the Visual Studio templates for new ASP.NET projects, but you can use NuGet directly to install these packages without getting the rest of the (generally useless) template content.
One package that Microsoft has adopted with the MVC 5 release is Bootstrap, which is an excellent CSS and JavaScript library for styling HTML that grew out of a project at Twitter. I have absolutely no design skills at all, and I like using Bootstrap because it lets me style content during the early stages of development without making too much of a mess. I like to work with professional designers on real projects (and I recommend you do the same), but in this book I’ll use Bootstrap to make some the examples easier to understand and to highlight specific results and features.
Note
■
Bootstrap is only one of the packages that Microsoft has adopted, and I only briefly describe its use in this
chapter. For full details of client-side development for MVC framework projects, see my
Pro ASP.NET MVC 5 Client
Development
book, which is published by Apress.
I’ll show you how I use Bootstrap later in this chapter, but in this section I will show you how to use the Visual Studio support for NuGet to download and install the Bootstrap package.
Note
■
Bootstrap isn’t directly related to the MVC Framework or the ASP.NET platform. In this chapter I use it to
demonstrate how to install a NuGet package and in later chapters to make the examples easier to follow. If you are
familiar with NuGet and Bootstrap (or are not interested in either), then you can move directly to Part 2 of this book, where
I turn to the details of the ASP.NET platform.
Visual Studio provides a graphical interface that lets you navigate through the package catalog, but I prefer to use the console feature that accepts NuGet commands directly in Visual Studio. Open the console by selecting Package Manager Console from the Tools ➤ Library Package Manager menu and enter the following command:
Install-Package -version 3.0.3 bootstrap
CHAPTER 2 ■ PATTERN AND TOOLS PRIMER
18
Tip
■
The
-versionargument allows me to specify a particular version of the package, and version 3.0.3 is the
current version of Bootstrap available as I write this. The latest version of the package will be installed if you omit the
–version
argument when using the Install-Package command. I use specific versions of packages in this book to ensure
that you are able to re-create the examples.
The Bootstrap NuGet package adds some CSS files to the Content folder (which is the home of static content in an MVC framework application) and some JavaScript files to the Scripts folder. Bootstrap mainly works through CSS files, but there are some JavaScript enhancements for more complex interactions. (The Bootstrap package also creates a fonts folder. Not all open source libraries fit neatly into the ASP.NET project structure, so occasionally you will see artifacts like this to support assumptions made by the library about the layout of its files.)
Using Bootstrap
I don’t want to get into too much detail about Bootstrap because it isn’t the topic of this book, and I will be using it only to make the examples easier to understand. To demonstrate the basic Bootstrap features, I have applied some of the most useful styles to the Views/Home/Index.cshtml file, as shown in Listing 2-4.
Listing 2-4. Applying Bootstrap Styles to the Index.cshtml File
@using SimpleApp.Models @{ Layout = null; }
<!DOCTYPE html> <html>
<head>
<meta name="viewport" content="width=device-width" /> <title>Vote</title>
<link href="~/Content/bootstrap.min.css" rel="stylesheet" />
<link href="~/Content/bootstrap-theme.min.css" rel="stylesheet" />
</head>
<body class="container">
<div class="panel panel-primary">
@if (ViewBag.SelectedColor == null) {
<h4 class="panel-heading">Vote for your favorite color</h4>
} else {
<h4 class="panel-heading">Change your vote from @ViewBag.SelectedColor</h4>
}
<div class="panel-body">
@using (Html.BeginForm()) { @Html.DropDownList("color",
new SelectList(Enum.GetValues(typeof(Color))), "Choose a Color",
CHAPTER 2 ■ PATTERN AND TOOLS PRIMER
<div>
<button class="btn btn-primary center-block"
type="submit">Vote</button>
</div> }
</div> </div>
<div class="panel panel-primary">
<h5 class="panel-heading">Results</h5>
<table class="table table-condensed table-striped">
@foreach (Color c in Enum.GetValues(typeof(Color))) { <tr><td>@c</td><td>@Votes.GetVotes(c)</td></tr> }
</table> </div> </body> </html>
The first changes in the view are the addition of link elements to import the bootstrap.min.css and
bootstrap-theme.min.css files into the HTML document. Bootstrap includes a set of base CSS classes that are supplemented by replaceable themes. The base classes are in the bootstrap.min.css file, and I have used the default theme that is defined by the bootstrap-theme.min.css file and that is installed by the NuGet package.
Tip
■
I am using the
minified
versions of the Bootstrap files in this example, which have been processed to remove
whitespace, comments, and other optional content. Minified files are used in deployment to reduce bandwidth
requirements or (as here) when using third-party packages that you do not need to debug. The NuGet package also
installs the human-readable files if you want to take a look at how Bootstrap works.
CHAPTER 2 ■ PATTERN AND TOOLS PRIMER
20
Note
■
Bootstrap functionality is largely provided through CSS classes but is supplemented with some JavaScript
additions. I don’t need to use the JavaScript features for this example and am only using the CSS classes.
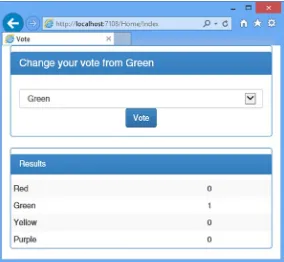
I am not going to describe the individual Bootstrap classes in detail, but I have provided a quick summary of those that I have used in Listing 2-4 in Table 2-1 so that you can see how I created the effect shown in the figure.
Figure 2-6. The effect of using Bootstrap on the example application
Table 2-1. The Bootstrap Classes Applied to the Index.cshtml File
Name
Description
Btn Styles button or a elements as Bootstrap buttons. This class is usually applied in conjunction with a button theme class, such as btn-primary.
btn-primary Used in conjunction with the btn class to apply a theme color to a button. The other button theme classes are btn-default, btn-success, btn-info, btn-warning, and btn-danger.
center-block Centers elements. I used this class in the view to position the Vote button.
container Centers the contents of the element it is applied to. In the listing, I applied this class to the body
element so that all of the HTML content is centered.
form-control Styles a Bootstrap form element. There is only one form element in the listing, but this class usefully sizes and aligns elements to present a form.
CHAPTER 2 ■ PATTERN AND TOOLS PRIMER
The Bootstrap classes are simple to use and can quickly create a consistent layout for the HTML in a view. For the most part, I applied the classes to the static HTML elements in the view in Listing 2-4, but I have also used a Bootstrap class with the HTML helper method that generates the select element from the enumeration of color values, like this:
...
@Html.DropDownList("color", new SelectList(Enum.GetValues(typeof(Color))), "Choose a Color", new { @class = "form-control" })
...
The HTML helpers are convenience methods used in Razor views to generate HTML elements from model data. All of the helper methods are overridden so that there is a version that accepts an object that is used to apply attributes to the elements that are created. The properties of the object are used for the attribute names, and the values for the attributes are taken from the property values. For the DropDownList helper in the example, I have passed in a dynamic object that defines a class property that applies the Bootstrap form-control class to the select
element that the helper creates.
Tip
■
I have to prefix the property name with
@because
classis a C# keyword. The
@symbol is a standard C# feature
that allows the use of keywords without confusing the compiler.
Summary
In this chapter, I started by refreshing your memory as to the nature and purpose of the MVC pattern. Understanding the MVC pattern will provide some useful context when considering the design and application of the platform features that I describe in Part 2 of this book.
I also showed you how to create a simple MVC framework application using Visual Studio. Visual Studio is a feature-rich and flexible development tool, and there are many choices about how projects are created and built. As this chapter demonstrated, I prefer a basic starting point from which I can add the functionality and features that I require, such as the Bootstrap library that I added to the example project with NuGet and that I briefly described. In Part 2 of this book, I begin to describe the ASP.NET platform in detail, starting with the two life cycles of an ASP.NET application.
Name
Description
panel Groups related content together. Used with the panel-body and panel-heading classes to denote the sections of the panel and, optionally, with a class that applies a theme color, such as panel-primary.
panel-body Denotes the content section of a panel.
panel-heading Denotes the heading section of a panel.
panel-primary Used in conjunction with the panel class to apply a theme color to a panel. The other theme classes are panel-default, panel-success, panel-info, panel-warning, and panel-danger.
table Styles a Bootstrap table.
table-condensed Used in conjunction with the table class to create a compact table layout.
table-striped Used in conjunction with the table class to color alternate rows in a table.
PART 2
CHAPTER 3
The ASP.NET Life Cycles
The ASP.NET platform defines two important life cycles that underpin the MVC framework. The first is the application life cycle, which tracks the life of a web application from the moment it starts to the moment it is terminated. The second is the request life cycle, which defines the path that an HTTP request follows as it moves through the ASP.NET platform from the point at which the initial request is received until the response is sent. In this chapter, I describe both life cycles and the context objects that the ASP.NET platform uses to describe them and the overall state of the application. Table 3-1 summarizes the chapter.
Table 3-1. Chapter Summary
Problem
Solution
Listing
Perform actions when the application starts and stops.
Use the special Application_Start and
Application_End methods in the global application class. 1–3
Monitor or modify a request as it is processed. Handle the events that define the request life cycle. 4–8 Get information about the state of the
application, the current request, or the response associated with it.
Use the properties defined by the context objects. 9–11, 13
Preparing the Example Project
For this chapter, I am going to continue use the SimpleApp project I created in Chapter 2 and that allows the user to vote for a color. You will find that most of the MVC framework applications that I build in this book are pretty simple because my focus is on the ASP.NET platform.
Tip
■
Don’t forget that you can download the source code for all the examples in this book for free from
www.apress.com.
The ASP.NET Application Life Cycle
CHAPTER 3 ■ THE ASP.NET LIFE CYCLES
26
These two moments—the point at which an application starts and stops receiving requests—define the application life cycle, the management of which provides the most fundamental features for ASP.NET web applications. ASP.NET provides notifications when the application starts and when it is stopped in a controlled way, and these notifications are the topic of this section of this chapter. Table 3-2 puts the application life-cycle notifications in context.
Table 3-2. Putting the Application Life-Cycle Notification in Context
Question
Answer
What is it? The application life-cycle notifications allow you to perform actions when the application starts and when it is shut down in a controlled way.
Why should I care? The notifications are useful if you have one-off configuration tasks or if you need to release resources when the application is stopped. The most common use of the application life cycle by MVC framework developers is to configure a dependency injection container. How is it used by the
MVC framework?
The MVC framework uses the application life cycle to perform configuration tasks that affect all requests, such as setting up routes, areas, and content bundles.
Understanding the Application Life Cycle
The life cycle of an ASP.NET application begins the moment the application is started and continues while HTTP requests are received from clients and processed to generate responses. It includes matching requests to controllers and actions and rendering content from Razor views. The life cycle ends when the application is stopped.
The ASP.NET platform provides notifications of the two stages of the life cycle through methods defined by the
global application class. The global application class has been around since the earliest versions of ASP.NET and consists of two files: Global.asax and Global.asax.cs.
Strictly speaking, the Global.asax file is the global application class, and the Global.asax.cs file is the associated code-behind file. This is the classic Web Forms approach to splitting declarative and programmatic code and is an artifact of the origins of ASP.NET. The Global.asax file used to be more important in ASP.NET applications, but it is just there for compatibility these days, even in Web Forms projects. Listing 3-1 shows the content of the
Global.asax file from the example project, although you will never need to edit this file for an MVC framework project.
Listing 3-1. The Contents of the Global.asax File
<%@ Application Codebehind="Global.asax.cs" Inherits="SimpleApp.MvcApplication" Language="C#" %>
Tip
■
To see the contents of this file, right-click
Global.asaxin the Solution Explorer and select View Markup from the
pop-up menu.
This is an example of a Web Forms directive that tells ASP.NET that the associated code file is called
CHAPTER 3 ■ THE ASP.NET LIFE CYCLES
The Global.asax file may be a mildly interesting artifact left over from earlier versions of ASP.NET, but for this chapter it is the Global.asax.cs file that is important. The role of these files has gradually changed as ASP.NET has matured, and now the term global application class is usually used to refer to the Global.asax.cs file to the extent that when you double-click Global.asax in the Solution Explorer, it is the Global.asax.cs file that opens in the editor.
Listing 3-2 shows the contents of the Global.asax.cs file that Visual Studio created for the example project.
Listing 3-2. The Contents of the Global.asax.cs File
using System;
using System.Collections.Generic; using System.Linq;
using System.Web; using System.Web.Mvc; using System.Web.Routing;
namespace SimpleApp {
public class MvcApplication : System.Web.HttpApplication { protected void Application_Start() {
AreaRegistration.RegisterAllAreas();
RouteConfig.RegisterRoutes(RouteTable.Routes); }
} }
The default global application class is called MvcApplication and is derived from the
System.Web.HttpApplication class. You’ll see many more classes from the System.Web namespace in this book because it is the home of the bulk of the ASP.NET platform functionality.
The MvcApplication class is instantiated by the ASP.NET framework, and the methods it defines are called at key moments in the application life cycle (and, as you’ll learn, in the request life cycle).
The default implementation of the MvcApplication class contains only one method, called Application_Start, but there is another method available, and I describe them both in the following sections.
Receiving Notifications When the Application Starts and Ends
The global application class supports two special methods that define the start and end of the application life cycle, as described by Table 3-3.
Table 3-3. The Global Application Class for Application Life-Cycle Notifications
Name
Description
Application_Start() Called when the application is started
Application_End() Called when the application is about to be terminated
CHAPTER 3 ■ THE ASP.NET LIFE CYCLES
28
The Application_End method is called just before the application is terminated and is an opportunity to release any resources that the application maintains and to generally tidy up. The usual reason given for using this method is to release persistent database connections, but most modern web applications don’t manage connections directly, and I rarely find it necessary to implement the Application_End method in my own projects. Databases are pretty good at managing their own connections these days, which is good because the Application_End method is called only when the application is shut down in an orderly manner. You can’t rely on the method being called if the server fails or there is some other kind of sudden, unexpected problem such as a power outage.
I refer to these methods as being special because they are implemented in an odd way. These methods are not defined by the base for the global application class (which is System.Web.HttpApplication), so you don’t have to use the override keyword to implement them. In fact, the ASP.NET framework uses reflection to look for the methods by name. You won’t receive an error if you mistype the method names; ASP.NET just assumes you don’t want to be notified when the application starts or stops. For this reason, it is important to ensure that you test that your code is being called, which I demonstrate later in this chapter.
Tip
■
You will sometimes see the
Application_Startand
Application_Endmethods defined with object
Objectand
EventArgsarguments, following the convention for a C# event handler method. This is optional, and the ASP.NET
framework is able to locate and call these methods with or without these arguments.
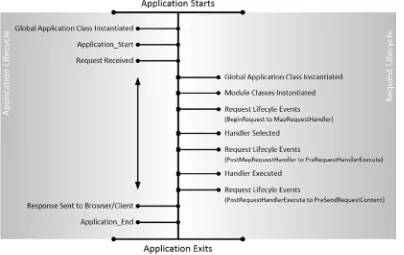
Calls to the Application_Start and Application_End methods bookend the life cycle of the application, and between those method calls ASP.NET receives and processes requests, as described in Figure 3-1. I’ll return to this diagram as I detail the request life cycle and show you how everything fits together.
CHAPTER 3 ■ THE ASP.NET LIFE CYCLES
Testing the Start and Stop Notifications
You can use the Application_Start and Application_End methods directly in your applications to perform one-off startup and shutdown activities, just as the MVC framework does. In this section, I’ll show you how to use the debugger to ensure that the methods are being called—something that is important when your custom code doesn’t work the way you expect.
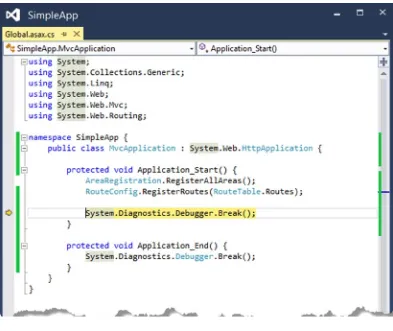
The simplest way to check that these methods are being called is to use the Visual Studio debugger. In Listing 3-3 you can see how I have added calls to the static System.Diagnostics.Debugger.Break method to the
Application_Start and Application_End methods, which has the same effect as setting a breakpoint using the Visual Studio code editor, but with the benefit of ensuring that you will get the same result I describe here if you re-create this example.
Listing 3-3. Breaking the Debugger in the Global.asax.cs File
using System;
using System.Collections.Generic; using System.Linq;
using System.Web; using System.Web.Mvc; using System.Web.Routing;
namespace SimpleApp {
public class MvcApplication : System.Web.HttpApplication {
protected void Application_Start() { AreaRegistration.RegisterAllAreas();
RouteConfig.RegisterRoutes(RouteTable.Routes); System.Diagnostics.Debugger.Break();
}
protected void Application_End() {
System.Diagnostics.Debugger.Break();
}
} }
I have added a call to the Break method in the existing Application_Start method and added the
Application_End method (which contains only a call to Break since my application doesn’t have any cleanup code and none is required by the MVC framework).
Testing the Start Notification
Testing the Application_Start method is simple. Select Start Debugging from the Visual Studio Debug menu, and Visual Studio will open a browser window. The ASP.NET framework begins initializing the application, creates an instance of the global application class, discovers the Application_Start method, and invokes it, which leads to the
CHAPTER 3 ■ THE ASP.NET LIFE CYCLES
30
Select Continue from the Visual Studio Debug menu, and execution of the application will resume. The request from the browser is processed, generating an HTML response that allows the user to vote for a color.
Testing the Stop Notification
Testing the Application_End method is a little trickier because selecting Stop Debugging detaches the debugger from the application before the Application_End method is called. The browser window is closed, the debugger is terminated, and Visual Studio returns to its default state—but the Debugger.Break method isn’t invoked.
To test the code in the Application_End method, you must work with IIS Express directly, rather than through Visual Studio. IIS Express is a cut-down version of the IIS application server included with Visual Studio and is used to run ASP.NET applications during development.
Execution of the application will continue, and the time and day of the week will be displayed by the browser. Locate the IIS Express icon on the Windows taskbar and right-click to make the pop-up menu appear. You will see a menu item for the SimpleApp project, and when you select it, you will see a Stop Site menu item, as shown in Figure 3-3.
CHAPTER 3 ■ THE ASP.NET LIFE CYCLES
Figure 3-3. Stopping an application using IIS Express
When you select Stop Site, IIS Express will stop the application, and as part of this process, the Application_End
method will be called. For my example, this means the Debugger.Break call is executed, as shown in Figure 3-4.
Figure 3-4. Testing the code in the Application_End method
The ASP.NET Request Life Cycle
CHAPTER 3 ■ THE ASP.NET LIFE CYCLES
32
Table 3-4. Putting the Request Life Cycle in Context
Question
Answer
What is it? The request life cycle is described by a series of events that describe the progress of a request from when it is received through until the response is sent.
Why should I care? The events are used when creating your own modules and handlers (which I introduce later in this chapter and describe properly in Chapters 4 and 5). You can also use these events to debug complex problems caused by interactions between ASP.NET components.
How is it used by the MVC framework?
The MVC framework includes a module and a handler. The module blocks requests for view files, and the handler is the component that locates the controller and action method that will process the request and renders the view that the action method selects.
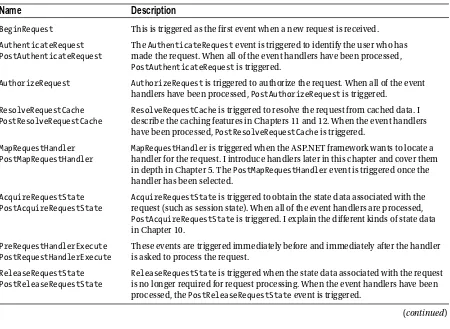
Table 3-5. The Request Life Cycle Events Defined by the Global Application Class
Name
Description
BeginRequest This is triggered as the first event when a new request is received.
AuthenticateRequest PostAuthenticateRequest
The AuthenticateRequest event is triggered to identify the user who has made the request. When all of the event handlers have been processed,
PostAuthenticateRequest is triggered.
AuthorizeRequest AuthorizeRequest is triggered to authorize the request. When all of the event handlers have been processed, PostAuthorizeRequest is triggered.
ResolveRequestCache PostResolveRequestCache
ResolveRequestCache is triggered to resolve the request from cached data. I describe the caching features in Chapters 11 and 12. When the event handlers have been processed, PostResolveRequestCache is triggered.
MapRequestHandler PostMapRequestHandler
MapRequestHandler is triggered when the ASP.NET framework wants to locate a handler for the request. I introduce handlers later in this chapter and cover them in depth in Chapter 5. The PostMapRequestHandler event is triggered once the handler has been selected.
AcquireRequestState PostAcquireRequestState
AcquireRequestState is triggered to obtain the state data associated with the request (such as session state). When all of the event handlers are processed,
PostAcquireRequestState is triggered. I explain the different kinds of state data in Chapter 10.
PreRequestHandlerExecute PostRequestHandlerExecute
These events are triggered immediately before and immediately after the handler is asked to process the request.
ReleaseRequestState PostReleaseRequestState
ReleaseRequestState is triggered when the state data associated with the request is no longer required for request processing. When the event handlers have been processed, the PostReleaseRequestState event is triggered.
Understanding the Request Life Cycle
The Application_Start and Application_End methods are not called on the MvcApplication instances that ASP.NET creates to handle requests. Instead, the ASP.NET framework triggers the sequence of events described in Table 3-5. These events describe the request life cycle.
CHAPTER 3 ■ THE ASP.NET LIFE CYCLES
Table 3-5. (continued)
Name
Description
UpdateRequestCache This event is triggered so that modules responsible for caching can update their state. I introduce the role of modules later in this chapter and describe them in depth in Chapter 4. I describe the built-in support for caching in Chapters 11 and 12.
LogRequest PostLogRequest
This event is triggered to provide an opportunity for details of the request to be logged. When all of the event handlers have been processed, PostLogRequest is triggered.
EndRequest This event is triggered when the request has been processed and the response is ready to be sent to the browser.
PreSendRequestHeaders PreSendRequestContent
This event is triggered just before the HTTP headers are sent to the browser. This event is triggered after the headers have been sent but before the content is sent to the browser.
Error This event is triggered when an error is encountered; this can happen at any point in the request process. See Chapter 6 for details about error handling.
THE LIFE OF A REQUEST LIFE CYCLE HTTPAPPLICATION OBJECT
The ASP.NET framework will create multiple instances of the
MvcApplicationclass to process requests, and
these instances can be reused so that they process several requests over their lifetime. The ASP.NET framework
has complete freedom to create
MvcApplicationinstances as and when they are required and to destroy them
when they are no longer needed. This means your global application class
must
be written so that multiple
instances can exist concurrently and that these instances can be used to process several requests sequentially
before they are destroyed. The only thing you can rely on is that each instance will be used to process one
request at a time, meaning you have to worry only about concurrent access to data objects that are shared
(I show you an example of this issue when I introduce application-wide state data in Chapter 10).
The ASP.NET framework triggers these events to chart the path of a request through the processing life cycle. You can handle these events in the global application class, in a module, or in a handler. I introduce modules and handlers in the following section and describe them in depth in Chapters 4 and 5.
Understanding Modules and Handlers
In the following sections, I show you how to respond to the request life-cycle events directly in the global application class. This is a good start for exploring the life-cycle events, but it is suitable for only the simplest of interactions with requests. Any serious request handling functionality tends to consume a number of life-cycle events, which means that the global application class quickly becomes a morass of code that handles the same events to handle requests in different ways. The ASP.NET framework deals with this by supporting modules, which are self-contained classes that receive the life-cycle events and can monitor and manipulate requests. Many of the most important ASP. NET platform services rely on the module functionality to prepare a request early in its life cycle. Examples are the state data and security services, which include modules that respond to events such as AcquireRequestState and
CHAPTER 3 ■ THE ASP.NET LIFE CYCLES
34
The ASP.NET framework also supports a component called a handler. Handlers are responsible for generating a response for a request. The handler for the MVC framework is the component responsible for locating a controller and action method to service a request and rendering the view that the action method specifies. The ASP.NET framework supports multiple handlers, which is why it is possible to mix and match development frameworks such as MVC, Web API, and Web Forms within the same application. The handler is linked to four of the request life-cycle events. The
MapRequestHandler and PostMapRequestHandler events are triggered before and after a handler is selected for the request, and the PreRequestHandlerExecute and PostRequestHandlerExecute events are triggered before and after the handler is asked to generate a response for the request. I describe how handlers work in detail in Chapter 5.
The reason that I have introduced modules and handlers in this chapter is because doing so allows me to illustrate the request life cycle more completely, as shown in Figure 3-5.
Figure 3-5. Adding the request handling process to the life-cycle diagram
Don’t worry if this seems complex; it will start to make sense as I explain how these events are handled and as you see how various ASP.NET platform services are implemented.
Notice that the global application class is instantiated by both the application and request life cycles. Not only does the ASP.NET framework create multiple instances to service parallel requests, but it also creates separate instances to support each life cycle. You will see the practical impact of this in the “Handling Property Exceptions” section later in this chapter.
Handling Request Life-Cycle Events Using Special Methods
To handle these events in the global application class, you create a method with a name that starts with Application_, followed by the event name, such as Application_BeginRequest, for example. As with the Application_Start
CHAPTER 3 ■ THE ASP.NET LIFE CYCLES
Listing 3-4. Handling Request life-Cycle Events in the Global.asax.cs File
using System;
using System.Collections.Generic; using System.Linq;
using System.Web; using System.Web.Mvc; using System.Web.Routing;
namespace SimpleApp {
public class MvcApplication : System.Web.HttpApplication {
protected void Application_Start() { AreaRegistration.RegisterAllAreas();
RouteConfig.RegisterRoutes(RouteTable.Routes); }
protected void Application_BeginRequest() {
RecordEvent("BeginRequest");
}
protected void Application_AuthenticateRequest() {
RecordEvent("AuthenticateRequest");
}
protected void Application_PostAuthenticateRequest() {
RecordEvent("PostAuthenticateRequest");
}
private void RecordEvent(string name) {
List<string> eventList = Application["events"] as List<string>;
if (eventList == null) {
Application["events"] = eventList = new List<string>();
}
eventList.Add(name);
}
} }
I have defined a method called RecordEvent that accepts the name of an event and stores it using one of the ASP.NET state management features. I describe these features in detail in Chapter 10, but the one I have used in this example—accessed via the Application property of the HttpApplication class—stores data in a way that makes it available throughout the application.
Caution
CHAPTER 3 ■ THE ASP.NET LIFE CYCLES
36
I call the RecordEvent method from three other methods I added to the global application class. These events will be called when the BeginRequest, AuthenticateRequest, and PostAuthenticateRequest events are triggered. I don’t have to explicitly register these methods as event handlers; the ASP.NET framework locates and invokes these methods automatically.
Displaying the Event Information
To display information about the events that my code receives, I need to make changes to the Home controller and its
Index view. In Listing 3-5, you can see how I retrieve the event state data and pass it to the view as the model object in the Home controller.
Listing 3-5. Getting the Event Information in the Controllers/HomeController.cs File
using System.Web.Mvc; using SimpleApp.Models;
namespace SimpleApp.Controllers {
public class HomeController : Controller {
public ActionResult Index() {
return View(HttpContext.Application["events"]);
}
[HttpPost]
public ActionResult Index(Color color) {
Color? oldColor = Session["color"] as Color?; if (oldColor != null) {
Votes.ChangeVote(color, (Color)oldColor); } else {
Votes.RecordVote(color); }
ViewBag.SelectedColor = Session["color"] = color; return View(HttpContext.Application["events"]);
} } }
To access the data I stored in the global application class, I have to use the HttpContext.Application
property, which I describe later in this chapter as part of the context objects that the ASP.NET framework provides and whose functionality I describe in Chapter 10. In Listing 3-6, you can see how I have updated the Razor view associated with the controller so that details of the events are displayed in the browser.
Listing 3-6. Displaying the Event Information in the Views/Home/Index.cshtml File
@using SimpleApp.Models
@model List<string>
@{ Layout = null; }