by Terry Collings
Red Hat
®Enterprise
Linux
®4
FOR
Hoboken, NJ 07030-5774
www.wiley.com
Copyright © 2005 by Wiley Publishing, Inc., Indianapolis, Indiana Published by Wiley Publishing, Inc., Indianapolis, Indiana Published simultaneously in Canada
No part of this publication may be reproduced, stored in a retrieval system or transmitted in any form or by any means, electronic, mechanical, photocopying, recording, scanning or otherwise, except as permit-ted under Sections 107 or 108 of the 1976 Unipermit-ted States Copyright Act, without either the prior written permission of the Publisher, or authorization through payment of the appropriate per-copy fee to the Copyright Clearance Center, 222 Rosewood Drive, Danvers, MA 01923, (978) 750-8400, fax (978) 646-8600. Requests to the Publisher for permission should be addressed to the Legal Department, Wiley Publishing, Inc., 10475 Crosspoint Blvd., Indianapolis, IN 46256, (317) 572-3447, fax (317) 572-4355, e-mail:
Trademarks:Wiley, the Wiley Publishing logo, For Dummies, the Dummies Man logo, A Reference for the Rest of Us!, The Dummies Way, Dummies Daily, The Fun and Easy Way, Dummies.com, and related trade dress are trademarks or registered trademarks of John Wiley & Sons, Inc. and/or its affiliates in the United States and other countries, and may not be used without written permission. Red Hat is a registered trademark of Red Hat, Inc. Linux is a registered trademark of Linus Torvalds. All other trademarks are the property of their respective owners. Wiley Publishing, Inc., is not associated with any product or vendor mentioned in this book.
LIMIT OF LIABILITY/DISCLAIMER OF WARRANTY: THE PUBLISHER AND THE AUTHOR MAKE NO REP-RESENTATIONS OR WARRANTIES WITH RESPECT TO THE ACCURACY OR COMPLETENESS OF THE CON-TENTS OF THIS WORK AND SPECIFICALLY DISCLAIM ALL WARRANTIES, INCLUDING WITHOUT LIMITATION WARRANTIES OF FITNESS FOR A PARTICULAR PURPOSE. NO WARRANTY MAY BE CRE-ATED OR EXTENDED BY SALES OR PROMOTIONAL MATERIALS. THE ADVICE AND STRATEGIES CON-TAINED HEREIN MAY NOT BE SUITABLE FOR EVERY SITUATION. THIS WORK IS SOLD WITH THE UNDERSTANDING THAT THE PUBLISHER IS NOT ENGAGED IN RENDERING LEGAL, ACCOUNTING, OR OTHER PROFESSIONAL SERVICES. IF PROFESSIONAL ASSISTANCE IS REQUIRED, THE SERVICES OF A COMPETENT PROFESSIONAL PERSON SHOULD BE SOUGHT. NEITHER THE PUBLISHER NOR THE AUTHOR SHALL BE LIABLE FOR DAMAGES ARISING HEREFROM. THE FACT THAT AN ORGANIZATION OR WEBSITE IS REFERRED TO IN THIS WORK AS A CITATION AND/OR A POTENTIAL SOURCE OF FUR-THER INFORMATION DOES NOT MEAN THAT THE AUTHOR OR THE PUBLISHER ENDORSES THE INFOR-MATION THE ORGANIZATION OR WEBSITE MAY PROVIDE OR RECOMMENDATIONS IT MAY MAKE. FURTHER, READERS SHOULD BE AWARE THAT INTERNET WEBSITES LISTED IN THIS WORK MAY HAVE CHANGED OR DISAPPEARED BETWEEN WHEN THIS WORK WAS WRITTEN AND WHEN IT IS READ.
For general information on our other products and services, please contact our Customer Care Department within the U.S. at 800-762-2974, outside the U.S. at 317-572-3993, or fax 317-572-4002. For technical support, please visit www.wiley.com/techsupport.
Wiley also publishes its books in a variety of electronic formats. Some content that appears in print may not be available in electronic books.
Library of Congress Control Number: 2004117578 ISBN: 0-7645-7713-1
Manufactured in the United States of America 10 9 8 7 6 5 4 3 2 1
About the Author
Terry Collingsis the Instructional Technologist at Muhlenberg College in Allentown, PA where he is responsible for researching and implementing emerging technology in an educational environment. He is also the system administrator for Red Hat Linux servers on campus.
Terry is also an adjunct faculty at Lehigh Carbon Community College where he teaches A+ and Network+ certification courses. He has previously taught courses on Unix, Linux, TCP/IP, and Novell Netware.
Dedication
This book is dedicated to my lovely wife Nancy, who kept our toddler enter-tained so I could work on this project.
Author’s Acknowledgments
I always have a hard time writing the acknowledgments for my books because there are so many people to recognize that I am always afraid that I’ll miss someone. Well, here goes.
I would like to thank all the people at Wiley who worked on this book, espe-cially Terri Varveris, my acquisitions editor, who finally convinced me to write a For Dummiesbook. I’ve known Terri for several years and have come to realize what a gem she is. Thanks to Chris Morris, my project editor, for keeping everything on track, and thanks to the technical and copy editors for putting their polish on the book. A special thank you goes to Doyle Smith who provided me with a few PCs so I could run all four versions of Enterprise Linux simultaneously.
Some of the people who helped bring this book to market include the following:
Acquisitions, Editorial, and Media Development
Project Editor:Christopher Morris
Acquisitions Editor:Terri Varveris
Sr. Copy Editor:Teresa Artman
Technical Editor:Susan Douglas
Editorial Manager:Kevin Kirschner
Media Development Manager:
Laura VanWinkle
Media Development Supervisor:
Richard Graves
Editorial Assistant:Amanda Foxworth
Cartoons:Rich Tennant (www.the5thwave.com)
Composition Services
Project Coordinator: Nancee Reeves, Emily Wichlinski
Layout and Graphics: Andrea Dahl, Lauren Goddard, Joyce Haughey,
Stephanie D. Jumper, Melanee Prendergast, Jacque Roth, Ron Terry
Proofreaders: Leeann Harney, Joe Niesen, Carl Pierce, Dwight Ramsey, TECHBOOKS Production Services
Indexer: TECHBOOKS Production Services
Publishing and Editorial for Technology Dummies
Richard Swadley,Vice President and Executive Group Publisher
Andy Cummings,Vice President and Publisher
Mary Bednarek,Executive Acquisitions Director
Mary C. Corder,Editorial Director
Publishing for Consumer Dummies
Diane Graves Steele,Vice President and Publisher
Joyce Pepple,Acquisitions Director
Composition Services
Gerry Fahey,Vice President of Production Services
Contents at a Glance
Introduction ...1
Part I: Becoming Familiar with Enterprise Linux ...7
Chapter 1: Getting Acquainted with Enterprise Linux...9
Chapter 2: Exploring the Desktop ...17
Chapter 3: Putting Your System to Work ...41
Chapter 4: Exploring the File System and Command Shell ...61
Part II: Configuring Your Enterprise Linux Local
Area Network ...83
Chapter 5: Configuring and Managing the X Window System ...85
Chapter 6: Configuring and Managing Printers ...97
Chapter 7: Configuring the Network...109
Chapter 8: The Network File System...123
Chapter 9: Connecting to Windows PCs Using Samba...131
Part III: Securing Your Enterprise Linux System ...141
Chapter 10: Security Basics ...143
Chapter 11: Intrusion Detection and Prevention...161
Part IV: Configuring Your Enterprise Linux Internet
Services ...179
Chapter 12: Configuring and Managing DNS Servers...181
Chapter 13: Configuring and Managing an E-Mail Server ...203
Chapter 14: Configuring and Managing an FTP Server ...221
Chapter 15: Serving Web Pages ...235
Part V: Maintaining Your Enterprise Linux System...251
Chapter 16: Maintaining Your System with the Red Hat Network...253
Chapter 17: Administering Users and Groups ...267
Chapter 18: Installing and Upgrading Software Packages ...279
Chapter 21: Ten Troubleshooting and Problem-Solving Tips ...329
Part VII: Appendixes ...339
Appendix A: Installing Red Hat Enterprise Linux ...341
Appendix B: What’s on the CD-ROM? ...361
Table of Contents
Introduction...1
About This Book...1
How This Book Is Organized ...2
Part I: Becoming Familiar with Enterprise Linux...2
Part II: Configuring Your Enterprise Linux Local Area Network ...3
Part III: Securing Your Enterprise Linux System...3
Part IV: Configuring Your Enterprise Linux Internet Services ...3
Part V: Maintaining Your Enterprise Linux System ...4
Part VI: The Part of Tens...4
Part VII: Appendixes...4
Icons Used in This Book ...5
Typographical Roadsigns...5
Part I: Becoming Familiar with Enterprise Linux ...7
Chapter 1: Getting Acquainted with Enterprise Linux . . . .9
Exploring the History of Enterprise Linux ...9
Examining the Versions of Red Hat Enterprise...10
Red Hat Enterprise AS...11
Red Hat Enterprise ES ...11
Red Hat Enterprise WS...12
Red Hat Desktop ...12
Putting Enterprise Linux to Work...13
Configuring your local network ...13
Using Enterprise Linux to maintain your system ...14
Securing your system...14
Providing Internet services ...15
Chapter 2: Exploring the Desktop . . . .17
Examining the Graphical Login Screen...17
Logging In and Using the GNOME Desktop ...19
Playing with the panel...20
Managing applets on the panel...21
Choosing applications from the Applications menu...22
Choosing actions from the Actions menu ...24
Using the Nautilus File Manager...25
Displaying your home folder...27
Displaying the contents of a folder ...27
Opening files...27
Using bookmarks ...28
Managing your files and folders ...29
Customizing the Nautilus File Manager...30
Editing File Manager preferences ...31
Changing the File Manager background and icon emblems ...32
Showing and hiding views ...33
Configuring GNOME ...33
Logging Out ...34
Taking a Look at KDE ...34
Managing applets...36
Choosing applications from the Applications menu...37
Using the Konqueror File Manager...39
Logging out...40
Chapter 3: Putting Your System to Work . . . .41
Getting Started...41
Browsing the Web...42
Changing Browser Preferences...44
Sending and Receiving E-mail ...45
Receiving e-mail ...48
Sending e-mail ...48
Working at the Office ...49
Writing with OpenOffice.org Writer...50
Calculating with OpenOffice.org Calc ...52
Impressing with OpenOffice.org Impress ...53
Configuring OpenOffice.org...54
Keeping Yourself Entertained ...55
Configuring your sound card ...55
Playing audio files...56
Playing video files...57
Working with Images...58
Chapter 4: Exploring the File System and Command Shell . . . .61
Examining the Enterprise Linux File System Structure ...61
Commanding the Shell...64
Opening a terminal window ...64
Shell command syntax ...66
Frequently Used Shell Commands ...68
Getting help ...68
Working with files and directories...69
Gaining superuser (root) privileges ...78
Changing your system path ...78
Mounting and unmounting drives ...79
Viewing and stopping processes ...80
Checking disk space ...80
Creating an alias ...81
Part II: Configuring Your Enterprise Linux Local
Area Network...83
Chapter 5: Configuring and Managing the X Window System . . . .85
Introducing the X Server ...85
Configuring the X Server with the X Configuration Tool...86
Changing the display resolution...86
Changing the display color depth ...87
Changing monitor type settings ...88
Changing your video card type...89
Configuring dual monitors...90
Manually Configuring Your X Server from the X Configuration File ...91
Device...91
Restarting Your X Server ...95
Disabling the X Server ...95
Chapter 6: Configuring and Managing Printers . . . .97
Starting the Printer Configuration Tool...98
Configuring the print queue...100
Selecting the print driver ...104
Editing the Printer Configuration...105
Deleting a printer...107
Setting the default printer ...107
Chapter 7: Configuring the Network . . . .109
The Enterprise Linux Network Configuration Tool...109
Adding an Ethernet device...110
Adding a wireless NIC ...113
Adding a modem connection ...115
Editing Your Network Configuration...117
Removing a NIC...117
Changing the NIC configuration ...118
Managing DNS settings ...119
Managing hosts...120
Working with profiles ...120
Chapter 8: The Network File System . . . .123
Configuring and Managing an NFS Server...123
Adding Shares to Export ...124
Editing and Deleting NFS Exported Shares ...127
Command Line Configuration...128
Configuring an NFS Client ...129
Mounting an NFS directory ...129
Mounting NFS directories automatically at system start...129
Chapter 9: Connecting to Windows PCs Using Samba . . . .131
Starting the Samba Server ...136
Connecting to the Samba Server...137
Connecting to a Samba Client...138
Part III: Securing Your Enterprise Linux System . . .141
Chapter 10: Security Basics . . . .143
Developing a Security Policy ...143
Physical security ...144
Document security ...144
Network security ...145
Consequences for breaking security policy...145
Responsibility ...146
Performing a security audit ...146
Implementing Host Security ...147
Disabling xinetd server services ...155
Building a Firewall...156
Configuring a simple firewall with the Security Level Configuration tool...157
Configuring a simple firewall with the iptables command...158
Chapter 11: Intrusion Detection and Prevention . . . .161
Discovering the Types of Intrusion Detection...161
Active detection ...162
Passive detection ...162
Using Software Detection Tools to Test Your System Security ...163
Scanning your network with nmap ...163
Part IV: Configuring Your Enterprise Linux
Internet Services ...179
Chapter 12: Configuring and Managing DNS Servers . . . .181
Translating Web Names to IP Addresses ...181
Types of DNS Servers ...183
Examining the DNS Server Configuration Files ...183
The named.conf file...185
Zone files ...193
Configuring a Caching DNS Server...195
Configuring a Secondary Master DNS Server ...196
Configuring a Primary Master Server...197
Checking Your Configuration...199
The host program...199
The dig program ...199
Chapter 13: Configuring and Managing an E-Mail Server . . . .203
How E-Mail Works ...203
Mail User Agent (MUA) ...204
The Ximian Evolution e-mail client ...204
Mail Transfer Agent (MTA)...209
Local Delivery Agent (LDA)...209
Introducing SMTP...210
The Post Office Protocol (POP3)...210
The Internet Mail Access Protocol (IMAP4) ...211
Using Sendmail ...211
Checking that Sendmail is installed and running ...211
Configuring Sendmail...212
The m4 macro processor ...213
Managing the mail queue ...214
Configuring POP3 ...215
Configuring IMAP4...216
Setting up aliases to make life easier ...216
Maintaining E-Mail Security ...217
Protecting against eavesdropping...218
Using encryption ...218
Using a firewall...218
Don’t get bombed, spammed, or spoofed...218
Some SMTP cautions...219
Chapter 14: Configuring and Managing an FTP Server . . . .221
Installing an FTP Server ...221
Configuring an FTP Server ...222
Configuring the /etc/vsftpd/vsftpd.conf file...223
Configuring the /etc/vsftpd.ftpusers file ...227
Configuring the /etc/vsftpd.user_list file...228
Starting the FTP Server ...228
Testing the FTP Server ...229
Logging In to FTP Servers ...229
Using gFTP for FTP access ...230
Accessing an FTP server with the command line FTP client...232
Chapter 15: Serving Web Pages . . . .235
Installing and Starting the Web Server ...235
Configuring and Managing Your Web Server ...238
Editing the Apache Configuration File Using the HTTP Configuration Tool...239
Main tab ...240
Virtual Hosts tab...240
Server tab ...248
Performance Tuning tab ...249
Saving Your Settings and Restarting the Web Server ...250
Part V: Maintaining Your Enterprise Linux System ...251
Chapter 16: Maintaining Your System
with the Red Hat Network . . . .253
Registering Your System ...253
Configuring the Up2date Agent ...256
Using the Red Hat Enterprise Linux Up2date Agent...259
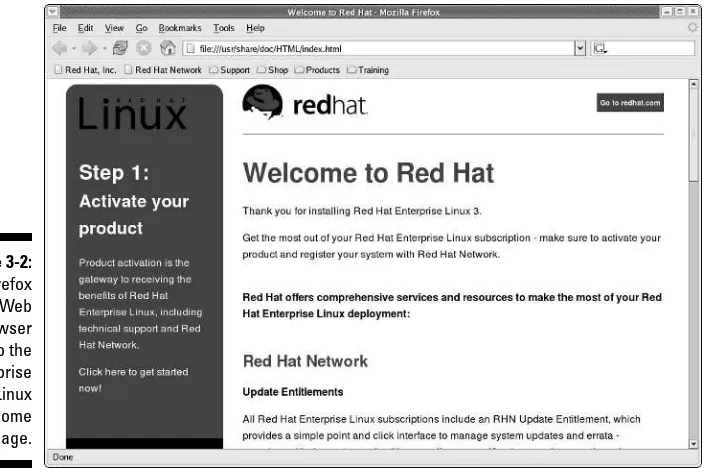
Accessing the Red Hat Network with a Web Browser ...262
Chapter 17: Administering Users and Groups . . . .267
Working with Users and Groups...267
Adding a new user...269
Adding a new group ...270
Changing user properties...271
Changing group properties ...272
Removing a user ...273
Restricting Disk Usage with Quotas...274
Configuring disk quotas...274
Obtaining disk quota statistics...277
Chapter 18: Installing and Upgrading Software Packages . . . .279
Managing Packages with the Red Hat Package Manager ...279
Installing system packages...280
Removing system packages ...282
Managing Applications from Binary rpm Files ...282
Installing binary rpm files ...283
Finding installed package files...284
Removing installed packages...285
Chapter 19: Backing Up and Restoring Your Files . . . .287
Planning Your Backup Strategy ...287
Don’t: Back up temp and cache files...287
Maybe: Back up OS files ...288
Do: Back up database files and user files ...288
Selecting Your Backup Media ...289
Determining Your Backup Method...289
Enterprise Linux Backup Tools ...292
Command line tools ...292
Advanced tools ...300
Part VI: The Part of Tens...311
Chapter 20: Ten Tips for Optimizing Your System . . . .313
Optimizing the X Window System...313
Optimizing NFS ...315
Optimizing Samba ...316
Optimizing DNS ...317
Optimizing Sendmail...318
Optimizing FTP ...320
Optimizing Your Web Server...320
Building a Custom Kernel...321
Shutting Down Unused Services ...322
Administering Your System by Using Webmin ...325
Chapter 21: Ten Troubleshooting and Problem-Solving Tips . . . .329
Unable to Log In ...329
Resetting a user’s password ...330
Creating a user account...330
Lost or forgotten root password ...330
CD-ROM Drive Not Detected During Installation ...331
CD-ROM Drive Does Not Mount After Installation ...332
Sound Does Not Work After Installation ...332
Unable to Unmount a Drive ...333
System Hangs During Boot ...334
Unable to Access Network Hosts ...335
Making an Emergency Boot Disk...336
Shell Commands Don’t Work ...336
Sources of Additional Information ...337
Part VII: Appendixes...339
Appendix A: Installing Red Hat Enterprise Linux . . . .341
Exploring Your PC’s Components ...341
Processor...342
Bus type ...342
Memory...343
Video card and monitor...343
Hard drive...344
Floppy disk drive...344
Keyboard and mouse ...344
SCSI controller ...345
CD-ROM drive ...345
Sound card ...345
Network card...345
Checking for Supported Hardware ...346
Starting the Red Hat Enterprise Linux Installation ...346
Partitioning the Hard Disk for Red Hat Enterprise Linux...349
Configuring Red Hat Enterprise Linux Installation ...351
Configuring the boot loader...352
Configuring the network...353
Configuring the firewall ...354
Configuring additional languages...356
Setting the time zone ...356
Setting the root password ...357
Selecting the package groups to install ...357
Completing the Installation...359
Appendix B: What’s on the CD-ROM? . . . .361
Introduction
W
elcome to Red Hat Enterprise Linux 4 For Dummies.RH Enterprise Linux 4 is the latest release of the OS intended for the business user. In this book, I introduce you to the four versions of Red Hat (RH) Enterprise Linux.Two of the versions of Enterprise Linux, the AS and ES versions, are intended for systems that are used as servers. The other two versions, WS and Desktop, are intended to be used on standalone PCs.
This book is intended for network and system administrators who manage Red Hat Enterprise Linux systems running the AS or ES versions. For system administrators, this book shows you the steps required to successfully main-tain or add to your systems. The book also helps those administrators who need to rapidly acquire knowledge of system administration and networking tasks for RH Enterprise Linux (RHEL). All tasks necessary to properly config-ure, maintain, and upgrade a Red Hat Enterprise Linux system are covered in this book.
If you are using the WS or Desktop versions of Enterprise Linux, don’t worry — I didn’t forget about you. Much of the information that is useful to system administrators is also useful to you. Some chapters are specifically intended for you and cover what you need to know to successfully use the WS or Desktop versions of Enterprise Linux.
About This Book
I have been told by several people whose opinions I value that my writing style is conversational and easy going. In fact, that was one of the selling points used by my acquisitions editor to convince me to do this book. Hopefully, I continue this style throughout this book, and you will enjoy reading it as you glean some valuable information about Enterprise Linux.
The book is primarily intended for new or less-experienced Red Hat Enterprise Linux administrators and users. The topics are explained in a concise, easy-to-follow style and will also be useful as a quick reference for more experienced readers. Some of the topics covered include
⻬Installing and configuring RHEL (printing, network services)
⻬Using shell scripting to manage an RHEL system
⻬Using system administration tools
⻬Using the Red Hat network service
⻬Installing and using security tools
⻬Optimizing system performance
⻬Using monitoring tools
It is critical for new and less-experienced users to rapidly acquaint them-selves with the details and functionality of Red Hat Enterprise Linux 4. This book provides these users with concise, step-by-step instructions of the key areas that will make them knowledgeable RH Enterprise Linux users. Users who buy this book can expect that they can read how to successfully admin-ister a RH Enterprise Linux system in a short time frame.
How This Book Is Organized
This book is divided into seven parts. The beginning parts give you an intro-duction to Enterprise Linux and progress through increasingly more complex topics. The middle parts get you started with system administration and security. The Part of Tens gives you some useful tips on optimizing your sys-tems as well as some solutions to common problems encountered by novice users. Finally, the appendixes offer installation instructions and also list what’s on the book’s companion CD material.
A nice thing about the book is that it is modular instead of linear. That is, you can just go to whatever part you want for information about the topics in that part. You don’t need to finish one chapter to go on to the next; each chapter is meant to stand alone.
Part I: Becoming Familiar
with Enterprise Linux
Linux, like OpenOffice,which is a complete office suite that lets you do any-thing that you can do with MS Office — but for zero cost. You explore a Web browser and an e-mail client and even play around with graphics and sound. The last topic in this part introduces you to the Linux file system and the com-mand shell. This part contains information useful to users of all four versions of Enterprise Linux.
Part II: Configuring Your Enterprise
Linux Local Area Network
This part begins with a tour through the X Window System, which provides the graphical interface to Enterprise Linux and what you see when you log in. You explore how to configure your system to use TCP/IP to communicate with other PCs on your network and how to get different types of printers to work on your local area network. You can share your files with other Linux or Unix users by following the topics covered in this part. You can even share your files with Windows users by using Samba, which is the last topic in this part. This part contains information useful to users of all four versions of Enterprise Linux.
Part III: Securing Your Enterprise
Linux System
Who isn’t concerned with security these days? Just read the paper or watch the news, and you will hear more about computer security problems than you care to. Your Linux system isn’t affected by the most of the problems that plague users of MS Windows, but there are some vulnerabilities that you should know about.
This part is where you will explore some security basics for your local net-work as well as external netnet-works. You can read about intrusion detection and some tools that you can use to help you find out whether someone has entered your system without your permission. This part contains information useful to users of all four versions of Enterprise Linux.
Part IV: Configuring Your Enterprise
Linux Internet Services
All the chapters in this part deal with setting up servers that provide services to other users. Your users won’t be able to find anything on the Internet
without a DNS server on your network; in this part, I show you how to config-ure one. I also show you how to configconfig-ure an e-mail server so your users can send and receive e-mail. The last two chapters in this part get you ready to share your files with other users across the Internet by showing you how to set up an FTP server. And, finally, the last chapter in this part gives you the details about setting up and maintaining a Web server. This part contains information useful to users of all the AS and ES versions of Enterprise Linux.
Part V: Maintaining Your
Enterprise Linux System
Most likely, after you have your system set up exactly as you want it and run-ning smoothly, you’d like to keep it that way. The topics in this part help you do just that. You can explore keeping your system updated by using the Red Hat Network,a subscription service that keeps an eye on your systems and lets you know when they need to be updated. If you’ve found some really cool software that you want to install, this part helps you install it and also upgrade software already on your system. Toward the end of the part, you’ll discover how to add users to your system as well as how to change user properties. And finally, you end the part by finding out about backing up and restoring your data. This part contains information useful to users of all four versions of Enterprise Linux.
Part VI: The Part of Tens
Every For Dummiesbook concludes with a Part of Tens, and this book is no different. Here, you find a chapter that mostly deals with optimizing the dif-ferent servers and services that your systems provide to other users. You can also read about ten of the most common problems new users have when running Enterprise Linux and what you can do to solve them. Hint:Maybe if you read this part first, you can avoid some of these pesky problems before they strike. This part contains information useful to users of all four versions of Enterprise Linux.
Part VII: Appendixes
Icons Used in This Book
Within each chapter, I use icons to highlight particularly important or useful information. You find the following icons in this book:
The Tip icon flags useful information that makes living with your Red Hat Enterprise Linux system even less complicated than you feared that it might be.
I sometimes use this icon to point out information you just shouldn’t pass by — don’t overlook these gentle reminders.
Be cautious when you see this icon — it warns you of things you shouldn’t do. The bomb is meant to emphasize that the consequences of ignoring these bits of wisdom can be severe.
This icon signals technical details that are informative and interesting, but not critical to understanding and using Red Hat Enterprise Linux. Skip these if you want (but please come back and read them later).
Typographical Roadsigns
I don’t use too many of these, but they come in handy. When I want you to type something, whether at a prompt or in a field, it appears in bold.A com-mand path looks like this: Choose File➪New. Finally, code and things
onscreen look like this. Told you it was simple.
Part I
Becoming Familiar
with Enterprise
Chapter 1
Getting Acquainted with
Enterprise Linux
In This Chapter
䊳Exploring the history of Enterprise Linux
䊳Examining the versions of Enterprise Linux
䊳Putting Enterprise Linux to work
E
nterprise Linux has four versions: Two of the versions are designed for workstation and desktop usage, and the other two versions are designed for server applications. Don’t get too bogged down trying to sort out the dif-ferences of these versions because the four versions of Enterprise Linux are really quite similar. In this chapter, I examine the different versions of Red Hat Enterprise Linux and what you can do with them. Before I go into the version descriptions, take a look at the history of Enterprise Linux.Exploring the History of Enterprise Linux
Red Hat Enterprise Linux is one of many available distributions of Linux. Several companies make their own commercial Linux distributions, but in this book, I discuss the Enterprise Linux distribution by Red Hat. A Linux distribu-tionis a complete version of the Linux operating system that contains the Linux kernel as well as other applications and programs that can be used for doing some type of work. The Linux kernelis the core of the Linux operating system and controls how the operating system functions with the hardware that makes up your PC. (Linux was originally developed by Linus Torvalds in 1991 while he was a college student in Finland.)The first publicly available version of Red Hat Linux appeared in the summer of 1994 and was based on kernel version 1.09. (The kernel is identified by a number that refers to the particular version of the kernel.) Since the release of the first version of the Red Hat Distribution, there have been many more releases, with each release improving upon the earlier versions. Red Hat made no distinction between its version’s suitability for home use or com-mercial (business) use of its distributions until May, 2002. By then, Red Hat was at release 7.3 of the Red Hat Linux distribution. Coinciding with the release of version 7.3 was the introduction of Red Hat Linux Advanced Server 2.1, which was renamed Enterprise Linux 2.1.
Enterprise version 2.1 was based on the Red Hat 7.3 version but was intended for commercial/business use. The major difference between the commercial and home versions of Red Hat Linux was in the support offerings available for the versions. The home version, if purchased through a boxed set, gave the user a limited number of technical support calls for a short time period, and then the users were on their own. The commercial version provided a longer time period for technical support and offered additional technical support that could be purchased at additional cost. Also, Red Hat had issued a new version of its operating system about every six months — changing far too often for most commercial uses. With the release of Enterprise Linux 2.1, Red Hat slowed the pace of system changes to give users a more stable platform (thus requiring less frequent updates) and focused its commercial efforts on the Enterprise version.
From this point forward, Red Hat continued development of its home user versions through version 8 and finally version 9, which was the last Red Hat distribution that was available for home user purchase. In the summer of 2003, Red Hat decided that it would merge its open development process with the Fedora Linux project — and the Fedora Project was born.
In October, 2003, Red Hat introduced Enterprise 3 that, like its predecessor Enterprise 2.1, was specifically geared toward business/enterprise users. Enterprise 3 was initially available in three versions — AS, ES, and WS — each designed for specific types of service. In the summer of 2004, Red Hat added another version of Enterprise 3 specifically for the desktop. That brings us to the present — Enterprise version 4 — which is the focus of this book.
Examining the Versions of
Red Hat Enterprise
All versions of Enterprise Linux share some similarities in their product fea-tures. The most significant of these features are
⻬One year of support and updates using the Red Hat Network included with the initial purchase, which is then renewable annually for 5 years for an additional yearly fee
Having a 12–18 month release cycle makes the update process more pre-dictable because a user knows that he won’t have to make any major changes to his system configuration for at least a year and perhaps longer. With all versions are based on the same operating system, a system administrator can more easily configure and maintain consistency because the same skill set is used for all versions.
Probably the most significant feature of Enterprise Linux is the level(s) of support available from Red Hat. One of the most frequently heard criticisms of Linux is the lack of user support typically available. With Enterprise 3, and Enterprise version 4 covered in this book, Red Hat has seriously addressed the support issue.
In the following sections, I examine the different versions of Enterprise Linux 4. (For installation details, see Appendix A.) Then I conclude the chapter the remainder of this chapter with what Enterprise Linux can do for you.
Red Hat Enterprise AS
Red Hat Enterprise AS is the top-of-the-line server operating system available from Red Hat. Enterprise AS is designed for large departments or company data centers. The AS version provides the same server functions as the ES version but is best suited for servers that have more than two CPUs with greater than 8GB of system RAM. In addition to support for more than two CPUs in the same system, there is support for many different types of CPUs as well, such as the IBM iSeries, pSeries, and zSeries.
The greatest difference between the AS and ES (see the following section) versions is the level of support available with the AS version. Users can pur-chase the premium level support option that provides 24/7 support with a guaranteed one-hour response time.
Red Hat Enterprise ES
Red Hat Enterprise ES is intended to provide for an entry-level or midrange server environment with support for up to two CPUs and 8GB of system RAM. The ES version is quite similar to the AS version (see the preceding section) but is meant for smaller-scale operations and does not provide the same level
of support as the AS version. The ES version includes the following applications:
⻬Web server
⻬Network services (DNS [Domain Name System], DHCP [Dynamic Host Configuration Protocol], firewall security, and more)
⻬File/print/mail servers
⻬SQL (Structured Query Language) databases
Red Hat Enterprise WS
Red Hat Enterprise WS provides nearly the same functionality as the Desktop version. Included with WS are the same Web browser, office suite, and e-mail client (Firefox, OpenOffice.org 1.1, and Evolution, respectively). The major difference between the WS and Desktop (see the following section) versions is the number of CPUs supported. The WS version supports up to two CPUs, but the Desktop version supports only one.
Red Hat Desktop
According to Red Hat, Enterprise 4 Desktop is “a high-quality, full-featured client system for use in a wide range of desktop deployments where security and manageability are key.” What does this mean to the typical user?
This version focuses on the desktop, containing applications that are used on the desktop. Red Hat Desktop includes a mail client program, similar to MS Outlook, called Evolution. Also included is the Firefox Web browser; a com-plete office suite, OpenOffice.org 1.1; and GAIM, which is an instant messag-ing client.
To find out more about some of the applications available in Enterprise Linux, take a look at Chapter 3.
Third-party productivity applications are also installed by default during the system installation. This is an improvement over earlier versions of Red Hat Linux. Adobe Acrobat Reader, a Macromedia Flash plug-in, RealPlayer, and Java are just a few of the applications that work in Red Hat Desktop right out of the box.
Putting Enterprise Linux to Work
Whether you’re planning to use the AS or ES server versions of Enterprise Linux or you’ll be using the WS or Desktop versions, the choices of productiv-ity software and what you can do with them are nearly infinite. You can use Enterprise Linux to manage all your system hardware, do system administra-tion, create networks for sharing data, browse the Internet, serve Web pages, and much more. Take a look at just some of the tasks that you can do with Enterprise Linux.
Configuring your local network
All versions of Enterprise Linux include the X Window System (find more on this in Chapter 5), based on XFree86, which provides the foundation for a graphical user interface (GUI). However, you aren’t stuck with just one GUI because Enterprise Linux supplies two well-known GUIs: KDE and GNOME.
⻬KDE:The K Desktop Environment is an optional GUI that can be selected at installation time.
⻬GNOME:This is the default GUI that’s installed when the operating system is installed.
If you have both GUIs installed, a tool on either desktop makes switching between the desktops very easy.
You don’t have to spend additional money to buy typical productivity appli-cations such as word processing or spreadsheet programs. All versions of Enterprise Linux ship with a complete office productivity suite — OpenOffice. org — as well as many other graphical applications that can be used for edit-ing graphics, buildedit-ing Web sites, and much more.
With either desktop, you can use the included graphical-based tools to con-figure and maintain your systems. You can also concon-figure the hardware in your system and add or remove devices.
Additionally, you can configure printers to work with your local network. Enterprise Linux includes support for many types of printers from different manufacturers. You can configure a printer connected directly to your system as well as many types of network-connected printers. (Read more about con-figuring system printers in Chapter 6.)
Enterprise Linux gives you everything you need to set up a local network so that your systems can share data with each other. For example, you can configure the AS and ES versions to provide local network services, such as Network File System (NFS), that shares files between the servers and WS and Desktop clients. (Read all about NFS in Chapter 8.) Or, you can configure the
Network Information System (NIS) to give your users the ability to log in to the network and use all the network resources.
You will also be able to share data with computers running other operating systems, such as MS Windows, Novell NetWare, or Mac OS X. (See Chapter 9 for more.) Enterprise Linux gives you all the tools that you need to configure your system to communicate with these other operating systems and exchange information.
Using Enterprise Linux to
maintain your system
Keeping your systems running properly and updated with the latest patches can be a daunting proposition. Don’t worry, though, because Enterprise Linux gives you all the tools that you need to perform these tasks. All versions of Enterprise Linux include a subscription to the Red Hat Network as well as the up2date application that constantly scans your system configuration and installed packages looking for packages that can be updated.
Tools are available in all versions that you can use to create and remove system users and groups. You use these same tools to change properties and permissions for your users and groups as well.
Several applications are available for creating file archives for backing up your data. You can compress your data to maximize your storage space and speed up your backup and restore process.
Installing application software in Enterprise Linux is a relatively easy process because most applications are available in the Red Hat Package Manager (RPM) format. You can use the graphical-based RPM tool to install your appli-cation, or you can use the rpmcommand from a command prompt. In many instances, you can either choose to use the graphical based tool or you can use the command line to enter your commands.
Read more about security basics in Chapter 10.
Securing your system
Anyone who uses a computer these days is well aware of the increasing prob-lems caused by unsecured systems. Enterprise Linux includes many of the tools that you need to secure your system from malicious attacks.
the command line firewall tool to create more complex firewall rules. You can protect your systems from internalattacks (attacks that originate inside your organization) as well as external(outside) attacks.
Applications are also available that you can use to actively detect system intrusions. You can configure how your system should respond to intrusions and what actions should be taken to ensure that your systems are not vulner-able to future attacks.
Find out more on intrusion prevention and detection in Chapter 11.
Providing Internet services
You can use Enterprise Linux to serve information across the Internet to users on different networks than your own. The ES and AS versions of Enterprise Linux include the following Internet servers:
⻬Apache httpdWeb server:The Apache Web server is the most widely used Web server in use today. (See Chapter 15.)
⻬FTP server:The vsftpdserver is an implementation of the File Transfer Protocol (FTP) that is used for transferring files across the Internet. (See Chapter 14.)
⻬sendmail:This is the most widely used mail transport agent in use today. (See Chapter 13.)
You can remotely log in to another computer on your own network or even on the Internet. Using the telnetprogram, or another more secure program called ssh, makes remote logins easy. After logging in remotely, you can con-trol the remote computer as though you were sitting in front of it.
In Enterprise Linux, all Internet servers are based on the Transmission Control Protocol/Internet Protocol (TCP/IP), which is the protocol on which the Internet is based. Any network applications that use TCP/IP are sup-ported natively by Enterprise Linux. (Read more on TCP/IP networking in Chapter 12.)
As you can see from this quick examination of the features of Enterprise Linux, you can do a lot with it. In fact, anything you can do with the most widely used operating system (MS Windows), you can do as well or better with Enterprise Linux. You systems will certainly be more secure and less vulnerable to attack if you are running Enterprise Linux. The remaining chapters of this book explain in more detail the features briefly discussed in this chapter.
Comparing Enterprise Linux and Fedora Core
In Fall, 2003, Red Hat announced that it would no longer sell nor support its retail box version of Red Hat Linux. Version 9 would be the last of many versions that I’ve seen over the years. Instead of continuing this long line of versions, Red Hat announced that it would provide support to the Fedora Project for development of what Red Hat described as a place for testing cutting-edge technology. What this means is that all development efforts for all Red Hat software would go into the Fedora Project and the Fedora software, which is known as Fedora Core.New releases of Fedora Core will occur about every six months, which is far too often for production-based systems, but allows for testing of features that would appear at some later date in the Enterprise versions. At the same time as the Fedora Project announcement, Red Hat placed nearly all its efforts into promoting its Enterprise Linux product and its features and benefits.
Many people were very confused by this move by Red Hat, and many users had a strong feeling that Red Hat Linux would no longer be available. This is simply not true. What was known as Red Hat Linux is simply now called Fedora Project. In my opinion, except for the name change and not being able to purchase a retail box version of Fedora, nothing has really changed as far as the features and functionality of the operating system.
The major advantages of Enterprise Linux over Fedora Core are the number of support options
that are available from Red Hat. For many years, one of the biggest reasons given by the corpo-rate world for not using Linux has been a lack of user support. With the promotion of Enterprise Linux, Red Hat has effectively removed lack of support as a reason for a company not to con-sider using Linux.
Another key feature of Enterprise Linux is the extended development and release cycle for new versions. Red Hat has stated that it plans to release new versions of Enterprise Linux every 12–18 months rather than every 6 months, as had been the case with Red Hat Linux.
However, probably the most significant difference between Fedora Core and Enterprise Linux is the difference in price. Purchasing the AS version of Enterprise Linux with the standard support option cost about $1,500, with the premium support package costing about $2,500. Fedora Core, on the other hand, is free.
Chapter 2
Exploring the Desktop
In This Chapter
䊳Examining the graphical login screen
䊳Logging in and using the GNOME desktop
䊳Using the Nautilus File Manager
䊳Adding bookmarks
䊳Configuring GNOME
䊳Logging out
䊳Taking a look at KDE
T
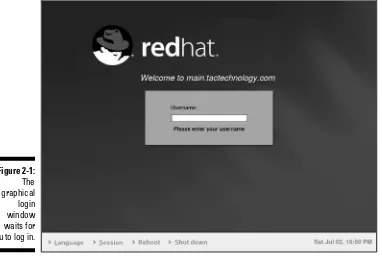
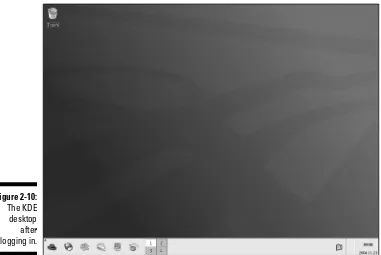
he GNOME (GNU Network Object Model Environment) desktop is a graph-ical user interface (GUI) that is installed as the default user interface during the installation process. Another popular desktop, KDE (K Desktop Environment), can also be selected as an option to be installed during system installation. Each of these user interfaces is similar to that of MS Windows or Mac OS X but with some notable differences. One large difference is the abil-ity of the user to select which desktop to use upon system login. In this chap-ter, I take you on a tour of both of these GUIs to discover some of the features that they offer and show you how to configure them to your liking.At the bottom of the window are four choices that you can click to make additional selections:
⻬Language:Clicking this opens a box displaying the languages available on your system. If you want to use the system default language, which was installed during system installation, you don’t need to do anything with this choice. In most cases, only one language is listed unless additional languages were installed during the system installation. The default guage would typically be the language used at your location. If other lan-guages have been installed, just click the language that you want to use.
⻬Session: Clicking Session gives you the opportunity to select the desk-top that you use after you log in. GNOME is the default deskdesk-top, so you need to use this choice only if you want to change to a different desktop, such as KDE.
⻬Reboot: Clicking Reboot will (you guessed it) ask you whether you want to reboot the system.
⻬Shut Down: Clicking Shut Down asks you whether you want to shut down your system.
Directly in the center of the window is the login field. This is where you enter your username and password to login. Here’s the way-too-easy drill:
1. Type your username.
2. Press Enter.
3. Type your password.
4. Press Enter again.
Logging In and Using
the GNOME Desktop
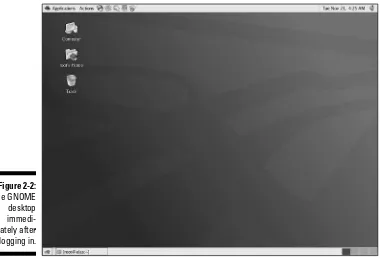
In this section, I walk you through logging in to the GNOME desktop and do some exploring to help you become familiar with its features. As I mention earlier, the GNOME desktop is installed as the default desktop, so to enter GNOME, you can just enter your username and password in the graphical login window without having to make any choices from the four options, as explained in the preceding section. After entering your username and pass-word, you see the GNOME desktop, as shown in Figure 2-2.
Figure 2-2: The GNOME desktop immedi-ately after logging in.
The GNOME desktop has a similar appearance to other well-known desktop environments like MS Windows or Mac OS X. If you can use either of these desktops, you can easily master GNOME in a short time. Notice that the GNOME desktop has a rather clean, almost Spartan, appearance.
The three icons in the upper-left corner of the desktop are links to your home directory, the system trash can that holds your deleted files until you empty the trash, and the Computer icon that opens the Nautilus graphical shell. The Nautilus File Manager gives you access to your files and directories so you can do typical file management tasks like copying and moving files. In addi-tion to regular file management tasks, the Nautilus File Manager lets you per-form desktop management as well. You look more closely at Nautilus in this chapter. Take a closer look at these icons.
⻬Computer: This icon also opens a Nautilus window. The Computer window contains four icons that are links to
•Floppy Drive:The Floppy Drive icon is a link to the folder that con-tains the system mount point for the floppy drive. Double-clicking this icon displays the contents of the floppy disk that you inserted in the floppy drive.
•CD-R Drive:The CD-R Drive icon is a link to the folder that contains the system mount point for the CD-R drive. Double-clicking this icon displays the contents of the CD-ROM disk that you inserted in the CD-R drive.
•Filesystem:This icon is a link to the file system. Double-clicking this icon opens a new window displaying the root directory of the file system.
•Network:Clicking the Network icon gives you access to the net-work file systems. Any files or directories that are available across your network are shown here.
⻬Home directory: This icon is a link to the user’s home directory. The name of the user shown on the desktop corresponds to the user who is logged in. For example, Figure 2-2 shows the icon labeled as root’s Homebecause I logged in with that user name. You can double-click this icon — or right-click and choose Open from the contextual menu — to open a Nautilus window that displays the user’s home directory.
⻬Trash:This icon is a link to the system trash can. You can drag any icon, file, or directory and drop it here. When you’re ready to empty the trash, just right-click and select Empty Trash from the contextual menu.
Playing with the panel
left of the top panel is the Applications icon, indicated by the Red Hat icon. To the right of the Applications icon is an Actions menu that contains some actions you can do, such as locking the desktop or logging out. To the right of the Actions menu are icons representing programs that were installed during the system installation. You can start any of these programs by clicking them from the panel. Just move your mouse over any icon, and a pop-up appears with a description of the program represented by the icon.
At the far right of the bottom panel is a square gray area — the Workspace Switcher — that is divided into four sections. When you first log in to GNOME, the leftmost section of Workspace Switcher should be blue, indicating that you are in workspace one. You can switch between four workspaces in GNOME, so you actually get four distinct desktops that you can use. You can open dif-ferent programs on the difdif-ferent desktops and switch between them by click-ing the Workspace Switcher for the desktop that you want to see. Open some programs on the different desktops and then try clicking each of the four squares to see the effect of changing to a different workspace.
On the far left of the bottom panel is a Close Window icon that will hide, if visible, all open windows on the desktop. If the windows are already hidden, clicking this icon displays the windows. The open area on the bottom panel between the Workspace Switcher and the Close Window icon is used to show any programs that you’re running on your desktop. You can switch between programs running on a single desktop by clicking the program name from the bottom panel. Also shown in this area are icons that you can add to the panel as well as applets. Appletsare applications that provide some type of useful information or entertainment.
Managing applets on the panel
The icons on the top and bottom panels are links to applications — applets. Applets placed on the panel make it quick and convenient to start your chosen application with a single click. If you are familiar with MS Windows, applets in GNOME are like shortcuts. In addition to the applets that are already on the panel, you can add your own. You also can move applets that are already there or delete them to make more room.
To add applets to the panel, do the following:
1. Right-click an empty area of the panel.
2. Choose Add to Panel from the contextual menu.
3. Choose the application that you want to add.
4. Click Add to add it to the panel.
To move applets to another location on the panel
1. Right-click the applet you want to move.
2. Click Move from the contextual menu.
3. Drag the applet to the desired location.
4. Click to release the applet to its new location.
To remove an applet from the panel
1. Right-click the applet you want to remove.
2. Choose Remove from Panel from the contextual menu.
To modify the properties of an applet (or the panel)
1. Right-click the applet (or an empty area of the panel).
2. Choose Properties from the contextual menu.
3. Change the parameters in the Properties dialog box.
Right-clicking the panel or any applets on it presents a contextual menu, which gives you access to Help and some useful utilities for panel configuration. Contextual menus are different depending on the type of applet that you’re selecting.
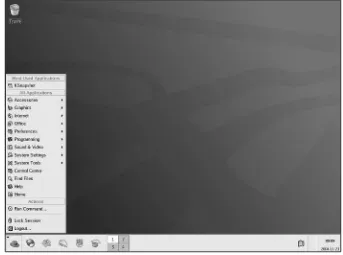
Choosing applications from
the Applications menu
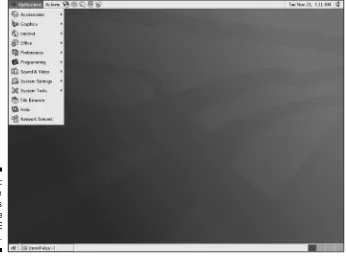
The Applications menu, represented by the Red Hat icon, is on the far-left corner of the top panel. The Applications menu button gives you access to a large number of applications. Click the Red Hat icon to open the Applications menu, and you see a menu, as shown in Figure 2-3, listing the many categories of applications from which you can choose.
Your Applications menu might not be exactly as described in this section depending on the version of Enterprise Linux that you have installed.
⻬Network Servers:Choosing this menu item opens the Nautilus File Manager and displays any network servers that you might have.
⻬Help:This menu item opens the Help browser. You can get help on using GNOME by choosing this item.
⻬File Browser:This menu item is a link to the Nautilus File Manager and opens in the user’s home directory.
⻬System Tools:This menu choice gives you access to many Enterprise Linux system administration utilities. You explore many of these tools in other chapters of this book.
⻬System Settings:This menu item contains Enterprise Linux system administration utilities and some GNOME configuration utilities as well.
⻬Sound & Video:Choosing this item gives you access to programs and utilities related to system sound and video. For example, if you want to adjust the system volume, use the utility here.
Figure 2-3: The Applications menu on the GNOME desktop.
⻬Programming:This menu item gives you access to some programs that can be used for debugging programs.
⻬Preferences: This menu choice opens the System Preferences window. Most of the GNOME settings can be modified with this menu choice. Selecting this from the menu is the same as double-clicking the Computer icon on the desktop.
⻬Office:This menu choice gives you access to the OpenOffice.org office suite. The OpenOffice suite contains word processing, spreadsheet, pre-sentation software, and much more. You can also start several of the OpenOffice applications by clicking the icons on the left side of the panel.
⻬Internet:Here you will find applications related to the Internet. For example, the Web browsers are located here as well as an FTP program.
⻬Graphics:This menu choice contains graphical programs. Here you find image viewing and editing applications.
⻬Accessories:Here you can find applications that don’t fit well into the other categories, like the calculator, as well as some text editors.
You have several ways to start applications in Enterprise Linux. You can click the Applications menu icon in the left corner of the panel. You can also start any executable application by double-clicking its icon from the Nautilus File Manager.
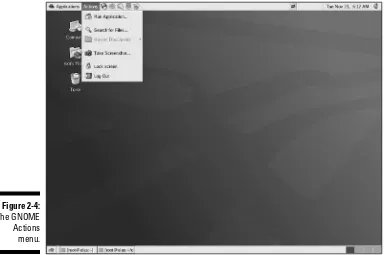
Choosing actions from the Actions menu
To the right of the Applications menu is the Actions menu, as shown in Figure 2-4.
Items on this menu, listed from top to bottom, include the following:
⻬Run Application: This menu item opens a dialog box where you can enter the name of a program that you want to run.
⻬Search for Files:Choosing this menu item opens a file search dialog box.
⻬Recent Documents: Documents that you have recently opened appear in this list.
⻬Take Screenshot: You can use this menu choice to capture an image of your current display.
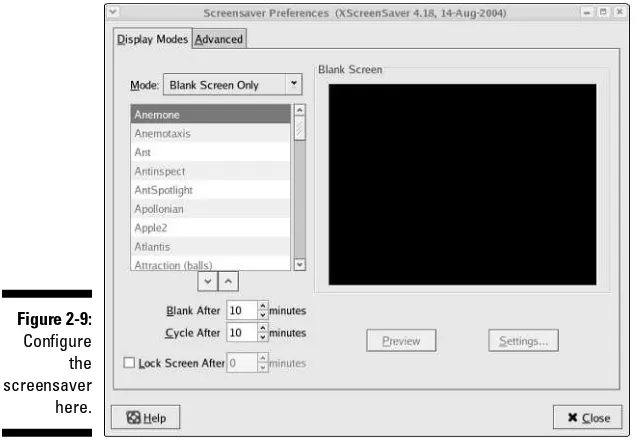
⻬Lock Screen: This menu option starts your system screensaver and locks your desktop. Move your mouse or press a key to open a dialog box that lets you enter your password to unlock the desktop.
Using the Nautilus File Manager
The Nautilus File Manager is a graphical shell for GNOME. You can use Nautilus not only to manage the files and directories on your system but also to perform many GNOME and system configurations. With Nautilus, you can even access your system applications.
To start the Nautilus File Manager, use any of the following methods:
⻬Select File Browser from the Applications menu.
⻬Right-click any folder and choose Browse Folder from the contextual menu.
Using any of the methods shown above will open the Nautilus File Manager, as shown in Figure 2-5.
A brief explanation of the items on the Nautilus File Manager window is in order:
⻬Menu bar:At the top of the window is the menu bar, similar to menu bars from other programs. From the menu bar, you can access to perform various actions.
Figure 2-4: The GNOME Actions menu.
⻬Toolbar: Below the menu bar is the toolbar. The toolbar holds buttons that you can use to perform the action indicated by the button, such as Back, Forward, and Reload.
⻬Location bar: The location bar contains a text field where you can enter a file, folder, or URL to go to. The location bar also has a zoom-in and a zoom-out button (magnifying glass icons) with which you can change the size of items. Finally, the View As Icons drop-down list lets you choose how you want to view the items.
⻬Window panes:Beneath the location bar, the Nautilus window is divided into two panes. The left, smaller pane (Information) shows a drop-down list that lets you choose what is displayed about items appearing in the larger, right pane. If you choose Tree from the list, you can see your entire file system tree in the left pane.
The larger, right pane displays the contents of the files or directories that you’re viewing. Note:All directories appear as folders in Nautilus. You can view the contents of folders as either a list or as icons by choos-ing from the View As Icons drop-down list (in the location bar). You can also access FTP sites by entering the URL into the location text field.
⻬Status bar:At the bottom of the Nautilus window is the status bar, which displays status information about the files or folders that you are viewing.
⻬Resize handle:In the lower-right corner is a handle that you can use to resize the window. Move your mouse over the handle and then click and drag to resize the window. Release the mouse button at the desired size.
When using the Nautilus File Manager, all directories are shown as folders. For the remainder of this section, I refer to directories as folders.
Displaying your home folder
If you start Nautilus by using one of the methods that I explain earlier, Nautilus opens to your home folder. However, if you changed folders while in Nautilus, you might want to return to your home folder. You can do this by
⻬Choosing Go➪Home from the Nautilus menu bar.
⻬Clicking the Home icon on the Nautilus toolbar.
If you want to refresh the display, click Reload on the toolbar.
Displaying the contents of a folder
You can easily move from one folder to another in Nautilus. Again, you have more than one way to navigate through your file system.
⻬Double-click the folder. If the folder that you want to view is visible in the large, right pane of the Nautilus window, you can open it by double-clicking it.
⻬Enter the location.You can enter the name of the folder that you wish to view by typing it into the location bar text field.
⻬Use the tree view.Choose Tree from the drop-down list in the small, left pane of the Nautilus window and select the folder that you wish to view.
⻬Use the Search tool.Click the Actions menu button and choose Search for Files from the menu.
To move forward and backward through your file system, you can use the Forward and Back buttons from the toolbar or you can choose Go➪ Forward/Back from the menu bar. To move up a level, you can use the Up button on the toolbar or you can choose Go➪Up from the menu bar.
Opening files
Whenever you double-click a file, Nautilus is configured by default to perform some type of action on the file depending on the type of file. Nautilus either opens the file by using a preconfigured viewer or runs the file if it is an exe-cutable file.
Nautilus has been configured to open the following types of files in the large, right pane:
⻬Graphic image files:Nautilus automatically displays a small icon of the graphic image in the folder view. Double-clicking the icon of the graphic opens the file in the left window. Click the Back button on the toolbar to return to the folder view. Nautilus can display GIF, JPEG, and PNG images.
⻬Text files: Nautilus opens any text files in the text viewer, which is dis-played in the large, right pane of the Nautilus window. Note:You cannot edit text in the text viewer. Click the Back button on the toolbar to return to the folder view.
Accessing FTP sites
You can use the Nautilus File Manager to access an FTP site. All you need to do is enter the URL of the site in the location bar text field. If you need to log in to the site, you can use the following syntax.
ftp://username:[email protected]
You can drag and drop files to move them from the FTP site to your desired folder.
Using bookmarks
With Nautilus, you can use bookmarks to keep track of your favorite loca-tions. You can bookmark files, folders, and FTP sites as desired.
Adding a bookmark
To add a bookmark, do the following:
1. Click the item that you wish to bookmark.
2. Choose Bookmarks➪Add Bookmark from the menu bar.
Editing bookmarks
To edit a bookmark, do the following:
1. Choose Bookmarks➪Edit Bookmarks to open the Edit Bookmarks dialog box, as shown in Figure 2-6.
3. Change the name and location as desired.
4. Click Close to finish editing the bookmark.
Deleting bookmarks
To delete a bookmark1. Choose Bookmarks➪Edit Bookmarks from the menu bar.
The Edit Bookmarks dialog box opens.
2. Select the bookmark that you want to remove.
3. Click the Remove button.
4. Click the Close button to close the dialog box.
Managing your files and folders
You can take many actions when managing your file system with Nautilus. Table 2-1 briefly explains the action that you want to perform and how you should do it.
Table 2-1
Managing Files and Folders with Nautilus
Action Method
Move an item. Click item and drag it to desired location.
Copy an item. Click item and hold Ctrl while dragging item.
Link to an item. Click item and press Ctrl+Shift while dragging.
Select single item. Click item.
(continued)
Figure 2-6: The Edit Bookmarks dialog box.
Table 2-1 (continued)
Action Method
Select contiguous items. In icon view, click and drag box around items. In list view, press Shift; click the first item, and then click the last.
Select multiple items. Press Ctrl; click desired items.
Select all items. Choose Edit➪Select All File from menu bar.
Create folder. Right-click and choose Create Folder from contextual menu.
Rename item. Right-click and choose Rename from the contextual menu.
Move to trash. Right-click and choose Move to Trash from the contex-tual menu.
Delete item. Right-click and choose Move to Trash.
Change permissions. Right-click, choose Properties, and click the Permissions tab.
Display trash. Right-click the Trash icon and choose Open from the contextual menu.
Restore trashed item. Open Trash folder and drag item to desired location.
Empty trash. Right-click the Trash icon and choose Empty Trash.
Add emblem. Right-click, choose Properties, click the Emblems tab, and choose desired emblem.
Change single icon. Right-click, choose Properties, click Select Custom Icon, and choose desired icon.
Change item size. Choose Zoom In or Zoom Out from toolbar.
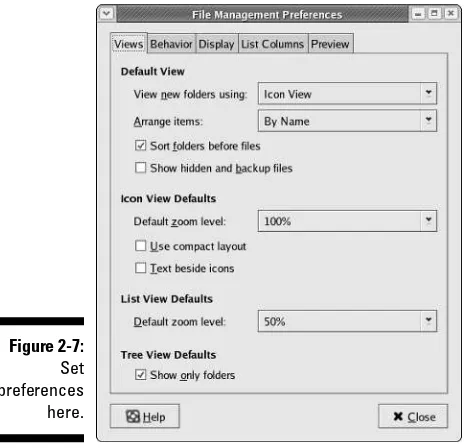
Editing File Manager preferences
To open the Nautilus File Management Preferences dialog box, choose Edit➪Preferences from the menu bar in a Nautilus window. The dialog box shown in Figure 2-7 appears.
On this dialog box are five tabbed pages:
⻬Views: Preferences on this tab give you options for setting the default view parameters for Nautilus, such as icon view, sort order, and showing hidden files.
⻬Behavior:Preferences on this tab are concerned with how Nautilus han-dles executable files and trash. You can also choose between single- and double-clicking here.
⻬Display: This tab lets you decide what information you want displayed with your icons, such as size, date created, date modified, and date format.
⻬List Columns:The settings on this tab let you choose what information is displayed as well as its order, when you choose list view.
⻬Preview:The settings on this tab determine how your files are displayed in their folders. For example, you can decide here whether you want thumbnail views of graphic files.
Figure 2-7: Set preferences here.
You can change many preferences to alter the appearance and performance of Nautilus. I’ve touched upon only a few of them, so experiment with them to see for yourself what they do.
Changing the File Manager background
and icon emblems
Another nice feature of Nautilus is the ability to display colors and patterns in the File Manager window. You can also assign emblems to icons. Emblems
are small graphics that are used to make your icons more meaningful. For example, I like to change the background color for my home directory to light blue. That way, I can tell immediately when I’m in my home directory when I see the blue background. You can easily change the colors and patterns or add emblems by doing the following:
1. Choose Edit➪Backgrounds and Emblems from the Nautilus menu bar to open the Backgrounds and Emblems dialog box, as shown in Figure 2-8.
2. Click the Patterns, the Colors, or the Emblems button on the left side of the dialog box.
3. Click and drag the pattern, color, or emblem from the right side of the dialog box to where you want to place it.
You can drag a color or pattern to the large, right pane of the File Manager window to change the color or pattern. You can drag an emblem to an icon to attach it to the icon.