Oracle® WebLogic Communication Services
Installation Guide
11
g
Release 1 (11.1.1)
E13808-02Oracle WebLogic Communication Services Installation Guide 11g Release 1 (11.1.1) E13808-02
Copyright © 2006, 2011, Oracle and/or its affiliates. All rights reserved.
This software and related documentation are provided under a license agreement containing restrictions on use and disclosure and are protected by intellectual property laws. Except as expressly permitted in your license agreement or allowed by law, you may not use, copy, reproduce, translate, broadcast, modify, license, transmit, distribute, exhibit, perform, publish, or display any part, in any form, or by any means. Reverse engineering, disassembly, or decompilation of this software, unless required by law for interoperability, is prohibited.
The information contained herein is subject to change without notice and is not warranted to be error-free. If you find any errors, please report them to us in writing.
If this is software or related documentation that is delivered to the U.S. Government or anyone licensing it on behalf of the U.S. Government, the following notice is applicable:
U.S. GOVERNMENT RIGHTS Programs, software, databases, and related documentation and technical data delivered to U.S. Government customers are "commercial computer software" or "commercial technical data" pursuant to the applicable Federal Acquisition Regulation and agency-specific supplemental regulations. As such, the use, duplication, disclosure, modification, and adaptation shall be subject to the restrictions and license terms set forth in the applicable Government contract, and, to the extent applicable by the terms of the Government contract, the additional rights set forth in FAR 52.227-19, Commercial Computer Software License (December 2007). Oracle America, Inc., 500 Oracle Parkway, Redwood City, CA 94065.
This software or hardware is developed for general use in a variety of information management applications. It is not developed or intended for use in any inherently dangerous applications, including applications that may create a risk of personal injury. If you use this software or hardware in dangerous applications, then you shall be responsible to take all appropriate fail-safe, backup, redundancy, and other measures to ensure its safe use. Oracle Corporation and its affiliates disclaim any liability for any damages caused by use of this software or hardware in dangerous applications.
Oracle and Java are registered trademarks of Oracle and/or its affiliates. Other names may be trademarks of their respective owners.
Intel and Intel Xeon are trademarks or registered trademarks of Intel Corporation. All SPARC trademarks are used under license and are trademarks or registered trademarks of SPARC International, Inc. AMD, Opteron, the AMD logo, and the AMD Opteron logo are trademarks or registered trademarks of Advanced Micro Devices. UNIX is a registered trademark licensed through X/Open Company, Ltd.
iii
Contents
Preface
... vAudience... v
Documentation Accessibility ... v
Related Documents ... v
Conventions ... v
1
Product and Installation Overview
Product Overview... 1-1 New in this Release... 1-1
Installation Prerequisites... 1-1 System Requirements ... 1-1 Port Requirements... 1-2 Checking if a Port is in Use... 1-2
Order of Installation... 1-2
Installation Topologies... 1-3 All-in-One Administration Server ... 1-3 All-in-One Managed Server... 1-3 Enterprise Deployment Topology ... 1-3
What Components are Installed... 1-3
2
Creating Database Schemas
Install RCU... 2-1
Create Database Schemas using RCU... 2-1
3
Installing Oracle WebLogic Communication Services Base Platform
Installing Oracle WebLogic SIP Server... 3-1
4
Install Oracle WebLogic Communication Services
Installing OWLCS Components... 4-1
Logging... 4-3
5
Configuring Oracle WebLogic Communication Services
Changing Realm from example.com... 5-4 Start the Administration Server ... 5-5 Start the Managed Server... 5-5 Provisioning Test Users... 5-5 Testing the Installation ... 5-6 Logging... 5-6
Configuring an All-in-One Administration Server... 5-6 Using Pre-configured Machine Realm ... 5-8 Changing Realm from example.com... 5-9 Start the Administration Server ... 5-10 Provisioning Test Users... 5-10 Testing the Installation ... 5-10 Logging... 5-11
Configuring OWLCS Enterprise Deployment... 5-11 Introducing Enterprise Deployment Topology ... 5-11 Prerequisites... 5-12 Installing Oracle WebLogic Communication Services ... 5-12 Creating Database Schema using RCU... 5-13 Installing Oracle WebLogic Communication Services Base Platform... 5-14 Installing OWLCS Components... 5-15 Repeating the Installation for Machine 2... 5-20 Configuring Load Balancers... 5-20 Starting Servers ... 5-21 Changing Realm from example.com... 5-22 Configuring Oracle WebLogic Communication Services ... 5-24 Provisioning Test Users ... 5-29 Testing the Installation ... 5-29 Starting JConsole to Modify MBeans on UNIX ... 5-30 Logging... 5-31
Uninstalling OWLCS Components... 5-31
6
Post-Installation
Changing Realm from example.com... 6-1
Provisioning Third-Party Call Control (TPCC) Users to Enable Third Party Call Control... 6-3
7
Troubleshooting
Port Conflicts... 7-1
Loss of Network Connection During Installation... 7-1
Cleanly Uninstalling OWLCS... 7-1
A
Creating a Silent Installation
Base Platform... A-1
v
Preface
This preface contains the following topics:
■ Audience
■ Documentation Accessibility ■ Related Documents
■ Conventions
Audience
This guide is intended for system administrators and developers who want to install and use Oracle WebLogic Communication Services.
Documentation Accessibility
For information about Oracle's commitment to accessibility, visit the Oracle Accessibility Program website at
http://www.oracle.com/us/corporate/accessibility/index.html.
Access to Oracle Support
Oracle customers have access to electronic support through My Oracle Support. For information, visit http://www.oracle.com/support/contact.html or visit
http://www.oracle.com/accessibility/support.html if you are hearing impaired.
Related Documents
For more information, see the following documents:
■ Oracle WebLogic Communication Services Administrator’s Guide ■ Oracle WebLogic Communication Services Developer’s Guide ■ Oracle Communicator User’s Guide
■ Oracle Fusion Middleware 11g Release Notes
Conventions
Convention Meaning
boldface Boldface type indicates graphical user interface elements associated
with an action, or terms defined in text or the glossary.
italic Italic type indicates book titles, emphasis, or placeholder variables for which you supply particular values.
1
Product and Installation Overview 1-1
1
Product and Installation Overview
This chapter describes Oracle WebLogic Communication Services (OWLCS), and recommended topologies in the following sections:
■ Section 1.1, "Product Overview" ■ Section 1.2, "Installation Prerequisites" ■ Section 1.3, "Order of Installation" ■ Section 1.4, "Installation Topologies"
■ Section 1.5, "What Components are Installed"
1.1 Product Overview
For information about the features and capabilities of Oracle WebLogic
Communication Services, see Oracle WebLogic Communication Services Administrator’s Guide.
1.1.1 New in this Release
This release of Oracle WebLogic Communication Services includes enhancements and new features. To read about new and improved features, see Oracle Technology Network.
1.2 Installation Prerequisites
This section describes prerequisites for installing OWLCS and for using specific OWLCS functionality.
1.2.1 System Requirements
To install OWLCS your system must meet the following requirements:
■ Oracle RDBMS Server 11.1.0.7 or Oracle RDBMS Server 10.2.0.4.
■ Recommended for development purposes only: Microsoft Windows 2000 with
Service Pack 3 or above, Microsoft Windows Server 2003 (32-bit) with Service Pack 1 or above, or Microsoft Windows XP Professional with Service Pack 2.
Order of Installation
■ JRockit SDK 1.6
1.2.2 Port Requirements
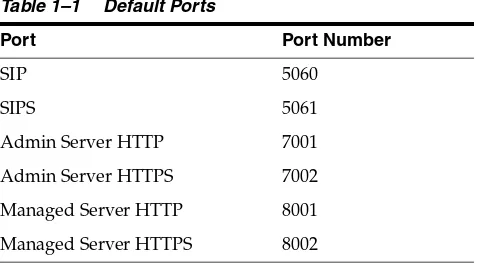
OWLCS requires the use of ports for TCP and UDP communications. See Oracle WebLogic Communication Services Administrator’s Guide for information on how to reconfigure port numbers following installation.
Table 1–1 lists the default ports used by OWLCS.
1.2.2.1 Checking if a Port is in Use
To check if a port is being used in Windows, you can run the netstat command as follows:
C:\> netstat -an | find "portnum"
Note that you need double quotes around the port number.
To check if a port is being used; (in UNIX) you can run the netstat command as follows:
netstat -a | grep portnum
1.3 Order of Installation
Installation and configuration of Oracle WebLogic Communication Services is accomplished by using the following installers and tools: Repository Creation Utility (RCU), OWLCS Base Platform Installer, OWLCS Installer, WebLogic Server (WLS) Configuration Wizard. The following chapters detail the steps you must take to install and configure these components.
Note: For a list of supported platforms, see Oracle WebLogic Communication Services Administrator’s Guide.
Note: When you start Oracle Universal Installer (runInstaller or
setup.exe) you can specify -jreLoc <jdk path> so that Oracle Universal Installer will not prompt you to provide a jdk. For example:
setup.exe -jreLoc c:\jdk1.6.5
Table 1–1 Default Ports
Port Port Number
SIP 5060
SIPS 5061
Admin Server HTTP 7001
Admin Server HTTPS 7002
Managed Server HTTP 8001
What Components are Installed
Product and Installation Overview 1-3
1.4 Installation Topologies
Oracle WebLogic Communication Services can be installed in the following installation modes:
■ All-in-One Managed Server ■ All-in-One Administration Server ■ Enterprise Deployment Topology
1.4.1 All-in-One Administration Server
All OWLCS components are deployed on an Administration Server within a domain on a physical machine. There are no managed servers. Configuration and management of OWLCS components is done using the same Administration Server.
All-in-One Administration Server is not meant to be a production environment, rather a test and evaluation environment. It does not include High Availability functionality.
1.4.2 All-in-One Managed Server
All OWLCS components are deployed on a Managed Server within a domain on a physical machine. An Administration Server installed on the same domain is used to configure and manage OWLCS components.
All-in-One Managed Server could be used in a production environment when high availability is not required. It does not include High Availability functionality.
1.4.3 Enterprise Deployment Topology
This is the minimal recommended HA topology for Enterprise Deployment for OWLCS. OWLCS components are separated as SIP Infrastructure, Services and Presence components. Each group of components is deployed within its own domain on two different machines.
Enterprise Deployment Topology is meant for production enterprise installations.
1.5 What Components are Installed
2
Creating Database Schemas 2-1
2
Creating Database Schemas
This chapter details the steps required to install Repository Creation Utility (RCU) and use it to create database schemas to use with Oracle WebLogic Communication Services. Topics include:
■ Section 2.1, "Install RCU"
■ Section 2.2, "Create Database Schemas using RCU"
2.1 Install RCU
RCU should already be installed on your computer. You use it to create schemas for OWLCS. You can reuse an existing database schema, or you can create a new one. If you are going to reuse an existing database schema, you can go on to the following chapter Chapter 3, "Installing Oracle WebLogic Communication Services Base Platform".
2.2 Create Database Schemas using RCU
Follow these steps to create new schemas:1. Navigate to the directory into which RCU is installed. For example: UNIX: $rcuHome/bin/rcu
Windows: <rcuHome>\BIN
where $rcuHome is the directory in which RCU is installed.
2. Start the application:
Note: RCU is available only on Linux and Windows platforms. Use Linux RCU to install for UNIX supported databases and Windows RCU for supported Windows databases
Create Database Schemas using RCU
UNIX: ./rcu
Windows: rcu.bat
The Repository Creation Utility Welcome screen appears.
3. Click Next. The Create Repository screen appears.
Figure 2–1 Create Repository screen
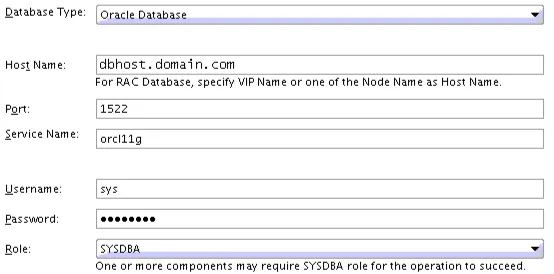
4. Select Create, then click Next. The Database Connection Details screen appears. For simplicity, many users use their sys name here. Enter database details in the fields provided (Database Type, Host Name, Port, Service Name, Username, Password, Role).
Figure 2–2 Database Connection Details screen
5. Click Next.The Installer checks prerequisites.
Create Database Schemas using RCU
Creating Database Schemas 2-3
When the prerequisite checks are complete, click OK. Click Next. The Components screen appears. Select OWLCS (all necessary [5] schemas will be selected,
including UMS).
Figure 2–3 Components screen
6. Click the Create a new prefix option and choose a schema prefix (such as
OWLCS).
7. Check the checkbox in front of WebLogic Communication Services. OWLCS and accompanying components are automatically selected for you (Metadata Services, Presence, SIP Infrastructure Subscriber Data Services SIP Infrastructure Location Service, and User Messaging Service). Ensure that those five components are selected before proceeding. If any of those five components are not selected, select them manually. Then, click OK when completed.
8. Click Next. The Schema Password screen appears.
Figure 2–4 Schema Passwords screen
9. Select Use same passwords for all schemas.
Create Database Schemas using RCU
11. Click Next. The Map Tablespaces screen appears. You click Manage Tablespaces
when you want to modify existing tablespaces.
Figure 2–5 Map Tablespaces screen
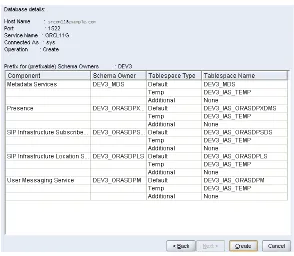
12. For this installation, click Next. A Repository Creation notification will appear. Click OK. Tablespaces are created, and the progress will be displayed in a pop-up notification. When the operation is completed, click OK. The Summary screen appears.
Create Database Schemas using RCU
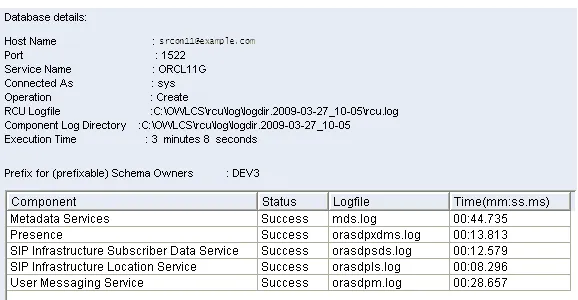
Creating Database Schemas 2-5 13. Click Create. The schema is created. A Completion Summary screen appears.
Figure 2–7 Completion Summary screen
3
Installing Oracle WebLogic Communication Services Base Platform 3-1
3
Installing Oracle WebLogic Communication
Services Base Platform
This chapter describes how to install servers using the Oracle WebLogic Server installer, and contains the following section:
■ Section 3.1, "Installing Oracle WebLogic SIP Server"
These installation instructions are written using UNIX syntax and assume a bash shell. You can adapt them for your shell on UNIX or use the corresponding Microsoft Windows commands and syntax when installing on Microsoft Windows.
3.1 Installing Oracle WebLogic SIP Server
Perform the following steps to install Oracle WebLogic Server and a SIP Servlet Container as an All-in-One Administration Server:
1. Give executable permission on the installer file (if needed).
2. Run one of the following commands, depending on your operating system. For example:
■ On Linux: ./owlcs10310_linux32.bin ■ On Windows: owlcs10310_win32.exe
The installation files are extracted and the Welcome screen appears.
3. On the Welcome screen click Next. The Choose Middleware Home Directory appears.
4. In the Choose Middleware Home Directory screen, select Create a New Middleware Home.
5. Enter the absolute path to the middleware home.
6. Click Next. The Register for Security Updates screen appears.
7. In the Register for Security Updates screen you can optionally enter the following:
■ An e-mail address for receiving updates on security issues (recommended).
Installing Oracle WebLogic SIP Server
■ Select the checkbox and enter your My Oracle Support password to receive
security updates through My Oracle Support. For more information, see
http://www.oracle.com/support/policies.html.
8. Click Next. The Choose Install Types screen appears.
9. On the Choose Install Types screen select Typical. Click Next. The Choose Product Installation Directories screen appears.
10. Though you can change locations, Oracle Corporation recommends that you use the default locations whenever possible. Click Next.
11. If on a Windows operating system, the Choose Shortcut Location screen appears. If you so choose, select the All Users Start Menu folder and click Next. The
Installation Summary screen appears.
12. On the Installation Summary screen, click Next.
13. On the Installation Complete screen click Next.
4
Install Oracle WebLogic Communication Services 4-1
4
Install Oracle WebLogic Communication
Services
This chapter describes the installation of Oracle WebLogic Communication Services. These procedures are performed after Oracle WebLogic Communication Services Base Platform has already been installed as described in the preceding chapters.
There are three types of installation topologies:
■ All-in-One Administration Server ■ All-in-One Managed Server
■ Enterprise Deployment (see Oracle Fusion Middleware Enterprise Deployment Guide
for Oracle WebCenter for more information and installation procedures)
This chapter contains the following topic:
■ Section 4.1, "Installing OWLCS Components" ■ Section 4.2, "Logging"
4.1 Installing OWLCS Components
Perform the following steps to install SIP Infrastructure and Presence components for the Administration Server:
1. Navigate to the OWLCS directory on your installation media or staged installation directory, and run one of the following commands, depending on your operating system:
■ UNIX: ./owlcs/Disk1/runInstaller ■ Windows: owlcs\Disk1\setup.exe
2. Enter <absolute path to middleware home>/jdk160_11 when asked to specify JRE/JDK location. This will start the Oracle Universal Installer for OWLCS.
Installing OWLCS Components
4. In the Prerequisites Checklist screen, verify that a check mark in the Status column appears for each of the prerequisites. If a failure notification appears, you must correct the problem (ensure that the operating system and service packs are correct, and the memory is adequate), then click Continue.
Figure 4–1 Prerequisite Checks screen
5. Click Next. The Specify Installation Location screen (Figure 4–2) appears. Enter (or select from the drop-down menu) the following:
■ Oracle Middleware Home: <absolute path of Oracle Middleware
home>
■ Oracle Home Directory: as11gr1wlcs
Figure 4–2 Specify Installation Location screen
6. Click Next. The Installation Summary screen appears.
7. On the Installation Summary screen, click Install. The Installation Complete screen appears.
8. On the Installation Complete screen, click Finish.
Logging
Install Oracle WebLogic Communication Services 4-3
This will close the installer and display a dialog asking you to launch the Oracle WebLogic configuration wizard. Click Yes.
You can now configure the server using the procedure in Chapter 5, "Configuring Oracle WebLogic Communication Services".
4.2 Logging
The default log level is the base log level: Notification:1. All logs are written to a single file at the following location:
MW_HOME/user_projects/domains/base_
domain/servers/<server>/logs/<servername>-diagnostic.log
For more information on logging, see Oracle WebLogic Communication Services Administrator’s Guide.
Note: If you selected No, you can launch the configuration wizard as follows:
■ On Microsoft Windows: MW_HOME\as11gr1wlcs\common\
bin\config.cmd
5
Configuring Oracle WebLogic Communication Services 5-1
5
Configuring Oracle WebLogic
Communication Services
This chapter describes how to install and configure the Oracle WebLogic
Communication Services in different topologies, using the Oracle WebLogic Server Configuration Wizard.
You only need to configure one of the topologies in this chapter. If you are installing OWLCS All-in-One Managed Server, then you only need to perform the actions in that section. To configure an Enterprise Deployment topology, then follow the instructions in that section.
It contains the following sections:
■ Section 5.1, "Configuring an All-in-One Managed Server" ■ Section 5.2, "Configuring an All-in-One Administration Server" ■ Section 5.3, "Configuring OWLCS Enterprise Deployment" ■ Section 5.4, "Uninstalling OWLCS Components"
5.1 Configuring an All-in-One Managed Server
Configuring an All-in-One Managed Server
Figure 5–1 OWLCS All-in-One Managed Server
Perform the following steps to configure an All-in-One Managed Server:
1. Click the Start the configuration wizard link to start the Oracle WebLogic Server Configuration Wizard. The wizard starts, and the Welcome screen appears.
2. In the Welcome screen select Create a new WebLogic domain.
3. Click Next. The Select Domain Source screen appears.
4. In the Select Domain Source screen perform the following steps:
■ Select Generate a domain configured automatically to support the following
products.
■ Check Oracle WebLogic Communication Services - 11.1.1.0 (as11gr1wlcs1).
Other required components are automatically selected components.
5. Click Next. The Configure Administrator Username and Password screen appears.
6. Make the following selections in the Configure Administrator Username and Password
screen:
■ Choose a User Name (such as: weblogic) ■ Choose a User Password.
■ Confirm User Password.
■ Description (for example: This user is the default administrator)
7. Click Next. The Configure Server Start Mode and JDK screen appears.
Configuring an All-in-One Managed Server
Configuring Oracle WebLogic Communication Services 5-3
Figure 5–2 Configuring Server Start Mode and JDK
9. Click Next. The Configure JDBC Component Schema screen appears.
10. In the Configure JDBC Component Schema screen, check all component schemas, fill common database information (everything except Schema Owner).
11. Check one datasource at a time and enter the Schema Owner. For example:
12. Click Next. The Test Component Schema screen appears.
13. In the Test Component Schema screen, all data source connections are tested. Recheck if there is a failure. If there aren’t any, click Next. The Configuration Summary screen appears.
14. In the Configuration Summary screen click Create.
15. Click Done.
5.1.1 Using Pre-configured Machine Realm
OWLCS is pre-configured with realm example.com. If you want to use this realm, modify the machine's hosts file, pointing example.com to the local IP to enable the server to lookup and resolve example.com. The absolute path to that file is:
Table 5–1 Schema owners
Component Schema schema_owner
User Messaging Service <prefix>_orasdpm
Location Service <prefix>_orasdpls
Subscriber Data Service <prefix>_orasdpsds
Presence <prefix>_orasdpxdms
Configuring an All-in-One Managed Server
UNIX: /etc/hosts
Windows: C:\WINDOWS\system32\drivers\etc\hosts
If, however, you want to use a different realm (this will be the typical situation), then you must change the realm. See Section 5.1.2, "Changing Realm from example.com" for instructions on changing the realm.
5.1.2 Changing Realm from example.com
The out-of-the-box realm (example.com) should be changed to reflect the realm and domain of your deployment. Make these modifications to the realm and domain:
■ SIP Server
1. Login to the Console; for example:
http://weblogic.example.com:7001/console
2. Click the SipServer link on left navigation pane.
3. In the Configuration->General tab, scroll down to Domain Aliases: and enter the realm you want to choose (for example: myrealm.com).
■ Digest Authentication
1. Login to the Console; for example:
http://weblogic.example.com:7001/console
2. Click Security Realms on the left navigation pane.
3. Click myRealm.
4. Click the Providers tab.
5. Click DigestIdentityAsserter.
6. Click Provider Specific tab.
7. Scroll down to DigestRealmName attribute and choose the appropriate realm (for example: myrealm.com).
■ Aggregation Proxy
1. Start JConsole as outlined in Section 5.3.5, "Starting JConsole to Modify MBeans on UNIX".
Use $DOMAIN_HOME is the directory of your domain, (that is, $MW_HOME/user_ projects/domains/base_domain)
<admin server host>: The host name of the machine on which you installed the server
<admin server port>: The port on which the admin server is listening
In our example, <admin server port> is 7001.
2. Click the MBeans tab.
3. Change value of the following mbean attribute for AggregationProxy mbean:
Realm = <yourcompany>
■ P-Asserted Identity URI for Third-Party Call Control
1. Start JConsole, using the following parameters on Machine 1, as outlined in Section 5.3.5, "Starting JConsole to Modify MBeans on UNIX".
Configuring an All-in-One Managed Server
Configuring Oracle WebLogic Communication Services 5-5
<admin server host>: The host name of the machine on which you installed the server
<admin server port>: The port on which the admin server is listening
In our example, <admin server port> is 7001.
2. Click the MBeans tab.
3. Change value of the following mbean attribute for ThirdPartyCall mbean:
PAssertedIdentityURI=sip:tpcc.user@<your realm>
Configure Machine with the new realm:
– UNIX: /etc/hosts
– Windows: C:\WINDOWS\system32\drivers\etc\hosts
5.1.3 Start the Administration Server
To start the Administration Server:
1. Navigate to MW_HOME/user_projects/domains/base_domain/bin
2. Run this command:
UNIX: ./startWebLogic.sh
Windows: startWebLogic.cmd
5.1.4 Start the Managed Server
To start the Managed Server:
1. Open a new terminal
2. Navigate to MW_HOME/user_projects/domains/base_domain/bin
3. Run this command:
UNIX: ./startManagedWebLogic.sh wlcs_server1
Windows: startManagedWebLogic.cmd wlcs_server1
4. Enter the Administrator user name and password.
Verify that the Managed Server is running when you see the console message:
<Server started in RUNNING mode>. Production Mode will require you to enter credentials when starting.
5.1.5 Provisioning Test Users
To confirm that the installation was successful, you should create a few test users to test out OWLCS using Oracle Communicator.
1. Start sash:
■ On UNIX: $DOMAIN_HOME/bin/launch_sash.sh -p 8001 ■ On Windows: $DOMAIN_HOME/bin/launch_sash.cmd -p 8001
Configuring an All-in-One Administration Server
2. Provision the user: Run the following command; replace alice with username and
example.com with your realm. Enter your password.
identity add privateId=alice publicId=sip:[email protected] role="Location Service" realm=yourcompany.com password=yourpassword
5.1.6 Testing the Installation
Perform the following procedures to test the installation:
1. Install Oracle Communicator by running the downloaded EXE file.
2. Provision a test user in OWLCS as described above (for example:
sip:[email protected]).
3. Create an Oracle Communicator account for sip:[email protected].
4. Login to Oracle Communicator, disregard the login pop up if it appears.
5. Click the menu button on the top left (Settings).
6. Choose Preferences.
7. Click the Network tab.
8. Check Use a proxy server, and enter the canonical host name of the load balancer in the Address field.
9. Do the same for XDMS Host. Ensure that the XDMS port is the HTTP listen port of the load balancer http pool.
10. Click OK.
11. Restart Oracle Communicator and log in.
12. Enter the username and the password (as chosen previously). If you can register and change your Presence status, the installation was successful.
You can create an account for another user similarly and add him/her as a buddy to the first user. User1 should be able to send instant messages to User2, and they should be able to see each other's presence.
5.1.7 Logging
All logs are written to a single file (per server) at the following location: MW_ HOME/user_projects/domains/base_domain/servers/wlcs_ server1/logs/wlcs_server1-diagnostic.log
5.2 Configuring an All-in-One Administration Server
Configuring an All-in-One Administration Server
Configuring Oracle WebLogic Communication Services 5-7
Figure 5–3 OWLCS All-in-One Administration Server
Perform the following steps to configure an All-in-One Administration Server:
1. Click the Start the configuration wizard link to start the Oracle WebLogic Server Configuration Wizard. The wizard starts, and the Welcome screen appears.
2. In the Welcome screen select Create a new WebLogic domain.
3. Click Next. The Select Domain Source screen appears.
4. In the Select Domain Source screen select Base this domain on an existing template. Click Browse and find this template file:
oracle.communications.allinoneadmin_template_11.1.1.jar
5. Click Next. The Specify Domain Name and Location screen appears.
6. Click Next. The Configure Administrator Username and Password screen appears.
7. Enter and confirm the following in the Configure Administrator Username and Password screen: admin_username and admin_password.
8. Click Next. The Configure Server Start Mode and JDK screen appears.
Configuring an All-in-One Administration Server
Figure 5–4 Configuring Server Start Mode and JDK
10. Click Next. The Configure JDBC Component Schema screen appears.
11. In the Configure JDBC Component Schema screen, check all component schemas, fill common database information (everything except Schema Owner).
12. Check one datasource at a time and enter the Schema Owner. For example:
13. Click Next. The Test Component Schema screen appears.
14. In the Test Component Schema screen, all data source connections are tested. Recheck if there is a failure. If there aren’t any, click Next. The Configuration Summary screen appears.
15. In the Configuration Summary screen click Create.
16. Click Done.
5.2.1 Using Pre-configured Machine Realm
OWLCS is pre-configured with realm example.com. If you want to use this realm, modify the machine's hosts file, pointing example.com to the local IP to enable the server to lookup and resolve example.com. The absolute path to that file is: Table 5–2 Schema owners
Component Schema schema_owner
User Messaging Service <prefix>_orasdpm
Location Service <prefix>_orasdpls
Subscriber Data Service <prefix>_orasdpsds
Presence <prefix>_orasdpxdms
Configuring an All-in-One Administration Server
Configuring Oracle WebLogic Communication Services 5-9
UNIX: /etc/hosts
Windows: C:\WINDOWS\system32\drivers\etc\hosts
If, however, you want to use a different realm (this will be the typical situation), then you must change the realm. See Section 5.2.2, "Changing Realm from example.com" for instructions on changing the realm.
5.2.2 Changing Realm from example.com
The out-of-the-box realm (example.com) should be changed to reflect the realm and domain of your deployment. Make these modifications to the realm and domain:
■ SIP Server
1. Login to the Console; for example:
http://weblogic.example.com:7001/console
2. Click the SipServer link on left navigation pane.
3. In the Configuration->General tab, scroll down to Domain Aliases: and enter the realm you want to choose (for example: myrealm.com).
■ Digest Authentication
1. Login to the Console; for example:
http://weblogic.example.com:7001/console
2. Click Security Realms on the left navigation pane.
3. Click myRealm.
4. Click the Providers tab.
5. Click DigestIdentityAsserter.
6. Click Provider Specific tab.
7. Scroll down to DigestRealmName attribute and choose the appropriate realm (for example: myrealm.com).
■ Aggregation Proxy
1. Start JConsole as outlined in Starting JConsole to Modify MBeans on UNIX. Use $DOMAIN_HOME is the directory of your domain, (that is, $MW_HOME/user_ projects/domains/base_domain)
<admin server host>: The host name of the machine on which you installed the server
<admin server port>: The port on which the admin server is listening
In our example, <admin server port> is 7001.
2. Click the MBeans tab.
3. Change value of the following mbean attribute for AggregationProxy mbean:
Realm = <yourcompany>
■ P-Asserted Identity URI for Third-Party Call Control
1. Start JConsole, using the following parameters on Machine 1, as outlined in Section 5.3.5, "Starting JConsole to Modify MBeans on UNIX".
Use $DOMAIN_HOME is the directory of your domain, i.e, $MW_HOME/user_ projects/domains/base_domain
Configuring an All-in-One Administration Server
<admin server port>: The port on which the admin server is listening
In our example, <admin server port> is 7001.
2. Click the MBeans tab.
3. Change value of the following mbean attribute for ThirdPartyCall mbean:
PAssertedIdentityURI=sip:tpcc.user@<your realm>
Configure Machine with the new realm:
– UNIX: /etc/hosts
– Windows: C:\WINDOWS\system32\drivers\etc\hosts
5.2.3 Start the Administration Server
To start the Administration Server:
1. Navigate to MW_HOME/user_projects/domains/base_domain/bin
2. Run this command:
UNIX: ./startWebLogic.sh
Windows: startWebLogic.cmd
Verify that the Administration Server is running when you see the console message:
<Server started in RUNNING mode>. Production Mode will require you to enter credentials when starting.
5.2.4 Provisioning Test Users
To confirm that the installation was successful, you should create a few test users to test out OWLCS using Oracle Communicator.
1. Start sash:
■ On UNIX: $DOMAIN_HOME/bin/launch_sash.sh ■ On Windows: $DOMAIN_HOME/bin/launch_sash.cmd
2. Provision the user: Run the following command, replace alice with username and
example.com with your realm (for example: yourcompany.com). Enter your password.
identity add privateId=alice publicId=sip:[email protected] role="Location Service" realm=yourcompany.com password=yourpassword
5.2.5 Testing the Installation
Perform the following procedures to test the installation:
1. Install Oracle Communicator by running the downloaded EXE file.
2. Provision a test user in OWLCS as described above (for example:
sip:[email protected]).
Configuring OWLCS Enterprise Deployment
Configuring Oracle WebLogic Communication Services 5-11 4. Login to Oracle Communicator, disregard the login pop up if it appears.
5. Click the menu button on the top left (Settings).
6. Choose Preferences.
7. Click the Network tab.
8. Check Use a proxy server, and enter the canonical host name of the load balancer in the Address field.
9. Do the same for XDMS Host. Ensure that the XDMS port is the HTTP listen port of the load balancer http pool.
10. Click OK.
11. Restart Oracle Communicator and log in.
12. Enter the username and the password (as chosen previously). If you can register and change your Presence status, then the installation was successful.
You can create an account for another user similarly and add him or her as a buddy to the first user. User1 should be able to send instant messages to User2, and they should be able to see each other's presence.
5.2.6 Logging
All logs are written to a single file (per server) at the following location: MW_ HOME/user_projects/domains/base_
domain/servers/AdminServer/logs/AdminServer-diagnostic.log
5.3 Configuring OWLCS Enterprise Deployment
This section describes how to complete the installation and configuration for the high-availability installation of OWLCS. The Enterprise Deployment topology is the OWLCS high-availability deployment solution.
5.3.1 Introducing Enterprise Deployment Topology
Configuring OWLCS Enterprise Deployment
Figure 5–5 Enterprise Deployment topology
5.3.2 Prerequisites
Ensure that your environment meets the following prerequisites:
■ Oracle RDBMS should be installed and operational in an Oracle RAC
environment. The supported versions are 11.1.0.7 and 10.2.0.4. Refer to the Oracle
Clusterware Installation Guide 11g Release 1 (11.1.), Oracle Real Application Clusters: For 11g Release 1 (11.1) and Oracle Real Application Clusters Installation Guide 11g Release 1.
■ Two machines are available for installing OWLCS. ■ A Load Balancer capable of routing SIP and HTTP traffic.
5.3.3 Installing Oracle WebLogic Communication Services
Installing Oracle WebLogic Communication Services consists of a number of installation tasks, described in the following sections:
■ Section 5.3.3.1, "Creating Database Schema using RCU"
■ Section 5.3.3.2, "Installing Oracle WebLogic Communication Services Base
Platform"
■ Section 5.3.3.3, "Installing OWLCS Components"
■ Section 5.3.3.4, "Repeating the Installation for Machine 2" ■ Section 5.3.3.5, "Configuring Load Balancers"
■ Section 5.3.3.6, "Starting Servers"
■ Section 5.3.3.7, "Changing Realm from example.com"
Configuring OWLCS Enterprise Deployment
Configuring Oracle WebLogic Communication Services 5-13
5.3.3.1 Creating Database Schema using RCU
This section describes how to create database schema using Repository Creation Utility (RCU).
Perform the following steps to create the database schema using RCU:
1. Run RCU by executing one of the following commands:
■ On UNIX: <rcuHome>/bin/rcu
■ On Windows: <rcuHome>\BIN\rcu.bat
This launches the installation wizard for RCU.
2. On the Welcome screen click Next.
3. In Step 1 of 7 (Create Repository), select Create and then Next.
4. On Step 2 of 7 (Database Connection Details), enter the database details and click
Next.
5. On Step 3 of 7 (Components), perform the following steps:
■ Select Create a new prefix, and choose a schema prefix (such as OWLCS).
■ Check the checkbox in front of WebLogic Communication Services. OWLCS and
accompanying components are automatically selected for you (Metadata Services, Presence, SIP Infrastructure Subscriber Data Services SIP Infrastructure Location Service, and User Messaging Service). Ensure that those five components are selected before proceeding. If any of those five components are not
selected, select them manually. Then, click OK when completed. Note: The procedure in this section can be skipped if the database schema has already been created. You can reuse a schema that you have already created. Remember to use the same schema prefix when entering database information while configuring the data sources as described in the procedure.
If skipping this procedure, ensure that you have created all component schema required by OWLCS, specifically, the Presence,
User Messaging, Subscriber Data Service, Location Service, and OWSM MDS schema.
Note: Provide the details for any one of the RAC hosts and use the service name of the DataBase.
Note: In general, users will be using database servers that are configured to use UTF-8 encoding. If you are not using a database server configured to use UTF-8 encoding, then a warning message appears informing you that your database is not using UTF-8 format by default. Click Ignore and continue with the installation.
Configuring OWLCS Enterprise Deployment
6. On Step 4 of 7 (Schema Passwords), perform the following steps:
■ Select Use same passwords for all schemas.
■ Enter your password in the field provided and confirm it. ■ Click Next.
7. On Step 5 of 7 (Map Tablespaces), perform the following steps:
■ For this installation, click Next. A Repository Creation notification will appear. ■ Click OK. Tablespaces will be created, and the progress will be displayed in a
pop-up notification.
8. On Step 6 of 7 (Summary), click Create. The schema is created. A Completion Summary screen appears.
9. On Step 7 of 7 (Completion Summary), click Close.
5.3.3.2 Installing Oracle WebLogic Communication Services Base Platform
Oracle WebLogic Communication Services Base Platform consists of Oracle WebLogic Server and a SIP server. Perform the following steps to install Oracle WebLogic Communication Services Base Platform:
1. Run one of the following commands, for example:
■ On Linux: owlcs10310_linux32.bin
■ On Microsoft Windows: owlcs10310_win32.exe
This launches the installation wizard and the Welcome screen appears.
2. On the Welcome screen click Next.
3. On the Choose Middleware Home Directory screen do the following:
■ Select Create a New Middleware Home. ■ Enter the absolute path of Middleware Home.
■ Click Next.
4. On the Register for Security Updates screen, do the following:
■ Enter your e-mail address and My Oracle Support Password (recommended)
to receive updates on security issues. Click Next.
■ Select the checkbox and enter your My Oracle Support password to receive
security updates through My Oracle Support. For more information, see
http://www.oracle.com/support/policies.html.
5. On the Choose Install Types screen, do the following:
■ Select Typical installation. ■ Click Next.
Configuring OWLCS Enterprise Deployment
Configuring Oracle WebLogic Communication Services 5-15
■ Though you can change locations, Oracle Corporation recommends that you
use the default locations whenever possible.
■ Click Next.
7. On the Choose Shortcut Location screen (Microsoft Windows only), do the following:
■ Select the All Users Start Menu folder. ■ Click Next.
8. On the Installation Summary screen, click Next.
9. On the Installation Complete screen, click Next.
5.3.3.3 Installing OWLCS Components
Perform the following procedures to install Oracle WebLogic Communication Services, which includes SIP Infrastructure, Services and Presence components, for each of the domains.
1. Navigate to the OWLCS directory on your installation media or staged installation directory, and run one of the following commands, depending on your operating system:
■ UNIX: owlcs/Disk1/runInstaller ■ Windows: owlcs\Disk1\setup.exe
2. Enter <absolute path to middleware home>/jdk160_11 when asked to specify the JRE/JDK location.
3. On the Welcome screen click Next. The Prerequisites Checklist appears.
4. In the Prerequisites Checklist screen, verify that a check mark in the Status column appears for each of the prerequisites. If a failure notification appears, you must correct the problem (ensure that the operating system and service packs are correct, and the memory is adequate), then click Continue.
5. Click Next. The Specify Installation Location screen appears. Enter (or select from the drop-down menu) the following:
■ Oracle Middleware Home: <absolute path of Oracle Middleware
home>
■ Oracle Home Directory: as11gr1wlcs
6. Click Next. The Installation Summary screen appears.
7. On the Installation Summary screen, click Install. The Installation Complete screen appears.
Note: The Java VM that you use here to run the installation process is not related to the Java VM that will be used by OWLCS at runtime. Selecting Sun JDK here does not preclude you from using JRockit at runtime.
Configuring OWLCS Enterprise Deployment
8. On the Installation Complete screen, click Finish.
This will close the installer and display a dialog asking you to launch the Oracle WebLogic configuration wizard. Click Yes.
5.3.3.3.1 Installing the OWLCS SIP Infrastructure Domain Perform the following steps in the WebLogic configuration wizard you launched to install the OWLCS SIP Infrastructure domain:
1. In the Welcome screen select Create a new WebLogic domain and click Next.
2. On the Select Domain Source screen:
■ Select Base this domain on an existing template. ■ Navigate to:
$MW_HOME/as11gr1wlcs1/common/templates/application and select oracle.communications.edgsipinfra_template_ 11.1.1.jar.
Click Open. Click Next.
3. On the Specify Domain Name and Location screen, click Next.
4. On the Configure Administrator Username and Password screen, select a username and
password.
5. On the Configure Server Start Mode and JDK screen, do the following:
■ Select the Start Mode and JVM of your choice (Production Mode and JRockit
are recommended for Production deployments). Click Next.
6. Check Configure selected component schemas as RAC.
7. Click Next.
8. On the Configure RAC Multi Data Source Component Schema screen, do the following:
■ Select all Multi Data Source Schema. Enter Service Name and Password. ■ Add database hosts by clicking the Add button and fill-in the Host Name,
Instance Name and Port fields.
■ Unselect all Multi Data Source Schema. Check one Schema at a time and type in
the Username. For example:
Note: If you selected No, you can launch the configuration wizard as follows:
■ On Microsoft Windows: MW_
HOME\as11gr1wlcs\common\bin\config.cmd
■ On UNIX: $MW_HOME/as11gr1wlcs/common/bin/config.sh
Multi Data Source Schema schema_owner
Location Service <prefix>_orasdpls
Subscriber Data Service <prefix>_orasdpsds
Configuring OWLCS Enterprise Deployment
Configuring Oracle WebLogic Communication Services 5-17 9. On the Test Component Schema screen, all data source connection are tested.
Recheck if there is a failure. If not, click Next.
10. On the Select Advanced Configuration screen, select Managed Servers, Clusters and Machines and click Next.
11. On the Configure Managed Servers screen, click Next.
12. On the Configure SIP data-tier Managed Server Partitions screen, click Next.
13. On the Assign SIP data-tier Managed Server to Partitions screen, click Next.
14. On the Configure Clusters screen, click Next.
15. On the Configure Machines screen, do the following:
■ Click Add twice to add two machines: new_Machine_1 and new_Machine_2. ■ Set the Node manager listen address of both the machines to All Local
Addresses.
■ Click Next.
16. On the Assign Servers to Machines screen, do the following:
■ Assign AdminServer, wlsc_sipinfra1, and wlcs_sipinfrastate1 to
new_Machine_1.
■ Assign wlcs_sipinfra2 and wlcs_sipinfrastate2 to new_Machine_2. ■ Click Next.
17. On the Configuration Summary screen, click Create.
18. Click Done.
The configuration wizard closes.
5.3.3.3.2 Installing the OWLCS Services Domain Perform the following steps to install the OWLCS Services domain.
1. Run the configuration wizard, as follows:
■ Microsoft Windows: $MW_
HOME\as11gr1wlcs1\common\bin\config.cmd
■ UNIX: $MW_HOME/as11gr1wlcs1/common/bin/config.sh
2. On the Welcome screen, select Create a new WebLogic domain, and click Next.
3. On the Select Domain Source screen:
■ Select Base this domain on an existing template. ■ Navigate to:
$MW_HOME/as11gr1wlcs1/common/templates/application
■ Select:
oracle.communications.edgservices_template_11.1.1.jar
■ Click Open. Click Next.
Configuring OWLCS Enterprise Deployment
5. On the Configure Administrator Username and Password screen, select a username and
password.
6. In the Configure Server Start Mode and JDK screen, select the Start Mode and JVM of your choice (Production Mode and JRockit are recommended for Production deployments).
7. In the Configure JDBC Component Schema screen, check Configure selected component schemas as RAC.
8. Click Next.
9. On the Configure RAC Multi Data Source Component Schema screen, do the following:
■ Select all Multi Data Source Schema. Enter Service Name and Password. ■ Add database hosts by clicking on the Add button and fill-in the Host Name,
Instance Name and Port fields.
■ Unselect all Multi Data Source Schema. Check one Schema at a time and type
in the Username. For example:
10. On the Test Component Schema screen, all data source connection are tested. Recheck if there is a failure. If not, click Next.
11. On the Select Advanced Configuration screen, select Managed Servers, Clusters and Machines and click Next.
12. On the Configure Managed Servers screen, click Next.
13. On the Configure SIP data-tier Managed Server Partitions screen, click Next.
14. On the Configure Clusters screen, click Next.
15. On the Configure Machines screen, do the following:
■ Click Add twice to add two machines: new_Machine_1 and new_Machine_2. ■ Set the Node manager listen address of both the machines to All Local Addresses. ■ Click Next.
16. On the Assign Servers to Machines screen, do the following:
■ Assign AdminServer and wlcs_services1 to new_Machine_1. ■ Assign wlcs_services2 to new_Machine_2.
■ Click Next.
17. On the Configuration Summary screen, click Create.
18. Click Done.
Multi Data Source Schema schema_owner
Location Service <prefix>_orasdpls
Subscriber Data Service <prefix>_orasdpsds
OWSM MDS Schema <prefix>_mds
Configuring OWLCS Enterprise Deployment
Configuring Oracle WebLogic Communication Services 5-19
The configuration wizard closes.
5.3.3.3.3 Installing the OWLCS Presence Domain Perform the following steps to install the OWLCS Presence domain:
1. Run the configuration wizard, as follows:
■ Microsoft Windows: $MW_
HOME\as11gr1wlcs1\common\bin\config.cmd
■ UNIX: $MW_HOME/as11gr1wlcs1/common/bin/config.sh
2. On the Welcome screen, select Create a new WebLogic domain. Click Next.
3. On the Select Domain Source screen, do the following:
■ Select Base this domain on an existing template. ■ Browse to the following template:
$MW_HOME/as11gr1wlcs1/common/templates/application and select oracle.communications.edgpresence_template_ 11.1.1.jar
Click Open. Click Next.
4. On the Specify Domain Name and Location screen click Next.
5. On the Configure Administrator Username and Password screen, select a username and
password.
6. On the Configure Server Start Mode and JDK screen, select the Start Mode and JVM of your choice (Production Mode and JRockit are recommended for Production deployments). Click Next.
7. In the Configuring JDBC Data Sources screen, check Configure selected component schemas as RAC.
8. Click Next.
9. On the Configure RAC Multi Data Source Component Schema screen, do the following:
■ Select all Multi Data Source Schema. Enter Service Name and Password. ■ Add database hosts by clicking the Add button and fill-in the Host Name,
Instance Name and Port fields.
■ Unselect all Multi Data Source Schema. Check one Schema at a time and type
in the Username. For example:
Multi Data Source Schema schema_owner
Location Service <prefix>_orasdpls
Subscriber Data Service <prefix>_orasdpsds
Presence <prefix>_orasdpxdms
OWSM MDS Schema <prefix>_mds
Configuring OWLCS Enterprise Deployment
10. On the Test Component Schema screen, all data source connection are tested. Recheck if there is a failure. If not, click Next.
11. On the Select Advanced Configuration screen, select Managed Servers, Clusters and Machines and click Next.
12. On the Configure Managed Servers screen, click Next.
13. On the Configure SIP data-tier Managed Server Partitions screen, click Next.
14. On the Configure Clusters screen, click Next.
15. On the Configure Machines screen, do the following:
■ Click Add twice to add two machines: new_Machine_1 and new_Machine_2. ■ Set the Node manager listen address of both the machines to All Local Addresses. ■ Click Next.
16. On the Assign Servers to Machines screen, do the following:
■ Assign AdminServer and wlcs_presence1 to new_Machine_1. ■ Assign wlcs_presence2 to new_Machine_2.
■ Click Next.
17. On the Configuration Summary screen, click Create.
18. Click Done.
5.3.3.4 Repeating the Installation for Machine 2
Repeat the following procedures for Machine 2:
■ Section 5.3.3.2, "Installing Oracle WebLogic Communication Services Base
Platform"
■ Section 5.3.3.3, "Installing OWLCS Components"
5.3.3.5 Configuring Load Balancers
Route network traffic through a Load Balancer. Load Balancers must be capable of routing both HTTP and SIP traffic, and must be configured to do so. This section details the properties of the Virtual Hosts and Ports for proper configuration.
5.3.3.5.1 HTTP Pools Configure two HTTP Pools. They are configured at the Load Balancer and route to ports 8001 and 8011 on the two Communication Server machines. The former is the location of the SIPInfra Containers. The latter is the location of the Services container used by external client applications such as Oracle WebCenter.
5.3.3.5.2 Main SIP Pools The Main SIP pool is used by SIP clients on the external network, including Oracle Communicator. This SIP pool must support both TCP and UDP.
Note: Ensure that you use exactly the same MW_HOME path as you used for Machine 1.
For example, if your MW_HOME on Machine 1 is
Configuring OWLCS Enterprise Deployment
Configuring Oracle WebLogic Communication Services 5-21
5.3.3.5.3 Presence SIP Pools Presence SIP Pools are the SIP pools used for accessing the Presence Server. These must support both UDP and TCP and need only be available internally.
5.3.3.5.4 Configuring Virtual Servers on the Load Balancer Configure the Load Balancer with Virtual Servers to support the pools listed above. Recommended settings are shown in Table 5–3.
In Table 5–3, the following column headings are used:
■ Name--Each Virtual Server should be configured with a Virtual Hostname bound to
a Load Balancer. The names in Table 5–3 are for illustration purposes only.
■ Listen Port--Recommended Listening Port (listening only; not ports to which they
send traffic) on the Load Balancer for the Virtual Hostname.
■ Members--Machine names and ports to which the specific Virtual Server directs
traffic. The recommended load-balancing method is round-robin.
■ Transport--The transport mechanism (either TCP or UDP) used for
communication.
■ Monitor--Health Monitors can be set to those described in the table for detecting
unavailable nodes.
■ Ext/Int--External or Internal. If External, then this Virtual Host and Port must be
accessible from external clients.
5.3.3.5.5 Persistence Configure Persistence for the LBR_SVC Virtual Server only. This ensures that existing clients are directed to the same Host. An Active Cookie-based mechanism is recommended.
5.3.3.6 Starting Servers
Servers should be started in the following order:
1. On Machine 1, start Admin Servers for the wlcs_sipinfra and wlcs_services domains, as follows:
■ wlcs_sipinfra
domains/wlcs_sipinfra/startWeblogic.sh
Table 5–3 Virtual Servers for Load Balancers
Name Listen Port Members Transport Monitor Ext/Int
LBR_SI 80 Machine 1: 8001 Machine 2: 8001
HTTP HTTP External
LBR_SVC 8011 Machine 1: 8011 Machine 2: 8011
HTTP HTTP External
LBR_MSIP_T 5060 Machine 1: 5060 Machine 2: 5060
TCP SIP External
LBR_MSIP_U 5060 Machine 1: 5060 Machine 2: 5060
UDP SIP External
LBR_PSIP_T 5070 Machine 1: 5070 Machine 2: 5070
TCP SIP Internal
LBR_PSIP_U 5070 Machine 1: 5070 Machine 2: 5070
Configuring OWLCS Enterprise Deployment
■ wlcs_services
domains/wlcs_services/startWeblogic.sh
2. On Machine 2, start Admin Server for the wlcs_presence domain, as follows:
■ domains/wlcs_presence/startWeblogic.sh
3. On Machine 1, start wlcs_sipinfrastate1
domains/wlcs_sipinfra/bin/startManagedWeblogic.sh wlcs_ sipinfrastate1
4. On Machine 2, start wlcs_sipinfrastate2
domains/wlcs_sipinfra/bin/startManagedWeblogic.sh wlcs_ sipinfrastate2 <machine 1 host name:7001>
5. On Machine 1, start all engines, as follows:
■ wlcs_sipinfra1 presence1 <machine 2 host name:7003>
6. On Machine 2, start all engines, as follows:
■ wlcs_sipinfra2
domains/wlcs_sipinfra/startManagedWeblogic.sh wlcs_ sipinfra2 <machine 1 host name:7001>
■ wlcs_services2
domains/wlcs_services/startManagedWeblogic.sh wlcs_ services2 <machine 1 host name:7002>
■ wlcs_presence2
domains/wlcs_presence/startManagedWeblogic.sh wlcs_ presence2
The process is complete when console output reads: <Server started in RUNNING mode>.
5.3.3.7 Changing Realm from example.com
After installation, the realm must be configured to be example.com. This value must be changed to reflect the real domain name used in the installation. This section describes all the places where this needs to be changed and how to change it.
Note: In Production Mode with JRockit (Customer Environment), you must enter credentials when starting both the Admin and the Managed Servers.
Configuring OWLCS Enterprise Deployment
Configuring Oracle WebLogic Communication Services 5-23
■ SIP Server
1. Login to the Administration Console for managing the wlcs_sipinfra domain. Administration Console for wlcs_sipinfra domain is located at:
http://<machine host 1>:7001/console
2. Click the SipServer link on left navigation pane.
3. In the Configuration->General tab, scroll down to Domain Aliases: and enter the realm you want to choose (for example: myrealm.com).
■ Digest Authentication
1. Login to the Administration Console of the wlcs_sipinfra domain. It can be accessed from: http://<machine 1 host>:7001/console
2. Click Security Realms on the left navigation pane.
3. Click myRealm.
4. Click the Providers tab.
5. Click DigestIdentityAsserter.
6. Click the Provider Specific tab.
7. Scroll down to DigestRealmName attribute and choose the appropriate realm (for example: myrealm.com).
■ Realm for Aggregation Proxy
1. Start JConsole, using the following parameters on Machine 1, as outlined in Section 5.3.5, "Starting JConsole to Modify MBeans on UNIX".
$DOMAIN_HOME: Absolute path to wlcs_sipinfra domain directory.
For example:
$MW_HOME/user_projects/domains/wlcs_sipinfra/ <admin server host>: Machine 1 Host Name
<admin server port>: Admin Server listen port for wlcs_sipinfra domain
In our example, <admin server port> is 7001.
2. Click the MBeans tab.
3. Expand the oracle.sdp.presence node.
4. In the subtree under oracle.sdp.presence, expand AggregationProxy node.
5. In the subtree under AggregationProxy, expand AggregationProxy.
6. In the subtree under AggregationProxy, expand both wlcs_sipinfra1 and wlcs_ sipinfra2.
7. In the subtree under wlcs_sipinfra1, expand AggregationProxy node.
8. Do the same for the one under wlcs_sipinfra2.
Note: Repeat steps 1-7 above for wlcs_services and wlcs_presence
Configuring OWLCS Enterprise Deployment
9. In the subtree under AggregationProxy, under wlcs_sipinfra1 node, expand
Attributes node. Do the same for the one under wlcs_sipinfra2.
10. In the subtree under Attributes, change the following attributes:
Realm = <yourcompany>
11. Do the same for the one under wlcs_sipinfra2.
■ P-Asserted Identity URI for Third-Party Call Control
1. Start JConsole, using the following parameters on Machine 1, as outlined in Starting JConsole to Modify MBeans on UNIX.
$DOMAIN_HOME: Absolute path to wlcs_sipinfra domain directory.
For example:
$MW_HOME/user_projects/domains/wlcs_sipinfra/ <admin server host>: Machine 1 Host Name
<admin server port>: Admin Server listen port for wlcs_sipinfra domain
In our example, <admin server port> is 700.
2. Click the MBeans tab.
3. Expand the oracle.sdp.thirdpartycall node.
4. In the subtree under oracle.sdp.thirdpartycall, expand ThirdPartyCall node.
5. In the subtree under ThirdPartyCall, expand both wlcs_sipinfra1 and wlcs_ sipinfra2.
6. In the subtree under wlcs_sipinfra1, expand ThirdPartyCall node.
7. Do the same for the one under wlcs_sipinfra2.
8. In the subtree under ThirdPartyCall, under wlcs_sipinfra1 node, expand the
Attributes node. Do the same for the one under wlcs_sipinfra2.
9. In the subtree under Attributes, change the following attributes:
PAssertedIdentityURI=sip:tpcc.user@<yourcompany>
10. Do the same for the one under wlcs_sipinfra2.
5.3.3.8 Configuring Oracle WebLogic Communication Services
The following procedures describe configuration of Oracle WebLogic Communication Services.
5.3.3.8.1 Configuring Default Application Router (DAR) Perform the following procedures to configure the Default Application Router (DAR):
■ "Configuring DAR for wlcs_sipinfra" ■ "Configuring DAR for wlcs_services" ■ "Configuring DAR for wlcs_presence"
Configuring DAR for wlcs_sipinfra
Perform the following steps to configure DAR for wlcs_sipinfra: