11
g
Release 1 (10.3.5)
E14140-05April 2011
Oracle Fusion Middleware Creating Domains Using the Configuration Wizard, 11g Release 1 (10.3.5) E14140-05
Copyright © 2007, 2011, Oracle and/or its affiliates. All rights reserved.
This software and related documentation are provided under a license agreement containing restrictions on use and disclosure and are protected by intellectual property laws. Except as expressly permitted in your license agreement or allowed by law, you may not use, copy, reproduce, translate, broadcast, modify, license, transmit, distribute, exhibit, perform, publish, or display any part, in any form, or by any means. Reverse engineering, disassembly, or decompilation of this software, unless required by law for interoperability, is prohibited.
The information contained herein is subject to change without notice and is not warranted to be error-free. If you find any errors, please report them to us in writing.
If this software or related documentation is delivered to the U.S. Government or anyone licensing it on behalf of the U.S. Government, the following notice is applicable:
U.S. GOVERNMENT RIGHTS Programs, software, databases, and related documentation and technical data delivered to U.S. Government customers are "commercial computer software" or "commercial technical data" pursuant to the applicable Federal Acquisition Regulation and agency-specific supplemental regulations. As such, the use, duplication, disclosure, modification, and adaptation shall be subject to the restrictions and license terms set forth in the applicable Government contract, and, to the extent applicable by the terms of the Government contract, the additional rights set forth in FAR 52.227-19, Commercial Computer Software License (December 2007). Oracle USA, Inc., 500 Oracle Parkway, Redwood City, CA 94065.
This software is developed for general use in a variety of information management applications. It is not developed or intended for use in any inherently dangerous applications, including applications which may create a risk of personal injury. If you use this software in dangerous applications, then you shall be responsible to take all appropriate fail-safe, backup, redundancy, and other measures to ensure the safe use of this software. Oracle Corporation and its affiliates disclaim any liability for any damages caused by use of this software in dangerous applications.
Oracle is a registered trademark of Oracle Corporation and/or its affiliates. Other names may be trademarks of their respective owners.
Preface
... vDocumentation Accessibility ... v Conventions ... v
1
Introduction
1.1 Introduction to WebLogic Domains... 1-1 1.2 Overview of the Configuration Wizard ... 1-3 1.2.1 Modes of Operation... 1-4 1.2.2 Output of the Configuration Wizard ... 1-4 1.3 About Domain and Extension Templates ... 1-5 1.4 Additional Tools for Creating, Extending, and Managing WebLogic Domains ... 1-6
2
Creating a WebLogic Domain
2.1 Before You Begin... 2-1 2.2 Domain Creation Process... 2-1 2.3 Starting the Configuration Wizard in Graphical Mode ... 2-2 2.4 Creating a WebLogic Domain in Graphical Mode... 2-3 2.4.1 Configuring Schemas ... 2-6 2.4.2 Configuring Data Sources ... 2-7 2.5 Starting the Administration Server ... 2-8
3
Extending WebLogic Domains
3.1 Before You Begin... 3-1 3.2 Domain Extension Process ... 3-1 3.3 Extending a WebLogic Domain in Graphical Mode... 3-2 3.4 Updating Startup Scripts on Remote Servers ... 3-5
4
Configuration Wizard Screens
4.1 Welcome ... 4-2 4.2 Select a WebLogic Domain Directory ... 4-3 4.3 Select Domain Source ... 4-3 4.4 Select Extension Source ... 4-5
4.7 Configure Server Start Mode and JDK ... 4-8 4.8 Configure JDBC Component Schema ... 4-10 4.9 Configure RAC Multi Data Source Schema ... 4-11 4.10 Test Component Schema ... 4-13 4.11 Configure JDBC Data Source ... 4-14 4.12 Configure Oracle RAC Multi Data Sources ... 4-15 4.13 Test JDBC Data Sources ... 4-16 4.14 Run Database Scripts... 4-17 4.15 Configure Keystore Credentials ... 4-18 4.16 Select Optional Configuration... 4-18 4.17 Configure Administration Server... 4-20 4.17.1 Specifying the Listen Address ... 4-21 4.17.2 Specifying the Listen Port... 4-21 4.18 Select JMS Distributed Destination Type ... 4-22 4.19 Configure Managed Servers... 4-23 4.20 Configure Clusters... 4-24 4.21 Assign Servers to Clusters ... 4-25 4.22 Create HTTP Proxy Applications ... 4-26 4.23 Configure Machines... 4-27 4.24 Assign Servers to Machines... 4-29 4.25 Target Deployments to Clusters or Servers ... 4-30 4.26 Target Services to Clusters or Servers... 4-31 4.27 Configure JMS File Stores ... 4-33 4.28 Configure RDBMS Security Store Database... 4-34 4.29 Configuration Summary ... 4-35 4.30 Creating Domain... 4-36 4.31 Extending Domain ... 4-37
A
Using Console Mode
This preface describes the document accessibility features and conventions used in this guide–Oracle Fusion Middleware Creating Domains Using the Configuration Wizard.
Documentation Accessibility
Our goal is to make Oracle products, services, and supporting documentation accessible to all users, including users that are disabled. To that end, our
documentation includes features that make information available to users of assistive technology. This documentation is available in HTML format, and contains markup to facilitate access by the disabled community. Accessibility standards will continue to evolve over time, and Oracle is actively engaged with other market-leading
technology vendors to address technical obstacles so that our documentation can be accessible to all of our customers. For more information, visit the Oracle Accessibility Program Web site at http://www.oracle.com/accessibility/.
Accessibility of Code Examples in Documentation
Screen readers may not always correctly read the code examples in this document. The conventions for writing code require that closing braces should appear on an
otherwise empty line; however, some screen readers may not always read a line of text that consists solely of a bracket or brace.
Accessibility of Links to External Web Sites in Documentation
This documentation may contain links to Web sites of other companies or
organizations that Oracle does not own or control. Oracle neither evaluates nor makes any representations regarding the accessibility of these Web sites.
Access to Oracle Support
Oracle customers have access to electronic support through My Oracle Support. For information, visit http://www.oracle.com/support/contact.html or visit http://www.oracle.com/accessibility/support.html if you are hearing impaired.
Conventions
The following text conventions are used in this document:
italic Italic type indicates book titles, emphasis, or placeholder variables for which you supply particular values.
monospace Monospace type indicates commands within a paragraph, URLs, code in examples, text that appears on the screen, or text that you enter.
1
1
Introduction
This guide describes how to use the Configuration Wizard to create, extend, and configure WebLogic domains.
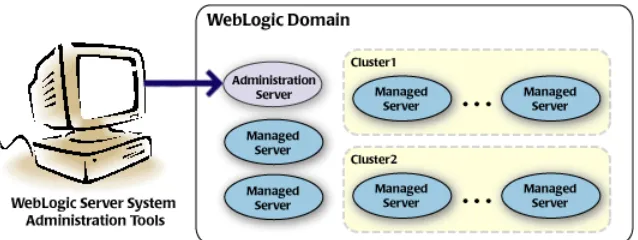
1.1 Introduction to WebLogic Domains
A WebLogic domain is the basic administrative unit of WebLogic Server. It consists of one or more WebLogic Server instances, and logically related resources and services that are managed collectively as one unit.
Figure 1–1 WebLogic Domain Structure
As shown in Figure 1–1, the basic domain infrastructure consists of one Administration Server and optional Managed Servers and clusters.
Introduction to WebLogic Domains
In addition to infrastructure components, a domain defines the basic network configuration for the server instances that it contains. Specifically, a domain defines application deployments, supported application services (such as database and messaging services), security options, and physical host machines.
Domain configuration information is stored in the configuration directories under the domain directory.
Common WebLogic Domain Configurations
You might find it useful to configure multiple WebLogic Domains based on specific criteria, such as system administrator responsibilities, the logical classification of applications, the geographical locations of servers, or size. The following table outlines the most common domain configurations.
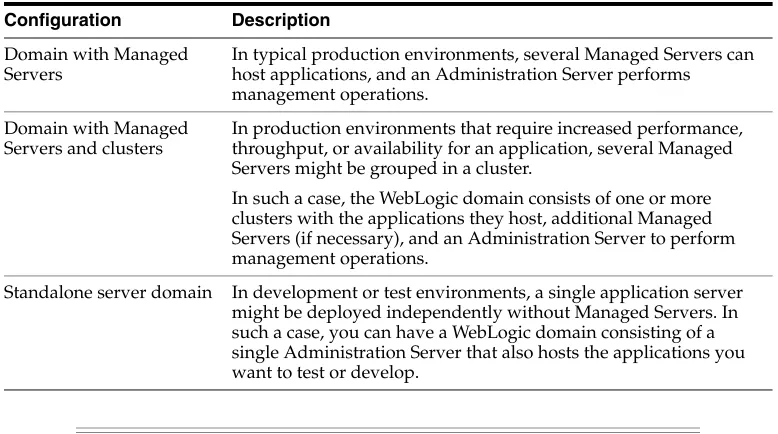
Table 1–1 WebLogic Domain Infrastructure Components
Component Description
Administration Server
A domain includes one WebLogic Server instance that is configured as an Administration Server. All changes to configuration and deployment of applications are done through the Administration Server.
The Administration Server provides a central point for managing the domain and providing access to the WebLogic Server administration tools. These tools include the following:
■ WebLogic Server Administration Console: Graphical user interface to
the Administration Server.
■ WebLogic Server Node Manager: A Java program that lets you start and
stop server instances—both Administration Servers and Managed Servers—remotely, and to monitor and automatically restart them after an unexpected failure.
Note that the Node Manager is installed on all the machines that host any server instance – both the Administration Server and Managed Servers.
For more information about the WebLogic Server administration tools, see "Summary of System Administration Tools and APIs" in Introduction to Oracle WebLogic Server.
Managed Servers
All other WebLogic Server instances in a domain are called Managed Servers. Managed Servers host application components and resources, which are also deployed and managed as part of the domain. In a domain with only a single WebLogic Server instance, that single server works as both the Administration Server and the Managed Server.
Clusters A domain may also include WebLogic Server clusters, which are groups of Managed Server instances that work together to provide scalability and high availability for applications. Clusters can improve performance and provide failover when a server instance becomes unavailable. The servers within a cluster can either run on the same machine or reside in different machines. To the client, a cluster appears as a single WebLogic Server instance.
For more information about WebLogic domains, see "Understanding Oracle WebLogic Server Domains" in Understanding Domain Configuration for Oracle WebLogic Server
1.2 Overview of the Configuration Wizard
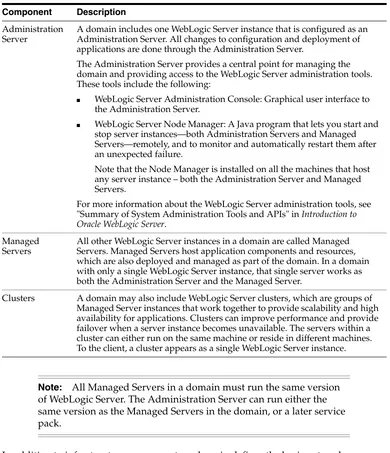
Before you can develop and run an application on a WebLogic domain, you must first create the WebLogic domain. The Configuration Wizard (illustrated in Figure 1–2), simplifies the process of creating and extending a domain.
To create or extend a WebLogic domain by using the Configuration Wizard, you simply select the product components (product templates) to be included in the domain (or choose a template that best meets your requirements), and provide basic configuration information. The Configuration Wizard then creates or extends the domain by adding the resources defined in the selected product templates.
For more information about templates, see Section 1.3, "About Domain and Extension Templates."
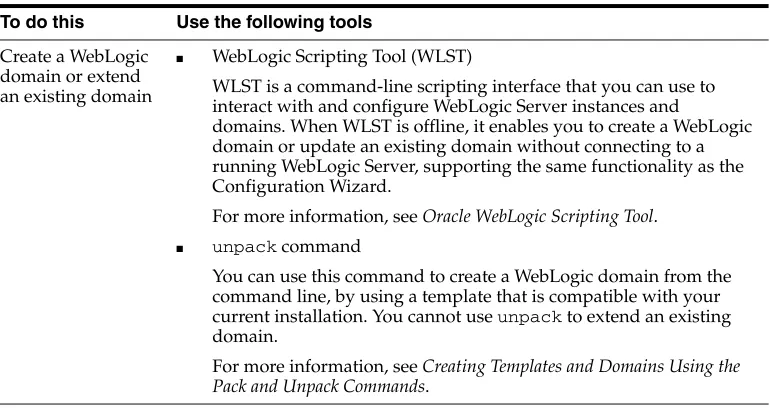
Table 1–2 Common WebLogic Domain Configurations
Configuration Description
Domain with Managed Servers
In typical production environments, several Managed Servers can host applications, and an Administration Server performs management operations.
Domain with Managed Servers and clusters
In production environments that require increased performance, throughput, or availability for an application, several Managed Servers might be grouped in a cluster.
In such a case, the WebLogic domain consists of one or more clusters with the applications they host, additional Managed Servers (if necessary), and an Administration Server to perform management operations.
Standalone server domain In development or test environments, a single application server might be deployed independently without Managed Servers. In such a case, you can have a WebLogic domain consisting of a single Administration Server that also hosts the applications you want to test or develop.
Overview of the Configuration Wizard
Figure 1–2 Configuration Wizard
After you use the Configuration Wizard to create a WebLogic domain, you can start a WebLogic Server instance in the domain to develop, test, and deploy applications.
1.2.1 Modes of Operation
You can use the Configuration Wizard can only when there is no server running. It supports the following modes of operation:
■ Graphical mode: An interactive, GUI-based mode
■ Console mode: An interactive, text-based mode
1.2.2 Output of the Configuration Wizard
A WebLogic domain that was created using the Configuration Wizard has the following directories:
■ autodeploy: This directory provides a location from which you can deploy
applications quickly on a development server. When the WebLogic Server instance is running in development mode, it automatically deploys any applications or modules that you place in this directory.
Note: The Domain Template Builder tool simplifies the process of creating templates by guiding you through the process of creating custom domain and extension templates. You can select these templates to create and extend domains either by using the Configuration Wizard or the WebLogic Scripting Tool (WLST). For information about the Domain Template Builder, see Creating Domain Templates Using the Domain Template Builder. For information about creating domains using WLST, see "Creating Domains Using WLST Offline" in Oracle WebLogic Scripting Tool.
■ bin: This directory contains scripts to start and stop the Administration Server,
and, optionally, Managed Servers.
■ config: This directory contains:
– A domain-specific configuration file, config.xml, that specifies the name of the WebLogic domain and the configuration parameter settings for each server instance, cluster, resource, and service in the domain.
– Subdirectories that contain the configuration for various system modules:
deployments, diagnostics, jdbc, jms, lib, nodemanager, and
security. These subdirectories contain configuration files that are incorporated, by reference, into the config.xml file.
■ console-ext—This directory contains console extensions used by the
Administration Server.
■ init-info: This directory contains files used by the Configuration Wizard to
support creation and extension of the WebLogic domain.
■ lib: This directory contains the domain library. When the server starts, any jar
files that you place in this directory are dynamically added to the end of the server classpath.
■ security: This directory contains common security files for all the servers in the
domain.
■ servers: This directory contains a subdirectory for each server in the domain.
These server subdirectories, in turn, contain subdirectories that hold directories and files specific to each server in a WebLogic domain, such as bin, cache, data,
logs, security, and tmp.
■ user_staged_config: If the domain is configured to be user-staged, that is, the
administrator is responsible for staging (copying) the configuration information to the Managed Servers, this directory provides an alternative to the config
directory.
If the template used to create a WebLogic domain includes applications, the application files are located, by default, in user_
projects/applications/domain_name.
For more information, see "Domain Configuration Files" in Understanding Domain Configuration for Oracle WebLogic Server
1.3 About Domain and Extension Templates
In the context of the Configuration Wizard, the term template refers to a Java Archive (JAR) file, which contains the files and scripts required to create or extend a WebLogic domain. The types of templates that the Configuration Wizard uses to create or extend WebLogic domains include:
■ Domain template: This type of template defines the full set of resources within a
WebLogic domain, including infrastructure components, applications, services, security options, and general environment and operating system options. You can
Additional Tools for Creating, Extending, and Managing WebLogic Domains
create a WebLogic domain based on the template by using the Configuration Wizard.
The product distribution includes a base WebLogic domain template. A domain template defines the core set of resources within a domain, including
– An Administration Server and basic configuration information
– Infrastructure components
– General environment and operating system requirements.
A domain template does not include sample applications. You can use a domain template to create a basic WebLogic domain, which you can then extend with applications and services, or additional product components.
■ Extension template: Whereas a domain template can create a self-sufficient
WebLogic domain, you use an extension template to add functionality to an existing domain. In the Configuration Wizard, before selecting the extension template to use, you must select the WebLogic domain you want to extend.
■ Managed Server template: This type of template defines the subset of resources,
within a WebLogic domain, that are required to create a Managed Server domain on a remote machine. You can create this type of template by using the pack
command.
The WebLogic Server product installation includes a set of predefined domain and extension templates. This set includes the base WebLogic domain template and various extension templates that allow you to add component features and samples to the base domain. For more information about these templates and how they relate to each other, see Oracle WebLogic Server Domain Template Reference.
1.4 Additional Tools for Creating, Extending, and Managing WebLogic
Domains
In addition to the Configuration Wizard, you can use the tools listed in Table 1–3 to create, extend, and manage domains. You can also perform run-time configuration by using the consoles of the product components (for example, the WebLogic Server Administration Console).
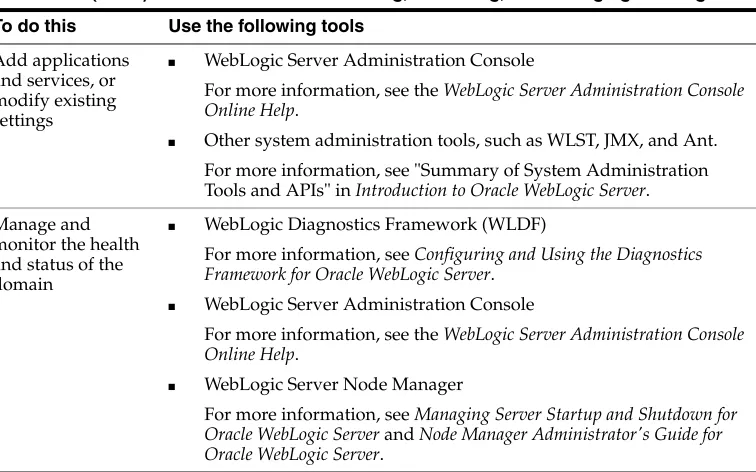
Table 1–3 Additional Tools for Creating, Extending, and Managing WebLogic Domains
To do this Use the following tools
Create a WebLogic domain or extend an existing domain
■ WebLogic Scripting Tool (WLST)
WLST is a command-line scripting interface that you can use to interact with and configure WebLogic Server instances and
domains. When WLST is offline, it enables you to create a WebLogic domain or update an existing domain without connecting to a running WebLogic Server, supporting the same functionality as the Configuration Wizard.
For more information, see Oracle WebLogic Scripting Tool.
■ unpack command
You can use this command to create a WebLogic domain from the command line, by using a template that is compatible with your current installation. You cannot use unpack to extend an existing domain.
Add applications and services, or modify existing settings
■ WebLogic Server Administration Console
For more information, see the WebLogic Server Administration Console Online Help.
■ Other system administration tools, such as WLST, JMX, and Ant.
For more information, see "Summary of System Administration Tools and APIs" in Introduction to Oracle WebLogic Server.
Manage and monitor the health and status of the domain
■ WebLogic Diagnostics Framework (WLDF)
For more information, see Configuring and Using the Diagnostics Framework for Oracle WebLogic Server.
■ WebLogic Server Administration Console
For more information, see the WebLogic Server Administration Console Online Help.
■ WebLogic Server Node Manager
For more information, see Managing Server Startup and Shutdown for Oracle WebLogic Server and Node Manager Administrator's Guide for Oracle WebLogic Server.
Table 1–3 (Cont.) Additional Tools for Creating, Extending, and Managing WebLogic
2
2
Creating a WebLogic Domain
This chapter describes how to create a new WebLogic domain by using the Configuration Wizard in graphical mode. It contains the following sections:
■ Section 2.1, "Before You Begin"
■ Section 2.2, "Domain Creation Process"
■ Section 2.3, "Starting the Configuration Wizard in Graphical Mode"
■ Section 2.4, "Creating a WebLogic Domain in Graphical Mode"
■ Section 2.5, "Starting the Administration Server"
2.1 Before You Begin
Prior to running the Configuration Wizard to create a domain on a UNIX or Linux operating system, if you have not already done so, set the CONFIG_JVM_ARGS
environment variable to the following value:
-Djava.security.egd=file:/dev/./urandom
This decreases the amount of time it takes for the Configuration Wizard to create or update a domain.
2.2 Domain Creation Process
The Configuration Wizard guides you through the process of creating a WebLogic domain for your target environment by selecting the product components to include in your domain, or by selecting domain template JAR files. If necessary, you can also customize the domain to suit your environment by adding and configuring Managed Servers, clusters, and machine definitions, or customizing predefined JDBC data sources and JMS file store directories.
You might want to customize your domain in the following circumstances:
■ To create a multi-server or clustered domain when using the default settings. All
the predefined WebLogic Server templates (those delivered with WebLogic Server) create single-server domains.
■ To use a database that is different from the default database in the domain or
extension template. In this case, you must customize the JDBC settings to point to the appropriate database.
Starting the Configuration Wizard in Graphical Mode
■ To create a test environment by using a domain template that you received, and to
modify the domain configuration to work in the test environment based on your requirements.
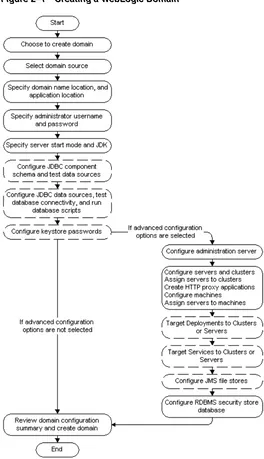
Figure 2–1 summarizes the Configuring Wizard steps for creating a WebLogic domain. The steps indicated in boxes with dashed lines are relevant only when you create WebLogic domains that contain specific products, such as those that use RCU and those that require JDBC data sources.
Figure 2–1 Creating a WebLogic Domain
2.3 Starting the Configuration Wizard in Graphical Mode
You can start the Configuration Wizard in graphical mode from either the Windows
Start menu or from the command line.
■ To start the Configuration Wizard in graphical mode on a Windows platform,
choose Start > Programs > Oracle WebLogic > WebLogic Server > Tools >
Configuration Wizard.
■ To start the Configuration Wizard in graphical mode from a Windows command
prompt or on UNIX systems:
1. Log in to the system on which the product is installed.
2. Open an MS-DOS command prompt window (on Windows) or a command shell (on UNIX).
3. Go to the following directory:
On Windows: WLHOME\common\bin
On UNIX: WLHOME/common/bin
where WLHOME is the directory in which WebLogic Server is installed.
4. Execute the following command:
On Windows: config.cmd
On UNIX: sh config.sh
The Welcome screen is displayed.
2.4 Creating a WebLogic Domain in Graphical Mode
To create a new WebLogic Domain by using the Configuration Wizard in graphical mode, start the Configuration Wizard as described in Section 2.3, "Starting the Configuration Wizard in Graphical Mode."
Note: If you attempt to start the Configuration Wizard in graphical mode on a system that cannot support graphical display, the
Configuration Wizard automatically starts in console mode.
Note: When you run the config.cmd or config.sh command, the following error message might be displayed to indicate that the default cache directory is not valid:
*sys-package-mgr*: can't create package cache dir
You can change the cache directory by including the
-Dpython.cachedir=valid_directory option in the command line.
Creating a WebLogic Domain in Graphical Mode
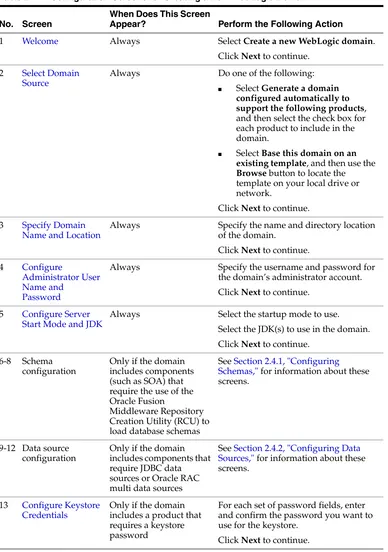
The Configuration Wizard displays a sequence of screens, in the order listed in Table 2–1. For more information on each screen, refer to the related section in Chapter 4, "Configuration Wizard Screens," or click the link in the Screen column.
Table 2–1 Configuration Screens for Creating a New WebLogic Domain
No. Screen
When Does This Screen
Appear? Perform the Following Action
1 Welcome Always Select Create a new WebLogic domain. Click Next to continue.
2 Select Domain Source
Always Do one of the following:
■ Select Generate a domain
configured automatically to support the following products, and then select the check box for each product to include in the domain.
■ Select Base this domain on an
existing template, and then use the Browse button to locate the template on your local drive or network.
Click Next to continue.
3 Specify Domain Name and Location
Always Specify the name and directory location of the domain.
Always Specify the username and password for the domain’s administrator account. Click Next to continue.
5 Configure Server Start Mode and JDK
Always Select the startup mode to use. Select the JDK(s) to use in the domain. Click Next to continue.
6-8 Schema configuration
Only if the domain includes components (such as SOA) that require the use of the Oracle Fusion
Middleware Repository Creation Utility (RCU) to load database schemas
See Section 2.4.1, "Configuring Schemas," for information about these screens.
9-12 Data source configuration
Only if the domain includes components that require JDBC data sources or Oracle RAC multi data sources
See Section 2.4.2, "Configuring Data Sources," for information about these screens.
13 Configure Keystore Credentials
Only if the domain includes a product that requires a keystore password
For each set of password fields, enter and confirm the password you want to use for the keystore.
14 Select Optional Configuration
Always Select the check box for each category (if any) for which you want to perform advanced configuration tasks
The available check boxes depend on the resources that are configured in the selected products or template.
Click Next to continue.
15 Configure Administration Server
Only if you selected Administration Server on the Select Optional Configuration screen
Change the settings for the Administration Server as needed. Click Next to continue.
16 Select JMS Distributed Destination Type
Only if you selected JMS Distributed Destination on the Select Optional Configuration screen
For each JMS system resource, select the distributed destination type.
Click Next to continue.
17 Configure Managed Servers
Only if you selected Managed Servers, Clusters, and Machines on the Select Optional Configuration screen
Add, delete, or reconfigureManaged Servers as needed.
Click Next to continue.
18 Configure Clusters Only if you selected Managed Servers, Clusters, and Machines on the Select Optional Configuration screen
Add, delete, or reconfigure clusters as needed.
Click Next to continue.
19 Assign Servers to Clusters
Only if you selected Managed Servers, Clusters, and Machines on the Select Optional Configuration screen, and your domain includes at least one cluster
Add servers to or remove servers from the clusters in your domain.
Click Next to continue.
20 Create HTTP Proxy Applications
Only if you selected Managed Servers, Clusters, and Machines on the Select Optional Configuration screen, and your domain includes at least one cluster, and at least one Managed Server that is not assigned to a cluster
For each cluster, specify whether or not you want to create an HTTP proxy application for the cluster. If you select the Create HTTP Proxy check box for a cluster, select the proxy server to use for that cluster. a
Click Next to continue.
21 Configure Machines Only if you selected Managed Servers, Clusters, and Machines on the Select Optional Configuration screen.
Add, delete, or reconfigure machines as needed.
Click Next to continue.
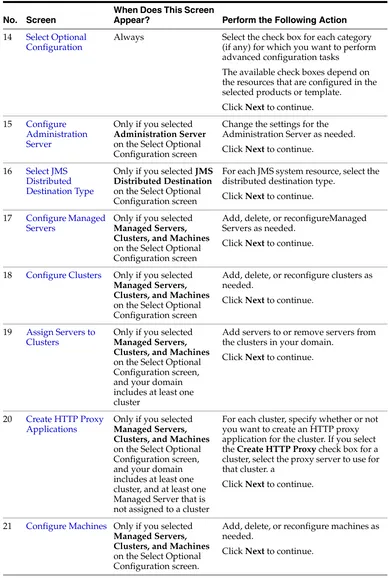
Table 2–1 (Cont.) Configuration Screens for Creating a New WebLogic Domain
No. Screen
When Does This Screen
Creating a WebLogic Domain in Graphical Mode
2.4.1 Configuring Schemas
The screens described in this section are displayed in the Configuration Wizard only if the domain includes components (such as SOA) that require the use of the Oracle Fusion Middleware Repository Creation Utility (RCU) to load database schemas. Table 2–2 lists the sequences of schema-related screens. For more information on each screen, refer to the related section in Chapter 4, "Configuration Wizard Screens," or click the link in the Screen column.
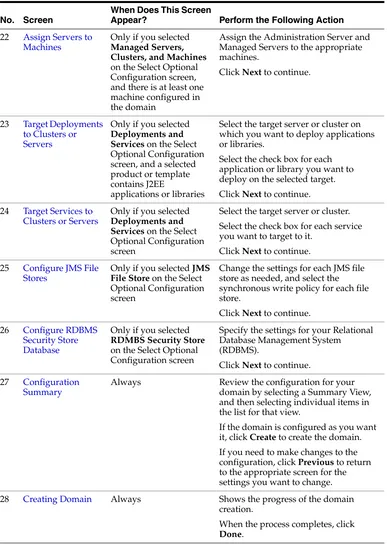
22 Assign Servers to Machines
Only if you selected Managed Servers, Clusters, and Machines on the Select Optional Configuration screen, and there is at least one machine configured in the domain
Assign the Administration Server and Managed Servers to the appropriate machines.
Click Next to continue.
23 Target Deployments to Clusters or Servers
Only if you selected Deployments and Services on the Select Optional Configuration screen, and a selected product or template contains J2EE
applications or libraries
Select the target server or cluster on which you want to deploy applications or libraries.
Select the check box for each application or library you want to deploy on the selected target. Click Next to continue.
24 Target Services to Clusters or Servers
Only if you selected Deployments and Services on the Select Optional Configuration screen
Select the target server or cluster. Select the check box for each service you want to target to it.
Click Next to continue.
25 Configure JMS File Stores
Only if you selected JMS File Store on the Select Optional Configuration screen
Change the settings for each JMS file store as needed, and select the synchronous write policy for each file store.
Click Next to continue.
26 Configure RDBMS Security Store Database
Only if you selected RDMBS Security Store on the Select Optional Configuration screen
Specify the settings for your Relational Database Management System (RDBMS).
Click Next to continue.
27 Configuration Summary
Always Review the configuration for your domain by selecting a Summary View, and then selecting individual items in the list for that view.
If the domain is configured as you want it, click Create to create the domain. If you need to make changes to the configuration, click Previous to return to the appropriate screen for the settings you want to change.
28 Creating Domain Always Shows the progress of the domain creation.
When the process completes, click Done.
Table 2–1 (Cont.) Configuration Screens for Creating a New WebLogic Domain
No. Screen
When Does This Screen
After configuring the screens in this section, return to row 9 in Table 2–1.
2.4.2 Configuring Data Sources
The screens described in this section are displayed in the Configuration Wizard only if the domain includes components that require JDBC data sources or Oracle RAC multi data sources. Table 2–3 lists the sequences of schema-related screens. For more
information on each screen, refer to the related section in Chapter 4, "Configuration
Table 2–2 Schema Configuration Screens
No. Screen
When Does This Screen
Appear? Perform the Following Action
6 Configure JDBC Component Schema
Only if the domain includes components (such as SOA) that require the use of the Oracle Fusion
Middleware Repository Creation Utility (RCU) to load database schemas
Configure the schema owner and password for each component schema listed on this screen. Changes to any of the fields on this screen are applied to all selected component schemas in the table.
For example, if all of your schemas reside on the same database, select all of the schemas in the table, then specify the appropriate database values for the schemas (DBMS/Service, Host Name, and Port).
If, for example, you have a different password for each schema, then you must select each schema individually and specify the password for the selected schema only.
Click Next to continue.
7 Configure RAC Multi Data Source Schema
Only if the domain includes components (such as SOA) that require the use of the Oracle Fusion
Middleware Repository Creation Utility (RCU) to load database schemas, and you selected the Configured selected component schemas as RAC multi data source schemas option
Configure the schema owner and password for each component schema listed on this screen. Changes to any of the fields on this screen are applied to all selected component schemas in the table.
For example, if all of your schemas reside on the same database, select all of the schemas in the table, then specify the appropriate database values for the schemas (Service Name, Host Name, Instance Name, and Port).
If, for example, you have a different password for each schema, then you must select each schema individually and specify the password for the selected schema only.
Click Next to continue.
8 Test Component Schema
Only if the domain includes components (such as SOA) that require the use of the Oracle Fusion
Middleware Repository Creation Utility (RCU) to load database schema
Test the configurations that you specified for the data sources in the previous screen.
Starting the Administration Server
2.5 Starting the Administration Server
When you finish creating your domain, you can start the Administration Server. For more information on the various methods you can use to start the Administration Server, see "Starting and Stopping Servers" in Managing Server Startup and Shutdown for Oracle WebLogic Server.
Table 2–3 Data Source Configuration Screens
No. Screen
When Does This Screen
Appear? Perform the Following Action
9 Configure JDBC Data Source
Only if the domain includes components that require JDBC data sources
Select a data source to configure, and then do one of the following:
■ Configure the fields for the data
source
■ Select the Configure selected data
sources as RAC multi data sources option
Click Next to continue.
10 Configure Oracle RAC Multi Data Sources
Only if the domain includes components that require JDBC data sources, and you selected the Configure selected data sources as RAC multi data sources option for at least on data source on the Configure JDBC Data Source screen
Configure the fields for the Oracle RAC multi data source, including the Oracle RAC host name, instance name, and port.
Click Next to continue.
11 Test JDBC Data Sources
Only if the domain includes components that require JDBC data sources
Select the data sources to test, and click Test Connection. Wait for the
connection test(s) to complete. Note: In order to test connections, the database to which you are trying to connect must be running.
If you do not want to test connections at this time, deselect all data sources. Click Next to continue.
12 Run Database Scripts
Only if the selected products or template includes a set of SQL files organized by database type
Select the data sources for which you want to run the database scripts. Select the database version. Click Run Scripts.
3
3
Extending WebLogic Domains
You can add product component functionality or additional applications and services to an existing WebLogic domain by extending it using the Configuration Wizard. For example, if you created a base WebLogic domain and you want to add the Avitek Medical Records Examples functionality, you can extend the domain by using the
medrec.jar template.
The Configuration Wizard simplifies the task of extending an existing WebLogic domain by using extension templates. Oracle provides various sample extension templates, as well as extension templates for various Fusion Middleware products. You can also create your own extension templates using WLST or the unpack command.
For information about extension templates provided by Oracle, see the Domain Template Reference.
This chapter contains the following sections:
■ Section 3.1, "Before You Begin."
■ Section 3.2, "Domain Extension Process."
■ Section 3.3, "Extending a WebLogic Domain in Graphical Mode."
■ Section 3.4, "Updating Startup Scripts on Remote Servers."
3.1 Before You Begin
Prior to running the Configuration Wizard to update a domain on a UNIX or Linux operating system, if you have not already done so, set the CONFIG_JVM_ARGS
environment variable to the following value:
-Djava.security.egd=file:/dev/./urandom
This decreases the amount of time it takes for the Configuration Wizard to create or update a domain.
3.2 Domain Extension Process
To extend a WebLogic domain, select the domain to extend and then select one or more additional product components. Alternatively, you can extend an existing domain by specifying an extension template JAR file that includes additional applications and services. You can also customize the JDBC connections and change the JMS file store. The Configuration Wizard uses your input to update the configuration files, such as
Extending a WebLogic Domain in Graphical Mode
Figure 3–1 summarizes the steps for extending a WebLogic domain by using the Configuration Wizard. The steps indicated in boxes with dashed lines are relevant only when you extend domains to include specific products, such as those that use RCU and those that require JDBC data sources.
Figure 3–1 Extending a WebLogic Domain
3.3 Extending a WebLogic Domain in Graphical Mode
To extend a new WebLogic Domain by using the Configuration Wizard in graphical mode, start the Configuration Wizard as described in Section 2.3, "Starting the Configuration Wizard in Graphical Mode."
The Configuration Wizard displays a sequence of screens, in the order listed in Table 3–1. For more information on each screen, refer to the related section in Chapter 4, "Configuration Wizard Screens," or click the link in the Screen column.
Table 3–1 Configuration Screens for Extending an Existing WebLogic Domain
No. Screen
When Does This Screen
Appear? Perform the Following Action
1 Welcome Always Select Extend an existing WebLogic domain.
Click Next to continue.
2 Select a WebLogic Domain Directory
Always Select a valid domain directory. Click Next to continue.
3 Select Extension Source
Always Do one of the following:
■ Select Extend domain
automatically to support the following added products, and then select the check box for each new product to include in the domain.
■ Select Extend my domain using an
existing extension template, and then use the Browse button to locate the template on your local drive or network.
Click Next to continue.
4-6 Schema configuration
Only if the selected products or template includes components (such as SOA) that require the use of the Oracle Fusion
Middleware Repository Creation Utility (RCU) to load database schemas
See Section 2.4.1, "Configuring Schemas," for information about these screens.
7-10 Data source configuration
Only if the selected products or template includes components that require JDBC data sources or Oracle RAC multi data sources
See Section 2.4.2, "Configuring Data Sources," for information about these screens.
11 Configure Keystore Credentials
Only if the selected products or template includes a product that requires a keystore password
For each set of password fields, enter and confirm the password you want to use for the keystore.
Click Next to continue.
12 Select Optional Configuration
Always Select the check box for each category (if any) for which you want to perform advanced configuration tasks
The available check boxes depend on the resources that are configured in the selected products or template.
Note: When extending a domain, the you cannot change the Administration Server or RDBMS security store configurations. Therefore, these options are not available.
Extending a WebLogic Domain in Graphical Mode
13 Select JMS Distributed Destination Type
Only if you selected JMS Distributed Destination on the Select Optional Configuration screen
For each JMS system resource, select the distributed destination type.
Click Next to continue.
14 Configure Managed Servers
Only if you selected Managed Servers, Clusters, and Machines on the Select Optional Configuration screen
Add, delete, or reconfigure Managed Servers as needed.
Click Next to continue.
15 Configure Clusters Only if you selected Managed Servers, Clusters, and Machines on the Select Optional Configuration screen
Add, delete, or reconfigure clusters as needed.
Click Next to continue.
16 Assign Servers to Clusters
Only if you selected Managed Servers, Clusters, and Machines on the Select Optional Configuration screen, and your domain includes at least one cluster
Add servers to or remove servers from the clusters in your domain.
Click Next to continue.
17 Create HTTP Proxy Applications
Only if you selected Managed Servers, Clusters, and Machines on the Select Optional Configuration screen, and your domain includes at least one cluster, and at least one Managed Server that is not assigned to a cluster
For each cluster, specify whether or not you want to create an HTTP proxy application for the cluster. If you select the Create HTTP Proxy check box for a cluster, select the proxy server to use for that cluster. a
Click Next to continue.
18 Configure Machines Only if you selected Managed Servers, Clusters, and Machines on the Select Optional Configuration screen.
Add, delete, or reconfigure machines as needed.
Click Next to continue.
19 Assign Servers to Machines
Only if you selected Managed Servers, Clusters, and Machines on the Select Optional Configuration screen, and there is at least on machine configured in the domain
Assign the Administration Server and Managed Servers to the appropriate machines.
Click Next to continue.
20 Target Deployments to Clusters or Servers
Only if you selected Deployments and Services on the Select Optional Configuration screen, and a selected product or template contains J2EE
applications or libraries
Select the target server or cluster on which you want to deploy applications or libraries.
Select the check box for each application or library you want to deploy on the selected target.
Click Next to continue.
Table 3–1 (Cont.) Configuration Screens for Extending an Existing WebLogic Domain
No. Screen
When Does This Screen
3.4 Updating Startup Scripts on Remote Servers
When you extend a WebLogic domain in which the Managed Servers are distributed (by using the pack and unpack commands) to remote machines, the startup scripts on the remote machines are not updated automatically.
To ensure that startup scripts on the remote machines are updated, perform the following steps after extending the domain:
1. Delete the Managed Server directories on the remote machines.
2. Create a Managed Server template from the extended domain, by using the pack
command with the -managed=true option.
3. Create Managed Servers on the remote machines, by using the unpack command to unpack the Managed Server template.
For more information about the pack and unpack commands, see Creating Templates and Domains Using the Pack and Unpack Commands.
21 Target Services to Clusters or Servers
Only if you selected Deployments and Services on the Select Optional Configuration screen
Select the target server or cluster. Select the check box for each service you want to target to it.
Click Next to continue.
22 Configure JMS File Stores
Only if you selected JMS File Store on the Select Optional Configuration screen
Change the settings for each JMS file store as needed, and select the synchronous write policy for each file store.
Click Next to continue.
24 Configuration Summary
Always Review the configuration for your domain by selecting a Summary View, and then selecting individual items in the list for that view.
If the domain is configured as you want it, click Extend to extend the domain. If you need to make changes to the configuration, click Previous to return to the appropriate screen for the settings you want to change.
25 Extending Domain Always Shows the progress of the domain creation.
When the process completes, click Done.
Table 3–1 (Cont.) Configuration Screens for Extending an Existing WebLogic Domain
No. Screen
When Does This Screen
4
4
Configuration Wizard Screens
This chapter contains screen shots and descriptions for all of the Fusion Middleware Configuration Wizard screens.
■ Welcome
■ Select a WebLogic Domain Directory
■ Select Domain Source
■ Select Extension Source
■ Specify Domain Name and Location
■ Configure Administrator User Name and Password
■ Configure Server Start Mode and JDK
■ Configure JDBC Component Schema
■ Configure RAC Multi Data Source Schema
■ Test Component Schema
■ Configure JDBC Data Source
■ Configure Oracle RAC Multi Data Sources
■ Test JDBC Data Sources
■ Run Database Scripts
■ Configure Keystore Credentials
■ Select Optional Configuration
■ Configure Administration Server
■ Select JMS Distributed Destination Type
■ Configure Managed Servers
■ Configure Clusters
■ Assign Servers to Clusters
■ Create HTTP Proxy Applications
■ Configure Machines
■ Assign Servers to Machines
Welcome
■ Configure JMS File Stores
■ Configure RDBMS Security Store Database
■ Configuration Summary
■ Creating Domain
4.1 Welcome
The Welcome screen displays when you start the Configuration Wizard.
Select one of the following options:
■ Create a new WebLogic domain—Select this option if you want to create a new
domain. Typically, the new domain will be based on the WebLogic Server Basic Domain, which includes an Administration Server and the default security realm
myrealm. You may, however, choose to use your own domain template to create the domain; your domain template must contain at least an Administration Server.
If you select this option, the Select Domain Source screen is displayed next.
■ Extend an existing WebLogic domain—Select this option if you already have a
WebLogic domain, and you want to add resources to that domain.
4.2 Select a WebLogic Domain Directory
Use the navigation tree to select a valid domain directory. A domain directory contains a config directory, which contains a config.xml file. In the navigation tree, these directories are indicated by a blue folder icon:
Select Domain Source
Choose whether to generate a domain that is configured automatically to support selected products, or to create a domain based on an existing domain template. Each product in the displayed list is associated with a single domain or extension template (a JAR file) which configures the domain resources needed for that product.
Select one of the following options:
■ Generate a domain configured automatically to support the following
products— By default, the Basic WebLogic Server Domain option is selected and cannot be cleared. Select the check boxes that correspond to the other products that you want to include in the domain. If you select a product that is dependent on resources provided by another product or products in the list, those products are also selected automatically.
The list of products (templates) differs based on the Fusion Middleware product installation you are configuring. The example shown here is for a standalone WebLogic Server environment. If you installed other Fusion Middleware products, such as SOA or WebCenter, products that you can include in those domains are also listed here.
For information about the various WebLogic Server products (templates) that may be listed on this screen, see the Domain Template Reference.
■ Base this domain on an existing template—Select this option if you want to create
a domain by using an existing domain template. Enter the full path to the template JAR file in the Template location field, or click Browse to navigate to the directory containing the required template. The template you select must define at least an Administration Server.
Typically, you either select one of the following domain templates provided with WebLogic Server, or select a custom domain template that you created:
– Basic WebLogic Server Domain
WL_HOME\common\templates\domains\wls.jar
– WebLogic Server Starter Domain
WL_HOME\common\templates\domains\wls_starter.jar Note: When you click Next, if any of the selected products require resources provided by another product that is not selected, a warning dialog box is displayed. Return to the Select Domain Source screen to select the dependency product before proceeding.
4.4 Select Extension Source
Choose whether to extend the domain by selecting one of the listed products, or by browsing to an extension template.
■ Extend my domain automatically to support the following added
products—Select the check boxes for the products to add to your WebLogic domain. The products already included in your domain are indicated by grayed-out check boxes.
For information about the various WebLogic Server products (templates) that may be listed on this screen, see the Domain Template Reference.
■ Extend my domain using an existing extension template—Specify the path to the
extension template in the Template location field.
Specify Domain Name and Location
4.5 Specify Domain Name and Location
Specify the following items:
■ Domain name—The name of the domain. The Configuration Wizard stores the
config.xml file and all other generated components for the domain in this directory, under the specified Domain directory. For example, if you enter
mydomain, your domain files are stored (by default) in MW_HOME\user_
projects\domains\mydomain.
The domain name is also listed on the Windows Start menu. For example, if your domain name is mydomain, and the Domain directory is user_projects, you can access commands for the domain by selecting Oracle WebLogic > user_ projects > mydomain from the Windows Start menu.
■ Domain location—The location in which your domain directory will be stored.
The default is MW_HOME\user_projects\domains. The domain location can be anywhere on your local drive or network. It does not have to located in MW_HOME.
On Windows, you must include the drive letter in this path.
Note: The domain name must not start with a number. This restriction is intended to prevent potential issues with internally generated JDBC store table names, which must start with an alphabetic character.
■ Application location—This field is displayed only if you selected a domain
template or product that contains applications. This is the location in which your applications will reside. The default is MW_HOME\user_
projects\applications.
On Windows, you must include the drive letter in this path.
4.6 Configure Administrator User Name and Password
Use this screen to define the default WebLogic Administrator account for the domain. This account is used to boot and connect to the domain’s Administration Server.
■ Name—The login username for the WebLogic Administrator account.
The username must not contain commas, tabs, or any of the following characters:
< > # | & ? ( ) { }
■ User Password—The password for the WebLogic Administrator account. The
password must be at least eight characters, and must contain at least one numeric character or at least one of the following characters:
! " # $ % & ' ( ) * + , - . / : ; < = > ? @ [ \ ] ^ _ ` { | } ~
■ Confirm User Password—Type the same password in the Confirm User
Password field. An error is displayed if the two entries do not match.
■ Description—Accept the default description or type your preferred description
Configure Server Start Mode and JDK
4.7 Configure Server Start Mode and JDK
On this screen, specify whether you want to run WebLogic in Production mode or Development mode. You also specify the location of the JDK(s) to use in this domain.
In the WebLogic Domain Startup Mode pane, select one of the following options:
■ Development Mode—In this mode, the security configuration is relatively
relaxed, allowing you to auto-deploy applications.
■ Production Mode—In this mode, the security configuration is relatively stringent,
requiring a username and password to deploy applications. Before putting a domain into production, familiarize yourself with procedures for securing a production environment. For more information, see "Ensuring the Security of Your Production Environment" in Securing a Production Environment for Oracle WebLogic Server.
For information about changing the run-time mode after you have created a WebLogic domain, see "Change to Production Mode" in the WebLogic Server Administration Console Online Help.
The JDK Selection pane lists all JDKs that are available for use in the domain. Select one of the following options:
■ Available JDKs—Select this option to use the listed JDKs in this domain. These
are the JDKs that were included with the WebLogic Server installer.
■ Other JDK—Select this option to use a different JDK than the ones in the available
list. Use the Browse button to navigate to the directory where the JDK resides.
Table 4–1 Differences Between Development and Production Mode
Feature Development Mode Production Mode
SSL You can use the demonstration digital certificates and the demonstration keystores provided by the WebLogic Server security services. With these certificates, you can design your application to work within environments secured by SSL.
For more information, see "Configuring SSL" in Securing Oracle WebLogic Server.
You must not use the demonstration digital certificates and the demonstration keystores. If you do so, a warning message is displayed.
Deploying applications
WebLogic Server instances can deploy and update applications that reside in the
domain_name/autodeploy directory automatically.
Oracle recommends that you use this method only in a single-server development
environment.
For more information, see "Deploying Applications and Modules with
weblogic.deployer" in Deploying Applications to Oracle WebLogic Server.
The auto-deployment feature is disabled. You must use the WebLogic Server Administration Console, the weblogic.deployer tool, or the WebLogic Scripting Tool.
Log file rotation By default, when you start the WebLogic Server instance, the server automatically renames (rotates) its local server log file as
SERVER-NAME.log.n. For the remainder of the server session, messages accumulate in the log file until the file grows to a size of 500 kilobytes.
For more information, see "Rotate Log Files" in the WebLogic Server Administration Console Online Help.
The default value of the Limit number of retained files setting in Logging
Configuration is true. This limits the number of log files that the server instance creates to store old messages.
The server rotates the local log file after the size of the file reaches 5000 kilobytes.
When the server is configured for production mode, by default, all versions of the log files are kept. Administrators may want to customize the number of log files that are retained.
The default value of Limit number of retained files setting in Logging Configuration is
false. The server creates new log files indefinitely, and you must clean up those files as you require.
JDBC system resource
The default capacity is 15 connections. The default capacity is 25 connections.
Note: If you select a JDK that is included in the installer, the
Configuration Wizard creates server startup scripts to invoke the JDK. If you select a JDK that is not supplied by the installer, the
Configure JDBC Component Schema
Select only those JDKs that are supported on the platform you are using. For a list of the JDKs that are supported for a specific platform, see Oracle Fusion Middleware Supported System Configurations at
http://www.oracle.com/technology/software/products/ias/files/fus ion_certification.html. The default selection reflects the JDK that best meets the requirements of your environment, based on the platform on which you are installing the WebLogic domain.
4.8 Configure JDBC Component Schema
For some Fusion Middleware components (for example, SOA and Web Center Spaces), JDBC data sources might be defined as part of the component's database schema, which are loaded (during installation) by using the Repository Creation Utility (RCU).
When you create a WebLogic domain for such components by using the Configuration Wizard, you can configure the JDBC component schema settings, such as database driver, schema owner, password, and so on.
The JDBC component schemas associated with the products for which you are creating the domain (for example, SOA) are listed in the lower half of the screen.
Select the schemas for which you want to specify data source settings by selecting the check box adjacent to each schema name.
Note: To configure one or more of the schemas as Oracle RAC multi data sources, select the check boxes adjacent to the name of the those schemas, and select the Configure selected component schemas as RAC multi data source schemas in the next panel check box. Click
■ Vendor—Select the database vendor.
■ Driver—Select the JDBC driver to use to connect to the database. The list includes
common JDBC drivers for the selected database vendor.
■ Schema Owner—Enter the username for connecting to the database. ■ Schema Password—Enter the password for the specified schema owner.
■ DBMS/Service—Enter a database DBMS name, or service name if you selected a
service type driver.
■ Host Name—Enter the name of the server hosting the database.
■ Port—Enter the port number to be used to connect to the server that hosts the
database.
The values that you specify are displayed in the appropriate columns in the schema list, for the selected schemas.
4.9 Configure RAC Multi Data Source Schema
Note: When you select multiple component schemas, the text
Varies among component schemas might be displayed in certain fields, indicating that the current values of those fields are different across the selected component schemas. If you change the values in such fields, the new values are applied uniformly across the selected component schemas.
Configure RAC Multi Data Source Schema
The component schemas that you opted to configure as Oracle RAC multi data sources in the Configure JDBC Component Schema screen of the wizard are listed in the lower half of the screen.
In the schema list in the lower half of the screen, select the schemas to configure as Oracle RAC multi data sources by selecting the check box adjacent to each schema name.
■ Driver—Select the JDBC driver to use to connect to the database. ■ Service Name—Enter a database Oracle RAC service name. ■ Username—Enter the username for connecting to the database. ■ Password—Enter the password for the specified username.
■ Host Name—Enter the name of the server hosting the Oracle RAC database
instances.
■ Instance Name—Enter the name of each Oracle database instance.
■ Port—Enter the port numbers to be used to connect to the server that hosts the
database.
The values that you specify are displayed in the appropriate columns in the schema list, for the selected schemas.
Note: When you select multiple data source schemas, the text "Varies among component schemas" might be displayed in certain fields, indicating that the current values of those fields are different across the selected schemas. If you go ahead and change the values in such fields, the new values are applied uniformly across the selected schemas.
Note: You must specify the host name, instance name, and port number of at least one database instance.
4.10 Test Component Schema
Use this screen to test the configurations that you specified for the data sources in the previous screen.
Select the check boxes adjacent to the names of the schemas to test, and then click Test Connections.
The wizard tests the configuration for each schema by attempting to connect to a URL that is constructed by using the driver, host, port, and other information that you specified while configuring the schema.
The result of the test is indicated in the Status column. Details are displayed in the
Configure JDBC Data Source
4.11 Configure JDBC Data Source
A JDBC data source contains a pool of database connections that are created when the data source instance is created—when it is deployed or targeted, or at server startup. Applications look up a data source on the JNDI tree, and then request a connection. When the applications no longer need the connections, they return the connections to the connection pool in the data source.
Use this screen to configure the JDBC data sources defined in your domain source.
The JDBC data sources associated with the products for which you are creating the domain are listed in the lower half of the screen.
Select the data source(s) for which you want to specify settings by selecting the check box adjacent to each data source name.
Note: To configure one or more of the data sources as Oracle RAC multi data sources, select the check box adjacent to the name of the required schema, and select the Configure selected data sources as RAC multi data sources in the next panel check box; then, click the
Next button.
Notes: When you select multiple data sources, the text Varies among data sources might be displayed in certain fields, indicating that the current values of those fields are different across the selected data sources. If you change the values in such fields, the new values are applied uniformly across the selected data sources.
■ Vendor—Select the database vendor.
■ Driver—Select the JDBC driver to use to connect to the database. The list includes
common JDBC drivers for the selected database vendor.
■ Username—Enter the username for connecting to the database. ■ Password—Enter the password for the specified username.
■ DBMS/Service—Enter a DBMS SID or service name. The value that you enter
depends on the driver that you selected.
■ If the name of the Oracle driver that you selected contains the words "for
Instance connections," you must enter the SID.
■ If the name of the Oracle driver contains the words "for Service connections,"
you must enter the service name.
■ For information about configuring a DataDirect driver, see the DataDirect
documentation.
■ Host Name—Enter the name of the server hosting the database. ■ Port—Enter the port number to be used to connect to the server.
The values that you specify are displayed in the appropriate columns in the data source list, for the selected data source.
4.12 Configure Oracle RAC Multi Data Sources
Use this screen to configure the data sources (that are included in the domain) as an Oracle RAC data sources.
The data sources that you opted to configure as Oracle RAC data sources on the Configure JDBC Data Source screen are listed in the lower half of the screen.
Test JDBC Data Sources
■ Driver—Select the JDBC driver to use to connect to the database. ■ Service Name—Enter an Oracle RAC database service name. ■ Username—Enter the username for connecting to the database. ■ Password—Enter the password for the specified username.
■ Host Name—Enter the name of the server hosting the Oracle RAC database
instances.
■ Instance Name—Enter the name of each Oracle database instance.
■ Port—Enter the port numbers to be used to connect to the server that hosts the
database.
To add a new database instance, click Add, and then specify the host name, instance name and port number.
4.13 Test JDBC Data Sources
Use this screen to test the data source connections you configured on the Configure JDBC Data Source and Configure Oracle RAC Multi Data Sources screens.
Select the check box for each data source you want to test, and then click Test Connections.
The wizard tests the configuration for each selected data source by attempting to connect to a URL that is constructed by using the driver, host, port, and other information that you specified while configuring the data source.
The result of the test is indicated in the Status column. Details are displayed in the
Connection Result Log section.
4.14 Run Database Scripts
A domain template might contain a set of SQL files organized by database type. If the domain template contains SQL files, you can run them while creating the WebLogic domain, in the Run Database Scripts screen. Database content for each of the data sources defined in your WebLogic domain is set up by using pre-existing SQL or database loading files.
Notes: In order to test the database connections, the database to which you are connecting must be running.
If you do not want to test the connections at this time, do not select any data sources. Click Next to continue.
Configure Keystore Credentials
1. In the Available JDBC Data Sources section, select the data source for which you want to run the scripts. The scripts that can be executed are displayed in the Available SQL Files and Database Loading Options section.
2. Select the database version from the DB Version drop-down list. 3. Click Run Scripts.
All the scripts displayed in the Available SQL Files and Database Loading Options section for the selected data source are executed, and the results are displayed in the Results section. To capture test output in a log file, select the Log File check box and specify the location of the log file.
4. Repeat steps 1 through 3 for each data source for which you want to execute SQL scripts.
5. Click Next.
4.15 Configure Keystore Credentials
This screen displays one set of Enter Keystore Password/Confirm Password fields for each product that requires a keystore password to be set.
For each set of password fields, enter and confirm the password you want to use for the keystore.
4.16 Select Optional Configuration
Select all categories (if any) for which you want to perform advanced configuration. For each category you select, the appropriate configuration screen is displayed to