L
A
TEX for Complete Novices
Version 1.4
Nicola L. C. Talbot
Dickimaw Books
http://www.dickimaw-books.com/
Copyright © 2004 Nicola L. C. Talbot
Permission is granted to copy, distribute and/or modify this document under the terms of the GNU Free Documentation License, Version 1.2 or any later version published by the Free Software Foundation; with no In-variant Sections, no Front-Cover Texts, and one Back-Cover Text: “If you choose to buy a copy of this book, Dickimaw Books asks for your support through buying the Dickimaw Books edition to help cover costs.ž A copy of the license is included in the section entitled “GNU Free Documentation Licensež.
Contents
1
Introduction
1
1.1 Class and Package Documentation . . . 3
1.2 Overview . . . 4
1.3 Recommended Reading . . . 5
2
Some Definitions
7
2.1 Source Code . . . 92.2 Output File . . . 9
2.3 DVI File . . . 9
2.4 Auxiliary Files . . . 9
2.5 Terminal or Command Prompt . . . 10
2.6 Commands . . . 11
2.7 Grouping (or Scope) . . . 14
2.8 Arguments . . . 15
2.8.1 Mandatory Arguments . . . 15
2.8.2 Optional Arguments . . . 16
2.9 Moving Arguments and Fragile Commands . . . 17
2.10 Robust Commands . . . 18
2.11 Short and Long Commands . . . 18
2.12 Declarations . . . 18
2.13 Inter-Sentence Spacing. . . 20
2.14 Hyphenation . . . 22
2.15 Environments . . . 23
2.16 The Preamble . . . 24
2.17 Lengths . . . 24
2.18 Class File . . . 26
2.19 TEX . . . 26
2.20 Perl . . . 26
3
From Source Code to Typeset Output
27
3.1 TeXWorks . . . 294
Creating a Simple Document
38
4.1 Using Simple Commands . . . 414.2 Packages . . . 42
4.2.1 Changing the Format of \today . . . 43
4.3 Special Characters and Symbols . . . 44
4.3.1 The inputenc Package. . . 47
4.4 Lists . . . 48
4.4.1 Unordered Lists. . . 48
4.4.2 Ordered Lists . . . 53
4.4.3 Description Environment . . . 55
4.5 Fonts . . . 58
4.5.1 Changing the Font Style . . . 59
4.5.2 Changing the Font Size . . . 63
4.5.3 Changing Document Fonts. . . 63
4.6 Aligning Material in Rows and Columns . . . 65
4.6.1 Column and Row Separation . . . 66
4.6.2 Spanning Columns . . . 69
4.6.3 Rules . . . 70
4.7 Boxes and Mini-Pages . . . 72
4.7.1 Framed Boxes . . . 76
5
Structuring Your Document
79
5.1 Author and Title Information . . . 795.2 Abstract . . . 81
5.3 Chapters, Sections, Subsections . . . 82
5.4 Creating a Table of Contents . . . 85
5.5 Cross-Referencing . . . 88
5.6 Creating a Bibliography . . . 97
5.7 Page Styles and Page Numbering . . . 101
5.8 Multi-Lingual Support: using the babel package . . . 105
6
The
graphicx
Package
107
6.1 Graphical Transformations . . . 1106.2 Package Options . . . 111
7
Floats
114
7.1 Figures . . . 1157.1.1 Side-By-Side Figures . . . 117
7.2 Tables . . . 118
7.2.1 Side-by-Side Tables . . . 120
7.3 Sideways Floats . . . 121
7.4 Sub-Floats . . . 121
8
Defining Commands
126
8.1 Defining Commands with an Optional Argument . . . 1318.2 Redefining Commands . . . 134
9
Mathematics
140
9.1 In-Line Mathematics . . . 1409.2 Displayed Mathematics. . . 141
9.3 Multiple Lines of Displayed Maths . . . 144
9.4 Mathematical Commands . . . 147
9.4.1 Maths Fonts . . . 147
9.4.2 Greek Letters . . . 147
9.4.3 Subscripts and Superscripts . . . 148
9.4.4 Functional Names . . . 150
9.4.5 Fractions . . . 152
9.4.6 Roots . . . 154
9.4.7 Mathematical Symbols . . . 155
9.4.8 Ellipses . . . 158
9.4.9 Delimiters . . . 159
9.4.10 Arrays . . . 166
9.4.11 Vectors . . . 169
9.4.12 Mathematical Spacing . . . 170
10 Defining Environments
172
10.1 Redefining Environments . . . 17511 Counters
176
A Downloading and Installing Packages
180
A.1 DTX and INS Files . . . 181A.2 Refreshing the TEX Database . . . 183
B Common Errors
184
B.1 * (No message, just an asterisk prompt!) . . . 185B.2 Argument of \cline has an extra } . . . 185
B.3 Argument of \multicolumn has an extra } . . . 185
B.4 \begin{. . . } ended by \end{. . . } . . . 186
B.5 Bad math environment delimiter . . . 186
B.6 Can only be used in preamble.. . . 186
B.7 Command . . . already defined . . . 187
B.8 Display math should end with $$ . . . 187
B.9 Environment . . . undefined . . . 187
B.10 Extra alignment tab has been changed to \cr. . . 187
B.11 Extra \right. . . 188
B.12 File ended while scanning use of . . . 188
B.13 File not found . . . 188
B.14 Illegal character in array arg . . . 189
B.15 Illegal parameter number in definition . . . 189
B.16 Illegal unit of measure (pt inserted) . . . 189
B.17 Lonely \item . . . 189
B.18 Misplaced alignment tab character & . . . 189
B.19 Missing } inserted. . . 190
B.20 Missing $ inserted . . . 190
B.21 Missing \begin{document} . . . 191
B.22 Missing delimiter . . . 191
B.23 Missing \endcsname inserted . . . 192
B.24 Missing \endgroup inserted . . . 192
B.25 Missing number, treated as zero . . . 192
B.26 Paragraph ended before \begin was complete . . . 193
B.27 Runaway argument . . . 193
B.28 Something’s wrongśperhaps a missing \item . . . 194
B.29 There’s no line here to end . . . 195
B.30 Undefined control sequence . . . 195
B.31 You can’t use ‘macro parameter character #’ in horizontal mode . . . 196
C Need More Help?
197
Bibliography
199
Acronyms
201
Summary
202
Index
241
GNU Free Documentation License
253
History
261
List of Figures
2.1 A Terminal . . . 11
2.2 Running texdoc From a Terminal . . . 12
3.1 Source Code for an Example Document . . . 31
3.2 The Typeset Document . . . 32
3.3 The Source Code Has a Misspelt Command . . . 33
3.4 An Error Message is Displayed . . . 34
3.5 A Short Help Message . . . 35
3.6 Error Tab . . . 36
3.7 Misspelt Class File . . . 37
4.1 Starting a New Document (1) . . . 40
4.2 Starting a New Document (2) . . . 40
4.3 TEX Views Each Letter as a Box . . . 72
5.1 Selecting LaTeXmk in TeXWorks . . . 92
5.2 TeXWorks Preferences . . . 94
5.3 Tool Configuration Dialog. . . 94
5.4 Tool Configuration Dialog: set the name and program location 95 5.5 Tool Configuration Dialog: adding -pdf argument . . . 95
5.6 Tool Configuration Dialog: adding $basename argument . . . . 96
7.1 Some Shapes . . . 116
7.2 A Circle . . . 118
7.3 A Rectangle . . . 118
7.4 A Sideways Figure . . . 122
7.5 Two Shapes. . . 124
8.1 Selecting MakeIndex in TeXWorks . . . 132
A.1 The TEX Directory Structure (TDS) Showing the Main LA TEX-Related Sub-Directories. . . 181
List of Tables
2.1 Units of Measurement . . . 24
4.1 Special Characters . . . 44
4.2 Symbols . . . 45
4.3 Ligatures and Special Symbols . . . 46
4.4 Accent Commands . . . 46
4.5 Font Changing Text-Block Commands. . . 60
4.6 Font Changing Declarations . . . 60
4.7 Font Size Changing Declarations . . . 63
7.1 A Sample Table . . . 119
7.2 Prices for 2011. . . 120
7.3 Prices for 2012. . . 120
8.1 Predefined Names . . . 138
9.1 Maths Font Changing Commands . . . 147
9.2 The amsfonts and amsmath Font Commands . . . 147
9.3 Lower Case Greek Letters . . . 148
9.4 Upper Case Greek Letters . . . 148
9.5 Function Names . . . 150
9.6 Modulo Commands . . . 150
9.7 Relational Symbols . . . 155
9.8 Binary Operator Symbols . . . 156
9.9 Arrow Symbols . . . 156
9.10 Over and Under Arrows . . . 157
9.11 Symbols with Limits . . . 157
9.12 Ellipses . . . 158
9.13 Delimiters . . . 160
9.14 Delimiter Sizing . . . 161
9.15 Mathematical Spacing Commands . . . 171
List of Exercises
1 Simple Document . . . 40
2 Using Simple Commands . . . 42
3 Using the datetime Package . . . 44
4 Using Special Characters . . . 47
5 Lists . . . 58
6 Fonts . . . 64
7 Aligning Material . . . 71
8 Creating Title Pages . . . 80
9 Creating an Abstract . . . 81
10 Creating Chapters, Sections etc . . . 84
11 Creating a Table of Contents . . . 86
12 Cross-Referencing . . . 93
13 Creating a Bibliography . . . 101
14 Page Styles and Page Numbering . . . 104
15 Using the graphicxPackage . . . 112
16 Creating Figures . . . 117
17 Creating Tables . . . 120
18 Creating Sub-Figures . . . 125
19 Defining a New Command . . . 130
20 Defining Commands with an Optional Argument . . . 133
21 Renewing Commands . . . 138
22 Maths: Fractions and Symbols . . . 159
23 Maths: Vectors and Arrays . . . 170
24 More Mathematics . . . 170
25 Defining a New Environment . . . 175
26 Using Counters . . . 179
Chapter 1
Introduction
The aim of this book is to introduce LATEX to a non-technical person. LATEX
is excellent for producing professional looking documents, however it is a
languagenot a word processor, so it can take a bit of getting used to, partic- [FAQ: Why is TeX not a WYSIWYG system?]
ularly if you have never had any experience using programming languages. LATEX does take a while to learn, so why should you use it? Here are a
few reasons but it is not an exhaustive list:
LATEX is far better at typesetting mathematical equations than word
pro-cessors. I wrote my Ph.D. thesis back in the days of LATEX2.09 (the old
version of LATEX) and given the high quantity of mathematics that I had to
typeset, it would have taken me considerably longer to write it in a word processor, and the resulting document wouldn’t have looked nearly as good. Even Microsoft have acknowledged TEX’s high-quality mathematical typog-raphy [12].
Example:
Here’s an equation taken from some kernel survival analysis:
↑ Output
𝜕2ℒ 𝜕𝑧𝜌𝑖2 =−
𝜕𝜌𝑖 𝜕𝑧𝜌𝑖 (︃ 𝜕𝑣𝑖 𝜕𝜌𝑖 e𝑣𝑖
1−e𝑣𝑖 +𝑣𝑖 e𝑣𝑖𝜕𝑣𝑖
𝜕𝜌𝑖(1−e
𝑣𝑖) + e2𝑣𝑖𝜕𝑣𝑖 𝜕𝜌𝑖 (1−e𝑣𝑖)2
)︃
↓ Output
(You can find out how to create this equation on page 161 in Section 9.4.9.) That’s all very well and good if you want to typeset some equations, but if your work doesn’t involve maths, does that mean that LATEX is not for you?
Although I am a mathematician, I have written plenty of documents with no maths in at all, including prose, poetry, newsletters, posters and brochures, but I still opt for LATEX because using LATEX ensures consistent formatting,
and the style of the document can be completely changed by simply using a different class file, or loading additional packages. This means that I can concentrate on writing the document, rather than worrying about how it will look. It also means that if, after having written a 200 page document, I then find that I need to change all the figure captions so that they are labelled “Figž instead of “Figurež, all I need to do is edit a single line, rather than going through 200 pages to individually edit every single figure caption.1.1
1.1Sure, you could use a search and replace function, but a sweeping replace-all can have unexpected side effects. For example, your document may include the sentence, “Fig-ures from the last quarter showed improvementž, which would get changed to, “Figs from the last quarter showed improvementž.
Serious fiction writers are taught never to remind the reader that they’re reading a book. Poor formatting is just as much a reminder of this as authorial intrusion.
LATEX makes it very easy to cross-reference chapters, sections,
equa-tions, figures, tables etc, and it also makes it very easy to generate a table of contents, list of figures, list of tables, index, glossary1.2 and bibliography.
You don’t need to worry about numbering anything, as this is done auto-matically, which means that you can insert new sections or swap sections around without having to worry about updating all the section numbering etc. Furthermore, if you use BibTEX1.3 in combination with LATEX, and you
have, say, 100 or more citations, it doesn’t matter if you are then told that the citations have to be re-ordered (say, in order of citation rather than al-phabetically). All that is required is a minor edit to change the appropriate style file rather than ploughing through the entire document changing all the citations by hand.
When you are editing a document using a word processor, the word processor has to work out how to reformat the document every time you type something. If you have a large document with a great many inserted objects (such as figures and equations), the response to keyboard input can become very slow. You may find that after typing a few words you will have to wait until the computer catches up before you can see what you have typed. With LATEX you type in your code using an ordinary text editor. The
document doesn’t get formatted until you pass it to LATEX, which means that
you are not slowed down by constant reformatting.
Lastly, there’s the fact that LATEX follows certain typographical rules, so
you can leave most of the typesetting to LATEX. You rarely need to worry
about minor things such as inter-sentence spacing. The default is English spacing, but if you have a publisher who disapproves of this, you can switch if off with a single command. (See Section 2.13.)
LATEX will also automatically deal with f-ligatures.1.4 That is, if any of the
following combination of letters are found: fl, ffl, ff, fi, ffi, they will
automatically be converted into the corresponding ligatures: fl, ffl, ff, fi, ffi. Note the difference between fluffier (2 ligatures) and fluffier (no ligatures). These points may seem minor but they all contribute towards the impact of the entire document. When writing technical documents, the presentation as well as the content is important. All too often examiners or referees are put off reading a document because it is badly formatted. This provokes an immediate negative reaction and provides little desire to look favourably upon your work.
To give you an idea of what you can do with LATEX, this book was written
in LATEX.1.5 The PDF versions (including the paperback version) were
gener-ated using PDFLATEX andmakeindex and the HTML version was generated
1.2Glossaries are covered inUsingLATEX to Write a PhD Thesis[13].
1.3Automating bibliographies is covered inUsing LATEX to Write a PhD Thesis[13]. 1.4Ligatures can be suppressed using themicrotypepackage if necessary
1.5The source code is available athttp://www.dickimaw-books.com/latex/novices/, but it really isnot the place to start if you are a beginner, as it contains LATEX andPerlcode beyond the scope of this tutorial.
using the LATEX2HTML1.6 converter. [FAQ:
Conversion from (La)TeX to
HTML]
For more reasons as to why you might want to use LATEX instead of a
word processor, have a look at Why TeX?
1.1
Class and Package Documentation
There are hundreds of classes and packages available on the Comprehen-sive TEX Archive Network1.7 (CTAN). These are made available by many
volunteers. Some provide detailed documentation to accompany their con-tribution, while others only provide a few notes in a README file or com-ments in the source files. This book only provides an introductory look at a small selection of these contributions. If you want further details on how to use a particular class or package you should check the documentation that accompanies it. You can use the texdoc application to search for the
documentation. This is a command line application, which means you need a terminal or command prompt (see Section 2.5).
To use texdoc, you need to type (at the command prompt) texdoc
fol-lowed by a space folfol-lowed by the name of the class or package you want information about. For example, to read thememoir documentation, type the
following at the command prompt (press the return/enter key at the end of the line):
texdoc memoir
Some packages come with more than one set of documentation. For exam-ple, the glossaries package comes with the main user manual, a short guide
for beginners and the documented code for advanced users. Just doing
texdoc glossaries
will display the advanced documented code. To list all available documenta-tion for a package, use the -l option:
texdoc -l glossaries
Then type the number corresponding to the file you want to view. If you can remember the file name (for example glossaries-user) you can type
that next time you want to view it:
texdoc glossaries-user
There is also aPerl/Tk-basedgraphical user interface (GUI)calledtexdoctk,
which is distributed with
TeX Live, that you can use instead of texdoc if you can’t work out how
to use a terminalor prefer a GUI approach.
Failing that, you can also check on CTAN [1] using the URL ctan.org/ pkg/⟨name⟩, where⟨name⟩is the name of the package or class. For exam-ple, if you want to look up the documentation for thememoirpackage, you can
1.6http://www.latex2html.org/ 1.7http://mirror.ctan.org/
find it at http://ctan.org/pkg/memoir or go to http://mirror.ctan.org/ and search for the package or class.
Another alternative recently made available is to use the URLtexdoc.net/ pkg/⟨name⟩. For example, http://texdoc.net/pkg/memoir will fetch the documentation for the memoir class.
However, it’s better to usetexdocortexdoctkto read the documentation
installed with the class or package on your computer to ensure it matches the installed class or package version.
Note that it is important to remember that the TEX world is mostly sup-ported by volunteers. CTAN [1] itself is maintained by a very small group (currently two people). It’s not like a commercial company with 24/7 sup-port and hundreds of paid employees constantly updating the software. At its core, TEX is a community effort. While some volunteers actively maintain and update their classes or packages, some people move on to other things and stop maintaining their work. Occasionally, if the class or package is popular, someone else might take over maintenance. There is no dedicated helpdesk to go to, but there are many ways of getting help, see Appendix C (Need More Help?)
1.2 Overview
This document is structured as follows:
Chapter 2 (Some Definitions) defines terms that will be used throughout this document. I strongly suggest that you look through this chapter before you start so that you understand the terminology used in this document. At the very least, you should read the first part that details how corre-sponding input and output is displayed in this document Ð you need to understand the difference between “inputž (source code) and “outputž (how the source code will appear in the typeset document).
Chapter 3 (From Source Code to Typeset Output) details the software that you will need to use LATEX and describes how to use the software.
Chapter 4 (Creating a Simple Document) shows you how to create a very basic document.
Chapter 5 (Structuring Your Document) shows you how to create chapters and other sectional units so that you end up with a fully structured docu-ment.
Chapter 6 (The graphicx Package) shows you how to include external image files and how to scale and rotate text.
Chapter 7 (Floats) describes how to create figures and tables.
Chapter 8 (Defining Commands) describes how to define your own commands, and redefine existing commands.
Chapter 9 (Mathematics) describes how to typeset mathematics.
Chapter 10 (Defining Environments) describes how to define new environments.
Chapter 11 (Counters) discusses how numbers are stored in counters, how to change their values, and how to define your own counter.
Appendix A (Downloading and Installing Packages) shows you how to download and install additional packages that weren’t installed with your TEX dis-tribution.
Appendix B (Common Errors) documents possible errors you may encounter, and gives advice on how to fix them.
Appendix C (Need More Help?) gives pointers on where to go for help.
Throughout this document there are pointers to related topics in theUK List of TEX Frequently Asked Questions1.8 (UK FAQ). These are displayed
in the margin in square brackets, as illustrated on the right. You may find [FAQ: What is LaTeX?]
these resources useful in answering related questions that are not covered in this book.
This book and associated files, including solutions to the exercises, are available on-line at: http://www.dickimaw-books.com/latex/novices/. The links in this document are colour-coded: internal links are blue, external links are magenta.
1.3 Recommended Reading
This document is designed as an introductory text, not a comprehensive
guide. For further reading try some of the following: [FAQ: Books on LaTeX]
LATEX: A Document Preparation System [9] is the user guide and
ref-erence manual for LATEX, and is a good basic text for anyone starting out,
however it doesn’t cover AMSTEX, so anyone who needs to typeset more [FAQ: What are the AMS
packages?]
than basic mathematics may prefer eitherA Guide to LATEX [7] orThe LATEX
Companion [3]. Both these books cover AMSTEX, BibTEX and makeindex.
In the same series as The LATEX Companion, there is also The LATEX
Graphics Companion [5] which details how to illustrate documents with LATEX and PostScript, including a chapter on colour (coloured text,
back-ground, tables and slides). This is recommended to anyone who is contem-plating heavy use of graphics, but you do need a basic knowledge of LATEX
before delving into it.
The final book in the “Companionž series which you may find useful is The LATEX Web Companion [4]. This is recommended for those interested
in creating documents for the web, either as HTML or PDF. It details how to convert LATEX documents into HTML using various applications such as
LaTeX2HTMLandTeX4ht, and how to create PDF documents using PDFLATEX, [FAQ: What is
PDFTeX?]
including how to create active links within your document using thehyperref
package.
There are two new LATEX books that I haven’t read but have been
rec-ommended to me: LATEX Beginner’s Guide [8] and LATEX and Friends [19].
1.8http://www.tex.ac.uk/faq
Note that theUK TEX User Group1.9 (UK TUG) has a 25% book discount
scheme for members. Seehttp://uk.tug.org/membershipfor more details of that and other associated benefits. If you’re not in the UK, have a look at http://www.tug.org/usergroups.html to see if there is a local user group in your area.
There is also a wealth of LATEX-related information on the Internet. [FAQ: How to get
help]
CTAN [1] is a good place to start. You can check the on-line catalogue [21] for information about available software and, as mentioned earlier, there is also the list of frequently asked questions which I recommend you try if you have any queries. See also Appendix C (Need More Help?)
1.9http://uk.tug.org/
Chapter 2
Some Definitions
As mentioned in Chapter 1 (Introduction), LATEX is a language, so you can’t
simply start typing and expect to see your document appear before your
very eyes. You need to know a few things before you can get started, so it’s [FAQ: Why is TeX not a WYSIWYG system?]
best to define a few terms first. Don’t worry if there seems a lot to take in, there will be some practical examples later, which should hopefully make things a little clearer.
Throughout this book,source codeis illustrated in a typewriter font with the wordInputplaced in the margin, and the corresponding output (how it will
appear in the PDF document) is typeset with the word Outputin the margin. Example:
A single line of code is displayed like this:
This is an \textbf{example}. Input
The corresponding output is illustrated like this:
This is an example. Output
Segments of code that are longer than one line are bounded above and below, illustrated as follows:
↑ Input
Line one\par
Line two\par
Line three.
↓ Input
with corresponding output:
↑ Output Line one
Line two Line three.
↓ Output
Take care not to confuse a backslash \ with a forward slash / as they have different meanings. (Commands typeset in blue, such as \par, indicate a hyperlink to the command definition in the summary.)
Commanddefinitions are shown in a typewriter font in the form:
\documentclass[⟨options⟩]{⟨class file⟩} Definition
In this case the command being defined is called \documentclass and text
typed⟨likethis⟩(such as⟨options⟩and⟨class file⟩) indicates the type of thing
you need to substitute. (Don’t type the angle brackets!) For example, if you want the scrartcl class file you would substitute ⟨class file⟩ with scrartcl
and if you want theletterpaperoption you would substitute ⟨options⟩with
letterpaper, like this:
\documentclass[letterpaper]{scrartcl} Input But more on that later.
Sometimes it can be easy to miss a space character when you’re reading this kind of book. When it’s important to indicate a space, the visible space symbol ␣ is used. For example:
A␣sentence␣consisting␣of␣six␣words. Input When you type up the code, replace any occurrence of ␣ with a space.
One other thing to mention is the comment character % (the percent symbol). Anything from the percent symbol up to, and including, the end of line character is ignored by LATEX. Thus
↑ Input
A simple % next comes a command to make some bold text
\textbf{example}
↓ Input
will produce the output
A simple example Output
The percent symbol is often used to suppress unwanted space resulting from line breaks2.1 in thesource code. For example, the following code
↑ Input
Foo%
Bar
↓ Input
will produce the output:
FooBar Output
as opposed to
↑ Input
Foo Bar
↓ Input
which will produce the output:
Foo Bar Output
On the other hand, spaces at the start of a line of input are ignored, so
↑ Input
Foo%
Bar
↓ Input
still produces:
FooBar Output
2.1LATEX treats the end-of-line character as a space.
2.1 Source Code
The source code consists of all the text and LATEX commands that make up
an entire document. The source code is typed in using a text editor, and [FAQ:
TeX-friendly editors and shells]
saved with the file extension .tex. The source code may be contained in
just one file, or it might be split across several files.
2.2 Output File
The LATEX application reads in yoursource codeand creates the typeset
doc-ument, theoutput file. This book assumes that you will be using the version of LATEX that produces PDF files (PDFLATEX). If you are using TeXWorks (see
Chapter 3 (From Source Code to Typeset Output)), you need to select the “PDFLaTeXž item from the drop-down list. If you are using TeXnicCen-ter, select the “LaTeXÑPDFž build profile. If you are using WinEdt, when you want to build your document click on the button marked “PDFLaTeXž rather than the one marked “LaTeXž. If you are using a terminal or com-mand prompt, use the comcom-mand pdflatex rather than latex.
(TeXnic-Center, WinEdt and using the terminal or command prompt approach are described in the supplemental material.)2.2
2.3 DVI File
TEX (and subsequently LATEX) originally created DVI (DeVice Independent)
files instead of PDF files.2.3 However, although there are free DVI viewers, not many people have them installed, so it’s really only TEX users who can read them. Also, you can’t embed image files in a DVI file or have fancy effects, such as rotation. Instead, people can use TEX/LATEX to create a DVI
file and then use an application to convert the DVI file to PostScript.
These days PDF is the preferred platform-independent format, and with the advent of PDFTEX, modern TEX/LATEX users can directly create PDF
documents rather than going through the DVI route. Some people still prefer to create DVI files as an intermediate step, particularly if they want to embed PostScript instructions (as is done by the pstricks package). For
simplicity, this book assumes that you have a modern TEX distribution and are using PDFLATEX rather than LATEXÑDVI.
2.4 Auxiliary Files
When LATEX creates your output file, it not only creates a PDF file but also
creates other associated files. The most common of these are the log file, which has the extension.log, and theauxiliary file, which has the extension
.aux.
2.2http://www.dickimaw-books.com/latex/novices/html/supplemental.html 2.3There was no PDF back then.
The log file contains a transcript of the most recent LATEX run. It lists
all the files that have been loaded, including the class file and any packages that your document has used. There should also be the class or package version number and date, although this is dependent on the class or package author. If you ever want to ask for help, you need to say what version you are using.
For example, this book uses thescrbook class, so the log file includes the
lines:
(/usr/local/texlive/2010/texmf-dist/tex/latex/koma-script/ scrbook.cls
Document Class: scrbook 2010/06/17 v3.06 KOMA-Script document class (book)
(This is actually now out-of-date as the latest version at the time of writing this is version 3.11a dated 2012/07/05.)
Error messages, warnings and general information messages are also written to the log file as well as the document statistics. You can delete this log file if you like. It will be created again the next time you run LATEX.
The auxiliary file contains all the information needed for cross-referencing (covered in Section 5.5). This is needed to ensure all your cross-references are up-to-date. You can delete this file, but you will need at least two LATEX
runs to ensure your cross-references are correct the next time you create your output file.
TeXWorks also creates a file with the extension .synctex.gz. This file
allows you to jump to and from thesource codeand the appropriate part of theoutput file. If you delete this file, you will have to run LATEX again before
you can use this function.
Other files that may be created include the table of contents file (.toc),
the list of figures file (.lof) and the list of tables file (.lot). Some class
files or packages create additional files. If your operating system hides file extensions, you might want to switch off this behaviour, if possible, to make it easier to distinguish between all the various files.
TeXWorks has a menu item FileÏRemove AUX Files that will remove the
auxiliary files.
2.5 Terminal or Command Prompt
Sometimes you may find that you need to use a command-line application. This is an application that doesn’t have a graphical user interface. This isn’t specific to TEX, but the TEX distribution comes with a number of them. In fact, front-ends (such as TeXWorks) run some of these applications for you when click on the typeset or build button.
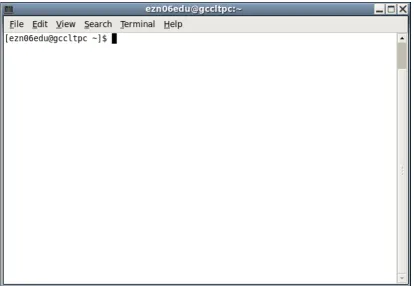
Most operating systems provide aterminal or command prompt where you can type the command-line application name and any associated infor-mation. For example, Figure 2.1 shows a terminal running under Fedora on Linux.
Windows To open the MSDOS Prompt, go to the Start menu, then “All Pro-gramsž, then “Accessoriesž and click on “MSDOS Promptž.
Mac OSX To open the Mac Terminal, go to your “Applicationsž folder, open “Utilitiesž and double click on “Terminalž.
Unix etc The Terminal is usually located either in the “Applicationsž menu or in the “System Toolsž subdirectory of the “Applicationsž menu.
Figure 2.1 A Terminal
Example:
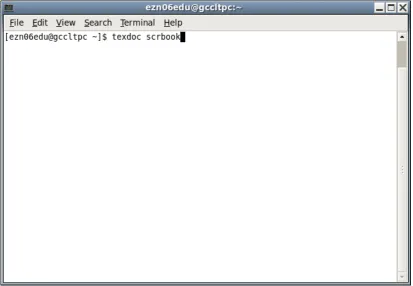
One such command-line application you are likely to need is texdoc. This
is mentioned in more detail in Section 1.1, but to use texdoc you need to
open the terminal or command prompt as described above and typetexdoc
followed by a package or class name, for example:
texdoc scrbook
(see Figure 2.2) then press the Enter or Return key.
Other TEX-related command-line applications include pdflatex, bibtex, makeindex, xindy and kpsewhich.
2.6 Commands
A command is used to tell LATEX to do a particular thing at that point in the
document. These are the basic forms a command can take:
Figure 2.2 Running texdoc From a Terminal
1. A Control Word.
This is a backslash \ followed by letters (A,. . . ,Z,a,. . . ,z). There can be [FAQ: Commands gobble following space]
no non-alphabetical characters in the command, apart from the ini-tial backslash, and the name is always case-sensitive so, for example, \gamma and \Gamma have different meanings. One command that often trips up new users is \LaTeX, which prints the LaTeX logo: LATEX. This
command has three captial letters and two lower case letters. If you get the case of any of the letters incorrect, you will get an “undefined control sequencež error.
There must be no space between the backslash and the start of the
B
command name. Some command names are made up of two or more names joined together, such as \tableofcontents. Make sure you don’t insert any spaces in the control word. This will either lead to an error or an unexpected result. For example,✔
\appendixname
displays “Appendixž but
✘
\appendix name
switches to the appendices and then prints the word “namež.
Most LATEX commands have fairly self-explanatory names. (For
exam-ple, \chapter starts a new chapter and \rightarrow prints an arrow
pointing to the right.) However, in most cases, you need to use U.S. spelling (for example, \color rather than\colour).
This is the most common form of command. Any spaces immediately following a command of this type are ignored, so for example
\TeX nician Input
will produce
TEXnician Output
whereas
\TeX{} nician Input
will produce
TEX nician Output
But the following will cause an “undefined control sequencež error:
✘
\TeXnician
There is one command that you must use in every document you cre-ate, and that is the\documentclasscommand. This command must be placed at the very start of your document, and indicates what type of document you are creating. This command is described in more detail in Chapter 4 (Creating a Simple Document).
2. A Starred Command
Some commands have variants that are indicated by an asterisk at the end of the name. For example, \chapter makes a numbered
chap-ter whereas \chapter* is makes an unnumbered chapter. A starred command is the version of the command with the asterisk. (On a UK keyboard the asterisk character is usually located on the same key as the digit 8.)
This may seem like a different form to a control word, described above. After all, I’ve just said that a control word can only contain alphabetical characters. However a starred command is actually a control word (such as \chapter) followed by an asterisk. The control word checks to see if the next character is an asterisk. If it is, it performs one action, otherwise it performs another action.
This type should therefore just come under the previous category, but as you will often hear of “starred commandsž it seemed better to have a separate category.
3. A Control Symbol.
This is a backslash followed by a single non-alphabetical character. For example \% will print a percent symbol. Spaces are not ignored after this type of command, for example
17.5\% VAT Input
will produce
17.5% VAT Output
It’s also possible to have starred forms of control symbols. For example \\ forces a line break. If it’s not followed by an asterisk a page break is allowed at that line break, but if it is followed by an asterisk \\* no
page break is allowed at that line break. (If a page break is needed, it will be made at the end of the previous line instead.)
4. Character Sequence.
Some special sequences of characters combine to form an instruction. For example ffi is the command to produce the ffi ligature, and the
sequence of symbols !‘ is the command to produce the upside down exclamation mark ¡
5. An Internal Command.
This is like the first type, a control word, but the @ character
ap-pears in the command name (for example \c@section) however in-ternal commands should only be used in class files orpackages. The @ symbol takes on a special meaning when a file is included using \documentclass (a class file) or \usepackage(a package).
For example, in a class file or package \c@section is an internal
rep-resentation of the sectioncounter, whereas in a.texfile\c@section is
interpreted as the command\c(the cedillaaccent command) that takes
the character @ as its argument, followed by section, which produces
the rather odd looking @¸ section. [FAQ: \@ and @
in macro names]
Don’t be tempted to use internal commands until you have first grasped the basics. You have been warned!
2.7 Grouping (or Scope)
A segment of code may be grouped by placing it within { and } (curly braces). Most commands that occur within a group will be local to that group. For example, \bfseries changes the font weight to bold, so the following segment of code:
↑ Input
Here is some text. {This text \bfseries is in a group.} Here is some more text.
↓ Input
will appear in the typeset document looking like:
Here is some text. This text is in a group. Here is some more text. Output As can be seen, the font change only stays in effect until it reaches the
end of the group (signified by the closing curly brace}.) For a command to
be in the same scopeas another command, both commands must be within the same group. For example, in the following, \bfseries and \itshape are in the same scope:
{\bfseries Some bold \itshape and italic text} Input But below, they are in different scopes:
{\bfseries Some bold text} {\itshape and some italic text} Input Environments form an implicit scope.
2.8 Arguments (also called “Parameters”)
Some commands take one or more arguments. This provides a way to give LATEX additional information so that it is able to carry out the command.
There are two types of arguments: mandatoryand optional.
2.8.1 Mandatory Arguments
Mandatory (or compulsory) arguments are arguments that haveto be spec-ified.
Examples:
1. If you want a footnote, you need to use the\footnotecommand, which has a mandatory argument that specifies the contents of the footnote. Like this:
Here is a footnote.\footnote{This is the footnote
text.} Input
Here is a footnote.2.4 Output
(By default you won’t get a hyperlink. This book uses thehyperref
pack-age, which generates the hyperlinks.)
2. If you want to start a new chapter, you need to use the\chapter com-mand, but you also need to tell LATEX the title of this new chapter. So
the \chapter command takes one mandatory argument that specifies the title.
For example, the following code:
\chapter{Some Definitions} Input
was used to generate the heading for the current chapter (at the top of page 7).
3. The command\textbftypesets its argument in a bold font (as opposed to the declaration\bfseries which switches to a bold font.)
For example, the following code:
\textbf{Some bold text.} Input
produces the output
Some bold text. Output
Notes:
1. LATEX takes the first non-space object following the command name as
the argument, which is why in the above examples the arguments have to be grouped.
Suppose the last example above didn’t have a group, so instead the code was:
\textbf Some bold text. Input
then only the “Sž would be the argument because it’s the first object following the command, in which case the output would look like:
Some bold text. Output
2. If you want the argument to be blank, use empty braces: {}. For example, suppose you want to have a chapter without a title2.5 you
would need to do:
\chapter{} Input
2.8.2 Optional Arguments
Some commands may have one or more optional arguments. Unlike mandatory arguments, optional arguments must always be enclosed in square brackets [ ].
Example:
The command \\ ends a line. So the following segment of code:
Line one\\Line two. Input
will produce the following output:
↑ Output Line one
Line two.
↓ Output
However the\\command also has an optional argument that allows you to specify how big the gap between the two lines should be. So the following segment of code:
Line one\\[1cm]Line two. Input
will produce the following output:
2.4This is the footnote text.
2.5The numbers for chapters, sections etc are automatically inserted by LATEX, so this ex-ample would produce a numbered chapter without a title.
↑ Output Line one
Line two.
↓ Output
Incidentally, note the difference between the previous example, and the following example:
Line one\\{[1cm]} Line two. Input
↑ Output Line one
[1cm] Line two.
↓ Output
In this example the [1cm]has been placed inside a group, so it is no longer [FAQ: Start of
line goes awry]
considered to be an optional argument, and since the command \\ does not take a mandatory argument, the[1cm]is simply interpreted as ordinary
text.
Example:
The command\framebox(which will be covered later inSection 4.7.1) takes amandatory argumentand two optional arguments. \frameboxputs a frame around the contents of its mandatory argument:
\framebox{Some Text} Input
Some Text Output
The first optional argument can be used to make the box a specified width:
\framebox[4cm]{Some Text} Input
Some Text Output
The second optional argument specifies the justification of the text (left, right or centred) within the box:
\framebox[4cm][r]{Some Text} Input
Some Text Output
In general, if a command has both optional and mandatory arguments, the optional arguments are usually specified first (although there are a few exceptions).
2.9 Moving Arguments and Fragile Commands
Certain types of commands, called fragile commands, can seriously mess things up when they are used in what is termed amoving argument. These types ofargumentare generally those whose contents are copied to another part of the document. For example, section headings appear at the start of a section, but they can also appear in the table of contents. The \footnote command is a fragile command, so
✘
\section{A heading\footnote{with a footnote}}will cause an error. [FAQ: An extra
‘}’??]
If there is no other command to use in its place, you should use\protect immediately before the fragile command:
\section{A heading\protect\footnote{with a footnote}} Input
This, however, is a contrived example, because it isn’t a good idea to have a [FAQ: Footnotes in LaTeX section headings]
footnote in a section heading, as it will also end up in the table of contents, and possibly in page headings.
2.10 Robust Commands
A robust command is a command that is not a fragile command.
2.11 Short and Long Commands
Ashort command is a commandwhose argument may not contain a para-graph break (either as a blank line or using \par.) Conversely, a long command is a command whoseargumentmay contain a paragraph break. Using short commands helps to test for forgotten braces, so it is rec-ommended that when you define a new command(see Chapter 8(Defining Commands)) you should always make the command a short command, un-less there is a chance that the argument may need to contain a paragraph break.
2.12 Declarations
The term declaration is used to refer to a command that affects the docu-ment from that point onwards. The declaration itself does not produce any text and, in most cases, its effect can be localised by placing the declaration within a group. For example, \bfseries is a declaration that switches the current font weight to bold, so the following code
↑ Input
Here is some normal text.
\bfseries Here is some bold text.
↓ Input
will appear in the typeset document looking like:
Here is some normal text. Here is some bold text. Output Some declarations don’t immediately have a visible effect. For example,
the declarations
\raggedright \raggedleft \centering Definition
only set the paragraph justification to ragged-right, ragged-left or centred, respectively, if the declaration is still in effect at the end of the paragraph. That is, if it is still in effect at the next \par or blank line.
Example:
↑ Input
This is an example paragraph illustrating the paragraph
justification declarations. The default justification is fully justified. \raggedright The paragraph justification can be switched to ragged-right or \raggedleft ragged-left. \par
↓ Input
↑ Output This is an example paragraph illustrating the paragraph justification
declarations. The default justification is fully justified. The paragraph justification can be switched to ragged-right or ragged-left.
↓ Output
Above, the justification at the paragraph break is ragged-left, so that’s the justification used for the entire paragraph. Compare with:
↑ Input {This is an example paragraph illustrating the paragraph
justification declarations. The default justification is fully justified. \raggedright The paragraph justification can be switched to ragged-right or \raggedleft ragged-left.} \par
↓ Input
↑ Output This is an example paragraph illustrating the paragraph justification
dec-larations. The default justification is fully justified. The paragraph justifica-tion can be switched to ragged-right or ragged-left.
↓ Output
Above, the justification at the paragraph break is fully-justified, since both the declarations \raggedright and \raggedleft are cancelled when their local scope (signified by the curly braces) ends. This type of mistake most often occurs when people try to centre text doing something like:
{\centering Some text that is supposed to be centred.
}
✘
Next paragraph.
The paragraph break (blank line) must go before the closing brace. {\centering Some text that is supposed to
be centred.
✔
}
Next paragraph.
B
While we’re on the subject of centred text, don’t be tempted to use
\centerline. It’s obsolete [15].
2.13 Inter-Sentence Spacing
Inter-sentence spacing refers to the default type of space to be inserted between adjacent sentences within a paragraph. There is disagreement over what size this space should be. French spacing uses the same space as used between words. English spacing uses an en-space (half an em-space). With proportional fonts (such as this one), the en-space is slightly larger than a single space. The difference is shown here:
↑ Input
X X
X\enspace X
↓ Input
↑ Output X X
X X
↓ Output
(Note that with fully-justified paragraphs, in both cases the spaces may be stretched to ensure the sides of the paragraph are ŕushed.)
TEX (and LATEX) defaults to English spacing, but you can switch to French
spacing using the declaration:
\frenchspacing Definition
and switch back again using
\nonfrenchspacing Definition
There was no en-space on a typewriter, so typists started using two spaces in an attempt to emulate that slightly larger than one space look. This habit has spread to word-processor users as well, and now many people incorrectly assume English spacing means adding two spaces after a full stop, which is too wide and looks ugly, but this error shouldn’t be used as a criticism against English spacing.
There has been a gradual trend towards French spacing over the last century, and some publishers insist on it. I think this may in part be due to a backlash against the ugliness of two spaces in typewritten and word-processed documents. In fact the Oxford Style Manual [11] simply states, “In text, only use a single space after all sentence punctuation.ž
Personally, I prefer English spacing, particularly in reference books. I have many reference books on my shelf, but I haven’t read any of them from cover-to-cover. I ŕick to a particular section and skim through the paragraphs until I reach the desired bit of information. Sometimes I’ve already looked something up, so I have a vague idea as to where to find the information. The extra space between sentences makes it easier to locate a particular sentence.
This isn’t so much of an issue with books designed to be read from beginning to end, such as a novel. However, I have read one such book
that used a font where the commas had tiny tails and most of the sentences contained multiple proper nouns, which made it very difficult to read as it wasn’t clear where the sentences ended. Is that a full stop followed by a new sentence that happens to start with a proper noun, or is it a comma whose tiny tail is blurred by my short-sighted eyes followed by a clause that happens to start with a proper noun? A well-written, well-presented document should not interrupt the reader, forcing them to continually go back to re-parse a sentence.
However, if you are writing a document, whether prose or technical, with the intention of having it published you must check with the publisher’s guidelines to see if they insist on a particular style.
Notes:
An end of sentence punctuation mark can be one of: a full stop (.), excla-mation mark (!) or question mark (?).
1. If an end of sentence punctuation mark follows a lower case character, TEX assumes the punctuation mark indicates the end of the sentence. For example, as in:
Did you see that? I certainly did. Input
2. Where this isn’t the case, use\␣ (backslash followed by a space).
↑ Input
This can happen when a sentence contains a lower case abbreviation, e.g.\␣like this one.
↓ Input
3. If an end of sentence punctuation mark follows an upper case charac-ter, TEX assumes the sentence hasn’t ended at that point. For example, as in:
The G.P. said it was only hypochondria. Input
4. Where the sentence actually ends with an upper case letter, add \@ after the letter and before the punctuation mark.
↑ Input
Yesterday, I saw my G.P\@. Tomorrow I’m going to see the specialist.
↓ Input
Note on Typewriter Fonts
Note that \nonfrenchspacing in a monospaced font will insert two spaces between sentences, emulating a typewritten document.
↑ Input \ttfamily
\nonfrenchspacing x. x.
\frenchspacing x. x.
↓ Input
↑ Output
x. x. x. x.
↓ Output
2.14 Hyphenation
Words sometimes require hyphenation to help justify paragraphs and pre-vent overly large areas of white space or protrusions into the right margin. Some word processors by default don’t hyphenate words in fully-justified paragraphs, which has led some people to believe that hyphenation is bad. Just because word processors do something a certain way, doesn’t mean that it’s the correct way. TEX has an excellent hyphenation algorithm, but the default hyphenation pattern is designed for English. If you are writing in another language, use the babel package to switch the hyphenation pattern
(see Section 5.8).
Despite using an excellent algorithm, TEX occasionally gets the hyphen-ation wrong, particularly where the hyphenhyphen-ation is context sensitive. There are two ways of setting the hyphenation for a given word.
1. For all occurrences of the word, use
\hyphenation{⟨hyphenated word⟩} Definition
inserting a hyphen - at all possible hyphenation points. For example:
\hyphenation{gal-axy} Input
2. For a particular instance of a word, use \- at the hyphenation point within the word. For example:
↑ Input
There once was a little alien called Uiop who lived in the faraway gal\-axy of Zxcv.
↓ Input
2.15 Environments
An environment is a block of code contained within the commands
\begin{⟨env-name⟩} Definition
and
\end{⟨env-name⟩} Definition
where ⟨env-name⟩ is the name of the environment. The block of code is then formatted in a method specific to that environment. For example, the
bfseries2.6 environment will typeset the contents of the environment in a bold
font. The following code:
\begin{bfseries}Here is some bold text.\end{bfseries} Input will appear in the typeset document looking like:
Here is some bold text. Output
Some environments also supplycommandsthat may only be used within that environment.
Example:
The itemize environment provides a command called \item so that you can specify individual items within an unordered list:
↑ Input
Shopping List:
\begin{itemize} \item Cabbages
\item Bananas
\item Apples
\end{itemize}
↓ Input
The above will produce the following output:
↑ Output Shopping List:
• Cabbages • Bananas • Apples
↓ Output
2.6Note there is no backslash in the environment name.
2.16 The Preamble
The preamble is the part of the source code that comes after the \documentclass command and before \begin{document} (the start of the
document environment). Only a few special commands may be placed in the
preamble (such as\title), and there are a few special commands that may only go in the preamble (such as \usepackage). Nothing that generates text (for example, \maketitle) may go in the preamble.
\documentclass{...}
ÎÉ This bit in here is the preamble. \begin{document}
2.17 Lengths
A length register stores dimensions (such as 1in, 5cm, 8.25mm). Like con-trol words, length registers start with a backslash and only contain alpha-betical characters in their name. These registers are used to determine page layouts etc. For example, the paragraph indentation is given by the length register \parindent. Acceptable units of measurement are listed in Table 2.1. The two relative units “emž and “exž are dependent on the current font. (The em-value used to be the width of an “Mž and the ex-value was the height of the letter “xž, but these days the values are more arbitrary [6].) Use em for widths and ex for heights if you want to use relative values.
Table 2.1 Units of Measurement
pt TEX point: 72.27pt = 1in in inch: 1in = 25.4mm mm millimetre: 1mm=2.845pt cm centimetre: 1cm = 10mm
ex the “x-heightž of the current font
em the width of a “quadž in the current font sp scaled point: 1sp = 65536pt
bp big point (or PostScript point): 72bp = 1in dd didôt point: 1dd=0.376mm
pc pica: 1pc=12pt cc cicero: 1cc=12dd
mu math unit: 18mu = 1em
To change a length you can use the command:
\setlength{⟨cmd⟩}{⟨length⟩} Definition
where ⟨cmd⟩ is the register (for example, \parindent) and ⟨length⟩ is the new length. Alternatively, you can add a value to a length using:
\addtolength{⟨cmd⟩}{⟨length increment⟩} Definition
The value of a length register can be displayed in your document using
\the⟨register⟩ Definition
Arubber length is a length that has a certain amount of elasticity. This
enables you to specify your desired length but allows LATEX to stretch or
contract the space to get the body of text as ŕushed with the margins as
possible. [FAQ: Zero
paragraph indent]
For example, the paragraph gap\parskipis usually set to0pt plus 1pt.
This means that the preferred gap is 0pt but LATEX can stretch it up to 1pt
to help prevent the page from having a ragged bottom. For example:
↑ Input \setlength{\parindent}{0pt}
\setlength{\parskip}{10pt plus 1pt minus 1pt}
This is the first paragraph.
This is the second paragraph.
The paragraph indentation is \the\parindent.
↓ Input
This now produces:
↑ Output This is the first paragraph.
This is the second paragraph. The paragraph indentation is 0.0pt.
↓ Output
In this example, the preferred paragraph gap is 10pt but it will allow for a
deviation of up to plus or minus 1pt.
B
Note that it’s generally best not to change \parskip explicitly as it can cause unexpected complications. If you use one of the KOMA-Script classes, such as scrreprt, you can use the parskip class option that can take the
following values: parskip=full(a full line height)parskip=half (half a line
height).2.7
Example:
\documentclass[parskip=full]{scrbook} Input If you want to change any of the page layout lengths (such as\textwidth), the easiest way to do it is to use the geometry package. This package should
have been installed when you installed your TEX distribution. For example: suppose you want the total text area to be 6.5in wide and 8.75in high with a left margin of 0.4in, then you would do:
\usepackage[body={6.5in,8.75in},left=0.4in]{geometry} Input
2.7There are also variants that have+,-or*as a suffix. See the KOMA-Script documentation for further details.
2.18 Class File
The class file (.cls) defines the page layout, heading styles and various
commands and environments needed for a particular type of document. The class file is specified using the command
\documentclass[⟨options⟩]{⟨class-name⟩} Definition
where ⟨class-name⟩ is the name of the file without the .cls extension. All
LATEX documents must start with this command. This book uses the scrbook
class.
2.19 TEX
TEXis the typesetting language written byDonald Knuth. He wrote a format [FAQ: What is TeX?]
of TEX called Plain TEX, but many people find Plain TEX complicated, so
[FAQ: Should I use Plain TeX or LaTeX?]
Leslie Lamport wrote a format of TEX called LATEX to make it a bit easier to
use. You can think of LATEX as a go-between converting your instructions
[FAQ: How does LaTeX relate to Plain TeX?]
into TEX. This book mostly uses the term LATEX, even if the matter is more
general to TEX, to avoid complicating matters. Some error messages you may see will be LATEX messages, some will be TEX messages. LATEX error
messages tend to be a bit easier to understand than TEX messages. There
are other formats of TEX, such as ConTeXt, but this book does not cover [FAQ: What is ConTeXt?]
them.
2.20 Perl
TEX-distributions such as TeX Live and MiKTeX also include some helper
applications that you may find useful. For example, texdoc (Section 1.1)
helps you access installed documentation and makeindex helps generate an
index for your document. Some of the helper applications are written in a scripting language called Perl, and you must have the perl application
installed to be able to use them. Unix-like operating systems should already have it installed. Windows users can choose between several Perl distri-butions. The most popular seem to be Strawberry Perl and Active Perl. Perl scripts that come with TEX include: epstopdf (converts Encapsulated
PostScript (EPS) files to PDF), pdfcrop (crops a PDF file), xindy (a more
ŕexible indexing application thanmakeindex), texcount (counts the number
of words in a LATEX document) and latexmk (runs LATEX and any associated
applications, such as bibtex, the required number of times to ensure the
document is fully up-to-date).
Chapter 3
From Source Code to Typeset
Output
Every time you want to create or edit a LATEX document, there are three
basic steps you will always need to follow:
1. Write or edit the source code.
2. Pass the source code to the latex or pdflatex application (“LATEX the
documentž).
• If there are any error messages, return toStep 1. • If there are no error messages, a PDF file is created.
3. View the PDF file to check the result. If you need to modify your document, go back to Step 1.
You will therefore need:
1. A text editor (to performStep 1). For example Vim,Emacs or Gedit.
2. The TEX software (to perform Step 2). If you don’t already have TEX [FAQ: (La)TeX for different machines]
on your machine, you will need to install it. The most convenient way to do this is to install from the TEX Collection DVD ROM, which is distributed to all TEX User Group3.1 (TUG) members, but you can also
download and install free TEX distributions, such as TeX Live, MiKTeX
orMacTeX, from the Internet (see on the following page). There is also proTeXt, an enhancement of MiKTeX that aims to be an easy-to-install
TEX Distribution. For more information including up-to-date links, go to http://www.ctan.org/starter.html.
3. A PDF viewer (to performStep 3). For exampleAdobe Reader,Sumatra, Evince orOkular.
This can be rather complicated for a beginner, especially for those with no experience writing computer code. Fortunately, there are some all-in-one applications (often called a front-end) that provide a text editor (for Step 1), buttons or menu items to run the latexorpdflatex command-line
application (for Step 2) and, in some cases, a viewer to perform Step 3.
3.1http://tug.org/
Section 3.1describes one such front-end called TeXWorks. I have chosen to describe TeXWorks because it is a free, cross-platform application. Bina-ries are available for Microsoft Windows, Mac OS X and GNU/Linux. The screen shots of TeXWorks in this book were taken from the Linux version running under Fedora. If you run TeXWorks on other operating systems, it may have a slightly different look, but it has the same functionality.
New versions of TeX Live and MiKTeX include TeXWorks for MS
Win-dows, and new versions of MacTeX include TeXWorks for Mac OS X users.
GNU/Linux users can use their Add/Remove Software utility to install TeX-Works. Alternatively, you can download TeXWorks by following the links provided at http://www.tug.org/texworks/.
If you’re confused by all the options, let’s keep things as simple as pos-sible:
• MS Windows:
You have a choice between MiKTeX (or proTeXt) and TeX Live. MiKTeX
provides a smaller and quicker installation, but the downside is that you may not have the classes or packages you want to use. MiKTeX can
install these whenever you try to LATEX a document that uses them, but
you need an Internet connection while it does this. TeX Live installs
everything, so it takes longer and needs more space, but you should have the majority of packages and classes that you need.
TeX Live:
1. Fetch and unpackhttp://mirror.ctan.org/systems/ texlive/tlnet/install-tl.zip
2. Run install-tl and follow the instructions. This
can take an hour or more. proTeXt:
1. Go to http://tug.org/protext/
2. Click on the “download the self-extract protext.exež link to download and run the executable.
MiKTeX:
1. Go to http://www.miktex.org/
2. In the left-hand panel, there is a link to the down-load page for the latest version. At time of writing, it is MiKTeX 2.9. Click on that link.
3. Scroll down to the section “Installing a basicMiKTeX
systemž.
4. If you’re happy with the selected mirror location, click on the “Downloadž button.
5. Run the executable.
• Mac OS X:
1. Go tohttp://tug.org/mactex/
2. Follow the instructions on that page.
• GNU/Linux:
1. Fetch and unpack http://mirror.ctan.org/systems/ texlive/tlnet/install-tl-unx.tar.gz
2. Follow the instructions athttp://tug.org/texlive/quickinstall. html
3. Once TeX Live has finished installing, run your
sys-tem’s “Add/Remove Softwarež tool.
4. Find “texworksž, select the newest version and install.
If you run into problems, there are mailing lists at http://tug.org/ mailman/listinfo/tex-live and http://docs.miktex.org/manual/lists. html for TeX Live and MiKTeX, and MacTeX help at http://www.tug.org/ mactex/help/. There is also a list of places where you can ask for help in Appendix C (Need More Help?).
3.1 TeXWorks
Hopefully you’ve managed to successfully install TEX and TeXWorks as de-scribed above, so let’s test it out.
First run TeXWorks. On Windows, you can access it via the Start menu.
On GNU/Linux, it’s probably located in ApplicationsÏOffice, or you can type
texworks in a terminal. You should now see the TeXWorks window. The
button marked with a grey triangle in a green circle is the build or typeset function. It runs the application in the drop-down list next to it. This is set to pdfLaTeX, which is what we want for now.
It’s a good idea to switch on the syntax highlighting, if it isn’t already on. This is done via the FormatÏSyntax Coloring sub-menu. Make sure the LaTeX
item is selected.
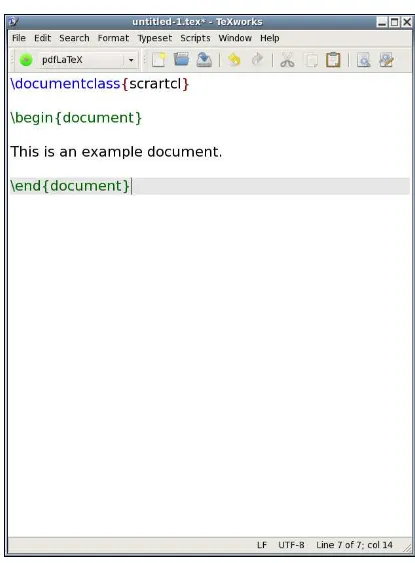
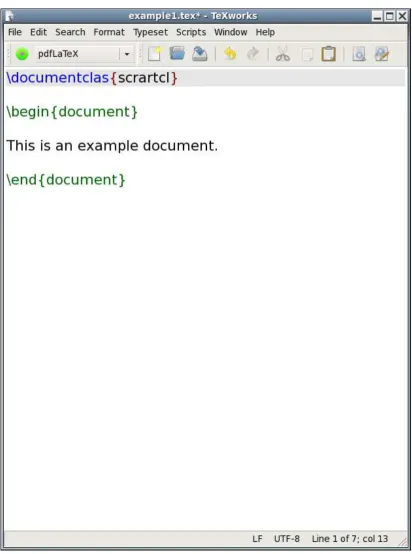
Next, type in the following sample source code, as shown in Figure 3.1 (the commands used here will be described in more detail in Chapter 4 (Creating a Simple Document)):
↑ Input
\documentclass{scrartcl}
\begin{document}
This is an example document.
\end{document}
↓ Input
Pay close attention to the backslashes at the start of each command name. If you find the font is a bit too small for you, you can make it larger
using the FormatÏFont menu item. This doesn’t affect the font size in your PDF file, just the font size of your code. This displays the “Select Fontž dialog box. Set the font size as appropriate.
Then save the document, using the FileÏSave As menu item. I called
my documentexample1.tex(remember the.texextension and stick to file
names that only consist of alphabetical characters, digits and hyphens Ð don’t uses spaces or underscores).
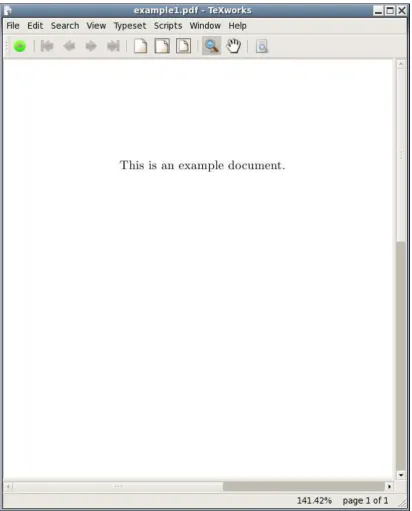
Now that you have saved the file, you can run pdfLaTeX. Make sure the drop-down list next to the build button has “pdfLaTeXž selected and click on the build button. If all goes well, a new window should open displaying the typeset document (Figure 3.2).
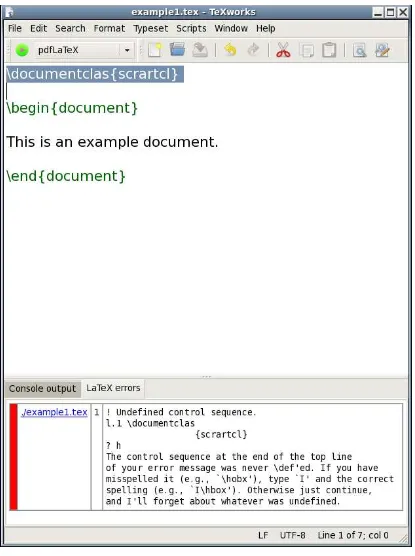
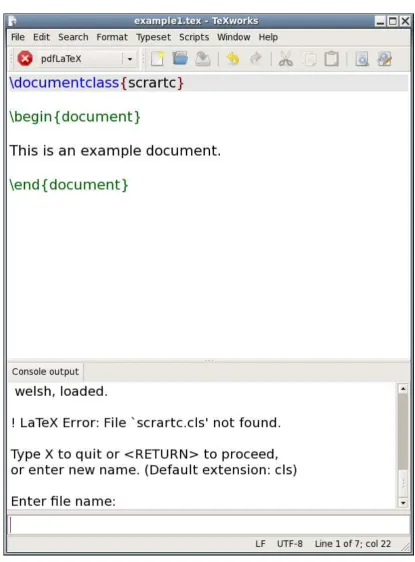
Now let’s see what happens if there is an error in the source code. In Figure 3.3 I have misspelt the \documentclass command. This time, when I click on the build button, I get the error message:
! Undefined control sequence. l.1 \documentclas
{scrartcl} ?
(Shown in Figure 3.4.)
Here “Undefined control sequencež means an unrecognised command, and below that message, “l.1ž means the error was encountered on line 1.
An input line at the bottom of the window has appeared with a cursor. LATEX is in interactive mode and is awaiting a response. There are several
responses, but I’m only going to mention two of them:
1. Typeh and press the Return/Enter key . This displays a short help
message and awaits a new response (see Figure 3.5). 2. Typ