Programming 101
The How and Why of Programming
Revealed Using the Processing
Programming Language
—
Programming 101
The How and Why of Programming
Revealed Using the Processing
Programming Language
ISBN-13 (pbk): 978-1-4842-3696-3 ISBN-13 (electronic): 978-1-4842-3697-0 https://doi.org/10.1007/978-1-4842-3697-0
Library of Congress Control Number: 2018946534 Copyright © 2018 by Jeanine Meyer
This work is subject to copyright. All rights are reserved by the Publisher, whether the whole or part of the material is concerned, specifically the rights of translation, reprinting, reuse of illustrations, recitation, broadcasting, reproduction on microfilms or in any other physical way, and transmission or information storage and retrieval, electronic adaptation, computer software, or by similar or dissimilar methodology now known or hereafter developed.
Trademarked names, logos, and images may appear in this book. Rather than use a trademark symbol with every occurrence of a trademarked name, logo, or image we use the names, logos, and images only in an editorial fashion and to the benefit of the trademark owner, with no intention of infringement of the trademark.
The use in this publication of trade names, trademarks, service marks, and similar terms, even if they are not identified as such, is not to be taken as an expression of opinion as to whether or not they are subject to proprietary rights.
While the advice and information in this book are believed to be true and accurate at the date of publication, neither the authors nor the editors nor the publisher can accept any legal responsibility for any errors or omissions that may be made. The publisher makes no warranty, express or implied, with respect to the material contained herein.
Managing Director, Apress Media LLC: Welmoed Spahr Acquisitions Editor: Louise Corrigan
Development Editor: James Markham Coordinating Editor: Nancy Chen Cover designed by eStudioCalamar
Cover image designed by Freepik (www.freepik.com)
Distributed to the book trade worldwide by Springer Science+Business Media New York, 233 Spring Street, 6th Floor, New York, NY 10013. Phone 1-800-SPRINGER, fax (201) 348-4505, e-mail orders-ny@ springer-sbm.com, or visit www.springeronline.com. Apress Media, LLC is a California LLC and the sole member (owner) is Springer Science + Business Media Finance Inc (SSBM Finance Inc). SSBM Finance Inc is a Delaware corporation.
For information on translations, please e-mail [email protected], or visit http://www.apress.com/ rights-permissions.
Apress titles may be purchased in bulk for academic, corporate, or promotional use. eBook versions and licenses are also available for most titles. For more information, reference our Print and eBook Bulk Sales web page at http://www.apress.com/bulk-sales.
Any source code or other supplementary material referenced by the author in this book is available to readers on GitHub via the book’s product page, located at www.apress.com/9781484236963. For more detailed information, please visit http://www.apress.com/source-code.
Printed on acid-free paper Jeanine Meyer
Chapter 1: Basics 1
Programming Concepts ���������������������������������������������������������������������������������������������������������������� 2 Programming Languages and Natural Languages ������������������������������������������������������������������ 2 Values and Variables ��������������������������������������������������������������������������������������������������������������� 3 Functions ��������������������������������������������������������������������������������������������������������������������������������� 5 Specifying Positions and Angles ��������������������������������������������������������������������������������������������� 5 Colors �������������������������������������������������������������������������������������������������������������������������������������� 6 Development Environment ������������������������������������������������������������������������������������������������������ 6 Role of Planning ���������������������������������������������������������������������������������������������������������������������� 7 Under the Covers��������������������������������������������������������������������������������������������������������������������������� 7 Processing Programming Features ����������������������������������������������������������������������������������������������� 8 Processing Development Environment ������������������������������������������������������������������������������������ 8 Functions ������������������������������������������������������������������������������������������������������������������������������� 10 Angles ������������������������������������������������������������������������������������������������������������������������������������ 11 Implementing Hello, World ���������������������������������������������������������������������������������������������������������� 13 Implementing the Daddy Logo ���������������������������������������������������������������������������������������������������� 21 Planning ��������������������������������������������������������������������������������������������������������������������������������� 21 Daddy Logo Program ������������������������������������������������������������������������������������������������������������� 24 Things to Look Up ����������������������������������������������������������������������������������������������������������������������� 27 How to Make This Your Own ������������������������������������������������������������������������������������������������������� 27 What You Learned ����������������������������������������������������������������������������������������������������������������������� 28About the Author xiii
About the Technical Reviewers xv
Acknowledgments xvii
Chapter 2: Interactions 31
Programming Concepts �������������������������������������������������������������������������������������������������������������� 33 Events ������������������������������������������������������������������������������������������������������������������������������������ 33 Randomness �������������������������������������������������������������������������������������������������������������������������� 34 Displaying Images from Files ������������������������������������������������������������������������������������������������ 34 Calculations, Including Built-in Functions ����������������������������������������������������������������������������� 34 Looping ���������������������������������������������������������������������������������������������������������������������������������� 35 Processing Programming Features ��������������������������������������������������������������������������������������������� 35 Under the Covers������������������������������������������������������������������������������������������������������������������������� 39 Polygon Sketch Operation Overview ������������������������������������������������������������������������������������������� 40 Implementing the Polygon Sketch ���������������������������������������������������������������������������������������������� 42 Planning ��������������������������������������������������������������������������������������������������������������������������������� 42 Polygon Sketch Program ������������������������������������������������������������������������������������������������������� 46 Coin Toss Sketch Operation Overview ����������������������������������������������������������������������������������������� 48 Implementing the Coin Toss Sketch �������������������������������������������������������������������������������������������� 50 Planning ��������������������������������������������������������������������������������������������������������������������������������� 50 Things to Look Up ����������������������������������������������������������������������������������������������������������������������� 53 How to Make This Your Own ������������������������������������������������������������������������������������������������������� 54 What You Learned ����������������������������������������������������������������������������������������������������������������������� 55 What’s Next ��������������������������������������������������������������������������������������������������������������������������������� 55Implementing the Make Path and Travel Path �������������������������������������������������������������������������� 100 How to Make This Your Own ����������������������������������������������������������������������������������������������������� 122 What You Learned ��������������������������������������������������������������������������������������������������������������������� 122 What’s Next ������������������������������������������������������������������������������������������������������������������������������� 122
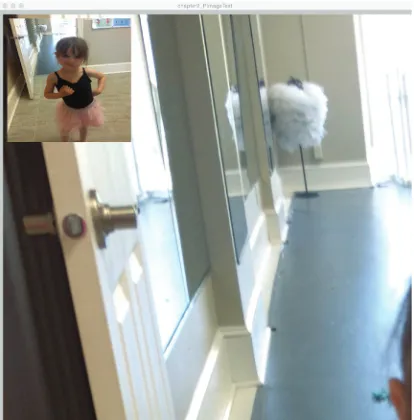
Implementing the Slingshot Sketch ������������������������������������������������������������������������������������������ 133 Image Test Operation Overview ������������������������������������������������������������������������������������������� 156 Implementing the Image Test ���������������������������������������������������������������������������������������������� 159 Things to Look Up ��������������������������������������������������������������������������������������������������������������������� 164 How to Make This Your Own ����������������������������������������������������������������������������������������������������� 164 What You Learned ��������������������������������������������������������������������������������������������������������������������� 165 What’s Next ������������������������������������������������������������������������������������������������������������������������� 165
Implementing the Origami Flower Sketch��������������������������������������������������������������������������������� 187 Planning ������������������������������������������������������������������������������������������������������������������������������� 187 Programming the Origami Flower ��������������������������������������������������������������������������������������� 189 Things to Look Up ��������������������������������������������������������������������������������������������������������������������� 193 How to Make This Your Own ����������������������������������������������������������������������������������������������������� 193 What You Learned ��������������������������������������������������������������������������������������������������������������������� 194 What’s Next ������������������������������������������������������������������������������������������������������������������������������� 194
Chapter 8: Combining Videos, Images, and Graphics 221
Family Collage Operation Overview ������������������������������������������������������������������������������������������ 225 Implementing the Family Collage Sketch���������������������������������������������������������������������������������� 227 Planning ������������������������������������������������������������������������������������������������������������������������������� 227 Programming the Family Collage Sketch ���������������������������������������������������������������������������� 228 Things to Look Up ��������������������������������������������������������������������������������������������������������������������� 237 How to Make This Your Own ����������������������������������������������������������������������������������������������������� 237 What You Learned ��������������������������������������������������������������������������������������������������������������������� 242 What’s Next ������������������������������������������������������������������������������������������������������������������������������� 242Chapter 10: 3D 271
Programming Concepts ������������������������������������������������������������������������������������������������������������ 274 Processing Programming Features ������������������������������������������������������������������������������������������� 275 Under the Covers����������������������������������������������������������������������������������������������������������������������� 284 Rolling Ball at Alhambra Operation Overview ��������������������������������������������������������������������������� 284 Implementing the Rolling Ball at Alhambra ������������������������������������������������������������������������������� 285 Planning ������������������������������������������������������������������������������������������������������������������������������� 285 Programming the Rolling Ball at Alhambra ������������������������������������������������������������������������� 286 Rotating Cube Operation Overview ������������������������������������������������������������������������������������������� 291 Implementing the Rotating Cube ���������������������������������������������������������������������������������������������� 291 Planning ������������������������������������������������������������������������������������������������������������������������������� 291 Programming the Rotating Cube ����������������������������������������������������������������������������������������� 293 Things to Look Up ��������������������������������������������������������������������������������������������������������������������� 298 How to Make This Your Own ����������������������������������������������������������������������������������������������������� 299 What You Learned ��������������������������������������������������������������������������������������������������������������������� 301 What’s Next ������������������������������������������������������������������������������������������������������������������������������� 302Appendix A: Publishing on the Web 303
Implementation ������������������������������������������������������������������������������������������������������������������������� 306 Preloading of Images ���������������������������������������������������������������������������������������������������������������� 307 Adding HTML to the body Element �������������������������������������������������������������������������������������������� 308 Adding Responses to Touch ������������������������������������������������������������������������������������������������������ 309About the Author
Jeanine Meyer is a Professor at Purchase College/State University of New York, where she teaches courses for students in the combined mathematics and computer science major, and across the College, including general education mathematics courses. Before coming to Purchase, she taught at Pace University, and prior to that was a
About the Technical Reviewers
Massimo Nardone has more than 23 years of experience in security, web and mobile development, and cloud and IT architecture. His true IT passions are security and Android. He has been programming and teaching programming with Android, Perl, PHP, Java, VB, Python, C/C++, and MySQL for more than 20 years.
He holds a master of science degree in computing science from the University of Salerno, Italy. He has worked as a project manager, software engineer, research engineer, chief security architect, information security manager, PCI/SCADA auditor, and senior lead IT security/cloud/SCADA architect for many years. He has worked as a visiting lecturer and supervisor for exercises at the Networking Laboratory of the Helsinki University of Technology (Aalto University).
His technical skills include security, Android, cloud, Java, MySQL, Drupal, Cobol, Perl, web and mobile development, MongoDB, D3, Joomla, Couchbase, C/C++, WebGL, Python, Pro Rails, Django CMS, Jekyll, Scratch, and more. He holds four international patents in the PKI, SIP, SAML, and proxy areas.
Takashi Mukoda is an international student at Purchase College/State University of New York. At Purchase College, he majors in mathematics/computer science and new media and has worked as a teaching assistant for computing and mathematics courses.
Takashi likes playing the keyboard and hiking in mountains to take pictures. His interest in programming and art has led him to create multimedia art pieces. Some of them are built with Processing and interact with human motion and sounds. See his web site at
Acknowledgments
Much appreciation to the subjects of the illustrations in this book, starting with my father (Joseph), and including my mother (Esther), Aviva, Grant, Liam, and especially Annika. Thanks to my children, Aviva and Daniel, for the photography, video and computer graphics work.
My students, teaching assistants, and colleagues always provide ideas, stimulation, feedback, and advice. Thanks especially to Irina Shablinsky for her efforts teaching me Processing, how to teach Processing, and introducing me to Takashi Mukoda. Thanks to David Jameson, whose comments and concerns made me produce the Under the Covers section for each chapter.
Introduction
Processing is a programming language built on top of another programming language called Java. To quote from the https://processing.org page, “Processing is a flexible software sketchbook and a language for learning how to code within the context of the visual arts.” The term for a program in Processing is sketch. However, Processing can be used to create applications that are far more than static sketches. You can use Processing to create dynamic, interactive programs. It is a great tool for learning programming.
The ten chapters in this book share a common design and structure. My goal is to introduce you to programming, focusing on the Processing language. In each chapter, I explain general programming concepts and specific Processing features through the use of one or more specific examples. The code, along with files such as image files, are combined as zip files and available https://github.com/Apress/programming-101. I hope the examples are entertaining; the goal, however, is not for you to learn the specific examples, but instead understand the concepts and features.
The introduction to each chapter starts with a brief description of the concepts and programming features used and the examples, then you need to be patient while I provide background. Each chapter includes a discussion of general “Programming Concepts” prior to plunging into the details. These are not limited to the Processing language, but are present in most programming languages. Presenting the concepts in a general way might help you if you are coming to this book knowing another language OR you hope to move on to another language someday.
Next, I describe the “Processing Programming Features” that are used to realize those concepts and produce the examples. This section will have actual code in it and maybe short examples.
A section called “Under the Covers” describes what Processing is doing for us behind the scenes and the relationship between Processing and Java. This section appears in different places in each chapter. It might be of more interest for readers who know something about Java, but I urge everyone to give it at least a quick scan.
contains a “Planning” and a “Program” section. The “Planning” section is where I describe my thought process. Programs do not spring into existence—at least for me—not like Mozart composing a symphony, which was said to emerge all at once from his mind. It is an iterative process for most of us. This section contains a table indicating the relationship of the functions. The “Program” section includes a table with one column for code and another column with an explanation of that line of code. These tables are long and are not meant to be read as poetry or fine literature. Instead, skip around. Use the function relationship table. If you download the code and try it out, you can use this section to improve your understanding of the program. The most critical step is to make changes, and I provide suggestions in the “How to Make This Your Own” section. This set of sections is repeated for each example.
A section titled “Things to Look Up” will contain a list of Processing features related to the ones described in the chapter. Processing is a large language and it is growing. I can show you only a small subset of the features and each feature is used in one way, perhaps using default values. You can and should consult other references to learn more. You can look things up in multiple ways. For example, you can go to the web site at https://processing.org/reference/ and just keep that open. Alternatively, if you want to look up how to draw a rectangle in Processing, it can be efficient to enter “processing.org rectangle” into Google (or another search engine) or the address field of browsers such as Chrome to retrieve a list of possible sites. It is best to use “processing. org” because processing is a common English word. You can try “Processing rectangle,” but you will need to skip over some sites that have nothing to do with the Processing language.
Remember that the goal of this chapter is not to teach you how to make my
examples, from peanut-shaped bald men to certain games to rotating 3D cubes, but to help you understand how to make your own programs! Make small changes and then large changes. Make your own programs! Chapters will close with two more sections: a brief review, “What You Learned,” and “What’s Next.”
The book also has an Appendix describing what is called ProcessingJS. This is a way to publish most types of Processing sketches on the Web. It also makes use of examples.
“Implementation” section contain complete programs. It is beneficial for your learning process to recognize the repetition.
Please do take a pause in reading to explore, experiment, and make your own programs. Learning how to program is critical for understanding how we function in today’s world and it might help you get a job, but the fact that drives me and, I hope will drive you, is that it is fun.
Basics
The Daddy logo is a version of a drawing my father would make, often as his signature on a letter or note or artwork. I hope that you will design or recall a drawing or symbol that has meaning to you and makes you happy the same way this cartoonish peanut-shaped, bald guy makes me.
We will need to do some work to start us off and get to the point that the coding is clear, but it is not too difficult. The traditional first task in using any programming language is to get the program to display the phrase “Hello, world.” This works well in demonstrating several important concepts, including what happens if the programmer makes certain types of errors. Because of the features built into Processing, you can produce a pretty fancy version of “Hello, world.”
Be patient with me and with yourself. At the end of the chapter, you will be able to implement your own Daddy logo.
Programming Concepts
This section, included in each chapter, is to provide a general introduction to concepts. I begin with comparing and contrasting programming languages with natural languages.
Programming Languages and Natural Languages
Programming languages have some similarities with natural languages but they also have significant differences. Programming languages are defined by rules just as a natural language’s grammar defines what is proper English, Spanish, or other language. A program contains statements of different types just as we find in English (or Spanish, etc.) and there also are ways to construct compound statements. Statements in programming languages contain terms and expressions involving terms. In
programming languages, programmers often come up with our own names for things. The names must follow certain rules, but these are not unduly restrictive. This is a difference from natural languages, in which we mainly use the official words of the language, whereas in programming, we are extending the language all the time.
A more significant difference between programming languages and natural languages is that the rules must be obeyed at all times when using programming languages! Consider that we all frequently utter grammatically incorrect statements when we speak and yet generally are understood. This is not the situation in
that the Processing system generally indicates where an error occurs. The development environments for Processing and other computer languages are themselves computer programs and they do not exhibit any impatience while we fix errors and try the program again. I will give some examples of statements, right after I introduce the concept of values and variables.
Values and Variables
Programming involves containers or buckets where we can store specific types of things (values). These kinds (types) of things are called data types. The following are some examples of data.
int //Integer e.g., 10
float //decimal value (e.g., 5.3)
boolean //logical values (e.g., true/ false)
char //single character (e.g., 'a')
String //a string of characters (e.g., "hello world") //String should start with a capitalized "S"
Our programs can include literal values such as 5, 100.345, and “Hello” in the code. In addition, a feature in all programming languages is what is termed variables. A variable is a construct for associating a name of our choosing with a value. We can initialize the variable, change it, and use it in an expression; that is, the value associated, often termed in the variable, can vary. Using variables makes our programs less mysterious. Moreover, we can define one variable in terms of another, making relationships explicit and preventing certain errors. In Processing, Java, and some, but not all, programming languages, variables need to be declared, or set up before use. One characteristic of variables is termed scope, which indicates what code has access (e.g., global variables vs. local variables), but that is best explained later.
The following are examples of Processing statements. Explanation is given in comments and later.
int classSize; // this declares, that is, sets up classSize to // be a variable.
classSize = 21; //assigns the value 21 to the variable classSize.
float score = 0; //declares the variable score AND
// assigns it a value. This is called initialization. if (score == 0) {
text("You did not score anything.", 100,100); text("Try again.", 100,300);
}
The // indicates that the rest of the line is a comment, meaning that Processing ignores it. It is intended for readers of the code, including you, to make things clear. You also can use the delimiters /* and */ for long comments.
Note
My examples, because they are surrounded by explanations, tend not to
have as many comments as i would use outside of teaching and writing books.
There are rules for variable and function names in all programming languages. Generally, they must start with a letter, uppercase or lowercase, and cannot contain spaces. The most important guidance for naming is that the names should have meaning for you. The programming language will accept single character names or names with no apparent meaning, but these will not be helpful when you are trying to recall what you were trying to do. So-called camel casing, as in classSize, can be helpful.
A single equal sign (=) means assignment and is used in what are called, naturally enough, assignment statements and initialization statements. The statement
classSize = classSize + 5;
will seem less illogical if you read it as:
classSize is assigned or gets the total of classSize and 5.
A double equal sign (==) is a comparison operator and often appears in an if statement. Think of it as like < or <=.
Functions
Programming work in any language is structured into units. One important way of structuring code comes with different names: function, procedure, subroutine, method. These are ways of packaging one or more statements into one unit. You will read about functions in “Processing Programming Features” and methods in “Under the Covers.” Briefly, functions are defined and functions are invoked. I can give you directions to my house, which is analogous to defining a function. At some later time, I can direct you to go to my house, which is analogous to invoking the function.
Programs can be considerably shorter as well as easier to modify through the use of functions and variables, so understanding both of these concepts is important. You do not need to accept this or understand this right now. It will be demonstrated later by my sketch for displaying two Daddy logos that takes just one statement more than displaying the Daddy logo just once.
Specifying Positions and Angles
If you say to yourself, “This is upside down,” then I know you understood. The unit is very small, so if your code positions something at 100, 200 and later at 101, 201, you probably will not detect the difference. Your intuition regarding this will improve with experience.
Note
as a teaser, processing has facilities for 3D as well as 2D. We get to 3D in
later chapters.
In this chapter, my Daddy logo has a smile made by specifying an arc of an ellipse. To produce the arc, I need to write code to indicate a starting angle and an ending angle of the arc. The system used in most computer languages is not the standard one in which a right angle is 90 degrees, a U-turn is a 180, and snowboarders do 1080s. It might be upsetting to realize this, but the notion of degrees with a circle consisting of 360 degrees was invented by people. I typically offer my students extra credit to identify where and when this happened. Instead, in most programming languages, we use a measure called radians. Think of wrapping a circle with lengths equal to one radius. How many lengths will this take? You know the answer: It is not a whole number, it is π, an irrational number often approximated by 3.14159. You will see radians in use, so be patient.
Colors
There are different ways to specify colors in computer languages and computer applications, and Processing supports more than one. In this text, we stick with
grayscale and RGB (red/green/blue). Because of how these values are stored, the range of grayscale is from 0 to 255 and the values for redness, greenness, and blueness are specified by a number from 0 to 255. This approach is used in many applications. If you want to use a certain color that you see in a photo, you can open the image file in Adobe PhotoShop or the online Pixlr or some other graphics tool, use the eye drop on the pixel (picture element) you want, and an information window will tell you the RGB value. See also in the mention of the Color Selector in “Thinks to Look Up.”
Development Environment
Processing development environment (PDE), which provides a way to prepare and make changes to a program as well as test it and save it. To give you a different example, Hypertext Markup Language (HTML) documents containing JavaScript are prepared and saved using a text editor, such as Sublime. The resulting files are opened (and run) using a browser, such as Chrome.
Role of Planning
I close this first “Programming Concepts” section by noting that preparing programs such as a Processing sketch generally involving planning and design. It might be best to step away from the keyboard. Some of the plans might need to be modified when you get to writing the code, but it is best to have plans!
Under the Covers
As I indicated earlier, Processing is a language built on Java. This means that the Processing code you write is Java code that the development environment puts into a larger Java program prepared for handling Processing sketches. In Java, there are no functions, but, instead, what are termed methods. I will introduce methods for our use in Processing in Chapter 4.
The PDE makes use of libraries, collections of methods holding the built-in functions of Processing, such as functions to draw a rectangle.
The Java program also defines default settings. Processing and other computer languages and many computer applications provide powerful features. If we needed to specify each aspect of each feature before anything happens, it would be tremendously burdensome. It is important to be aware that certain things can be adjusted, though, as you will see in our very first example later, with the discussion on default values for font, text size, fill color, and stroke color.
The design and capabilities of Processing provide us a way to get started creating and implementing our ideas quickly.
Processing Programming Features
In this section, I explain the concepts focusing on Processing features. There will be small coding examples to prepare for the larger (although not too large) examples covered later in the chapter.
To use Processing, you need to go to the processing.org web site and follow the directions to download and install Processing on your computer.
Processing Development Environment
To describe the PDE in abstract terms is too difficult, so let’s get started. Once you have downloaded and installed Processing, open it. At the top of the PDE window, you will see the Processing File toolbar.
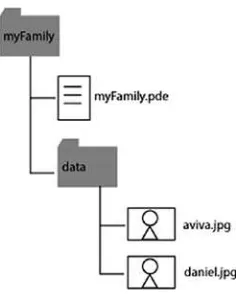
Using Save As… in the PDE produces a folder, in this case named first0, which contains a file named first0.pde. The examples explored in future chapters will consist of folders containing additional items. For example, a Processing sketch named myFamily that makes use of an image file aviva.jpg and an image file daniel.jpg will be a folder named myFamily containing a file named myFamily.pde and a folder named data that contains the two files aviva.jpg and daniel.jpg. The relationship of these files is shown in Figure 1-4.
Functions
Processing uses the term function for grouping together one or more statements into something that can be invoked (called). Functions are defined with header statements and then the body, a sequence of statements, contained within brackets. You will see in this chapter and every chapter definitions for the setup function, a function that Processing expects the programmer to supply. The header is
void setup()
The term void indicates that this function does not produce or return a value. The opening and closing parentheses with nothing between them indicate that this function does not expect any parameters.
The Daddy logo example includes a function called daddy that does the work of drawing the cartoon. Its header is
void daddy(int x, int y, int w, int h)
The parameters are the things between the parentheses. The parameter list is the place for the programmer to give names and specify the data type. This means that when I wrote the code to invoke daddy, which is necessary because daddy was something I made up, not anything Processing expects, Processing will check that the values cited in the call are the correct type.
I feel obliged to show you an example of a function that does produce a value, a standard one supplied in many textbooks.
float calculateTax (float bill, float rate) { return (bill*rate);
}
The header indicates that this function calculates a floating-point value, sometimes called a decimal number. The code includes what is termed an expression: bill*rate. The asterisk indicates multiplication.
Because it generates a value, a call of this function can be used in an expression. With this function defined, I could write an expression (part of a statement) with something like this.
Total = 150.53 + calculateTax(150.53, .07);
Processing will assign the 150.53 to the parameter bill and the .07 to the parameter rate, perform the multiplication bill * rate, which in this case is 150.53 * .07, and return the result so it is available to be added to 150.53. The variable Total will be set to 161.0671.
I hope the names of these variables are suggestive. My examples are more complex and more interesting and, because context is given, more understandable, in later chapters.
Angles
In Processing, angles start at 0 and move clockwise around the circle as the number increases. Notice the location of PI/3. However, you can designate a negative angle. The angle labeled –PI/4 could also be specified as PI+.75PI or 1.75*PI.
go back and forth between degrees and radians, but I suggest building up your intuition in radians. One way to do that is to examine my code and change the smile. You get immediate feedback and can try again.
Implementing Hello, World
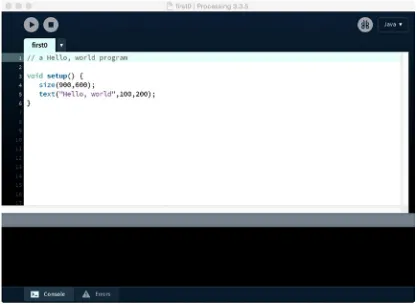
In Processing, we need to write a function named setup. Here is the code for my first try at a Hello, World program.
It is not necessary, but it is good practice to put a comment at the start, as I did here. The // indicates a comment, which is ignored by Processing.
The first line of actual code is the header line of a function, which has several elements. The term setup gives a name to the function. As I indicated earlier, we define a setup function to get our sketch started. The parentheses, (), after the name indicate that there are no parameters to this function. Parameters are extra information passed to the function and you will see examples of parameters in the Daddy logo example. The brackets, the opening { on the first line and the closing } on the last line, mark off the body, or contents, of the function. People follow different conventions for the location of the brackets. They do not have to be where they are, but can instead be what you see here: void setup()
{size(900,600);
text("Hello, world",100,200);}
The first statement within the body of the function specifies the size of the display window. The width is set at 900 and the height at 600. When you run or execute the program, you will see what these settings produce.
The second and last statement within the body of the function does the work of displaying the string “Hello, world” at the position 100 pixel units from the left side of the display window and 200 pixel units from the top.
You should save the program, which you do by clicking File and then selecting Save. Select Save rather than Save As… to save the file in the same place as you indicated in the first Save As… command. Of course, you could wait to rename the program and then use Save As…, but my motto is to save early and often.
The next step is to try the program by running it. Do this by clicking on the play (triangle/arrow) button in the upper left of the screen shown in Figure 1-6.
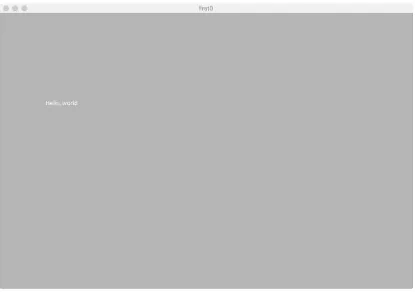
The result will be disappointing, but it is educational. You should see what is shown in Figure 1-7, namely the phrase “Hello, world” in tiny, white letters.
In addition to syntactic mistakes, we could make semantic mistakes, mistakes of meaning or faulty logic. If you or I had written “Hellowold,” the rules of Processing would accept it, but it might not be what we intended. Similarly, if we intended to draw a red circle and instead drew a blue one or if we produced a drawing with the left eye not on the face, that would be a semantic mistake. Processing does not help us notice or fix these. We are on our own.
You can say that the program shown in Figure 1-6 and producing the result shown in Figure 1-7 represents a semantic error. I will say it was a success—the desired message was displayed—but we can do better. Remember my mention of default values? The call to the text function makes use of the current settings for text size, text font, text color, and text alignment. I will show you an improvement. To encourage good habits, go to the File menu, select Save As…, and save with a new name, first1. The improved sketch will change the text size and the color. I leave font and alignment to you.
The Processing function fill() sets the color of a shape or the color of text and the function stroke() sets the color of the outline of a shape. If we use just one number, the color is grayscale, or black to white. The value should be a number from 0 to 255, where 0 is black and 255 is white. If we use three numbers, the numbers specify the amounts of redness, greenness and blueness. As with positions and angles, you will gain intuition on this as you use it.
Here is the complete code for the improved sketch; notice that two statements have been added to the original sketch, and I also changed the comment at the start.
// improved Hello, world program, setting size and color
void setup() { size(900,600);
textSize(30); //bigger than default fill(250,0,250); //changed color for text text("Hello, world",100,200);
}
The call to the function textSize sets the new size. The call to the fill function sets the color. Save the sketch and then run this program; it will produce what is shown in Figure 1-9.
Because Processing facilitates much more than displaying text, I describe one more program here. Click File, select Save As…, and save this file with the name first2. Now modify the program with the addition of one more statement. I provide the whole sketch, but it is just the line with the call to the ellipse function that is to be added. The ellipse is centered at 180, 200. Its width is 300 and its height is 200. Ellipses can be specified in different ways depending on the setting of a variable named ellipseMode. You can look this up to see the possibilities.
// a Hello, world inside of ellipse
void setup() { size(900,600);
ellipse(180,200,300,200);//I fiddled with these values textSize(30); //bigger than the default
fill(250,0,250); //changed color for text text("Hello, world",100,200);
}
Why is the ellipse white with a black border? The answer is that the default value for fill is 255, producing white, and the default for stroke is 0, producing black. I strongly urge you to put the book down (or close the window on whatever application you are reading the e-book version) and do some experiments. Put a call to the fill function and a call to the stroke function before the ellipse command. Change “Hello, world” to something else. Draw a circle instead of an ellipse. Try stuff!
This activity with Hello, world examples introduced the basics, but not every feature required for the Daddy logo project. Here is a list of what additional Processing constructs will be used, with short explanations.
• Declaration of variables, including initialization. An example of this is int skinnyFaceWidth = 60;
• The color data type and the color function: This is an unusual, but acceptable situation of one name being used for two distinct things. In Processing, color is a data type similar to int or float. The color function is used to produce a value of data type color. The following code could appear:
color skinTone = color(255,224,189);
I advise you to not use the same name for different things even if they are related.
• The ellipseMode function: Processing provides different ways to specify an ellipse. For example, a programmer can specify the center or the upper left corner. I use it here to introduce the idea. A call to ellipseMode(CENTER);
means that the parameters specify the center of the ellipse. In different situations, you might find one way more natural than the other.
• Expressions, making use of arithmetic operators: You will read later in the “Planning” section how my code defines certain variables in terms of other variables. For example, the center of the arc that is the mouth is set to be a certain distance, namely one tenth of the height, further down the screen than the center of the ellipse that is the lower part of the peanut shape. My code converts (the technical term cast is used) the results to be rounded to an integer.
int mouthYoffset = int(.10*h);
• Definition of a programmer defined-function, daddy, with
parameters: Defining what are called programmer-defined functions is the main lesson of this chapter. The function I define is called daddy and its parameters are used to specify the position and the dimensions of the Daddy figure.
invoked over and over. How often draw is invoked is called the frame rate and you can change this. It would not do any harm to repeat this, but I decided to show how to turn it off through the use of noLoop().
These all are best explained in the context of use, so be patient to read what follows.
Implementing the Daddy Logo
With the introduction using the Hello, world examples, and hoping you have done some noodling around in Processing on your own, I move on to the Daddy logo. I describe my thought process when planning the sketch, then explain declaration of variables, use of expressions, color data type and color function, the draw function, and programmer- defined functions.
Planning
My approach to producing the peanut shape is to draw two ellipses, one slightly on top of the other, with no borders. Borders are turned off by a call to the function noStroke(). The drawing of borders is turned back on by a call to stroke with the desired color. I won’t quite call this a hack, but it is a trick. To make the mouth, I used the noFill() function because I just wanted the outline.
My plan is to define a function called daddy with parameters indicating the position of the Daddy logo cartoon and the width and height of the peanut-shaped figure. The two ellipses, eyes, mouth, and hair will each be placed using horizontal and vertical values derived from the parameters. I also will make use of global variables. I could have achieved the same effects by putting a lot of code inside the setup function because this is just a static drawing. However, I am using a function as well as defining the contents of draw and making use of variables to model good practices. This approach does require me to work out the relative position of the two ellipses (the upper and lower parts of the face) and the relative positions of each of the circles representing eyes, the arc that represents the mouth, and the two arcs that represent the one hair on the top of the head.
I define a programmer-defined function called daddy. The header line is void daddy(int x, int y, int w, int h)
This defines daddy as a function expecting four parameters, each integer (whole numbers), with the names x, y, w, and h. You could think of parameters as additional information sent with the invocation of the function. Normally, I would choose longer names, but decided that these were clear enough, standing for the horizontal position, the vertical position, the width, and the height. The parameters will each be referenced in the body of the function. Their values will be the values set by a call to the function. The function is called twice, both in the draw function:
daddy(ctrx,ctry,faceWidth, faceHeight);
daddy(3*ctrx, 2*ctry,skinnyFaceWidth, skinnyFaceHeight);
This is a chicken-and-egg situation. I haven’t told you what is inside my daddy function. All I can say now is that the first call of daddy will set the x appearing inside the function to the value of ctrx, the value of y appearing inside the function to the value of ctry, and so on for w and h. The ctrx and ctry are variables that I have named. They will be the horizontal coordinate and the vertical coordinate of the center of one of the two circles used in the Daddy cartoon.
The variables cited in these two lines are global variables, to be explained soon. Just from looking at these two statements, assuming that skinnyFaceWidth and skinnyFaceHeight are appropriately named, we can make a safe guess that the skinny Daddy figure is three times as far from the left and twice as far down the screen and that is indeed what appears in Figure 1-1.
Execution of code starts with the setup function. The draw function is invoked next. In this particular case, the first statement in the draw function is executed, which means control goes to the daddy function. All the statements in the daddy function are executed with the parameters referenced in the call in the first statement. Then control returns to draw and the second statement is executed. This means control goes again to the daddy function with all the statements executed with the new set of parameters. Control returns to draw and the last statement is executed. As you see here, this last statement is noLoop();. The effect of this is to stop looping; that is, stop any further invocation of draw.
Global variables are declared outside of functions, whereas local variables are declared inside of functions. Global variables are used inside of functions and persist, or stay around when a function completes. In contrast, local variables go away when the function completes. The benefits of local variables and the more elaborate scoping rules of many computer languages and many other features apply more in big, or at least bigger, programming projects involving more than one person, than they do in teaching examples. Still, it is a good practice to think about what values you want to persist and what values are only used within a function.
Some of the expressions defining variables in terms of other variables produce floating-point numbers, which are then cast to integers. (I could have made everything integers, but decided to do it this way mainly to show you casting.) The critical thing is that all the settings for the eyes and the mouth and the lower and upper ellipses that produce the peanut shape are defined in terms of x, y, w, and h. For example, inside the daddy function, there is the declaration with initialization of a local variable that will be used for the horizontal positioning of the eyes.
int eyeXoffset = int((15.0/80.0)*w);
This statement sets up eyeXoffset as a variable of data type int and initializes it to be a fraction of the value of w, which is the width of the upper ellipse. This value is rounded off to be an integer. How did I arrive at the fraction 15.0/80.0?
Experimentation. Why don’t I write it 15/80? Because division of integers always rounds down to the largest integer not larger than the value. This means 15/80 produces 0, whereas 15.0/80.0 produces 0.1875. So, although my code casts to integer when the calculation is over, I do not want the intermediate value to be an integer.
By the way, there are two eyes, but only one variable with the name eyeXoffset. If you examine the code, you will notice that in one place, the expression uses addition for eyeXoffset and in another, the expression indicates subtraction.
One last step in planning is to produce a function table. Table 1-1 shows the functions for the Daddy logo sketch.
Table 1-1.
Daddy Logo Functions
Function Name Invoked by Invokes
setup Underlying Java program
Daddy Logo Program
My daddyLogo sketch starts with comments.
// This produces a peanut-like shape that was a self-portrait by my father // he sometimes used it as a signature.
// daddy using variables and function // this version draws two different faces
Creating comments such as these at the start is a good practice. You also should put comments throughout the code. This is a case of “Do as I say, not as I do,” as I omit comments in the code because I produce Table 1-2 with an explanation of each statement.
The sketch continues, first with the declaration of the global variables, then with the definitions of setup, draw, and daddy. The general procedure for programming in Processing requires me to define a setup and a draw. I chose to name and define a function I call daddy. The advantage of doing that is that I could put in multiple calls to the function and produce cartoons at distinct places in the display window of distinct widths and heights. If I tried to do this with what I call naked numbers, I would eventually produce the same thing, but probably have some situations with eyes outside the head.
Note
When programmers need to refer to any built-in processing function or
variable, we need to use the name accurately, including case. however, when we
make up our own names, it is totally up to us, as long as we are consistent. i could
have decided that the width of the skinny face would be held in a variable named
skinniW
, but if i later referred to it as
skinnyW
, processing would have called
it an error. therefore misspelling of names is fine, if you are consistent. also be
willing to use longer names, perhaps with camelCasing because that will help you
understand your program and be consistent.
Table 1-2.
Code for Daddy Logo Sketch
int ctrx = 100; horizontal location for first face
int ctry = 160; Vertical location
int faceWidth = 80; Width of lower part of first face
int faceHeight = 100; height of both parts of first face
int skinnyFaceWidth = 60; Width of second face
int skinnyFaceHeight = 130; height of second face
int eyeSize = 10; eye size for both faces
color skinTone = color(255,224,189); Color of faces
void setup() header for required setup function
{ Opens setup function
size(800,600); specifies size of window
} Closes setup function
void draw() header for draw
{ Opens draw function body
daddy(ctrx,ctry,faceWidth, faceHeight); Calls daddy function to make first face
daddy(3*ctrx, 2*ctry,skinnyFaceWidth, skinnyFaceHeight );
Calls daddy function to make second face
noLoop(); turns off looping: no more draw
} Closes draw function
void daddy(int x,int y, int w, int h) header function for daddy function
{
noStroke(); turn off outline to produce peanut shape by drawing two ellipses
fill(skinTone);
int eyeXoffset = int((15.0/80.0)*w); Calculate x offset for eyes
int eyeYoffset = int(.35*h); Calculate y offset for eyes