800 East 96th Street, Indianapolis, Indiana, 46240 USA
Sams
Teach Yourself
24
in
Hours
iOS
®
5
Application
All rights reserved. No part of this book shall be reproduced, stored in a retrieval system, or transmitted by any means, electronic, mechanical, photocopying, recording, or otherwise, without written permission from the publisher. No patent liability is assumed with respect to the use of the information contained herein. Although every precaution has been taken in the preparation of this book, the publisher and author assume no responsibility for errors or omissions. Nor is any liability assumed for damages resulting from the use of the information contained herein. ISBN-13: 978-0-672-33576-1
ISBN-10: 0-672-33576-X
Library of Congress Cataloging-in-Publication Data is on file. Printed in the United States of America
First Printing December 2011
Trademarks
All terms mentioned in this book that are known to be trademarks or service marks have been appropriately capitalized. Sams Publishing cannot attest to the accuracy of this information. Use of a term in this book should not be regarded as affecting the validity of any trademark or service mark.
Warning and Disclaimer
Every effort has been made to make this book as complete and as accurate as possible, but no warranty or fitness is implied. The information provided is on an “as is” basis. The author and the publisher shall have neither liability nor responsibility to any person or entity with respect to any loss or damages arising from the information contained in this book.
Bulk Sales
Sams Publishing offers excellent discounts on this book when ordered in quantity for bulk pur-chases or special sales. For more information, please contact
U.S. Corporate and Government Sales 1-800-382-3419
For sales outside of the U.S., please contact
Introduction. . . 1
HOUR 1 Preparing Your System and iDevice for Development. . . 5
2 Introduction to Xcode and iOS Simulator. . . 25
3 Discovering Objective-C: The Language of Apple Platforms. . . 59
4 Inside Cocoa Touch. . . 89
5 Exploring X-code’s Interface Builder. . . 117
6 Model-View-Controller Application Design. . . 147
7 Working with Text, Keyboards, and Buttons. . . 175
8 Handling Images, Animation, Sliders, and Steppers. . . 205
9 Using Advanced Interface Objects and Views. . . 231
10 Getting the User’s Attention. . . 261
11 Introducing Multiple Scenes and Popovers. . . 291
12 Making Choices with Toolbars and Pickers. . . 337
13 Advanced Storyboards Using Navigation and Tab Bar Controllers. . . 385
14 Navigating Information Using Table Views and Split View Controllers. . . 421
15 Reading and Writing Application Data. . . 463
16 Building Rotatable & Resizable User Interfaces. . . 503
17 Using Advanced Touches and Gestures. . . 531
18 Sensing Orientation and Motion. . . 557
19 Working with Rich Media. . . 583
20 Interacting with Other Applications. . . 629
21 Implementing Location Services. . . 661
22 Building Background-Aware Applications. . . 691
23 Building Universal Applications. . . 717
24 Application Tracing and Debugging. . . 735
Introduction
1
Who Can Become an iOS Developer?. . . 2
Who Should Use This Book? . . . 2
What Is (and Isn’t) in This Book?. . . 3
HOUR 1: Preparing Your System and iDevice for Development
5
Welcome to the iOS Platform. . . 5Becoming an iOS Developer . . . 9
Creating and Installing a Development Provisioning Profile. . . 14
Running Your First iOS App. . . 19
Developer Technology Overview. . . 20
Further Exploration . . . 22
Summary. . . 23
Q&A. . . 23
Workshop. . . 24
HOUR 2: Introduction to Xcode and the iOS Simulator
25
Using Xcode. . . 25Using the iOS Simulator . . . 51
Further Exploration . . . 56
Summary. . . 57
Q&A. . . 57
Workshop. . . 58
HOUR 3: Discovering Objective-C: The Language of Apple Platforms
59
Object-Oriented Programming and Objective-C . . . 59Exploring the Objective-C File Structure. . . 64
Objective-C Programming Basics . . . 73
Memory Management and ARC. . . 83
Summary. . . 86
Q&A. . . 87
Workshop. . . 88
HOUR 4: Inside Cocoa Touch
89
What Is Cocoa Touch? . . . 89Exploring the iOS Technology Layers . . . 91
Tracing the iOS Application Life Cycle . . . 97
Cocoa Fundamentals. . . 99
Exploring the iOS Frameworks with Xcode. . . 108
Further Exploration . . . 113
Summary. . . 113
Q&A . . . 114
Workshop. . . 114
HOUR 5: Exploring Xcode’s Interface Builder
117
Understanding Interface Builder. . . 117Creating User Interfaces . . . 123
Customizing the Interface Appearance . . . 129
Connecting to Code . . . 133
Further Exploration . . . 142
Summary. . . 143
Q&A . . . 144
Workshop. . . 144
HOUR 6: Model-View-Controller Application Design
147
Understanding the Model-View-Controller Paradigm. . . 147How Xcode Implements MVC. . . 149
Using the Single View Application Template. . . 154
Further Exploration . . . 171
Summary. . . 172
Q&A . . . 172
HOUR 7: Working with Text, Keyboards, and Buttons
175
Basic User Input and Output. . . 175
Using Text Fields, Text Views, and Buttons. . . 177
Further Exploration . . . 200
Summary. . . 201
Q&A . . . 202
Workshop. . . 202
HOUR 8: Handling Images, Animation, Sliders, and Steppers
205
User Input and Output. . . 205Creating and Managing Image Animations, Sliders, and Steppers. . . 207
Further Exploration . . . 227
Summary. . . 228
Q&A . . . 228
Workshop. . . 229
HOUR 9: Using Advanced Interface Objects and Views
231
User Input and Output (Continued) . . . 231Using Switches, Segmented Controls, and Web Views. . . 236
Using Scrolling Views . . . 252
Further Exploration . . . 258
Summary. . . 259
Q&A . . . 259
Workshop. . . 260
HOUR 10: Getting the User’s Attention
261
Alerting the User . . . 261Exploring User Alert Methods. . . 271
Further Exploration . . . 288
Summary. . . 289
Q&A . . . 289
HOUR 11:
Implementing Multiple Scenes and Popovers
291
Introducing Multiscene Storyboards . . . 292
Understanding the iPad Popover. . . 309
Using a Modal Segue . . . 319
Using a Popover. . . 328
Further Exploration . . . 334
Summary. . . 335
Q&A . . . 335
Workshop. . . 336
HOUR 12:
Making Choices with Toolbars and Pickers
337
Understanding the Role of Toolbars. . . 337Exploring Pickers. . . 341
Using the Date Picker. . . 349
Using a Custom Picker . . . 364
Further Exploration . . . 380
Summary. . . 381
Q&A . . . 381
Workshop. . . 382
HOUR 13: Advanced Storyboards Using Navigation and Tab Bar Controllers
385
Advanced View Controllers . . . 386Exploring Navigation Controllers. . . 388
Understanding Tab Bar Controllers. . . 393
Using a Navigation Controller. . . 398
Using a Tab Bar Controller . . . 407
Further Exploration . . . 417
Summary. . . 417
Q&A . . . 418
HOUR 14:
Navigating Information Using Table Views and
Split View Controllers
421
Understanding Tables. . . 422
Exploring the Split View Controller (iPad Only). . . 430
A Simple Table View Application . . . 433
Creating a Master-Detail Application . . . 443
Further Exploration . . . 460
Summary. . . 460
Q&A . . . 461
Workshop. . . 461
HOUR 15:
Reading and Writing Application Data
463
iOS Applications and Data Storage. . . 463Data Storage Approaches . . . 465
Creating Implicit Preferences. . . 473
Implementing System Settings. . . 479
Implementing File System Storage . . . 492
Further Exploration . . . 500
Summary. . . 501
Q&A . . . 501
Workshop. . . 502
HOUR 16: Building Rotatable and Resizable User Interfaces
503
Rotatable and Resizable Interfaces . . . 503Creating Rotatable and Resizable Interfaces with Interface Builder. . . 508
Reframing Controls on Rotation. . . 513
Swapping Views on Rotation . . . 521
Further Exploration . . . 527
Summary. . . 527
Q&A . . . 528
HOUR 17:
Using Advanced Touches and Gestures
531
Multitouch Gesture Recognition. . . 532
Using Gesture Recognizers. . . 534
Further Exploration . . . 553
Summary. . . 554
Q&A . . . 554
Workshop. . . 554
HOUR 18: Sensing Orientation and Motion
557
Understanding Motion Hardware. . . 558Accessing Orientation and Motion Data . . . 560
Sensing Orientation. . . 564
Detecting Tilt and Rotation . . . 568
Further Exploration . . . 579
Summary. . . 580
Workshop. . . 581
HOUR 19: Working with Rich Media
583
Exploring Rich Media. . . 583The Media Playground Application. . . 598
Further Exploration . . . 625
Summary. . . 626
Q&A . . . 627
Workshop. . . 627
HOUR 20:
Interacting with Other Applications
629
Extending Application Integration . . . 629Using Address Book, Email, Twitter, and Maps... Oh My. . . 641
Further Exploration . . . 658
Summary. . . 659
Q&A . . . 659
HOUR 21: Implementing Location Services
661
Understanding Core Location. . . 661
Creating a Location-Aware Application. . . 668
Using the Magnetic Compass. . . 678
Further Exploration . . . 686
Summary. . . 687
Q&A . . . 687
Workshop. . . 688
HOUR 22: Building Background-Aware Applications
691
Understanding iOS Backgrounding. . . 692Disabling Backgrounding . . . 696
Handling Background Suspension. . . 697
Implementing Local Notifications. . . 698
Using Task-Specific Background Processing. . . 701
Completing a Long-Running Background Task. . . 708
Further Exploration . . . 714
Summary. . . 715
Q&A . . . 715
Workshop. . . 716
HOUR 23: Building Universal Applications
717
Universal Application Development . . . 717Creating a Universal Application (Take 1) . . . 722
Creating a Universal Application (Take 2) . . . 726
Using Multiple Targets . . . 730
Further Exploration . . . 732
Summary. . . 733
Q&A . . . 733
HOUR 24: Application Tracing and Debugging
735
Instant Feedback with NSLog. . . 736
Using the Xcode Debugger. . . 738
Further Exploration . . . 752
Summary. . . 753
Q&A . . . 753
Workshop. . . 753
John Rayis currently serving as a Senior Business Analyst and Development Team Manager for the Ohio State University Research Foundation. He has written numerous books for Macmillan/Sams/Que, including Using TCP/IP: Special Edition,Teach Yourself Dreamweaver MX in 21 Days,Mac OS X Unleashed, and Teach Yourself iPad Development in 24 Hours. As a Macintosh user since 1984, he strives to ensure that each project presents the Macintosh with the equality and depth it deserves. Even technical titles such as Using TCP/IP
contain extensive information about the Macintosh and its applications and have garnered numerous positive reviews for their straightforward approach and accessibility to beginner and intermediate users.
To the crazy ones.
Thank you, Steve Jobs.
Acknowledgments
Thank you to the group at Sams Publishing—Laura Norman, Keith Cline, Anne Groves—for not giving up on this book, despite the changes, delays, and other challenges that we encountered along the way. I’m not sure how you manage to keep all of the files, figures, and information straight, but on this end it looks like magic.
As the reader of this book, youare our most important critic and commentator. We value your opinion and want to know what we’re doing right, what we could do better, what areas you’d like to see us publish in, and any other words of wisdom you’re willing to pass our way.
You can email or write me directly to let me know what you did or didn’t like about this book—as well as what we can do to make our books stronger.
Please note that I cannot help you with technical problems related to the topic of this book, and that due to the high volume of mail I receive, I might not be able to reply to every message.
When you write, please be sure to include this book’s title and author as well as your name and phone or email address. I will carefully review your comments and share them with the author and editors who worked on the book.
E-mail: [email protected] Mail: Greg Wiegand
Associate Publisher Sams Publishing 800 East 96th Street Indianapolis, IN 46240 USA
Reader Services
In less than half a decade, the iOS platform has changed the way that we, the public, think about our mobile computing devices. Only a few years ago, we were thrilled by phones with postage-stamp-sized screens, tinny audio, built-in tip calculators, and text-based web brows-ing. Times have indeed changed. With full-featured applications, an interface architecture that demonstrates that small screens can be effective workspaces, and touch controls unri-valed on any platform, the iPhone brings us the convenience of desktop computing within our pockets.
When Steve Jobs introduced the iPad, people laughed at the name and the idea that “a big iPod Touch” could be magical. In the 2 years that have passed since its introduction, the iPad has become the de facto standard for tablet computing and shows no signs of slowing down. Rarely a week goes by when I don’t read a review of a new app that is described as “magical” and that could only have been created on the iPad. The excitement and innova-tion surrounding iOS and the sheer enjoyment of using the iOS devices has led it to become the mobile platform of choice for users and developers alike.
With Apple, the user experience is key. The iOS is designed to be controlled with your fin-gers rather than by using a stylus or keypad. The applications are “natural” and fun to use, instead of looking and behaving like a clumsy port of a desktop app. Everything from inter-face to application performance and battery life has been considered. The same cannot be said for the competition.
Through the App Store, Apple has created the ultimate digital distribution system for devel-opers. Programmers of any age or affiliation can submit their applications to the App Store for just the cost of a modest yearly Developer Membership fee. Games, utilities, and full-feature applications have been built for everything from pre-K education to retirement liv-ing. No matter what the content, with a user base as large as the iPhone, iPod Touch, and iPad, an audience exists.
My hope is that this book will bring iOS development to a new generation of developers.
Teach Yourself iOS 5 Development in 24 Hoursprovides a clear natural progression of skills development, from installing developer tools and registering your device with Apple, to sub-mitting an application to the App Store. It’s everything you need to get started in 24 one-hour lessons.
Who Can Become an iOS Developer?
If you have an interest in learning, time to invest in exploring and practicing with Apple’s developer tools, and an Intel Macintosh computer running Lion, you have everything you need to begin creating software for iOS.
Developing an app won’t happen overnight, but with dedication and practice, you can be writing your first applications in a matter of days. The more time you spend working with the Apple developer tools, the more opportunities you’ll discover for creating new and excit-ing projects.
You should approach iOS application development as creating software that youwant to use, not what you think others want. If you’re solely interested in getting rich quick, you’re likely to be disappointed. (The App Store is a crowded marketplace—albeit one with a lot of room—and competition for top sales is fierce.) However, if you focus on building apps that are useful and unique, you’re much more likely to find an appreciative audience.
Who Should Use This Book?
This book targets individuals who are new to development for the iPhone and iPad and have experience usingthe Macintosh platform. No previous experience with Objective-C, Cocoa, or the Apple developer tools is required. Of course, if you do have development experience, some of the tools and techniques may be easier to master, but the authors do not assume that you’ve coded before.
What Is (and Isn’t) in This Book?
The material in this book specifically targets iOS release 5 and later on Xcode 4.2 and later. Much of what you’ll be learning is common to all the iOS releases, but this book also covers several important areas that have only come about in iOS 4 and 5, such as gesture recog-nizers, embedded video playback with AirPlay, Core Image, multitasking, universal (iPhone/iPad) applications, and more!
Unfortunately, this is not a complete reference for the iOS APIs; some topics just require much more space than this book allows. Thankfully, the Apple developer documentation is available directly within the free tools you’ll be installing in Hour 1, “Preparing Your System and iDevice for Development.” In many hours, you’ll find a section titled “Further
Exploration.” This identifies additional related topics of interest. Again, a willingness to explore is an important quality in becoming a successful developer.
Each coding lesson is accompanied by project files that include everything you need to com-pile and test an example or, preferably, follow along and build the application yourself. Be sure to download the project files from the book’s website at http://teachyourselfios.com. If you have issues with any projects, view the posts on this site to see whether a solution has been posted.
Preparing Your System and
iDevice for Development
What You’ll Learn in This Hour:
.
The iOS hardware limitations you face
.
Where to get the tools you need to develop for iOS devices
.
How to join the iOS Developer Program
.
The need for (and use of) provisioning profiles
.
What to expect during the first few hours of this book
The iOS device family opens up a whole realm of possibilities for developers: Multitouch interfaces, always-on Internet access, video, and a whole range of built-in sensors can be used to create everything from games to serious productivity applications. Believe it or not, as a new developer, you have an advantage. You are starting fresh, free from any pre-conceived notions of what is possible in a mobile application. Your next big idea may well become the next big thing on Apple’s App Store.
This hour prepares you for your first development project. You’re about to embark on the road to becoming an iOS developer, but you need to do a bit of prep work before you start coding.
Welcome to the iOS Platform
iOS Devices
The iOS platform family currently consists of the iPhone, iPad, iPod Touch, and Apple TV; but at present, the Apple TV is not open for development. As you work on the tutorials in this book, you’ll notice that in many screenshots that I focus on iPhone-centric projects. This isn’t because I’m lacking iPad love; it’s because iPad interfaces are so large it’s difficult to capture them in a screenshot. The good news is that if you want to develop a project on the iPad, you develop it on the iPad! If you want to develop it for the iPhone, you develop it for the iPhone! In almost all cases, the coding process is identical. In the few cases where it isn’t, I make sure you understand what is different between the devices (and why). You’ll also find that each tutorial is available in an iPad and iPhone version on this book’s website (http://teachyourselfios.com), so you can follow along with a working application on whatever device you choose.
Like Apple’s developer tools and documentation, I do not differentiate between the iPhone and iPod Touch in the lessons. For all intents and purposes, developing for these devices is identical, although some capabilities aren’t available in earlier versions of the iPod Touch (but the same can be said for earlier versions of the iPhone and iPad, as well).
Display and Graphics
The iOS devices offer a variety of different resolutions, but iOS provides a simple way of thinking about them. The iPhone screen, for example, is 320×480 points (see
Figure 1.1). Notice that I said points, not pixels. Prior to the release of the iPhone 4’s Retina display, the iPhone was320×480 pixels. Now, the actual resolution of an iOS
device is abstracted behind a scaling factor. This means that although you may be working with the numbers 320×480 for positioning elements, you may have more
pixels than that. The iPhone 4 and 5, for example, have a scaling factor of 2, which means that they are really (320×2) x (480×2) or 640×960 resolution devices.
Although that might seem like quite a bit of screen real estate, remember that all these pixels are displayed on a screen that is roughly 3.5-inch diagonal.
The iPad 2, on the other hand, ships with a 1024×768 point screen. However, the
iPad 2 has a scaling factor of 1, so it is also a 1024×768pixelscreen. It is widely
expected that Apple will update the iPad with a Retina display in the next year, at which time it will stillhave a 1024×768-point screen but a resolution of 2048×1536
pixels and a scaling factor of 2.
We take a closer look at how scaling factors work when we position objects on the screen throughout this book. The important thing to know is that when you’re building your applications, iOS automatically takes the scaling factor into play to display your apps and their interfaces at the highest possible resolution (with rarelyanyadditional work on your part).
If you have a 27-inch cinema display on your desk, these handheld resolutions may seem limiting. Keep in mind, however, that desktop computers only recently exceeded this size, and many websites are still designed for 800×600. In addition, an
iOS device’s display is dedicated to the currently running application. You have one window to work in. You can change the content within that window, but the desktop and multiwindow application metaphors are gone.
The screen limits aren’t a bad thing. As you’ll learn, the iOS development tools give you plenty of opportunities to create applications with just as much depth as your desktop software—albeit with a more structured and efficient interface design. The graphics that you display on your screen can include complex animated 2D and 3D displays thanks to the OpenGL ES implementation available on all iOS devices. OpenGL is an industry standard for defining and manipulating graphic images that
320 Points
480 Points
FIGURE 1.1
The iPhone screen is meas-ured in points— 320×480
(portrait), 480×320
(land-scape)—but each point may be made up of more than 1 pixel.
is widely used when creating games. Each year’s device revisions improve these capa-bilities with more advanced 3D chipsets and rendering acapa-bilities, but even the original iPhone has very respectable imaging abilities.
Application Resource Constraints
As with the HD displays on our desktops and laptops, we’ve grown accustomed to processors that can work faster than we can click. The iOS devices use a range of processors, from a ~400MHz ARM in the early iPhones to a dual-core 1GHz A5 in the iPad 2. The “A” chips are a “system on a chip” that provide CPU, GPU, and other capabilities to the device, and this series is the first Apple-designed CPU series to be used in quite awhile.
Apple has gone to great lengths to keep the iOS devices responsive regardless of what you’re doing. Unfortunately, that means that unlike the Mac OS, your device’s capa-bility to multitask is limited. Starting in iOS 4, Apple created a limited set of multi-tasking APIs for very specific situations. These enable you to perform some tasks in the background, but your application can never assume that it will remain running. The iOS preserves the user experience above all else.
Another constraint that you need to be mindful of is the available memory. In the original iPhone, 128MB of RAM is available for the entire system, including your appli-cation. There is no virtual memory (slower storage space used as RAM), so you must carefully manage the objects that your application creates. In the latest models of the iPhone and iPad, Apple has graciously provided 512MB. This is great for us, but keep in mind that there are no RAM upgrades for earlier models.
Connectivity
Input and Feedback
iOS devices shine when it comes to input and feedback mechanisms and your ability to work with them. You can read the input values from the capacitive multitouch (up to 11 fingers on the iPad) screen, sense motion and tilt via the accelerometer and gyroscope (iPhone 4, iPad 2, and later), determine where you are using the GPS (3G required), see which way you’re facing with the digital compass (iPhone 4, iPad 2, and later), and understand how a device is being used with the proximity and light sensors. iOS can provide so much data to your application about how and where it is being used that the device itself truly becomes a controller of sorts—much like (but surpassing) devices such as the Nintendo Wii and PlayStation Move. iOS devices also support capturing pictures and video (iPhone, iPad 2, and later) directly into your applications, opening a realm of possibilities for interacting with the real world. Already applications are available that identify objects you’ve taken pictures of and that find references to them online (such as the Amazon Mobile app) or perform real-time translation of printed text (Word Lens).
Finally, for each action your user takes when interacting with your application, you can provide feedback. This, obviously, can be visible feedback on the screen, or it can be high-quality audio and force feedback via vibration (iPhone only). As a developer, you can leverage all these capabilities (as you’ll learn in this book). That wraps up our quick tour of the iOS platform. Never before has a single device defined and provided so many capabilities for a developer. As long as you think through the resource limitations and plan accordingly, a wealth of development opportunities await you.
Becoming an iOS Developer
Being an iOS developer requires more than just sitting down and writing a program. You need a modern Intel Macintosh desktop or laptop running Snow Leopard or Lion and at least 6GB of free space on your hard drive. The more screen space you have on your development system, the easier it is to create an effective workspace. Lion users can even take Xcode into fullscreen mode, removing all distractions. That said, I’ve worked perfectly happily on a 13-inch MacBook Air, so an ultra-HD multi-monitor setup certainly isn’t necessary.
The standard program ($99) is available for both companies and individuals. If you want to publish to the App Store with a business name, you are given the option of choosing a standard “individual” or “company” program during the registration.
Registering as a Developer
Big or small, free or paid, your venture into iOS development begins on Apple’s web-site. To start, visit the Apple iOS Dev Center (http://developer.apple.com/ios), shown in Figure 1.2. If you have an existing Apple ID from using iTunes, iCloud, or other Apple services, you can use that ID for your developer account. If not, or if you want a new ID to use solely for development, you can create a new Apple ID during the registration process.
Joining the Apple Developer Program
Despite somewhat confusing messages on the Apple website, there really is no fee associated with joining the Apple Developer Program, downloading the iOS SDK (Software Development Kit), writing iOS applications, and running them on Apple’s iOS Simulator.
Limitations do apply, however, to what you can do for free. If you want to have early access to beta versions of the iOS and SDK, you must be a paid member. If you want to load the applications you write on a physical device or distribute them via the App Store, you also need to pay the membership fee. Most applications in this book work just fine on the simulator provided with the free tools, so the decision on how to proceed is up to you.
Perhaps you aren’t yet sure whether the paid program is right for you. Don’t worry; you can upgrade at any time. I recommend that you start with the free program and upgrade after you’ve written a few sample applications and run them in the simulator.
Obviously, things such as motion sensor input and GPS readings can’t be accu-rately presented in the simulator, but these are special cases and aren’t needed until later in this book.
If you choose to pay, the paid Developer Program offers two levels: a standard pro-gram ($99) for those who will be creating applications that they want to distribute from the App Store, and an enterprise program ($299) for large (500+ employee) companies that want to develop and distribute applications in-house but not
through the App Store. Most likely, the standard program is what you want.
Did You
Know?
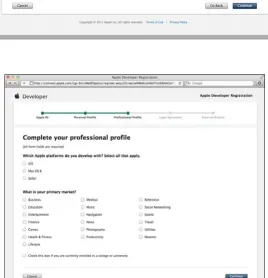
Click the Register link in the upper right, and then click Get Started on the subse-quent page. When the registration starts, decide whether to create an Apple ID or jump-start registration by choosing to use an existing Apple ID, as shown in Figure 1.3. After making your choice, click Continue.
The registration process walks you through the process of creating a new Apple ID (if needed) and collects information about your development interests and experience, as shown in Figure 1.4.
If you’ve chosen to create a new ID, Apple verifies your email address by sending you a clickable link to activate your account.
Joining a Paid Developer Program
After you have a registered and activated Apple ID, you can decide to join a paid program or to continue using the free resources. If you choose to join a paid pro-gram, point your browser to the iOS Developer Program page (http://developer. apple.com/programs/ios/) and click the Enroll Now link. After reading the introduc-tory text, click Continue to begin the enrollment process.
When prompted, choose I’m Registered as a Developer with Apple and Would Like to Enroll in a Paid Apple Developer Program, and then click Continue.
FIGURE 1.2
FIGURE 1.4
The multistep registration process collects a variety of infor-mation about your develop-ment experi-ence.
FIGURE 1.3
FIGURE 1.5
Choose which paid program you want.
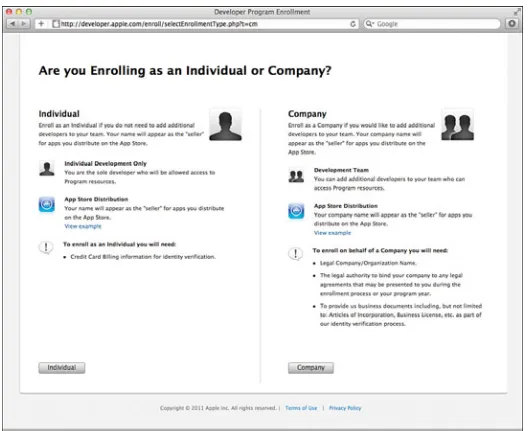
The registration tool now guides you through applying for the paid programs, including choosing between the individual and company options, as shown in Figure 1.5.
Unlike the free developer membership, the paid Developer Program does not take effect immediately. When the App Store first launched, it took months for new devel-opers to join and be approved into the program. Today, however, it might take hours or a few days. Just be patient.
Installing the iOS Developer Tools
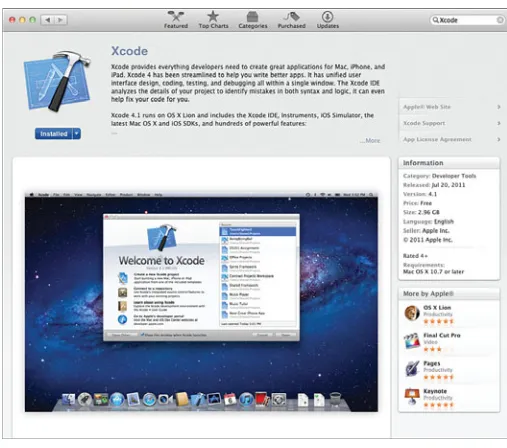
For Lion (or later) users, downloading the iOS developer tools is as easy as point and click. Open the App Store from your Dock, search for Xcode, and download it for free, as shown in Figure 1.6. Sit back while your Mac downloads the large (~3GB) installer. If you don’t have Lion, you can download the current-release version of the iOS developer tools directly from the iOS Dev Center (http://developer.apple.com/ios).
If you have the free developer membership and log in to the iOS Dev Center, you’ll likely see just a single installer for Xcode and the iOS SDK (the current-release version of the development tools). If you’ve become a paid program member, you may see additional links for different versions of the SDK (5.1, 6.0, and so on). The examples in this book are based on the 5.0+ series of iOS SDKs, so be sure to choose that option if presented.
FIGURE 1.6
Download the release version of Xcode from the App Store.
When the download completes, you have either a disk image (if you downloaded from the iOS Developer site) or an installer (if you downloaded from the App Store). Open the disk image, if necessary, and run the installer. You don’t have to change any of the defaults during the installation process, so just read and agree to the soft-ware license and click Continue to proceed through the steps.
Unlike most applications, the Apple developer tools are installed in a folder called Developer located at the root of your hard drive. Inside the Developer folder are dozens of files and folders containing developer frameworks, source code files, exam-ples, and of course, the developer applications themselves. Nearly all your work in this book will be in the application Xcode, located in the Developer/Applications folder and in the Developer group in Launchpad (see Figure 1.7).
Although we won’t get into real development for a few more hours, we willbe config-uring a few options in Xcode in the next section, so don’t forget where it is.
Creating and Installing a Development
Provisioning Profile
Watch
Out!
FIGURE 1.7
Most of your work will start with Xcode (which you can find in the Developer folder).
For Paid Members Only
Only paid developer accounts can complete the following steps. If you have a free developer account, don’t fret; you can use the iOS Simulator to test your apps until you’re ready for a paid membership. Skip ahead to “Running Your First iOS App,” later in this hour.
In many development guides, this step isn’t covered until after development begins. In my mind, once you’ve written an application, you’re going to want to run it on a real device immediately. Why? Because it’s just cool to see your own code running on your own iPhone or iPad!
What’s a Development Provisioning Profile?
Like it or not, Apple’s current approach to iOS development is to make absolutely certain that the development process is controlled—and that groups can’t just distrib-ute software to anyone they want. The result is a rather confusing process that ties together information about you, any development team members, and your applica-tion into a “provisioning profile.”
FIGURE 1.8
Open the Xcode Organizer and select your device.
Configuring a Device for Development
In the past, creating a provisioning profile for the sole purpose of development was a frustrating and time-consuming activity that took place in an area of the iOS devel-oper site called the Provisioning Portal. Apple has dramatically streamlined the process in recent versions of Xcode, making provisioning as simple as connecting your device and clicking a button.
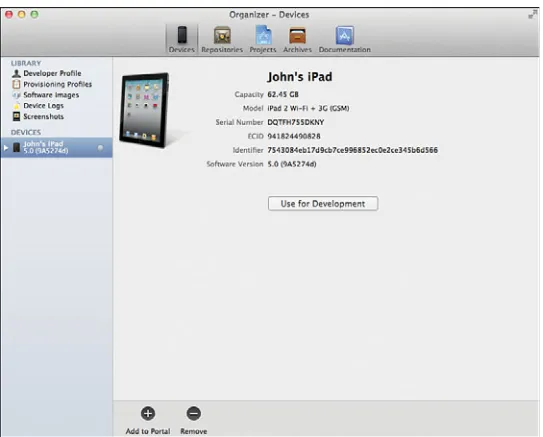
To install the development profile, first make sure that your device is connected to your computer, and then launch Xcode. When Xcode first launches, dismiss any “Welcome” windows that appear, and then immediately choose Window, Organizer from the menu. The Organizer utility slightly resembles iTunes in its layout. You should see your iOS device listed in the leftmost column of the Organizer under the Devices section, as shown in Figure 1.8.
Click the device icon to select it, and then click the Use for Development button. Your screen should now resemble Figure 1.8.
Next, click the Use for Development button located near the center of the screen. When prompted, provide the Apple ID login associated with your paid developer membership. Be sure to click the Remember Password in Keychain check box so that you can access online developer resources through Xcode without encountering addi-tional prompts.
FIGURE 1.9
Submit a request for a new develop-ment certificate.
also registers your device with Apple so that it can run the software you create (and beta releases of iOS). If this is the first time you’ve been through the process, you are asked whether a development certificate should be generated, as shown in Figure 1.9. Click Submit Request to continue.
Xcode continues to communicate with Apple to create a development profile that will be named Team Provisioning Profile as well as a unique App ID. This ID identi-fies a shared portion of the iOS device keychain to which your application will have access.
The keychain is a secure information store on iOS devices that can be used to save passwords and other critical information. Most apps don’t share a keychain space (and therefore cannot share protected information). If you use the same App ID for multiple applications, however, those applications can share keychain data.
For the purposes of this book, there’s no reason the tutorial apps can’t share a single App ID, so letting Xcode generate an ID for us is just fine. Xcode will, in fact, create a “wildcard” App ID that will be applied to any application you create using the Team Provisioning Profile.
Finally, Apple’s servers use all of this information, along with the unique identifier of your connected iOS device, to provide Xcode with a completed provisioning profile. Xcode then transparently uploads the profile to your device.
FIGURE 1.10
The profile should now be listed in the Xcode Organizer.
To view the details of the profile (and verify its installation), expand the disclosure arrow beside your device name in the Organizer and click the Provisioning Profiles line. You should see the Team Provisioning Profile, date of creation, the automati-cally generated App ID, and the devices using the profile, as shown in Figure 1.10. Congratulations! You’re ready to run an application on your device.
But Wait... I Have More Than One iOS Device
We’ve discussed provisioning a single device for development. But what if you have multiple devices that you want to install onto? No problem. Just connect the additional devices and use the Use for Development button to add them to your account and provision them.
Apple allows a totalof 100 unique devices to be used on your account within the span of 1 year, so be judicious in registering devices if you plan to do extensive in-house development testing.
After you have a development machine configured, you can easily configure other computers using the Developer Profile item in the Xcode Organizer’s Library. The Export Developer Profile and Import Developer Profile buttons export (and subse-quently import) all your developer profiles/certificates in a single package.
Did You
FIGURE 1.11
The opened proj-ect should look a bit like this.
Running Your First iOS App
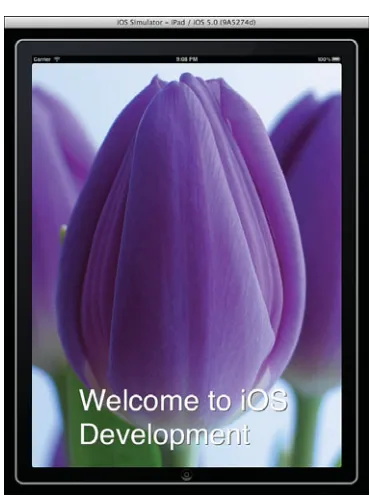
It seems wrong to go through a whole hour about getting ready for iOS development without any payoff, right? For a real-world test of your efforts, let’s actually try to run an application on your iOS device. If you haven’t downloaded the project files to your computer, now is a good time to visit http://teachyourselfiOS.com and down-load the archives.
Within the Hour 1 Projects folder, open the Welcome folder. Double-click
Welcome.xcodeproj to open a simple application in Xcode. After the project opens, your display should be similar to Figure 1.11.
Next, make sure that your iOS Device is plugged into your computer. Using the Scheme pop-up menu in the upper-left corner of the Xcode window, choose the name of your device, as shown in Figure 1.12. This tells Xcode that when the project is built it should be installed on your device, not run in the simulator. If you don’t have a paid developer membership, choose either the iPhone Simulator or iPad Simulator option, depending on which version of the project you’re using.
Typically, you see just one option for running an application on either the iPhone Simulator or the iPad Simulator. In Figure 1.12, you see both. This occurs when you are using an iPhone-targeted app (because they run on iPhones and iPads) or when an app is a universal application (more on that later in the book). In this case, the screenshot was captured using the iPhone version of the project so that both options could be seen.
Finally, click the Run button in the upper-left corner of the window. After a few sec-onds, the application should be installed and launched on your device. Because I can’t actually show you my device running the app, Figure 1.13 demonstrates what it looks like in the iPad Simulator.
Click Stop in the Xcode toolbar to exit the application. You can now quit Xcode— we’re done with it for the day.
When you clicked Run, the Welcome application was installed and started on your iOS device. It remains there until you remove it manually. Just touch and hold the Welcome icon until it starts wiggling, and then delete the application as you would any other. Applications installed with your development certificate stop working when the certificate expires (120 days after issuance).
Developer Technology Overview
Over the course of the next few hours, you are introduced to the technologies that you’ll be using to create iOS applications. The goal is to get you up to speed on the tools and technology, and then you can start actively developing. This means you’re still a few hours away from writing your first app, but when you start coding, you’ll have the necessary background skills and knowledge to successfully create a wide variety of applications.
FIGURE 1.12
Choose where you want the app to run (on a device or in the simulator).
FIGURE 1.13
Congratulations! You’ve just installed your first homegrown iOS application.
The Apple Developer Suite
In this hour, you downloaded and worked with the Xcode application. This, coupled with the iOS Simulator, will be your home for the duration of the book. These two applications are so critical, in fact, that we spend 2 hours (Hour 2, “Introduction to Xcode and the iOS Simulator,” and Hour 5, “Exploring Xcode’s Interface Builder”) covering their capabilities and use.
It’s worth mentioning that almost every iPhone, iPad, iPod, and Macintosh applica-tion you run, whether created by a single developer at home or by a huge company, is built using the Apple developer tools. This means that you have everything you need to create software as powerful as any you’ve ever run.
Objective-C
If you’ve never worked with a programming language before, don’t worry. Hour 3, “Discovering Objective-C: The Language of Apple Platforms,” covers everything you need to get started. Developing for iOS in Objective-C is a unique programming experience, even if you’ve used other programming languages in the past. The lan-guage is unobtrusive and structured in a way that makes it easy to follow. After your first few projects, Objective-C will fade into the background, letting you concentrate on the specifics of your application.
Cocoa Touch
While Objective-C defines the structure for iOS applications, Cocoa Touch defines the functional building blocks, called classes, that can make iOS devices perform cer-tain actions. Cocoa Touch isn’t a “thing,” per se, but a collection of interface ele-ments, data storage eleele-ments, and other handy tools that you can access from your applications.
As you’ll learn in Hour 4, “Inside Cocoa Touch,” you can access literally hundreds of different Cocoa Touch classes and do thousands of things with them. This book covers quite a few of the most useful classes and gives you the pointers necessary to explore even more on your own.
Model-View-Controller
The iOS platform and Macintosh use a development approach called Model-View-Controller (MVC) to structure applications. Understanding why MVC is used and the benefits it provides will help you make good decisions in structuring your most com-plex applications. Despite the complicated-sounding name, MVC is really just a way to keep your application projects arranged so that you can easily update and extend them in the future. You learn more about MVC in Hour 6, “Model-View-Controller Application Design.”
Further Exploration
Summary
This hour introduced you to the iOS platform, its capabilities, and its limitations. You learned about the different iOS devices’ graphic features, RAM sizes, and the various sensors that you can use in your applications to create uniquely “aware” experiences. We also discussed the Apple iOS developer tools, how to download and install them, and the differences between the various paid Developer Programs. To prepare you for actual on-phone development, you explored the process of creating and installing a development provisioning profile in Xcode and even installed an application on your device.
The hour wrapped up with a quick discussion about the development technologies that make up the first part of this book and form the basis for all the iOS develop-ment you’ll be doing.
Q&A
Q.
I thought that iOS devices ranged from a minimum of 16GB of RAM in the
low-end iPad and iPhone to 64GB on the high-end models. Don’t they?
A. The “memory” capabilities of devices that are advertised to the public are the storage sizes available for applications, songs, and so forth. It is separate from the RAM that can be used for executing programs. If Apple implements vir-tual memory in a future version of iOS, it is possible that the larger storage could be used for increasing available RAM.
Q.
What platform should I target for development?
A. That depends on your goals. If you want to reach the largest audience, con-sider a universal application that works on the iPhone, iPad, and iPod Touch. We explore this in a few projects later in this book. If you want to make use of the most-capable hardware, you can certainly target the unique capabilities of a specific device, but by doing so you might be limiting the size of your cus-tomer base.
Q.
Why isn’t the iOS platform open?
potential for a harmful application to cause damage to data or otherwise neg-atively impact the user. Whether this is an appropriate approach, however, is open to debate.
Workshop
Quiz
1. What is the resolution of the iPhone screen?
2. What is the cost of joining an individual iOS Developer Program?
3. What language will you use when creating iOS applications?
Answers
1. Trick question. The iPhone screen has 320×480 points, but you can’t tell how
many pixels unless you multiply by the scaling factor. The iPhone 4 and 5 have a scaling factor of 2; all other models have a scaling factor of 1.
2. The Developer Program costs $99 a year for the individual option.
3. Objective-C is used for iOS development.
Activities
1. Establish an Apple developer membership and download and install the developer tools. This is an important activity that you should completed before starting the next hour’s lesson (if you didn’t do so while following along in this hour).
Introduction to Xcode and the
iOS Simulator
What You’ll Learn in This Hour:
.
How to create new projects in Xcode
.
Code editing and navigation features
.
Where to add classes and resources to a project
.
How to modify project properties
.
Compiling for iOS devices and the iOS Simulator
.
How to interpret error messages
.
Features and limitations of the iOS Simulator
The core of your work in the Apple Developer Suite will be spent in two applications: Xcode and the iOS Simulator. These apps provides all the tools that you need to design, program, and test applications for the iPhone and iPad. And, unlike other platforms, the Apple Developer Suite is entirely free.
This hour walks you through the basics you need to work with Xcode’s code-editing tools and the iOS Simulator, and you get some hands-on practice working with each. We cover Xcode’s interface-creation tools in Hour 5, “Exploring Xcode’s Interface Builder.”
Using Xcode
FIGURE 2.1
Explore Apple’s developer resources, right from the Xcode Welcome screen.
After you install the developer tools, as described in Hour 1, “Preparing Your System and iDevice for Development,” you should be able to find Xcode in the
Developer/Applications folder located at the root level of your hard drive or in the Developer group in Launchpad. We walk through the day-to-day use of Xcode’s tools in this hour, so if you haven’t installed the tools yet, do so now.
Launch Xcode now. After a few moments, the Welcome to Xcode screen displays, as shown in Figure 2.1.
You can choose to disable this screen by unchecking the Show This Window When Xcode Launches check box, but it does provide a convenient “jumping-off” point for sample code, tutorials, and documentation. In Hour 4, “Inside Cocoa Touch,” we take a detailed look at the documentation system included in Xcode, which is quite extensive. For now, click Cancel to exit the Welcome screen.
Creating and Managing Projects
Most of your development work will start with an Xcode project. A project is a collec-tion of all the files associated with an applicacollec-tion, along with the settings needed to “build” a working piece of software from the files. This includes images, source code, and a file that describes the appearance and objects that make up the interface.
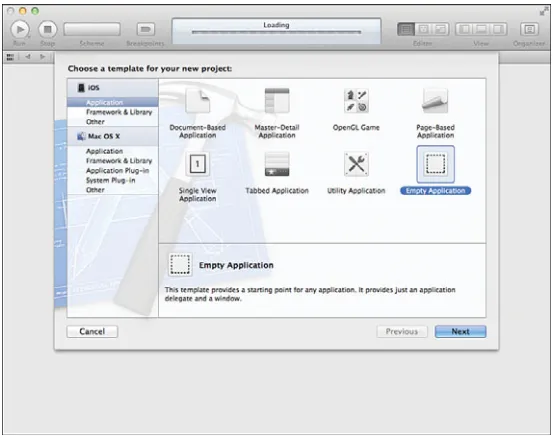
Choosing a Project Type
FIGURE 2.2
To create a new project, start by choosing an appropriate template.
quickly start a new development effort. Although it is possible to build an applica-tion completely from scratch, the time saved by using a template is significant. We use several templates throughout this book, depending on what type of application we’re building.
Along the left side of the Template window are the categories of templates available. Our focus is on the iOS Application category, so be sure that it is selected.
On the right side of the display are the templates within the category, with a description of the currently highlighted template. For this tutorial, click the Empty Application template, and then click Next.
After choosing the template, you are prompted for a product name and a company identifier. The product name is the name of your application, and the company identifier is the domain name of the organization or individual producing the app, but in reverse order. Together, these two values make up something called the bun-dle identifier, which uniquely identifies your application among all other iOS apps. For example, in this hour, we create an app called HelloXcode. This becomes the product name. I own the domain teachyourselfios.com, so I enter
Did You
Know?
Did You
Know?
FIGURE 2.3
Choose a product name and company identifier for your app.
device (iPad or iPhone) you are using from the Device Family pop-up, and make sure that the Use Automatic Reference Counting check box is selected. The Include Unit Tests check box should be unchecked. Your screen will look similar to mine, as shown in Figure 2.3.
The class prefix is an arbitrary string that is appended onto the start of the file-names in an Xcode application template. Apple has traditionally automatically assigned the product name as the prefix but has changed this in recent versions of Xcode.
Core data is an advanced means of storing application data that may be of inter-est as your projects needs grow.
Finally, unit testing is a process for defining automated tests for functional units of your code. These topics are beyond the scope of this book, but you can read more about them using the Xcode documentation system discussed in the next hour.
When satisfied with your settings, click Next. Xcode prompts for a save location for the project. Navigate to an appropriate location on your drive, make sure the Source Control option is unchecked, and then click Create. Xcode makes a folder with the name of the project and places all the associated template files within that folder.
By the
Way
Navigator Editor Utility
Toolbar FIGURE 2.4
Finding your way around the Xcode interface can be intimidating at first.
Getting Your Bearings
After you’ve created or opened a project in Xcode, the interface displays an iTunes-like window that will be used for everything from writing code to designing your application interfaces. If this is your first time in Xcode, the assortment of buttons and menus and icons can be more than a little intimidating. To help get a feel for what all of this is, let’s start by defining the major functional areas of the interface, shown in Figure 2.4.
Toolbar: Displays project status and provides easy access to common functions.
Navigator: Manages files, groups, and other information related to your project.
Editor: Edits project content (code, interfaces, and more).
Utility: Provides quick access to object inspectors, help, and project components.
Project Navigator
FIGURE 2.5
Use the Project Navigator to browse your project resources.
By the
Way
If you ever find that your display seems completely different from what you’re expecting, use the View menu on the Xcode menu bar to show the toolbar, Navigator, or any other pieces that have gone missing.
You’ll get accustomed to the features offered within each of these areas as we work through the book. For now, we focus on the Navigator and Editor.
Navigating Your Project
The Navigator can operate in many different modes, from navigating your project files to searching results and error messages. The modes are changed using the icons immediately above the Navigator area. The folder icon shows the Project Navigator and is where you’ll spend most of your time.
The Project Navigator displays a top-level icon representing (and named after) your project; this is the project group. You can use the disclosure arrow in front of the project group to open and show the files and groups that make up your application. Let’s take a look at the HelloXcode project we created a few minutes ago.
In Xcode, expand the HelloXcode project group in the Project Navigator. You’ll see three folders associated with the application, as highlighted in Figure 2.5.
Did You
Know?
Within the project group are three subgroups that you’ll find useful:
Project Code: Named after the project, this folder contains the code for the class files and resources that you add to your project. As you’ll learn in the next hour, classes group together application features that complement one another. Most of your development will be within a file located here.
Frameworks: Frameworks are the core code libraries that give your applica-tion a certain level of funcapplica-tionality. By default, Xcode includes the basic frame-works for you, but if you want to add special features, such as sound or vibration, you may need an additional framework. We walk through the process of adding frameworks in Hour 10, “Getting the User’s Attention.”
Products: Anything produced by Xcode is included here (typically, the exe-cutable application).
If you dig a bit further, you’ll find a Supporting Files group within the Project Code folder. This contains files that, although necessary for your application to work cor-rectly, are rarely edited by hand.
If you find that you want additional logical groupings of files, you can define your own groups via File, New, New Group. Some people, for example, like to keep images, icons, and other files grouped in a Resources group.
Finding Your Way with Filtering
At the bottom of the Navigator area is a small toolbar that you can use to filter or adjust what is currently being displayed. In the Project Navigator, for example, you can enter text in the search field to only display project resources (groups or files) that match. You can also use the icons to the right of the field to limit the results to recent files or files that haven’t been saved (the clock and pen/paper icons, respectively).
The filtering options are contextual; they change based on what is currently being displayed in the Navigator. Be sure to take advantage of Xcode’s extensive tooltips to explore the interface as you encounter new areas and features.
Adding New Code Files to a Project
Project Navigator
Project Navigator
FIGURE 2.6
Use Xcode to add new files to a project.
Can I Add Empty Files Manually?
Yes, you could drag your own files into one of the Xcode groups and copy them into the project. However, just as a project template gives you a head start on implementation, Xcode’s file templates do the same thing. They often include an outline for the different features that you must implement to make the code functional.
Adding Resources to a Project
Many applications will require sound or image files that you’ll integrate into your development. Obviously, Xcode can’t help you “create” these files, so you’ll have to add them by hand. To do this, just click and drag the file from its location into the project code group in Xcode. You are prompted to copy the files. Always make sure the Copy check box is selected so that Xcode can put the files where they need to go within your project directory.
Did You
Know?
FIGURE 2.7
Drag the Background.png file into the project code folder and choose to copy if needed.
In the provided HelloXcode project folder that corresponds with what you’re building this hour, you’ll find an Images folder containing the file Background.png. Choose to copy if needed, as shown in Figure 2.7. Copying the files ensures that they are cor-rectly placed within your project and accessible by your code.
If you drag a folder with multiple files into your project, Xcode, by default, automati-cally creates a group containing all the files. In the tutorials, I will usually add mul-tiple files by dragging the whole folder (and thus creating a group) into the project.
Removing Files and Resources
If you’ve added something to Xcode that you decide you don’t want, you can delete it easily. To remove a file or resource from your project, simply select it within the Project Navigator and press the Delete key. Xcode gives you the option to delete any references to the file from the project and move the file to the Trash or just to delete the references (see Figure 2.8).
FIGURE 2.8
Deleting a file’s reference leaves the actual file untouched.
By the
Way
File
Editor
FIGURE 2.9
Choose the group, then the file, and then edit.
If Xcode can’t find a file that it expects to be part of a project, that file is high-lighted in red in the Xcode interface. This might happen if you accidentally use the Finder to delete a file from the project folder. It also occurs when Xcode knows that an application file will be created by a project but the application hasn’t been generated yet. In this case, you can safely ignore the red .app file within the Products group.
Editing and Navigating Code
To edit code in Xcode, just use the Project Navigator to find the file you want to edit, and then click the filename. The editable contents of the file are shown in the Editor area of the Xcode interface (see Figure 2.9).
Symbol Navigator
Symbol Navigator
Symbol
Symbol
FIGURE 2.10
The Symbol Navigator is a quick way to jump between methods and properties.
then click AppDelegate.m to begin editing the source code. Notice that above the editor is a visual path to the file you are editing. Clicking any portion of the path reveals a pop-up menu for quickly jumping to other files in same location. To the left of the path are forward and back arrows that move back and forth between files that you’ve been editing, just like pages you visit in a web browser.
For this project, we use an interface element called a label to display the text Hello Xcodeon your device’s screen. This application, like most that you write, uses a method to show our greeting. A methodis just a block of code that executes when something needs to happen. In this example, we use an existing method called
application:
didFinishLaunchingWithOptionsthat runs as soon as the application starts.
Jumping Through Code with the Symbol Navigator
The easiest way to find a method or property within a source code file is to use the Symbol Navigator, opened by clicking the icon to the immediate right of the Project Navigator. This view, shown in Figure 2.10, enables you to expand your project classes to show all the methods, properties, and variables that are defined. Choosing an item from the list jumps to and highlights the relevant line in your source code.
Did You
Know?
Watch
Out!
When you are editing a file, the visual path above the editor ends in the symbol label where your cursor is currently located (if any). Clicking this label displays a list of the symbols defined in code you are working on, and choosing one jumps to that section of code.
Using Code Completion
Using the Xcode editor, type the following text to implement the
application:didFinishLaunchingWithOptionsmethod. Start a new line immedi-ately following the line with text “Override point for customization after application launch” (a comment). You need to enter just the bolded code lines shown in Listing 2.1.
LISTING 2.1
Your First Code Exercise
- (BOOL)application:(UIApplication *)application
didFinishLaunchingWithOptions:(NSDictionary *)launchOptions {
self.window = [[UIWindow alloc]
initWithFrame:[[UIScreen mainScreen] bounds]];
// Override point for customization after application launch.
UILabel *myMessage;
myMessage.textColor = [UIColor colorWithPatternImage:
[UIImage imageNamed:@”Background.png”]]; [self.window addSubview:myMessage];
self.window.backgroundColor = [UIColor whiteColor]; [self.window makeKeyAndVisible];
return YES; }
Haste Makes Waste
If you decide to skip ahead and run this application, you’ll quickly realize that the code you entered is not going to work. Some errors have been intentionally included here that you correct later this hour.
By the
Way
FIGURE 2.11
Xcode automatically completes the code as you type.
To accept an autocompletion suggestion, press Tab, and the code will be inserted, just as if you typed the whole thing. If there are multiple possible outcomes for the autocomplete line, you can arrow up and down to select the one you want and then press Tab. Xcode tries to complete method names, variables that you’ve defined, and anything else related to the project that it might recognize.
After you’ve made your changes, you can save the file by choosing File, Save.
It’s not important to understand exactly what this code does—at this point, you just need to get experience in the Xcode editor. The “short and sweet” description of this fragment, however, is that it creates a label object in the upper-left corner of the screen; sets the label’s text, font, size, and color; and then adds it to the application’s window.
Searching Your Code with the Search Navigator
Did You
Know?
Search Navigator
FIGURE 2.12
Use the Search Navigator to find text throughout your project.
The search results display below the search field, along with a snippet of the file con-taining the text you were looking for. Clicking a search result opens the correspon-ding file in the editor and jumps to the line containing your search string.
To make things even more interesting, you can use the filter field at the bottom of the Search Navigator to filter your search results by a secondary term. You can also click the Find label at the top of the Search Navigator to switch to a Replace mode— enabling you to perform project-wide find and replace.
If you’re looking for a string within a file you are actively editing, choose Edit, Find (Command+F) to open a more traditional Find field at the top of the editor. This gives you quick access to find (or find/replace) within a given file, rather than across the entire project.
Adding Pragma Marks
Sometimes navigating code by symbols or with a search isn’t very efficient. To help denote important pieces of code in plain English, you can insert a #pragma mark
Pragma mark
Pragma mark
FIGURE 2.13
Pragma marks can create logical divisions in your code.
There are two common types of pragma marks:
#pragma mark
-and
#pragma mark <label name>
The first inserts a horizontal line in the symbol menu; the second inserts an arbitrary label name. You can use both together to add a section heading to your code. For example, to add a section called “Methods for starting and stopping the application” followed by a horizontal line, you could type the following:
#pragma mark Methods for starting and stopping the application #pragma mark
-After the pragma mark has been added to your code and saved, the symbol menu updates accordingly, as shown in Figure 2.13. Choosing a pragma mark from the symbol menu jumps to that portion of the code.
Using the Assistant Editor
Standard Editor
Standard Editor
Assistant Editor
Assistant Editor
FIGURE 2.14
The Assistant Editor opens related files to the right of the file you are working on.
Xcode simplifies this back-and-forth editing in the Assistant Editor mode. The assis-tant editor automatically looks at the file you have opened for editing and opens, right beside it, the related file that you also need to work on, as shown in
Figure 2.14.
To switch between Standard and Assistant Editor modes, you use the first and second buttons, respectively, in the Editor section of the Xcode toolbar.
Managing Snapshots
If you’re planning to make many changes to your code and you’re not quite sure you’ll like the outcome, you might want to take advantage of the Xcode “snapshot” feature. A code snapshot is, in essence, a copy of all your source code at a particular moment in time. If you don’t like changes you’ve made, you can revert to an earlier snapshot. Snapshots are also helpful because they show what has changed between multiple versions of an application.
To take a snapshot, choose File, Create Snapshot. You are prompted for a name of the snapshot and for a description, as shown in Figure 2.15. Provide appropriate input, and then click Create Snapshot. That’s it.
FIGURE 2.15
Create a snapshot of your project at any point in time.
FIGURE 2.16
Use a snapshot to figure out what changes you’ve made among different versions of your application.
Did You
Know?
Choose a Scheme
FIGURE 2.17
Change the scheme to target an iOS device or one of the variants of the iOS Simulator.
Xcode snapshots are a limited form of version control. Xcode also includes the GIT version control system and Subversion support. We won’t be using these tools in this book because the snapshot support is more than enough for most small to medium-size projects.
Building Applications
After you’ve completed your source code, it’s time to build and run the application. The build process encompasses several different steps, including compiling and link-ing.Compilingtranslates the instructions you type into something that your iOS device understands. Linkingcombines your code with the necessary frameworks the application needs to run. During these steps, Xcode displays any errors that it might find.
Before building an application, you must first choose what it is being built to run on: the iOS Simulator or a physical iDevice.