Exam Ref
real-world mastery of implementing and configuring Windows•
Install and Configure Servers•
Configure Server Roles and Features•
Configure Hyper-V•
Deploy and Configure Core Network Services•
•
•
•
•
Advanced Windows Store
HTML5 and JavaScript
Advanced Windows Stor
e App
Development Using HTML5 and J
avaScript
Joli Ballew
core Windows Server 2012 infrastructure
Certification
Microsoft Certified Solutions (MCSA) certifications validate
required for the MCSA: Windows Server 2012 certification.
microsoft.com/learning/certification
Craig Zacker
networking, and PC hardware. He is
Exam Ref 70-482
70 687
Configuring
Windows 8.1
PUBLISHED BY Microsoft Press
A Division of Microsoft Corporation One Microsoft Way
Redmond, Washington 98052-6399 Copyright © 2014 by Joli Ballew
All rights reserved. No part of the contents of this book may be reproduced or transmitted in any form or by any means without the written permission of the publisher.
Library of Congress Control Number: 2014931890 ISBN: 978-0-7356-8477-5
Printed and bound in the United States of America.
First Printing
Microsoft Press books are available through booksellers and distributors worldwide. If you need support related to this book, email Microsoft Press Book Support at [email protected]. Please tell us what you think of this book at http://www.microsoft.com/learning/booksurvey.
Microsoft and the trademarks listed at http://www.microsoft.com/en-us/legal/intellectualproperty/Trademarks /EN-US.aspx are trademarks of the Microsoft group of companies. All other marks are property of their respective owners.
The example companies, organizations, products, domain names, email addresses, logos, people, places, and events depicted herein are fictitious. No association with any real company, organization, product, domain name, email address, logo, person, place, or event is intended or should be inferred.
This book expresses the author’s views and opinions. The information contained in this book is provided without any express, statutory, or implied warranties. Neither the authors, Microsoft Corporation, nor its resellers, or distributors will be held liable for any damages caused or alleged to be caused either directly or indirectly by this book.
Acquisitions Editor: Anne Hamilton Developmental Editor: Karen Szall Editorial Production: nSight, Inc.
Technical Reviewer: Randall Galloway; Technical Review services provided by Content Master, a member of CM Group, Ltd.
Contents at a glance
Introduction xiii
Preparing for the exam
xvi
CHAPTER 1 Install and upgrade to Windows 8.1 1
CHAPTER 2 Configure hardware and applications 53
CHAPTER 3 Configure network connectivity 123
CHAPTER 4 Configure access to resources 171
CHAPTER 5 Configure remote access and mobility 231
CHAPTER 6 Monitor and maintain Windows clients 277
CHAPTER 7 Configure system and data options 329
Contents
Introduction xiii
Microsoft certifications xiii
Acknowledgments xiv
Errata & book support xiv
We want to hear from you xv
Stay in touch xv
Preparing for the exam xvi
Chapter 1 Install and upgrade to Windows 8.1
1
Objective 1.1: Evaluate hardware readiness and compatibility. . . .2
Choose the ideal Windows 8.1 edition 2
Perform readiness tests 5
Choose an installation option (clean or upgrade) 10
Objective summary 13
Objective review 13
Objective 1.2: Install Windows 8.1 . . . .15
Perform manual installations and upgrades 15
Perform a clean installation 16
Upgrade from Windows 7 17
Upgrade from Windows 8 19
Migrate from previous versions of Windows 20
Install additional Windows features 21
Install as Windows To Go and to VHD 25
Explore the custom Windows 8.1 installation 32
Objective summary 33
Objective review 34
Objective 1.3: Migrate and configure user data . . . .34
Use Windows Easy Transfer 35
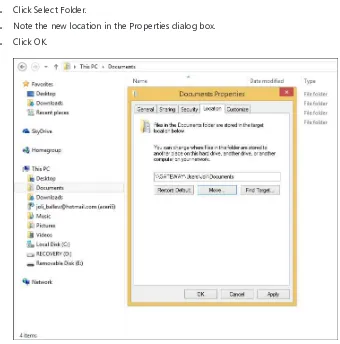
Configure folder location 40
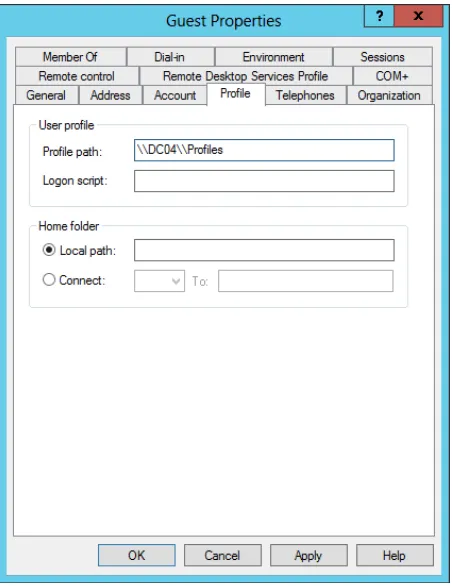
Configure profiles 42
Objective review 46
Chapter summary . . . .47 Answers . . . .49
Objective 1.1: Thought experiment 49
Objective 1.1: Review 49
Objective 1.2: Thought experiment 50
Objective 1.2: Review 50
Objective 1.3: Thought experiment 51
Objective 1.3: Review 52
Chapter 2
Configure hardware and applications
53
Objective 2.1: Configure devices and device drivers . . . .53 Install and manage drivers with Device Manager 54
Configure devices 60
Use Pnputil.exe to manage the Driver Store 65
Create a driver update policy 66
Objective summary 68
Objective review 68
Objective 2.2: Install and configure desktop apps and Windows
Store apps . . . .70
Install and repair applications 73
Manage access to the Windows Store 76
Objective summary 79
Objective review 80
Objective 2.3: Control access to local hardware and applications . . . 81 Configure application restrictions using AppLocker 81 Configure application restrictions using Software Restriction
Manage installation of and access to removable devices 84
Configure Assigned Access 86
Objective summary 88
Objective review 88
Objective 2.4: Configure Internet Explorer 11 and Internet Explorer for the desktop . . . .90
Configure Compatibility View and explore Group Policy
settings 90
Configure security and privacy settings 92
Manage add-ons, toolbars, extensions, search providers,
and more 94
Configure Download Manager 96
Objective summary 97
Objective review 97
Objective 2.5: Configure Hyper-V . . . 98
Create and configure a virtual machine 99
Create and manage checkpoints 107
Create and configure virtual switches 108
Create and configure virtual disks 110
Move a virtual machine 111
Objective summary 113
Objective review 114
Chapter summary . . . .115 Answers . . . .116
Objective 2.1: Thought experiment 116
Objective 2.1: Review 116
Objective 2.2: Thought experiment 117
Objective 2.2: Review 117
Objective 2.3: Thought experiment 118
Objective 2.3 Review 118
Objective 2.4: Thought experiment 119
Objective 2.4: Review 120
Objective 2.5: Thought experiment 121
Chapter 3
Configure network connectivity
123
Objective 3.1: Configure IP settings . . . .123Configure IP settings 124
Objective summary 133
Objective review 133
Objective 3.2: Configure networking settings . . . .134
Connect to a wireless network 134
Manage preferred wireless networks 136
Configure location-aware printing 137
Configure network adapters 139
Objective summary 141
Objective review 141
Objective 3.3: Configure and maintain network security . . . .142
Configure Network Discovery 142
Configure Windows Firewall 144
Configure Windows Firewall with Advanced Security 145
Configure connection security rules (IPsec) 150
Create authenticated exceptions 151
Objective summary 153
Objective review 153
Objective 3.4: Configure remote management . . . .154 Configure and use Remote Assistance and Remote Desktop 155
Make modifications remotely using an MMC 159
Explore Remote Management tools and configure settings 160
Objective summary 163
Objective review 163
Chapter summary . . . .164 Answers . . . .165
Objective 3.1: Thought experiment 165
Objective 3.1: Review 165
Objective 3.2: Thought experiment 166
Objective 3.2: Review 166
Objective 3.4: Thought experiment 168
Objective 3.4: Review 168
Chapter 4
Configure access to resources
171
Objective 4.1: Configure shared resources . . . .171
Configure HomeGroup settings 172
Configure shared folder permissions 174
Configure file libraries 180
Configure shared printers 181
Set up and configure SkyDrive 184
Objective summary 188
Objective review 188
Objective 4.2: Configure file and folder access . . . 189
Configure NTFS permissions 190
Configure disk quotas 195
Encrypt files and folders using EFS 197
Configure object access auditing 199
Objective summary 204
Objective review 205
Objective 4.3: Configure authentication and authorization . . . .206
Set up and configure a Microsoft account 206
Configure authentication in workgroups and domains 208 Configure virtual smart cards and biometrics 211
Configure user rights 214
Manage credentials and certificates 215
Configure User Account Control behavior 221
Objective summary 223
Objective review 223
Chapter summary . . . .225 Answers . . . .226
Objective 4.1: Thought experiment 226
Objective 4.1: Review 226
Objective 4.2: Thought experiment 227
Objective 4.3: Thought experiment 228
Objective 4.3: Review 228
Chapter 5
Configure remote access and mobility
231
Objective 5.1: Configure remote connections . . . .231
Configure remote authentication 232
Configure Remote Desktop settings 234
Configure VPN connections and authentication 236
Enable VPN Reconnect 237
Configure broadband tethering 238
Objective summary 241
Objective review 241
Objective 5.2: Configure mobility options . . . .242
Configure offline file policies 243
Configure power policies 246
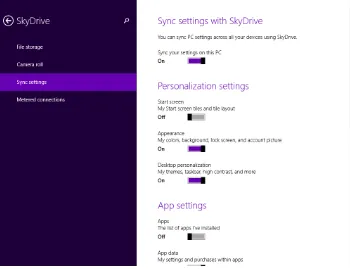
Configure sync options 249
Configure Wi-Fi Direct 254
Configure Windows To Go 255
Objective summary 260
Objective review 260
Objective 5.3: Configure security for mobile devices . . . .262
Configure BitLocker 262
Configure BitLocker To Go 267
Configure startup key storage 269
Objective summary 270
Objective review 271
Chapter summary . . . .272 Answers . . . .273
Objective 5.1: Thought experiment 273
Objective 5.1: Review 273
Objective 5.2: Thought experiment 274
Objective 5.2: Review 274
Objective 5.3: Thought experiment 275
Chapter 6 Monitor and maintain Windows clients
277
Objective 6.1: Configure and manage updates . . . .277Update Windows Store apps 278
Configure update settings 280
Manage update history 282
Roll back updates 283
Configure Windows Update policies 284
Objective summary 290
Objective review 290
Objective 6.2: Manage local storage . . . .291
Manage disk volumes 292
Manage file system fragmentation 299
Manage Storage Spaces 300
Objective summary 302
Objective review 302
Objective 6.3: Monitor system performance . . . .303
Configure Task Manager 304
Monitor system resources 308
Configure indexing options 309
Configure and analyze event logs 311
Configure event subscriptions 314
Optimize networking performance 316
Objective summary 321
Objective review 322
Chapter summary . . . .323 Answers . . . .324
Objective 6.1: Thought experiment 324
Objective 6.1: Review 324
Objective 6.2: Thought experiment 325
Objective 6.2: Review 325
Objective 6.3: Thought experiment 327
Chapter 7
Configure system and data options
329
Objective 7.1: Configure system recovery . . . .329Perform a driver rollback 330
Configure a recovery drive 330
Configure System Restore and create a restore point 333
Perform a refresh or recycle 334
Objective summary 336
Objective review 336
Objective 7.2: Configure file recovery . . . .337
Recover files from SkyDrive 337
Configure File History 339
Restore previous versions of files and folders 342
Objective summary 343
Objective review 343
Chapter summary . . . .344 Answers . . . .345
Objective 7.1: Thought experiment 345
Objective 7.1: Review 345
Objective 7.2: Thought experiment 346
Objective 7.2: Review 346
Index 349
Introduction
The Configuring Windows 8.1 exam (70-687) is separated into seven sets of objectives. This book contains seven chapters that clearly detail what those objectives are and what you can expect to see on the exam. While most certification books focus on how to perform tasks as they relate to the exam objectives, this book covers the general, high-level knowledge you need to know to answer questions regarding why and when you’d actually perform those tasks.
We assume you’ve been working in a related industry for a while and have the general knowledge needed to support Windows 8.1; we assume you feel almost ready to take the exam. Thus, in this book you’ll only see how-to steps and walkthroughs when we feel that it’s something you might not have done before or might be confusing. For example, we include steps that show how to set up a virtual machine and install an operating system on it, as well as steps that walk you through configuring options for VPM Reconnect, but we won’t offer steps for installing a device driver or configuring Windows Update. We’ll also include things you might not think you need to study or even know; we’ll offer exam tips that include com-mand-line tools and parameters and PowerShell commands for performing tasks, and we’ll offer links to resources on the internet we feel would benefit you on the job and on the exam.
This book covers every exam objective, but it does not cover every exam question. Only the Microsoft exam team has access to the exam questions themselves and Microsoft regu-larly adds new questions to the exam, making it impossible to cover specific questions. You should consider this book a supplement to your relevant real-world experience and other study materials. If you encounter a topic in this book that you do not feel completely com-fortable with, use the links you’ll find in the text to find more information and take the time to research and study the topic. Great information is available on MSDN, TechNet, and in blogs and forums.
Microsoft certifications
MORE INFO ALL MICROSOFT CERTIFICATIONS
For information about Microsoft certifications, including a full list of available certifica
-tions, go to http://www.microsoft.com/learning/en/us/certification/cert-default.aspx.
Acknowledgments
I’d like to thank the people at Microsoft Press for having faith in my work once again, and for selecting me to write this book. I enjoy writing for the Microsoft team, specifically with Karen Szall, my acquisitions and project editor. She is positive, informative, and friendly, and is always around when I need her. (She’s also very patient when I completely ruin a writing template or accidentally edit it!) I’d also like to thank my technical editor, Randall Galloway, for meticulously reading every word and correcting my missteps. Of course, the book would not flow as you would expect without a copy editor, and mine was incredible; thanks Teresa Horton.
Finally, I’d like to acknowledge my family, including Cosmo, Jennifer, my dad, Andrew, and even little Allie, for being patient while I work my odd hours and sometimes stay in my “writer’s head” long after my work is complete for the day. I’d also like to call out my literary agents and representatives, including Stacey Barone, Katrina Bevin, and Renee Midrack at Studio B.
Errata & book support
We’ve made every effort to ensure the accuracy of this book and its companion content. Any errors that have been reported since this book was published are listed at:
http://aka.ms/ER687R2/errata
If you find an error that is not already listed, you can report it to us through the same page.
If you need additional support, email Microsoft Press Book Support at [email protected].
We want to hear from you
At Microsoft Press, your satisfaction is our top priority, and your feedback our most valuable asset. Please tell us what you think of this book at:
http://aka.ms/tellpress
The survey is short, and we read every one of your comments and ideas. Thanks in advance for your input!
Stay in touch
Preparing for the exam
C H A P T E R 1
Install and upgrade to
Windows 8.1
Deploying a new operating system, whether it is to a single computer for a home user, a dozen computers for a small business, or 10,000 computers for a large enterprise (complete with myriad laptops, tablets, and other mobile devices), requires, in a nutshell, careful plan-ning, researching, and testing.
First, you must decide which edition of Windows 8.1 will meet your clients’ needs. That requires some research and a knowledge of what each edition offers. Next, you’ll need to determine if there are existing hardware and software compatibility issues and decide what to do when compatibility poses a problem. You’ll also have to choose a clean installation or an upgrade given the scenario, and you’ll have to know what limitations exist for these options with regard to the currently installed operating system. Beyond that, you’ll need a plan to migrate users’ data, accounts, user profiles, Windows settings, and even applications before installing the new operating system.
Once you’ve done all of this, you might also have to determine how you’ll do it. You might perform the installation using an installation disk or installation files you’ve down-loaded. There are other ways to deploy an operating system, though, especially if you have a lot of machines to update, which can include using the available large-scale assessment and deployment tools from Microsoft including the Application Compatibility Toolkit (ACT), the Windows Assessment and Deployment Toolkit (ADK), and the Microsoft Deployment Toolkit (MDT) 2013, among others. It all starts with evaluating existing hardware and soft-ware and assessing compatibility, though, so that’s where we’ll start.
Objectives in this chapter:
■ Objective 1.1: Evaluate hardware readiness and compatibility
■ Objective 1.2: Install Windows 8.1
■ Objective 1.3: Migrate and configure user data
I M P O R T A N T
Have you read
page xvi?
Objective 1.1: Evaluate hardware readiness and
compatibility
Windows 8.1 is available in four editions. One, Windows RT, only runs on the ARM platform, but the other three can be installed on traditional 32-bit or 64-bit computing platforms. Beyond that, there are minimum requirements for installing each edition. There are various upgrade paths to consider, too, should you decide to go that route.
This objective covers how to:
■ Choose the ideal Windows 8.1 edition
■ Perform readiness tests
■ Choose an installation option (clean or upgrade)
Choose the ideal Windows 8.1 edition
There are four Windows 8.1 editions, and each offers specific features. You can narrow your options for selecting an operating system by learning the basics about each:
■ Windows RT This edition comes preinstalled on tablets and similar devices that run on ARM processors. You can’t buy it as a stand-alone product. It won’t run on anything other than ARM processors, so there is no need to consider it if you are looking for an operating system to install on a typical laptop or desktop PC. In addition, it can run apps from the Windows Store, but it cannot be used to install or run the traditional Windows x86/x64 applications you’d normally obtain from the Internet, network shares, CDs, or DVDs. Windows RT devices come with a special version of Microsoft Office for completing tasks that require it, but they do not come with Windows Media Player and have other limitations.
■ Windows 8.1 This edition is the popular retail edition of Windows. It is most often used by home users but might also work for some home office users. This edition comes preinstalled on the majority of PCs available from big-box stores, and you’ll see it on most of the devices your end users bring to work (from home). You can buy this edition and install it on x86/x64 platforms. The main limitation of this edition in an enterprise is that it can’t join a domain. Thus, if your client needs to join a domain, this isn’t the edition you’ll select. (It’s easy to upgrade to Windows 8.1 Professional, though, should that be necessary.)
(VHD) Boot. If your client needs any of these features and you don’t have (and don’t want) a volume licensing agreement to purchase Windows 8.1 Enterprise, this is the edition you’ll choose.
MORE INFO BITLOCKER
To learn more about BitLocker, refer to this TechNet article: http://technet.microsoft.com /en-us/library/hh831507.aspx#BKMK_Overview. There is quite a bit of information here you might see on the exam, such as the following: BitLocker does not support dynamic disks;
the boot order must be set to start first from the hard disk, and not the USB or CD drives; and BitLocker supports multifactor authentication for operating system drives.
■ Windows 8.1 Enterprise This edition is only available through the Microsoft volume licensing program. Customers can purchase an Enterprise Agreement (EA), Select Agreement, or Open License. Customers have the ability to purchase Software Assurance (SA) with each license for Windows 8. Not all customers buy SA on Windows and therefore sometimes pay after each product release. If you are enrolled, you’ll get all of the features in Windows 8.1 Professional and these features that are exclusive to Windows 8.1 Enterprise: Start screen control, Windows To Go Creator, AppLocker, BranchCache, DirectAccess, and Virtual Desktop Infrastructure (VDI) Enhancements.
Each Windows 8.1 edition has minimum and maximum system settings for CPU sockets and RAM, among other things. The hardware you use to install Windows 8.1 must meet these requirements.
Table 1-1 details minimum system requirements for Windows 8.1.
TABLE 1-1 Minimums for common resources
32-bit (x86) 64-bit (x64)
Processor speed 1 gigahertz (GHz) or faster 1 GHz or faster
System memory (RAM) 1 GB 2 GB
Available hard disk space 16 GB 20 GB
Graphics adapter DirectX 9 graphics adapter with WDDM driver
DirectX 9 graphics adapter with WDDM driver
Secure Boot Unified Extensible Firmware Interface
(UEFI)–based BIOS UEFI-based BIOS
EXAM TIP
You might be asked why certain features won’t work on a specific machine, and you’ll be given the machine’s specifications. One notable problem is that you can’t snap two apps on
the screen unless the screen resolution is at least 1024 x 768. It'll need to be 1600 x 1200 to
It’s important to note, when talking about 32-bit and 64-bit operating systems, that you can’t perform an in-place upgrade of a compatible and upgradable 32-bit operating system to a 64-bit operating system (in-place means you can opt to keep the user’s personal files, applications, and Windows settings, or some combination of those). You’ll have to perform a clean installation in these instances, and your hardware will have to support the 64-bit edition.
There are lots of other features to compare among these four Windows 8.1 editions. The best way to see every option is to visit http://www.microsoft.com and search for Compare Windows 8.1 Editions and then choose Windows 8.1 Enterprise | Compare Editions in the results. However, Table 1-2 shows the most notable differences among them, which will cer-tainly be enough information to rule out editions that won’t work for a client. (Don’t worry if you aren’t familiar with all of the features in the list; you’ll learn about most, if not all of them, throughout this book.)
EXAM TIP
The questions on the exam won’t ask you to recite what features are included with which editions of Windows 8.1. Instead you’ll be asked to choose an edition based on a specific scenario. Cost might be a factor; the limitations of an installed CPU or RAM might be a fac
-tor, too. Incompatible proprietary software (perhaps 32-bit) or software applications that can’t be updated might rule out a 64-bit edition (or even the upgrade itself). Make sure that you know what edition you’d need to select if, say, a question on the exam states that a client needs to join a domain, install and run desktop apps, or use Client Hyper-V.
Table 1-2 details the most notable differences among the four Windows 8.1 editions.
TABLE 1-2 Notable differences among Windows 8.1 editions
Windows RT 8.1 Windows 8.1 Windows 8.1
Professional Windows 8.1 Enterprise
Install and run desktop apps No Yes Yes Yes Microsoft Office Home and
Windows RT 8.1 Windows 8.1 Windows 8.1
Professional Windows 8.1 Enterprise
Smart Screen control No No Yes Yes
Windows To Go Creator No No No Yes
AppLocker No No No Yes
BitLocker and BitLocker To Go No No Yes Yes
BranchCache No No No Yes
DirectAccess No No No Yes
Remote Desktop Host No No Yes Yes
VDI Enhancements No No No Yes
There are a few other requirements not listed thus far; you’ll need an Internet connection to access the Windows Store and to get online, and you’ll need a compatible touch device to use touch features. Users will also need a Microsoft Account to use certain apps and the Windows Store.
NOTE STUDY FOR THE EXAM WITH THE IDEAL OPERATING SYSTEM
Throughout this book I assume you are running Windows 8.1 Professional or Enterprise edition.
Finally, all editions offer automatic app updates from the Windows Store, Internet
Explorer 11, 3-D printing support, Biometric Enrollment, InstantGo, MiraCast Wireless Display Support, Mobile Hotspot and Wi-Fi Tethering, Wi-Fi Direct Wireless Printing Support, Device Enrollment, Exchange ActiveSync, Open MDM Support, Work Folders, Workplace Join, Device Encryption, Family Safety, Multifactor Authentication for Bring Your Own Device (BYOD) sup-port, Remote Business Data Removal, Trusted Boot, Windows SmartScreen, Built-In Virtual Private Network (VPN) Clients, Remote Desktop Client, and others. Make sure you are familiar with the entire list of features before sitting for the exam.
Perform readiness tests
After you have decided which edition of Windows 8.1 you want to install on a particular workstation or in a specific scenario, you’ll need to verify the computer meets the minimum requirements to support it. One way is to manually compare the requirements to the hard-ware that is installed on the workstation(s) in question.
REAL WORLD THE MINIMUM REQUIREMENTS AREN’T ENOUGH
If you install Windows 8.1 on a computer that meets or barely exceeds the minimum
requirements for RAM shown in Table 1-1, you can expect that the user will encounter
that the user will become agitated and frustrated. If the computer freezes at the wrong moment, the user may well unplug the machine to restart it (or worse).
If you install Windows 8.1 on a computer with 16 GB, 20 GB, or even 40 GB of free hard disk space, in cases involving home and small business users who are not part of a domain,
you’re setting up yourself and your end user for trouble. Although you can perform an
installation, you can expect that ordinary users will run out of disk space quickly (if that’s where they save their data).
If you install Windows 8.1 on a computer that will be used primarily for gaming, you will
need to have more than a DirectX 9 graphics adapter. Many new games require DirectX 10. You’ll also need much more RAM and a much faster CPU for games to play properly and
without any lag.
Beyond frustration, a full hard drive, and problems playing certain games, there are other instances when minimum requirements just won’t do. Client Hyper-V requires a 64-bit
sys-tem with Second Level Address Translation (SLAT) capabilities and additional 2 GB of RAM
in Windows 8.1 Professional or Enterprise, for example. This isn’t mentioned in the basic list of minimum requirements.
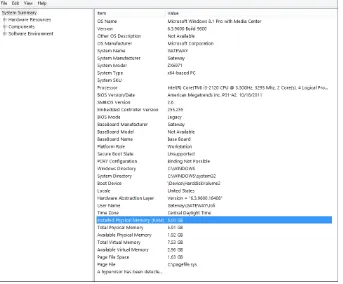
FIGURE 1-1 Using the System Information tool.
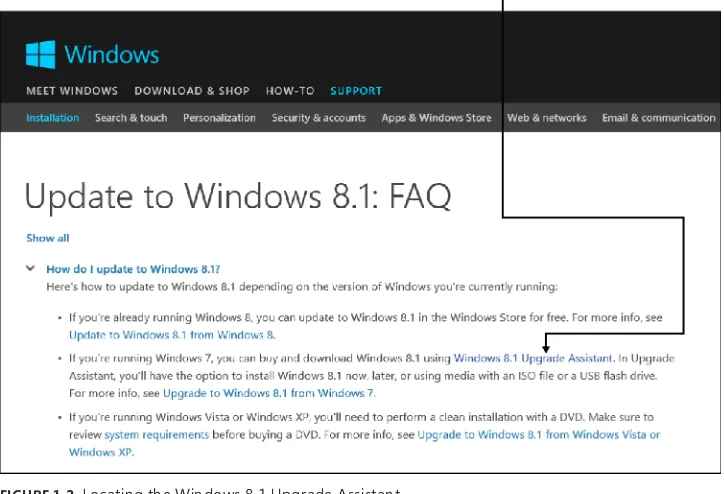
If you’d rather automate the task of assessing a computer, you can use the Windows Upgrade Assistant, which is much more user-friendly than manual evaluations. Again, though, this is a per-computer evaluation. You can access the Windows 8.1 Upgrade Assistant from http://windows.microsoft.com/en-US/windows-8/upgrade-to-windows-8. Click the link to Windows 8.1 Upgrade Assistant. That webpage is shown in Figure 1-2.
FIGURE 1-2 Locating the Windows 8.1 Upgrade Assistant.
NOTE USE ENTERPRISE TOOLS TO EVALUATE READINESS IN A DOMAIN
If you are assessing an enterprise group of computers that are part of a domain (hundreds or even thousands, perhaps), you’ll want to use a program or application that is capable of comparing what is currently in inventory to what is required of the new operating system you’ve selected. Neither of the options offered thus far (manual comparison or Windows Upgrade Assistant) would work in an enterprise with a large number of comput
-ers. Additionally, you’ll likely incorporate programs such as the Application Compatibility Toolkit (ACT) to help you determine the readiness of your software.
After you’ve determined what edition of Windows 8.1 to install and assessed the avail-able hardware, you might have to perform some hardware upgrades. You might even have to replace older computers with new ones. Often though, you can repurpose the older comput-ers and buy new ones for only those clients that require them to help minimize costs.
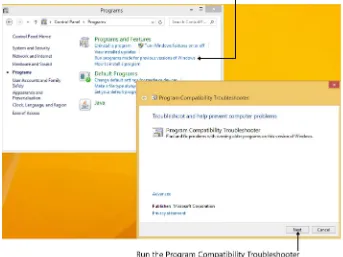
With the hardware evaluation complete, you’ll need to take a few more steps. One of the most important is to verify that the software the client uses and depends on works properly with Windows 8.1. You’ll have to set up a test machine (or multiple test machines) to deter-mine this, and if the software doesn’t work you can try it in Program Compatibility mode (see Figure 1-4). You open the Program Compatibility Troubleshooter from Control Panel and work through it to define the problem and try solutions. For the most part, the solution comes down to running the problematic application in the mode in which it was designed to run (perhaps Windows Vista or Windows XP). If problems persist or can’t be resolved, you’ll have to reassess the upgrade or try other options such as hosting the application on a network server or in the cloud. (A better option is to replace the outdated software with something that is compatible for the long term, but this isn’t generally something that’s easy to do.)
If Program Compatibility mode doesn’t resolve compatibility problems, you still have options. You can use Microsoft Application Virtualization software (MS App-V), which allows applications to be streamed to any client from a virtual application server. It removes the need for traditional local installation of the applications, which resolves problems associated with incompatibility. On single workstations, Client Hyper-V might be more suitable. However, Client Hyper-V only runs on 64-bit PCs that are running the 64-bit version of Windows 8 Professional or Enterprise.
FIGURE 1-4 Locate and run the Program Compatibility Troubleshooter.
NOTE THERE’S MORE TO UPGRADING THAN INSTALLING THE OPERATING SYSTEM
If you are updating all of the computers in a company from, say, Microsoft Windows XP to Windows 8.1, you’ll have more to worry about than the cost of upgrading the hardware, finding compatible drivers for legacy peripherals, and upgrading software. You have to also consider the cost required to retrain users, make hardware and software purchases, and create a substantial help desk infrastructure, at least for a while, to get help to users immediately when they need it.
Choose an installation option (clean or upgrade)
or Windows 8 computer, which retains the user’s personal data, applications, and configura-tion settings, which a home user often desires.
EXAM TIP
In many, if not most instances, opting to perform a clean installation is a better solution to upgrading. If you see a test question that asks about this, carefully assess the information given. You might be better served by migrating the data off the machine, performing a clean installation, and then transferring the data back.
Often, upgrading a healthy Windows 7 computer is preferable for end users who aren’t computer savvy because (except for the changes in the operating system itself) their settings, applications, printer configurations, network settings, desktop backgrounds, screensavers, and so forth come out of the installation unscathed. Users aren’t bombarded with change when an in-place upgrade is performed, and you don’t have to reinstall their applications, network, and so forth.
NOTE UNDERSTAND SUPPORTED UPGRADE PATHS FROM WINDOWS 7
Within Windows 7 editions, there are limitations as to which Windows 8.1 edition you can upgrade to. You can upgrade Windows 7 Starter, Windows 7 Home Basic, and Windows 7 Home Premium to Windows 8.1 or Windows 8.1 Professional. You can upgrade Windows 7 Professional and Windows 7 Ultimate to Windows 8.1 Professional. You can update Windows 7 Professional and Windows 7 Enterprise to Windows 8.1 Enterprise, too, pro
-vided there is a volume licensing agreement in place.
Upgrading isn’t always an option for home users (or for that matter, any user). If a com-puter must be replaced because it is old or incompatible, or if the comcom-puter is plagued with impossible-to-remove malware, web browser toolbars, and unwanted search engines, the in-place upgrade can’t be performed. In general, it’s best to do a clean install. True in-place upgrades can’t be performed on computers that run any compatible operating system before Windows 7 either. Table 1-3 outlines what is and isn’t transferred when any kind of upgrade is performed.
TABLE 1-3 Upgrade paths for Windows 8.1
Upgrading from What you can keep
Windows 8 Windows Store apps, desktop applications, personal files, Windows settings Windows 7 Applications, personal files, Windows settings
NOTE UNDERSTAND UPGRADE PATHS FROM WINDOWS 8
Within Windows 8 editions, there are limitations as to which Windows 8.1 edition you can perform an in-place upgrade to. You can upgrade Windows 8 to Windows 8.1. You can upgrade Windows 8, Windows 8 Professional, and Windows 8 Professional with Media Center to Windows 8.1 Professional. You can upgrade from Windows 8 Professional, Windows 8 Professional with Media Center, Windows 8 Enterprise, and Windows 8.1 Professional to Windows 8.1 Enterprise provided there is a volume license in place.
In larger enterprises, the decision to upgrade or perform a clean installation depends on the factors listed thus far (and perhaps others, such as how much time and money it will cost to retrain thousands of employees, install updated hardware, update proprietary software, and so on), but more often than not a clean installation will be performed on computers in an enterprise. The reasons are many, but knowing exactly what is on each machine lets the enterprise reduce costs associated with training, support, and upgrades, which is always a major coup for network administrators. Also, network administrators can test Windows updates, app updates, and other software before it’s installed, knowing that it is an appropri-ate test for all of the affected computers. A clean install also strips the computer of lingering problems or hidden malware.
In addition, in enterprises, most users store their data on network servers, and those same servers maintain user profiles including but not limited to configuration settings and logon credentials, which makes migrating data pretty straightforward (and safe). Data is stored on servers, too, so you don’t have to worry too much about accidental data loss. Additionally, larger domains likely have the tools already in place to migrate user data, profiles, settings, and so on, and making use of those tools is a plus. Whatever the reason, when all of the com-puters are virtually identical, they are much easier to manage. There are lots of enterprise-compatible options to help you assess upgrade strategies, many of which are introduced later in this chapter.
Thought experiment
Select the best Windows 8 edition based on a client’s needs
In this thought experiment, apply what you’ve learned about this objective. You can find answers to these questions in the “Answers” section at the end of this chapter.
Active Directory domain, and there is one Windows Server 2008 R2 server on the network. The company does not have a Microsoft volume licensing agreement.
All of the machines have at least a 1 GHz processor and 2 GB of RAM, and each has at least an 80 GB hard drive. The video cards support the minimum requirements for DirectX 9. All of the computers are located in a single large warehouse.
The committee would like to spend the least amount of money possible on the upgrade. It would prefer to also have the option to upgrade existing computers but wants to know the ramifications of doing so and could reconsider. Beyond that, the workstation users need to have access to Active Directory domain support and Storage Spaces, and a handful of users need Client Hyper-V.
Answer the following questions for your manager:
1. What edition of Windows 8.1 should you install, which platform option, and why? Explain why your choice of edition is the only applicable choice for the company.
2. Detail where you would start in the testing process to verify compatibility for these 25 computers.
3. Would you suggest a clean installation over an upgrade? Why or why not?
Objective summary
■ There are four Windows 8.1 editions: Windows RT, Windows 8.1, Windows 8.1 Professional, and Windows 8.1 Enterprise.
■ Each Windows 8.1 edition offers its own set of features. You choose the edition to install based on the features you need.
■ There are upgrade paths from Windows XP, Windows Vista, Windows 7, and Windows 8, but you can only perform an in-place upgrade from Windows 7 and Windows 8 (to keep applications, personal files, and Windows settings intact). A clean installation is best in most instances, if feasible.
■ In most instances, you can use Program Compatibility mode to force older, noncom-patible programs to function in Windows 8.1. You can also opt for App-V or Client Hyper-V if necessary.
Objective review
1. You need to perform an in-place upgrade for the computers in your small business.
You have nine computers to update to Windows 8.1. These computers all run different editions of Windows, some with service packs and some without. Which of the follow-ing operatfollow-ing systems can be upgraded while retainfollow-ing at least Windows settfollow-ings and users’ personal files? (Choose all that apply.)
A. Windows Vista
B. Windows XP SP3
C. Windows 7 Home Premium (with or without SP1)
D. Windows 8
2. You want to install Windows 8.1 Professional 64-bit onto a laptop with this hardware:
1 GHz processor, 1 GB of RAM, 16 GB solid state drive (SSD), and a monitor with a maximum screen resolution of 800 x 600. Which of these will you need to upgrade? (Choose all that apply.)
A. Hard disk
B. Processor
C. Monitor (or related hardware)
D. RAM
3. You need to select a Windows 8.1 edition to install for a client who needs the
fol-lowing: AppLocker, Boot from VHD, BranchCache, and Client Hyper-V. Which edition supports all of these?
A. Windows 8.1 RT
B. Windows 8.1
C. Windows 8.1 Professional
D. Windows 8.1 Enterprise
4. Your client wants to install Windows 8.1 Professional on all of the computers in his
organization. He wants to perform an in-place upgrade to minimize the impact of the installation on his employees. Which of the following will not support this upgrade; in other words, which of these will require a clean installation? (Choose all that apply.)
A. Windows 7 Home Premium
B. Windows 7 Enterprise
C. Windows 7 Ultimate
Objective 1.2: Install Windows 8.1
There are lots of ways to install Windows 8.1 and lots of scenarios to consider. There are upgrades, including in-place upgrades from Windows 7 and Windows 8 and limited upgrades from earlier operating systems. Depending on the currently installed operating system, you will be able to keep some combination of user accounts, user profiles, personal files and fold-ers, Windows settings, and applications, which you learned about in the previous section.
There is also the clean installation, in which you format the hard drive before you install the operating system. If you need a clean installation on a computer that contains user data you need to keep, you have to back up the data before you begin. You can opt to migrate user data off the machine, perform a clean installation, and transfer the data back. In a similar scenario, you can migrate data off an old computer and onto a new one. (Migration options are detailed in Objective 1.3.) These are traditional installations and migration options, but now there are more installation options to consider, including installing Windows 8.1 as Windows To Go and to VHD.
On an enterprise level, installations are automated and customized. It would be extremely time-consuming to go from machine to machine to perform the upgrades manually. Although you won’t learn how to perform an automated installation or create a custom Windows 8.1 image here (that topic could fill more than a couple of chapters), you will gain a high-level understanding of it. You’ll likely be tested on general knowledge related to auto-mated installations.
This objective covers how to:
■ Perform manual installations and upgrades
■ Install additional Windows features
■ Install as Windows to Go and to VHD
■ Explore the custom Windows 8.1 installation
Perform manual installations and upgrades
MORE INFO WINDOWS EASY TRANSFER
Windows Easy Transfer (WET), outlined in Objective 1.3 in this chapter, is a tool that you can use to migrate user profile information, data, and settings off the computer before you reinstall it. You use WET again to put the data back on. You can also use WET to transfer data from an old computer to a new one. It’s a popular tool for home users and small businesses because it is graphical and wizard-led. Consider using WET before you perform a clean installation. Similarly, the User State Migration Tool (USMT) is also discussed in Objective 1.3. This command-line migration tool is used by larger organizations.
Perform a clean installation
A clean installation is the simplest way to install Windows 8.1 on a new computer or a computer or disk partition off of which you are willing to wipe all data (format). After you’ve backed up the users’ data (if applicable), there are two ways to get started: You can supply a boot disk if the computer has no operating system on it, or you can boot the computer from the Windows 8.1 installation files if it does. During the installation you might opt to choose a custom installation option, in which you will choose on which partition to install Windows if multiple options exist or create and delete partitions as applicable.
NOTE ONE PARTITION AND A MULTIBOOT SYSTEM
You can create a multiboot system on a computer that contains only one partition by using Disk Management to first shrink the partition and then create a new simple volume on it. Then, during the normal installation of Windows 8.1, choose this partition using the Custom Installation option.
These are the steps for installing the operating system clean on a computer that already has one installed (and you’ll see some of the related screens throughout this chapter). This is the simplest installation scenario (except for upgrading a Windows 8 computer to Windows 8.1).
1. Turn on the computer and insert the Windows 8.1 installation media into the DVD
drive or USB port.
2. If prompted, opt to boot from the DVD or USB drive (or other applicable media). You’ll
have to restart the computer and press a specific key such as F12 or F2 to see this prompt if the computer doesn’t offer it on its own. The key you’ll choose is assigned by the manufacturer.
3. Choose your language, time zone, and keyboard or input method and click Next.
4. Click Install Now.
5. Select the I Accept The License Terms check box and click Next.
7. From the list provided, select the partition on which to install Windows. Click Drive
Options (Advanced) to add or delete existing partitions if desired and necessary.
8. Wait while the installation completes.
9. Work through the setup process to do the following:
A. Agree to the license terms.
B. Configure default settings.
C. Sign in to your account.
D. Choose a method to verify your account.
E. Opt to use SkyDrive (or not). Note that the name SkyDrive is changing to OneDrive
and at some point the exam will also make the terminology change.
NOTE CUSTOM INSTALLATIONS OFFER MORE OPTIONS
When you choose to install Windows with a custom installation, you’re presented with the “Where do you want to install Windows?” options. From there, you can either select an available partition or click Drive Options (Advanced) to delete, format, and create new partitions.
Upgrade from Windows 7
To upgrade a computer running Windows 7 to a compatible, upgradable edition of Windows 8.1, perform the following steps (the steps you take might be slightly different from these depending on the edition you’re installing). These are the steps for upgrading Windows 7 Ultimate to Windows 8.1 Enterprise.
1. Insert the Windows 8.1 installation disk into the DVD drive.
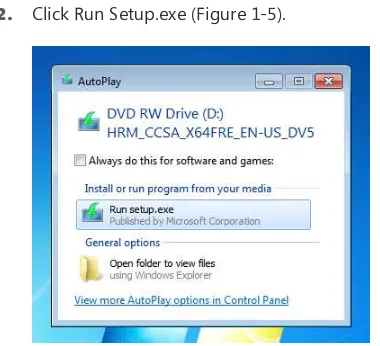
2. Click Run Setup.exe (Figure 1-5).
3. Click Yes in the User Account Control box.
4. Select the Go Online And Install Updates (Recommended) button and click Next.
5. Select the I Accept The License Terms check box and click Accept.
6. Verify that the items to keep are correct and click Next.
7. Click Install.
8. After the installation completes, work through the setup process.
The setup process for Windows 8.1 requires you work through the same setup steps. You’ll need to do the following:
■ Agree to the license terms.
■ Configure default settings.
■ Sign in to your account.
■ Choose a method to verify your account.
■ Opt to use SkyDrive (or not).
When the installation and setup is complete, you’ll see the Windows 8.1 Start screen, shown in Figure 1-6.
Upgrade from Windows 8
To upgrade Windows 8 to Windows 8.1, you’ll use the Windows Store, provided the user has a retail or OEM-activated version of Windows 8. If the computer was activated using Volume Licensing, the user won’t be offered the update there.
NOTE UPGRADE OPTIONS FOR WINDOWS 8 TO WINDOWS 8.1
Windows 8.1 upgrades are available in the Windows Store or on media. Note that when you upgrade to Windows 8.1 from the Windows Store, you cannot change editions. Upgrading to a different edition of Windows 8.1 is supported from media only. However, you can upgrade Windows 8.1 to Windows 8.1 Professional, as outlined later in this chapter.
To install Windows 8.1 from the Windows Store, follow these steps:
1. On the Start screen, click Store.
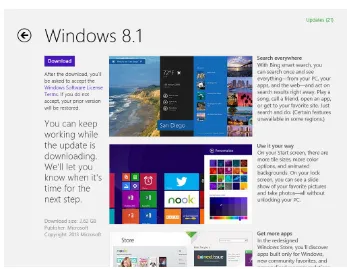
2. Click the option to update Windows 8.1.
3. Click Download (see Figure 1-7).
FIGURE 1-7 Download Windows 8.1 from the Windows Store.
4. Click Restart Now when prompted.
EXAM TIP
Sometimes you’ll be asked to identify the path to a specific setting in Group Policy. Group Policy enables network administrators to assign specific permission to groups of users to secure resources, among other things. (You’ll learn about Group Policy in various chapters in this book.) Here’s one you might see: If you want to prevent users from seeing the option to update to Windows 8.1 from the Windows Store under any circumstances, you can set the Group Policy Turn Off The Offer To Upgrade To The Latest Version Of Windows located under Computer\Administrative Templates\Windows Components\Store. Make sure you’re familiar with Group Policy and the most used settings before attempting the exam. For more information about this and other frequently asked questions regarding Windows 8.1, refer to the article at http://technet.microsoft.com/en-us/windows/jj721676.aspx.
Migrate from previous versions of Windows
You learned earlier that it is possible to upgrade Windows XP and Windows Vista machines to Windows 8.1. The steps for performing the installation are the same as outlined already in this objective. However, you also learned that not everything gets transferred during the upgrade. If you upgrade Windows XP to Windows 8.1, only the users’ personal files are carried over. Applications must be reinstalled and Windows settings re-created. If you upgrade Windows Vista to Windows 8.1, only the users’ personal files and Windows settings are maintained, and applications must be reinstalled.
Therefore, before you upgrade any machine that has Windows XP or Windows Vista installed, you should carefully and methodically back up the data on it. I say carefully and methodically because if a computer is that old, there could be user data everywhere, includ-ing the root drive, the Program Files folder, and other places that a common backup won’t normally include. With that done, you can perform the installation upgrade.
However, upgrades aren’t generally the better option. Clean installations provide more reliable results. Thus, if there’s any way to perform a clean installation instead of an upgrade, you should opt for it. There are several migration options from which to choose when this is the case.
To learn about migration options, refer to Objective 1.3 in this chapter. For home users and businesses with a manageable number of computers to upgrade, consider the Windows Easy Transfer Wizard. For larger organizations, consider the User State Migration Tool.
Automate installations in enterprises
You can also automate installations. This is how enterprises install upgrades for hundreds or thousands of workstations. To automate an installation, you’ll need to have a Windows 8.1 Volume Licensing Agreement with Microsoft. Then, to start, you’ll need to create an installa-tion image and choose a way to deploy that image. You might have multiple images, perhaps one image for all of the computers used by the Sales department, another for computers in the Inventory department, and so on. You need the Microsoft Deployment Toolkit (MDT), Windows Assessment and Deployment Kit (ADK), a file server to hold the installation files (as a share), and media that can be used to start the computers during deployment or a server configured with the Windows Deployment Services (WDS) role (and network cards on the PCs to upgrade that can boot to the installation image). If you have all of this in place, Microsoft recommends a Lite-Touch, High-Volume Deployment strategy if your enterprise has between 200 and 500 computers and recommends a Zero-Touch, High-Volume Deployment strategy if your enterprise has 500 or more machines.
Regarding images, an image is a custom installation file that can contain device drivers, applications, specific settings for the desktop background, and so on. There are thin images and thick images. A thin image has little or no customization, and most of the device drivers, applications, and updates are installed using another method on each client computer. A thick image includes applications, device drivers, and updates, among other things, and requires much more planning, network bandwidth, and other resources than a thin image. Microsoft recommends using thin images in most instances, because they can reduce installation time, maintenance time, storage requirements, and costs, among other things. MDT makes using thin images with the Lite-Touch, High-Volume Deployment strategy pretty straightforward for experienced network administrators. For more information visit http://technet.microsoft.com /en-us/windows/dn282138.
EXAM TIP
In previous editions of this exam and the related exam for Windows 7, automated installa
-tions were a big part of Objective 1. The objectives have changed quite a bit though, and we don’t think that they’ll be covered as heavily as before (if at all). However, you should understand the big picture with regard to automated installations, just in case.
Install additional Windows features
features by purchasing those features from Microsoft. You can also configure Windows 8.1 for additional languages.
Install additional features
One place to enable additional features is Control Panel. If you’re new to Windows 8.1, you can right-click the Start button in the lower-left corner of the screen to get to it quickly. Once in Control Panel, in Category view, click Programs, and then select Turn Windows features on or off, as shown in Figure 1-8.
FIGURE 1-8 Turn Windows features on or off.
FIGURE 1-9 Add features to Windows 8.1.
After you click Yes to bypass the User Account Control box, you’ll have the option to either buy a key online or type a product key you already own. Whichever you select, follow the prompts to purchase and install the new features. Once installation completes (the computer will restart during the installation), you’ll see the new features.
Configure Windows for additional languages
Windows 8.1 includes support for additional languages. By adding a language, you can change the language you use to read and write in Windows, apps, and the web. Adding a language involves five steps, each outlined in its own section here.
ADD A LANGUAGE
To add a language (using the Windows 8.1 charms with which you should become familiar), follow these steps:
1. Position your cursor at the bottom or top right of the screen, click Settings, and then
click Change PC Settings.
2. Click Time And Language, click Region And Language, and then click Add A Language.
3. Click the desired language from the list. If another list appears, click the desired option
FIGURE 1-10 Sometimes a language has several options.
DOWNLOAD AND INSTALL LANGUAGE PACKS
To see your preferred language used in Windows and apps, you might need to download the appropriate language pack. To download a language pack, follow these steps:
1. Continuing from the previous set of steps, click the language you want to use in the
right pane.
2. Some languages such as English (United Kingdom) have Language Pack Available
underneath them. If that is the case, click Options.
3. Click Download. (This might take some time.)
CHANGE YOUR WINDOWS DISPLAY LANGUAGE
To change your display language, follow these steps:
1. Continuing from the previous set of steps, return to the Time And Language, Region
And Language section of PC Settings if applicable.
2. Click the language to set as the primary language.
3. Click Set As Primary. If the language can become your Windows display language,
you’ll see Will Be Display Language After Next Sign-In appear under the language.
SWITCH BETWEEN KEYBOARDS
When you add a language, you can type in that language. Before you can do that, you must switch between keyboards or input methods. The easiest way is to press the Windows key + Spacebar. You can also switch by using the language abbreviation on the taskbar (see Figure 1-11). Note that the taskbar shows the time and date format the way it is displayed in the selected language.
FIGURE 1-11 Switch languages by using the taskbar.
ADD A KEYBOARD LAYOUT FOR A LANGUAGE
Finally, you’ll need to add a keyboard layout for your language and possibly make it your default keyboard. To add a keyboard layout for a language, follow these steps:
1. Open Control Panel and in Small Icons or Large Icons view, click Language.
2. Click Advanced Settings.
3. Under Override For Default Input Method, choose the keyboard layout you’d like to
make your default keyboard and then click Save.
Install as Windows To Go and to VHD
There are two more ways to install Windows 8.1 to discuss here. You can install as Windows To Go and you can install Windows 8.1 onto a VHD. You’ll need to be able to activate the operating system in either instance, so make sure you have the proper activation codes (or volume licensing) to do so before you start.
EXAM TIP
Sometimes you’ll be asked to choose the correct syntax for performing a task at a com
stands for (Windows) Server License Manager Script, and dlv stands for Display License in
-formation (Verbose). If you’ve never heard of a command, try figuring out what the letters in the command might stand for, and you might be able to make an educated guess.
Install as Windows To Go
You can give users a Windows To Go USB flash drive that holds a copy of Windows 8.1 Enterprise. They can use this USB drive to run Windows from a computer other than their own, provided the computer can be configured to boot to a USB drive.
There are a few things that are unique about Windows To Go:
■ You can only create Windows To Go drives from a Windows 8–based Enterprise edition computer.
■ The computer used to boot to the drive must meet Windows 7 certification require-ments, but it doesn’t have to be running Windows 7.
■ The Windows To Go drive can hold the same image used on enterprise workstations and can be managed using the same methods.
■ Windows To Go isn’t a desktop replacement operating system; it is simply a short-term solution when the user can’t be at his or her workstation.
■ The host computer’s internal hard disks aren’t accessible to ensure data isn’t acciden-tally or maliciously accessed. Likewise, Windows To Go won’t be listed in File Explorer.
■ Trusted Platform Model (TPM) can’t be used with Windows To Go drives. TPM protects a specific computer from unauthorized access, and Windows To Go is used on more than one computer. When BitLocker is used, though, you can configure a system boot password.
■ Hibernate and sleep aren’t enabled by default, although they can be enabled through Group Policy.
■ Neither Windows Recovery Environment (RE) nor resetting or refreshing is available. Problematic drives should be reimaged.
■ For Windows To Go images that are running Windows 8.1, Windows Store apps can roam between multiple PCs on a Windows To Go drive.
■ The USB drive you use must be Windows To Go certified.
To create a Windows To Go drive, you use the Windows To Go Creator Wizard. You will have to have access to a .wim file, which can be on a network share, a DVD, or a USB drive. A .wim file contains a disk image that can be mounted inside the Windows operating system. In simple terms, it’s a type of installation file. These files allow a user to use the disk image on multiple computer platforms, including a Windows To Go drive.
To create a Windows To Go USB drive, follow these steps:
1. Sign into your Windows 8–based Enterprise computer using your Administrator
2. Insert a Windows To Go certified USB drive.
3. Press Windows key + W to open Search Settings, type Windows To Go, and then
press Enter.
4. If the User Account Control dialog box appears, click Yes.
5. On the Choose The Drive You Want To Use page, select the drive that represents the
USB drive you inserted previously and then click Next.
6. On the Choose A Windows 8 Image page, click Add Search Location and locate the
.wim file.
7. Click Select Folder and then click Next.
8. If desired, select the Use BitLocker With My Windows To Go Workspace check box and
enter the required passwords and password hint.
9. Click Create. Note that any data on the drive will be erased.
10. Wait for the process to complete, which could take up to 30 minutes.
Install to VHD
A VHD contains the entire contents of a hard disk in a portable file that network administra-tors can use to transport entire virtual machines (VMs) from one host computer to another. A VHD functions exactly like a hard disk does in a physical machine. VHDs can also exist on a computer for the long term, without any intention of porting them. In this instance, a single computer, even with a single partition, can host multiple VHDs, all running different operat-ing systems at the same time, givoperat-ing network administrators a soperat-ingle computer for testoperat-ing software on various operating systems easily. These types of VHDs are created on comput-ers that have a parent operating system, meaning an operating system is installed on the computer that hosts the VHD. A native-boot VHD is a VHD that is created and runs without a parent operating system. Windows 8.1 supports native boot to these types of VHDs.
Often, VHDs are used to test applications and hardware under various circumstances, but there are lots of other reasons to use them. VHDs are quite useful in circumstances in which the operating system(s) needs to be reinstalled often, which is true of testing environ-ments but also true of public kiosks, school computer labs, public libraries, and anywhere else a computer is open to guests or otherwise apt to be compromised. They’re also useful in companies with a high turnover rate because computers can be repurposed easily. When you need to reinstall the VHD, you just copy your master VHD back over it and the VHD is as good as new. You can create a VHD by using DiskPart or the Disk Management Console.
To create a VHD and install Windows 8.1 on it, follow these steps:
1. In File Explorer, right-click This PC and then click Manage.
2. In the left pane, click Disk Management.
3. Right-click Disk Management and click Create VHD. See Figure 1-12.
FIGURE 1-12 Create a new VHD.
4. In the Location box, type the location and name of the VHD you want to create.
5. In the Virtual Hard Disk Size box, choose GB to avoid calculation errors and type a
FIGURE 1-13 Configure the new VHD.
6. Under Virtual Hard Disk Format, choose VHD or VHDX after reading the information
offered.
7. Choose Fixed Size (Recommended) or Dynamically Expanding.
8. Click OK.
9. Wait while the VHD is created.
FIGURE 1-14 Initialize the new disk.
11. Choose MBR or GPT, noting that GPT is not recognized by all previous versions of
Windows, and click OK.
12. Right-click the new disk near Unallocated, and click New Simple Volume, as shown in
Figure 1-15.
FIGURE 1-15 Create a new simple volume on the new disk.
13. Click Next four times to accept the defaults for the new volume and then click Finish.
14. Make a note of the drive letter assigned to the new disk (mine is F).
15. Locate Windows ADK on your computer. The best way is to open File Explorer and
16. Right-click the shortcut to Deployment And Imaging Tools Environment and click Run
As Administrator.
17. At the command prompt, type the following command, also shown in Figure 1-16, and
press Enter.
Dism /apply-image /imagefile:<path to install.wim> /index:1 /ApplyDir:<drive
letter of VHD>
FIGURE 1-16 Apply the image to the new VHD.
18. Once the process completes, at the command prompt type bcdboot F:\windows to
add the VHD to the boot menu (if desired).
19. At any time, you can right-click the VHD in Disk Management and click Detach VHD.
(Click Attach VHD from Disk Management in the left pane when you need it again.) You can now restart the computer and choose the VHD from the boot menu. You’ll have to work through the setup process just as you would with any new installation, which includes inputting a product key, choosing the color of the Start screen, joining a network, and so on.
EXAM TIP
Make sure to familiarize yourself with the tools in the ADK. Deployment Imaging Servicing and Management (DISM) is a command line tool you can use to apply, capture, delete, export and perform other tasks with images. This new command line tool replaces ImageX, so if you see that command in an answer it’s probably a red herring. Refer to the article here to learn more about DISM: http://technet.microsoft.com/en-US/library/hh825258.aspx.
Explore the custom Windows 8.1 installation
Network administrators often create their own custom installation files with Windows 8.1 so that the installation file contains device drivers, software, updates, custom wallpapers and screensavers, and other items required by the target computers. You can add these to minimize what must be done after installation completes. There are a lot of steps involved in creating a custom installation, and a high-level outline is provided here.
To create a custom installation, you’ll need to download and install the Windows ADK. The ADK contains the tools you’ll need to perform the required tasks. You’ll also need a reference computer that you’ll set up to represent a typical computer in your organization. You’ll need a test computer to test the installation image you’ll create from the reference computer, an empty USB drive or CD for creating a Windows PE disk, and an external storage device where you can create the share that contains the installation files.
With all of those things in place, you’ll do the following:
1. Create a share on the network to hold the installation files and other files related to the
deployment of Windows 8.1.
2. Create a reference computer that will serve as a template for the workstation
configu-ration, complete with all of the software you want to install, language packs, settings, required device drivers, custom wallpapers, and anything else you want to include.
3. Prepare the reference computer for imaging by removing certain values unique to the
reference computer. You’ll use the following commands:
■ Sysprep /generalize to remove unique IDs. You might add other command-line options like /oobe (to give the installation an out-of-box experience).
■ Copype.cmd to create a Windows PE boot disk, with the proper command-line options like c:\winpe (to note the location of the required PE files).
■ Oscdimg.exe to package the Windows PE files into a sector-based image file, along with proper command-line options.
4. Capture an image of the reference computer, which results in an image file. Using this
file, you can install as many workstations as desired and apply your image to all of them, creating uniformity. You’ll use these commands:
■ DISM with command-line options including /capture-image to capture the image of the computer’s hard disk.
■ Net use with command-line options including something like z: \\server\share to denote the location of the network share where the files are stored.
5. Create an answer file to partially automate the installation or an unattended answer