11
g
Release 1 (11.1.1)
E13810-01
Copyright © 2006, 2009, Oracle and/or its affiliates. All rights reserved.
This software and related documentation are provided under a license agreement containing restrictions on use and disclosure and are protected by intellectual property laws. Except as expressly permitted in your license agreement or allowed by law, you may not use, copy, reproduce, translate, broadcast, modify, license, transmit, distribute, exhibit, perform, publish, or display any part, in any form, or by any means. Reverse engineering, disassembly, or decompilation of this software, unless required by law for interoperability, is prohibited.
The information contained herein is subject to change without notice and is not warranted to be error-free. If you find any errors, please report them to us in writing.
If this software or related documentation is delivered to the U.S. Government or anyone licensing it on behalf of the U.S. Government, the following notice is applicable:
U.S. GOVERNMENT RIGHTS Programs, software, databases, and related documentation and technical data delivered to U.S. Government customers are "commercial computer software" or "commercial technical data" pursuant to the applicable Federal Acquisition Regulation and agency-specific supplemental regulations. As such, the use, duplication, disclosure, modification, and adaptation shall be subject to the restrictions and license terms set forth in the applicable Government contract, and, to the extent applicable by the terms of the Government contract, the additional rights set forth in FAR 52.227-19, Commercial Computer Software License (December 2007). Oracle USA, Inc., 500 Oracle Parkway, Redwood City, CA 94065.
This software is developed for general use in a variety of information management applications. It is not developed or intended for use in any inherently dangerous applications, including applications which may create a risk of personal injury. If you use this software in dangerous applications, then you shall be responsible to take all appropriate fail-safe, backup, redundancy, and other measures to ensure the safe use of this software. Oracle Corporation and its affiliates disclaim any liability for any damages caused by use of this software in dangerous applications.
Oracle is a registered trademark of Oracle Corporation and/or its affiliates. Other names may be trademarks of their respective owners.
Preface
... viiAudience... vii
Documentation Accessibility ... vii
Related Documents ... viii
Conventions ... viii
1
Overview
Introducing Oracle Communicator... 1-1
Getting More Help... 1-1
2
Setting Up Oracle Communicator
Install Oracle Communicator... 2-1
Get Started... 2-1 Create a New Account... 2-1 Create Account Wizard... 2-1 Select an Account ... 2-2 Select Account Dialog... 2-3 Authenticate... 2-3 Authentication Dialog ... 2-3 Register to a Server ... 2-4 Menus... 2-4 New Application Versions... 2-4 Terminology... 2-5
Change Presence Menu in the System Tray... 3-2 Presence Policy ... 3-3 Presence Policy Dialog ... 3-3
New Subscribers... 3-3 New Subscriber Dialog... 3-4
Contacts... 3-5 Manage Contacts ... 3-5 About the Contact List... 3-5 Main Screen... 3-5 Create Contacts... 3-6 SIP Services ... 3-7
4
Using Oracle Communicator
Oracle Communicator Main... 4-1 Settings... 4-2 History ... 4-2 Open History ... 4-3 Delete History... 4-3 Communicate with a Contact in History... 4-3 Add a Contact from History... 4-3 Create New Group ... 4-4 Contacts ... 4-4 Other Main Window Actions ... 4-4
Understanding the Communications Dialog... 4-4 Communication Dialog ... 4-4 Save Message ... 4-4 Add Contact from Communication Dialog... 4-4
Instant Message... 4-4 Introduction ... 4-5 Send an Instant Message... 4-5 Smileys... 4-6
File Transfer... 4-6 Initiate File Transfer... 4-6 Select a File ... 4-7 File Transfer Notification ... 4-7 Send a File ... 4-7 Receive a File... 4-7
Cannot Authenticate... 4-8 Cannot See Anyone in My Policy List ... 4-8 Messaging... 4-8 Message Delivery Failed ... 4-8
5
Configuring Oracle Communicator
Setting the Default Values for an Installation of Oracle Communicator... 5-1
Customizing the Installer File... 5-2 Configuring customize.xml ... 5-2 Enabling User Self-Provisioning... 5-3 Setting the Outbound Proxy Address... 5-3 Setting the Oracle Communicator Skin ... 5-3 Enabling Presence ... 5-3 Enabling NAT Traversal and Discovery ... 5-4 Enabling Directory Searches ... 5-5 Setting the Service Provider’s Web Page... 5-6 Setting the Upgrade Policy ... 5-6 Storing Resource-Lists Documents... 5-6 Creating a Customized Installer File... 5-6
Setting the Oracle Communicator Upgrade Policy... 5-8
Setting Banners in Oracle Communicator... 5-10
Configuring Oracle Communicator to Retrieve Resource-Lists Documents... 5-11 Updating Buddy Lists ... 5-11 Upgrading Buddy Lists ... 5-12 Prompting Users to Upgrade to XDMS-Stored Buddy Lists... 5-12
A
The Oracle Communicator Configuration File
The customize-sample.xml File... A-1
This preface contains the following topics:
■ Audience
■ Documentation Accessibility ■ Related Documents
■ Conventions
Audience
This guide is intended for users of Oracle Communicator.
Documentation Accessibility
Our goal is to make Oracle products, services, and supporting documentation accessible to all users, including users that are disabled. To that end, our
documentation includes features that make information available to users of assistive technology. This documentation is available in HTML format, and contains markup to facilitate access by the disabled community. Accessibility standards will continue to evolve over time, and Oracle is actively engaged with other market-leading
technology vendors to address technical obstacles so that our documentation can be accessible to all of our customers. For more information, visit the Oracle Accessibility Program Web site at http://www.oracle.com/accessibility/.
Accessibility of Code Examples in Documentation
Screen readers may not always correctly read the code examples in this document. The conventions for writing code require that closing braces should appear on an
otherwise empty line; however, some screen readers may not always read a line of text that consists solely of a bracket or brace.
Accessibility of Links to External Web Sites in Documentation
This documentation may contain links to Web sites of other companies or
For more information, see the following documents:
■ Oracle WebLogic Communication Services Administrator’s Guide
■ Oracle WebLogic Communication Services Developer’s Guide
■ Oracle Fusion Middleware 11g Release Notes
Conventions
The following text conventions are used in this document:
Convention Meaning
boldface Boldface type indicates graphical user interface elements associated with an action, or terms defined in text or the glossary.
italic Italic type indicates book titles, emphasis, or placeholder variables for which you supply particular values.
1
Overview
This chapter describes Oracle Communicator, its intended purpose, and how to use it. Additional information may be provided by your administrator.
Introducing Oracle Communicator
Oracle Communicator enables you to keep in touch with the important people in your life. You can see your Contacts' presence (that is, their availability), and communicate with them by sending instant messages and sharing files.
Getting More Help
The Help pages in the product describe all Oracle Communicator functionality, in-context; you may or may not have all functionality enabled depending on the version provided by your service provider.
This guide is meant to give you an overview of the functionality of Oracle Communicator. Its screens illustrate functionality, but your screens’ appearance depends on the theme selected. The appearance of your screens will vary, depending on your theme. In this guide, and in Help pages, you will see screen examples using the Slate theme. Some functionality is accessed differently depending on the selected theme. Your service provider will make one or more themes available to you, and you may select them using the Preferences dialog.
Note: A Banner Notification may appear when you start Oracle Communicator. It is a way for your system administrator to contact you about Oracle Communicator, or about any other organizational information. Banners may be persistent (that is, they remain on your screen), or you may be able to dismiss them by clicking on a Close
2
Setting Up Oracle Communicator
This chapter describes installation and set-up of Oracle Communicator. Topics include:
■ Install Oracle Communicator ■ Get Started
■ Settings
Install Oracle Communicator
In order to install Oracle Communicator, you must run the installation program. Your service provider will point you to the installation program.
Start the installation program, and follow the on-screen instructions.
Get Started
After you install and start the application, Create a New Account and register; you may need to provide a username and a password for authentication.
Create a New Account
Before you can start using Oracle Communicator, you must create an account. The account will contain information about you and your contact information. You may create multiple accounts (in the same way as you can have several email accounts).
When you start Oracle Communicator for the first time, you do not have any accounts. The Create Account Wizard dialog is launched automatically.
Create Account Wizard
Figure 2–1 Create Account Wizard
The second page of the wizard requires you to enter a SIP address. Enter you SIP address and click Next.
Your SIP address usually looks very similar to an e-mail address. It is possible that your SIP address is in fact the same as your e-mail address. Contact your service provider or network administrator if you don't know your SIP address.
On the third and last page of the Create Account Wizard dialog, in the Full name text box, enter the name you want others to see when you communicate with them. This name will be included in the communication dialog when you send messages. Click the Finish button.
Select an Account
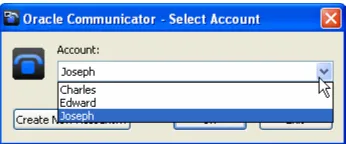
When you start Oracle Communicator, you will see the Select Account dialog.
Select Account Dialog
Select the account you want to use in the Account drop-down list box and click OK. The selected account will be used. If you click Cancel, the application will close.
If you want the application to automatically select this Account, select the checkbox Automatically sign in with this account. You will not see this dialog the next time you start the application since the account will be selected automatically. If you have signed in with an account automatically, but would like to use another account, you can sign out from the current account.
You can also create a new account by clicking the Create New Account button. If there is no account available, which is the case the first time the application runs, you must create an account before you see the Select Account dialog. The Create Account wizard is displayed automatically when starting the application the first time.
Authenticate
Authentication secures your information when using Oracle Communicator. You authenticate by providing your username and your password. Your username is usually your SIP address but might also be another name (provided by your service provider).
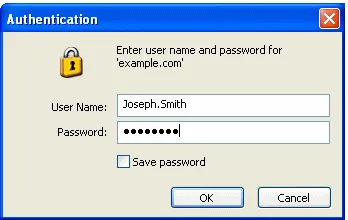
Authentication Dialog
If you enter an incorrect combination of username and password, authentication fails and you cannot access Oracle Communicator. You will then be asked again to
authenticate.
Figure 2–3 Authentication dialog
By clicking Cancel in the Authentication dialog, you give up the authentication attempt and the action you tried to perform will fail.
By checking the Save password checkbox in the Authentication dialog, you can save your username and password. Then you don't need to authenticate yourself again when you open Oracle Communicator. The username and password are saved locally on your computer.
Register to a Server
Registering to a server means starting Oracle Communicator and logging in. When registered to a server, you become available for communication and can see the presence of your Contacts. Your own presence will be updated to show that you are now available on the SIP service on which you registered (such as a PC).
You authenticate yourself when logging on; this protects your SIP address from unauthorized use.
Menus
Most commands and actions can be reached through the menu bar; note that the buttons look different depending on the theme you have chosen.
Figure 2–4 Main menu bar
■ Settings menu contains Preferences among some other menu items
■ History enables you to control the History settings
■ Create New Group menu is used to create new groups
■ Contacts Menus include icons that enable you to Add, Search, and Hide Contacts
New Application Versions
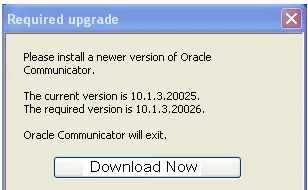
When your service provider makes a new application version available, you may automatically be notified when you start Oracle Communicator. The message will appear in a message dialog telling you where you can find the new version. Click on the button in the message dialog to go to the web page where you can download the new version. Follow the instructions given there to download and install the new version. The update can be required or recommended.
Required upgrades prevent you from running Oracle Communicator until you
upgrade. It is important that you update because new versions include fixes of earlier errors, and can contain new functionality.
Figure 2–5 New Version dialog
If a version is Recommended, you have a choice to install or defer the upgrade. When you see a new version message, you can take one of the following actions:
■ Click the More Information button to be taken to an upgrade page that gives you
information and instructions.
■ Click Close to ignore the upgrade alert until the next time you start Oracle
■ Click the Don't remind me of this upgrade again checkbox to discontinue being
reminded of this particular upgrade. When another upgrade is available, you will be notified.
Terminology
Here are some common terms used in Oracle Communicator:
■ Administrator—An administrator is a person who sets up your Oracle
Communicator environment for you. The Administrator provides the
functionality you can use (such as network connectivity and calling features). The Administrator also provides the information you need to log on to and use Oracle Communicator, and answers your questions.
■ Contact—A Contact is someone you add to your Contact List. By adding them, you
subscribe to their presence information.
■ Contact List—Your personal list of Contacts.
■ Group—A group of Contacts in the Contact List.
■ Instant Message—A text message that you can send to a Contact, or receive from a
Contact.
■ Presence Information—The presence status (presence icons) and presence message.
■ Presence Message—Your optional presence message can be used to further describe
your availability.
■ Presence Server—The place to which you register; provided by your service
provider.
■ Presence Status—Your presence status (presence icons) indicates your availability
to others.
■ Register—In order to use the functionality in Oracle Communicator, you must first
register (create an account and password).
■ Service Provider—A Service Provider is a person, department, or outside company
that provides the underlying connectivity that you use when using Oracle Communicator.
■ SIP Address—An address that works for many different kinds of communication.
The address is SIP service-independent and looks like an e-mail address (for example: [email protected]).
■ User ID or User Identity—The User ID is unique and identifies your account to your
service provider. The User ID, together with your Password, will be used for authentication when you register or try to access a service. For convenience you can choose to save the User ID and Password in your client, but this lessens security.
Settings
Preferences
In the Preferences dialog in the Settings menu, you can change your settings for how Oracle Communicator should look and behave on your PC. You can set the following preferences:
■ Account Preferences ■ Presence Preferences ■ Appearance Preferences ■ Security Preferences ■ Network Preferences ■ Advanced Preferences
After making your changes click Apply or OK. Click Cancel if you want to close the Preferences dialog without applying your changes.
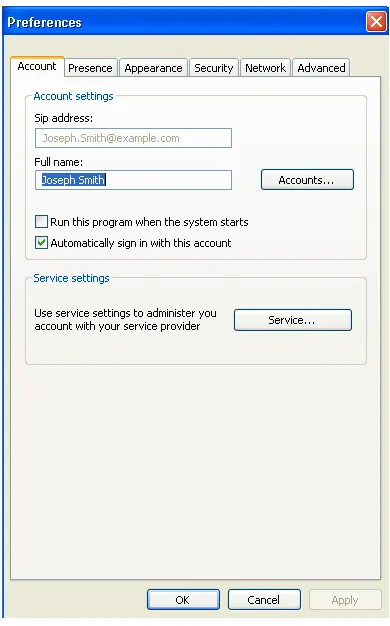
Account Preferences
To change you account preferences click Preferences in the Settings menu and then click the Account tab.
Figure 2–6 Account preferences
On the first page you can change your account and service settings.
SIP Address The SIP Address text box shows what SIP address is used in this account. If you want to use another SIP address you must create a new account.
Full Name In the Full name text box you can change the name that is included in all messages you send and calls you make. The recipient will see this name or the Display name if she or he has set one for you.
Accounts Click the Accounts... button to see the list of accounts you have created. You can delete accounts by selecting the desired account, and clicking the Delete button. Click the Close button when you are finished.
Deleting Accounts To delete an account, click on the account name to select it, then click the Delete button.
Automatic Start Check the Run this program when the system starts checkbox if you want Oracle Communicator to start automatically when you start your PC.
Automatically Signing In Check the Automatically sign in with this account checkbox if you want the application to automatically use this user ID when Oracle
Communicator starts. Automatically signing in with this account is the default setting.
Service Settings (Optional) The Service button is a link to your service provider's web pages where you can change your service settings. This button may or may not appear, depending on what your service provider has set up for you. What service settings you can change depend on the services provided to you. Contact your service provider for more information.
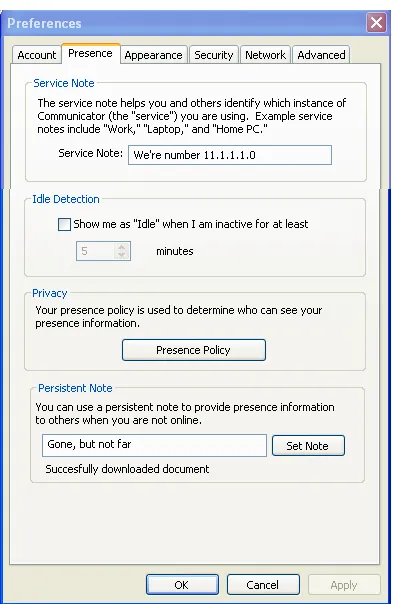
Presence Preferences
Figure 2–7 Presence preferences
After making your changes click Apply or OK. Click Cancel if you want to close the Preferences dialog without applying your changes.
Service Note The optional text that is written in the Service Note box specifies what you want to call this client, for example PC at home, PC at work, laptop, and so on. This text is shown in others' Contact Lists.
Idle Detection By enabling this feature (checking the checkbox), it is possible to
automatically change your presence status to Idle when there is no activity on your PC for the specified time (in minutes). This tells your Contacts that you were available on this machine, but have not been active on it for the specified amount of time.
Privacy Under the Privacy heading, you can click the Presence Policy button to change who is allowed to see your presence information. The Presence Policies dialog will appear.
Persistent Note Under the Persistent Note heading, you can enter a message that will be visible to all of your Contacts when you are offline. To enter a Persistent Note, type in some text, then click Set Note.
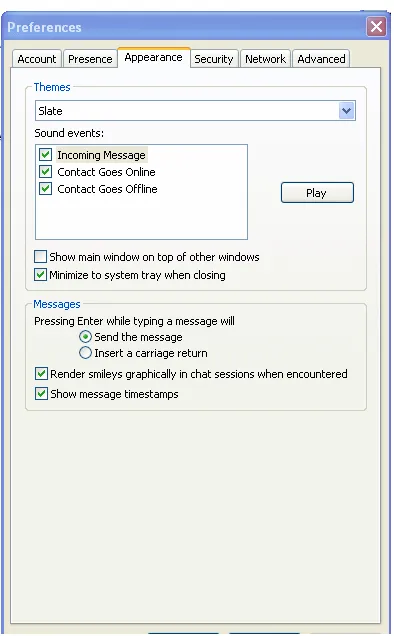
Appearance Preferences
Figure 2–8 Appearance preferences
After making your changes click Apply or OK. Click Cancel if you want to close the Preferences dialog without applying your changes.
Themes The theme determines how Oracle Communicator's main dialog and
communication dialog will look and sound. You can change your theme to any theme included in the Themes drop-down menu.
Show main window on top of all other windows This setting will cause Oracle
Communicator's Main window to always stay on top of all other windows on you desktop when it is not minimized.
Minimize to system tray when closing This setting will cause Oracle Communicator's Main window to minimize to the system tray instead of shutting down when you click the
Close button at the right top of the window. To shut down the application when this setting in activated you must right-click the application icon in the system tray and select Exit.
Messages Choose what should happen when the Enter key is pressed when writing a message. Either send the message or insert a new line in the message.
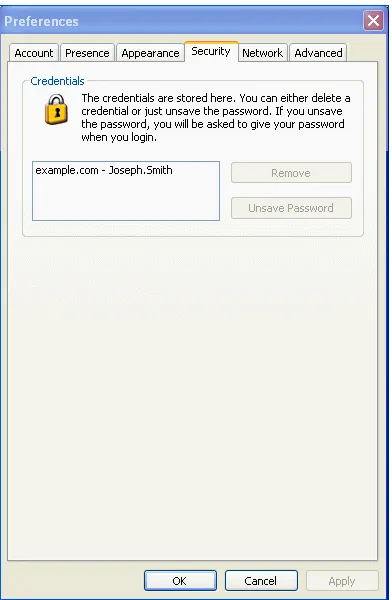
Security Preferences
To change the security preferences click Preferences in the Settings menu and then click the Security tab.
Figure 2–9 Security Preferences
After making your changes click Apply or OK. Click Cancel if you want to close the Preferences dialog without applying your changes.
Credentials When you are required to authenticate yourself, you can choose to save your password (Saving your password is the default setting.). What you actually save are your credentials; a username and a password. Saving credentials decreases security. You can unsave a password or remove the whole credential if you like. To do so, click on one of the credentials in the list and click Unsave Password if you do not want the password to be saved for this credential; click Remove to remove the credential altogether.
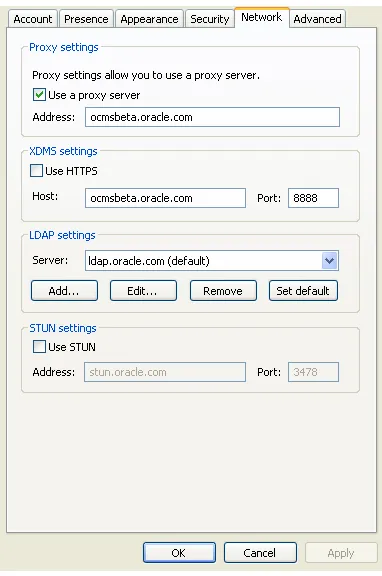
Network Preferences
Note: Changes you make to your password or credentials will take effect the next time you log in.
To change the network preferences click Preferences in the Settings menu and then click the Network tab.
Figure 2–10 Network preferences
After making your changes click Apply or OK. Click Cancel if you want to close the Preferences dialog without applying your changes.
Proxy Settings Check the Use a proxy server checkbox and fill in the Address: field if you want to use a proxy server. Proxy servers are used in many organizations, depending on the way the system is set up. Your service provider will provide proxy server information, if needed.
XDMS Settings Check or uncheck the Use HTTPS checkbox, depending on server configuration.
LDAP Settings Your organization may use LDAP services for looking up people and groups. If so, set your LDAP server here. Your service provider will provide the information you must use here. Buttons in the LDAP settings field include: Add...,
Edit..., Remove, and Set default. These buttons, and the fields they contain, should only be used if you are sure of the information, or if you are instructed to use them by your service provider.
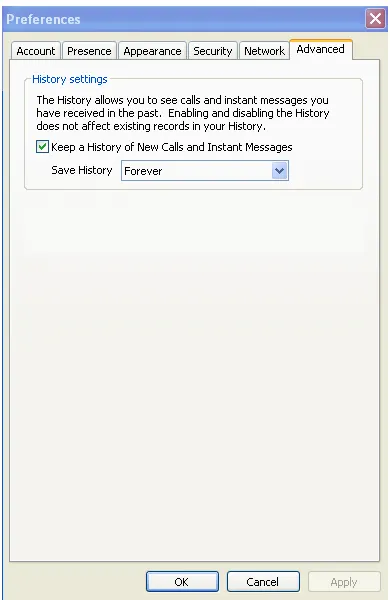
Figure 2–11 Advanced preferences
History Settings The History contains a record of communications you've had. You can also use it to contact someone with whom you've communicated in the past.
You can control whether or not these records are kept (and, if they are kept, the length of time for which they are kept) in the Advanced Preferences tab. On that tab, Keep a History of New Calls and Instant Messages is selected by default. If this box is checked, a record of communications will be saved in your History. You can also set the time period for which you want to retain these records (Forever, Until I sign out, For 14 Days, For 30 Days).
Save History Option If you choose not to keep your records forever, old records are only deleted when you sign out of your account.
You may delete individual records from the History (or the entire History) by using the History dialog.
Themes
Figure 2–12 Themes
3
Who’s Your Buddy?
This chapter describes how you can get the most out of using Presence. You set your Presence to let the world know something about you, such as your location,
availability, or any other information, and you view your Contacts’ Presence to learn the same types of information about them. Topics include:
■ Presence
■ New Subscribers ■ Contacts
Presence
Presence means being able to see your Contacts' availability, and to display your availability.
A Contact is any person about whose presence you are interested. One person can simultaneously be available on multiple SIP services. For example, you can be logged on with the same account both with Oracle Communicator on your home PC and on your personal laptop at the same time.
The main presence indicator is a presence icon (their appearances vary according to theme):
■ Available on at least one SIP service
■ Busy, and does not want to be disturbed
■ Away
You can toggle among these presence indicators by clicking on the Presence icon.
Set Presence
In addition to the graphical presence indicators, you can type in a Presence Note, which is shown next to your name in the Contact List. This can be used to convey more information that you want to share. To add information to your Presence Note, click in the Presence field and type in your note. Then press Enter, or just click outside the text field. Your new Presence note appears.
You can also add Smileys to your Presence Note. To do so, click on the smiley face next to the Presence Note field, and select your favorite Smiley.
Figure 3–2 Adding a Smiley to your Presence
Toggling between presence statuses (icons) does not change the presence text; these two pieces of information are independent.
Save Presence
You can store a presence status/presence text combination for later use. To do this, click the down-pointing arrow on the drop-down in the My presence text area and select Save current presence. You can recall the saved state(s) by selecting one from the drop-down area.
The drop-down area also stores each of the three presence statuses (available, busy and away) along with empty text (into which you can enter your own text). Selecting one of these (indicated by the angle brackets in the drop-down selection list) will set your presence status to the indicated status and will clear your presence text.
Figure 3–3 Choosing Presence Statuses
A user cannot set his/her presence status to unavailable; rather, this is the presence status others see when you are offline. You can set a persistent note (in Preferences > Presence) that will also be displayed to users when you are offline.
A user who is otherwise available may also become idle if away from his/her computer for a customizable period of time. You can set whether to go idle and how long the computer is idle before going into that state (in Preferences > Presence).
All available SIP services are shown under each Contact's presence icon. If a person is logged in to at least one SIP service, there will be a small plus (+) icon in front of their presence icon. If you click on the plus (+) icon, you will be shown the list of SIP services on which the Contact is logged.
Change Presence Menu in the System Tray
Presence Policy
You can decide who is allowed to see your presence information and who is not. People who are interested in your presence status are called presence watchers or just watchers. Whenever someone subscribes to your presence, he or she becomes a
watcher. Just subscribing is not enough, though; in order to actually get your presence information, a watcher must be approved by you.
People who are accepted watchers are allowed to see your current presence, and will receive updates when it changes. People who are not accepted will not be allowed to see your presence or get any updates.
The first time you can decide if someone is allowed to see your presence is when they have added you to their Contact List. You will then see the New Subscribers dialog. However, you can change your mind at any time and change who is allowed to see your presence. To see and change the presence policy list, click Preferences under the Settings menu and then click the Security tab. Click the Presence Policy button and the Presence Policy dialog appears.
Figure 3–4 Presence Policy
Presence Policy Dialog
The Contacts in the upper area are accepted as watchers, the people listed in the lower area are not, and may not even ask you to allow them to see your presence again. You can move people between the different states by selecting them and clicking the arrow buttons. When you click OK your presence policy will be saved.
New Subscribers
Figure 3–5 New Subscribers dialog
New Subscriber Dialog
The New Subscriber dialog will also be displayed when you start the application if one or more Contacts have added you to their Contact List while you have been
disconnected.
If you do not want a Contact to see your presence, uncheck the checkbox to the left of the name of this Contact. This Contact will not be notified that you rejected the request, but will only see you as a grey ghost figure, a Contact with no information, in his or her Contact List. All checked Contacts will see your presence. You can change who can or cannot see your presence using presence policy settings.
At the bottom of the dialog there is an Add Accepted Contact to Contact List
checkbox. If this checkbox is checked, the Contacts will be added to your Contact List. If you do not want to add these Contacts, just uncheck the Add Accepted Contact to Contact List checkbox. Click OK to apply your choices.
Figure 3–6 Contact Properties dialog
Contacts
Contacts are people using Oracle Communicator. You can share information about yourself with them, and communicate with them.
Manage Contacts
Not all Contacts are equal. There are some that you may want to allow to view your Presence, and there are others whom you do not. The choice is yours; you control access.
About the Contact List
The Contact List (also called the Buddy List) shows all of your Contacts, Contact Groups, and their presence statuses. Names displayed in the Contact List can be changed in the properties for each Contact. When one of your contacts come online or goes offline, their name is highlighted for a few seconds.
Main Screen
Depending on the theme you are displaying, your Contact List will look different, and behave slightly differently.
In the Communicator theme, clicking on a Contact's name displays the SIP Services that Contact is using. When you right-click on the Contact's name, a drop-down list is displayed from which you can message this contact. Additionally, you can delete the Contact, rename it, or open the Properties dialog for this Contact.
Your administrator may have configured the Contact List's information to be stored on a server. If that is the case, the same Contact List will be downloaded even if you install Oracle Communicator on different machines. If it has not been configured in that way, the you must create a new Contact List wherever you install Oracle Communicator.
Create Contacts
To create a new Contact in your Contact List:
1. Select Add Contact... in the Edit Contact List menu or in the Context menu that appears when you right-click in an empty area of the Contact List. The Add or Search Contact dialog appears. You can either manually enter the data for the Contact, or search for a Contact on your network.
Figure 3–7 Adding a Contact
2. Enter a SIP address, a Display name or a Full Name for the Contact. If you enter a SIP address you can click the Get Info from Server button to get more Contact
Information from the server (this feature only works if your administrator has set it up for you). Otherwise, enter Contact Information manually in the text boxes.
3. Click the Add Contact button and the new Contact will appear in your Contact List and the Add or Search Contact dialog will close.
You can also add the Contact you are communicating with from the File menu in the Communication dialog.
SIP Services
In the Communicator theme, if a Contact is online, you can expand the branch they are on by pressing the plus sign (+) next to their name to see the SIP service or services they are on.
Devices
If a Contact is online on any SIP service, a SIP service presence symbol will appear under her or his name for each SIP service they are running. Presence status is shown next to each SIP service.
In the Slate theme, a blue symbol that toggles between a plus sign (+) and a minus sign (-) to the left of the expanded Contact enables you to display or hide SIP information for that Contact.
Note that this might be a SIP service with no presence. In that case, the Contact's presence will be offline but showing the registered SIP service with this symbol.
This will only be the case for a PC SIP service. If the Contact logs off a particular SIP service, the SIP service presence symbol under that Contact is removed.
Note: All data you have entered manually will be overwritten with the information returned from the server when using the Get Info from Server function.
If you enter a Display name for a Contact, that is what will be displayed in the Contact List and in the messages and calls received from this Contact. If no display name is given, the Full name is displayed instead. If neither Display name nor Full name is given, the SIP address is displayed. You must enter a SIP address to be able to see presence and send instant messages to this Contact. If you wish, you can enter a postal address and telephone numbers that are associated with the contact. To enter a telephone number, select one of either Work Phone, Home Phone or Mobile Phone and enter the number in the adjacent field.
1. Right-click the Contact you want to edit and select Properties… from the Context menu.
Figure 3–8 Edit Properties
2. The Contact Properties dialog appears in which you can change the information for the selected Contact. Enter the data in the text boxes. If the Contact has a SIP address, you can click the Get Info from Server button to get more contact information from the server.
3. Click OK when you are done editing the Contact Properties.
Search for Contacts
You can search for Contacts instead of creating them manually. Then you can add them to your Contact List, or communicate with them.
In the following example, a user is searching for Contacts in their organization's LDAP server. In order for such a search to work at your organization, an Administrator must have set up the LDAP server beforehand.
1. Select Search from the Add Contact menu. The Add or Search Contact dialog appears, showing the page for searching for Contacts.
2. Select the criteria you want to search by in the Search for Contacts by drop-down menu. Then enter your search text in the Containing text text box. If you check the
Exact match only checkbox, the search will only return contacts with information matching the exact text you have specified. Otherwise, the search will return any Contact with information containing the text you have specified. Finally, select on which server you want to search in the Use Server drop-down menu.
3. Click the Search button to display the search results, which will be displayed on the next page of the dialog. If you hover over the returned Contacts you can see more information about them. You can sort the results by clicking on the column headings.
4. Select the Contacts you want to add to your Contact List. To select several Contacts at the same time, use the Shift or the Ctrl key at the same time as you select them.
■ To add the Contacts without viewing or editing the Contact information, click
Add Contacts. The Contacts are added immediately.
■ To view or edit the information of a selected Contact before you add it, select
information is shown. Edit the information by entering or modifying data in the text boxes. When you are done editing, click the Add Contact button. The Contact is added to the Contact List.
5. Click Close to close the dialog.
Delete Contacts
Select the Contact you want to delete. Then right-click and choose Delete from the Context menu. When you delete a Contact, Oracle Communicator prompts you if you are sure that you want to delete the Contact. A check box (checked by default)
indicates that you want to block the deleted contact from watching your presence.
Deleting a contact does not remove that Contact from the watcher list; the Contact will still be able to see your presence (if you do not want them to see your presence, you must make a change in the presence policy dialog.).
By pressing the Shift or the Ctrl key when selecting Contacts, you can select several Contacts to delete simultaneously. You can also delete a Group that contains Contacts.
Create Groups
Groups are collections of Contacts. You may for instance want to keep certain contacts in a group (Workmates, for example) for ease of viewing. To create a Group:
1. Depending on your theme, click an icon, or right-click in the Contact List area and select Create Group. A new Group is created in your Contact List.
2. Edit the name of the group.
3. To move Contacts to the Group, use drag-and-drop; click the Contact, drag it to the group and drop it. A plus (+) sign appears to the left of the group, click it to expand the group and show the included Contacts.
Edit Groups
You can change the name of a group and also move the Contacts out of a group or to another group. To move a Contact, simply drag and drop the Contact over the group title to which you want to move it.
To rename a Group:
1. Right-click the group and select Rename.
Note: When you have added a Contact with a SIP address, this Contact will receive a message saying that you want to subscribe to their presence. The Contact can then approve/reject your request the New Subscriber dialog.
Delete Groups
To delete a group:
1. Right-click the group you want to delete and select Delete. A warning appears asking if you want to delete.
2. Click OK to proceed with the deletion. The group and the Contacts in the group are deleted from your Contact List.
4
Using Oracle Communicator
This chapter describes the main usage areas of Oracle Communicator. Topics include:
■ Understanding the Communications Dialog ■ Instant Message
■ File Transfer ■ Troubleshooting
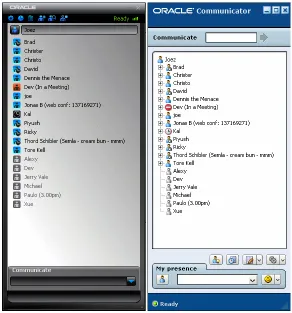
Oracle Communicator Main
Figure 4–1 Oracle Communicator Main window
You can access your Contacts from here, and you can use the menu items:
■ Settings ■ History
■ Create New Group ■ Contacts
Settings
Use the Settings Menu to set up your Oracle communicator, and to customize it for your use. For more information on the Preferences, see Get Started.
You also use the Settings menu to access online Help, and to log off and/or exit Oracle Communicator.
History
Figure 4–2 History
Open History
To open History, select History from the Communicate menu or select History from the
File menu in the Communication dialog (In the Slate theme, click the Show History
icon.). The History dialog appears.
The first column shows an arrow indicating the direction of the record (incoming or outgoing). An arrow pointing to the right indicates an outgoing message; an arrow pointing to the left indicates an incoming message.
Delete History
You can remove individual items from the history by selecting them and pressing the Delete key or right-clicking on one of the items and choosing Delete this entry. If you click Clear Entire History, you will delete all of the records.
Communicate with a Contact in History
You can double-click on an instant message record to see the contents of that conversation. These contents will appear in a new communications window.
To communicate with a Contact in the History, right-click on any of the sessions and choose an action from the Communicate menu.
Add a Contact from History
You can add a Contact to you Contact List from the History list, if it is not already in your Contact List.
1. Right-click the Contact in the list and select Add to Contact List. Note that if the Contact is already in your Contact List, the Add to contact list menu item is inactivated. The Contact Properties dialog appears.
Create New Group
You can create a new group using the Create New Group icon on the menu bar. For more information on Creating and otherwise manipulating Groups see Create Groups.
Contacts
There are three Contacts icons on the menu bar that you use to create and manipulate Contacts. They are:
Figure 4–3 Contact icons on the menu bar
■ Create Contacts ■ Search for Contacts
■ Show/Hide offline Contacts that enables you to display only online Contacts, or to
display all (online and offline) Contacts.
Other Main Window Actions
From the Main window of Oracle Communicator, you can also Set Presence.
Understanding the Communications Dialog
The Communications dialog is your main vehicle for communicating with Contacts. To open the Communications dialog, double-click on a Contact in you Contact List.
Communication Dialog
The Communication dialog is the area from which you will take most actions.
Save Message
From the File menu in the Communication dialog you can save a message dialog. Choose File > Save Text to save the text of a communication.
Add Contact from Communication Dialog
If you are communicating with someone who is not already on your Contact List, you can add the person to your Contact List.
1. Select Add Contact from the File menu. The Contact Properties dialog appears.
2. Edit the information in the text boxes or use the Get Info from Server button to get Contact information from the server. See Create a Contact for more information about creating a contact.
If you want to move your Contact List between different computers you can store your Contact List on the server. To do this, select Store Contact List in the Edit Contact List menu.
Instant Message
Figure 4–4 Sending an instant message
Introduction
Use Instant Messaging to send and receive text messages from your Contacts.
Send an Instant Message
You can send instant messages to your Contacts, or anyone else with a SIP address. There are two kinds of instant messages: text messages and voice messages.
To send an instant text message to a Contact in your Contact List, double-click the Contact name. The Communication dialog appears. Enter a text message in the lower part of the dialog and click Send. Your message has been received by the recipient when it appears in the Message area.
You can also add smileys to your messages. Just click on the Smiley icon and choose one of the Smileys that appear.
Send IMs to People Not in your Contact List To send an instant message to someone not in your Contact List, enter a SIP address in the Communicate text box in the Main window and select Send Message... from the Communicate menu to the right of the text box. The Communication dialog appears. Write your text message in the lower part of the dialog and click the Send button. Your message has been received when it appears in the Message area.
Send a Message to non-Oracle Communicator Users To send an instant message to someone not in your Contact List, enter a SIP address in the Communicate text box in the Main window and select Send Message... from the Communicate menu to the right of the text box. The Communication dialog appears. Write your text message in the lower part of the dialog and click the Send button. Your message has been received when it appears in the Message area.
Smileys
To add smileys to your message, click the Smiley button in the Communication dialog and select the smiley of your choice.
Figure 4–5 Smileys
File Transfer
If your Oracle Communicator administrator has set up the file transfer capability, you can send and receive files with your Contacts. You can send a file in different ways: from the main window, by entering a SIP address and clicking the Communicate
button, or from a Communication dialog by clicking the icon.
Figure 4–6 File transfer invitation
Initiate File Transfer
Right-click on the Contact's name and choose Send File.
OR
While in a communication, Click the File menu, and choose Send File.
Select a File
Choose the file, and click Open. The receiving Contact receives a notification that you are offering to send a file. You can accept or decline.
File Transfer Notification
If you Decline, the sender receives a notification that you have declined the transfer, and the transfer is cancelled.
If you Accept, a Progress dialog appears. When the transfer is complete, the dialog shows that the transfer is done. Dismiss the dialog.
Send a File
You can send a file to your Contacts, or anyone else, as long as they have a SIP address, are using this application and have a service provider that supports file transfer.
1. Right-click a Contact in your Contact List and select Send File... from the menu. To send a file to someone not in your Contact List enter a SIP address in the Address text box in the Main window and select Send File... from the
Communicate menu. You can also send a file from the Communication dialog with someone you are already communicating with.
2. In the File Transfer dialog point out the file you want to send and click Open.
3. If the other party accepts the file transfer the application will start sending the selected file. The File Transfer dialog will inform you of the progress of the file transfer and also when it is done. The File Transfer dialog will also inform you if the other party declined.
Receive a File
When someone wants to send you a file you will receive a pop-up showing the sender. Click on the pop-up and the File Transfer dialog appears.
To accept choose where to save the file by writing the path or using the Browse
button. Then click the Accept button and you will start receiving the file. The File Transfer dialog will inform you of the progress of the file transfer and also when it is done.
To decline the file transfer click the Decline button. The other party will be notified of the decline.
Troubleshooting
This section contains some tips to help you if you encounter a problem. Sections include:
Cannot Register
There are several different things that can cause this problem:
■ No network connection: Make sure your dial up connection or network connection
is working. See your PC documentation for more details on configuring your network connection.
■ Faulty proxy settings: Make sure your proxy settings are correct. If you do not use
a proxy, ensure that you have not checked the Use Proxy Server option in Preferences under Settings in the Main window.
■ Wrong SIP address: The presence server is determined from your SIP address. If it
has been incorrectly entered, then the server will not be found. Create a new account with the correct SIP address.
■ Server problem: The presence server you want to use might be unreachable.
Contact your service provider for support if the problem persists.
Cannot Authenticate
Make sure your username and password are entered correctly. These are usually provided by your service provider.
Contact your service provider for support if the problem persists.
Cannot See Anyone in My Policy List
If your Presence Policy list is empty or incomplete, first make sure you are registered. The Presence Policy list is only populated once you have been successfully registered to the server. If you are registered, then the client may be having trouble downloading your policy from the server.
Contact your service provider for support if the problem persists.
Messaging
Messaging troubleshooting tip:
Message Delivery Failed
5
Configuring Oracle Communicator
This chapter describes how administrators create customized installations of Oracle Communicator. This chapter includes the following sections:
■ Setting the Default Values for an Installation of Oracle Communicator ■ Customizing the Installer File
■ Setting the Oracle Communicator Upgrade Policy
■ Configuring Oracle Communicator to Retrieve Resource-Lists Documents
Setting the Default Values for an Installation of Oracle Communicator
You can customize Oracle Communicator installations that populate user accounts with default settings appropriate to the configuration and topology of a particular site. For example, you can distribute installer files to Communicator users that set their accounts to use a SIP proxy with the default address of ourproxy.example.com. You set these defaults by creating an XML file called customize.xml. Using a program that supports adding files to a RAR file, you then package this file with the installer file (the self-extracting RAR file called OracleCommunicatorSetup.exe) that you distribute to Communicator users.When a user installs a setup file that includes customize.xml, the properties from the customize file are used to overwrite the following two files in the Oracle
Communicator install directory:
■ Program Files\Oracle\Oracle Communicator\defaults.xml
■ Program Files\Oracle\Oracle Communicator\customize\vendor.xml
defaults.xml is a template for creating account-specific XML files. These files are updated whenever users modify their configurations through the user interface. As a result, these properties can vary from account to account. For example, one user account-specific XML file may designate the proxy as beta.testcomany.com, while another may designate proxy.example.com.
vendor.xml describes the properties that are the same for all Communicator users.
Customizing the Installer File
The Oracle Communicator installer includes a template file for customize.xml called customize-sample.xml. This file documents every property that might require customization. By modifying and renaming this file to customize.xml and then packaging it with the installer file as described in "Creating a Customized Installer File", you set the defaults for all of the users in an Oracle Communicator installation.
The customize-sample.xml file is divided in two sections: Vendor and Account. In general, Vendor settings apply to every account in a given Communicator installation and cannot be changed by the user. The settings configured in the Account section are used to create an account-specific XML file whenever a user creates a new
Communicator account. Some of the properties in a user’s account-specific XML file are set using Communicator’s Preferences dialog (Table 5–1).
Figure 5–1 The Oracle Communicator Preferences Dialog
Configuring customize.xml
customize-sample.xml includes all of the elements needed for creating a custom installer. You can remove any element in the Vendor or Account sections that does not require customization. If you remove an XML element, the system uses a default value documented in customize-sample.xml.
Example 5–1 illustrates the structure of customize-sample.xml. For the full file, see
Only include the elements that are appropriate to the topology and configuration of
The <Vendor> element provides Oracle Communicator users with read-only values. The properties set within this section are the same for all users. Setting the content of the <SelfProv> element to 1 enables end users to see the Service Settings menu option. This opens the service provider’s Web page URL. See "Setting the Service Provider’s Web Page" for more information on configuring this URL.
Setting the Outbound Proxy Address
To enable use of the outbound proxy, enter 1 as the content for
<UseOutboundProxy>. Next, enter the IP address of the outbound proxy server where all requests are sent on the first hop. For example, enter
sip:my.host:5060;transport=tcp. If you do not specify this value, then a default address of outbound.<host> is used instead, where <host> is taken from the Oracle Communicator user’s SIP address. See also the SIPOutboundProxy attribute of the PresenceSupplierWebService and PresenceConsumerWebService MBeans in Oracle Communication and Mobility Server Administrator’s Guide.
Setting the Oracle Communicator Skin
The <Theme> element sets the default theme for the Oracle Communicator user interface. The current options are Slate, Communicator, and Jazz.
Set to 1 to use HTTPS to connect to the Aggregation Proxy. To enable this secure connection to the server, refer to "Securing the XDMS with the Aggregation Proxy" in Oracle Communication and Mobility Server Administrator’s Guide.
■ <Host>
The host of the XDMS. For example, enter your.xdms.domain.com. For HTTPS, define the host for the Aggregation Proxy.
■ <Port>
The port number of the XDMS. For HTTPS, configure the port as the HTTPS port of the Aggregation Proxy host. For example, enter 443.
■ <RootContext>
The root of the XDMS. The default value is services. Set <RootContext> to aggregationproxy, the context root of the Aggregation Proxy, for either HTTP or HTTPS connections to the Aggregation Proxy. If Communicator connects to the Aggregation Proxy using HTTPS (that is, <UseHttps>1</UseHttps>), then you must define <RootContext> as aggregationproxy. If the Aggregation Proxy is not used, then set <RootContext> to the default value of services.
■ <PresRuleAUID>
The ID of the application usage for presrules. The default is pres-rules.
■ <PresRuleDocName>
The name of the pres-rules document. The default value is presrules.
■ <HardStateAUID>
The ID of the application usage for PIDF (Presence Information Data Format) manipulation. The default value is pidf-manipulation.
■ <HardStateDocName>
See also "Presence" and "XCapConfig".
The document name for pidf manipulation application usage. Unauthenticated users are blocked when no rule is found. The default is hardstate.
■ <ResourceListAUID>
The application usage id (AUID) of the resource-lists document. The default value is resource-lists.
■ <ResourceListsDocName>
The name of the resource-lists document The default value is index.
Enabling NAT Traversal and Discovery
The <UseRPortForNatTraversal>, <UseStun>,<StunServerAddress> and <StunServerPort> elements are used to enable NAT traversal (that is, to enable a user to connect from behind a router). The latter three properties are used to provide information on the STUN Server, if one is available. Configure these elements as follows:
■ <UseRPortForNatTraversal>
Tip: To enable Oracle Communicator to request a user’s buddy lists from the XDMS, you must configure the <ResourceListAUID> and <ResourceListsDocName> elements. You must also set the
Set to 1 to enable use the rport parameter specified in RFC 3581. The rport parameter, which is in the Via header field, enables the Communicator client to request OWLCS to send the response back to the source IP address and port from which the request originated.
■ <UseStun>
Set to 1 to enable STUN.
■ <StunServerAddress>
The address of the STUN Server.
■ <StunServerPort>
The primary STUN port to which to bind for listening for incoming binding requests. The value is UDP port 3478, the default STUN Port as described in RFC 3489.
For more information, see "STUN Service".
Enabling Directory Searches
The LDAP server that you define within the <LdapServers> element enable Oracle Communicator users to search contact lists through Oracle Communicator’s support of LDAPv3. By default, Oracle Communicator does not define an LDAP Server. The child <LdapServer> elements have their own children, which specify the LDAP Server accessed by Oracle Communicator users. These include:
■ <Name>
The name of the LDAP Server.
■ <Ip>
The IP address of the LDAP Server.
■ <Port>
The port number of the LDAP Server
■ <BaseObject>
The starting point for searches using the DN (Distinguished Name) syntax. For example, enter dc=oracle,dc=com to search within oracle.com.
■ <Default>
Set this as the default LDAP server if more than one LDAP servers are defined.
■ <useTLS>
Set to 1 to use a TLS connection to the LDAP server.
■ <UseAuthentication>
■ <SipUriAttribute>
Indicates which LDAP schema attribute, if any, should be mapped to the SIP address of a contact.
■ <SipUriProtocolPrefix>
If set to 1, this indicates that the LDAP server returns SIP addresses prepended with sip:.
■ <SipUriLowercaseTransform>
If set to 1, then the SIP address of a contact returned by the LDAP server is put in lower case.
Setting the Service Provider’s Web Page
Defining the <Provisioning> element’s child, <Location>, defines the service provider’s Web page that Oracle Communicator user’s to launch from the Service Settings menu item. The value for <Location> is a URL.
Setting the Upgrade Policy
See "Setting the Oracle Communicator Upgrade Policy".
Storing Resource-Lists Documents
To store the resource-lists document on the XMDS, set the
<UseServerResourceLists> to 1. If the resource-lists document resides on the XDMS:
■ The resource-lists document is written to the address specified by the
<XDMSSettings> element.
■ OWLCS performs a full document replacement on the XDMS whenever users
change their buddy lists.
■ Because changes to the buddy list document through SUBSCRIBE/NOTIFY are
not supported, the buddy lists for concurrent sessions of Oracle Communicator may not match. See also "Updating Buddy Lists".
To store the resource-lists document locally as a file, set <UseServerResourceLists> to 0.
Creating a Customized Installer File
To create the customized installer file:
1. Download and install an application that supports adding files to a RAR. These instruction use WinRAR (http://www.rarlab.com/) as an example.
2. Open the self-extracting RAR file, OracleCommunicatorSetup.exe, in WinRAR.
Figure 5–2 Opening the Oracle Communicator Setup File
3. Extract customize-sample.xml and rename it customize.xml.
4. Edit the customize.xml file with your specific settings. Typically, you edit all of the server settings to match the deployment. You can comment out or remove the XML elements for those properties for which the default values suffice.
5. Using WinRAR (or another application that manages RAR files), package
customize.xml with the setup file (OracleCommunicatorSetup.exe) using one of the following methods:
■ Open OracleCommunicatorSetup.exe in WinRAR (Figure 5–2) and then
drag and drop customize.xml into OracleCommunicatorSetup.exe. In the Archive Name and Parameters dialog (Figure 5–3), select
OracleCommunicatorSetup.exe as the archive and then click OK.
Figure 5–3 Adding customize.xml to the Installer
can either add customize.xml back to OracleCommunicatorSetup.exe or rename a copy of the setup file and add customize.xml to that.
6. If desired, sign the new self-extracting.exe so that users who download it have confidence in the source of the modified installer.
7. Distribute the modified self-extracting.exe to end-users.
Setting the Oracle Communicator Upgrade Policy
This section describes how to configure upgrade.xml to specify the upgrade policy for all Oracle Communicator instances installed by end-users.
For upgrading versions 10.1.3.2 or 10.1.3.3 to 11.1.1.1, you must make changes to an existing upgrade.xml that you deployed when you made the previous version available to your users.
For upgrading versions 10.1.3.4 to 11.1.1.1, you must make changes to an existing notification.xml that you deployed when you made a previous version (10.1.3.4) available to your users. Here is a sample:
<?xml version="1.0" encoding="UTF-8"?>
You then reference this document within customize.xml by defining the
<Notifications> element that is located in the <Account> section. For example, configuring the <Location> element to point to upgrade policy results in the retrieval and review of the upgrade policy when a user logs into the newly installed Oracle Communicator. See "customize-sample.xml" for detailed instructions on how to use notification.xml for future upgrades.
<Notifications>
<!-- 0 disabled, 1 enabled --> <UseNotifications>1</UseNotifications> <!-- xml document location -->
<Location>http://notification.example.com/notification.xml</Location> </Notifications>
If the version of the user’s Communicator client is lower than the required version defined in <Must> element of the upgrade policy, then Communicator displays a dialog that alerts users to the fact that they must upgrade. (Figure 5–4).
Figure 5–4 The Required Upgrade Dialog
Clicking the dialog’s Click Here to Upgrade button opens the download URL in a default URL. If the user’s version is higher than the required version specified in the <Must> element, but lower than the version defined in the <Recommended> element, then Communicator presents the user with a dialog with that enables the user to open the download URL from the default browser or to ignore this option.
For a Communicator installation that points to the upgrade policy described above, Communicator does not prompt users to upgrade to versions of Communicator greater than, or equal to, both the versions set for the <Must> (10.1.3.20002) and <Recommended> (10.1.3.2003) elements and will wait the number of seconds specified in <Interval> (86400) before retrieving from upgrade.xml or
notification.xml (depending on whether the version installed is the one prior to 11.1.1.1.* or 11.1.1.1+ respectively). The upgrade policy affects users running Versions 10.1.3.20001, 10.1.3.20002, 10.1.3.20003, and 10.1.3.20004 of Communicator as follows:
■ 10.1.3.20001: Communicator prompts the user that an upgrade is required. When
the user then clicks the button, Communicator is closed and the URL specified in upgrade.xml is launched in the default browser.
■ 10.1.3.20002: Because the user has the latest required version, but not the latest
Figure 5–5 The Recommended Upgrade Dialog
■ 10.1.3.20003: Communicator does not prompt the user to upgrade.
■ 10.1.3.20004: Communicator does not prompt the user to upgrade.
If upgrade.xml is not available for some reason (for example, the server is down, the <VersionControl> and <Location> elements were not specified properly, or a firewall blocks access to the upgrade document), then the upgrade process will fail silently with no ill effect on the user's experience. The user can login normally.
Setting Banners in Oracle Communicator
Administrators can publish a message on the Client by making changes to an .xml file on the server. The .xml file used to make this change is notification.xml as described in the version control documentation. Here is a sample
notification.xml:
<?xml version="1.0" encoding="UTF-8"?> <Notification>
<Upgrade>
<Must>11.1.1.10001</Must>
<Recommend>11.1.1.10001</Recommend>
<Download>http://www.oracle.com/downloadsample</Download> </Upgrade>
<BannerMessage>
<MessageID></MessageID> <MessageType></MessageType>
Note: It is not possible to ensure that every instance of
<MessageContent></MessageContent> </BannerMessage>
<Interval>86400</Interval> </Notification>
The Administrator must modify the tags within the BannerMessage element. Here is a brief description of each tag:
■ MessageID - every new message the Administrator wants to push out to the
Client must have a unique MessageID.
■ MessageContent - the message text the Administrator wants displayed.
■ Interval - time after which the Client gets the message data from server.
■ MessageType - one of the following:
■ showforever - users log on to Oracle Communicator and see the banner
message. Users cannot close the banner. Logging on and then on again, or changing themes does not make the message disappear. It persists until a new message (with a new MessageID) is published on the server.
■ showonce - users log on to Oracle Communicator and see the banner
message. This type of message has a Close button. Clicking the Close button closes the message. If users log out and then log back on, or change themes, the message does not appear again.
■ normal - users log on to Oracle Communicator and see the banner message.
This type of message has a Close button. Clicking the Close button closes the message. But the next time the user logs on (or upon interval expiration), the new message will still be visible.
Configuring Oracle Communicator to Retrieve Resource-Lists Documents
The parameters set through the <UseServerResourceLists>,<ResourceListsDocName>, and <ResourceListAUID> attributes enable Oracle Communicator to retrieve a user’s buddy list from resource-lists document stored on the XDMS at startup. Oracle Communicator reads the resource-lists document only once, when the user first logs in. Any changes made to the resource-lists document after that initial login (for example, through a different session of Oracle
Communicator writing to the server) are not read and may be overwritten.
Updating Buddy Lists
Oracle Communicator does not support partial updates. Instead, it saves and uploads the entire buddy list document to the XDMS after any modification, such as:
■ Adding a buddy.
■ Adding a new group.
■ Changing a buddy’s contact information.
■ Changing a group name.