I n t r o d u c t i o n 1
Delphi for Windows
Copyright Agreement
I n t r o d u c t i o n
Delphi is not just a development environment for visually creating applications with components. It also includes everything you need to create the components for building applications in the same environment, using the same Object Pascal language.
The Delphi Component Writer’s Guide and its accompanying Help file (CWG.HLP) describe everything you need to know to write components for Delphi applications. The printed manual and the Help file contain the same information in different forms.
This material has two purposes:
1 To teach you how to create working components
2 To ensure that the components you write are well-behaved parts of the Delphi environment
Whether you’re writing components for your own applications or for commercial distribution, this book will guide you to writing components that fit in well with any Delphi application.
What is a component?
Components are the building blocks of Delphi applications. Although most components represent visible parts of a user interface, components can also represent nonvisual elements in a program, such as timers and databases.
There are three different levels at which to think about components: a functional definition, a technical definition, and a practical definition.
The functional definition of “component”
From the end user’s perspective, a component is something to choose from the palette and use in an application by manipulating it in the Forms Designer or in code. From the component writer’s perspective, however, a component is an object in code. Although there are few real restrictions on what you can do when writing a component, it’s good to keep in mind what the end user expects when using the components you write.
Before you attempt to write components, we strongly recommend that you become familiar with the existing components in Delphi so you can make your components
familiar to users. Your goal should be to make your components “feel” as much like other components as possible.
The technical definition of “component”
At the simplest level, a component is any object descended from the type TComponent. TComponent defines the most basic behavior that all components must have, such as the ability to appear on the Component palette and operate in the Forms Designer.
But beyond that simple definition are several larger issues. For example, although TComponent defines the basic behavior needed to operate the Delphi environment, it can’t know how to handle all the specific additions you make to your components. You’ll have to specify those yourself.
Although it’s not difficult to create well-behaved components, it does require that you pay close attention to the standards and conventions spelled out in this book.
The component writer’s definition of “component”
At a very practical level, a component is any element that can “plug into” the Delphi development environment. It can represent almost any level of complexity, from a simple addition to one of the standard components to a vast, complex interface to another hardware or software system. In short, a component can do or be anything you can create in code, as long as it fits into the component framework.
The definition of a component, then, is essentially an interface specification. This manual spells out the framework onto which you build your specialized code to make it work in Delphi.
Defining the limits of “component” is therefore like defining the limits of programming. We can’t tell you every kind of component you can create, any more than we can tell you all the programs you can write in a given language. What we can do is tell you how to write your code so that it fits well in the Delphi environment.
What’s different about writing components?
There are three important differences between the task of creating a component for use in Delphi and the more common task of creating an application that uses components:
• Component writing is nonvisual
• Component writing requires deeper knowledge of objects • Component writing follows more conventions
Component writing is nonvisual
I n t r o d u c t i o n 3 Although you can’t use the same visual tools for creating components, you can use all the programming features of the Delphi development environment, including the Code Editor, integrated debugger, and ObjectBrowser.
Component writing requires deeper knowledge of objects
Other than the non-visual programming, the biggest difference between creating components and using them is that when you create a new component you need to derive a new object type from an existing one, adding new properties and methods. Component users, on the other hand, use existing components and customize their behavior at design time by changing properties and specifying responses to events.
When deriving new objects, you have access to parts of the ancestor objects unavailable to end users of those same objects. These parts intended only for component writers are collectively called the protected interface to the objects. Descendant objects also need to call on their ancestor objects for a lot of their implementation, so component writers need to be familiar with that aspect of object-oriented programming.
Component writing follows more conventions
Writing a component is a more traditional programming task than visual application creation, and there are more conventions you need to follow than when you use existing components. Probably the most important thing to do before you start writing
components of your own is to really use the components that come with Delphi, to get a feeling for the obvious things like naming conventions, but also for the kinds of abilities component users will expect when they use your components.
The most important thing that component users expect of components is that they should be able to do almost anything to those components at any time. Writing
components that fulfill that expectation is not difficult, but it requires some forethought and adherance to conventions.
Creating a component (summary)
In brief, the process of creating your own component consists of these steps:
1 Create a unit for the new component.
2 Derive a component type from an existing component type.
3 Add properties, methods, and events as needed.
4 Register your component with Delphi.
5 Create a Help file for your component and its properties, methods, and events. All these steps are covered in detail in this manual. When you finish, the complete component includes four files:
1 A compiled unit (.DCU file)
2 A palette bitmap (.DCR file)
3 A Help file (.HLP file)
Although only the first file is required, the others make your components much more useful and usable.
What’s in this book?
The Delphi Component Writer’s Guide is divided into two parts. The first part explains all the aspects of building components. The second part provides several complete examples of writing different kinds of components.
Part I, “Creating components”
The chapters in this part of the book describe the various parts of components and how you create them.
• Chapter 1, “Overview of component creation,” explains the basic steps involved in the creation of any component. You should read this chapter before starting to create components.
• Chapter 2, “OOP for component writers,” presents several topics component writers need to know about programming with objects.
• Chapter 3, “Creating properties,” presents the procedures for adding properties to components.
• Chapter 4, “Creating events,” describes the process of adding events to components.
• Chapter 5, “Creating methods,” explains the process of adding methods to components and describes the conventions component writers should follow in naming and protecting methods.
• Chapter 6, “Using graphics in components,” describes the aspects of the Delphi graphics encapsulation that are particularly useful to component writers.
• Chapter 7, “Handling messages,” describes the Windows messaging system and the mechanisms built into Delphi components to handle messages.
• Chapter 8, “Registering components,” presents the requirements for customizing the way your components interact with the Delphi development environment, including providing Help to component users.
Part II, “Sample components”
The chapters in this part of the book give concrete examples of making components.
• Chapter 9, “Modifying an existing component,” demonstrates the simplest way to create a new component, by making modifications to an already-working
component.
I n t r o d u c t i o n 5 • Chapter 11, “Customizing a grid,” shows how to create a component based on one
of the abstract component types in the component library.
• Chapter 12, “Making a control data-aware,” demonstrates how to take an existing control and make it into a data-aware browsing control.
• Chapter 13, “Making a dialog box a component,” explains how to take a complete, working form and turn it into a reusable dialog box component.
• Chapter 14, “Building a dialog box into a DLL,” shows how to take a form and its controls and build it into a dynamic-link library (DLL) that any Windows application can use.
What’s not in this book?
Although this book touches on all the aspects that define a Delphi component, it can’t possibly cover every aspect of every kind of component you might want to write. If you want to create a component that operates on any system at a low level, you need to understand that system’s low-level operations.
For example, if you want to create components that take advantage of the intricacies of the communications functions built into Windows, you need to know enough about communications and the Windows API functions that implement them to make the appropriate calls to those functions from within your component. Similarly, if you want to access data in databases not directly supported by the Borland Database Engine, you need to know how to program the interface for that database so your component can provide access.
On the other hand, if all you want to do is create some slightly customized versions of the standard components provided with Delphi, all you really need is a good working knowledge of the Delphi development environment and its standard components, and some fundamental programming skills.
Manual conventions
The printed manuals for Delphi use the special typefaces and symbols described in Table Intro.1 to indicate special text.
Table Intro.1 Typefaces and symbols in these manuals
Typeface or symbol Meaning
Monospace type Monospaced text represents text as it appears onscreen or in Object Pascal code. It also represents anything you must type.
[ ] Square brackets in text or syntax listings enclose optional items. Text of this sort
should not be typed verbatim.
Boldface Boldfaced words in text or code listings represent Object Pascal reserved words or compiler options.
Keycaps This typeface indicates a key on your keyboard. For example, “Press Esc to exit a menu.”
■ This symbol indicates the beginning of a procedure description. The text that
follows describes a set of general steps for performing a specified kind of task.
➤ This symbol indicates a specific action you should take, such as a step in an
example.
Table Intro.1 Typefaces and symbols in these manuals (continued)
P a r t I , C r e a t i n g c o m p o n e n t s 7
P a r t
I
Part ICreating components
One of the key features of Delphi is that you can extend the library of components available for your applications from within Delphi itself. The chapters in this part describe all the aspects of component creation.
These are the topics you need to master to create your own components:
• Overview of component creation
• OOP for component writers
• Creating properties
• Creating events
• Creating methods
• Using graphics in components
• Handling messages
C h a p t e r 1 , O v e r v i e w o f c o m p o n e n t c r e a t i o n 9
C h a p t e r
1
Chapter 1
Overview of component creation
This chapter provides a broad overview of component architecture, the philosophy of component design, and the process of writing components for Delphi applications.
The main topics discussed are
• The Visual Component Library • Components and objects
• How do you create components? • What goes in a component? • Creating a new component • Testing uninstalled components
All this material assumes you have some familiarity with using Delphi and its standard components.
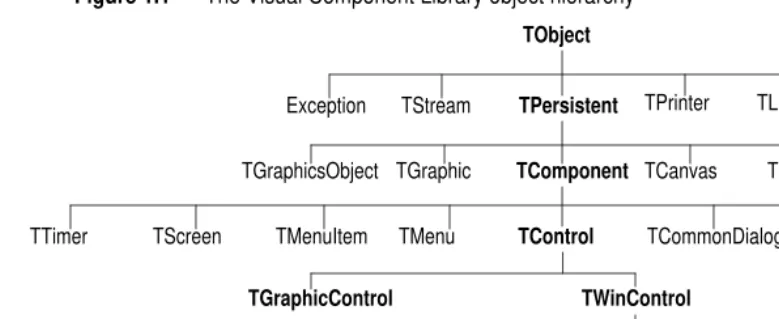
The Visual Component Library
Delphi’s components are all part of an object hierarchy called the Visual Component Library (VCL). Figure 1.1 shows the relationship of the objects that make up VCL. Chapter 2 discusses object hierarchies and the inheritance relationships between objects.
Figure 1.1 The Visual Component Library object hierarchy
When you create a component, you add to the VCL by deriving a new object from one of the existing object types in the hierarchy.
Components and objects
Because components are objects, component writers work with objects at a different level than component users do. Creating new components requires that you derive new types of objects. Chapter 2 describes in detail the kinds of object-oriented tasks
component writers need to use.
Briefly, there are two main differences between creating components and using components. When creating components,
• You have access to parts of the object that are inaccessible to end users • You add new parts (such as properties) to your components
Because of these differences, you need to be aware of more conventions, and you need to think in terms of how end users will use the components you write.
How do you create components?
A component can be almost any program element you want to manipulate at design time. Creating a new component means deriving a new component object type from an existing type. You can derive a new component from any existing component, but the following are the most common ways to create new components:
• Modifying existing controls • Creating original controls • Creating graphic controls • Subclassing Windows controls • Creating nonvisual components
TObject
TPersistent TPrinter TStream
Exception TList
TComponent TCanvas TPicture TStrings TGraphic
TGraphicsObject
TControl TCommonDialog TGlobalComponent TMenu
TMenuItem TScreen
TTimer
TWinControl TGraphicControl
TCustomEdit TCustomListBox
TScrollBar
TCustomControl TCustomComboBox
TScrollingWinControl TButtonControl
TForm
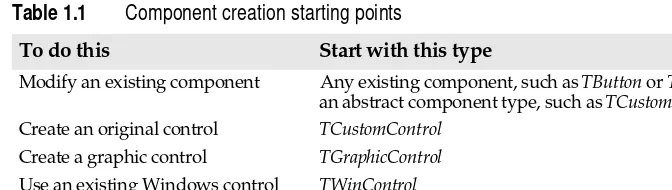
C h a p t e r 1 , O v e r v i e w o f c o m p o n e n t c r e a t i o n 11 Table 1.1 summarizes the different kinds of components and the object types you use as starting points for each.
You can also derive other objects that are not components, but you cannot manipulate them in a form. Delphi includes a number of that kind of object, such as TINIFile or TFont.
Modifying existing controls
The simplest way to create a component is to start from an existing, working component and customize it. You can derive a new component from any of the components provided with Delphi. For instance, you might want to change the default property values of one of the standard controls.
There are certain controls, such as list boxes and grids, that have a number of variations on a basic theme. In those cases, Delphi provides an abstract control type (with the word “custom” in its name, such as TCustomGrid) from which to derive customized versions.
For example, you might want to create a special kind of list box that does not have some of the properties of the standard TListBox type. You can’t remove a property from an ancestor type, so you need to derive your component from something higher in the hierarchy than TListBox. Rather than forcing you to go clear back to an abstract control type and reinvent all the list box functions, the Visual Component Library (VCL) provides TCustomListBox, which implements all the properties needed for a list box, but does not publish all of them.
When deriving a component from one of the abstract types such as TCustomListBox, you publish those properties you want to make available in your component and leave the rest protected. Chapter 3 explains publishing inherited properties.
Chapter 9 and Chapter 11 show examples of modifying existing controls.
Creating original controls
A standard control is an item that’s visible at run time, usually one the user can interact with. These standard controls all descend from the object type TWinControl. When you create an original control (one that’s not related to any existing control), you use TWinControl as the starting point.
Table 1.1 Component creation starting points
To do this Start with this type
Modify an existing component Any existing component, such as TButton or TListBox, or
an abstract component type, such as TCustomListBox.
Create an original control TCustomControl
Create a graphic control TGraphicControl
Use an existing Windows control TWinControl
The key aspect of a standard control is that it has a window handle, embodied in a property called Handle. The window handle means that Windows “knows about” the control, so that, among other things,
• The control can receive the input focus
• You can pass the handle to Windows API functions (Windows needs a handle to identify which window to operate on.)
If your control doesn’t need to receive input focus, you can make it a graphic control, which saves system resources. The next section describes graphic controls.
All the components that represent standard windows controls, such as push buttons, list boxes, and edit boxes, descend from TWinControl except TLabel, since label controls never receive the input focus.
Creating graphic controls
Graphic controls are very similar to custom controls, but they don’t carry the overhead of being Windows controls. That is, Windows doesn’t know about graphic controls. They have no window handles, and therefore consume no system resources. The main restriction on graphic controls is that they cannot receive the input focus.
Delphi supports the creation of custom controls through the type TGraphicControl. TGraphicControl is an abstract type derived from TControl. Although you can derive controls from TControl, you’re better off deriving from TGraphicControl, which provides a canvas to paint on, and handles WM_PAINT messages, so all you need to do is override the Paint method.
Chapter 10 shows an example of creating a graphic control.
Subclassing Windows controls
Windows has a concept called a window class that is somewhat similar to the object-oriented programming concept of object or class. A window class is a set of information shared between different instances of the same sort of window or control in Windows.
When you create a new kind of control (usually called a custom control) in traditional Windows programming, you define a new window class and register it with Windows. You can also base a new window class on an existing class, which is called subclassing.
In traditional Windows programming, if you wanted to create a custom control, you had to write it in a dynamic-link library (DLL), much like the standard Windows controls, and provide an interface to it.
Using Delphi, you can create a component “wrapper” around any existing Windows class. So if you already have a library of custom controls that you want to use in your Delphi applications, you can create Delphi components that let you use your existing controls and derive new controls from them just as you would any other component.
C h a p t e r 1 , O v e r v i e w o f c o m p o n e n t c r e a t i o n 13
Creating nonvisual components
The abstract object type TComponent is the base type for all components. The only components you’ll create directly from TComponent are nonvisual components. Most of the components you’ll write will probably be various kinds of visual controls.
TComponent defines all the properties and methods essential for a component to participate in the Form Designer. Thus, any component you derive from TComponent will already have design capability built into it.
Nonvisual components are fairly rare. You’ll mostly use them as an interface for nonvisual program elements (much as Delphi uses them for database elements) and as placeholders for dialog boxes (such as the file dialog boxes).
Chapter 13 shows an example of creating a nonvisual component.
What goes in a component?
There are few restrictions on what you can put in the components you write. However, there are certain conventions you should follow if you want to make your components easy and reliable for the people who will use them.
This section discusses the philosophies underlying the design of components, including the following topics:
• Removing dependencies • Properties, events, and methods • Graphics encapsulation
• Registration
Removing dependencies
Perhaps the most important philosophy behind the creation of Delphi’s components is the necessity of removing dependencies. One of the things that makes components so easy for end users to incorporate into their applications is the fact that there are generally no restrictions on what they can do at any given point in their code.
The very nature of components suggests that different users will incorporate them into applications in varying combinations, orders, and environments. You should design your components so that they function in any context, without requiring any preconditions.
An example of removing dependencies
Delphi components protect users from worrying about window handles and whether they are valid by ensuring that a valid handle is always available when needed. That is, by using a property for the window handle, the component can check whether the window has been created, and therefore whether there is a valid window handle. If the handle isn’t already valid, the property creates the window and returns the handle. Thus, any time a user’s code accesses the Handle property, it is assured of getting a valid handle.
By removing the background tasks such as creating the window, components allow developers to focus on what they really want to do. If a developer needs to pass a window handle to an API function, it shouldn’t be necessary to first check to make sure there’s a valid handle and, if necessary, create the window. With component-based programming, the programmer can write assuming that things will work, instead of constantly checking for things that might go wrong.
Although it might take a little more time to create components that don’t have dependencies, it’s generally time well spent. Not only does it keep users of your components from having to repeatedly perform the same tasks, but it also reduces your documentation and support burdens, since you don’t have to provide and explain numerous warnings or resolve the problems users might have with your components.
Properties, events, and methods
Outside of the visible image the component user manipulates in the form at design time, the most obvious attributes of a component are its properties, events, and methods. Each of these is sufficiently important that it has its own chapter in this book, but this section will explain a little of the philosophy of implementing them.
Properties
Properties give the component user the illusion of setting or reading the value of a variable in the component while allowing the component writer to hide the underlying data structure or to implement side effects of accessing the value.
There are several advantages to the component writer in using properties:
• Properties are available at design time.
This allows the component user to set and change initial values of properties without having to write code.
• Properties can check values or formats as the user assigns them.
Validating user input prevents errors caused by invalid values.
• The component can construct appropriate values on demand.
Perhaps the most common type of error programmers make is to reference a variable that hasn’t had an initial value assigned. By making the value a property, you can ensure that the value read from the property is always valid.
C h a p t e r 1 , O v e r v i e w o f c o m p o n e n t c r e a t i o n 15
Events
Events are connections between occurrences determined by the component writer (such as mouse actions and keystrokes) and code written by component users (“event handlers”). In essence, an event is the component writer’s way of providing a hook for the component user to specify what code to execute when a particular occurrence happens.
It is events, therefore, that allow component users to be component users instead of component writers. The most common reason for subclassing in traditional Windows applications is that users want to specify a different response to, for example, a
Windows message. But in Delphi, component users can specify handlers for predefined events without subclassing, so they don’t need to derive their own components.
Chapter 4 explains how to add events for standard Windows occurrences or events you define yourself.
Methods
Methods are procedures or functions built into a component. Component users use methods to direct a component to perform a specific action or return a certain value not covered by a property. Methods are also useful for updating several related properties with a single call.
Because they require execution of code, methods are only available at run time.
Chapter 5 explains how to add methods to your components.
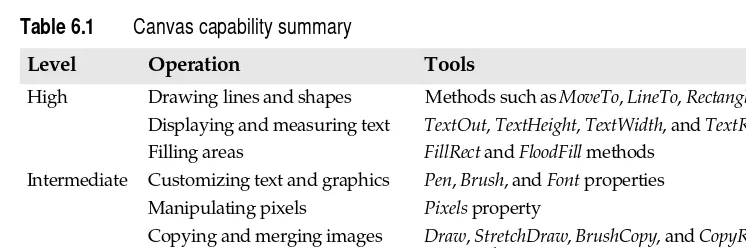
Graphics encapsulation
Delphi takes most of the drudgery out of Windows graphics by encapsulating the various graphic tools into a canvas. The canvas represents the drawing surface of a window or control, and contains other objects, such as a pen, a brush, and a font. A canvas is much like a Windows device context, but it takes care of all the bookkeeping for you.
If you’ve ever written a graphic Windows application, you’re familiar with the kinds of requirements Windows’ graphics device interface (GDI) imposes on you, such as limits on the number of device contexts available, and restoring graphic objects to their initial state before destroying them.
When working with graphics in Delphi, you need not concern yourself with any of those things. To draw on a form or component, you access the Canvas property. If you want to customize a pen or brush, you set the color or style. When you finish, Delphi takes care of disposing of the resources. In fact, it caches resources, so if your application frequently uses the same kinds of resources, it will probably save a lot of creating and recreating.
Of course, you still have full access to the Windows GDI, but you’ll often find that your code is much simpler and runs faster if you use the canvas built into Delphi
Registration
Before your components can operate in Delphi at design time, you have to register them with Delphi. Registration tells Delphi where you want your component to appear on the Component palette. There are also some customizations you can make to the way Delphi stores your components in the form file. Registration is explained in Chapter 8.
Creating a new component
There are several steps you perform whenever you create a new component. All the examples given that create new components assume you know how to perform these steps.
■ You can create a new component two ways:
• Creating a component manually • Using the Component Expert
Once you do either of those, you have at least a minimally functional component ready to install on the Component palette. Installing components is explained in Chapter 2 of the Delphi User’s Guide. After installing, you can add your new component to a form and test it in both design time and run time. You can then add more features to the
component, update the palette, and continue testing.
Creating a component manually
The easiest way to create a new component is to use the Component Expert. However, you can also perform the same steps manually.
■ Creating a component manually requires three steps:
1 Creating a new unit
2 Deriving the component object
3 Registering the component
Creating a new unit
A unit is a separately compiled module of Object Pascal code. Delphi uses units for a number of purposes. Every form has its own unit, and most components (or logical groups of components) have their own units as well. Units are discussed in more detail in online Help.
When you create a component, you either create a new unit for the component, or add the new component to an existing unit.
■ To create a unit for a component, choose File|New Unit.
Delphi creates a new file and opens it in the Code Editor.
C h a p t e r 1 , O v e r v i e w o f c o m p o n e n t c r e a t i o n 17
Note When adding a component to an existing unit, make sure that unit already contains only component code. Adding component code to a unit that contains, for example, a form, will cause errors in the Component palette.
Once you have either a new or existing unit for your component, you can derive the component object.
Deriving the component object
Every component is an object descended from the type TComponent, from one of its more specialized descendants, such as TControl or TGraphicControl, or from an existing component type. “How do you create components?” on page 10 describes which types to descend from for different kinds of components.
Deriving new objects is explained in more detail in “Creating new objects” in Chapter 2. ■ To derive a component object, add an object type declaration to the interface part of the
unit that will contain the component.
➤ To create, for example, the simplest component type, a non-visual component
descended directly from TComponent, add the following type definition to the interface part of your component unit:
type
TNewComponent = class(TComponent)
end;
You can now register TNewComponent. Note that the new component does nothing different from TComponent yet. However, you’ve created a framework on which you’ll build your new component.
Registering the component
Registering a component is a simple process that tells Delphi what components to add to its component library, and which pages of the Component palette the components should appear on. Chapter 8 describes the registration process and its nuances in much more detail.
■ To register a component,
1 Add a procedure named Register to the interface part of the component’s unit. Register takes no parameters, so the declaration is very simple:
procedure Register;
If you’re adding a component to a unit that already contains components, it should already have a Register procedure declared, so you don’t need to change the declaration.
2 Write the Register procedure in the implementation part of the unit, calling RegisterComponents for each component you want to register.
RegisterComponents is a procedure that takes two parameters: the name of a
➤ To register a component named TNewComponent and place it on the Samples page of the Component palette, add the following Register procedure to the unit that contains TNewComponent’s declaration:
procedure Register;
begin
RegisterComponents('Samples', [TNewComponent]);
end;
Once you register a component, you can install the component onto the Component palette.
Using the Component Expert
You can use the Component Expert to create a new component. Using the Component Expert simplifies the initial stages of creating a new component, as you need only specify three things:
• The name of the new component • The ancestor type
• The Component palette page you want it to appear on
The Component Expert performs the same tasks you would do when creating a component manually, namely
• Creating a new unit
• Deriving the component object • Registering the component
The Component Expert cannot add components to an existing unit. You must add components to existing units manually.
■ To open the Component Expert, choose File|New Component.
Figure 1.2 The Delphi Component Expert
After you fill in the fields in the Component Expert, choose OK. Delphi creates a new unit containing the type declaration and the Register procedure, and adds a uses clause that includes all the standard Delphi units.
C h a p t e r 1 , O v e r v i e w o f c o m p o n e n t c r e a t i o n 19
Testing uninstalled components
You can test the run-time behavior of a component before you install it on the Component palette. This is particularly useful for debugging newly-created
components, but you can use the same technique for testing any component, regardless of whether the component appears on the Component palette.
In essence, you can test an uninstalled component by emulating the actions performed by Delphi when a user places a component from the Component palette on a form. ■ To test an uninstalled component, do the following:
1 Add the name of component’s unit to the form unit’s uses clause.
2 Add an object field to the form to represent the component.
This is one of the main differences between the way you add components and the way Delphi does it. You add the object field to the public part at the bottom of the form’s type declaration. Delphi would add it above, in the part of the type declaration that it manages.
You should never add fields to the Delphi-managed part of the form’s type declaration. The items in that part of the type declaration correspond to the items stored in the form file. Adding the names of components that do not exist on the form can render your form file invalid.
3 Attach a handler to the form’s OnCreate event.
4 Construct the component in the form’s OnCreate handler.
When you call the component’s constructor, you must pass a parameter specifying the owner of the component (the component responsible for destroying the
component when the time comes). You will nearly always pass Self as the owner. In a method, Self is a reference to the object that contains the method. In this case, in the form’s OnCreate handler, Self refers to the form.
5 Assign the component’s Parent property.
Setting the Parent property is always the first thing to do after constructing the component. The parent is the component that visually contains the component, which is most often the form, but might be a group box or panel. Normally, you’ll set Parent to Self, that is, the form. Always set Parent before setting other properties of the component.
6 Set any other component properties as desired.
➤ Suppose you want to test a new component of type TNewComponent in a unit named NewTest. Create a new project, then follow the steps to end up with a form unit that looks like this:
unit Unit1;
interface uses
SysUtils, WinTypes, WinProcs, Messages, Classes, Graphics, Controls,
type
TForm1 = class(TForm)
procedure FormCreate(Sender: TObject); { 3. Attach a handler to OnCreate }
private
{ Private declarations }
public
{ Public Declarations }
NewComponent1: TNewComponent; { 2. Add an object field }
end;
var
Form1: TForm1;
implementation
{$R *.DFM}
procedure TForm1.FormCreate(Sender: TObject);
begin
NewComponent1 := TNewComponent.Create(Self); { 4. Construct the component } NewComponent1.Parent := Self; { 5. Set Parent property } NewComponent.Left := 12; { 6. Set other properties... )
ƒ { ...continue as needed }
end;
end.
Summary
C h a p t e r 2 , O O P f o r c o m p o n e n t w r i t e r s 21
C h a p t e r
2
Chapter 2
OOP for component writers
Working with Delphi, you’ve encountered the idea that an object contains both data and code, and that you can manipulate objects both at design time and run time. In that sense, you’ve become a component user.
When you create new kinds of components, you deal with objects in ways that end users never need to. Before you start creating components, you need to be familiar with these topics related to object-oriented programming (OOP) in general, presented in this chapter:
• Creating new objects • Ancestors and descendants • Controlling access
• Dispatching methods • Objects and pointers
This material assumes familiarity with the topics discussed in Chapter 6 of the Delphi User’s Guide. If you have used objects in Borland’s previous Pascal products, you should also read through Appendix A for a discussion of changes in the Pascal object model.
Creating new objects
The primary difference between component users and component writers is that users manipulate instances of objects, and writers create new types of objects. This concept is fundamental to object-oriented programming, and an understanding of the distinction is extremely important if you plan to create your own components.
Object types are generally more complex than simple types such as Integer, but by assigning different values to instances of the same type, a user can perform quite different tasks.
For example, it’s quite common for a user to create a form containing two buttons, one labeled OK and one labeled Cancel. Each is an instance of type TButton, but by assigning different values to the Text, Default, and Cancel properties and assigning different handlers to the OnClick events, the user makes the two instances do very different things.
Deriving new types
The purpose of defining object types is to provide a basis for useful instances. That is, the goal is to create an object that you or other users can use in different applications in different circumstances, or at least in different parts of the same application.
There are two reasons to derive new types:
• Changing type defaults to avoid repetition • Adding new capabilities to a type
In either case, the goal is to create reusable objects. If you plan ahead and design your objects with future reuse in mind, you can save a lot of later work. Give your object types usable default values, but make them customizable.
The following sections provide a closer look at the two reasons for deriving new types.
Changing type defaults to avoid repetition
In all programming tasks, needless repetition is something to avoid. If you find yourself rewriting the same lines of code over and over, you should either place the code in a subroutine or function, or build a library of routines you’ll use in many programs.
The same reasoning holds for components. If you frequently find yourself changing the same properties or making the same method calls, you should probably create a new component type that does those things by default.
For example, it’s possible that each time you create an application, you find yourself adding a dialog box form to perform a particular function. Although it’s not difficult to recreate the dialog box each time, it’s also not necessary. You can design the dialog box once, set its properties, and then install the result onto the Component palette as a reusable component. Not only can this reduce the repetitive nature of the task, it also encourages standardization and reduces the chance of error in recreating the dialog box.
Chapter 9 shows an example of changing the default properties of a component.
Adding new capabilities to a type
C h a p t e r 2 , O O P f o r c o m p o n e n t w r i t e r s 23 As a general rule, derive your new component from the type that contains the closest subset of the features you want. You can add capabilities to an object, but you can’t take them away, so if an existing component type contains properties that you don’t want to include in yours, you should derive from that component’s ancestor.
For example, if you want to add some capability to a list box, you would derive your new component from TListBox. However, if you want to add some new capability but exclude some existing capabilities of the standard list box, you need to derive your new list box from TCustomListBox, the ancestor of TListBox. Next, recreate or make visible the list box capabilities you want to include. Finally, add your new features.
Chapter 11 shows an example of customizing an abstract component type.
Declaring a new component type
When you decide that you need to derive a new type of component, you then need to decide what type to derive your new type from. As with adding new capabilities to an existing type, the essential rule to follow is this: Derive from the type that contains as much as possible that you want in your component, but which contains nothing that you don’t want in your component.
Delphi provides a number of abstract component types specifically designed for component writers to use as bases for deriving new component types. Table 1.1 on page 11 shows the different types you can start from when you create your own components.
■ To declare a new component type, add a type declaration to the component’s unit.
Here, for example, is the declaration of a simple graphical component:
type
TSampleShape = class(TGraphicControl)
end;
A finished component declaration will include property, field, and method declarations before the end, but an empty declaration is also valid, and provides a starting point for the addition of component features. Chapter 10 shows an example of creating a complete graphic control.
Ancestors and descendants
From a component user’s standpoint, an object is a self-contained entity consisting of properties, methods and events. Component users don’t need to know or care about such issues as what object a given component descends from. But these issues are extremely important to you as a component writer.
know everything your component inherits, so you can take advantage of inherited features without recreating them.
From the definition of object types, you know that when you define an object type, you derive it from an existing object type. The type you derive from is called the immediate ancestor of your new object type. The immediate ancestor of the immediate ancestor is called an ancestor of the new type, as are all of its ancestors. The new type is called a descendant of its ancestors.
If you do not specify an ancestor object type, Delphi derives your object from the default ancestor object type, TObject. Ultimately, the standard type TObject is an ancestor of all objects in Object Pascal.
Object hierarchies
All the ancestor-descendant relationships in an application result in a hierarchy of objects. You can see the object hierarchy in outline form by opening the Object Browser in Delphi.
The most important thing to remember about object hierarchies is that each
“generation” of descendant objects contains more than its ancestors. That is, an object inherits everything that its ancestor contains, then adds new data and methods or redefines existing methods.
However, an object cannot remove anything it inherits. For example, if an object has a particular property, all descendants of that object, direct or indirect, will also have that property.
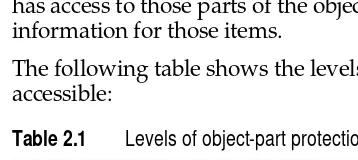
Controlling access
Object Pascal provides four levels of access control on the parts of objects. Access control lets you specify what code can access what parts of the object. By specifying levels of access, you define the interface to your components. If you plan the interface carefully, you will improve both the usability and reusability of your components.
Unless you specify otherwise, the fields, methods, and properties you add to your objects are published, meaning that any code that has access to the object as a whole also has access to those parts of the object, and the compiler generates run-time type information for those items.
The following table shows the levels of access, in order from most restrictive to most accessible:
Table 2.1 Levels of object-part protection
Protection Used for
private Hiding implementation details
protected Defining the developer’s interface
public Defining the run-time interface
C h a p t e r 2 , O O P f o r c o m p o n e n t w r i t e r s 25 All protections operate at the level of units. That is, if a part of an object is accessible (or inaccessible) in one part of a unit, it is also accessible (or inaccessible) everywhere else in the unit. If you want to give special protection to an object or part of an object, you need to put it in its own unit.
Hiding implementation details
Declaring part of an object as private makes that part invisible to code outside the unit in which you declare the object type. Within the unit that contains the declaration, code can access the part as if it were public.
Private parts of object types are mostly useful for hiding details of implementation from users of the object. Since users of the object can’t access the private parts, you can change the internal implementation of the object without affecting user code.
Note This notion of privacy differs from some other object-oriented languages, such as C++, where only “friends” of a class can access the private parts of the class. In that sense, you can consider that all objects and other code in a unit are automatically friends of every object declared in that unit.
Here is an example that shows how declaring a field as private prevents users from accessing information. The listing shows two form units, with each form having a handler for its OnCreate event. Each of those handlers assigns a value to a private field in one of the forms, but the compiler only allows that assignment in the form that declares the private field.
unit HideInfo;
interface
uses SysUtils, WinTypes, WinProcs, Messages, Classes, Graphics, Controls, Forms, Dialogs;
type
TSecretForm = class(TForm) { declare new form }
procedure FormCreate(Sender: TObject);
private { declare private part }
FSecretCode: Integer; { declare a private field }
end;
var
SecretForm: TSecretForm;
implementation
procedure TSecretForm.FormCreate(Sender: TObject);
begin
FSecretCode := 42; { this compiles correctly }
end;
end. { end of unit }
unit TestHide; { this is the main form file }
interface
uses SysUtils, WinTypes, WinProcs, Messages, Classes, Graphics, Controls, Forms, Dialogs, HideInfo; { use the unit with TSecretForm }
type
TTestForm = class(TForm)
procedure FormCreate(Sender: TObject);
var
TestForm: TTestForm;
implementation
procedure TTestForm.FormCreate(Sender: TObject);
begin
SecretForm.FSecretCode := 13; { compiler stops with "Field identifier expected" }
end;
end. { end of unit }
Although a program using the HideInfo unit can use objects of type TSecretForm, it cannot access the FSecretCode field in any of those objects.
Defining the developer’s interface
Declaring part of an object as protected makes that part invisible to code outside the unit in which you declare the object type, much like parts declared private. The difference with protected parts, however, is that units that contain object types derived from the object type can access the protected parts.
You can use protected declarations to define a developer’s interface to the object. That is, users of the object don’t have access to the protected parts, but developers (such as component writers) do. In general, that means you can make interfaces available that allow component writers to change the way an object works without making those details visible to end users.
Defining the run-time interface
Declaring part of an object as public makes that part visible to any code that has access to the object as a whole. That is, the public part has no special restrictions on it. If you don’t specify any access control (private, protected, or public) on a field, method, or property, that part will be published.
Public parts of objects are available at run time to all code, so the public parts of an object define that object’s run-time interface. The run-time interface is useful for items that aren’t meaningful or appropriate at design time, such as properties that depend on actual run-time information or which are read-only. Methods that you intend for users of your components to call should also be declared as part of the run-time interface.
Note that read-only properties cannot operate at design time, so they should appear in the public declaration section.
Here is an example that shows two read-only properties declared as part of a component’s run-time interface:
type
TSampleComponent = class(TComponent)
private
FTempCelsius: Integer; { implementation details are private }
function GetTempFahrenheit: Integer;
public
C h a p t e r 2 , O O P f o r c o m p o n e n t w r i t e r s 27
property TempFahrenheit: Integer read GetTempFahrenheit;
end; ƒ
function GetTempFahrenheit: Integer;
begin
Result := FTempCelsius * 9 div 5 + 32;
end;
Since the user cannot change the value of the properties, they cannot appear in the Object Inspector, so they should not be part of the design-time interface.
Defining the design-time interface
Declaring part of an object as published makes that part public and also generates run-time type information for the part. Among other things, run-run-time type information ensures that the Object Inspector can access properties and events.
Because only published parts show up in the Object Inspector, the published parts of an object define that object’s design-time interface. The design-time interface should include any aspects of the object that a user might want to customize at design time, but must exclude any properties that depend on specific information about the run-time environment.
Note Read-only properties cannot be part of the design-time interface because the user cannot alter them. Read-only properties should be public.
Here is an example of a published property. Because it is published, it appears in the Object Inspector at design time.
type
TSampleComponent = class(TComponent)
private
FTemperature: Integer; { implementation details are private }
published
property Temperature: Integer read FTemperature write FTemperature; { writable! }
end;
Temperature, the property in this example, is available at design time, so users of the component can adjust the value.
Dispatching methods
Dispatching is the term used to describe how your application determines what code to execute when making a method call. When you write code that calls an object method, it looks like any other procedure or function call. However, objects have three different ways of dispatching methods.
The three types of method dispatch are
Virtual and dynamic methods work the same way, but the underlying implementation is different. Both of them are quite different from static methods, however. All of the different kinds of dispatching are important to understand when you create
components.
Static methods
All object methods are static unless you specify otherwise when you declare them. Static methods work just like regular procedure or function calls. The compiler determines the exact address of the method and links the method at compile time.
The primary advantage of static methods is that dispatching them is very quick. Because the compiler can determine the exact address of the method, it links the method directly. Virtual and dynamic methods, by contrast, use indirect means to look up the address of their methods at run time, which takes somewhat longer.
The other distinction of a static method is that it does not change at all when inherited by another type. That is, if you declare an object type that includes a static method, then derive a new object type from it, the descendant object shares exactly the same method at the same address. Static methods, therefore, always do exactly the same thing, no matter what the actual type of the object.
You cannot override static methods. Declaring a method in a descendant type with the same name as a static method in the object’s ancestor replaces the ancestor’s method.
In the following code, for example, the first component declares two static methods. The second declares two static methods with the same names that replace the methods in the first.
type
TFirstComponent = class(TComponent)
procedure Move;
procedure Flash;
end;
TSecondComponent = class(TFirstComponent)
procedure Move; { different from the inherited method, despite same declaration }
function Flash(HowOften: Integer): Integer; { this is also different }
end;
Virtual methods
Calling a virtual method is just like calling any other method, but the mechanism for dispatch is a little more complex because it is also more flexible. Virtual methods enable you to redefine methods in descendant objects, but still call the methods the same way. That is, the address of the method isn’t determined at compile time. Instead, the object looks up the address of the method at run time.
C h a p t e r 2 , O O P f o r c o m p o n e n t w r i t e r s 29 The virtual directive in a method declaration creates an entry in the object’s virtual method table, or VMT. The VMT holds the addresses of all the virtual methods in an object type.
When you derive a new object from an existing object type, the new type gets its own VMT, which includes all the entries from its ancestor’s VMT, plus any additional virtual methods declared in the new object. In addition, the descendant object can override any of its inherited virtual methods.
Overriding methods
Overriding a method means extending or refining it, rather than replacing it. That is, a descendant object type can redeclare and reimplement any of the methods declared in its ancestors. You can’t override static methods, because declaring a static method with the same name as an inherited static method replaces the inherited method completely. ■ To override a method in a descendant object type, add the directive override to the end
of the method declaration.
Using override will cause a compile-time error if
• The method does not exist in the ancestor object • The ancestor’s method of that name is static
• The declarations are not otherwise identical (names and types of parameters, procedure vs. function, and so on)
The following code shows the declaration of two simple components. The first declares three methods, each with a different kind of dispatching. The other, derived from the first, replaces the static method and overrides the virtual methods.
type
TFirstComponent = class(TCustomControl)
procedure Move; { static method }
procedure Flash; virtual; { virtual method }
procedure Beep; dynamic; { dynamic virtual method }
end;
TSecondComponent = class(TFirstComponent)
procedure Move; { declares new method }
procedure Flash; override; { overrides inherited method }
procedure Beep; override; { overrides inherited method }
end;
Dynamic methods
Dynamic methods are virtual methods with a slightly different dispatch mechanism. Because dynamic methods don’t have entries in the object’s virtual method table, they can reduce the amount of memory the object consumes. Dispatching dynamic methods is somewhat slower than dispatching regular virtual methods, however, so if a method call is time-critical or repeated often, you should probably make the method virtual, rather than dynamic.
Instead of creating an entry in the object’s virtual method table, dynamic assigns a number to the method, and stores the address of the associated code. Unlike the virtual method table, which contains the addresses of all of an object’s virtual methods, inherited and introduced, the dynamic method list contains entries only for methods introduced or overridden by a particular object type. Inherited dynamic methods are dispatched by searching each ancestor’s dynamic method list, in reverse order of inheritance.
There is a variation on dynamic methods used for handling messages, including Windows messages, in an application. Chapter 7 discusses these message-handling methods. The dispatch mechanism for message handlers is identical to that for other dynamic methods, but you declare them differently.
Objects and pointers
One thing to be aware of when writing components that you don’t need to consider when using existing components is that every Object Pascal object (and therefore every component) is really a pointer. The compiler automatically dereferences the object pointers for you, so in most cases, you never need to think about objects being pointers.
This becomes important, however, when you pass objects as parameters.
In general, you should pass objects by value rather than by reference. That is, when declaring an object as a parameter to a routine, you should not make it a var parameter. The reason is that objects are already pointers, which are references. Passing an object as a var parameter, then, would be passing a reference to the reference.
Summary
When writing components, you deal with objects in ways that component users never do, but those aspects should never be obvious to the component user.
By choosing appropriate ancestors for your components, carefully designing the interfaces so that they expose all the properties and methods that users need without burdening them with inappropriate items, and following the guidelines for designing methods and passing parameters, you can create useful, reusable components.
C h a p t e r 3 , C r e a t i n g p r o p e r t i e s 31
C h a p t e r
3
Chapter 3
Creating properties
Properties are the most distinctive parts of components, largely because component users can see and manipulate them at design time and get immediate feedback as the components react in real time. Properties are also important because, if you design them well, they make your components easier for others to use and easier for you to maintain.
In order to best make use of properties in your components, you should understand the following:
• Why create properties? • Types of properties
• Publishing inherited properties • Defining component properties • Creating array properties • Writing property editors
Why create properties?
Properties provide significant advantages, both for you as a component writer and for the users of your components. The most obvious advantage is that properties can appear in the Object Inspector at design time. That simplifies your programming job, because instead of handling several parameters to construct an object, you just read the values assigned by the user.
From the component user’s standpoint, properties look like variables. Users can set or read the values of properties much as if those properties were object fields. About the only thing they cannot do with a property that they would with a variable is pass it as a var parameter.
From the component writer’s standpoint, however, properties provide much more power than simple object fields because
This is very important, because unlike methods, which are only available at run time, properties let users customize components before running an application. In general, your components should not contain a lot of methods; most of them can probably be encapsulated into properties.
• Unlike an object field, a property can hide implementation details from users.
For example, the data might be stored internally in an encrypted form, but when setting or reading the value of the property, the data would appear unencrypted. Although the value of a property might be a simple number, the component might look up the value from a database or perform complex calculations to arrive at that value.
• Properties allow side effects to outwardly simple assignments.
What appears to be a simple assignment involving an object field is really a call to a method, and that method could do almost anything.
A simple but clear example is the Top property of all components. Assigning a new value to Top doesn’t just change some stored value; it causes the component to relocate and repaint itself. The effects of property setting need not be limited to an individual component. Setting the Down property of a speed-button component to True causes the speed button to set the Down properties of all other speed buttons in its group to False.
• The implementation methods for a property can be virtual, meaning that what looks like a single property to a component user might do different things in different components.
Types of properties
A property can be of any type that a function can return (since the implementation of the property can use a function). All the standard rules of Pascal type compatibility apply to properties, just as they would to variables. Type compatibility is explained in Chapter 5 of the Delphi User’s Guide.
The most important aspect of choosing types for your properties is that different types appear differently in the Object Inspector. The Object Inspector uses the type of the property to determine what choices appear to the user. You can specify a different property editor when you register your components, as explained in “Writing property editors” in this chapter.
Table 3.1 How properties appear in the Object Inspector
Property type Object Inspector treatment
Simple Numeric, character, and string properties appear in the Object Inspector as
numbers, characters, and strings, respectively. The user can type and edit the value of the property directly.
Enumerated Properties of enumerated types (including Boolean) display the value as defined in
C h a p t e r 3 , C r e a t i n g p r o p e r t i e s 33
Publishing inherited properties
All components inherit properties from their ancestor types. When you derive a new component from an existing component type, your new component inherits all the properties in the ancestor type. If you derive instead from one of the abstract types, many of the inherited properties are either protected or public, but not published.
If you need more information about levels of protection such as protected, private, and published, see “Controlling access” on page 24.
■ To make a protected or public property available to users of your components, you must redeclare the property as published.
Redeclaring means adding the declaration of an inherited property to the declaration of a descendant object type.
If you derive a component from TWinControl, for example, it inherits a Ctl3D property, but that property is protected, so users of the component cannot access Ctl3D at design time or run time. By redeclaring Ctl3D in your new component, you can change the level of protection to either public or published.
The following code shows a redeclaration of Ctl3D as published, making it available at design time:
type
TSampleComponent = class(TWinControl)
published
property Ctl3D;
end;
Note that redeclarations can only make a property less restricted, not more restricted. Thus, you can make a protected property public, but you cannot “hide” a public property by redeclaring it as protected.
When you redeclare a property, you specify only the property name, not the type and other information described in “Defining component properties.” You can also declare new default values when redeclaring a property, or specify whether to store the property.
Set Properties of set types appear in the Object Inspector looking like a set. By
expanding the set, the user can treat each element of the set as a Boolean value: True
if the element is included in the set or False if it’s not included.
Object Properties that are themselves objects often have their own property editors.
However, if the object that is a property also has published properties, the Object Inspector allows the user to expand the list of object properties and edit them
individually. Object properties must descend from TPersistent.
Array Array properties must have their own property editors. The Object Inspector has
no built-in support for editing array properties.
Table 3.1 How properties appear in the Object Inspector (continued)
Defining component properties
The syntax for property declarations is explained in detail in online Help in the topic for the reserved word property. This section focuses on the particulars of declaring
properties in Delphi components and the conventions used by the standard components.
Specific topics include
• The property declaration • Internal data storage • Direct access • Access methods • Default property values
The property declaration
Declaring a property and its implementation is straightforward. You add the property declaration to the declaration of your component object type.
■ To declare a property, you specify three things:
• The name of the property • The type of the property
• Methods to read and/or set the value of the property
At a minimum, a component’s properties should be declared in a public part of the component’s object-type declaration, making it easy to set and read the properties from outside the component at run time.
To make the property editable at design time, declare the property in a published part of the component’s object type declaration. Published properties automatically appear in the Object Inspector. Public properties that aren’t published are available only at run time.
Here is a typical property declaration:
type
TYourComponent = class(TComponent) ƒ
private
FCount: Integer; { field for internal storage }
function GetCount: Integer; { read method }
procedure SetCount(ACount: Integer); { write method }
public
property Count: Integer read GetCount write SetCount; { property declaration }
end;
C h a p t e r 3 , C r e a t i n g p r o p e r t i e s 35
Internal data storage
There are no restrictions on how you store the data for a property. In general, however, Delphi’s components follow these conventions:
• Property data is stored in object fields.
• Identifiers for properties’ object fields start with the letter F, and incorporate the name of the property. For example, the raw data for the Width property defined in TControl is stored in an object field called FWidth.
• Object fields for property data should be declared as private. This ensures that the component that declares the property has access to them, but component users and descendant components don’t.
Descendant components should use the inherited property itself, not direct access to the internal data storage, to manipulate a property.
The underlying principle behind these conventions is that only the implementation methods for a property should access the data behind that property. If a method or another property needs to change that data, it should do so through the property, not by direct access to the stored data. This ensures that the implementation of an inherited property can change without invalidating descendant components.
Direct access
The simplest way to make property data available is direct access. That is, the read and write parts of the property declaration specify that assigning or reading the property value goes directly to the internal storage field without calling an access method. Direct access is useful when the property has no side effects, but you want to make it available in the Object Inspector.
It is common to have direct access for the read part of a property declaration but use an access method for the write part, usually to update the status of the component based on the new property value.
The following component-type declaration shows a property that uses direct access for both the read and write parts:
type
TSampleComponent = class(TComponent)
private { internal storage is private }
FReadOnly: Boolean; { declare field to hold property value }
published { make property available at design time }
property ReadOnly: Boolean read FReadOnly write FReadOnly;
end;