Early Praise for
Create Mobile Games with Corona
It’s straightforward, it’s thorough, and it walks new users through all of the basics. I especially like how the book explains full game templates for popular genres in an easy-to-understand way.
➤ Brent Sorrentino, developer liaison at Corona Labs
I’ve wanted to make an iPhone game since the launch of the App Store, and now I feel like I’m closer to my goal. The Corona SDK is a powerful tool, but good tuto-rials are hard to find; I feel much more prepared having read Silvia’s book!
➤ Stephen Orr, lead developer at Made Media
Looking for a way into programming mobile devices? What could be more fun than making a game (or three)? Create Mobile Games with Corona inspired me to get a little further with an idea I had for a mobile app, and Corona offers lots of speed and versatility for creating such things.
➤ Stephen Wolff, Django developer
Do you want to develop games for the Android platform? Look no further. This book teaches you to create ready-to-distribute games in Lua in no time. Highly recommended!
Build with Lua on iOS and Android
Silvia Domenech
Many of the designations used by manufacturers and sellers to distinguish their products are claimed as trademarks. Where those designations appear in this book, and The Pragmatic Programmers, LLC was aware of a trademark claim, the designations have been printed in initial capital letters or in all capitals. The Pragmatic Starter Kit, The Pragmatic Programmer, Pragmatic Programming, Pragmatic Bookshelf, PragProg and the linking g device are trade-marks of The Pragmatic Programmers, LLC.
Every precaution was taken in the preparation of this book. However, the publisher assumes no responsibility for errors or omissions, or for damages that may result from the use of information (including program listings) contained herein.
Our Pragmatic courses, workshops, and other products can help you and your team create better software and have more fun. For more information, as well as the latest Pragmatic titles, please visit us at http://pragprog.com.
The team that produced this book includes:
Fahmida Y. Rashid and Aron Hsiao (editors) Potomac Indexing, LLC (indexer)
Candace Cunningham (copyeditor) David J Kelly (typesetter)
Janet Furlow (producer) Juliet Benda (rights) Ellie Callahan (support)
Copyright © 2013 The Pragmatic Programmers, LLC.
All rights reserved.
No part of this publication may be reproduced, stored in a retrieval system, or transmitted, in any form, or by any means, electronic, mechanical, photocopying, recording, or otherwise, without the prior consent of the publisher.
Printed in the United States of America. ISBN-13: 978-1-937785-57-4
Contents
Acknowledgments . . . ix
Preface . . . xi
Part I — Getting Started
1. Hello, Corona! . . . 3
A Word on Game Development 3
1.1
1.2 Getting Started with Corona 5
1.3 Building Our First App 10
1.4 What We Covered 13
Part II — Planet Defender
2. The Game Loop . . . 17
What You’ll Learn 17
2.1
2.2 A Crash Course in Corona Programming 17 2.3 Designing Our First Game: Planet Defender 29
2.4 Creating the Project 30
2.5 Coding the Game Loop 32
2.6 What We Covered 37
3. Sprites and Movement . . . 39
What You’ll Learn 39
3.1
3.2 Displaying Images 39
3.3 Animated Sprites 43
3.4 Handling Many Images 48
3.5 Moving Images 52
3.6 Adding Spaceships to the Game 56
4. Input and Menus . . . 59
What You’ll Learn 59
4.1
4.2 Touch-Based Input 59
4.3 Displaying Scenes Using the Storyboard API 63
4.4 Adding Buttons 66
4.5 Adding Lives and Difficulty 68
4.6 Exercises and Expansion Options 74
4.7 What We Covered 74
Part III — Vertical-Scrolling Shooter
5. Representing Movement and Perspective . . . 79
What You’ll Learn 79
5.1
5.2 Designing a Basic Scroller 80
5.3 Adding Menus and the Basic Framework 80
5.4 Adding and Removing Units 81
5.5 Displaying Scrolling Backgrounds and Parallax Effects 90
5.6 Generating Random Backgrounds 94
5.7 Exercises and Expansion Options 97
5.8 What We Covered 98
6. Adding Shooting, Collisions, and Power-Ups . . . 99
What You’ll Learn 99
6.1
6.2 Shooting 99
6.3 Checking for Collisions 105
6.4 Adding Animated Explosions 111
6.5 Adding Power-Ups 115
6.6 Ending the Game 119
6.7 Exercises and Expansion Options 119
6.8 What We Covered 120
7. Adding Sound . . . 121
What You’ll Learn 121
7.1
7.2 Finding Game Sounds 122
7.3 Understanding the Corona Sound API 122
7.4 Adding Sound Effects 123
7.5 Playing Background Music 130
7.6 Exercises and Expansion Options 134
7.7 What We Covered 135
Part IV — Tower Defense
8. Displaying Maps and Sorting Depths . . . 139
What You’ll Learn 139
8.1
8.2 Designing a Tower-Defense Game 140
8.3 Defining Tile-Based Maps 140
8.4 Building Towers 144
8.5 Sorting Depths in Corona 151
8.6 Exercises and Expansion Options 152
8.7 What We Covered 153
9. Adding Movement and Artificial Intelligence . . . . 155
What You’ll Learn 155
9.1
9.2 Adding Enemies 155
9.3 Implementing Enemy Movement 161
9.4 Adding Tower AI 171
9.5 Exercises and Expansion Options 185
9.6 What We Covered 185
10. Loading and Saving. . . 187
What You’ll Learn 187
10.1
10.2 Loading Levels 188
10.3 Loading and Saving the Game 194
10.4 Exercises and Expansion Options 202
10.5 What We Covered 203
Part V — Physics and Distribution
11. Physics and the Accelerometer . . . 207
What You’ll Learn 207
11.1
11.2 Defining the Project 208
11.3 Adding User Input 212
11.4 Using the Accelerometer 214
11.5 Working with Removable Crates 216
11.6 Exercises and Expansion Options 219
11.7 What We Covered 220
12. Publishing Our Apps . . . 221
What You’ll Learn 221
12.1
12.3 Testing on Our Phones 229
12.4 Selling In-App Features 231
12.5 Adding Advertisements 236
12.6 Exercise: Modifying the Game 237
12.7 What We Covered 238
A1. Corona Resources . . . 239
Corona Development Tools 239
A1.1
A1.2 Corona Development Environments 240
A1.3 Art Resources 241
A1.4 Game Sounds 242
A2. Classes in Corona . . . 245
Index . . . 249
Acknowledgments
I would like to begin by thanking the artists who have made this book’s projects possible. Without them, the demos would be limited to stick figures created by an artistically challenged programmer. I am indebted to Daniel Cook from Lost Garden for his 2D tile set;1 Cliff Harris from Positech Games for his explosion generator;2 Lamoot and Luke.RUSTLTD from OpenGameArt, who shared their user-interface assets and crates, respectively;3,4 and my father, Gabriel Domenech, who painted the spaceships, planets, and back-grounds used throughout the book. Thanks to Kibblesbob and Mike Koening at SoundBible for their missile and bomb sounds and to Kevin MacLeod at Incompetech for his Space Fighter Loop and Pinball Spring music loops.5,6
I must also thank the amazing community of developers who code using Corona, as well as all the beta readers who caught numerous bugs and made suggestions on the forums. This book also received lots of input from a great group of technical reviewers: in no particular order, they are Brent Sorrentino, Charley Stran, Javier Collado, Stephen Wolff, Al Scherer, Stephen Orr, and Brian Schau. Of course, this book is what it is thanks to my editors, Fahmida Y. Rashid and Aron Hsiao, both exceptional in different ways. Finally, thanks to the Pragmatic Programmers for their wonderful writing workflow and everything they do for the programming community...oh, and for letting me write this book!
1. http://www.lostgarden.com 2. http://www.positech.co.uk
3. http://opengameart.org/users/lamoot 4. http://opengameart.org/users/lukerustltd
Preface
Greetings and welcome to the world of mobile-game development! If you’re reading this, then you’re probably already aware of the Corona SDK and its usefulness for mobile app development and mobile games in particular.1 In this book, you’ll learn Corona by developing a series of mobile games, master-ing most of Corona’s capabilities in the process. We’ll start with a relatively simple game and some basic mechanics and then quickly move on to more complex games and techniques. By the time we’re done, you’ll be able to code interactive games with moving units and projectiles and even include advertisements.
Corona? Why Corona?
The Corona SDK is a great tool for making 2D mobile games. It’s cross-plat-form, it’s easy to learn, and it makes it really fast to code games. You can also forget about buying expensive programs and tools before you get started, because Corona lets you code and distribute your games for free. You need to buy it only if you want to add advanced features such as in-game ads or in-game purchases.
Cross-Platform Development
Many game-development environments make it difficult for us to create games for multiple platforms. Even if we can port to multiple platforms, some of those games may not be optimized. When making mobile games, it’s especially important to use as few resources as possible; we don’t want users to see their battery life plummet the second they open our games. Corona lets us make games specifically targeted at mobile devices, both iOS and Android, so we won’t be making lazy ports of PC games.
Free Starter Edition
Corona’s free starter edition is called Corona SDK Starter. Unlike many game engines’ starter editions, it comes with almost all the features currently available in the Pro version. You can install the program, learn how to use it, and distribute your games with the free version. You don’t have to buy Corona until your games are really good and you want to add advertisements or offer in-app purchases.
Quick Prototyping and Coding
You won’t believe this until you get coding, but Corona makes coding much faster than if you decided to code directly in Objective-C or Java. You’ll use Lua, and you can load and display an image with a single line of code. You can add physics to that image with another line. You can write great games using very little code.
Built-in Physics Engine
Corona comes with a Physics application programming interface (API) built on top of Box2D, which means you won’t have to code your own physics behaviors and collision-detection functions. Adding physics to your games will be easy and quick. Debugging will be easy, too.
Great Developer Community
A wonderful community uses Corona. You can visit the official discussion boards to interact with other Corona programmers.2 There are lots of tutorials and ready-made code samples for you to use while writing your games.
Who Should Read This Book?
This book is for aspiring game developers and mobile developers, especially those who want to develop polished, professional games for multiple platforms quickly and easily. Even if you’re not a programming guru, you’ll find it easy to code games using Corona with this book as your guide. You’ll make the most out of this book if you know at least one programming language. If you’re familiar with functions, variables, loops, and classes, then you’re good to go.
What’s This Book About?
book and make several games. In fact, if you’re like me and would prefer to jump directly into action, you can install Corona and start building your first app in Chapter 2, The Game Loop, on page 17.
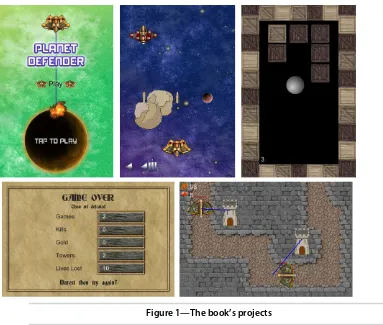
Figure 1—The book’s projects
Over the course of this book, we’ll build the games shown in the screenshots, but let’s take a look at what you’ll learn.
• In Chapters 2 through 4, in Part II, Planet Defender, on page 15, we’ll develop a planet-defender game. Players will be in charge of destroying hordes of invading enemy ships. To achieve this, you’ll learn how to write a game loop, add sprites, and accept basic player input.
• In Chapters 5 through 7, in Part III, Vertical-Scrolling Shooter, on page 77, we’ll build a fast-paced vertical scroller. You’ll learn how to add ani-mation to game objects, sort objects into groups, and create perspective effects. We’ll also talk more about sprites and object movement and enhance our interactivity techniques.
• After creating two space games in Parts II and III, we’ll switch gears in Chapters 8 through 10, in Part IV, Tower Defense, on page 137, and build a fun tower-defense game instead. You’ll learn to create waves of enemies, move them around the screen, and enable players to build towers to kill them. To make this work, we’ll implement movement, pathfinding, shooting, and even progressive difficulty settings.
• In Chapters 11 and 12, in Part V, Physics and Distribution, on page 205, you’ll learn advanced game-programming techniques in Corona. We’ll make a basic physics-based game, and we’ll add advertisements, achievements, and in-app purchases. We’ll conclude the book with instructions for publishing our apps and releasing them into the world so all our cool new programs aren’t doomed to oblivion on our hard drives. You’ll need a Pro version of Corona to complete some activities in Chapter 12, but the Starter edition should be fine for everything else.
How to Read This Book
Nobody expects you to read a programming book the way you’d read a novel; you are not expected to read it from cover to cover. Instead, feel free to skip to those sections that interest you and go back if you have trouble with some of the concepts from previous chapters. You can also jump to the projects that interest you and read the explanations for the features you’d like to learn. If you’re of the classic type and want to read the chapters consecutively, then you’re welcome to do so.
Online Resources
As you work on the book’s projects, you’ll need to download the book’s code files, found at http://pragprog.com/book/sdcorona/create-mobile-games-with-corona. There, you’ll have access to the complete code projects built for this book.
You can also visit the section of the Pragmatic Forums dedicated to this book, found at http://forums.pragprog.com/forums/247.
Ready, Get Set, Go!
Now that you’ve reached this point, you’re ready to get to the real action. You can start by reading Chapter 1, Hello, Corona!, on page 3, where we’ll install Corona and create our first “Hello, Corona!” program, or you can skip directly to Chapter 2, The Game Loop, on page 17, and start coding our Planet Defender game.
Part I
Getting Started
Hello, Corona!
Greetings, and welcome to Create Mobile Games with Corona. In this chapter, you’ll learn how to install Corona, build a really small app to ensure the game engine works properly, and learn a bit about game development along the way.
In this book, you’ll start learning about Corona from scratch and build several mobile games. If you want to jump ahead, you can install Corona and start working on your first app in Chapter 2, The Game Loop, on page 17. Stick around if you want to learn about the various terms we’ll be using as we familiarize ourselves with Corona.
1.1
A Word on Game Development
Making games is both a rational activity and a creative endeavor. What does this mean? It means that no matter how smart or skilled we may be, we can’t just write an equation for fun, implement it in code, and end up with great, immersive gameplay. Technical skills are certainly involved, but making games also requires developers to have fun and express their creative sides. To transform ourselves into serious game developers, in other words, we’ll have to imagine entirely fictional worlds, their characters, and their properties and then combine all of them with our technical skills before sharing them with others.
90 Percent Development, 90 Percent Polish
Programming games may seem similar to traditional programming, but there are some important differences. Yes, we’ll write code and compile and debug programs. As game developers, however, we also have to focus on entertain-ment. Even if we manage to create a well-coded, well-rendered, bug-free game, players won’t play it if it’s not fun. On the other hand, players often take to a really fun game even if it has ugly graphics and isn’t perfectly implemented behind the scenes.
To be solid game developers, we’ll need to work with an eye toward making fun, playable games, not just writing great code. The best way to make sure that this happens is to enjoy what we’re doing; if we’re not enjoying the games as we make them, players probably won’t enjoy our games, either. That’s not to say that things never get tough. When coding, we’ll encounter persistent bugs and intractable issues; problem solving and the implementation of workarounds are part of the programming cycle, so it’s important to remember that game development doesn’t end just because an initial prototype is working.
The prototype is just the beginning. For polished games, we’ll have to expand our prototypes and convert them into full games and then refine them until we’re happy with the results. This is different from nongame programming, in which we might focus on core functionality and bugs. This balancing, polish, and testing stage in a game’s life cycle surprises novice game developers with the unexpected workload. If we’re not careful, it can postpone launches by many months, so it’s important to balance the “second 90 percent” of game development with a healthy dose of practicality. Once we’re happy with our games and find them to be fun, it’s often a good idea to launch them even if they aren’t yet perfect and have bugs. We’ll always be able to patch or release successors in the future. Otherwise, the polishing stage can wind up taking longer than the development stage.
Becoming a Game Developer
Many mobile games don’t have a long list of contributors and specialists behind them. Since the number of developers tends to be small for mobile games, it’s important to know at least something about programming if you want to make mobile games, because you’ll sometimes end up doing a bit of everything, including working on the code, design, and art. You’ll be in great shape if you’ve already used other programming languages, but don’t worry if you don’t have a broad set of programming skills. Lua, the language we use with Corona, is easy to learn, and this book will get you up to speed quickly.
Working through this book will develop the core tool set any mobile-game programmer needs.
Beyond gaining basic programming skills, prototyping is the first step in game development. As we gain proficiency with game programming in this book, we’ll prototype several games with mechanics that can be used for many future game projects. It’s always tempting to polish graphics and gameplay at this point, but our key goal for the prototyping stage will be to create games that work and can be played. The prototype tells us whether a game will ever be fun and identifies key changes that need to be made in subsequent development stages.
Graphics come after the prototyping stage. After nailing a fun prototype, it’s usually time for us to come up with great graphics. On large development teams, there’s often an artist in the group, but there are alternatives to this model. There are lots of free and paid resources for game graphics; Appendix
1, Corona Resources, on page 239, lists some of these, and we’ll use them in
various places in our examples. In this book, we won’t let a lack of artistic ability prevent us from becoming successful mobile-game developers.
The testing stage follows everything else. We all have friends and family or know dedicated gamers who can play and provide feedback about a game. Paid testers are sometimes an option, but they certainly aren’t necessary. The key difference between developing traditional software and games is in this stage. We want to fix gameplay or user-experience issues but not get bogged down trying to uncover or address every possible minor bug or gameplay balance issue. These issues are typically addressed using updates and patches after releasing the game.
After designing, coding, and testing games, we’ll release them, instantly be-coming mobile-game developers! Games that have a fun underlying concept and work reasonably well will have a lot of gameplays (also called app sessions), and the number will increase quickly. After a brief period to rest and regain energy, we can begin the development process again with a new idea for a game.
1.2
Getting Started with Corona
text editor. Over the next few pages, we’ll cover the download, installation, and basic usage of Corona, and then we’ll discuss some of the common text editors available to you, in case you don’t already have a preferred one installed.
Downloading, Installing, and Meeting Corona
Feel free to use the starter edition of Corona as we work through this book. It’s free to download and use, and doing so won’t limit your ability to follow along with the early projects. You’ll be unable to add in-app purchases to your games, but you’ll be fine with the rest of the book’s projects, though.
To download Corona, visit the Corona SDK website and click the Download link.1 You’ll have to create an account. There’s no workaround for this, so an email address and password are needed. Use something memorable because these details will be needed to run the Corona program. After registering, you’ll see the page to download the program.
Installing Corona is user-friendly. Open your downloaded file and follow the instructions (click Next most of the time). Once Corona is installed, you’ll be prompted for the username and password you created a moment ago.
Once Corona has been installed, we’re ready to begin. If you’re using Windows, open the Corona simulator. If you’re on Mac OS, open the Corona folder in the Applications folder and then open the Corona simulator to open Corona and reach the landing screen. If you want to see the console, open the Corona terminal instead.
The landing screen Corona displays at launch is intuitive. We can create a new project, run a local project in the simulator, monitor a dashboard with our games’ statistics (although this feature is only for subscribers), or exper-iment with the array of demos that ship with Corona. There is also a set of links pointing us to the Corona community and documentation.2 These links are useful if you want to meet fellow Corona developers or learn about a specific function.
Creating a New Project
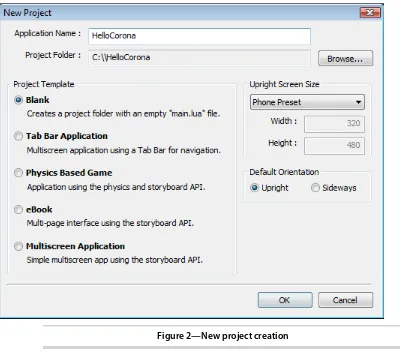
Let’s create a new project in Corona, just to familiarize ourselves with the development process and the choices available. As you can see in the following screenshot, we’re asked to enter an application name and to select the folder
1. Corona Labs: http://www.coronalabs.com/products/corona-sdk/ 2. http://www.coronalabs.com
where we want to create our application. Then Corona offers us a choice of templates. We can choose from several options (see the following figure).
Figure 2—New project creation
• A Blank project template that provides an empty main.lua file. This is the template to use when writing an app from scratch. This can be a good choice for some single-screen games, but it is extra work for anything more complicated, meaning that we won’t use it in this book.
• A Tab Bar Application template (called App on Mac OS) for creating apps with standard menu bars. Because we’re focused on game development, we’ll use our own custom menus most of the time, so we won’t get much mileage out of this option either.
projects that didn’t start with this template). It also comes with storyboard support (like the multiscreen application) to simplify switching game scenes.
• An eBook template for ebook apps. We won’t usually need these when making games.
• A Multiscreen Application template (called Scene on Mac OS) for apps that involve multiple views. We’ll use this template throughout this book since it gives us an easy way to divide our games into different scenes (menus, levels, and end-game screens).
Though we could go ahead and finish creating a project now, let’s back up for the moment and take a quick look at the Corona simulator that will make our work easier as we develop games throughout the book.
The Simulator
The Corona simulator looks just like a mobile device, and you can even change its appearance to match that of several devices on the market. If we develop an iPad game, for example, the simulator can show us the game as it would appear on the larger screen. When we open the simulator, it asks us to choose the project being simulated and starts it using the appropriate device.
As we develop, the console output screen will often be an important develop-ment tool. It tends to hide behind the simulator. To see it, move windows around so that it’s visible. We’ll use the console output screen to monitor any runtime errors. These will happen on a regular basis, particularly as we run new chunks of code for the first time.
The Demos
Corona also comes bundled with an assortment of premade demonstration programs, each of which showcases one or two important features. As we work through the examples in this book, you’ll gain confidence to be able to rip these apart and learn from additional examples. Some of the demos are great apps in their own rights and offer gameplay mechanics similar to those in some popular games. To access the sample projects, click on “Help” in the top menu.
Getting Official Corona Documentation
Like most programming environments, Corona offers extensive documentation. Corona’s docs are wonderful learning tools because they usually offer detailed examples. Because the official docs are complete, you can use the official Corona SDK documentation to solve specific problems or fill knowledge gaps after we’ve finished working through this book.
Access the official Corona docs on the Corona website at www.coronalabs.com.
Choosing a Text Editor or Environment
If you don’t already have a favorite text editor, you should consider picking one that highlights Lua code and shows line numbers. Any text editor will do as long as you can save Corona files with the proper extension (.lua). We’ll spend most of our development time typing away in a text editor, so it’s important that you choose one that feels comfortable to you. There are lots of options for programmers to choose from, but the following are three of the most popular free applications. In case you’d rather use a paid resource designed specifically for Corona, check out the ones listed in Appendix 1,
Corona Resources, on page 239.
Eclipse
Platform: Mac OS or Windows
Eclipse is a great coding environment for many languages, and it also offers the option to make coding in Lua a lot easier because it highlights variables and color syntax as you code. Because of Lua’s dynamic nature, spelling mistakes can lead to a lot of trouble during development, so a text editor that highlights variables can help reduce the number of frustrating mistakes.
Download Eclipse from http://www.eclipse.org/ and the Lua development tools from http://www.eclipse.org/koneki/ldt/.
Notepad++
Platform: Windows
If you’re more fond of Notepad-style editors, choose Notepad++. It offers syntax highlighting and line numbers so that you can concentrate on coding rather than text details. It’s also lightweight and launches quickly. It’s not a development environment in the sense of Eclipse, but I use it to code 90 percent of my Lua programs.
Download Notepad++ from http://notepad-plus-plus.org/.
CodeMAX
Platform: Mac OS or Windows
Download CodeMAX from http://codemax.luaforge.net/.
1.3
Building Our First App
To get the ball rolling and test the Corona simulator at the same time, let’s create a simple program that will draw ten rectangles on the screen. Not everything will make sense at this point, but you’ll come to understand everything we do here over the next several chapters.
A Test Project
Open the Corona simulator, make a new blank project, and call it something like HelloCorona. This results in a file called main.lua that will hold our code. Navigate to the folder where you decided to create the project, and open the resulting file with your favorite text editor. From now on, we’ll use the text editor to type our code, and each time we want to run the program we’ll go back to the simulator and open it. You’ll have to close the project in the Corona simulator if you want to make changes to some of the images and resources. Otherwise, they’re considered “open” by the simulator, and you won’t be able to update them.
The main.lua file that we’ll be editing has some generated text already. You can either write immediately after it or replace it; both ways will work.
We want to draw some rectangles on the screen, so let’s start writing in main.lua. We draw rectangles with Corona’s display.newRect() function, so you would enter display.newRect(leftBorder, topBorder, width, height) to create some rectangle-drawing code. We could write something like this ten times to draw ten rectangles, but it’s easier to use a loop. Enter for i = 1, 10 do before our rectangle-drawing code. If you’ve previously coded in other languages, this should be instantly familiar. If you haven’t, don’t worry, because you’ll learn about loops in the next chapter. For now, let’s just take a look at the code we’ve entered.
HelloCorona/main.lua
-- Draw 10 rectangles: for i = 1, 10 do
-- Draw a new rectangle at a random position,
-- and with a random size and color
local newRectangle = display.newRect( math.random(320),
math.random(480), 10 + math.random(100), 10 + math.random(100) ) newRectangle:setFillColor( math.random(), math.random(),
math.random() ) end
This code will create ten random rectangles with different sizes and colors.
Testing Our App
Corona makes it really easy to compile and test apps. We don’t need to download anything to an actual mobile device; to run our app, we just have to open it from the Corona simulator’s menu. Apps in the simulator run just like on mobile devices. The only difference is that instead of tapping the screen with your finger, you’ll use your computer’s mouse.
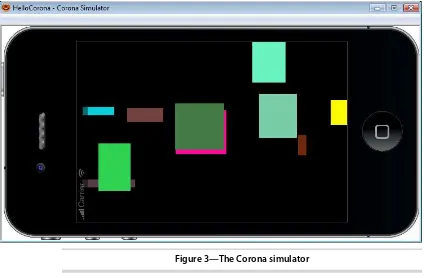
Click the Simulate option on the simulator’s starting screen, and navigate to the folder containing the app. To run an app, you just have to open its main code file, called main.lua. If there are several code files in a project, Corona will load them when they’re required, so there’s no need to open them explicitly in the simulator. Take a look at the following image to see what the simulator looks like.
Figure 3—The Corona simulator
The Stage
If the code worked for you, you already have a running project. It’s time to introduce a fundamental concept in Corona development: the stage. As we develop our games in the coming chapters, we’ll draw a lot of things on the screen. In Corona, the device’s screen is part of a graphical area called the stage. Think of the Corona stage the same way you’d think of a theater stage: anything that you add to the stage is intended for the audience (the player).
As is the case in theater, however, some things on the stage (say, at the end, in the wings) may be present and ready for use but not yet be visible to the audience. In Corona, we can do the same thing—draw things on the stage but outside the visible area of the screen. Corona automatically manages the stage and knows which things are on the visible part of the stage and which things are onstage but not yet visible. In this book (and in many other game-development contexts), we call the visible area of the device’s screen the screen bounds. From now on we’ll say that an object is “out of bounds” when it’s on the stage but not yet visible to the player (not within the screen bounds).
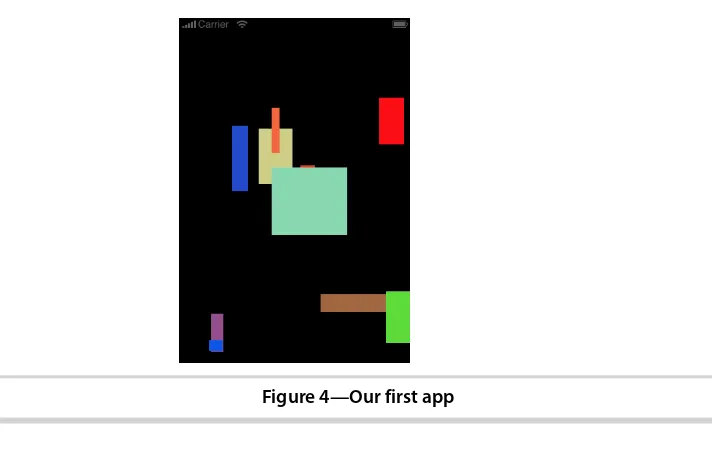
We’ve just drawn our first ten rectangles on the stage (and within the screen bounds), as shown in the following image. In the coming chapters, we’ll draw much, much more.
Figure 4—Our first app
Debugging
If the code in the test project didn’t produce the expected result, it’s time to check the console for error messages. Many other development environments
stop everything whenever incorrect code is encountered. The Corona simulator usually keeps going, so errors and issues go undetected unless we monitor the console while running the project in the simulator. The console is where Corona prints all its error messages. Most of the errors are pretty straightfor-ward English and may reference the specific function or command that is causing trouble. As a result, it’s generally easy to tell by looking at an error what type of issue may be causing the problem.
Debugging just requires you to update your code and then run it again in the simulator. Sometimes it works after an easy change, but sometimes it doesn’t. Luckily, as as a Corona developer, you’ll soon learn to use the console to send yourself test messages while the code is running—everything from in-game data to “Everything is fine if we reached this far” messages—using the print function. You can also use the Debugger tool that comes with Corona and that can be used from some development environments like those listed Appendix 1, Corona Resources, on page 239.
1.4
What We Covered
Whew! We finished our first chapter. You learned a little about game develop-ment in general, installed Corona, ensured that it works, and even started some coding. At this point, you’re ready to tackle games.
Not so sure? Feeling a bit overwhelmed? Don’t worry. Coding games is easy once you get rolling, but everyone feels intimidated at the beginning. You’ll get much more comfortable as we work through some mini-programs in the next few chapters. In The Game Loop, we’ll start building something called a game loop, which we’ll turn into a full-fledged game over the two chapters that follow.
Part II
Planet Defender
The Game Loop
Now that we’ve sprinted through the introduction and seen the lay of the land, it’s time to get started with our first project. You don’t need to know or understand everything in the first chapter by heart, but it’s a good idea to have a working installation of Corona on your computer and to have played with a few of samples in the simulator a bit before beginning this chapter.
2.1
What You’ll Learn
In this chapter, we’ll start our first game project. We’ll do the following:
• Design a small arcade game
• Create the basic layout for the game • Learn the basics of Corona
• Experiment with the Lua programming language
Toward the end of the chapter, we’ll focus on writ-ing code that will update our game several times. By the end of the chapter, our app will look like the image shown earlier.
2.2
A Crash Course in Corona Programming
The Console on Mac OS
If you’re using Windows, then the Corona console appears automatically when you open the simulator. If you’re working on Mac OS, you need to go to your Applications folder and open the Corona Terminal link. If you access the Corona simulator using the link on your Launchpad, then you won’t automatically see the console.
Creating a Multiscreen Application
Let’s start a new project in the Corona simulator so that we can test some of the basic options we have in the program. In Corona, we’ll create a new project each time we want to create a new app.
Create a new multiscreen application (called Scene if you’re on Mac OS), also known as a storyboard project in earlier versions of Corona. You can call it anything you like, but since we’ll work on a game called Planet Defender, you may want to call it PlanetDefender.
The Corona Storyboard application programming interface (API) lets us divide an app into independent scenes, and each scene creates an empty image where we can add graphics and text. It’s easier to use scenes for each part of an app, such as the main menu, the game, and the “game over” message. We can group related code to make it easier to write and debug, and we’ll usually remove most images once we change scenes. By using a multiscreen application, we’ll be able to swap from one of these sets of images and func-tions to another using Corona’s scene-transitioning tools.
To create a multiscreen application, click the New Project button on the sim-ulator. You’ll get to the project-creation screen like you did in Hello, Corona!, and you’ll only have to select Multiscreen Application as the project type. You’ll get a file called main.lua and the main scene file, called scenetemplate.lua. If you want to change the scene’s filename, you’ll have to update the call to storyboard.gotoScene() in main.lua so that it calls the new name instead of the default scenetemplate.lua scene.
Each new scene file comes with four main functions, which Corona generates automatically for us as soon as we make a new project that uses the Story-board API.
• createScene() will be called before showing the scene. Use this function to add content that has to appear right from the beginning of the scene.
• enterScene() will be called after showing the scene completely (in other words, after all the scene-transition effects). Use this to initialize a game or to add button effects.
• exitScene() will be called just before going out of the scene (in other words, before scene-transition effects). Use this to remove events, but don’t remove visible objects yet.
• destroyScene() will be called once the scene is no longer visible. Use this function to remove images and other visible objects from the stage.
Writing on the Console
Our first tool in Corona will be the print() function, which prints any text or variable on the console. Remember that the console will always appear if you’re using Windows, but you have to open the Corona terminal if you’re using Mac OS.
To use the console, create a new project and type the following example in its main.lua, which calls print() and writes the word message on the console.
GameLoop/GameLoop_Console/main.lua
-- Print "message" on the console print("message")
If you relaunch the program now (Ctrl+R), note the new text that has appeared on the console as we run our program. We’ve just called print() to write the word message on the console, but we can write anything else there.
To execute the program, you have to open the app from the Corona simulator. The console opens automatically when you run a project, but sometimes hides behind the simulator’s screen. Drag it somewhere visible to see the output. In this case, you’ll see the text message, which we passed as a parameter in the print() function.
As you can see in the following image, the print() function writes a message of our choosing on the console, which will make it easier for us to send ourselves messages as our program runs so that we can monitor what it’s doing.
As we discover bugs or problems with the programs we write, we’ll add calls to this print() function in strategic places in the code and then relaunch the program and watch the console to see what it is doing.
You’ve probably noticed the lines preceded by -- in the sample code. This is how we indicate that the line is a comment and will not be processed by Corona. If you want to add notes to yourself within the code or just want to disable some function calls temporarily, you can add comments to do so.
Variables and Functions
Writing on the console is great, and functions like print() and others let us instruct the mobile device to do all kinds of things. But most of what goes on in a mobile game is more complicated than putting words on the screen. Functions give us a way to make our own complex lists of instructions, and variables will give us a way to hold the important information about our game world that our functions will use for decision making and important gameplay tasks.
Variables
Variables let us keep track of operations’ results. We can store the number of lives a player has, keep count of the number of enemies on the screen, or even store the player’s username. To define a variable, we type its name in Corona and assign a value to it. For example, we can write myFavoriteNumber = 12 to create a new variable called myFavoriteNumber.
Let’s say we want to add a list of numbers and that we want to use that total number for something else. In this case, variables let us add them up once and then use the result as much as we want.
This is easier done than said, though, so let’s write that function. We’ll just add three numbers (1, 4, and 7) and store them as a variable called sumTotal. We’ll then be able to print the total sum several times without having to recalculate the total every single time. Type the text from our example in a new project and see what happens.
GameLoop/GameLoop_Variables/main.lua
-- Add three numbers and store them in a variable sumTotal = 1 + 4 + 7
-- Print the sum print( sumTotal )
print( "in case you didn't see that, the total is " .. sumTotal )
When we run this code as shown, Corona first calculates the total using the normal addition operators and stores it in a variable called sumTotal. By using the print() command that we already talked about, the program then prints the total and prints it again in case we didn’t notice it the first time around.
Figure 7—Variables in Corona
The second print() command in this example uses the string-concatenation operator in Lua, which lets you combine strings and variables. It’s really useful for debugging.
Naming Variables
To name variables, you can use a lowercase letter for the start of the word and use a capital letter for every new word you use in the variable. For example, a variable holding my score would be called myScore.
You can use any other naming system you like, as long as it makes sense to you. We’re game developers, so we’re a bit like coding pirates (not software pirates, but those who pillage and plunder and live however they want to live). We can name variables in any way we like. Yarr! And if someone doesn’t like it, we can throw them overboard to the sharks. Har, har! (Or we can agree to use a common naming conven-tion if we really have to work with them...and there are no sharks nearby.)
Functions
In Lua, like in most programming languages, we can also create our own functions; we aren’t limited to built-in functions like print(). By making our own functions and giving them names, we can create complex sets of directions or instructions that we can repeat over and over again anywhere in our code each time we call them by name. This saves us the hassle of rewriting a complex list of tasks each time we need to repeat it. We can execute a function whenever an enemy shoots or whenever the player loses a life. That way, we can avoid repeating code, and we can write neater programs.
In Lua, we begin a list of instructions that we’d like to turn into a function using the function keyword. At the end of the list of instructions, we add the end keyword. We can even send messages to our functions that they can use in carrying out their instructions (like the text message that we sent to print(), which Corona then output on the screen). These are called parameters and act like variables that the instructions in our functions can use. We indicate that our function expects extra information (parameters) by enclosing names for them in brackets in the function definition.
By creating our own functions and letting them receive messages using parameters, we can easily perform basic lists of steps over and over again in our code, adapting them to individual cases. In Corona, we always have to write function definitions before calling the functions, because the code won’t find them otherwise.
Let’s build an example to illustrate the process. In this example we write a function that receives two numbers as its parameters and prints them to the console. We call the function printTwoNumbers(), and its parameters are number1 and number2. Again, we use the string-concatenation operator to combine the variables with readable text, to know what Corona has just printed on the console.
GameLoop/GameLoop_Functions/main.lua
-- Prints two numbers on the console
function printTwoNumbers( number1, number2 )
print( "The two numbers are: "..number1.." and "..number2 ) end
-- Call the function printTwoNumbers( 1, 2 ) printTwoNumbers( 4, 3 )
See how easy that was? Any time we want to print two numbers on the con-sole, we call printTwoNumbers() and pass it the two numbers that we’d like to print, like the following figure shows. We can pass just about any pair of numbers as parameters and call the function from just about any part of our program with similarly useful results.
Figure 8—Functions in Corona
Local and Global Variables
So far, we’ve used variables to keep track of values. Corona also lets us define local and global variables for our games. In broad terms, local variables are accessible from wherever we define them (such as a function or code file) but not from an unrelated part of the program. Global variables are accessible from the entire program.
We might just need a variable during a short code fragment (such as within a function), so a local variable can be useful for that because it stops being useful outside the code and we can let Corona “forget” it. If we’re keeping track of something gamewide or an app-configuration value, then it makes sense to use a global variable, because we’ll likely need it later.
We can define a global variable by writing variableName = value, and local variables need the prefix local. In technical terms, the local keyword basically means that the variable won’t be accessible from outside the area where we define it. If we place it in a function, then we won’t be able to use the variable from another function; if we place it in a code file, other code files won’t be able to access the variable.
Create a new project for this example. We’ll use a variable called hidingVariable and set it in three ways: as a global variable in the main code file, as a local variable in an external file, and as a local variable in a function. The code is quite simple, and we just have to make sure we add the local keyword when-ever we want the effect to be local and omit it if we want the variable’s changes to transfer to other code files.
First create the global hidingVariable variable; then set its value to "global".
GameLoop/GameLoop_Local_Global/main.lua
-- Define a global variable called hidingVariable, -- and set its value to "global"
print( "Setting the global hidingVariable to \"global\"" ) hidingVariable = "global"
print ( "the global hidingVariable = " .. hidingVariable )
Now create a new file and create a local hidingVariable variable. Set its value to "local".
GameLoop/GameLoop_Local_Global/hidingvariable.lua
-- Use a local variable called hidingVariable in this file -- and set its value to "local"
print( "Setting the file's local hidingVariable to \"local\"" ) local hidingVariable = "local"
If you write a function and update a local instance of the variable within it, its changes will not affect the global variable’s output.
GameLoop/GameLoop_Local_Global/main.lua
-- Create a function that uses a function-level hidingVariable -- and set its value to "function"
-- Store a local variable function checkHidingVariable( )
print( "Setting the function's local hidingVariable to \"function\"" ) local hidingVariable = "function"
print( "In the function, hidingVariable = " .. hidingVariable ) end
Let’s try an experiment and check whether Corona can access the variables. We’ll add a few print() statements along the way and see how it affects the variable we can access. To run the code in hidingvariable.lua, you’ll have to use a function called require(), which includes a different code file from the game. This will be really useful when we start making more complex games.
GameLoop/GameLoop_Local_Global/main.lua
-- Run the function and print the variable's value checkHidingVariable( )
print( "After the function ends, the global "..
"hidingVariable is still = " .. hidingVariable )
-- Include the external file and print the value again require( "hidingvariable" )
print( "After including the external file, the global "..
"hidingVariable is still = " .. hidingVariable )
As you can see in Figure 9, Local and global variables, on page 25, local variables within a function mean that we’ll access that variable’s value, and using them in external files means that we won’t be able to read them.
It’s good to keep this in mind if we are ever tempted to name local and global variables using the same names!
Tables and Loops
Sometimes we’ll want to keep track of a list of related items. For example, if one of your games has ten or more enemies, it makes sense to store their properties in a single variable instead of hard-coding a variable for each of them. That’s where tables come in handy. We can use a table to store a list of values (even of varying size) and access them using one common name.
Since we’re using tables, we also need a way to access each of their values. We could do it manually, but it would be just as laborious as hard-coding one variable for each enemy in a game; it’s just not practical. Instead, we can
Figure 9—Local and global variables
use loops, which perform a function n times and just repeat the same task for each of our related variables. In the example of storing enemies, we can move them all easily by storing them in a table and looping through the table to call each enemy’s move function. That’s it. We write the code once and use it several times.
Let’s use the print() function we’ve just learned and make Corona count from 1 to 5. In Lua, we use for and while to iterate through values. We could print 1 to 5 using a variable, but let’s also define a list. Lists in Lua are like arrays in other languages; they store a set of related values. We store them using the curly brackets, as in variable = { }, and we can access an element like in many other languages using the square brackets, such as variable[position]. Lua’s lists start their position counter at 1, so the first value will be at variable[1]. Other languages use 0 to access the first value in a list, so it’s easy to forget this and get an out-of-range error.
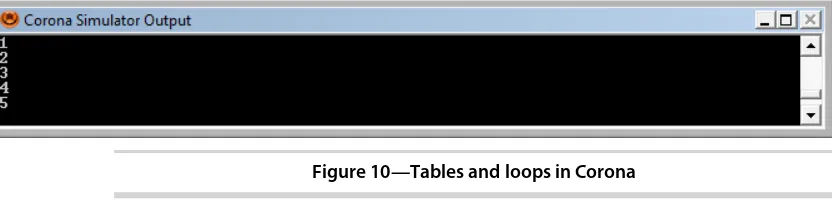
In the following example, we’ll store a list with the values from 1 to 5 and use an iterator variable called i to loop through the numbers. In each loop step, we’ll use print() to output the list’s value to the console. It’s a very basic example, but it showcases most of the traditional programming concepts we’ll need to code games: loops, lists, and displaying messages using the console.
GameLoop/GameLoop_Tables_Loops/main.lua
-- Define a number list
myNumberList = { 1, 2, 3, 4, 5 }
-- Loop through the list and print each number on the console for i = 1, #myNumberList do
print( myNumberList[ i ] ) end
Figure 10—Tables and loops in Corona
Most of the time, we’ll use lists instead of variables because we’ll have a varying number of enemies, bullets, or other game objects. We’ll loop through them because we’ll make them have similar behaviors. For example, bullets will all move in straight lines, so we can code movement once and apply it to all bullets using a loop.
Using Classes in Corona
If you’ve used other languages in the past, you’ll certainly have heard of classes. If you haven’t heard of them, don’t worry. Classes are a tool to help programmers group similar elements in a program and set common variable names and functions for those classes. For example, if we’re making a driving video game, we can make a Car class and code all the driving functions in it. We’re then able to use that Car class to create instances, or elements that use those functions and variables. We could create variables for a redCar, a slowCar, and an oldCar, using the Car class as our base. In each of these instances, we’d have to focus only on their speed and maneuverability instead of rewriting the movement functions again and again.
Choosing a Class System
Since Corona uses Lua, it doesn’t really come with a fully featured class sys-tem. To be able to use classes, we can use a custom library that lets us repeat the same code and functions for some variables over and over again without having to repeat our code. We can write our own code to do this, we can search the Internet and choose our favorite Lua class system, or we can use the class.lua file from this chapter’s code files.1 In this book, we’ll use class.lua from the code files in most of the chapters, so make sure to download it.
To choose a class system, we have to make sure that it’s easy to use and that we can expand it to suit our needs. At this point, we don’t need to know how
1. Remember that you can download the book’s code files from http://pragprog.com/book/ sdcorona/create-mobile-games-with-corona.
the class system in the chapter’s code files works; we need to know only how to use it. However, in case you’re curious, here’s a high-level summary: It’s basically some functions that let us create a new class instance using a class’s ClassName() function. Calling this will call its ClassName:new() function to create a new instance of the class object. We can use the self variable within class functions to access the instance. If you already feel comfortable using Lua, you can get more details about how this works Appendix 2, Classes in Corona, on page 245. Otherwise, let’s stop talking about complex theories and try a few experiments to see how this really works.
Creating a New Class
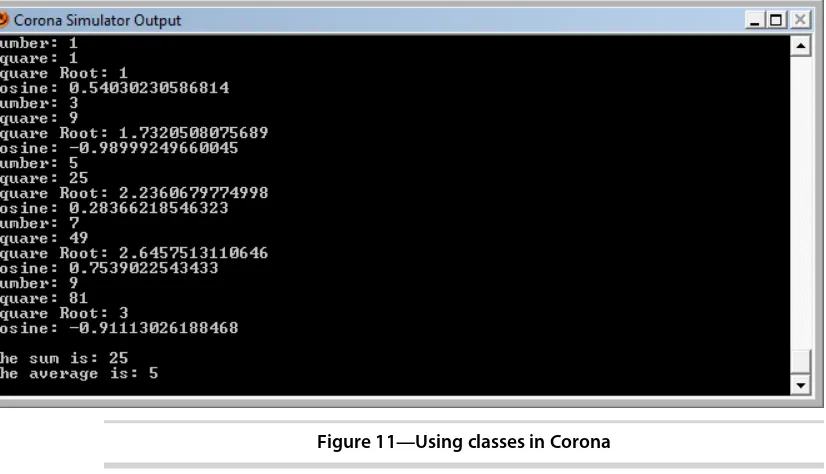
Instead of focusing on the theory, let’s try an example. We’ve used numbers and the Corona console’s print() function, so let’s write a MathsNumber class to perform a few operations for us. We’ll use this class to store a list of numbers, a function to add a new number to the list, and another function to calculate the list’s average. We include the class file by calling Corona’s require() function.
GameLoop/GameLoop_Classes/main.lua
require("class")
In the class function we’re using, we can create a new class by using the Class() command, so start by initializing the MathsNumber class. Also initialize the list of numbers, listOfNumbers, to keep track of all the numbers we’ve added so far.
GameLoop/GameLoop_Classes/main.lua
-- Create a new class and initialize a list of numbers MathsNumber = Class( )
listOfNumbers = { }
After creating the new class, move on to writing the constructor, or Class-Name:new(). First add the number to the list of numbers, and then calculate a few mathematical operations. Let’s keep things simple at this point—print the number’s square, its square root using math.sqrt(), and its cosine using math.cos().
GameLoop/GameLoop_Classes/main.lua
-- Create the MathsNumber constructor function MathsNumber:new( number )
-- Store the value as one of the instance's properties (use self to do so) self.value = number
-- Print the number, its square, its square root, and its cosine print( "Number: "..number )
print( "Square: "..(number * number) )
Call MathsNumber:new to add a new number to the list, and it will output the number, followed by its square, square root, and cosine.
Now that we have these functions, we can perform operations with the num-bers we’re adding to listOfNumnum-bers in MathsNumber:new(). Since we want to calculate the average, create a new calculateAverage() function. Loop through the numbers and add them up, and then divide the total sum by the list size.
GameLoop/GameLoop_Classes/main.lua
-- Calculates the average of the list of numbers function calculateAverage( )
-- Initialize a variable to 0 local total = 0
-- Add each number from the list to the total for i = 1, #listOfNumbers do
total = total + listOfNumbers[ i ].value end
-- Divide the total by the number of numbers print( )
print( "The sum is: " .. total ) average = total / #listOfNumbers print( "The average is: "..average ) end
Now that we have the average calculating function, it’s easy to add a few numbers to the list, such as 1, 3, 5, 7, and 9, by calling MathsNumber(), and then calculate the average of all five numbers.
GameLoop/GameLoop_Classes/main.lua
-- Create five instances of the class and add them to the list of numbers listOfNumbers [ #listOfNumbers + 1 ] = MathsNumber(1)
listOfNumbers [ #listOfNumbers + 1 ] = MathsNumber(3) listOfNumbers [ #listOfNumbers + 1 ] = MathsNumber(5) listOfNumbers [ #listOfNumbers + 1 ] = MathsNumber(7) listOfNumbers [ #listOfNumbers + 1 ] = MathsNumber(9) -- Calculate the average
calculateAverage( )
When you run this program, you will see something similar to Figure 11,
Using classes in Corona, on page 29. It first calculates the square, square root, and cosine for each of the numbers, and then it calculates the average.
This was a really easy example, but it’ll be the base of most of our game-development code. The main difference is that we’ll work with sprites and images instead of numbers—we’re game developers, after all!
As you can see, classes save us time and energy by letting us reuse code. Even though using classes can seem daunting at first, we’ll quickly get used to them. The easiest way to approach them is to think of common properties
Figure 11—Using classes in Corona
we can easily see; there’s no need to second-guess ourselves. In an avatar-dressing game, if we want to code shirts, pants, and socks, we can group them as clothes and write a clothes class to make our life easier.
2.3
Designing Our First Game: Planet Defender
Now that we’ve installed Corona and learned the basic programming vocabu-lary and techniques needed to develop games, it’s time to start making a real game.
For our first project, we’ll design a game that we can code and understand using the basic knowledge that we already have. We’ll need to create and manage three main things.
• A way for the game to keep updating itself, frame after frame, in an endless loop that handles most of the game-related code (a game loop)
• A set of images to graphically represent the elements of the game (sprites)
• A few buttons and a start menu to enable the player to interact with the game (interactivity)
be in charge of defending the planet by destroying (tapping) the approaching ships. The game will end whenever an enemy ship reaches the planet.
Target Features
When designing a game, the best way to begin is by outlining a list of the features the game will have. For our first game, we’ll need the following:
• A background image
• A properly positioned planet image • Enemy ships that move toward the planet
• Functions to interpret and act on player input (screen taps) so that ships can be destroyed
• A score counter
2.4
Creating the Project
It’s time to create a new project to hold our first game. Create a new multi-screen application. Rename the automatically generated scenetemplate.lua scene file to game.lua—we’ll work only on the project’s gameplay, so calling the code file game.lua makes it easier to recognize. It’s important to change the scene names to something explicit because it makes coding much easier in the long run. Using scenetemplate.lua can be more comfortable now, but in five months’ time we might not remember what the scene had, and we’ll have to read it to know whether that’s the file we want to update.
We also have to open main.lua to update the file we want to load first, because otherwise we’ll get an error once the program attempts to open scenetemplate.lua. To update this, make sure that main.lua calls the scene name by using storyboard.gotoScene().
GameLoop/GameLoop/main.lua
-- Require the Storyboard API
local storyboard = require "storyboard"
-- load the game.lua scene storyboard.gotoScene( "game" )
Now that the program will go directly to the game scene, it’s time for us to start working on it.
Drawing the Background Image
Since it’s a bit daunting to start using a new programming language without seeing results, let’s begin by adding a background image to the game. As game developers, seeing images in our games is great because they let us see
that the program isn’t broken (or at least not completely). We’ll sometimes have to make further checks to see whether the nonvisual code is working, but seeing images behave in the way we expect them to is usually a good sign.
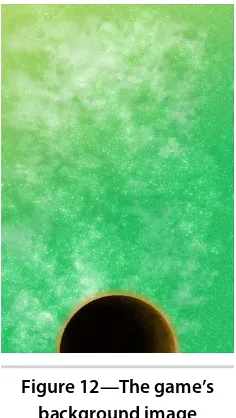
We can draw an image on the stage by calling the display.newImage() function. Pass as a parameter the name of an image located in the game project folder, and Corona will load and display the image. To load an image called space_background.jpg, write display.newImage( "space_background.jpg" ). The function returns the image Corona has just loaded, so you’ll usually want to store it as a local variable to be able to change its properties easily. You can save images in a folder to make your project folder neater, and then pass the relative path (for example, foldername/space_back-ground.jpg) to this function.
Figure 12—The game’s background image
When working with images, we can’t just add them anywhere and hope they look good. In games, we usually work with many images, so we have to make sure each image is well-positioned. Also, when changing scenes, it’s common to remove everything from the stage. To make it easier for us to access all objects on the stage, Corona has something called display groups. A group (or display group) in Corona is just like a folder on your PC— it helps you keep your images organized. Each scene automatically generated by Corona comes with a group variable called group where we can add our scene objects. We can use that whenever we work with images.
To add a display object to a group, call the group:insert() function, and the image will be added
to the scene’s main group. Now load a background image using display.newImage() and add it to the main scene group using group:insert().
You can set the image’s anchor point, which is the point responsible for moving the image around, by setting the image’s anchorX and anchorY variables. You can set values between 0 (top or left) and 1 (bottom or right). In this case, since we want to place the image’s top left corner in the screen’s top left corner, we have to set both values to 0.
GameLoop/GameLoop/game.lua
-- Load a background image when the scene is created function scene:createScene( event )
local image = display.newImage( "images/space_background.jpg" ) image.anchorX, image.anchorY = 0, 0
group:insert( image ) end
If you compile the project now, you’ll be able to see the image in action, as shown in Figure 12, The game’s background image.
Right now, it doesn’t move or do anything, but it’s always nice to see that the previously empty stage is no longer empty.
2.5
Coding the Game Loop
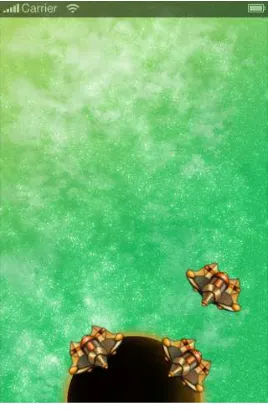
Having images on the screen is great, but we need a way to regularly update them to create the illusions of motion and activity. Otherwise, players will be bored by bullets, enemies, and a player character that just sit there, motion-less. In this game, we have to move enemy ships and get rid of dead units (the ones that have been tapped).
Adding an Event Listener
Corona divides every second into a fixed number of up to sixty frames, which is the number of times that the stage is rendered and shown to the user. We can ask the program to call a function of our choosing whenever it’s time for a new frame to appear. We tell Corona to do this using an event listener called enterFrame.
An event listener is like a little spy in Corona programs that will call a function for us (whichever function we ask it to call) whenever a specific event happens. In the case of the enterFrame listener, the event is the start of a new frame. Corona has other listeners that can call a function each time an animation changes, when a sound ends, or even when the player taps the screen.
We ask an event listener to do these things for us by calling the addEventListener() function. If we want an event listener to focus on just one object, we’ll call object:addEventListener(), but when we want to track a generic event such as when the stage moves to the next frame, we’ll use Runtime:addEventListener(), which assigns the listener to the game’s running environment in general.
Many game developers call their frame-update functions either tick() or enter-Frame(). We’ll use tick() because it’s easier to write and reminds us that time is passing with each update. We’ll use the tick() name for all of our frame-update functions throughout the book, but remember that you can name the function in any way you like and it will still be called as long as you pass its name to the addEventListener() function along with "enterFrame".
GameLoop/GameLoop/game.lua
-- A placeholder for the tick function -- Called every frame
function tick( )
-- Here we'll add the code that needs to be executed each frame end
Now that we know the type of event we’ll add (enterFrame), the function we need to call to set up the event listener (Runtime:addEventListener()), and the function we want the event listener to call (tick()), add the event listener to the enterScene() function to call tick() sixty times per second. Remember that Corona generated enterScene() automatically when we created a new storyboard project and that the function is called as soon as the program enters the scene.
GameLoop/GameLoop/game.lua
-- Called immediately after scene has moved onscreen: function scene:enterScene( event )
local group = self.view -- Add an event listener
-- This will call the tick function each frame: Runtime:addEventListener( "enterFrame", tick ) end
This enterFrame event listener is like a little CIA agent who will watch the game and call the tick() function, which is like the headquarters, every time the program enters a new frame. All we have to do now is add code to the tick() function to update all of the game’s objects, doing whatever needs to be done in each frame to make this program behave like a game.
Adding EnterFrame Listeners to Objects
Corona lets us add event listeners to actual game objects. This means we can keep track of when the player touches an object in the game and if two objects collide with each other. We can also add an enterFrame event listener to game objects such as sprites, which you’ll learn about in Chapter 3, Sprites and
Movement, on page 39. However, if we add event listeners to objects that can
be removed from the game, we need to make sure we also call the removeEventListener() function to remove the listeners. Otherwise, we might not clear it out properly, and it might be called for as long as the app remains active.
To avoid this, it’s a good idea to avoid enterFrame events, consolidate actions in the game tick(), and make sure that we call relevant update functions for each of the objects on the stage. That way, the only time we’ll have to remove an enterFrame event listener is if we ever leave the game scene. This also saves Corona from keeping track of lots of event listeners; if we’re routinely tracking