Practical
Web 2.0
Applications with
PHP
Quentin Zervaas
Develop a complete PHP web application
from start to finish
Quentin Zervaas
Practical Web 2.0
All rights reserved. No part of this work may be reproduced or transmitted in any form or by any means, electronic or mechanical, including photocopying, recording, or by any information storage or retrieval system, without the prior written permission of the copyright owner and the publisher.
ISBN-13 (pbk): 978-1-59059-906-8
ISBN-10 (pbk): 1-59059-906-3
ISBN-13 (electronic): 978-1-4302-0474-9
ISBN-10 (electronic): 1-4302-0474-5
Printed and bound in the United States of America 9 8 7 6 5 4 3 2 1
Trademarked names may appear in this book. Rather than use a trademark symbol with every occurrence of a trademarked name, we use the names only in an editorial fashion and to the benefit of the trademark owner, with no intention of infringement of the trademark.
Lead Editor: Ben Renow-Clarke Technical Reviewer: Jeff Sambells
Editorial Board: Steve Anglin, Ewan Buckingham, Tony Campbell, Gary Cornell, Jonathan Gennick, Jason Gilmore, Kevin Goff, Jonathan Hassell, Matthew Moodie, Joseph Ottinger, Jeffrey Pepper, Ben Renow-Clarke, Dominic Shakeshaft, Matt Wade, Tom Welsh
Project Manager: Richard Dal Porto Copy Editors: Andy Carroll, Kim Wimpsett Assistant Production Director: Kari Brooks-Copony Production Editor: Liz Berry
Compositor: Diana Van Winkle Proofreader: Lisa Hamilton
Indexer: Broccoli Information Management Artist: Diana Van Winkle
Cover Designer: Kurt Krames
Manufacturing Director: Tom Debolski
Distributed to the book trade worldwide by Springer-Verlag New York, Inc., 233 Spring Street, 6th Floor,
New York, NY 10013. Phone 1-800-SPRINGER, fax 201-348-4505, e-mail [email protected], or
visit http://www.springeronline.com.
For information on translations, please contact Apress directly at 2855 Telegraph Avenue, Suite 600,
Berkeley, CA 94705. Phone 510-549-5930, fax 510-549-5939, e-mail [email protected], or visit
http://www.apress.com.
The information in this book is distributed on an “as is” basis, without warranty. Although every precaution has been taken in the preparation of this work, neither the author(s) nor Apress shall have any liability to any person or entity with respect to any loss or damage caused or alleged to be caused directly or indirectly by the information contained in this work.
Contents at a Glance
About the Author
. . . xvAbout the Technical Reviewer
. . . xviIntroduction
. . . xvii■
CHAPTER 1
Application Planning and Design
. . . 1■
CHAPTER 2
Setting Up the Application Framework
. . . 9■
CHAPTER 3
User Authentication, Authorization, and Management
. . . 45■
CHAPTER 4
User Registration, Login, and Logout
. . . 73■
CHAPTER 5
Introduction to Prototype and Scriptaculous
. . . 123■
CHAPTER 6
Styling the Web Application
. . . 171■
CHAPTER 7
Building the Blogging System
. . . 219■
CHAPTER 8
Extending the Blog Manager
. . . 265■
CHAPTER 9
Personalized User Areas
. . . 297■
CHAPTER 10
Implementing Web 2.0 Features
. . . 335■
CHAPTER 11
A Dynamic Image Gallery
. . . 371■
CHAPTER 12
Implementing Site Search
. . . 427■
CHAPTER 13
Integrating Google Maps
. . . 469■
CHAPTER 14
Deployment and Maintenance
. . . 519■
INDEX
. . . 547Contents
About the Author
. . . xvAbout the Technical Reviewer
. . . xviIntroduction
. . . xvii■
CHAPTER 1
Application Planning and Design
. . . 1What Is Web 2.0?
. . . 2Database Connectivity
. . . 2Web Site Templates
. . . 3Web Site Features
. . . 3Main Home Page and User Home Page
. . . 3User Registration
. . . 4Account Login and Management
. . . 4User Blogs
. . . 4Web Site Search
. . . 4Application Management
. . . 5Other Aspects of Development
. . . 5Search-Engine Optimization
. . . 5PHPDoc-Style Commenting
. . . 5Security
. . . 7Application Logging
. . . 7Maintainability and Extensibility
. . . 7Version Control and Unit Testing
. . . 8Summary
. . .8
■
CHAPTER 2
Setting Up the Application Framework
. . . 9Web Server Setup
. . . 9Operating System
. . . 10Installing the Apache HTTP Server
. . . 10Installing MySQL 5
. . . 11Installing PHP 5.2.3
. . . 11Application Filesystem Structure
. . . 12Web Root Directory
. . . 12Data Storage Directory
. . . 12PHP Classes Directory
. . . 13Templates Directory
. . . 13Full Directory Structure
. . . 13Installing the Zend Framework
. . . 14Configuring the Web Server
. . . 15Creating a Virtual Host in Linux
. . . 15Creating a Virtual Host in Windows
. . . 17Restarting Your Web Server
. . . 17Setting Up the Database
. . . 17Using the Model-View-Controller Pattern
. . . 18Separating Application Logic from Presentation Logic
. . . 19Directing All Requests to index.php
. . . 21Introduction to the Zend_Controller Class
. . . 22How Requests Work with Zend_Controller
. . . 23Creating the IndexController
. . . 25Defining Application Settings
. . . 27Connecting to the Database
. . . 29Testing the Database Connection
. . . 30The Smarty Template Engine
. . . 30Why Not Use a Different Template Engine?
. . . 33Downloading and Installing Smarty
. . . 34Automatic View Rendering with Zend_Controller
. . . 36Integrating Smarty with the Web Site Controllers
. . . 39Adding Logging Capabilities
. . . 41Writing to the Log File
. . . 43Summary
. . . 44■
CHAPTER 3
User Authentication, Authorization, and Management
. . . 45Creating the User Database Table
. . . 45Timestamps
. . . 47User Profiles
. . . 48Introduction to Zend_Auth
. . . 49Instantiating Zend_Auth
. . . 50Authenticating with Zend_Auth
. . . 52Introduction to Zend_Acl
. . . 54Combining Zend_Auth, Zend_Acl, and Zend_Controller_Front
. . . 57Managing User Records with DatabaseObject
. . . 61The DatabaseObject_User Class
. . . 62Using DatabaseObject_User
. . . 64Managing User Profiles
. . . 66Using Profile_User
. . . 67Integrating Profile_User with DatabaseObject_User
. . . 69Summary
. . . 72■
CHAPTER 4
User Registration, Login, and Logout
. . . 73Adding User Registration to the Application
. . . 73Creating the Form Processor for User Registration
. . . 74Displaying the Registration Form and Processing Registrations
. . . 81Adding CAPTCHA to the User Registration Form
. . . 88Adding E-mail Functionality
. . . 95Implementing Account Login and Logout
. . . 100Creating the Login Template
. . . 101Adding the Account Controller Login Action
. . . 102Logging Successful and Failed Login Attempts
. . . 105Logging Users Out of Their Accounts
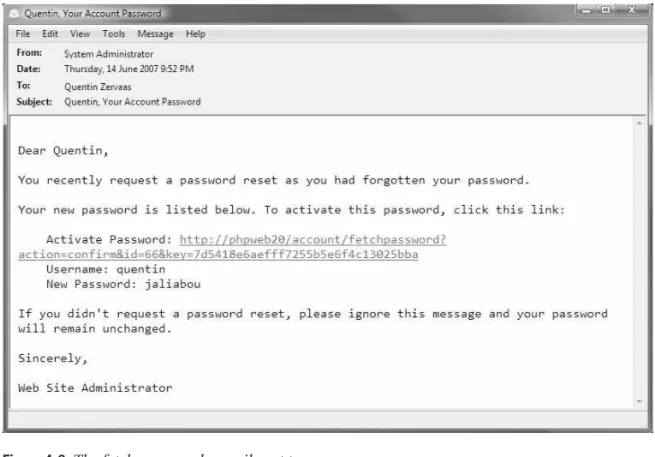
. . . 107Dealing with Forgotten Passwords
. . . 108Resetting a User’s Password
. . . 109Functions for Resetting Passwords
. . . 112Implementing Account Management
. . . 116Creating the Account Home Page
. . . 116Updating the Web Site Navigation
. . . 118Allowing Users to Update Their Details
. . . 120Summary
. . . 121■
CHAPTER 5
Introduction to Prototype and Scriptaculous
. . . 123Downloading and Installing Prototype
. . . 123Prototype Documentation
. . . 124Selecting Objects in the Document Object Model
. . . 124The $() Function
. . . 124The getElementsByClassName() Function
. . . 125The $$() Function
. . . 128The getElementsBySelector() Function
. . . 129Prototype’s Hash Object
. . . 129Other Element Extensions
. . . 130Showing and Hiding Elements
. . . 131Retrieving Dimensions of Elements . . .
131Managing Classes of Elements
. . . 131Manipulating Strings with Prototype
. . . 133Ajax Operations in Prototype
. . . 134Ajax Request Options
. . . 134Ajax Callback Functions
. . . 135JavaScript Object Notation (JSON)
. . . 138An Ajax.Request Example
. . . 140Event Handling in Prototype
. . . 145Observing an Event
. . . 145Finding Out Which Element an Event Occurred On
. . . 146Canceling an Event
. . . 147Creating JavaScript Classes in Prototype
. . . 147Creating a Class
. . . 147Binding Function Calls to Objects
. . . 148From Prototype to Scriptaculous
. . . 151Prebuilt Controls
. . . 151Drag and Drop
. . . 152Visual Effects
. . . 152DOM Element Builder
. . . 153JavaScript Unit Testing
. . . 153Downloading and Installing Scriptaculous
. . . 154Combining Prototype, Scriptaculous, Ajax, and PHP
in a Useful Example
. . . 154Creating the Main HTML Page: index.php
. . . 156Styling the Application: styles.css
. . . 157Creating and Populating the Database: schema.sql
. . . 158Managing the List Items on the Server Side: items.php
. . . 159Processing Ajax Requests on the Server Side: processor.php
. . . 161Creating the Client-Side Application Logic: scripts.js
. . . 163Summary
. . . 169■
CHAPTER 6
Styling the Web Application
. . . 171Adding Page Titles and Breadcrumbs
. . . 171The Breadcrumbs Class
. . . 172Generating URLs
. . . 174Setting the Title and Trail for Each Controller Action
. . . 178Creating a Smarty Plug-In to Output Breadcrumbs
. . . 180Integrating the Design into the Application
. . . 183Creating the Static HTML
. . . 184Moving the HTML Markup into Smarty Templates
. . . 188Constructing the CSS
. . . 192Specifying Media Types and Loading the CSS File
. . . 192Creating the Application CSS
. . . 193Creating a Print-Only Style Sheet
. . . 198The Full Application Style Sheet
. . . 201Styling the Application Web Forms
. . . 204Loading Prototype and Scriptaculous
. . . 207Implementing Client-Side Form Validation
. . . 208Adding JSON Support to CustomControllerAction
. . . 209Modifying the Form Processor
. . . 209Modifying the Registration Controller Action
. . . 210Creating the JavaScript Form Validator
. . . 212Loading the UserRegistrationForm Class
. . . 216Summary
. . . 217■
CHAPTER 7
Building the Blogging System
. . . 219Creating the Database Tables
. . . 219Setting Up DatabaseObject and Profile Classes
. . . 221Creating the DatabaseObject_BlogPost Class
. . . 221Creating the Profile_BlogPost Class
. . . 223Creating a Controller for Managing Blog Posts
. . . 223Extending the Application Permissions
. . . 223The BlogmanagerController Actions
. . . 225Linking to Blog Manager
. . . 226Creating and Editing Blog Posts
. . . 228Creating the Blog Post Submission Form Template
. . . 228Instantiating FormProcessor_BlogPost in editAction()
. . . 231Implementing the FormProcessor_BlogPost Class
. . . 233Generating a Permanent Link to a Blog Post
. . . 240Filtering Submitted HTML
. . . 243Creating a New Blog Post
. . . 247Previewing Blog Posts
. . . 248Creating the Preview Action
. . . 249Implementing the Preview Template
. . . 249Updating the Status of a Blog Post
. . . 254Completing setstatusAction()
. . . 254Notifying the User
. . . 256Summary
. . . 262■
CHAPTER 8
Extending the Blog Manager
. . . 265Listing Blog Posts on the Blog Manager Index
. . . 265Fetching Blog Posts from the Database
. . . 266Assigning Recent Posts and the Monthly Summary
to the Template
. . . 274Displaying Recent Posts in the Template
. . . 276Displaying the Monthly Summary
. . . 279Ajaxing the Blog Monthly Summary
. . . 283Creating the Ajax Request Output
. . . 284The BlogMonthlySummary JavaScript Class
. . . 285Installing the BlogMonthlySummary Class
. . . 287Notifying the User About the Content Update
. . . 287Integrating a WYSIWYG Editor
. . . 291Downloading and Installing FCKeditor
. . . 292Configuring FCKeditor
. . . 293Loading FCKeditor in the Blog Editing Page
. . . 294Summary
. . . 296■
CHAPTER 9
Personalized User Areas
. . . 297Controlling User Settings
. . . 297Presenting Customizable Settings to Users
. . . 298Processing Changes to User Settings
. . . 299Creating Default User Settings
. . . 301The UserController Class
. . . 302Routing Requests to UserController
. . . 303Handling Requests to UserController
. . . 309Displaying the User’s Blog
. . . 313Displaying the Blog Index Page
. . . 313Displaying Individual Blog Posts
. . . 318Generating Blog Archive Links
. . . 322Displaying the Monthly Archive
. . . 324Populating the Application Home Page
. . . 326Loading Recent Public Posts
. . . 326Implementing the Application Home Page
. . . 327■
CHAPTER 10
Implementing Web 2.0 Features
. . . 335Tags
. . . 336Implementing Tagging
. . . 336Managing Blog Post Tags
. . . 340Displaying a User’s Tags on Their Blog
. . . 344Displaying a Tag Space
. . . 347Displaying Tags on Each Post
. . . 351Web Feeds
. . . 351Data Formats for Web Feeds
. . . 352Creating an Atom Feed with Zend_Feed
. . . 352Adding the Feed to UserController
. . . 353Linking to Your Feed
. . . 355Other Feed Options
. . . 357Microformats
. . . 358An Example of Using Microformats
. . . 358Why Use Microformats?
. . . 360Microformatting Your Tags
. . . 362Allowing Users to Create a Public Profile
. . . 363Allowing Users to Create a Public Profile
. . . 363Displaying a User’s Profile
. . . 366Summary
. . . 369■
CHAPTER 11
A Dynamic Image Gallery
. . . 371Storing Uploaded Files
. . . 372Creating the Database Table for Image Data
. . . 373Controlling Uploaded Images with DatabaseObject
. . . 373Uploading Files
. . . 374Setting the Form Encoding
. . . 375Adding the Form
. . . 375Specifying the File Input Type
. . . 377Setting the Maximum File Size
. . . 378Handling Uploaded Files
. . . 379Sending Images
. . . 387Resizing Images
. . . 390Creating Thumbnails
. . . 390Managing Blog Post Images
. . . 399Automatically Loading Blog Post Images
. . . 399Displaying Images on the Post Preview
. . . 401Deleting Blog Post Images
. . . 403Using Scriptaculous and Ajax to Delete Images
. . . 406Deleting Images when Posts Are Deleted
. . . 411Reordering Blog Post Images
. . . 412Displaying Images on User Blogs
. . . 417Extending the GetPosts() Function
. . . 417Displaying Thumbnail Images on Blog Index
. . . 418Displaying Images on the Blog Details Page
. . . 420Displaying Larger Images with Lightbox
. . . 422Summary
. . . 425■
CHAPTER 12
Implementing Site Search
. . . 427Introduction to Zend_Search_Lucene
. . . 427Comparison to MySQL Full-Text Indexing
. . . 428Zend_Search_Lucene Field Types
. . . 429Field Naming
. . . 430Indexing Application Content
. . . 430Indexing Multiple Types of Data
. . . 431Creating a New Zend_Search_Lucene_Document
. . . 431Retrieving the Index Location
. . . 433Building the Entire Index
. . . 434Indexing and Unindexing a Single Blog Post
. . . 435Triggering Search Index Updates
. . . 439Creating the Search Tool
. . . 442Adding the Search Form
. . . 442Handling Search Requests
. . . 443Querying the Search Index
. . . 444Displaying Search Results
. . . 448Types of Searches
. . . 451Adding Autocompletion to the Search Tool
. . . 452Providing Search Suggestions
. . . 452Creating an Action Handler to Return Search Results
. . . 453Retrieving Search Suggestions
. . . 454Loading the SearchSuggestor Class
. . . 457Displaying Search Suggestions
. . . 457Adding Mouse Navigation to Results
. . . 460Adding Keyboard Navigation to Results
. . . 462■
CHAPTER 13
Integrating Google Maps
. . . 469Google Maps Features
. . . 469Geocoding
. . . 469Displaying Maps
. . . 470Controlling Maps
. . . 473Planning Integration
. . . 473Limitations of Google Maps
. . . 473Browser Compatibility
. . . 474Documentation and Resources
. . . 474Creating a Google Maps API Key
. . . 474Adding Location Storage Capabilities
. . . 475Creating the Database Table
. . . 475Creating the DatabaseObject_BlogPostLocation Class
. . . 475Modifying Blog Posts to Load Locations
. . . 477Creating Our First Map
. . . 478Creating a New Blog Manager Controller Action
. . . 479Displaying Your First Google Map
. . . 481Managing Locations on the Map
. . . 487Handling Location Management Ajax Requests
. . . 487Creating the Address Lookup Form
. . . 492Extending the BlogLocationManager JavaScript Class
. . . 493Using BlogLocationManager
. . . 508Displaying the Map on Users’ Public Blogs
. . . 509Outputting Locations Using the Geo Microformat
. . . 509Creating the BlogLocations Class
. . . 511Updating the Blog Post Display Template
. . . 514Summary
. . . 516■
CHAPTER 14
Deployment and Maintenance
. . . 519Application Logging
. . . 519E-mailing Critical Errors to an Administrator
. . . 519Using Application Logs
. . . 523Site Error Handling
. . . 524Objectives of Error Handling
. . . 526Handling Predispatch Errors
. . . 526Application Runtime Errors
. . . 531Web Site Administration
. . . 535Administrator Section Features
. . . 535Deploying Application Files with Rsync
. . . 542Backup and Restore
. . . 543Exporting a Database
. . . 543Importing a Database
. . . 544Summary
. . . 545About the Author
■QUENTIN ZERVAASis a web developer based in Adelaide, South Australia, where he has been self-employed since 2003. After receiving his bachelor’s degree in computer science from the University of Adelaide in 2001, Quentin worked for several web development firms before branching out on his own, developing a wide range of custom web applications for customers all around the world.
Quentin has recently started a new company called Recite Media (http://www.recite. com.au) with two partners. Recite Media develops web applications primarily for other devel-opment or design companies to resell. Its flagship product, Recite CMS, is being used by some of Australia’s largest companies.
Quentin also runs and writes for his PHP development resource site, PhpRiot (www.phpriot.com), which provides a number of useful articles on a wide variety of PHP-related topics.
After completing his role as the technical reviewer for Beginning Ajax with PHP: From Novice to Professional(Apress, 2006), he decided to undertake writing this book.
About the Technical Reviewer
■JEFFREY SAMBELLSis a graphic designer and self-taught web application developer best known for his unique ability to merge the visual world of graphics with the mental realm of code. After obtaining his bachelor’s of technology degree in graphic communications manage-ment with a minor in multimedia, Jeffrey originally enjoyed the paper-and-ink printing industry, but he soon realized the world of pixels and code was where his ideas would prosper.
Jeffrey has previously published articles related to print design and has contributed to award-winning graphical and Internet software designs. His latest book, AdvancED DOM Scripting: Dynamic Web Design Techniques(friends of ED, 2007), was an instant success. In late 2005, Jeffrey also became a PHP 4 Zend Certified Engineer; he updated the certification to PHP 5 in September 2006 to become one of the first PHP 5 Zend Certified Engineers. Jeffrey also maintains a blog at http://jeffreysambells.comwhere he discusses his thoughts about everything from web development to photography.
He currently lives and plays in Ontario, Canada, with his wife, Stephanie; his daughter, Addison; and their little dog, Milo.
Introduction
M
any of today’s web development books and articles cover single aspects of the development life cycle, delving only into specific features rather than looking at the whole picture.In this book, we will develop a complete web application. Although we will be using various third-party libraries and tools to aid in development, we will be developing the application from start to finish.
The focus of this book is on Web 2.0, a catchphrase that has been in use for a few years now and is typically used to refer to web sites or web applications that have particular charac-teristics. Some of these characteristics include the following:
• Correctly using HTML/XHTML, CSS, and other standards
• Using Ajax (Asynchronous JavaScript and XML) to provide a responsive application without requiring a full refresh of pages
• Allowing syndication of web site content using RSS
• Adding wikis, blogs, or tags
Although not everybody is an advocate of the “Web 2.0” phrase, the term does signify forward progress in web development. And although not everybody has the need to provide a wiki or a blog on their web site, the other characteristics listed (such as correct standards usage) provide a good basis for a web site and should be used by all developers, regardless of how they want their web site or application categorized.
I wrote this book because I want to share with other users how I build web sites. Having been a web developer for ten years now (full-time for the past seven), I have a solid under-standing of a wide range of web-related topics and have much to offer newer developers or developers looking to expand their own knowledge.
Who This Book Is For
This book has been written primarily for intermediate to expert PHP programmers. Although programmers of all levels will benefit from this book, we do jump in to the deep end very quickly, so some prior knowledge of PHP is assumed.
Having said that, if you’re relatively new to PHP, you will definitely benefit from this book because it will formalize some of the techniques you have already learned and will show you some different ways of approaching various problems.
In this book, I have made the assumption that you are familiar with HTML and CSS, although since most of the code developed in this book is PHP and JavaScript, an advanced knowledge of HTML and CSS is not critical. All JavaScript code is explained thoroughly, which, in combination with the Prototype JavaScript library we will be using, makes the listings rela-tively straightforward.
How This Book Is Structured
We will start the book by determining which features to implement in our web application and then implement each one as we progress through the book. Each chapter will add a new set of features to the application, until reaching the final chapter where we look at strategies for deploying the application.
The specific type of application we develop in this book (a multiuser blogging system) is not particularly important; rather, it is used simply as a tool to show you the process of devel-oping a web application. Each chapter is specifically designed to demonstrate particular aspects of development that may arise regardless of the type of application:
• Chapter 1, Application Planning and Design.We begin the book by looking at what defines Web 2.0, as well as looking briefly at the features that will be implemented in the application. Additionally, this chapter covers various aspects of the web develop-ment life cycle that should be considered when planning and impledevelop-menting web applications.
• Chapter 2, Setting Up the Application Framework.In this chapter, we begin to imple-ment the web application. This process begins by correctly setting up the environimple-ment (that is, installing the correct web server software) and then by creating the initial file structure of the site. In addition to connecting to the database with PHP, we will handle user requests with the Zend Framework and manage HTML code using the Smarty Template Engine.
• Chapter 3, User Authentication, Authorization, and Management.This chapter gives the first look at using a database. We look at how to easily manage database data when we implement the user system. Additionally, we look at how a role-based permissions system works and then implement it into the application.
• Chapter 4, User Registration, Login, and Logout.Continuing from Chapter 3, this chapter shows how to implement a user registration system. Since this is the first time the book deals with user-submitted data, this chapter looks at how to correctly deal with such data when we create the registration and login forms.
• Chapter 5, Introduction to Prototype and Scriptaculous.Since we make heavy use of JavaScript and Ajax in later chapters, we move away from the main application in this chapter while we explore two of the most useful JavaScript libraries available. Prototype helps programmers develop easily maintainable cross-platform JavaScript code, while Scriptaculous simplifies the process of adding appealing visual effects to web pages.
• Chapter 7, Building the Blogging System.This chapter moves on to beginning the implementation of the blogging system. In this chapter, we give users the ability to add, edit, and delete their blog posts. One of the key concepts covered is how to correctly allow user-submitted HTML while keeping the site safe and secure for visitors.
• Chapter 8, Extending the Blog Manager.This chapter largely builds on what was implemented in Chapter 7. A comprehensive Ajax example is included in this chapter that we will use to help users manage their blogs. We also integrate an open source What You See Is What You Get (WYSIWYG) editor into a blog post creation form.
• Chapter 9, Personalized User Areas.At this point in the book, users can create a new account as well as manage their very own blogs. In this chapter, we make their blogs public in the application. We give each user a public home page within our application web site in which all of their blog posts are shown. This chapter shows how to imple-ment more advanced URL schemes, as well as shows you how to enable users to customize their own experience by managing their own profiles and settings.
• Chapter 10, Implementing Web 2.0 Features.Although several of the features we define as Web 2.0 (such as standards compliancy and Ajax) apply throughout web applications, a few concrete features are often defined as being part of the Web 2.0 movement. In this chapter, we will look at some of these, including microformats, web feeds (RSS and Atom), and tagging.
• Chapter 11, A Dynamic Image Gallery.In this chapter, we expand the capabilities of the blogging system by allowing users to upload photos for each of their blog posts. This allows us to see how to correctly handle not only file uploads but also image-specific issues, such as dynamically generating thumbnails.
• Chapter 12, Implementing Site Search.This chapter is essentially split into two parts: creating search indexes based on user blog posts and then allowing site visitors to search for posts. Indexing data can be a complicated topic, but by using the tools pro-vided by the Zend Framework, the task is made simpler. After implementing the basic search functionality, we extend it to use an intuitive Ajax-based autocompleter, similar to that of Google Suggest.
• Chapter 13, Integrating Google Maps.You as a developer can use many freely available web services on the Internet to improve your own web site. In this chapter, we extend the blog capabilities further to allow users to add locations to their blog posts using Google Maps. We create an advanced sample implementation of Google Maps that combines the Google Maps API with our database using Ajax, as well as learn how to manage map data in real-time.
Prerequisites
A number of third-party applications and libraries are used in this book. We discuss down-loading and installing each of these as required, but for your reference, the following are used:
• PHP 5.2.3
• Apache 2.2 on Linux (and its variants) or Windows (earlier versions of Apache may also work)
• MySQL 5 or PostgreSQL 8
• Prototype 1.5.1.1
• Scriptaculous 1.7.1 beta 3
• Zend Framework 1.0.2 or newer
• Smarty Template Engine 2.6.18
• FCKeditor 2.4.3 (an open source JavaScript WYSIWYG editor)
In addition to these applications and libraries, in this book I use several custom PHP classes that I have implemented. Each of these is available in the application source, which can be downloaded as per the following instructions.
Downloading the Code
All code listings in this book are available from the book’s web site at http://www.myphpbook.com. The source code for this book is also available to readers at http://www.apress.comon this book’s page on the Apress web site. You can download the full web application as it stands at the end of any of the chapters.
Additionally, I’ve included a number of bonus add-ons in the source code, including an administration area and a blog post commenting system.
Contacting the Author
If you have any questions about the code in this book, your first stop should be the book’s web site at http://www.myphpbook.com. This web site contains answers to frequently asked ques-tions as well as various other web development resources.
Application Planning and Design
I
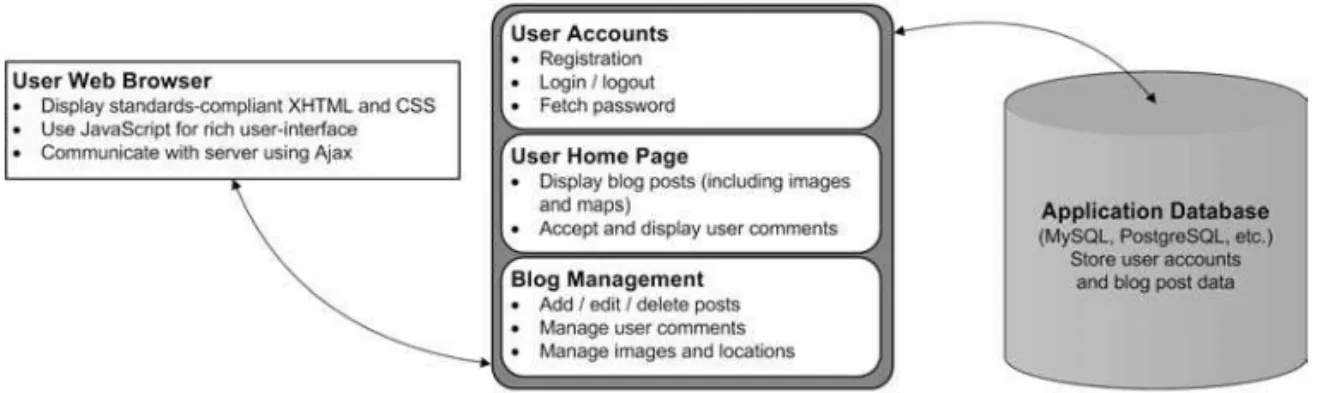
n this book we will be creating a blogging web application that will allow us to cover not only all of the different PHP and database considerations involved, but also a number of different Web 2.0 principles (such as Ajax and tagging). The blogging application will allow users to create and manage their own blog. Each user will have their own public page on which their blog posts are published.Figure 1-1 shows how the application will be structured. As you can see, we will use a data-base to store application data, and we will create separate logical areas in the application to manage each feature as required. Additionally, one of the core aspects of Web 2.0 applications is using standards-compliant XHTML and CSS. We will focus on developing clean markup and well-structured JavaScript classes to ensure maximum compatibility and accessibility.
Figure 1-1.The basic structure of our web application
There are a number of different aspects of the application that we must cover, including database connectivity, template management, user authentication and permissions, and con-sumption of third-party web services.
In this chapter we will look at all features of the web application from a “black box” point of view. Each specific feature will be broken down in its respective chapter; here we will look at the application as a whole and discuss various options that need to be considered.
In essence, this chapter can be viewed as an informal design document, including an analysis of all required features and a look at design from a high-level. In developing the web application, we will be using both custom-written code as well as various third-party libraries (such as Prototype for JavaScript development, Smarty for template management in PHP, and the Zend Framework for several other features).
What Is Web 2.0?
So exactly what defines a web site as being “Web 2.0”? There are many different opinions on this, making it difficult to pinpoint an exact definition; however, some of the features typically associated with Web 2.0 sites are as follows:
• Using standards-compliant HTML and CSS.This allows sites to work across many plat-forms and helps with accessibility. This includes the use of microformats to generate friendly HTML that can be used across a variety of platforms (as we will see in Chapter 10).
• Using Ajax to provide a rich user interface.By performing trivial operations in the background using XMLHttpRequest, web pages can be more functional and intuitive.
■
Note
XMLHttpRequestis a JavaScript API that allows a background HTTP request to occur while a user is viewing a web page. This means that the current page can be updated based on a response from the server without the user navigating to another page on the web site. The phrase “making an Ajax request” (or similar) typically refers to performing an HTTP request in the background using XMLHttpRequest.• Sharing data using web feeds and web services.Users like to aggregate many feeds to easily receive content updates from their favorite sites using web feeds (such as RSS or Atom). Additionally, web services can enable one site to use data from other sites (for instance, we will display maps on our site using Google Maps).
• Incorporating social networking tools.Blogs and forums can enable users to commu-nicate with each other.
While none of these features or aspects of development are new, we use the Web 2.0 term to describe the current generation of web sites that make good use of HTML and CSS while perhaps improving their interface with Ajax and social-networking tools. These are sites that “do things right.” However, that’s not to say that a site that uses any of these features is neces-sarily a good site.
Database Connectivity
In this application, we will need to save a number of different types of data, including
• User accounts
• User settings
• User-submitted data (such as blog posts, images, tags)
We will be using the Zend Framework’s Zend_DBclass to handle the database abstraction. This is essentially an interface to the PDO extension for PHP 5. We will cover the installation of all required software in Chapter 2.
■
Note
In this book, all “database code” (i.e., PHP code that interacts with the database) will be self-contained within its relevant class or function. This means that if you want to use a different database abstraction layer (such as PEAR DB, ADOdb, or your own custom layer), it will be fairly straightforward to implement in place of Zend_Db.Web Site Templates
One of the reasons PHP has become so popular is that you can easily include PHP code directly within the HTML code you want to output. This makes developing simple and small web applications very easy; however, this typically doesn’t scale well. When an application grows large, it becomes difficult either to add new functionality within a bunch of HTML markup or to change the site design by sifting through the PHP code.
To deal with this, we aim to separate our application logicfrom our display logic. Essen-tially, this means the code that does the hard work (such as processing forms, reading data from the database, or checking user permissions) is performed in one place, while the HTML that will be output to the end user is stored in its own template file.
In Chapter 2 we will look at Model-View-Controller (MVC), which is a design pattern specifically describing this separation of application and display logic. We will be using the Smarty Template Engine to manage the display of templates, as this is a very popular and powerful template engine (Smarty will essentially make up the “view” portion of MVC, as we will see in Chapter 2).
Web Site Features
So far we have only looked at peripheral aspects of web application development, so let’s take a look at some specifics. Let’s look at what the end users of the web application would see.
Main Home Page and User Home Page
The home page of our web application will display blog posts from all users in a single journal. Registered users will be able to decide whether or not their posts are public and therefore are displayed on the home page.
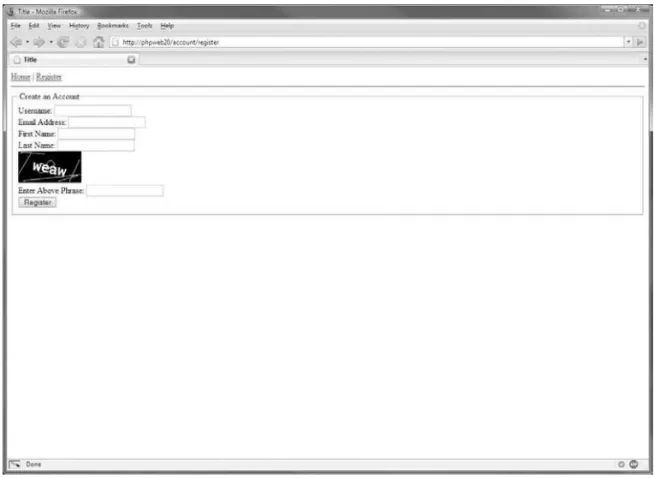
User Registration
We will need to create an account registration tool so new users can sign up and create a blog with our web application.
Essentially, this tool will need to do the following:
• Validate their details (we will use Ajax to help us with this).
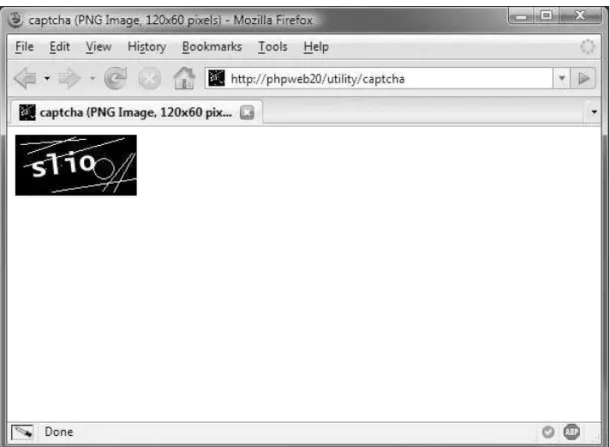
• Use CAPTCHA to prevent automated registrations.
■
Note
A CAPTCHA is typically an image made up of a series of random characters that must be entered by the user when submitting a form. This technique is used to differentiate between humans and computers. It is discussed further in Chapter 4.• Create their account in the database.
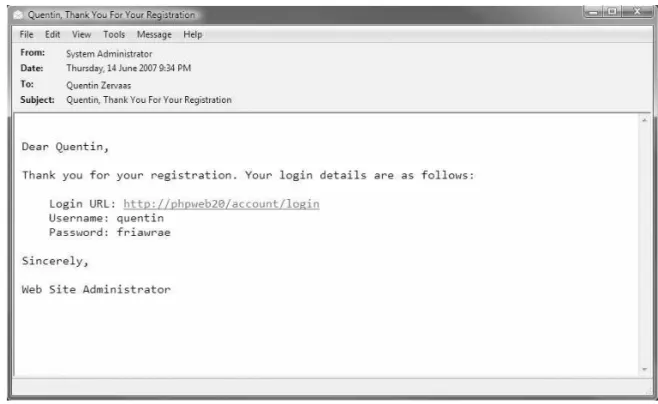
• E-mail them to confirm their account details.
Account Login and Management
Once a user has created and confirmed their account, they will be able to log in to their account. This part of the application will allow them to do several things:
• Manage their blog (see the next section).
• Update their account details (such as their e-mail address).
• Log out from their account.
User Blogs
The blog functionality is the core feature of the application, and we will use it to demonstrate a wide variety of web development and Ajax programming concepts. There are many features we must implement to make a useful blogging system. Users must be able to do the following:
• Add, edit, and delete blog posts.
• Tag posts.
• Upload images to blog posts, and display an image gallery for the user’s account.
• Tie geographical data (maps) to the blogs.
Web Site Search
It needs to be easy to use and efficient, and it must provide meaningful results. To make it easier to use, we will develop an auto-completing search box (similar to that of Google Suggest—see http://www.google.com/webhp?complete=1).
Application Management
Administration of a web site or application is very important, and it is often overlooked or underdeveloped. An administration area is used to perform day-to-day management of the web application, such as viewing web site statistics or posting news to the site.
It often doesn’t receive the attention it deserves because it requires spending development time (which means money) on an area of the site that the target demographic never sees.
In Chapter 14 we will look at various strategies for application deployment, management, and maintenance. Because this area is not for “public consumption,” advanced features and a rich interface aren’t as important as they are on the main area of the site, and we won’t be focusing on the development of this area. However, we will look at the features you should consider when developing an administration area for the blogging application.
Other Aspects of Development
In addition to the specific features of our web application, there are some other aspects we must consider in the development process. No chapters are specifically devoted to any of these topics, but they do form the basis for content that is covered throughout the book.
Search-Engine Optimization
While we are not looking to achieve high search-engine rankings with this particular web application (after all, it’s not a real-world web site we are developing), we will still aim to develop our code in a way that is optimal for search engines. This means that if you choose to extend the application developed in this book, a strong basis for search-engine ranking will have been formed.
Specifically, this means the following:
• Using friendly URLs. A friendly URL is basically a URL that doesn’t contain a lot of extraneous characters. For example, if you had a document called “About Us,” a URL such as http://www.example.com/about-uswould be user friendly, while a URL such as http://www.example.com/documents.php?id=1234would not be so friendly.
• Correctly using HTML markup (such as headings, paragraphs, and tables).
• Correctly using HTTP status codes and content types (where relevant).
PHPDoc-Style Commenting
While this is not essential for the development of our web application, it is a good habit to get into when developing. Additionally, you may find it useful when following code examples in this book to have a PHPDoc comment block before each function.
■
Note
The code displayed in this book typically won’t include any PHPDoc comments since listings will be described in the text; however, they will be included in the downloadable code for this web application where possible.PHPDoc works by placing a block of comments before each function, class, or variable definition. It is not mandatory in all situations—only where you feel it is necessary.
Each comment block begins with a description, and then is followed by a series of one or more optional parameters. For example, when adding PHPDoc comments to a function, you specify the input parameters and return value data. Obviously, the PHPDoc comments you would write for a variable definition would contain different information.
The following code shows an example of a PHPDoc comment for a simple user-defined function:
<?php /**
* mySimpleFunction *
* A simple function to return a friendly message * to the user based on their name and age *
* @param string $name The name of the user * @param int $age The age of the user
* @return string The generated welcome message */
function mySimpleFunction($name, $age) {
$str = sprintf('Hello %s, your age is %d', $name, $age); return $str;
} ?>
The first thing to note is how the block of comments begins. The /**token indicates to the PHPDoc parser that a PHPDoc comment block is beginning.
The first line of the block is a short description. My own personal preference here is to simply use the name of the function, class, or variable.
■
Note
Although it is not required, the usual convention is to include an asterisk at the beginning of each line of the /** … */ block. This is primarily to improve readability and to easily identify entire PHPDoc blocks.The final section of the comment block contains the various PHPDoc parameters used by the parser to link the API documentation together better and to provide you with useful docu-mentation. Each parameter begins with @, directly followed by the name of the parameter. Following that is the information required for that particular parameter.
In this example, you can see the @paramand @returnparameters. @paramis used to specify aspects of the function arguments: first, the type of argument (in this case, our first argument is a string); next, its name (which in this case is $name); and finally, a brief description of what the input data should contain. The @returnparameter is used to give information about the data returned from the function: the type of data is specified, followed by a brief description of what the return data contains.
For more information about phpDocumentor, read the “phpDocumentor Guide to Creat-ing Fantastic Documentation” at http://www.phpdoc.org/tutorial.php.
Security
We will be looking closely at the security of our web site, as this very important aspect of web development is often overlooked or implemented incorrectly.
For instance, we will focus on making sure attacks such as SQL injection, cross-site scripting (XSS), and cross-site request forgeries (CSRF) do not occur. This is especially important in sites that not only make use of JavaScript and Ajax, but also make heavy use of user-submitted data. We achieve this by correctly filtering submitted data while correctly “escaping”
user-submitted data when it is returned to users’ browsers.
Application Logging
An aspect of development that ties in closely to both the security and performance considera-tions is that of logging. We will maintain a log file within our application to record significant events. For example, we will record a log entry whenever somebody tries to log in but provides incorrect information.
Maintainability and Extensibility
In addition to using some well-known third-party classes and libraries, we will also be devel-oping our own custom classes in such a way that they can easily be expanded upon in the future.
Some of the ways we will make our code easily maintainable and extensible include
• Using a template engine to separate application logic from display logic.
• Using database abstraction to handle database server interaction.
• Making heavy use of the object oriented programming (OOP) features in PHP 5 to organize code.
Version Control and Unit Testing
There are two other reasonably important aspects of the web development process that we won’t be covering in this book, but that you should at least be aware of: version control and unit testing. While they are important, they don’t directly concern the concepts and libraries we will be looking at in this book.
Almost all web development projects I undertake use some form of version control (typi-cally Subversion). This allows me to track any and all changes made to the files, and it also aids with code deployment. If you’re not familiar with Subversion, I encourage you to use it for your own development projects. You can download it from http://subversion.tigris.org, and you can download the free O’Reilly book on Subversion from http://svnbook.red-bean.com.
Unit testing is another important tool that should be used when developing your own web sites (or when developing libraries you can use in multiple applications). A unit test is a script designed to test the functionality of a class (or of an entire package, or just individual methods inside a class).
You can perform automated testing using multiple unit tests, which will assist in finding regression bugs if they occur (that is, bugs that occur incidentally as a result of changing code that previously worked).
All of the code provided in this book has been tested, so including unit tests with all of the code would be somewhat redundant. For your own unit testing, you can use a package such as Simple Test (http://www.lastcraft.com/simple_test.php).
Summary
Setting Up the Application
Framework
I
n the last chapter, we covered the features that we will be implementing in our web applica-tion. Before we can get started on these features, however, we must set up our development environment. In this chapter, we will be completing a number of tasks, beginning with setting up the required server software.Following that, we will create a filesystem structure that will serve as the basis for our web application. There are a number of different types of files in our web application, and we will keep them as organized as possible. For example, we need one directory for the web server to use as the base directory from which to serve files, we need another directory to hold custom and third-party PHP libraries, and we need another to hold web site templates.
Next, we will set up the database. The actual creation of database schema and various queries will be covered in later chapters, but here we will write the PHP code required to con-nect to the database.
Then we will write code to handle client requests to our web site. We will use the Model-View-Controller design pattern to handle requests, and we will look more closely at this model in this chapter.
Finally, we will install the Smarty Template Engine into our application and set up some basic templates. We will expand on these templates as we continue through this book, but the material provided here should explain the basics of Smarty.
Also in this chapter, we will create a configuration file for our web application. This file allows you to deploy the web applications to different servers easily. For example, we will be storing database connection settings in this file, meaning that you can switch databases or the database password simply by modifying this file.
Web Server Setup
Setting up a web server correctly can be a complex task, and I cannot cover all scenarios in this book. However, I will cover the setup used for all code in this book.
I have used a somewhat typical LAMP setup (Linux/Apache/MySQL/PHP), broken down as follows:
• Operating system: Linux • Web server: Apache 2.2 • Database server: MySQL 5
Operating System
The code in this book has been developed and tested on Linux, FreeBSD, and Microsoft Win-dows XP. There are no differences in code required for any of these platforms. Note also that references to Linux can typically also include similar platforms such as FreeBSD and Mac OS X.
For Windows there are slight differences in the configuration of the web server, as well as in the application configuration file we will develop later in this chapter. Each of these differ-ences is noted in the relevant places.
Installing the Apache HTTP Server
Apache HTTP Server 2.2 is the web server of choice for this book—it is the latest stable release of Apache at the time of writing. This web server is available for Linux and Windows. Since I can’t guarantee all PHP code in this book will work correctly on IIS, you should use Apache if you are using Windows. Alternatively, you may choose to use an older version of Apache (such as 1.3 or 2.0). There should be no problems with doing so, but this cannot be guaranteed.
You can download Apache 2.2 from http://httpd.apache.org. We will use a typical con-figuration, enabling all modules (including mod_rewrite, which we require in order to use Zend_Controller). You may also wish to include extra options that aren’t included by default (such as SSL).
To install Apache on Windows, you can download the installer from the Apache web site, which will take you through the installation step by step.
The easiest way to install Apache (as well as PHP and MySQL) on Linux is to use the packaging system that comes with your operating system (such as Ports on FreeBSD). However, if you do not use a packaging system, you can install Apache 2.2.4 on Linux by downloading the httpd-2.2.4.tar.gzfile (or a newer version if one is available) and using the following commands:
# tar -zxf httpd-2.2.4.tar.gz # cd httpd-2.2.4
# ./configure --enable-modules=all # make
# make install
Note that by default this will install Apache into the /usr/local/apache2directory.
Assuming each of these steps were successful, the Apache files should now be installed. You can configure the web server by editing the /usr/local/apache2/conf/httpd.conffile. Once that has been done, you can start the web server by issuing the following command:
# /usr/local/apache2/bin/apachectl start
If there is an error in the configuration, you will be notified. Alternatively, you can issue the configtestcommand instead of startwith apachectlto ensure that the configuration is correct.
Installing MySQL 5
Next you must install MySQL 5. You can download it from http://dev.mysql.com/downloads. Just like Apache, the Windows version of MySQL 5 is very straightforward to install as it uses an installer. If you are installing on Linux, it is recommended that you download the binary distribution, as MySQL can be a slow program to compile from source. I recommend installing MySQL to the /usr/localdirectory, although you may prefer a different setup.
Assuming you have downloaded the 5.0.41 version, the commands to install MySQL on Linux are as follows:
# cd /usr/local
# tar -zxf /path/to/mysql-5.0.41-linux-i686.tar.gz # ln -s mysql-5.0.41-linux-i686 mysql
# cd mysql # ./configure
Setting up the server using a symbolic link to /usr/local/mysqlallows you to upgrade the server version in the future much more easily.
Once you have run the configure script, you can start the MySQL server with the following command:
# ./bin/mysqld_safe &
Note that this assumes you are already in the /usr/local/mysqldirectory.
It is now recommended that you add /usr/local/mysql/binto your system path so you can easily load MySQL programs when required (such as mysql, mysqladmin, and mysqldump).
Installing PHP 5.2.3
The code developed in this book is designed to run on PHP 5.2.3 (or later). We will be using many PHP 5-specific features, so you will not be able to run the code in this book on PHP 4. Strictly speaking, you can use a version of PHP 5 earlier than 5.2.3, but it is best to use the lat-est available version. Note that the Zend Framework requires a minimum PHP version of 5.1.4.
Download PHP 5.2.3 (or later) from the PHP web site
(http://www.php.net/downloads.php), and use the following commands to compile a fresh version of PHP. Note that these commands only include the minimum options required for compatibility with the code in this book.
# tar -zxf php-5.2.3.tar.gz # cd php-5.2.3
# ./configure --with-apxs2 \ --with-gd --with-curl \
--with-mysql --with-pdo-mysql \ --with-jpeg-dir --with-png-dir \ --with-freetype-dir --with-zlib # make
# make install
■
Note
Please ensure that your version of PHP is built with the GD library enabled, as we will use it in this book for generating CAPTCHA images (Chapter 4) and for resizing uploaded images (Chapter 11).When you run the make installcommand, the Apache httpd.conffile will be modified to load the PHP library; however, you may still need to add the following lines to ensure that Apache recognizes files with the extension .php as PHP files:
AddType application/x-httpd-php .php
AddType application/x-httpd-php-source .phps
This second line is optional, but it is included with the PHP documentation, so I have included it here.
You should also modify the DirectoryIndexdirective in httpd.confso index.phpfiles are treated as index files. You can simply add index.phpto this command so it looks something like the following:
DirectoryIndex index.php index.html
Application Filesystem Structure
Let’s now take a look at the filesystem structure we will be using for the web application. The precise naming and organization of the directories in the web application is not in itself criti-cal—it is simply important that everything is easy to find and manage.
In this book, we will develop the entire application within a directory called /var/www/ phpweb20(with “phpweb20” referring to the title of this book). You can, of course, use whichever directory on your own server that you choose, although we will refer back to this directory name on several occasions.
Web Root Directory
We need to define a root directory for the web server to access. This is the directory specified in the Apache configuration, and it is where Apache looks for files when a user requests a page in the web site. I will call this directory htdocs(the full path is /var/www/phpweb20/htdocs).
Most of the files in our application will exist outside of this directory (such as PHP classes and web site templates), which prevents users from directly accessing these files.
Data Storage Directory
Next, we need a directory for storing application data (that is, data in addition to that in the database). Here we will store log files (both from Apache, and those we create ourselves), files uploaded by users, as well as any other temporary data.
PHP Classes Directory
We next need a directory called include, which will be used to store all PHP functions and libraries. Any third-party scripts we use (such as Smarty) will also be stored in this directory in addition to our own code. Application controllers (scripts that define the different actions users can perform on the web site) will be stored in a directory called Controllersin the includedirectory.
When we create the Apache virtual host for our application (in the “Configuring the Web Server” section of this chapter), we will include the includedirectory in the PHP include_path directive, so our application will know where to find this code.
Templates Directory
Finally, we need a directory to hold all the web site templates. We could put these directly inside either the htdocsdirectory or the includedirectory; however, they are not PHP code (although they do contain display logic), and they shouldn’t be directly accessible (although they do contain HTML markup). We will put them in a directory called templates.
Full Directory Structure
Putting this all together, the directory structure of our web application will look like this:
/ |- /data | |- /logs
| |- /uploaded-files | |- /tmp
|- /htdocs |- /include | |- /Controllers |- /templates
To create this structure in Linux, you would issue the following commands:
# mkdir /var/www/phpweb20 # cd /var/www/phpweb20 # mkdir data
# mkdir data/logs
# mkdir data/uploaded-files # mkdir data/tmp
# mkdir htdocs # mkdir include
# mkdir include/Controllers # mkdir templates
When you view the directory listing, you should see the following:
# ls
■
Note
You will need sufficient permissions to create this directory structure. You may instead prefer to keep the code for this book in your home directory. I chose to use /var/wwwsince it is a commonly used area on web servers to hold web sites, and it is short and easy to refer back to when required. (On a typical Windows setup, you won’t need any special permissions to create the required directories.)Installing the Zend Framework
The Zend Framework is an open-source library of PHP 5 components that can be used to solve tasks that commonly arise in everyday web development. It is actively contributed to by a large number of developers, and it is backed by Zend (the company that writes the Zend Engine, which has powered PHP since PHP 4). We will be using this framework in our applica-tion, as it allows us to focus on developing a Web 2.0 applicaapplica-tion, rather than getting bogged down in the details of building an entire application infrastructure.
These are some of the components we will be using:
• Zend_Authand Zend_Acl: Used to authenticate users when they try to log in and to check their permissions (see Chapter 3)
• Zend_Controller: Used to handle client requests and direct the requests to the appro-priate classes (see later this chapter)
• Zend_Db: Used to interact with the application MySQL database • Zend_Mail: Used to send e-mails to users
• Zend_Validateand Zend_Filter: Used to check and sanitize user-submitted data in forms • Zend_Search: Used for full-text searching
We will use more components, but, as you can see, we will be making heavy use of the framework.
Download the Zend Framework from http://framework.zend.com. In this book, I used version 1.0.2, but you should use the most up-to-date version available. Use these commands to extract the library to the includedirectory:
# cd /var/www/phpweb20
# wget http://framework.zend.com/releases/ZendFramework-1.0.2/ ZendFramework-1.0.2.tar.gz
# tar -zxf ZendFramework-1.0.2.tar.gz # mv ZendFramework-1.0.2/library/Zend include
Configuring the Web Server
A typical development setup is to use your normal computer (such as your Windows or Mac OS machine) to write your code, while running the web server on another server. In such a case, you need to access the web server over a network. For example, I use a Windows machine for my day-to-day work, while my web server is a FreeBSD machine elsewhere in the office.
■
Tip
I aim to keep my development web server configured identically to my production server, as this helps to eliminate any unforeseeable issues that may arise when deploying my code (such as different versions of linked libraries).For the purposes of this book, I assume the web application is accessible using the web address http://phpweb20. In order to access my web server using this hostname, I make a fake DNS entry in my Windows host file so my browser will resolve the phpweb20hostname to
192.168.0.80. This is the entry I add in my Windows hostname file (c:\windows\system32\ drivers\etc\hostsin Windows XP):
192.168.0.80 phpweb20
■
Note
Setting up a host as described here is not related to the development of the web application, but rather allows you to access it in your web browser. Creating fake hostnames is a simple trick for develop-ment purposes, eliminating the need for a DNS server or a real domain. Once you deploy your application live, you will need to use a real hostname so other people can access your web site.If you have control over a real DNS server, you may instead prefer to create your own hostname. (Just keep in mind that I continually refer to phpweb20throughout this book.)
■
Note
You could use IP-based hosting, which would allow you to simply access http://192.168.0.80. Since name-based hosting in Apache is arguably the most common setup, I’ve chosen instead to use the method described previously (that is, setting up a fake hostname). Obviously, using a real hostname is better, but I’ve tried to simplify matters by not requiring it for this book.Creating a Virtual Host in Linux
To configure the web server, we must first create the <VirtualHost>entry for Apache. I like to store this configuration data in its own file within my application directory, and then use the
Listing 2-1.Virtual Host Configuration for Apache on Linux (httpd.conf )
<VirtualHost 192.168.0.80> ServerName phpweb20
DocumentRoot /var/www/phpweb20/htdocs
<Directory /var/www/phpweb20/htdocs> AllowOverride All
Options All </Directory>
php_value include_path .:/var/www/phpweb20/include:/usr/local/lib/pear php_value magic_quotes_gpc off
php_value register_globals off </VirtualHost>
In your main httpd.conffile (commonly found in /usr/local/apache2/conf/httpd.conf for a default Linux install), you would add the following line:
Include /var/www/phpweb20/httpd.conf
■
Note
For this VirtualHostdirective to work, you must have previously included the NameVirtualHost 192.168.0.80in your main web server configuration before loading this virtual host.There may be other directives you wish to add to your configuration, but this is a pretty standard configuration. It allows you to override configuration per directory as required with a
.htaccessfile (because of the AllowOverridedirective), and it tells the PHP module where to look for included files. In this example, it will first look in the current directory, then in the
/var/www/phpweb20/includedirectory, then finally in the PEAR library. Note that the specific location of PEAR may change depending on your Linux distribution or operating system.
■
Note
As a general rule, the PHP register_globalssetting should be set to off. If this setting is on, the form, URL, session, and cookie variables will be made into global variables, which is generally a bad thing. The problem is that for many years the default was to have this setting enabled, so some web servers will have it enabled while others won’t. All code in this book will work with register_globalsturned off, just as all code you develop should (unless there’s a particular reason to do otherwise). The same applies to theCreating a Virtual Host in Windows
Creating a virtual host in Windows is similar to the process in the previous section, except that the paths must be adjusted. Note also that the PHP include_pathdirective uses a semicolon as the separator rather than a colon, since a colon is used to indicate a drive label.
Listing 2-2 shows the Windows equivalent of Listing 2-1. Once again, you will need to include it in the main web server configuration file, typically found in C:\Program Files\Apache Software Foundation\Apache2.2\conf\httpd.confon Windows.
Listing 2-2.Web Server Configuration for Apache on Windows (httpd.conf )
<VirtualHost *:80> ServerName phpweb20
DocumentRoot "c:/www/phpweb20/htdocs"
<Directory "c:/www/phpweb20/htdocs"> AllowOverride None
Options All </Directory>
php_value include_path ".;c:/www/phpweb20/include;c:/program files/php/pear" php_value magic_quotes_gpc off
php_value register_globals off </VirtualHost>
Restarting Your Web Server
After making changes to your web server configuration, you must restart your web server. In Linux, the typical way to do this is with the following command:
# apachectl restart
In Windows, you can restart Apache by going to Control Panel ➤Administrative Tools ➤
Services and selecting restart on the Apache2 service.
Once your server has been restarted, you should be able to access http://phpweb20 directly in your browser (or by entering the server IP address directly, although if you’re using a name-based virtual host system as described previously, this will not show files from the application directory).
Setting Up the Database
To create the database, load the MySQL client program (mysql) and issue the CREATE DATABASEcommand as shown here:
# mysql -u root
Welcome to the MySQL monitor. Commands end with ; or \g. Your MySQL connection id is 1 to server version: 5.0.27-standard
mysql> CREATE DATABASE phpweb20; Query OK, 1 row affected (0.00 sec)
mysql> use phpweb20 Database changed
Next, we must create the phpweb20user and assign a password to the account:
mysql> grant all on phpweb20.* to phpweb20@localhost identified by 'myPassword'; Query OK, 0 rows affected (0.01 sec)
■
Warning
I use the password myPasswordfor this book, but if you plan on deploying this application and using it as a real-world site, it is essential that you use a different password than the one created here, as anybody who has read this book will be able to access your database if you don’t.To ensure that the database and user have been correctly created, try exiting from the MySQL client and connecting using the new details. To do so, type the following command and then enter your password when prompted:
# mysql -u phpweb20 -p phpweb20
We will next take a quick look at handling client requests, and then we will return to our MySQL database and look at the PHP code for accessing the database.
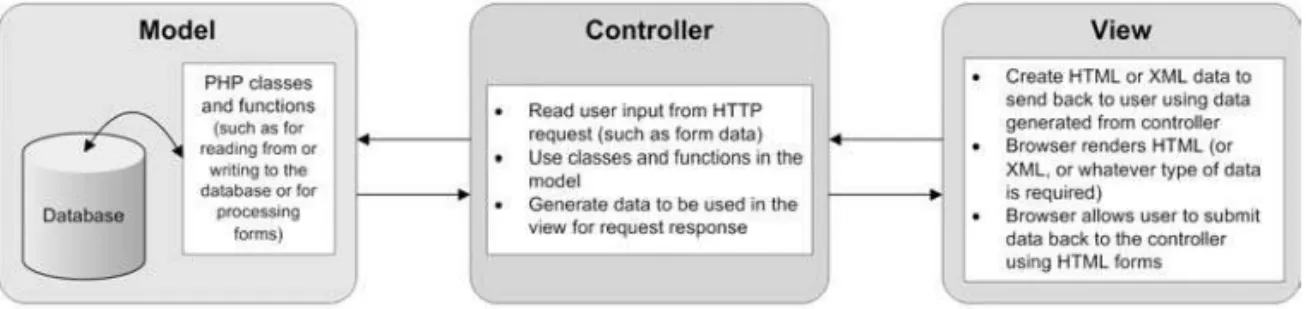
Using the Model-View-Controller Pattern
The Model-View-Controller (MVC) design pattern is a commonly used method of designing web applications. In simple terms, it separates the presentation of the application from the underlying application logic.
The three parts of the pattern work as follows:
• Model:This represents the application logic. It performs the “hard work” of the applica-tion, such as interacting with the database, processing credit card transactions, or sending e-mails to users.