| 427
Developing Learning Media of the Projection Drawing to Improve the
Quality of Learning Process and Outcomes
Mulyantoa and Ani Rakhmawatia
aFaculty of Teacher Training and Education
Universitas Sebelas Maret Surakarta Indonesia
Corresponding e-mail: [email protected]
Abstract: The study aims to develop a media for teaching projection drawing to improve the quality of learning
process and outcomes. The research was conducted at the Department of Arts Education, Faculty of Teacher Training and Education, Universitas Sebelas Maret, Surakarta, Indonesia. The study is a classroom action research consisting of two cycles. The subjects of the research are 20 students. The research manipulate the multimedia-based learning resource in the form of the power point presentation program that displays moving dot-points, lines, and colored objects, supported with sound effects. The data was collected through observation and interview, and is then analyzed using comparative technique to compare the condition before, during, and after the research. The result of the research, which is a media for teaching and learning projection drawing, consists of nine topics, including: concept of projection image plane, projection of points, projection of lines, projection of planes, projection of the surface of an object, projection of object rotated to the left, projection of object rotated to the front, projection of oblique object, and projection of truncated objects. The model of drawing sequence was presented sequentially as an integrated drawing item in which lines were displayed in different primary colors followed by a combination of motions and sound effects. To use the model effectively, the study finds that the configuration of dots and lines should be presented more precisely, each picture should be clearly drawn with identical sound in each movement, movement of curves should show the center point, each topic should be displayed per field, and each image should be followed by the description of the problem.
Keywords: Learning media, projection drawing, learning process, learning outcome
1. INTRODUCTION
The Projection Drawing is one of core subjects taught in the Department of Arts Education Faculty of Teacher Training Education the Sebelas Maret University. It course teaches techniques how to draw objects, both real and imaginary objects, that are projected onto a planar surface using a systematic method with the help of parallel projection lines (Sulardjohadi, 1984:9). The projected objects include dots, lines, planes, shapes, or a combination of some of these objects. The course is taught in the third semester and worth 3 credit points. The role of this course is very important because the teaching materials become a foundation for other courses related to design drawing, that is, the 4-creditsof Applied Design, 7-credits of Wooden Arts, credits of Leather Arts, 7-credits of Metal Arts, 7-7-credits of Ceramic Arts, and the 7-credits ofTextile Arts.
The teaching materials in the projection drawing have characteristics as concrete and real features, which is presented in the form of two-dimensional geometric objects that are
projected as three-dimensional objects. The teaching materials are also linear and interrelated, which means that the lesson should start with the easiest materials and then eventually progressing to the more difficult ones. In addition, the beginning of lessons is prerequisite for the subsequent materials. The teaching materials are mostly technical and exact science. However, students of the Arts Education Department are mostly high school graduates focusing on social science disciplines. This leads to problems in comprehending the lessons as well as students achievement of the competence targeted. To solve this problem, relevant teaching materials are highly needed, for example by using multimedia authoring through power point presentations.
| 428
characteristics of the students, the targeted dominant learning style such as visual, auditory, or kinesthetic, the condition of the surrounding environment, and the range of teaching. The use of media as a teaching aid
may refer to Edgar Dale’s
Cone of Experience that presents groups of experience arranged according to degree of abstraction/concept, from the most concrete to the most abstract (in Dahar, 1998; Padmowihardjo, 1994; and Sadiman, 2009: 8).
The resources used in teaching and learning projection drawing can be various, such as: (1) whiteboards and colored markers, (2) manually drawn projection images, and (3) projection image drawn in a transparent plastic displayed using an overhead projector. These traditional style of learning resources have weaknesses; therefore, it is important to start using a relevant modern learning resource base on computer technology which such as multimedia and power point presentation program. Regarding the teaching of the projection drawing, this type of media and learning resource can clearly provide a proper procedure to create a projection image. Furthermore, it can also display moving images, which will be useful in demonstrating how a line, plane, or object is created. These features cannot be found in other conventional learning and teaching media.
There are three types of projection: orthographic projection, oblique projection, and perspective projection. The similarity between the three types of projection is that all of them consist of objects, projection lines, and projection plane. The objects are always projected to the projection plane, which is usually a piece of paper. What makes them different is the position of the objects on the projection plane and how the lines are projected (Mauro et. al., 1982: 51). In terms of projection line, there are two basic types of projection: central and parallel. In parallel projection, the objects are projected through parallel lines or lights, so that the size of the resulted projection is as big as the real object. Parallel projection includes orthographic and oblique projection. In central projection or convergent projection line, the objectsare projected by means of light rays that converge at one point, so that the projected
image is smaller than the actual size of the object. Central projection is also known as perspective projection.
However, the teaching of those various types of drawing base on conventional strategies has problems and weaknesses. Therefore, the objective of this action research is to create a model of learning resource for teaching projection drawing by manipulating the program available in the Microsoft power point. This program potentially creates mediathat presentintegrated materials include texts and colored, moving images, and supported with sound effects. This learning media will be useful for lecturers as well as students to enhance achieving the competence in drawing the projection. As such, multimedia not only makes learning and teaching process easier, it enables teachers to develop a more complex teaching material.
The study has limitation. The scope of the research is limited to the aspects of resources for teaching and learning the projection drawing created using multimedia, particularly the power point presentation program. The study focuses to create materials for the teaching orthogonal projection, where all the projection lines are orthogonal to the projection plane. The projected objects are geometric shapes such as rectangles, circles, cuboids, cylinders, pyramids, and prisms. Moreover, the research specifically uses multi view orthographic projection, in which the projection plane is parallel to one of the coordinate axes of the object. The presentation of the images displays six types of view: top view, bottom view, front view, end view, left view, and right view. These images are then simplified into three points: top view, front view, and left or right view.
| 429
of the pyramid is 11, the diameter of the base is 8, and the coordinates of the center of the surface is (2, 5, 5). The position of the pyramid is upright, and the surface closest to the center point forms an angle of 45 degrees to plane II. The pyramid is then inclined at 30 degrees to the rear and 45 degrees to the left. The complete action can be seen in the Figure 1.
Figure 1. The projection of pyramid inclined
To teach these drawing projection of pyramid, students can follow the following steps, that is: (1) Determine the X-axis and Y-axis; (2) Determine the center of the base surface (2, 5, 5) and draw the pyramid base on plane I based on the center point; (3) Draw the oblique axis inclining at an angle of 45 degrees; (4) Draw the oblique pentagonal pyramid of height 11 then rotate the pyramid at an angle of 30 degrees; (5) The pentagonal pyramid is then projected onto plane I, resulting in Pyramid 1 (A1, B1, C1, D1, E1. T1); (6) Pyramid 1 and Pyramid 4 are projected onto plane II, resulting in Pyramid 2 (A2, B2, C2, D2, E2. T2); (7) Pyramid 1 and Pyramid 2 are projected onto plane III, resulting in Pyramid 3 (A3, B3, C3, D3, E3. T3); and lastly, (8) To create a clearer and more interesting projection image, each side of the object is drawn in different colors.
However, drawing each point of a projection is very complicated. For example, a pentagonal pyramid has 6 points: 5 points on the base and 1 point on the top. Therefore, a
projection image is obtained
by projecting from each point. If this is done manually, it will take a long time and each projection line cannot be drawn in different colors. It will be easier for teachers to teach and for students to understand if multimedia is used as a means of teaching and learning, which combines texts, colors, sounds, videos,
pictures, and animations (Vaughan, 2006: 2). Therefore, this classroom action research using computer technology is a powerful effort to yield the proper drawing image. The potential of multimedia in developing successful learning and teaching process and it outcomes have been applied in different school environment (Sunardi and Anggraini, 2012; Marfuatun, 2012). Not only do they attract attention of the students and their interest to learn, the use of media is effective to increase the motivation of the students and improve their learning outcomes.
According to Sutopo (in the Directorate of Workforce, 2007: 15-16), there are six components that influence the development of computer-assisted learning, including: (1) The development of concept is conducted by identifying problems, formulating objectives, analyzing the learning needs, analyzing the characteristics of the students, and planning and organizing software as learning material; (2) Two stages of designing the products; (3) Designing software and developing flowcharts to visualize the workflow of the product from the beginning to the end; (4) Collecting materials needed to create products such as the main material, animated pictures, audio for illustration, clip-art images, graphs, etc.; (5) Assembling, in which teaching material is drafted and inputted to each frame called screen mapping; (6) Trial to find out how far the created product can achieve the targeted aims and objectives. A good product must meet two criteria: instruction criteria and presentation criteria.
Based on the description above, the framework of the classroom action research in general consists of five procedures, that is: (1) Organizing lesson plans based on the
syllabus by considering the availability of learning facility (LCD and multimedia computers) owned by the institution as well as the students;
(2) Manually creating projection drawing assignments and the answer key based on the lesson plan, from the beginning to the end of the lesson;
| 430
(4) The media that has been created is then validated by a media expert and an expert in the material
(5) Then, the media is used for teaching in the classroom, observed, and evaluated for improvement and standardization
2. RESEARCH METHOD
The study was conducted through classroom action research in the Department of Arts Education, Faculty of Teacher Training and Education, Universitas Sebelas Maret (UNS) in Surakarta, Indonesia. The subjects of the research are 20 students in the third semester that started college in 2013. The study consists of two cycles, and each cycle consists of four stages including planning, action, observation, and evaluation.
During the planning stage, the researcher created a syllabus and lesson plans. Next, five assignments on projection drawing are created based on the lesson plans, together with the answer key. The assignments are to be used as learning resources. The topic of the assignments is projection of points, projection of planes, projection of cuboids, projection of pyramids, and projection of the surface of pyramids. The learning resources are validated by a media expert and an expert in projection. In the next stage, which is the action stage, the five prepared topics are delivered consecutively in five meetings. The period of each meeting is 150 minutes. During the action stage, students are requested to give comments, review, and recommendations for the improvement of the media. At the end of each meeting, students are required to do an assignment manually on an A3 paper sheet. In the observation stage, an observer analyzes
the teacher’s behavior during the action stage
and observes how the students respond to the learning process and the use of multimedia. The teacher observes the behavior of the students during the lesson. The evaluation stage is conducted by the researchers based on
the result of the observation and the students’
assignment.
Similarly, in the second cycle, four assignment topics are created, which are: projection of pyramid rotated to the left, projection of pyramid rotated to the front, projection of oblique pyramid, and projection of pyramidal frustum. The multimedia
displayed in the second cycle is a development from the one used in the first cycle, with improvement in several aspects. These media are presented in four meetings, each of which takes 150 minutes. The presentation of the media is closely observed. After the meetings, the researchers conduct an interview with the students. The interview result is used to support the observation data. Before taking any action, the students must take part in an examination, in which they are required to draw projections manually. The works of the students are evaluated to obtain an average score. The average score of the pretest is compared with the average score of the assignment in the first and the second cycle. The average score of the first cycle assignment is compared with the average score of the second cycle assignment. To compare the score, the researchers use t-test with a significance level of 5%. Lastly, the data is analyzed and evaluated in order to improve the learning media.
3. RESULT AND DISCUSSION
The objective of teaching projection drawing with multimedia is that by the end of the course, the students will be able to draw projectionof geometric figures insequential steps in order to succeed creating correct, nice-looking, and accurate projected image. The aim of the teaching and learning activity consists of four aspects: audience, behavior, condition, and degree. Audience refers to the students; behavior refers to how the students draw projection in sequential order so that it is recognizable how each element in the projection (points, lines, planes, objects) is created. Condition refers to the behavior of drawing the projection independently, with reference to the material given by the teacher, without any help from other people. Degree refers to the outcome of the projection that meets certain standards, is accurate, has decent shape, volume, and color, and easily understood by others.
| 431
line. (4) Projection of planes, which illustrates how to draw a plane. (5) Projection of the surface of an object, which shows how to draw an object.
The media for teaching projection drawing is created with certain concepts. The main materials to be displayed in the presentation are as follows: (a) in the beginning, the presentation displays the front view of a cuboid painted with red stripes. The sides are blue and the top side is green with white dots. The colors are chosen based on what adolescents may like (Widyatmoko, 2007: 191). According to Prawira (1988: 43), most adolescents like red, blue, purple, green, orange, and yellow. In addition, according to Hadi (2008), based on studies on the development of e-learning, female students tend to like soft colors and complex typefaces; while male students are interested in dark colors, animated pictures, and simple typefaces. (b) The red striped front side is then moved to the back (the cursor blinks and move to the back following the red plane) until it comes close to the back panel/projection plane II. (c) The green dotted side, which is now on the top, is moved down (the cursor blinks and move down following the green side) until it comes close to the base/projection plane I. (d) The blue side is moved to the left (the cursor blinks and moves to the left following the blue side) until it comes close to the side panels/projection plane III. (e) The red striped side, the green dotted side, and the blue sides are projected on each of the three projection planes. In this display, the projection plane is a three-dimensional space. (f) Next, the space is altered into a two-dimensional flat surface. The alteration is shown through the side surfaces/projection plane III that are tilted to the left so it becomes parallel with the back panel /projection plane II. (g) Then, the base is tilted down so that it becomes parallel with the back panel. (h) Finally, the sides and the base are parallel with the back panel, resulting in a two-dimensional projection plane.
The “projection of points”media displays
how to determine the coordinates of point (6, 3, 2) on plane I, plane II, and plane II. There are several things to be taken into consideration in order to improve the media: (1) A fulcrum support needs to be added in
drawing curves. The fulcrum should be blinking throughout the process of drawing the curve. (2) In drawing points, it would be better to have transparent projected points; then after all points (A1, A2, A3) intersect, the transparent point will be made opaque.
The “projection of lines” media consists
of several slides. The first slide displays the problem statement. The second slide shows how to find the coordinate of Point A on Plane I and on Plane II. The third slide displays how to find Point A on Plane III by moving the red line from A1 to A3 and line from A2 to A3. When the red curve moves, the red fulcrum on the intersection of the axes starts blinking. This indicates that the point is the axis of the movement of the curve. The next slide shows how to draw Point B1, B2, and B3 similar to how Point A1, A2, and A3 are made. After B1, B2, and B3 intersect, the next step is drawing Line A1B1 by connecting A1 to B1, drawing Line A2B2 by connecting A2 to B2, and drawing Line A3B3 by connecting A3 to B3.
The “Projection of plane” media also
consists of several slides. The first slide displays the problem statement. The second slide displays rectangle ABCD parallel with plane II and both of its sides are parallel to X and Y-axis. The rectangle is projected on to plane I, resulting in a line. The third slide shows the rectangle ABCD projected on to plane III, resulting in a line as well. On the next slide, the results of the two projections are combined, showing that when the position of an object is parallel to the projection plane, its projection will become a line.
The teaching of the projection of the pyramid surface media starts with brainstorming of the problem statement. The next slides consecutively display how to draw the base of the pyramid on Plane I, how to draw the projection of the pyramid on Plane II, how to draw the Projection of the pyramid on Plane III, and how to draw a red curve as the
sides of the pyramid’s surface. Next, the media
| 432
1a1b
Limas alas segi enam beraturan dibuka kulitnya
Figure 2. The media of drawing projection of the truncated leather prism
The second cycle yields media in four topics: (1) Projection of object rotated to the left or right. (2) Projection of object rotated to the front or back. (3) Projection of oblique object. (4) Projection of truncated object and the size of its actual area.
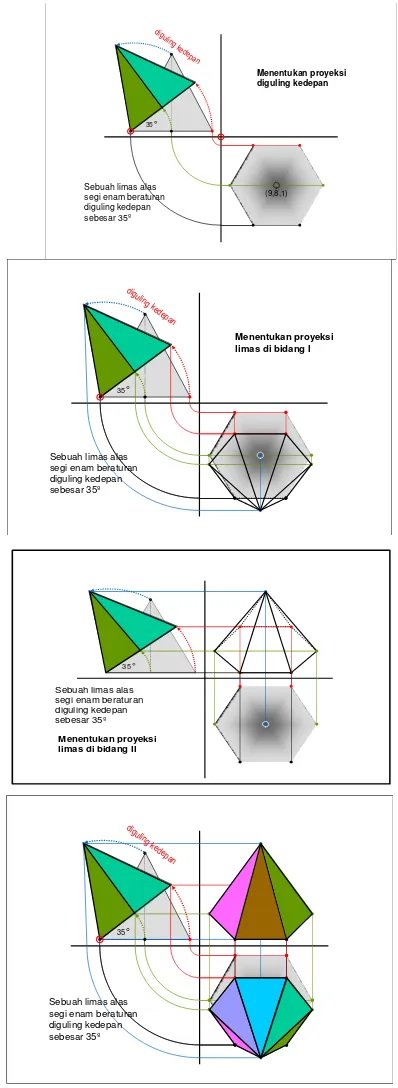
The media for the “pyramid rotated to the
front” starts with displaying a hexagonal
pyramid and its center point on Plane I. After that, the seven points of the pyramid are projected onto Plane III, and creating left view pyramid with its height. The pyramid is then rotated to the front (on the picture, it is rotated to the left) at an angle of 35 degrees, indicated by a dotted curve moving to the direction of
the rotation and a text saying “rotated to the
front” (see Figure 3a). On the second slide, the
rotated pyramid on Plane III is projected onto Plane I, indicated by a projection line from Plane III to Plane I. Next, a projection line is drawn on Plane I from the beginning point of the object to the front (on the picture, it is drawn from the top to bottom), so that the two projection lines from the seven points intersect on Plane I. The seven points are connected to form a pyramid rotated to the front (Figure 3b). The third slide shows the pyramid points on Plane I and Plane III are projected onto Plane II, so that the projection lines from the seven points intersect on Plane II forming a pyramid rotated to the front (Figure 3c). On the fourth slide, the three pyramid projections on Plane I, II, and III are colored. The coloring process starts with the pyramid on Plane I, followed by the pyramid on Plane II and finally Plane III. The process results in colorful projection of pyramid rotated to the front (Figure 3d). One
idea that can be implemented to improve the media is adding an information text indicating the rotating angle of 35 degrees. In addition, when the object is rotated, it will be helpful to draw a rotation projection line in form of dotted line and a rotation fulcrum point.
digu ling
ked ep
an
(9,8,1)
35°
Sebuah limas alas segi enam beraturan diguling kedepan sebesar 35º
Menentukan proyeksi diguling kedepan
digu ling
kedep an
35°
Sebuah limas alas segi enam beraturan diguling kedepan sebesar 35º
Menentukan proyeksi limas di bidang I
digu ling
ked ep
an
(9,8,1)
35°
Sebuah limas alas segi enam beraturan diguling kedepan sebesar 35º
Figure 3a-3dThe projection drawing media of pyramid inclined to front
35° Sebuah limas alas segi enam beraturan diguling kedepan sebesar 35º
| 433
The oblique pyramid projection media can be improved by drawing helping fulcrum line to rotate the object. The step to make a moving line begins with drawing a blinking point that moves to the end line. To draw a regular hexagon, first, determine the center of the circumcircle and its coordinate. Then, connect the vertices. For sound effect, a popular Indonesian pop music was chosen. Mack (1995: 20) recommends a popular pop music to improve the focus of comprehension. Several improvements also that can be done to improve
the “projection of truncated object” media are
for example explaining the distance when determining the helping axis and adding description of the truncated object and the whole/actual object by writing it on the object. For this study, the researchers conducted three tests: pretest (before the research), posttest I (after the first cycle completed), and posttest II (after the second cycle completed). The average scores of the pretest, posttest I, and posttest II consecutively are 2.75, 3.17, and 3.41 (the grading system uses 4-point grading scale, with 4 being the highest and 0 being the lowest). It can be seen that the average score increases, indicating that the implementation of multimedia in the first and second cycle is a significant influence. According to the result of the t-test before the research and after the first cycle (t0-1), the score is 12.41 with the significance rate of 95% and the t-table of 2.09. This shows a significant difference between the score before and after the first cycle. This result indicates that the media implemented in the first cycle is relevant. Moreover, the t-test score before and after the second cycle (t0-2) increases to 20.66 with the significance rate of 95% and t-table of 2.09, showing a significant improvement after the second cycle. This indicates that the media used in the second cycle is also relevant. The average t-test score after the first cycle and the second cycle (t 1-2) is 13.27 and t0,05 is 2.09, indicating a significant improvement after the first and the second cycle. It can be concluded that the media used for teaching in the second cycle is relevant.
Based on the analysis of the observation and interview data, it is proven that during and after the lesson that was delivered through the media of power point presentation, the
student’s quality of learning has improved.
There are several aspects that indicate the
improvement, including the student’s more
focused attention to the lesson, bigger learning passion, better motivation, obedience in submitting assignments, better understanding about the projection drawing lesson, as well as the livelier classroom discussions. Therefore, based on the average test score, the t-test result before and after the research, and the observation and interview during and after the research, the researchers conclude that the multimedia as a learning resource significantly influences the improvement of the quality of
student’s learning process and outcome.
4. CONCLUSION
Based on the discussion, it can be concluded that the most appropriate learning media to teach projection drawing must include the following characteristics:
(a) At the beginning of the presentation, it is important to display descriptive
information about the
assignment/instruction.
(b) When drawing points, in the beginning they should be made transparent. Only after all projection lines have been created are the points drawn opaquely.
(c) When creating a moving line, it is important to give mark on the position of the line, for example with blinking points. Next, the movement of the projection line in the beginning topics should not be too fast (around three to five seconds). In the next advanced topics, the movement may be faster (two to three seconds).
(d) In drawing curves, it is important to create points with the same color as the curve that are blinking when the curve moves until it stops moving.
(e) Use contrasting striking colors to draw projection lines.
(f) In the beginning topics, the projection lines should move individually. In the
next topics, they may move
simultaneously.
(g) In drawing truncated objects, there is no need to name the objects such as object 1, 2, 3, and so on. It is enough to write only
“truncated object”.
| 434
projection plane. If the projection is drawn on Plane I, the projections on other planes are not shown in order not to distract the concentration of the students to understand the lesson.
(i) Information texts about the angle of the object rotation should be displayed in the relevant place.
(j) It is better to use the same sound effect for every type of movement. The sound effect should not be too extreme and should be ear catching.
Last but not least, to develop a learning resource using multimedia, one should consider the readability of the message and information. The media should be easily understood by students, even by ones with the lowest skill of understanding. In addition, the attractiveness of the media should also be adapted to the age of the students.
REFERENCES
Association of Education and Communication
Technology (AECT). (1977). The Definition of Education Technology. Washington: AECT Anitah, S. (2009).Media Pembelajaran. Surakarta: FKIP
UNS
Dahar, R.W. (1988). Teori-teoriBelajar. Jakarta:
Departemen Pendidikandan Kebudayaan,. Direktorat Ketenagaan, DitjenD ikti, Depdiknas. (2007).
Pengembangan Inovasi Pembelajaran. Direktorat
Jenderal Pendidikan Tinggi,Proyek
Pengembangan Lembaga Pendidikan Tenaga Kependidikan
Effendi, Y. (1978).Disain Warna Susunan dan
Fungsinya. Bandung: ITB
Frick, H. (1979). Menggambar Bangunan Kayu. Yogyakarta: Kanisius
Hadi, M.S. (2008). “Studi Analisis Pengembangan Desain dan Warna yang Berwawasan Gender pada Pembuatan Media Pembelajaran Berbasis
E-Learning”, Jurnal Pendidikan dan Pembelajaran, XV (1).
Kardun.(1985). Ilmu Proyeksi. Jakarta: PT Pradnya Paramita.
Mack, D. (1995). Apresiasi Music Popular. Yogyakarta: Yayasan Pustaka Nusantara.
Marfuatun, S.M. and Kun S.B..(2012). “Pengembangan
Media PembelajaranBerbasis Program Director MX pada Pembelajaran Topik Kimia Inti dan
Radiokimia”, Cakrawala Pendidikan. XXXI (2), 256-266.
Mauro.(1982). Teknik Menggambar Arsitektur. Bandung Miles, M. B. and Huberman, A. M. (1984).Qualitative
Data Analysis: A Sourcebook of New Methods. Berverly Hills: Sage Publications
Padmowihardjo, S. (1994).Psikologi Belajar Mengajar. Jakarta: Universitas Terbuka.
Prawira, S.D. (1988). Warna sebagai Salah Satu unsure
Seni dan Desain.Jakarta: Departemen
Pendidikan dan Kebudayaan, Direktorat
Jenderal Pendidikan Tinggi, Proyek
Pengembangan Lembaga Pendidikan Tenaga Kependidikan.
Sardiman, A.S.; Rahardjo R.; Anung H.; and Rahardjito.
(2009). Media Pendidikan: Pengertian,
Pengembangan dan Pemanfaatannya. Jakarta: Rajawali.
Suhardiman.(1988). Perspektif dan Proyeksi.Klaten: Intan Pariwara
Sulardjohadi.(1984). Gambar Proyeksi Metode dan Macamnya. Jakarta: Wijaya
Sunadi and Anggraini, D. (2012).“Pengembangan Bank
Soal dan Pembahasan Ujia n Nasional berbasis
Multimedia Pembelajaran Interaktif dengan
Macromedia Authorware 7.0”, Cakrawala Pendidikan, XXXI (3), 394-408.
Suparyono, Y. (1988). Konstruksi Perspektif.
Yogyakarta: Kanisius
Widyatmoko.(2007). Irama Visual. Yogyakarta: Jala Sutra.