AutoIt v3: Your
Quick Guide
by Andy Flesner
Copyright © 2007 O’Reilly Media, Inc. ISBN: 978-0-596-51512-6
Released: September 14, 2007
AutoIt is becoming increasingly popular
in the system administration field as a
tool for automating administrative tasks.
Although this is one of its more popular
uses, you can use AutoIt to automate
anything in a Windows environment.
This powerful scripting language can run
any program and manipulate keyboard
and mouse input. With its RunAs
sup-port, administrators can perform
unat-tended installations and configuration
changes using embedded administrative
privileges.
This guide teaches you the foundations
of the AutoIt v3 language. You will learn
about variables and includes, graphical
user interfaces, user-defined functions,
and conditional and loop statements.
You will then apply what you have
learned in examples related to the system
administration field. The examples in
this Short Cut can be used to create
any-thing from a game modification to a
log-on script that verifies Windows updates.
Contents
Introduction and AutoIt
History ... 2
Variables and Includes ... 2
Graphical User Interfaces
Introduction and AutoIt History
AutoIt started in late 1998 as a C-compiled program used to automate keystrokes
during software installations. In January 1999, the AutoIt team released AutoIt v1,
which included the
Send
,
Run
,
RunWait
,
WinWait
,
WinWaitClose
,
WinWaitActive
,
WinHide
,
WinActivate
,
WinClose
,
WinRestore
,
Sleep
and
SetKeyDelay
functions.
Au-toIt v2 was released in August that same year and included the first version of
AutoItX, which offered DLL/COM control. Over the next two years, massive
up-dates to AutoIt v2 added many new functions to the language. In May 2001, the
AutoIt source code was completely rewritten in C++ and development stalled until
2003, when the first beta version of AutoIt v3 was released. Over 100 beta versions
later, the AutoIt developers released AutoIt v3 in February of 2004. February of
2005 marked the release of AutoIt v3.1.0, which added the capability of graphical
user interface (GUI) creation. This version was the most notable release because
it brought AutoIt to the forefront of the scripting world and made it a rival to Visual
Basic Scripting, batch files, and other popular scripting languages. AutoIt is free
to use and has a strong and helpful community base.
This Short Cut is a guide for AutoIt v3.2.4.9, released on May 25, 2007. Download
the latest version of AutoIt here:
http://www.autoitscript.com/autoit3/down
loads.php
I recommend using the SciTE AutoIt3 Editor for writing scripts. It has an extensive
help file and color-codes everything nicely. You can download the latest SciTE
AutoIt3
Editor
here:
http://www.autoitscript.com/autoit3/scite/down
loads.php
Variables and Includes
A variable is simply a named placeholder for a string or array of data. You can use
a variable as many times as you need within a script and it only requires declaration
once. This allows you to manage and manipulate data in a centralized location if
desired.
Example 1. Windows Update Automation
If @Username <> "Administrator" Then
RunAsSet("Administrator",@ComputerName,"password")
install()
RunAsSet() Else
install() EndIf
Func install()
RunWait("Windows Update 1.exe /passive /norestart") RunWait("Windows Update 2.exe /passive /norestart") EndFunc
Example 2. Windows Update Automation Using Variables
Global $admin, $password, $program, $program2
$admin = "Administrator"
$password = "password" ; change password to the password for the Administrator account
; change the following program names to the actual filenames of 2 Windows updates $program = "Windows Update 1.exe /passive /norestart"
$program2 = "Windows Update 2.exe /passive /norestart"
If @Username <> "Administrator" Then
RunAsSet($admin,@ComputerName,$password)
install()
RunAsSet() Else
install() EndIf
Func install()
RunWait($program) RunWait($program2) EndFunc
Note how modifying the variables listed in the variable declarations can change
the program names. This practice becomes more useful as you develop more
com-plicated scripts.
Variable Types—Dim, Global, and Local
There are three types of variables in AutoIt:
Dim
Declaring a variable using
Dim
gives it the scope of its current location within
The following is an example of declaring a
Dim
variable in the global scope. It
runs
setup.exe
in the directory where the script is located:
Dim $variable = @ScriptDir & "\setup.exe" Run($variable)
The next example shows how declaring a
Dim
variable inside a function allows
it only
Local
scope and how the variable is destroyed once the function is
com-plete. The result is a script that errors out when run because
$variable
is not
declared globally:
function()
Func function()
Dim $variable = @ScriptDir & "\setup.exe" EndFunc
Run($variable)
You should explicitly declare variables as
Global
or
Local
to avoid problems. If
a
Dim
variable is declared inside a function but a
Global
variable already exists,
the
Global
variable is overwritten. The following example shows what happens
if a
Global
variable exists when the same variable is declared as
Dim
within a
function. The result is that
setupbad.exe
runs instead of
setup.exe
; the
Global
$variable
is modified to
setupbad.exe
because
Dim
was used to declare the
var-iable locally within the function:
Global $variable = @ScriptDir & "\setup.exe"
function()
Func function()
Dim $variable = @ScriptDir & "\setupbad.exe" EndFunc
Run($variable)
Global
This type of variable can be read from or written to from anywhere in the script.
Global
variables can be used in functions without being destroyed when the
functions complete. The following is an example of declaring a
Global
variable:
Global $variable = 2
Local
A
Local
variable is used in the scope of a function. Once the function is
exists, the function modifies the
Global
variable and it is not destroyed when
the function completes. Variables are always checked in the local scope first,
then in the global scope. The following example shows the use of a
Local
var-iable within a function:
function()
Func function()
Local $variable = @ScriptDir & "\setup.exe" Run($variable)
EndFunc
AutoIt Variable Explicit Declaration Is Not Required
AutoIt does not require the explicit declaration of variables. However, as a
debugging measure it is wise to explicitly declare all variables used within a
script. If you do not explicitly declare variables, it can become very difficult
to find a mistyped variable name that may be causing your script to error on
execution. You should include the following in your scripts to require the
explicit declaration of variables in order to avoid bugs:
Opt("MustDeclareVars", 1)
With this option enabled, all variables must now be explicitly declared using
Global
,
Local
, or
Dim
.
Constants
A constant is a variable that never changes. It remains a static value for the entire
script execution. You cannot change the value of a constant, nor can you convert
an existing variable into a constant. Placing Const after Dim, Global or Local makes
the variable a constant. You can also declare a constant variable without explicit
declaration. The following example illustrates how to declare a constant variable
in each scenario:
Const $example = 0
Dim Const $example1 = 1
Global Const $example2 = 2
Local Const $example3 = 3
Arrays
An array is a matrix of data in which all the elements are of the same data type and
size. For example, an array of two numbers—“5” and “3”—is declared as follows:
$num[0] = "5"
Arrays can also be multidimensional, with up to 64 dimensions.
Example 3
shows
a two-dimensional array.
Example 3. Two-Dimensional Array
$letter[0][0] = "w"
$letter[0][1] = "x"
$letter[1][0] = "y"
$letter[1][1] = "z"
A visual representation of
Example 3
would be a 2×2 matrix as displayed in
Figure 1
.
Note
Variants—Arrays with Differing Data Types
An array using different data types is known as a variant and can contain
anything from a number to a Boolean value. Variants are not restricted in
AutoIt; however, they are not recommended. Using differing data types in
an array—especially arrays within an array—can dramatically decrease the
execution speed of your scripts.
Finding the Correct Include
Includes are files that contain prewritten functions for AutoIt. Think of them as
functions written into your script that you can call to perform actions for you. You
can utilize these files by adding them to your script with the following:
#include <filename.au3>
Table 1. AutoIt v3 Standard Includes
Include
Description
Array.au3
Functions that assist with array management
AVIConstants.au3
AVI Constants
ButtonConstants.au3
Button Constants
Color.au3
Functions that assist with color management
ComboConstants.au3
ComboBox Constants
Constants.au3
Various AutoIt Constants
Date.au3
Functions that assist with dates and times
DateTimeConstants.au3
DateTime Control Constants
EditConstants.au3
Edit Constants
File.au3
Functions that assist with files and directories
GuiCombo.au3
Functions that assist with ComboBox
GUIConstants.au3
Includes all GUI related constants
GUIConstantsEx.au3
Constants to be used in GUI applications
GUIDefaultConstants.au3
GUI default control styles
GuiEdit.au3
Functions that assist with Edit control
GuiIPAddress.au3
Used to create a GUI IP Address Control
GuiList.au3
Functions that assist with Listbox
GuiListView.au3
Functions that assist with ListView
GuiMonthCal.au3
Functions that assist with MonthCal
GuiSlider.au3
Functions that assist with Slider Control “Trackbar”
GuiStatusBar.au3
Functions that assist with the Statusbar control
GuiTab.au3
Functions that assist with the Tab Control
GuiTreeView.au3
Functions that assist with TreeView
IE.au3
Internet Explorer Automation UDF Library for
Auto-It3
Inet.au3
Functions that assist with the Internet
ListBoxConstants.au3
ListBox Constants
ListViewConstants.au3
ListView Constants
Include
Description
Memory.au3
Memory management routines
Misc.au3
Functions that assist with Common Dialogs
Process.au3
Functions that assist with process management
ProgressConstants.au3
Progress Constants
SliderConstants.au3
Slider Constants
Sound.au3
Functions that assist with Sound files
SQLite.au3
Functions that assist access to an SQLite database
SQLite.dll.au3
Inline
SQLite3.dll
StaticConstants.au3
Static Constants
StatusBarConstants.au3
StatusBar Constants
String.au3
Functions that assist with String manipulation
TabConstants.au3
Tab Constants
TreeViewConstants.au3
TreeView Constants
UpDownConstants.au3
UpDown Constants
Visa.au3
VISA (GPIB & TCP) library
WindowsConstants.au3
Windows Constants
FileInstall—Including Files in AutoIt Scripts
The
FileInstall()
function allows the inclusion of any file—such as an executable
or image file—in the compiled script executable. This is similar to
#include
, but
it dramatically increases the size of your compiled executable in most cases. This
is the syntax of the
FileInstall()
function:
FileInstall("sourcefile","destination" [,flag])
The flags for
FileInstall()
are optional. A flag of 0 tells the function not to
over-write existing files. Use a flag of 1 if you would like to overover-write any existing files
the script may encounter. The source file cannot be a variable; it must be a string,
and it cannot contain wildcards.
Example 4
is an installation you can perform with the
FileInstall()
function that
extracts all installation files to the temp directory. When compiled, the entire
in-stallation is a single executable.
Example 4. Using the FileInstall() Function
#NoTrayIcon
FileInstall("C:\Documents and Settings\Administrator\Desktop\Program\" & _ "Setup.exe", @TempDir & "\Setup.exe", 1)
FileInstall("C:\Documents and Settings\Administrator\Desktop\Program\" & _ "Setup.exe", @TempDir & "\setup.ico", 1)
FileInstall("C:\Documents and Settings\Administrator\Desktop\Program\" & _ "Setup.exe", @TempDir & "\setup.ini", 1)
FileInstall("C:\Documents and Settings\Administrator\Desktop\Program\" & _ "Setup.exe", @TempDir & "\program.dll", 1)
FileInstall("C:\Documents and Settings\Administrator\Desktop\Program\" & _ "Setup.exe", @TempDir & "\readme.txt", 1)
Run(@TempDir & "\Setup.exe")
WinWait("Installation Wizard", "Welcome to the")
If Not WinActive("Installation Wizard", "Welcome to the") Then _
WinActivate("Installation Wizard", "Welcome to the") WinWaitActive("Installation Wizard", "Welcome to the") ControlClick("Installation Wizard", "", "Next")
WinWait("Installation Wizard", "Installation Complete")
If Not WinActive("Installation Wizard", "Installation Complete") Then _
WinActivate("Installation Wizard", "Installation Complete") WinWaitActive("Installation Wizard", "Installation Complete") ControlClick("Installation Wizard", "", "Finish")
In this example,
FileInstall()
copies five files to the temp directory, then the
Run
()
command runs
Setup.exe
. The program then waits for the installation wizard to
appear using
WinWait()
and makes it active using
WinActivate()
before clicking
Next with
ControlClick()
and then Finish with
ControlClick()
to complete the
installation.
Line Continuation
An underscore ( _ ) signals that the current line of code continues onto the
next line. This practice keeps code clean and alleviates line wrapping and/
or lines running off the side of the screen when writing or editing scripts.
If the line being separated is a string, it must be closed and linked to a new
string on the following line, as shown in this example:
Incorrect:
"string _continuation of string"
Correct:
"string" & _
Graphical User Interfaces (GUIs)
One of the newest features of AutoIt is its ability to create graphical user interfaces.
This feature adds an extraordinary amount of possibilities to the already useful
AutoIt language. Some of the most common uses of a GUI are installation menus,
input forms, and progress bars.
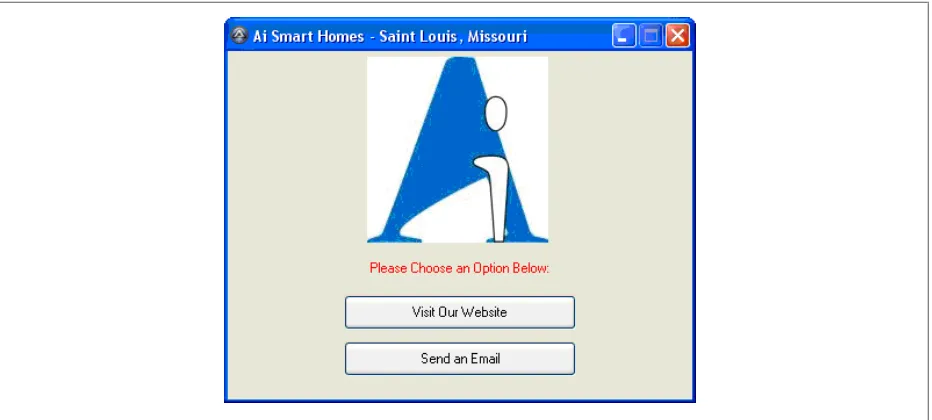
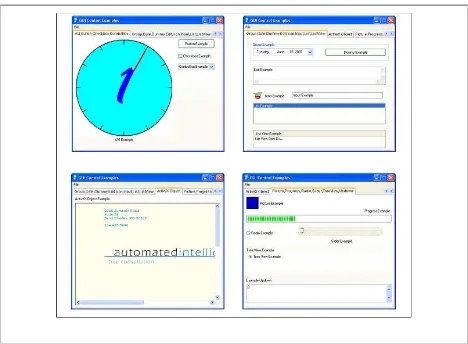
I am beginning this section with an example so you can see the layout of GUI creation
and get familiar with the functions used to create GUIs. Example 5 displays a
two-button GUI with instructions and an image. It can be modified and used for anything
you can use a two-button chooser for: an installer for two different programs, a
chooser for two different types of users, etc. You can easily increase the size of the
GUI and create more buttons. You will learn what each GUI function does and how
to configure each of them later on in Example 8
.
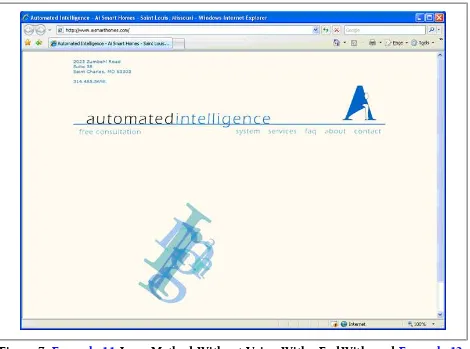
Example 5. Graphical User Interface—Ai Smart Homes
; Includes the GuiConstants (required for GUI function usage) #include <GuiConstants.au3>
; Hides tray icon #NoTrayIcon
; Change to OnEvent mode Opt('GUIOnEventMode', 1)
; GUI Creation
GuiCreate("Ai Smart Homes - Saint Louis, Missouri", 400, 300) GuiSetIcon("icon.ico")
; Runs the GUIExit() function if the GUI is closed GUISetOnEvent($GUI_EVENT_CLOSE, 'GUIExit')
; Logo / Pic
GuiCtrlCreatePic("logo.jpg",120,5,156,160)
; Instructions
GUICtrlCreateLabel("Please Choose an Option Below:", 50, 180, 300, 15, $SS_CENTER) GUICtrlSetColor(−1,0xFF0000) ; Makes instructions Red
; Button1
GUICtrlCreateButton("Visit Our Website", 100, 210, 200, 30) GUICtrlSetOnEvent(−1, 'website') ; Runs website() when pressed
; Button2
Func website()
; Hides the GUI while the function is running
GUISetState(@SW_HIDE)
Run("C:\Program Files\Internet Explorer\iexplore.exe www.aismarthomes.com") Exit
EndFunc
Func email()
; Hides the GUI while the function is running
GUISetState(@SW_HIDE)
Run("mailto:[email protected]") Exit
EndFunc
; Shows the GUI after the function completes GUISetState(@SW_SHOW)
; Idles the script in an infinite loop - this MUST be included when using OnEvent mode
While 1
Sleep(500) WEnd
; This function makes the script exit when the GUI is closed Func GUIExit()
Exit EndFunc
Figure 2
displays the GUI created by
Example 5
. Assuming
logo.jpg
is in the same
directory as the
*.au3
script file when it is compiled, a logo is displayed on the GUI
as shown.
Note
Comments in a Script
Comments in an AutoIt script can be denoted in two ways:
1.
Semicolon
. The semicolon denotes the beginning of a comment on a
single line. Anything following a semicolon on a single line is
commen-ted. If your comment runs onto the next line, you must begin that line
with another semicolon or the script reads that line as code and most
likely errors upon execution.
2.
#comments-start and #comments-end (also denoted as #cs and #ce)
.
These commands comment an entire section of text within a script on
multiple lines. Anything after
#comments-start
or
#cs
is commented
until
#comments-end
or
#ce
is used to close the comment.
GUI Event Modes
How do you make something happen when a button is clicked on your GUI? There
are two different event modes you can use to cause a reaction in your script when
a button is pressed:
1.
MessageLoop (default)
. This is the default mode; it causes the GUI only to
respond to events if the
GuiGetMsg()
function is called. It is wise to call this
function many times per second in a loop; otherwise, you will have a slow or
unresponsive GUI. The following loop continuously calls the
GuiGetMsg()
function until one of the two buttons are pressed or the user attempts to close
the GUI:
While 1
$guimsg = GuiGetMsg() Select
Case $guimsg = $GUI_EVENT_CLOSE
Exit ; closes the GUI
Case $guimsg = $button1
button1(); runs button1 function
Case $guimsg = $button2
button2(); runs button2 function
EndSelect WEnd
Notice that the loop is infinite (noted by
While 1
; you will learn more about
this in the Conditional and Loop Statements section later in the Short Cut).
The
$guimsg
variable will be continuously updated by the
GuiGetMsg()
causes a respective function to run. Closing the GUI causes the program to
exit.
Example 6
incorporates the
GuiGetMsg()
loop into a fully functional
script.
Example 6. The GuiGetMsg() Method
; Includes the GuiConstants (required for GUI function usage) #include <GuiConstants.au3>
; GUI Creation
GuiCreate("Menu", 400, 150)
; Button1
$button1 = GUICtrlCreateButton("Button1", 100, 20, 200, 30)
; Button2
$button2 = GUICtrlCreateButton("Button2", 100, 70, 200, 30)
; Shows the GUI after creation GUISetState(@SW_SHOW)
Func Function1()
; Hides the GUI while the function is running
GUISetState(@SW_HIDE)
; ================
; The script you would like to perform for Button1 goes here ; ================
EndFunc
Func Function2()
; Hides the GUI while the function is running
GUISetState(@SW_HIDE)
; ================
; The script you would like to perform for Button2 goes here ; ================
EndFunc
While 1
$guimsg = GuiGetMsg() Select
Case $guimsg = $GUI_EVENT_CLOSE Exit ; closes the GUI
Case $guimsg = $button1
function1(); runs Button1 function
Case $guimsg = $button2
function2(); runs Button2 function
2.
OnEvent
. Denoted by
AutoItSetOption('GUIOnEventMode', 1)
,
OnEvent
mode
basically pauses the script when something is chosen on the GUI and runs a
function. Once the function is completed, the main script resumes.
Exam-ple 7
shows how to properly use
OnEvent
mode in a script similar to
Example 6
.
Example 7. The GUIOnEventMode Method
; Includes the GuiConstants (required for GUI function usage) #include <GuiConstants.au3>
; Changes to OnEvent mode Opt('GUIOnEventMode', 1)
; GUI Creation
GuiCreate("Menu", 400, 150)
; Runs the GUIExit() function if the GUI is closed GUISetOnEvent($GUI_EVENT_CLOSE, 'GUIExit')
; Button1
GUICtrlCreateButton("Button1", 100, 20, 200, 30)
GUICtrlSetOnEvent(−1, 'Function1') ; run Function1 when pressed
; Button2
GUICtrlCreateButton("Button2", 100, 70, 200, 30)
GUICtrlSetOnEvent(−1, 'Function2') ; run Function2 when pressed
Func Function1()
; Hides the GUI while the function is running
GUISetState(@SW_HIDE)
; ================
; The script you would like to perform for Button1 goes here ; ================
EndFunc
Func Function2()
; Hides the GUI while the function is running
GUISetState(@SW_HIDE)
; ================
; The script you would like to perform for Button2 goes here ; ================
EndFunc
; Shows the GUI after the function completes GUISetState(@SW_SHOW)
While 1
Sleep(500) WEnd
; This function makes the script exit when the GUI is closed Func GUIExit()
Exit EndFunc
Notice the
While 1
loop again, just like in
MessageLoop
mode. This time, instead of
refreshing a variable with the
GuiGetMsg()
function continuously,
OnEvent
mode
refreshes the
Sleep(500)
command (which is a 500 ms timeout) until an event
occurs. If Button1 or Button2 are pressed, their corresponding functions will run.
If the GUI is closed, the script will exit.
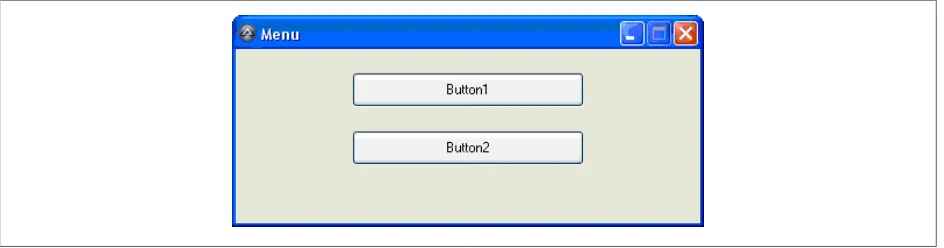
Both
Example 6
and
Example 7
create the GUI shown in
Figure 3
. Both scripts
perform the same actions, but each uses a different event mode.
When creating a GUI, it is important to decide which type of event mode to use.
Both methods work in any case, but
MessageLoop
tends to be more suited for a
script where the GUI is the main focus. In a script where the GUI is not the main
or only focus,
OnEvent
mode tends to be the better solution. In the end, both
meth-ods perform the same set of tasks; they just go about them in different ways.
Choosing between
OnEvent
and
MessageLoop
mode is, in most cases, a personal
preference.
GUI Controls
Table 2
lists the controls available in AutoIt, their descriptions, and their
associ-ated functions.
Table 2. AutoIt GUI Controls
Control
Description
Function
AVI Video Clip
Inserts an AVI video clip
GuiCtrlCreateAvi()
Button
creates a button
GuiCtrlCreateButton()
Checkbox
creates a checkbox
GuiCtrlCreateCheckbox()
Combo Box
Creates a combo box
GuiCtrlCreateComboBox()
Context Menu
Creates a context (right-click)
menu for a control of the entire
GUI
GuiCtrlCreateContextMenu
()
Date
Creates a date control
GuiCtrlCreateDate()
Dummy
Creates a dummy control
GuiCtrlCreateDummy()
Edit
Creates an edit control
GuiCtrlCreateEdit()
Group
Creates a group control
GuiCtrlCreateGroup()
Icon
Creates an icon
GuiCtrlCreateIcon()
Input
Creates an input box
GuiCtrlCreateInput()
Label
Creates a static text control
GuiCtrlCreateLabel()
List
Creates a list control
GuiCtrlCreateList()
List View
Creates a list
GuiCtrlCreateListView()
List View Item
Creates a list item
GuiCtrlCreateListViewItem
()
Menu
Creates a menu
GuiCtrlCreateMenu()
Menu Item
Creates an item for a menu or
con-text menu
GuiCtrlCreateMenuItem()
Object—
ActiveX
Creates an ActiveX control
GuiCtrlCreateObj()
Picture
Inserts a picture
GuiCtrlCreatePic()
Progress Bar
Inserts a progress bar
GuiCtrlCreateProgress()
Radio Button
Inserts a radio button
GuiCtrlCreateRadio()
Slider
Inserts a slider
GuiCtrlCreateSlider()
Tab
Creates a tab control
GuiCtrlCreateTab()
Control
Description
Function
Tree View Item
Creates a tree view item
GuiCtrlCreateTreeViewItem
()
Up / Down
Creates an up/down list control
GuiCtrlCreateUpdown()
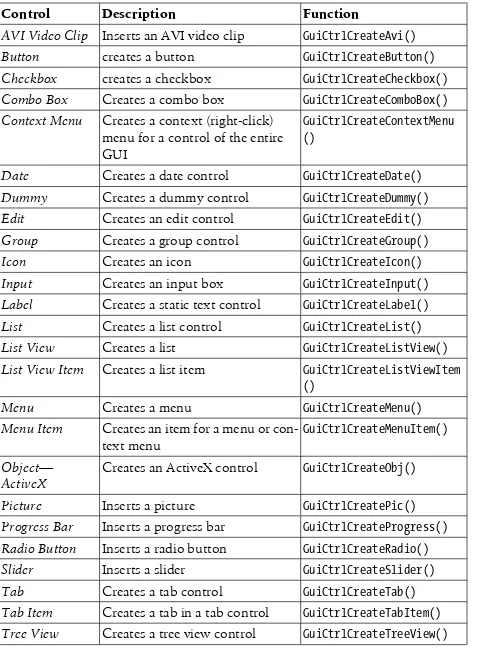
Example 8
contains examples of every AutoIt GUI control. Each item within the
example is labeled with a comment above it. To learn more about the different
options of each control, look them up in the AutoIt help file.
Example 8. Complete GUI Controls
#include <GuiConstants.au3>
; GUI Creation
GuiCreate("GUI Control Examples", 500, 420) GuiSetIcon(@WindowsDir & "\explorer.exe", 0)
; Menu Creation
$filemenu = GUICtrlCreateMenu("File")
GUICtrlCreateMenuitem("Example File Menu Item",$filemenu)
; Context Menu
$contextmenu = GUICtrlCreateContextMenu()
; Context Menu Item
GUICtrlCreateMenuitem("Example1",$contextmenu) GUICtrlCreateMenuitem("",$contextmenu) ; separator GUICtrlCreateMenuitem("Example2",$contextmenu)
; Tab Creation
GUICtrlCreateTab(0,0,500,400)
; Tab 1 Creation ; ===================
GUICtrlCreateTabItem("AVI,Button,Checkbox,ComboBox")
; AVI
GUICtrlCreateAvi(@WindowsDir & "\clock.avi",-1,10,30,321,321,$ACS_AUTOPLAY) GUICtrlCreateLabel("AVI Example",140,355,60,15)
; Button
GUICtrlCreateButton("Button Example",350,30,120,30)
; Checkbox
GUICtrlCreateCheckbox("Checkbox Example",350,70,120,30)
; Combo Box
; Tab 2 Creation ; ===================
GUICtrlCreateTabItem("Group,Date,Dummy,Edit,Icon,Input,List,ListView")
; Start Group
GUICtrlCreateGroup("Group Example",20,40,460,60)
; Date
GUICtrlCreateDate("",30,60,200,25)
; Dummy
$dummybutton = GUICtrlCreateButton("Dummy Example",270,60,200,25) $dummy = GUICtrlCreateDummy()
; Close Group
GUICtrlCreateGroup("",-99,-99,1,1)
; Edit
GUICtrlCreateEdit("Edit Example",30,120,440,60)
; Icon
GUICtrlCreateIcon(@WindowsDir & "\Cursors\drum.ani",-1,30,200,32,32) GUICtrlCreateLabel("Icon Example",70,210,80,20)
; Input
GUICtrlCreateInput("Input Example",160,205,300,20)
; List
GUICtrlCreateList("List Example",30,240,440,80)
; List View
$listview = GUICtrlCreateListView("List View Example",30,330,440,60)
; List View Item
GUICtrlCreateListViewItem("List View Item Example",$listview)
; Tab 3 Creation ; ===================
GUICtrlCreateTabItem("ActiveX Object")
; ActiveX Object
GUICtrlCreateLabel("ActiveX Object Example",10,30,140,20) $ie = ObjCreate("Shell.Explorer.2")
$GUIActiveX = GUICtrlCreateObj($ie,10,50,480,340) $ie.navigate("http://www.aismarthomes.com")
; Tab 4 Creation ; ===================
; Picture
GUICtrlCreatePic(@WindowsDir & "\Blue Lace 16.bmp",10,30,40,40) GUICtrlCreateLabel("Picture Example",55,45,80,20)
; Progress Bar
GUICtrlCreateLabel("Progress Example",400,70,90,20) $progress = GUICtrlCreateProgress(10,90,480,25) GUICtrlSetData($progress,33)
; Radio
GUICtrlCreateRadio("Radio Example",10,140,90,20)
; Slider
GUICtrlCreateLabel("Slider Example",290,170,100,20) GUICtrlCreateSlider(180,130,280,30)
; Tree View
GUICtrlCreateLabel("Tree View Example",10,200,120,20) $treeview = GUICtrlCreateTreeView(10,220,480,60)
; Tree View Item
$treetoplevel = GUICtrlCreateTreeViewItem("Tree View Example",$treeview) GUICtrlCreateTreeViewItem("Subitem1",$treetoplevel)
GUICtrlCreateTreeViewItem("Subitem2",$treetoplevel)
; Up/Down
GUICtrlCreateLabel("Example Updown",10,300,100,20) $updowninput = GUICtrlCreateInput("0",10,320,480,60) GUICtrlCreateUpdown($updowninput)
; Close Tabs
GUICtrlCreateTabItem("")
; Display GUI
GuiSetState(@SW_SHOW)
; Continuous Loop to check for GUI Events While 1
$guimsg = GUIGetMsg() Select
Case $guimsg = $dummybutton
GUICtrlSendToDummy($dummy) Case $guimsg = $dummy
MsgBox(0,"Dummy Example","You have clicked the dummy button.") Case $guimsg = $GUI_EVENT_CLOSE
When run,
Example 8
outputs the four tabs shown in
Figure 4
.
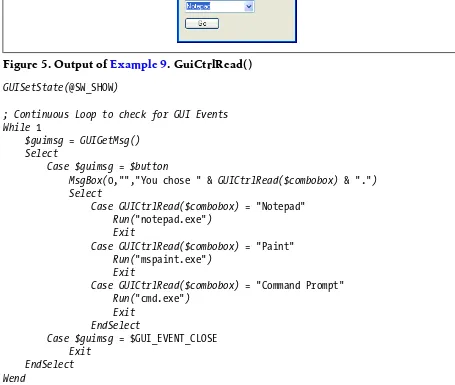
Manipulating Data in GUIs
While creating a GUI, you must assign a variable to any controls that are used as
data in a function. For example, when creating a combo box, assigning a variable
to it allows its value to be checked during a
GuiCtrlRead()
function.
Example 9
shows how to perform an action based on the value of a combo box.
Example 9. GuiCtrlRead()
#include <GuiConstants.au3>
; GUI Creation
GuiCreate("Combo Example",200,80) ; Combo Box Creation
$combobox = GuiCtrlCreateCombo("Notepad",10,10,120,20) GuiCtrlSetData(−1,"Paint|Command Prompt")
; Button Creation
$button = GuiCtrlCreateButton("Go",10,40,60,20)
GUISetState(@SW_SHOW)
; Continuous Loop to check for GUI Events While 1
$guimsg = GUIGetMsg() Select
Case $guimsg = $button
MsgBox(0,"","You chose " & GUICtrlRead($combobox) & ".") Select
Case GUICtrlRead($combobox) = "Notepad" Run("notepad.exe")
Exit
Case GUICtrlRead($combobox) = "Paint" Run("mspaint.exe")
Exit
Case GUICtrlRead($combobox) = "Command Prompt" Run("cmd.exe")
Exit EndSelect
Case $guimsg = $GUI_EVENT_CLOSE Exit
EndSelect Wend
Notice the
Select...Case
that performs actions based on the
GUICtrlRead
($combobox)
function. It is nested within the initial
Select...Case
statement that
performs actions based on the
GUIGetMsg()
function.
Example 9
outputs the
com-bo com-box shown in
Figure 5
.
User Functions
Functions can be called at any time throughout a script any number of times.
AutoIt comes with predefined functions that perform many different tasks. There
are also many user-defined functions created by the AutoIt community. These
functions were written by AutoIt users and increase the functionality of AutoIt.
You must use the
#include
command when using these user-defined functions in
Creating Functions—Func, Return, EndFunc
The syntax of a User-Defined Function is as follows:
Func functioname ( [Const] [ByRef] $param1, ..., [Const] [ByRef]
$paramN,_
$optionalpar1 = value, ...)
...
[Return [value]]
EndFunc
The following subsections explain the different components of a function.
Const and ByRef
Both
Const
and
ByRef
can apply to a single parameter and the order in which they
are written makes no difference. Please keep the following in mind when using
Const
and
ByRef
:
•
Const
is optional, and only a variable declared as
Const
can be passed to a
Const
parameter in a function.
•
ByRef
is also optional, and it requires that the input of its parameter is a variable.
When you use this option, any changes are reflected to the original variable.
By default, a copy of the variable is used inside the function.
Parameters
If a parameter is not set with a default value, then it must be declared when calling
the function. A parameter with a default value is known as an
optional
parameter
. For instance, the following function uses variables with default values
and can be called using those default values as
function()
. When the function is
run, a message box pops up stating that the value of
$z
is 5:
Func function($x = 2, $y = 3)
$x + $y = $z
MsgBox(0,"$z's value",$z) EndFunc
The variables can still be declared differently, but defaults are used if the variables
are not explicitly expressed when calling the function. When the function is
changed as follows, variables must be declared when calling the function. An
ex-ample of correctly calling this function is
function(5,3)
and the resulting message
box would display a value of 8. If either
$x
or
$y
is not declared, the function does
not run properly:
Func function($x, $y)
$x + $y = $z
Return
Use
Return
to exit the function. The default return value in a user-defined function
is 0, but the return value can be specified. The following example displays a
mes-sage box with the current user’s username:
MsgBox(0,"Currently logged on user",user())
Func user()
$user = @UserName Return $user EndFunc
User-Defined Functions
There are many user-defined function (UDF) libraries available on the AutoIt
fo-rums. You can find a list of current AutoIt UDF collections here:
http://www.au
toitscript.com/forum/index.php?showtopic=45167
. The following list
de-scribes some of these UDF libraries:
Auto3Lib
Developed by Paul Campbell (username PaulIA), this UDF library includes over
1,200 functions, including Animation controls, DateTime controls, Header
controls, IPAddress controls, Listbox controls, ListView controls, Menus,
Month Calendar controls, ProgressBar controls, StatusBar controls, Tab
con-trols, ToolbarWindow concon-trols, ToolTip concon-trols, Tree View concon-trols, and
many more.
SysTray_UDF
Developed by user Tuape, this UDF library allows you to read info from system
tray icons and remove them.
Microsoft Word Automation Library
Developed by Bob Anthony (username big_daddy), this UDF library allows you
to create and manipulate Microsoft Word documents.
ExcelCOM_UDF
Developed by user Locodarwin, this UDF library allows you to create and
ma-nipulate Microsoft Excel workbooks.
I have created a sample UDF to find a specific image on-screen based on its
Pixel
Checksum()
value. The
_findchecksum
UDF is written below. You must save this
order to create and run it. The
_findchecksum()
function returns 0 if the checksum
is not found or returns an array containing x and y coordinates ([0] being x and
[1] being y) if the checksum is found.
The
_findpixelchecksum
UDF is well suited for automating tasks where images
must be clicked or moved. A very popular field for this type of automation is video
game modification. There are many online role-playing games for which people
program scripts like this in order to automate crafting, experience “grinding,” and
other sorts of repetitive tasks.
; =================================================================================== ; _findchecksum UDF v1 - June 24, 2007
; Written by Andy Flesner
; Designed and Tested for Windows XP Service Pack 2 ; http://autoit.flesner.com
; =================================================================================== #cs
Syntax is as follows: _findchecksum($checksum, $width, $height, $pcolor, $x = 0, _ $y = 0, $d_width = @DesktopWidth, $d_height = @DesktopHeight)
$checksum - the checksum to search for $width - the width of the checksum area $height - the height of the checksum area
$pcolor - the pixel color of the top left pixel of the checksum object $x - the starting x coordinate
$y - the starting y coordinate
$D_Width - Width of the total search area, default is desktop resolution width $D_Height - Height of the total search area, default is desktop resolution height
The function returns the x and y coordinates of the upper left corner where the checksum is found as an array. For Example:
$coordinates = _findchecksum($checksum, $width, $height, $pcolor)
The x coordinate would be $coordinates[0] and the y coordinate would be $coordinates[1].
If the coordinates are not found, the function returns a value of 0. #ce
; ===================================================================================
Func _findchecksum($checksum, $width, $height, $pcolor, $x= 0, $y = 0, _
$d_width = @DesktopWidth, $d_height = @DesktopHeight) $current_y = $d_height - 1
While 1
$xy = PixelSearch($x, $y, $d_width- 1, $current_y, $pcolor) If @error AND $current_y = ($d_height - 1) Then
ElseIf @error Then $x = 0
$y = $current_y + 1
$current_y = ($d_height - 1)
ElseIf $checksum = PixelCheckSum($xy[0], $xy[1],$xy[0] + $width, _
$xy[1] + $height) Then Return $xy
Else
$x = $xy[0] + 1
$y = $xy[1] $current_y = $y EndIf
WEnd EndFunc
Example 10
selects an area, finds its checksum, and then finds that checksum on
the screen when a hotkey is pressed.
Example 10. findchecksum() User-Defined Function
#include <findchecksum_UDF.au3>
Global $checksum, $coord,$pcolor
;Specify checksum width Global $width = 30
;Specify checksum height Global $height = 30
HotKeySet("{ENTER}","checksum_record")
Global $instructions1 = "Move the mouse to the top left of the search" & @LF & _ "area and then press Enter to record the area."
Global $instructions2 = "Press the F key to find the recorded area."
While $checksum = ""
$coord = MouseGetPos()
$pcolor = PixelGetColor($coord[0],$coord[1])
ToolTip($instructions1 & @LF & @LF & "x = " & $coord[0] & @LF & "y = " & _
$coord[1] & @LF & @LF & "Decimal Pixel Color = " & $pcolor,$coord[0] - 250, _
$coord[1] - 100) Sleep(100) WEnd
HotKeySet("f","checksum_find")
While 1
WEnd
Func checksum_record()
$checksum = PixelChecksum($coord[0], $coord[1], $coord[0] + $width, _ $coord[1] + $height)
HotKeySet("{ENTER}") EndFunc
Func checksum_find() ToolTip("")
$found = _findchecksum($checksum, $width, $height,$pcolor) If$found = 0 Then
MsgBox(4096,"Error","Checksum not found.") Exit
Else
MouseMove($found[0] + ($width / 2), $found[1] + ($height / 2), 1000
)
ToolTip("Found it!") Sleep(5000)
ToolTip("")
MsgBox(0,"Checksum Found", "Checksum found with center at x=" &_
$found[0] + ($width / 2) & " y=" & $found[1] + ($height / 2)
& ".") Exit EndIf EndFunc
Run, or compile and run,
Example 10
. Then move your mouse cursor to an area
on the screen that you would like the program to find, and press Enter. Then move
your cursor to a different point on the screen. By pressing the F key, you prove the
concept of the program and the cursor moves to the center of the checksum that
you told it to store in memory (by pressing Enter earlier). See
Figure 6
for an
illustration.
Conditional and Loop Statements
Conditional and loop statements simplify source code and make complex tasks
possible.
Instead of repeating the same code over and over, you can simply perform a loop
statement to repeat the code until a condition is met. While an expression is true,
your statement will continuously loop.
Conditional statements allow you to perform tasks based on the truth of a given
expression. If the given expression is true, the statement runs.
Conditional Statements
A conditional statement performs actions based on whether certain conditions are
met. There are three types of conditional statements in AutoIt:
1.
If...Then...Else
.
If
statements simply perform actions if an expression is true;
otherwise, they perform actions listed after
Else
.In the following example, the
message box only pops up if
$number
equals 2; if not, the script exits:
Global $number = 2 If $number = 2 Then
MsgBox(0, "Message", "The value of $number is " & $number & ".") Else
Exit EndIf
If
statements can also be nested. This means that an
If
statement can contain
multiple
If
statements within itself, as shown in the following example:
Global $number = 2
If @OSVersion = "WIN_XP" Then If @Username = "Administrator" Then If $number = "2" Then
MsgBox(0, "Message", "The value of $number is " & $number & ".") Else
Exit EndIf Else
MsgBox(4096, "Error", "You must be logged on as Administrator.") EndIf
Else
MsgBox(4096, "Error", "You must be running Windows XP.") EndIf
ElseIf
is used to add another expression to evaluate. Usually, a
Select...Case
or
Switch...Case
statement is more effective for evaluating
multiple expressions. The following example displays an
If
statement that
If @OSVersion = "WIN_VISTA" Then
MsgBox(0, "OS Version", "You are running Windows Vista.") ElseIf @OSVersion = "WIN_2003" Then
MsgBox(0, "OS Version", "You are running Windows 2003.") ElseIf @OSVersion = "WIN_XP" Then
MsgBox(0, "OS Version", "You are running Windows XP.") ElseIf @OSVersion = "WIN_2000" Then
MsgBox(0, "OS Version", "You are running Windows 2000.") Else
EndIf
Boolean (
AND, OR, NOT
) and logical (
<,<=, >, >=, <>, =, ==
) operators can
be used in
If
statements. Here is an example that uses both Boolean and logical
operators:
Global $num1 = InputBox("Number 1","Number 1: ","") Global $num2 = InputBox("Number 2","Number 2: ","")
If @OSVersion = "WIN_XP" AND @OSServicePack = "Service Pack 2" Then If $num1 + $num2 > 10 Then
MsgBox(0,"Greater than 10","The sum of Number 1 and Number 2 is " & _ "greater than 10.")
ElseIf $num1 + $num2 < 10 Then
MsgBox(0,"Less than 10","The sum of Number 1 and Number 2 is less " & _ "than 10.")
Else
MsgBox(0,"Must be 10","If not less than or greater than 10, the sum " & _
"of Number 1 and Number 2 must be equal to 10.") EndIf
Else
MsgBox(4096,"Error","You must be running Windows XP SP2.") EndIf
If the version of Windows on the user’s machine is not XP Service Pack 2, the
user sees a pop up telling him he must be running Windows XP SP2. If the
user
is
running XP SP2, the script performs an
If
statement on the
$num1 +
$num2
expression. If the expression is greater or less than 10, the user sees a
message box stating this. If neither of the expressions is true, the sum must
be 10, and the user is prompted with a message stating this fact.
2.
Select...Case
. In the case of an
If
statement,an expression is evaluated as true
or false. If the expression is true, the statement associated with the expression
is executed. A
Select...Case
statement is similar, but instead of evaluating
an expression as true or false,it evaluates multiple expressions at once. An
example of a
Select...Case
statement follows:
Select
Case @OSVersion = "WIN_VISTA"
Case @OSVersion = "WIN_2003"
MsgBox(0, "OS Version", "You are running Windows 2003.") Case @OSVersion = "WIN_XP"
MsgBox(0, "OS Version", "You are running Windows XP.") Case @OSVersion = "WIN_2000"
MsgBox(0, "OS Version", "You are running Windows 2000.") EndSelect
A message box tells the user whether the version of Windows running is Vista,
2003, XP, or 2000.
As with
If
statements,
Select...Case
statements can be nested and allow the
use of Boolean and logical operators. Instead of
Else
(as in
If
statements),
these statements use
Case Else
, which performs the same task.
Case Else
runs
if no other case succeeds as true. The following is an example of a nested
Select...Case
statement that uses Boolean and logical operators:
Global $num1 = InputBox("Number 1","Number 1: ","") Global $num2 = InputBox("Number 2","Number 2: ","")
Select
Case @OSVersion = "WIN_XP" AND @OSServicePack = "Service Pack 2" Select
Case $num1 + $num2 > 10
MsgBox(0,"Greater than 10","The sum of Number 1 and Number 2 " & _
"is greater than 10.") Case $num1 + $num2 < 10
MsgBox(0,"Less than 10","The sum of Number 1 and Number 2 is " & _
"less than 10.") Case $num1 + $num2 = 10
MsgBox(0,"Equals 10","The sum of Number 1 and Number 2 is " & _ "equal to 10.")
EndSelect Case Else
MsgBox(4096,"Error","You must be running Windows XP SP2.") EndSelect
3.
Switch...Case
.
Switch...Case
statements are very similar to
Select...Case
statements; the difference is the layout of the expressions to be evaluated. In
a
Switch...Case
statement, the data to be evaluated is declared with
Switch
.
The script then evaluates each case, just like a
Select...Case
statement, to
see which is true. (If none are true, the statement within
Case Else
is
execu-ted.) One advantage of using
Switch...Case
is the
To
parameter, which allows
the expression to be true if the value is between a range.
Switch...Case
state-ments can also be nested. The following is an example of a nested
Global $num1 = InputBox("Number 1","Number 1: ","") Global $num2 = InputBox("Number 2","Number 2: ","")
Switch @OSVersion Case "WIN_XP"
Switch @OSServicePack Case "Service Pack 2" Switch $num1 + $num2
Case 0 To 9
MsgBox(0,"Less than 10","The sum of Number 1 and " & _ "Number 2 is less than 10.")
Case 10
MsgBox(0,"Equals 10","The sum of Number 1 and Number " & _
"2 is equal to 10.") Case Else
MsgBox(0,"Greater than 10","The sum of Number 1 and " & _
"Number 2 is greater than 10.") EndSwitch
Case Else
MsgBox(4096,"Error","You must be running Windows XP Service " & _
"Pack 2.") EndSwitch
Case Else
MsgBox(4096,"Error","You must be running Windows XP.") EndSwitch
Loop Statements
Loop statements are just statements that repeat themselves a number of times.
There are four types of loop statement available in AutoIt v3:
1.
For...Next
. The syntax for a
For...Next
loop statement is as follows:
For <variable> = <start> To <stop> [Step <stepval>] Statements
...
Next
A specified variable, which is automatically defined locally even if
MustDeclar
eVars
is enabled, is stepped to the stop number by
<stepval>
(default of 1).
The loop is complete once the value of the variable exceeds the
<stop>
value.
<stop>
and
<stepval>
can be variables, but they are only read when the loop
starts for the first time.
For...Next
statements can be nested. The following
is an example of a
For...Next
statement in which the script displays a
For $variable = 10 To 1 Step −1
SplashTextOn("Countdown",$variable,65,20) Sleep(1000)
Next
SplashOff()
MsgBox(0,"", "Boom!")
2.
For...In...Next
. This type of loop statement is used to evaluate an array of data
or a
COM
object. This is the
For...In...Next
syntax:
For <variable> In <expression> Statements
...
Next
If the expression is an object collection with no elements, the script skips the
loop and the variable contains an empty string of data. If the expression is
neither an object nor an array, the script ends with an error unless a custom
error handler is used.
For...In...Next
statements can also be nested. Here is
an example of using
For...In...Next
to evaluate an array of data:
Global $array[4]
$array[0]="w" $array[1]="x" $array[2]="y" $array[3]="z"
For $element IN $array
MsgBox(0,"Current $array item",$element) Next
3.
Do...Until
. This type of loop performs its statements until an expression is
true. This is the
Do...Until
syntax:
Do
Statements ...
Until <expression>
The expression is tested after performing the statements, so the loop runs at
least once.
Do...Until
statements can also be nested. The following is an
ex-ample that uses
Do...Until
to perform a 10-second countdown and then pop
up a message:
$variable = 10
Do
SplashTextOn("Countdown",$variable,65,20) Sleep(1000)
Until $variable = 0
SplashOff()
MsgBox(0,"","Boom!")
4.
While...WEnd
. While the expression is true, this loop continues executing
down to the
WEnd
statement. Unlike a
Do...Until
statement, a
While
loop’s
expression is evaluated at the beginning of the loop. This means that if the
expression is not true at the beginning of the loop, it does not run. The
While...WEnd
syntax is as follows:
While <expression> Statements ...
Wend
A continuous loop can be created using
While...WEnd
if the expression is set
to 1. This tells AutoIt to run the loop
While 1=1
. Continuous loops can be
used to force the script to wait for some type of input (a hotkey being pressed,
for instance).
The following is an example of a
While...WEnd
statement:
$variable = 10
While $variable > 0
SplashTextOn("Countdown",$variable,65,20) Sleep(1000)
$variable = $variable - 1 WEnd
SplashOff()
MsgBox(0,"","Boom!")
While
$variable
is greater than zero, the loop continuously counts down from
10 to 1 each second. After the loop is complete, a message box appears saying,
“Boom!”
With...EndWith
This type of statement doesn’t really fit in as a conditional or loop statement. The
AutoIt help file categorizes
With...EndWith
statements as loop statements, but their
only use is to simplify object reference code. The syntax for a
With...EndWith
statement is as follows:
With <expression> Statements ...
The expression must be an object type.
Example 11
and
Example 12
show object
reference code that is simplified using the
With...EndWith
statement:
Example 11. Long Method Without Using With...EndWith
#cs
The following script is written without using With...EndWith #ce
$object = ObjCreate("InternetExplorer.Application.1")
$object.Visible = 1
$object.Height = 768
$object.Width = 1024
$object.Navigate("http://www.aismarthomes.com/")
Example 12. Simplified Code Using With...EndWith
#cs
The following displays how With...EndWith statements simplify Object code #ce
$object = ObjCreate("InternetExplorer.Application.1")
With $object
.Visible = 1 .Height = 768 .Width = 1024
.Navigate("http://www.aismarthomes.com/") EndWith
Notice how the
$object
is given to
.Visible
,
.Height
,
.Width
, and
.Navigate
Component Object Models (COM) Extensions
COM
extensions provide a common interface for working with software
appli-cations in a Microsoft environment. Appliappli-cations have defined
COM
objects that
can be used in AutoIt (and other programming languages) to manipulate the
applications and perform tasks within them. To use
COM
objects, you must
know the object name and its properties and methods. To find an application’s
objects, and the object properties and methods, you can utilize Microsoft’s
OLE/COM Object Viewer that is part of the Windows 2000 Resource Kit.
You can download the OLE/COM Object Viewer here:
http://download.microsoft.com/download/win2000platform/oleview/
1.00.0.1/nt5/en-us/oleview_setup.exe
You will likely receive an error about
iviewers.dll
when you run
oleview.exe
.
To fix this error, download the following:
http://download.microsoft.com/download/2/f/
1/2f15a59b-6cd7-467b-8ff2-f162c3932235/ovi386.exe
Once downloaded, run
ovi386.exe
and extract its contents to C:\MSTOOLS
\BIN. Copy
iviewers.dll
from C:\MSTOOLS\BIN to the directory where you
installed
oleview_setup.exe
. Then register the DLL using
regsvr32
iviewers.dll
within the install directory of
oleview_setup.exe
.
When viewing objects within the OLE/COM Object Viewer, only those
ob-jects with a TypeLib and an IDispatch control can be used within AutoIt.
The following is an example of using
COM
objects that simply creates an Excel
spreadsheet and then closes Excel:
$oExcel = ObjCreate("Excel.Application") ; creates an Excel object
With $oExcel
.Visible = 1 ; shows Excel
.WorkBooks.Add ; creates a new workbook .Quit ; closes Excel
EndWith
For more detailed information about
COM
objects, please read the AutoIt v3
help file.
Automation Examples
With its abilities to modify the registry, copy files, run as another user, control
keyboard and mouse input, and use
COM
objects, there isn’t much you can’t do with
This section is full of examples modeled after scripts I have written and used as a
server systems administrator. All of these scripts were rewritten for this book; they
are designed and tested to work with Microsoft Windows XP Service Pack 2.
AntiVirus Compliance Check
This program checks for the existing McAfee AntiVirus version, ePO Agent
ver-sion, and the DAT definition file date. The script was designed to block users from
accessing domain resources if they do not keep their systems AntiVirus compliant.
It first detects a missing AntiVirus and/or an ePO Agent, then verifies that the DAT
definition file is within five business days old (McAfee does not usually release
DAT files on weekends).
Lock.exe
is referenced in this script. It is listed later in
this guide as
User Lockout
.
Example 13
uses nested
If
statements,
Select...Case
statements, and user-defined functions.
Example 13. AntiVirus Compliance Check
#include <Date.au3> ; Include Date constants
; Declare all Global Variables
;=====================================================================
Global $dat71, $dat71monthday, $dat71year, _
$dat71format, $dat80i, $dat80imonthday, _ $dat80iyear, $dat80iformat, $dat85, _ $dat85monthday, $dat85monthday, _ $dat85year, $dat85format, $datdate, _ $sLongDayName, $currentdate, $datediff, _ $answer, $username, $epoversion, _
$eporeg, $updatepath, $weekday
; Finds out who is currently logged onto the machine
;===================================================================== $username = EnvGet("USERNAME")
; Pulls ePO Version from the Registry
;=====================================================================
$eporeg = RegRead("HKEY_LOCAL_MACHINE\SOFTWARE\Network Associates\ePolicy " & _ "Orchestrator\Application Plugins\EPOAGENT3000","Version")
; Truncates the ePO Version to the leftmost 3 characters
;===================================================================== $epoversion = StringLeft($eporeg,3)
If $epoversion = "3.6" Then
; Do Nothing
ElseIf $epoversion = "" Then ; If the Agent key is missing, there is no Agent ; installed
MsgBox(0,"EPO Agent Not Installed!","You do not have a Virus-Scan Update " & _ "Agent installed! Your account has been locked out! Click OK to exit.") Exit
Else ; If there is an Agent installed, but an outdated version
RunWait("Lock.exe","") ; lock the account
MsgBox(0,"EPO Agent Outdated!","You do not have a current Virus-Scan Update " & _
"Agent installed! Your account has been locked out! Click OK to exit.") Exit
EndIf
; Runs the DatDate() function to determine the age of the installed DAT file ;=====================================================================
DatDate()
Func DatDate()
$dat71 = RegRead("HKEY_LOCAL_MACHINE\SOFTWARE\Network Associates\ePolicy " & _ "Orchestrator\Application Plugins\VIRUSCAN7100","DatDate") ; pulls
; registry information for datdate for McAfee Scan Engine 7.1
$dat71monthday = StringTrimRight($dat71, 5) ; takes the month and day out of
; the datdate key
$dat71year = StringTrimLeft($dat71, 6) ; takes the year out of the datdate key
$dat71format = ($dat71year & "/" & $dat71monthday) ; reorders the date with
; the year first YYYY/MM/DD format for later calculations
$dat80i = RegRead("HKEY_LOCAL_MACHINE\SOFTWARE\Network Associates\ ePolicy " & _
Orchestrator\Application Plugins\VIRUSCAN8000","DatDate") ; pulls registry ; information for datdate for McAfee Scan Engine 8.0i
$dat80imonthday = StringTrimRight($dat80i, 5) ; takes the month and day out of
; the datdate key
$dat80iyear = StringTrimLeft($dat80i, 6) ; takes the year out of the datdate key
$dat80iformat = ($dat80iyear & "/" & $dat80imonthday) ; reorders the date with
; the year first YYYY/MM/DD format for later calculations
$dat85 = RegRead("HKEY_LOCAL_MACHINE\SOFTWARE\Network Associates\ePolicy " & _ Orchestrator\Application Plugins\VIRUSCAN8600","DatDate") ; pulls registry ; information for datdate for McAfee Scan Engine 8.5.0i
$dat85monthday = StringTrimRight($dat85, 5) ; takes the month and day out of
; the datdate key
$dat85format = ($dat85year & "/" & $dat85monthday) ; reorders the date with
; the year first YYYY/MM/DD format for later calculations
If $dat71 = "" And $dat80i = "" And $dat85 = "" Then RunWait("Lock.exe","") ; lock the account
MsgBox(0,"No Virus Protection Detected!","You are not currently running " & _
any anti-virus protection and your account has been locked out. Click " & _ "OK to close this message.")
ElseIf $dat71 = "" And $dat80i = "" Then ; engine version is 8.5
$datdate = $dat85format
ElseIf $dat71 = "" And $dat85 = "" Then ; engine version is 8.0i
$datdate = $dat80iformat
ElseIf $da