Tom Igoe
Making
Things Talk
Practical
Methods for
Connecting
Physical Objects
PROJECTS
AND IDEAS
TO CREATE
TALKING
OBJECTS FROM
Making
Things Talk
First Edition
Tom Igoe
The O’Reilly logo is a registered trademark of O’Reilly Media, Inc. The MAKE: Projects series
designations, Making Things Talk, and related trade dress are trademarks of O’Reilly Media, Inc.
Many of the designations used by manufacturers and sellers to distinguish their products are claimed as trademarks. Where those designations appear in this book, and O’Reilly Media, Inc. was aware of
the trademark claim, the designations have been printed in caps or initial caps.
While every precaution has been taken in the preparation of this book, the publisher and authors assume no responsibility for errors or omissions, or for damages resulting from the use of the
information contained herein.
Please note: Technology, and the laws and limitations imposed by manufacturers and content owners, are constantly changing. Thus, some of the projects described may not work, may be inconsistent
with current laws or user agreements, or may damage or adversely affect some equipment.
Your safety is your own responsibility, including proper use of equipment and safety gear, and determining whether you have adequate skill and experience. Power tools, electricity, and other
resources used for these projects are dangerous unless used properly and with adequate precautions, including safety gear. Some illustrative photos do not depict safety precautions or equipment, in
order to show the project steps more clearly. These projects are not intended for use by children.
Use of the instructions and suggestions in Making Things Talk is at your own risk. O’Reilly Media, Inc.,
disclaims all responsibility for any resulting damage, injury, or expense. It is your responsibility to make sure that your activities comply with applicable laws, including copyright.
ISBN-10: 0-596-51051-9
ISBN-13: 978-0-596-51051-0
Copyright © 2007 O’Reilly Media, Inc. All rights reserved. Printed in U.S.A.
Published by Make:Books, an imprint of Maker Media, a division of O’Reilly Media, Inc.
1005 Gravenstein Highway North, Sebastopol, CA 95472.
O’Reilly books may be purchased for educational, business, or sales promotional use. For more information, contact our corporate/institutional sales department:
800-998-9938 or [email protected]. Print History
September 2007
First Edition
Publisher: Dale Dougherty
Associate Publisher and Executive Editor: Dan Woods Editor: Brian Jepson
Copy Editor: Nancy Kotary Creative Director: Daniel Carter Designer: Katie Wilson
Preface . . . .VIII Who This Book Is For . . . X What You Need To Know . . . .XI Contents of This Book . . . .XI On Buying Parts . . . XII Using Code Examples . . . XIII Using Circuit Examples . . . XIII Acknowledgments . . . XIV We’d Like to Hear from You . . . XV
Chapter 1: The Tools . . . .16
It Starts with the Stuff You Touch . . . 18
It’s About Pulses . . . 18
Computers of All Shapes and Sizes . . . 19
Good Habits . . . 20
Tools . . . 21
Using the Command Line . . . 28
It Ends with the Stuff You Touch . . . 47
Chapter 2: The Simplest Network . . . 48
Layers of Agreement . . . 50
Making the Connection: The Lower Layers . . . 52
Saying Something: The Application Layers . . . 56
Project 1: Monski Pong . . . 56
Flow Control . . . 68
Project 2: Wireless Monski Pong . . . 71
Project 3: Negotiating in Bluetooth . . . 75
Conclusion . . . 78
Chapter 3: A More Complex Network . . . 80
Network Maps and Addresses . . . 82
Clients, Servers, and Message Protocols . . . 87
Project 4: A Networked Cat . . . 94
Project 6: Networked Air Quality Meter . . . 126
Serial-to-Ethernet Modules: Programming and Troubleshooting Tools . . . 139
Conclusion . . . 145
Chapter 5: Communicating in (Near) Real Time . . . 146
Interactive Systems and Feedback Loops . . . 148
Transmission Control Protocol: Sockets & Sessions . . . 149
Project 7: A Networked Game . . . 150
Conclusion . . . 174
Chapter 6: Wireless Communication . . . 176
Why Isn’t Everything Wireless? . . . 178
Two Flavors of Wireless: Infrared and Radio . . . 179
Project 8: Infrared Transmitter-Receiver Pair . . . 181
Project 9: Radio Transmitter-Receiver Pair . . . 186
Project 10: Duplex Radio Transmission . . . 193
An XBee Serial Terminal . . . 198
Project 11: Bluetooth Transceivers . . . 207
What About Wi-Fi? . . . 217
Buying Radios . . . 217
Conclusion . . . 218
Chapter 7: The Tools . . . 220
Look, Ma: No Microcontroller! . . . 222
Who’s Out There? Broadcast Messages . . . 223
Project 12: Reporting Toxic Chemicals in the Shop . . . 228
Directed Messages . . . 246
Project 13: Relaying Solar Cell Data Wirelessly . . . 250
Conclusion . . . 259
Chapter 8: How to Locate (Almost) Anything . . . 260
Network Location and Physical Location . . . 262
Determining Distance . . . 265
Project 14: Infrared Distance Ranger Example . . . 266
Project 15: Ultrasonic Distance Ranger Example . . . 268
Project 16: Reading Received Signal Strength Using XBee Radios . . . 273
Project 17: Reading Received Signal Strength Using Bluetooth Radios . . . 276
Determining Position Through Trilateration . . . 277
Project 18: Reading the GPS Serial Protocol . . . 278
Determining Orientation . . . 284
Project 19: Determining Heading Using a Digital Compass . . . 284
Project 20: Determining Attitude Using an Accelerometer . . . 288
Project 24: RFID Meets Home Automation . . . 316
Network Identification . . . 326
Project 25: IP Geocoding . . . 328
Project 26: Email from RFID . . . 333
Conclusion . . . .340
Appendix A: And Another Thing . . . 342
Other Useful Protocols . . . 344
Proxies of All Kinds . . . 347
Mobile Phone Application Development . . . 352
Other Microcontrollers . . . 356
New Tools . . . 358
Appendix B: Where to Get Stuff . . . 360
Hardware . . . 362
Software . . . 366
Appendix C: Program Listings . . . 368
Preface
For a couple of decades now, computer scientists have used the term object-oriented programming to refer to a style of software development in which programs and subprograms are thought of as objects. Like physical objects, they have properties and behaviors. They inherit these properties from the prototypes from which they descend. The canonical form of any object in software is the code that describes its type. Software objects make it easy to recombine objects in novel ways. You can reuse a software object, if you know its interface, the collection of properties and methods that its creator allows you access to (and documents, so that you know how to use them). It doesn’t matter how a software object does what it does, as long as it does it consistently. Software objects are most effective when they’re easy to understand and when they work well with other objects.
Who This Book Is For
This book is written for people who want to make things talk to other things. Maybe you’re a science teacher who wants to show your students how to monitor weather conditions at several locations around your school district simultaneously, or a sculptor who wants to make a whole room of choreographed mechanical sculptures. You might be an industrial designer who needs to be able to build quick mockups of new products, modeling both their forms and their functions. Maybe you’re a cat owner, and you’d like to be able to play with your cat while you’re away from home. It’s a primer for people with little technical training and a lot of interest. It’s for people who want to get projects done.
The main tools in this book are personal computers, web servers, and microcontrollers, the tiny computers inside everyday appliances. Over the past decade, microcontrollers and the programming tools for them have gone from being arcane items to common, easy-to-use tools. Elementary school students are using the tools that graduate students were baffled by only a decade ago. During that time, my colleagues and I have taught people from diverse back-grounds (few of them computer programmers) how to use these tools to increase the range of physical actions that computers can sense, interpret, and respond to.
In recent years, there’s been a rising interest among people using microcontrollers to make their devices not
only sense and control the physical world, but also talk to other things about what they’re sensing and controlling. If you’ve built something with a Basic Stamp or a Lego Mindstorms kit, and wanted to make that thing communi-cate with other things you or others have built, this book is for you. It is also useful for software programmers familiar with networking and web services who want an introduction to embedded network programming.
If you’re the type of person who likes to get down to the very core of a technology, you may not find what you’re looking for in this book. There aren’t detailed code samples for Bluetooth or TCP/IP stacks, nor are there circuit diagrams for Ethernet controller chips. The In the physical world, we’re surrounded by all kinds of electronic objects: clock radios, toasters, mobile phones, music players, children’s toys, and more. It can take a lot of work and a significant amount of knowledge to make a useful electronic gadget. It can take almost as much knowledge to make those gadgets talk to each other in useful ways. But that doesn’t have to be the case. Electronic devices can be — and often are — built up from modules with simple, easy-to-understand interfaces. As long as you understand the interfaces, you can make anything from them. Think of it as object-oriented hardware. Understand-ing the ways in which thUnderstand-ings talk to each other is central to making this work. It doesn’t matter whether the object is a toaster, an email program on your laptop, or a networked database. All of these objects can be connected if you can figure out how they communicate. This book is a guide to some of the tools for making those connections.
Many people whose experience of programming begins with microcontrollers can do wonderful things with some sensors and a couple of servomotors, but may not have done much in the way of communication between the microcontroller and other programs on a personal computer. Similarly, many experienced network and multimedia programmers have never experimented with hardware of any sort, including microcontrollers. If you’re either of these people, this book is for you. Because the audience of this book is diverse, you may find some of the introductory material a bit simple, depending on which background you’re coming from. If so, feel free to skip past the stuff you know and get to the meaty parts.
If you’ve never used a microcontroller, you’ll need a little background before starting with this book. My previous book, Physical Computing: Sensing and Controlling the Physical World with Computers, co-authored with Dan
What You Need to Know
In order to get the most from this book, you should have a basic knowledge of electronics and programming microcontrollers, some familiarity with the Internet, and access to both.
Contents of This Book
This book is composed of explanations of the concept that underlie networked objects, followed by recipes to illustrate each set of concepts. Each chapter contains instructions on how to build working projects that make use of the new ideas introduced in that chapter.
In Chapter 1, you’ll encounter the major programming tools in the book, and get to “Hello World!” on each of them. Chapter 2 introduces the most basic concepts needed to make things talk to each other. It covers the characteristics that need to be agreed upon in advance, and how keeping
those things separate in your mind helps troubleshooting. You’ll build a simple project that features one-to-one serial communication between a microcontroller and a personal computer using Bluetooth radios as an example of modem communication. You’ll learn about data protocols, modem devices, and address schemes.
components used here strike a balance between simplic-ity, flexibilsimplic-ity, and cost. They use object-oriented hardware, requiring relatively little wiring or code. They’re designed
to get you to the end goal of making things talk to each other as fast as possible.
X
O’Sullivan, introduces the fundamentals of electronics, microcontrollers, and physical interaction design for beginning readers.
You should also have a basic understanding of computer programming before reading much further. If you’ve never done any programming, check out the Processing pro-gramming environment at www.processing.org. Process-ing is a simple language designed for nonprogrammers to learn how to program, yet it’s powerful enough to do a number of advanced tasks. It will be used throughout this book whenever graphic interface programming is needed. There are code examples in a few different programming languages in this book. They’re all fairly simple examples, however, so if you don’t want to work in the languages provided, you can rewrite them in your favorite language using the comments in these examples.
Some of them, like Jameco (www.jameco.com), Digi-Key (www.digikey.com), and Newark (www.newarkinone.com; their sister company in Europe is Farnell, www.farnell. com), are general electronics parts retailers, and sell many of the same things as each other. A full list of suppliers is listed in Appendix B. If a part is commonly found at many retailers, it is noted. Other parts are specialty parts, available from only one or two vendors. I’ve noted that too. Feel free to use substitute parts for things you are familiar with.
Because it’s easy to order goods online, you might be tempted to communicate with vendors entirely through their websites. Don’t be afraid to pick up the phone as well. Particularly when you’re new to this type of project, it helps to talk tosomeone about what you’re ordering, and to ask questions. You’re likely to find helpful people at the end of the phone line for most of the retailers listed here. In Appendix B, I’ve listed phone numbers wherever possible. Use them.
X
On Buying Parts
You’ll need a lot of parts for all of the projects in this book. As a result, you’ll learn about a lot of vendors. Because there are no large electronics parts retailers in my city, I buy parts online all the time. If you’re lucky enough to live in an area where you can buy from a brick-and-mortar store, good for you! If not, get to know some of these vendors.
Chapter 3 introduces a more complex network: the Internet. It covers the basic devices that hold it together, and the basic relationships between devices. You’ll see the messages that underlie some of the most common tasks you do on the Internet every day, and learn how to send those messages. You’ll write your first set of programs to allow you to send data across the Net based on a physical activity in your home.
In Chapter 4, you’ll build your first embedded device. You’ll get more experience with command-line connections to the Net, and you’ll connect a microcontroller to a web server without using a desktop or laptop computer as an intermediary.
Chapter 5 takes the Net connection a step further by explaining socket connections, which allow for longer interaction. In this chapter, you’ll learn how to write a server program of your own that you can connect to from an embedded device, a personal computer, or anything else connected to the Net. You’ll connect to this server program from the command line and from a microcon-troller, in order to understand how devices of different types can connect to each other through the same server.
Chapter 6 introduces wireless communication. You’ll learn some of the characteristics of wireless, along with its possibilities and limitations. Several short examples in this
chapter enable you to say “Hello World!” over the air in a number of ways.
Chapter 7 offers a contrast to the socket connections of Chapter 5, introducing message-based protocols like UDP on the Internet and ZigBee and 802.15.4 for wireless networks. Instead of using the client-server model used in the earlier chapters, here you’ll learn how to design con-versations where each object in a network is equal to the others, exchanging information one message at a time.
Chapter 8 is about location. It introduces a few tools to help you locate things in physical space, and some thoughts on the relationship between physical location and network relationships.
Chapter 9 deals with identification in physical space and network space. In that chapter, you’ll learn a few tech-niques for generating unique network identities based on physical characteristics. You’ll also learn a bit about how a networked device’s characteristics can be determined.
For example, writing a program that uses several chunks of code from this book does not require permission. Selling or distributing a CD-ROM of examples from O’Reilly books does require permission. Answering a question by citing this book and quoting example code does not require permission. Incorporating a significant amount of example code from this book into your product’s documentation does require permission.
We appreciate attribution. An attribution usually includes the title, author, publisher, and ISBN. For example: “Making Things Talk: Practical Methods for Connecting Physical Objects, by Tom Igoe. Copyright 2007 O’Reilly Media, 978-0-596-51051-0.” If you feel that your use of code examples falls outside fair use or the permission given above, feel free to contact us at [email protected]. X
Using Code Examples
This book is here to help you get your job done. In general, you may use the code in this book in your programs and documentation. You do not need to contact us for permission unless you’re reproducing a significant portion of the code.
Even though we want you to be adventurous, we also want you to be safe. Please don’t take any unnecessary risks in building the projects that follow. Every set of instructions is written with safety in mind. Ignore the safety instructions at your own peril. Be sure you have the appropriate level of knowledge and experience to get the job done in a safe manner.
Please keep in mind that the projects and circuits shown in this book are for instructional purposes only. Details like power conditioning, automatic resets, RF shielding, and other things that make an electronic product certifiably ready for market are not included here. If you’re designing real products to be used by people other than yourself, please do not rely on this information alone.
Using Circuit Examples
In building the projects in this book, you’re going to break things and void warranties. If you’re averse to this, put this book down and walk away. This is not a book for those who are squeamish about taking things apart without knowing whether they’ll go back together again.
Technology, and the laws and limitations imposed by manufacturers and content owners, are constantly changing. Thus, some of the projects described may not work, may be inconsistent with current laws or user agreements, or may damage or adversely affect some equipment.
Your safety is your own responsibility, including proper use of equipment and safety gear, and determining whether you have adequate skill and experience. Power tools, electricity, and other resources used for these projects are dangerous, unless used properly and with adequate precautions, including safety gear. Some illustrative photos do not depict safety precautions or equipment, in order to show the project steps more clearly. These projects are not intended for use by children.
Use of the instructions and suggestions in this book is at your own risk. O’Reilly Media, Inc., disclaims all responsibility for any resulting damage, injury, or expense. It is your responsibility to make sure that your activities comply with applicable laws, including copyright.
The Interactive Telecommunications Program in the Tisch School of the Arts at New York University has been my home for the past decade or more. It is a lively and warm place to work, crowded with many talented people. This book grew out of a class called Networked Objects that I have taught there for several years. I hope that the ideas herein represent the spirit of the place, and give you a sense of my own enjoyment working there.
Red Burns, the department’s chair and founder, has supported me since I first entered this field. She’s indulged my many flights of fancy, and brought me firmly down to earth when needed. She has challenged me on every project to make sure that I use technology not for its own sake, but always in the service of empowering people.
Dan O’Sullivan introduced me to physical computing and then generously allowed me to share in teaching it and shaping its role at ITP. He’s been a great advisor and col-laborator, and offered constant feedback as I worked. Most of the chapters started with a rambling conversation with Dan. His fingerprints are all over this book, and it’s a better book for it.
Clay Shirky, Daniel Rozin, and Dan Shiffman have also been close advisors on this project. Clay’s watched indulgently as the pile of parts mounted in our office and interrupted his own writing to offer opinions on my ideas as they came up. Daniel Rozin has and offered valuable critical insight as well, and his ideas are heavily influential in this book. Dan Shiffman read many drafts and offered great feedback. He also contributed many great code samples and libraries.
Fellow faculty members Marianne Petit, Nancy Hechinger, and Jean-Marc Gauthier have been supportive through-out the writing, offering encouragement and inspiration, covering departmental duties for me, and offering inspira-tion through their work.
The rest of the faculty and staff at ITP have also made this possible. George Agudow, Edward Gordon, Midori Yasuda, Megan Demarest, Nancy Lewis, Robert Ryan, John Duane, Marlon Evans, Tony Tseng, and Gloria Sed have tolerated
Acknowledgments
This book is the product of many conversations and collaborations. It would not have been possible without the support and encouragement of my own network.
all kinds of insanity in the name of physical computing and networked objects, and made things possible for me and the other faculty and students. Research residents Carlyn Maw, Todd Holoubek, John Schimmel, Doria Fan, David Nolen, Peter Kerlin, and Michael Olson have assisted both faculty and students over the past few years to realize projects that have influenced the ones you see in these chapters, both in their own classes and in general. Faculty members Patrick Dwyer, Michael Schneider, Greg Shakar, Scott Fitzgerald, Jamie Allen, Shawn Van Every, James Tu, and Raffi Krikorian have used the tools from this book in their classes, or have lent techniques of their own to the projects described here.
The students of ITP have pushed the boundaries of possi-bility in this area, and their work is reflected in many of the projects. I have cited specifics where they come up, but in general I’d like to thank all the students who’ve taken the Networked Objects class over the years, as they’ve helped me to understand what this is all about. Those from the 2006 and 2007 classes have been particularly influential, as they’ve had to learn the stuff from early drafts of this book, and have caught several important mistakes in the manuscript.
of new tools. Noodles the cat put up with all manner of silliness in order to finish the cat bed and its photos. No animals were harmed in the making of this book, though one was bribed with catnip.
Casey Reas and Ben Fry have made the software side of this book possible by creating Processing. Without Processing, the software side of networked objects was much more painful. Without Processing, there would be no simple, elegant programming interface for Arduino and Wiring. The originators of Arduino and Wiring have made the hard-ware side of this book possible. Massimo Banzi, Gianluca Martino, David Cuartielles, and David Mellis on Arduino, Hernando Barragán on Wiring, and Nicholas Zambetti bridging the two. I have been lucky to work with them.
Though I’ve tried to use and cite many hardware vendors in this book, special mention must be made of Nathan Seidle at SparkFun. This book would not be what it is without him. While I’ve been talking about object-oriented hardware for years, Nathan and the folks at SparkFun have been quietly making it a reality.
Thanks also to the support team at Lantronix. Their products are good and their support is excellent. Garry Morris, Gary Marrs, and Jenny Eisenhauer have answered countless emails and phone calls from me helpfully and cheerfully.
I have drawn ideas from many colleagues from around the world in these projects through conversations in workshops and visits. Thanks to the faculty and students I’ve worked with at the Royal College of Art’s Interaction Design program, UCLA’s Digital Media | Arts program, the Interaction Design program at the Oslo School of Architecture and Design, Interaction Design Institute Ivrea, and the Copenhagen Institute of Interaction Design.
Many networked object projects have inspired this writing. Thanks to those whose work illustrates the chapters: Tuan Anh T. Nguyen, Joo Youn Paek, Doria Fan, Mauricio Melo, and Jason Kaufman, Tarikh Korula and Josh Rooke-Ley of Uncommon Projects, Jin-Yo Mok, Alex Beim, Andrew Schneider, Gilad Lotan and Angela Pablo, Mouna Andraos and Sonali Sridhar, Frank Lantz and Kevin Slavin of Area/Code, and Sarah Johansson.
Working for MAKE has been a great experience. Dale Dougherty has been encouraging of all of my ideas, patient with my delays, and indulgent when I wanted to try new things. He’s never said no without offering an acceptable
alternative (and often a better one). Brian Jepson has gone above and beyond the call of duty as an editor, building all of the projects, suggesting modifications, debugging code, helping with photography and illustrations, and being endlessly encouraging. It’s an understatement to say that I couldn’t have done this without him. I could not have asked for a better editor. Thanks to Nancy Kotary for her excellent copyedit of the manuscript. Katie Wilson made this book far better looking and readable that I could have hoped for. Thanks also to Tim Lillis for the illustrations. Thanks to all of the MAKE team.
Thanks to my agents: Laura Lewin, who got the ball rolling; Neil Salkind, who picked it up from her; and the whole support team at Studio B. Thanks finally to my family and friends who listened to me rant enthusiastically or complain bitterly as this book progressed. Much love to you all. X
We’d Like to Hear from You
Please address comments and questions concerning this book to the publisher:
O’Reilly Media, Inc.
1005 Gravenstein Highway North Sebastopol, CA 95472
(800) 998-9938 (in the United States or Canada) (707) 829-0515 (international or local) (707) 829-0104 (fax)
We have a website for this book, where we list errata, examples, and any additional information. You can access this page at: www.makezine.com/go/MakingThingsTalk To comment or ask technical questions about this book, send email to: [email protected]
Maker Media is a division of O’Reilly Media devoted entirely to the growing community of resourceful people who believe that if you can imagine it, you can make it. Consisting of MAKE Magazine, CRAFT Magazine, Maker Faire, and the Hacks series of books, Maker Media encourages the Do-It-Yourself mentality by providing creative inspiration and instruction.
For more information about Maker Media, visit us online: MAKE: www.makezine.com
The Tools
This book is a cookbook of sorts, and this chapter covers the staple ingredients. The concepts and tools you’ll use in every chapter are introduced here. There’s enough information on each tool to get you to the point where you can make the tool say
“Hello World!”
Chances are you’ve used some of the tools in this chapter before, or other tools just like them. Skip past the things you know and jump into learning the tools that are new to you. You may want to explore some of the less-familiar tools on your own to get a sense of what they can do. The projects in the following chapters only scratch the surface of what’s possible for most of these tools. References for further investigation are provided.Happy Feedback Machine by Tuan Anh T. Nguyen
It Starts with the Stuff You Touch
All of the objects that you’ll encounter in this book, tangible or intangible, will have certain behaviors. Software objects will send and receive messages, store data, or both. Physical objects will move, light up, or make noise. The first question to ask about any of them is: what does it do? The second is: how do I make it do what it’s supposed to do? Or, more simply, what is its interface?
An object’s interface is made up of three elements. First, there’s the physical interface. This is the stuff you touch. The knobs, switches, keys, and other sensors that make up the physical interface react to your actions. The connectors that join objects are also part of the physical interface. Many of the projects in this book will show you how to build physical interfaces. Every network of objects begins and ends with a physical interface. Even though some objects in a network (software objects) have no physical interface, people build their mental models of how a system works based on the physical interface. A computer is much more than the keyboard, mouse, and screen, but that’s what we think of it as, because that’s what we see and touch. You can build all kinds of wonderful functions into your system, but if those functions aren’t apparent in the things people get to see, hear, and touch, your wonderful functions will never get used. Remember the lesson of the VCR clock that constantly blinks 12:00 because no one can be bothered to learn how to set it: if the physical interface isn’t good, the rest of the system suffers.
Second, there’s the software interface, the commands that you send to the object to make it respond. In some projects, you’ll invent your own software interface, and in others, you’ll rely on existing interfaces to do the work for you. The best software interfaces have simple, consistent
functions that result in predictable outputs. Unfortunately, not all software interfaces are as simple as you’d like them to be, so be prepared to have to experiment a little to get some software objects to do what you think they should do. When you’re learning a new software interface, it helps to approach it mentally in the same way you do with a physical interface. Don’t try to use all the functions at once. Learn what each function does on its own before you try to use them all together. You don’t learn to play the piano by starting with a Bach fugue — you start one note at a time. Likewise, you don’t learn a software interface by writing a full application with it — you learn it one function at a time. There are many projects in this book; if you find any of their software functions confusing, write a simple program that demonstrates just that function, then return to the project.
Finally, there’s the electrical interface, the pulses of electrical energy sent from one device to another to be interpreted as information. Unless you’re designing new objects or the connections between them, you never have to deal with this interface. When you’re designing new objects or the networks that connect them, however, you have to know and understand a few things about the electrical interface, so that you know how to match up objects that might have slight differences in their electrical interfaces.
X
It’s About Pulses
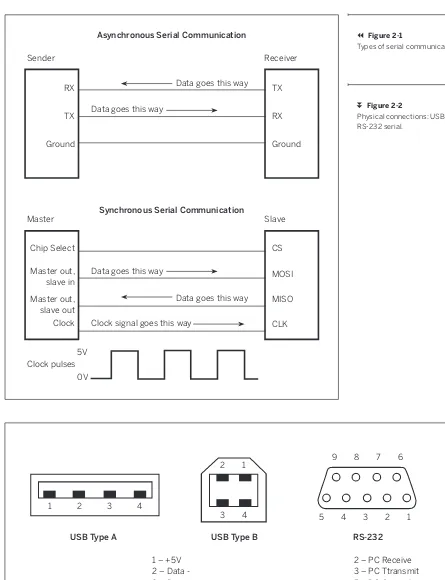
Serial protocols like RS-232, USB, and IEEE 1394 (also known as FireWire and i.Link) connect computers to printers, hard drives, keyboards, mice, and other periph-eral devices. Network protocols like Ethernet and TCP/IP connect multiple computers to each other through network hubs, routers, and switches. A communications protocol usually defines the rate at which messages are exchanged, the arrangement of data in the messages, and the grammar of the exchange. If it’s a protocol for physical objects, it will also specify the electrical characteristics, and sometimes even the physical shape of the connectors. Protocols don’t specify what happens between objects, however. The commands to make an object do something rely on protocols in the same way that clear instructions rely on good grammar. You can’t give good instructions if you can’t form a good sentence.
One thing that all communications protocols share, from the simplest chip-to-chip message to the most complex network architecture, is this: it’s all about pulses of energy. Digital devices exchange information by sending timed
pulses of energy across a shared connection. The USB connection from your mouse to your computer uses two wires for transmission and reception, sending timed pulses of electrical energy across those wires. Likewise, wired network connections are made up of timed pulses of electrical energy sent down the wires. For longer distances and higher bandwidth, the electrical wires may be replaced with fiber optic cables carrying timed pulses of light. In cases where a physical connection is inconvenient or impossible, the transmission can be sent using pulses of radio energy between radio transceivers (a transceiver is two-way radio, capable of transmitting and receiving). The meaning of data pulses is independent of the medium that’s carrying them. You can use the same sequence of pulses whether you’re sending them across wires, fiber optic cables, or radios. If you keep in mind that all of the communication you’re dealing with starts with a series of pulses, and that somewhere there’s a guide explaining the sequence of those pulses, you can work with any commu-nication system you come across.
X
The second type of computer you’ll encounter in this book, the microcontroller, has no physical interface that humans can interact with directly. It’s just an electronic chip with input and output pins that can send or receive electrical pulses. Using a microcontroller is a three-stage process:
1. You connect sensors to the inputs to convert physical energy like motion, heat, and sound into electrical energy. 2. You attach motors, speakers, and other devices to the
outputs to convert electrical energy into physical action. 3. Finally, you write a program to determine how the input
changes affect the outputs.
In other words, the microcontroller’s physical interface is whatever you make of it.
The third type of computer in this book, the network server, is basically the same as a desktop computer, and may even have a keyboard, screen, and mouse. Even though it can do all the things you expect of a personal computer, its primary function is to send and receive data over a network. Most people using servers don’t think of them as physical things, because they only interact with them over a network, using their local computers as physical interfaces to the server. A server’s most important interface for most users’ purposes is its software interface.
Computers of all Shapes and Sizes
You’ll encounter at least four different types of computers in this book, grouped according to their physical interfaces. The most familiar of these is the personal
The fourth group of computers is a mixed bag: mobile phones, music synthesizers, and motor controllers, to name a few. Some of them will have fully developed physical interfaces, some of them will have minimal physical interfaces but detailed software interfaces, and most will have a little of both. Even though you don’t
normally think of these devices as computers, they are. When you think of them as programmable objects, with interfaces that you can manipulate, it’s easier to figure out how they can all communicate with each other, regardless of their end function.
X
Good Habits
Networking objects is a bit like love. The fundamental problem in both is that when you’re sending a message, you never really know whether the receiver understands what you’re saying, and there are a thousand ways for your message to get lost or garbled in transmission.
You may know why you feel the way you do, but your partner doesn’t. All he or she has to go on are the words you say and the actions you take. Likewise, you may know exactly what message your local computer is sending, how it’s sending it, and what all the bits mean, but the remote computer has no idea what they mean unless you program it to understand them. All it has to go on are the bits it receives. If you want reliable, clear communications (in love or networking), there are a few simple things you have to do:
• Listen more than you speak.
• Never assume that what you said is what they heard.
• Agree on how you’re going to say things in advance.
• Ask politely for clarification when messages aren’t clear.
Listen More Than You Speak
The best way to make a good first impression, and to main-tain a good relationship, is to be a good listener. Listening is more difficult than speaking. You can speak anytime you want to, but you never know when the other person is going to say something, so you have to listen all the time. In networking terms, this means that you should write your programs such that they’re listening for new messages most of the time, and sending messages only when necessary. It’s often easier to send out messages all the time rather than figure out when it’s appropriate, but it can lead to all kinds of problems. It usually doesn’t take a lot of work to limit your sending, and the benefits far outweigh the costs.
Never Assume
What you say is not always what the other person hears. Sometimes it’s a matter of misinterpretation, and other times, you may not have been heard clearly. If you assume that the message got through and continue on obliviously, you’re in for a world of hurt. Likewise, you may be tempted to work out all the logic of your system, and all the steps of your messages before you start to connect things together, then build it, then test it all at once. Avoid that temptation.
It’s good to plan the whole system out in advance, but build it and test it in baby steps. Most of the errors that occur in building these projects occur in the communica-tion between objects. Always send a quick “Hello World!” message from one object to the others and make sure that the message got there intact before you proceed to the more complex details. Keep that “Hello World!” example on hand for testing when communication fails.
They’re most often in the element with which you’re least familiar, and therefore are avoiding. When you can’t get a message through, think about every link in the chain from sender to receiver, and check every one. Then check the links you overlooked.
Agree on How You Say Things
In good relationships, you develop a shared language based on shared experience. You learn the best ways to say things so that your partner will be most receptive, and you develop shorthand for expressing things that you repeat all the time. Good data communications also rely on shared ways of saying things, or protocols. Sometimes you make up a protocol yourself for all the objects in your system, and other times you have to rely on existing protocols. If you’re working with a previously established protocol, make sure you understand what all the parts are before you start trying to interpret it. If you have the luxury of making up your own protocol, make sure you’ve consid-ered the needs of both the sender and receiver when you define it. For example, you might decide to use a protocol that’s easy to program on your web server, but turns out to be impossible to handle on your microcontroller. A little thought to the strengths and weaknesses on both sides of the transmission and a little compromise before you start to build will make things flow much more smoothly.
Ask Politely for Clarification
Messages get garbled in countless ways. Sometimes you hear one thing; it may not make much sense, but you act on it … only to find out that your partner said something entirely different from what you thought. It’s always best to ask nicely for clarification to avoid making a stupid mistake. Likewise, in network communications, it’s wise to check that any messages you receive make sense. When they don’t, ask for a repeat transmission. It’s also wise to check that a message was sent, rather than assume. Saying nothing can be worse than saying something wrong. Minor problems can become major when no one speaks up to acknowledge that there’s a problem. The same thing can occur in network communications. One device may wait forever for a message from the other side, not knowing that the remote device is unplugged, or perhaps it didn’t get the initial message. When no response is forthcoming, send another message. Don’t resend it too often, and give the other party time to reply before resending. Acknowledging messages may seem like a luxury, but it can save a whole lot of time and energy when you’re building a complex system.
X
Tools
As you’ll be working with the physical, software, and electrical interfaces of objects, the tools you’ll need are physical tools, software, and (computer) hardware.
Physical Tools
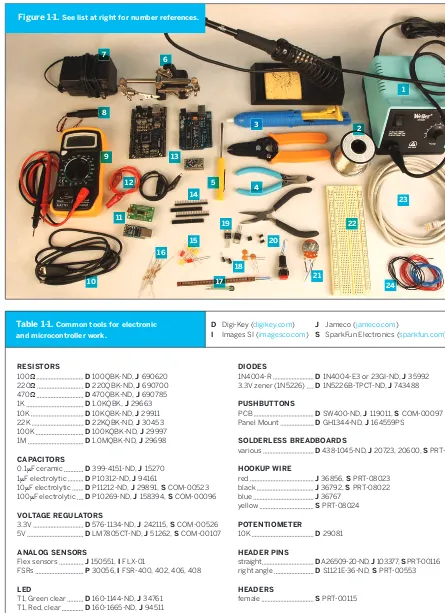
If you’ve worked with electronics or microcontrollers before, chances are you have your own hand tools already. Figure 1-1 shows the ones used most frequently in this book. They’re common tools, and can be obtained from many vendors. A few are listed in Table 1-1.
In addition to hand tools, there are some common elec-tronic components that you’ll use all the time. They’re listed as well, with part numbers from the retailers featured most frequently in this book. Not all retailers will carry all parts, so there are many gaps in the table.
RESISTORS
10"F electrolytic D P11212-ND, J 29891, S COM-00523 100"F electrolytic D P10269-ND, J 158394, S COM-00096 VOLTAGE REGULATORS
Table 1-1. Common tools for electronic and microcontroller work.
DIODES
1N4004-R D 1N4004-E3 or 23GI-ND, J 35992 3.3V zener (1N5226) D 1N5226B-TPCT-ND, J 743488 PUSHBUTTONS
PCB D SW400-ND, J 119011, S COM-00097 Panel Mount D GH1344-ND, J 164559PS
SOLDERLESS BREADBOARDS
various D 438-1045-ND, J 20723, 20600, S PRT-00137 HOOKUP WIRE
straight D A26509-20-ND, J 103377, S PRT-00116 right angle D S1121E-36-ND, S PRT-00553 HEADERS
D Digi-Key (digikey.com) I Images SI (imagesco.com)
J Jameco (jameco.com)
here. Cheap soldering irons die fast, but a mid-range iron like the Weller WLC-100 work great for small electronic work. Avoid the Cold Solder irons. They solder by creating a spark, and that spark can damage static-sensitive parts like micro-controllers. Jameco (jameco.com): 146595; RadioShack: 640-2802 and 640-2078
2 Solder 21-23 AWG solder is best. Get lead-free solder if you can, it’s healthier for you. Jameco: 668271; RadioShack: 640-0013
3 Desoldering pump This helps when you mess up while soldering. Jameco: 305226; SparkFun (sparkfun.com): TOL-00082
4 Wire stripper, Diagonal cutter, Needle-nose pliers Avoid the 3-in-1 versions of these tools. They’ll only make you grumpy. These three tools are essential for working with wire, and you don’t need expensive ones to have good ones. Wire stripper: Jameco: 159291; RadioShack: 640-2129A; SparkFun: TOL-00089 Diagonal cutter: Jameco: 161411; Radio– Shack: 640-2043; SparkFun: TOL-00070 Needlenose pliers: Jameco: 35473; Radio– Shack: 640-2033; SparkFun: TOL-00079
5 Mini-screwdriver Get one with both Phillips and slotted heads. You’ll use it all the time. Jameco: 127271; RadioShack: 640-1963
6 Helping hands These make soldering much easier. Jameco: 681002
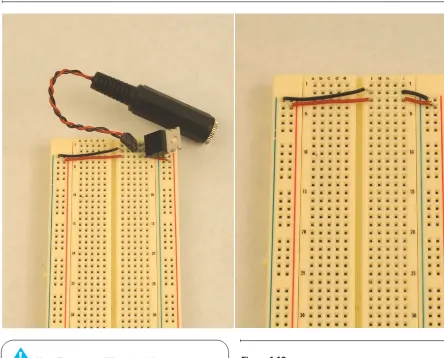
7 9–12V DC power supply You’ll use this all the time, and you’ve probably got a spare from some dead electronic device. Make sure you know the polarity of the plug so you don’t reverse polarity on a component and blow it up! Most of the devices shown in this book have a DC power jack that accepts a 2.1mm inner diameter/5.5mm outer diameter plug, so look for an adaptor with the same dimensions. Jameco: 170245 (12V, 1000mA); RadioShack: 273-1667 (3–12V, 800mA); SparkFun: TOL-00298
8 Power connector, 2.1mm inside diameter/ 5.5mm outside diameter You’ll need this to connect your microcontroller module or breadboard to a DC power supply. This size connector is the most common for the power supplies that will work with the circuits you’ll be building here. Jameco: 159610; Digi-Key (digikey.com): CP-024A-ND
expensive one. As long as it measures voltage, resistance, amperage, and con-tinuity, it’ll do the job. Jameco: 220812; RadioShack: 22-810; SparkFun: TOL-00078
10 USB cables You’ll need both USB A-to-B (the most common USB cables) and USB A-to-mini-B (the kind that’s common with digital cameras) for the projects in this book. SparkFun: CAB-00512, CAB-00598
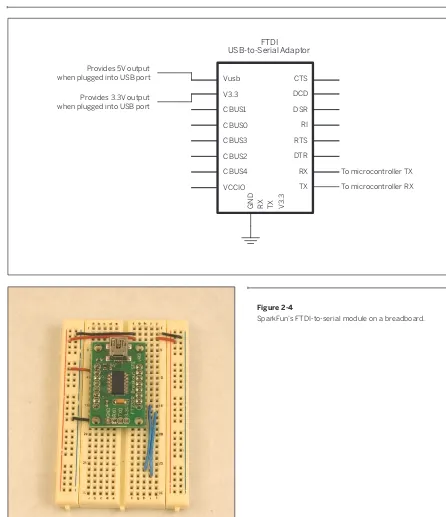
11Serial-to-USB converter This converter lets you speak TTL serial from a USB port. Breadboard serial-to-USB modules like the FT232 modules shown here are cheaper than the consumer models, and easier to use in the projects in this book. SparkFun: BOB-00718 or DEV-08165
12Alligator clip test leads It’s often hard to juggle the five or six things you have to hold when metering a circuit. Clip leads make this much easier. Jameco: 10444; RadioShack: 278-016; SparkFun: CAB-00501
13Microcontroller module The microcon-trollers shown here are the Arduino NG and the Arduino Mini. Available from SparkFun and Make (store.makezine. com) in the U.S., PCB-Europe in Europe (pcb-europe.net/catalog/) and from multiple distributors internationally. See arduino.cc/en/Main/Buy for details in your region.
14Header pins You’ll use these all the time. It’s handy to have female ones around as well. Jameco: 103377; Digi-Key: A26509-20-ND; SparkFun: PRT-00116
15Spare LEDs for tracing signals LEDs are to the hardware developer what print statements are to the software developer. They let you see quickly if there’s voltage between two points, or if a signal’s going through. Keep spares on hand. Jameco: 3476; RadioShack: 276-0069; Digi-Key: 160-1144-ND, 160-1665-ND
16Resistors You’ll need resistors of various values for your projects. Common values are listed in Table 1-1.
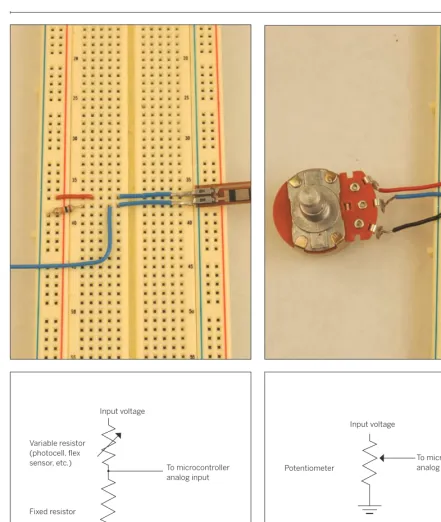
17 Analog sensors (variable resistors)
There are countless varieties of variable resistors to measure all kinds of physical properties. They’re the simplest of analog sensors, and they’re very easy to build into test circuits. Flex sensors and force-sensing resistors are handy for testing a circuit or a program. Flex sensors: Jameco: 150551; Images SI: FLX-01
Images SI: FSR-400, 402, 406, 408
18Capacitors You’ll need capacitors of various values for your projects. Common values are listed in Table 1-1.
19 Voltage regulators Voltage regulators take a variable input voltage and output a constant (lower) voltage. The two most common you’ll need for these projects are 5V and 3.3V. Be careful when using a regulator that you’ve never used before. Check the data sheet to make sure you have the pin connections correct. 3.3V: Digkey: 576-1134-ND; Jameco: 242115; SparkFun: COM-00526
5V: Digkey: LM7805CT-ND; Jameco: 51262; SparkFun: COM-00107
20Pushbuttons There are two types you’ll find handy: the PCB-mount type like the ones you find on Wiring and Arduino boards, used here mostly as reset buttons for breadboard projects; and panel-mount types used for interface controls for end users. But you can use just about any type you want. PCB-mount type: Digi-Key: SW400- ND; Jameco: 119011; SparkFun: COM-00097 Panel-mount type: Digi-Key: GH1344-ND; Jameco: 164559PS
21Potentiometers You’ll need potentiom-eters to let people adjust settings in your project. Jameco: 29081
22Solderless breadboard Having a few around can be handy. I like the ones with two long rows on either side, so you can run power and ground on both sides. Jameco: 20723 (2 bus rows per side); Radio– Shack: 276-174 (1 bus row per side); Digi-Key: 438-1045-ND; SparkFun: PRT-00137
23 Ethernet cables A couple of these will come in handy. Jameco: 522781
24Black, red, blue, yellow wire 22 AWG solid-core hook-up wire is best for making solderless breadboard connec-tions. Get at least three colors, and always use red for voltage and black for ground. A little organization of your wires can go a long way.
Black: Jameco: 36792 Blue: Jameco: 36767 Green: Jameco: 36821
Red: Jameco: 36856; RadioShack: 278-1215 Yellow: Jameco: 36919
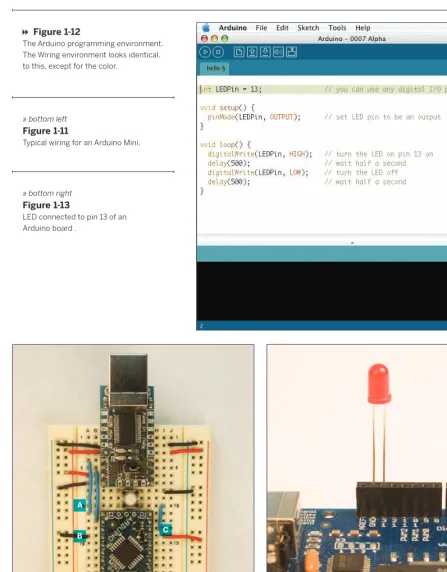
Figure 1-2
The Processing editor window.
Software Tools
Processing
The multimedia programming environment used in this book is called Processing. It’s based on Java, and made for designers, artists, and others who don’t need to know all the gory details of programming, but want to get something done. It’s a useful tool for explaining program-ming ideas because it takes relatively little Processing code to make big things happen, such as opening a network connection, connecting to an external device through a serial port, or controlling a camera through FireWire. It’s a free, open source tool available from
It’s not too flashy a program, but it’s a classic. It should print Hello World! in the message box at the bottom of the editor window. It’s that easy.
Programs in Processing are called sketches, and all the data for a sketch is saved in a folder with the sketch’s name. The editor is very basic, without a lot of clutter to
println("Hello World!\n"); Here’s your first Processing
program. Type this into the editor window, and press the Run button on the top left-hand side of the toolbar:
8
get in your way. The toolbar has buttons to run and stop a sketch, create a new file, open an existing sketch, save the current sketch, or export to a Java applet. You can also export your sketch as a standalone application from the File menu. Files are normally stored in a subdirectory of your Documents folder called Processing, but you can save them wherever you prefer if you don’t like them there.
/*
Triangle drawing program Language: Processing
Draws a triangle whenever the mouse button is not pressed. Erases when the mouse button is pressed.
*/
// declare your variables:
float redValue = 0; // variable to hold the red color float greenValue = 0; // variable to hold the green color float blueValue = 0; // variable to hold the blue color
// the setup() method runs once at the beginning of the program:
void setup() {
size(320, 240); // sets the size of the applet window background(0); // sets the background of the window to black fill(0); // sets the color to fill shapes with (0 = black) smooth(); // draw with antialiased edges
}
// the draw() method runs repeatedly, as long as the applet window // is open. It refreshes the window, and anything else you program // it to do:
void draw() {
// Pick random colors for red, green, and blue: redValue = random(255);
greenValue = random(255); blueValue = random(255);
// set the line color:
stroke(redValue, greenValue, blueValue);
// draw when the mouse is up (to hell with conventions): if (mousePressed == false) {
// draw a triangle:
triangle(mouseX, mouseY, width/2, height/2,pmouseX, pmouseY); }
// erase when the mouse is down: else {
background(0); fill(0); } }
Here’s a second program that’s a bit more exciting. It illustrates some of the main programming structures in Processing:
Processing is a fun language to play with, because you can make interactive graphics very quickly. It’s also a simple introduction to Java for beginning programmers. If you’re a Java programmer already, you can include Java directly in your Process-ing programs. ProcessProcess-ing is expandable through code libraries. You’ll be using two of the Processing code libraries frequently in this book: the serial library and the networking library.
For more on the syntax of Processing, see the language reference guide at www.processing.org. To learn more about programming in Processing, check out Processing: A Programming Handbook for Visual Designers and Artists, by Casey Reas and Ben Fry (MIT Press, 2007), the creators of Processing.
BASIC users: If you’ve never used a C-style for-next loop, it can seem a bit forbidding. What this bit of code does is establish a variable called myCounter. As long as number is less than or equal to ten, it executes the instructions in the curly brackets. myCounter++ tells the program to add one to myCounter each time through the loop. The equivalent BASIC code is:
for myCounter = 0 to 10 Print myCounter next
Mac OS X Users: Once you’ve downloaded and installed Processing, there’s an extra step you’ll need to take that will make the projects in this book that use Processing possible.
for (int myCounter = 0; myCounter <=10; myCounter++) { println(myCounter);
} Here’s a typical for-next loop.
Try this in a sketch of its own (to start a new sketch, select New from Processing’s File menu):
8
Every Processing program has two main routines, setup() and draw(). setup() happens once at the beginning of the program. It’s where you set all your initial conditions, like the size of the applet window, initial states for variables, and so forth. draw() is the main loop of the program. It repeats continuously until you close the applet window.
In order to use variables in Processing, you have to declare the variable’s data type. In the preceding program, the variables redValue, greenValue, and blueValue are all float types, meaning that they’re floating decimal-point numbers. Other common variable types you’ll use are ints
(integers), booleans (true or false values), Strings of text, and bytes.
Like C, Java and many other languages, Processing uses C-style syntax. All functions have a data type, just like variables (and many of them are the void type, meaning that they don’t return any values). All lines end with a semicolon, and all blocks of code are wrapped in curly brackets. Conditional statements (if-then statements), for-next loops, and comments all use the C syntax as well. The preceding code illustrates all of these except the for-next loop.
Go to the Processing application directory, then to the libraries/ serial/ subdirectory. There’s a file there called macosx_setup. command. Double-click this. It will run a script that enables Processing to use serial communication to USB, Bluetooth, and other devices. A terminal window will open and run a script that will ask you a few questions. It will also ask for your admin-istrator password, so don’t run it unless you have adminadmin-istrator access to your machine. Say “yes” to anything it asks, and provide your password when needed. When it’s done, you’ll be able to use the serial ports of your computer through Processing. You’ll be making heavy use of this capability later on in this book.
Remote Access Applications
One of the most effective debugging tools you’ll use in making the projects in this book is a command-line remote access program, which allows you access to the
command-line interface of a remote computer. If you’ve never used a command-line interface before, you’ll find it a bit awkward at first, but you get used to it pretty quickly. This tool is especially important when you need to log into a web server, as you’ll need the command line to create PHP scripts that will be used in this book.
Figure 1-3 The main PuTTY window.
}
If you already know how to create PHP and HTMLdocuments and upload them to your web server, you can skip ahead to the “PHP” section.
In a command-line interface, everything is done by typing commands at the cursor. The programs you’ll be running and the files you’ll be writing and reading aren’t on your machine. When you’re using the PHP programming language described shortly, for example, you’ll be using programs and reading files directly on the web host’s computer.
Although this is the most direct way to work with PHP, some people prefer to work more indirectly, by writing text files on their local computers and uploading them to the remote computer. Depending on how restrictive your web hosting service is, this may be your only option (however, there are many inexpensive hosting companies that offer full command-line access). Even if you prefer to work this way, there are times in this book when the command line is your only option, so it’s worth getting to know a little bit about it now.
On Windows computers, there are a few remote access programs available, but the one that you’ll use here is called PuTTY. You can download it from www.puttyssh.org. Download the Windows-style installer and run it. On Mac OS X and Linux, you can use OpenSSH, which is included with both operating systems, and can be run in the Terminal program with the command ssh.
Before you can run OpenSSH, you’ll need to launch a terminal emulation program, which gives you access to your Linux or Mac OS X command line. On Mac OS X, the program is called Terminal, and you can find it in the
Utilities subdirectory of the Applications directory. On Linux, look for a program called xterm, rxvt, Terminal, or Konsole.
NOTE: ssh is a more modern cousin of a longtime Unix remote access program called telnet. ssh is more secure, in that it scrambles all data sent from one computer to another before sending it, so it can’t be snooped on en route. telnet sends all data from one computer to another with no encryption. You should use ssh to connect from one machine to another whenever you can. Where telnet is used in this book, it’s because it’s the only tool that will do what’s needed for the examples in question. Think of telnet as an old friend: maybe not the coolest guy on the block, maybe he’s a bit of a gossip, but he's stood by you forever, and you know you can trust him to do the job when everyone else lets you down.
X
Mac OS X and Linux
Open your terminal program. These Terminal applications give you a plain text window with a greeting like this:
Last login: Wed Feb 22 07:20:34 on ttyp1 ComputerName:~ username$
Type [email protected] at the command line to connect to your web host. Replace username and myhost.com with your username and host address.
Windows
On Windows, you’ll need to start up PuTTY (see Figure 1-3). To get started, type myhost.com (your web host’s name) in the Host Name field, choose the SSH protocol, and then click Open.
Once you’ve connected to the remote web server, you should see something like this:
Last login: Wed Feb 22 08:50:04 2006 from 216.157.45.215 [userid@myhost ~]$
Now you’re at the command prompt of your web host’s computer, and any command you give will be executed on that computer. Start off by learning what directory you’re in. To do this, type the following:
pwd
which stands for “print working directory.” It asks the computer to list the name and pathname of the directory in which you’re currently working. You’ll see that many Unix commands are very terse, so you have to type less. The downside of this is that it makes them harder to remember. The server will respond with a directory path, such as:
/home/igoe
This is the home directory for your account. On many web servers, this directory contains a subdirectory called public_html or www, which is where your web files belong. Files that you place in your home directory (that is, outside or www or public_html) can’t be seen by web visitors.
NOTE: You should check with your web host to learn how the files and directories in your home directory are set up.
To find out what files are in a given directory, use the list (ls) command, like so:
ls –l .
NOTE: The dot is shorthand for “the current working directory.” Similarly, a double dot is shorthand for the directory (the parent directory) that contains the current directory.
The –l means “list long.” You’ll get a response like this:
total 44
drwxr-xr-x 13 igoe users 4096 Apr 14 11:42 public_html drwxr-xr-x 3 igoe users 4096 Nov 25 2005 share
This is a list of all the files and subdirectories of the current working directories, and their attributes. The first column lists who’s got permissions to do what (read, modify, or execute/run a file). The second lists how many links there are to that file elsewhere on the system; it’s not something you’ll have much need for, most of the time. The third column tells you who owns it, and the fourth tells you the group (a collection of users) the file belongs to. The fifth lists its size, and the sixth lists the date it was last modified. The final column lists the filename.
In a Unix environment, all files whose names begin with a dot are invisible. Some files, like access-control files that you’ll see later in the book, need to be invisible. You can get a list of all the files, including the invisible ones, using the –a modifier for ls, this way:
ls -la
To move around from one directory to another, there’s a “change directory” command, cd. To get into the public_ html directory, for example, type:
cd public_html
To go back up one level in the directory structure, type:
cd ..
To return to your home directory, use the ~ symbol, which is shorthand for your home directory:
cd ~
If you type cd on a line by itself, it also takes you to your home directory.
If you wanted to go into a subdirectory of a directory, for example the cgi-bin directory inside the public_html directory, you’d type cd public_html/cgi-bin. You can type the absolute path from the main directory of the server (called the root) by placing a / at the beginning of the file’s pathname. Any other file pathname is called a relative path.
To make a new directory, type:
This command will make a new directory in the current working directory. If you then use ls -l to see a list of files in the working directory, you’ll see a new line with the new directory. If you then type cd directoryname to switch to the new directory and ls –la to see all of its contents, you’ll see only two listings:
drwxr-xr-x 2 tqi6023 users 4096 Feb 17 10:19 . drwxr-xr-x 4 tqi6023 users 4096 Feb 17 10:19 ..
The first file, . , is a reference to this directory itself. The second, .. , is a reference to the directory that contains it. Those two references will exist as long as the directory exists. You can’t change them.
To remove a directory, type:
rmdir directoryname
You can remove only empty directories, so make sure that you’ve deleted all the files in a directory before you remove it. rmdir won’t ask you if you’re sure before it deletes your directory, though, so be careful. Don’t remove any direc-tories or files that you didn’t make yourself until you know your way around.
Controlling Access to Files
Type ls –l . to get a list of files in your current directory and take a closer look at the permissions on the files. For example, a file marked drwx--- means that it’s a directory, and that it’s readable, writable, and executable by the system user that created the directory (also known as the owner of the file). Or take the file marked -rw-rw-rw. The – at the beginning means it’s a regular file, not a directory, and that the owner, the group of users that the file belongs to (usually, this is the group that the owner is a member of), and everyone else who accesses the system can read and write to this file. The first rw- refers to the owner, the second refers to the group, and the third refers to the rest of the world. If you're the owner of a file, you can change its permissions using the chmod command:
chmod go –w filename
The options following chmod refer to which users you want to affect. In the preceding example, you’re removing write permission (-w) for the group (g) that the file belongs to, and for all others (o) besides the owner of the file. To restore write permissions for the group and others, and to also give them execute permission, you’d type:
chmod go +wx filename
A combination of u for user, g for group, and o for others, and a combination of + and – and r for read, w for write, and x for execute gives you the capability to change permissions on your files for anyone on the system. Be careful not to accidentally remove permissions from yourself (the user). Also, get in the habit of not leaving files accessible to the group and others unless you need to: on large hosting providers, it’s not unusual for you to be sharing a server with hundreds of other users!
Creating, Viewing, and Deleting Files
Two other command-line programs you’ll find useful are nano and less. nano is a text editor. It’s very bare-bones, and you may prefer to edit your files using your favorite text editor on your own computer and then upload them to your server. But for quick changes right on the server, nano is great. To make a new file, type:nano filename.txt
The nano editor will open up. Figure 1-4 shows what it looked like after I typed in some text.
All the commands to work in nano are keyboard
commands you type using the Control key. For example, to exit the program, type Control-X. The editor will then ask you if you want to save, and prompt you for a filename. The most common commands are listed along the bottom of the screen.
While nano is for creating and editing files, less is for reading them. less takes any file and displays it to the screen one screenful at a time. To see the file you just created in nano, for example, type:
less filename.txt
You’ll get a list of the file's contents, with a : prompt at the bottom of the screen. Press the spacebar for the next screenful. When you’ve read enough, type q to quit. There’s not much to less, but it’s a handy way to read long files. You can even send other commands through less (or almost any command-line program) using the pipe (|) operator. For example, try this:
Once you’ve created a file, you can delete it using the rm command, like this:
rm filename
Like rmdir, rm won’t ask you if you’re sure before it deletes your file, so use it carefully.
There are many other commands available in the Unix command shell, but these will suffice to get you started for now. For more information, type help at the command prompt to get a list of commonly used commands. For any command, you can get its user manual by typing man commandname. For more on getting around Unix and Linux systems using the command line, see Learning the Unix Operating System by Jerry Peek, John Strang, and Grace Todino-Gonguet. When you’re ready to close the connection to your server, type: logout
PHP
The server programs in this book are mostly in PHP. PHP is one of the most common scripting languages for appli-cations that run on the web server (server-side scripts). Server-side scripts are programs that allow you to do more with a web server than just serve fixed pages of text or HTML. They allow you to access databases through a browser, save data from a web session to a text file, send mail from a browser, and more. You’ll need a web hosting account with an Internet service provider for most of the projects in this book, and it’s likely that your host already provides access to PHP. If not, talk to your system admin-istrator to see whether it can be installed.
To get started with PHP, you’ll need to make a remote connection to your web hosting account using ssh as you did in the last section. Some of the more basic web hosts don’t allow ssh connections, so check with yours to see whether they do (and if yours doesn’t, look around for an inexpensive hosting company that does; it will be well worth it for the flexibility of working from the command line). Once you’re connected, type: php -v
You should get a reply like this:
PHP 4.3.9 (cgi) (built: Nov 4 2005 11:49:43) Copyright (c) 1997-2004 The PHP Group
Zend Engine v1.3.0, Copyright (c) 1998-2004 Zend Technologies
This tells what version of PHP is installed on your server. The code in this book was written using PHP4, so as long as you’re running that version or later, you’ll be fine. PHP makes it easy to write web pages that can display results from databases, send messages to other servers, send email, and more.
Most of the time, you won’t be executing your PHP scripts directly from the command line. Instead, you’ll be calling the web server application on your server, most likely a program called Apache, and asking it for a file (this is all accomplished simply by opening a web browser, typing in the address of a document on your web server, and pressing Enter — just like visiting any other web page). If the file you ask for is a PHP script, the web server applica-tion will look for your file and execute it. It’ll then send a message back to you with the results.
For more on this, see Chapter 3. For now, let’s get a simple PHP program or two working. Here’s your first PHP program. Open your favorite text editor, type this in, and save it on the server with the name hello.php in your public_html directory. (Your web pages may be stored in a different directory, such as www or web/public.)
<?php
echo "<html><head></head><body>\n"; echo "hello world!\n";
echo "</body></html>\n"; ?>
Now, back at the command line, type the following to see the results:
php hello.php
You should get the following response:
<html><head></head><body> hello world!
</body></html>
Now try opening this file in a browser. To see this program in action, open a web browser and navigate to the address of this file on your website. Because you saved it in public_ html, the address is http://www.example.com/hello.php (replace www.example.com with your web site and any additional path info needed to access your home files, such as http://tigoe.net/~tigoe/hello.php). You should get a web page like the one in Figure 1-5.
Figure 1-5
The results of your first PHP script, in a browser.
If it still doesn’t work, your web server may not be configured or PHP. Another possibility is that your web server uses a different extension for php scripts, such as .php4. Consult with your web hosting provider for more information.
You may have noticed that the program is actually printing out HTML text. PHP was made to be combined with HTML. In fact, you can even embed PHP in HTML pages, by using the <? and ?> tags that start and end every PHP script. If you get an error when you try to open your PHP script in a browser, ask your system administrator if there are any requirements as to which directories PHP scripts need to be in on your server, or on the file permissions for your PHP scripts.
If you see the PHP source code instead of what’s shown in Figure 1-5, you may have opened up the PHP script as a local file (make sure your web browser’s location bar says http:// instead of file://).