DUMmIES
2
ND EDITION
DUMmIES
2
ND EDITION
Hoboken, NJ 07030-5774
Copyright © 2004 by Wiley Publishing, Inc., Indianapolis, Indiana Published by Wiley Publishing, Inc., Indianapolis, Indiana Published simultaneously in Canada
No part of this publication may be reprodfuced, stored in a retrieval system or transmitted in any form or by any means, electronic, mechanical, photocopying, recording, scanning or otherwise, except as permitted under Sections 107 or 108 of the 1976 United States Copyright Act, without either the prior written permission of the Publisher, or authorization through payment of the appropriate per-copy fee to the Copyright Clearance Center, 222 Rosewood Drive, Danvers, MA 01923, (978) 750-8400, fax (978) 646-8600. Requests to the Publisher for permission should be addressed to the Legal Department, Wiley Publishing, Inc., 10475 Crosspoint Blvd., Indianapolis, IN 46256, (317) 572-3447, fax (317) 572-4447, e-mail: [email protected].
Trademarks: Wiley, the Wiley Publishing logo, For Dummies, the Dummies Man logo, A Reference for the Rest of Us!, The Dummies Way, Dummies Daily, The Fun and Easy Way, Dummies.com, and related trade dress are trademarks or registered trademarks of John Wiley & Sons, Inc. and/or its affiliates in the United States and other countries, and may not be used without written permission. All other trademarks are the property of their respective owners. Wiley Publishing, Inc., is not associated with any product or vendor mentioned in this book.
LIMIT OF LIABILITY/DISCLAIMER OF WARRANTY: THE PUBLISHER AND THE AUTHOR MAKE NO REPRESENTATIONS OR WARRANTIES WITH RESPECT TO THE ACCURACY OR COMPLETENESS OF THE CONTENTS OF THIS WORK AND SPECIFICALLY DISCLAIM ALL WARRANTIES, INCLUDING WITHOUT LIMITATION WARRANTIES OF FITNESS FOR A PARTICULAR PURPOSE. NO WARRANTY MAY BE CRE-ATED OR EXTENDED BY SALES OR PROMOTIONAL MATERIALS. THE ADVICE AND STRATEGIES CONTAINED HEREIN MAY NOT BE SUITABLE FOR EVERY SITUATION. THIS WORK IS SOLD WITH THE UNDERSTANDING THAT THE PUBLISHER IS NOT ENGAGED IN RENDERING LEGAL, ACCOUNTING, OR OTHER PROFESSIONAL SERVICES. IF PROFESSIONAL ASSISTANCE IS REQUIRED, THE SERVICES OF A COMPETENT PROFESSIONAL PERSON SHOULD BE SOUGHT. NEITHER THE PUBLISHER NOR THE AUTHOR SHALL BE LIABLE FOR DAMAGES ARISING HEREFROM. THE FACT THAT AN ORGANIZATION OR WEBSITE IS REFERRED TO IN THIS WORK AS A CITATION AND/OR A POTENTIAL SOURCE OF FURTHER INFORMATION DOES NOT MEAN THAT THE AUTHOR OR THE PUBLISHER ENDORSES THE INFORMATION THE ORGANIZATION OR WEBSITE MAY PROVIDE OR RECOMMENDATIONS IT MAY MAKE. FURTHER, READERS SHOULD BE AWARE THAT INTERNET WEBSITES LISTED IN THIS WORK MAY HAVE CHANGED OR DISAPPEARED BETWEEN WHEN THIS WORK WAS WRITTEN AND WHEN IT IS READ.
For general information on our other products and services or to obtain technical support, please contact our Customer Care Department within the U.S. at 800-762-2974, outside the U.S. at 317-572-3993, or fax 317-572-4002.
Wiley also publishes its books in a variety of electronic formats. Some content that appears in print may not be available in electronic books.
Library of Congress Control Number: 2004102364 ISBN: 0-7645-6790-X
Manufactured in the United States of America 10 9 8 7 6 5 4 3 2 1
His favorite pastimes include collecting gargoyles, watching St. Louis Cardinals baseball, playing his three pinball machines and the latest computer games, supercharging computers, and rendering 3-D flights of fancy with TrueSpace — and during all that, he listens to just about every type of music imaginable. (For those of his readers who are keeping track, he’s up to 1,200+ audio CDs in his collection.)
With a degree in journalism and creative writing from Louisiana State University, Mark took the logical career choice and started programming computers. After five years as a COBOL programmer for a hospital system, he decided there must be a better way to earn a living, and he became the Documentation Manager for Datastorm Technologies, a well-known communications software developer. Somewhere between organizing and writing software manuals, Mark began writ-ing computer books; his first book, Running a Perfect BBS, was published in 1994.
Along with writing several books a year and editing whatever his publishers throw at him, Mark has recently branched out into Web-based education, designing and teaching a number of online classes — called WebClinics — for Hewlett-Packard.
Mark’s rapidly expanding list of books includes Building a PC For Dummies, Scanners For Dummies, CD and DVD Recording For Dummies, Mac OS X Panther All-In-One Desk Reference For Dummies, PC All-In-One Desk Reference For Dummies, Microsoft Office v. X Power User’s Guide, BURN IT! Creating Your Own Great DVDs and CDs, The Hewlett-Packard Official Printer Handbook, The Hewlett-Packard Official Recordable CD Handbook, The Hewlett-Packard Official Digital Photography Handbook, Computer Gamer’s Bible, Recordable CD Bible, Teach Yourself the iMac Visually, Running a Perfect BBS, Official Netscape Guide to Web Animation, and the Windows 98 Troubleshooting and Optimizing Little Black Book.
His books have been translated into 12 languages so far — his favorites are German, Polish, Dutch, and French. Although he can’t read them, he enjoys the pictures a great deal.
Mark welcomes all comments and questions about his books — you can reach him at [email protected], or visit MLC Books Online, his Web site, at
Author’s Acknowledgments
Unlike other types of books an author can tackle, a For Dummies book is a very personal project. Writing a book like this one involves distilling every-thing I know about a subject into words, so just about everyone that I need to appreciate, praise, and applaud works for my favorite publisher — Wiley!
As with all my books, I’d like to first thank my wife, Anne, and my children, Erin, Chelsea, and Rose, for their support and love — and for letting me follow my dream!
I owe a continuing debt of thanks to the Production team, this time led by Project Coordinator Maridee Ennis. You’ve all done it again! These folks take care of everything from producing new line art to designing the layout and proofreading the text before it heads to the printer, and the quality of this fin-ished book is a tribute to their hard work.
Thanks are also due to my editorial manager, Carol Sheehan, my technical editor, Dennis Cohen, and my editorial assistant, Amanda Foxworth. Each of them reviewed either the grammar or technical accuracy of every page (and even the general coherency from time to time)! It’s a demanding job, and I’m always grateful for the extra eyes checking my words.
Some of the people who helped bring this book to market include the following:
Acquisitions, Editorial, and Media Development
Project Editor: Susan Pink
Acquisitions Editor: Bob Woerner
Technical Editor: Dennis Cohen
Editorial Manager: Carol Sheehan
Permissions Editor: Laura Moss
Media Development Specialist: Kit Malone
Media Development Manager: Laura VanWinkle
Media Development Supervisor:
Richard Graves
Editorial Assistant: Amanda Foxworth
Cartoons: Rich Tennant (www.the5thwave.com)
Production
Project Coordinator: Maridee Ennis
Layout and Graphics: Andrea Dahl, Lauren Goddard, Joyce Haughey, Stephanie D. Jumper, Kristin McMullan, Lynsey Osborn, Heather Ryan,
Rashell Smith, Melanee Wolven
Proofreaders: Carl W. Pierce, Brian H. Walls, TECHBOOKS Production Services
Indexer: TECHBOOKS Production Services
Publishing and Editorial for Technology Dummies
Richard Swadley, Vice President and Executive Group Publisher
Andy Cummings, Vice President and Publisher
Mary C. Corder, Editorial Director
Publishing for Consumer Dummies
Diane Graves Steele, Vice President and Publisher
Joyce Pepple, Acquisitions Director
Composition Services
Gerry Fahey, Vice President of Production Services
Chapter 2: The Joys of Buying a Scanner ...23
Part II: Surviving the Installation ...41
Chapter 3: “Will That Be Parallel, USB, or FireWire?” ...43
Chapter 4: And Then There’s SCSI ...49
Chapter 5: Installing the Extra Stuff ...59
Part III: Bread-and-Butter Scanning ...73
Chapter 6: Just Plain, Basic Scanning ...75
Chapter 7: Examining Your Original: The Sequel ...95
Chapter 8: Attack of the Fine-Tuning Monster...111
Chapter 9: Image Editing the Easy Way ...129
Part IV: The Lazy Expert’s Guide to
Advanced Scanning ...149
Chapter 10: So You Want to Be an Internet Graphics Guru...151
Chapter 11: Advanced Image Editing 101 ...171
Chapter 12: Maintaining the Scanner Beast ...189
Chapter 13: Scanner Projects for Crafty People ...207
Part V: The Part of Tens ...223
Chapter 14: Ten Tips and Tricks for Better Scanning and Editing ...225
Chapter 15: Ten Things to Avoid Like the Plague ...239
Chapter 16: Ten Signs of a Good Scan ...249
Chapter 17: Ten Favorite Effects ...267
Part VI: Appendixes ...279
Appendix A: Scanner Hardware and Software Manufacturers ...281
Appendix B: Glossary ...285
Appendix C: About the CD ...295
Index ...303
How This Book Is Organized...3
Part I: The Scam on Scanners ...3
Part II: Surviving the Installation...3
Part III: Bread-and-Butter Scanning ...3
Part IV: The Lazy Expert’s Guide to Advanced Scanning ...4
Part V: The Part of Tens...4
Part VI: Appendixes...4
Icons Used in This Book...4
Where to Go from Here...5
Part I: The Scam on Scanners ...7
Chapter 1: Let’s Get Digitized! . . . .9
“Okay, I’ll Bite — What’s a Scanner?” ...10
What Can I Scan, Mr. Spock? ...11
Different Breeds of Scanner ...11
Examining the Innards...15
The sensor...15
The motor...16
The light...16
The brain ...16
The interface ...17
Scanning Explained (for Normal Folks)...17
Resolving Resolution ...19
How Deep Is Your Color?...21
Chapter 2: The Joys of Buying a Scanner . . . .23
A Game of Five Questions (Actually, Just Three)...24
King size or hideaway? ...24
How many dots are enough?...27
A bit more about bit depth...28
Have I Got an Interface for You!...29
Moving in parallel...29
The ultimate in usefulness ...30
For those in the fast lane ...31
TWAIN (Not the Tom Sawyer Guy)...32
Scanner Features to Covet ...33
One pass, one scanner, one king ...33
Let your finger do the scanning...33
Feed me!...34
Adapt to transparency...34
Your warranty is your shield ...34
Software You’ve Just Gotta Have...34
The image editor ...35
Supporting Your Local Hardware Hut...40
Part II: Surviving the Installation ...41
Chapter 3: “Will That Be Parallel, USB, or FireWire?” . . . .43
The Plug and the Play...44
Before You Begin. . . . ...45
Your box is your castle! ...45
Register, register, register!...45
Check for packing materials!...45
Docking at the Parallel Port ...46
USB or Bust (and FireWire, too) ...46
Don’t Forget Your Driver! ...47
Chapter 4: And Then There’s SCSI . . . .49
The Way Things Should Work...50
Look Out, It’s the Terminator, er, Governor of California!...51
It’s an end thing, man...51
Setting termination can be fun (almost) ...53
Can I See Some ID, Please? ...54
Installing Your SCSI Card ...55
Connecting Your SCSI Scanner ...57
Uh . . . It’s Not Working ...58
Chapter 5: Installing the Extra Stuff . . . .59
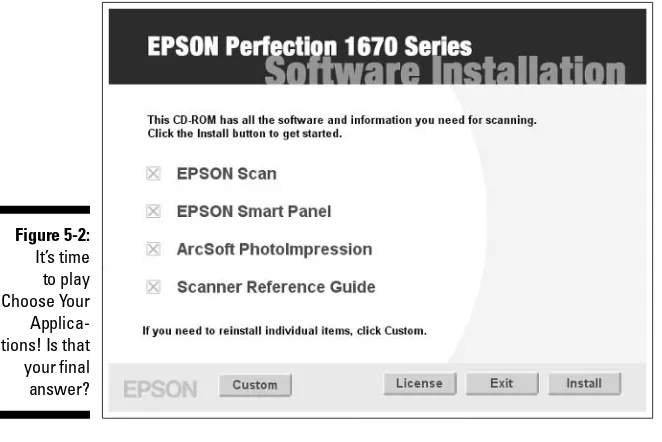
Installing Your Scanner Software ...59
Pile On an Image Editor ...61
“Do I Need More Storage?”...64
Query one: What’s your free-space situation?...64
Query two: Are you a road warrior? ...66
Part III: Bread-and-Butter Scanning ...73
If you have a flatbed...81
If you have a sheet-fed ...82
If you have something else...83
Make with the Settings ...85
Previewing on Parade ...88
Color and Grayscale Photographs ...100
Halftone Images ...102
3-D Objects...104
Text ...108
Chapter 8: Attack of the Fine-Tuning Monster . . . .111
Are All These Advanced Settings Really Necessary?...112
Setting Your Resolution...112
Colors and Bits, Colors and Bits ...115
The Light and the Dark...117
Size Really Does Count ...119
Making Green Bananas Yellow...121
Basic Filters 101...123
Flipping and Rotating: The Scanner Dance Craze ...124
Let’s Invert ...126
Chapter 9: Image Editing the Easy Way . . . .129
Introducing the Tool of Choice: Paint Shop Pro...130
Opening a File ...132
Shall We Browse?...133
Sharpen That Line, Mister!...137
It’s Just Too Big!...139
Mirror, Mirror, on the Wall ...140
The Light and the Dark...142
Wouldn’t a Frame Look Nice? ...143
Removing Uncle Milton’s Red-Eye...144
Rotating 101 ...146
Who Needs Color, Anyway? ...146
A Little Alchemy: Changing Image Formats ...147
Part IV: The Lazy Expert’s Guide to
Advanced Scanning ...149
Chapter 10: So You Want to Be an Internet Graphics Guru . . . .151
GIF Isn’t a Snack Food, and JPEG Isn’t Spelled Jaypeg ...152
Joint Photographic Experts Group...152
Graphics Interchange Format ...153
Windows bitmap...154
Tagged image file format ...155
What the Sam Hill Is a PNG?...155
Choosing Color Depth for Web Images ...156
Compression in the 21st Century ...158
That Color Doesn’t Look Right ...162
What Size Is Best for the Web? ...163
Sending Your Scans through E-Mail ...164
Wait a Second: Is This Legal? ...167
Should I Keep This to Myself? ...169
Chapter 11: Advanced Image Editing 101 . . . .171
Making Magic with Scanned Images ...172
Introducing Filters and Effects ...174
Going Wild with the Effect Browser ...175
Let’s Hear It for Plug-Ins! ...177
Editing Tiny Pieces of Your Images...180
Copying and pasting (without glue) ...180
Changing colors (without crayons) ...182
Imaging Tools You Can’t Resist ...184
Image manipulation...184
Image correction: Kai’s PhotoSoap2 ...185
Image cataloging: Photo Album 4 ...186
Plug-in software: Eye Candy 4000...187
Chapter 12: Maintaining the Scanner Beast . . . .189
Calibrate Your Way to Happiness...189
The Right Way to Clean Your Scanner ...191
On the outside ...192
Reboot — just reboot!...203
Keep that software current! ...204
Okay, it is a software nightmare ...204
Help! ...206
Chapter 13: Scanner Projects for Crafty People . . . .207
Creating a Custom Wine Label ...207
A T-Shirt with a Personal Touch...210
Stage 1: Preparations ...210
Stage 2: Printing...210
: Liftoff!...211
Stage 3 Creating a Slide Show CD ...213
Using an OCR Program ...217
Faxing a Scanned Image ...220
Part V: The Part of Tens ...223
Chapter 14: Ten Tips and Tricks for Better
Scanning and Editing . . . .225
Hard Drive Tips and Tricks ...231
Know Thy Scanning Software ...234
Defragment Your Hard Drive ...235
Splurge on Your Monitor ...237
Chapter 15: Ten Things to Avoid Like the Plague . . . .239
The Pentium II and the PowerPC 60x ...240
Printer Cartridge Scanners ...241
Serial Scanners ...241
Old Printer Cables...242
Refurbished Hardware...243
Scanning Copyrighted Work ...244
Windows 95 and System 7...244
Obscure Image Formats ...245
Small-Capacity Hard Drives and Floppy Disks ...246
Chapter 16: Ten Signs of a Good Scan . . . .249
Keeping Things Straight ...249
Crop ’Til You Drop...251
You’re Looking Sharp...254
Flat Is Nice...256
That’s, Like, So . . . Transparent ...258
Your Original Is Your Friend ...261
Favor the First Generation ...261
Size Does Matter...262
Colors That Balance...264
A Finely Tuned Format ...265
Chapter 17: Ten Favorite Effects . . . .267
Introducing the Sample Scan ...268
Fur ...269
Appendix A: Scanner Hardware and Software Manufacturers . . . .281
Hardware Manufacturers ...281
Software Developers ...282
Appendix B: Glossary . . . .285
Appendix C: About the CD . . . .295
System Requirements ...295
Using the CD with Microsoft Windows...296
Using the CD with Mac OS...297
What You’ll Find on the CD ...298
Adobe Acrobat Professional, from Adobe Systems ...298
ViewIt, from HexCat Software ...301
VueScan, from Hamrick Software ...301
WinRAR, from RARLAB ...301
Troubleshooting ...302
Index ...303
Until three or four years ago, you probably would have considered a printer, a set of speakers, and a joystick. Today, however, more and more prospective computer owners are considering a scanner as a must-have. Scanners are less expensive than ever — you can easily find several models online (or at your local Maze O’ Wires computer store) for less than $100 — but I think that’s only part of the reason. If you choose a Universal Serial Bus (USB) scanner, it’s also among the easiest computer peripherals to install. Again, that counts for something, although I don’t think that’s the heart of the matter.
The real reason that scanners have enjoyed such a surge in popularity is that more computer owners now recognize just how useful a scanner can be! More applications than ever make use of your scanner, and the Internet makes it easy to share the documents and images you scan through e-mail or your Web site. Many computer owners are even turning to their scanners for handicrafts, such as creating custom-printed items!
I wrote this book especially for scanner owners who want to find out all about what that marvelous piece of machinery can do. You can start from the basics and work your way to the tips, tricks, and technology used by scanner experts. As with any other For Dummies titles, I use the English language you studied in school, with no jargon and as few ridiculous computer acronyms as I can possibly manage! As you can tell already, I also include a little humor — at least, what my editors agree is humorous.
What’s Really Required
“Do I need a degree in advanced thakamology to use this thing? Or will I end up spending more on software than I do on food?” Rest easy! Allow me to tell you first what’s not required for this book:
⻬ I make no assumptions about your previous knowledge of computers, graphic arts, software, or Italian cooking.
⻬ Some unbelievers seem to think that creating great scanned images, edit-ing them just the way you like them, and usedit-ing them in your projects requires either a lifetime of graphic arts experience or a $1000 program. I’m here to tell you that you can do everything in this book with no previ-ous art training and the software that probably came with your scanner.
So what is required? A scanner, the software it needs to run (which you should have received with the scanner), and a desire to improve your scan-ning skills. Oh, I almost forgot: A curious nature and an urge to experiment are good when working with special effects, too.
About This Book
Each chapter in this book has been written as a reference on a specific topic relating to your scanner. Note that you can begin anywhere because each chap-ter is self-contained. Unless you’ve already had some experience with installing and using a scanner, however, I think that you’ll benefit the most from reading from front to back. The book also includes a glossary of computer and scanner terms and an appendix with information about manufacturers of scanning hardware and software.
Conventions Used in This Book
I can decrease the technobabble to a minimum, but, unfortunately, there’s no such thing as a computer book that doesn’t have at least a few special keys you have to press or menu commands you have to choose.
From time to time, I may ask you to type a command in Windows or Mac OS. That text often appears like this: Type me. To execute a command, you press the Enter (or Return) key.
I use the following format for menu commands:
Edit➪Copy
This shorthand instruction indicates that you should choose the Edit menu and then choose the Copy menu item.
From time to time, I mention messages you should see displayed on-screen by an application or the operating system. Those messages look like this:
How This Book Is Organized
After careful thought (read that “flipping a coin”), I’ve divided this book into six major parts. If additional coverage of an important topic appears elsewhere, it’s cross-referenced for your convenience.
Part I: The Scam on Scanners
In Part I, I introduce you to what a scanner does and how it’s constructed, discuss the various types of scanners on the market, and establish important concepts, such as color depth and resolution. For those shopping for a scan-ner, I discuss features, show you how to evaluate your scanning needs, and help you decide whether to buy your new toy online or from a local store.
Part II: Surviving the Installation
You will survive your scanner installation unscathed! The chapters in Part II cover the installation of different types of scanners: USB, FireWire, parallel port, and SCSI models. I also provide guidelines for installing your software and testing your new scanner as well as a number of side issues you should consider, such as the addition of a printer, a CD-RW or DVD-RW/+RW drive, and a hard drive to your system.
Part III: Bread-and-Butter Scanning
Part IV: The Lazy Expert’s Guide
to Advanced Scanning
That’s me, all right! In Part IV, you discover the advanced stuff you’ll be crav-ing if you read the first three parts first: image formats, Internet and Web tips and tricks, advanced image editing, scanner maintenance and troubleshoot-ing, and even a chapter devoted to projects such as creating a custom T-shirt, creating a slide show CD-ROM of your images, using an OCR program, and sending a fax using a scanned image.
Part V: The Part of Tens
The four chapters that make up the famous “Part of Tens” section are a quick reference of tips and advice on several topics relating to your scanner. Each list has ten tips. I especially recommend Chapter 17, where I introduce you to my top ten favorite special effects. In fact, skim that chapter first so that you get an idea of the magic you can perform on your scanned photographs! A little inspiration never hurts when you’re just getting started!
Part VI: Appendixes
The appendixes feature a scanner hardware and software manufacturer list, a glossary of computer terms and (mostly unnecessary) acronyms, and a description of the programs on the companion CD-ROM.
Icons Used in This Book
I like important notes to stand out on the page! To make sure that you see certain paragraphs, they’re marked with one of these icons:
Now there is a mug of distinction! You’ll find this icon parked next to my Mark’s Maxims: the “100-percent-practically-without-exception” rules that apply to things (like hardware) and procedures (like wiping your scanner’s glass to keep it clean). Commit these Maxims to memory, and you’ll thank me later.
Something could be damaging to your scanner or your software or even both.
Always read the information for this icon first!
Where to Go from Here
My recommendations?
to see how they worked, you’ll like this information. Remember that you can also ignore this stuff with impunity!
This icon points out information that saves you time and trouble (and per-haps even cash).
⻬ If you’re thinking about buying a scanner, the box is still unopened in the trunk of your car, or you’re knee deep in the installation, start with Part I.
⻬ If you need help with operating an existing scanner, start with Part II.
⻬ For all other concerns, use the index or jump straight to the chapter you need. (You can always return to the beginning of the book later, at your leisure.)
Y
ner itself: what it does, what it contains, and what our journey begins with an introduction to the䊳 Understanding what a scanner does
䊳 Finding material to scan
䊳 Recognizing the different types of scanners
䊳 Identifying parts common to all scanners
䊳 Uncovering how your scanner works
䊳 Explaining resolution
䊳 Understanding bit depth
I
n medieval times, magicians known as alchemists used to weave tales of a wonderful box. In this box, they said, one could place an ordinary item (an egg, for example), close the lid, and — presto! — the egg would turn to pure gold or a flawless diamond. Many alchemists spent their lives trying to per-fect this nifty little household appliance. In fact, some said that they actually did, and these people became the performers we know today as magicians. (A few politicians and used-car salesmen are probably in that group also.) Everyone knows that a machine like that is a fairy tale.But, wait: What if I told you that such a box really does exist — one that can take ordinary paper and turn it into creative magic? Imagine a machine that can bring a smile to the faces of your friends and family or reshape opinions, safeguard your memories, and perhaps even help sell your ’79 Pinto?
In this chapter, I introduce you to the computer equivalent of the alchemist’s magic box. You discover what you can do with a scanner, what types of scan-ners are available, what makes them tick (if you want to know), and the importance of resolution and color.
“Okay, I’ll Bite — What’s a Scanner?”
Although many different types of scanners are available — flatbed, sheet-fed, color, and black-and-white, just to name a few — they all perform the same function. Therefore, it’s easy to define exactly what a scanner is:
Scanner. (n) A machine that reproduces an image from a source object, producing an identical digital image for display or processing.
There — that explains everything, at least for technotypes. In plain English, a scanner “reads” the image from an object (typically a piece of paper) and then creates a copy of that image as a picture file on your computer. (If you’re curious about what goes on inside, I explain the process later in this chapter.)
Of course, my explanation also has exceptions. It figures, right?
⻬ You don’t necessarily have to scan something from a sheet of paper. For example, your source image can be printed on fabric or some other material or can be a photographic negative.
⻬ A scanner doesn’t necessarily have to create a picture file on your com-puter; if you’ve used a fax machine or a copy machine, you’ve been using a scanner. After the scanner read the image, it was simply sent somewhere else. The fax machine sent the image as data over the tele-phone line, and the copy machine sent the image to the built-in printer to create a duplicate.
⻬ You may not be scanning that original to create an image file on your computer. With the right software, scanners can now recognize the printed characters on a page and enter them into your word processor. I discuss this process, called optical character recognition (or OCR, for those who crave acronyms), in detail and show you how to use it later in this book. Another good example of a “rogue” scanning application is the familiar barcode, which has appeared on just about every inanimate object in your local shipping office and grocery store.
⻬ Books
⻬ Photographs
⻬ Magazines
⻬ Business cards
⻬ Printed text
⻬ Flat objects
⻬ Fabric
⻬ Photograph negatives
⻬ Sketches and original art
⻬ Cereal and pizza boxes
You get the idea: If it’s reasonably flat and it has any type of image on it, it’s likely to be scanner material. Scanners can record surface detail, too, but the results vary widely according to the material that makes up the object. (Naturally, the darker the material, the harder it is for your scanner to deliver a clear image.)
Different Breeds of Scanner
Over the past few years, different types of scanners have evolved for different jobs. Some types provide a better-quality scan, some take up less room, and some are designed especially for one type of original media. In Chapter 2, I get into the specifics of which type of scanner is perfect for you. For now, take a moment for a scenic overview of what’s available. Sit back and enjoy the tour. (Have an hors d’oeuvre!)
Figure 1-1:
The flatbed scanner. Have you ever seen anything so beautiful?
⻬ Sheet-fed: Limited space on your desk? A sheet-fed scanner may be the answer. The shortest models are about the size of a roll of aluminum foil, and other models look suspiciously like a fax machine. (As a matter of fact, a fax machine has a built-in scanner that it uses to create an image of the page.) Figure 1-2 shows you a typical sheet-fed scanner.
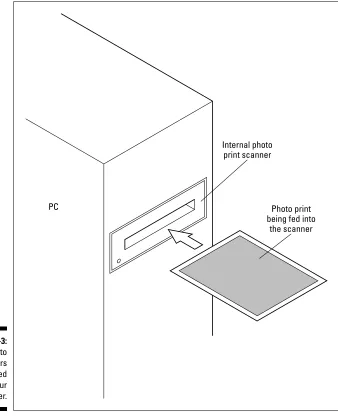
⻬ Photo scanner: Many photo scanners are internal computer compo-nents, which means they fit inside your computer’s case, as shown in Figure 1-3. Photo scanners are specially designed to read individual pic-tures taken with a film camera (or even small printed items, such as business cards or a driver’s license).
⻬ Handheld scanners: These portable scanners come in different shapes and sizes, ranging from a handheld model that can scan three or four inches at a time to a pen scanner that reads a single line of text. Handheld scanners don’t offer the picture quality and convenience of a flatbed scanner. They can fit in a laptop case (or even a pocket), though, so they have their place with the road warriors among us. Barcode scan-ners are also typically handheld. Figure 1-4 shows a handheld scanner.
Figure 1-2:
Internal photo print scanner
PC Photo print
being fed into the scanner
Figure 1-3:
Photo scanners are installed inside your computer.
⻬ Negative scanners: The snobs of the scanner world, negative scanners are designed for only one purpose: to scan photographic slides and neg-atives. Although these scanners are usually hideously expensive, if the images you need are on slides or you want the best possible scan of a photographic negative, a negative scanner is the only way to produce a high-quality image. Figure 1-5 provides glimpse of a negative scanner.
Figure 1-4:
If you’re on the road, a handheld scanner doesn’t weigh you down.
negatives goes here Tray holding
Figure 1-5:
emphatic “No!” None of the material in this section has any cosmic meaning, so if the closest you want to get to your scanner’s mechanical side is plugging in the power cord to the wall outlet, feel free to jump ahead to the next sec-tion (which, come to think of it, you can skip as well)!
Hey, if you’re still reading, you’re curious about mechanical mysteries, like I am. Did you disassemble alarm clocks when you were a kid, too? (Dad even-tually had to lock his up in the garage.) Read on while I explain the common parts shared by every scanner.
The sensor
Crack open your scanner — no, don’t grab a hammer, it’s just a figure of speech — and you’ll find that the sensor is the star of the show. The scanner sensor is comprised of an array of individual photosensitive cells. Wait — don’t drift off yet — it gets better! Each of these cells returns a certain amount of electrical current to the scanner’s brain; how much current is determined by the amount of reflected light the cell receives as it passes by the original image. Figure 1-6 illustrates how this process works.
Figure 1-6:
the pixels. Dark surface Scanner
Medium surface Light surface Light Scanning head Light Scanning head
High current returned Medium current
If you’re knowledgeable about your human anatomy (or, like me, you were able to stay awake in high-school biology class long enough to pass), you can see the parallels between this process and how the human eye works. In the eye, the photosensitive nerves perform the same function: They send impulses to your brain that depend on the amount of light they receive.
Each of the cells in the scanner’s sensor reads a single dot of the image. And that basic building block, the pixel, is a unit of measure I return to time and time again in this book. Your computer monitor is also measured in pixels, as are digital cameras. All digital images are made up of individual pixels. Your eye and brain work together to combine them into the image you see.
The motor
Of course, the sensor doesn’t do you a tremendous amount of good if it just sits in one place on the image. You would get a single line of pixels from the original! (That makes for a very bad scan, as you can imagine.) The designers of the first scanners knew that they needed to move the sensor across the surface of the original so that they could scan the entire thing, so they added the motor.
Figure 1-7 illustrates the two types of motors in today’s scanners: In effect, one design moves the sensor head past the original, and the other moves the original past the scanner head (which is fixed in one spot). In later chap-ters, I explain which is better for you; both types of motor drives have their advantages.
The light
A sensor that’s sensitive to light needs illumination, and your scanner carries its own built-in “reading lamp” — the light that’s reflected from the original is picked up by the sensor. Most scanners have this light mounted right next to the scanner head.
The brain
Figure 1-7:
Something
has to move in a scanner — either the sensor or the original.
Original remains motionless in a flatbed
scanner
Fixed scanner head
Original moves past scanning head in a sheet-fed scanner Original
Rollers Motor-driven rollers
The interface
Every scanner needs a connection of some sort to your computer. In all their wisdom (and their surprisingly intermittent common sense), computer hard-ware designers have to have a separate word for this connection. For some reason, the word connection didn’t hack it. Therefore, they call the type of connection your scanner uses an interface. Although most scanners made these days use the Universal Serial Bus (USB, for normal human beings), I introduce you to all the connections (whoops, there I go again) — the interfaces — found on scanners. As you’d expect, I also help you determine which is best for you.
Scanning Explained (for Normal Folks)
meet you there. This stuff is absolutely not necessary. If you’re like me, how-ever, and you stick your head into everything electronic from sheer curiosity, keep reading!
Here’s the process your scanner uses to produce that spiffy digital image (use Figure 1-8 to follow along, if you like):
1. The scanner light is turned on.
2. The sensor head moves slowly past the original, or the original is moved slowly past the sensor head. (Anyway, movement and a motor are involved, as I mention in the preceding section.)
3. The sensor reads the amount of light reflected by the original in each pixel of the current scan line and sends those signals to the scanner’s brain.
4. The signals are converted to binary data and sent to your computer through the interface.
5. The sensor head moves to the next line of pixels, and the process begins again with Step 2.
This process is repeated until the scanner has read each line of pixels in the original image. Depending on the type of scanner, the sensor head typically makes as many as three full transits across the original to capture a com-plete, full-color image. I tell you more about this process later in this book.
Although this operation sounds lengthy, things are moving at computer speeds. For example, most scanners can read an entire page of text in fewer than 10 sec-onds and can read an entire full-page image in fewer than 30 secsec-onds.
ical scanner is comprised of hundreds of individual sensors. The density of these individual sensors leads to what’s likely the most important single specification you should consider in a scanner: resolution.
Scanner resolution is commonly measured in dots per inch, or dpi — the number of individual dots scanned per inch of the original image. The dpi measurement is usually expressed as horizontal (the number of individual sensors in the array) by vertical (the distance the sensor head moves between individual lines), for example, 600 x 1200. I call this measurement the “common” dpi because most scanner manufacturers use it in their specifications.
Other scanner manufacturers may give you only one dpi figure. That’s what I call the “true” dpi because it measures only the number of pixels horizon-tally. It’s the resolution measurement used by professional graphic artists, service bureaus, and publishers, so high-end scanners often provide only a single dpi figure.
If you’re comparing a scanner that’s listed with two figures, such as 600 x 1200 dpi, with a scanner listed with just one figure, such as 600 dpi, don’t panic! Just compare the first figure, which is the horizontal dpi measurement. In fact, because both scanners offer 600 dpi, they have the same horizontal resolution.
If you want to be a stickler, however, using a dpi rating to describe a scan-ner’s resolution is technically incorrect. I tell you more about this subject in the nearby sidebar, “Positive peer pressure!”
Figure 1-9:
As you may expect, the general rule calls for a higher dpi: The higher the res-olution, the better the quality and the higher the detail of your digital image. However, a higher resolution also results in much larger image files, and not every original benefits from an astronomically high resolution. Therefore, you probably don’t need to spend the extra $100 to buy a 1200 x 2400 dpi model when a 600 x 1200 dpi scanner will satisfy just about any PC owner or office worker. I discuss this subject in more detail in Chapter 2.
Positive peer pressure!
If I’m going to be completely accurate here, I should use a different measure of resolution, called samples per inch rather than dots per inch. Samples per inch, or spi, refers to the scanning purist would say that dpi is a term that belongs with computer printers, which print — rather than scan — dots.
samples per inch effectively the same method of virtually every manufacturer of scanners on the face of this planet uses dpi when referring to res-olution in their advertisements and specifications.
It may not be strictly accurate, but everyone (and I mean everyone) uses it. In this book, I’ve caved in to peer pressure and elected to use dpi rather than spi.
Scanning purists can complain all they like. As valuable for you to know what people really use, not a technical term that you’ll probably never see in an online store or on the side of a scanner ners with the “in” crowd at your next cocktail party while the technonerds sulk in the corner and grumble about spi.)
number of individual sensors in the array. A You may be saying, “Now, wait a second. Isn’t measuring as dots per inch?” You bet! That’s why
scan-⻬ The interpolated resolution (also called the enhanced resolution) is an inflated figure delivered by the software provided with the scanner. The interpolated value adds a large number of extra dots to the scanned image by using a mathematical formula, without reading them from the original material. Interpolation is supposed to improve the quality of the image, which is why the interpolated resolution advertised for a particu-lar scanner model is always higher than the raw resolution. (Those addi-tional dots are ghosts!)
Here’s the payoff: I strongly recommend that you judge scanners by their opti-cal resolution while shopping. Forget about the interpolated value. It’s noth-ing more than a guess made by a program, and in my experience it doesn’t visibly improve the image. If an advertisement doesn’t list the raw or optical resolution, find it on the manufacturer’s Web site or the specifications on the box. This factor is important when comparing two different scanners.
How Deep Is Your Color?
I have one other massively important scanner topic to introduce here: color depth. The whole concept of color depth probably hasn’t been a featured topic of conversation around your table (I know that it has never been men-tioned around mine), although it can dramatically affect the appearance of your final scanned images and is the other criteria that will probably help you decide between those two or three different scanners on your shopping list.
In the computer world, color depth refers to the number of colors in an image (whether that image is on a computer monitor, captured by a digital camera, or captured by a scanner). Color depth is referred to in two ways:
⻬ The maximum number of discrete colors (as in 256 colors or 16 million colors).
When it comes to color depth, “higher is better” is full-color images — especially large ones — you’ve probably decided to use a color depth of 256 colors, or 8 bits. Why? The answer is simple: The lower the color depth, the less time it takes a 56-Kbps modem to download the image to your 16-million-color image over a telephone modem connection brings new meaning to the name still set their display color depth to 256 colors, so a 16-million-color (24-bit) image is mostly wasted data. Until more people have high-speed Internet connections, such as cable modems or DSL, 256 colors is probably the best choice.
On the other hand, if you’re printing your images, anything less than 24-bit color is simply unacceptable. The fewer colors in your image (and the fewer colors your printer can deliver), the more your beautiful high-resolution digital photograph looks like a Sunday comic strip Which is best? That depends on two things: your output device (such as your monitor or your printer) and your own eyes. Only you can determine whether the quality of the finished image is acceptable, so experiment when you your scanned photos.
Will that be Web color or print color?
not the rule of thumb used on the Web! If you’re experienced at building Web pages that feature
visitor’s Web browser. (Downloading a huge “World Wide Wait.”) Also, some computer owners
printed on cheap newspaper.
create Web pages with scanned images or print
Most scanner manufacturers use the second method to describe the color depth of their products. Again, the general rule is the higher the bit depth, the better the color because your scanner is better able to capture subtle dif-ferences in color and shading from the original.
The scanner you select must capture a minimum of 24-bit color, although most models sold these days can reach 30-, 32-, 34-, 36-, 42- or 48-bit color. (The higher bit depths allow a more accurate color capture, even if the final image is printed at only 24-bit color.) That’s all there is to color depth — no confusing acronyms, no exceptions, and no gimmicks. Refreshing, isn’t it?
䊳 Evaluating your needs
䊳 Selecting an interface
䊳 Understanding TWAIN support
䊳 Choosing additional features
䊳 Judging bundled software
䊳 Buying a scanner online
䊳 Buying a scanner locally
A
ll right, as my dad used to say, “Let’s get this show on the road!” You can buy a scanner in one of two ways:⻬ Method One: Jump in your car, head directly to the Lots o’ Wires super-store near you, ask a salesperson to point at his or her favorite scanner, and buy it.
⻬ Method Two: Research the scanner models with the features you want (either through the Web or through computer magazines), compare them, and buy your choice through an online or local store.
Which technique is easier? Oh, I agree — Method One is as simple as it gets. On the other hand, which approach is practically guaranteed to save you money and identifies a scanner with more features that closely match your needs and your computer system? Definitely Method Two!
A Game of Five Questions
(Actually, Just Three)
Buying a scanner isn’t as difficult as buying an entire computer system (which requires an entire For Dummies book all to itself), nor is it as simple as buying a new hard drive (which boils down to capacity, connection type, and price for everyone other than technotypes). Although a scanner falls somewhere between the two extremes, you absolutely need to ask yourself only three questions before you continue reading about the other features and luxuries you should understand.
King size or hideaway?
Before you start shopping, you have to decide how big is too big: Can you dedicate the desk space for a flatbed scanner, which can actually take up more room than a typical computer? Or will you stay lean and mean with a sheet-fed scanner? Although I briefly mention this dilemma in Chapter 1, you need to settle on a design before you go any further. To help you determine which to choose, I cover the advantages of both.
Reasons to choose a flatbed scanner
To be honest, I’m about as biased as I can be: I want you to buy a flatbed scanner. Why the enthusiasm? Here are my reasons:
⻬ A flatbed scanner is far more versatile. With a flatbed model, you can scan materials and three-dimensional objects other than paper, such as a piece of fabric or a TV remote control (or even that new tattoo on your arm). Basically, if you’ve ever made copies of something on a copy machine, you can scan it with a flatbed.
Figure 2-1:
A modern flatbed scanner: the HP ScanJet 5530.
⻬ A flatbed scanner produces a better scan. With a flatbed scanner, the scanning head moves past the material, a process that’s inherently more stable than having the material move past the scanning head (as in a sheet-fed model). This is why just about any flatbed scanner features higher resolution (and often better color depth) than a sheet-fed scanner.
The reason to choose a sheet-fed scanner
“Now, wait a second, Mark. There must be some reason to buy a sheet-fed scanner!” You’re right — and here it is:
Figure 2-2:
The HP OfficeJet 6110
multi-function device.
Unless size is a primary concern (and you’re not seduced by the advantage I just mentioned), choose a flatbed — and be happy.
Note: If you’re interested in a specialized scanner, such as a photo scanner or negative scanner, remember that these exotic varieties are designed espe-cially for a particular media. You can’t scan anything else on them.
When you need to get really portable
easy to carry with you, a portable sheet-fed unit may do the trick — but what if you need to scan text from books or magazines? If you tear pages about barcodes on products? Can you imagine trying to scan a plastic DVD movie case with a sheet-fed scanner?
easy to capture individual lines of text from Businesses can use barcode scanning applica-tions to track inventory without typing a single audio CDs can effortlessly add titles to their col-lection database.
If you’re looking for a scanning solution that’s from those periodicals, don’t bet on being a wel-come visitor to your local library. And what
(Remember those?) Move the scanner over a single line of text, including rows of troublesome numbers, and the software automatically enters the characters into your favorite application. (It even reads the text aloud, which helps you ensure the accuracy of the scan.)
scanner and the IntelliScanner Collection soft-ware, as shown in the figure. When you scan a barcode, Collection automatically retrieves detailed information about that item from Internet data sources and enters it for you. (Think “instant impressive information.”)
for your collection. You get a handheld USB
How many dots are enough?
Table 2-1
Selecting the Right dpi
“Common” DPI True DPI Common Applications Suitable For
600 x 600 600 School projects Kids 600 x 1200 600 Line art, photographs Scavengers 1200 x 2400 1200 Almost anything Most computer
owners 2400 x 2400 2400 Design and graphic art Photographers, and higher artists, designers
Note: By the way, if you’re wondering what I mean by a scavenger (see the “Suitable For” column in the table), don’t be offended! That’s a term I coined in another of my For Dummies books, Building a PC For Dummies (published by Wiley & Sons Publishing). The term refers to someone (like me!) who acquires older hardware. For example, if your Uncle Milton gives you his old 600 x 600 scanner because he has just bought a new model, you’re a scavenger. This concept also applies to hardware bought at a garage sale or on eBay. In Table 2-1, it means that you’re not likely to find a new scanner on the market now with a resolution of less than 1200 x 1200.
Naturally, a model with a higher resolution can do everything a lower-resolution scanner can do. Also, the figures in the table are the minimum: If you find two scanners with the right features and one delivers 2400 x 4800 resolution for only $50 more, you may want to spend the extra money.
A bit more about bit depth
Again, the higher the bit rate, the better the scanner. Should you spend extra cash, though, for a 42-bit or 48-bit scanner? Look out: Here’s another of my patented, high-tech tables to help you decide this issue, too (see Table 2-2).
Table 2-2
Choosing a Bit Depth
Bit Depth Common Applications Suitable For
24, 30, 32, 36 bit Basic color scanning Kids, scavengers 42 bit Almost anything Most computer owners 48 bit Design and graphic art Photographers, artists,
Have I Got an Interface for You!
For technowizards, discussing the pros and cons of hardware interfaces often results in passionate arguments that last for hours. In fact, I’ve dodged sev-eral floppy disks and a mouse pad or two thrown in the heat of the moment. Enough variety exists in the number of cables, ports, and different connec-tors to fill several catalogs. What’s worse, many computer salespeople suffer from CECSAUB (short for Confusing Everything with a Collection of Silly Acronyms Used as Buzzwords).
Here’s a promise: I reduce the interface confusion to a minimum! (You can thank me with an e-mail to [email protected], if you like.) I present the four common connections you can use to add a scanner to your system, and help you determine which is right for your system. I even try to keep the acronyms down to four or fewer letters.
Moving in parallel
Even the oldest IBM-compatible computers are virtually guaranteed to have a
parallel port (often called a printer port). Although the parallel port was origi-nally used only to provide a connection for your printer, the port is sometimes used to provide a connection for external devices, such as scanners. Figure 2-3 illustrates a parallel port in all its 25-pin glory.
Figure 2-3:
The old-timer of scanner connections, the parallel port.
If your PC was built within the past ten years or so, you can probably use a parallel port scanner. If your machine is older, check the manual to determine whether the parallel port is bidirectional (or offers ECP and EPP modes). If so, it should work with a scanner.
⻬ Pros: The universal nature of the parallel port means that you can use your parallel port scanner on just about any computer, including lap-tops. Parallel port scanners are usually the least expensive models you can buy.
⻬ Cons: Parallel scanners are very slow compared to the other connection options I cover in this chapter. Also, if you’re already using a Zip drive or other external device on your computer’s parallel port, you may experi-ence problems if you try to daisy-chain a scanner by hooking it up at the end of a connected series of parallel devices (for example, a scanner connected to a Zip drive, which is in turn connected to the computer’s parallel port).
If your computer doesn’t have one of the other connections or you have an older laptop, a parallel port scanner may be your only choice. If you can use a USB model, however, you should pass on a parallel port connection.
The ultimate in usefulness
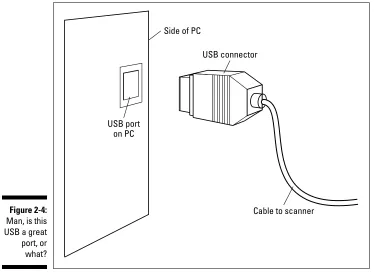
Here’s an acronym I can appreciate: USB is short for Universal Serial Bus.
(Personally, I think the U stands for useful, or perhaps ultimate.) The USB port is the Holy Grail of computer owners everywhere: It’s a medium- to high-speed, easy-to-use connection for attaching all sorts of peripherals to your computer, and it has proven as popular a piece of technology as the wheel. A USB port can support as many as 127 devices. Tell the truth here: Have you ever seen a computer with 127 external devices connected at one time?
(I couldn’t even fit a system like that in my basement!)
USB port on PC
Cable to scanner Figure 2-4:
Man, is this USB a great port, or what?
⻬ Pros: USB 1.1 scanners are as inexpensive as their parallel port brethren, and they’re much faster. A USB scanner is so simple to use that even a politician can connect one to a computer. That’s what I call user friendly.
⻬ Con: If I had to list a disadvantage of USB scanners, I would have to men-tion that USB is not available on PCs and Macintosh computers that are more than five or six years old.
Cheap, simple, and powerful — you can see why USB is the connection choice for most scanner shoppers. I heartily recommend it!
For those in the fast lane
can handle only a measly 63 devices. The latest FireWire standard (called FireWire 800 in the Mac world) is significantly faster than even USB 2.0, but it’s not likely to appear on scanning hardware anytime soon — plus, using older FireWire hardware with a new FireWire 800 port requires a special con-nector or cable, because the new FireWire 800 ports are a different shape.
⻬ Pros: FireWire shares the same user-friendly features as USB 1.1 and is much faster than computers with older USB ports.
⻬ Cons: FireWire ports are much more rare than USB in the PC world, so your computer may not have the ports to use one of these scanners. (If you like, you can add a FireWire adapter card to your computer.) Plus, FireWire hardware is usually significantly more expensive than USB.
Unless the scanner with the features you want demands a FireWire connec-tion, I recommend that you select a USB scanner instead.
Forget SCSI? Never!
The final candidate in the connection beauty pageant has been a favorite of computer hardware hackers for decades: SCSI (short for Small Computer Systems Interface) technology is used in computers for everything from hard drives to CD recorders and scanners.
⻬ Pros: SCSI is fast, and as many as 15 devices can be added to your system through a single SCSI adapter card. Unlike USB and FireWire, SCSI supports both internal and external devices.
⻬ Cons: SCSI is harder to install and configure than any other connection types I cover, and SCSI scanners are typically more expensive than their USB counterparts.
If your computer already has SCSI onboard, you may want to consider a SCSI scanner. For complete details on SCSI, turn to Chapter 4.
TWAIN (Not the Tom Sawyer Guy)
Check any scanning hardware or software you’re buying to make sure that it’s TWAIN compatible and save yourself a headache.
Scanner Features to Covet
In this section, I talk about the other features that can separate a good scan-ner buy from a great one. Although none of these extras is a requirement, each of them is nice to have.
One pass, one scanner, one king
In scanning terminology, a pass is a single sweep of the scanning head across the material. Therefore, a single-pass scanner takes only one trip across your photograph or document, digitizing the entire image at one time. Although a
triple-pass scanner may be cheaper, it has to make three complete passes to capture the same data. These extra passes can result in distortion in the image because even a slight bump can shift the source material between passes (especially if you’re trying to scan a three-dimensional object, such as a book cover or a canned ham).
That’s not all. Naturally, a triple-pass scanner also requires at least three times the scanning time, which means that you have more time to spend wishing that you had a single-pass scanner! I heartily recommend that you save yourself those minutes and concentrate your comparison shopping on single-pass models.
Let your finger do the scanning
Most scanners are controlled entirely from the computer. In other words, you have to run the capture software that comes with your scanner before you can do anything. On the other hand, if your scanner features one-button
scanning, you don’t have to load any program.
Feed me!
Can you imagine a printer without a paper tray? You would end up loading sheets of paper into your printer by hand! Some people feel the same way about scanners. Personally, I don’t scan that many documents in one day. But if you’re working in an office environment or your work involves heavy-duty scanning of dozens of documents, a document feeder is a good idea. Your scanner may come with a document feeder already installed, but this feature is typically offered as optional equipment. Check a scanner’s specifications on the manufacturer’s Web site to see whether it can accept a feeder.
Adapt to transparency
As I mention earlier in this chapter, you can buy a scanner that’s specially designed for slides and negatives — and many high-end flatbed scanners can do a fine job of digitizing transparent material. Just look for a scanner that includes its own light source; these models can backlight a transparent original, allowing the scanning head to correctly interpret the colors. With a
transparency light (sometimes also called a transparency adapter), you can scan 35mm slides, photographic negatives, and the transparencies used in overhead projectors.
Your warranty is your shield
Most scanners now on the market have a one-year warranty, although it never hurts to check for extras (that you hope you won’t need). For example, does the manufacturer offer free technical support over the phone? Is the company’s Web site up-to-date, with software patches and driver updates posted regularly? Some companies also provide e-mail technical support from their Web sites.
While you’re visiting any hardware manufacturer’s Web site, look for FAQ files (FAQ is Internet savvy-speak, short for Frequently Asked Questions) that you can download about the product you’re considering or a scanner you’ve bought. These files are usually chock-full of information, tips, and solutions to customer complaints.
Software You’ve Just Gotta Have
Note: Your scanner may combine several programs into a software suite that can perform some or all the tasks in this section. If so, that’s a powerful advantage to consider when you’re comparing one scanner with another.
The image editor
For most scanner owners, the image editor is the primary program used every day. Not only can it control the scanner during the actual image acqui-sition, but you can also edit and improve the scan after it has been saved to your hard drive. (Plus, you can go totally wacky in an artistic sort of way.) The image editor is to digital photographs what a word processor is to written documents.
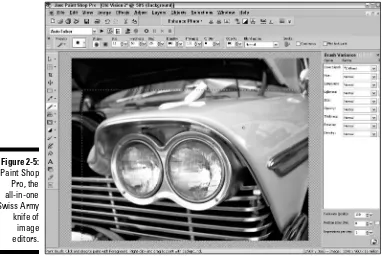
I can’t think of a better example of an image editor than Paint Shop Pro, from Jasc, Inc. (www.jasc.com), which I use extensively in examples throughout this book. I first started using this great program in its shareware days, back in the hoary 1980s and early 1990s. (I know that makes me a microprocessing Methuselah, but no cracks about my age, please.) The latest version of this pro-gram packs the same power as Adobe Photoshop but for hundreds of dollars less. Naturally, Paint Shop Pro is TWAIN compatible, so it’s a good match for just about any scanner. Figure 2-5 illustrates an image I’m editing in Paint Shop Pro 8.
What can you do with an image editor? I discuss this subject in depth in Chapters 9 and 11, but let me run through the top ten tasks quickly:
⻬ Crop
⻬ Rotate
⻬ Change colors
⻬ Add special effects
⻬ Add text
⻬ Resize
⻬ Change contrast and brightness
⻬ Fix individual pixels
⻬ Convert to other image formats
⻬ Convert color to black and white
Figure 2-5:
Paint Shop Pro, the all-in-one Swiss Army knife of image editors.
The OCR program
Next in our cavalcade of scanning software is the OCR, or optical character recognition, program, which can “read” the text from a scanned document and insert it into a word processor, just as if you had retyped the text your-self. Many OCR software packages can also handle photographs and line art as well as simple text, creating a virtual copy of the original scanned docu-ment in Microsoft Word or Corel WordPerfect.
This feature sounds cosmically neat, and it can be. However, I think it’s important to remember this important Mark’s Maxim:
No OCR software is perfect.
The accuracy of the recognition depends not only on the program you use but also on a host of other conditions, including
⻬ The font used in the original material.
can fix these errors by individually correcting words the software couldn’t recognize, although I don’t want you to think that the process is foolproof.
The faxing program
As Frank Gorshin may have asked Adam West in my favorite classic TV series, “Riddle me this, Batman: Why is a fax-modem not like a fax machine?” Allow me to answer that, Caped Crusader: A fax-modem can send only docu-ments you create electronically, such as a résumé or a digital photograph. If you want to send Aunt Harriet a copy of a recipe from the newspaper, how-ever, you’re out of luck. You have no way to fax from a physical original (called a hard copy by technotypes and media types alike).
But, wait! With a scanner, a program such as WinFax PRO (see Figure 2-6) can turn your computer system into a true fax machine that’s as good as the expensive model you have at work. If you’re using Mac OS X 10.3 — popularly called “Panther” — you don’t even need a separate application! These lucky Mac folks can fax a document from an application, or fax a scanned image from Panther’s Preview application. This, my friends, is the definition of sassy.
The copying program
Need a full-featured copier for your home or office? To be honest, you can’t find the answer in this book. Although the addition of a scanner can turn your computer system into a basic copy machine, the scanner still can’t deliver the versatility and features of the real thing.
Figure 2-6:
WinFax PRO can use your scanner to fax documents.
And the Winner Is . . .
It’s totally up to you! Look over any notes you may have made as you’ve read this chapter, and you have the complete picture of the scanner you need. For example, suppose that you’ve written down the following:
Flatbed, 1200 x 1200, 36-bit, USB, TWAIN, one-pass, one-button scanning, image editor, OCR
With those specifications, you can go comparison shopping — on the Web or in a real, live brick-and-mortar store — confident that you know exactly what you need.
puters these days. Let me take a moment to fill you in on the advantages of buying your scanner online:
⻬ Prices are lower. Of course, this is probably Reason Number One that most folks shop online. You can’t beat the prices.
⻬ Shopping online is a time-saver. After you’re familiar with your favorite online stores, you can compare models, find the lowest price on the model you choose, and buy it, all within an hour or two. (You save gas as well.)
⻬ You may save on sales tax. Depending on your location, you may not have to pay sales tax on your online purchase.
⻬ It’s in stock! You can not only find any scanner on the market online but also always find a store with one in stock.
When you’re using your credit card online, follow the Mark’s Maxim that I consider the golden rule of Web shopping:
Never entrust your credit card to any Web site that doesn’t use a secure connection!
Reputable online stores use this encryption to safeguard your credit card data as well as your sensitive personal information.
Netscape Navigator and Microsoft Internet Explorer (the two big guns in PC Web browsing) support secure sessions, as does Apple’s Safari browser for the Macintosh. When a locked padlock icon appears on the status line at the bottom of the browser window (or at the top of the window, if you’re using Safari), you know that the session is secure.