Learning Android
Marko Gargenta
Learning Android by Marko Gargenta
Copyright © 2011 Marko Gargenta. All rights reserved. Printed in the United States of America.
Published by O’Reilly Media, Inc., 1005 Gravenstein Highway North, Sebastopol, CA 95472. O’Reilly books may be purchased for educational, business, or sales promotional use. Online editions are also available for most titles (http://my.safaribooksonline.com). For more information, contact our corporate/institutional sales department: (800) 998-9938 or [email protected].
Editors: Andy Oram and Brian Jepson
Production Editor: Holly Bauer
Copyeditor: Genevieve d’Entremont
Proofreader: Jennifer Knight
Indexer: Jay Marchand
Cover Designer: Karen Montgomery
Interior Designer: David Futato
Illustrator: Robert Romano
Printing History:
March 2011: First Edition.
Nutshell Handbook, the Nutshell Handbook logo, and the O’Reilly logo are registered trademarks of O’Reilly Media, Inc. Learning Android, the image of a Little Owl, and related trade dress are trademarks of O’Reilly Media, Inc.
Many of the designations used by manufacturers and sellers to distinguish their products are claimed as trademarks. Where those designations appear in this book, and O’Reilly Media, Inc., was aware of a trademark claim, the designations have been printed in caps or initial caps.
While every precaution has been taken in the preparation of this book, the publisher and author assume no responsibility for errors or omissions, or for damages resulting from the use of the information con-tained herein.
Table of Contents
Preface . . . xiii
1. Android Overview . . . 1
Android Overview 1
Comprehensive 1
Open Source Platform 2
Designed for Mobile Devices 2
History 3
Google’s Motivation 3
Open Handset Alliance 4
Android Versions 4
Summary 5
2. The Stack . . . 7
Stack Overview 7
Linux 7
Portability 7
Security 8
Features 8
Native Libraries 9
Dalvik 9
Android and Java 10
Application Framework 11
Applications 12
The APK 12
Application Signing 12
Application Distribution 12
Summary 13
3. Quick Start . . . 15
Installing the Android SDK 15
Setting Up a PATH to Tools 16
Installing Eclipse 16
Eclipse Workspace 17
Setting Up Android Development Tools 17
Hello, World 18
Creating a New Project 18
Manifest File 20
An Emulator Versus a Physical Phone 25
Summary 25
4. Main Building Blocks . . . 27
What Are Main Building Blocks? 27
A Real-World Example 27
Part 1: Android User Interface 39
Building an Activity 40
Networking and Multithreading 41
Debugging Android Apps 41
Part 2: Preferences, Filesystem, Options Menu, and Intents 41
The Activity 41
Menu System and Intents 42
Filesystem 42
Part 3: Android Services 42
Services 42
Application Object 42
SQLite and Android’s Support for It 42
Refactoring the Code Again 43
Part 5: Lists and Adapters 43
Timeline Activity 43
More Refactoring? 43
Part 6: Broadcast Receivers 43
Boot and Network Receivers 44
Timeline Receiver 44
Permissions 44
Part 7: Content Providers 44
Status Data 44
Android Widgets 44
Part 8: System Services 45
Compass and Location 45
Intent Service, Alarms, and Notifications 45
Summary 45
6. Android User Interface . . . 47
Two Ways to Create a User Interface 47
Declarative User Interface 47
Programmatic User Interface 48
The Best of Both Worlds 48
Views and Layouts 48
Starting the Yamba Project 51
The StatusActivity Layout 52
Important Widget Properties 54
Strings Resource 55
The StatusActivity Java Class 56
Creating Your Application-Specific Object and Initialization Code 56 Compiling Code and Building Your Projects: Saving Files 59
Adding the jtwitter.jar Library 59
Updating the Manifest File for Internet Permission 61
Logging in Android 62
Other UI Events 70
Adding Color and Graphics 74
Adding Images 74
Adding Color 76
Alternative Resources 79
Optimizing the User Interface 80
Hierarchy Viewer 81
Update the Manifest File 88
The Options Menu 89
The Menu Resource 89
Android System Resources 90
Update StatusActivity to Load the Menu 91
Update StatusActivity to Handle Menu Events 92
Strings Resource 92
The User Data Partition 97
Filesystem Security 98
Summary 99
8. Services . . . 101
The Yamba Application Object 102
The YambaApplication Class 102
Update the Manifest File 104
Simplifying StatusActivity 105
UpdaterService 105
Creating the UpdaterService Java Class 106
Update the Manifest File 107
Add Menu Items 108
Update the Options Menu Handling 109
Testing the Service 109
Looping in the Service 110
Pulling Data from Twitter 113
The Database Schema and Its Creation 120
Four Major Operations 121
Creating the TimelineActivity Class 139
About Adapters 142
Adding a ListView to TimelineActivity 142
Creating a Row Layout 143
Creating an Adapter in TimelineActivity.java 144
TimelineAdapter 146
ViewBinder: A Better Alternative to TimelineAdapter 149
Updating the Manifest File 150
Initial App Setup 152
Registering the BootReceiver with the AndroidManifest File 162
Testing the Boot Receiver 163
The TimelineReceiver 163
Broadcasting Intents 165
The Network Receiver 167
Adding Custom Permissions to Send and Receive Broadcasts 169
Declaring Permissions in the Manifest File 170
Updating the Services to Enforce Permissions 171
Updating TimelineReceiver to Enforce Permissions 172
Summary 173
12. Content Providers . . . 175
Creating a Content Provider 175
Defining the URI 176
Inserting Data 177
Updating Data 178
Deleting Data 179
Querying Data 179
Getting the Data Type 180
Updating the Android Manifest File 181
Using Content Providers Through Widgets 181
Implementing the YambaWidget class 182
Creating the XML Layout 185
Creating the AppWidgetProviderInfo File 185
Updating the Manifest File 186
Testing the Widget 186
Summary 186
13. System Services . . . 189
Compass Demo 189
Common Steps in Using System Services 190
Getting Updates from the Compass 190
Compass Main Activity 191
Custom Rose Widget 194
Location Service 195
Where Am I? Demo 196
Updating Yamba to Use the Location Service 200
Updating Our Preferences 200
Updating the Yamba Application 201
Updating the Status Activity 202
Intent Service 206
Alarms 208
Adding an Interval to Preferences 209
Updating BootReceiver 210
Sending Notifications 212
Summary 214
14. The Android Interface Definition Language . . . 215
Writing the AIDL 216
Implementing the Service 217
Implementing a Parcel 218
Registering with the Manifest File 220
Implementing the Remote Client 221
Binding to the Remote Service 221
Testing That It All Works 224
Summary 225
15. The Native Development Kit (NDK) . . . 227
What Is and Isn’t the NDK For? 227
Problems Solved by the NDK 227
The Toolchain 228
Packaging Your Libs 228
Documentation and Standardized Headers 228
An NDK Example: Fibonacci 229
FibLib 229
The JNI Header File 231
C Implementation 232
The Makefile 234
Building the Shared Library 234
The Fibonacci Activity 235
Testing That It All Works 236
Summary 237
Index . . . 239
Preface
This book sprang from years of delivering the Marakana Android Bootcamp training class to thousands of software developers at some of the largest mobile companies located on four continents around the world. Teaching this class, over time I saw what works and what doesn’t. This book is a distilled version of the Android Bootcamp training course that I developed at Marakana and fine-tuned over numerous engagements.
My background is in Java from back before it was even called that. From the beginning, I was very interested in embedded development as a way to program various devices that surround us in everyday life. Because Java primarily took off in web application development, most of my experience in the previous decade has been in building large enterprise systems. Then Android arrived, and once again I became very excited about building software for nontraditional computers. My current interests lie in using An-droid on devices that may not even resemble a typical phone.
This book teaches anyone who knows Java (or a similar language) how to develop a reasonably complex Android application. I hope you find this book fairly comprehen-sive and that you find the example-based learning reasonably motivating. The goal of
Learning Android is to get you to think in Android terms.
What’s Inside
Chapter 1, Android Overview
Is an introduction to Android and its history Chapter 2, The Stack
Is an overview of the Android operating system and all its parts from a very high level
Chapter 3, Quick Start
Helps you set up your environment for Android application development Chapter 4, Main Building Blocks
Explains the Android components application developers use to put together an app
Chapter 5, Yamba Project Overview
Explains the Yamba application that we’ll build together through this book and use as an example to learn Android’s various features
Chapter 6, Android User Interface
Explains how to build the user interface for your application Chapter 7, Preferences, the Filesystem, the Options Menu, and Intents
Covers some of the operating system features that make an application developer’s life easier
Chapter 8, Services
Covers building an Android service to process background tasks Chapter 9, The Database
Explains the Android framework’s support for the built-in SQLite database and how to use it to persist the data in your own application
Chapter 10, Lists and Adapters
Covers an important feature of Android that allows large data sets to be linked efficiently to relatively small screens
Chapter 11, Broadcast Receivers
Explains how to use the publish-subscribe mechanism in Android to respond to various system and user-defined messages
Chapter 12, Content Providers
Shows how to design a content provider to share data between applications, in this case using it to enable our app widget to display data on the home screen Chapter 13, System Services
Introduces various system services that an app developer can tap into Chapter 14, The Android Interface Definition Language
Covers building an inter-process communication mechanism to allow for remote access to a service from another application
Chapter 15, The Native Development Kit (NDK)
Introduces how to write native C code as part of your Android application
Conventions Used in This Book
The following typographical conventions are used in this book:
Italic
Indicates new terms, URLs, email addresses, filenames, and file extensions.
Constant width
Used for program listings, as well as within paragraphs to refer to program elements such as variable or function names, data types, and XML entities.
Constant width bold
Constant width italic
Shows text that should be replaced with user-supplied values or by values deter-mined by context.
This icon signifies a tip, suggestion, or general note.
This icon indicates a warning or caution.
Using Code Examples
This book is here to help you get your job done. In general, you may use the code in this book in your programs and documentation. You do not need to contact us for permission unless you’re reproducing a significant portion of the code. For example, writing a program that uses several chunks of code from this book does not require permission. Selling or distributing a CD-ROM of examples from O’Reilly books does require permission. Answering a question by citing this book and quoting example code does not require permission. Incorporating a significant amount of example code from this book into your product’s documentation does require permission.
We appreciate, but do not require, attribution. An attribution usually includes the title, author, publisher, and ISBN. For example: “Learning Android by Marko Gargenta (O’Reilly). Copyright 2011 Marko Gargenta, 978-1-449-39050-1.”
If you feel your use of code examples falls outside fair use or the permission given here, feel free to contact us at [email protected].
Safari® Books Online
Safari Books Online is an on-demand digital library that lets you easily search over 7,500 technology and creative reference books and videos to find the answers you need quickly.
With a subscription, you can read any page and watch any video from our library online. Read books on your cell phone and mobile devices. Access new titles before they are available for print, get exclusive access to manuscripts in development, and post feed-back for the authors. Copy and paste code samples, organize your favorites, download chapters, bookmark key sections, create notes, print out pages, and benefit from tons of other time-saving features.
O’Reilly Media has uploaded this book to the Safari Books Online service. To have full digital access to this book and others on similar topics from O’Reilly and other pub-lishers, sign up for free at http://my.safaribooksonline.com.
How to Contact Us
Please address comments and questions concerning this book to the publisher: O’Reilly Media, Inc.
1005 Gravenstein Highway North Sebastopol, CA 95472
800-998-9938 (in the United States or Canada) 707-829-0515 (international or local)
707 829-0104 (fax)
We have a web page for this book, where we list errata, examples, and any additional information. You can access this page at:
http://oreilly.com/catalog/9781449390501/
To comment or ask technical questions about this book, send email to: [email protected]
For more information about our books, courses, conferences, and news, see our website at http://oreilly.com.
Find us on Facebook: http://facebook.com/oreilly Follow us on Twitter: http://twitter.com/oreillymedia
Watch us on YouTube: http://www.youtube.com/oreillymedia
Acknowledgments
This book is truly a result of outstanding teamwork. First, I’d like to thank my editors at O’Reilly, Andy Oram and Brian Jepson. Andy, your comments were spot-on and constructive. Brian, thank you for persuading me to take on writing this book in the first place.
I would like to thank all my technical editors: Dan Bornstein, Hervé Guihot, Frank Maker III, and Bill Schrickel. Thank you for diligently reading my half-baked drafts and providing valuable comments.
I’d like to thank my team at Marakana—Aleksandar (Saša) Gargenta, Ken Jones, and Laurent Tonon—for bringing back firsthand feedback from teaching Android Boot-camp courses using the draft of this book. Saša, special thanks to you for sending me back to the drawing board more times than I’d like to admit. This book is probably months past due because of your in-depth technical comments.
And finally, a huge thanks to my wife, Lisa, and daughter, Kylie. I know what a sacrifice it was for you while I was crisscrossing the world working on this material. Thank you for supporting me along the way.
CHAPTER 1
Android Overview
In this chapter, you will learn how Android came about. We’ll take a look at its history to help us understand its future. As this mobile environment enters a make-or-break year, we look at the key players in this ecosystem, what motivates them, and what strengths and weaknesses they bring to the table.
By the end of this chapter, you will better understand the ecosystem from a business point of view, which should help clarify the technology choices and how they relate to long-term advantages for various platforms.
Android Overview
Android is a comprehensive open source platform designed for mobile devices. It is championed by Google and owned by Open Handset Alliance. The goal of the alliance is to “accelerate innovation in mobile and offer consumers a richer, less expensive, and better mobile experience.” Android is the vehicle to do so.
As such, Android is revolutionizing the mobile space. For the first time, it is a truly open platform that separates the hardware from the software that runs on it. This allows for a much larger number of devices to run the same applications and creates a much richer ecosystem for developers and consumers.
Let’s break down some of these buzz words and see what’s behind them.
Comprehensive
Android is a comprehensive platform, which means it is a complete software stack for a mobile device.
For developers, Android provides all the tools and frameworks for developing mobile apps quickly and easily. The Android SDK is all you need to start developing for An-droid; you don’t even need a physical phone.
For users, Android just works right out of the box. Additionally, users can customize their phone experience substantially.
For manufacturers, it is the complete solution for running their devices. Other than some hardware-specific drivers, Android provides everything else to make their devices work.
Open Source Platform
Android is an open source platform. The entire stack, from low-level Linux modules all the way to native libraries, and from the application framework to complete appli-cations, is totally open.
More so, Android is licensed under business-friendly licenses (Apache/MIT) so that others can freely extend it and use it for variety of purposes. Even some third-party open source libraries that were brought into the Android stack were rewritten under new license terms.
So, as a developer, you have access to the entire platform source code. This allows you to see how the guts of the Android operating system work. As manufacturer, you can easily port Android OS to your specific hardware. You can also add your own propri-etary secret sauce, and you do not have to push it back to the development community if you don’t want to.
There’s no need to license Android. You can start using it and modifying it today, and there are no strings attached. More so, Android has many hooks at various levels of the platform, allowing anyone to extend it in unforeseen ways.
There are couple of minor low-level pieces of code that are proprietary to each vendor, such as the software stack for the cellular, WiFi, and Bluetooth radios. Android tries hard to abstract those components with interfaces so that vendor-specific code can be managed easily.
Designed for Mobile Devices
Android is a purpose-built platform for mobile devices. When designing Android, the team looked at which mobile device constraints likely were not going to change for the foreseeable future. For one, mobile devices are battery powered, and battery perform-ance likely is not going to get much better any time soon. Second, the small size of mobile devices means that they will always be limited in terms of memory and speed. These constraints were taken into consideration from the get-go and were addressed throughout the platform. The result is an overall better user experience.
History
The history of Android is interesting and offers some perspective on what the future might hold.
These are the key events of the past few years:
• In 2005, Google buys Android, Inc. The world thinks a “gPhone” is about to come out.
• Everything goes quiet for a while.
• In 2007, the Open Handset Alliance is announced. Android is officially open sourced.
• In 2008, the Android SDK 1.0 is released. The G1 phone, manufactured by HTC and sold by the wireless carrier T-Mobile USA, follows shortly afterward. • 2009 sees a proliferation of Android-based devices. New versions of the operating
system are released: Cupcake (1.5), Donut (1.6), and Eclair (2.0 and 2.1). More than 20 devices run Android.
• In 2010, Android is second only to Blackberry as the best-selling smart phone platform. Froyo (Android 2.2) is released and so are more than 60 devices that run it.
In 2005, when Google purchased Android, Inc., the world thought Google was about to enter the smart phone market, and there were widespread speculations about a de-vice called the gPhone.
Google’s CEO, Eric Schmidt, made it clear right away that Android’s ambitions were much larger than a single phone. Instead, they envisioned a platform that would enable many phones and other devices.
Google’s Motivation
Google’s motivation for supporting the Android project seems to be having Android everywhere and by doing that, creating a level playing field for mobile devices. Ulti-mately, Google is a media company, and its business model is based on selling adver-tising. If everyone is using Android, then Google can provide additional services on top of it and compete fairly. This is unlike the business models of other software vendors who depend on licensing fees.
Although Google does license some proprietary apps, such as Gmail and Maps, and makes some money off the Android market, its primary motivation is still the adver-tising revenue that those apps bring in.
Open Handset Alliance
For this to be bigger than just Google, Android is owned by the Open Handset Alliance, a nonprofit group formed by key mobile operators, manufacturers, carriers, and others. The alliance is committed to openness and innovation for the mobile user experience. In practice, the alliance is still very young and many members are still learning to work with each other. Google happens to be putting the most muscle behind the Android project at the moment.
The first version of the Android SDK was released without an actual phone on the market. The point of this is that you don’t really need a phone for Android development. There are some exceptions (hardware sensors, telephony, etc.), but for the most part the Android SDK con-tains everything you’ll need for developing on this platform.
Android Versions
Like any software, Android is improved over time, which is reflected in its version numbers. However, the relationship between different version numbers can be con-fusing. Table 1-1 helps explain that.
Table 1-1. Android versions through Android 2.3
Android version API level Nickname
Android 1.0 1
Android 1.1 2
Android 1.5 3 Cupcake
Android 1.6 4 Donut
Android 2.0 5 Eclair
Android 2.01 6 Eclair
Android 2.1 7 Eclair
Android 2.2 8 Froyo (frozen yogurt)
Android 2.3 9 Gingerbread
Android 2.3.3 10 Gingerbread
Android 3.0 11 Honeycomb
As application developers, you will want to make sure you know which API level your application is targeting in order to run. That API level will determine which devices can and cannot run your application.
Typically your objective is to have your application run on as many devices as possible. So, with that in mind, try to shoot for an API level that is as low as possible. Keep in mind the distribution of Android versions on real devices out there. Figure 1-1 shows a snapshot of the Android Device Dashboard from mid-2010.
Figure 1-1. Historical Android version distribution through January 2011
You may notice that there are not a lot of users of Android 1.5 and 1.6. You may also notice that not a lot of users have the latest and greatest Android 2.3, but the number of 2.x users is growing. This is because everyone with 1.0 and 1.1 got upgraded over the air (OTA) automatically to 1.5. On the other hand, users who still have devices with Android 1.5 and 1.6 likely will never be able to upgrade to 2.x versions. Their older devices do not have the relevant firmware, and most manufacturers are not plan-ning on releasing firmware upgrades as they are busy working on new models. With that in mind, you will probably choose 1.6 or 2.0 as your minimum development target, unless you truly need the features of the latest version.
Summary
The Android operating system was designed from the ground up to be a comprehensive open source platform for mobile devices. It is a game-changer in the industry and has enjoyed great success.
In the next chapter, we’ll take a look at the entire Android operating system at a high level to gain a technical understanding of how all the pieces fit together.
CHAPTER 2
The Stack
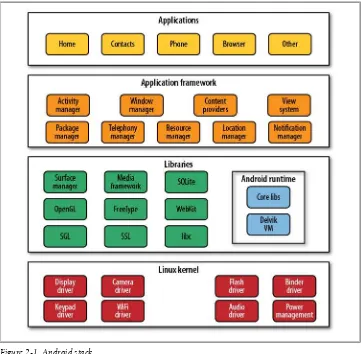
This is the 9,000-foot overview of the Android platform. Although you’re concerned primarily with writing Android applications, understanding the layout of the system will help shape your understanding about what you can or cannot do easily with Android.
By the end of this chapter, you’ll understand how the whole system works, at least from the high level.
Stack Overview
The Android operating system is like a cake consisting of various layers. Each layer has its own characteristics and purpose. The layers are not cleanly separated but often seep into each other.
When you read through this chapter, keep in mind that I am concerned only with the big picture of the entire system and will get into the nitty-gritty details later on. Fig-ure 2-1 shows the parts of the Android stack.
Linux
Android is built on top of Linux. Linux is a great operating system and the poster child of open source. There are many good reasons for choosing Linux as the base of the Android stack. Some of the main ones are its portability, security, and features.
Portability
Linux is a portable platform that is relatively easy to compile on various hardware architectures. What Linux brings to Android is a level of hardware abstractions. By basing Android on Linux, we don’t have to worry too much about underlying hardware features. Most low-level parts of Linux have been written in fairly portable C code, which allows for third parties to port Android to a variety of devices.
Figure 2-1. Android stack
Security
Linux is a highly secure system, having been tried and tested through some very harsh environments over the decades. Android heavily relies on Linux for security. All An-droid applications run as separate Linux processes with permissions set by the Linux system. As such, Android passes many security concerns to the underlying Linux system.
Features
Native Libraries
The native libraries are C/C++ libraries, often taken from the open source community in order to provide necessary services to the Android application layer. Among others, they include:
Webkit
A fast web-rendering engine used by Safari, Chrome, and other browsers
SQLite
A full-featured SQL database
Apache Harmony
An open source implementation of Java
OpenGL
3D graphics libraries
OpenSSL
The secure locket layer
Although many of these libraries are used as-is, one notable exception is Bionic, which is basically a rewritten version of the standard C library. Bionic is used for two reasons:
Technology
To make it purpose-built for tiny, battery-powered devices
License
To make it license-friendly for others who might want to adopt it and change it
GNU libc, the default C library for Linux, is licensed under a GPL li-cense, which requires any changes that you release publicly to be pushed back to the open source community. As such, it might not be the most business-friendly open source license when a company wants to keep their derivative work proprietary. Bionic, on the other hand, is licensed under an Apache/MIT license, which doesn’t require derivative works to be open sourced.
Dalvik
Dalvik is a purpose-built virtual machine designed specifically for Android, developed by Dan Bornstein and his team at Google.
The Java virtual machine (VM) was designed to be a one-size-fits-all solution, and the Dalvik team felt they could do a better job by focusing strictly on mobile devices. They looked at which constraints specific to a mobile environment are least likely to change in the near future. One of these is battery life, and the other is processing power. Dalvik was built from the ground up to address those constraints.
Another side effect of replacing the Java VM with the Dalvik VM is the licensing. Whereas the Java language, Java tools, and Java libraries are free, the Java virtual ma-chine is not. This was more of an issue back in 2005 when the work on Dalvik started. Nowadays, there are open source alternatives to Sun’s Java VM, namely the OpenJDK and Apache Harmony projects.
By developing a truly open source and license-friendly virtual machine, Android yet again provides a full-featured platform that others are encouraged to adopt for a variety of devices without having to worry about the license.
Android and Java
In Java, you write your Java source file, compile it into a Java byte code using the Java compiler, and then run this byte code on the Java VM. In Android, things are different. You still write the Java source file, and you still compile it to Java byte code using the same Java compiler. But at that point, you recompile it once again using the Dalvik compiler to Dalvik byte code. It is this Dalvik byte code that is then executed on the Dalvik VM. Figure 2-2 illustrates this comparison between standard Java (on the left) in Android using Dalvik (on the right).
It might sound like you have to do a lot more work with Android when it comes to Java. However, all these compilation steps are automated by tools such as Eclipse or Ant, and you never notice the additional steps.
You may wonder, why not compile straight from Java into the Dalvik byte code? There are a couple of good reasons for the extra steps. Back in 2005, when work on Dalvik started, the Java language was going through frequent changes, but the Java byte code was more or less set in stone. So, the Android team chose to base Dalvik on Java byte code instead of Java source code.
A side effect of this is that in theory you could write Android applications in any other language that compiles down to Java byte code. For example, you could use Python or Ruby. I say “in theory” because in practice the appropriate libraries that are part of the SDK would need to be available. But it is likely that the open source community will come up with a solution to that in the future.
Another thing to keep in mind is that Android Java is a nonstandard collection of Java classes. Java typically ships in:
Java Standard Edition
Used for development on basic desktop-type applications
Java Enterprise Edition (aka J2EE or JavaEE)
Used for development of enterprise applications
Java Micro Edition (aka J2ME or JavaME)
Java for mobile applications
Android’s Java set of libraries is closest to Java Standard Edition. The major difference is that Java user interface libraries (AWT and Swing) have been taken out and replaced with Android-specific user interface libraries. Android also adds quite a few new fea-tures to standard Java while supporting most of Java’s standard feafea-tures. So, you have most of your favorite Java libraries at your disposal, plus many new ones.
Application Framework
The application framework is a rich environment that provides numerous services to help you, the app developer, get your job done. This is the best-documented and most extensively covered part of the platform because it is this layer that empowers devel-opers to get creative and bring fantastic applications to the market.
In the application framework layer, you will find numerous Java libraries specifically built for Android. You will also find many services (or managers) that provide the eco-system of capabilities your application can tap into, such as location, sensors, WiFi, telephony, and so on.
As you explore Android application development, most of your focus will be on this part of the stack, and you will get to use many of the application framework components.
Applications
And finally, there are the applications that you and other developers create. These applications are what end users find valuable about Android. They can come prein-stalled on the device or can be downloaded from one of the many Android markets.
The APK
An application is a single application package (APK) file. An APK file roughly has three main components. An API consists of the following major components:
Dalvik executable
This is all your Java source code compiled down to a Dalvik executable. This is the code that runs your application.
Resources
Resources are everything that is not code. Your application may contain a number of images and audio/video clips, as well as numerous XML files describing layouts, language packs, and so on. Collectively, these items are the resources.
Native libraries
Optionally, your application may include some native code, such as C/C++ li-braries. These libraries could be packaged together with your APK file.
Application Signing
Android applications must be signed before they can be installed on a device. For de-velopment purposes, we’ll be signing our example applications with a debug key—a key that you already have on your development platform. However, when you distrib-ute your application commercially, you’ll want to sign it with your own key. The Android developer document titled “Signing Your Application” has the details.
Application Distribution
In practice, the biggest market currently is Android Market, run by Google. It is unclear whether Google means to just seed the market space while other stores develop or plans to make it a profitable venture.
Applications can also be distributed via the Web. When you download an APK file from a website through the browser, the application represented by the APK file is installed automatically on your phone.
What about viruses, malware, spyware, and other bad things?
With its decentralized application distribution system, it is certainly possible for an unsuspecting user to download a malicious app that consequently does bad things. For example, there have been reports of phishing attacks via fake banking apps.
So, Android leaves it to the marketplace to sort it out. Eventually, there will be stores that are more reputable and those that are less so, at least in theory. Google relies on user reports for policing its Android Market, but other stores may choose to do more proactive testing and raise the bar on what gets into the store in the first place.
Summary
In this chapter, you got a big-picture overview of what comprises the Android operating system and how its various pieces fit together. You now understand what makes An-droid so complete, open, and attractive to developers.
In the next chapter, we’ll look at how to set up your development environment so you can get up to speed quickly. We’ll also look at a simple Hello World application and dissect it to help you understand the various pieces of an Android application.
CHAPTER 3
Quick Start
In this chapter, you will learn how to set up your environment for Android develop-ment. I’ll go beyond just listing where you can download the software, and will cover some of the best practices in getting set up. I’ll look at development operating system choices as well as the Android tools available. You will see the good, the bad, and the ugly of the various tool and platform choices that you’re about to make (or that some-one else has already made for you).
By the end of this chapter, you will have your entire development environment set up. You’ll be able to write a Hello World application, build it, and run it on the emulator (or a physical device, if you want).
I’m going to use ~ to refer to your home directory. On Mac OS X, that’s typically something like /Users/marko. On Linux, it would be /home/ marko, and on Windows Vista and 7, C:\Users\marko (in Windows XP, it would be C:\Documents and Settings\marko). Also, I’m going to use Unix-style forward slashes and not Windows backslashes to denote file path separators.
So, if you’re on Windows, just change ~ to C:\Users\YourUserName
and / to \. Other than that, everything should be pretty much for different operating systems, regardless of whether you use OS X, Linux, or Windows.
Installing the Android SDK
The Android Software Development Kit (SDK) is all you need to develop applications for Android. The SDK comes with a set of tools as well as a platform to run it and see it all work. You can download the Android SDK for your particular platform from the Android SDK Download page.
Once you download it, unzip (or on Linux, untar) it into a folder that is easy to get to. Further examples in the book will assume your SDK is in the folder ~/android-sdk. If it’s in a different location, use that location instead of ~/android-sdk. For example:
Windows
C:\apps\android-sdk-windows Linux
/home/YourUserName/android-sdk-linux_86 Mac OS X
/Users/YourUserName/android-sdk-mac_86
For Windows users, I strongly recommend choosing directories without spaces in them. This is because we’ll be doing work on the command line and spaces just complicate things. Because the Windows XP home directory is in C:\Documents and Settings, I would recommend putting android-sdk in a top-level directory that you create, such as C:\apps. However, on Windows Vista or 7, you can simply extract android-sdk into C:\Users\YourUserName.
Setting Up a PATH to Tools
The Android SDK has a folder that contains all its major tools. Since we’re going to use these tools from the command line, it is very helpful to add your ~/android-sdk/tools/
and your ~/android-skd/platform-tools/ directories to your system PATH variable. This
will make it easier to access your tools without having to navigate to their specific location every single time.
Details for setting up the PATH variable depend on the platform; see step 2 of the
docu-ment “Installing Android SDK”.
Installing Eclipse
Eclipse is an open source collection of programming tools originally created by IBM for Java. Nowadays, most developers in the Java community favor Eclipse as their Integrated Development Environment (IDE) of choice. Eclipse lives at http://eclipse.org. Eclipse has a lot of time-saving features, which I’ll be pointing out as we continue. Keep in mind that, although powerful, Eclipse tends to be very resource-hungry, and so you might want to restart it once a day if it starts running sluggishly.
If you choose not to use Eclipse, please refer to “Developing in Other IDEs”.
Download Eclipse at http://www.eclipse.org/downloads/. I recommend Eclipse IDE for Java Developers (not the twice-as-large Eclipse for Java EE Developers). You can install it in any directory you’d like.
Eclipse Workspace
Eclipse organizes all your work by projects. Projects are placed in a workspace, which is a location you choose. So, where you put your workspace is significant. I recommend
~/workspace as a simple place for your code. On Windows, however, I recommend storing your workspace in a directory that doesn’t have spaces in it (they complicate anything you might do at the command line). C:\workspace is a good choice for Win-dows users.
Setting Up Android Development Tools
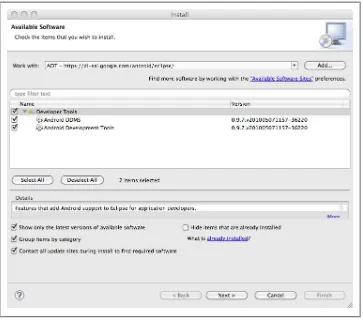
You also need to set up Android Tools for Eclipse. The instructions are:
1. Start Eclipse, then select Help→Install New Software (see Figure 3-1). 2. In the Available Software dialog, click Add.
3. In the Add Site dialog that appears, enter a name for the remote site (for example, “Android Plugin”) in the “Name” field.
4. In the “Location” field, enter this URL: https://dl-ssl.google.com/android/ eclipse/.
5. Click OK.
6. Back in the Available Software view, you should now see “Developer Tools” added to the list. Select the checkbox next to Developer Tools, which will automatically select the nested tools Android DDMS and Android Development Tools. Click Next.
7. In the resulting Install Details dialog, the Android DDMS and Android Develop-ment Tools features are listed. Click Next to read and accept the license agreeDevelop-ment and install any dependencies, then click Finish.
8. Restart Eclipse.
If you have trouble downloading the plug-in, you can try using “http” in the URL instead of “https” (https is preferred for security reasons).
Hello, World
To make sure everything is set up properly, we’re going to write a simple Hello World program. As a matter of fact, there’s not much for us to write, but a lot to understand. This is because Eclipse will create the project shell for us from some predefined templates.
Creating a New Project
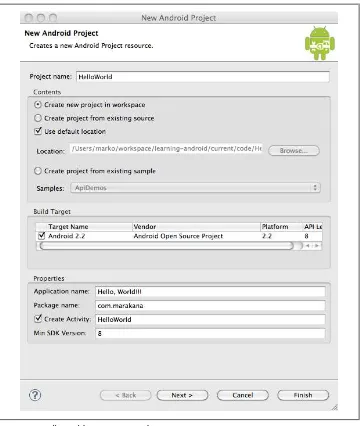
In Eclipse, choose File→New→Android Project. Sometimes (especially the first time you run Eclipse) the Android tools may not be appear there right away. They should show up in the future after you’ve used them for the first time. If Android Project is not an option under File→New, choose Other and look for Android Project in there.
In the new project dialog window, fill out the following:
1. “Project name” is an Eclipse construct. Eclipse organizes everything into projects. A project name should be one word. I like to use the CamelCase naming convention here. Go ahead and type HelloWorld.
2. Next, you need to choose the build target. The build target tells the build tools which version of the Android platform you are building for. In here you should see a list of available platforms and add-ons you have installed as part of your SDK. Go ahead and pick one of the newer ones, such as Android 2.2 (but don’t choose the targets named Google APIs—those are Google’s proprietary extensions to the Android platform). For our purposes, we’ll stick to Android Open Source versions of the Android platform.
3. You need to fill out your project properties next. The application name is the plain English name of your application. Go ahead and enter something like Hello, World!!!.
4. The package name is a Java construct. In Java, all source code is organized into packages. Packages are important because, among other things, they specify the visibility of objects between the various Java classes in your project. In Android, packages are also important for application signing purposes. Your package name should be the reverse of your domain name with optional subdomains. I might use
com.example.calculator if I were building a calculator app and my domain name
was example.com. I’m going to be using com.marakana for my package name here.
5. You can optionally specify an activity. I haven’t covered activities yet (you’ll learn about them in Chapter 6), but think of them as corresponding to the various screens in your application. An activity is going to be represented by a Java class, and therefore its name should adhere to Java class naming conventions: start with an upper-case letter and use CamelCase to separate words. So, type HelloWorld for
your activity name.
6. The minimum SDK version is the minimum version of Android—as represented by API level—that is required for the device to run this application. You want this number to be as low as possible so that your app can run on as many devices as possible. I’m going to put 8 here to represent Android 2.2, which I know I have installed.
Finally, click on the Finish button, and Eclipse will create your project. Let’s look at the various files that this process created in Figure 3-2.
Figure 3-2. HelloWorld new project window
Manifest File
Example 3-1. AndroidManifest.xml
<?xml version="1.0" encoding="utf-8"?>
<manifest xmlns:android="http://schemas.android.com/apk/res/android" package="com.marakana" android:versionCode="1" android:versionName="1.0"> <application android:icon="@drawable/icon" android:label="@string/app_name"> <activity android:name=".HelloWorld" android:label="@string/app_name"> <intent-filter>
<action android:name="android.intent.action.MAIN" /> <category android:name="android.intent.category.LAUNCHER" /> </intent-filter>
</activity>
</application>
<uses-sdk android:minSdkVersion="8" />
</manifest>
Layout XML Code
The layout file specifies the layout of your screen. In this case, shown in Example 3-2, we have only one screen, and it’s loaded by the HelloWorld.java code seen in Exam-ple 3-5.
Example 3-2. res/layout/main.xml
<?xml version="1.0" encoding="utf-8"?>
<LinearLayout xmlns:android="http://schemas.android.com/apk/res/android" android:orientation="vertical" android:layout_width="fill_parent" android:layout_height="fill_parent">
<TextView android:layout_width="fill_parent"
android:layout_height="wrap_content" android:text="@string/hello" /> </LinearLayout>
Strings
This is another XML file that contains all the text that your application uses. For ex-ample, the names of buttons, labels, default text, and similar types of strings go into this file. This is the best practice for separating the concerns of various files, even if they are XML files. In other words, layout XML is responsible for the layout of widgets, but strings XML is responsible for their textual content (see Example 3-3).
Example 3-3. res/values/strings.xml
<?xml version="1.0" encoding="utf-8"?> <resources>
<string name="hello">Hello World, HelloWorld!</string> <string name="app_name">Hello, World!!!</string> </resources>
The R File
The R file is the glue between the world of Java and the world of resources (see Exam-ple 3-4). It is an automatically generated file, and as such, you never modify it. It is recreated every time you change anything in the res directory, for example, when you add an image or XML file.
You don’t need to look at this file much. We will use the data in it quite a bit, but we’ll use Eclipse to help us refer to values stored in this file.
Example 3-4. gen/com/marakana/R.java
/* AUTO-GENERATED FILE. DO NOT MODIFY. *
* This class was automatically generated by the * aapt tool from the resource data it found. It * should not be modified by hand.
*/
package com.marakana;
public final class R {
public static final class attr { }
public static final class drawable { public static final int icon=0x7f020000;
The Java code is what drives everything. This is the code that ultimately gets converted to a Dalvik executable and runs your application (see Example 3-5).
Example 3-5. HelloWorld.java
package com.marakana;
import android.app.Activity; import android.os.Bundle;
public class HelloWorld extends Activity {
/** Called when the activity is first created. */ @Override
setContentView(R.layout.main); }
}
The Emulator
Running your application on a physical device versus an emulated device is pretty much the same thing. That is because the emulator is an actual code emulator, meaning it runs the same code base as the actual device, all the way down to the machine layer.
A simulator and an emulator sound very similar, but are fundamentally different. To emulate means to imitate the machine executing the binary code. So, an emulator is sort of like a virtual machine. A simulator merely simulates the behavior of the code at a higher level. Android SDK ships with a true emulator, based on QEMU.
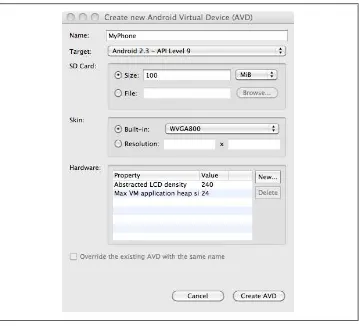
To use the emulator, we’ll have to create an Android Virtual Device (AVD). The easiest way to do that is to start the android tool via Eclipse.
To create a new AVD, start the tool called Android SDK and AVD Manager (see Fig-ure 3-3). You can start this tool from Eclipse by clicking on the icon or via the command line by starting the tool called android, which is located in your SDK/tools
directory.
Figure 3-3. Android SDK and AVD Manager
From within the Android SDK and AVD Manager window, choosing “New…” pops up a Create New AVD dialog window (see Figure 3-4). In this dialog, you specify the
parameters for your new AVD. The name can be any name you choose. The target designates which version of Android you want installed on this particular AVD. The list of possible targets is based on platforms and add-ons that you have installed into your SDK. If you don’t have any targets, go back to the Android SDK and AVD Manager window and choose the “Available packages” tab to install at least one platform, for example, Android 2.3 - API level 9.
Each AVD can have an SD card. You can just specify a number here for your built-in card, in megabytes. The skin is the look and feel of your device as well as its form factor. The Hardware option lets you fine-tune what this AVD does and doesn’t support.
Figure 3-4. New AVD dialog
Figure 3-5. Emulator
An Emulator Versus a Physical Phone
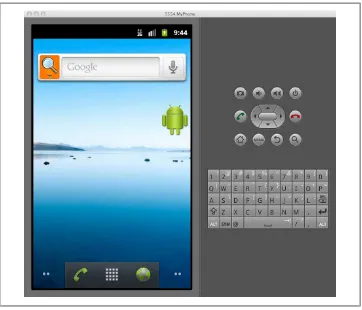
For the most part, running your application on the emulator is identical to running it on a physical phone. There are some notable exceptions, mostly things that are just hard to virtualize, such as sensors. Other hardware-related features such as telephony and location services, can be simulated in the emulator.
Summary
Setting up the Android development environment basically involves setting up Android SDK and Eclipse. Once you have set up your development environment, a good way to test that everything is working is to use Eclipse to create a simple Hello World project and run it in the emulator. If that runs fine, you are almost certain that your system is set up and ready for further development.
CHAPTER 4
Main Building Blocks
In this chapter, you will learn about the big blocks in Android. We’ll give you a high-level overview of what activities are, how intents work, why services are cool, how to use broadcast receivers and content providers to make your app scale, and much more. By the end of this chapter, you will understand the main Android components for building applications. You should conceptually know when you’d use what compo-nent. You will also see how these components relate to a real-world application.
What Are Main Building Blocks?
The main building blocks are components that you use as an application developer to build Android apps. They are the conceptual items that you put together to create a bigger whole. When you start thinking about your application, it is good to take a top-down approach. You design your application in terms of screens, features, and the interactions between them. You start with conceptual drawing, something that you can represent in terms of “lines and circles.” This approach to application development helps you see the big picture—how the components fit together and how it all makes sense.
A Real-World Example
Let’s say that we want to build a Twitter app. We know that the user should be able to post status updates. We also know the user should be able to see what her friends are up to. Those are basic features. Beyond that, the user should also be able to set her username and password in order to log into her Twitter account. So, now we know we should have these three screens.
Next, we would like this app to work quickly regardless of the network connection or lack thereof. To achieve that, the app has to pull the data from Twitter when it’s online and cache the data locally. That will require a service that runs in the background as well as a database.
We also know that we’d like this background service to be started when the device is initially turned on, so by the time the user first uses the app, there’s already up-to-date information on her friends.
So, these are some straightforward requirements. Android building blocks make it easy to break them down into conceptual units so that you can work on them independently, and then easily put them together into a complete package.
Activities
An activity is usually a single screen that the user sees on the device at one time. An application typically has multiple activities, and the user flips back and forth among them. As such, activities are the most visible part of your application.
I usually use a website as an analogy for activities. Just like a website consists of multiple pages, so does an Android application consist of multiple activities. Just like a website has a “home page,” an Android app has a “main” activity, usually the one that is shown first when you launch the application. And just like a website has to provide some sort of navigation among various pages, an Android app should do the same.
On the Web, you can jump from a page on one website to a page on another. Similarly, in Android, you could be looking at an activity of one application, but shortly after you could start another activity in a completely separate application. For example, if you are in your Contacts app and you choose to text a friend, you’d be launching the activity to compose a text message in the Messaging application.
Activity Life Cycle
Launching an activity can be quite expensive. It may involve creating a new Linux process, allocating memory for all the UI objects, inflating all the objects from XML layouts, and setting up the whole screen. Since we’re doing a lot of work to launch an activity, it would be a waste to just toss it out once the user leaves that screen. To avoid this waste, the activity life cycle is managed via Activity Manager.
Activity Manager is responsible for creating, destroying, and managing activities. For example, when the user starts an application for the first time, the Activity Manager will create its activity and put it onto the screen. Later, when the user switches screens, the Activity Manager will move that previous activity to a holding place. This way, if the user wants to go back to an older activity, it can be started more quickly. Older activities that the user hasn’t used in a while will be destroyed in order to free more space for the currently active one. This mechanism is designed to help improve the speed of the user interface and thus improve the overall user experience.
container-based environment similar to programming for Java applets or servlets. So, when it comes to an activity life cycle, you don’t get to say what state the activity is in, but you have plenty of opportunity to say what happens during the transitions from state to state. Figure 4-1 shows the states that an activity can go through.
Figure 4-1. Activity life cycle
Starting state
When an activity doesn’t exist in memory, it is in a starting state. While it’s starting up, the activity will go through a whole set of callback methods that you as a developer have an opportunity to fill out. Eventually, the activity will be in a running state. Keep in mind that this transition from starting state to running state is one of the most expensive operations in terms of computing time, and this also directly affects the battery life of the device. This is the exact reason why we don’t automatically destroy activities that are no longer shown. The user might want to come back to them, so we keep them around for a while.
Running state
The activity in a running state is the one that is currently on the screen and interacting with the user. We also say this activity is in focus, meaning that all user interactions— such as typing, touching the screen, and clicking buttons—are handled by this one activity. As such, there is only one running activity at any given time.
The running activity is the one that has priority in terms of getting the memory and resources it needs to run as quickly as possible. This is because Android wants to make sure the running activity is zippy and responsive to the user.
Paused state
When an activity is not in focus (i.e., not interacting with the user) but still visible on the screen, we say it’s in a paused state. This is not a typical scenario, because the device’s screen is usually small, and an activity is either taking up the whole screen or none at all. We often see this case with dialog boxes that come up in front of an activity, causing it to become Paused. All activities go through a paused state en route to being stopped.
Paused activities still have high priority in terms of getting memory and other resources. This is because they are visible and cannot be removed from the screen without making it look very strange to the user.
Stopped state
When an activity is not visible, but still in memory, we say it’s in a stopped state. Stopped activity could be brought back to the front to become a Running activity again. Or, it could be destroyed and removed from memory.
The system keeps activities around in a stopped state because it is likely that the user will still want to get back to those activities some time soon, and restarting a stopped activity is far cheaper than starting an activity from scratch. That is because we already have all the objects loaded in memory and simply have to bring it all up to the foreground.
Stopped activities can be removed from memory at any point.
Destroyed state
A destroyed activity is no longer in memory. The Activity Manager decided that this activity is no longer needed and has removed it. Before the activity is destroyed, it can perform certain actions, such as save any unsaved information. However, there’s no guarantee that your activity will be stopped prior to being destroyed. It is possible for a paused activity to be destroyed as well. For that reason, it is better to do important work, such as saving unsaved data, en route to a paused state rather than a destroyed state.
Intents
Intents are messages that are sent among the major building blocks. They trigger an activity to start up, tell a service to start or stop, or are simply broadcasts. Intents are asynchronous, meaning the code that sends them doesn’t have to wait for them to be completed.
An intent could be explicit or implicit. In an explicit intent, the sender clearly spells out which specific component should be on the receiving end. In an implicit intent, the sender specifies the type of receiver. For example, your activity could send an intent saying it simply wants someone to open up a web page. In that case, any application that is capable of opening a web page could “compete” to complete this action. When you have competing applications, the system will ask you which one you’d like to use to complete a given action. You can also set an app as the default. This mechanism works very similarly to your desktop environment, for example, when you downloaded Firefox or Chrome to replace your default Internet Explorer or Safari web browsers. This type of messaging allows the user to replace any app on the system with a custom one. For example, you might want to download a different SMS application or another browser to replace your existing ones. Figure 4-2 shows how intents may be used to “jump” between various activities, in the same application or in another app altogether.
Figure 4-2. Intents
Services
Services run in the background and don’t have any user interface components. They can perform the same actions as activities, but without any user interface. Services are useful for actions that we want to perform for a while, regardless of what is on the
screen. For example, you might want your music player to play music even as you are flipping between other applications.
Don’t confuse the Android services that are part of an Android app with native Linux services, servers, or daemons, which are a much lower-level component of the operating system.
Services have a much simpler life cycle than activities (see Figure 4-3). You either start a service or stop it. Also, the service life cycle is more or less controlled by the developer, and not so much by the system. Consequently, we as developers have to be mindful to run our services so that they don’t consume shared resources unnecessarily, such as the CPU and battery.
Figure 4-3. Service life cycle
The fact that a service runs in the background doesn’t mean it runs on a separate thread. If a service is doing some processing that takes a while to complete (such as performing network calls), you would typically run it on a separate thread. Otherwise, your user interface will run notice-ably slower. In other words, services and activities run on the same main application thread, often called the UI thread.
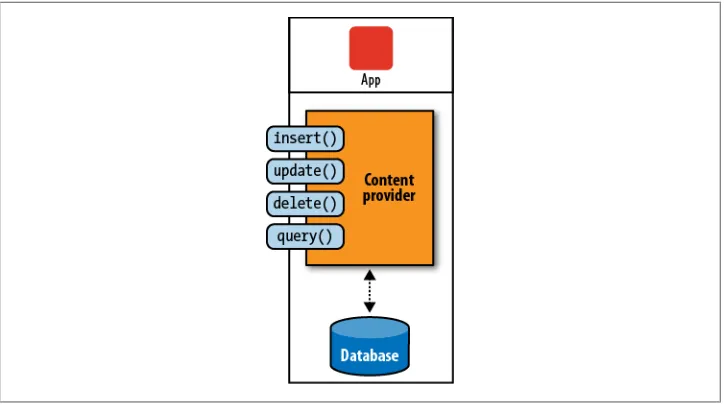
Content Providers
The Android system uses this mechanism all the time. For example, Contacts Provider is a content provider that exposes all user contact data to various applications. Settings Provider exposes system settings to various applications, including the built-in Settings application. Media Store is responsible for storing and sharing various media, such as photos and music, across various applications. Figure 4-5 illustrates how the Contacts app uses Contacts Provider, a totally separate application, to retrieve data about users’ contacts. The Contacts app itself doesn’t have any contacts data, and Contacts Provider doesn’t have any user interface.
Figure 4-5. Contacts application using Contacts Provider to get the data Figure 4-4. Content provider
This separation of data storage and the actual user interface application offers greater flexibility to mash up various parts of the system. For example, a user could install an alternative address book application that uses the same data as the default Contacts app. Or, he could install widgets on the Home screen that allow for easy changes in the System Settings, such as turning on or off the WiFi, Bluetooth, or GPS features. Many phone manufactures take advantage of content providers to add their own applications on top of standard Android to improve overall user experience, such as HTC Sense. Content providers are relatively simple interfaces, with the standard insert(), update(), delete(), and query() methods. These methods look a lot like standard
da-tabase methods, so it is relatively easy to implement a content provider as a proxy to the database. Having said that, you are much more likely to use content providers than write your own.
Broadcast Receivers
Broadcast receivers are Android’s implementation of a system-wide publish/subscribe mechanism, or more precisely, an Observer pattern. The receiver is simply dormant code that gets activated once an event to which it is subscribed happens.
The system itself broadcasts events all the time. For example, when an SMS arrives, a call comes in, the battery runs low, or the system gets booted, all those events are broadcasted, and any number of receivers could be triggered by them.
In our Twitter app example, we want to start the update service once the system starts up. To do that, we can subscribe to the broadcast that tells us the system has completed booting up.
You can also send your own broadcasts from one part of your application to another, or to a totally different application.
Broadcast receivers themselves do not have any visual representation, nor are they ac-tively running in memory. But when triggered, they get to execute some code, such as starting an activity, a service, or something else.
Application Context
So far you have seen activities, services, content providers, and broadcast receivers. Together, they make up an application. Another way of saying this is that they live inside the same application context.
Application context refers to the application environment and the process within which all its components are running. It allows applications to share the data and resources between various building blocks.
else. Application context lives as long as your application is alive. As such, it is inde-pendent of the activities life cycle. You can easily obtain a reference to the context by calling Context.getApplicationContext() or Activity.getApplication(). Keep in mind
that activities and services are already subclasses of context, and as such they inherit all its methods.
Summary
In this chapter, you learned about some of the most important Android application components. We put together these components to create various applications, from a simple Hello World to much more complex creations.
In the next chapter, we’ll outline a Yamba application as an example of how all these bits and pieces come together to form a working Android app.
CHAPTER 5
Yamba Project Overview
The best way to learn is by an example, and that example has to meet certain criteria. After working with thousands of new Android developers and using various example applications to explain some of the unique concepts that this platform has to offer, I concluded that the best example has to be:
Comprehensive
A good example app should demonstrate most of the aspects of the application framework that are unique to Android. Additionally, there should be a good reason to use a specific feature in order to get the job done. This is important in order to create the right motivation for those new to Android.
Familiar
The example application should be simple to understand. We want to focus on design and implementation, and not on features and benefits.
The Yamba Application
The application I picked for this book is a Twitter-like application. We call it Yamba, which stands for Yet Another Micro Blogging App. Yamba lets a user connect to a service such as Twitter, pull down friends’ statuses, and update that user’s own status. Yamba covers most of the main Android building blocks in a natural way. As such, it’s a great sample application to illustrate both how various components work individually and how they fit together. Services such as Twitter are more or less familiar to most people, so the features of the application do not require much explanation.
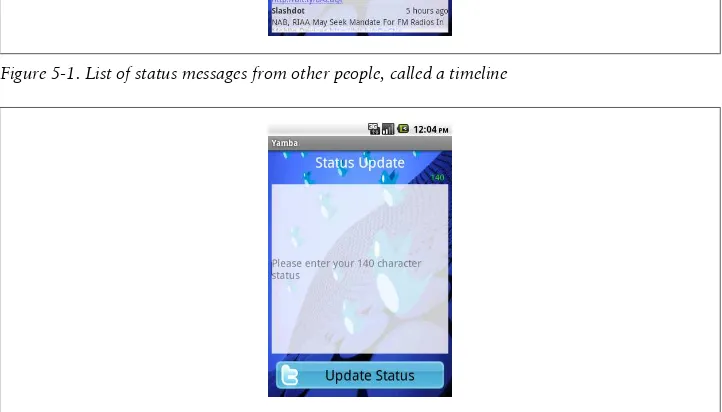
Figures 5-1 through 5-3 show what a finished product could look like.
Figure 5-1. List of status messages from other people, called a timeline
Figure 5-2. Screen where the user can enter a status message