UNIVERSITY OF WATERLOO
Department of Electrical and Computer Engineering
ECE 324 and ECE 325
Microprocessor Systems and Interfacing
Lecture Notes Part I
Wayne M. Loucks, PEng [email protected]
Robert B. Gorbet, PEng [email protected] Carol C.W. Hulls, PEng [email protected]
Bill Bishop,
[email protected] January 2002
Copyright (c) 2002 by the University of Waterloo. All Rights Reserved.
UNIVERSITY OF WATERLOO
Department of Electrical and Computer Engineering
Section I:
Course Introduction
Course Introduction
Players
Laboratory Instructors
Roger Sanderson E2 2355 Ext. 6184 [email protected]
Eric Praetzel E2 2357 Ext. 5249 [email protected]
Instructors
Rob Gorbet DC 3518 Ext. 3489 [email protected]
Wayne Loucks CPH 1325K Ext. 4792 [email protected]
Carol Hulls DC 2725 Ext. 5314 [email protected]
Teaching Assistants
Jeff Dungen E2 2365 Ext. TBA [email protected]
Bill Bishop DC 2544 [email protected]
Steve Marchetti [email protected]
Brian Keats E2 1304 [email protected]
Hai Jiang DC 3562 [email protected]
ECE324/325 Course Staff I - 1
Course Introduction
Course Components and Marking Scheme
The graded work in the course consists of three labs, a midterm examination, and a final examination.
If the grade computed according toscheme 1is less than 50%, then that is
the grade assigned. If it is greater than (or equal to) 50%, then the grade
computed according to scheme 2is assigned.
In other words, you must be able to pass the course based on your exam marks in order to have the lab mark count towards your final grade.
graded weight
work scheme 1 scheme 2
Lab 1 0% 4%
Lab 2 0% 4%
Lab 3 0% 12%
Midterm Exam 25% 20%
Final Exam 75% 60%
Course Introduction
Schedule
In addition to the normal course structure (Lectures, Tutorial and Labs) there are a number of special scheduling characteristics.
• Three hours of tutorial information is presented in the lecture times
during the start of the term. As a result we will have lectures during the tutorial time slots for the first 2 weeks of the term.
• Special tutorial Jan 9 and 10, 6:30-9:30 CPH 1346 (Each student
attends 1, please sign up.)
• ECE 325 will have make-up lectures at 8:30 three times during the
term.
Lab Signup:
• Starts Noon Friday Jan 4
• URL:http://www.ece.uwaterloo.ca/signup.html
• There are two lab slots to signup for this term.
– Special tutorial (one of) Jan 9 or 10 (6:30-9:30 PM)
∗ individual
∗ download and read lab 0 materialbeforethe tutorial.
– Regular weekly lab slot
∗ Groups of 2 (there may be room for 1 or 2 groups of one,
however instructor approval is required.)
Nuts and Bolts I - 3
Course Introduction
Electronic Course Support
Course Website:
• Content
– Contact points
– Lecture notes
– Lab material and manual
– Lab FAQ
– Web pointers for both lab and lecture material
– Old exams (many with solutions)
– Assignments
• Location: www.pads.uwaterloo.ca/ece324/or
www.pads.uwaterloo.ca/ece325/or
www2.pads.uwaterloo.ca/ece324/or
www2.pads.uwaterloo.ca/ece325/or
www.ece.uwaterloo.ca/∼ece324or
through the main ECE home page. The trailing / is required
for the pads addresses.
• Protection: Access limited to uwaterloo domain or users with valid
Polaris/Nexus Accounts. (Login off campus using your Nexus pass-word and account).
Course Introduction
Electronic Course Support (cont.)
Course Newsgroup
The course newsgroupuw.ece.ece324is to be used as a forum to discuss
lab and other course related issues. This newsgroup is to be used by both ECE324 and ECE 325 students. Throughout the term information about the course and the labs will be posted to the newsgroup. It is also a forum for questions (and even answers) related to many aspects of ECE 324 and ECE 325.
Paper Course Support
As well as being online, course lecture notes, lab manual, and any other handouts will be available in the DC copy centre.
Nuts and Bolts I - 5
Course Introduction
System Views
Control Computer
System to Control (Other Courses)
Open Loop vs Closed Loop (Other courses)
Computer system For performing some
(control) task
System to Control
When the Temp is over 80 degrees shut the damper
If IN1 > ox1a07 then OUT = 0x40 View A: System-Centric View
View B: Computer-Centric View
Course Introduction
Overview of Course Material
Sensors
Input Signal Conditioning
Input Interface
Computer (Processor plus
Memory)
Output Interface
Output Signal Conditioning
Actuators
Overview and characteristics
Analog signals, Electrical isolation Shielding grounding and noise
Time synchronization Analog input,
Digital input serial and parallel
CPU Software issues Memory interfacing (ROM, RAM, DRAM, DMA) Bus implementations, hierarchy and control (see next slide)
Analog output,
Digital output (serial and parallel)
Isolation,
Noise, shielding and grounding
Overview and characteristics
Processor physical environment: Chassis and power
Computer System
Physical System
Topics
Overview I - 7
Course Introduction
Constraints on Performance
Processor
Memory
Interconnection Systems or
External (to Processor) Interconnection
Network
Perfomance specified by computer designer Performance
constrained by external factors
Processor Subsystem
Output Interface
Input Interface
Course Introduction
Computer Organization
• ECE 325 Valvano: 1.1.3, 9.3.2, 9.4
• ECE 324 ECE 222 and ECE 150
CPU
Interface
Interface
Device
Device
Clock ROM
RAM
RAM
Typical (no frills) Computer Structure
Background I - 9
Course Introduction
Memory
• Stores instructions or data (indistinguishable except by context of
read/write).
• Stored memory values are accessed using their address
• Memory is connected to CPU using one (or more) buses.
• ROM (Read Only Memory): usually contains the sequence of
in-structions necessary to place the processor in a known start-up state. This may be the final state (if a monitor is used as in the lab) or this state may be just the starting point for a more functional operating system.
• RAM (Random Access Memory) used to store values and programs
that may change.
• There is no distinction between ROM and RAM addresses (other
than they tend to be in groups).
Course Introduction
Interface
• Interface computer to the outside world
• Converts external signals (analog or digital) to appropriate levels and
timing to permit reading/writing by the processor.
Issues
• Signal Characteristics:
– Analog (values, offset)
– Digital (number of bits)
– Noise
– Ground reference
– Current/voltage/light/magnetic
• Time Characteristics
– Unidirectional/bidirectional data flow
– Source or destination responsible for control of data flow
– Signalling to transfer the data
Background I - 11
Course Introduction
CPU
• Central Processing Unit – composed of:
– Arithmetic and Logic Unit(s): to perform operations required
by the instruction sequence
– Registers:
∗ Data Registers: to provide internal storage for
intermedi-ate results. (Also referred to as General Purpose Regis-ters.)
∗ Special Purpose Registers:
· Program Counter (PC): contains the address of the
next instruction to be read.
· Instruction Register (IR): contains the current
instruc-tion (NOT its address)
· Status Register: The Program Status Register (PSW)
contains the current status of execution (flags etc.)
· Stack Pointer (SP): In CPUs that support stack-oriented
operations (push, pull, jump to subroutine, return from subroutine ... ) the SP points to the top of the stack.
· Accumulator: A register that has restricted use within
some arithmetic or logic operation.
– Control Unit: to read instructions from memory to provide a
sequence of instructions to execute.
Course Introduction
Control Signals
• Many operations are triggered by a control signal.
• An active high control signal indicates a certain condition when it
has a value of 1.
• An active low control signal indicates a certain condition when it has
a value of 0.
• A rising-edge occurs when a signal changes from a low voltage to a
higher voltage.
• A falling-edge occurs when a signal changes from a high voltage to
a lower voltage
RD
/RD
Active High Signal
Active Low Signal Rising Edge Falling Edge
Background I - 13
Course Introduction
Clock
• In general terms a clock provides synchronization among two or more
units.
• In general terms a clock may be implemented as an active edge
(rising or falling) on a given signal.
• In the case of a processor, such as those discussed this term, the
(processor) clock signal is a source of regular, periodic rising and falling edges.
• The processor clock can also be used as a measure of the time
required to execute a given instruction.
• Changes in output signals occur in a predictable relationship with
the system clock.
• Input signals are sampled at a predictable time with respect to the
system clock.
Course Introduction
Systems, Actuators and Sensors
Consider a physical system with the widest possible set of parameters.
Possible System Components
• Humans: Response times milliseconds to minutes (May be referred
to as human-in-the-loop.)
• Machines with moving parts: Response times milliseconds to
multi-ple hours
• Machines without moving parts: Response times tens of nanoseconds
and up
• Chemical Reactions: Response times any
Interfacing General Issues I - 15
Course Introduction
Sensors and Actuators (cont.)
Possible Sensors
In our case all sensors will produce an electrical signal (analog or digital).
• Electrical:Electrical – voltmeter
• Mechanical:Electrical – switches, strain gauges
• Chemical:Electrical – pH meters
• Optical:Electrical – light meter
• Thermal:Electrical – temperature sensor
• Magnetic:Electrical – speedometer
Possible Actuators
(Actuators in the broadest sense) Again: consider electrical inputs.
• Electrical:Mechanical – motors, speakers, solenoids
• Electrical:Chemical – electrodes for electroplating
• Electrical:Optical – electronic displays. fibre-optic drivers
• Electrical:Thermal – resistive heaters, Pelletier devices
• Electrical:Magnetic – electro-magnets (or magnetic coils)
Course Introduction
Interfacing Requirements
What is to be transferred?
• Data
• Time of an event (Or a time to be associated with the event)
• Time and data associated with an event
Differences between source and destination domain
• Differ in view of time
• Differ in physical characteristics
– Differ in view of logic values
– Differ in view of data meaning
– Differ in view of signal ground
– Differ in quality of signal (noise)
• Differ in control
– Source may provide data spontaneously
– Source may provide data only when stimulated by the
desti-nation
An interface may need to deal with any combination of these issues.
Interfacing General Issues I - 17
Course Introduction
Need for Synchronization
Consider two types of transfers:
• Data-only transfers
• Transfers where the differences in time domains between source and
destination matter.
Data-only Transfers
System 1
System 2
Data
Course Introduction
Synchronous Common View of Time
Data
System 1
System 2
Synchronous Transfer
(Common View of Time)
Synchronous vs Asynchronous Systems I - 19
Course Introduction
Asynchronous Different Views of Time
System 1
System 2
Asynchronous -- must share
Time
Data
view of time to transfer
data
UNIVERSITY OF WATERLOO
Department of Electrical and Computer Engineering
Section II:
Embedded Systems
January 2002
Embedded Systems
Introduction to Embedded Systems
An embedded system is a special-purpose computer system designed to perform a task without the user’s knowledge of its existence. The user may provide input to the embedded system via controls and sensors but the user need not be aware of the presence of the embedded system.
Some applications of embedded systems are the following:
• Consumer electronics
– TVs, VCRs, CD players, etc.
• Household appliances
– washers, dryers, microwave ovens, etc.
• Automotive
– ABS systems, fuel injectors, transmissions, etc.
• Telecommunications
– handsets, cellular phones, pagers, etc.
Valvano 1.1.1
Embedded Systems
Embedded System Design
• Embedded systems come in all shapes and sizes
• Simple embedded systems are constructed out of electronics without
the need for a processor and software
• Complex embedded systems incorporate one or more processors with
sophisticated control software
• Often, the hardware components of a complex embedded
system are designed prior to the development of any software
• Hardware/software codesign is the term given to the task of
simultaneously designing hardware and software components of a combined hardware/software system
• Embedded system design is:
– challenging
– multidisciplinary
– pervasive
– complex
– fun
– a hard-to-acquire skill
Introduction II - 2
Embedded Systems
Microprocessors vs. Microcontrollers
Microprocessors:
The term, microprocessor, commonly refers to a general-purpose
Central Processing Unit (CPU).
• Powerful, despite the name
• Suitable for all types of computations
• Require additional hardware components to support
communications and storage
Microcontrollers:
The term, microcontroller, commonly refers to a Central Processing Unit
(CPU) that has been specialized to control the operation of a mechanical or electronic system.
• Small and cost-effective
• Built-in memory
• Specialized built-in interface support for some of the following:
– high-speed communication
– parallel devices
– serial devices
– analog devices
Embedded Systems
System-On-a-Chip (SOC)
The term,System-On-a-Chip (SOC), refers to a fully-functional
computer system implemented in a single computer chip.
Typically, aSystem-On-a-Chip (SOC) incorporates the following
hardware components:
• Microprocessor or a microcontroller
• Communication port(s)
• Volatile storage (e.g., Random Access Memory⇒RAM )
• Non-volatile storage (e.g., Read-Only Memory⇒ ROM )
ASystem-On-a-Chip (SOC)can be used to implement an embedded system or a portion of an embedded system.
Terminology II - 4
Embedded Systems
Programmable Logic Device (PLD)
The term, programmable logic device, refers to a computer chip that can
be “rewired” to implement a custom digital circuit using primitive building blocks.
• Several types of PLD technologies exist:
– SRAM (Static Random Access Memory)
– EEPROM (Electronically-Erasable Programmable
Read-Only Memory)
– Anti-fuse
• Primitive building blocks include the following:
– Flip-flops
– Multiplexers
– Lookup tables
– Logic gates
• Not all PLDs are created equally:
– In-system programmability vs. external
programming hardware
– One-time programmable vs. reconfigurable
Embedded Systems
System-On-a-Programmable-Chip (SOPC)
The term, System-On-a-Programmable-Chip (SOPC), refers to a
System-On-a-Chip constructed using a high-density, reconfigurable, programmable logic device (PLD).
Advantages (with respect to SOC):
• Flexible
• Upgradable
Disadvantages (with respect to SOC):
• Potentially slower
• More expensive in large quantities
Terminology II - 6
UNIVERSITY OF WATERLOO
Department of Electrical and Computer Engineering
Section III:
The Excalibur Development System
The Excalibur Development System
Introduction to the Laboratory Studies
• New laboratory studies have been created for this course
– New hardware (Altera Excalibur Development Board, NIOS
Processor)
– New software (Altera Quartus II, Cygnus GnuPro Toolset)
– New lab manual
• New laboratory studies:
– Lab 0: Introduction to the Excalibur Development Board
– Lab 1: Parallel Ports and Interrupts
– Lab 2: Noise Detection and Correction
– Lab 3: Analog Interfacing
Introduction III - 1
The Excalibur Development System
Online Documentation
• Altera provides online documentation for the Excalibur Development
Board, the NIOS Processor, Quartus II and the Cygnus GnuPro Toolset.
• All of the documentation files are located in the following
directory (for the Nexus machines in the lab):
c:\Software\eng\ece\Altera\Excalibur\NIOS Documentation
• For your convenience, we have also placed a copy of these
documen-tation files on the ECE 324/325 website.
• You will need toprioritizeyour reading...
The Excalibur Development System
Online Documentation - Suggested Reading
doc list.txt
Summary of the NIOS documentation Lab 0
nios getting started guide.pdf
Overview of the development board and its use Lab 0 nios tutorial.pdf
Tutorial on the embedded system builder Lab 0 nios software development reference.pdf
Developing C software to interface with peripherals Lab 1 faq sdk.txt
Frequently asked questions on the software development kit Lab 1 nios pio datasheet.pdf
Description of the PIO Interface Lab 1
nios uart datasheet.pdf
Description of the UART Interface Lab 1
nios timer datasheet.pdf
Description of the Timer Interface Lab 1
faq hdk.txt
Frequently asked questions on the hardware development kit Lab 2 nios spi datasheet.pdf
Description of the SPI Bus Interface Lab 3
nios development board guide.pdf
Detailed description of the development board Reference nios programmers reference.pdf
Detailed description of the Nios processor Reference avalon.txt
Detailed description of the Avalon Bus Interface Reference
Reading Materials III - 3
The Excalibur Development System
VHDL References
• Prior to attempting Lab 2, you will need to learn a subset of VHSIC
Hardware Description Language (VHDL)
• Tutorial support will be available to assist you with learning VHDL
• Follow the course news group and the course web site for information
as Lab 2 approaches.
• For additional information on VHDL, refer to the following
textbooks:
– VHDL, 3rd Ed. by Douglas Perry
– The Designer’s Guide to VHDLby Peter Ashenden
– Fundamentals of Digital Logic with VHDL Designby Stephen Brown and Zvonko Vranesic
The Excalibur Development System
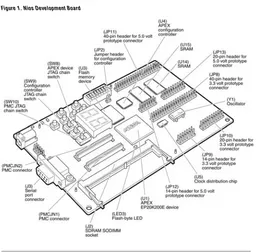
The Excalibur Development Board
A diagram of the Excalibur Development Board is shown below:
Nios Embedded Processor Development Board
Figure 1. Nios Development Board
This diagram is reprinted with permission from Altera Corporation
Excalibur Development III - 5
The Excalibur Development System
Sample Excalibur Structural Layout
NIOS Processor
Avalon Interconnection Bus
External RAM External FLASH
Internal ROM*
Interfaces (Altera or personal)
CPLD and Memory on Excalibur
(Internal) Devices
The Excalibur Development System
APEX EP20K200E Programmable Logic Device
• Most important device on the Altera Excalibur Development Board
• Provides the programmable hardware to implement the SOPC (SRAM
Based)
• May be programmed to implement a complete computer system
• Capacity for custom hardware development
• Wired to connectors so the pinouts of the device are fixed
– Refer to the NIOS Development Board Guide for the pinouts
– Unused pins must be configured as tri-stated inputs
– Failure to set the pins appropriately can damage the APEX
device
Excalibur Development III - 7
The Excalibur Development System
APEX EP20K200E Programmable Logic Device
(cont.)
A detailed datasheet for these devices is available on Altera’s web site at:
http://www.altera.com/literature/ds/apex.pdf
Logic Element
The basic logic element in an APEX IC is shown below:
The Excalibur Development System
Operating Modes
Excalibur Development III - 9
The Excalibur Development System
The NIOS Embedded Processor
• Implements the Central Processing Unit (CPU) and all internal
sys-tem peripherals
• Two versions exist: 16-bit and 32-bit
• 33 MHz clock speed (when using the Excalibur Development Board)
• Hardware development tools allow you to select the following
pro-cessor attributes:
– Instruction width (16-bit vs. 32-bit)
– Address width
– Internal peripherals
– External peripheral interfaces
The Excalibur Development System
Block Diagram of the NIOS Embedded System
User-Defined
The NIOS Embedded System:
An Example of a System-On-a-Programmable Chip (SOPC)
A
valon Bus
Serial I/O
Serial I/O
General-Purpose
APEX EP20K200E Programmable Logic Device Custom
Instruction Unit
External Logic and Interfaces PIO
On-Chip RAM
Excalibur Development III - 11
The Excalibur Development System
Excalibur Hardware Development Kit (HDK)
• Kit permits the design, verification, and implementation of an
em-bedded system on the Excalibur Development Board
• Quartus II:
– Provides a wizard that allows you to design a custom NIOS
embedded processor for your system
– Provides a library of peripherals that you can incorporate into
your system
– Compiles, simulates, and implements your embedded
system in the APEX device
• Leonardo Spectrum Level 1:
– 3rd-Party logic synthesis software
– Interacts with Quartus II to help optimize your embedded
sys-tem
– Processes your design files into a netlist used by Quartus II
Resources
• Nios Getting Started Guide.pdf
• faq hdk.txt
• The Help commands available in the Quartus II system.
The Excalibur Development System
Excalibur Software Development Kit (SDK)
• Kit permits the design, compilation, debugging, and testing of
soft-ware for your embedded system
• Provides several tools and utilities including the following:
– GnuPro C Compiler (gcc <file>):
∗ Compiles and links C and assembly language
software
– Gnu Debugger (gdb <file>):
∗ Debugs C and assembly language software compiled with
the GnuPro C Compiler
– NIOS Build (nb <file>):
∗ Batch file that compiles and links your C software with
the NIOS embedded processor libraries
– NIOS Run (nr <file> or nr -t):
∗ Downloads software to the Excalibur Development Board
and starts executing the software in a terminal window emulator
∗ Executes a simple terminal window emulator when run
with the -t command-line option
• Provides libraries that permit Quartus II to generate a custom set of
software libraries (processor SDK) for your embedded processor
Excalibur Development III - 13
The Excalibur Development System
Resources
• nios software development reference.pdf
• faq sdk.txt
The Excalibur Development System
Board Initialization
External Flash External SRAM
APEX Device NIOS Proicessor
Internal ROM
Serial Port
JTAG
Serial Connection to PC (Through Terminal Emulator) ByteBlaster Cable to
Configure the APEX Device and
load Internal ROM Factory Default System and Monitor
Power-up System and Monitor (GERMS) Users executable Code
At power-up and when CLEAR is pressed, copy to configure APEX device and copy GERMS to the internal ROM
Code loaded (usually) by downloading the code using the GERMS monitor
The RESET button forces the processor to restart execution of the current program. (Remember the monitor is usually the power-up program.)
(JTAG signals can reset the Device and remove all the currently
programmed devices).
Excalibur Development III - 15
The Excalibur Development System
GERMS Monitor
What is a Monitor?
What is the GERMS Monitor
• More information nios software development reference.pdf
• Commands:
G Go (Run a program)
E Erase (the Flash)
R Relocate (next) download
M Memory dump and set
S Send S-Records (i.e., S-records
are to be sent and loaded into memory as specified.)
: I-records are to be loaded into memory.
The Excalibur Development System
Read-Only Memory
• Essential peripheral if you plan on programming software for your
system
• Stores the GERMS Monitor to permit interaction with your
embed-ded system via a serial port
• May be either internal or external
• Internal:
– Implements the interface and a volatile form of ROM inside
the APEX device
• External:
– Implements the interface inside the APEX device and uses
external, non-volatile, FLASH ROM devices for the ROM
NIOS Peripherals III - 17
The Excalibur Development System
Random Access Memory
• Essential peripheral if you plan on programming software for your
system
• Stores software and data
• May be either internal or external
• Internal:
– Implements the interface and the RAM inside the APEX device
• External:
– Implements the interface inside the APEX device and uses
external SRAM devices for the RAM
The Excalibur Development System
Universal Asynchronous Receiver / Transmitter
• Usually referred to as a UART. More information is available in the
nios uart datasheet.pdf and the
nios software development reference.pdf
• Essential peripheral for communication with the GERMS
Monitor
• Implements a bidirectional serial port
• Software and commands are sent to the embedded system from the
terminal window via the development board’s serial port
• Output results are sent to the terminal window from the
embedded system via the development board’s serial port
• Development board’s serial port runs asynchronously at 115,200 BPS
with 8-bits, no parity, and 2 stop bits when communicating with the GnuPro toolset.
NIOS Peripherals III - 19
The Excalibur Development System
Parallel Input / Output
• Usually referred to as the PIO. More information is available in the
nios pio datasheet.pdf and the
nios software development reference.pdf
• Essential for all of the laboratory studies in this course
• Implements a parallel port with a 32-bit or 16-bit interface
• May be abidirectional,dedicated input, ordedicated output port
• Width can be configured
• Interrupts can be triggered on a level or an edge
• Level-triggered interrupts may occur on:
– Logic ‘1’ (high) signal
– Logic ‘0’ (low) signal
• Edge-triggered interrupts may occur on:
– Rising edges
– Falling edges
– Both edges
The Excalibur Development System
Timer
• Usually referred to as the Timer. More information is available in
the nios timer datasheet.pdf and the nios software development reference.pdf
• Essential for Lab 1 and useful in Labs 2 and 3
• Simple 32-bit interval timer
• Internal 32-bit counter increments once per clock cycle
• Capable of generating an interrupt when a specific 32-bit value
re-ferred to as the Period is reached
• Internal count value referred to as theSnapmay be read or set to a
value
• All reads and writes to 32-bit registers use two 16-bit operations for
compatibility with 16-bit NIOS Processors
• Multiple timers can be implemented in a single embedded
system
NIOS Peripherals III - 21
The Excalibur Development System
Serial Peripheral Interface
• Usually referred to as a SPI. More information is available in the
nios spi datasheet.pdf and the
nios software development reference.pdf
• Essential for Lab 3
• Implements a port compatible with the Motorola Serial Peripheral
Interface (SPI)
• Uses 4 wires (Out, In, Clock, and Select)
• Additional information on the SPI Bus will be provided prior to Lab
3
The Excalibur Development System
Memory Map
• Memory map of your embedded system depends upon
peripheral selection
• Each peripheral requires a specific range of memory addresses
• Memory map does not need to be contiguous – you can skip
ad-dresses
• Peripherals can be mapped anywhere provided that they do not
over-lap or cause memory alignment problems
Programming the NIOS III - 23
The Excalibur Development System
Character I/O Example
The Register and Software Data Structure shown below is taken from the nios software development reference.pdf.
Nios UART
Notes
(1) Read-only value.
(2) Write-event register. A write operation to this address causes an event in the device.
(3) A write-operation to the Status register clears these bits: E, TOE, ROE, BRK, FE, PE.
(4) Host-written control value. Can be read back at any time.
Software Data Structure:
typedef volatile struct {
int np_uartrxdata; // Read-only, 8-bit int np_uarttxdata; // Write-only, 8-bit int np_uartstatus; // Read-only, 9-bit int np_uartcontrol; // Read/Write, 9-bit int np_uartdivisor; // Read/Write, 16-bit, optional } np_uart;
Register Map
A2..A0 Register Name
15 14 13 12 11 10 9 8 7 6 5 4 3 2 1 0
0 RxData1 Rx Data
1 TxData2 TxData
2 Status3 E* RRDY TRDYTMT TOE* ROE* BRK* FE* PE*
3 Control4 iE* iRRDY iTRDY iTMT iTOE* iROE* iBRK* iFE* iPE*
4 Divisor Baud Rate Divisor (optional)
The Excalibur Development System
Serial I/O Example
#include "nios_peripherals.h" /* NIOS peripheral definitions */ #include "nios.h" /* NIOS definitions */
unsigned char ece324_getchar( ) { /* Wait for a character. */
while( !(na_uart1->np_uartstatus & np_uartstatus_rrdy_mask) ) {}
/* Return the character. This clears the RRDY bit in the UART’s status register. */
return( na_uart1->np_uartrxdata ); }
int main( void ) { unsigned char cin;
/* Disable UART interrupts on RRDY, ROE, BRK, FE, and PE. */ na_uart1->np_uartcontrol &= 0xFF70;
/* Call the ece324_getkey( ) function. It will block until a character is read. */
cin = ece324_getchar( );
/* Display the character. */
printf( "You pressed the %c character\n", cin );
/* Initiate a TRAP to return to the GERMS Monitor. The return value is ignored. */
return( 0 ); }
Programming the NIOS III - 25
The Excalibur Development System
PIO Structure
Nios PIO
Notes
(1) Read-only value.
(2) Host-written control value. Can be read back at any time.
(3) Write-event register. A write operation to this address causes an event in the device. (a) A write-operation to the Data-out register changes the value on the PIO output pins, if any. (b) A write-operation to the Edge Capture register clears all bits in the register 0.
Software Data Structure
typedef volatile struct {
int np_piodata; // read/write, up to 32 bits
int np_piodirection; // write/readable, up to 32 bits, 1->output // bit
int np_piointerruptmask; // write/readable, up to 32 bits, 1->enable // interrupt
int np_pioedgecapture; // read, up to 32 bits, cleared by any write } np_pio;
Register Map
A1..A0 Register Name Variable Size 1..32 bits
0 Data-in1
Data-out3,a
Data Value currently on PIO inputs (read). New value to drive on PIO outputs (write).
1 DataDir2 Data Direction (optional): Individual control for each port bit. 1=out, 0=in. 2 Int Mask2 Interrupt Mask (optional): Per-bit IRQ enable/disable. 3 Edge Capture3,b Edge Capture (optional): Per-bit synchronous edge detect-and-hold.
The Excalibur Development System
Parallel I/O Example
#include "nios_peripherals.h" /* NIOS peripheral definitions */ #include "nios.h" /* NIOS definitions */
int main( void ) {
/* Set DIP Switch PIO direction to dedicated inputs. */ na_dip_switch_pio->np_piodirection = 0;
/* Set LEDs (2 least significant bits) to dedicated outputs. */ na_led_pio->np_piodirection = 3;
/* Loop forever, writing DIP Switch least significant bit values to the LEDs. */
while( 1 ) {
/* Output the least significant bit values to the LEDs. */
na_led_pio->np_piodata = na_dip_switch_pio->np_piodata; }
/* Initiate a TRAP to return to the GERMS Monitor. The return value is ignored. */
return( 0 ); }
Programming the NIOS III - 27
The Excalibur Development System
Interrupt Service Routine Example
#include "nios_peripherals.h" /* NIOS peripheral definitions */ #include "nios.h" /* NIOS definitions */
void TimerInterrruptHandler( int context ) {
/* Print a period every time an interrupt occurs. */ printf( "." );
/* Clear the interrupt flag now that it has been handled. */ na_timer1->np_timerstatus = 0; }
int main( void ) {
/* Set the low and high 16-bit registers with the
appropriate count value representing a 1s clock period. The exact value depends upon the clock frequency so we use the nasys_clock_freq constant. */
na_timer1->np_timerperiodl = nasys_clock_freq; na_timer1->np_timerperiodh = nasys_clock_freq >> 16;
/* Set the control register to start the timer in continuous mode and set the timer to generate interrupts */
na_timer1->np_timercontrol = np_timercontrol_start_mask || np_timercontrol_cont_mask || np_timercontrol_ito_mask;
/* Add the timer interrupt handler to the vector table. It is assumed here that the timer uses IRQ 27. */ nr_installuserisr( 27, TimerInterruptHandler, 0 );
/* Initiate a TRAP to return to the GERMS Monitor. The return value is ignored. */
return( 0 ); }
The Excalibur Development System
Lab 0 Reminders
• It cannot be emphasized enough to read the Lab 0 material before the special tutorial.
• see the hardware design flow on the next slide.
• parts of the lab
– Quartus II standard design process (a full-adder)
– Quartus II use megawizard to instantiate an Excalibur system
– Program an Excalibur development board with this NIOS
sys-tem and then download several programs to observe its oper-ation.
• very (superficial) initial exposure to VHDL.
Lab 0 Summary III - 29
The Excalibur Development System
Hardware Design Flow
Hardware Design Flow
Quartus II
Leonardo Spectrum Tool Flow
VHDL, V, AHDL, BDF, EDIF
AHDL, EDIF
SOF, POF, JAM
JCF VWF VWF Design
Files
Logic Synthesis
Placement and Routing Elaboration
Functional Simulation Timing Analysis
Configuration Timing Simulation
Verification Design Entry
Compilation
Design Concept
Simulation
Hardware Design Flow
Overview
Netlist Representation
UNIVERSITY OF WATERLOO
Department of Electrical and Computer Engineering
Section IV:
Debugging Suggestions for the Labs
January 2002
Debugging Suggestions for the Labs
Scientific Method
• Gather data
• Develop hypothesis
• Predict new facts
• Perform experiments
• Prove or disprove the hypothesis
Valvano: 2.11.1, 2.11.3
Debugging Suggestions for the Labs
General Software Debugging Suggestions
The list below provides some options for debugging that can be applied to both hardware and software problems. Not all problems will require all of the steps. (Every problem requires the first point.)
Each instructor will have specific comments on some of the suggestion points.
• Thinking is often more effective than unguided action.
• Become comfortable with all of the tools available to work on the
problem. (More on later slides.)
• Read all warning messages and other commentary provided by the
tools.
• Simplify the problem.
• Stabilize the problem.
• Localize (and thus locate) the problem. (More on later slides.)
• Become familiar with common errors and learn to recognize them.
• Gather more information.
• Explain the problem to someone else.
Review of First Year Suggestions IV - 2
Debugging Suggestions for the Labs
General Software Debugging Suggestions (cont.)
• Return to difficult problems after a break.
• Don’t assume that the tools are infallible, nor that they are the most
obvious cause of a given problem.
• Recompile everything.
• Repair problems as you find them. (In some cases.)
• Think outside the box.
Debugging Suggestions for the Labs
Tools for debugging 324/325 lab studies
In addition to the (many) tools described in the literature a number of others must be considered by the debug team.
• GERMS Monitor: Can be used to drive hardwareeven if the s/w is
not yet ready or working. This can help isolate, stabilize and simplify the problem. Specific examples listed below.
– Read/write to device interface to confirm operation
– Your program could write to a memory location during
execu-tion and when failure happens that locaexecu-tion could be exam-ined. (This provides an output technique if the display link is not working or not appropriate.)
• Built-in devices. The LEDs and 7-segment displays could be used to
provide feedback on the operation of your program.
• C-functions: Standard use of printfstyle debugging.
• SignalTap: A tool that can be loaded into your design to provide a
logic analyzer-like observation tool. Although a significant effort is required to use this tool, it can prove invaluable for some problems.
• GNU Debugger (See the nios-elf-gdb section in the Software
Devel-opment Reference.)
Review of First Year Suggestions IV - 4
UNIVERSITY OF WATERLOO
Department of Electrical and Computer Engineering
Section V:
Computer Organization, Digital Design
Review
Computer Organization, Digital Design Review
CPU-Memory Interface (CPU Version)
• FromComputer Organization, Hamacher, Vranesic and Zaky 4th Ed. Chapter 3, Section 3.2-3.3.
• Consider the one-bus CPU structure shown below.
PC
MAR
MDR
Y
Z
IR
R1
R3
Internal CPU BUS
Control
Read Write
MFC
To Memory
ALU
File:222rev.
CPU-Memory Interface (CPU Version) V - 1
Computer Organization, Digital Design Review
CPU-Memory Interface (CPU Version)
• Sample Instruction execution Sequence (Figure 3.5)
* R1 ← R1 + [R3]
Step Action
1 PCout,MARin,READ, Clear Y, Set Carry, Add, Zin
2 Zout, PCin, WMFC
3 MDRout, IRin
4 R3out,MARin, READ
5 R1out, Yin,WMFC
6 MDRout,Add, Zin
7 Zout, R1in, END
Computer Organization, Digital Design Review
CPU-Memory Interface (CPU Version)
• Review Internal Operation
• Note theMemory Interfaceoperations
– MDRin, MDRout, MARin, READ, WRITE, WMFC
– What does READ/WRITE do/mean?
– What about WMFC?
CPU-Memory Interface (CPU Version) V - 3
Computer Organization, Digital Design Review
CPU-Memory Interface (CPU Version) cont.
PC
MAR
MDR
Y
Z
IR
R1
R3 Internal CPU BUS
Control
Read Write
MFC
To Memory
ALU
File:222rev.
Computer Organization, Digital Design Review
CPU-Memory Interface (Memory Version)
Consider the system pictured below.
• Where are:
– MAR?
– MDR?
– READ?
CPU Clock Rate: 100MHz
Period: 10 nsec
Memory Access Time:
50 nsec (+- 5 nsec) Address
Data
MAR
MDR
Memory Read Operation
File:222read1.
• How can the clocks be synchronized?
• How is theWMFCsignal used?
• When does the value come back from memory?
CPU-Memory Interface (Memory Version) V - 5
Computer Organization, Digital Design Review
CPU - Memory Timing Interactions
• CPU and Memory may differ by a significant difference in
perfor-mance (factor of 5 in the example). Assume that the memory has the following performance.
Data ? Data 1 ? Data 2
Address Address 1 Address 2
File:222read3. Valvano: 9.4
Computer Organization, Digital Design Review
CPU - Memory Timing Interactions - Synchronous
Option
• CPU could specify that it will only transfer data one out of 5 cycles.
(One example is shown below)
Address Data
Valid Address
Valid Data Sync Pulse
1 2 3 4 5 6
CPU CLK
File:222read4.
• The memory uses the Synch Pulse to indicate when the memory
address is correct.
• Note all CPU transfers are at the same rate in this case (data must
be correct by the 5th pulse following the sync. pulse (i.e., the fifth falling edge)).
CPU-Memory Interface (Memory Version) V - 7
Computer Organization, Digital Design Review
CPU - Memory Timing Interactions - Asynchronous
Option
• CPU and memory could exchange timing signals.
Address Valid Address
3 4 5 1
2
1 6
Processor Sync Pulse
Data Valid Data
Memory Sync Signal CPU CLK (Not used by
Memory)
(From P roce s s or Vie w)
(From Me mory Vie w)
File:222read5.
• Processor now waits until the memory has produced the requested
value.
Computer Organization, Digital Design Review
Synchronous vs Asynchronous
• Note in the synchronous case both the CPU and the memory had
the same concept of time
• In the asynchronous case they each had different concepts of time.
CPU-Memory Interface (Memory Version) V - 9
Computer Organization, Digital Design Review
CPU - Memory Signals
• What happens if there are two (different) memories involved?
CPU Clock Rate
100 MHz (10 ns)
Memory
50 ns (+/- 5 ns) Address
Data
Memory
10 ns (+/-1 ns) Memory Read Operation
File:222read2.
• How are multiple drivers for the same line handled (ECE 223 and
ME 262)?
• How is one device selected from a set?
Computer Organization, Digital Design Review
Multiple Drivers
• Consider the simplified case shown below.
File:223a. Valvano: 1.6 and 8.4
• How do the AND gates safely and reliably drive the shared line?
• When does Memory 1 or Memory 2 drive the line?
Multiple Drivers V - 11
Computer Organization, Digital Design Review
Multiple Drivers
At the transistor level (For our purposes consider the transistor as shown ... See ECE 231 and 332 for more precise models)
File:223d.
Computer Organization, Digital Design Review
Multiple Drivers
Consider a standard AND Gate
File:223c.
Multiple Drivers V - 13
Computer Organization, Digital Design Review
A More Complete View
Now connect two of these together (This cannot work if the memory values are different!)
File:223b.
Computer Organization, Digital Design Review
Alternatives
• Must prevent two (opposite direction) transistors from being active
at the same time.
• Eliminate two of the transistors
– Permanently – Passive Pull-Up or Pull-Down, (e.g.,
Open-Collector or Open-Drain respectively)
– Temporarily (Tri-State)
Multiple Drivers V - 15
Computer Organization, Digital Design Review
Alternatives - Passive Pull-Up (Open-Collector)
• Eliminate the two transistors that could pull the bus line to supply
voltage.
• Must replace with a passive component (resistors)
File:223e.
• Which leads to the following structure.
• (Note the impact of various values on the signal on the bus).
File:223f.
Computer Organization, Digital Design Review
Alternatives - Active Pull-Up and Pull-Down
(Tri-State)
• It is also possible to add gating so that at any given time only one
pair of drivers can be enabled.
Signal Value Enable
Tri-state Output Q1
Q2
File:223g Or in a bus situation
decoder
signal
value Enable
Q1
Q2
Tri-State Output
File:223h
Multiple Drivers V - 17
Computer Organization, Digital Design Review
Differences - Timing
• Passive pull-up means that the parasitic capacitance of the bus wire
is charged through the resistor R.
– If R is too small, then very large (slow) transistors are needed
– If R is too large, then capacitor charges very slowly
File:223i.
Computer Organization, Digital Design Review
Differences - Errors
Impact of Multiple Drivers (with different values) enabled on the same signal line.
• Impact at the Receiver
– Passive pull-up: the value read will be low in all cases. (I,e.,
if one is pulling down the value is down.)
– Active pull-up and pull-down. The value read will be
indeter-minate.
– If you have a passive pull-down then since one will be pulling
up the value read will correspond to a high value.
• Impact at the Drivers
– Passive pull-up drivers could tolerate multiple active drivers.
– Active pull-up and pull-down systems may have short or long
term problems with conflicting values.
∗ As a result, in most cases, one mustselect or enable at
most one driver per line at a time.
Multiple Drivers V - 19
Computer Organization, Digital Design Review
Device Selection
• Most common structure is a bus. (This topic will be revisited later
in the term in more detail.)
• Bus signals:
– Data transfer signals including
∗ Address signals
∗ Data lines
∗ Direction control
∗ Timing control
– Bus arbitration signals
– Special purpose signals.
• For now, just consider a basic set of data transfer control signals.
– Address lines (named Addr0 ... Addr15)
– Data lines (named Data0 ... Data15)
– A Read signal and a Write signal
Valvano: 9.1 and 9.2
Computer Organization, Digital Design Review
Timing (Example) - Read
Consider the Read operation shown below
Addr
/Read
Data (CPU)
(Mem)
A B C D E F
File:223j.
• Time A the CPU (thebus master) drives the address value onto the
address lines.
• Time B the CPU (thebus master) asserts the Read signal.
• Time C (at some time later) thebus slave drives the data lines with
the requested value.
Device Selection V - 21
Computer Organization, Digital Design Review
Address Decoding - Read
• What could the circuit look like to perform the bus slave actions?
– Assumptions Required
∗ Bus Master has allowed for the amount of time required to decode the address before the active part of /Read occurs.
∗ Option 1. ... No Aliasing
∗ Option 2. ... Aliasing Permitted
Computer Organization, Digital Design Review
Address Decoding - No Aliasing
File:223l.
Device Selection V - 23
Computer Organization, Digital Design Review
Address Decoding - Some Aliasing
File:223m.
Computer Organization, Digital Design Review
Address Decoding - Write
Consider the following Write Operation
File:223k.
• At time A the bus master drives the Address and Data Lines
• At time B it then asserts Write
Device Selection V - 25
Computer Organization, Digital Design Review
Metastability
• Unfortunately, reality is seldom as simple as we would like
• Consider the following circuit.
File:meta1.
UNIVERSITY OF WATERLOO
Department of Electrical and Computer Engineering
Section VI:
Parallel Interfacing
January 2002
Parallel Interfacing
Function of Parallel Interfaces
(Vranesic and Zaky Sections 5.4 and 5.5)
(Hamacher Vranesic and Zaky (ECE 222) Section 4.5.2)
(Valvano 1.7, 8.1, 8.2, 9.3, 9.4)
• Buffer
– Time (Synchronization)
– Level
• General structure
I/O Lines Control/Synch Lines Data
R/W(Read Not Write) CS (Chip Select) Other Control LInes (I.e. Address) Microprocessor/ System Bus Side
Device Side Parallel
I/O Port
File:basic.
Parallel Interfacing
Function of Parallel Interfaces
Processing Domain Device Domain
Interface
Processor
Memory
Partial Address Decoding
Function of Parallel Interfaces VI - 2
Parallel Interfacing
Function of Parallel Interfaces
A15
No Aliasing
A01
/WRITE
CLOCK
Signals to and/or from the device
Device Interface
File:structure1.
Parallel Interfacing
Function of Parallel Interfaces
Property Processor Side Device Side
Signal Levels Proc. Standards Dev. Standards
Timing Memory-like Any
Signals RD and WR or R/W
and CK
Any
Delays Fixed, Known Unknown, Variable
Function of Parallel Interfaces VI - 4
Parallel Interfacing
Function of Parallel Interfaces
• Or from a system view
File:para-a.pdf
Parallel Interfacing
Microprocessor Side
• Later this term we will examine more buses in detail.
• General signal groups within a bus:
– Data – bi-directional between the processor and memory and
devices.
– Selection – some technique is required to select which memory
location or which I/O device (address)
– Control – the transfers must be synchronized.
∗ Data transfer synchronization signals (i.e. R/W, Clock,
...),
∗ Bus control signals (I.e. Bus Request, Bus Grant ... )
and often
∗ Processor arbitration signals (I.e. IRQ ...)
• For our purposes, at this point in the course, we only need to consider
the following situation.
– Assume a memory mapped I/O device (as opposed to a 2-bus
structure)
– Assume that the interface has more than 1 register memory
mapped (assume 4)
– Assume that the bus is a synchronous bus (global clock)
– Assume that the timing is similar to that specified in the
fol-lowing figure.
Microprocessor Side VI - 6
Parallel Interfacing
Sample Processor Bus
Clock
Valid Address Valid Address Address
ChipSelect
Data Invalid Device Data ? Processor Data
? R/W
Read Write
Interface Clocks Data Into Register
File:bus1.
Parallel Interfacing
Microprocessor Side
Abstract signal, instantaneous change
Rising edge, some allowance for delay in transition
Rising edge, imprecision in start time and some allowance for transition delay
Signal of unknown value at start, but has known value after transition.
Tri-stated line takes on value Single Signal Representations
Multiple Signal Representation (E.g., Address lines)
Tri-stated Signal, imprecision on start time
Change of value (unknown value) or listed as shown as A and B.
A B
File:glossary.
Microprocessor Side VI - 8
Parallel Interfacing
Device Side Alternatives
• Unidirectional – Cost/Complexity
• Bi-directional – Versatility
– Control
∗ Explicit (Data Direction Register)
∗ Implicit (no Data Direction Register)
– Alternatives
∗ Open Collector – implicit or explicit (passive pull-up)
∗ Tri-State – explicit only
∗ Pseudo Bi-directional – implicit or explicit
Parallel Interfacing
Device Side Alternatives - Unidirectional Input
Unidirection (Input)
Device Si
g
nals
Tri-State Drivers
Address Decoder
Address Bus
Control Signals
D0 D1
Tri-State Enable = F(A15, A14, ... A1,
Device Side Alternatives VI - 10
Parallel Interfacing
Device Side Alternatives - Unidirectional Output
Unidirection (Output)
Device Signals
Address Decoder
Address Bus
Control Signals
D0 D1
Clock 1
R/W
Clock 2
Ck
File:para-uno. and para-uon.
Parallel Interfacing
Device Side Alternatives - Explicit Bidirectional
Device Signals
Tri-State Drivers
Address Decoder
Address Bus
Control Signals
D
D
Write Data = Foutput(A15, .. A0, R/W, Ck)
Tri-State Drivers Data Direction Register
Write DDR = Fddr(A15, .. A0, R/W, Ck)
File:para-exp.
Device Side Alternatives VI - 12
Parallel Interfacing
Context
De codingCircuit
Parallel Interfacing
Open Collector (Explicit Direction Control A.K.A.
Passive Pull-up)
Data DDR
DDR -- Data Direction Register uP
(Write DDR)
uP (Write Data)
uP (Read Data) X
I/O
Output Input
One Bit of Passive Pull-up Bidirectional I/O Port
File:opencoll.
• DDR = 1⇒X =Data, and I/O may float and as a result the value
readmay =Data written,
• DDR = 0⇒X = 0 and I/O floats.
• Note the value read
• Power-up DDR = 0 (Only safe state)
Device Side Alternatives VI - 14
Parallel Interfacing
Tri-State (Explicit Control)
UP
(Write DDR)
uP (Write Data)
uP (Read Data)
Output Input
One Bit Tri-State Bi-directional I/O Port
One bit of processor bus
File:tristate.
Parallel Interfacing
Implicit Directional Control (Also known as Pseudo
Bi-Directional)
(Write Data)One Bit of Data Bus
up (Read Data)
File:pseudob.
• DOW N = DAT A ... if DAT A = 0 then the I/O line is low.
Note: DATA refers to the value stored in the D flip-flop.
• U P =OutputControl•DAT A=⇒if DAT A= 1 then the I/O
line is pulled high, only whileOutputControl is high.
• Note: No DDR
• Note Similar to open collector.
Device Side Alternatives VI - 16
Parallel Interfacing
Synchronization
Whenever two systems communicate there is a question as to how data can be passed from one domain to the other. This transfer may include:
• Signal Translation (light↔ electrical, or 5v↔3v, or 5v↔ 10ma)
• Synchronization. When is the data to be read or written?
Consider the following dimensions to the problem.
• Data may be
– Persistent: I.e. it will remain/must remain valid until the
cus-tomer explicitly accepts the data
– Transient: I.e. the data will vanish if not read at the
appro-priate time.
• The Source of the data may either inform or not inform the Receiver
that the data is present.
• The Receiver may (or may not) request new data when it is ready
for the data.
Parallel Interfacing
Signalling of Data Changes
• The data source may signal changes (or new values) either
– In-Band: meaning that the only indication that there has been a change is the fact that the value on the data lines is different than it was previously (I.e. a different key has been pushed).
– Out-of-Band: meaning that one more extra signals are pro-vided to indicate that the data has changed.
Synchronization VI - 18
Parallel Interfacing
Persistence of Data
Consider the persistence from the perspective of the receiver of the data.
• Persistent data may be accepted at the convenience of the Receiver.
Once the change has been detected, then after the data has been accepted the source is informed that the value is no longer needed.
• Transient data must be accepted within a time specified by the
source after its presence is signaled. This could be done with a latch at the receiver.
Time Persistent data
Transient Data
Valid Data Valid Data
File:datatype.
Parallel Interfacing
Persistence of Data (cont.)
• How might you handle persistent data? (Fully Interlocked,
out-of-band signalling)
Parallel Interface (CPU as the
Customer)
Device Registers Data Valid
Accept Data
Valid Accept
Counter Timer
File:persist.
Synchronization VI - 20
Parallel Interfacing
Persistence of Data (cont.)
• How might you handle transient data? (Out of band signalling shown
below.)
File:para-tra.
Parallel Interfacing
Persistence of Data (cont.)
• It may also be noisy (bounce)
SPST (Single Pole Single Throw) DPDT (Double Pole Double Throw)
A
C B
A B
Switch Starts to change state Milliseconds
C
File:switchdebounce.
• Ways to de-bounce?
– Software: unknown duration of bounce (assume limit, act
Af-ter stable)
– Hardware: counter or shift register (clock to sample etc.) or
more expensive switch and RS latch.
Valvano: 8.1.2 and 8.1.3
Synchronization VI - 22
Parallel Interfacing
Control Line Issues
• Input Synchronization:
– How to inform CPU
∗ Interrupt
∗ Polling
– Function:
∗ Inform CPU only
∗ Clock Data
– Active Edge
– When to reset Status bit.
• Output Synchronization
– When to set bit/signal
∗ CPU only
∗ As a side effect of some external event
– When to reset bit/signal (as above).
– When/How to inform CPU.