raspberrypi.org/magpi
The official Raspberry Pi magazine
BUY
IN PRINT WORLDWIDE!
magpi.cc/store
RASPBERRY PI 3B+
Fully Benchmarked
Engineering Team Interview
Perfect Project Ideas
5GHz WiFi
1.4GHz CPU
Gigabit Ethernet
Power Over
Ethernet
Power Management
BUILD AMAZING
BATTLE ROBOTS
BUILD AMAZING
BATTLE ROBOTS
Also inside:
>
CREATE A RASPBERRY PI SMART FAN
>
THE NINTENDO SWITCH-STYLE CONSOLE
How to win at Pi Wars 2018
PAGE 28
Welcome
EDITORIAL
Editor: Lucy Hattersley [email protected]
Features Editor: Rob Zwetsloot [email protected]
Sub Editors: Phil King and Jem Roberts
DESIGN
Critical Media: criticalmedia.co.uk
Head of Design: Dougal Matthews
Designers: Mike Kay and Lee Allen
Illustrator: Sam Alder
PUBLISHING
For advertising & licensing: Publishing Director: Russell Barnes
[email protected] | +44 (0)7904 766523
Director of Communications: Liz Upton
CEO: Eben Upton
The MagPi magazine is published by Raspberry Pi (Trading) Ltd., 30 Station Road, Cambridge, CB1 2JH. The publisher, editor, and contributors accept no responsibility in respect of any omissions or errors relating to goods, products or services referred to or advertised in the magazine. Except where otherwise noted, content in this magazine is licensed
WELCOME TO
THE OFFICIAL
MAGAZINE
t’s always exciting when Raspberry Pi releases a new model. The Raspberry Pi 3 Model B+ (or Pi 3B+ for short) sports a revised quad-core system-on-chip which now runs faster, at 1.4GHz.
It’s a meaningful speed boost. Everything feels a little snappier. Big programs like Mathematica load faster and online videos play more smoothly.
Raw power is always a headline grabber, but we find it’s the other tweaks that make the new Raspberry Pi truly interesting.
Eagle-eyed readers will already have spotted the chrome-plating around the wireless networking chip. This now supports dual-band (2.4 GHz and 5 GHz) wireless networking, enabling faster data transmission speeds from wireless networks.
Even more exciting is the long-awaited inclusion of Gigabit Ethernet (albeit limited via the USB channel). There’s now also Power over Ethernet (PoE) via a new official HAT accessory. PoE is something the community has wanted for a long time; it enables the Raspberry Pi 3B+ to be deployed on a network without requiring a separate power supply.
Many readers are already thinking of quirky uses for a networked Raspberry Pi that works independently of a mains supply.
But let’s not forget the speed boost. The new speed is impressive. Turn to page 16 to read all about the new Raspberry Pi 3B+, including benchmarks, real-world testing, and project ideas.
Lucy Hattersley
Editor
I
CONTRIBUTORS
Alex Bate, Brian Beuken, Mike Cook,David Crookes, Gareth Halfacree, Magdalena Jadach, Steve Martin, Nicola King, Jeroen Peters, Matt Richardson, Bartlomiej Rutkowskim, Richard Smedley, Clive Webster
GET IN TOUCH
THIS MONTH:
[email protected]
FIND US ONLINE
raspberrypi.org/magpi
This magazine is printed on paper sourced from sustainable forests and the printer operates an environmental management system which has
DISTRIBUTION
Seymour Distribution Ltd
2 East Poultry Ave London
EC1A 9PT | +44 (0)207 429 4000
SUBSCRIPTIONS
Raspberry Pi PressMann Enterprises, Unit E, Brocks Business Centre, Haverhill, CB9 8QP
magpi.cc/subscribe
16
RASPBERRY PI 3B+
Learn more with speed tests and team interviews
40
MAKE A MIDI SEQUENCER
Create your own drum machine with Raspberry Pi
54
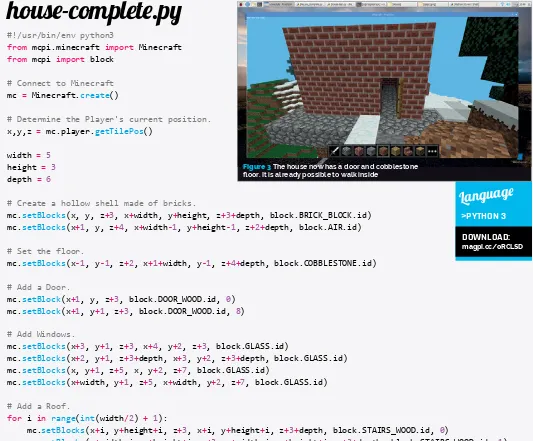
BUILD A MINECRAFT HOUSE
Build the virtual house of your dreams in Minecraft Pi
64
BUILD AMAZING BATTLE ROBOTS
RASPBERRY
FIELDS
Official two-day
festival announced!
10
Truly the cat’s meowRASPBERRY PI 3B+
Contents
Issue 68 April 2018
raspberrypi.org/magpi
COVER FEATURE
16
IN THE NEWS
>
PI 101 – INSTALL UBUNTU
38
How to use Ubuntu on Raspberry Pi
>
BUILD A DRUM SEQUENCER
40
Pi Bakery is back with another MIDI music project
>
SET UP A DOCKER CONTAINER
48
Install Plex and learn about Docker in the process
>
AUTOMATE A DESK FAN
52
The Pi Fan is a temperature-controlled USB fan
>
MAKE A HOUSE IN MINECRAFT
54
Create a house with the touch of a button>
MAKE GAMES WITH C PART 4
58
This time we’re manipulating images
TUTORIALS
06
CODE CLUB
WESTMINSTER
MPs, Lords, and kids get their hands on Pi
ROBO-CAT
YOUR PROJECTS
Contents
>
NEWS
06
>
TECHNICAL FAQ
62
>
BOOK REVIEWS
80
>
FINAL WORD
98
REGULARS
>
MATRIX VOICE
74
>
MAKE MARK APP
76
>
NES CASE
79
REVIEWS
COMMUNITY
> RPI ZWEI INTERVIEW
84
Making a music album with the Pi as the instrument
> THE MONTH IN RASPBERRY PI
86
Birthday parties and new Pi models galore this month> COMMUNITY PROFILE
90
We talk to US teacher Amanda Haughs
> EVENTS
92
Jams, Dojos, and Clubs around the world next month
> YOUR LETTERS
94
You ask us things and we answer them Creating an eye-catching visual effect on your TV
Everything you need to know about the robotic contest
64
PI WARS
Create a retro console with Switch controllers
A 3D-printed, electromechanical display
PIXEL
36
Control your music with QR codes
QROCODILE
34
THE BIG FEATURE
30
PI SWITCH
32
IN ASSOCIATION WITH:
97
News
ode Club came to Westminster in January, to demonstrate how a Code Club works to MPs and Peers. The event was organised by Lloyds Banking Group, hosted by Labour MP Wes Streeting, and Code Club was invited to take part.
Coppice Primary School, from Wes’s Ilford North constituency,
C
FEATURE
CODE CLUB
IN WESTMINSTER
was invited to “simulate a Code Club in Portcullis House,” says Dan Elwick, Code Club regional coordinator, London & East of England.
Code Club participated “to raise awareness within the Houses of Parliament, as well as to staff in Lloyds Banking Group, about what Code Club is, and how it works,” Dan explains to us.
Showcase event for MPs and Lords “a special experience”
Code Club’s Dan Powell talking with some of the pupils from Coppice Primary School
Wes Streeting MP hosted the special Code Club event, organised by Lloyds Banking Group
News
CODE CLUB IN WESTMINSTER
“Politicians were coming in during their lunch break,” Dan reveals, “and there was a talk from Lloyds Banking Group and Wes Streeting… I think also it was a special experience for the children involved.”
Hosting the event “over the road from the Houses of Parliament”, as Dan puts it, gave the children of Coppice Primary the chance to “come to Westminster and experience that
environment.” It also allowed politicians to see a Code Club in action, and talk to children about their coding skills. “Children were so excited to be there and the MPs clearly enjoyed it too,” Dan tells us. “There was a real buzz in the room.”
The event ran for an hour and a half, over a lunchtime. In that time the 28 pupils from Coppice Primary created one of two games, based on Code Club projects.
Playing politics
The children were a “mixed cohort [of] Code Club members and selected pupils from years 4, 5, and 6”, Dan explains. Code Clubs
The event was organised by Lloyds Banking Group, and Code Club was delighted to be asked to take part. As Sarah Sheerman-Chase, Senior Programme Manager, explains, “We’ve been collaborating with Lloyds Banking Group for about 18 months now, and they’re really keen supporters – hundreds of
their staff are registered to volunteer with Code
Club and their colleagues run over 70 clubs.” Lloyds Banking Group has its “own, internal drive for digital inclusion, and Code Club is key part of that initiative,” says Sarah. The scheme is called Digital Champions, where over 27 000 colleagues have pledged to help people or charities with their basic digital skills. It’s part of the bank’s Helping Britain Prosper Plan, which Lloyds Banking Group says: “takes us beyond business as usual.”
It tackles the social and economic issues that matter to Britain, such as building digital skills and tackling social disadvantage.
Sarah reveals, “There are around 700 [Lloyds Banking Group] colleagues registered with us now”, while Lloyds Banking Group “has also started a pilot of Code Clubs in some of its branches.”
CODE CLUB IN LLOYDS BANKS
are held for children aged 9 to 13years old – see codeclub.org.uk. “So we set the children a couple of Code Club projects,” Dan reveals. “There was one fairly basic project, and then another more advanced one. All the guests could see the children coding and how much they enjoyed making things with code.”
The first project was Ghostbusters, “a game where you clone lots of ghosts, and
then ‘click’ to catch them,” says Dan. The second was Clone Wars, a “Space Invaders-style game, where you’re shooting lightning bolts at hippos that are falling from the sky.”
Both projects are on the Code Club Projects webpage (see magpi.cc/unpyFy) and use Scratch.
MPs and Peers from Parliament chatted with the children as they worked on their games. “The children found that really interesting,” Dan confirms. “I heard one of the Lords saying to the children, ‘And that’s why you should all stand for election in your local area when you grow up!’”
To raise awareness within
the Houses of Parliament
about what Code Club is
News
oftware engineer Michal Szwaj has released an open-source Android Auto emulator called OpenAuto, which runs on a Raspberry Pi 3.
Michal’s motivation for the project was straightforward: he wanted to retrofit his car and use Android Auto while driving. “I wanted to keep my car’s original head unit to preserve the design of the dashboard,” says Michal, but his car is “14 years old, so its head unit is far, far behind the modern head units.”
Thankfully a Raspberry Pi 3 has “a lot of advantages” for OpenAuto, as Michal lists: “It is very cheap, [has a] multicore processor, hardware video decoding, OS based on Linux, support for the MCP2515 CAN Bus module, and RCA video output.”
Upgrade your car’s navigation and entertainment system
Android Auto essentially allows an Android smartphone to ‘project’ its interface onto another screen, but while this “sounds trivial,” Michal reveals that actually “projection requires processing a huge amount of data” as the projection system needs to display the Android Auto screen, play sounds, and relay user inputs to the smartphone as quickly as possible.
Michal reveals, “The challenge is to handle projection on [a Raspberry Pi], where RAM and CPU utilisation is very limited and even a small bottleneck leads to audio or video glitches.”
In-car entertainment
Michal continues, “The most important thing to implement [for successful emulation] was support for hardware acceleration of video decoding.”
He tells us, “As far as I know, all Android Auto POCs use GStreamer to render the video stream.” Alas, “GStreamer used on the Raspberry Pi does not provide plug-and-play support for OpenMAX,” according to Michal’s research. This means that OpenAuto’s video is “pretty slow, even at 480p@30[fps].”
As such, Michal cannot recommend you install OpenAuto in your car just yet, but by the time you read this, version 1.0 of the software should have been released for you to trial on a bench.
Head to magpi.cc/cbSUyr to see how to install OpenAuto in Raspbian.
S
OPENAUTO: ANDROID AUTO RUNNING ON A RASPBERRY PI
OPENAUTO:
ANDROID AUTO RUNNING
ON A RASPBERRY PI
AboveOpenAuto is an Android Auto emulator, allowing your Android smartphone to ‘project’ its interface onto your car’s screen
News
oftware engineer Bas Timmer managed to get the full, x86 version of Windows 10 running on a Raspberry Pi 3. But it wasn’t easy.
Full-fat Windows 10
with your Raspberry Pi
Bas tells us that he used both standard versions of Windows, as well as the ARM64 version,
to compare codebases. His first
attempt, to port the “UEFI version from the IoT Core” to boot into Windows didn’t work out.
Instead, Bas “added the required features to run Windows (ACPI tables) to an open-source UEFI I’d found for the RPi on GitHub [see
magpi.cc/guhzUy].”
After “some days of debugging”, Bas managed to get into the Windows boot/install environment. Unfortunately, the drivers for
S
WINDOWS 10 / RASPBERRY FIELDS FOREVER
WINDOWS
10
UP AND
RUNNING
Above Look very closely – that’s the Broadcom BCM2837 processor of a Raspberry Pi listed in Windows 10’s
Device Specifications
nearly everything were missing, so Bas had to write “a hacky driver” just to get a USB keyboard to work.
Curiously, Bas found that Windows 10 has support for “a special interrupt controller” used in the Raspberry Pi’s Broadcom processor “that’s not usually used in ARM chips.”
You can read about Bas’s progress, and see new updates, through his Twitter account
@NTAuthority.
his summer sees the first Raspberry Fields ‘community celebration’, held in the home of the Raspberry Pi – Cambridge, UK.
Held over the weekend of Saturday 30 June and Sunday 1 July, the new annual festival is a celebration of
New Raspberry Pi summer festival launched
T
RASPBERRY
FIELDS
FOREVER
everything that makers have learnt and achieved since the Raspberry Pi was launched six years ago.
The weekend will include opportunities to learn about the amazing projects that community members are working on, try activities, watch fascinating science and technology talks, and generally celebrate all things Raspberry Pi and digital making.
There will also be face-painting, fun performances, free giveaways, delicious food, and other
festival-themed activities to get involved with.
The festival will be led by the Raspberry Pi Foundation, but run by
its volunteer community of young people, hobbyists, educators, and enthusiasts of any age and skill.
Tickets cost £5 for over-16s and are free for under-16s, bought from the Cambridge Junction site before arriving. Head over to raspberrypi.org/raspberry-fields for more information.
AboveThe
first Raspberry
News
RASPAD TABLET
NOW TRENDING
The stories we shared
that flew around the world
HOLOGRAM NOVA REVIEW
magpi.cc/cqetsf
Adding a cellular modem to your Raspberry Pi has
never been easier – just plug the Nova into one of the Pi’s USB ports, install the software, and you’ve got yourself an IoT device ready to monitor the world.
THE NEXT VERSE AT THE V&A MUSEUM
magpi.cc/kDoAvk
Artist Stewart Francis Easton created an artwork that
combined embroidery, music, and a Raspberry Pi 2
to depict the cycle of life. Elements of the image were embroidered using conductive thread, making them interactive.
OHBOT PI REVIEW – ROBOTIC FACE
magpi.cc/rwPUCM
You can now control this robotic face with your
Raspberry Pi, with a wide range of actions available,
from head turns to blinking eyes to lip movement. The sense of creepiness fades pretty quickly.
RASPAD
TABLET
hinese companySunFounder has smashed its Kickstarter campaign for its RasPad, a 10.1-inch tablet PC based on the Raspberry Pi.
With an initial target of just £7246, the RasPad raised around £22 000 in its first hour and, at the time of writing, was up to over £250 000 – see magpi.cc/huCOtU.
It’s easy to see why, with an IPS touchscreen and a ‘Hatch’ at the rear for access to the GPIO pins and camera connector. You can even use RasPad’s screen as a secondary display via its dedicated inputs. Prices start at just $129 (£95).
Simple as an iPad; flexible as a Raspberry Pi
C
wanted to use the Raspberry Mike Wong, CEO of SunFounder, Pi because “[its] community is one of the largest, offering lots of useful information and open-source resources.”The access to the GPIO pins was “a necessity” in Mike’s view, given how people “buy Raspberry Pi to learn hardware programming.”
Mike confirms, “We wanted an all-in-one tablet that’s also useful for DIYers… We just want the RasPad to serve as a vehicle to see where people’s creativity can really take them.”
RightThe IPS screen
offers iPad-style visuals with Raspberry Pi levels
News
RASPBERRY BOOM / FARNELL LAUNCHES CLOUDIO
rom the makers of the Raspberry Shake – a seismograph for your Pi – comes the Raspberry Boom, a device to detect ‘infrasonic’ noises undetectable by the human ear.
While the Shake detects movements, the Boom detects noises, so it can discern just about any event, from avalanches and breaking icebergs to lightning and transport.
The sensor detects sound waves of 0.05–20 Hz, way below typical human hearing. But Mike Hotchkiss, consumer marketing manager for Raspberry Shake, confirms that “the Raspberry Boom was designed to be operated in your home” – the
Detect aurorae, heavy traffic, or meteors on your Raspberry Pi
F
RASPBERRY
BOOM
device and software will filter background noises.
You can connect your Raspberry Boom device to the Station View network to create a global network of sensors. Mike also clarifies, “We have a few ways for users to grab the data in real-time
and integrate into their own websites,” Full details are at magpi.cc/jJBvsM.
The Raspberry Boom is being launched via Kickstarter, so head to magpi.cc/cadepc for pricing and more information.
IoT meets app-like simplicity
raspIO’s Cloudio add-on board has a huge range of hardware and sensors
to make your first steps into IoT a
breeze. It’s even programmed with a drag-and-drop (Scratch-like) interface, so you can set up your device from your phone.
With voice, IR, light, and temperature sensors built in, you’ve got plenty of IoT abilities baked in to the Cloudio board, including a 0.96-inch OLED display. But there are also three ADC ports, a mini servo-motor port, and three digital output ports to incorporate extra abilities.
The app also supports IFTTT integration, a sensor
G
FARNELL LAUNCHES
CLOUDIO
AboveGraspIO’s Cloudio makes it simple to build and program a sophisticated IoT device in minutes
monitor, dashboard, and
custom notifications.
Hari Kalyanaraman, Farnell’s global head of emerging business, tells us, “Graspio Cloudio is aiming to make things simple for those people with little or no coding experience to create applications… The goal was to make it easy for anyone to build IoT projects and get up and running in minutes.”
The Cloudio board costs £33 from magpi.cc/XbqhhF, and is compatible with all versions of the Raspberry Pi.
RightThe Raspberry Boom detects
News
RASPBERRY PI ROBO-CAT
RASPBERRY PI
ROBO-CAT
hinese roboticist Rongzhong Li has created a robotic cat from scratch, including realistic movements and Alexa integration.
Rongzhong started with some modelling sticks and a Raspberry Pi beginner kit, all of which is “still integrated somewhere on the cat,” he tells us. You can see OpenCat’s evolution at magpi.cc/ZWYGKy. The maker wanted to use a Raspberry Pi to power OpenCat because of the “easy access to hardware interfaces under a Linux environment” rather than the Pi being “a tiny and cheap computer.”
Gaited development
Rongzhong studied many mammalian gaits, and believes “different gaits can be generated by simple tuning amplitude, phase duration, and other tiny parameters”. OpenCat is “not constrained by [being a] cat.”
He found that he had to use an Arduino ‘slave’ to handle the robotics, while the Raspberry Pi handles higher functions such as the Alexa integration.
Currently, OpenCat uses Alexa “to trigger certain behaviours,” but there are also references to ‘hosting video streams’ through OpenCat. As Rongzhong says, voice assistants “can now run on a pet-like body, and interact with people in a pet-like manner. [This] may encourage more people to embrace robotics at home.”
Rongzhong is currently developing ways to make OpenCat financially self-supporting – whether that means selling OpenCat kits or something else, we’ll have to wait and see.
OpenCat pounces to replace
man’s best friend
C
Above leftOpenCat uses an Arduino to handle the robotics,
and a Raspberry Pi
to provide higher functions such as Alexa support
The newest Raspberry Pi is here!
he concept of ‘plussing’ is common at the Walt Disney Company. It was a term coined by Walt himself; the act of looking at an idea or project in development and wondering how they could make it better still. It’s what helps make the
‘Disney Difference’.
Raspberry Pi has taken the original Pi 3 and plussed it to make it better still, in the form of the new Raspberry Pi 3 Model B+ (or Pi 3B+ for short). Taking the design and features to their logical conclusion in terms of power and speed, the new Pi 3B+ is the ultimate Raspberry Pi so far.
Join us as we explore the most magical computer on Earth.
T
RASPBERRY PI
The Pi Hut
magpi.cc/zVTpyCForthings.io
magpi.cc/KYJbMiPimoroni
magpi.cc/LhuKdSCPC
magpi.cc/aIgkOF
Pi Supply
magpi.cc/LktvfUModMyPi
magpi.cc/rMXCsWRS Components
magpi.cc/nDkZGZUK
Feature
Places
to
Adafruit
magpi.cc/zmwrgRMicro Center
magpi.cc/ilGneEPiShop.us
magpi.cc/OXUfGhAllied
Electronics
magpi.cc/oYjmQJelement14
magpi.cc/MwMCFyCanaKit
magpi.cc/CfUyzxYadom
magpi.cc/rkxwtO
Reichelt
magpi.cc/bvezBQKubii
magpi.cc/NliAVB
pi3g
magpi.cc/kyZutY
Rasppishop
magpi.cc/XCZMOCKiwi Electronics
magpi.cc/QraRmaNorth America
Europe
Still not su
re
where to get you
r
Raspberry Pi from?
Visit the official page
and click Buy Now!
magpi.cc/pOyjBN
MEET THE
RASPBERRY PI 3B+
A plus in the name hides a wealth of new hardware
and design tweaks in a classic footprint
B
Running at 1.4 GHz, the revised system-on-chip (SoC) design includes brand-new package technology
A
Designed by Proant, the new
ground-plane antenna offers
improved performance over the Raspberry Pi 3B+’s chip antenna Shielded under a metal
plate, the new radio module includes dual-band 2.4 GHz
and 5 GHz WiFi compatibility
C
Feature
A
B
C
F
E
D
The new USB and network chip features Gigabit connectivity, considerably boosting Ethernet throughput
An optional Power-over-Ethernet (PoE) HAT module, available separately, can power the Raspberry Pi 3B+
A clever power
management integrated circuit (PMIC) replaces discrete components and provides smoother power
RASPBERRY PI 3B+
Feature
>STEP-01
Download an operating system
You’ll need an operatingsystem, available from
raspberrypi.org/downloads, to use your new Raspberry Pi. Raspbian, the
Foundation’s official operating system,
is the best choice for most users.
>STEP-02
Flash to microSD card
Install the operating system – a process
known as ‘flashing’ – onto a high-quality
microSD card of at least 8GB (Raspbian Lite) or 16GB (Raspbian with Desktop). The easiest way is to use the tool from
etcher.io and follow its three steps.
>STEP-03
Connect the cables
Insert the microSD card, then begin connecting cables. For most users these will include an HDMI display, a USB keyboard and mouse (or Bluetooth receiver for them), an Ethernet cable
(optional), and finally a 2 A or higher 5 V micro-USB power supply.
QUICK SETUP
D
E
SoC:
Broadcom BCM2837B0 quad-core A53 (ARMv8) 64-bit @ 1.4 GHz
GPU:
Broadcom VideoCore IV
Networking:
Gigabit Ethernet, 2.4 GHz and 5 GHz 802.11b/g/n/ac WiFi
RAM:
1GB LPDDR2 SDRAM
Bluetooth:
Bluetooth 4.2, Bluetooth Low Energy (BLE)
GPIO:
40-pin GPIO header, populated
Storage:
microSDPorts:
HDMI, 3.5 mm analogue audio-video jack, 4× USB 2.0, Ethernet, Camera Serial Interface (CSI), Display Serial Interface (DSI)
Dimensions:
82 mm x 56 mm x 19.5 mm
BENCHMARKING
THE PI 3B+
The promise of improved performance is one thing, but there’s
only one way to get to the truth of the matter: benchmark testing
ith an upgraded processor boasting impressive new packaging and improved networking capabilities, the Raspberry Pi 3B+ should sit head and shoulders above its predecessor the Raspberry Pi 3. To determine whether these improvements are noticeable in the real world, the Pi 3B+, along with the Pi 3 and a range of other board models, have been put through a series of benchmark
W
Driving the GPIO pins via Python can result in a CPU bottleneck, as demonstrated by this simplest of
programs: a pin is switched on and off
as quickly as possible while connected to a frequency counter. Note that updates to the GPIO driver and Python itself will alter these results.
PYTHON GPIO
Higher is better
Raspberry Pi
Model A
43.07 42.63
62.32
58.55 48.75
Model B Zero Zero W Model A+
42.62
181.9
264.5
311.5
Model B+ Pi 2 Pi 3 Pi 3B+
tests, measuring everything from raw CPU performance to power
draw and WiFi signal quality.
Spec comparison
Although it’s the same underlyingdesign as on the Pi 3, the Pi 3B+’s
BCM2837 system-on-chip (SoC)
is now in spin B0 and features improved packaging alongside
a heat-spreader, which have
helped boost its performance
from 1.2 GHz to 1.4 GHz. This has
a knock-on effect on memory
performance, too, while the new USB Ethernet controller
offers Gigabit connectivity
at a theoretical maximum throughput of 300 Mbps, due
to its use of a single USB 2.0
channel. Finally, a switch to a
new dual-band radio module
and antenna design inspired by the Pi Zero W improves the Pi 3B+’s connectivity compared to its predecessor.
A synthetic benchmark designed to stress the central processor, SysBench’s CPU test highlights the performance gains available to CPU-bound applications – in particular those which can take advantage of the multiple processing cores available on the Pi 2, Pi 3, and Pi 3B+.
SYSBENCH CPU
Lower is better
Raspberry Pi
Model B Zero Zero W Model A+
339.21
MULTI-THREADED (SECS)
SINGLE-THREADED (SECS)
1.02
2.601
0.714 1.071 0.714
1.428
2.295
3.672
5.661
The Ethernet port, which connects via a shared USB channel, has been the last feature of the Raspberry Pi design to receive an upgrade. This test copies an incompressible 100MB
file to each Pi on test, and there’s no
surprise in seeing the Pi 3B+’s Gigabit Ethernet topping the chart.
ETHERNET
THROUGHPUT
Higher is better
Raspberry Pi
61.8
Model B
84.58 89.19 89.08
212.9
Model B+ Pi 2 Pi 3 Pi 3B+
THROUGHPUT (Mbps)
147.27
Not all applications are limited by available CPU performance, with some reliant on memory throughput – the speed at which data can be written to and read from RAM. The SysBench memory test carries out repeated 1kB reads and writes then reports the throughput in megabytes per second (MBps).
SYSBENCH
MEMORY
THROUGHPUT
Higher is better
Raspberry Pi
Model A Model B Zero Zero W Model A+
108
1kB WRITES (MBps)
1kB READS (MBps)
67
A head-to-head shoot-out between the Pi 3’s single-band 2.4 GHz WiFi radio and chip antenna and the Pi 3B+’s new dual-band 2.4 GHz and 5 GHz radio with ground-plane antenna
offers a look at the improvements you
can expect in both signal quality and number of visible access points.
WIFI SIGNAL
QUALITY
Higher is better
Cell Number
PI 3 SIGNAL QUALITY PI 3B+ SIGNAL QUALITY
34
More performance is always welcome, but there’s no such thing as a free lunch. This test, which measures power draw at the desktop with an HDMI display, wireless keyboard, and – where applicable – Ethernet connected, shows how an older model of Pi may be better suited to battery-powered and embedded applications.
POWER DRAW
Lower is better
Raspberry Pi
Model A Model B Zero Zero W Model A+ Model B+ Pi 2 Pi 3 Pi 3B+
0.765
2.244
0.51 0.663 0.51
1.173
1.326 1.377
2.295
POWER DRAW IDLE (W)
POWER DRAW LOAD (W)
UPDATING THE
RASPBERRY PI
Eben Upton, co-creator of the Raspberry Pi and co-founder of the Raspberry Pi
Foundation, delves into the technology that makes the new Pi 3B+ special
hen working on a new Raspberry Pi design, there’s one thing Eben Upton always keeps clear in his mind. “It’s a Raspberry Pi, so it
costs $35,” he laughs.
Delivering constant
improvements without increasing the price is a challenge, but one the Raspberry Pi Foundation welcomes. “Over time, there are
a couple of things that help,”
Eben explains. “One is obviously a Moore’s Law thing [the
observation by Intel co-founder
Gordon Moore that the number of transistors on a new chip doubles every 18 months], where you can genuinely get more silicon for your money. That particularly
applies to RAM: DRAM [dynamic
random access memory] has gone
through probably four or five
process shrinks between Pi 1 and Pi 3B+. I don’t think we’re spending
significantly more on RAM now, despite having quadrupled the amount of RAM in the device.
“The other thing is a gradual increase in the amount of silicon we can put in the design. More and more of the BOM (the bill of materials) is silicon, and the reason for that is that the cost of manufacturing Raspberry Pi keeps going down because of automation. There are still investments going on in automation now that are taking costs down. The other thing
is connectors: I pay a lot less for an
HDMI connector than I used to, and
that’s just economies of scale.”
W
“We just didn’t see the Raspberry Pi’s success coming,” admits Eben. “It’s still very strange to be where we are now. It’s great, you know, the Foundation’s
got 80-something people working for it; across the two organisations, Foundation and Trading, we’ve got 120 people, and are on our way to 150. Hundreds of thousands of kids attending Code Clubs, and all the teachers we’ve trained.
“It’s amazing. It’s a weird journey, such a weird journey, that still doesn’t really seem real. If you sit still and think about it, it just doesn’t seem real. But it’s been great!”
“If you sit still and think about it, it just doesn’t seem real,” says Eben Upton regarding the Raspberry Pi’s success
“The BCM2837B0 is largely the same chip as before, but it’s a higher-tech package,” explains Eben. “We’ve made various tweaks to the package design which have
the effect of reducing both the
resistance between the [solder] balls and the transistor which is furthest away.
“We’ve also experienced challenges in the past associated with the distance between the thermal sensor on the die and the thing that’s generating all the heat. The new metal heat-spreader has
the effect of ensuring that the entire
die sits at the same temperature. It also gives you a somewhat larger area to do convective, conductive, radiative heat loss from.”
The Pi 3B+ offers boosted
performance, some of which is explained by the new packaging technology, but not all. “While
most of the frequency uplift comes
from the changes we made to the Broadcom part, the new Power
Management Integrated Circuit is
quite a substantial contributor to it,
by reducing the extent to which we need to margin for the regulation
accuracy and load-step.”
The overhauled networking
was trickier to implement. “5 GHz
WiFi is hard to do,” reveals Eben.
“The reference PCB layouts assume a higher level of PCB technology than we have. You can’t just get the reference PCB design and use it, because it’s not on the right PCB technology, so getting a PCB
design that was implementable
and still had the requisite signal integrity and stuff required to do conformant 5 GHz was really fiddly and required a bunch of iteration.
OLD TECH
The original Pi 3 isn’t going away,
though. “It’ll be sold alongside it,”
explains Eben. “I expect the 3B+ will replace it for most consumers, there’s not much reason to buy a Pi 3 if you have a Pi 3B+, but for
industrial use it’s a bit different
because you’ve got people who
have designed the Pi 3 into stuff.
“We’re always surprised by the long tail of old products. You know,
we still sell the Raspberry Pi 2.
I don’t know, we probably sold
100 000 Raspberry Pi 2s last year,
something like that, so there’s always that long tail, and I think that tail is going to be longer and thicker for the Pi 3 than it’s been
for any previous product.”
AboveRoger Thornton designed the Raspberry Pi 3B+ board, having previously worked on the Pi Zero W
AboveA 3D rendering highlights the ‘vias’ that connect layers of the Pi 3B+ circuit board
Below
Conformance testing for 5 GHz WiFi was a challenge for the new radio hardware
The cost of manufacturing
Raspberry Pi keeps going
down because of automation
Raspberry Pi 3B+
Raspberry Pi 3
GET STARTED
WITH YOUR
RASPBERRY PI 3B+
Is the 3B+ your first Raspberry Pi? Here’s what you need to know…
veryone’s got to start somewhere, and if you’ve ever seen the rate Pi boards
are sold we’d hazard a guess that the 3B+ will be someone’s first
Raspberry Pi. If so, welcome to the community! We’ve got some great tips on where to start on your grand Raspberry Pi adventure.
E
Connecting to WiFi
Plugging in an Ethernetcable is easy and the only problem you’ll tend to encounter is not having a long enough cable, in which case you’ll have to connect
using the Raspberry Pi’s built-in
wireless capabilities. This is very easy in Raspbian – simply look in
the top right-hand corner for the
wireless symbol…
Click on it and select your WiFi name. It will ask for your password and then automatically connect from now on!
Change your password
It’s a good idea to change the default password on Raspbian. It’s raspberry just so you know.
As all Raspberry Pis come with
a standard password for the standard user name (pi), it means other people can more easily
access any secret or sensitive files
on your Raspberry Pi. Changing the password is very easy, though. Go to the
Terminal and then type passwd
and hit ENTER. Enter the current password (raspberry) and then enter your new password. That’s it!
You can also add a new user name to use instead of the default one if you wish. Check out the full guide on the Raspberry Pi
website: magpi.cc/WlunZG.
Need a bit more info on how to set
up your first Raspberry Pi? Head to the official setup guide for a
detailed, and easy-to-understand, breakdown: magpi.cc/getstarted.
Turn on SSH
In a few tutorials you’ll find for your
Raspberry Pi online, they’ll ask you to do the majority of the work in the Terminal. You can either do this on the Pi, or by controlling it remotely from another computer via SSH.
SSH is turned off by default
on the Raspberry Pi, but it can be turned on a couple of ways. Once you’ve set up
your Raspberry Pi, go to Raspberry Pi
Configuration in
the Menu under Preferences. Go to the
Interfaces tab and click Enable next
to SSH. After a reboot, you’ll be
able to connect to your Raspberry Pi via SSH – on Windows you can use software called PuTTY (magpi.cc/xOaGBD). You’ll just need to enter pi@raspberrypi as the host name and click Open.
You can also drop an empty file
named ssh into the boot partition of the Raspbian microSD card to
enable SSH automatically. Note:
unless you have connected the Raspberry Pi to a wireless network, you’ll need a wired Ethernet connection to SSH in to it.
Your pi-top laptop is very easy to upgrade thanks to the ability to access the Raspberry Pi readily after you’ve constructed
it – just slip the cover off and it’s
right there!
For the newer version of the pi-top, you’ll need to remove the board covering the Raspberry Pi.
Check out the pi-top website (pi-top.com) as well and look for the latest version of the OS to make sure it will all work when connected up.
READ THE
MAGPI 65
Everything a total newcomer needs to know is found in issue 65, available as a free download.>
magpi.cc/65TEN PROJECTS
TO POWER UP!
Here are some projects that can be made better with a Pi 3B+!
SOLVE THE EIGHT
QUEENS CHESS
PROBLEM
>
magpi.cc/JgrHLHThe eight queens problem is
one that’s tricky to solve as it
requires you to check many, many
permutations. The tutorial we’ve published previously (in issue
#65) has been streamlined so the
Raspberry Pi can run it a bit better. Now with the extra power, you can make the code a bit more complex.
Can you win the big prize?
DATASCIENCEPI
>
magpi.cc/GBNqkBThe original version of this project uses a Raspberry Pi Zero to do some data crunching. Its creator Scott Edenbaum has tested his setup on a Pi 3 before, saying it takes about two hours to build on there and even longer on the Pi Zero. With the extra power the 3B+
affords, can it be done in under two hours?
IMAGE EDITING
ON YOUR
RASPBERRY PI
>
magpi.cc/xiyAqrImage editing uses up a fair amount of resources. While Mirage on a Raspberry Pi is a
bit less power-hungry than a 50-layer Photoshop project,
having a higher CPU speed to render or make changes can be very handy to help speed
up your workflow
EASY RETRO
GAMING ON A
RASPBERRY PI
>
magpi.cc/BmPQxgWhile old computers and consoles are far less powerful than a Raspberry Pi, emulating them properly uses up a lot of processing power. With the extra oomph the Pi 3B+ provides, true emulation is a step closer on the Raspberry Pi.
BUILD A LIGHTWEIGHT
PYTHON WEB SERVER
>
magpi.cc/bWyKazWhile similar to the LAMP server, this one is
a bit lighter, meaning it uses fewer resources. Using the Raspberry
Pi 3B+, you can max
out your efficiency
with a server running Flask, and even use your Pi
3B+ for other stuff
in the meantime.
SET UP A
FILE SERVER
>
magpi.cc/XJyPYqThe improved network speeds of the Raspberry Pi 3B+ make it much better suited for being a
file server than ever before. It’s
a pretty simple setup as well, so it’s worth trying out if you’re thinking of how to centralise
all your files on your network.
ASTRO PI FLIGHT
DATA ANALYSIS
>
magpi.cc/xhtNKjData analysis can take a while, especially if you’re getting a lot of data and you want to do a large amount of processing on it. While even the Pi Zero is capable of doing some simple analysis
quickly, as soon as you begin scaling it up you start to require
a little more power.
BUILD A
WEB SERVER
>
magpi.cc/dhKtSKThis one can make use of both the Raspberry Pi 3B+’s extra processing power and enhanced network connectivity to perform better than ever before. Even the improved wireless helps out here!
SENSE HAT
DATA LOGGER
>
magpi.cc/CYrngdLogging data from the Sense HAT is
fairly easy for the Raspberry Pi to do. So why not use the spare processing power to do something useful with
the data? Create a live analysis or crunch any numbers? It’s always
good to multitask if you can.
OCTAPI:
CALCULATING PI
>
magpi.cc/PptaMuThe OctaPi is a cluster computer using eight Raspberry Pis. Hence the name. Pooling the Pis’ resources together helps you calculate faster, especially when it comes to irrational numbers
like π (pi). What’s better than eight Pi 3s? Eight Pi 3B+ boards.
Time to set some speed records.
Discover more inspirational projects for Raspberry Pi in The Official Raspberry Pi Projects – Volume 3 book.
>
store.rpipress.ccTutorial
WALKTHROUGH
Pricing
Rolling Subscription
£4 a month
Quick and easy to set up
No long-term commitment
Subscribe for a year:
£55
(UK)
£80
(EU)
$90
(USA)
£95
(Rest of World)
Subscription benefits:
FREE!
Delivery to your door
E
XCLUSIVE!
Raspberry Pi offers and discounts
NO OBLIGATION!
Leave any time
*SUBSCRIBE TODAY
FROM JUST £4
magpi.cc/subscribe
SAVE
35%
UP TO
* Leave any time applies to Rolling Subscription only
MODMYPI
VOUCHER
£5 FREE!
Tutorial
Subscribe in print for
12 months today and
you’ll receive:
Pi Zero W
Pi Zero W case
with three covers
USB and HDMI
converter cables
Camera Module
connector
JOIN FOR 12 MONTHS
AND GET A
SUBSCRIBE ON
APP STORES
PI ZERO W
STARTER KIT
FROM
£2.29
WORTH
£20
ot much beats curling up on the sofa with a lovely cup of tea and a gripping box set, but there is a slight chance that you’ll become square-eyed by the time the credits roll. It’s a well-known fact that watching too much TV, especially in the dark, puts a strain on your peepers. Yet while backlighting a television set helps enormously by increasing the amount of ambient light around
Projects
SHOWCASE
As well as reducing eye strain, the ambient lighting surrounding
Jimmy White’s goggle-box is rather eye-catching.
David Crookes
takes a look
> The software, Ambient LightServer, is open source
> One part runs on a Pi, the other on PC
> The WS2801 LED lights cost just £19.99
> You can adjust colour saturation and brightness
> Jimmy plans to add an IR sensor for remote power-up/down
Quick
Facts
AMBIENT
TV LIGHTING
N
It doesn’t matter where the camera is located in the room – it just needs a full view of the screen without
glare or reflections
Since it relies on a webcam rather than a source, this system works regardless of what’s being shown,
whether a film or game.
The colours around the edge of the screen are detected by the camera and processed so that the LEDs can match them
JIMMY WHITE
Jimmy describes himself as a “geek, DJ, photographer and father”. His son loves his TV so much, Jimmy built him one.
deviousweb.com
the screen, dedicated TVs which do this can prove rather expensive.
Realising that and already owning a decent smart TV, Jimmy White decided to make his own light setup using a Raspberry Pi 3, a USB camera, and some LED strips. He wanted to produce a bias lighting effect that took into account whatever he was watching or playing, adjusting the colour of the lighting to match the screen.
“I was inspired by the standalone ambient light offerings I have seen on the market, but they all required the ‘source’ to be external to the TV, which did not meet my requirements,” he says.
Watching videos
Projects
AMBIENT TV LIGHTING
Above The power and data wires are soldered to the Raspberry Pi 3 and the software was installed to a 16GB card
Above Jimmy created a test card so that the screen could be calibrated via AmbientLightPyClient on a PC
strips, but they all depended on the external HDMI source,” he explains. “I eventually came across a piece of open-source software written especially for the Pi on GitHub and it was just the thing I was looking for.”
The software, AmbientLightServer by Waldo Bronchart
(magpi.cc/gZLhHv), works by capturing colours from the edge of a television screen using a webcam. It then uses the data it gathers to update any attached LEDS with those colours. It works very well but Jimmy had to tweak it, editing the number of LEDs in the strips, adding the location of the starting light and creating an install script (magpi.cc/rnrwEW).
He also worked with a companion app called AmbientLightPyClient, which runs on a PC and allows the edges of the screen to be defined and the colour saturation and brightness to be set. The
parts list, however, was more straightforward. Jimmy already had some Raspberry Pi 3s (“I wanted to make use of them as a low-cost solution,” he says), a 16GB memory card, and a Logitech C270 webcam, so he set about buying the LEDs and some 18-gauge electrical wire.
Wiring up
“The most difficult part was trying to work out which direction
>STEP-01
Connect the LEDs
Jimmy bought a 3 metre roll of WS2801 LEDs which he cut into two strips and attached to the back of his TV. These connect to a Raspberry Pi 3.
>STEP-02
Setting it up
The Pi 3 runs AmbientLightServer, driving the LEDs. A Python Qt client app called AmbientLightPyClient runs on a PC and connects to it. The sampling region and colour settings can be controlled.
>STEP-03
Sit back and watch
A webcam pointed at the display captures the TV’s on-screen colours. It uses this data to tell the Raspberry Pi which colours the LEDs need to emit to create an ambient light.
LET THERE BE LIGHT
the LEDs went in relation to the screen,” he recalls. “Having a strip running [in] the wrong direction, orientation, and position was rather confusing.” He used hook-and-loop fasteners to stick the
LEDs to the back of the set in the most unobtrusive way and he tested they worked by creating his own four-colour ‘test card’. This was displayed on the screen and the camera was pointed so that it could capture the display’s full view.
“The camera detects the colours around the edge of the screen and adjusts the LEDs to match.” Jimmy reveals. Indeed, it captures
The camera detects the colours
around the edge of the screen
and adjusts the LEDs to match
ne of the most popular things to do with a Raspberry Pi is to put it at the heart of a retro gaming setup. There are myriad multi-system emulators – programs which replicate the gaming systems of old – along with some slick graphical front-ends, making it a rather straightforward process. But we still see projects that go the extra mile such as this one. PiSwitch makes great use of the Joy-Con controllers of the Nintendo Switch console to produce a beautiful handheld machine.
PiSwitch is the brainchild of 32-year-old Christopher Foote who, as a child, would get one
Projects
SHOWCASE
New meets old in Christopher Foote’s take on the retro-gaming
handheld console thanks to Nintendo’s latest innovative controllers.
David Crookes
reports
> The Joy-Cons can be used for two-player gaming
battery offers a
2.5-hour life
> PiSwitch can also be plugged into a TV
> An optional camera was added for fun
Quick
Facts
PI
SWITCH
O
The Joy-Cons are used to control the games. After much struggle, Christopher managed to get the analogue sticks working
The 7-inch Raspberry Pi Touch Display is at the heart of the project, which also makes use of RetroPie for emulation
CHRISTOPHER FOOTE
Chris is a systems administrator and engineer from Olympia, Washington who is joined by his seven-year-old son and wife to help test his creative inventions and blunders.magpi.cc/eoZylo
game a year to play (“two if I was lucky,” he says). He recalls spending countless hours trying to accomplish everything he could in those titles. “But there were always many games that I wanted to play but I couldn’t,” he laments.
Spurred on by this, he began using RetroPie a few years ago to enjoy games made for systems as diverse as the Atari 2600 and Mega Drive. But although he ran it on a Adafruit’s PiGRRL2, he found the buttons were sticky and he didn’t like the screen. “Then my wife got a Nintendo Switch for my son and when I played with it I realised the controllers were exactly what I needed for my device,” he tells us.
Having discovered the Switch Joy-Cons were Bluetooth devices, Christopher got to work pairing them with a Raspberry Pi. “I spent a lot of time trying to connect two of them to work as a single controller and I thought if I could solve that problem, then the rest would be a cakewalk,” he says.
Mapping controls
He compiled Linux Joystick Mapper on his Pi 3 before mapping the controllers to keyboard keys and mouse buttons. “It worked great apart from the analogue sticks, so I looked through the code for a few hours, figured how Linux Joystick Mapper worked, and reprogrammed it for Joy-Con compatibility.”
Projects
PISWITCH
>STEP-01
Connect the controllers
The controllers must be woken at the boot menu by tapping the + and – buttons. “Nintendo makes the Joy-Cons go to sleep when they’re not in use, to save battery,” says Christopher.
>STEP-02
Select RetroPie
Christopher created his own touchscreen menu and included RetroPie, Kodi, and Debian. “RetroPie has a
huge community, so with research you’ll find someone who’s done part of what you’re trying to figure.”
>STEP-03
Play a game
You need to copy a game ROM to the microSD card. This is a digital version of a game cartridge. By selecting the right console and the game in RetroPie, you can have some fun.
SWITCH ON TO
RETRO GAMING
Knowing his project was possible, he could then get to work on refining it. He soldered a headphone jack to the Raspberry Pi so that he could listen to the games when commuting. He then sought to boost the battery life by soldering a power board and switch. A speaker was also added, along with a Pi V2 Camera Module (although this, he admits, was optional and included for fun). A case was printed and the components assembled inside before a 7-inch touchscreen was added.
Fitting perfectly
One of the lovely parts of the build is the way the Joy-Cons click into place to the left and right of the screen, just like on a Nintendo Switch. “I took my Switch and
a pair of digital calipers and I measured the inserts for the controllers,” Christopher says, getting the fit just right.
The two controllers make the PiSwitch versatile. “I can play one-player with both controllers to fully emulate a Nintendo 64 or PlayStation controller,” he explains. “The Joy-Cons also
load different controller maps.” This ensures they work well with retro games whether as a single controller or separate ones, but also as a mouse or to flip through media on Kodi, which he also installed.
In the near future, Christopher is going to work on refining the case and the overall look of the console. “I’m also looking to add support for streaming via Steam,” he says. “I think being able to play games from your desktop anywhere in the house with the comfort of a handheld device would be a really cool feature.”
I realised the controllers were
exactly what I needed
The rough 3D-printed case needs
refinement, but it contains access
points for the jack, the microSD card, and the Raspberry Pi’s HDMI port
een to find a way to enable his young children to quickly and easily search for and play their favourite music tracks on the family’s Sonos sound system, Chris Campbell had a brainwave. “Usually my kids ask me to play certain songs that they already know, and then I have to use the Sonos app on my phone or computer to hunt them down. One night at the dinner table I was lamenting how many steps are involved in using the
Projects
SHOWCASE
A snappy idea, making it easier to control a Sonos multi-room
speaker system, as
Nicola King
discovers
> The name comes from ‘QR’ and ‘crocodile’
> It can play music in a selected room
> QR codes are glued onto pieces of card
> Qrocodile has voice feedback
> It currently supports ten commands
Quick
Facts
QR
OCODILE
K
Each card has a unique QR code on the reverse
The Raspberry Pi interprets the code and sends a command to the Sonos sound system
The mini camera continually scans for QR codes
CHRIS CAMPBELL
A San Francisco-based software developer by day, Chris is a keen photographer and a musician, recording music under the pseudonym La Bonne Soupe.
labonnesoupe.org
Sonos apps to search for music or to enable the turnable… That’s when the seed of an idea was planted.”
Initially he thought of creating a simple button that just enabled the vinyl turntable linked to the Sonos, but grander plans soon started to take shape, centred on the use of QR codes.
Scanning for codes
Printed on cards, the QR codes are read by a mini camera connected to
Projects
QROCODILE
>STEP-01
Croc case
The crocodile-shaped case houses the Raspberry Pi 3, QR code card holder, and mini camera. It’s built from green LEGO bricks belonging to Chris’s son. This was the easiest part of the project.
>STEP-02
Generate codes
A Python script takes a list of songs (from your local music library and/or Spotify), as well as commands, and generates cards with an icon and text on one side and a QR code on the other.
>STEP-03
Play the music
Another Python script run on the Raspberry Pi scans the QR code with the camera and acts upon it, using a custom fork of node-sonos-http-api to access the Sonos sound system and play the music.
CREATING A
QROCODILE
Above The cute croc-shaped case is built from his son’s green LEGO bricks Chris spent around four weeks
working on the project in his spare time, ironing out several issues along the way, such as with the QR encoding algorithm. His first implementation simply encoded the full artist, album, and song title metadata in the QR code. “This worked fine for short names/titles, but not so well for songs or albums with really long titles. It hadn’t occurred to me that the more information you cram into a QR code, the tinier those little black
and white squares get. And the smaller those squares get, the harder it becomes for the camera to read.”
His solution was to apply a hash function to the metadata, so that only a few characters need to be stored in the QR code in order to identify a song. “After making that change, the QR codes were much less fine-grained and could be read easily by the Raspberry Pi- attached camera.”
So, what do his children think of their dad’s invention? “They love it! My son likes that it allows him to be in control of the playlist for their dance parties. My daughter enjoys being able to play her favourite song Starman over and over.”
No qrocodile tears
So far, no qrocodile-related fights have broken out between the kids. “They picked up on how to use it almost immediately.”
For those who’d like to build one, Chris has supplied full instructions
on GitHub (magpi.cc/CxZOkQ). “My qrocodile is just one incarnation of a concept; I’m interested to see what sort of tweaks and variations other people come up with on their own!”
Still working on perfecting the project, he has plans to add extra commands such as a weather forecast. He’d also like to explore making the qrocodile work with NFC-embedded cards, and creating a smaller version using a Pi Zero W.
QR codes are read by a mini
camera connected to a
ooking to create a decorative project for his office party, Gavan Fortune decided that a standard LED matrix display would be too obvious. “Somehow I started thinking about electromechanical things like the flip-dot display and wondered what I could do that would be a little bit different,” he tells us.
The result is the Pixel, an amazing electromechanical matrix display controlled by a Raspberry Pi (magpi.cc/tcMzFz). Each of its 64 ‘pixels’ is turned on and off by a servo rotating a 3D propeller-like shape to reveal its bright yellow vanes from a black casing.
Unique design
“I don’t know of any other implementation of this shape for a display,” says Gavan. “The idea came from the AWS visual display (a.k.a. sunflower) in a train cab, which in its active state displays interleaved yellow and black segments, but this was an exercise in extending the yellow part to cover the whole circle. This is not possible to do with a part rotating behind a shutter, and meant that there had to be a third dimension to the moving part.”
Projects
SHOWCASE
Featuring an ingenious rotating pixel design, Gavan Fortune’s
electromechanical matrix display is most impressive.
Phil King
reports
> The display weighs around 2.5 kg
> 64 pixels are rotated into view by servos…
> …Driven by three Pololu Mini Maestro
24 boards
> 448 3D-printed components were required
> It took over two weeks of solid 3D-printing time
Quick
Facts
PIXEL
L
GAVAN FORTUNE
Gavan has a background in software and electronics and enjoys music, flying, and making things.coolfactor.org
ELECTROMECHANICAL
DISPLAY
As a pixel is rotated, its vanes emerge from the black casing
Comprising seven 3D parts, each pixel is turned by a servo at the rear
Monitor stands add extra support to the matrix to