Building Web
Applications with
Visual Studio 2017
Using .NET Core and Modern JavaScript
Frameworks
—
Philip Japikse
Building Web
Applications with Visual
Studio 2017
Using .NET Core and Modern
JavaScript Frameworks
Philip Japikse
Philip Japikse Kevin Grossnicklaus Ben Dewey
West Chester, Ohio Ellisville, Missouri Charleston, South Carolina
USA USA USA
ISBN-13 (pbk): 978-1-4842-2477-9 ISBN-13 (electronic): 978-1-4842-2478-6 DOI 10.1007/978-1-4842-2478-6
Library of Congress Control Number: 2017947048
Copyright © 2017 by Philip Japikse, Kevin Grossnicklaus and Ben Dewey
This work is subject to copyright. All rights are reserved by the Publisher, whether the whole or part of the material is concerned, specifically the rights of translation, reprinting, reuse of illustrations, recitation,
broadcasting, reproduction on microfilms or in any other physical way, and transmission or information storage and retrieval, electronic adaptation, computer software, or by similar or dissimilar methodology now known or hereafter developed.
Trademarked names, logos, and images may appear in this book. Rather than use a trademark symbol with every occurrence of a trademarked name, logo, or image we use the names, logos, and images only in an editorial fashion and to the benefit of the trademark owner, with no intention of infringement of the trademark. The use in this publication of trade names, trademarks, service marks, and similar terms, even if they are not identified as such, is not to be taken as an expression of opinion as to whether or not they are subject to proprietary rights.
While the advice and information in this book are believed to be true and accurate at the date of publication, neither the authors nor the editors nor the publisher can accept any legal responsibility for any errors or omissions that may be made. The publisher makes no warranty, express or implied, with respect to the material contained herein.
Distributed to the book trade worldwide by Springer Science+Business Media New York,
233 Spring Street, 6th Floor, New York, NY 10013. Phone 1-800-SPRINGER, fax (201) 348-4505, e-mail [email protected], or visit www.springeronline.com. Apress Media, LLC is a California LLC and the sole member (owner) is Springer Science + Business Media Finance Inc (SSBM Finance Inc). SSBM Finance Inc is a Delaware corporation.
For information on translations, please e-mail [email protected], or visit http://www.apress.com/ rights-permissions.
Contents at a Glance
About the Authors ...xix
About the Technical Reviewer ...xxi
Acknowledgments ...xxiii
Introduction ...xxv
■
Part I: Visual Studio 2017 and .NET Core ... 1
■
Chapter 1: Introducing Entity Framework Core ... 3
■
Chapter 2: Building the Data Access Layer with Entity Framework Core ... 49
■
Chapter 3: Building the RESTful Service with ASP.NET Core MVC Services ... 83
■
Chapter 4: Introducing ASP.NET Core MVC Web Applications ... 119
■
Chapter 5: Building the SpyStore Application with ASP.NET Core MVC ... 157
■
Part II: Client-Side Tooling and JavaScript Frameworks ... 209
■
Chapter 6: JavaScript Application Tools ... 211
■
Chapter 7: Introduction to TypeScript ... 241
■
Chapter 8: Angular 2 ... 281
■
Chapter 9: React ... 329
Contents
About the Authors ...xix
About the Technical Reviewer ...xxi
Acknowledgments ...xxiii
Introduction ...xxv
■
Part I: Visual Studio 2017 and .NET Core ... 1
■
Chapter 1: Introducing Entity Framework Core ... 3
The SpyStore Database ... 4
Installing Visual Studio 2017 and .NET Core ... 5
Installing Visual Studio ... 5
Installing the .NET Core SDKs ... 6
The .NET Core Command Line Interface (CLI) ... 8
Creating and Configuring the Solution and Projects ... 8
Creating the Solution and Projects ... 8
Changes to the Project Files ... 11
Updating the Target Framework ... 11
Working with NuGet Packages ... 13
Manually Restoring Packages ... 13
Adding the Project References ... 14
Adding Entity Framework Core ... 14
Adding EF Packages to the SpyStore.DAL Project ... 14
Installing/Updating Packages Using the SpyStore.DAL.csproj File ... 16
Adding EF Packages to the SpyStore.Models Project ... 16
Building the Foundation ... 17
Understanding the DbContext Class ... 17
Building the Base Entity Class ... 22
Adding the Category Model Class ... 24
Adding the Categories DbSet ... 26
Migrations ... 26
Executing EF .NET CLI Commands ... 27
Creating the First Migration ... 27
Applying the Migration ... 29
Creating Migration SQL Scripts ... 30
Understanding CRUD Operations Using Entity Framework ... 31
Creating Records ... 31
Reading Records ... 31
Updating Records ... 32
Deleting Records ... 33
Unit Testing EF Core ... 34
Creating the CategoryTests Class ... 34
Testing EF CRUD Operations ... 37
Adding the Core Repository Interface and Base Class ... 41
Adding the IRepo Interface ... 41
Adding the Base Repository ... 43
Adding the Category Repository ... 46
Summary ... 47
■
Chapter 2: Building the Data Access Layer with Entity Framework Core ... 49
The SpyStore Database ... 49
Navigation Properties and Foreign Keys ... 50
Handling Display Names ... 51
Finishing the Model Classes ... 52
Updating the Category Model ... 52
Adding the Product Model ... 52
Adding the Shopping Cart Record Model ... 53
Adding the Order Model ... 54
Adding the Order Detail Model... 54
Adding the Customer Model ... 55
Updating the StoreContext ... 56
Updating the Database to Match the Model ... 58
Creating the Migration ... 58
Deploying the Migration ... 58
Adding the Stored Procedure and User Defined Function ... 58
Adding a New Migration ... 59
Implementing the Up() Method ... 59
Implementing the Down() Method ... 60
Updating the Database ... 60
Adding the OrderTotal Calculated Field ... 60
Updating the Order Class ... 60
Making OrderTotal a Computed Column ... 60
Adding a New Migration and Update the Database ... 61
Automating the Migrations ... 61
Adding the View Models ... 62
The Product with Category View Model ... 62
The Order Detail with Product Info View Model ... 63
The Order with OrderDetails View Model ... 63
The Cart Record with Product Infor View Model ... 64
Completing the Repositories ... 64
Extending the Interfaces ... 64
Initializing the Database with Data ... 75
Creating Sample Data ... 76
Using the Sample Data ... 78
Using the Initializer in Tests ... 80
Creating NuGet Packages for the Data Access Library ... 81
Setting the NuGet Properties ... 81
Creating the NuGet Packages ... 81
Summary ... 82
■
Chapter 3: Building the RESTful Service with ASP.NET Core MVC Services ... 83
Introducing the MVC Pattern ... 83
The Model ... 83
The View ... 83
The Controller ... 84
Introducing ASP.NET Core MVC Web API ... 84
ASP.NET Core and .NET Core ... 84
Dependency Injection ... 85
Determining the Runtime Environment ... 85
Routing ... 86
Creating the Solution and the Core MVC Project ... 87
Adding the Package Source for the Data Access Layer ... 90
Updating and Adding NuGet Packages ... 90
The ASP.NET Core “Super” Packages ... 91
MVC Projects and Files ... 92
The Program.cs File ... 92
The appsettings.json File(s) ... 93
The runtimeconfig.template.json File ... 94
The Startup.cs File ... 94
The Controllers Folder ... 100
Controllers and Actions ... 102
Controllers ... 102
Actions ... 102
An Example Controller ... 104
Exception Filters ... 108
Creating the SpyStoreExceptionFilter ... 108
Adding the Exception Filter for All Actions ... 110
Building the Controllers ... 110
The Category Controller ... 111
The Customer Controller ... 112
The Search Controller ... 113
The Orders Controller ... 113
The Product Controller ... 114
The Shopping Cart Controller ... 115
Using the Combined Solution ... 118
The Unit Test Solution ... 118
Summary ... 118
■
Chapter 4: Introducing ASP.NET Core MVC Web Applications ... 119
Introducing the “V” in ASP.NET Core MVC ... 119
Creating the Solution and the Core MVC Project ... 120
Updating and Adding NuGet Packages ... 122
Routing Revisited ... 123
The Route Table ... 123
URL Templates and Default Values ... 123
MVC Web Applications Projects and Files ... 124
The Program.cs File ... 124
The appsettings.json File ... 124
The Startup.cs File ... 124
The Controllers Folder ... 126
The Views Folder ... 126
Controllers, Actions, and Views ... 129
ViewResults ... 129
Views ... 130
Layouts ... 133
Partial Views ... 134
Sending Data to Views ... 134
Package Management with Bower ... 135
Updating and Adding Bower Packages ... 136
Bower Execution ... 136
Bundling and Minification ... 137
The BundlerMinifier Project ... 137
Configuring Bundling and Minification ... 137
Visual Studio Integration... 139
.NET Core CLI Integration ... 141
Creating the Web Service Locator ... 142
Creating the IWebServiceLocator Interface ... 142
Creating the WebServiceLocator Class ... 142
Adding the WebServiceLocator Class to the DI Container ... 143
Creating the WebAPICalls Class to Call the Web API Service ... 143
Creating the IWebApiCalls Interface ... 143
Creating the Base Class Code ... 144
Creating the WebApiCalls Class ... 148
Adding WebApiCalls Class to the DI Container ... 151
Adding the Fake Authentication ... 151
Building the Authentication Helper ... 151
Adding the AuthHelper Class to the DI Container ... 152
Creating the Action Filter for the Fake Authentication ... 152
Adding the Action Filter for All Actions ... 154
Adding the View Models ... 154
■
Chapter 5: Building the SpyStore Application with ASP.NET Core MVC ... 157
Tag Helpers ... 157
Enabling Tag Helpers ... 159
The Form Tag Helper ... 160
The Anchor Tag Helper ... 160
The Input Tag Helper ... 160
The TextArea Tag Helper ... 161
The Select Tag Helper ... 161
The Validation Tag Helpers ... 162
The Link and Script Tag Helpers ... 163
The Image Tag Helper ... 163
The Environment Tag Helper ... 163
Custom Tag Helpers ... 163
Building the Controllers ... 164
The Products Controller ... 165
The Orders Controller ... 168
The Shopping Cart Controller ... 170
Validation ... 176
Server Side Validation... 176
Client Side Validation ... 180
Updating the View Models ... 182
View Components ... 183
Building the Server Side Code ... 183
Building the Client Side Code ... 186
Invoking View Components... 186
Invoking View Components as Custom Tag Helpers ... 186
Updating and Adding the Views ... 187
The ViewImports File ... 187
The Shared Views ... 187
The Cart Views ... 195
The Orders Views ... 200
Running the Application ... 205
Using Visual Studio 2017 ... 205
Using the .NET Command Line Interface (CLI) ... 206
Using the Combined Solutions ... 206
Summary ... 207
■
Part II: Client-Side Tooling and JavaScript Frameworks ... 209
■
Chapter 6: JavaScript Application Tools ... 211
What Tools Are We Covering? ... 211
Node.js ... 212
Manually Installing Node.js ... 212
Installing Node using the Chocolatey Package Manager ... 213
Setting Up Visual Studio to Use the Latest Version of Node ... 213
Getting Started with Node.js ... 214
Introduction to NPM ... 215
Saving Project Dependencies ... 217
Executable Packages ... 218
Installing Packages Locally vs. Globally ... 220
Bower ... 220
Bower and Visual Studio ... 222
Installing Bower Prerequisites ... 222
Installing Git ... 222
Installing Bower ... 222
Using Bower ... 223
Installing Bower Packages ... 223
Installing Bower Packages Using Visual Studio ... 224
Gulp ... 227
Installing Gulp ... 228
Copying Files Using Gulp ... 229
Module Loaders ... 233
What Is a Module ... 234
SystemJS ... 235
WebPack ... 237
Summary ... 240
■
Chapter 7: Introduction to TypeScript ... 241
Why TypeScript? ... 241
TypeScript Basics ... 242
An Overview of TypeScript Syntax ... 242
Implementing a Basic TypeScript Application ... 253
Setting Up a Sample Project ... 254
Working with TypeScript Files ... 257
NPM Packages ... 259
Adding TypeScript ... 261
Summary ... 279
■
Chapter 8: Angular 2 ... 281
Creating a New Visual Studio Core Project ... 281
Project Files ... 284
Setting Up the Startup Class ... 284
NPM Install ... 286
Gulp Setup ... 287
Typescript Setup ... 287
Main SpyStore App Component Setup... 288
Creating the Root index.html Page ... 289
Creating the Root App Component ... 291
Creating the App Module ... 292
Core Concepts ... 293
Application Initialization ... 293
Components ... 294
Services ... 295
Templating ... 297
Routing ... 300
Building the SpyStore Angular App... 303
Adding Routing ... 303
Connecting to Services ... 306
Route Parameters ... 311
Search Page ... 313
Product Details Page ... 316
Cart Page ... 320
Checkout ... 326
Summary ... 328
■
Chapter 9: React ... 329
Solution Overview ... 329
Creating a New Visual Studio Core Project ... 330
Project Files ... 332
Setting Up the Startup Class ... 333
NPM Packages ... 334
TypeScript Setup ... 337
Initial Project Folder ... 338
WebPack... 342
Introduction to React ... 351
Components ... 351
Application Organization ... 355
Models ... 356
Routing ... 362
App Component ... 365
CategoryLinks Component ... 369
Products Component ... 371
ProductDetail Component ... 376
Cart Component ... 380
CartRecord Component... 384
Additional Thoughts ... 387
Summary ... 388
About the Authors
Philip Japikse is an international speaker, Microsoft MVP, ASPInsider, MCSD, CSM, and CSP, and a passionate member of the developer community. He has been working with .NET since the first betas, developing software for over 30 years, and heavily involved in the Agile community since 2005. Phil is co-author of the best selling C# and the .NET 4.6 Framework (http://bit.ly/pro_csharp), the Lead Director for the Cincinnati .NET User’s Group (http://www.cinnug.org), and the Cincinnati Software Architect Group. He also co-hosts the Hallway Conversations podcast (http://www.hallwayconversations.com), founded the Cincinnati Day of Agile (http://www.dayofagile.org), and volunteers for the National Ski Patrol. Phil enjoys learning new
technologies and is always striving to improve his craft. You can follow Phil on Twitter via http://www.twitter.com/skimedic and read his blog at http://www.skimedic.com/blog.
About the Technical Reviewer
Eric Potter is a Software Architect for Aptera Software and a Microsoft MVP for Visual Studio and Development Technologies. He works primarily in the .NET web platform, but loves opportunities to try out other stacks. He has been developing high-quality custom software solutions since 2001. At Aptera, he has successfully delivered solutions for clients in a wide variety of industries. He loves to dabble in new and exciting technologies. In his spare time, he loves to tinker with Arduino projects. He fondly remembers what it was like to develop software for the Palm OS. He has an amazing wife and five wonderful children. He blogs at http://
Acknowledgments
Philip Japikse: This book could not have happened without the very talented (and patient) team at Apress. The idea for this book started when .NET Core was still called ASP.NET 5, and the ride from ASP.NET 5 to Visual Studio 2017 has been an interesting one, to say the least. This book also couldn’t have happened without my loving wife Amy and all of the time she spent copy editing for me (for free) to keep my words from being a jumbled mess. I also want to thank my co-authors for all of their hard work. The goal of this book is to cover multiple technologies, and without their dedication to the cause, this book would have died a long time ago. Finally, I have to thank my children for their patience and understanding. Now that we are done, we can get out on the slopes and make a few turns!
Kevin Grossnicklaus: First, I’d like to express my extreme gratitude to Phil and Ben for the opportunity to be a part of this book at all. It has been a lot of fun and something I am honored to be a part of. An equally large thank you goes out to the team at Apress for being patient and helping pull everything together. Writing about technologies during their beta cycle is always challenging and getting three authors (including a chronically slow one like myself ) to the finish line deserves some type of medal. Next, a shout out to my team at ArchitectNow for pushing me to keep on top of technology just as much now as I did early in my career. I am constantly amazed at all the cool technologies and products we get to use on a daily basis. That said, who knew we would be writing this much JavaScript in 2017? Finally, to my awesome wife Lynda and my three beautiful daughters, Alexis, Emily, and Hanna: Thanks for putting up with all the time I spend working, writing, or with all my other random hobbies. I love you all very much!
Introduction
This idea for this book came out of a discussion among conference speakers about the problem with keeping up with technology. Not only the rapid fire and revolutionary changes in the .NET ecosystem, but also the proliferation of JavaScript frameworks. I stated to the group:
“There needs to be a book designed to get someone up to speed on ASP.NET 5 and help them make informed decisions about which JavaScript framework (if any) to use. The problem is that the material on the popular JavaScript frameworks is too comprehensive. We need to have a book that gives enough information to enable informed decisions without having to invest weeks learning a framework that might not be a fit. Following the fail fast mantra from lean.”
A silence fell over the group. They all looked at me and said, “Great idea! When are you going to write it?” Thus, this book was born, at least in concept. I knew that it was more than I could tackle on my own, so I reached out to two of my long-time friends, Ben and Kevin, and asked them if they would be interested. I knew they are deeply immersed in many of the JavaScript frameworks and would be a great match to round out the writing team.
The Goals of This Book
After much discussion, we settled on two main goals for this book. The first goal is to bring the .NET developer up to speed with Visual Studio 2017 and .NET Core, including Entity Framework Core, Core MVC Services (formerly Web API), and Core MVC Web Applications. The second goal is to cover a three different JavaScript frameworks (Angular2, Aurelia, and React) as well as client-side build tools and TypeScript. Each of the web applications will consist of the same UI and functionality, and all will use the same RESTful service and database as the backend.
Introducing the SpyStore Database
Introducing the SpyStore Web Site
Based on the SpyStore database and the list of features we wanted to show for each framework, the UI was completely reimagined and created by Ben Dewey, one of our co-authors. The site is very simple, consisting of the following site map.
The Home Page
The home page is also the Product list page, showing the Featured Products. Products can also be displayed for each Category by selecting one of the dynamically created menu items at the top of the page. The top right has links for the Shopping Cart and Order History pages, as well as the Search box. Figure 2 shows the home page listing the featured products.
The site is also responsive, and it will alter its UI based on the view port. Figure 3 shows the home page as viewed on a mobile device.
Figure 3. The home page on a mobile device
The Details/Add to Cart Page
Figure 4. The Product Details/Add to Cart page
The Order History Page
The Order History page shows all of the top line details for a Customer’s orders. The full-screen version is shown in Figure 7 and the mobile device version is shown in Figure 8.
The Cart Page
The Cart page demonstrates the bulk of the work in the application, with methods to add, delete, and update Shopping Cart records. The Cart page is shown in standard view in Figure 6. The mobile view isn’t any different, it’s just smaller.
Figure 6. The Cart page
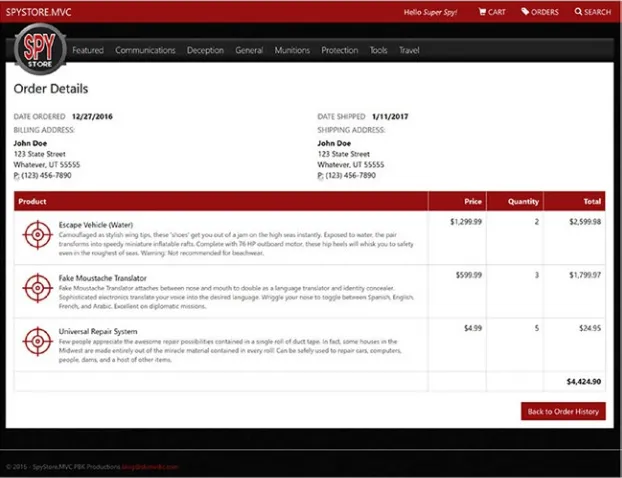
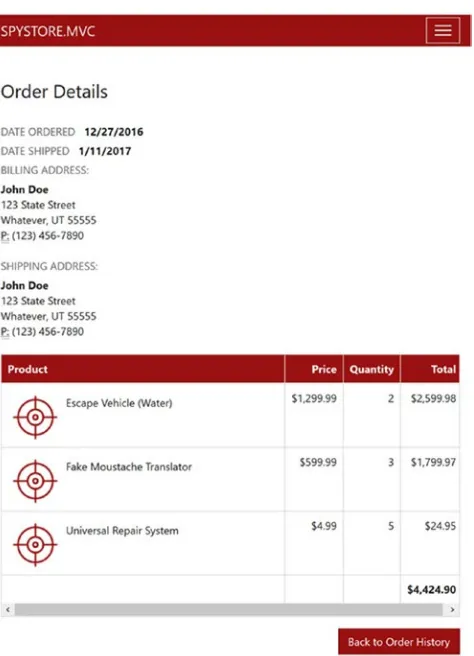
The Order Details Page
The Order Details page shows all of the details for an order, and it is shown in standard view in Figure 9 and on a mobile device in Figure 10.
How This Book Is Organized
This book is organized in two parts, which are aligned with the goals of the book. The first part focuses on Visual Studio 2017 and .NET Core, building the data access layer with Entity Framework Core, the RESTful service with Core MVC Services (formerly called Web API), and finally, the SpyStore web site with ASP.NET Core MVC.
The second part covers client-side build utilities (like Gulp, NPM, and Web Pack), TypeScript, and then builds the SpyStore site using Angular2, Aurelia, and React. The sites use the SpyStore.Service RESTful service built in Part I as the service endpoint.
Part I: Visual Studio 2017 and .NET Core
Part I covers building an end-to-end .NET Core application with Visual Studio 2017.
Chapter 1, “Introducing Entity Framework Core,” begins with installing Visual Studio 2017 and .NET Core SDK and creating the solutions and projects. Then it introduces Entity Framework Core, CRUD operations, and migrations. It then creates a complete data access layer for one table, complete with a repository and unit tests.
Chapter 2, “Building the Data Access Layer with Entity Framework Core,” covers the remaining Entity Framework concepts needed for this application. The rest of the tables from the SpyStore database are added into the data access layer, complete with repositories, migrations, and view models. The final section builds custom NuGet packages from the data access layer.
Chapter 3, “Building the RESTful Service with ASP.NET Core MVC Services,” introduces Core MVC in the context of building RESTful services, then builds the RESTful service for the SpyStore database. The service built in this chapter serves as the service endpoint for all of the web applications built in the rest of the book.
Chapter 4, “Introducing ASP.NET Core MVC Web Applications,” completes the Core MVC story by adding Actions and Views, package management, and bundling and minification. The last sections build core infrastructure for the application.
Chapter 5, “Building the SpyStore Application with ASP.NET Core MVC,” covers two new features in Core MVC—Tag Helpers and View Components. Server-side and client-side validation (including custom validation) are covered, and then the Views, Controllers, and Actions are built to finish the Core MVC Web Application. The final section covers the different ways to run the applications.
This completes the .NET portion of the book.
Part II: Client-Side Tooling and JavaScript Frameworks
Part II expands on the information learned in Part 1 and introduces architecture patterns needed to build modern JavaScript applications.
Chapter 6, “JavaScript Application Tools,” sets the groundwork for the JavaScript framework chapters and helps you understand the commonalities that exist between the future chapters. There is a core set of knowledge required regardless of which framework your team chooses. This chapter covers Node.js, NPM, Bower, Gulp, SystemJS, and WebPack.
Chapter 7, ”Introduction to TypeScript,” introduces you to the core aspects of the TypeScript language. TypeScript will be the language used in later chapters to build the SpyStore interface in Angular and React.
Chapter 8, “Angular 2,” provides a step-by-step walkthrough of building the SpyStore application using Angular 2 and Visual Studio 2017. After guiding the reader through setting up a basic Angular 2 app in Visual Studio, the chapter describes the core architectural components of Angular. After that, the remainder of the chapter focuses on taking the core concepts and applying them to the relevant aspects of the application.
Chapter 9, “React,” walks through implementing the SpyStore application using React and Visual Studio 2017. The development workflow put in place will be built around WebPack and the core structure of the React application will be similar in many regards to that of the Angular solution built in Chapter 8. This will allow developers to compare both frameworks while seeing how they differ in the implementation of the same interface.
The Source Code
Introducing Entity Framework Core
ADO.NET contains everything a .NET developer needs to create data access layers for their applications, but very little (if anything) is done for the developer. For example, ADO.NET requires the developer to first create connections, SQL statements, commands, and data readers, and then translate the data from the database into the application’s .NET classes that model the domain. When the user is done making changes to the data, the developer then needs to essentially reverse the process to persist any additions, deletions, or changes to the data.
Writing ADO.NET data access code takes time, and it is largely the same code from application to application, just swapping out the SQL statements (or stored procedures) and the model classes. Instead of spending time on data access plumbing, developers should be adding features and differentiators from the competition’s applications. Those features could mean the difference between a booming business and a failed startup.
The availability of Object RelationalMapping frameworks (commonly referred to as ORMs) in .NET greatly enhanced the data access story by managing the bulk of those data access tasks. The developer creates a mapping between the domain models and the database, and the vast majority of the Create, Read, Update, and Delete (CRUD) operations are handled by the ORM. This leaves the developer free to focus on the business needs of the application.
■
Note
If that sounds too good to be true, it is. ORMs are not magical unicorns riding in on rainbows. Every
decision involves tradeoffs. ORMs reduce the amount of work for developers creating data access layers, but
can also introduce performance and scaling issues if used improperly. As with any decision, make sure you
understand the pros and cons of a framework before unilaterally adding it to your development stack. I have
found that both Entity Framework 6.x and Entity Framework Core are extremely valuable tools in my toolkit.
I also only use EF for CRUD operations, and use T-SQL for server-side set operations.
Microsoft’s entry into the ORM landscape is Entity Framework (or simply, EF). Introduced in .NET 3.5 Service Pack 1, the initial versions were much maligned, including a (now) infamous “vote of no confidence” regarding EF version 1.0. The EF team at Microsoft has been hard at work releasing new versions, and since the first version, EF has seen evolutionary as well as revolutionary changes. The current version for the full .NET Framework is EF 6.1.3 and is being used widely throughout the .NET developer community.
A big change from prior versions of EF (for some of you) is that support for the Entity Designer is not going to be added—EF Core only supports the Code First development paradigm, either from an existing database or by creating new one. If you are currently using Code First, you can safely ignore the previous sentence.
When .NET Core and the related frameworks (including ASP.NET Core and EF Core) went RTM in June 2016, EF received a fair amount of criticism for the list of missing features in the product (compared to EF 6.x). The features that were released were solid and performed significantly faster than their EF 6.x counterparts, but if your application needed any of the missing features, EF 6.x was the only choice. Version 1.1 for EF Core was released November 14, 2016, and significantly narrowed the gap between EF 6.x and EF Core. EF Core 1.1 is the version used in this book.
■
Note
The full comparison of EF 6 and the current production version of EF is available here: https://
docs.microsoft.com/en-us/ef/efcore-and-ef6/features, and the roadmap for EF Core is available on
GitHub here: https://github.com/aspnet/EntityFramework/wiki/Roadmap.
Two chapters isn’t nearly enough to cover all of Entity Framework Core, and this isn’t meant to be an extensive reference for EF Core. But it covers enough for most (if not all) line of business applications, and includes what you need to know to effectively use EF Core in your projects.
■
Note
If you didn’t read the intro, the tl;dr version is this: This book covers building a fake e-commerce site
we are calling
SpyStore
. It is loosely based on the IBuySpy database that shipped as a sample app with the .NET
1.1 SDK. The first two chapters build the data access layer and the next chapter builds a RESTful service that
exposes the data access layer, and then the next two build the user interface in Core MVC. The rest of the book
focuses on frontend technologies, including build tools, TypeScript, and then different JavaScript frameworks,
including Angular 2, React, and Aurelia.
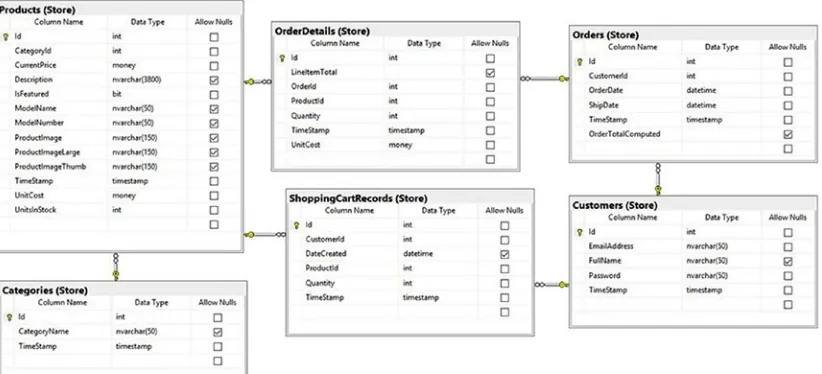
The SpyStore Database
You will build this database using the Code First pattern. For reference, the complete database creation script SpyStoreDatabase.sql is included in the downloadable code for this chapter.
■
Note
The database and web sites created in this book are not full featured e-commerce sites, but simply
demo code useful for showing the techniques and concepts of the frameworks and languages covered. As
such, we have ignored important subjects like security, authentication, authorization, and to a large extent, error
handling. If it seems like a simplistic design that has gaps, that is intentional!
Installing Visual Studio 2017 and .NET Core
.NET Core and its related frameworks currently ship out of band from Visual Studio, so you need to install Visual Studio and .NET Core separately. The experience will be significantly improved when the tooling is fully baked.
Installing Visual Studio
If you haven’t already installed Visual Studio 2017, you can get the free community edition at https://www.visualstudio.com/en-us/visual-studio-homepage-vs.aspx. All of the .NET samples in this book will work with the free community edition as well the paid versions. The install experience for VS2017 is very different than previous versions. Features are broken into workloads. Make sure you select the “ASP.NET and web development” and the “.NET Core cross platform development” workloads to include .NET Core, ASP.NET Core, and Entity Framework Core, as shown in Figure 1-2.
■
Note
This book is written using January 28, 2017 Release Candidate of Visual Studio 2017 (release notes
and downloads are available here:
https://www.visualstudio.com/en-us/news/releasenotes/vs2017-relnotes)and Preview 4 of the .NET Core tooling (installed with Visual Studio 2017). The most recent .NET
Core SDK (both x86 and x64) are available here:
https://github.com/dotnet/core/blob/master/release-notes/rc3-download.md. Historically, the RC tag is applied when a product is ready to be fully released exceptfor bug fixes and security fixes. However, this isn’t guaranteed, and it’s possible that if you are using the fully
released versions, your images and workflow might be slightly different in regards to Visual Studio and Visual
Studio .NET Core tooling.
Visual Studio Code is a new tool (also free) that runs on Linux and Mac and works with .NET Core. Additionally, there is an early version of Visual Studio 2017 for the Mac. While it’s not used to build the .NET Core apps in this book, all of the work in this book can be developed with either Visual Studio Code or Visual Studio 2017 for the Mac.
Installing the .NET Core SDKs
Microsoft set up a home page for everything .NET at http://www.dot.net. From here all released versions of .NET (including .NET Core) are accessible. This book is using .NET Core Version 1.1, which at the time of this writing is the current release.
■
Note
With .NET Core, Microsoft is using a different approach to release. The Long Term Support (LTS)
version is supported for at least one year after the next LTS release and are distinguished as Major Versions
(e.g. 1.0, 2.0). They will only be updated with critical fixes. Version 1.0.3 is the LTS release in production.
The current version is the latest released Minor Version (e.g. 1.1, 2.1), and will be supported for three months
after the next Minor Version release. The complete story on the support lifecycle can be found here:
To install the .NET SDKs (both x86 and x64 versions need to be installed), download them from here: https://github.com/dotnet/core/blob/master/release-notes/rc3-download.md. After installing them, to confirm the version that is currently installed, enter the following commands in a command prompt:
dotnet dotnet --info
The dotnet command shows the version of .NET Core on your machine (your output may be different based on the version installed):
C:\Users\skime>dotnet
Microsoft .NET Core Shared Framework Host
Version : 1.1.0
Build : 928f77c4bc3f49d892459992fb6e1d5542cb5e86
Usage: dotnet [common-options] [[options] path-to-application]
Common Options:
--help Display .NET Core Shared Framework Host help. --version Display .NET Core Shared Framework Host version.
Options:
--fx-version <version> Version of the installed Shared Framework to use to run the application.
--additionalprobingpath <path> Path containing probing policy and assemblies to probe for.
Path to Application:
The path to a .NET Core managed application, dll or exe file to execute.
If you are debugging the Shared Framework Host, set 'COREHOST_TRACE' to '1' in your environment.
To get started on developing applications for .NET Core, install the SDK from: http://go.microsoft.com/fwlink/?LinkID=798306&clcid=0x409
The dotnet –info command shows the version of the .NET Core tooling on your machine (your output may be different based on the version installed):
C:\Users\skime>dotnet --info
.NET Command Line Tools (1.0.0-rc3-004530)
Product Information:
Version: 1.0.0-rc3-004530 Commit SHA-1 hash: 0de3338607
OS Platform: Windows RID: win10-x64
Base Path: C:\Program Files\dotnet\sdk\1.0.0-rc3-004530
At the time of this writing, the current version of the .NET Core framework is 1.1.0, and the version of the tooling for .NET Core is version 1.0.0-rc3-004530.
The .NET Core Command Line Interface (CLI)
The commands just used are part of the .NET Core Command Line Interface, or CLI. .NET Core places an emphasis on command line support, and in many places, the command line tooling is better than the GUI tooling in Visual Studio. The commands all start with the invoker dotnet, followed by a specific command. Each framework in the .NET Core ecosystem has its own commands, including EF Core. You will use the Core CLI throughout the .NET chapters in this book.
Creating and Configuring the Solution and Projects
Separation of Concerns (SoC) is a design principle in software development where applications are partitioned based on distinct responsibilities. This leads to more maintainable code and cleaner implementations. In this book, the data access layer, RESTful service, and each UI will be developed following this principle.The data access layer will be developed in its own solution following a repository pattern. The repositories shield the calling code from having to understand specifics about how the data access works. The solution consists of two projects, one to hold the application models and the other to hold all of the EF Core code. This further separation enables Core MVC applications to reference the strongly typed models without needing all of the EF Core code as well, as additional projects are added to the solution for testing.
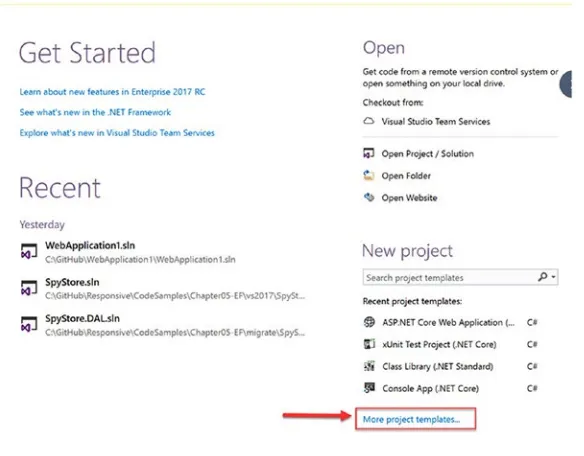
Creating the Solution and Projects
In the New Project dialog box, select the Console App (.NET Core) template located in Installed ➤ Visual C# ➤ .NET Core. Name the project SpyStore.DAL, as shown in Figure 1-4. Click OK to create the project. Figure 1-3. Creating the SpyStore.DAL project and solution
Open Program.cs and delete the following line from the Main method:
Console.WriteLine("Hello World!");
The file should contain the following after the editing:
using System; class Program {
static void Main(string[] args) {
} }
■
Note
Previous versions of .NET allowed for data access libraries to be Class Library projects. Core is
different. If you can’t execute
dotnet runagainst a project, you also can’t execute
dotnet ef. This is because
.NET Core doesn’t have a globally installed framework, but is installed on a per project basis. Due to this, in
order to run migrations for the data access library, the project type must be a Console Application.
Next, add a class library to the solution to hold the models. Right-click on the solution name and select Add ➤ New Project…, as shown in Figure 1-5.
Figure 1-5. Adding a new project
Finally, add the unit test project. Even though there are two different templates for unit test projects, you are going to build one from scratch. Right-click on the solution and select Add ➤ New Project…, then select the Console App (.NET Core) template and name the project SpyStore.DAL.Tests. Click OK to create the new project and close the wizard.
Changes to the Project Files
If you’ve been tracking the .NET Core story, there have been a myriad of changes. What started as ASP.NET5 had grown to .NET Core, ASP.NET Core, and EF Core. The command line tools changed from DNX and DNU to DOTNET. The project files started as project.json and *.xproj and then (with VS2017) reverted back to *.csproj. The good news is that the drastic changes are winding down with the release of VS2017, and the landscape is beginning to stabilize. The removal of project.json brings .NET Core projects back to being MSBuild compatible and aligns them with the rest of the .NET family in regards to tooling.
The Visual Studio 2017 <projectname>.csproj file has some nice updates over previous versions of Visual Studio. One of the biggest changes is the replacement of individual file listings with project directories, also referred to as file globbing. This carries forward one of the major benefits of the project. json file and the folder structure scoping of .NET Core projects. Also, all of the NuGet package information for the project is contained in this file (instead of a separate packages file), and finally, additional nodes were added for the .NET Core command line tooling (replacing the “tools” node in project.json).
VS2017 enables editing the project file directly through Visual Studio. This is a much-improved workflow over the previous method of editing the file in an external text editor and then reloading the project.
Updating the Target Framework
The default templates in Visual Studio target the LTS version of .NET Core, which is currently 1.0.3. The projects all need to be updated to 1.1. Right-click on the SpyStore.DAL project and select Properties. On the Application tab, change the Target Framework to NETCoreApp 1.1, as shown in Figure 1-7. Do this for the SpyStore.DAL.Tests project as well.
Next, right-click on the SpyStore.Models project and select Properties. For this project, update the target framework to NETStandard 1.6, as shown in Figure 1-8.
Figure 1-7. Updating the target framework to NETCoreApp 1.1
Working with NuGet Packages
EF Core and the other .NET Core frameworks are distributed as NuGet packages. When a new project is created using Visual Studio, the actual NuGet packages aren’t included, just a reference to those packages, so the packages need to be restored. Most source code control systems also don’t include the package files, so a restore needs to happen when projects are loaded from source code control. This is a good thing, since it saves considerable space in the template files and source code control systems. It also means that you must have Internet access to work with .NET Core projects.
Visual Studio executes a package restore when a new project is created. A message to this effect is displayed in the Solution Explorer window briefly when the new project wizard finished. Visual Studio also executes a restore when a change is detected in the project file. Packages can also be restored on demand.
■
Note
NuGet is updated at a fairly rapid cadence. If you receive errors while restoring, updating, or adding
packages, try updating your version of NuGet Package Manager by downloading the latest version from
https://www.nuget.org/.Manually Restoring Packages
Packages can be restored manually from Package Manager Console, from the command prompt, or through Visual Studio using the NuGet Package Manager GUI.
Restoring Packages from the CLI
You can restore the NuGet packages in your solution (or project) using the .NET Core CLI by entering dotnet restore in a standard command prompt. The command restores the packages for every *.csproj file that it finds in the directory tree at and below where the command was executed. In other words, if you enter the command at the solution level, the packages in all of the projects in your solution will be restored (if they are in the same directory tree, of course). If you enter it at a project level, only the packages for that project are restored.
Restoring with Package Manager Console
You can also force a package refresh through Package Manager Console (PMC) in Visual Studio. To restore packages using PMC, first open it by selecting View ➤ Other Windows ➤ Package Manager Console. The console window will load in the bottom of the Visual Studio workspace by default.
Adding the Project References
The SpyStore.DAL project needs to reference the SpyStore.Models project. Add the reference by right-clicking the SpyStore.DAL project in Solution Explorer, select Add ➤ Reference, and then click on Projects in the left side of the Reference Manager. Check the box next to SpyStore.Models, as shown in Figure 1-9. Click OK to add the reference.
Figure 1-9. Adding the project reference
The SpyStore.DAL.Tests project needs to reference the SpyStore.DAL and SpyStore.Models projects. Add the references by right-clicking the SpyStore.DAL.Tests project in Solution Explorer, selecting Add ➤ Reference, and then selecting the SpyStore.Models and SpyStore.DAL projects in the References Manager dialog. Click OK after selecting the projects to finish adding the references.
Adding Entity Framework Core
The required EF Core packages can be added to a project by manually updating the *.csproj file, using PMC, or using the NuGet Package Manager. The simplest way is to use NuGet Package Manager.
Adding EF Packages to the SpyStore.DAL Project
This package needs to be installed by hand:
Microsoft.EntityFrameworkCore.Tools.DotNet (see note) .NET Core SDK command line tools for EF Core
1.0.0-msbuild3-final
■
Note
At the time of this writing, the
Microsoft.EntityFrameworkCore.Tools.DotNet packagecan’t be
properly installed properly through the NuGet package manager. The package must be installed by manually
updating the project file, as you will do next. Depending on when you are reading this book, the versions
will most likely be updated from Table
1-1
. When selecting packages, pay close attention in NuGet Package
Manager to make sure that you are picking the correct versions, especially when working with pre-release
packages.
Table 1-1. Entity FrameworkCore Packages
Package
Version
Microsoft.EntityFrameworkCore The core package of the framework 1.1.0 Microsoft.EntityFrameworkCore.Design The shared design time components
of EF Core tools
1.1.0
Microsoft.EntityFrameworkCore.Relational Shared components for relational database providers
1.1.0
Microsoft.EntityFrameworkCore.Relational.Design Shared design time components for relational database providers
1.1.0
Microsoft.EntityFrameworkCore.SqlServer Microsoft SQL Server database provider for EF Core
1.1.0
Microsoft.EntityFrameworkCore.SqlServer.Design Design time EF Core functionality for MS SQL Server
1.1.0
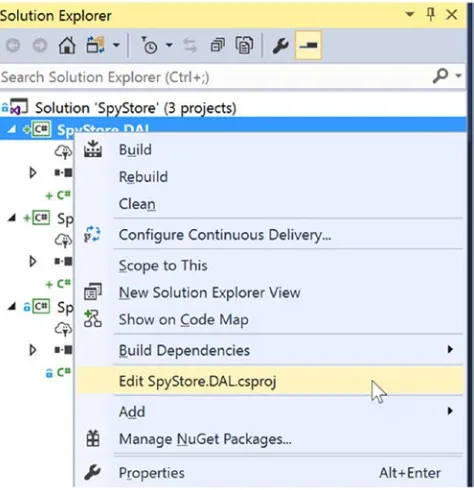
Installing/Updating Packages Using the SpyStore.DAL.csproj File
You can also update and install NuGet packages directly in the SpyStore.DAL.csproj file. Right-click on the SpyStore.DAL project and select Edit SpyStore.DAL.csproj, as shown in Figure 1-10.
Tooling references are placed in their own item group. .NET Core CLI tools are added with a
DotNetCliToolReference tag. Add a new ItemGroup and then add the following markup. This enables the dotnet ef command line functions that will be utilized later.
<ItemGroup>
<DotNetCliToolReference Include="Microsoft.EntityFrameworkCore.Tools.DotNet"> <Version>1.0.0-msbuild3-final</Version>
</DotNetCliToolReference> </ItemGroup>
Future releases of VS2017 will probably provide a user interface to do this, but for now, manually entering these values is part of the joy of working with pre-release software!
Adding EF Packages to the SpyStore.Models Project
The SpyStore.Models project only needs two packages added:
• Microsoft.EntityFrameworkCore (v1.1.0)
• Microsoft.EntityFrameworkCore.SqlServer (v1.1.0)
Adding Packages to the SpyStore.DAL.Tests Project
The SpyStore.DAL.Tests project needs the following packages added:
• xUnit (at least 2.2.0-beta5-build3474)
• xunit.runner.visualstudio (at least 2.2.0-beta5-build1225
• Microsoft.NET.Test.Sdk (v15.0.0-preview-20170125-04))
• Microsoft.EntityFrameworkCore (v1.1.0)
• Microsoft.EntityFrameworkCore.Design (v1.1.0)
• Microsoft.EntityFrameworkCore.Relational (v1.1.0)
• Microsoft.EntityFrameworkCore.SqlServer (v1.1.0)
To add them, open NuGet Package Manager and repeat the previous steps to add the required packages.
Building the Foundation
The process that will be followed to create the data access layer is fairly standard, and one that I’ve mastered since my adoption of ORMs.
1. Create the context class.
2. Create a base entity class.
3. Create and configure model class(es).
4. Add the model to the context as a DbSet<T>.
5. Create a migration and run it to update the database.
6. Add a strongly typed repository for the model.
Creating a base entity class is optional, but commonly done to hold common properties across all entities. Adding a custom repository implementation is also optional, and largely dependent on the architecture of the project. The DbContext provides some Unit of Work and Repository implementation details, so technically, including any repository functionality beyond that is unnecessary. However, it is common for developers to add their own repository implementation to enable tighter control of the CRUD process and increase code reuse.
Understanding the DbContext Class
Table 1-2. Some of the Properties Exposed by DbContext
DbContext Property
Definition
Database Provides access database related information and functionality, including execution of SQL statements.
Model The metadata about the shape of entities, the relationships between them, and how they map to the database.
ChangeTracker Provides access to information and operations for entity instances this context is tracking.
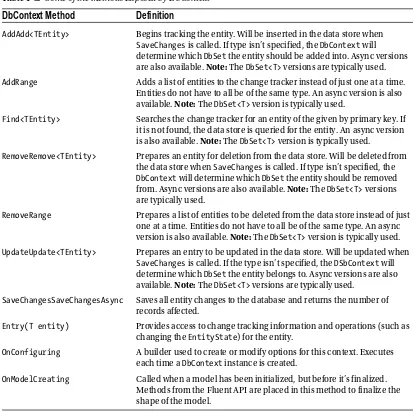
Table 1-3. Some of the Methods Exposed by DbContext
DbContext Method
Definition
AddAdd<TEntity> Begins tracking the entity. Will be inserted in the data store when SaveChanges is called. If type isn’t specified, the DbContext will determine which DbSet the entity should be added into. Async versions are also available. Note: The DbSet<T> versions are typically used.
AddRange Adds a list of entities to the change tracker instead of just one at a time. Entities do not have to all be of the same type. An async version is also available. Note: The DbSet<T> version is typically used.
Find<TEntity> Searches the change tracker for an entity of the given by primary key. If it is not found, the data store is queried for the entity. An async version is also available. Note: The DbSet<T> version is typically used.
RemoveRemove<TEntity> Prepares an entity for deletion from the data store. Will be deleted from the data store when SaveChanges is called. If type isn’t specified, the DbContext will determine which DbSet the entity should be removed from. Async versions are also available. Note: The DbSet<T> versions are typically used.
RemoveRange Prepares a list of entities to be deleted from the data store instead of just one at a time. Entities do not have to all be of the same type. An async version is also available. Note: The DbSet<T> version is typically used.
UpdateUpdate<TEntity> Prepares an entry to be updated in the data store. Will be updated when SaveChanges is called. If the type isn’t specified, the DSbContext will determine which DbSet the entity belongs to. Async versions are also available. Note: The DbSet<T> versions are typically used.
SaveChangesSaveChangesAsync Saves all entity changes to the database and returns the number of records affected.
Entry(T entity) Provides access to change tracking information and operations (such as changing the EntityState) for the entity.
OnConfiguring A builder used to create or modify options for this context. Executes each time a DbContext instance is created.
EF Core data access layers need a custom class that derives from the DbContext base class. The next section covers building the StoreContext class.
Creating the StoreContext Class
To get started, create a new folder in the SpyStore.DAL project named EF. In this folder, add a new class named StoreContext.cs. Add the following namespaces to the class:
using Microsoft.EntityFrameworkCore;
using Microsoft.EntityFrameworkCore.Infrastructure; using SpyStore.Models.Entities;
Inherit from DbContext and add the following two constructors, as shown here:
namespace SpyStore.DAL.EF {
public class StoreContext : DbContext {
public StoreContext() {
}
public StoreContext(DbContextOptions options) : base(options) {
} } }
The second constructor takes an instance of the DbContextOptions class. The options that can be passed in include settings for the database provider, connection resiliency, and any other options specific to your application. The options are typically passed in through a dependency injection (DI) framework, such as is used in ASP.NET Core. This allows automated tests to inject a different instance for testing purposes (such as the InMemory provider) as well as configure EF Core to use development or production servers without changing any of the data access code.
EF Core has a fallback mechanism in case the parameterless constructor is used to create the StoreContext class, the OnConfiguring event handler.
protected override void OnConfiguring(DbContextOptionsBuilder optionsBuilder) {
}
string to target when creating and applying migrations. Add the following code to the StoreContext class (updating the connection string to match your machine’s configuration):
protected override void OnConfiguring(DbContextOptionsBuilder optionsBuilder) {
if (!optionsBuilder.IsConfigured) {
optionsBuilder.UseSqlServer(
@"Server=(localdb)\mssqllocaldb;Database=SpyStore;Trusted_Connection=True;MultipleActive ResultSets=true;");
} }
Unlike prior versions of EF, the modularity of EF Core requires an application to add the database providers and configure them for use. In this example, the context is configured to use the SQL Server database provider, using the LocalDB instance and the database SpyStore.
Understanding the DbSet<T> Collection Type
Each model collection is represented by a DbSet<T> specialized collection property in the DbContext class. Each DbSet<T> property contains all of the like entities (e.g., Category records) tracked in the context. Table 1-4 lists the methods available on DbSet<T> that are used in this data access layer.
Table 1-4. Some of the Methods Exposed by DbSet<T>
DbSet<T> Method
Definition
Add/AddRange Begins tracking the entity/entities in the Added state. Item(s) will be added when SaveChanges is called. Async versions are available as well.
Find Searches for the entity in the ChangeTracker by primary key. If not found, the data store is queried for the object. An async version is available as well.
Update/Update Begins tracking the entity/entities in the Modified state. Item(s) will be updated when SaveChanges is called. Async versions are available as well.
Remove/Remove Begins tracking the entity/entities in the Deleted state. Item(s) will be removed when SaveChanges is called. Async versions are available as well.
Attach/AttachRange Begins tracking the entity/entities in the Unchanged state. No operation will execute when SaveChanges is called. Async versions are available as well.
■
Note
This book is only presenting the synchronous versions of the EF methods, and leaves it to the reader
Connection Resiliency
When dealing with any database, but especially with cloud-based databases (such as SQL Azure),
applications benefit from a retry strategy in case of a connectivity hiccup. These hiccups are usually referred to as transient errors. EF Core Version 1.1 added the ability to define a connection strategy, long available in EF 6. A connection strategy defines a set of errors that should invoke a retry operation, the number of retries, and the amount of time to wait between the retries.
The SQL Server provider for EF Core provides a SqlServerRetryExecutionStrategy class. The class defaults the retry count to 5 with a delay between retries of 30 seconds. This connection strategy uses the SqlServerTransientExceptionDetector to determine if the action should be retried. The EnableRetryOnFailure method is a handy shortcut to configure the retry limit and retry wait time to the default values, as well as the ability to add errors to the retry list.
Update the OnConfiguring to the following:
protected override void OnConfiguring(DbContextOptionsBuilder optionsBuilder) ResultSets=true;", options => options.EnableRetryOnFailure());
} }
Custom Connection Strategies
A custom connection strategy can also be created. Create a new class in the EF directory of the SpyStore.DAL project named MyConnectionStragey.cs. Add a using for Microsoft.EntityFrameworkCore.Storage and derive the class from ExecutionStrategy. Add the following code:
using System;
using Microsoft.EntityFrameworkCore.Storage;
namespace SpyStore.DAL.EF {
public class MyExecutionStrategy : ExecutionStrategy {
public MyExecutionStrategy(ExecutionStrategyContext context) : base(context, ExecutionStrategy.DefaultMaxRetryCount, ExecutionStrategy.DefaultMaxDelay)
{ }
public MyExecutionStrategy(
ExecutionStrategyContext context, int maxRetryCount,
TimeSpan maxRetryDelay) : base(context, maxRetryCount, maxRetryDelay) {
protected override bool ShouldRetryOn(Exception exception) {
return true; }
} }
Both constructors require an ExecutionStrategyContext (which comes from the
DbContextOptionsBuilder). The first constructor defaults the retry count and retry delay to 5 and the 30 seconds, respectively, just like the default SqlServerRetryExecutionStrategy. The ShouldRetryOn method returns true if EF should retry the operation, and false if it should not. In this example, it always returns true, so as long as there are retry counts left, it will always retry. Not a good implementation for production, but useful for testing error handling.
Adding the custom strategy to a context is as simple as replacing the EnableRetryOnFailure with the following code:
contextOptionsBuilder.UseSqlServer(connectionString,
options => options.ExecutionStrategy(c=> new MyExecutionStrategy(c)));
Building the Base Entity Class
All of the tables in the database have a primary key named Id and a Timestamp field named TimeStamp. Since all models have these properties, they will be placed in a base class. EF Core pulls properties in base classes and derived classes together when shaping the database tables.
■
Note
At the time of this writing,
complex types
are not yet supported in EF Core. This is a feature of EF 6.x
where a class is used as a property on a model and pulled into the database appropriately. This is a technique
used frequently in domain driven design. This feature is on the roadmap for EF Core, but nothing has been
announced as to when it will be delivered. For now, EF Core supports inheritance, but not complex types.
In the SpyStore.Models project, delete the Class1.cs file that was auto-generated by the template. Add a new folder in the project named Entities by right-clicking on the SpyStore.Models project and selecting Add ➤ New Folder. Create a new folder under the Entities folder named Base. In the Base folder, add a new class named EntityBase.cs by right-clicking on the folder and selecting Add ➤ Class. Add the following namespaces to the class:
Make the class abstract (since it will only ever be inherited from) and add two properties—Id (int) and TypeStamp (byte[])—as follows:
namespace SpyStore.Models.Entities.Base {
public abstract class EntityBase {
public int Id { get; set; }
public byte[] TimeStamp { get; set; } }
}
If this looks simple, it is! EF model classes are just Plain Old CLR Objects (POCOs). Shaping of the database tables and fields and mapping the classes to the database is done through the EF built-in conventions, data annotations (from System.ComponentModel), and the EF Fluent API. Each of these will be covered as needed in this book.
■
Note
There isn’t enough space in this book to cover EF conventions, data annotations, and Fluent API
in their entirety. To explore all of the options available in shaping entities and the backing database, the full
documentation is at the following URL: https://docs.microsoft.com/en-us/ef/core/modeling/.
Entity Framework Conventions
There are many conventions built into EF, and if you understand them, they are very beneficial in reducing the amount of manual configuration needed to properly shape the database. However, there is a lot to know, and that can cause problems. For example, the primary key convention creates a primary key for a table when EF finds a field named Id or <typename>Id (such as CustomerId on a class named Customer). For SQL Server, if the datatype of the property is int or GUID, the values will be generated by the server when a new record is added. Any other datatype will need to be configured by the developer. Each database provider has its own variations of this convention as well.
If the application relied only on EF conventions to shape the database, each developer would need to know and understand that convention. And that’s just one convention! The more “secret sauce” a project has, the greater the opportunity for developer confusion and errors. Instead of relying solely on conventions, a common practice (and one used in this book) is to be explicit as possible when defining entities by using data annotations and/or the Fluent API. For the base class, the explicit definition will be done through data annotations, covered in the next section.
Data Annotations Support in EF Core
Adding Data Annotations to the EntityBase Class
For primary key fields, the Key and DatabaseGenerated attributes replace the EF conventions. They don’t add any functionality, but are explicit and obvious to another developer. As detailed in the previous table, the Key attribute identifies the property as the primary key. The DatabaseGenerated attribute with the DatabaseGeneratedOption of Identity instructs SQL Server to generate the value when new records are added. Update the Id property by adding the following code:
[Key, DatabaseGenerated(DatabaseGeneratedOption.Identity)] public int Id { get; set; }
The next data annotation to add is the Timestamp attribute. In SQL Server, rowversion fields get updated by the server every time a record is added or saved. The CLR datatype that represents a rowversion is a byte array of length 8. Update the Timestamp property to the following, and the base class is complete:
[Timestamp]
public byte[] TimeStamp { get; set; }
Adding the Category Model Class
Each of the tables listed in the Figure 1-1 will be represented by a .NET class (the simplest modeling mechanism for EF project), starting with the Category table.
Table 1-5. Some of the Data Annotations Supported by EF Core
Data Annotation
Definition
Table Defines the table name for the model class. Allows specification of the schema as well (as long as the data store supports schemas).
Column Defines the column name for the model property.
Key Defines the primary key for the model. Not necessary if the key property is named Id or combines the class name with Id, such as OrderId. Key fields are implicitly also [Required].
Required Declares the property as not nullable.
ForeignKey Declares a property that is used as the foreign key for a navigation property. InverseProperty Declares the navigation property on the other end of a relationship. MaxLength Specifies the max length for a string property.
TimeStamp Declares a type as a rowversion in SQL Server and adds concurrency checks to database operations.
DatabaseGenerated Specifies if the field is database generated or not. Takes a DatabaseGeneratedOption value of Computed, Identity, or None.
NotMapped Specifies that EF needs to ignore this property in regards to database fields.