PHP
Game Programming
reserved. No part of this book may be reproduced or transmitted in any form or by any means, electronic or mechanical, including photocopy-ing, recordphotocopy-ing, or by any information storage or retrieval system with-out written permission from Course PTR, except for the inclusion of brief quotations in a review.
The Premier Press logo and related trade dress are trademarks of Premier Press and may not be used without written permission.
Paint Shop Pro 8 is a registered trademark of Jasc Software. PHP Coder is a trademark of phpIDE.
All other trademarks are the property of their respective owners. Important: Course PTR cannot provide software support. Please contact the appropriate software manufacturer’s technical support line or Web site for assistance.
Course PTR and the author have attempted throughout this book to distinguish proprietary trademarks from descriptive terms by following the capitalization style used by the manufacturer.
Information contained in this book has been obtained by Course PTR from sources believed to be reliable. However, because of the possibility of human or mechanical error by our sources, Course PTR, or others, the Publisher does not guarantee the accuracy, adequacy, or complete-ness of any information and is not responsible for any errors or omis-sions or the results obtained from use of such information. Readers should be particularly aware of the fact that the Internet is an ever-changing entity. Some facts may have changed since this book went to press.
Educational facilities, companies, and organizations interested in multi-ple copies or licensing of this book should contact the publisher for quantity discount information. Training manuals, CD-ROMs, and por-tions of this book are also available individually or can be tailored for specific needs.
ISBN: 1-59200-153-X
Library of Congress Catalog Card Number: 2004090731 Printed in the United States of America
04 05 06 07 08 BH 10 9 8 7 6 5 4 3 2 1
Course PTR, a division of Course Technology 25 Thomson Place
Manager of Editorial Services: Heather Talbot
Senior Acquisitions Editor: Emi Smith
Associate Marketing Manager: Kristin Eisenzopf
Acknowledgments
T
here are so many people who made this book possible for me. First I would like to thank André LaMothe for giving me this opportunity. I would also like to thank my editor, Dan Foster, for all of his hard work. I also need to thank my company, DATA Inc. (www.datausa.com) for understanding my rigorous schedule. Thank you to Mike Gesner (President and CEO), Michael Melson (Technical Director), Randy Chong (Game Design Director), Wesley Potter (Game Designer), and Jonathan Shusta (Art Director) of Dragonfly Game Design (www.dragonflygamedesign.com) for making the MMO possible. Without you guys this book wouldn’t have been as cool as it is. I would also like to thank Jenai for being my constant support and putting up with my odd hours, odd moods, and general weirdness throughout the creation of this whole book.About the Author
MATT RUTLEDGE ([email protected]) is lead developer at DATA, Inc. (www.datausa.com), a Denver, Colorado-based digital visualization company specializing in 3D computer ani-mation and Web development. Matt has 7 years of experience in the multimedia world. He developed several telecommunication applications before moving into the realm of Web development. Matt specializes in database-driven and interactive online applications. Matt also actively writes articles for asp101 (www.asp101.com) and the MSDNAA (www.msdnaa.net).
About the Series Editor
ANDRÉ LAMOTHE, CEO, Xtreme Games LLC, has been involved in the computing indus-try for more than 25 years. He wrote his first game for the TRS-80 and has been hooked ever since! His experience includes 2D/3D graphics, AI research at NASA, compiler design, robotics, virtual reality, and telecommunications. His books are top sellers in the game programming genre, and his experience is echoed in the Premier Press Game
Development books.
Letter from the Series Editor
Over the last half decade or so, a little piece of software called PHP has been gener-ating a lot of buzz and has quickly risen from a single programmer’s side-project to the Web programming language. Now in version 5, PHP (a recursive abbreviation for PHP Hypertext Preprocessor) is practically synonymous with the development of dynamic Web sites and flexible content. But what few realize is that it’s capable of a lot more than just making Web sites—in fact, it’s showing serious potential for making games! With the surge in popularity of Web-based games and applications like Habbo Hotel, Yahoo’s board, card and puzzle games, and even The Sims, there’s never been a better time to get involved in online game development. And with PHP, a completely free tool, it has never been cheaper or easier!
That’s what’s so exciting about PHP Game Programming. Matt Rutledge has taken the formidable tasks of teaching both game development and the PHP language and condensed them into one easy-to-read text that makes it all seem effortless. But what makes this book so special is that it’s not just meant for game developers; anyone who wants to learn PHP will find that this book teaches it in a fun way that’s far more engaging than the countless other PHP books on the shelves. After all, making games is a lot more fun than sorting employee records! But don’t think this book is all about goofing off. From Chapter 1 on, you get a hardcore PHP education that starts in the trenches, with everything you need to know about server configuration and setup. Once you’re locked and loaded, you’ll complete a tour of the language itself, cover-ing all the major constructs and features. PHP’s syntax is remarkably similar to lan-guages like C, C++, and Java, and if you’re already familiar with one of those then this material will be very easy to absorb. Finally, the entire last half of the book is devoted to serious game programming topics, from graphics to chess algorithms to dynamic battlefield terrains.
In conclusion, it won’t be long before everything from your shoes to your refrigera-tor has a connection to the Internet, and online games are certainly leading the way toward the ultra-connected world of the future. Many programmers find themselves leaving languages like C or C++ behind in favor of languages with built-in network-ing capabilities like Java, Perl, and PHP. With a development tool as powerful and accessible as PHP, this is your chance to turn your online game ideas into a reality! Sincerely,
André LaMothe
Contents
Introduction . . . xiii
Part I
Introduction to the World of PHP . . . 1
Chapter 1 So What Is All This Server Stuff? . . . 3
Chapter 2 Waging the Configuration War. . . 23
Understanding the Client/Server Relationship . . . 3
The Web Server . . . 5
Sessions and Session Variables . . . 5
TCP/IP. . . 13
Installing the IIS Web Server . . . 14
Installation on Windows 2000/XP Professional . . . 15
Installation on Windows 98 . . . 17
Installing the Apache Web Server on Windows ME/XP . . . 18
Installing the Apache Web Server on UNIX . . . 19
The Platforms . . . 23
Building and Installing PHP on UNIX . . . 24
Installation on Windows for IIS/Apache . . . 26
Installing the Windows Extensions . . . 29
Testing Your Installation . . . 29
ix Contents
Chapter 3 I Have Conquered the Server, Let Me at the Code! . . . 31
The Basics of the HTML Tag . . . 31
The Almighty HTML Document. . . 32
The HTML Body . . . 33
Graphics and HTML . . . 36
The File Formats . . . 37
Using the File Formats in Your Document . . . 39
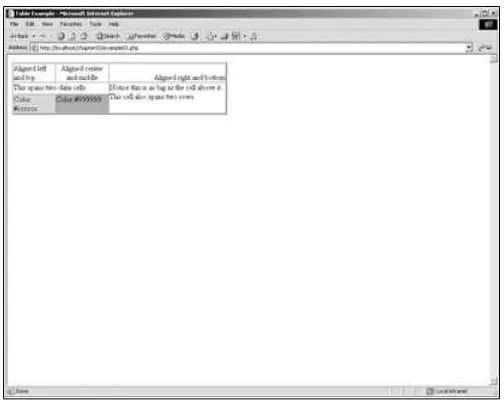
Tables . . . 41
Layouts, Tables, and Graphics . . . 44
Creating Forms for Input. . . 48
Conclusion . . . 51
Part II
Enter the Language . . . 53
Chapter 4 Say Hello to PHP . . . 55
Chapter 5 Operators, Statements, and Functions . . . 77
Creating a PHP Page . . . 56
Data Types . . . 57
Type Casting . . . 58
Variable Variables . . . 58
Constants. . . 58
Naming Conventions . . . 59
Functions for Variables . . . 60
Functions for Strings . . . 61
printf() and sprintf() . . . 64
Regular Expressions and Pattern Matching. . . 66
Using the Regular Expression Functions . . . 68
Processing Forms with PHP . . . 71
Conclusion . . . 76
Operators . . . 77
Arithmetic Operators . . . 78
Comparison Operators . . . 78
Logical Operators . . . 79
Ternary Operator. . . 80
Bitwise Operators . . . 82
Variable Assignment Shortcuts . . . 85
Statements . . . 86
if Statements . . . 88
The switch Statement . . . 90
while and do…while Loops . . . 93
The for Loop . . . 94
Functions . . . 94
Passing Parameters to a Function . . . 95
Recursion. . . 98
The Magic of Including Files . . . 99
Conclusion . . . 100
Part III
Arrays, Games, and Graphics . . . 101
Chapter 6 Arrays! . . . 103
Chapter 7 Playing with Chess and Databases . . . 133
Initializing Arrays . . . 104
Using Strings for Indexes. . . 105
Looping through Sequential Arrays . . . 106
Looping through Non-Sequential Arrays . . . 108
Multi-Dimensional Arrays . . . 110
Sorting Arrays . . . 112
Your First PHP Game . . . 117
Conclusion . . . 132
Non-Relational Databases . . . 134
Creating and Opening a Database . . . 134
Looping through the Database . . . 136
Inserting an Entry into Your Database . . . 137
Updating an Entry in Your Database . . . 139
Deleting an Entry from Your Database . . . 140
Chess Programming: A Quick Overview . . . 140
Starting the Chess Game . . . 141
Working with the Pieces . . . 143
Getting the User Input and Modifying the Database . . . 151
xi Contents
Chapter 8 GD Graphics Overview . . . 157
What Is GD?. . . 157
Installing GD . . . 158
Creating and Using a New Image . . . 160
How to Use Colors . . . 161
Allocating Colors to an Image . . . 161
Filling the Image . . . 162
Setting Your Transparent Color. . . 163
Converting a True-Color Image to a Palette Image . . . 165
Counting Colors in an Image . . . 165
Retrieving a Color at a Point. . . 166
Drawing Basic Shapes on Your Empty Canvas. . . 167
Pixels and Lines . . . 167
From Lines to Rectangles . . . 169
From Rectangles to Polygons . . . 172
From Polygons to Arcs and Ellipses . . . 174
Creating Images with Text. . . 179
Saving Your Images . . . 184
Using Existing Images . . . 185
Conclusion . . . 192
Chapter 9 Creating Battle Tank and Using Dynamic Terrain . . . 193
Planning Battle Tank . . . 193
Creating the Graphics . . . 195
Creating the Game Logic. . . 196
Creating Dynamic Terrain . . . 205
Conclusion . . . 209
Part IV
Extras and Final Projects . . . 211
Chapter 10 PHP and Sockets . . . 213
Socket Basics . . . 213
Creating a Server. . . 220
Creating the Client . . . 223
Integrating Sockets with Battle Tank . . . 224
Chapter 11 Kiddy Cartel—Creating Your Own MMO . . . 229
Installing mySQL . . . 230
Relational Databases: A Quick Rundown . . . 231
Kiddy Cartel: The Rules and Specifications . . . 233
Creating Your Base Actions . . . 235
Creating a Command with Sub-Commands . . . 240
Creating a Command without Sub-Commands. . . 245
Look at All the Commands…Now What? . . . 248
Conclusion . . . 256
Chapter 12 Building Your PHP Skills . . . 257
PHP and Ming . . . 257
How to Create a Flash Movie . . . 259
Drawing to Your Flash Movie . . . 262
Filling Objects with Ming . . . 265
Adding Animation to Your Flash Movie . . . 271
Adding ActionScript to Your Flash Piece . . . 275
Conclusion . . . 279
Part V
Appendixes . . . 281
Appendix A HTML Language Reference . . . 283
. . . 309
. . . 329
Appendix B PHP Language Reference Appendix C Support — Debugging Applications Appendix D GD SDK Language Reference . . . 341
Syntax Errors . . . 329
Semantic Errors . . . 331
Logic Errors . . . 332
PHP and Error Reporting . . . 333
Handling Errors . . . 334
Application and Installation Problems . . . 335
Introduction
O
ver the past few years the World Wide Web has grown tremendously. From its infant stages when a Web page was nothing more than text with HTML to dynamic, robust, extensible, rich multimedia content. Five years ago you would never have thought of playing a game on the Web, but today, with current scripting lan-guages, you can do just that. PHP has transformed the Web as we know it. PHP provides quick, dynamic, real-time tools to bring life to Web sites.PHP (otherwise known as the hypertext preprocessor) burst onto the scene in 1994 when Rasmus Lendorf released a package of “Personal Home Page” tools to the public. As more interest for these tools grew, Rasmus decided to create his own scripting engine to parse input from an HTML form. The first version of PHP was born; it was called PHP/FI. The programming community quickly grew out of PHP/FI, and PHP soon became the API as you know it today. If you know C/C++ or Java then learning the basic PHP con-structs will be extremely easy.
PHP is a wonderful tool with quick, on-the-fly, compilation. It also offers you a ton of libraries to work with to create graphics, Flash pieces, connections to databases, and con-nections to other computers.
The main focus of this book is to take all of these tools and give you the knowledge and power to create turn-based games on the Web.
Why PHP?
You might ask, why PHP? What is the difference between PHP and another embedded scripting language such as ASP? The main difference between these languages is obviously syntax. But beyond that PHP offers you tons of libraries, all for free. The interpretation of code is faster than ASP, and connecting to a database requires only two to three lines of code. The best part of PHP is that it is an object-oriented language, which inherently gives you a great deal of flexibility in your games.
Who Should Read This Book?
This book is for anyone who wants to implement any Web-based games. An understand-ing of HTML would be helpful. I have included, however, a section dedicated to teachunderstand-ing you some basics of HTML. Knowledge of your operating system will be helpful too. Since PHP is a cross-platform language I can cover only so much in the way of installing PHP. If something goes wrong during installation it will help if you know your operating sys-tem. This book is not for someone with advanced PHP skills.
What’s On the CD?
■ All the source code in the book■ The PHP installer for Windows and UNIX
■ PHP libraries
■ Evaluation edition of Jasc Paint Shop Pro 8
■ ST Software’s PHP Integrated Development Environment
■ MySQL 4.0
How This Book Is Organized
I intended this book to be read in sequential order. If you are a beginner and this is your first exposure to PHP I suggest that you read the book in this manner. However, if you already have a knowledge of PHP you can feel free to skip around from chapter to chapter.
This book is broken into four main parts. The first part of this book walks you through setting up PHP and your Web server. The second part introduces you to PHP itself. In the third part of this book you start creating your very own PHP Web-based games. In the fourth part of this book you take a look at all of the cool stuff PHP can do.
xv Introduction
■ Chapter 1—So What Is All This Server Stuff?. This chapter gives you an overview of server architecture and how the Web works generally. You will also learn how to install an IIS server and an Apache Web server.
■ Chapter 2—Waging the Configuration War. After you have installed your Web server, this chapter will walk you through the steps of installing the PHP CGI Interpreter. This chapter will also show you some of the basics for configuring PHP.
■ Chapter 3—I Have Conquered the Server, Let Me at the Code! This chapter will teach you the basics of HTML. It also includes a brief explanation of how images work in the World Wide Web.
■ Chapter 4—Say Hello to PHP. This chapter introduces you to the PHP language itself. You will learn the basic points of PHP, such as how to create a PHP page, how to declare variables in PHP, and how to use regular expressions.
■ Chapter 5—Operators, Statements, and Functions. In this chapter you will learn about arithmetic, logic, and bitwise operators. You will also learn how to create logic statements and functions.
■ Chapter 6—Arrays! This chapter will teach you how to allocate and use arrays in PHP. After you have learned all the finer points of arrays you will create your first game.
■ Chapter 7—Playing with Chess and Databases. In this chapter you will learn about non-relational databases. You will also create a simple chess game that uses a non-relational database to keep track of moves.
■ Chapter 8—GD Graphics Overview. This chapter introduces Boutell’s GD graph-ics library. You will learn how to create graphgraph-ics, manipulate graphgraph-ics, and add dynamic text to your graphics.
■ Chapter 9—Creating Battle Tank and Using Dynamic Terrain. In this chapter you will first create a Scorched Earth game remake called Battle Tank. After you have created the initial game you will add dynamic terrain.
■ Chapter 10—PHP and Sockets. This chapter introduces you to socket program-ming with PHP. It describes how to send and receive data through sockets.
■ Chapter 12—Building Your PHP Skills. In this final chapter you will take a look at additional applications for PHP, such as using Ming to create dynamic Flash movies.
■ Appendix A—HTML Language Reference
■ Appendix B—PHP Language Reference
■ Appendix C—Support—Debugging Applications
Introduction
to the World
of PHP
Chapter 1
So What Is All This Server Stuff? . . . .3
Chapter 2
Waging the Configuration War . . . .23
Chapter 3
I Have Conquered the Server, Let Me at the Code! . . . .31
chapter 1
So What Is All
This Server Stuff?
■ How the Client/Server Relationship Works
■ The Web Server
■ Sessions and Session Variables
■ TCP/IP
■ Installing the IIS Web Server
■ Installing the Apache Web Server on Windows
■ Installing the Apache Web Server on UNIX
B
efore getting to the configuration and installation of PHP, it is important to know how a Web server and Web browser work together. Accordingly, this chapter will cover some basic server architecture and discuss some points that will change the way you design your applications. If you feel like you already know these concepts, you may wish to skip this section and move on to the section on installation.Understanding the Client/Server Relationship
When you talk about viewing a PHP page, you are referring to a Web page. When you go to a Web page a series of events occur. These events start at the client with the request, go to a server to get the page, and end back at the client for viewing. Take a look at these events as listed below, and depicted in Figure 1.1.
1. The client computer connects to the Internet. 2. The client opens a Web browser.
3. The client requests a page from a Web site. When you do this, a message is sent over the Internet to a name server, and the name server then directs you to the server that hosts the Web page.
4. The server that hosts the Web page receives your request and retrieves the requested page.
5. If the page is a scripted page, such as a PHP page, the server compiles the page through a just-in-time compiler that generates HTML.
6. The server then transmits the completed HTML back to the client (the browser). 7. The Web browser receives the HTML and displays an interpretation of the page. All of that is fairly straightforward; it’s almost like magic. There is only one catch—from browser to browser, your Web pages are not displayed identically. That is why we say the browser interprets the page. For instance, when Internet Explorer receives a page that includes nested tables, both with heights of 100%, Internet Explorer interprets the height of the inner table relative to the height of the outer table. However, in Netscape Naviga-tor, the browser will make both the inner and the outer table the height of the browser window. This poses a problem if you want a page to look the same in multiple browsers. It gets worse when you switch between OS platforms. Let’s say you have a page of text, and for some reason the text determines the layout of the page, and you get it looking perfect on a Windows platform. When you then view the page on a Macintosh, the font is
Request Received
Reqest P age HTML Received
The Internet Page Sent Web Server
Web Client/Browser
5 Sessions and Session Variables
rendered very differently. The kerning (the space between characters) and the leading (the space between lines) is totally different. In fact, the font itself might be changed to a dif-ferent font altogether. Style sheets can mitigate some of these problems, but you’ll still run into layout issues. The point is that what the browser displays is not a photograph, so if you want your games to work on several different browsers you have to be careful about the types of elements (text and graphics) you use.
The Web Server
Now that you have a general understanding of how a client/server relationship works you can take a closer look at the heart of the beast: the Web server itself.
A Web server runs what is called an HTTP daemon. This daemon handles all of the requests received on a particular port. The HTTP daemon will listen to two ports—port 80 and port 443. Port 80 is the general Web port (http://). Port 443 is the standard for secure socket (https://). A Web server is also said to be stateless. That is to say, no perma-nent connection is maintained between the client and the server. This is extremely impor-tant to understand. It will make debugging or solving certain problems much easier, and, more important, this concept will completely change the way you design your games. It won’t be as easy as making a library of functions or a simple engine and calling functions. You will need to develop a way to keep state.
Think about that for a minute. What does that really mean? Well, it means that every time a particular event happens in your PHP game—e.g., the user enters coordinates and clicks the fire button—the Web browser will reopen the connection to the server, resend the request to the server, and the server will then process the page and send it back. Now you need to reload all of your variables/states and update the page appropriately. Otherwise the whole game would start over, and that would be no fun. Don’t get me wrong — there are some side scripting languages, such as JavaScript, that you can use for client-side event processing. However, that is beyond the scope of this book, which focuses on how to make games with PHP. So how exactly do you do this?
Sessions and Session Variables
When working with sessions there are some important things to remember. If you have a server farm running, a user’s session does not follow him as he moves from server to server. In other words, a session is only valid on a single server. The session is process dependent. This means that if your Web server needs to be restarted and there are current sessions active, then the sessions will be lost. One unique feature of sessions in PHP is that they are not cookie dependent. So if a client does not accept HTTP cookies, the client can still take advantage of sessions.
There are currently two methods supported for passing sessions in PHP4:
■ Cookies
■ URL Parameter
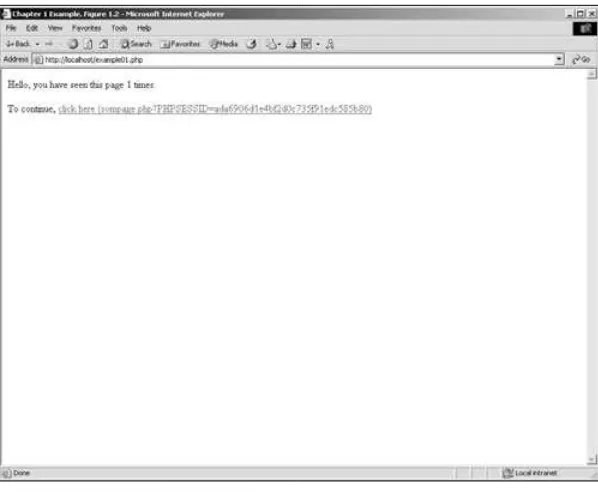
Cookies are of course the preferred method, but since they are not always available you can pass the session id along the query string as a URL parameter. Here is an example of how you might pass the session id along the query string in PHP.
<?php
if(!session_is_registered(‘nCount’)) {
session_register(‘nCount’); $nCount = 1;
} else {
$nCount++; }
?>
<p>Hello, you have seen this page <?php echo $nCount; ?> times.</p>
<p>To continue, <a href=”somepage.php?<?php echo strip_tags(SID)?>”>click here (sompage.php?<?php echo strip_tags(SID)?>)</A></p>
In this example we check to see if the session variable nCount is registered. If it is not regis-tered we register it and initialize it. Otherwise we add 1 to the count and display our mes-sage to the user. The output of this page might look something like you see in Figure 1.2.
N o t e
7 Sessions and Session Variables
Figure 1.2 An example output of passing a session id.
That long number at the end of the link, ada6906d1e4bf2d0c753f91edc585b80, is the ses-sion id. PHP stores these sesses-sions in the sesses-siondata folder, usually C:\PHP\sesses-siondata. If you look in this folder you will see files that start with sess_ and end with a long GUID like the one on the end of the URL. This is how PHP itself keeps track of the session data. When you start debugging you will probably reference this folder quite often because you can open up these files and see if the session variables you set are being stored. If they are not being stored then you will need to check your php.ini file to make sure sessions are enabled.
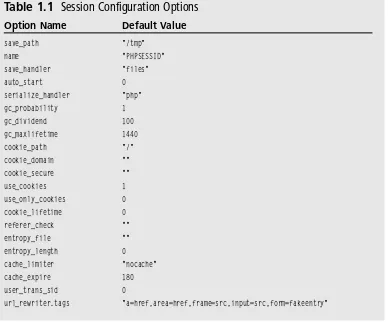
Now that you have a general knowledge of how sessions in PHP work, take a look at the configuration options available to you and what each one of them means. There are 21 configurable options for sessions in PHP (see Table 1.1) and each one of these behaviors is configurable in the php.ini file.
All of these options, except user_trans_sid, can be set anywhere using the ini_set()
Session Configuration Options
Option Name
save_path “/tmp”
name “PHPSESSID”
save_handler “files”
auto_start 0
serialize_handler “php” gc_probability 1
gc_dividend 100
gc_maxlifetime 1440
cookie_path “/”
cookie_domain “”
cookie_secure “”
use_cookies 1
use_only_cookies 0 cookie_lifetime 0
referer_check “”
entropy_file “”
entropy_length 0 cache_limiter “nocache”
cache_expire 180
user_trans_sid 0
url_rewriter.tags “a=href,area=href,frame=src,input=src,form=fakeentry”
Table 1.1
Default Value
Here is an overview of each of these configurable session options.
session.save_handler
session.save_handler defines the name of the handler that is used for the sessions data management.
session.save_path
session.save_path This is where the sessions are stored if session.save_handler is set to files. There is an optional N argument to this option that determines the num-ber of directory levels that your sessions will be stored across. For example, setting the save_path option to 5;./temp, where 5 is the optional argument, will result in a directory structure something like this:
9 Sessions and Session Variables
If the N argument is used you must create the directory structure yourself. Also, if you do use the N argument you must surround the session.save_path in quotes because the semicolon is also used for comments in the php.ini file. For our pur-poses, I do not recommend using this option.
session.name
session.name specifies the name of the session that is used to reference the sessionid in cookies. This should only take alphanumeric characters.
session.auto_start
session.auto_start specifies if the session module should start automatically. If you do use session.auto_start then you cannot put objects into your sessions because the class definition must be loaded before starting the session.
session.serialize_handler
session.serialize_handler is the name of the handler which is used to serialize or deserialize data in the session. Currently only the internal formats “php” and “WDDX” are valid. WDDX is also available only if PHP is compiled with WDDX support.
session.gc_probability and session.gc_dividend
session.gc_probability specifies the probability when the garbage collection process should start. This is calculated by using gc_probability/gc_dividend.
session.gc_maxlifetime
session.gc_maxlifetime is the number of seconds at which the session data is seen as garbage and cleaned up.
session.cookie_path
session.cookie_path is the path for which the cookie is valid.
session.cookie_domain
session.cookie_domain is the domain for which the cookie is valid.
session.cookie_secure
session.cookie_secure tells the cookies whether they should be sent over secure con-nections only.
session.use_cookies
session.use_only_cookies
session.use_only_cookies tells the session module that it should only use cookies to store the session ids. This prevents attacks from session variables being passed along the URL.
session.cookie_lifetime
session.cookie_lifetime specifies the lifetime of the cookie in seconds. The default value 0 means wait until the browser is closed to expire the cookie.
session.referer_check
session.referer_check contains a string for which you want to check each HTTP referer. If PHP does not find this substring, the embedded session id will be marked as invalid.
session.entropy_file
session.entropy_file gives a path to an external file that will be used as an addition in creating the session id. The external file will contribute to the randomness in the session creation.
session.entropy_length
session.entropy_length specifies the number of bytes which will be read from the
session.entropy_file variable. When set to its default value of 0, it disables the entropy options.
session.cache_limiter
session.cache_limiter specifies the cache control method to use. Valid options for this are none, nocache, private, private_no_expire, and public.
session.cache_expire
session.cache_expire is the time to live for cached session pages in minutes. This option has no effect if session.cache_limiter is set to nocache.
session.user_trans_sid
session.user_trans_sid specifies whether or not transparent sid support is enabled.
url_rewriter.tags
url_rewriter.tags specifies what HTML tags should be rewritten to include the ses-sion id if session.user_trans_sid is set to 1.
11 Sessions and Session Variables
Session Functions
Function Name Arguments Description
session_cache_expire [int new_cache_expire]
session.cache_expire is replaced with
session_cache_limiter [string cache_limiter] returns the name of the current setting for
session_decode
session_encode void returns an encoded string with the contents of the current session.
session_destroy void destroys the current session and any data associated with the current session.
session_get_cookie_params void returns an array with the current sessions cookie
session_id
must call this before session_start().
session_is_registered
session_module_name
instead.
session_name [string name]
specified it sets the name of the current session.
session_regenerate_id void will regenerate the session id and replace the current session id with the newly generated session id.
session_register ]
arguments can be a string holding the name of a
that name in the current session.
session_save_path [string path] returns the path of the current directory where
current path is replaced with path.
session_set_cookie_params int lifetime [,string path] [,string domain]
Table 1.2
returns the current setting for session.cache_expire. If new_cache_expire is specified, the current
new_cache_expire.
session.cache_limiter. If cache_limiter is specified, the name of session.cache_limiter is set to cache_limiter.
string val decodes the session data in the variable val.
information. The array contains the following items: lifetime, path, domain, and secure.
[string val] returns the current session id. If val is specified it will replace the current session id. If val is specified you
string val returns true if there is a global variable with a name specified in val.
[string val] returns the name of the current session module. If val is specified, that module will be used
returns the name of the current session. If name is
mixed name [, mixed … accepts a variable number of arguments; any of these
variable or an array consisting of variable names or other arrays. For each of the names specified, session_register() will register a global variable with
sessions are being stored. If path is specified, the
sets the cookie parameters, lifetime, path, domain, and secure.
Session Functions
(continued)Function Name Arguments Description
session_set_save_handler sets the session storage functions used for storing and
session_start void
is all based on the current session id.
session_unregister
session_unset void
session_write_close void this will end the current session and store the session
Table 1.2
string open, string close,
string read, string write, retrieving data. You would use this when you wanted string destroy, string gc to create your own session handling functions.
creates a session or resumes the current session. This
string var unregisters global variables with the name specified in var.
this frees all session variables currently registered.
data. You do not need to explicitly call this function.
I know that you are saying to yourself, “What the hell am I supposed to do with all of this?” To tell you the truth, you won’t use half of these functions for what you will be doing. Just because you won’t use them in the examples does not mean that you won’t use them in some of your games. As for the functions you will use, here is an example PHP script that sets some session variables. Do not worry about the syntax of all the code right now; I’ll cover that in Chapter 4. For now, just look at how I am using the functions listed in Table 1.2.
<?php
// use $_SESSION instead of session_register due to security issues session_start();
$turn = $_SESSION[‘turn’]; if(!isset($turn))
{
$turn = 1;
$_SESSION[‘turn’] = $turn; }
printf(“Current turn value: “ + $_SESSION[‘turn’]);
unset($turn); session_destroy(); ?>
Now take a look and see what this small example is doing. First you start the session using
TCP/IP 13
to initialize the variable. After you initialize the variable, it sets the session variable turn to whatever is in the variable $turn. Then, the current value is printed, the variable is unset, and the session is destroyed.
Do not worry if you aren’t comfortable with all of this yet. You will be using sessions in all the projects in this book, so it will make more sense when you see sessions being used in an actual context.
If you’re feeling a bit overwhelmed this would probably be a good time to take a break. If you’re ready for more, continue with the discussion of how the Web server talks to the client with TCP/IP. After that, you will install and configure an IIS (Internet Information Server) Web server and an Apache Web server.
TCP/IP
TCP/IP (Transmission Control Protocol/Internet Protocol) is simply a communications protocol that computers use to talk to each other. What do the different components of TCP/IP do?
■ TCP. This is responsible for verifying the correct delivery of data from a client to a server, or a server to a client. TCP has built-in error checking and will trigger transmissions until the data has successfully reached its destination.
■ IP. This is responsible for moving packets of data from node to node. IP forwards these packets based on a four-byte destination address (IP Address).
Just like every other communications protocol, TCP/IP is constructed of layers; however, each of the layers in TCP/IP is logical instead of physical. All network traffic moves through these layers as they travel through the hardware. Here are the layers and a little bit of information about each.
■ Application Layer. This layer handles everything that is not TCP/IP. The Web browser, in our case, is the application layer.
■ Transport Layer. This layer handles all the routing and delivery of data. This layer also includes the error control and sequence checking.
■ Internet Layer. This is the layer responsible for data addressing, transmission, packet fragmentation, and packet reassembly.
■ Network Access Layer. This layer handles the transmission of the data across the network, including determining how to access the hardware.
the data to achieve the maximum data exchange rate, while avoiding congestion and packet loss. TCP/IP also attempts to pack as much data into a packet as possible.
To sustain an acceptable data transfer rate while avoiding network overload, TCP/IP contains four algorithms: Slow Start, Congestion Avoidance, Fast Retransmit, and Fast Recovery. The Slow Start algorithm avoids injecting multiple segments into the network during the transmission. The reason for this is if there are routers and slower links between the sender and the receiver you start to lose packets and you slow down your connection. So the Slow Start algorithm enables TCP/IP to only send data at the rate which the acknowl-edgments are returned.
The Congestion Avoidance algorithm does what the name says—it avoids congestion. Network congestion usually occurs when a large amount of data is sent out of a larger pipe and received on a smaller pipe. Congestion can also occur when multiple streams of data arrive at a router whose output capacity is less then the sum of the inputs.
The Fast Retransmit algorithm is triggered when the receiving end sends a duplicate acknowledgment. This occurs when an out-of-order segment is received, a duplicate ACK is received, or a packet is lost. When this occurs, TCP/IP will retransmit the packet that was excepted.
The Fast Recovery algorithm is triggered after the Fast Retransmit sends the missing packet segment. This allows TCP/IP to recover from the missing segment while still avoid-ing network congestion. If fast recovery was not available, the user might see a significant decrease in data transmission.
Now that you know how TCP/IP works, you are set with the knowledge you need to con-tinue the march. The next step is to install the Web server. Following are installation walk-throughs for IIS and Apache.
Installing the IIS Web Server
IIS (Internet Information Server) is included with the Windows 2000 installation disk. PWS (Personal Web Server), a trimmed down version of IIS, is available with the Win-dows 98 installation disk. The differences between IIS and PWS are relatively small; the biggest differences are:
■ PWS cannot host multiple Web sites on a single machine.
■ PWS cannot log to an ODBC compliant database.
■ PWS cannot restrict access by IP address.
■ PWS cannot perform indexing.
15 Installing the IIS Web Server
Fortunately for us, none of this affects our development. Basically, PWS is not intended to be a production server. So if you want to run your own Web sites beyond just develop-ment you will need to install IIS.
C a u t i o n
IIS/PWS is not supported on Windows ME or Windows XP Home Edition, so you will need to install Apache Web Server for Windows.
Before you install IIS, if there are any other Web servers running on your machine you will need to uninstall them. If IIS or PWS is already installed on your machine, please skip to Chapter 2 to set up PHP.
Installation on Windows 2000/XP Professional
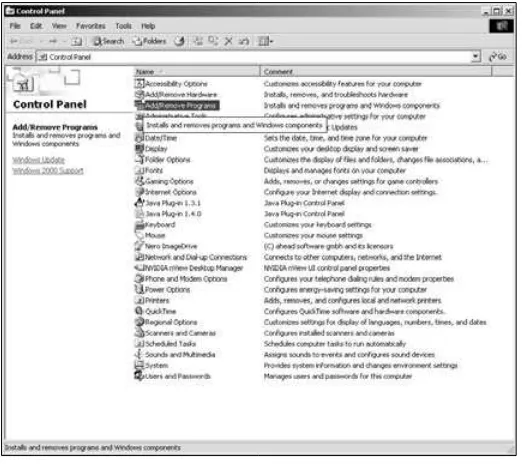
IIS/PWS, which I will just refer to as IIS from here on, is a Windows component, so you will need to have your Windows installation disk ready. To start the installation, click on Start>Settings>Control Panel, and double-click on the Add/Remove Programs icon as shown in Figure 1.3.
C a u t i o n
Your Control Panel may differ from that in Figure 1.3.
Now click on the Windows Component Tab (if you are using Windows XP click on the Add/Remove Windows Components button) on the left-hand side and scroll down until you see Internet Information Services (IIS). Click on Internet Information Services (IIS), then click the Details button in the lower right corner of the window. You should see a screen that looks similar to Figure 1.4.
Now you can select the components you want to install with IIS. By default, Common Files, Internet Information Services Snap-In, Personal Web Manager, and World Wide Web Server should be selected. On Windows XP you will not see the Personal Web Man-ager option. Also, the World Wide Web Server is actually World Wide Web Services on Windows XP. If these are not selected then you should select them and click OK.
To install, click the Next button. After Windows is finished installing IIS to C:\Inetpub, there will be several new items on your computer. In C:\Inetpub there are five folders: AdminScripts, iissamples, Scripts, webpub, and wwwroot. The wwwroot folder is where the default Web site for IIS lives. You will be working mostly with this folder and virtual directories.
T i p
A virtual directory can live anywhere on your computer, but it shows up under the Default Web site. This is extremely useful if you don’t want to keep your Web files under the C:\Inetpub directory.
17 Installing the IIS Web Server
That’s it! IIS is now installed on your machine. With this install you can run HTML and ASP pages. Now it is time to add the PHP CGI Interpreter to your IIS installation. You can either read on to see how this process is completed for Windows 98/ME and the Apache Web Server, or you may just skip straight to Chapter 2 to learn how to install PHP.
Installation on Windows 98
To install PWS on Windows 98 you will need to insert your installation disk and navigate to the add-ons\pws folder. Once you reach the add-ons\pws folder, double-click on the setup.exe icon. This will launch the PWS installer. You will be presented with a screen with three buttons: Minimum, Typical, and Custom. Click on Custom. You should see a screen that looks like Figure 1.5.
Once you get to this screen make sure the following are checked:
■ Common Program Files
■ FrontPage 98 Server Extensions
■ Microsoft Data Access Components
■ Personal Web Server (PWS)
■ Transaction Server
Once you have selected these options, click the Next button and make sure the installation directory for the WWW service is set to C:\Inetpub\wwwroot, as shown in Figure 1.6.
Figure 1.6 The PWS installation—WWW Service screen.
Click Next to finish the installation. Once the installation is complete you can skip to Chapter 2 to install the PHP CGI Interpreter.
Installing the Apache Web Server
on Windows ME/XP
Installing Apache on Windows ME or Windows XP Home Edition is very easy. I have included the Apache 2.0.46 msi installer on the CD in the Apache directory. If a newer ver-sion is available at the time you read this, you can download it at www.apache.org. To install Apache, double-click on the apache_2.0.46-win32-x86-no_src.msi in the Apache directory on the CD included with this book. Once the installation starts it will ask you for a few things.
■ Network Domain. This is where you enter the DNS domain for which your server will be registered. Just type in mydomain.com.
■ Server Name. This is your server’s fully qualified domain name. Type in server.mydomain.com.
■ Administrator’s E-Mail Address. Just enter your e-mail address here.
■ For Whom to Install Apache. Select for All Users, on Port 80, and as a Service.
19 Installing the Apache Web Server on Windows ME/XP
Figure 1.7 The Apache MSI installer.
Once you have all that information entered, click the Next button. Select Typical Install, and then click Next. Click Next one more time to accept the default directory, C:\Program Files\Apache Group. The installation will create a subdirectory in the default directory named Apache2 — this is where all the files for Apache will live.
That’s it! Wasn’t that easy? Now you can move on to Chapter 2 and install the PHP CGI Interpreter.
Installing the Apache Web Server on UNIX
The first thing you need to do is get the source code for the Apache server. I have included version 2.0.46 on the CD in the Apache directory. There might be a newer version out when you read this book—if you would like to check, you can download the newer ver-sion from www.apache.org. There are a two basic requirements that you will need to install Apache.
■ Disk Space. You need at least 50 megabytes of temporary free disk space available. After Apache is installed, it occupies 10 megabytes.
Now that you know the requirements and have the Apache source files, you need to extract them from the tarball. To do this, type the following at the command prompt:
$ gzip -d httpd-2.0.46.tar.gz $ tar xvf httpd-2.0.46.tar
This will create a new directory under your present working directory containing the source code of the distribution. You will need to cd into that directory before compiling the server. $ cd httpd-2.0.46
Now you need to configure the Apache source tree. This is done by using the configure script that is in the root directory of the distribution that you just extracted. Before you run this script there are several environment variables and flags that the configure script can take. The environment variables are listed in Table 1.3 and always appear before the configure command.
Depending on the setup of your computer, you will need to define some of these envi-ronment variables. An example of the configure command might look something like this:
$ CC=”gcc” ./configure —prefix=/sw/pkg/apache
For a complete list of the configuration options, run ./configure—help. After configure has run, it will take several minutes to test for the availability of features on your machine and to finish building the Makefiles.
After the configure script has finished running you can build the distribution by typing in
make at the command prompt. This will create the installation files. Be patient with this process; it usually takes approximately 3 minutes to finish. It could be even longer depending on the number of modules you selected.
CC=
CPPFLAGS=
CFLAGS=
LDFLAGS=
LIBS= Library location information.
INCLUDES=
TARGET=
SHLIB_PATH=
Table 1.3
Environment Variables
Variable Name Description
The name of the C compiler.
Miscellaneous C preprocessor compiler options. Debugging and optimizations for the C Compiler. Options for the linker.
Header file search directories.
21 Installing the Apache Web Server on INIX
As soon as the make script is finished, you can install the Apache Web Server package. To do this, simply type make install at the command prompt. After the install script has fin-ished, Apache is installed and ready to go. There are some customizations that you can do by editing the httpd.conf file. There are tons of options in this file—far too many to go through here in this book. So, I direct you to the online Apache documentation at http://httpd.apache.org/docs-2.0/.
After you have finished customizing your Apache installation you should have to start the server. During the installation, Apache put a start script in your bin directory called
apachectl. To start the server you simply have to type the following:
$ /apache/bin/apachectl start
You should now be able to request a Web page via a URL (http://localhost/). If you ever need to stop the server, you type:
$ /apache/bin/apachectl stop
chapter 2
Waging the
Configuration War
■ The Platforms
■ Building and Installing PHP on UNIX
■ Installation on Windows for IIS/Apache
■ Testing Your Installation
P
HP is a very versatile language and comes with a myriad of options. PHP sup-ports several hundred APIs and interfaces to other programming tools. So it would be worthwhile to consider what you want PHP to do and install only the modules you need.You will be configuring the PHP interpreter with a few extra modules, one of which is Boutell’s GD library (GD SDK). The GD SDK allows you to generate and manipulate images on the fly, which I consider to be very important in the development of games. If you would like to install other modules, feel free. The majority of the installs are very similar.
Let’s get to it!
The Platforms
Since PHP is not OS dependent we will be installing and configuring PHP for UNIX and Windows.
When you talk about UNIX, the Web server of choice is Apache. You can configure PHP in two different ways when you install on Apache.
■ As a CGI Interpreter.
N o t e
You can only configure PHP as an Apache module with the Apache server.
When PHP is compiled as an Apache module it runs in the same memory space as the Apache server. This means two things to you: 1) you get a performance boost when inter-preting pages, but 2) you get screwed if a page goes haywire. If one of your PHP pages goes haywire when running in the same memory space as the Apache server, the Apache server will halt. This means you are dead in the water — no pages will be served up until it is restarted. However, if you configure PHP as a interpreter you avoid the whole issue alto-gether. The disadvantage is obviously a minor performance hit, but it is negligible.
On the other side of the coin is Microsoft Windows with IIS (Internet Information Server) or PWS (Personal Web Server). Distributions of PHP are available from IIS 3 up to IIS 5; I have included the IIS and Apache installs on the CD provided with the book.
Building and Installing PHP on UNIX
If you’re going to install PHP on a Windows platform you can continue on to the next sec-tion, unless this topic is really of interest to you.
The installation on UNIX-like systems is fairly straightforward. You need to generate the make files by running the autoconf scripts and then carry out a make and install. I will only be covering how to install PHP as a CGI Interpreter for simplicity’s sake.
Let’s get started. The first step is to uncompress the distribution and extract the files.
$ gzip cd php4.2.3.tar.gz | tar xvf
-Now you must change to the directory where the distribution was unpacked and run the configure script to generate the necessary make files. You can pass other options to tell the configure script what modules you would like to install. For example:
$ ./configure withgd=/usr/src/gd2.0.4 enablegdnativettf enablegdimgstrttf --with-jpeg-dir=/usr --with-png-dir=/usr
25 Building and Installing PHP on UNIX
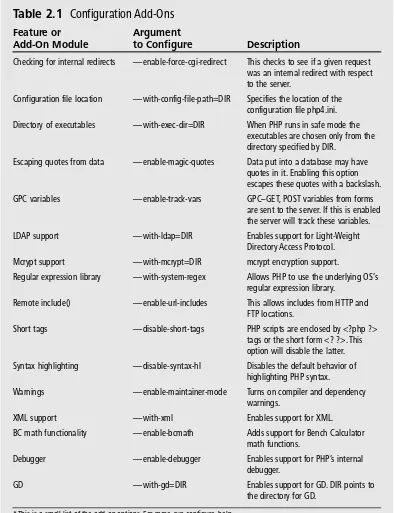
Configuration Add-Ons
Argument
Add-On Module Description
Checking for internal redirects — enable-force-cgi-redirect
Configuration file location — with-config-file-path=DIR Specifies the location of the configuration file php4.ini. Directory of executables — with-exec-dir=DIR When PHP runs in safe mode the
executables are chosen only from the directory specified by DIR.
Escaping quotes from data — enable-magic-quotes Data put into a database may have
escapes these quotes with a backslash. —
— with-ldap=DIR
Mcrypt support — with-mcrypt=DIR mcrypt encryption support.
Regular expression library — with-system-regex
Remote include() — enable-url-includes
Short tags — disable-short-tags PHP scripts are enclosed by <?php ?>
Syntax highlighting — disable-syntax-hl Disables the default behavior of highlighting PHP syntax. —
XML support — with-xml Enables support for XML.
BC math functionality — enable-bcmath Adds support for Bench Calculator
Debugger — enable-debugger
GD — with-gd=DIR
Table 2.1
Feature or
to Configure
This checks to see if a given request was an internal redirect with respect to the server.
quotes in it. Enabling this option
GPC variables enable-track-vars GPC–GET, POST variables from forms
are sent to the server. If this is enabled the server will track these variables.
LDAP support Enables support for Light-Weight
Directory Access Protocol.
Allows PHP to use the underlying OS’s regular expression library.
This allows includes from HTTP and FTP locations.
tags or the short form <? ?>. This option will disable the latter.
Warnings enable-maintainer-mode Turns on compiler and dependency
warnings.
math functions.
Enables support for PHP’s internal debugger.
Enables support for GD. DIR points to the directory for GD.
Now if the earlier configure script ran successfully there should be a file called make in the directory. This is the file that will build the distribution. To run it, type the following:
$ make
If you see a link time failure, you are most likely missing a reference to a library. If a library is in a non-standard location you will need to specify the path to the library and re-run the make file again.
$ export LD_LIBRARY_PATH=$LD_LIBRARY_PATH:/var/otherlibdir $ make
After all of the source files have been successfully compiled and linked you can install the distribution. To do this you must have root privileges. I am assuming that you are installing as root; if you are not you will need to assume the super user.
T i p
To assume the super user, or root user from a command line, simply type su at the command prompt and enter the password.
To install the distribution, simply enter the following command:
$ make install
That’s it. You should now have PHP installed on your system. The only thing left to do is tell Apache what to do with PHP pages. Navigate to the folder where your Apache config-uration file lives (usually httpd.conf), open it, and type the following lines:
AddType application/x-httpd-php4 .php4 .php AddType application/x-httpd-php4-source .phps Action application/x-httpd-php4 /cgi-bin/php
DirectoryIndex index.html index.shtml index.cgi index.php4 index.php AddIcon /icons/script.gif .conf .sh .shar .csh .ksh .tcl .php4 .php .phps
Finally, you will need to restart the Apache Web server. That’s all that you need to do — you’re done configuring PHP and Apache. Now would probably be a good time to take a break and get another Mountain Dew. . . . Next up: testing!
Installation on Windows for IIS/Apache
27 Installation on Windows for IIS/Apache
the source on a Windows machine, but if you really would like to learn that, there is won-derful documentation at www.php.net.
To start the installation of PHP, double-click on the php-4.3.2-installer.exe file on the CD. This will bring up the installation wizard. Go ahead and click the Next button and agree to the license agreement. Make sure that the installation type is set to Standard and click the Next button. If the directory C:\PHP is where you want the installation, click Next; otherwise change the directory. Now you will be presented with a screen to enter your SMTP server and the from address for the mail function. Just leave these as they are (SMTP Server = localhost, and from address = [email protected]), and click Next. You should see a screen that looks like Figure 2.1. This is where you will select the Web server that you installed in Chapter 1. If you installed IIS for Windows 2000/XP you will want to select Microsoft IIS 4 or higher. If you installed PWS for Windows 98 you will want to select PWS Microsoft Windows 9x. If you installed Apache for Windows ME you will want to select Apache.
After you have selected your Web server click Next to start the installation. If you are asked to select scriptmap nodes to add PHP mappings to, click on Select All and then click on OK.
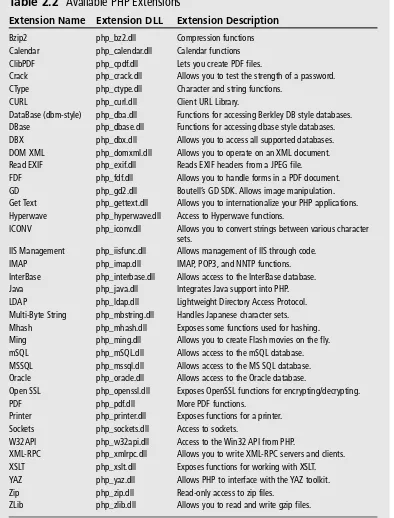
After the installation is finished you can add the modules that you need.
Extension Name Extension DLL Extension Description
Bzip2 php_bz2.dll Compression functions
Calendar Calendar functions
ClibPDF
Crack php_crack.dll Allows you to test the strength of a password.
CURL php_curl.dll
DataBase (dbm-style) php_dba.dll DBase
DBX php_dbx.dll
DOM XML php_domxml.dll Allows you to operate on an XML document. Read EXIF
FDF Allows you to handle forms in a PDF document.
GD php_gd2.dll
php_gettext.dll
ICONV
IIS Management php_iisfunc.dll IMAP
InterBase
Multi-Byte String php_mbstring.dll
Mhash php_mhash.dll Exposes some functions used for hashing.
Ming php_ming.dll
mSQL php_mSQL.dll
MSSQL php_mssql.dll
Oracle
Open SSL php_openssl.dll Exposes OpenSSL functions for encrypting/decrypting. PDF
Table 2.2
Available PHP Extensions
php_calendar.dll
php_cpdf.dll Lets you create PDF files.
CType php_ctype.dll Character and string functions.
Client URL Library.
Functions for accessing Berkley DB style databases. php_dbase.dll Functions for accessing dbase style databases.
Allows you to access all supported databases.
php_exif.dll Reads EXIF headers from a JPEG file. php_fdf.dll
Boutell’s GD SDK. Allows image manipulation.
Get Text Allows you to internationalize your PHP applications.
Hyperwave php_hyperwave.dll Access to Hyperwave functions.
php_iconv.dll Allows you to convert strings between various character sets.
Allows management of IIS through code. php_imap.dll IMAP, POP3, and NNTP functions. php_interbase.dll Allows access to the InterBase database.
Java php_java.dll Integrates Java support into PHP.
LDAP php_ldap.dll Lightweight Directory Access Protocol.
Handles Japanese character sets.
Allows you to create Flash movies on the fly. Allows access to the mSQL database. Allows access to the MS SQL database. php_oracle.dll Allows access to the Oracle database.
php_pdf.dll More PDF functions.
php_printer.dll Exposes functions for a printer.
Sockets php_sockets.dll Access to sockets.
Access to the Win32 API from PHP.
Allows you to write XML-RPC servers and clients.
XSLT Exposes functions for working with XSLT.
YAZ Allows PHP to interface with the YAZ toolkit.
php_zip.dll Read-only access to zip files.
php_zlib.dll Allows you to read and write gzip files.
29 Testing Your Installation
Installing the Windows Extensions
Now that you have PHP installed you can add extensions to the installation. Table 2.2 pro-vides a list of the extensions available to Windows.
Adding an extension is very easy — all you need to do is copy the dlls you want and edit the php.ini file. First create a directory called extensions in the folder where you installed PHP (usually C:\PHP). Now extract the php-4.3.2-Win32.zip file that is included on the CD. Go to the directory that the zip file extracted to and copy all of the dlls out of the dlls directory and paste them into C:\WINNT\system32 if you are on a Windows 2000 machine; C:\WINDOWS\system32 if on a Windows XP machine; or if you are on a Win-dows 98 machine, C:\WINDOWS\system. Now go back to the folder where the zip file extracted to and copy all the dlls out of the extensions folder and paste them into the extensions folder you created.
Now that you have the dlls in their proper places, open up your php.ini file. It should be located in the C:\<WINDOWS DIRECTORY>\php.ini. Once you have that file open, go to the “Paths and Directories” section and look for extension_dir =” ./”. We want to set this to C:\PHP\extensions\. Now go to the “Dynamic Extensions” section and uncomment the following lines:
1. extension=php_dbase.dll 2. extension=php_gd2.dll 3. extension=php_sockets.dll
N o t e
It is important that you put the trailing backslash on C:\PHP\extensions\
Go ahead and save your php.ini file and exit. You now have installed the extensions and the PHP interpreter. All that’s left to do is to test the installation to make sure it is parsing PHP pages.
Testing Your Installation
PHP should now be installed and working on your machine. Go ahead and test it out. Open up your favorite text editor and type the following:
Then save this file as test.php and move it to a place where you will be able to hit it. If you are on Windows you can put it in C:\Inetpub\wwwroot\test.php; if you are in UNIX you can put it in /usr/web/test/php.
Open up a Web browser and type in http://localhost/test.php and you should see some-thing similar to Figure 2.2.
chapter 3
I Have Conquered
the Server,
Let Me at the Code!
■ The Basics of the HTML Tag
■ The Almighty HTML Document
■ The HTML Body
■ Graphics and HTML
■ Tables
■ Creating Forms for Input
C
ongratulations; if you are here then you have successfully configured and set up the Web server and the PHP CGI interpreter. In this chapter I will cover HTML (Hyper Text Markup Language). HTML is very important to us, because without it we would not be able to display anything to our user. That would not be a very fun game would it?If you feel comfortable with HTML you can skip ahead to Chapter 4 and start in on PHP. However, if you feel like you need a refresher on HTML, grab some snacks, crack open a Mountain Dew, then open up your favorite text editor and we will get started.
The Basics of the HTML Tag
HTML tags are straightforward to understand. You have a beginning tag and an ending tag. In other words, every tag has two elements that are paired together. The beginning tag looks like <tag_name> and the ending tag looks like </tag_name>. The only difference between these two tags is the forward slash in the end tag. Almost every tag in HTML
has attributes. To use these attributes your tag would look like this: <tag_name attribute1=”someValue”></tag_name>. The only tags in HTML that don’t have attributes you can set in the tag are <HTML></HTML>, <HEAD></HEAD>, and <TITLE></TITLE>. All other tags have one or more attributes that you can apply to them.
Now that you know the basics of an HTML tag, take a look at the different elements of an HTML document and how it is structured.
The Almighty HTML Document
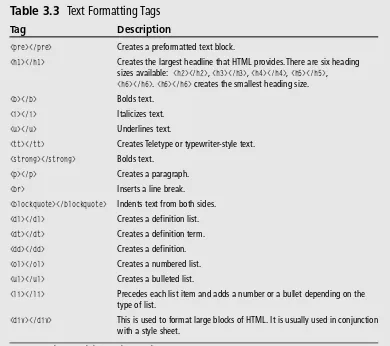
An HTML document usually has an extension of .htm or .html; however, since you will be coding in PHP in the near future you should just get in the habit of saving your HTML documents with the extension .php. To begin, please refer to Table 3.1, which contains the four basic tags that make up the beginnings of a HTML document.
As you may guess, everything that goes into your HTML document will be surrounded by the <HTML> tags and anything you want to display will go in between the <BODY> tags. The <HTML> tags are important; even though the majority of browsers out there can handle a document without the HTML tags, there is still a chance that your page will be misinterpreted. It is just safer to include them.
N o t e
Every tag starts out with <name_of_tag> and ends with </name_of_tag>.
The head section of your HTML document (<HEAD></HEAD>) is sort of like a quick reference for browsers. It supplies the document title, contains META data, and establishes rela-tionships between HTML documents and file directories. For the most part, you will not be dealing with all of these in your application. The only tag you will really need to worry about is the <TITLE></TITLE> tag. All this tag does is give your page a title and display it in the title bar of the window, like in Figure 3.1.
Description
<HTML></HTML> Creates a HTML document.
<HEAD></HEAD>
<TITLE></TITLE> Sets the title of the document.
<BODY></BODY> Contains the visible area of the document.
Table 3.1
Tags for the Beginning
Tag
33 The Almighty HTML Document
Figure 3.1 An example title tag.
I strongly suggest you give your pages logical names to relieve confusion when you edit them later; don’t use page names like “Page 1”. Similarly, do not make your titles extremely long. A good rule of thumb is, if your title is longer than three to five words, then it is too long.
Let’s go ahead and move on to the nitty gritty of HTML. If you are not quite clear on how all of these tags fit together, don’t worry—I will show an example soon.
The HTML Body
Table 3.2 shows the BODY tag attributes.
Everything that displays in your HTML page happens inside the <BODY></BODY> tags. When I say “everything” I mean anything that is visible to the user. That includes images, text, tables, links, background colors, text colors, link colors, forms, and buttons.
Attribute Description
Bgcolor #RRGGBB
Text #RRGGBB
Link #RRGGBB
Vlink #RRGGBB
Alink #RRGGBB Sets the color of the link when a user is clicking on it.
Background URL to image
Topmargin # of pixels
Leftmargin # of pixels
Marginheight # of pixels
Marginwidth # of pixels
Table 3.2
BODY Tag Attributes
Values
Sets the color to the specified HEX value. Sets the text to the specified color. Sets the link to the specified color.
Sets the visited states of links to the specified color.
Sets the background of the document to a specified image. Sets the value of the top margin of the document in Internet Explorer.
Sets the value of the left margin of the document in Internet Explorer.
Sets the value of the top margin of the document in Netscape. Sets the value of the left margin of the document in Netscape.
* A complete list of tags is included in Appendix A.
Most of the time you will just want to make the text stand out a little more, maybe for a header or something. For instance, you might want to label an input field or just make paragraphs to give instructions. So, we will be using the <H3></H3>, <B></B>, <P></P>, and
<BR> tags the majority of the time. Take a look at an example of an HTML document with these elements in it.
<HTML>
To master the art of PHP game programming you need to be fluent in HTML. Otherwise no one will be able to see your game.</p>