Eclipse IDE
Pocket Guide
Ed Burnette
Eclipse IDE Pocket Guide by Ed Burnette
Copyright © 2005 O’Reilly Media, Inc. All rights reserved. Printed in the United States of America.
Published by O’Reilly Media, Inc., 1005 Gravenstein Highway North, Sebastopol, CA 95472.
O’Reilly books may be purchased for educational, business, or sales promotional use. Online editions are also available for most titles (safari.oreilly.com). For more information, contact our corporate/ institutional sales department: (800) 998-9938 or[email protected].
Editor: Brett McLaughlin Production Editor: Marlowe Shaeffer Cover Designer: Ellie Volckhausen Interior Designer: David Futato
Printing History:
August 2005: First Edition.
Nutshell Handbook, the Nutshell Handbook logo, and the O’Reilly logo are registered trademarks of O’Reilly Media, Inc. ThePocket Guide series designations,Eclipse IDE Pocket Guide, the images of ornate butterflyfish, and related trade dress are trademarks of O’Reilly Media, Inc.
Java and all Java-based trademarks and logos are trademarks or registered trademarks of Sun Microsystems, Inc., in the United States and other countries. O’Reilly Media, Inc. is independent of Sun Microsystems, Inc.
Many of the designations used by manufacturers and sellers to distinguish their products are claimed as trademarks. Where those designations appear in this book, and O’Reilly Media, Inc. was aware of a trademark claim, the designations have been printed in caps or initial caps.
While every precaution has been taken in the preparation of this book, the publisher and author assume no responsibility for errors or omissions, or for damages resulting from the use of the information contained herein.
0-596-10065-5
v
Contents
Part I. Introduction
What Is Eclipse?
1
Conventions Used in This Book
2
System Requirements
2
Downloading Eclipse
3
Installing Eclipse
3
3, 2, 1, Launch!
4
Specify a Workspace
4
Exploring Eclipse
4
Getting Upgrades
5
Moving On
6
Part II. Workbench 101
Views
8
Editors
9
vi | Contents
Toolbars and Coolbars
12
Perspectives
13
Rearranging Views and Editors
14
Maximizing and Minimizing
16
Part III. Java Done Quick
Creating a Project
18
Creating a Package
20
Creating a Class
21
Entering Code
21
Running the Program
23
Part IV. Debugging
Running the Debugger
25
Setting Breakpoints
25
Single Stepping
28
Looking at Variables
28
Changing Code on the Fly
30
Part V. Unit Testing with JUnit
A Simple Factorial Demo
32
Contents | vii
Running Tests
34
Test First
36
Part VI. Tips and Tricks
Code Assist
38
Templates
39
Automatic Typing
40
Refactoring
41
Hover Help
42
Hyperlinks
43
Quick Fixes
43
Searching
44
Scrapbook Pages
46
Java Build Path
47
Launch Configurations
48
Part VII. Views
Breakpoints View
50
Console View
52
Debug View
53
Declaration View
54
viii | Contents
Error Log View
55
Expressions View
56
Hierarchy View
58
Javadoc View
60
JUnit View
60
Navigator View
61
Outline View
62
Package Explorer View
62
Problems View
64
Search View
65
Tasks View
66
Variables View
67
Part VIII. Short Takes
CVS
68
Ant
69
Web Tools Platform
70
Testing and Performance
70
Visual Editor
71
C/C++ Development
71
Contents | ix
Plug-in Development
72
Rich Client Platform
73
Standard Widget Toolkit
73
Part IX. Help and Community
Online Help
75
Getting Help
75
Help Topics
76
Eclipse Web Site
76
Community Web Sites
78
Reporting Bugs
79
New Account
80
Searching
80
Adding an Entry
80
Newsgroups
81
Mailing Lists
82
Conclusion
82
Appendix. Commands
83
1
PART I:
PART I
Introduction
Welcome to the pocket guide for the Eclipse Integrated Development Environment. This book is the ultimate “no fluff” user’s manual for the Eclipse IDE, in particular, its Java Development Toolkit (JDT). This book is designed to get you up and running quickly in the environment even if you’ve never used Eclipse before. Some Java™ programming knowledge will be helpful when reading this guide, but even if you’re new to Java, you can still find a good deal of useful information within these pages. Let’s begin with an overview of what Eclipse is and how to download and install it. If you’re already using Eclipse, you can skip this section and jump to Part II.
What Is Eclipse?
2 | Part I: Introduction
Conventions Used in This Book
Italic
Used for filenames, directory names, URLs, and tools from Unix such as vi. Also used for emphasis and to introduce new terms.
Constant width
Used for names of Java packages, methods, etc.; com-mands; variables; and code excerpts.
Constant width bold
Used for keywords within code examples and for text that the user should type literally.
System Requirements
Eclipse runs on today’s most popular operating systems, including Windows XP, Linux, and Mac OS X. It requires Java to run, so if you don’t already have Java installed on your machine, you must first install a recent version. You can down-load Java for Windows and Linux fromhttp://java.sun.com; look for the J2SE SDK (Software Development Kit) package without a NetBeans™ bundle. Mac OS X has Java preinstalled. See Table 1 for the minimum and recommended system requirements.
Table 1. System requirements for Eclipse
Requirement Minimum Recommended
Java version 1.4.0 5.0 or greater
Memory 512 MB 1 GB or more
Free disk space 300 MB 1 GB or more
Installing Eclipse | 3
In order to unpack Eclipse’s download package, you will need a standard archive program. Some versions of Win-dows have one built in; for other versions, you can use a pro-gram such as WinZip (http://www.winzip.com). The other platforms come with an archive program preinstalled.
TIP
In the interests of space and simplicity, the rest of this book will focus on the Windows version of Eclipse. Oth-er platforms will be vOth-ery similar, although you may no-tice slight platform-specific differences.
Downloading Eclipse
To download the Eclipse IDE, go tohttp://www.eclipse.org. Click on “downloads” and then select the most recent stable or release version of the Eclipse SDK for your platform. If prompted for a mirror site, pick the one located closest to you. If that one is slow or unavailable, simply return to the download page and try a different mirror, or try the main site.
TIP
You may see other download packages such as Runtime, JDT, and RCP on the download page. You don’t need those. Just get the one package called Eclipse SDK.
Installing Eclipse
4 | Part I: Introduction
After you have unpacked the SDK, you should have a subdi-rectory calledeclipse, which in turn has directories in it such aspluginsandfeatures. If you don’t see these, check the set-tings on your archive program. A common mistake is to unpack Eclipse in such a way that its directory structure is not preserved. Eclipse won’t run unless you unpack it with the exact directory paths that exist in the archive.
3, 2, 1, Launch!
You are now ready to launch Eclipse. Inside theeclipse direc-tory, you’ll find a launcher program for the IDE called, strangely enough, eclipse (or eclipse.exe). Invoke that pro-gram to bring up the IDE.
TIP
On Windows, you may find it convenient to create a desktop shortcut to launch Eclipse.
Specify a Workspace
The first time you start Eclipse, you will be prompted for the location of your workspace. The workspace is the location where your source code and other files and settings will be stored on your workstation. Specify a permanent location— somewherenotin your install directory—preferably a loca-tion that will be backed up regularly.
Putting the workspace in a different place from where you installed Eclipse makes upgrades easier. See the “Getting Upgrades” section, later in Part I, for more information.
Exploring Eclipse
Getting Upgrades | 5
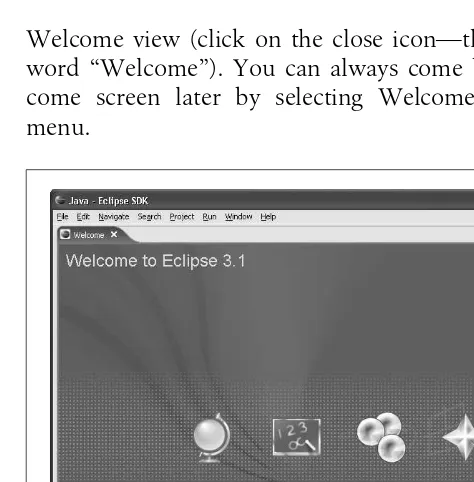
Welcome view (click on the close icon—the × next to the word “Welcome”). You can always come back to the Wel-come screen later by selecting WelWel-come from the Help menu.
Getting Upgrades
Eclipse includes an automatic update facility that can handle
point releases (i.e., bug-fix versions) without any work on your part. For example, Eclipse would install an upgrade from 3.1.0 to 3.1.1 automatically. However, for anything more sub-stantial, the best practice is to do a manual clean install.
TIP
A clean install is especially important if you want to use beta versions of Eclipse (calledStableorMilestone builds
on the download page). Milestone builds are sometimes buggy, so you may need to temporarily go back and run your previous version.
6 | Part I: Introduction
For example, let’s say you have been running Version 3.1 for a while and now Version 3.2 has come out. You want to upgrade right away because each new release contains a number of important bug fixes and useful new features. Also, if you have a problem with an older release and report it to the developers, they will simply ask you to upgrade (see “Reporting Bugs” in Part IX). So, you should upgrade, but what’s the best way to do it?
First, rename your eclipse directory to something else, like
eclipse3.1. Then download the new SDK package and install it normally, as if you had never installed Eclipse before. This is called aclean installbecause you are not attempting to mix new and old code together. Note that your workspace doesn’t need to change at all, but you should back it up before running the new version just in case. Now do you see why I recommended you don’t keep your workspace in the install directory?
TIP
Any additional plug-ins you have installed for Eclipse will need to be reinstalled at this point unless you keep them in anextension location separate from the Eclipse SDK.
Moving On
7
PART II:
PART II
Workbench 101
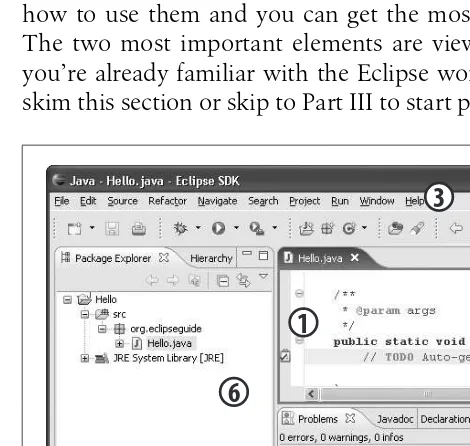
Eclipse’s main window, called theworkbench, is built with a few common user interface elements (see Figure 2). Learn how to use them and you can get the most out of the IDE. The two most important elements are views and editors. If you’re already familiar with the Eclipse workbench, you can skim this section or skip to Part III to start programming.
Figure 2. The Eclipse workbench is made up of views, editors, and other elements.
1
1Editor
2Fast views
3Menu bar
4Tool bars
5Perspectives
6Views
2
3
4
4
5
8 | Part II: Workbench 101
Views
Aviewis a window that lets you examine something, such as a list of files in your project. Eclipse comes with dozens of different views; see Table 2 for a partial list. These views are covered in more detail in Part VII.
To open a view, select Window ➝ Show View. The most
commonly used views are listed in that menu. To see the full list, select Other....
Most views have a titlebar that includes the icon and name for the view, a close icon, a toolbar, and an area for the con-tent (see Figure 3 for an example showing the Outline view). Note that if the view is too narrow, the toolbar will be pushed to the next line. To discover what all the buttons do, move your mouse over a button, and a little window called a
tool tip will appear that describes the item. Table 2. Commonly used Eclipse views
View name Description
Package Explorer Shows all your projects, Java packages, and files.
Hierarchy Displays the class and interface relationships for the selected object. Outline Displays the structure of the currently open file.
Problems Shows compiler errors and warnings in your code. Console Displays the output of your program.
Javadoc Shows the description (from comments) of the selected object. Declaration Shows the source code where the selected object is declared.
Editors | 9
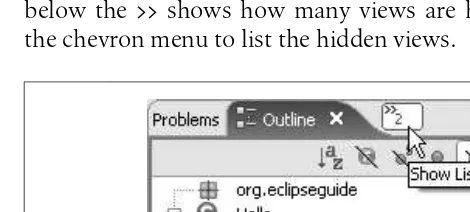
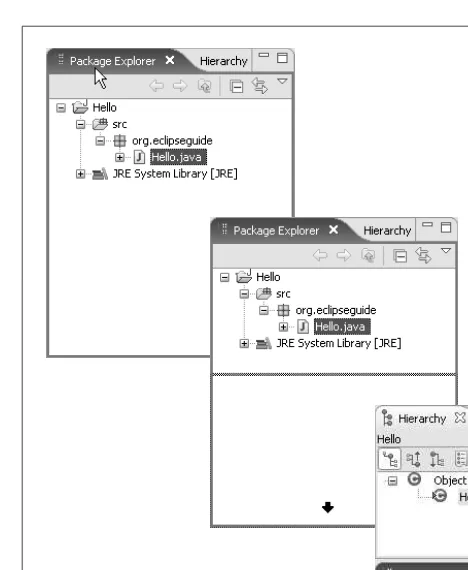
Multiple views can be stacked together in the same rectangu-lar area. The titlebar will show a tab for each view, but only one view can be active at a time. Click on a tab to bring its view to the front. If the window is too narrow to show all the titles, achevron menuwill appear (see Figure 4; the number below the>> shows how many views are hidden). Click on the chevron menu to list the hidden views.
Editors
Aneditorin Eclipse is just like any other editor—it lets you modify and save files. What sets editors in Eclipse apart is their built-in language-specific knowledge. In particular, the Java editor completely understands Java syntax; as you type, the editor can provide assistance such as underlining syntax errors and suggesting valid method and variable names (see Figure 5). Most of your time will be spent in the Java editor, but there are also editors for text, properties, and other types of files.
Editors share many characteristics with views. But unlike views, editors don’t have toolbars, and you will usually have more than one of the same type of editor open (for example, several Java editors). Also, you can save or revert an editor’s contents, but not a view’s. An asterisk in the editor’s titlebar indicates that the editor has unsaved data. Select File➝Save
or press Ctrl+S to write your changes to disk.
10 | Part II: Workbench 101
Menus
Eclipse is filled with menus, yet it’s not always obvious how to access them. So, let’s take a quick tour. The most promi-nent one is themain menuacross the top of the Eclipse win-dow. Click on a menu item to activate it or press Alt and the shortcut key for the menu (for example Alt+F for the File menu).
Some views haveview menus that open when you click on the downward-pointing triangle icon near the upper right of the view (see Figure 6 for an example).
Another menu is hidden in the titlebar under the icon to the left of the title. Right-click on the icon to access thesystem menu; this allows you to close the view or editor, move it around, and so forth. The system menu is shown in Figure 7. Figure 5. The Java editor provides typing assistance and immediate error detection.
Menus | 11 TIP
Most commands in Eclipse can be performed in several dif-ferent ways. For example, to close a view you can either use the system menu or click on the close icon. Use which-ever way is most convenient for you.
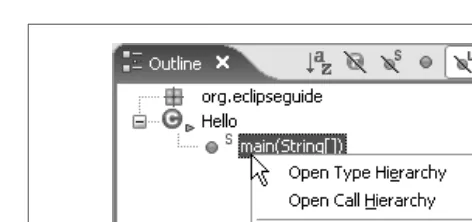
Finally, you can right-click on any item in the content area to bring up the context menu (see Figure 8). Notice the key-board shortcuts listed to the right of the menu description. These shortcuts can be used instead of the menu to execute a particular command. For example, instead of right-clicking on main and selecting Open Type Hierarchy, you can just selectmain and press the F4 key.
TIP
Starting in Eclipse 3.1, you can press Ctrl+Shift+L to see a list of the current key definitions. To change them, go to Window➝Preferences➝General➝Keys. By using
key definitions and shortcuts, you can work in Eclipse without touching the mouse at all.
12 | Part II: Workbench 101
Toolbars and Coolbars
Atoolbaris a set of buttons (and sometimes other controls) that perform commonly used actions when you click on them. Usually toolbars appear near the top of the window that contains them. A collection of toolbars is called a cool-bar (see Figure 9).
TIP
Most Eclipse documentation uses the termtoolbarto re-fer to both toolbars and coolbars, so the rest of this book will do the same unless it’s necessary to make a special distinction between the two.
In the “Views” section, you saw some examples of toolbars that were part of views. The toolbar at the top of the Work-bench window is called the main toolbar (seen back in Figure 8. Right-click in the content area for the context menu.
Perspectives | 13
Figure 2). As you edit different files, the main toolbar will change to show tools that apply to the current editor.
Perspectives
Aperspective is a set of views, editors, and toolbars, along with their arrangement on your desktop. Think of a perspec-tive as a way of looking at your work that is optimized for a specific kind of task, such as writing programs.
As you perform a task, you may rearrange windows, open new views, and so on. Your arrangement is saved under the current perspective. The next time you have to perform the same kind of task, simply switch to that perspective, and Eclipse will put everything back the way you left it.
To switch perspectives, select Window➝Open Perspective
or click on the Open Perspective icon (to the right of the main toolbar). This will bring up a list of the most com-monly used perspectives; select Other... to see the full list.
Eclipse comes with several perspectives already defined; these are shown in Table 3.
Table 3. Built-in Eclipse perspectives
Perspective Purpose
Resource Arrange your files and projects. Java Develop programs in the Java language. Debug Diagnose and debug problems that occur at runtime.
Java Browsing Explore your code in a Smalltalk-like environment. Java Type Hierarchy Explore your code based on class relationships. Plug-in Development Create add-ins to Eclipse.
CVS Repository Exploring Browse a source code repository, including its files and revision history.
14 | Part II: Workbench 101
Each perspective has a set of views associated with it that are open by default. For example, the Java perspective starts with the Package Explorer view open. If you don’t like the default, close any views you don’t want and open others with Window➝Show View.
TIP
Sometimes Eclipse will offer to switch perspectives for you. For example, if you’re in the Resource perspective and create a Java project, it will ask if you’d like to switch to the Java perspective. Usually the best thing is to an-swer Yes and have it remember your decision so it won’t ask you again.
Perspectives are there for your convenience. Feel free to cus-tomize them all you want. To restore a perspective to its fac-tory default, select Window ➝ Reset Perspective. To save
your perspective under a different name, select Window➝
Save Perspective As.... The new perspective will show up in the Window➝Open Perspective➝Other... menu.
Rearranging Views and Editors
Views and editors can be shown side by side or stacked on top of other views and editors. To move a view or editor, simply click on its titlebar and drag it to a new location (see Figure 10). The only restrictions are that editors have to stay in their own rectangular area, and they can’t be mixed with views. However, you can arrange the views around the edi-tors, and you can even drag views outside of the main Eclipse window (these are called tear-off views). You can also col-lapse a view to an icon on the edge of the window (this is called afast view).
Rearranging Views and Editors | 15
Figure 10. You can see how the Package Explorer is dragged from a tab into the bottom of the window.
Table 4. Cursor shapes while dragging views and editors
Cursor shape Final position of the view/editor being dragged Above the window under the cursor
Below the window under the cursor To the left of the window under the cursor To the right of the window under the cursor On top of a stack of windows under the cursor
In the fast view area (it will slide out as needed or when manually clicked)
16 | Part II: Workbench 101 TIP
By dragging editors, you can show two files side by side. Starting in Eclipse 3.1, you can also edit two portions of the same file by using the Window➝New Editor command.
To change the relative size of side-by-side views or editors, move the mouse cursor to the thin dividing line between two of them. The cursor shape will change, indicating you can move that divider by clicking it and dragging it to the desired location.
Maximizing and Minimizing
Sometimes you need to focus temporarily on a single view or editor. For example, you might want to hide all the views and use the whole Eclipse window to look at one large file in the editor. You could resize the editor manually by dragging its edges, but an easier way is tomaximize the editor.
Double-click on the view or editor’s titlebar (or click on the maximize icon) to make it expand; double-click again (or use the restore icon) to restore the window to its original size. When a window is maximized, you won’t be able to see any of the other views or editors outside of the current stack.
Maximizing and Minimizing | 17 TIP
Remember, you can save your favorite window arrange-ments as named perspectives.
18
PART III:
PART III
Java Done Quick
Get your stopwatch ready because we’re going to create and run some simple Java code as quickly as possible. Ready... set...go!
Creating a Project
An Eclipseproject is just a directory that holds your pro-gram’s resources (source code, icons, and so forth). Usually projects are subdirectories in your workspace (see the “Spec-ify a Workspace” section in Part I). You can import an exist-ing project, but for this exercise, we’ll make one from scratch.
To create a project, select File➝New➝Project... and then
double-click Java Project. This opens the New Java Project wizard (see Figure 11).
For “Project name,” type in something original like Hello. Under “Project layout,” enable the “Create separate source and output folders” option.
TIP
Creating a Project | 19
Click Finish to accept the default options and let Eclipse cre-ate the project. If you see a dialog that says Confirm Perspec-tive Switch, enable the “Remember my decision” option and click Yes. Also, if you see a dialog about Java 5.0 compli-ance, enable compliance for the entire workspace (not just the project).
20 | Part III: Java Done Quick
After a moment, you should see your new empty project in the Package Explorer view (see Figure 12).
Creating a Package
A Javapackageis a standard way to organize your classes into separate namespaces. Although you can create classes with-out packages, doing so is considered bad programming prac-tice. To create a new package, select File➝New➝Package
or click on the New Package icon in the main toolbar (). Enter the package name as org.eclipseguide and click Fin-ish. You can see the results in the Package Explorer, as shown in Figure 13.
Figure 12. A new Java project is born.
Entering Code | 21 TIP
If you looked at the project on disk, you would see the
Hellodirectory, asrcdirectory under that,orgunder that, andeclipseguideunder that. A compact form is shown in the Package Explorer as a convenience.
Creating a Class
With theorg.eclipseguidepackage highlighted, select File➝
New ➝ Class or click on the New Java Class icon ().
Enter the name of the class, starting with a capital letter. For this example, enterHello.
Under the section of the dialog that asks which method stubs you would like to create, select the option to create public static void main(String[] args).
Leave the rest of the options set to their default values and click Finish. Eclipse will generate the code for the class for you (this generated class is shown in Figure 14), and open the Java editor with your new class in view.
TIP
Whenever Eclipse generates code, it inserts TODO com-ments to indicate the places you need to edit. Every place in the code that has aTODOcomment is listed in the Tasks view (see Part VII).
Entering Code
You could run the program now, but it wouldn’t be very interesting. So, let’s add a few lines to print something out. Start by deleting the generated comment that says:
22 | Part III: Java Done Quick
Then replace it with this code:
for (int i = 0; i < 10; i++) { System.out.println( "Hello, world " + i); }
When you’re done, the Java editor should look similar to Figure 15.
Figure 14. Now the package has a file in it. You can further expand the file to see its classes.
Running the Program | 23
The editor looks innocent enough, but through its clever use of colors and annotations, the window is quietly conveying a great deal of information. A large number of options to con-trol this information can be found under Window➝
Prefer-ences➝Java➝Editor.
TIP
Press Ctrl+Shift+F (or select Source➝Format) to
refor-mat your code and fix any indentation and spacing prob-lems. Do this early and often. If you’d like, you can customize the formatting rules in the Java preferences.
Running the Program
Press Ctrl+S (or select File➝Save) to write the code to disk
and compile it. In the Package Explorer, right-click on
Hello.javaand select Run As➝Java Application. The
pro-gram will run, and the Console view will open to show the output (see Figure 16).
24 | Part III: Java Done Quick
That’s it! You’ve written, compiled, and run your first pro-gram in Eclipse in just a few minutes. Now, try it again and see if you can do it in under a minute. My record is 35 sec-onds. Go ahead, I’ll wait.
TIP
After you have run the program once, you can press Ctrl+F11 (Run ➝Run Last Launched) or click on the
Run icon in the toolbar () to run it again.
25
PART IV:
PART IV
Debugging
Let’s face it: all but the most trivial programs have bugs in them. Eclipse provides a powerful debugger to help you find and eliminate those bugs quickly. This part of the book will give you a head start in understanding how to use the Eclipse debugger.
Running the Debugger
Running your program under the control of the debugger is similar to running it normally. Right-click on the file contain-ing your main method (Hello.java) and select Debug As➝
Java Application. Or, if you have run or debugged the pro-gram before, just press F11 (or select Run ➝ Debug Last
Launched), or click on the Debug button () in the main toolbar.
Go ahead and try that now. What happened? The program ran to completion and sent its output to the Console view just as if you had run the class normally. You have to set a breakpoint to actually take advantage of the debugger.
Setting Breakpoints
26 | Part IV: Debugging
example, we want to stop on theSystem.out.println( )call, so double-click in the gutter next to that line. A breakpoint indi-cator will appear, as shown in Figure 17.
Now, press F11 and Eclipse will run your program again in debug mode. The breakpoint indicator will change when the class is loaded, and the debugger will stop at the line where you added the breakpoint.
TIP
One of the nice things about breakpoints in Eclipse is that they stay with the line even if the line number changes (e.g., due to code being added or removed above it).
When the breakpoint is reached and the program stops, you’ll notice several things. First, Eclipse will switch to the Debug perspective. If you see a dialog asking to confirm the perspective switch, select “Remember my decision” and click Yes.
TIP
Using one perspective for coding and another for debug-ging is optional, but some people like being able to cus-tomize their window arrangement for each task. You can disable this switching in the Run/Debug preferences (Window➝Preferences➝Run/Debug).
Setting Breakpoints | 27
Next, several new views will open—most importantly, the Debug view (see Figure 18). This view lets you control all the threads of execution of all the programs being debugged. Finally, the line of code where you put the breakpoint will be highlighted to indicate which line will be executed next.
To continue running after a breakpoint, click on the Resume button in the Debug view’s toolbar () or press F8 (Run➝
Resume). Execution will continue until the next breakpoint is hit or the program terminates.
TIP
If your program is in a long-running loop, click on the Suspend button () or select Run➝Suspend to make it
stop. Or, just add a new breakpoint at any time—the pro-gram does not have to be stopped.
28 | Part IV: Debugging
Single Stepping
Like most debuggers, the one provided by the Eclipse IDE lets you step line by line through your program with one of two commands:step into(; F5; or Run➝Step Into) and
step over (; F6; or Run ➝ Step Over). The difference
between the two is apparent when the current line is a method call. If you step into the current line, the debugger will go to the first line of the method. If you step over the current line, the debugger will run the method and stop on the next line.
Try stepping now, by running until your breakpoint is hit and then pressing F6 several times in a row. Watch the high-light bar move around as the current line changes.
If you step into a method call and then change your mind, execute the step returncommand (; F7; or Run ➝ Step
Return). This lets the program run until the current method returns. The debugger will stop at the line following the line that called the method.
Looking at Variables
The Eclipse IDE provides many different ways to examine and modify your program state. For example, as you single step, you may have noticed that the Variables window shows the current value of all the local variables, parameters, and fields that are currently visible (see Figure 19). You can quickly identify which variables are changing because Eclipse draws them in a different color. If any of the variables are nonprimitives (objects or arrays), you can expand them to look at the individual elements.
Looking at Variables | 29 TIP
When you are coding, try to use the smallest possible scope for your local variables. For example, instead of de-claring all your variables at the top of a function, declare them inside the statement blocks (curly braces) where they are actually used. Besides being a good program-ming practice, this will limit the number of items dis-played in the Variables view.
Another way to see the value of a particular variable is to move your cursor over it in the source editor. After a short pause, a tool tip window will appear with the value. See Figure 20 for an example.
What if you need to see the value of a Java expression? No problem: just use the mouse or keyboard to select the expres-sion in the editor, then press Ctrl+Shift+D (or right-click and Figure 19. The Variables view shows all the values in scope. Changes since the last step or resume are highlighted in red.
30 | Part IV: Debugging
select Display). Eclipse will evaluate the expression (includ-ing any side effects) and show the results in a pop-up win-dow (see Figure 21). The expression can be as simple or as complicated as you like, as long as it’s valid.
For compound objects like class instances, you may want to try the Inspect command (Ctrl+Shift+I, or right-click and select Inspect) instead of Display. This will let you expand items and collapse members as in the Variables view.
Changing Code on the Fly
Eclipse blurs the line between editing and debugging by letting you modify a running program. You don’t have to stop the program—just edit and save it. If possible, Eclipse will compile just the class that was modified and insert it into the running process. This handy feature is calledhot code replace.
TIP
If you modify a method that the program is currently exe-cuting, the debugger will have to drop to the previous frame and begin that method again from its first line. This doesn’t work on themain( )method because there is no caller.
Changing Code on the Fly | 31
Some kinds of changes can be made on the fly and some can-not. Simple things (like fixing an expression formula, chang-ing comments, addchang-ing new local variables, addchang-ing new statements to an existing method, etc.) should work fine. If for some reason execution cannot continue, you will get an error dialog with the option to continue without making the change, terminate the program, or terminate and restart it from the beginning.
TIP
Hot code replace requires special support from the Java virtual machine that is not present in all versions of Java. It’s known to work in Sun’s Java Version 1.4.2 and later, but not all vendors support it. If your Java version does not support it, you’ll get an error dialog when you try to save.
The debugger has so many features that it’s impossible to cover them all here. Part VI covers more advanced topics that impact running and debugging your program, especially in the “Launch Configurations” section. But in your first pass through this book, you may want to continue with Part V, which covers unit testing. Later, you can go to Part VII to find out what all those buttons in the Debug and Breakpoint views do.
The Eclipse online help is also a good resource for informa-tion on running and debugging. See the following secinforma-tions in the User’s Guide (Help➝Help Contents➝Java Development
User Guide):
• Concepts➝Debugger
32
PART V:
PART V
Unit Testing with JUnit
JUnit is a regression testing framework written by Kent Beck and Erich Gamma. Since Erich is the project leader for Eclipse’s Java toolkit, it’s only natural that JUnit is well inte-grated into the IDE.
A Simple Factorial Demo
To try out unit testing in Eclipse, first create a project called
Factorial containing a class called Factorial. Inside that class, create afactorial( ) method as follows:
public class Factorial {
public static double factorial(int x) { if (x == 0)
return 1.0;
return x + factorial(x - 1); }
}
TIP
Creating Test Cases | 33
Creating Test Cases
To test this class, you’ll need to create a test case for it. Atest caseis a class that extends the JUnitTestCaseclass and con-tains test methods that exercise your code. To create a test case, right-click on Factorial.java in the Package Explorer and select New➝JUnit Test Case.
TIP
If you get a dialog offering to add the JUnit library to the build path, select Yes.
A dialog window will come up with the name of the test case (FactorialTest) already filled in, along with the name of the class being tested. Click Next to show the Test Methods dia-log, select thefactorial(int) method, and click Finish to generate the test case. Eclipse will then generate some code for you, similar to the following:
public class FactorialTestextends TestCase { public void testFactorial( ) {
} }
Now, all you need to do is supply the contents of the testFactorial( ) method. JUnit provides a number of static methods that you call in your tests to make assertions about your program’s behavior. See Table 5 for a list.
Table 5. JUnit assertion methods
Method Description
assertEquals( )
assertNotEquals( ) See if two objects or primitives have the same value. assertSame( )
assertNotSame( ) See if two objects are the same object. assertTrue()
assertFalse( ) Test a Boolean expression. assertNull( )
34 | Part V: Unit Testing with JUnit
To test thefactorial( )method, call the method with a few sample values and make sure it returns the right results. Now, insert a blank line and press Ctrl+Space (this brings up thecode assistfeature, which is discussed in Part VI); you will discover that JUnit supplies a version ofassertEquals( )that takes three arguments. The first two are the values to com-pare, the last is a “fuzz factor;”assertEquals( )will fail if the difference between the supplied values is greater than the fuzz factor. Supply the value you expect the method to return as the first parameter; use the method call itself as the sec-ond. For example,
public void testFactorial( ) { assertEquals(1.0,
Factorial.factorial(0), 0.0); assertEquals(1.0,
Factorial.factorial(1), 0.0); assertEquals(120.0,
Factorial.factorial(5), 0.0); }
Feel free to insert a few more assertions in this method or add additional test methods.
You can also override thesetUp( )andtearDown( )methods, respectively, to create and destroy any resources needed by each test, such as a network connection or file handle.
TIP
All test methods must start with the word “test” so JUnit can figure out which methods to run. JUnit will ignore any methods in the test class that it doesn’t recognize.
Running Tests
To run the test case, right-click on FactorialTest.java and select Run As ➝ JUnit Test. The JUnit view appears, and
Running Tests | 35
and a special icon next to the view title indicate that some-thing went wrong (see Figure 22).
If you double-click on the test class or method name in the Failures list, Eclipse will open that test in the editor. Double-click on a line in the Failure Trace to go to a specific line number.
TIP
The best practice if a test fails is to set a breakpoint on the failing line and then use the debugger to diagnose the problem. Just select Debug instead of Run to run the debugger.
When you examine the test, you can see that the factorial function is not being calculated correctly, due to an error in the formula. To correct the error, replace the+ with a*:
return x * factorial(x - 1);
36 | Part V: Unit Testing with JUnit
Now, rerun your tests (Ctrl+F11). You shouldn’t see any fail-ures; instead, you should see a green bar, indicating success.
Test First
Having a good suite of tests is important—so important, that many developers advocate writing the tests for new code before a single line of the code itself! This is calledtest driven development, or TDD for short. Such tests represent the requirements that your code must satisfy in order to be con-sidered correct.
To see how Eclipse makes TDD simple, keep the unit test you just created, but delete theFactorial.javafile (select it in the Package Explorer and press Delete). The editor for the FactorialTestclass will shown an error immediately because the Factorial class is not defined anymore. This simulates the state you would be in if you had written your test class first.
Put the text cursor on the first line that has an error and press Ctrl+1 (Edit➝Quick Fix). Select the “Create class ‘Factorial’”
option and press Enter. When the New Java Class dialog appears, press Enter to accept the defaults.
Now, go back to theFactorialTesteditor and note that the compiler complains that there is nofactorial(int)method. Press Ctrl+1 to create one.
Unfortunately, the current version of Eclipse is not always smart enough to figure out the right return type, so you may need to change the generated return type to be adouble. Use a dummy return value (0.0) for now. At this point, Factorial. java should look something like this:
public static double factorial(int i) { return 0.0;
Test First | 37 TIP
Of course, this is not the right way to calculate a factori-al, but all you want to do at this point is get the program to compile again.
Now you have a test case, a little bit of code, and no errors— so try running the tests. Unsurprisingly, they fail. At this point in actual TDD, you would go back to the code being tested and fix it so that it passes the tests, then add another test, make that work, and repeat the process until done.
Compare this technique with what most people typically do. They write a bunch of code first, then write a trivial little test program to exercise that code (maybe something with a main( )method and a fewprintln( )statements). Once that test is working, they throw the test away and assume their class will never break again.
Don’t ever throw tests away! Nurture them, slowly add to them, and run them often, preferably as part of an auto-mated build and test system. Techniques even exist to create unit tests for user interfaces.
TIP
When you get a bug report from your users, your first im-pulse may be to fix the bug. Instead, stop and write a unit test that fails because of the bug. Then, change the code so the test works. This ensures your fix actually solves the problem and helps improve your tests over time.
The JUnit view is covered in more detail in Part VII. If you want to learn more about unit testing best practices, see:
http://www.junit.org
JUnit home page
http://www.testdriven.com
38
PART VI:
PART VI
Tips and Tricks
The Eclipse IDE has an incredibly rich set of features, but many of them are hidden from view. With a little digging, you can discover its secrets and get the most out of the envi-ronment. This part of the book gets you started with several useful but less visible features.
Code Assist
The Java editor is always paying attention to what you type, ready to offer helpful suggestions through a feature called
code assist(also calledcontent assist). To use it, go to the Java editor in the Hello example and start a new statement in the main( ) method. Begin typing the following:
System.
Pause after the period. A code assist window (similar to that shown in Figure 23) will appear. The window shows you all the valid possibilities at this point. Type the letteroand the choices will narrow down toout. Press Enter to accept this choice. Given the long names most Java programs use, this can be a real time-saver.
Templates | 39
is fully configurable in the Java editor preferences (Window
➝Preferences➝Java➝Editor).
Templates
Eclipse provides a shorthand way of entering text called tem-plates. For example, in the Java editor, if you typeforand press Ctrl+Space, the code assist window will pop up as before, but this time it will display a few templates that start with the word “for” (see Figure 24).
Selecting the first one will cause code similar to this to appear in the editor:
for (int i = 0; i < array.length; i++) {
}
Figure 23. Code assist tells you what comes next and displays any Javadoc (if the source is available).
40 | Part VI: Tips and Tricks
The cursor highlights the first variablei. If you start typing, all three occurrences of that variable will be modified. Press-ing Tab will cause the variablearrayto be selected; pressing Tab again will put the cursor on the blank line between the braces so you can supply the body of the loop.
TIP
If you try this, you may see different variable names. Eclipse guesses which variables to use based on the sur-rounding code.
For a list of all predefined templates, and to create your own or export them to an XML file, see Window➝Preferences➝
Java➝Editor➝Templates.
Automatic Typing
Closely related to code assist is a feature calledautomatic typing. If you’re following along with the earlier example shown in Figure 23, the text cursor should be positioned after System.out. Type .println( (that is, period, println, opening parenthesis). The Java editor will type the closing parenthesis for you automatically. Now, type a double quote, and the closing quote appears. Type in some text and then press the Tab key. Tab advances to the next valid place for input, which is after the closing quote. Hit Tab again, and the cursor advances to the end. Type a semicolon to finish the statement.
TIP
Refactoring | 41
Refactoring
Refactoringmeans transforming code without changing its functionality. Consider renaming, which is the simplest form of refactoring. If you rename a local variable fromrose to daisy, it would smell as sweet.
Much has been written on refactoring, such asRefactoring: Improvingthe Design of ExistingCode (Addison Wesley). Before Eclipse and similar tools were available, program-mers had to do refactoring manually or with simple text sub-stitutions. For example, in the vi editor, running the command:1,$s/rose/daisy/gwill replace “rose” with “daisy” everywhere in the current file.
If you’ve ever tried this, you know it’s usually a bad idea. Your simple search-and-replace operation can change more than just the variable you intended, even with a clever substi-tution string. Plus, if you need to change multiple files, you’ll have to go to a scripting language such as Perl.
Here’s how it works in Eclipse. To rename a symbol (i.e., a class, method, variable, etc.), select it in the editor and press Alt+Shift+R (Refactor ➝ Rename). Type in the new name
and press Enter to perform the change. Done!
If you like, you can select the Preview button before perform-ing the changes; this will show you what the modified source will look like (see Figure 25). You can also undo the refactor-ing (Ctrl+Z or Edit➝Undo) if you change your mind.
Here’s another handy refactoring supported by Eclipse: to move a class from one package to another, simply go to the Package Explorer view and drag the file to where you want it. Eclipse will take care of changing the package statement in the file and in all the other class files that refer to it. Neat, huh?
42 | Part VI: Tips and Tricks
Development User Guide) under Reference➝Refactoring for
more information.
Hover Help
You’ve seen that code assist is a good way to explore an unfamiliar API. Another useful tool is hover help. To use hover help, simply move the mouse cursor over a symbol you want to know more about and pause for a moment. For example, try hovering overprintlninSystem.out.println. A little pop-up window will appear, giving you a short descrip-tion of the method.
For best results, you need access to the source code of the symbol you are examining. For Java library methods, the source comes with the JDK (J2SE SDK) package. Eclipse can usually figure out how to find this source code on its own, but see Window ➝Preferences➝Java ➝ Installed JREs to
configure the JDK’s location.
Quick Fixes | 43
If you are using code from a third-party JAR file, the source is often provided in a separate file or a subdirectory. You can tell Eclipse about this location by right-clicking on the JAR file in the Package Explorer and selecting Properties➝Java
Source Attachment.
If you don’t have the source code, but you have the API doc-umentation (Javadoc) in HTML form, select the symbol you want information on and press Shift+F2 (Navigate➝Open
External Javadoc). To make this work, you have to configure the Javadoc URL in the properties for the JAR file: right-click on the JAR file and select Properties➝Javadoc Location.
Hyperlinks
Did you know there is a web browser built into the Java edi-tor? Well, there is—sort of. The editor lets you navigate around your program as if it were a web site. Hold down the Ctrl key and move your mouse through your source code. An underline will appear to indicate hyperlinked symbols. You can leave the mouse cursor over the symbol to see its defini-tion, or click on it to open the declaration in the editor.
Like a browser, Eclipse maintains a history of all the pages you’ve visited. Use the Back command (; Alt+Left; or Nav-igate➝Left) to go to the previous location, and use Forward
(; Alt+Right; or Navigate➝Right) to go to the next one.
Quick Fixes
44 | Part VI: Tips and Tricks
For example, try misspelling theSystem.outmethodprintln asprintline. Press Ctrl+1 (Edit➝Quick Fix) to see several
possible fixes. One of them will be Change to println(..). Press the down arrow to see a preview of each proposed change; press Enter to accept the one you want.
The Quick Fix command can also make suggestions for small source transformations on lines that don’t have errors. For example, if you have code like this:
if (!(hail || thunder))
and you select the text(!(hail || thunder)and press Ctrl+1, Eclipse will suggest some possible transformations, such as “Push negation down.” Choosing that particular option would change the code to:
if (!hail && !thunder)
Searching
The Eclipse IDE provides dozens of different ways to locate things. Eclipse breaks these up into two major categories:
Find
Look for something in the current file.
Search
Look for something in multiple files.
The Find command (Ctrl+F or Edit➝Find/Replace) is just a
run-of-the-mill text locator like you would see in any editor. You can look for plain strings or full regular expressions, and you can optionally substitute the text you find with other text. The shortcut to find the next occurrence is Ctrl+K.
A handy variant on Find is incremental find, a feature bor-rowed from the Emacs editor. Press Ctrl+J (Edit➝
Searching | 45
Searches are much more interesting. To start with, Eclipse supports locating strings and regular expressions in many files at once. You can search the entire workspace, just the current project, or any subset (called aworkingset) that you define. To do this kind of search, select Search➝File....
Eclipse can also do a full language-aware search. Since Eclipse has its own built-in Java compiler, it understands the difference between, say, a method named fact and a field named fact, or even between two methods that have the same names but take different parameters, such asfact(int) andfact(double). This kind of search is available by select-ing Search➝Java....
These searches and more are accessible through the Search dialog (; Ctrl+H; or Search➝Search). The most common
variations also have direct menus or shortcuts of their own. For example, to find all references to a symbol, select the symbol and press Ctrl+Shift+G (or Search➝References ➝
Workspace). To find the symbol’s declaration, press Ctrl+G (Search ➝ Declarations ➝Workspace). To find only those
places where the symbol is modified, try Search ➝ Write
Access➝Workspace.
TIP
Current versions of Eclipse don’t allow you to perform searches on arbitrary files in the filesystem, but you can use an advanced option under File➝New➝Folder to
link outside directories into your workspace and then search them.
46 | Part VI: Tips and Tricks
Scrapbook Pages
Ascrapbook pageis a way to create and test snippets of code without all the trappings of normal Java code. In some ways, it’s like working in a scripting language, but you have the full expressiveness of Java in addition to being able to make calls into any of your code or any of the system libraries.
To create a scrapbook page, select File➝New➝Other...➝
Java➝Java Run/Debug➝Scrapbook Page. Enter the name
of the page—for example, test—and click Finish (or just press Enter). A new editor page will open fortest.jpage.
In the blank scrapbook page, try typing in an expression like
123/456, press Ctrl+A to select the expression, and press Ctrl+Shift+D (Run ➝ Display) to run it and display the
result. (The answer in this case is(int) 0because both num-bers are integers and the result was truncated.) Note that the result is selected, so you can copy it quickly (or press Back-space to remove it from the page).
Next, try entering Math.PI and displaying its result. This works because the scrapbook page already has all the system libraries imported, including theMathclass. If you need a par-ticular import, you can bring up the context menu and select Set Imports....
Let’s try something a little more complicated. Type in this snippet of code:
double d = 3.14; System.out.println(d);
Now select the snippet and press Ctrl+U (Run➝Execute) to
execute it. The output will appear in the Console window. Execute is exactly like Display except that Execute doesn’t show the return value (if any).
Java Build Path | 47
Java Build Path
If you’ve done any Java programming before, you’re familiar with the Java classpath—a list of directories and JAR files containing Java classes that make up the program. Usually this is controlled by an environment variable (CLASSPATH) or a command-line option (-cp).
In Eclipse, classpath details are a little more complicated. The first thing to realize is that Eclipse doesn’t use the CLASSPATHenvironment variable. It understands and controls the location of all classes itself. Additionally, Eclipse makes a distinction between runtime and build (compile) time. In Eclipse terminology,classpathrefers only to the runtime class list, while build path refers to the compile-time list. These two paths may be different, but, by default, they will both be set to the list you specify in the build path.
To see the build path, right-click on your project and select Properties➝Java Build Path. A dialog will appear, with the
tabs described in Table 6.
In addition to going through the Java Build Path dialog, you can right-click on directories and JAR files in the Package Table 6. Java Build Path tabs
Tab name Description
Source Tell the Java compiler where your source code is located. Each source directory is the root of a package tree. You can also control where generated output files (such as .class files) go.
Projects Make the current project depend on other projects. Classes in the other projects will be recognized at build time and runtime. The other projects do not have to be built into a JAR file before referring to them in Eclipse; this cuts down on development time. Libraries Pull in code that is not in Eclipse projects, such as JAR files. See
Table 7 for the kinds of locations you can access. Order and Export If other projects are dependent on this one, expose (or don’t
48 | Part VI: Tips and Tricks
Explorer view and select commands under the Build Path menu to add and remove items from the build path.
The Libraries tab is very flexible about the locations it allows you to specify for JARs and class files. Other features in Eclipse use similar lists, so if you understand this tab, it will help you understand those features as well. Table 7 explains the buttons on the Libraries tab.
Launch Configurations
How do you specify command-line parameters to your pro-gram or change the Java VM options that are used to invoke your program? Every time you select Run As➝Java
Applica-tion on a new class that has a main( ) method, Eclipse cre-ates a launch configuration for you. Alaunch configurationis the set of all the options used to run your program.
To change those options, select Run ➝ Run... and locate
your configuration in the dialog. Click on the configuration to see all the options in a series of tabbed pages on the right-hand side of the window (the tabs are described in Table 8). You can also create new configurations in this dialog. Table 7. JAR and class locations in the Java Build Path
Button name Description
Add JARs... Specify JAR files in the workspace (this project or other projects).
Add External JARs... Specify full pathnames for JAR files outside the workspace (not recommended for team projects).
Add Variable... Use a symbolic variable name (likeJRE_LIB orECLIPSE_ HOME) to refer to a JAR file outside the workspace. Add Library... Refer to a directory outside the workspace containing several
JAR files.
Launch Configurations | 49
Many more features of Eclipse are waiting to be discovered, and new ones are added in each release. The “Tips and Tricks” section of the online help (Help➝Tips and Tricks)
is a good place to look for the kinds of little nuggets that can save you time or let you do something new. You can also find a useful command and keyboard shortcut listing in the Appendix.
Table 8. Launch configuration tabs
Tab name Description
Main Specify the project and the name of the Main class.
Arguments Set the program arguments, the Java VM arguments, and the working directory in which to start the program.
JRE Specify the version of Java used to run the program (this can be different than the one used to compile it).
Classpath Set the list of JARs and classes available at runtime. Source Locate the source code inside or outside the workspace.
50
PART VII:
PART VII
Views
Eclipse has so many different views and toolbars that it’s easy to get overwhelmed trying to decipher them all. Consider this part of the book to be your own personal secret decoder ring.
Breakpoints View
The Breakpoints view (in the Debug perspective) shows a list of all the breakpoints you have set in your projects. Use it to enable and disable breakpoints, edit their properties, and set
exception breakpoints (which trigger a stop when a Java exception occurs). Table 9 lists the commands on the Break-points view toolbar.
Table 9. Breakpoints view toolbar
Icon Description
Remove the selected breakpoint(s). Remove all breakpoints in all projects.
Show/hide breakpoints not valid in the selected remote debug target (toggle).
Edit the source code at the breakpoint.
Breakpoints View | 51
Double-click on a breakpoint to edit the code at that line. To fine-tune when the breakpoint will be triggered, right-click on the breakpoint and select Properties. Table 10 shows some of the properties you can set. The exact options that appear will vary depending on the breakpoint’s type.
In the Eclipse Java development environment, anexpression
is anything you can put on the righthand side of a Java assignment statement. This can include ordinary variables, fields, method calls, arithmetic formulae, and so forth.
A conditional breakpoint is a breakpoint that doesn’t stop every time. For example, if you’re debugging a crash that occurs on the 100th time through a loop, you could put a breakpoint at the top of the loop and use a conditional expression like i == 99, or you could specify a hit count of 100—whichever is more convenient.
Collapse the breakpoint tree.
When the program stops, highlight the breakpoint that caused it to stop (toggle).
Create a breakpoint for a Java exception.
Table 10. Breakpoint properties
Property Description
Enabled Indicates whether the breakpoint is currently in effect. Hit Count Specifies how many times the breakpoint must be hit before the
programs stops.
Condition Stops only when the expression is true or changes value. Suspend Policy Pauses the whole program or just a single thread.
Filtering Limits the breakpoint’s effect to the given thread(s). Table 9. Breakpoints view toolbar (continued)
52 | Part VII: Views
Console View
The Console view displays the output of programs that are run under the control of Eclipse. Use it to view standard out-put or error outout-put from your Java programs, or from Ant, CVS, or any other external program launched from Eclipse. You can also type into the Console view to provide standard input.
The Console view is closely tied to the Debug view. It keeps a separate page for each program listed in the Debug view, whether or not the program is currently running. Table 11 shows the commands on the Console view’s toolbar.
TIP
If your program prints a stack traceback, the Console view turns each line into a hyperlink. Click on a link to go to the location indicated in the traceback.
Options for the Console view can be found under Window➝
Preferences➝Run/Debug➝Console.
Table 11. Console view toolbar
Icon Description
Terminate the current program.
Remove all record of previously terminated programs. Clear all the lines in the current console page.
Keep the view from scrolling as new lines are added to the end (toggle). Prevent the view from automatically switching to other pages (toggle). Switch to an existing console page.
Debug View | 53
Debug View
The Debug view (in the Debug perspective) lists all grams that were launched by Eclipse. Use it to pause pro-gram execution, view tracebacks, and locate the cause of deadlocks (more on this shortly). Table 12 shows the com-mands on the Debug view’s toolbar.
Step filters prevent you from having to stop in classes, packages, initializers, or constructors that you don’t find interesting. The list of filters is configured in Window ➝
Preferences➝Java➝Debug➝Step Filtering.
One option in the Debug view menu deserves a special men-tion: Show Monitors.Monitorsare Java thread synchroniza-tion points.Deadlocksoccur when one thread is waiting on a monitor that will never be released. When you turn on the Show Monitors option, the Debug view will display a list of monitors owned or waited on by each thread. Any dead-locks will be highlighted.
Table 12. Debug view toolbar
Icon Description
Continue running a program or thread that was previously paused. Pause the current program or thread.
Terminate the current program.
Disconnect from a remote debugger.
Remove all record of previously terminated programs. Single step into method calls.
Single step over method calls.
Continue execution until the current method returns.
Rewind execution to the beginning of the selected stack frame (requires VM support).
54 | Part VII: Views
Declaration View
The Declaration view (in the Java perspective) shows the Java source code that defined the current selection. Use this view to see the declaration of types and members as you move around your code, without having to switch editors. The toolbar for the Declaration view contains the single icon shown in Table 13.
TIP
The declaration can also be seen by holding down the Ctrl key and hovering the mouse pointer over the type or member in the Java editor.
Display View
The Display view (in the Debug perspective) shows expres-sion results in an unstructured format. Use it as a temporary work area in which to place expressions and calculate their values. Table 14 shows the commands on the Display view’s toolbar.
Table 13. Declaration view toolbar
Icon Description
Open an editor on the input source code.
Table 14. Display view toolbar
Icon Description
Inspect the selected expression. Display the selected expression. Evaluate the selected expression.
Error Log View | 55
There are four different ways to evaluate expressions in the Eclipse debugger:
Inspect (Ctrl+Shift+IorRun➝Inspect)
Show the value of an expression in an expandable tree format. Optionally, copy it into the Expressions view. The value is never recalculated.
Display (Ctrl+Shift+DorRun➝Display)
Show the value of an expression in a simple string for-mat. Optionally, copy it into the Display view. The value is never recalculated.
Execute (Ctrl+UorRun➝Execute)
Evaluate the expression but don’t show its value.
Watch (Run➝Watch)
Copy an expression into the Expressions view. Its value is recalculated every time you do a Step or Resume command.
For example, in the Java editor, you could highlight an expression such as array[i-1] and press Ctrl+Shift+D. A pop-up window appears, showing the current value of that array element. Press Ctrl+Shift+D again and the expression is copied to the Display view.
If this view looks familiar to you, that’s because it’s essen-tially an unnamed scrapbook page.
TIP
See the “Scrapbook Pages” section in Part V for more in-formation on scrapbook pages.
Error Log View
The Error Log view is not included by default in any perspec-tive, but you can open it with Window ➝ Show View ➝
56 | Part VII: Views
dumps when reporting problems to the developers. It can also display warnings and informational messages logged by Eclipse plug-ins. Table 15 shows the commands on the Error Log view’s toolbar.
TIP
See “Reporting Bugs” in Part IX for instructions on how to report problems in Eclipse.
Expressions View
The Expressions view (in the Debug perspective) shows a list of expressions and their values in the debugger. Use it to examine program states persistently as you step through your code, and to set breakpoints when fields are accessed or modified. This view is similar to the Variables view (described later in Part VII) except that the Expressions view shows only expressions that you have explicitly added. Table 16 describes the Expressions view’s toolbar.
Table 15. Error Log view toolbar
Icon Description
Export the error log to another file.
Import the error log from another file. Clear the view without modifying the logfile. Clear the view and erase the logfile. Open the logfile in an external text editor.
Reload the view with the contents of the logfile.
Table 16. Expressions view toolbar
Icon Description
Expressions View | 57
There are three ways of looking at any expression in the Eclipse IDE; this is true for both the Expressions view and the Variables view:
Literal mode
The fields, and nothing but the fields
Logical mode
The way you normally think about the object
Details pane
The string representation (as returned by thetoString( ) method)
Consider ajava.lang.LinkedListobject. If you look at it lit-erally (as in Figure 26), you’ll see it contains some internal data structures, such as the number of items and a reference to the first item. But if you look at it logically (Figure 27), it simply contains a list of objects.
Collapse all the expanded trees in the view. Remove the current expression from the view.
Remove all expressions in the view.
Figure 26. Literal mode shows an object’s internal data structures. Table 16. Expressions view toolbar (continued)
58 | Part VII: Views
Additionally, the Expressions and Variables views support an optional text area called the Details pane. This pane show