Master the most useful features of Word, Excel, PowerPoint,
and Outlook 2011 for Mac
Guy Hart-Davis
Learn
Office 2011
for
Mac OS X
i
Learn Office 2011
for Mac OS X
■ ■ ■
Guy Hart-Davis
Learn Office 2011 for Mac OS X
Copyright © 2010 by Guy Hart-Davis
All rights reserved. No part of this work may be reproduced or transmitted in any form or by any means, electronic or mechanical, including photocopying, recording, or by any information storage or retrieval system, without the prior written permission of the copyright owner and the publisher.
ISBN-13 (pbk): 978-1-4302-3333-6
ISBN-13 (electronic): 978-1-4302-3334-3
Printed and bound in the United States of America 9 8 7 6 5 4 3 2 1
Trademarked names, logos, and images may appear in this book. Rather than use a trademark symbol with every occurrence of a trademarked name, logo, or image we use the names, logos, and images only in an editorial fashion and to the benefit of the trademark owner, with no intention of infringement of the trademark.
The use in this publication of trade names, trademarks, service marks, and similar terms, even if they are not identified as such, is not to be taken as an expression of opinion as to whether or not they are subject to proprietary rights.
President and Publisher: Paul Manning Lead Editor: Steve Anglin
Technical Reviewer: Jennifer Kettell
Editorial Board: Steve Anglin, Mark Beckner, Ewan Buckingham, Gary Cornell, Jonathan Gennick, Jonathan Hassell, Michelle Lowman, Matthew Moodie, Duncan Parkes, Jeffrey Pepper, Frank Pohlmann, Douglas Pundick, Ben Renow-Clarke, Dominic Shakeshaft, Matt Wade, Tom Welsh
Distributed to the book trade worldwide by Springer Science+Business Media, LLC., 233 Spring Street, 6th Floor, New York, NY 10013. Phone 1-800-SPRINGER, fax (201) 348-4505, e-mail [email protected], or visit www.springeronline.com.
For information on translations, please e-mail [email protected], or visit www.apress.com.
Apress and friends of ED books may be purchased in bulk for academic, corporate, or promotional use. eBook versions and licenses are also available for most titles. For more information, reference our Special Bulk Sales–eBook Licensing web page at
www.apress.com/info/bulksales.
iii
This book is dedicated to the memory of Paul Raven.Contents at a Glance
■
Contents ... vi
■
About the Author ... xviii
■
About the Technical Reviewer ... xix
■
Acknowledgments ... xx
■
Introduction ... xxi
Part I: Building Essential Office Skills ... 1
■
Chapter 1: Getting Up to Speed with the Office Applications ... 3
■
Chapter 2: Learning Common Tools Across the Office Suite ... 25
■
Chapter 3: Working with Text ... 81
■
Chapter 4: Using Pictures and Shapes in Your Documents ... 111
■
Chapter 5: Customizing Office to Suit You ... 143
Part II: Creating Documents with Microsoft Word ... 179
■
Chapter 6: Entering Text and Using Views ... 181
■
Chapter 7: Adding Style: Formatting Your Documents ... 207
■
Chapter 8: Creating Complex Documents and Layouts ... 247
■
Chapter 9: Creating Business Documents with Mail Merge ... 285
■
Chapter 10: Revising and Reviewing Documents ... 303
■
Chapter 11: Printing, Securing, and Sharing Documents ... 331
Part III: Analyzing Data with Microsoft Excel ... 343
■
Chapter 12: Creating Workbooks and Entering Data ... 345
■ CONTENTS AT A GLANCE
v
Part IV: Creating Presentations with Microsoft PowerPoint ... 541
■
Chapter 18: Starting to Build a Presentation in PowerPoint ... 543
■
Chapter 19: Creating Clear and Compelling Slides ... 571
■
Chapter 20: Adding Life and Interest to a Presentation ... 597
■
Chapter 21: Delivering a Presentation Live or Online ... 623
Part V: E-mailing and Organizing with Outlook ... 647
■
Chapter 22: Using E-mail Effectively ... 649
■
Chapter 23: Keeping Your Contacts in Order ... 689
■
Chapter 24: Managing Your Calendar ... 709
■
Chapter 25: Working with Tasks and Notes ... 725
■
Index ... 739
Contents
■
Contents at a Glance ... iv
■
About the Author ... xviii
■
About the Technical Reviewer ... xix
■
Acknowledgments ... xx
■
Introduction ... xxi
Part I: Building Essential Office Skills ... 1
■
Chapter 1: Getting Up to Speed with the Office Applications ... 3
Meeting the Office Applications and Learning What You Can Do with Them ... 3
Microsoft Word ... 4
Microsoft Excel ... 5
Microsoft PowerPoint ... 6
Microsoft Outlook ... 7
Understanding the Common Features of the Applications ... 8
The Title Bar and the Close, Minimize, and Zoom Buttons ... 9
The Toolbars ... 9
The Ribbon ... 11
The Status Bar ... 11
Opening Applications ... 12
Opening an Application from the Dock ... 12
Opening an Application from the Applications Folder ... 13
Making a Application Launch Automatically ... 13
Creating a Document ... 14
Saving a Document ... 16
■ CONTENTS
vii
■
Chapter 2: earning Common Tools Across the Office Suite ... 25
Using the Menus, the Toolbars, and the Ribbon ... 25
Using the Menus ... 27
Using the Toolbars ... 28
Using the Ribbon ... 28
Giving Commands from the Ribbon ... 30
Minimizing the Ribbon ... 30
Using the Toolbox ... 31
Using the Scrapbook to Collect Items ... 34
Using the Reference Tools Palette to Look Up Information ... 35
Using the Compatibility Report Pane to Check a Document’s Compatibility with Older Versions of the Application ... 36
Sharing a Document with Other People ... 38
Sending a Document via E-mail ... 38
Saving a Document to SkyDrive ... 40
Saving a Document to a SharePoint Site ... 41
Saving Time and Effort with AutoCorrect ... 43
Choosing Standard AutoCorrect Options ... 45
Choosing AutoFormat As You Type Options ... 46
Choosing Math AutoCorrect Options ... 51
Creating AutoCorrect Entries ... 53
Creating AutoCorrect Exceptions ... 54
Working with Smart Buttons ... 55
Checking Spelling and Grammar ... 57
Checking Spelling ... 57
Checking Grammar in Word and Outlook ... 61
Taking Control over Spelling Checks with Custom Dictionaries ... 71
Printing Documents ... 76
Printing a Full Copy of the Document Quickly ... 76
Printing Exactly What You Need ... 76
Summary ... 80
■
Chapter 3: Working with Text ... 81
Entering Text in Your Documents ... 81
Entering Text in Documents Using Copy and Paste ... 81
Entering Text by Scanning a Document and Using Optical Character Recognition ... 82
Entering Text by Using Speech Recognition ... 82
Inserting Symbols in a Document ... 82
Navigating with the Keyboard and Selecting Objects ... 87
Applying Direct Formatting to Text and Objects ... 88
Using Cut, Copy, and Paste ... 91
Using Standard Cut, Copy, and Paste in the Office Applications ... 91
Using Find and Replace ... 93
Searching Quickly with the Search Box on the Standard Toolbar ... 93
Locating Text with the Find Dialog Box or Advanced Find Dialog Box ... 94
Replacing Text with Replace ... 97
Creating Tables ... 99
Inserting a Table ... 99
■ CONTENTS
Drawing a Table ... 102
Merging and Splitting Cells in a Table ... 103
Adding Content to a Table ... 103
Formatting a Table ... 104
Creating Hyperlinks ... 105
Summary ... 109
■
Chapter 4: Using Pictures and Shapes in Your Documents ... 111
Understanding How You Position Graphical Objects ... 111
Choosing Where to Insert a Graphical Object ... 112
Inserting Clip Art ... 112
Inserting a Clip Art Picture Using the Clip Art Browser ... 113
Inserting a Clip Art Picture Using the Clip Gallery ... 114
Managing Your Clip Art Items with the Clip Gallery ... 115
Inserting Pictures in Your Documents ... 120
Inserting Pictures from iPhoto ... 120
Inserting Pictures from Your Mac’s File System ... 121
Adding and Formatting a Shape ... 123
Applying a Style to a Shape ... 126
Rotating a Graphical Object ... 127
Positioning a Graphical Object ... 128
Choosing Text Wrapping in Word ... 129
Making a Picture Look the Way You Want It ... 132
Adjusting a Picture’s Sharpness, Brightness, Contrast, and Colors ... 132
Applying a Picture Style ... 133
Cropping a Picture ... 134
Saving Space by Compressing Pictures ... 136
Inserting SmartArt ... 137
Arranging Graphical Objects to Control Which Is Visible ... 140
Arranging Graphical Objects Using the Arrange Submenu ... 140
Rearranging Graphical Objects with Dynamic Reordering ... 141
Summary ... 142
■
Chapter 5: Customizing Office to Suit You ... 143
Choosing Which Toolbars to Display and How to Display Them ... 143
Choosing Which Toolbars to Display ... 143
Switching the Standard Toolbar Between Icons and Text and Icons Only ... 144
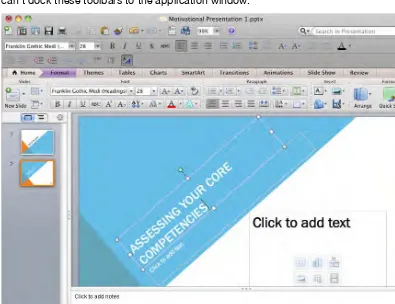
Undocking and Docking the Formatting Toolbar ... 144
Customizing the Toolbars and Menus in Word, Excel, and PowerPoint ... 146
Preparing to Customize the Toolbars, Menu Bars, or Menus ... 146
Finding the Commands to Add to the Toolbars or Menus ... 148
Customizing a Toolbar ... 149
■ CONTENTS
ix
Choosing General Options for the Ribbon ... 160
Choosing Which Tabs and Groups to Display ... 161
Closing the Ribbon Preferences Pane ... 161
Customizing the Toolbar in Outlook ... 162
Changing How the Buttons Appear ... 162
Changing Which Buttons Appear on the Toolbar ... 163
Creating Custom Keyboard Shortcuts in Word and Excel ... 164
Choosing Essential Preferences in Word, Excel, and PowerPoint ... 167
Opening the Preferences Dialog Box or Preferences Window ... 167
Setting Your User Name, Initials, and Address ... 169
Choosing Whether to Display the Gallery Dialog Box When the Application Opens ... 170
Choosing Whether to Receive Feedback with Sound ... 170
Choosing Whether to Confirm Launching Other Applications ... 170
Changing the Number of Recent Documents the Application Tracks ... 171
Choosing the Default Format for Saving Documents ... 172
Setting AutoRecover to Keep Backups of Your Documents for Safety ... 174
Setting the Default Folders for Saving Your Documents and Presentations ... 175
Summary ... 178
Part II: Creating Documents with Microsoft Word ... 179
■
Chapter 6: Entering Text and Using Views ... 181
Entering Text in Your Word Documents ... 181
Inserting the Text from a File in a Document ... 182
Inserting Prebuilt Blocks of Text with AutoText ... 183
Selecting Text in Word-Specific Ways ... 187
Selecting Text with the Mouse ... 187
Selecting Text with the Extend Selection Feature ... 187
Selecting Multiple Items at Once ... 188
Moving with Keyboard Shortcuts and the Browse Object ... 189
Telling Word Where to Find Your Templates ... 191
Creating Backup Documents and Recovering from Disaster ... 193
Using Views and Windows to See What You Need ... 194
Picking the Right View for What You’re Doing ... 194
Opening Extra Windows ... 204
Splitting the Document Window into Two Panes ... 205
Summary ... 206
■
Chapter 7: Adding Style: Formatting Your Documents ... 207
Understanding Word’s Many Types of Formatting ... 207
Understanding Direct Formatting and When to Use It ... 208
Understanding Styles and When to Use Them ... 208
Formatting Your Documents the Best Way ... 209
Applying Styles to a Document ... 210
Applying Styles from the Quick Styles Box on the Ribbon ... 210
Applying Styles with the Styles Pop-Up Menu on the Formatting Toolbar ... 212
Applying Styles with the Styles Pane ... 213
Applying Styles Using the Style Dialog Box ... 216
Applying Different Quick Styles to a Document ... 217
Changing the Styles in the Quick Style Gallery ... 218
■CONTENTS
Applying Styles Using the Keyboard . ... 220
See Which Styles a Document Uses . ... 220
Creating Custom Styles . ... 221
Creating a Custom Style by Example . ... 222
Modifying an Existing Style . ... 232
Applying Direct Formatting on Top of Styles . ... 233
Copying and Pasting Formatting Using the Format Painter ... 234
Navigating Quickly Around Your Documents . ... 234
Using the Sidebar ... 234
Using Find and Replace . ... 236
Replacing Text, Formatting, and Styles . ... 243
Navigating with Go To . ... 245
Summary ... 246
■
Chapter 8: Creating Complex Documents and Layouts ... 247
Working with Word’s Extra Table Features . ... 247
Converting Existing Text into a Table . ... 248
Converting a Table to Text . ... 250
Nesting One Table Inside Another Table . ... 251
Creating Complex Documents with Multiple Sections ... 252
Adding Headers, Footers, and Page Numbers . ... 254
Adding Headers and Footers to a Document . ... 254
Inserting Page Numbers in a Document . ... 258
Creating Newspaper-Style Columns of Text . ... 260
Breaking Your Columns with Column Breaks . ... 262
Removing Multiple Columns from a Section or Document ... 263
Using Bookmarks, Fields, and References . ... 263
Marking Important Parts of a Document with Bookmarks ... 263
Inserting Automated Information with Fields . ... 266
Adding Cross-References to Other Parts of a Document ... 270
Creating Long Documents with Outline View . ... 272
How Outlines Work . ... 272
Developing the Outline of a Document . ... 273
Promoting and Demoting Headings . ... 274
Expanding and Collapsing the Outline and Headings ... 275
Moving Paragraphs Up and Down the Document ... 276
Switching from Outline View to Another View . ... 277
Adding Footnotes and Endnotes . ... 277
Adding a Footnote . ... 277
Adding an Endnote . ... 279
Customizing Footnotes and Endnotes to Suit Your Document ... 280
■ CONTENTS
xi
Creating a New Data Source in Word ... 289
Opening an Existing Data Source ... 293
Using Contacts from the Office Address Book ... 293
Using Contacts from the Mac OS X Address Book ... 293
Using Data from a FileMaker Pro Database ... 294
Inserting Placeholders in Your Main Document ... 294
Filtering the Recipients of the Merge Document ... 295
Previewing the Results of the Mail Merge ... 297
Completing the Mail Merge ... 298
Merging Individual Documents to a Printer ... 299
Merging to a New Document ... 300
Merging to E-mail Messages ... 300
Restoring a Mail Merge Main Document to a Normal Document ... 301
Summary ... 302
■
Chapter 10: Revising and Reviewing Documents ... 303
Understanding How You Can Work on Documents with Your Colleagues ... 303
Editing a Document Simultaneously with Your Colleagues ... 304
Sharing Documents with Your Colleagues on a Network ... 308
Tracking the Changes in a Document ... 309
Choosing Which Changes to Track ... 310
Turning On Track Changes for a Document ... 313
Ensuring Your Colleagues Use the Track Changes Feature ... 313
Working in a Document with Track Changes On ... 314
Choosing How to View the Document’s Changes and Markup ... 316
Controlling Which Changes Word Displays ... 317
Integrating Tracked Changes into a Document ... 318
Using Track Changes in Full Screen View ... 320
Adding Comments to a Document ... 321
Adding a Comment ... 321
Viewing and Reviewing Comments ... 323
Deleting Comments ... 325
Comparing or Combining Different Versions of the Same Document ... 326
Summary ... 329
■
Chapter 11: Printing, Securing, and Sharing Documents ... 331
Using Word’s Features for Printing Documents ... 331
Printing a Custom Range of Pages ... 331
Printing Markup and Other Items ... 333
Securing a Document ... 335
Removing Sensitive Information from a Document ... 335
Protecting a Document with a Password ... 337
Marking a Document As Read-Only ... 339
Making a Document You Can Open with Earlier Versions of Word ... 340
Creating PDF Documents for Digital Distribution ... 342
Summary ... 342
Part III: Analyzing Data with Microsoft Excel ... 343
■
Chapter 12: Creating Workbooks and Entering Data ... 345
Creating and Saving a New Workbook ... 345
■ CONTENTS
Creating a New Workbook ... 345
Saving a Workbook ... 347
Navigating the Excel Interface, Worksheets, and Workbooks ... 348
Understanding Workbooks, Worksheets, Columns, and Rows ... 350
Moving the Active Cell ... 351
Selecting and Manipulating Cells ... 352
Enter Data in Your Worksheets ... 354
Typing Data in a Cell ... 354
Editing a Cell ... 355
Entering Data Quickly Using AutoFill ... 357
Pasting Data into a Worksheet ... 361
Copying and Moving Data with Drag and Drop ... 365
Inserting, Deleting, and Rearranging Worksheets ... 366
Inserting and Deleting Worksheets ... 366
Rearranging the Worksheets in a Workbook ... 367
Making Excel Display Worksheets the Way You Need ... 369
Understanding Excel’s Views ... 369
Splitting the Window to View Separate Parts of a Worksheet ... 370
Opening Extra Windows to Show Other Parts of a Workbook ... 371
Changing the Window and Arranging Open Windows ... 372
Zooming to Show the Data You Need to See ... 373
Freezing Rows and Columns So That They Stay On-Screen ... 374
Summary ... 375
■
Chapter 13: Formatting Your Worksheets ... 377
Working with Rows and Columns ... 377
Inserting and Deleting Rows, Columns, and Cells ... 377
Setting Row Height ... 380
Setting Column Width ... 381
Hiding Rows and Columns ... 382
Formatting Cells and Ranges ... 383
Understanding the Three Main Tools for Applying Formatting ... 383
Controlling How Data Appears by Applying Number Formatting ... 386
Setting the Workbook’s Overall Look by Applying a Theme ... 388
Setting Alignment ... 389
Choosing Font Formatting ... 391
Applying Borders and Fills ... 392
Applying Protection to Cells ... 393
Applying Conditional Formatting to Identify Particular Values ... 394
Understanding Excel’s Preset Types of Conditional Formatting ... 394
Applying a Preset Form of Conditional Formatting ... 396
■ CONTENTS
xiii
Telling Excel Which Part of the Worksheet to Print ... 411
Checking the Page Layout and Where the Page Breaks Fall ... 412
Printing a Worksheet or Workbook ... 414
Sharing Your Workbooks with Your Colleagues ... 415
Protecting a Workbook or Some of Its Worksheets ... 415
Sharing a Workbook So That Your Colleagues Can Edit It ... 417
Working in a Shared Workbook ... 419
Resolving Conflicts in a Shared Workbook ... 419
Summary ... 420
■
Chapter 14: Creating Powerful and Persuasive Charts ... 421
Learning the Essentials of Charts in Excel ... 421
Understanding Embedded Charts and Chart Sheets ... 422
Understanding the Components of a Chart ... 423
Understanding Excel’s Chart Types and Choosing Which to Use ... 426
Creating, Laying Out, and Formatting a Chart ... 427
Creating a Chart ... 427
Changing a Chart from an Embedded Chart to a Chart Sheet ... 429
Changing the Chart Type ... 430
Switching the Rows and Columns in a Chart ... 430
Changing the Source Data for a Chart ... 430
Choosing the Layout for the Chart ... 432
Adding a Separate Data Series to a Chart ... 432
Applying a Style to a Chart ... 433
Adding a Title to a Chart ... 434
Adding Axis Titles to the Chart ... 434
Changing the Scale or Numbering of an Axis ... 435
Adding a Legend to a Chart ... 438
Adding Axis Labels from a Range Separate from the Chart Data ... 439
Adding Data Labels to the Chart ... 439
Choosing Which Gridlines to Display ... 440
Formatting a Chart Wall and Chart Floor ... 441
Formatting Individual Chart Elements ... 443
Copying Chart Formatting ... 444
Reusing Your Own Designs by Creating Custom Chart Types ... 445
Adding Sparklines to Your Worksheets ... 446
Inserting Sparklines ... 447
Formatting Your Sparklines ... 448
Summary ... 450
■
Chapter 15: Crunching Numbers with Formulas and Functions ... 451
Understanding the Difference Between Formulas and Functions ... 452
Referring to Cells and Ranges in Formulas and Functions ... 452
Referring to a Cell ... 452
Referring to Ranges ... 454
Referring to Named Cells and Ranges ... 455
Performing Custom Calculations by Creating Formulas ... 456
Meeting Excel’s Calculation Operators ... 456
Using the Calculation Operators ... 458
■ CONTENTS
Understanding the Order in Which Excel Evaluates Operators ... 461
Nesting Parts of Formulas to Control Operator Precedence ... 462
Entering Formulas Quickly by Copying and Using AutoFill ... 463
Troubleshooting Common Problems with Formulas ... 463
Performing Standard Calculations by Inserting Functions ... 468
Understanding Function Names and Arguments ... 469
Inserting Functions with the AutoSum Pop-up Menu ... 470
Inserting Functions with the Formula Builder ... 471
Inserting Functions with the Insert Pop-up Menu ... 475
Inserting Functions by Typing Them into a Worksheet ... 476
Summary ... 477
■
Chapter 16: Creating Simple Databases and Solving Business Problems ... 479
Creating Databases in Excel ... 479
Understanding What You Can and Can’t Do with Excel Database Tables ... 480
Creating a Database Table and Returning Data ... 481
Resizing a Database Table ... 487
Sorting a Database Table by One or More Fields ... 488
Identifying and Removing Duplicate Records in a Database Table ... 490
Filtering a Database Table ... 492
Solving Business Problems with Scenarios and Goal Seek ... 494
Examining Different Scenarios in a Worksheet ... 495
Using Goal Seek ... 505
Summary ... 507
■
Chapter 17: Manipulating Data with PivotTables ... 509
Understanding What PivotTables Are and What You Can Do with Them ... 509
Creating and Laying Out a PivotTable ... 511
Creating a PivotTable Automatically ... 511
Creating a PivotTable Manually ... 513
Changing the PivotTable to Show Different Data ... 521
Changing the Function Used to Summarize a Field ... 525
Controlling the Design of a PivotTable ... 526
Formatting a PivotTable ... 528
Applying a PivotTable Style ... 528
Choosing Options for a PivotTable Style ... 528
Naming a PivotTable and Setting Options for It ... 529
Renaming a PivotTable ... 530
Choosing Display Options for a PivotTable ... 530
Choosing Layout Options for a PivotTable ... 532
Choosing Data Options for a PivotTable ... 533
Refreshing the Data in a PivotTable ... 535
■ CONTENTS
xv
Changing the Slide Size or Orientation ... 548
Navigating the PowerPoint Window ... 549
Add Content to a Slide ... 551
Adding, Deleting, and Rearranging Slides ... 552
Adding a Slide ... 552
Deleting a Slide ... 555
Rearranging Slides ... 555
Using Views to Work on Your Presentation ... 556
Creating Your Slides in Normal View ... 556
Rearranging Your Slides in Slide Sorter View ... 556
Creating Notes Pages in Notes Page View ... 558
Running a Presentation in Slide Show View ... 559
Opening Extra Windows to See Different Parts of the Presentation ... 560
Creating the Outline of a Presentation ... 560
Organizing Your Slides into Sections ... 561
Collaborating on a Presentation with Your Colleagues ... 563
Editing a Presentation Simultaneously with Your Colleagues ... 564
Comparing Two Copies of the Same Presentation ... 568
Summary ... 570
■
Chapter 19: Creating Clear and Compelling Slides ... 571
Planning the Slides in Your Presentation ... 571
Choosing Slide Layouts to Suit the Contents ... 573
Using PowerPoint’s Built-in Slide Layouts ... 573
Creating Custom Slide Layouts ... 574
Formatting Text on Your Slides ... 575
Changing the Font, Font Size, and Alignment ... 575
Changing the Indentation and Line Spacing of Text ... 577
Rotating Text ... 578
Using Bulleted Lists ... 580
Adding Tables, SmartArt, Charts, and Hyperlinks to Slides ... 584
Adding Tables to Slides ... 585
Adding SmartArt Graphics to Slides ... 589
Adding Charts to Slides ... 589
Adding Hyperlinks to Slides ... 594
Summary ... 595
■
Chapter 20: Adding Life and Interest to a Presentation ... 597
Adding Pictures to a Presentation ... 597
Adding Movies and Sounds to a Presentation ... 599
Adding a Movie to a Slide ... 599
Adding a Sound to a Slide ... 603
Adding Transitions to Slides ... 606
Adding Animations to Slides ... 609
Understanding the Essentials of Animations ... 609
Adding an Animation to an Object ... 610
Changing the Order of Animations ... 612
Using Animation to Display Bulleted Paragraphs One at a Time ... 613
Animating SmartArt Graphics, Charts, and Tables ... 615
■ CONTENTS
Keeping Extra Information Up Your Sleeve with Hidden Slides ... 618
Creating Custom Slide Shows Within a Presentation ... 619
Opening the Custom Shows Dialog Box ... 620
Creating a Custom Slide Show ... 620
Playing a Custom Slide Show ... 622
Editing or Deleting a Custom Slide Show ... 622
Summary ... 622
■
Chapter 21: Delivering a Presentation Live or Online ... 623
Getting Ready to Deliver a Presentation in Person ... 623
Setting Up Your Display and Choosing the Resolution ... 624
Using Presenter View ... 626
Practicing Your Presentation ... 628
Rehearsing Timings for Slides ... 629
Delivering a Presentation to a Live Audience ... 630
Starting a Presentation ... 630
Displaying the Slides You Need ... 630
Annotating the Slides ... 632
Controlling a Presentation Using the Keyboard ... 633
Displaying a White Screen or Black Screen ... 634
Creating a Handout for a Presentation ... 634
Recording Narration into a Presentation ... 636
Exporting and Sharing a Presentation ... 637
Broadcasting a Slide Show ... 639
Saving a Presentation as Pictures ... 642
Saving a Presentation as a Movie ... 643
Summary ... 645
Part V: E-mailing and Organizing with Outlook ... 647
■
Chapter 22: sing E-mail Effectively ... 649
Setting Up Outlook ... 650
Launching Outlook ... 650
Adding an E-mail Account to Outlook ... 651
Importing an Existing E-mail Account ... 657
Meeting the Outlook Interface ... 658
Using the Toolbar, Ribbon, and Menu Bar ... 659
Using and Customizing the Navigation Pane ... 659
Using and Customizing the Message List and Reading Pane ... 660
Using and Customizing the Reading Pane ... 664
Sending and Receiving Messages ... 667
Sending an E-mail Message ... 667
Receiving and Reading Messages ... 674
■ CONTENTS
xvii
Adding Consistent Closings to Your Messages with Signatures ... 682
Dealing with Spam ... 685
Removing Nonspam Messages from the Junk E-mail Folder ... 685
Marking Spam Messages as Junk ... 685
Changing Your Junk E-mail Protection Settings ... 685
Creating a List of Safe Domains for E-mail ... 686
Removing Senders You’ve Blocked by Mistake ... 687
Summary ... 688
■
Chapter 23: Keeping Your Contacts in Order ... 689
Creating Contacts ... 689
Creating a Contact from Scratch ... 689
Importing Contacts from Other Address Books ... 695
Working with Contacts ... 704
Viewing Your Contacts ... 704
Arranging Your Contacts ... 705
Searching for a Contact ... 706
Editing Contact Information ... 706
Communicating with Your Contacts ... 706
Summary ... 707
■
Chapter 24: Managing Your Calendar ... 709
Meeting the Calendar Interface ... 709
Displaying the Dates You Want ... 711
Customizing the Calendar Settings ... 711
Understanding Appointments, Events, and Meetings ... 713
Creating Appointments and Events ... 713
Creating One-Shot Appointments ... 713
Creating Repeating Appointments ... 717
Scheduling Meetings ... 719
Setting Up a Meeting ... 719
Tracking the Status of Meeting Invitations You’ve Sent ... 721
Dealing with Invitations to Meetings ... 722
Summary ... 723
■
Chapter 25: Working with Tasks and Notes ... 725
Creating Tasks ... 725
Meeting the Tasks Interface ... 725
Creating One-Shot Tasks ... 726
Creating Recurring Tasks ... 728
Viewing, Arranging, and Filtering the Task List ... 730
Viewing Your Tasks in the My Day Window ... 733
Managing Your Tasks ... 733
Taking Notes ... 735
Meeting the Notes Interface ... 735
Creating a Note ... 736
Editing and Using Your Notes ... 737
Summary ... 737
■
Index ... 739
■ INTRODUCTION
About the Authors
■ INTRODUCTION
xix
About the Technical
Reviewer
Jennifer Ackerman Kettell has written and contributed to dozens of books about software applications, web design, and digital photography. She has worked for Microsoft and other top companies, and has done freelance web design and online community management. Jenn has lived all over the United States, but currently calls upstate New York home.
■INTRODUCTION
Acknowledgments
My thanks go to the many people who helped create this book:
• Michelle Lowman for signing me to write the book
• Tom Welsh for developing the manuscript
• Jenn Kettell for reviewing the manuscript for technical accuracy and contributing helpful suggestions
• Kim Wimpsett for editing the manuscript with care
• Adam Heath for coordinating the book project and keeping things running
• MacPS, LLC for laying out the chapters of the book
■ INTRODUCTION
xxi
Introduction
Do you need to get your work done with the Office:Mac 2011 applications—smoothly, easily, and quickly? Good! You’ve picked up the right book.
Who Is This Book For?
This book is designed to help beginning and intermediate users get up to speed quickly with the Office:Mac 2011 applications and immediately become productive with them.
If you need to learn to use Word, Excel, PowerPoint, and Outlook to get everyday tasks done, at work or at home, you will benefit from this book’s focused approach and detailed advice. You can either start from the beginning of the book and work through it, or use the Table of Contents or the Index to find the topic you need immediately, and then jump right in there.
What Does This Book Cover?
This book contains five parts that cover the shared Office features and the four applications. Part 1 of the book brings you up to speed with the common features that the Office applications share:
• Chapter 1, “Getting Started with Office 2011,” introduces you to Office’s four applications—Word, Excel, PowerPoint, and Outlook—and what you can do with them. You learn how to open and close the applications; you meet key features such as the new Ribbon interface; and you create, save, close, and reopen documents.
• Chapter 2, “Learning Common Tools Across the Office Suite,” shows you how to control the Office applications using the menus, the toolbars, and the Ribbon, and how to make the most of the tools in the Toolbox. This chapter also explains Office’s common ways of sharing a document with others, how to save time and effort by using the AutoCorrect and AutoFormat features the smart way, and how to use the spelling and grammar checkers. You’ll also learn how to print documents.
• Chapter 3, “Working with Text,” shows you how to do everything from entering text (using the keyboard or other means) to creating tables and hyperlinks. Along the way, you’ll learn how to work with cut, copy, and paste, and how to use the Find and Replace features.
■ INTRODUCTION
• Chapter 4, “Using Pictures and Shapes in Your Documents,” teaches you how to add visual interest to your Office document by adding pictures and shapes. You’ll learn how to insert clip art, pictures (such as photos), and shapes; how to rotate and position graphical objects; and how to use Office’s tools for making pictures look the way you want them. This chapter also covers inserting SmartArt diagrams and arranging graphical objects to control which is visible.
• Chapter 5, “Customizing Office to Suit You,” walks you through
customizing the toolbars, the Ribbon, and keyboard shortcuts to make the applications easier and faster to use. You’ll also learn how to set essential preferences in the applications, such as the General preferences and the Save preferences.
Part 2 of the book covers using Microsoft Word, the powerful word processing application:
• Chapter 6, “Entering Text and Using Views,” shows you how to enter text quickly in Word documents. You’ll learn how to select text in advanced ways with the mouse and the keyboard, how to move around your documents, and how to tell Word where to find your custom templates. You’ll also learn to create backup documents automatically, and to make the most of Word’s seven different views of a document.
• Chapter 7, “Adding Style: Formatting Your Documents,” teaches you the right way to format a document quickly and consistently by using styles rather than applying direct formatting bit by bit. It also shows you how to get around your documents by using the Sidebar and the Find feature, and how to harness the power of the Replace feature.
• Chapter 8, “Creating Complex Documents and Layouts,” starts by showing you how to use Word’s extra features for creating tables. The chapter then explains how to break a document into multiple sections; how to add headers, footers, and page numbers; and how to create newspaper-style columns of text. You’ll learn to use bookmarks and cross-references, develop your documents using Word’s powerful Outline view, and add footnotes and endnotes to your documents.
• Chapter 9, “Creating Business Documents with Mail Merge,” shows you how to use Word to create business documents swiftly and efficiently. You’ll learn to set up mail merge documents (such as letters or labels), connect them to data sources, and save or print the results.
• Chapter 10, “Revising and Reviewing Documents,” covers how to use Word’s features for working with your colleagues on documents. You’ll learn how to edit a document either simultaneously or separately, how to use the Track Changes feature to mark revisions, and how to integrate changes into a document. You’ll also see how to add comments to a document and compare two document versions that contain untracked changes.
■ INTRODUCTION
xxiii
Part 3 teaches you to create spreadsheets and charts with Excel:
• Chapter 12, “Creating Workbooks and Entering Data,” covers creating different types of workbooks in Excel and entering data in them. You’ll learn how to navigate the Excel interface, use workbooks and worksheets, and use Excel’s views and features to see the data you need.
• Chapter 13, “Formatting Your Worksheets,” explains how to insert, delete, and format rows and columns in worksheets; how to format cells and ranges; and how to use the advanced conditional-formatting and data-validation features to identify unusual values or erratic input. This chapter also shows you how to format quickly and consistently with styles, how to add headers and footers to worksheets, and how to share workbooks effectively with your colleagues.
• Chapter 14, “Creating Powerful and Persuasive Charts,” teaches you how Excel’s charts work and how to add them to your workbooks. You’ll learn how to lay out a chart effectively, how to make it look good, and how to hide any components you don’t want to display. You’ll even learn how to save time by reusing the custom chart formatting you create.
• Chapter 15, “Crunching Numbers with Formulas and Functions,” makes clear the difference between a formula and a function, and shows you first how to create custom formulas and then how to use Excel’s built-in functions.
• Chapter 16, “Creating Simple Databases and Solving Business Problems,” shows you how to use Excel to create databases for storing and
manipulating your information. You’ll learn how to enter information into a database, how to sort the information, and how to filter it to find only the results you want. You’ll also learn how to use the Goal Seek feature and scenarios to work out solutions to business problems.
• Chapter 17, “Manipulating Data with PivotTables,” explains how to use Excel’s powerful PivotTable feature to manipulate your data so that you can discover the information you need. PivotTables take a few minutes to grasp, but you’ll be surprised how easy they are to use.
Part 4 of the book takes you through creating good-looking, persuasive presentations with PowerPoint:
• Chapter 18, “Starting to Build a Presentation,” gets you started by creating a presentation document using either a design template or a content template. The chapter then shows you how to add, delete, and rearrange slides; how to use PowerPoint’s views effectively; how to develop the outline of a presentation; and how to break a presentation into separate sections. You’ll also learn how to collaborate with your colleagues on creating a presentation.
• Chapter 19, “Creating Clear and Convincing Slides,” guides you through the toughest part of creating a good presentation: creating slides that convey your meaning clearly and powerfully. This chapter shows you how to plan a presentation, choose suitable layouts (or create your own), and add text and other content to your slides.
• Chapter 20, “Adding Life and Interest to a Presentation,” shows you ways of spicing up a presentation by using graphics, movies, sounds, animations, and transitions. You’ll also learn how to hide slides to keep them up your sleeve and how to build custom slide shows that enable you to reveal only part of a larger presentation.
■ INTRODUCTION
• Chapter 21, “Delivering a Presentation Live or Online,” explains how to deliver the presentation you’ve created. You can deliver the presentation live in person, broadcast it across the Internet, or create a version of the presentation that you can share via e-mail or in other ways. You’ll also learn how to use PowerPoint’s Presenter view and how to create a handout for a presentation.
Part 5 of the book shows you how to manage your e-mail, schedule, contacts, and tasks with Outlook:
• Chapter 22, “Using E-mail Effectively,” first shows you how to set up Outlook to work with your ISP or e-mail provider’s servers. Once Outlook is working, you’ll learn how to get around its complex user interface, how to send and receive e-mail, and how to manage your messages.
• Chapter 23, “Keeping Your Contacts in Order,” covers creating contacts either from scratch or importing them from your address books, spreadsheets, or other sources. The chapter also shows you how to view and sort your contacts, add or update their contact information, and quickly create communications to your contacts.
• Chapter 24, “Managing Your Calendar,” brings you up to speed with Outlook’s Calendar interface, shows you how to customize it, and teaches you to use its views. After that, it explains how to create one-shot
appointments and repeating appointments, schedule meetings, and respond to meeting requests.
• Chapter 25, “Working with Tasks and Notes,” shows you how to use Outlook to define the tasks you need to complete and track your progress on completing them. This chapter also explains how to use Outlook’s Notes feature to jot down information as you work.
Conventions Used in This Book
This book uses several conventions to make its meaning clear without wasting words:
• Ribbon commands and menu commands: The ➤ sign shows the sequence for choosing an item from the Ribbon or a command from the menu bar. For example, “Choose Home ➤ Paragraph ➤ Decrease indent from the Ribbon” means that you click the Home tab of the Ribbon (displaying the tab’s contents), go to the Paragraph group, and then click the Decrease Indent button. Similarly, the ➤ sign indicates a menu sequence. For example, “Choose Insert ➤ Photo ➤ Picture from File from the menu bar” means that you click the Insert menu on the menu bar to open the menu, click the Photo item to open the Photo submenu, and then click the Picture from File item on the Photo submenu.
■ INTRODUCTION
xxv
• Check boxes: The Office applications use many check boxes—the square boxes that can either have a check mark in them (indicating that the option is turned on) or not (indicating that the option is turned off). This book tells you to “select” a check box when you need to put a check mark in the check box, and to “clear” a check box when you need to remove the check mark from it. If the check box is already selected or cleared, you don’t need to change it.
• Keyboard shortcuts: In the Office applications, you can often save time and effort by using a keyboard shortcut rather than a Ribbon command. This book uses + signs to represent keyboard shortcuts. For example, “press Cmd+S” means that you hold down the Cmd key, press the S key, and then release the Cmd key. “Press Cmd+Option+T” means that you hold down the Cmd key and the Option key, press the T key, and then release the Cmd key and the Option key.
Part
Building Essential
Office Skills
To save you time and effort, the Office:Mac 2011 applications share many common features. This part of the book shows you how to get started quickly with the applications and learn to use these common features.
In Chapter 1, you’ll quickly meet Office’s four main applications—Word, Excel,
PowerPoint, and Outlook—and learn what you can do with them. You’ll grasp essential moves, such as opening and closing the applications; and you’ll create, save, close, and reopen documents.
In Chapter 2, you’ll take control of the applications using the menus, the toolbars, and the ribbon. You’ll learn how to share a document with others, how to save time and effort by using the AutoCorrect and AutoFormat features the smart way, and how to use the spelling and grammar checkers. You’ll also learn how to print documents.
In Chapter 3, you’ll study how to work with text—everything from entering text using the keyboard to creating tables and hyperlinks. By the end of the chapter, you’ll also know how to work with cut, copy, and paste, and how to use the Find and Replace features.
In Chapter 4, you’ll add visual interest to your Office document by inserting pictures and shapes. You’ll learn how to insert clip art, pictures (such as photos), and shapes; how to rotate and position graphical objects; and how to use Office’s tools for making pictures look the way you want them. When you need more complex illustrations, you can add SmartArt diagrams and arrange graphical objects to overlap each other, with fine control over which object is visible.
In Chapter 5, you’ll make the Office applications easier and faster to use by customizing the toolbars, the Ribbon, and keyboard shortcuts. You’ll also learn how to set essential preferences in the applications, such as the general and save preferences.
I
3
3
Chapter
Getting Up to Speed with
the Office Applications
You’re probably in a hurry to start being productive using Office 2011, so this chapter gets you moving quickly. First, you’ll meet each of the applications, find out what you can do with them, and come to grips with key features such as the Ribbon and the toolbars. Then, I’ll show you how to launch the applications or make them launch themselves. Finally, you’ll look at how to create, save, and close documents, as well as how to reopen them when you need to work on them again.
Meeting the Office Applications and Learning What
You Can Do with Them
Microsoft Office 2011 comes in two versions and includes either three or four main applications, which this section briefly introduces. The basic version, Microsoft Office Home & Student, includes Microsoft Word, Microsoft Excel, and Microsoft PowerPoint; the more expensive version, Microsoft Office Home & Business, adds Microsoft Outlook to those three applications. This book shows you how to become proficient with these four applications.
NOTE: Apart from the four main applications, Office also includes the Microsoft Messenger instant messaging application, the Microsoft Communicator telephony and conferencing application, the Remote Desktop Connection application for connecting remotely to Windows computers, and the Microsoft Document Connection application for connecting to SharePoint sites and Windows Live SkyDrive. This book focuses on the four main applications and doesn’t cover the others.
For ease of use and to save time, the four main applications share many features, from the ways in which you create, save, and open documents to common actions you
1
CHAPTER 1: Getting Up to Speed with the Office Applications
4
perform in them, such as copying text from one part of a document and pasting it in at another part.
Part 1 of this book discusses these common features. Parts 2 through 5 of the book then examine each of the applications in turn.
Microsoft Word
Microsoft Word (see Figure 1–1) is a word processing application that you can use to create everything from a single-page letter to a 1,000-page book complete with a table of contents, an index, and cross-references between different parts of the book.
Figure 1–1. Microsoft Word is the Office application for creating text-based documents.
CHAPTER 1: Getting Up to Speed with the Office Applications
5
Microsoft Excel
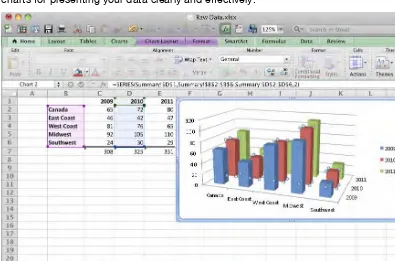
Microsoft Excel (see Figure 1–2) is a spreadsheet application that you can use to record, calculate, and analyze data. Excel includes features for creating many different types of charts for presenting your data clearly and effectively.
Figure 1–2. Each Microsoft Excel workbook contains as many worksheets as you need for entering and analyzing your data.
Part 3 of this book shows you how to work quickly and effectively in Microsoft Excel.
CHAPTER 1: Getting Up to Speed with the Office Applications
6
Microsoft PowerPoint
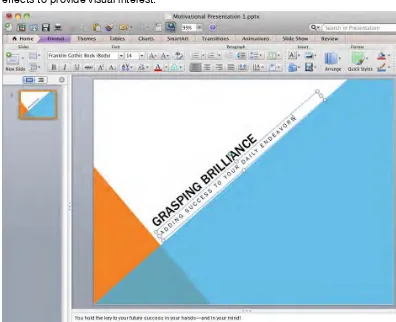
Microsoft PowerPoint (see Figure 1–3) is an application for creating and delivering presentations. Each presentation consists of slides, to which you can add any data from straightforward text to charts and movies. You can also add animations and transition effects to provide visual interest.
Figure 1–3. In Microsoft PowerPoint, you create slides and organize them into slide shows.
CHAPTER 1: Getting Up to Speed with the Office Applications
7
Microsoft Outlook
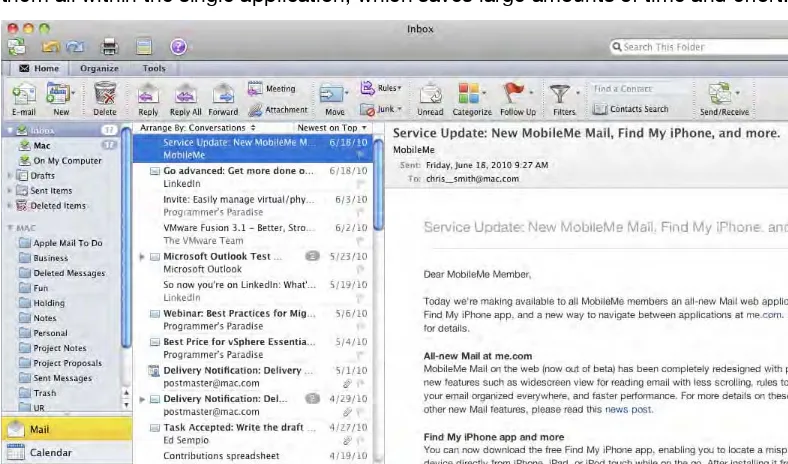
Microsoft Outlook (see Figure 1–4) is an application for e-mail and managing your contacts, calendar, and task list. If you have multiple e-mail accounts, you can manage them all within the single application, which saves large amounts of time and effort.
Figure 1–4. Microsoft Outlook makes it easy to work with multiple e-mail accounts and to schedule your business and home life.
Part 5 of this book shows you how to send e-mail and organize your life with Outlook.
CHAPTER 1: Getting Up to Speed with the Office Applications
8
Understanding the Common Features of the
Applications
As you can see from the figures on the past few pages, the Office applications share a common look and several common features. Some of the features are standard for Mac OS X applications, but others are peculiar to the Office applications.
CHAPTER 1: Getting Up to Speed with the Office Applications
9
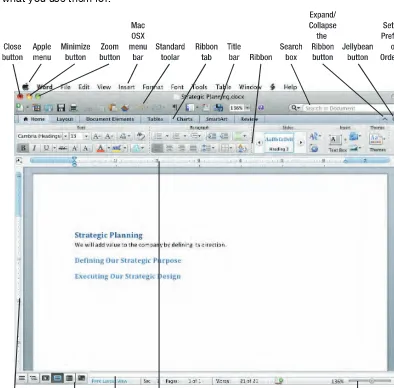
The Title Bar and the Close, Minimize, and Zoom Buttons
The title bar at the top of the window shows the name of the open document and its file extension—for example, Strategic Planning.docx.At the left end of the title bar are the following three buttons:
Close. Click this button to close the window. The application stays open even if you close the last window; to close the application, quit it by pressing Cmd+Q or by clicking the application’s menu and then clicking the Quit command (for example, choose Word ➤ Quit Word). Minimize. Click this button to minimize the window to the Dock. By
default, Mac OS X displays each minimized window as an icon on the right side of the Dock divider bar; click this icon to restore the window to its former size.
TIP: To save space on the Dock, Ctrl+click or right-click the Dock divider bar (the dashed white line), click Dock Preferences to display the Dock pane in System Preferences, and then select the Minimize windows into application icon check box. Press Cmd+Q or choose System Preferences
➤ Quit System Preferences to quit System Preferences. Now, when you minimize a window, Mac OS X puts it in the application’s icon in the Dock. To restore a window, Ctrl+click or
right-click the application’s icon, and then right-click the window you want.
Zoom. Click this button to make Mac OS X enlarge the application’s window to the amount of space Mac OS X estimates will make its contents fit just right. This works better for some windows than for others; you’ll often need to adjust the window size (by dragging the lower-right corner) after zooming. Click the Zoom button again to restore the window to its previous size.
The Toolbars
Below the title bar, each application by default displays a toolbar—a bar containing icons for frequently used commands, such as creating or opening documents, saving them, and printing them.
Word, Excel, and PowerPoint each have a Standard toolbar and a Formatting toolbar.
Standard. This toolbar appears by default, docked (attached) to the application window. You can hide it by choosing View ➤ Toolbars ➤ Standard, removing the check mark from the Standard item.
Formatting. This toolbar doesn’t appear by default, but you can display it (by choosing View ➤ Toolbars ➤ Formatting) when you need it.
CHAPTER 1: Getting Up to Speed with the Office Applications
10
NOTE: You can also display or hide toolbars by Ctrl+clicking or right-clicking a displayed toolbar and then using the Toolbars submenu on the context menu that appears.
Word also has a Database toolbar, and PowerPoint has an Outlining toolbar; Figure 1–6 shows PowerPoint with the Standard toolbar, Formatting toolbar, and Outlining toolbar all displayed at the top of the application window. In Word, Excel, and PowerPoint, you can create other toolbars as needed and put on them the commands you want, but you can’t dock these toolbars to the application window.
Figure 1–6. Each application has one or more toolbars to give you quick access to important commands. PowerPoint has the Standard toolbar, Formatting toolbar, and Outlining toolbar, which you can see at the top of this window.
CHAPTER 1: Getting Up to Speed with the Office Applications
11
The Ribbon
Below the title bar and any toolbars the application is displaying, the Ribbon runs across the top of the window. The Ribbon is a control bar that contains multiple tabs. You can display one tab’s contents at a time by clicking the tab at the top.
Each Office application has a Home tab that contains some of the most widely useful commands—for example, applying the most popular types of formatting. Beyond this tab, each application has other tabs to cover its needs. For example, PowerPoint’s tabs include the Slide Show tab, the Transitions tab, and the Animations tab, none of which Word, Excel, or Outlook need.
NOTE: When you need as much space as possible for working in a document, you can minimize the Ribbon by clicking the tab that’s currently active, clicking the Hide Ribbon button (the ^ button) at the right end of the Ribbon, choosing View ➤ Ribbon, or pressing Cmd+Option+R. To display the Ribbon again, click the tab you want to see, click the Show Ribbon button (the ∨ button) at the right end of the Ribbon, choose View ➤ Ribbon, or press Cmd+Option+R.
In Word, Excel, and PowerPoint, each tab contains several groups of controls, divided into different types of actions. For example, the Home tab in PowerPoint contains a Slides group for creating and laying out slides, a Font group for applying font formatting, a Paragraph group for applying paragraph formatting, and several other groups. Unlike the other three applications, Outlook’s tabs don’t use groups.
You’ll look at the details of how to use the Ribbon in Chapter 2, but the basic method is straightforward. You click the tab for the type of action you want to take and then click the button or control for the action you want to take. For example, to insert a picture in a Word document, you click the Home tab to display its contents, go to the Insert group, and then click the Picture button.
NOTE: If you find the Ribbon awkward to use, you can turn it off in Word, Excel, and PowerPoint and use the menus and toolbars instead. See Chapter 2 for instructions on turning the Ribbon off.
Outlook doesn’t let you turn the Ribbon off.
The Status Bar
At the bottom of the application window is the status bar, which shows information about the document and what you’re currently working on and provides controls for changing the view and zooming in or out. For example, in Word, the status bar shows the view the document is using, the current page number, the number of words in the document, and the proofing status (whether the document contains spelling or grammar errors).
CHAPTER 1: Getting Up to Speed with the Office Applications
12
Opening Applications
To get anything done in the Office applications, you’ll need to open and close the applications. You can open an application from the Dock or the Applications folder or by opening a document associated with that application. You may also want to open one or more applications when you log in to your Mac.
Opening an Application from the Dock
Usually, the easiest way to open one of the Office applications is by clicking its icon on the Dock (see Figure 1–7). The Office installer automatically adds an icon for each Office application to the Dock, so the icons should be there unless you remove them.
Figure 1–7. The standard way of launching an Office application is to click its icon on the Dock. Hold the mouse pointer over an icon to display its name, as for Microsoft Excel here.
NOTE: If the Dock doesn’t contain icons for the Office applications, you can add them easily. Click the Finder icon at the left end of the Dock (or the top end if you’ve displayed the Dock vertically), and then choose Go ➤ Applications from the menu bar to display the Applications folder. Microsoft Communicator is in the Applications folder itself; to reach the other applications, open the Microsoft Office 2011 folder to display the applications. Then click an application’s icon and drag it to the Dock, dropping it to the left of the Dock divider bar (the dashed white line); if
CHAPTER 1: Getting Up to Speed with the Office Applications
13
Opening an Application from the Applications Folder
If you choose not to place icons for the Office applications on the Dock, you can run the applications from the Applications folder. To do so, follow these steps:
1. Click the Finder icon on the Dock to activate the Finder.
2. Choose Go ➤ Applications from the menu bar to display the Applications folder.
3. Open the Microsoft Office 2011 folder.
4. Double-click the application you want to launch.
Making a Application Launch Automatically
If you work in one or more of the Office applications every time you use your Mac, set the application to run automatically when you log in. For example, you may want to run Word, Excel, and Outlook each computing session so that you can work on documents, update your spreadsheets, and check your e-mail.
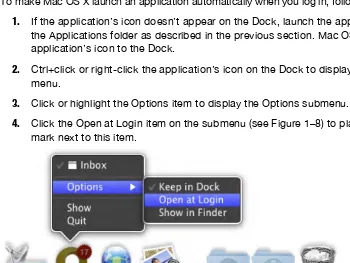
To make Mac OS X launch an application automatically when you log in, follow these steps:
1. If the application’s icon doesn’t appear on the Dock, launch the application from the Applications folder as described in the previous section. Mac OS X adds the application’s icon to the Dock.
2. Ctrl+click or right-click the application’s icon on the Dock to display the context menu.
3. Click or highlight the Options item to display the Options submenu.
4. Click the Open at Login item on the submenu (see Figure 1–8) to place a check mark next to this item.
Figure 1–8. To make an application launch automatically when you log in, Ctrl+click or right-click the Dock icon, and then choose Options ➤ Open at Login.
CHAPTER 1: Getting Up to Speed with the Office Applications
14
Now log out and then log back in. Check that Mac OS X automatically starts the applications you chose.
NOTE: You can set up any application to launch automatically as described in this section. The more applications you set to launch automatically, the longer the login process will take—but once it is finished, you’ll be ready to work fast.
Cre
ating a Doc
ument
In Word, Excel, and PowerPoint, you create individual documents and save them in separate files. For example, in Word, you create word processing documents such as reports or letters. In Excel, you create workbooks containing worksheets of data. In PowerPoint, you create presentation documents containing slides.
NOTE: Documents work differently in Outlook. While you create individual messages and other items (such as tasks and appointments) in Outlook, the application automatically stores most of your data for you.
Word, Excel, and PowerPoint come with templates, files that contain the basic structures of different kinds of documents. For example, Word includes templates for letters, reports, faxes, and other types of documents. A template can contain anything from the paper size, margins, and layout of a document up to an almost complete document in which you need to fill in only a few pieces of information to get a complete document. For example, in a customer letter template, you may need to fill in only the customer’s name, address, and product type to produce a complete document.
When you want to work from a blank slate, you can create a new Word document, Excel workbook, or PowerPoint presentation that has no contents and no special formatting.
To create a new document based on a template, follow these steps:
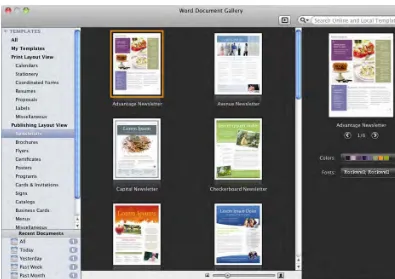
1. Open the Gallery dialog box in one of the following ways:
Launch the application. The application displays the Gallery dialog box automatically. Word displays the Word Document Gallery dialog box (see Figure 1–9), Excel displays the Excel Workbook Gallery dialog box, and PowerPoint displays the PowerPoint Presentation Gallery dialog box.