Real-Time Communication with WebRTC by Salvatore Loreto and Simon Pietro Romano
Copyright © 2014 Salvatore Loreto and Prof. Simon Pietro Romano. All rights reserved.
Printed in the United States of America.
Published by O’Reilly Media, Inc., 1005 Gravenstein Highway North, Sebastopol, CA 95472.
O’Reilly books may be purchased for educational, business, or sales promotional use. Online editions are also available for most titles (http://my.safaribooksonline.com). For more information, contact our corporate/ institutional sales department: 800-998-9938 or [email protected].
Editors: Simon St.Laurent and Allyson MacDonald
Production Editor: Kristen Brown
Revision History for the First Edition:
2014-04-15: First release
See http://oreilly.com/catalog/errata.csp?isbn=9781449371876 for release details.
Nutshell Handbook, the Nutshell Handbook logo, and the O’Reilly logo are registered trademarks of O’Reilly Media, Inc. Real-Time Communication with WebRTC, the image of a viviparous lizard, and related trade dress are trademarks of O’Reilly Media, Inc.
Many of the designations used by manufacturers and sellers to distinguish their products are claimed as trademarks. Where those designations appear in this book, and O’Reilly Media, Inc. was aware of a trademark claim, the designations have been printed in caps or initial caps.
While every precaution has been taken in the preparation of this book, the publisher and authors assume no responsibility for errors or omissions, or for damages resulting from the use of the information contained herein.
ISBN: 978-1-449-37187-6
This book is dedicated to my beloved son Carmine and my wonderful wife Annalisa. They are my inspiration and motivation in everything I do.
— Salvatore Loreto
This book is dedicated to Franca (who was both my mother and my best friend) and to my beloved daughters Alice and Martina.
Table of Contents
Preface. . . vii
1. Introduction. . . 1
Web Architecture 1
WebRTC Architecture 2
WebRTC in the Browser 3
Signaling 5
WebRTC API 5
MediaStream 6
PeerConnection 7
DataChannel 8
A Simple Example 9
2. Handling Media in the Browser. . . 11
WebRTC in 10 Steps 11
Media Capture and Streams 12
MediaStream API 12
Obtaining Local Multimedia Content 13
URL 13
Playing with the getUserMedia() API 13
The Media Model 19
Media Constraints 19
Using Constraints 19
3. Building the Browser RTC Trapezoid: A Local Perspective. . . 25
Using PeerConnection Objects Locally: An Example 27
Starting the Application 32
Placing a Call 36
Hanging Up 44
Adding a DataChannel to a Local PeerConnection 46
Starting Up the Application 51
Streaming Text Across the Data Channel 57
Closing the Application 60
4. The Need for a Signaling Channel. . . 63
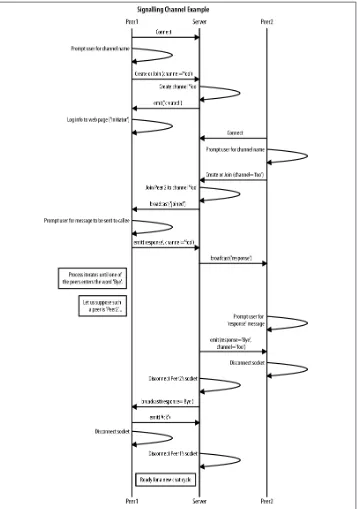
Building Up a Simple Call Flow 63
Creating the Signaling Channel 72
Joining the Signaling Channel 76
Starting a Server-Mediated Conversation 79
Continuing to Chat Across the Channel 82
Closing the Signaling Channel 85
5. Putting It All Together: Your First WebRTC System from Scratch. . . 91
A Complete WebRTC Call Flow 91
Initiator Joining the Channel 104
Joiner Joining the Channel 110
Initiator Starting Negotiation 112
Joiner Managing Initiator’s Offer 115
ICE Candidate Exchanging 117
Joiner’s Answer 121
Going Peer-to-Peer! 123
Using the Data Channel 125
A Quick Look at the Chrome WebRTC Internals Tool 129
6. An Introduction to WebRTC API’s Advanced Features. . . 133
Conferencing 133
Identity and Authentication 134
Peer-to-Peer DTMF 135
Statistics Model 136
A. WebRTC 1.0 APIs. . . 139
Index. . . 145
Preface
Web Real-Time Communication (WebRTC) is a new standard that lets browsers com‐ municate in real time using a peer-to-peer architecture. It is about secure, consent-based, audio/video (and data) peer-to-peer communication between HTML5 browsers. This is a disruptive evolution in the web applications world, since it enables, for the very first time, web developers to build real-time multimedia applications with no need for pro‐ prietary plug-ins.
WebRTC puts together two historically separated camps, associated, respectively, with telecommunications on one side and web development on the other. Those who do not come from the telecommunications world might be discouraged by the overwhelming quantity of information to be aware of in order to understand all of the nits and bits associated with real-time transmission over the Internet. On the other hand, for those who are not aware of the latest developments in the field of web programming (both client and server side), it might feel uncomfortable to move a legacy VoIP application to the browser.
The aim of this book is to facilitate both communities, by providing developers with a learn-by-example description of the WebRTC APIs sitting on top of the most advanced real-time communication protocols. It targets a heterogeneous readership, made not only of web programmers, but also of real-time applications architects who have some knowledge of the inner workings of the Internet protocols and communication para‐ digms. Different readers can enter the book at different points. They will be provided with both some theoretical explanation and a handy set of pre-tailored exercises they can properly modify and apply to their own projects.
We will first of all describe, at a high level of abstraction, the entire development cycle associated with WebRTC. Then, we will walk hand in hand with our readers and build a complete WebRTC application. We will first disregard all networking aspects related to the construction of a signaling channel between any pair of browser peers aiming to communicate. In this first phase, we will illustrate how you can write code to query (and gain access to) local multimedia resources like audio and video devices and render them
within an HTML5 browser window. We will then discuss how the obtained media streams can be associated with a PeerConnection object representing an abstraction for a logical connection to a remote peer. During these first steps, no actual communication channel with a remote peer will be instantiated. All of the code samples will be run on a single node and will just help the programmer familiarize with the WebRTC APIs. Once done with this phase, we will briefly discuss the various choices related to the setup of a proper signaling channel allowing two peers to exchange (and negotiate) informa‐ tion about a real-time multimedia session between each other. For this second phase, we will unavoidably need to take a look at the server side. The running example will be purposely kept as simple as possible. It will basically represent a bare-bones piece of code focusing just on the WebRTC APIs and leave aside all stylistic aspects associated with the look and feel of the final application. We believe that readers will quickly learn how to develop their own use cases, starting from the sample code provided in the book.
The book is structured as follows:
Chapter 1, Introduction
Covers why VoIP (Voice over IP) is shifting from standalone functionality to a browser component. It introduces the existing HTML5 features used in WebRTC and how they fit with the architectural model of real-time communication, the so-called Browser RTC Trapezoid.
Chapter 2, Handling Media in the Browser
Focuses on the mechanisms allowing client-side web applications (typically written in a mix of HTML5 and JavaScript) to interact with web browsers through the WebRTC API. It illustrates how to query browser capabilities, receive browser-generated notifications, and apply the application-browser API in order to properly handle media in the browser.
Chapter 3, Building the Browser RTC Trapezoid: A Local Perspective
Introduces the RTCPeerConnection API, whose main purpose is to transfer stream‐ ing data back and forth between browser peers, by providing an abstraction for a bidirectional multimedia communication channel.
Chapter 4, The Need for a Signaling Channel
Focuses on the creation of an out-of-band signaling channel between WebRTC-enabled peers. Such a channel proves fundamental, at session setup time, in order to allow for the exchanging of both session descriptions and network reachability information.
Chapter 5, Putting It All Together: Your First WebRTC System from Scratch
Concludes the guided WebRTC tour by presenting a complete example. The readers will learn how to create a basic yet complete Web Real-Time Communication sys‐ tem from scratch, using the API functionality described in the previous chapters.
Chapter 6, An Introduction to WebRTC API’s Advanced Features
Explores advanced aspects of the WebRTC API and considers the future.
Conventions Used in This Book
The following typographical conventions are used in this book:
Italic
Indicates new terms, URLs, email addresses, filenames, and file extensions.
Constant width
Used for program listings, as well as within paragraphs to refer to program elements such as variable or function names, databases, data types, environment variables, statements, and keywords.
Constant width bold
Shows commands or other text that should be typed literally by the user.
Constant width italic
Shows text that should be replaced with user-supplied values or by values deter‐ mined by context.
This element signifies a tip or suggestion.
This element signifies a general note.
This element indicates a warning or caution.
Using Code Examples
Supplemental material (code examples, exercises, etc.) is available for download at
This book is here to help you get your job done. In general, if example code is offered with this book, you may use it in your programs and documentation. You do not need to contact us for permission unless you’re reproducing a significant portion of the code. For example, writing a program that uses several chunks of code from this book does not require permission. Selling or distributing a CD-ROM of examples from O’Reilly books does require permission. Answering a question by citing this book and quoting example code does not require permission. Incorporating a significant amount of ex‐ ample code from this book into your product’s documentation does require permission.
We appreciate, but do not require, attribution. An attribution usually includes the title, author, publisher, and ISBN. For example: “Real-Time Communication with WebRTC
by Salvatore Loreto and Simon Pietro Romano (O’Reilly). Copyright 2014 Salvatore Loreto and Prof. Simon Pietro Romano, 978-1-449-37187-6.”
If you feel your use of code examples falls outside fair use or the permission given above, feel free to contact us at [email protected].
Safari® Books Online
Safari Books Online is an on-demand digital library that delivers expert content in both book and video form from the world’s leading authors in technology and business.
Technology professionals, software developers, web designers, and business and crea‐ tive professionals use Safari Books Online as their primary resource for research, prob‐ lem solving, learning, and certification training.
How to Contact Us
Please address comments and questions concerning this book to the publisher:
O’Reilly Media, Inc.
1005 Gravenstein Highway North Sebastopol, CA 95472
800-998-9938 (in the United States or Canada) 707-829-0515 (international or local)
707-829-0104 (fax)
We have a web page for this book, where we list errata, examples, and any additional information. You can access this page at http://oreil.ly/realtime-comm-webRTC. To comment or ask technical questions about this book, send email to bookques [email protected].
For more information about our books, courses, conferences, and news, see our website at http://www.oreilly.com.
Find us on Facebook: http://facebook.com/oreilly
Follow us on Twitter: http://twitter.com/oreillymedia
Watch us on YouTube: http://www.youtube.com/oreillymedia
Acknowledgments
This book wouldn’t be here without the efforts of many people. The authors gratefully acknowledge some of the many here, in no particular order:
• The people at O’Reilly, with a special mention to Allyson MacDonald and Simon St.Laurent, who have enthusiastically supported our book proposal and invested considerable time and effort in bringing this manuscript to market. Allyson, in particular, has been closely involved in creating the final pages you read.
• The reviewers, who provided valuable feedback during the writing process: Lorenzo Miniero, Irene Ruengeler, Michael Tuexen, and Xavier Marjou. They all did a great job and provided us with useful hints and a thorough technical review of the final manuscript before it went to press.
• The engineers at both the IETF and the W3C who are dedicating huge efforts to making the WebRTC/RtcWeb initiatives become a reality.
CHAPTER 1
Introduction
Web Real-Time Communication (WebRTC) is a new standard and industry effort that extends the web browsing model. For the first time, browsers are able to directly ex‐ change real-time media with other browsers in a peer-to-peer fashion.
The World Wide Web Consortium (W3C) and the Internet Engineering Task Force (IETF) are jointly defining the JavaScript APIs (Application Programming Interfaces), the standard HTML5 tags, and the underlying communication protocols for the setup and management of a reliable communication channel between any pair of next-generation web browsers.
The standardization goal is to define a WebRTC API that enables a web application running on any device, through secure access to the input peripherals (such as webcams and microphones), to exchange real-time media and data with a remote party in a peer-to-peer fashion.
Web Architecture
The classic web architecture semantics are based on a client-server paradigm, where browsers send an HTTP (Hypertext Transfer Protocol) request for content to the web server, which replies with a response containing the information requested.
The resources provided by a server are closely associated with an entity known by a URI (Uniform Resource Identifier) or URL (Uniform Resource Locator).
WebRTC Architecture
WebRTC extends the client-server semantics by introducing a peer-to-peer communi‐ cation paradigm between browsers. The most general WebRTC architectural model (see Figure 1-1) draws its inspiration from the so-called SIP (Session Initiation Protocol) Trapezoid (RFC3261).
Figure 1-1. The WebRTC Trapezoid
In the WebRTC Trapezoid model, both browsers are running a web application, which is downloaded from a different web server. Signaling messages are used to set up and terminate communications. They are transported by the HTTP or WebSocket protocol via web servers that can modify, translate, or manage them as needed. It is worth noting that the signaling between browser and server is not standardized in WebRTC, as it is considered to be part of the application (see “Signaling” on page 5). As to the data path, a PeerConnection allows media to flow directly between browsers without any inter‐ vening servers. The two web servers can communicate using a standard signaling pro‐ tocol such as SIP or Jingle (XEP-0166). Otherwise, they can use a proprietary signaling protocol.
Figure 1-2. The WebRTC Triangle
WebRTC in the Browser
A WebRTC web application (typically written as a mix of HTML and JavaScript) inter‐ acts with web browsers through the standardized WebRTC API, allowing it to properly exploit and control the real-time browser function (see Figure 1-3). The WebRTC web application also interacts with the browser, using both WebRTC and other standardized APIs, both proactively (e.g., to query browser capabilities) and reactively (e.g., to receive browser-generated notifications).
The WebRTC API must therefore provide a wide set of functions, like connection man‐ agement (in a peer-to-peer fashion), encoding/decoding capabilities negotiation, se‐ lection and control, media control, firewall and NAT element traversal, etc.
Network Address Translator (NAT)
The Network Address Translator (NAT) (RFC1631) has been standardized to alleviate the scarcity and depletion of IPv4 addresses.
Figure 1-3. Real-time communication in the browser
The design of the WebRTC API does represent a challenging issue. It envisages that a continuous, real-time flow of data is streamed across the network in order to allow direct communication between two browsers, with no further intermediaries along the path. This clearly represents a revolutionary approach to web-based communication.
Let us imagine a real-time audio and video call between two browsers. Communication, in such a scenario, might involve direct media streams between the two browsers, with the media path negotiated and instantiated through a complex sequence of interactions involving the following entities:
• The caller browser and the caller JavaScript application (e.g., through the mentioned JavaScript API)
• The caller JavaScript application and the application provider (typically, a web server)
• The application provider and the callee JavaScript application
1. DTLS is actually used for key derivation, while SRTP is used on the wire. So, the packets on the wire are not DTLS (except for the initial handshake).
Signaling
The general idea behind the design of WebRTC has been to fully specify how to control the media plane, while leaving the signaling plane as much as possible to the application layer. The rationale is that different applications may prefer to use different standardized signaling protocols (e.g., SIP or eXtensible Messaging and Presence Protocol [XMPP]) or even something custom.
Session description represents the most important information that needs to be ex‐ changed. It specifies the transport (and Interactive Connectivity Establishment [ICE]) information, as well as the media type, format, and all associated media configuration parameters needed to establish the media path.
Since the original idea to exchange session description information in the form of Ses‐ sion Description Protocol (SDP) “blobs” presented several shortcomings, some of which turned out to be really hard to address, the IETF is now standardizing the JavaScript Session Establishment Protocol (JSEP). JSEP provides the interface needed by an ap‐ plication to deal with the negotiated local and remote session descriptions (with the negotiation carried out through whatever signaling mechanism might be desired), to‐ gether with a standardized way of interacting with the ICE state machine.
The JSEP approach delegates entirely to the application the responsibility for driving the signaling state machine: the application must call the right APIs at the right times, and convert the session descriptions and related ICE information into the defined mes‐ sages of its chosen signaling protocol, instead of simply forwarding to the remote side the messages emitted from the browser.
WebRTC API
Datagram Transport Layer Security (DTLS)
The DTLS (Datagram Transport Layer Security) protocol (RFC6347) is designed to prevent eavesdropping, tampering, or message forgery to the datragram transport of‐ fered by the User Datagram Protocol (UDP). The DTLS protocol is based on the stream-oriented Transport Layer Security (TLS) protocol and is intended to provide similar security guarantees.
The DTLS handshake performed between two WebRTC clients re‐ lies on self-signed certificates. As a result, the certificates themselves cannot be used to authenticate the peer, as there is no explicit chain of trust to verify.
To ensure a baseline level of interoperability between different real-time browser func‐ tion implementations, the IETF is working on selecting a minimum set of mandatory to support audio and video codecs. Opus (RFC6716) and G.711 have been selected as the mandatory to implement audio codecs. However, at the time of this writing, IETF has not yet reached a consensus on the mandatory to implement video codecs.
The API is being designed around three main concepts: MediaStream, PeerConnec tion, and DataChannel.
MediaStream
A MediaStream is an abstract representation of an actual stream of data of audio and/or video. It serves as a handle for managing actions on the media stream, such as displaying the stream’s content, recording it, or sending it to a remote peer. A Media Stream may be extended to represent a stream that either comes from (remote stream) or is sent to (local stream) a remote node.
A LocalMediaStream represents a media stream from a local media-capture device (e.g., webcam, microphone, etc.). To create and use a local stream, the web application must request access from the user through the getUserMedia() function. The application specifies the type of media—audio or video—to which it requires access. The devices selector in the browser interface serves as the mechanism for granting or denying access. Once the application is done, it may revoke its own access by calling the stop() function on the LocalMediaStream.
Media-plane signaling is carried out of band between the peers; the Secure Real-time Transport Protocol (SRTP) is used to carry the media data together with the RTP Control Protocol (RTCP) information used to monitor transmission statistics associated with data streams. DTLS is used for SRTP key and association management.
As Figure 1-4 shows, in a multimedia communication each medium is typically carried in a separate RTP session with its own RTCP packets. However, to overcome the issue of opening a new NAT hole for each stream used, the IETF is currently working on the possibility of reducing the number of transport layer ports consumed by RTP-based real-time applications. The idea is to combine (i.e., multiplex) multimedia traffic in a single RTP session.
Figure 1-4. The WebRTC protocol stack
PeerConnection
STUN and TURN
The Session Traversal Utilities for NAT (STUN) protocol (RFC5389) allows a host ap‐ plication to discover the presence of a network address translator on the network, and in such a case to obtain the allocated public IP and port tuple for the current connection. To do so, the protocol requires assistance from a configured, third-party STUN server that must reside on the public network.
The Traversal Using Relays around NAT (TURN) protocol (RFC5766) allows a host behind a NAT to obtain a public IP address and port from a relay server residing on the public Internet. Thanks to the relayed transport address, the host can then receive media from any peer that can send packets to the public Internet.
The PeerConnection mechanism uses the ICE protocol (see “ICE Candidate Exchang‐ ing” on page 117) together with the STUN and TURN servers to let UDP-based media streams traverse NAT boxes and firewalls. ICE allows the browsers to discover enough information about the topology of the network where they are deployed to find the best exploitable communication path. Using ICE also provides a security measure, as it pre‐ vents untrusted web pages and applications from sending data to hosts that are not expecting to receive them.
Each signaling message is fed into the receiving PeerConnection upon arrival. The APIs send signaling messages that most applications will treat as opaque blobs, but which must be transferred securely and efficiently to the other peer by the web application via the web server.
DataChannel
The DataChannel API is designed to provide a generic transport service allowing web browsers to exchange generic data in a bidirectional peer-to-peer fashion.
The standardization work within the IETF has reached a general consensus on the usage of the Stream Control Transmission Protocol (SCTP) encapsulated in DTLS to handle nonmedia data types (see Figure 1-4).
providing the notion of in-sequence delivery. A message sequence can be sent either ordered or unordered. The message delivery order is preserved only for all ordered messages sent on the same stream. However, the DataChannel API has been designed to be bidirectional, which means that each DataChannel is composed as a bundle of an incoming and an outgoing SCTP stream.
The DataChannel setup is carried out (i.e., the SCTP association is created) when the
CreateDataChannel() function is called for the first time on an instantiated PeerCon nection object. Each subsequent call to the CreateDataChannel() function just creates a new DataChannel within the existing SCTP association.
A Simple Example
Alice and Bob are both users of a common calling service. In order to communicate, they have to be simultaneously connected to the web server implementing the calling service. Indeed, when they point their browsers to the calling service web page, they will download an HTML page containing a JavaScript that keeps the browser connected to the server via a secure HTTP or WebSocket connection.
When Alice clicks on the web page button to start a call with Bob, the JavaScript in‐ stantiates a PeerConnection object. Once the PeerConnection is created, the JavaScript code on the calling service side needs to set up media and accomplishes such a task through the MediaStream function. It is also necessary that Alice grants permission to allow the calling service to access both her camera and her microphone.
In the current W3C API, once some streams have been added, Alice’s browser, enriched with JavaScript code, generates a signaling message. The exact format of such a message has not been completely defined yet. We do know it must contain media channel in‐ formation and ICE candidates, as well as a fingerprint attribute binding the communi‐ cation to Alice’s public key. This message is then sent to the signaling server (e.g., by XMLHttpRequest or by WebSocket).
Figure 1-5 sketches a typical call flow associated with the setup of a real-time, browser-enabled communication channel between Alice and Bob.
The signaling server processes the message from Alice’s browser, determines that this is a call to Bob, and sends a signaling message to Bob’s browser.
CHAPTER 2
Handling Media in the Browser
In this chapter, we start delving into the details of the WebRTC framework, which ba‐ sically specifies a set of JavaScript APIs for the development of web-based applications. The APIs have been conceived at the outset as friendly tools for the implementation of basic use cases, like a one-to-one audio/video call. They are also meant to be flexible enough to guarantee that the expert developer can implement a variegated set of much more complicated usage scenarios. The programmer is hence provided with a set of APIs which can be roughly divided into three logical groups:
1. Acquisition and management of both local and remote audio and video:
• MediaStream interface (and related use of the HTML5 <audio> and <video> tags)
2. Management of connections:
• RTCPeerConnection interface
3. Management of arbitrary data:
• RTCDataChannel interface.
WebRTC in 10 Steps
The following 10-step recipe describes a typical usage scenario of the WebRTC APIs:
1. Create a MediaStream object from your local devices (e.g., microphone, webcam). 2. Obtain a URL blob from the local MediaStream.
5. Add the local stream to the newly created connection. 6. Send your own session description to the remote peer. 7. Receive the remote session description from your peer.
8. Process the received session description and add the remote stream to your
RTCPeerConnection.
9. Obtain a URL blob from the remote stream.
10. Use the obtained URL blob to play the remote peer’s audio and/or video.
We will complete the above recipe step by step. In the remainder of this chapter we will indeed cover the first three phases of the entire peer-to-peer WebRTC-based commu‐ nication lifecycle. This means that we will forget about our remote peer for the moment and just focus on how to access and make use of local audio and video resources from within our browser. While doing this, we will also take a look at how to play a bit with constraints (e.g., to force video resolution).
Warning: WebRTC supported browsers
At the time of this writing, the WebRTC API is available in Chrome, Firefox, and Opera. All of the samples contained in this book have been tested with these browsers. For the sake of conciseness (and since Opera and Chrome act almost identically when it comes to the API’s implementation) we will from now on just focus on Chrome and Firefox as running client platform examples.
Media Capture and Streams
The W3C Media Capture and Streams document defines a set of JavaScript APIs that enable the application to request audio and video streams from the platform, as well as manipulate and process the stream data.
MediaStream API
A MediaStream interface is used to represent streams of media data. Flows can be either input or output, as well as either local or remote (e.g., a local webcam or a remote connection). It has to be noted that a single MediaStream can contain zero or multiple tracks. Each track has a corresponding MediaStreamTrack object representing a specific media source in the user agent. All tracks in a MediaStream are intended to be synchron‐ ized when rendered. A MediaStreamTrack represents content comprising one or more channels, where the channels have a defined, well-known relationship to each other. A channel is the smallest unit considered in this API specification. Figure 2-1 shows a
Figure 2-1. A MediaStream made of one video track and two audio tracks
The W3C Media Capture and Streams API defines the two methods getUserMedia()
and createObjectUrl(), which are briefly explained in the following sections.
Obtaining Local Multimedia Content
The getUserMedia() API allows web developers to obtain access to local device media (currently, audio and/or video), by specifying a set of (either mandatory or optional) constraints, as well as proper callbacks for the asynchronous management of both suc‐ cessful and unsuccessful setup:
getUserMedia(constraints, successCallback, errorCallback)
getUserMedia() prompts the user for permission to use their webcam or other video or audio input.
URL
The createObjectUrl() method instructs the browser to create and manage a unique URL associated with either a local file or a binary object (blob):
createObjectURL(stream)
Its typical usage in WebRTC will be to create a blob URL starting from a MediaStream
object. The blob URL will then be used inside an HTML page. This procedure is actually needed for both local and remote streams.
Playing with the getUserMedia() API
So, let’s get started with the getUserMedia() API call and its returned MediaStream
Example 2-1. Our first WebRTC-enabled HTML page <!DOCTYPE html>
<html> <head>
<title>getUserMedia very simple demo</title>
</head> <body>
<div id="mainDiv">
<h1><code>getUserMedia()</code> very simple demo</h1>
<p>With this example, we simply call <code>getUserMedia()</code> and display the received stream inside an HTML5 <video> element</p>
<p>View page source to access both HTML and JavaScript code...</p>
<video autoplay></video>
<script src="js/getUserMedia.js"></script> </div>
</body> </html>
Example 2-1 contains a reference to a JavaScript file (getUserMedia.js), whose content is shown in Example 2-2.
Example 2-2. The getUserMedia.js file
// Look after different browser vendors' ways of calling the getUserMedia() // API method:
// Opera --> getUserMedia // Chrome --> webkitGetUserMedia // Firefox --> mozGetUserMedia
navigator.getUserMedia = navigator.getUserMedia || navigator.webkitGetUserMedia || navigator.mozGetUserMedia;
// Use constraints to ask for a video-only MediaStream: var constraints = {audio: false, video: true};
var video = document.querySelector("video");
// Callback to be called in case of success... function successCallback(stream) {
if (window.URL) {
// Chrome case: URL.createObjectURL() converts a MediaStream to a blob URL video.src = window.URL.createObjectURL(stream);
} else {
// Firefox and Opera: the src of the video can be set directly from the stream video.src = stream;
}
// We're all set. Let's just play the video out! video.play();
}
// Callback to be called in case of failures... function errorCallback(error){
console.log("navigator.getUserMedia error: ", error); }
// Main action: just call getUserMedia() on the navigator object navigator.getUserMedia(constraints, successCallback, errorCallback);
The following screenshots show how the page looks when we load it into either Chrome (Figure 2-2) or Firefox (Figure 2-3).
Figure 2-3. Opening our first example in Firefox
Warning: Opening JavaScript files in Chrome
If you want to test the code in Google Chrome on your local ma‐ chine, you are going to face some challenges, since Chrome will not load local files by default due to security restrictions. In order to overcome such issues you’ll have to either run a web server locally on your machine and use it to serve the application’s files, or use the
--allow-file-access-from-files option when launching your browser.
As you can see from the figures above, both browsers ask for the user’s consent before accessing local devices (in this case, the webcam). After gathering such an explicit con‐ sent from the user, the browser eventually associates the acquired MediaStream with the page, as shown in Figures 2-4 and 2-5.
It is important to note that the permission grant is tied to the domain of the web page, and that this permission does not extend to pop ups and other frames on the web page.
Figure 2-4. Showing the acquired MediaStream in Chrome
Delving into some of the details of the simple code reported above, we can highlight how we make a call to the API method getUserMedia(constraints, successCall back, errorCallback), whose arguments have the following meaning:
• A constraints object (see “Media Constraints” on page 19), used to specify that we are interested in gathering just the local video (constraints = {audio: false, video: true}).
• A success callback which, if called, is passed a MediaStream. In our case, such a
MediaStream is first made available to the console for the user’s inspection (win dow.stream = stream;). Then, it is attached to the <video> element of the HTML5 page and eventually displayed. With reference to console inspection of the returned object, Figure 2-6 shows a snapshot of the output of such an activity within the developer’s tool window in Chrome. Each MediaStream is characterized by a label and contains one or more MediaStreamTracks representing channels of either au‐ dio or video.
Figure 2-6. Inspecting a MediaStream in Chrome’s console
• A failure callback which, if called, is passed an error object. In our basic example, the mentioned callback just logs the returned error to the console (con sole.log("navigator.getUserMedia error: ", error);).
The Media Model
Browsers provide a media pipeline from sources to sinks. In a browser, sinks are the
<img>, <video>, and <audio> tags. A source can be a physical webcam, a microphone, a local video or audio file from the user’s hard drive, a network resource, or a static image. The media produced by these sources typically do not change over time. These sources can be considered static. The sinks that display such sources to the users (the actual tags themselves) have a variety of controls for manipulating the source content.
The getUserMedia() API method adds dynamic sources such as microphones and cameras. The caracteristics of these sources can change in response to application needs. These sources can be considered dynamic in nature.
Media Constraints
Constraints are an optional feature for restricting the range of allowed variability on a source of a MediaStream track. Constraints are exposed on tracks via the Constraina ble interface, which includes an API for dynamically changing constraints.
The getUserMedia() call also permits an initial set of constraints to be applied (for example, to set values for video resolution) when the track is first obtained.
The core concept of constraints is a capability, which consists of a property or feature of an object together with the set of its possible values, which may be specified either as a range or as an enumeration.
Constraints are stored on the track object, not the source. Each track can be optionally initialized with constraints. Otherwise, constraints can be added afterwards through the dedicated constraint APIs.
Constraints can be either optional or mandatory. Optional constraints are represented by an ordered list, while mandatory constraints are associated with an unordered set.
The aim is to provide support for more constraints before the final version of the API is released; such constraints will include things like aspect ratio, camera facing mode (front or back), audio and video frame rate, video height and width, and so on.
Using Constraints
Warning: getUserMedia() constraints support in WebRTC browsers getUserMedia() constraints are currently only supported in Chrome. The example in this section will assume that you use this browser.
Let’s first build the HTML page in Example 2-3.
Example 2-3. Playing with constraints: The HTML page <!DOCTYPE html>
<!DOCTYPE html PUBLIC "-//W3C//DTD HTML 4.01 Transitional//EN" "http://www.w3.org/TR/html4/loose.dtd">
<html>
<h1><code>getUserMedia()</code>: playing with video constraints</h1>
<p>Click one of the below buttons to change video resolution...</p>
<div id="buttons">
<button id="qvga">320x240</button>
<button id="vga">640x480</button>
<button id="hd">1280x960</button>
</div>
<p id="dimensions"></p>
<video autoplay></video>
<script src="js/getUserMedia_constraints.js"></script> </div>
</body> </html>
Figure 2-7. A simple HTML page showing the use of constraints in Chrome
Example 2-4 shows the JavaScript code used to both acquire the local video stream and attach it to the web page with a well-defined resolution.
Example 2-4. Playing with constraints: The getUserMedia_constraints.js file // Define local variables associated with video resolution selection // buttons in the HTML page
var vgaButton = document.querySelector("button#vga"); var qvgaButton = document.querySelector("button#qvga"); var hdButton = document.querySelector("button#hd");
// Video element in the HTML5 page
var video = document.querySelector("video");
// The local MediaStream to play with var stream;
// Look after different browser vendors' ways of calling the // getUserMedia() API method:
navigator.getUserMedia = navigator.getUserMedia ||
navigator.webkitGetUserMedia || navigator.mozGetUserMedia;
// Callback to be called in case of success... function successCallback(gotStream) {
// Attach the returned stream to the <video> element
// Callback to be called in case of failure... function errorCallback(error){
console.log("navigator.getUserMedia error: ", error); }
// Constraints object for low resolution video var qvgaConstraints = {
// Constraints object for standard resolution video var vgaConstraints = {
// Constraints object for high resolution video var hdConstraints = {
qvgaButton.onclick = function(){getMedia(qvgaConstraints)}; vgaButton.onclick = function(){getMedia(vgaConstraints)}; hdButton.onclick = function(){getMedia(hdConstraints)};
// Simple wrapper for getUserMedia() with constraints object as // an input parameter
if (!!stream) { video.src = null; stream.stop(); }
navigator.getUserMedia(constraints, successCallback, errorCallback); }
The code in Example 2-4 is quite straightforward. The core part is related to the proper definition of constraints objects, each of which can be passed as an input parameter to the getUserMedia() function. The three sample objects therein contained simply state that video is to be considered mandatory and further specify resolution in terms of lower bounds on both its width and height. To give the reader a flavor of what this means, Figures 2-8 and 2-9 show, respectively, a 320×240 and a 640×480 resolution stream.
CHAPTER 3
Building the Browser RTC Trapezoid:
A Local Perspective
In the previous chapter, we started to delve into the details of the Media Capture and
Streams API by covering the first three steps of what we called a 10-step web real-time
communications recipe. In particular, we discussed a couple of examples showing how we can access and manage local media streams by using the getUserMedia() method. The time is now ripe to start taking a look at the communication part.
In this chapter we will analyze the WebRTC 1.0 API, whose main purpose is to allow media to be sent to and received from another browser.
As we already anticipated in previous chapters, a mechanism is needed to properly coordinate the real-time communication, as well as to let peers exchange control mes‐ sages. Such a mechanism, universally known as signaling, has not been defined inside WebRTC and thus does not belong in the RTCPeerConnection API specification.
The choice to make such an API agnostic with respect to signaling was made at the outset. Signaling is not standardized in WebRTC because the interoperability between browsers is ensured by the web server, using downloaded JavaScript code. This means that WebRTC developers can implement the signaling channel by relying on their fa‐ vorite messaging protocol (SIP, XMPP, Jingle, etc.), or they can design a proprietary signaling mechanism that might only provide the features needed by the application.
The signaling channel is needed to allow the exchange of three types of information between WebRTC peers:
Media session management
Setting up and tearing down the communication, as well as reporting potential error conditions
Nodes’ network configuration
Network addresses and ports available for the exchanging of real-time data, even in the presence of NATs
Nodes’ multimedia capabilities
Supported media, available encoders/decoders (codecs), supported resolutions and frame rates, etc.
No data can be transferred between WebRTC peers before all of the above information has been properly exchanged and negotiated.
In this chapter, we will disregard all of the above mentioned issues related to the setup (and use) of a signaling channel and just focus on the description of the RTCPeerCon‐ nection API. We will achieve this goal by somehow emulating peer-to-peer behavior on a single machine. This means that we will for the time being bypass the signaling channel setup phase and let the three steps mentioned above (session management, network configuration, and multimedia capabilities exchange) happen on a single machine. In Chapter 5 we will eventually add the last brick to the WebRTC building, by showing how the local scenario can become a distributed one thanks to the introduction of a real signaling channel between two WebRTC-enabled peers.
Coming back to the API, calling new RTCPeerConnection (configuration) creates an
Figure 3-1. Adding a MediaStream to a PeerConnection
Using PeerConnection Objects Locally: An Example
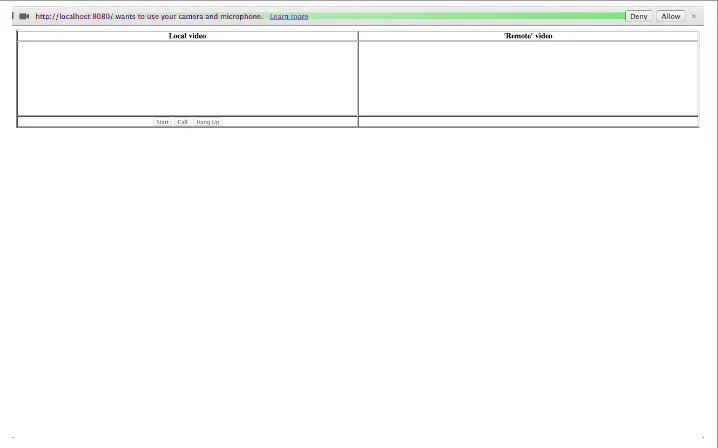
Let’s now start with the simple HTML code shown in Example 3-1.Example 3-1. Local RTCPeerConnection usage example
<!DOCTYPE html PUBLIC "-//W3C//DTD HTML 4.01 Transitional//EN" "http://www.w3.org/TR/html4/loose.dtd">
<html>
<head>
<title>Local PeerConnection() example</title>
</head>
<body>
<tr>
Example 3-1 acts as a container for two video streams, represented side by side in a table format. The stream on the left represents a local capture, whereas the one on the right mimics a remote party (which will actually be a further capture of the local audio and video devices). Media capture and rendering is triggered by events associated with three buttons, which function, respectively, to start the application, to place a call between the local and the (fake) remote party, and to hang up the call. The core of this application is, as usual, the JavaScript code contained in the file localPeerConnection.js, which is reported in the following:
// JavaScript variables holding stream and connection information var localStream, localPeerConnection, remotePeerConnection;
var remoteVideo = document.getElementById("remoteVideo");
// JavaScript variables assciated with call management buttons in the page var startButton = document.getElementById("startButton");
var callButton = document.getElementById("callButton"); var hangupButton = document.getElementById("hangupButton");
// Just allow the user to click on the Call button at start-up startButton.disabled = false;
callButton.disabled = true; hangupButton.disabled = true;
// Associate JavaScript handlers with click events on the buttons startButton.onclick = start;
callButton.onclick = call; hangupButton.onclick = hangup;
// Utility function for logging information to the JavaScript console function log(text) {
console.log("At time: " + (performance.now() / 1000).toFixed(3) + " --> " \
+ text); }
// Callback in case of success of the getUserMedia() call function successCallback(stream){
log("Received local stream");
// Associate the local video element with the retrieved stream if (window.URL) {
// Function associated with clicking on the Start button // This is the event triggering all other actions function start() {
log("Requesting local stream");
// First of all, disable the Start button on the page startButton.disabled = true;
// Get ready to deal with different browser vendors... navigator.getUserMedia = navigator.getUserMedia ||
navigator.webkitGetUserMedia || navigator.mozGetUserMedia; // Now, call getUserMedia()
log("navigator.getUserMedia error: ", error); });
}
// Function associated with clicking on the Call button
// This is enabled upon successful completion of the Start button handler function call() {
// First of all, disable the Call button on the page... callButton.disabled = true;
// ...and enable the Hangup button hangupButton.disabled = false; log("Starting call");
// Note that getVideoTracks() and getAudioTracks() are not currently // supported in Firefox...
// ...just use them with Chrome if (navigator.webkitGetUserMedia) {
// Log info about video and audio device in use
if (navigator.webkitGetUserMedia) {
RTCPeerConnection = webkitRTCPeerConnection; // Firefox
} else if(navigator.mozGetUserMedia){
RTCPeerConnection = mozRTCPeerConnection;
RTCSessionDescription = mozRTCSessionDescription; RTCIceCandidate = mozRTCIceCandidate;
}
log("RTCPeerConnection object: " + RTCPeerConnection);
// This is an optional configuration string, associated with // NAT traversal setup
var servers = null;
// Create the local PeerConnection object
localPeerConnection = new RTCPeerConnection(servers);
log("Created local peer connection object localPeerConnection"); // Add a handler associated with ICE protocol events
localPeerConnection.onicecandidate = gotLocalIceCandidate;
// Create the remote PeerConnection object
remotePeerConnection = new RTCPeerConnection(servers);
remotePeerConnection.onicecandidate = gotRemoteIceCandidate; // ...and a second handler to be activated as soon as the remote // stream becomes available.
remotePeerConnection.onaddstream = gotRemoteStream;
// Add the local stream (as returned by getUserMedia()) // to the local PeerConnection.
localPeerConnection.addStream(localStream); log("Added localStream to localPeerConnection");
// We're all set! Create an Offer to be 'sent' to the callee as soon // as the local SDP is ready.
localPeerConnection.createOffer(gotLocalDescription, onSignalingError); }
function onSignalingError(error){
console.log('Failed to create signaling message : ' + error.name); }
// Handler to be called when the 'local' SDP becomes available function gotLocalDescription(description){
// Add the local description to the local PeerConnection localPeerConnection.setLocalDescription(description); log("Offer from localPeerConnection: \n" + description.sdp);
// ...do the same with the 'pseudoremote' PeerConnection
// Note: this is the part that will have to be changed if you want // the communicating peers to become remote
// (which calls for the setup of a proper signaling channel) remotePeerConnection.setRemoteDescription(description);
// Create the Answer to the received Offer based on the 'local' description remotePeerConnection.createAnswer(gotRemoteDescription, onSignalingError); }
// Handler to be called when the remote SDP becomes available function gotRemoteDescription(description){
// Set the remote description as the local description of the // remote PeerConnection.
remotePeerConnection.setLocalDescription(description);
log("Answer from remotePeerConnection: \n" + description.sdp);
// Conversely, set the remote description as the remote description of the // local PeerConnection
localPeerConnection.setRemoteDescription(description); }
// Handler to be called when hanging up the call function hangup() {
// Reset local variables localPeerConnection = null; remotePeerConnection = null; // Disable Hangup button hangupButton.disabled = true;
// Enable Call button to allow for new calls to be established callButton.disabled = false;
}
// Handler to be called as soon as the remote stream becomes available function gotRemoteStream(event){
// Associate the remote video element with the retrieved stream if (window.URL) {
log("Received remote stream"); }
// Handler to be called whenever a new local ICE candidate becomes available function gotLocalIceCandidate(event){
if (event.candidate) {
// Add candidate to the remote PeerConnection
remotePeerConnection.addIceCandidate(new RTCIceCandidate(event.candidate)); log("Local ICE candidate: \n" + event.candidate.candidate);
} }
// Handler to be called whenever a new remote ICE candidate becomes available function gotRemoteIceCandidate(event){
if (event.candidate) {
// Add candidate to the local PeerConnection
localPeerConnection.addIceCandidate(new RTCIceCandidate(event.candidate)); log("Remote ICE candidate: \n " + event.candidate.candidate);
} }
In order to easily understand the contents of this code, let’s follow the evolution of our application step by step. We will show screen captures taken with both Chrome and Firefox, so you can appreciate the differences related to both the look and feel of the application and the developers’ tools made available by the two browsers.
Starting the Application
Figure 3-2. The example page loaded in Chrome
As you can see from both figures, the browser is asking for the user’s consent to access local audio and video devices. As we know from the previous chapter, this is due to the execution of the getUserMedia() call, as indicated by the JavaScript snippet that follows:
// Function associated with clicking on the Start button // This is the event triggering all other actions function start() {
log("Requesting local stream");
// First of all, disable the Start button on the page startButton.disabled = true;
// Get ready to deal with different browser vendors... navigator.getUserMedia = navigator.getUserMedia ||
navigator.webkitGetUserMedia || navigator.mozGetUserMedia; // Now, call getUserMedia()
navigator.getUserMedia({audio:true, video:true}, successCallback, function(error) {
log("navigator.getUserMedia error: ", error); });
}
As soon as the user provides consent, the successCallback() function is triggered. Such a function simply attaches the local stream (containing both audio and video tracks) to the localVideo element in the HTML5 page:
...
// Associate the local video element with the retrieved stream if (window.URL) {
Figure 3-4. The example page after user grants consent, in Chrome
Placing a Call
Once consent has been granted, the Start button gets disabled and the Call button be‐ comes in turn enabled. If the user clicks on it, the Call() function is triggered. Such a function first does some basic housekeeping like disabling the Call button and enabling the Hangup button. Then, in the case of Chrome and Opera (this feature is not currently implemented in Firefox), it logs some information about the available media tracks to the console:
// Function associated with clicking on the Call button
// This is enabled upon successful completion of the Start button handler function call() {
// First of all, disable the Call button on the page... callButton.disabled = true;
// ...and enable the Hangup button hangupButton.disabled = false; log("Starting call");
// Note that getVideoTracks() and getAudioTracks() are not currently // supported in Firefox...
// ...just use them with Chrome if (navigator.webkitGetUserMedia) {
// Log info about video and audio device in use
The getVideoTracks() and getAudioTracks() methods, defined by the MediaStream constructor in the Media Capture and Streams API, return a sequence of MediaStreamTrack objects representing, respec‐ tively, the video tracks and the audio tracks in the stream.
Once done with the preceding operations, we finally get into the core of the code, namely the part where we encounter the RTCPeerConnection object for the very first time:
... // Chrome
if (navigator.webkitGetUserMedia) {
RTCPeerConnection = webkitRTCPeerConnection; // Firefox
} else if(navigator.mozGetUserMedia){
RTCPeerConnection = mozRTCPeerConnection;
RTCSessionDescription = mozRTCSessionDescription; RTCIceCandidate = mozRTCIceCandidate;
}
log("RTCPeerConnection object: " + RTCPeerConnection); ...
The above snippet contains some JavaScript code that has a solitary goal of detecting the type of browser in use, in order to give the right name to the right object. You will notice from the code that the standard RTCPeerConnection object is currently prefixed both in Chrome (webkitRTCPeerConnection) and in Firefox (mozRTCPeerConnec tion). The latter browser, by the way, also has a nonstandard way of naming the related
RTCSessionDescription and RTCIceCandidate objects associated, respectively, with the description of the session to be negotiated and the representation of ICE protocol candidate addresses (see Chapter 4).
Once the (right) RTCPeerConnection object has been identified, we can eventually in‐ stantiate it:
...
// This is an optional configuration string, associated with // NAT traversal setup
var servers = null;
// Create the local PeerConnection object
localPeerConnection = new RTCPeerConnection(servers);
log("Created local peer connection object localPeerConnection"); // Add a handler associated with ICE protocol events
localPeerConnection.onicecandidate = gotLocalIceCandidate; ...
The above snippet shows that an RTCPeerConnection object is instantiated through a constructor taking an optional servers parameter as input. Such a parameter can be used to properly deal with NAT traversal issues, as will be explained in Chapter 4.
RTCPeerConnection
Calling new RTCPeerConnection(configuration) creates an RTCPeerConnection ob‐ ject. The configuration has the information to find and access the STUN and TURN servers (there may be multiple servers of each type, with any TURN server also acting as a STUN server). Optionally, it also takes a MediaConstraints object “Media Con‐ straints” on page 19.
When the RTCPeerConnection constructor is invoked, it also creates an ICE Agent re‐ sponsible for the ICE state machine, controlled directly by the browser. The ICE Agent will proceed with gathering the candidate addresses when the IceTransports constraint is not set to “none.”
that are currently received through this RTCPeerConnection object. The stream sets are initialized to empty sets when the RTCPeerConnection object is created.
The interesting thing to notice here is that the configuration of the newly created Peer Connection is done asynchronously, through the definition of proper callback methods.
The onicecandidate handler is triggered whenever a new candidate is made available to the local peer by the ICE protocol machine in‐ side the browser.
// Handler to be called whenever a new local ICE candidate becomes available function gotLocalIceCandidate(event){
if (event.candidate) {
// Add candidate to the remote PeerConnection
remotePeerConnection.addIceCandidate(new RTCIceCandidate(event.candidate)); log("Local ICE candidate: \n" + event.candidate.candidate);
} }
The addIceCandidate() method provides a remote candidate to the ICE Agent. In addition to being added to the remote description, connectivity checks will be sent to the new candidates as long as the
IceTransports constraint is not set to “none.”
The snippet takes for granted that the remote peer is actually run locally, which avoids the need for sending information about the gathered local address to the other party across a properly configured signaling channel. Here is why this application won’t work at all if you try and run it on two remote machines. In subsequent chapters we will discuss how we can create such a signaling channel and use it to transfer ICE-related (as well as session-related) information to the remote party. For the moment, we simply add the gathered local network reachability information to the (locally available) remote
peer connection. Clearly, the same reasoning applies when switching roles between caller
and callee, i.e., the remote candidates will simply be added to the local peer connection
as soon as they become available:
...
// Create the remote PeerConnection object
remotePeerConnection = new RTCPeerConnection(servers);
log("Created remote peer connection object remotePeerConnection"); // Add a handler associated with ICE protocol events...
remotePeerConnection.onaddstream = gotRemoteStream; ...
The onaddstream and onremovestream handlers are called any time a MediaStream is respectively added or removed by the remote peer. Both will be fired only as a result of the execution of the setRemote Description() method.
The preceding snippet is related to the onaddstream handler, whose implementation looks after attaching the remote stream (as soon as it becomes available) to the remote Video element of the HTML5 page, as reported in the following:
// Handler to be called as soon as the remote stream becomes available function gotRemoteStream(event){
// Associate the remote video element with the retrieved stream if (window.URL) {
log("Received remote stream"); }
Coming back to the Call() function, the only remaining actions concern adding the local stream to the local PeerConnection and eventually invoking the createOffer()
method on it:
...
// Add the local stream (as returned by getUserMedia() // to the local PeerConnection
localPeerConnection.addStream(localStream); log("Added localStream to localPeerConnection");
// We're all set! Create an Offer to be 'sent' to the callee as soon as // the local SDP is ready
localPeerConnection.createOffer(gotLocalDescription,onSignalingError); }
function onSignalingError(error) {
console.log('Failed to create signaling message : ' + error.name); }
The createOffer() method plays a fundamental role, since it asks the browser to properly examine the internal state of the PeerConnection and generate an appropriate
RTCSessionDescription object, thus initiating the Offer/Answer-state machine.
The createOffer() method generates an SDP blob containing an RFC3264 offer with the supported configurations for the session: the descriptions of the local MediaStreams attached, the codec/RTP/ RTCP options supported by the browser, and any candidates that have been gathered by the ICE Agent. The constraints parameter may be supplied to provide additional control over the offer generated.
The createOffer() method takes as input a callback (gotLocalDescription) to be called as soon as the session description is made available to the application. Also in this case, once the session description is available, the local peer should send it to the callee by using the signaling channel. For the moment, we will skip this phase and once more make the assumption that the remote party is actually a locally reachable one, which translates to the following actions:
// Handler to be called when the 'local' SDP becomes available function gotLocalDescription(description){
// Add the local description to the local PeerConnection localPeerConnection.setLocalDescription(description); log("Offer from localPeerConnection: \n" + description.sdp);
// ...do the same with the 'pseudoremote' PeerConnection // Note: this is the part that will have to be changed if // you want the communicating peers to become remote
// (which calls for the setup of a proper signaling channel) remotePeerConnection.setRemoteDescription(description);
// Create the Answer to the received Offer based on the 'local' description remotePeerConnection.createAnswer(gotRemoteDescription,onSignalingError); }
As stated in the commented snippet above, we herein directly set the retrieved session description as both the local description for the local peer and the remote description for the remote peer.
The setLocalDescription() and setRemoteDescription() meth‐ ods instruct the RTCPeerConnection to apply the supplied RTCSes sionDescription as the local description and as the remote offer or answer, respectively.
callback (gotRemoteDescription) to be called as soon as the remote browser makes its own session description available to the remote peer. Such a handler actually mirrors the behavior of the companion callback on the caller’s side:
// Handler to be called when the remote SDP becomes available function gotRemoteDescription(description){
// Set the remote description as the local description of the // remote PeerConnection
remotePeerConnection.setLocalDescription(description);
log("Answer from remotePeerConnection: \n" + description.sdp); // Conversely, set the remote description as the remote description // of the local PeerConnection
localPeerConnection.setRemoteDescription(description); }
The createAnswer() method generates an SDP answer with the sup‐ ported configuration for the session that is compatible with the pa‐ rameters in the remote configuration.
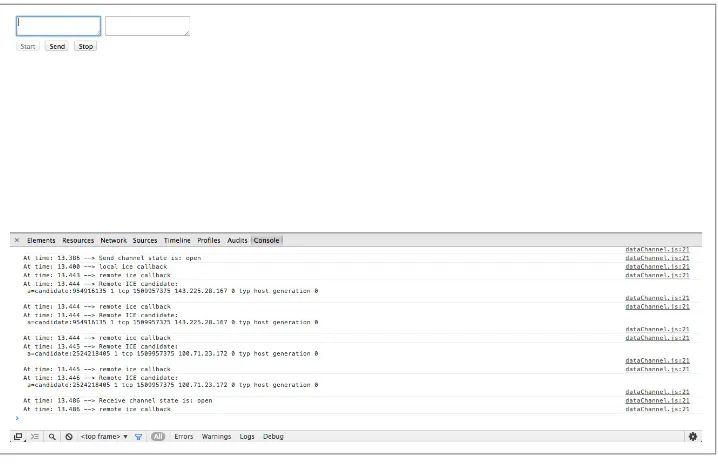
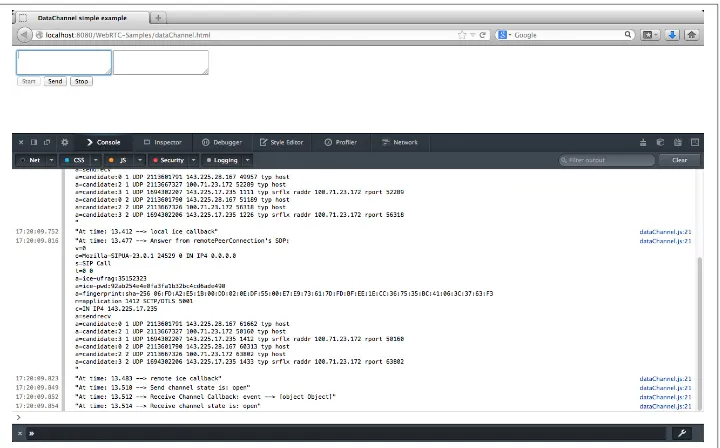
The entire call flow described above can actually be tracked down on the browser’s console, as shown in Figure 3-6 (Chrome) and Figure 3-7 (Firefox).
Figure 3-7. Firefox console tracking down a call between two local peers
The two snapshots show the sequence of events that have been logged by the application, as well as session description information in an SDP-compliant format. This last part of the log will become clearer when we briefly introduce the Session Description Pro‐ tocol in Chapter 4.
Figure 3-8. Chrome showing local and remote media after a successful call
Hanging Up
Once done with a call, the user can tear it down by clicking on the Hangup button. This triggers the execution of the associated handler:
// Handler to be called when hanging up the call function hangup() {
log("Ending call"); // Close PeerConnection(s) localPeerConnection.close(); remotePeerConnection.close(); // Reset local variables localPeerConnection = null; remotePeerConnection = null; // Disable Hangup button hangupButton.disabled = true;
// Enable Call button to allow for new calls to be established callButton.disabled = false;
}
As we can see from a quick look at the code, the hangup() handler simply closes the instantiated peer connections and releases resources. It then disables the Hangup button and enables the Call button, thus rolling the settings back to the point we reached right after starting the application for the very first time (i.e., after the getUserMedia() call). We’re now in a state from which a new call can be placed and the game can be started all over again. This situation is depicted in Figure 3-10 (Chrome) and Figure 3-11 (Firefox).
Figure 3-10. Chrome after tearing down a call
Notice that the two frames in both windows are different, which illustrates the fact that, even though no peer connection is available anymore, we now have a live local stream and a frozen remote stream. This is also reported in the console log.
Adding a DataChannel to a Local PeerConnection
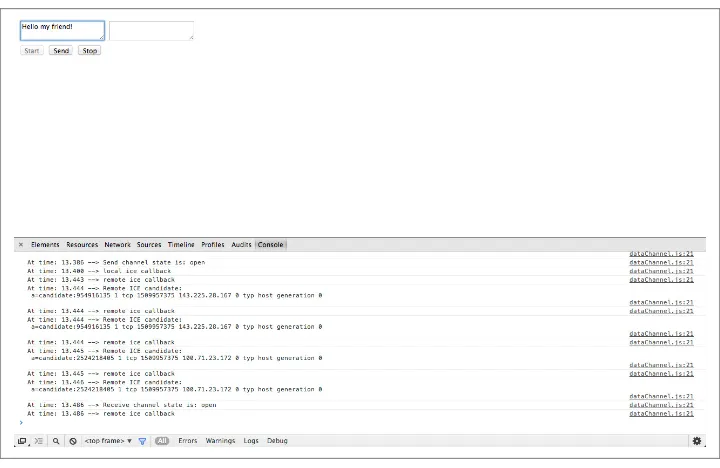
The Peer-to-Peer Data API lets a web application send and receive generic application data in a peer-to-peer fashion. The API for sending and receiving data draws inspiration from WebSocket.
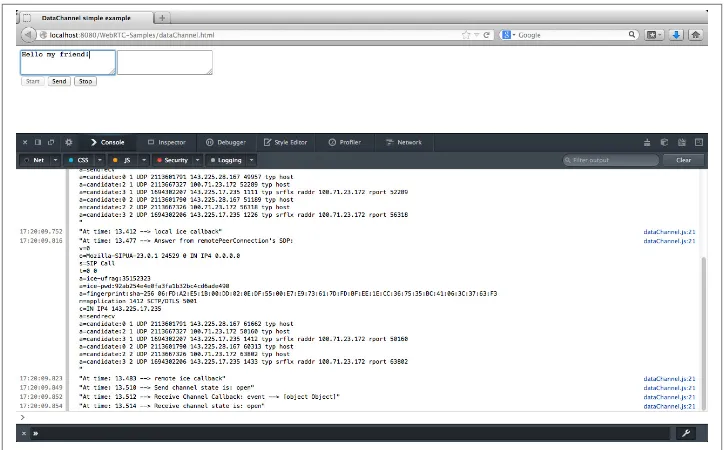
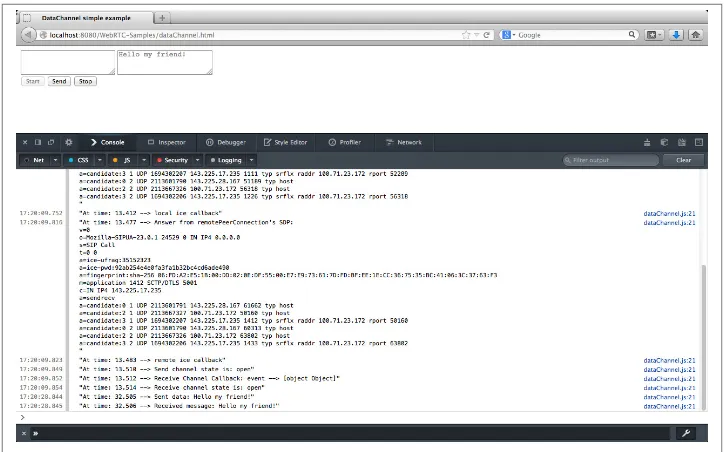
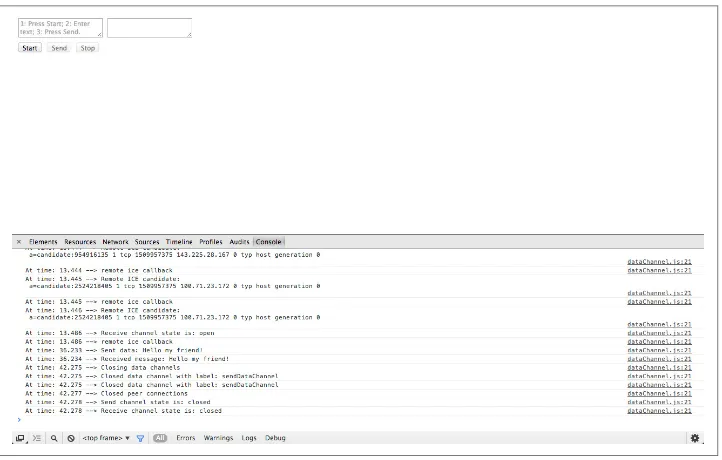
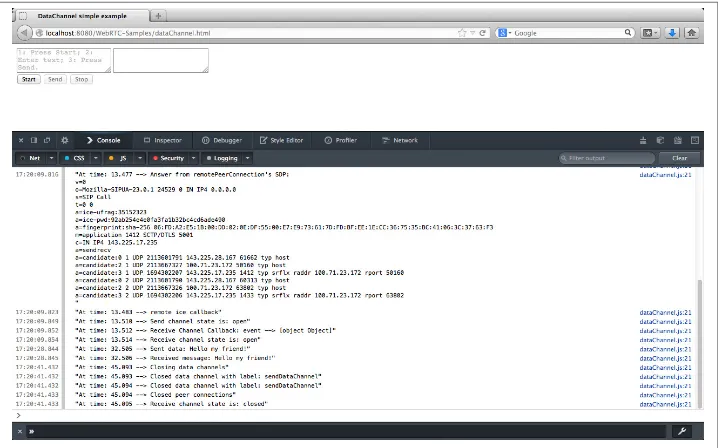
In this section we will show how to add a DataChannel to a PeerConnection. Once again, we will stick to the local perspective and ignore signaling issues. Let’s get started with the HTML5 page in Example 3-2.
Example 3-2. Local DataChannel usage example
<!DOCTYPE html PUBLIC "-//W3C//DTD HTML 4.01 Transitional//EN" "http://www.w3.org/TR/html4/loose.dtd">
<textarea rows="5" cols="50" id="dataChannelSend" disabled placeholder=" 1: Press Start; 2: Enter text; 3: Press Send."></textarea>
<textarea rows="5" cols="50" id="dataChannelReceive" disabled></textarea>
<div id="buttons">
<button id="startButton">Start</button>
<button id="sendButton">Send</button>
<button id="closeButton">Stop</button>
</div>
<script src="js/dataChannel.js"></script> </body>
</html>