Learn
HTML5
Published with the authorization of Microsoft Corporation by: O’Reilly Media, Inc.
1005 Gravenstein Highway North Sebastopol, California 95472
Copyright © 2013 by Faithe Wempen
All rights reserved. No part of the contents of this book may be reproduced or transmitted in any form or by any means without the written permission of the publisher.
ISBN: 978-0-7356-6982-6
1 2 3 4 5 6 7 8 9 LSI 7 6 5 4 3 2
Printed and bound in the United States of America.
Microsoft Press books are available through booksellers and distributors worldwide. If you need support related to this book, email Microsoft Press Book Support at [email protected]. Please tell us what you think of this book at http://www.microsoft.com/learning/booksurvey.
Microsoft and the trademarks listed at http://www.microsoft.com/about/legal/en/us/IntellectualProperty/ Trademarks/EN-US.aspx are trademarks of the Microsoft group of companies. All other marks are property of their respective owners.
The example companies, organizations, products, domain names, email addresses, logos, people, places, and events depicted herein are fictitious. No association with any real company, organization, product, domain name, email address, logo, person, place, or event is intended or should be inferred.
This book expresses the author’s views and opinions. The information contained in this book is provided without any express, statutory, or implied warranties. Neither the authors, O’Reilly Media, Inc., Microsoft Corporation, nor its resellers, or distributors will be held liable for any damages caused or alleged to be caused either directly or indirectly by this book.
Acquisitions and Developmental Editor: Russell Jones
Contents at a Glance
Introduction xv
PART I GETTInG STARTED wITh hTML
CHapTer 1 HTML Basics: The Least You Need to Know 3
CHapTer 2 Setting Up the Document Structure 19
CHapTer 3 Formatting Text with Tags 29
CHapTer 4 Using Lists and Backgrounds 49
CHapTer 5 Creating Hyperlinks and anchors 71
PART II STyLE ShEETS AnD GRAPhICS
CHapTer 6 Introduction to Style Sheets 87
CHapTer 7 Formatting Text with CSS 105
CHapTer 8 Formatting paragraphs with CSS 125
CHapTer 9 Inserting Graphics 141
PART III PAGE LAyouT AnD nAvIGATIon
CHapTer 10 Creating Navigational aids 163
CHapTer 11 Creating Division-Based Layouts 179
CHapTer 12 Creating Tables 199
CHapTer 13 Formatting Tables 223
CHapTer 14 Creating User Forms 241
CHapTer 15 Incorporating Sound and Video 261
CHapTer 16 HTML and Microsoft expression Web 275
PART Iv APPEnDICES
appeNDIx a Designing for Usability 307
appeNDIx B Designing for accessibility 313
appeNDIx C Quick reference 321
Glossary 323
vii
Contents
Introduction . . . .xv
PART I
GETTInG STARTED wITh hTML
Chapter 1 hTML Basics: The Least you need to Know
3
Understanding HTML Tags . . . 3Opening a Webpage in Notepad . . . 6
Other Ways of Opening Webpages in Notepad . . . 9
Adding a Location to the Favorites List . . . .11
Previewing HTML Files in a Web Browser . . . .13
Making, Saving, and Viewing Changes . . . 16
Key Points . . . 17
Chapter 2 Setting up the Document Structure
19
Specifying the Document Type . . . .20Creating the HTML, Head, and Body Sections . . . 21
Creating Paragraphs and Line Breaks . . . .23
Specifying a Page Title and Metatags . . . .26
Key Points . . . .28
Chapter 3 Formatting Text with Tags
29
Creating Headings . . . .30Applying Bold and Italic Formatting . . . .33
Applying Superscript and Subscript Formatting . . . 35
What do you think of this book? We want to hear from you! Microsoft is interested in hearing your feedback so we can continually improve our books and learning resources for you. To participate in a brief online survey, please visit:
Using Monospace and Preformatted Text . . . .36
Formatting a Block Quotation . . . 42
Configuring View Settings in Internet Explorer . . . .44
Key Points . . . .48
Chapter 4 using Lists and Backgrounds
49
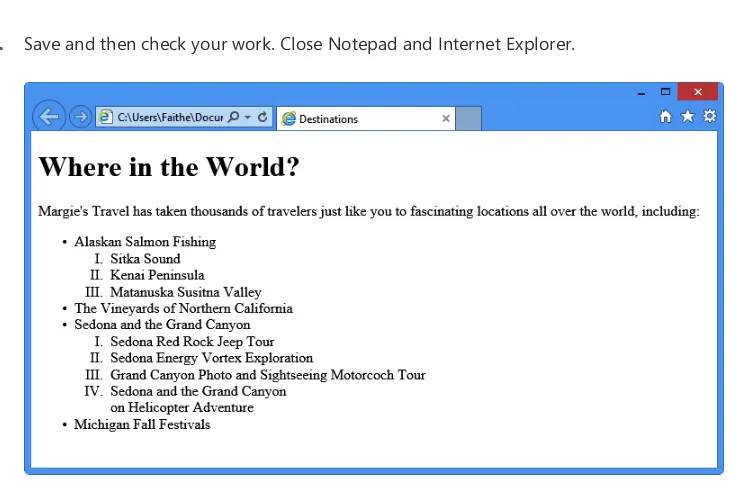
Creating Bulleted and Numbered Lists . . . .50Nesting Lists . . . 51
Changing the Bullet or Number Character . . . .52
Specifying the Start of a Numbered List . . . .53
Creating Definition Lists . . . .56
Inserting Special Characters . . . .58
Inserting Horizontal Lines . . . .60
Choosing Background Colors and Foreground Colors. . . .64
Understanding How Colors are Specified on Webpages . . . .64
Applying a Background Color . . . .65
Applying a Foreground Color . . . .66
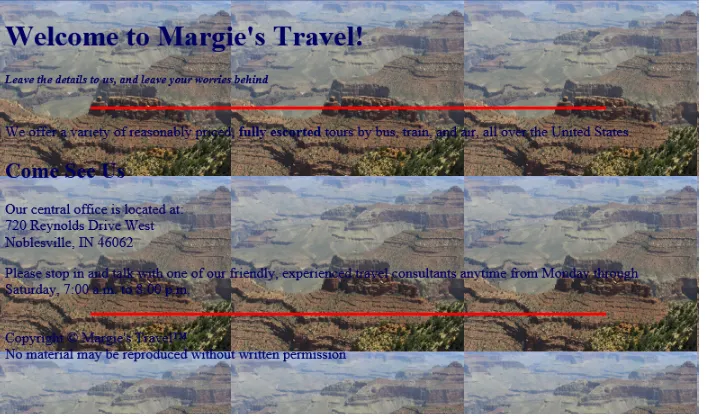
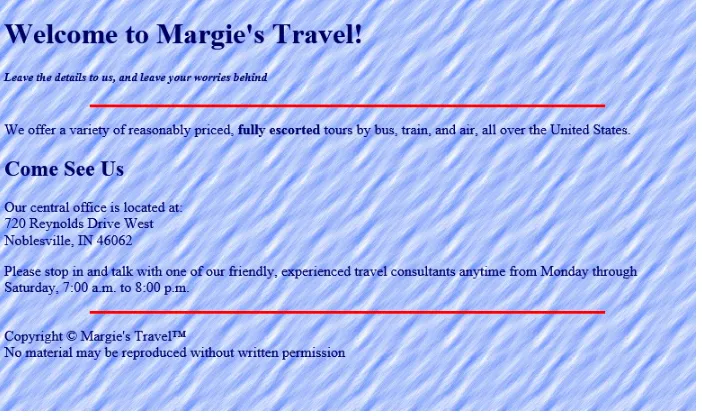
Specifying a Background Image File . . . .67
Key Points . . . .70
Chapter 5 Creating hyperlinks and Anchors
71
Hyperlinking to a Webpage . . . .72Using Partial Paths and Filenames . . . .72
Using Relative and Absolute Paths . . . .73
Setting a Target Window . . . 74
Hyperlinking to an Email Address . . . 76
Creating and Hyperlinking to Anchors . . . .79
Hyperlinking to Other Content . . . .82
Contents ix
PART II
STyLE ShEETS AnD GRAPhICS
Chapter 6 Introduction to Style Sheets
87
Understanding Styles . . . .88
Constructing Style Rules . . . .89
Creating Styles for Nested Tags . . . .93
Creating Classes and IDs for Applying Styles . . . .95
Applying Styles to Hyperlinks with Pseudo-Classes . . . .98
Creating and Linking to External Style Sheets . . . .100
Key Points . . . .102
Chapter 7 Formatting Text with CSS
105
Specifying a Font Family . . . .106Specifying a Font Size and Color . . . .109
Applying Bold and Italics . . . .114
Applying Strikethrough and Underlining . . . .116
Creating Inline Spans . . . .118
Adjusting Spacing between Letters . . . .120
Key Points . . . .124
Chapter 8 Formatting Paragraphs with CSS
125
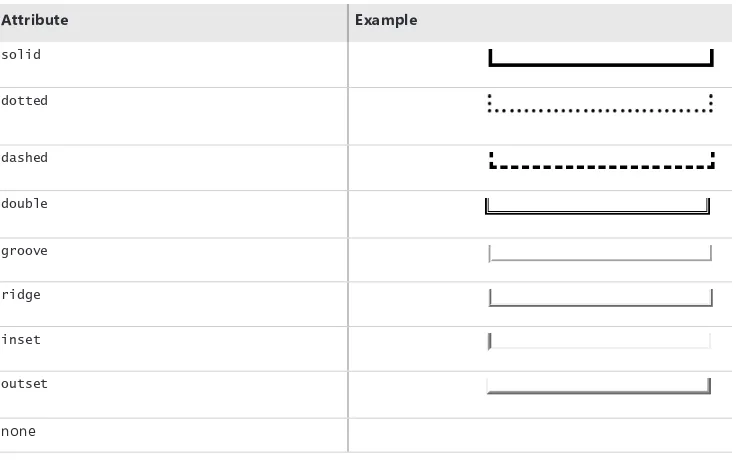
Indenting Paragraphs . . . .126Applying a Border to a Paragraph . . . .129
Specifying a Border Style . . . .129
Setting Border Padding . . . .130
Specifying Border Width and Color . . . .131
Formatting Border Sides Individually . . . .131
Setting All Border Attributes at Once . . . .132
Specifying the Horizontal Alignment of a Paragraph . . . .134
Specifying Vertical Space within a Paragraph . . . .137
Chapter 9 Inserting Graphics
141
Understanding Graphic Size and Resolution . . . .142
Inserting a Graphic . . . .143
Clearing a Graphic . . . .146
Controlling Image Size and Padding . . . .148
Using a Graphic as a Hyperlink . . . .151
Creating Thumbnails . . . .153
Including Alternate Text for Graphics . . . .155
Adding Figure Captions . . . .156
Key Points . . . .159
PART III
PAGE LAyouT AnD nAvIGATIon
Chapter 10 Creating navigational Aids
163
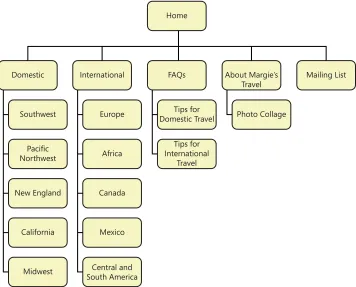
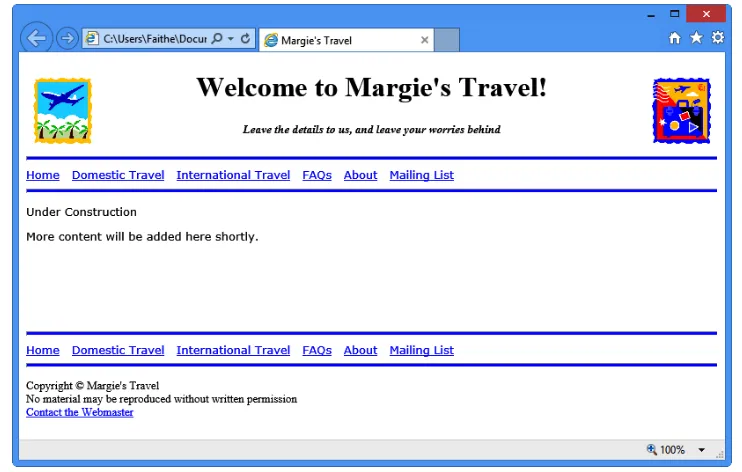
Planning Your Site’s Organization . . . .164Creating a Text-Based Navigation Bar. . . .166
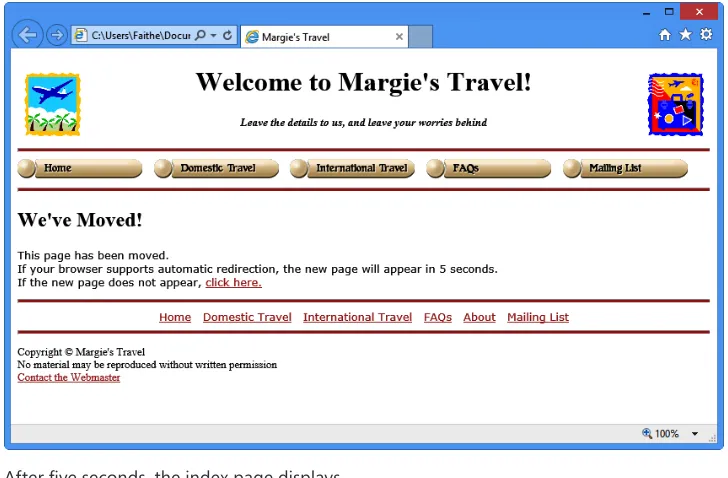
Creating a Graphical Navigation Bar . . . .169
Redirecting to Another URL . . . .173
Creating Custom Error Pages . . . .175
Key Points . . . .178
Chapter 11 Creating Division-Based Layouts
179
Understanding HTML5 Semantic Tags . . . .180Beginning to Think in Divisions . . . .181
Creating Divisions . . . .182
Creating an HTML5 Semantic Layout . . . .184
Positioning Divisions. . . .187
Floating a Division to the Right or Left . . . .187
Positioning a Division on the Page . . . .188
Formatting Divisions. . . .195
Contents xi
Chapter 12 Creating Tables
199
Creating a Simple Table . . . .200
Chapter 13 Formatting Tables
223
Applying Table Borders . . . .224Chapter 15 Incorporating Sound and video
261
Understanding Audio and Video in HTML5 . . . .262
HTML Multimedia Basics . . . .262
Multimedia Formats and Containers . . . .263
Codecs: Decoding the Video and Audio . . . .263
Which Format to Choose? . . . .264
Encoding Video . . . .264
Embedding Video Clips . . . .266
Introducing the <video> Tag . . . .266
The <embed> Tag: Your Fallback Plan . . . .268
Place a Video Clip on a Webpage . . . .269
Incorporating Audio on a Webpage . . . .271
Playing Audio with the <audio> Tag . . . .271
Playing Audio in Older Browsers . . . .272
Key Points . . . .274
Chapter 16 hTML and Microsoft Expression web
275
Exploring the Expression Web Interface . . . .276Creating Websites and Webpages . . . .281
Create a Page by Using a CSS Template . . . .285
Insert Graphics . . . .288
Import an Images Folder . . . .288
Place Images on a Page . . . .289
Add a Background Image to a Division . . . .290
Formatting Text . . . .292
Formatting a Division . . . .297
Inserting Hyperlinks . . . .299
Contents xiii
PART Iv
APPEnDICES
Appendix A
Designing for usability
307
Understanding Usability . . . .307
Appendix B
Designing for Accessibility
313
Guideline 1: Provide Equivalent Alternatives to Auditory and Visual Content . . . .314Guideline 2: Don’t Rely on Color Alone . . . .314
Guideline 3: Use Markup and Style Sheets, and Do So Properly . . . .315
Guideline 4: Clarify Natural Language Usage . . . .316
Guideline 5: Create Tables that Transform Gracefully . . . .316
Guideline 6: Ensure Pages that Feature New Technologies Transform Gracefully . . . .317
Guideline 7: Ensure User Control of Time-Sensitive Content Changes . . 317
Guideline 8: Ensure Direct Accessibility of Embedded User Interfaces . .318 Guideline 9: Design for Device Independence . . . .318
What do you think of this book? We want to hear from you! Microsoft is interested in hearing your feedback so we can continually improve our books and learning resources for you. To participate in a brief online survey, please visit:
Appendix C
Quick Reference
321
Tags Added in HTML 5 . . . .321
Tags Removed in HTML 5 . . . .322
Glossary 323
xv
Introduction
H
ypertext Markup Language (HTML) is the basic programming language of the World Wide Web. It’s the common thread that ties together virtually every website, from large-scale corporate sites like Microsoft’s to single-page classroom projects at the local grade school.In simple terms, a webpage (or HTML document) is a plain text file that has been encoded using HTML so that it appears nicely formatted in a web browser. Here’s what HTML means, word-by-word:
■ hypertext Text that you click to jump from document to document. This is a reference to the ability of webpages to link to one another.
■ Markup Tags that apply layout and formatting conventions to plain text. Literally, the plain text is “marked up” with the tags.
■ Language A reference to the fact that HTML is considered a programming language.
Don’t let the phrase “programming language” intimidate you. Creating a webpage with HTML is much simpler than writing a computer program in a language like Micro-soft Visual Basic or C++. You can create a simple webpage in just a few minutes.
Tip When people think of computer programming, they usually think of writing a compiled program. A compiled programming language runs the human-readable programming code through a utility that converts it to an executable file (usually with an .exe or .com extension), which is then distribut-ed to users. In contrast, HTML is an interpretdistribut-ed programming language. That means the program is distributed in human-readable format to users, and the program in which it is opened takes care of running it. The HTML code for webpages resides in files. Each time your web browser opens a webpage, it processes the HTML code within the file.
This book teaches beginner-level HTML in a rather fundamentalist way: by creating plain text files in Notepad. There are so many good website creation programs on the market nowadays that you may be wondering why this book takes this approach.
The last chapter of this book shows how to use Microsoft Expression Web to create web content, and you may eventually choose to move to a program like that. However, you will be a much better web designer—and understand what is going on in design programs much better—if you tough it out with Notepad in the beginning.
who Should Read This Book
This book is designed for non-programmers who are brand-new to HTML. It doesn’t assume any previous web design or programming knowledge of any kind, so it’s perfect for home hobbyists and self-educators, as well as high school and college classrooms.
Assumptions
This book expects that you have basic computer literacy skills and you can use the operating system on your PC. The detailed procedures for this book were written with Windows developers in mind, but the general information applies to building webpages on any operating system. You should know how to manage files, run programs, and access the Internet.
I’m also assuming that if you’re reading this book, you are actually interested in learning HTML and not just knocking out a quick webpage only to never think about HTML again. This book provides you with a solid foundation in HTML that you’ll be able to draw from for years to come.
who Should not Read This Book
This book is not for experienced programmers who already have significant HTML knowl -edge and are just interested in updating their skills for HTML5. This book doesn’t cover many of HTML5’s advanced features that experienced web developers are likely to be interested in learning about; instead, it provides a solid foundation for the beginner.
organization of This Book
Introduction xvii headings, paragraphs, and lists. Part II, “Style Sheets and Graphics,” explains how to use
cascading style sheets (CSS) to apply formatting to a page or a group of pages and how to include graphic elements on a page. Part III, “Page Layout and Navigation,” explains how to create intuitive page layouts and navigational aids as well as how to add special elements such as forms and multimedia.
Conventions and Features in This Book
This book presents information using conventions designed to make the information readable and easy to follow.
■ Each exercise consists of a series of tasks, presented as numbered steps (1, 2, and so on) listing each action you must take to complete the exercise.
■ Boxed elements with labels such as “Note” provide additional information or alternative methods for completing a step successfully.
■ Text that you type displays in boldface. For example, if you are instructed to type some text to an existing block of code, the text you are to type is displayed in bold.
■ Glossary terms marked in the text are explained in the glossary at the end of the book.
System Requirements
You will need the following hardware and software to complete the practice exercises in this book:
■ A computer running the operating system of your choice. The examples in this book use Windows 8, but you can use any Windows, Mac, Linux, or UNIX oper-ating system.
■ A text-editing program. The examples in this book use Notepad, which comes with all Windows versions.
■ One or more web browsers. The examples in this book use Internet Explorer 10. You will probably want at least one other browser in which to check your work, because different browsers might display content in different ways.
Code Samples
Each chapter includes exercises that let you interactively try out new material learned in the main text. All files you will need to complete these exercises can be downloaded from the following page:
http://go .microsoft .com/FWLink/?Linkid=263540
Follow the instructions to download the 9780735669826_files.zip file.
Installing the Code Samples
Follow these steps to install the code samples on your computer so that you can use them with the exercises in this book.
1. Unzip the 9780735669826_files.zip file that you downloaded from the book’s
website (name a specific directory along with directions to create it, if necessary).
2. If prompted, review the displayed end user license agreement. If you accept the
terms, select the accept option and then click Next.
Note If the license agreement doesn’t display, you can access it from the same webpage from which you downloaded the 9780735669826_files.zip file.
using the Code Samples
The folder created by the Setup.exe program contains subfolders for each chapter. Within a chapter’s folder are additional subfolders that hold the files for each exercise. Each time you begin an exercise, make sure that you are using the files provided specifi -cally for that exercise.
Introduction xix
Acknowledgments
Thank you to my editorial team at O’Reilly for a job well done, including Russell Jones (Acquisitions/Development), John Mueller (Technical Editor), Jeff Riley (Copy Editor), and Melanie Yarbrough (Production Editor). It is a pleasure to work with a professional team of editors who make the complex process of producing a book go as smoothly as possible.
Errata & Book Support
We’ve made every effort to ensure the accuracy of this book and its companion con-tent. Any errors that have been reported since this book was published are listed on our Microsoft Press site at oreilly.com:
http://go .microsoft .com/FWLink/?Linkid=263542
If you find an error that is not already listed, you can report it to us through the same page.
If you need additional support, email Microsoft Press Book Support at mspinput@ microsoft .com.
Please note that product support for Microsoft software is not offered through the addresses above.
we want to hear from you
At Microsoft Press, your satisfaction is our top priority, and your feedback our most valuable asset. Please tell us what you think of this book at:
http://www .microsoft .com/learning/booksurvey
The survey is short, and we read every one of your comments and ideas. Thanks in advance for your input!
Stay in Touch
1
Pa r t I
Getting Started
with HTML
ChAPTER 1 HTML Basics: The Least You Need to Know . . . .3
ChAPTER 2 Setting Up the Document Structure. . . .19
ChAPTER 3 Formatting Text with Tags . . . .29
ChAPTER 4 Using Lists and Backgrounds . . . .49
3
Chapter 1
HTML Basics: The Least
You Need to Know
In this chapter, you will:
■ Learn how HTML tags work
■ Open a webpage in Notepad
■ Preview a webpage in Internet Explorer
■ Make, save, and view changes
■ Learn how to publish your pages to a server
As you work through this book’s exercises, you’ll learn HTML by creating and editing text files in Notepad (or any plain text editor), and then viewing them in a web browser to check your work. This chapter teaches the important basic skills you need in order to work in these programs.
Important Before you can use the practice files provided for this chapter, you need to download and install them from the book’s companion content location. For more information, see “Code Samples” at the beginning of this book.
understanding hTML Tags
HTML tags are codes inside angle brackets, like this: <p>. There are dozens of tags defined in the HTML5 standard. You can use these tags to specify where formatting should be applied, how the layout should appear, what pictures should be placed in certain locations, and more.
For example, suppose you wanted a certain word to appear in bold, like this:
Save up to 50% on clearance items.
In HTML, there’s no Bold button to click (like there is in a word-processing program). Therefore, you have to “tag” the word or characters that you want to be bold. The tag to turn on bold is <b>, and the code to turn bold off is </b>. Your HTML code would look something like this:
Save up to <b>50%</b> on clearance items.
That’s an example of a two-sided tag, which encloses text between an opening tag and a closing tag, in this case <b> and </b>. Note the forward slash (/) in the closing tag (</b>). That slash dif-ferentiates an opening tag from a closing tag. With a two-sided tag, there is always a corresponding closing tag for every opening tag.
To understand how this system of tagging came about, you need to know that back in the early days of the Internet, nearly everyone connected to it by using dial-up modems at speeds ranging from 2400 bps to 28.8 Kbps. That’s really slow. Text files transfer much faster than binary files, so for any type of information-sharing system to be popular, it had to be text-based. Otherwise, people would doze off while waiting for a page to load.
People designing webpages also wanted their pages to be attractive. They couldn’t just format pages in a word processor, though, because every word processor handled formatting differently and it was impossible to know which word processor a visitor might be using. Word-processing files are also much larger than plain-text files.
The web’s creators developed an elegant solution. Instead of sending the formatted pages over the Internet, they created an application—a web browser—that could interpret plain-text code (HTML tags) as formatting instructions. The text could be sent quickly and efficiently in plain-text format, and then be processed and displayed attractively and graphically on the local PC.
ChAPTER 1 HTML Basics: The Least You Need to Know 5 The <img> tag is different in several ways from the <b> tag. It is one-sided, meaning it does not have a closing tag, and it takes attributes. An attribute is text within the tag that contains information about how the tag should behave. For example, for an <img> tag, you have to specify a source (ab-breviated src). Here’s an example:
<img src="tree.gif">
This <img> tag uses the src= attribute and specifies that the file tree .gif be displayed.
Many tags accept attributes, either optional or required. You’ll see many examples throughout the exercises in this book. Attributes are usually written in pairs in the form name=value, where the name of the attribute is on the left side of the equals sign, and the value on the right.
With HTML, you can also create hyperlinks from one page to another. When a visitor clicks a hyper-link, the web browser loads the referenced page or jumps to a marked section (a “bookmark”) within the same page. You will learn to create hyperlinks in Chapter 5, “Creating Hyperlinks and Anchors.”
The tag for a hyperlink is <a>, a two-sided tag, but most people wouldn’t recognize it without the attribute that specifies the file or location to which to jump. For example, to create a hyperlink with the words Click Here that jumps to the index .htm file when clicked, the coding would look like this:
<a href="index.htm">Click Here</a>
What is xHTML?
There is a language related to HTML called Extensible Markup Language (XML) that program-mers use to create their own tags. It’s widely used for web databases, for example, because it can define tags for each data field. Because XML can be so completely customized, program -mers can create almost any other markup language within it just by re-creating all the officially accepted tags of that language.
XHTML, then, is HTML written within the larger language of XML. Because it is virtually identical to HTML in its functionality, the basic set of tags is the same and you can learn both HTML and XHTML at the same time. You can also use XHTML to create new tags and exten-sions, which is a valuable feature for advanced web developers.
There’s just one thing about XHTML to watch out for: it’s not tolerant of mistakes. For ex-ample, in HTML, technically you are supposed to begin each paragraph with <p> and end each paragraph with </p>. But in HTML you can leave out the closing </p> tag if you want (or if you forget it). That won’t work in XHTML. There are lots of little ways that XHTML is picky like that. I’ll point out some of them along the way in this book.
At one point, it was thought that XHTML would eventually replace HTML 4, but due to interoperability problems, that has not happened; instead HTML5 is poised to succeed HTML 4. This book doesn’t explicitly cover XHTML, but most of what you will learn can be applied to XHTML coding.
opening a webpage in notepad
The rest of this book assumes that you will be working in Notepad or some other text editor, so you’ll need a basic understanding of whatever text editor you select. Notepad is included with all versions of Windows. It’s a simple text editor that saves only in plain-text format. That’s ideal for HTML editing because you don’t need to worry about any extra word-processing formatting being included in the file.
Note You are welcome to use a different text editor application to complete the exercises in this book. Notepad is just a suggestion.
ChAPTER 1 HTML Basics: The Least You Need to Know 7 Note You may run into various extensions on webpage files on the Internet, such as .php,
.asp, and .jsp. Those are all special formats designed for use with specific server
techno-logies. This book covers developing only the basic type of webpage: the type with an .htm extension.
In the following exercise, you will open a webpage in Notepad and examine its text and tags.
Open a Webpage in Notepad
1. In Windows 8, press the Windows key to display the Start screen. Begin typing Notepad, and
when you see Notepad at the left, click it.
Note Because you will be using Notepad extensively in this book, you might want to create a shortcut for Notepad on the taskbar. To do so in Windows 8, after locating the Notepad app as shown in the previous figure, right-click its tile, and then click Pin to Taskbar. Or, in an earlier Windows version, after locating Notepad on the Accessories submenu, right-click it there and then click Pin to Taskbar.
2. In the untitled Notepad window, click File | Open.
3. Navigate to the folder containing the practice files for this chapter. To do so, on the Places bar,
click Documents (or My Documents if you are using Windows XP). In the Open dialog box, double-click Microsoft Press, double-click HTML 5 Start Here, and then double-click 01Basics.
Note You won’t see any files in the list at this point. The only thing that you should see is a _Solutions folder. (That folder contains the solution files for the lesson, but you don’t need those now.)
4. Click the Files Of Type drop-down arrow and then click All Files.
5. In the Open dialog box, click welcome .htm and then click Open.
ChAPTER 1 HTML Basics: The Least You Need to Know 9 Note The .htm extension might not appear on the welcome file in the Open dialog box. By default, file extensions for known file types are turned off in Windows. To turn them on, open File Explorer (Windows 8), Computer (Windows Vista or 7), or My Computer (Windows XP). In Windows 8, on the View tab, select the File name extensions check box. In earlier Windows versions, click the Tools menu (press Alt for the menu bar if you don’t see it) and then click Folder Options. On the View tab of the Folder Options dialog box, clear the Hide Extensions For Known File Types check box and then click OK.
6. Locate the <html> and </html> tags.
These tags signify the beginning and end of the HTML. They are typically the first and last tags in document, with the exception of the DOCTYPE, which you’ll learn about later.
7. Locate the <body> and </body> tags.
These tags signify the beginning and end of the visible portion of the webpage when viewed in a browser.
8. Locate the <p> and </p> tags.
These tags signify the beginning and end of a paragraph.
Leave Notepad open for later use. You don’t have to save your work because you didn’t make any changes.
Other Ways of Opening Webpages in Notepad
FIGuRE 1-1 You can open a file with Notepad by right-clicking the file, pointing to Open With, and then clicking
Notepad.
Note File Explorer is the file management interface in Windows 8. In earlier versions of Windows, that same interface is called Windows Explorer.
ChAPTER 1 HTML Basics: The Least You Need to Know 11
FIGuRE 1-2 To copy the Notepad shortcut to the desktop, right-click it, point to Send to, and then click Desktop (create shortcut).
Caution Theoretically, you could set Notepad as the default application for opening files that have an .htm or .html extension. But that would cause more problems than it’s worth, because then all your HTML content would open in Notepad not just the pages you are us-ing for these lessons.
adding a Location to the Favorites List
While working through this book, you will open many files in Notepad. To save yourself the trouble of navigating to the data file folder each time, you might want to add that folder to your Favorites bar, which displays in the navigation pane in the Open dialog box.
In the following exercise, you learn how to add a shortcut that brings you directly to the HTML 5 Start Here folder from the Favorites list.
add a Location to Your Favorites List
Note You can actually do this in almost any application (especially the Microsoft ones), but Notepad is handy because you worked with it in the preceding exercise.
2. Navigate to the folder containing the practice files for this book.
On the Places bar, click Documents (or click My Documents if you are using Windows XP). In the Open dialog box, double-click Microsoft Press. The HTML 5 Start Here folder displays as an icon. Depending on your View setting, the icon might be a different size than shown here. The icon size is not important for the task at hand.
3. Drag the HTML 5 Start Here folder icon to the Favorites list on the left side of the window.
A shortcut for that folder displays on the Favorites list.
Drag the folder here
ChAPTER 1 HTML Basics: The Least You Need to Know 13
Previewing hTML Files in a web Browser
Because Notepad is not a WYSIWYG (“What You See Is What You Get”) program, you won’t be able to immediately see how the tags you type will look in the finished product. To work around this, most people like to keep a browser window open next to Notepad so they can see their work by looking at their browser.
You can preview your work in any browser; you do not need to use Internet Explorer 10 (although that’s what I use in this book’s examples). In fact, as you progress with your web development skills, you will probably want to acquire several different browsers in which to test your pages, because each browser might display page elements a little differently. For beginners, though, Internet Explorer is a good choice because it’s one of the most popular browsers—one that a large percentage of your target audience is likely to be using. Other popular browsers include Google Chrome, Firefox, Safari, and Opera.
If you are using Windows 8, you have two different versions of Internet Explorer: the regular desk-top version and the customized Windows 8 app version. You can start the deskdesk-top version of Internet Explorer from the Internet Explorer icon that’s pinned to the left of the taskbar on the desktop. You can start the custom version from the Internet Explorer tile on the Start screen. This book uses the desktop version of Internet Explorer, but you might want to check your work in the custom version when you start developing your own sites.
Caution Versions of Internet Explorer prior to version 10 do not support some of the HTML5 features. (Internet Explorer 9 supports most of the features, but not all.) You will probably want to test your webpages in an earlier version of Internet Explorer to make sure that people who use those versions will be able to view your pages. But don’t use an early version of Internet Explorer as you work through this book’s examples; you won’t get the full effect of the new HTML5 features.
Tip If the video card in your computer has two monitor connectors on it, or if you have an additional video card that you could install in your system, you might want to set up two monitors side-by-side. That way you can work on your HTML code in Notepad on one monitor and display the page full-screen in Internet Explorer in the other. All recent ver-sions of Windows support at least two monitors, and some verver-sions support many more.
Open a Webpage in Internet explorer
1. Using File Explorer (or Windows Explorer), open Documents\Microsoft Press\HTML 5 Start
Here\01Basics and then double-click welcome .htm. The file opens in Internet Explorer (or your default browser, if you’re not using Internet Explorer).
Note If Internet Explorer is not your default browser but you want it to be, from within Internet Explorer, click Tools | Internet Options, click the Programs tab, and then click Make Default.
That’s by far the easiest way if File Explorer is already open and displaying the file’s location. Follow the next steps to learn another way that might be preferable when Internet Explorer is already open but File Explorer (or Windows Explorer) isn’t.
2. In Internet Explorer, click File | Open.
The Open dialog box displays.
Note If the menu bar does not display in Internet Explorer, press the Alt key to display it.
3. Click the Browse button and then browse to Documents\Microsoft Press\HTML 5 Start
Here\01Basics.
Tip If you created the shortcut in the Favorites bar earlier in the chapter, you can use that to save a few clicks when browsing for the location.
ChAPTER 1 HTML Basics: The Least You Need to Know 15 The path to the file displays in the Open dialog box.
5. Click OK.
Tip Remember, not all web browsers display pages the same way. For example, one brows-er’s idea of what text should look like might be different from another. It’s a good idea to check your pages in multiple web browsers, such as Firefox, Netscape, and Opera. These are available as free downloads from www.firefox.com, www .netscape .com, and www .opera .com, respectively.
Making, Saving, and viewing Changes
After you’ve made a change to a webpage, you will probably want to see how that change looks in a browser. If you set up your Internet Explorer and Notepad windows side by side in the preceding two exercises, it’s easy to view those changes. Simply save your work in Notepad and then refresh the display in Internet Explorer by clicking the Refresh button or pressing F5.
In the following exercise, you will change us to me in the welcome .htm file and then preview that change in Internet Explorer. This exercise builds on the previous two, so make sure you have com-pleted them before starting this exercise. You can use this procedure throughout the rest of the book to preview your work from each exercise.
Make and View Changes to an HTML File
1. In both Notepad and Internet Explorer, reopen the welcome .htm file (if it is not still open)
located in the Documents\Microsoft Press\HTML 5 Start Here\01Basics folder.
Remember, if you’re using Windows 8, we’re using the desktop version of Internet Explorer. In earlier versions of Windows that’s not an issue because there is no custom version.
2. In Notepad, locate the word us and change it to me, as shown in the bold text in the following
code:
<p>Let me show you the world!</p>
3. Save your work (File | Save).
4. Switch to Internet Explorer and click the Refresh button (or press F5).
ChAPTER 1 HTML Basics: The Least You Need to Know 17
5. Close Internet Explorer and close Notepad.
Key Points
In this chapter, you explored HTML and you were introduced to some basic skills that will be essential in following along with the exercises in upcoming chapters. Here are the key points to remember from this chapter:
■ Any plain text editor, including Notepad, can be an HTML editor.
■ Most webpages have an .htm or .html extension. You can open these pages in Notepad, but first you need to change the Files Of Type setting in the Open dialog box to All Files. You must change this setting each time you use the Open dialog box.
■ An alternative way to open a webpage in Notepad is to right-click it in File Explorer, point to Open With, and then click Notepad.
■ To preview a page in a web browser, click File | Open from the browser’s menu.
■ You can double-click an .htm or .html file in File Explorer to open it automatically in your default web browser.
19
Chapter 2
Setting Up the
Document Structure
In this chapter, you will:
■ Specify the document type
■ Create the HTML, head, and body sections
■ Create paragraphs and line breaks
■ Specify a page title and keywords
Every society needs an infrastructure with certain rules that everyone agrees to for the general public good. For example, we have all agreed that a red light means “stop” and a green light means “go.” Everyone who wants to participate in the transportation system must play by those rules. If not, chaos ensues.
HTML is the same way. You can get creative with your web content, but there must be an underlying structure in place for web browsers to read and render your webpages properly. That means the docu-ment must contain certain tags that identify its major sections and that indicate to the browser what type of coding the document uses.
In this chapter, you’ll learn how to structure a document with the correct underlying tags. You’ll learn how to specify the type of HTML you are writing and how to create Head sections and Body sections. You’ll also learn how to create paragraph breaks and line breaks, how to specify a page title, and how to enter hidden keywords by which your page can be found in search engines.
Specifying the Document Type
The document type tells the browser how to interpret the tags. Including a document type tag is not strictly necessary, but if you’re trying to get into good HTML habits from the get-go, you’ll want to make sure it’s included.
When creating an HTML5 document, the first line of the document should be this tag:
<!DOCTYPE html>
The DOCTYPE tag always begins with an exclamation point and is always placed at the begin-ning of the document, before any other tag. Most HTML tags are not case-sensitive, but the word DOCTYPE should always be uppercase.
Using the DOCTYPE tag is like signing a contract. It is an optional tag, but when you use it, you are promising that your coding will conform to certain standards. When a web browser encounters a DOCTYPE tag, it processes the page in standards mode. When it doesn’t encounter the DOCTYPE tag, it can’t assume that the page conforms to a standard, so it processes the page in quirks mode. When the browser sees the tag <!DOCTYPE html>, it assumes you are using HTML5.
The distinction between standards mode and quirks mode came about in earlier days, when there were problems with standardization between web browsers. With some browsers, to display pages properly, you needed to get a little creative with the HTML code. Modern HTML coding does not al-low that, but some older pages still include these obsolete workarounds. By using the DOCTYPE tag, you are making a promise to the web browser that there is nothing but pure HTML code in the page. (And, since I’m teaching you to do everything the right way, that’s a reasonable promise you can make.)
Earlier versions of HTML used more complex DOCTYPE tags. If you were using HTML 4.01, for example, the syntax for the tag would be:
<!DOCTYPE HTML PUBLIC "-//W3C/DTD HTML 4.01 Transitional//EN" "http://www.w3.org/TR/ html4/loose.dtd">
And, if you were using XHTML, the syntax for the tag would be:
<!DOCTYPE HTML PUBLIC "-//W3C/DTD XHTML 1.0 Transitional//EN" "http://www.w3.org/TR/ xhtml1/DTD/xhtml1-transitional.dtd">
ChAPTER 2 Setting Up the Document Structure 21
Creating the hTML, head, and Body Sections
All your HTML coding—except the DOCTYPE tag—should be placed in an <html> section. Recall from Chapter 1 that when a tag is two-sided, as <html> is, it requires a corresponding closing tag that is identical to the opening tag but contains a slash immediately after the opening angle bracket (for example, </html>). The tags <html> and </html> serve as a “wrapper” around all the other tags in the document except the DOCTYPE tag.
In addition, your HTML file should have two sections: a Head section and a Body section. The Head section is defined by the two-sided tag <head>. The Head section contains the page title, which is the text that will display in the title bar or page tab of the web browser. It also includes information about the document that is not displayed, such as its metatags (which you’ll learn about later in this chap-ter). You can also include lines of code that run scripts, like Javascript.
The Body section is defined by the two-sided <body> tag and it contains all the information that displays in the web browser when you view the page.
Note The <html>, <head>, and <body> tags are all optional in HTML, but you should still use them because it’s a good design practice. They are required in XHTML. In ad-dition, in XHTML you must add an argument to the <html> tag that declares its XML namespace, a reference to the fact that XHTML is created within XML (as you learned in Chapter 1). Here’s how the opening <html> tag should look in an XHTML document:
<html xlmns=“http://www .w3 .org/1999/xhtml”>.
In the following exercise, you will create an HTML5 template file that you can reuse later for your own work. That way you don’t have to retype those same DOCTYPE, head, and body tags every time you want to create a new webpage.
Create an HTML5 Template
1. Open Notepad and then click the Format menu. Word Wrap should have a check mark next to
it. If it does not, click it to enable the Word Wrap feature.
2. In the Notepad window, type the following:
<!DOCTYPE html>
3. Press Enter and then type:
<html> <head>
4. Press Enter two or three times to insert some blank lines and then type:
</head> <body>
5. Press Enter two or three times to insert some blank lines and then type:
</body> </html>
6. Save the file as HTML5 .htm on your Windows desktop (or to any other location that is
ChAPTER 2 Setting Up the Document Structure 23 Note Most of the files you work with in this book will be stored elsewhere, but you might
find it helpful to keep the templates created in this exercise handy for reuse. The desktop is a convenient place to store them. Of course, you can store them anywhere you like.
7. Close Notepad.
You now have a template for creating any HTML documents you like. You can reopen this template file and save it under different names.
Tip If you want to avoid accidentally editing the template in the future, make it read-only. To do so, in Windows Explorer, right-click the file and then click Properties from the con -textual menu. In the Properties dialog box, select the Read-Only check box. When you try to save changes to a read-only file, an error message displays and a Save As dialog box prompts you to save a copy of it with a new name.
Creating paragraphs and Line Breaks
Within the <body> section of the document, you type the text that will display on the webpage. Each paragraph of text should be enclosed in a two-sided tag that indicates its type.
The most basic paragraph type is the body paragraph, indicated by the <p> tag. It is a two-sided tag, so the paragraph text is placed between a <p> and a </p>.
Note In HTML, the code will still work even if the </p> is omitted; in XHTML, however, it won’t work without a closing tag. Even if you never plan on coding in XHTML, it is a good practice to include the </p> tag. This way, you won’t fall into any sloppy habits.
When a browser displays a webpage, it inserts vertical white space between paragraphs (see Figure 2-1).
That spacing is usually convenient, but it can be a problem when the extra space between lines is unwanted, such as with an address (see Figure 2-2).
FIGuRE 2-2 Sometimes you do not want extra space between each line, as shown in this example.
To create a line break without officially starting a new paragraph (and thereby adding that extra white space), use the line break tag: <br>. This is a one-sided tag placed within a paragraph, at the end of each line, like this:
<p>720 Reynolds Drive<br> Noblesville, IN 46062</p>
Note In XHTML, the line break tag is <br />. The end slash (and the space preceding it) is necessary to indicate that it’s a self-closing tag. Notice that the slash is placed after the let-ters, not before, as with the closing end of a two-sided tag. In XHTML, one-sided tags must end with a slash to indicate that they are self-closing. The space between the text and the final slash is also required, so the tag will be recognized in HTML.
In the following exercise, you will add text to an HTML file template and then preview it in Internet Explorer.
add Text to an HTML File
1. Open the HTML5 .htm file located in the Documents\Microsoft Press\HTML 5 Start
Here\02Structure\CreatingParagraphs folder.
2. Save the file as index .htm in the Documents\Microsoft Press\HTML 5 Start Here\02Structure
ChAPTER 2 Setting Up the Document Structure 25 Note It is customary to name the opening page of a website index .htm, index .html,
default .htm, or default .html. When users type a URL in their web browsers but omit the file
name (like typing www .microsoft .com rather than www.microsoft.com/filename.htm), most servers will automatically respond with the index or default page (if one exists).
3. In Internet Explorer, open the index .htm file and arrange the Notepad window and the Inter
-net Explorer window so that both are visible.
The index file displayed in Internet Explorer is currently blank.
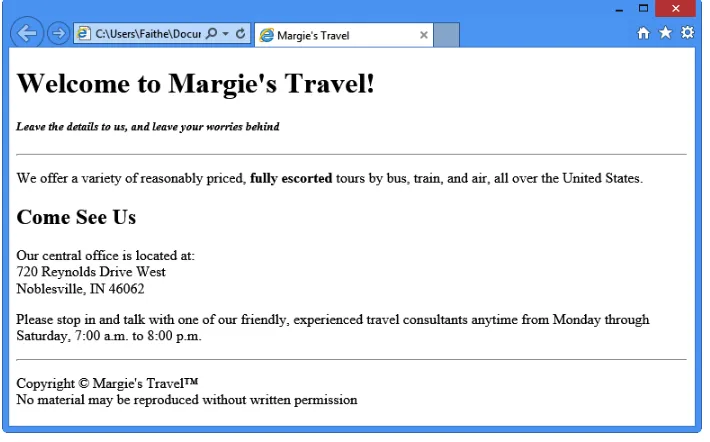
4. In the Notepad window, type the following text between the <body> and </body> tags:
<p>Welcome to Margie’s Travel!</p>
<p>We offer a variety of reasonably priced, fully escorted tours by bus, train, and air, all over the United States.</p>
<p>Our central office is located at:<br> 720 Reynolds Drive West<br>
Noblesville, IN 46062</p>
<p>Please stop in and talk with one of our friendly, experienced travel consultants anytime from Monday through Saturday, 7:00 a.m. to 8:00 p.m.</p>
5. Save your work and then switch to Internet Explorer and press F5 or click the Refresh button
to see the result of the changes. Leave both windows open for the next exercise.
Note Your screen might look slightly different, depending on the settings you have config -ured in your browser.
Specifying a page Title and Metatags
Perhaps you noticed in the preceding exercise that the complete path to the file displayed in the page tab or in the browser title bar (depending on the browser you are using). Usually when you view a webpage, a friendly, descriptive title displays in that spot instead. That text is specified by a <title> tag placed in the <head> section (also called the header). Here’s an example:
<head>
<title>Margie’s Travel</title> </head>
Troubleshooting Make sure you place the <title> tag in the <head> section; don’t place it in the <body> section.
Another element you can place in the header is the <meta> tag. The <meta> tag has several purposes. One of these is to identify keywords related to your page. Placing appropriate keywords on your page can make it easier for people to find your page when they are searching the web using a search engine. When some search engines index your page, they rely not only on the full text of the page, but also on any keywords they find in the <meta> tag area.
Note Not all search engines refer to <meta> tags. Google does not, for example; it indexes only the text contained in the <body> area. Because of the potential for abuse of the sys-tem, such as web developers packing their pages with unrelated keywords, fewer and fewer search engines these days are using them.
For example, suppose the Margie’s Travel site would be useful to people who are searching for guided travel tours and vacations that are customized for senior citizens. Perhaps the phrase “senior citizen” is not mentioned on the main page, but you want people who search for that phrase to be directed to the main page anyway. You could place the following in the <head> section:
<meta name="keywords" content="senior, senior citizen, travel, tours">
ChAPTER 2 Setting Up the Document Structure 27 Note If you are coding in XHTML, you would add a space and a / at the end of <meta> tag because it is a one-sided (self-closing) tag. This is not necessary in HTML.
The <meta> tag can also be used to redirect visitors to another page. For example, suppose you told everyone the address of your website and then you needed to move it to another URL. You could place a “We’ve Moved” page at the original address and use the <meta> tag to redirect users to the new address after five seconds, like this:
<meta http-equiv="refresh" content="5; url=http://www.contoso.com/newpage.htm">
Here’s yet another common use: the <meta> tag can specify a character encoding scheme. This is not a big issue if you are coding only in English (or in a language like English that uses a Roman character set), but it is considered a tidy coding practice to include anyway. If you want, you can add <meta charset=“utf-8”> to the <head> section of your document to explicitly spell out that your page is in English.
In the following exercise, you will add a page title and some keywords to the index.htm page you created in the preceding exercise.
Specify a page Title and Metatags
1. In Notepad, open the index .htm file from the previous exercise. If you have not completed the
previous exercise, open the index .htm file located in the Documents\Microsoft Press\HTML 5 Start Here\02Structure\SpecifyingTitle folder.
2. Between the <head> and </head> tags, type the following text to create the page title:
<title>Margie’s Travel</title>
3. After the title, type the following <meta> tag:
<meta name="keywords" content="senior, senior citizen, travel, tours">
Press Enter to start a new line and then type the following <meta> tag:
<meta encoding="utf-8">
4. Save your work and then view the file in Internet Explorer.
5. Close Notepad and Internet Explorer.
Key Points
In this chapter, you learned how to create the overall structure of a document and how to divide it into head and body sections. You learned how to create paragraphs and how to add a page title. Here are the key points to remember from this chapter:
■ To specify HTML5 as the document type, type <!DOCTYPE html> at the beginning of the file.
■ All the HTML coding in a document (except the DOCTYPE) is enclosed within a two-sided <html> tag.
■ The <html> and </html> tags enclose the <head> and <body> sections.
■ The <head> area contains the page title (<title>) and any <meta> tags. The <body> area contains all the displayable text for the page.
■ Enclose each paragraph in a two-sided <p> tag. Most browsers add space between paragraphs when displaying the page.
■ To create a line break without starting a new paragraph, use the one-sided <br> tag.
■ When coding for XHTML, end one-sided tags with a space and a slash ( /). The space is required for recognition in HTML, and the slash is necessary for recognition in XHTML.
■ Use the <title> and </title> tags to enclose the text that should display in the browser’s title bar. Place these in the <head> section of the file.
29
Chapter 3
Formatting Text
with Tags
In this chapter, you will:
■ Create headings
■ Apply bold and italic formatting
■ Apply superscript and subscript formatting
■ Use monospaced and preformatted text
■ Format a block quotation
■ Configure Internet Explorer view settings
Creating webpages is not word processing . It’s important to keep that in mind as you learn HTML because I’m going to ask you to be patient for a few chapters as you learn HTML the right way—that is, the standards-compliant way.
When most people think of formatting text, the first thing that pops into their minds is choosing a font—a typeface, size, and color. That’s easy to do in a word-processing document, but in HTML it’s more complicated. Early versions of HTML used a <font> tag to specify a particular typeface, size, or color. If it were a decade ago, I would be happy to teach you that tag in this chapter, but the <font> tag has been removed from HTML5. Even though most browsers still recognize the <font> tag, you shouldn’t use it; it’s obsolete. Therefore, rather than teach you bad habits with old tags, I’m going to teach you how to apply typefaces, sizes, and colors to text with styles—but not in this chapter. Although using styles is a superior way of applying fonts to text, it is a little more advanced than you’re ready for just yet. You’ll learn all about using fonts in HTML code in Part II, “CSS Style Sheets and Graphics.”
Most of the tags discussed in this chapter are semantic tags; they describe the function of the text, rather than provide directions for formatting. For example, the <h1> heading tag specifies that the text within it should be formatted as a major heading, but it provides no specifics as to what that formatting should be.
The formatting specifics for semantic tags can come from a variety of sources:
•
Styles As you will learn in Part II of this book, you can specify the font families and sizes to use throughout your entire website. For example, you can select a font family that will be suggested to the browser whenever a certain tag is applied.•
The web browser in use Each web browser has defaults for the standard HTML tags. For example, in Internet Explorer (and most other browsers), <h1> is left-aligned, 18-point Times New Roman. Most browsers use the same defaults for the very basic tags, but non-standard browsers, such as those on phones, often display text very differently.•
Individual user customization A user can customize his web browser to suit his prefer-ences. Later in this chapter, you’ll get to play with these settings in Internet Explorer so you’ll know what your potential audience might be doing.Keep in mind as you practice using tags that their formatting is not fixed. The results you see when previewing the exercise pages in Internet Explorer represent the default settings for your version of Internet Explorer (or whatever browser you are using to preview them); the style is not intrinsic to those tags themselves. That will become important in Part II of the book, when you learn how to define more specific formatting for tags.
Important Before you can use the practice files provided for this chapter, you need to download and install them from the book’s companion content location. See “Downloading the Companion Content” at the beginning of this book for more information.
Creating headings
Headings in webpages function the same way as they do in printed documents--they separate text into sections. The HTML standard defines six levels of headings, <h1> through <h6>, each one pro-gressively smaller in font size.
ChAPTER 3 Formatting Text with Tags 31
FIGuRE 3-1 Headings using the default formatting in Internet Explorer 10.
Perhaps you noticed that headings 5 and 6 are actually smaller than body text. Keep in mind, though, that these are just the default settings; you can redefine these headings to display any size you want.
Many screen-reader programs use the heading codes <h1> through <h6> to help visually im-paired users navigate a document, and some page structures rely on headings for outlining, too. (HTML5 has a new way of outlining documents, but that’s beyond the scope of this book.) In some cases, though, you might have a stack of headings that collectively should take up only one spot in an outline, like this example:
<h1>Margie’s Travel</h1>
<h2>Travel for the young at heart!</h2>
HTML5 introduces a new tag to deal with this situation: <hgroup>. When you enclose a stack of headings within <hgroup>, only the first heading in the stack displays in an outline; other headings will be ignored by screen readers and other outlining tools.
<hgroup>
<h1>Margie’s Travel</h1>
<h2>Travel for the young at heart!</h2> </hgroup>
Browsers that do not support this tag simply ignore it, so there is no harm in using it when appropriate.
Create Headings
1. In both Notepad and Internet Explorer, open the index .htm file located in the
Documents\Microsoft Press\HTML 5 Start Here\03Format\CreatingHeadings folder.
2. Immediately below the <body> tag, edit the first line to use the <h1> tag instead of the <p>
tag, like this:
<h1>Welcome to Margie’s Travel!</h1>
3. Click at the end of the line you just edited, press Enter to start a new paragraph, and then type
the following:
<h5>Leave the details to us, and leave your worries behind</h5>
Note Some coding purists will tell you that you should use an <h2> heading instead of <h5> for the subtitle above and then apply a style to make the text look like you want, but because it is a few chapters yet until you will learn about styles, I’m taking a shortcut. For now, the default appearance of the <h5> heading is much closer to the desired look we want for this exercise.
4. Use a two-sided <hgroup> tag to enclose the two paragraphs you just worked with, like this:
<hgroup>
<h1>Welcome to Margie’s Travel!</h1>
<h5>Leave the details to us, and leave your worries behind</h5> </hgroup>
5. Immediately above the line containing the text Our central office is located at:, type the following:
<h2>Come See Us</h2>
6. Save the file and then refresh Internet Explorer to check your work.
ChAPTER 3 Formatting Text with Tags 33
7. Leave the file open in both Notepad and Internet Explorer for the next exercise.
Applying Bold and Italic Formatting
Applying bold and italic styles are two ways of making text stand out and attract attention. You gen-erally use these styles in paragraphs rather than in headings, but it’s perfectly acceptable to use them anywhere.
For simple boldface and italics, use the <b> tag or the <i> tag, respectively. Each is a two-sided tag that encloses the text to be formatted. For example:
<p>I had a <i>great</i> time at the party.</p>
<p>The reception will be held at <b>The Arbor Arch</b> in Plainfield.</p>
If you want to apply both bold and italic formatting, you can nest one tag inside the other. Don’t mix up their order, though. When nesting tags, the rule is: first in, last out. So this is correct:
<p>The next book we will read is <b><i>The Catcher in the Rye</i></b></p>
In contrast, the following example is wrong, because the order of the ending </b> and </i> tags are reversed:
<p>The next book we will read is <b><i>The Catcher in the Rye</b></i></p>
Note HTML also allows the <strong> tag as a substitute for <b> and the <em> tag (em-phasis) as a substitute for <i>. You will probably never use those, but you should know what they are in case you come across them. You can also define bold attributes and italic attri -butes for styles, as you will learn in Part II.
In the following exercise, you will make text bold and italic.
apply Bold and Italic
1. If they are not already open, open the index .htm file (that you worked with in the previous
exercise) in both Internet Explorer and Notepad.
Alternately, you can use the index .htm file located in the Documents\Microsoft Press\HTML 5 Start Here\03Format\ApplyingBold folder.
2. In Notepad, locate the <h5> heading near the top of the document and then enclose its text
in an <i> tag:
<h5><i>Leave the details to us, and leave your worries behind</i></h5>
3. In the first body paragraph, enclose fully escorted in a <b> tag:
<p>We offer a variety of reasonably priced, <b>fully escorted</b> tours by bus, train, and air, all over the United States.</p>
4. Enclose the office hours in <b> and <i> tags:
<p>Please stop in and talk with one of our friendly, experienced travel consultants anytime from Monday through Saturday, <b><i>7:00 a.m. to 8:00 p.m.</i></b></p>
Note Remember the “first in, last out” rule. If you begin with <b><i>, end with </i></b>.
5. Save the file and then refresh Internet Explorer to view the results.
ChAPTER 3 Formatting Text with Tags 35
Applying Superscript and Subscript Formatting
Superscript formatting makes text smaller and raises it off the baseline. You’d typically use superscript to format exponents in math equations (for example, the 2 shown in X2+1) and for footnote numbers
and symbols (like this**). You can also use superscript to format ordinal numbers (such as 1st, 2nd, and
3rd) to make your page look more polished.
Subscript makes text smaller and moves it below the baseline. The most common use for subscripts is in chemical formulas (for example, H2SO4).
Note How much the text shifts up or down, or how much smaller the font size becomes, depends on the browser. In some browsers, using superscript or subscript changes the line spacing so that a paragraph that contains them can seem unevenly spaced.
In the following exercise, you will apply superscript formatting to create a footnote and an ordinal.
apply Superscript Formatting
1. If they are not already open, open the index .htm file that you worked with in the previous
exercise in both Internet Explorer and Notepad.
2. At the end of the last line of text, between the </b> and the </p> tags, type <sup>1</sup>,
as shown in the following:
<p>Please stop in and talk with one of our friendly, experienced travel consultants anytime from Monday through Saturday, <b><i>7:00 a.m. to 8:00 p.m.</i></b><sup>1</sup></p>
This creates a superscript number for a footnote.
3. Immediately before the </body> tag, type the following:
<p><sup>1</sup>Closed the 1<sup>st</sup> Saturday in January</p>
4. This creates the footnote itself, which includes an ordinal number.
5. Save the file and then refresh the page in Internet Explorer to view the results.
6. Close Notepad and Internet Explorer. The next exercise uses a different file.
using Monospace and Preformatted Text
ChAPTER 3 Formatting Text with Tags 37 As a demonstration, let’s take a look at 10 of each character to see the difference:
MMMMMMMMMM
IIIIIIIIII
Most webpages that we’re accustomed to viewing use proportional fonts; they are attractive, professional-looking, and easier to read.
In contrast, a monospace font is one whose characters occupy exactly the same amount of hori-zontal space, regardless of the actual size and shape of the individual character. Back in the days of the typewriter, all type was monospaced because of the way the typewriter worked: as you typed, the carriage moved exactly the same amount of space to the right, no matter which letter was keyed. Here are those same 10 Ms and Is in a monospace font:
MMMMMMMMMM
IIIIIIIIII
Some common uses for monospaced text include:
■ Lines of programming code (like the HTML lines in this book)
■ Text that you are instructing a user to type
■ ASCII art (artwork created by using text characters)
It is uncommon to use monospaced text on a website, but for special situations it’s nice to have that capability. To apply monospace style, you can use any of the tags outlined in Table 3-1. Most browsers do not make a formatting distinction between these tags by default, but you can define them differently in your styles if you like.
TABLE 3-1 Tags that Apply Monospace Style
Tag Description
<kbd> (Keyboard) The tag used for monospaced text to indicate something a user should type on a keyboard
<code> (Code) The tag used for monospaced text applied to programming code
<samp> (Sample) The tag used for sample text, which is largely the same thing as <code>