111
Workshop 8
Intent 2
A.
Tujuan
1.
Memahami cara untuk membuat Intent External
B.
Tugas Pendahuluan
1.
Pelajari cara kerja Intents Android
C.
Percobaan
a. Percobaan 1: Membuat Intent Explisit dari Dua Buah Activity
Langkah 1: Buat project Android baru pada Eclipse
Langkah 2: Tambahkan statement berikut pada main.xml
<?xml version="1.0" encoding="utf-8"?> <LinearLayout
xmlns:android="http://schemas.android.com/apk/res/android"
android:layout_width="fill_parent"
android:layout_height="fill_parent"
android:orientation="vertical" >
<TextView
android:layout_width="fill_parent"
android:layout_height="wrap_content"
android:text="This is main" />
<Button
android:id="@+id/main_btnPage"
android:layout_width="wrap_content"
android:layout_height="wrap_content"
android:text="Go To Child"/>
112
Langkah 3: Buatlah sebuah file XML baru, beri nama child.xml :
<?xml version="1.0" encoding="utf-8"?> <LinearLayout
xmlns:android="http://schemas.android.com/apk/res/android"
android:layout_width="fill_parent"
android:layout_height="fill_parent"
android:orientation="vertical" >
<TextView
android:id="@+id/child_txtPage"
android:layout_width="fill_parent"
android:layout_height="wrap_content"
android:text="This is Child"/>
<Button
android:id="@+id/child_btnPage"
android:layout_width="wrap_content"
android:layout_height="wrap_content"
android:text="Back to main"/>
</LinearLayout>
Langkah 4 : Lengkapi statement berikut pada MainActivity.java
package com.ai.intent;
import android.app.Activity;
import android.content.Intent;
import android.os.Bundle;
import android.view.View;
import android.widget.Button;
public class MainActivity extends Activity {
/** Called when the activity is first created. */
@Override
public void onCreate(Bundle savedInstanceState) { super.onCreate(savedInstanceState);
setContentView(R.layout.main);
Button go=(Button)findViewById(R.id.main_btnPage); go.setOnClickListener(new View.OnClickListener() {
@Override
public void onClick(View v) { Intent i = new
Intent(MainActivity.this,Child.class);
i.putExtra("pesan", "From Activity Main"); startActivity(i);
} }); }
113
Langkah 5 : Kemudian, buatlah sebuah activity lagi, misal beri nama Child.java,
berikut adalah kodingnya :
package com.ai.intent;
import android.app.Activity;
import android.content.Intent;
import android.os.Bundle;
import android.view.View;
import android.widget.Button;
import android.widget.TextView;
public class Child extends Activity {
public void onCreate(Bundle savedInstanceState){
super.onCreate(savedInstanceState); setContentView(R.layout.child);
TextView txtChild =
(TextView)findViewById(R.id.child_txtPage);
Button go = (Button)findViewById(R.id.child_btnPage);
//menerima intent yg dikirim
Intent i=this.getIntent(); txtChild.setText("This is child "
+i.getStringExtra("pesan"));
go.setOnClickListener(new View.OnClickListener() {
@Override
public void onClick(View v) { finish();
} }); }
}
Langkah 6 : Pada AndroidManifest.xml perhatikan setiap baris kodenya sebagai
berikut :
<?xml version="1.0" encoding="utf-8"?>
<manifest xmlns:android="http://schemas.android.com/apk/res/android"
package="com.ai.intent"
android:versionCode="1"
android:versionName="1.0" >
114
<application
android:icon="@drawable/ic_launcher"
android:label="@string/app_name" >
<activity
android:name=".MainActivity"
android:label="@string/app_name" >
<intent-filter>
<action android:name="android.intent.action.MAIN" />
<category
android:name="android.intent.category.LAUNCHER" />
</intent-filter>
</activity> <activity
android:name=".Child"
android:label="@string/app_name" >
<intent-filter>
<action android:name="android.intent.action.VIEW" />
<category
android:name="android.intent.category.DEFAULT" />
</intent-filter>
</activity>
</application>
</manifest>
Langkah 5 : Tekan F11 untuk mendebug aplikasi pada emulator Android
Langkah 6 : Maka akan muncul output awal sebagai berikut :
115
Langkah 7 : Coba untuk klik pada button [Go To Child] yang akan meng-intent
ke activity kedua, maka akan muncul output sebagai berikut :
Gambar 42 Tampilan Child Activity
b. Percobaan 2: Membuat Contoh Aplikasi BMI (Body Mass Index)
Langkah 1: Buat project Android baru pada Eclipse
Langkah 2: Tambahkan statement berikut pada main.xml
<?xml version="1.0" encoding="utf-8"?> <LinearLayout
xmlns:android="http://schemas.android.com/apk/res/android"
android:layout_width="fill_parent"
android:layout_height="fill_parent"
android:orientation="vertical" >
<TextView
android:id="@+id/lbltitle"
android:layout_width="wrap_content"
android:layout_height="wrap_content"
android:text="CEK BMI ANDA"
android:textStyle="bold"
android:textColor="#ffcc0000"
android:textSize="20px"
android:layout_gravity="center_horizontal" />
<TextView
android:layout_width="fill_parent"
android:layout_height="wrap_content"
116
<TextView
android:layout_width="fill_parent"
android:layout_height="wrap_content"
android:text="Masukkan berat badan(kg) :" /> <EditText
android:id="@+id/bb"
android:layout_width="fill_parent"
android:layout_height="wrap_content"> </EditText>
<TextView
android:text="Masukkan tinggi badan(m) :"
android:id="@+id/TextView01"
android:layout_width="wrap_content"
android:layout_height="wrap_content"> </TextView>
<EditText
android:id="@+id/tb"
android:layout_width="fill_parent"
android:layout_height="wrap_content"> </EditText>
<Button
android:text="Hitung"
android:id="@+id/hitung"
android:layout_width="wrap_content"
android:layout_height="wrap_content"> </Button>
</LinearLayout>
Langkah 3: Buatlah sebuah file XML baru, beri nama hasil.xml :
<?xml version="1.0" encoding="utf-8"?> <LinearLayout
xmlns:android="http://schemas.android.com/apk/res/android"
android:layout_width="match_parent"
android:layout_height="match_parent"
android:orientation="vertical" >
<TextView
android:id="@+id/lblbolide"
android:layout_width="wrap_content"
android:layout_height="wrap_content" android:text="HASIL BMI ANDA"
android:textStyle="bold" android:textColor="#ff00cc"
android:layout_gravity="center_horizontal" >
</TextView>
<TextView
117
android:layout_height="wrap_content"android:textSize="20px"> </TextView>
<TextView
android:layout_width="fill_parent"
android:layout_height="wrap_content" android:textSize="20px"
android:background="#ff00cc" android:text="Hasil :" android:textStyle="bold"> </TextView>
<TextView
android:id="@+id/hslAngka"
android:layout_width="wrap_content"
android:layout_height="wrap_content"> </TextView>
<TextView
android:layout_width="wrap_content"
android:layout_height="wrap_content" android:textSize="20px">
</TextView>
<TextView
android:background="#ff00cc"
android:text="Kategori" android:textStyle="bold"
android:id="@+id/kategori"
android:layout_width="fill_parent"
android:layout_height="wrap_content"> </TextView>
<TextView
android:id="@+id/hslKategori"
android:layout_width="wrap_content"
android:layout_height="wrap_content"> </TextView>
</LinearLayout>
Langkah 4 : Lengkapi statement berikut pada class MainActivity :
package com.ai.intent;
import java.security.PublicKey;
import android.app.Activity;
import android.content.Intent;
import android.graphics.Typeface;
118
import android.os.Bundle;import android.view.View;
import android.widget.Button;
import android.widget.EditText;
import android.widget.TextView;
import android.view.View.OnClickListener;
public class IntentBMIActivity extends Activity { EditText beratbadan;
EditText tinggibadan; TextView hasil, angka; Button btnHitung;
Float berat, tinggi, hsl;
@Override
public void onCreate(Bundle savedInstanceState) { super.onCreate(savedInstanceState);
setContentView(R.layout.main);
beratbadan=(EditText)findViewById(R.id.bb); tinggibadan=(EditText)findViewById(R.id.tb); btnHitung=(Button)findViewById(R.id.hitung);
btnHitung.setOnClickListener(new OnClickListener() { public void onClick(View v) {
itung(beratbadan.getText().toString(),
tinggibadan.getText().toString()); callIntent(v);
} }); }
public void callIntent (View v){ Intent i = new
Intent(IntentBMIActivity.this,hitungBMI.class); i.putExtra("hasil", hsl);
startActivity(i); }
public void itung(String b, String t){
berat = Float.parseFloat(beratbadan.getText().toString());
tinggi = Float.parseFloat(tinggibadan.getText().toString());
hsl = berat/(tinggi*tinggi);
119
Langkah 5 : Kemudian, buatlah sebuah activity lagi, untuk menampilkan hasil
hitung activity pertama, berikut adalah kodingnya :
package com.ai.intent;
import android.widget.EditText;
import android.widget.TextView;
import android.app.Activity;
import android.graphics.Typeface;
import android.os.Bundle;
import android.view.View;
public class hitungBMI extends Activity { Float hsl;
TextView hasil, angka, title2;
public void onCreate(Bundle savedInstanceState){
super.onCreate(savedInstanceState); setContentView(R.layout.hasil);
TextView title2=(TextView)findViewById(R.id.lblbolide); Typeface
myfont2=Typeface.createFromAsset(getAssets(),"fonts/PoloBrush.ttf"); title2.setTypeface(myfont2);
hasil=(TextView)findViewById(R.id.hslKategori); angka=(TextView)findViewById(R.id.hslAngka);
Bundle bundle = getIntent().getExtras(); //Intent i = this.getIntent();
float hsl=bundle.getFloat("hasil"); if(hsl<18.5){
angka.setText(""+hsl);
hasil.setText("UNDERWEIGHT"); }
else if(hsl>=18.5 && hsl<24.99){ hasil.setText("NORMAL"); angka.setText(""+hsl); }
else if(hsl>=25 && hsl<29.99){ hasil.setText("OVERWEIGHT"); angka.setText(""+hsl); }
else if(hsl>=30){
hasil.setText("OBESITAS"); angka.setText(""+hsl); }
120
Langkah 6 : Pada AndroidManifest.xml perhatikan setiap baris kodenya sebagai
berikut :
<?xml version="1.0" encoding="utf-8"?>
<manifest xmlns:android="http://schemas.android.com/apk/res/android"
package="com.ai.intent"
android:versionCode="1"
android:versionName="1.0" >
<uses-sdk android:minSdkVersion="10" />
<application
android:icon="@drawable/ic_launcher"
android:label="@string/app_name" >
<activity
android:name=".IntentBMIActivity"
android:label="@string/app_name" >
<intent-filter>
<action android:name="android.intent.action.MAIN" />
<category
android:name="android.intent.category.LAUNCHER" />
</intent-filter>
</activity>
<activity
android:label="HitungBMI"
android:name=".hitungBMI"></activity>
</application>
</manifest>
Langkah 5 : Tekan F11 untuk mendebug aplikasi pada emulator Android
121
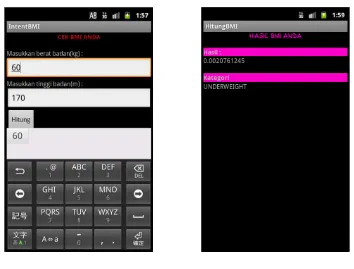
Gambar 43 Tampilan Awal BMI
Langkah 7 : Isikan data-data pada text box, kemudian klik button [Hitung],
maka akan menghubungkan ke activity kedua sebagai berikut
122
c. Percobaan 3: Membuat Contoh Kurs Dollar ke Rupiah
Langkah 1: Buat project Android baru pada Eclipse
Langkah 2: Tambahkan statement berikut pada main.xml
<?xml version="1.0" encoding="utf-8"?> <TableLayout
xmlns:android="http://schemas.android.com/apk/res/android"
android:layout_width="fill_parent"
android:layout_height="fill_parent"
android:background="#ff0000ff"
android:stretchColumns="*" >
<TextView
android:layout_width="wrap_content"
android:layout_height="wrap_content"
android:padding="3dip"
android:textStyle="bold"
android:textColor="#6495ED" android:layout_margin="20dp"
android:text="KURS DOLLAR" android:textSize="25dp"
/>
<TableRow>
<TextView
android:layout_width="wrap_content"
android:layout_height="wrap_content"
android:padding="3dip"
android:text="Masukkan Dalam Dollar (USD)" />
<EditText
android:id="@+id/Edittext1"
android:gravity="right"
android:padding="3dip"
android:text="" />
</TableRow>
<Button
android:id="@+id/btnHitung"
android:text="HITUNG"
android:layout_width="fill_parent"
android:layout_height="wrap_content"
/>
<TableRow>
<TextView
android:padding="3dip"
android:text="Hasil Dalam Rupiah (Rp)" />
<EditText
123
android:gravity="right"
android:padding="3dip"
android:text="" />
</TableRow> </TableLayout>
Langkah 3: Buatlah sebuah file XML baru, beri nama convert.xml :
<?xml version="1.0" encoding="utf-8"?> <LinearLayout
xmlns:android="http://schemas.android.com/apk/res/android"
android:orientation="vertical"
android:layout_width="wrap_content"
android:layout_height="wrap_content">
<TextView android:text="PERHITUNGAN"
android:id="@+id/TextView02"
android:layout_width="wrap_content"
android:layout_height="wrap_content" android:textStyle="bold"
android:textColor="#6495ED" android:layout_margin="20dp"
>
</TextView> <TextView
android:text="Nominal Dalam USD :"
android:id="@+id/TextView03"
android:layout_width="wrap_content"
android:layout_height="wrap_content" android:textColor="#6495ED"
>
</TextView>
<EditText
android:id="@+id/USD"
android:layout_width="wrap_content"
android:layout_height="wrap_content"> </EditText>
<Button
android:id="@+id/convert"
android:layout_width="wrap_content"
android:layout_height="wrap_content"
android:text="CONVERT" />
124
Langkah 4 : Lengkapi statement berikut pada class Main Activity :
package com.kurs;
import android.app.Activity;
import android.app.DownloadManager.Request;
import android.content.Intent;
import android.os.Bundle;
import android.view.View;
import android.widget.Button;
import android.widget.EditText;
import android.widget.Toast;
public class KursDollarActivity extends Activity { /** Called when the activity is first created. */
private static final int REQUEST_CODE = 1; {
}
float hsl;
Button btnHitung; EditText Edittext1; EditText editText2;
@Override
public void onCreate(Bundle savedInstanceState) { super.onCreate(savedInstanceState);
setContentView(R.layout.main);
Button btnHitung =(Button)findViewById(R.id.btnHitung);
// set OnClickListener event to btnHitung
btnHitung.setOnClickListener(new View.OnClickListener() {
public void onClick(View v) {
// TODO Auto-generated method stub
callIntent(); }
}); }
public void callIntent() { try{
Intent i = new Intent(KursDollarActivity.this, convertActivity.class);
EditText Edittext1= (EditText)findViewById(R.id.Edittext1); String dataActivity_1 = Edittext1.getText().toString(); //untuk mengirim data guanakan put Extra
125
}catch(Exception e){
Toast.makeText(getApplicationContext(), e+"", 1).show();
} }
protected void onActivityResult(int requestCode, int resultCode, Intent data) {
if (resultCode == RESULT_OK && requestCode == REQUEST_CODE){
Bundle b = data.getExtras(); float hasil = b.getFloat("hasil");
EditText text2 =
(EditText)findViewById(R.id.Edittext2);
text2.setText(""+hasil);
}
}
}
Langkah 5 : Kemudian, buatlah sebuah activity lagi, untuk menampilkan hasil
hitung activity pertama, berikut adalah kodingnya :
package com.kurs;
import android.app.Activity;
import android.app.DownloadManager.Request;
import android.content.Intent;
import android.os.Bundle;
import android.view.View;
import android.widget.Button;
import android.widget.EditText;
import android.widget.Toast;
public class convertActivity extends Activity {
/** Called when the activity is first created. */
Bundle extras;
@Override
public void onCreate(Bundle savedInstanceState) {
super.onCreate(savedInstanceState); setContentView(R.layout.convert);
extras = getIntent().getExtras();
if (extras == null) {
return; }
126
if (value1 != null) {EditText Edittext1 = (EditText) findViewById(R.id.USD);
Edittext1.setText(value1); }
Button btnConvert = (Button) findViewById(R.id.convert); btnConvert.setOnClickListener(new View.OnClickListener() {
public void onClick(View v) {
// TODO Auto-generated method stub
hitung(value1); finish(); }
}); }
public void hitung(String a) {
float ai = Float.parseFloat(a);
float hsl = (ai * 10000); Intent i = new Intent();
extras.putFloat("hasil", hsl); i.putExtras(extras);
setResult(Activity.RESULT_OK, i); }
}
Langkah 6 : Pada AndroidManifest.xml perhatikan setiap baris kodenya sebagai
berikut :
<?xml version="1.0" encoding="utf-8"?>
<manifest xmlns:android="http://schemas.android.com/apk/res/android"
package="com.kurs"
android:versionCode="1"
android:versionName="1.0" >
<uses-sdk android:minSdkVersion="10" />
<application
android:icon="@drawable/ic_launcher"
android:label="@string/app_name" >
<activity
android:name=".KursDollarActivity"
android:label="@string/app_name" >
<intent-filter>
<action android:name="android.intent.action.MAIN" />
<category
android:name="android.intent.category.LAUNCHER" />
</intent-filter>
</activity>
127
android:label="@string/app_name"
android:name=".convertActivity">
<intent-filter>
<action android:name="com.kurs.hasil" />
<category
android:name="android.intent.category.DEFAULT" />
</intent-filter>
</activity>
</application>
</manifest>
Langkah 5 : Tekan F11 untuk mendebug aplikasi pada emulator Android
Langkah 6 : Maka akan muncul output awal sebagai berikut :
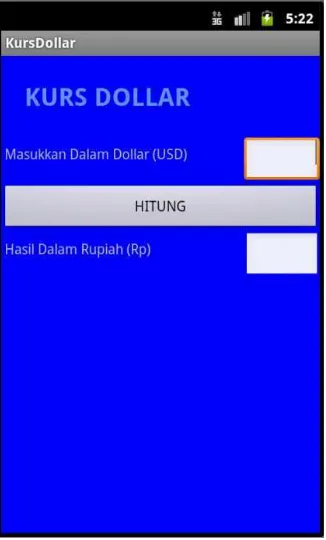
Gambar 45 Tampilan Awal Konversi Mata Uang
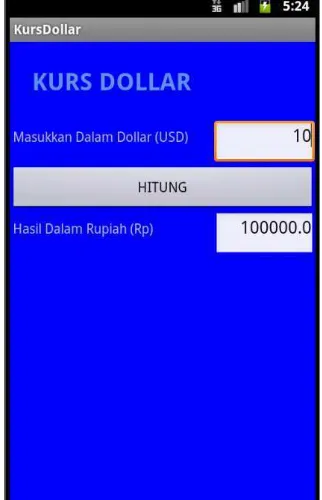
Langkah 7 : Isikan sebuah input pada text box, kemudian klik button [Hitung],
128
Gambar 46 Tampilan Perhitungan Konversi Mata Uang
Langkah 7 : klik button [Convert], akan menampilkan hasil sebagai berikut :
129
d. Percobaan 4: Mengirimkan SMS dengan Intent
Langkah 1: Buat project Android baru pada Eclipse
Langkah 2: Tambahkan statement berikut pada main.xml
<?xml version="1.0" encoding="utf-8"?> <LinearLayout
xmlns:android="http://schemas.android.com/apk/res/android"
android:layout_width="fill_parent"
android:layout_height="fill_parent"
android:orientation="vertical" >
<Button
android:id="@+id/btnSend"
android:layout_width="fill_parent"
android:layout_height="wrap_content"
android:text="Send SMS" />
</LinearLayout>
Langkah 3 : Lengkapi statement berikut pada class java MainActivity
package com.ai.sms;
import android.R.string;
import android.app.Activity;
import android.app.PendingIntent;
import android.content.BroadcastReceiver;
import android.content.Context;
import android.content.Intent;
import android.content.IntentFilter;
import android.os.Bundle;
import android.telephony.gsm.SmsManager;
import android.view.View;
import android.widget.Button;
import android.widget.Toast;
public class SMSSendingIntentActivity extends Activity { Button btnSendSms;
/** Called when the activity is first created. */
@Override
public void onCreate(Bundle savedInstanceState) { super.onCreate(savedInstanceState);
setContentView(R.layout.main);
btnSendSms =(Button)findViewById(R.id.btnSend);
btnSendSms.setOnClickListener(new View.OnClickListener() {
@Override
public void onClick(View v) {
130
Intent i = new
Intent(android.content.Intent.ACTION_VIEW);
i.putExtra("address","5558; 5560"); i.putExtra("sms_body", "Test sending sms intent");
i.setType("vnd.android-dir/mms-sms"); startActivity(i);
}
}); }
private void sendSMS(String phoneNum,String message) { String SENT ="SMS_SENT";
String DELIVERED = "SMS_DELIVERED";
PendingIntent sentPI = PendingIntent.getBroadcast(this, 0,
new Intent(SENT), 0);
PendingIntent delivPI = PendingIntent.getBroadcast(this, 0,
new Intent(DELIVERED), 0);
registerReceiver(new BroadcastReceiver() {
@Override
public void onReceive(Context arg0, Intent arg1) { switch (getResultCode()) {
case Activity.RESULT_OK:
Toast.makeText(getBaseContext(), "SMS
SENT", Toast.LENGTH_SHORT).show();
break;
case SmsManager.RESULT_ERROR_GENERIC_FAILURE: Toast.makeText(getBaseContext(), "Generic
Failure", Toast.LENGTH_SHORT).show();
break;
case SmsManager.RESULT_ERROR_NO_SERVICE: Toast.makeText(getBaseContext(), "No
Service", Toast.LENGTH_SHORT).show();
break;
case SmsManager.RESULT_ERROR_NULL_PDU:
Toast.makeText(getBaseContext(), "Null
PDU", Toast.LENGTH_SHORT).show();
break;
case SmsManager.RESULT_ERROR_RADIO_OFF:
Toast.makeText(getBaseContext(), "Radio
Off", Toast.LENGTH_SHORT).show();
break;
default:
break;
}
}
},new IntentFilter(SENT));
//---when the SMS has been
registerReceiver(new BroadcastReceiver(){ @Override
131
{
case Activity.RESULT_OK:
Toast.makeText(getBaseContext(), "SMS Delivered", Toast.LENGTH_SHORT).show();
break;
case Activity.RESULT_CANCELED:
Toast.makeText(getBaseContext(), "SMS not Delivered", Toast.LENGTH_SHORT).show();
break; } }
}, new IntentFilter(DELIVERED));
SmsManager sms = SmsManager.getDefault();
sms.sendTextMessage(phoneNum, null,message, sentPI,delivPI);
} }
Langkah 4 : Lakukan editing pada kode yang dicetak tebal berikut pada class
AndroidManifest.xml:
<?xml version="1.0" encoding="utf-8"?>
<manifest xmlns:android="http://schemas.android.com/apk/res/android"
package="com.ai.sms"
android:versionCode="1"
android:versionName="1.0" >
<uses-sdk android:minSdkVersion="10" />
<application
android:icon="@drawable/ic_launcher"
android:label="@string/app_name" >
<activity
android:name=".SMSSendingIntentActivity"
android:label="@string/app_name" >
<intent-filter>
<action android:name="android.intent.action.MAIN" />
<category
android:name="android.intent.category.LAUNCHER" />
</intent-filter>
</activity>
</application>
<uses-permission
android:name
=
"android.permission.SEND_SMS"
/>
</manifest>
Langkah 5 : Tekan F11 untuk mendebug aplikasi pada emulator Android
Langkah 6 : Launch 2 buah emulator lagi dengan api yang sama.
Langkah 7 : Maka akan muncul outputnya, kemudian klik pada button [Send
132
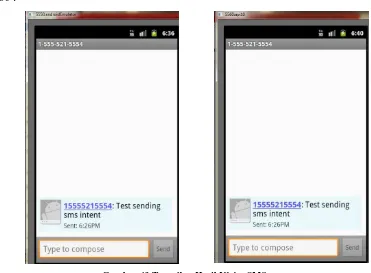
Gambar 48 Tampilan Send SMS dengan Intent
Langkah 8 : Kemudian, akan muncul notifikasi sms masuk pada emulator 5558 dan
5560 :