Oracle® Fusion Middleware
Report Designer's Guide for Oracle Business Intelligence Publisher Release 11g (11.1.1)
Part No. E13881-02
Oracle Fusion Middleware Report Designer's Guide for Oracle Business Intelligence Publisher, Release 11g (11.1.1)
Part No. E13881-02
Copyright © 2010, 2011, Oracle and/or its affiliates. All rights reserved. Primary Author: Leslie Grumbach Studdard
Contributing Author: Tim Dexter
Contributor: Oracle Business Intelligence Publisher development, product management, and quality assurance teams
Oracle is a registered trademark of Oracle Corporation and/or its affiliates. Other names may be trademarks of their respective owners.
This software and related documentation are provided under a license agreement containing restrictions on use and disclosure and are protected by intellectual property laws. Except as expressly permitted in your license agreement or allowed by law, you may not use, copy, reproduce, translate, broadcast, modify, license, transmit, distribute, exhibit, perform, publish or display any part, in any form, or by any means. Reverse engineering, disassembly, or decompilation of this software, unless required by law for interoperability, is prohibited.
The information contained herein is subject to change without notice and is not warranted to be error-free. If you find any errors, please report them to us in writing.
If this software or related documentation is delivered to the U.S. Government or anyone licensing it on behalf of the U.S. Government, the following notice is applicable:
U.S. GOVERNMENT RIGHTS
Programs, software, databases, and related documentation and technical data delivered to U.S. Government customers are "commercial computer software" or "commercial technical data" pursuant to the applicable Federal Acquisition Regulation and agency-specific supplemental regulations. As such, the use, duplication, disclosure, modification, and adaptation shall be subject to the restrictions and license terms set forth in the applicable Government contract, and, to the extent applicable by the terms of the Government contract, the additional rights set forth in FAR 52.227-19, Commercial Computer Software License (December 2007). Oracle USA, Inc., 500 Oracle Parkway, Redwood City, CA 94065.
This software or hardware is developed for general use in a variety of information management applications. It is not developed or intended for use in any inherently dangerous applications, including applications that may create a risk of personal injury. If you use this software or hardware in dangerous applications, then you shall be responsible to take all appropriate fail-safe, backup, redundancy, and other measures to ensure its safe use. Oracle Corporation and its affiliates disclaim any liability for any damages caused by use of this software or hardware in dangerous applications.
iii
Contents
Send Us Your Comments
Preface
Part 1 Introduction
1 Introduction
Overview of the Oracle Business Intelligence Publisher Report Designer's Guide...1-1
New Features for Oracle Business Intelligence Publisher 11g Release 1 (11.1.1)... 1-4
Part 2 Creating Reports and Layouts
2 Creating or Editing a Report
About Report Components... 2-1
Process Overview... 2-2
Launching the Report Editor... 2-3
Selecting the Data Model... 2-3
About the Report Editor Interface...2-4
Adding Layouts to the Report Definition...2-5
Configuring Layouts... 2-7
Configuring Parameter Settings for the Report...2-10
Configuring Report Properties... 2-11
3 Creating BI Publisher Layout Templates
Launching the Layout Editor...3-3
About the Layout Editor Interface... 3-6
The Page Layout Tab... 3-12
Inserting Layout Components... 3-22
About Layout Grids... 3-22
About Repeating Sections... 3-26
About Data Tables... 3-31
About Charts...3-52
About Gauge Charts... 3-58
About Pivot Tables... 3-61
About Text Items... 3-68
About Images...3-73
About Lists...3-74
Setting Predefined or Custom Formulas... 3-80
Saving a Layout... 3-90
4 Creating RTF Templates
What Is an RTF Template... 4-2
About XSLT Compatibility... 4-2
Getting Started... 4-2 Prerequisites... 4-3 About Adding BI Publisher Code... 4-3
Key Concepts... 4-4 Associating the XML Data to the Template Layout... 4-4
Designing the Template Layout...4-7
Adding Markup to the Template Layout... 4-7 Creating Placeholders... 4-8 Defining Groups... 4-12
Defining Headers and Footers... 4-16 Native Support...4-16
Inserting Images and Charts... 4-18 Images... 4-18 Chart Support... 4-19
Drawing, Shape, and Clip Art Support... 4-30
v
Background and Watermark Support... 4-47
Template Features... 4-49 Page Breaks... 4-49 Initial Page Number... 4-50 Last Page Only Content... 4-51 End on Even or End on Odd Page... 4-54 Hyperlinks... 4-55 Table of Contents... 4-58 Generating Bookmarks in PDF Output... 4-59 Check Boxes... 4-60 Drop Down Lists... 4-61
Conditional Formatting... 4-64 If Statements... 4-65 If Statements in Boilerplate Text... 4-65 If-then-Else Statements... 4-66 Displaying Page Totals... 4-76 Brought Forward/Carried Forward Totals... 4-78 Running Totals...4-82
Data Handling... 4-84 Sorting...4-84 Checking for Nulls... 4-85 Regrouping the XML Data... 4-85
Using Variables... 4-92
Defining Parameters...4-93
Setting Properties... 4-95
Advanced Report Layouts... 4-97 Batch Reports... 4-97 Handling No Data Found Conditions... 4-99 Pivot Table Support... 4-100 Dynamic Data Columns... 4-103
Number, Date, and Currency Formatting... 4-106
Calendar and Timezone Support... 4-123
Using External Fonts... 4-125 Custom Barcode Formatting... 4-128
Controlling the Placement of Instructions Using the Context Commands... 4-129
Namespace Support...4-136
Using XSL Elements... 4-136
Using FO Elements... 4-138
Guidelines for Designing RTF Templates for Microsoft PowerPoint Output...4-138
5 Creating RTF Templates Using the Template Builder for Word
Introduction... 5-1
Getting Started... 5-3
Accessing Data for Building Your Template... 5-7
Inserting Components to the Template... 5-9
Previewing a Template...5-31
Template Editing Tools... 5-32
Uploading a Template to the BI Publisher Server...5-37
Using the Template Builder Translation Tools... 5-37
Setting Options for the Template Builder... 5-39
Setting Up a Configuration File... 5-44
BI Publisher Menu Reference... 5-44
6 Creating Excel Templates
Introduction... 6-1
Concepts... 6-3
Building a Simple Template... 6-4
Formatting Dates... 6-14
Defining BI Publisher Functions... 6-18 Reporting Functions...6-18 Formatting Functions That Rely on Specific Data Attribute Values...6-29 Grouping Functions... 6-39
Preprocessing the Data Using an XSL Transformation (XSLT) File... 6-41
Using the Template Viewer to Debug a Template... 6-42
7 Creating PDF Templates
Overview... 7-1 Requirements... 7-1
Designing the Template... 7-2
Adding Markup to the Template... 7-4 Creating a Placeholder... 7-5 Defining Groups of Repeating Fields...7-8
Adding Page Numbers... 7-9
Performing Calculations... 7-13
vii
Runtime Behavior...7-15
Creating a Layout from a Predefined PDF Form... 7-17
Adding or Designating a Field for a Digital Signature... 7-19
8 Creating Flash Templates
Introduction... 8-1
Building a Flash Template... 8-3
Uploading the Flash Template to the Report Definition... 8-13
Setting Properties for PDF Output... 8-13
For More Information...8-15
9 Creating eText Templates
Introduction... 9-1
Structure of eText Templates... 9-2
Constructing the Data Tables...9-6 Command Rows... 9-6 Structure of the Data Rows... 9-12
Setup Command Tables... 9-16
Creating a Filler Block... 9-29
Expressions, Control Structures, and Functions... 9-31
Identifiers, Operators, and Literals... 9-35
10 Setting Report Processing and Output Document Properties
Introduction... 10-1
PDF Output Properties... 10-2
PDF Security Properties... 10-4
PDF Digital Signature Properties... 10-7
RTF Output Properties... 10-9
HTML Output Properties... 10-10
FO Processing Properties... 10-11
RTF Template Properties... 10-14
PDF Template Properties... 10-15
Flash Template Properties...10-16
CSV Output Properties... 10-17
Excel 2007 Output Properties... 10-18
All Outputs... 10-18
Part 3 Creating and Implementing Style Templates
11 Creating and Implementing Style Templates
Understanding Style Templates... 11-1
Creating a Style Template RTF File... 11-3
Uploading a Style Template File to the Catalog...11-5
Assigning a Style Template to a Report Layout... 11-6
Updating a Style Template...11-7
Adding Translations to Your Style Template Definition... 11-7
Part 4 Creating and Implementing Sub Templates
12 Understanding Subtemplates
What is a Subtemplate...12-1
Supported Locations for Subtemplates... 12-2
Designing a Subtemplate... 12-2
Testing Subtemplates from the Desktop... 12-2
Creating the Sub Template Object in the Catalog...12-3
Calling a Subtemplate from an External Source... 12-4
13 Designing RTF Subtemplates
Understanding RTF Subtemplates... 13-1
Process Overview for Creating and Implementing RTF Subtemplates...13-2
Creating an RTF Subtemplate File...13-2
Calling a Subtemplate from Your Main Template... 13-3
When to Use RTF Subtemplates... 13-5
Adding Translations to an RTF Subtemplate... 13-9
14 Designing XSL Subtemplates
Understanding XSL Subtemplates...14-1
Process Overview for Creating and Implementing XSL Subtemplates...14-2
Creating an XSL Subtemplate File... 14-2
Calling an XSL Subtemplate from Your Main Template... 14-3
Creating the Sub Template Object in the Catalog...14-5
ix
Part 5 Translating Reports and Catalog Objects
15 Translation Support Overview and Concepts
Translation Support Overview... 15-1
Working with Translation Files... 15-2
What Is an XLIFF...15-2
Structure of the XLIFF File... 15-2
Locale Selection Logic... 15-5
16 Translating Individual Templates
Overview... 16-1
Types of Translations... 16-1
Using the XLIFF Option... 16-3
Using the Localized Template Option... 16-6
17 Translating Catalog Objects, Data Models, and Templates
Overview...17-1
What Can Be Translated... 17-2
Exporting the XLIFF File... 17-3
Identifying and Updating the Object Tags...17-3
Importing the XLIFF File... 17-3
A Techniques for Handling Large Output Files
Techniques for Handling Large PDF Output Files... A-1
Reusing Static Content... A-1
Generating Zipped PDF Output... A-4
Implementing PDF Splitting for an RTF Template... A-6
Implementing PDF Splitting for a PDF Template... A-7
B Extended Function Support in RTF Templates
Extended SQL and XSL Functions... B-1
XSL Equivalents... B-18
Using FO Elements... B-19
C Designing Accessible Reports
Introduction... C-1
Defining a Document Title...C-3
Defining Alternative Text for an Image... C-3
Defining a Table Summary... C-4
Defining a Table Column Header... C-4
Defining a Table Row Header...C-4
Sample Supported Tables... C-5
D Supported XSL-FO Elements
Supported XSL-FO Elements... D-1
xi
Send Us Your Comments
Oracle Fusion Middleware Report Designer's Guide for Oracle Business Intelligence Publisher, Release 11g (11.1.1)
Part No. E13881-02
Oracle welcomes customers' comments and suggestions on the quality and usefulness of this document. Your feedback is important, and helps us to best meet your needs as a user of our products. For example: • Are the implementation steps correct and complete
• Did you understand the context of the procedures • Did you find any errors in the information
• Does the structure of the information help you with your tasks
• Do you need different information or graphics If so, where, and in what format • Are the examples correct Do you need more examples
If you find any errors or have any other suggestions for improvement, then please tell us your name, the name of the company who has licensed our products, the title and part number of the documentation and the chapter, section, and page number (if available).
Note: Before sending us your comments, you might like to check that you have the latest version of the document and if any concerns are already addressed. To do this, access the new Oracle E-Business Suite Release Online Documentation CD available on My Oracle Support and www.oracle.com. It contains the most current Documentation Library plus all documents revised or released recently.
Send your comments to us using the electronic mail address: [email protected] Please give your name, address, electronic mail address, and telephone number (optional).
If you need assistance with Oracle software, then please contact your support representative or Oracle Support Services.
xiii
Preface
Intended Audience
Welcome to Release 11g (11.1.1) of the Oracle Fusion Middleware Report Designer's Guide for Oracle Business Intelligence Publisher.
This book is intended for the following users:
• report designers who will be designing report layouts and creating reports for BI Publisher
See Related Information Sources on page xiv for more Oracle E-Business Suite product information.
Documentation Accessibility
For information about Oracle's commitment to accessibility, visit the Oracle
Accessibility Program website at http://www.oracle.com/us/corporate/accessibility/
Structure
1 Introduction
2 Creating or Editing a Report
3 Creating BI Publisher Layout Templates 4 Creating RTF Templates
5 Creating RTF Templates Using the Template Builder for Word 6 Creating Excel Templates
7 Creating PDF Templates 8 Creating Flash Templates 9 Creating eText Templates
10 Setting Report Processing and Output Document Properties 11 Creating and Implementing Style Templates
14 Designing XSL Subtemplates
15 Translation Support Overview and Concepts 16 Translating Individual Templates
17 Translating Catalog Objects, Data Models, and Templates A Techniques for Handling Large Output Files
B Extended Function Support in RTF Templates C Designing Accessible Reports
D Supported XSL-FO Elements
Related Information Sources
For more information, see the following documents in the Oracle Business Intelligence
Enterprise Edition 11g Release 1 (11.1.1) documentation set:
• The Oracle Business Intelligence chapter in the Oracle Fusion Middleware Release
Notes for your platform
• Oracle Fusion Middleware Data Modeling Guide for Oracle Business Intelligence Publisher
• Oracle Fusion Middleware User's Guide for Oracle Business Intelligence Publisher
• Oracle Fusion Middleware Administrator's Guide for Oracle Business Intelligence Publisher
• Oracle Fusion Middleware Developer's Guide for Oracle Business Intelligence Publisher
• Oracle Fusion Middleware Upgrade Guide for Oracle Business Intelligence Enterprise Edition
• Oracle Fusion Middleware User's Guide for Oracle Business Intelligence Enterprise Edition Oracle Fusion Middleware Installation Guide for Oracle Business Intelligence
• Oracle Fusion Middleware System Administrator's Guide for Oracle Business Intelligence Enterprise Edition
• Oracle Fusion Middleware Metadata Repository Builder's Guide for Oracle Business Intelligence Enterprise Edition
System Requirements and Certification
Refer to the system requirements and certification documentation for information about hardware and software requirements, platforms, databases, and other information. Both of these documents are available on Oracle Technology Network (OTN).
xv
http://www.oracle.com/technology/software/products/ias/files/fusion_requirements.ht m
The certification document covers supported installation types, platforms, operating systems, databases, JDKs, and third-party products:
http://www.oracle.com/technology/software/products/ias/files/fusion_certification.html
Do Not Use Database Tools to Modify Oracle E-Business Suite Data
Oracle STRONGLY RECOMMENDS that you never use SQL*Plus, Oracle Data Browser, database triggers, or any other tool to modify Oracle E-Business Suite data unless otherwise instructed.Oracle provides powerful tools you can use to create, store, change, retrieve, and maintain information in an Oracle database. But if you use Oracle tools such as SQL*Plus to modify Oracle E-Business Suite data, you risk destroying the integrity of your data and you lose the ability to audit changes to your data.
Part 1
Introduction 1-1
1
Introduction
Overview of the Oracle Business Intelligence Publisher Report Designer's
Guide
Oracle Business Intelligence Publisher is a reporting and publishing application that enables you to extract data from multiple data sources, create layouts for report data, and publish the report to numerous output formats. BI Publisher also enables you to schedule reports and deliver the reports to multiple delivery destinations required by your business.
The Oracle Fusion Middleware Report Designer's Guide for Oracle Business Intelligence Publisher describes how to create report layouts and use BI Publisher's report editor to assemble the components of a report. See these other guides for more information about using the product for other business roles:
Role Sample Tasks Guide
Data Model developer Fetching and structuring the data to use
in reports Oracle Fusion Middleware Data Modeling Guide for Oracle Business Intelligence Publisher
Administrator Configuring Security
Configuring System Settings
Diagnosing and Monitoring System Processes
Oracle Fusion Middleware Administrator's Guide for Oracle Business Intelligence Publisher
Application developer or integrator
Integrating BI Publisher into existing applications using the application programming interfaces
Role Sample Tasks Guide
Report consumer Viewing reports
Scheduling report jobs
Managing report jobs
Oracle Fusion Middleware User's Guide for Oracle Business Intelligence Publisher
Overview for Report Designers
A report consists of a data model, a layout, and a set of properties. Optionally, a report may also include a style template and a set of translations. A report designer performs the following tasks:
• Design the layout for the report. The layout can be created using a variety of tools. The output and design requirements of a particular report will determine the best layout design tool. Options include the Layout Editor, which is a Web-based layout design tool and enables interactive output, Microsoft Word, Adobe Acrobat, Microsoft Excel, and Adobe Flexbuilder.
• Set runtime configuration properties for the report.
• Design style templates to enhance a consistent look and feel of reports in your enterprise.
• Create sub templates to re-use common functionality across multiple templates
• Enable translations for a report.
About the Template Types
BI Publisher offers several options for designing layouts for your reports. The following formats are supported. Note that the layout type determines the types of output documents supported.
• BI Publisher layout (XPT)
BI Publisher's Layout Editor is a Web-based design tool for creating layouts. Layouts created with the Layout Editor support interactive viewing as well as the full range of output types supported by RTF layouts.
• Rich Text Format (RTF)
Introduction 1-3
layout options. RTF templates support a variety of output types, including: PDF, HTML, RTF, Excel, PowerPoint, zipped PDF, and MHTML.
• Portable Document Format (PDF)
PDF templates are used primarily when you need to use a predefined form as a layout for a report (for example, a form provided by a government agency). Because many PDF forms already contain form fields, using the PDF form as a template simply requires mapping data elements to the fields that exist on the form. You can also design your own PDF templates using Adobe Acrobat Professional. PDF templates only support PDF output.
• Microsoft Excel (XLS)
Excel templates enable you to map data and define calculations and formatting logic in your Excel workbook. Excel templates support Microsoft Excel (.xls) output only.
If you only need to view report data in Excel, you can also use BI Publisher's Analyzer for Microsoft Excel to download report data to an Excel worksheet. Create a layout for the data in Excel and then upload the spreadsheet back to BI Publisher to save as a report layout.
• XSL Stylesheet
Layouts can also be defined directly in XSL formatting language. Specify whether your layout is for FO, HTML, XML, or Text transformation.
• eText
These are specialized RTF templates used for creating text output for Electronic Data Interchange (EDI) or Electronic Funds Transfer (EFT) transactions.
• Flash
BI Publisher's support for Flash layouts enables you to develop Adobe Flex templates that can be applied to BI Publisher reports to generate interactive Flash output documents.
About Setting Runtime Properties
BI Publisher provides a variety of user-controlled settings that are specified via an easily accessible Runtime Configuration page. These include security settings for individual PDF reports, HTML output display settings, font mapping, currency formatting, and other output-specific settings. For more information see Setting Report Processing and Output Document Properties, page 10-1. These settings are also
About Translations
BI Publisher provides the ability to create an XLIFF file from your RTF templates. XLIFF is the XML Localization Interchange File Format. It is the standard format used by localization providers. Using BI Publisher's XLIFF generation tool you can generate the standard translation file of your RTF template. You can then translate this file (or send to a translation provider). Once translated, the file can be uploaded to the report definition under the appropriate locale setting so that at runtime the translated report will automatically be run for users selecting the corresponding locale. For more information, see Translating Reports and Catalog Objects, page 15-1.
About Style Templates
A style template is an RTF template that contains style information that can be applied to layout templates. The style information in the style template is applied to report layout templates at runtime to achieve a consistent look and feel across your enterprise reports.
For more information, see Creating and Implementing Style Templates, page 11-1.
About Sub Templates
A Sub Template is a piece of formatting functionality that can be defined once and used multiple times within a single layout template or across multiple layout template files. This piece of formatting can be in an RTF file format or an XSL file format. RTF subtemplates are easy to design as you can use Microsoft Word native features. XSL subtemplates can be used for complex layout and data requirements.
For more information, see Creating and Implementing Sub Templates, page 12-1.
New Features for Oracle Business Intelligence Publisher 11
g
Release 1
(11.1.1)
This section describes new features in Oracle Business Intelligence Publisher 11g
Release 1 (11.1.1). If you are upgrading from a previous release, read the following for information about new features, tools, and procedures.
This section includes the following topics:
• New Features for Oracle BI Publisher 11g Release 1 (11.1.1.5)
• New Features for Oracle BI Publisher 11g Release 1 (11.1.1.3)
New Features for Oracle BI Publisher 11
g
Release 1 (11.1.1.5)
Introduction 1-5
Excel Templates
An Excel template is a report layout that you design in Microsoft Excel for retrieving your enterprise data in Excel. Excel templates provide a set of special features for controlling the display of data and providing specific formatting instructions. Excel templates support the following features:
• Define the structure for your data in Excel output
• Split hierarchical data across multiple sheets and dynamically name the sheets
• Create sheets of data that have master-detail relationships
• Use native XSL functions in your data to manipulate it prior to rendering
• Use native Excel functionality
For more information, see Creating Excel Templates, page 6-1.
Excel Template Builder
BI Publisher provides a downloadable add-in to Excel that enables you to preview your Excel template with sample data. This facilitates design by enabling you to test and edit your template without having to upload it to the BI Publisher catalog first. The
Template Builder for Excel is installed automatically when you install the Template Builder for Word. The tools can be downloaded from the Home page of Oracle Business Intelligence Publisher or Oracle Business Intelligence Enterprise Edition as follows:
Under the Get Started region, click Download BI Publisher Tools.
For more information, see Creating Excel Templates, page 6-1
New Interactive List Component for BI Publisher Layouts
The list component displays all values of a data element in a vertical or horizontal list. When viewed in interactive mode, clicking an item in the list updates the results shown in the linked components of the report. The list enables the report consumer to quickly see results for each item in the list by clicking the list entry. For more information see About Lists, page 3-74.
Redesigned Formula Dialog for BI Publisher Layout Editor
The formula dialog in the BI Publisher layout editor has been redesigned for better usability. For more information, see Setting Predefined or Custom Formulas, page 3-80.
New Features for Oracle BI Publisher 11
g
Release 1 (11.1.1.3)
Major User Interface Improvements
The user interface has undergone major improvements in several areas, including a new Home page and redesigned editors and panes. These improvements are intended to make working with Oracle BI Publisher easier and more consistent. This guide provides detailed information on working with the various pieces of the user interface.
Shared Oracle BI Presentation Catalog
For installations of BI Publisher with the Oracle BI Enterprise Edition, BI Publisher now shares the same catalog with Oracle BI Presentation services.
Layout Editor Design Tool
This release introduces a new type of layout template and design tool. The Layout Editor is launched from within BI Publisher and provides an intuitive WYSIWIG drag-and-drop interface for designing report layouts.
Interactive Viewer
For reports created with the new BI Publisher layout editor, a new interactive output type is available. The interactive viewer enables pop-up chart details, scrollable tables, table filtering, table sorting, and propagated filtering across different components of the report. This interactivity is achieved simply by designing the report in the layout editor, no additional coding is necessary.
Sub Templates
Previously subtemplates had to be stored outside of the BI Publisher catalog and called at runtime from the external directory. In this release your RTF and XSL subtemplates can be saved and managed as objects in the BI Publisher catalog.
Style Templates
A style template is an RTF template that contains style information that can be applied to RTF layouts. The style information in the style template is applied to RTF layouts at runtime to achieve a consistent look and feel across your enterprise reports. Style templates are saved and managed in the BI Publisher catalog.
Zipped PDF Output
Part 2
Creating or Editing a Report 2-1
2
Creating or Editing a Report
About Report Components
A report consists of the following components: • Data Model
• Layout
• Properties
• Translations
The first step in creating a new report is to select the source of the data for the report. A Data Model defines data that is used by a report. A Data Model may contain multiple data sets and it defines how data fields are structured in relation to each other. It may also contain parameters with lists of values, bursting definitions and other structures or properties that determine how data is provided to a report. Creating a data model is
documented in the Oracle Fusion Middleware Data Modeling Guide for Oracle Business
Intelligence Publisher.
The next step is to design a layout for the report data. The layout defines how the data is presented in the report. A layout consists of a template file and a set of properties for rendering the template file. BI Publisher supports templates created from a variety of sources including Microsoft Word, Adobe Acrobat, Microsoft Excel, Adobe Flash, and BI Publisher's own layout editor. A report can include multiple layouts.
Next, configure properties for the report. The report properties enable you to control
many aspects of the report generation, formatting, and display.
Optionally, add translations for the report. BI Publisher's translation support enables you to include translations for individual layouts or for all translatable strings in the layout, data model, and the report metadata.
information about report components see the following:
Topic Where to get more information
Creating a data model Creating Data Models, Oracle Fusion Middleware Data Modeling Guide for Oracle Business Intelligence Publisher
How to choose a template type About the Template Types, page 1-2
Creating specific template types Creating BI Publisher Layout Templates, page 3-1
Creating RTF Templates Using the Template Builder for Word, page 5-1
Creating RTF Templates, page 4-2
Creating Excel Templates, page 6-1
Creating PDF Templates, page 7-1
Creating Templates Using the Excel Analyzer, Oracle Fusion Middleware User's Guide for Oracle Business Intelligence Publisher
Creating Flash Templates, page 8-1
Creating eText Templates, page 9-1
Translating reports Translating Reports and Catalog Objects, page 15-1
Process Overview
Creating a new report consists of the following steps. Each of these steps is discussed in detail in this section.
Task Section
Launch the Report Editor. Launching the Report Editor, page 2-3
Select the data model. Selecting the Data Model, page 2-3
Use the Layout Editor to create the layout or upload a template file.
Adding Layouts to the Report Definition, page 2-5
Creating or Editing a Report 2-3
Task Section
Configure parameters for the report. Configuring Parameter Settings for the Report, page 2-10
Configure report properties. Configuring Report Properties, page 2-11
Add translations for your layouts.
Complete this step if your report requires support for multiple languages.
Translation Support Overview and Concepts, page 15-1
Launching the Report Editor
Launch the Report Editor in one of the following ways:
• From the global header, click New and then click Report.
• From the Home page, under the Create region, click Report.
Selecting the Data Model
Navigate through the catalog and select the data model for your report.
Click Open to add the data model to your report.
If you have not already created the data model, click Cancel to close the Choose dialog.
From the report editor, click the Create New Data Model button (see figure in next
section) to launch the Data Model Editor. See Creating a Data Model, Oracle Fusion
Middleware Data Modeling Guide for Oracle Business Intelligence Publisher for more information on creating data models.
About the Report Editor Interface
Creating or Editing a Report 2-5
From this point you can:
• add, upload, or generate a layout
• configure the data model parameter defaults for this report
• configure the report properties
This procedure addresses these options in the order listed.
Adding Layouts to the Report Definition
There are three options for adding a layout to your report:
• Create Layout - select one of the basic or shared templates to launch the Layout Editor.
• Upload Layout - upload a template file layout that you have designed in one of the supported file types.
To Add a Layout Using the Layout Editor
1. Under the Create Layout region, click one of the basic or shared templates to launch
the Layout Editor.
2. Design the template. See Creating BI Publisher Layout Templates, page 3-1 for
information on using the Layout Editor.
3. When finished, click Save. In the Save Template dialog enter a name for this layout
and select a locale. Click Save.
4. Click Return to return to the Report Editor.
5. Configure the settings for the layout. See Configuring Layouts, page 2-7.
To Add a Layout by Uploading a Template File
Note that uploading a template file assumes that you have followed the instructions in this guide for creating a template file (RTF, PDF, Excel, Flash, or eText).
1. Under the Upload or Generate Layout region, click the Upload icon.
2. In the Upload dialog, perform the following:
• Enter a Layout Name.
• Click Browse to locate the Template File in your local file system.
• Select the Template Type from the list.
• Select the Template Locale from the list.
• Click Upload.
If you are connected to BI Publisher through the Template Builder or Excel Analyzer, you can upload the layout file directly from either tool. See Creating RTF Templates Using the Oracle BI Publisher Template Builder for Word, page 5-1 or Using the Analyzer for Excel, Oracle Fusion Middleware User's Guide for Oracle Business Intelligence Publisher for more information.
To Add a Layout by Generating a Template File
1. Under the Upload or Generate Layout region, click the Generate icon.
2. In the Autogenerate Layout dialog, perform the following:
Creating or Editing a Report 2-7
• Click Generate.
The autogenerate feature creates a simple table-based RTF layout that includes all the fields in your data model.
Important: The autogenerate layout feature can only be used with data sets for which metadata is available. Therefore this feature cannot be used with data sets generated from stored XML files, HTTP feeds, Web services, or migrated data templates.
Configuring Layouts
After creating or uploading the layouts for your report, you can configure settings for the layout from the List View. The List View is shown in the following figure:
Applying a Style Template to the Layout
A style template contains style definitions that are applied to the paragraphs, headings, tables, and headers and footers of a report. A style template is optional and can only be applied to an RTF template file. For more information on creating a style template, see Creating and Implementing Style Templates, page 11-1.
If you wish to apply a style template to this layout, click Choose to browse for and
select the style template. To then apply the style template to an individual layout in the list, select the Apply Style Template box for that layout in the list of properties.
About the Layouts Toolbar
Use the toolbar buttons to perform the following:
Toolbar Button Description
Toolbar Button Description
Edit Launches the Layout Editor for the selected layout.
This button is enabled for BI Publisher layouts (.xpt) only.
Properties Launches the Properties page to enable the upload of localized templates and XLIFF files to associate with this layout.
This button is enabled for RTF (.rtf) and BI Publisher layouts (.xpt) only.
For more information on localizing templates, see Translation Support Overview and Concepts, page 15-1.
Delete Deletes the selected layout.
Configuring the Layout Settings
The List View enables you to configure the following settings for your layout:
Setting Description
Name Place your cursor in the text box to enter a new name for the layout.
Template File Displays the name of the file that was saved to the report definition. Click the template file name to download it.
Type Displays the template file type.
Output Formats Select the output types to be enabled for this layout. By default, all valid output types for a layout are enabled. The layout type determines the output types available.
See Valid Output Types for Layout Types, page 2-9 for the complete list.
Default Format Select the default output format for this layout when viewed or scheduled.
Default Layout Select the layout that this report will use by default when viewed online or scheduled. Only one box in this column can be checked.
Creating or Editing a Report 2-9
Setting Description
Active By default a layout is active.
Clear this box when you want to keep the layout as part of the report definition, but no longer make it available. When a layout is inactive it will not display in the report viewer or the scheduler.
View Online By default, a layout is available for report consumers who open the report in the Report Viewer. If this layout is for scheduled reports only, clear this box.
Locale Displays the locale selected when the layout was uploaded. This field is not updateable.
Valid Output Types for Layout Types
Layout Type Valid Output Types
PDF PDF, PDFZ, CSV, Data
RTF HTML, PDF, PDFZ, RTF, Excel, Excel2000, PowerPoint, PowerPoint2007, MHTML, CSV, FO, Data
XPT Interactive, HTML, PDF, PDFZ, RTF, Excel, Excel2000, PowerPoint, PowerPoint2007, MHTML, CSV, FO, Data
XLS Excel, Excel2000, CSV, Data
Flash Flash, PDF, MHTML, CSV, Data
XSL Stylesheet (FO) Same outputs as RTF
XSL Stylesheet (HTML
XML/Text)
HTML, XML, Text, Data
eText Text, CSV, Data
Editing a Layout
To edit any other template type, click the File name link to download the layout to a local computer for editing.
Configuring Parameter Settings for the Report
Parameters are defined in the data model, but the report editor enables you to configure the parameter settings specifically for each report that uses the data model.
To configure the parameters for this report:
1. On the Report Editor page, click Parameters. The Parameters dialog is shown in the
following figure:
2. Customize the parameter settings for this report as follows:
Property Description
Show This property controls whether the parameter is displayed to the user.
Disable the Show property If you do not want the user to see or change the parameter values that are passed to the data model.
Creating or Editing a Report 2-11
Property Description
Default Value This property enables you to configure the default value for the parameter specifically for this report. The initial default values are defined in the data model.
Parameters Display per Line This property controls how many parameters are displayed on one line in the report viewer.
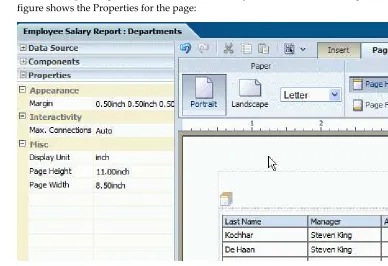
Configuring Report Properties
The Report Properties dialog has the following option sets: • General - set general properties for your report.
• Caching - specify caching options for this report.
• Formatting - set the runtime configuration properties for the report. See Setting Report Processing and Output Document Properties, page 10-1 for information on setting these properties.
• Font Mapping - create font mappings for this report.
• Currency Format- define currency formats for this report.
Setting the General Properties
Set the properties on the General tab as follows:
Description
Creating or Editing a Report 2-13
translatable.
Run Report Online
Disable this property if you do not want users to view this report in the online Report Viewer. When disabled, users will be able to Schedule the report only. For most reports you will keep this enabled. Disable it for long-running, batch, or other reports for which online viewing is not appropriate. When this property is enabled, you can also set the following properties:
Property Description
Show controls Default: Enabled
This property controls the display of the control region of the report. The Control region consists of the Template list, Output list, and Parameter lists. Disable this property if you do not want users to view and update these options.
Allow Sharing Report Links Default: Enabled
The Actions menu of the Report Viewer includes the option Share Report Link, which enables users to display the URL for the current report. Disable this property if you do not want users to see and copy the report link.
Open Links in New Window Default: Enabled
This property controls how links contained within a report are opened. By default links will open in a new browser window. Disable this property to open links in the same browser window.
Asynchronous Mode Default: Not enabled.
Reports run in asynchronous mode use a unique thread to execute the report when run in the report viewer. This allows BI Publisher to cleanly terminate the thread if a user cancels the report execution. Note that there are
Property Description
Auto Run Default: Enabled
When this property is enabled the report will automatically run when the user selects the Open link for the report. When Auto Run is disabled, selecting the Open link for the report displays the online viewer but does not run the report. The user must select an output type from the View Report menu to run the report.
Excel Analyzer Options
Default: Online Mode
This property controls the method by which report data is downloaded to Excel and also impacts the ability to interact with the BI Publisher server from Microsoft Excel.
Using Offline Mode has the following effects:
• Your report data downloads faster and large data sets are handled more efficiently
• You do not have to enable macros
• You can enable your own custom macros
• You cannot log in or connect to the BI Publisher server from your Microsoft Excel session. Therefore you cannot upload a template directly from Excel, nor can you update the report parameters or apply a new template.
The online mode cannot process data sets that are larger than 5 megabytes. You would therefore enable this property for reports that generate very large data sets that you wish to manipulate in Excel. Note that the Offline Mode also requires the data to be in <ROWSET><ROW>...</ROWS>...</ROWSET> format.
The following table details the differences between the online and offline modes:
Consideration Offline Mode Online Mode
Performance Data is downloaded faster to Excel and large data sets are handled more efficiently
Creating or Editing a Report 2-15
Consideration Offline Mode Online Mode
Macros You do not have to enable macros to use the Excel Analyzer in this mode. You can also create your own custom macros to use with the Excel Analyzer.
You must enable macros to use the Excel Analyzer in this mode. Custom macros are not supported in this mode.
Connection with BI Publisher No connection after data is downloaded. You cannot upload templates directly from Excel, change parameters, or apply new templates to the data.
You can connect to the BI Publisher server from your Excel session. You can directly upload templates to the report, update the report parameters, and apply new templates from within your Excel session.
Data set Structure Data must be in <ROWSET>
<ROW>
...</ROWS>..
</ROWSET> format
It is recommended that data is in <ROWSET>
<ROW>...
</ROWS>..
</ROWSET> format.
For more information about the Analyzer for Excel, see Using the BI Publisher Analyzer for Excel, Oracle Fusion Middleware User's Guide for Oracle Business Intelligence Publisher.
Advanced Options
Enable Bursting
If this report requires bursting, select this box and then select the appropriate bursting definition from the list. When a user schedules the report, he can choose to use the bursting definition to format and deliver the report.
The bursting definition is a component of the data model. For more information, see
Adding Bursting Definitions, Oracle Fusion Middleware Data Modeling Guide for Oracle
Business Intelligence Publisher.
Report is Controlled by External Application. Users cannot run or schedule report from catalog, can view history
Setting the Caching Properties
Set the properties on the Caching tab as follows: Enable Data Caching Default: Not enabled
When this property is enabled, the data generated by the online submission of this report will be stored in cache. Subsequent requests to run this report with the same parameter selections will display the report using the data stored in the cache.
This setting enhances performance by using stored data to generate a report rather than regenerating the data from the source. The data will remain in the cache according to the time limit specified in the Cache Duration property. You can control whether the cache for the report is shared by users by setting the User Level property.
When data caching is enabled, you have the options of setting the following properties:
Caching Duration (Minutes) Default: 30 minutes
Enter the time limit for a report data set or document to remain in cache. Once the time limit has expired, the next request for the same report will generate a fresh data set.
User Level Default: Enabled
Creating or Editing a Report 2-17
cache. When enabled, this property ensures that each user can only see data that they are authorized to view.
However, user-level cache has less efficient performance. If the report data is not user sensitive, you can disable this property to enhance performance.
Document Caching Default: Enabled
Enable this property to cache the report document. With document cache enabled, when a user views the report online, the document (data plus layout) will be placed in cache. When any other user (unless User Level is enabled) uses the online viewer to view the exact same report (same layout, same output type, same parameter selections) the document will be retrieved from cache. The document will remain in cache according to the caching duration
specified. Note that scheduled reports do not use document cache.
User Can Refresh Report Data Default: Not Enabled
When this property is enabled, the user can choose to
refresh the data on demand. When the user clicks Refresh
in the report viewer, BI Publisher will generate a fresh data set for the report.
Setting the Formatting Properties
The Formatting properties tab enables you to set runtime properties at the report level. These same properties can also be set at the system level, from the Administration page. The Formatting properties tab displays both the system-level setting and the
report-level setting for each property. If different values are set at each level, the report level will take precedence.
For a full description of each property, see Setting Report Processing and Output Document Properties, page 10-1.
Configuring Font Mapping
BI Publisher's font mapping feature enables you to map base fonts in RTF or PDF templates to target fonts to be used in the published document. Font mappings can be set at the report level or the system level. When you view the report properties Font Mapping tab, any system level settings will be displayed. To change the settings for this report, edit the font mappings here.
To create a Font Mapping:
• Under RTF Templates or PDF Templates, select Add Font Mapping.
• Enter the following on the Add Font Mapping page:
• Base Font - enter the font family that will be mapped to a new font. Example: Arial
• Select the Style: Normal or Italic (Not applicable to PDF Template font
mappings)
• Select the Weight: Normal or Bold (Not applicable to PDF Template font
mappings)
• Select the Target Font Type: Type 1 or TrueType
• Enter the Target Font
If you selected TrueType, you can enter a specific numbered font in the
collection. Enter the TrueType Collection (TTC) Number of the desired font.
For a list of the predefined fonts see BI Publisher's Predefined Fonts, page 10-20.
Configuring Currency Formats
The Currency Formats tab enables you to map a number format mask to a specific currency so that your reports can display multiple currencies with their own
corresponding formatting. Currency formatting is only supported for RTF and XSL-FO templates.
Currency formats can be set at the report level or the system level. When you view the report properties Currency Formats tab, any system level settings will be displayed. To change the settings for this report, edit the currency formats here.
To apply these currency formats in your RTF template, you must use the
format-currency function. See Currency Formatting, page 4-121 for detailed procedures.
To add a currency format:
1. Click the Add icon.
2. Enter the ISO currency code, for example: USD, JPY, EUR, GBP, INR.
3. Enter the format mask to apply for this currency.
Creating or Editing a Report 2-19
where
9 represents a displayed number only if present in data G represents the group separator
D represents the decimal separator
0 represents an explicitly displayed number regardless of incoming data
See Using the Oracle Format Mask, page 4-110 for more information about these format mask components.
Creating BI Publisher Layout Templates 3-1
3
Creating BI Publisher Layout Templates
This chapter covers the following topics: • Introduction
• Launching the Layout Editor • About the Layout Editor Interface • The Page Layout Tab
• Inserting Layout Components • About Layout Grids
• About Repeating Sections • About Data Tables • About Charts • About Gauge Charts • About Pivot Tables • About Text Items • About Images • About Lists
• Setting Predefined or Custom Formulas • Saving a Layout
Introduction
Release 11g of Oracle BI Publisher introduces a new type of layout template. The BI
Publisher Layout template enables end users to:
• generate high fidelity, pixel perfect reports to PDF, RTF, Excel, PowerPoint, and static HTML
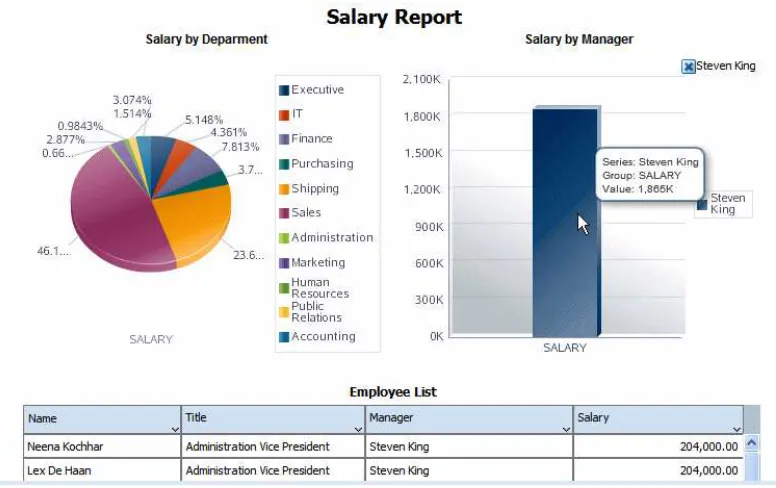
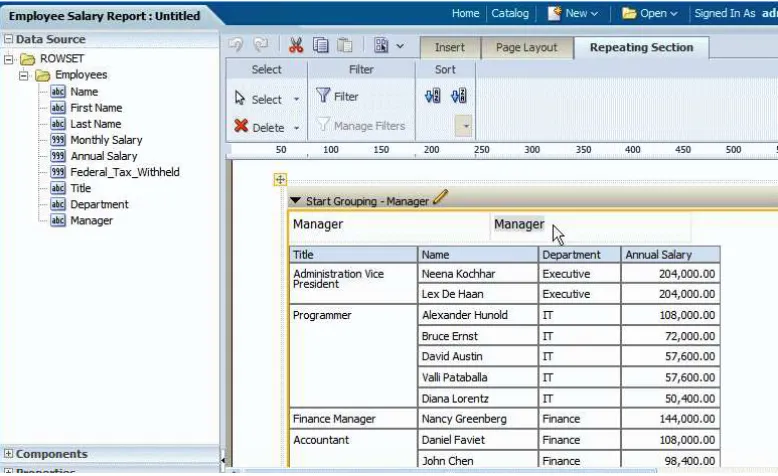
BI Publisher Layout Templates are created using the BI Publisher Layout Editor - a design tool that provides a WYSIWIG, drag and drop interface for creating pixel perfect reports in PDF, RTF, Excel, PowerPoint, and HTML. It also provides dynamic HTML output that supports lightweight interaction through a browser. This interactive output is featured in the figure below:
Notice the following features:
• Pop-up chart details – pause your cursor over chart items to display details of data.
Creating BI Publisher Layout Templates 3-3
• Scrollable tables – table data can be scrolled while maintaining display of the headers and totals.
• Table column sorting – table data can be sorted by different columns from within the viewer.
• Table column filtering – table data can be filtered by values in different columns from within the viewer.
• Automatic table totaling – table data totals are automatically added to the layout.
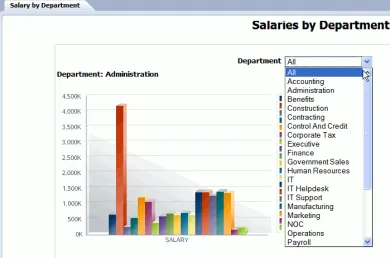
• Propagated filtering - filter other components by clicking on chart areas or by clicking on pivot table header, column, or elements
• Collapse and expand areas of the document
When to Use a BI Publisher Layout
BI Publisher layouts are best suited for reports of simple to medium complexity that do not require custom coding. Because the dynamic HTML view is only available for BI Publisher layouts, BI Publisher layouts must be used when there is a requirement to enable a report consumer to interact with the report (change sorting, apply filters, and so on).
Prerequisites and Recommendations
• To use the layout editor your account must be granted a role that includes the appropriate permissions for accessing report layout tools.
• You must attach sample data to your data model before you create a new layout. For information on adding sample data to the data model, see Testing Data Models
and Generating Sample Data, Oracle Fusion Middleware Data Modeling Guide for
Oracle Business Intelligence Publisher.
• For optimum viewing, set your display resolution to 1024 x 768 or higher.
• For enabling interactive sorting and filtering the complete data set that is passed to the layout should be limited to several thousand rows to achieve a responsive report. BI Publisher layouts have a comparable performance to RTF layouts for generating static output such as PDF or RTF documents.
Launching the Layout Editor
When Creating a New Report:
• After selecting the data model for a new report, the report editor displays the Add
Layout page.
From the Create Layout region, click a predefined template to launch the layout
editor.
When Editing a Report:
1. In the Report Editor:
From the Thumbnail view, click Add New Layout.
or
From the List view, click the Create button on the layouts table toolbar.
2. From the Create Layout region, click a predefined template to use to launch the
layout editor.
When Viewing a Report:
You can also access the Layout Editor when viewing a report. Click Actions and then
click Edit Layout. Note that the layout must have been created in the layout editor.
Selecting a Predefined Layout
Creating BI Publisher Layout Templates 3-5
The Basic and Shared Templates offer common layout structures with specific
components already added. Choosing one of the predefined layouts is optional, but can facilitate layout design. If your enterprise utilizes a common design that is not available here, you can add predefined layouts for your own use, or your Administrator can add more for all users.
Adding Shared Templates for All Users
To add predefined layout files to the shared directory for all users to access:
1. Log in with Administrator privileges and navigate to the Catalog.
2. In the Shared Folders directory, open the Components folder.
3. Locate the Boilerplates report and click Edit.
4. Click Add New Layout.
5. Design or upload the layout.
To design the layout: Click an existing boilerplate (or blank) to launch the layout
editor. Insert the components to the layout. When finished, click Save and give your
boilerplate a name. This layout will now display to all users in the Shared
To upload a layout: Click Upload to upload a predefined BI Publisher Template (.xpt file).
6. Save the report.
Any BI Publisher Templates (.xpt) added to this report will be displayed to all users as a Shared Template.
Adding Personal Predefined Layouts
To add predefined layouts that are available to your account user only:
1. Navigate to My Folders.
2. Create a new report called "Boilerplates". This report will have not have a data model.
3. Click Add New Layout.
4. Design or upload the layout.
To design the layout: Click an existing boilerplate (or blank) to launch the layout
editor. Insert the components to the layout. When finished, click Save and give your
boilerplate a name.
To upload a layout: Click Upload to upload a predefined BI Publisher Template
(.xpt file).
These layouts will be presented in the My Templates region when you create a new
layout.
About the Layout Editor Interface
Creating BI Publisher Layout Templates 3-7
The Layout Editor interface comprises the following: • The top of the Layout Editor contains two toolbars:
• The Static toolbar is always available and contains common commands such as
save and preview. See About the Static Toolbar, page 3-10.
• The Tabbed toolbar includes the Insert tab, the Page Layout tab, and a dynamic
tab that shows the most commonly used actions and commands for the selected layout component. You can collapse this toolbar to make more room to view your design area. See About the Tabbed Toolbar, page 3-11.
• The accordion pane on the left contains the following:
• Use the Data Source pane to select the data fields to drag to the layout
components.
• Use the Components pane to select layout components and drag them to the
design area. You can also use the Insert tab to insert components when this
pane is collapsed.
• Use the Properties pane to modify properties for the selected layout
component.
to allow more room to view the layout.
• The lower right region is the design area for building your layout.
About the Data Source Pane
The Data Source pane displays the structure of your data model and the data elements that are available to insert into your layout.
To insert a data element, select and drag it from the Data Source pane to the component in the layout.
The data type for each field is represented by an appropriate icon: number, date, or text. The following figure shows the data source pane. Note that the icon beside each element indicates the data type:
The JOB_TITLE element is shown as text, the SALARY element is shown as a number, and the HIRE_DATE element is shown as a date data type.
Note: When you enter dates in the Layout Editor (such as a data comparison for a filter or for conditional formatting), use one of the following XSL date or time formats: YYYY-MM-DD or
YYYY-MM-DDTHH:MM:SS.
About the Components Pane
The Components pane contains the layout components that you can insert into a report. These components include charts, pivot tables, and images. To insert a component, simply drag and drop it to the layout.
Creating BI Publisher Layout Templates 3-9
The following figure shows the Components pane:
About the Properties Pane
The Properties pane displays the properties for the selected component. The properties displayed are determined by the selected component. Some of the properties available in the Properties pane are also editable in the dynamic tab for the component.
Click a property value to edit it. The change is applied to the component when you move your cursor out of the field. Collapse or expand a property group by clicking the plus or minus signs beside the group name.
The properties available for each component are discussed in detail in the
corresponding section for that component in this chapter. Note that if a property field is blank, the default is used.
About the Static Toolbar
The Static toolbar extends on either side of the tabbed toolbar and is shown in the following figure:
Use it to perform the following functions: • Undo and redo operations.
• Cut, copy and paste items.
• Preview as Interactive, HTML, PDF, Microsoft Word (RTF), Microsoft Excel, Microsoft PowerPoint, or Microsoft PowerPoint 2007.
• Return to the previous page.
• Create a new layout.
• Open a layout.
• Save the layout.
Creating BI Publisher Layout Templates 3-11
About the Tabbed Toolbar
The Tabbed toolbar contains the following tabs:
• The Insert tab provides the components and page elements that can be placed on a
layout. See Inserting Layout Components, page 3-22.
• The Page Layout tab provides common page-level tools and commands. See About
the Page Layout Menu, page 3-12.
• The component-specific tab provides the most commonly used commands and properties for the component that is selected in the layout. For example, when you select a chart, the Chart tab displays. See the section on a specific component for details on the commands.
To set or control more properties for the selected component, open the Properties pane in the accordion pane, as described in About the Properties Pane, page 3-9.
Selecting and Deleting Layout Objects
Each of the component-specific tabs include the Select region.
• The Select tool enables you to control precisely which component on the layout has
focus. This ability is particularly helpful when working with a complex layout where components overlap. For example, to select a table, it is sometimes difficult to click the correct spot to select the table and not a column, or header cell. To avoid unnecessary clicking, use the Select tool to precisely select the Table component from the list.
About the Insert Tab
Use the Insert tab to insert report components and page elements. The following figure
shows the Insert tab:
The Components group displays the report components that you can insert into your layout. To insert a component, select and drag the item to the desired location in the design area. For more information about each component, see its corresponding section in this chapter.
The Page Elements group contains page-level elements for your report. To insert a page break, the page number, or the total page number calculation, select and drag the component to the desired position in the layout.
Note: Page elements are intended for paginated output types, such as PDF and RTF. Using them in interactive or HTML output may have unexpected results.
The Page Layout Tab
The Page Layout tab is shown in the following figure:
The Page Layout tab contains commands to set up your layout.
Paper Options
Option Description
Creating BI Publisher Layout Templates 3-13
Option Description
Paper Size Select from the following paper size options: Letter, Legal, A4, A3, Executive, B5, Com-10, Monarch DL, or C5. Note that the paper size will determine the dimensions of the layout area.
Header/Footer Options
Option Description
Page Header Click to insert a page header in your layout. By default, the page header appears on every page of a printed report, but can be configured to skip the first page.
To remove the page header, click Page Header again.
Page Footer Click to insert a page footer in your layout. By default, the page footer appears on every page of a printed report, but can be configured to skip the last page.
To remove the page footer, click Page Footer again.
Report Header Click to insert a report header to your layout. The report header appears only once at the beginning of the report.
To remove the report header, click Report Header again.
Report Footer Click to insert a report footer to your layout. The report footer appears only once at the end of the report.
To remove the report footer, click Report Footer again.
Setting Properties for Headers and Footers
The Properties pane enables you to set the following properties for headers and footers. To access the Properties pane, select the header or footer in the design region, then click Properties from the accordion pane on the left of the page.
For all report and page headers and footers:
• Height - set the height of the header region in pixels, points, centimeters, or inches
• Show in the first page - select True to show the header in the first page. Select False to suppress the header from the first page.
The following figure shows the Properties for a report header:
For footers:
• Show in the last page - select True to show the footer in the last page. Select False to suppress the footer from the last page.
View Options
Option Description
Grid Click to insert gridlines in the layout design area. The grid unit size will depend on the Display Unit selected. To remove the gridlines, click Grid again.
Ruler Click to insert a display ruler across the top of the layout design area. The ruler units will depend on the Display Unit. To remove the ruler, click Ruler again.