Intrusion Detection Systems
with Snort
◆
Managing Linux Systems with Webmin: System
Administration and Module Development
Jamie Cameron
◆
Implementing CIFS: The Common Internet File System
Christopher R. Hertel
◆
Embedded Software Development with eCos
Anthony J. Massa
◆
The Linux Development Platform: Configuring, Using,
and Maintaining a Complete Programming
Environment
Rafeeq Ur Rehman, Christopher Paul
◆
Intrusion Detection Systems with Snort:
Advanced IDS Techniques with Snort, Apache,
MySQL, PHP, and ACID
Intrusion Detection Systems
with Snort
Advanced IDS Techniques Using
Snort, Apache, MySQL, PHP, and ACID
Rafeeq Ur Rehman
Prentice Hall PTR
A CIP catalog record for this book can be obtained from the Library of Congress.
Editorial/production supervision: Mary Sudul Cover design director: Jerry Votta
Cover design: DesignSource
Manufacturing manager: Maura Zaldivar Acquisitions editor: Jill Harry
Editorial assistant: Noreen Regina Marketing manager: Dan DePasquale
© 2003 Pearson Education, Inc. Publishing as Prentice Hall PTR Upper Saddle River, New Jersey 07458
This material may be distributed only subject to the terms and conditions set forth in the Open Publication License, v1.0 or later (the latest version is presently available at
<http://www.opencontent.org/openpub/>).
Prentice Hall books are widely used by corporations and government agencies for training, marketing, and resale.
The publisher offers discounts on this book when ordered in bulk quantities. For more information, contact Corporate Sales Department, Phone: 800-382-3419; FAX: 201-236-7141;
E-mail: [email protected]
Or write: Prentice Hall PTR, Corporate Sales Dept., One Lake Street, Upper Saddle River, NJ 07458.
Other product or company names mentioned herein are the trademarks or registered trademarks of their respective owners.
Printed in the United States of America 1st Printing
ISBN 0-13-140733-3
Pearson Education LTD.
Pearson Education Australia PTY, Limited Pearson Education Singapore, Pte. Ltd. Pearson Education North Asia Ltd. Pearson Education Canada, Ltd.
Pearson Educación de Mexico, S.A. de C.V. Pearson Education — Japan
vii
C
O N T E N T SChapter 1 Introduction to Intrusion Detection and Snort
1
1.1
What is Intrusion Detection?
5
1.1.1 Some Definitions 6
1.1.2 Where IDS Should be Placed in Network Topology 8
1.1.3 Honey Pots 9
1.1.4 Security Zones and Levels of Trust 10
1.2
IDS Policy
10
1.3
Components of Snort
12
1.3.1 Packet Decoder 13
1.3.2 Preprocessors 13
1.3.3 The Detection Engine 14
1.3.4 Logging and Alerting System 15
1.3.5 Output Modules 15
1.4
Dealing with Switches
16
1.5
TCP Stream Follow Up
18
1.6
Supported Platforms
18
1.7
How to Protect IDS Itself
19
1.7.1 Snort on Stealth Interface 20
1.7.2 Snort with no IP Address Interface 20
Chapter 2 Installing Snort and Getting Started
23
2.1
Snort Installation Scenarios
24
2.1.1 Test Installation 24
2.1.2 Single Sensor Production IDS 24
2.1.3 Single Sensor with Network Management System Integration 25
2.1.4 Single Sensor with Database and Web Interface 25
2.1.5 Multiple Snort Sensors with Centralized Database 26
2.2
Installing Snort
28
2.2.1 Installing Snort from the RPM Package 28
2.2.2 Installing Snort from Source Code 29
2.2.3 Errors While Starting Snort 43
2.2.4 Testing Snort 43
2.2.5 Running Snort on a Non-Default Interface 51
2.2.6 Automatic Startup and Shutdown 52
2.3
Running Snort on Multiple Network Interfaces
54
2.4
Snort Command Line Options
55
2.5
Step-By-Step Procedure to Compile and Install Snort
From Source Code
56
2.6
Location of Snort Files
56
2.7
Snort Modes
58
2.7.1 Network Sniffer Mode 58
2.7.2 Network Intrusion Detection Mode 65
2.8
Snort Alert Modes
66
2.8.1 Fast Mode 67
2.8.2 Full Mode 68
2.8.3 UNIX Socket Mode 68
2.8.4 No Alert Mode 69
2.8.5 Sending Alerts to Syslog 69
2.8.6 Sending Alerts to SNMP 69
2.8.7 Sending Alerts to Windows 70
2.9
Running Snort in Stealth Mode 71
2.10
References 73
Chapter 3 Working with Snort Rules
75
3.1
TCP/IP Network Layers
76
3.2
The First Bad Rule
77
3.3
CIDR 78
Contents ix
3.5
Rule Headers
81
3.5.1 Rule Actions 81
3.5.2 Protocols 83
3.5.3 Address 84
3.5.4 Port Number 86
3.5.5 Direction 88
3.6
Rule Options
88
3.6.1 The ack Keyword 89
3.6.2 The classtype Keyword 89
3.6.3 The content Keyword 93
3.6.4 The offset Keyword 94
3.6.5 The depth Keyword 95
3.6.6 The content-list Keyword 95
3.6.7 The dsize Keyword 95
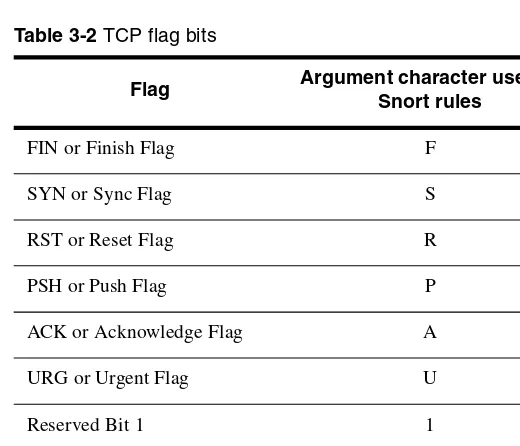
3.6.8 The flags Keyword 96
3.6.9 The fragbits Keyword 97
3.6.10 The icmp_id Keyword 98
3.6.11 The icmp_seq Keyword 98
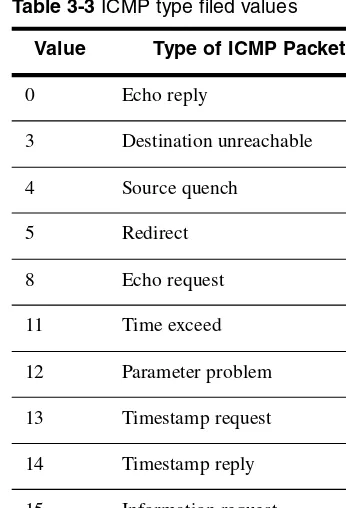
3.6.12 The itype Keyword 98
3.6.13 The icode Keyword 99
3.6.14 The id Keyword 100
3.6.15 The ipopts Keyword 100
3.6.16 The ip_proto Keyword 101
3.6.17 The logto Keyword 102
3.6.18 The msg Keyword 103
3.6.19 The nocase Keyword 103
3.6.20 The priority Keyword 103
3.6.21 The react Keyword 104
3.6.22 The reference Keyword 104
3.6.23 The resp Keyword 105
3.6.24 The rev Keyword 107
3.6.25 The rpc Keyword 107
3.6.26 The sameip Keyword 108
3.6.27 The seq Keyword 108
3.6.28 The flow Keyword 108
3.6.29 The session Keyword 109
3.6.30 The sid Keyword 110
3.6.31 The tag Keyword 110
3.6.32 The tos Keyword 111
3.6.34 The uricontent Keyword 111
3.7
The Snort Configuration File
112
3.7.1 Using Variables in Rules 112
3.7.2 The config Directives 114
3.7.3 Preprocessor Configuration 116
3.7.4 Output Module Configuration 116
3.7.5 Defining New Action Types 117
3.7.6 Rules Configuration 117
3.7.7 Include Files 117
3.7.8 Sample snort.conf File 118
3.8
Order of Rules Based upon Action
119
3.9
Automatically Updating Snort Rules
120
3.9.1 The Simple Method 120
3.9.2 The Sophisticated and Complex Method 122
3.10
Default Snort Rules and Classes
125
3.10.1 The local.rules File 127
3.11
Sample Default Rules
127
3.11.1 Checking su Attempts from a Telnet Session 127
3.11.2 Checking for Incorrect Login on Telnet Sessions 128
3.12
Writing Good Rules
128
3.13
References 129
Chapter 4 Plugins, Preprocessors and Output Modules
131
4.1
Preprocessors 132
4.1.1 HTTP Decode 133
4.1.2 Port Scanning 134
4.1.3 The frag2 Module 135
4.1.4 The stream4 Module 136
4.1.5 The spade Module 137
4.1.6 ARP Spoofing 138
4.2
Output Modules
139
4.2.1 The alert_syslog Output Module 140
4.2.1 The alert_full Output Module 143
4.2.1 The alert_fast Output Module 143
4.2.1 The alert_smb Module 143
4.2.1 The log_tcpdump Output Module 144
4.2.1 The XML Output Module 146
4.2.1 Logging to Databases 150
Contents xi
4.2.1 Unified Logging Output Module 153
4.2.1 SNMP Traps Output Module 154
4.2.1 Log Null Output Module 155
4.3
Using BPF Fileters
155
4.4
References 156
Chapter 5 Using Snort with MySQL
157
5.1
Making Snort Work with MySQL
160
5.1.1 Step 1: Snort Compilations with MySQL Support 161
5.1.1 Step 2: Install MySQL 161
5.1.1 Step 3: Creating Snort Database in MySQL 161
5.1.1 Step 4: Creating MySQL User and Granting
Permissions to User and Setting Password 163
5.1.1 Step 5: Creating Tables in the Snort Database 164
5.1.1 Step 6: Modify snort.conf Configuration File 170
5.1.1 Step 7: Starting Snort with Database Support 171
5.1.1 Step 8: Logging to Database 172
5.2
Secure Logging to Remote Databases Securely
Using Stunnel
174
5.3
Snort Database Maintenance
175
5.3.1 Archiving the Database 175
5.3.2 Using Sledge Hammer: Drop the Database 176
5.4
References 176
Chapter 6 Using ACID and SnortSnarf with Snort
177
6.1
What is ACID?
178
6.2
Installation and Configuration
179
6.3
Using ACID
184
6.3.1 ACID Main Page 188
6.3.2 Listing Protocol Data 189
6.3.3 Alert Details 191
6.3.4 Searching 192
6.3.5 Searching whois Databases 197
6.3.6 Generating Graphs 198
6.3.7 Archiving Snort Data 198
6.3.8 ACID Tables 201
6.4
SnortSnarf 202
6.5
Barnyard 207
Chapter 7 Miscellaneous Tools
209
7.1
SnortSam 210
7.2
IDS Policy Manager
212
7.3
Securing the ACID Web Console
217
7.3.1 Using a Private Network 217
7.3.2 Blocking Access to the Web Server on the Firewall 218
7.3.3 Using iptables 218
7.4
Easy IDS
218
7.5
References 219
Appendix A Introduction to tcpdump
221
Appendix B Getting Started with MySQL
223
Appendix C Packet Header Formats
237
Appendix D Glossary 243
Appendix E SNML DTD
245
1
C
H A P T E R1
Introduction to
Intrusion Detection
and Snort
ecurity is a big issue for all networks in today’s enterprise environ-ment. Hackers and intruders have made many successful attempts to bring down high-profile company networks and web services. Many methods have been developed to secure the network infrastructure and communication over the Internet, among them the use of firewalls, encryption, and virtual private networks. Intrusion detection is a relatively new addition to such techniques. Intrusion detection methods started appearing in the last few years. Using intrusion detection methods, you can collect and use information from known types of attacks and find out if someone is trying to attack your network or particular hosts. The infor-mation collected this way can be used to harden your network security, as well as for legal purposes. Both commercial and open source products are now available for this purpose. Many vulnerability assessment tools are also available in the market that can be used to assess different types of security holes present in your network. A comprehensive security system consists of multiple tools, including:
(http://www.netscreen.com). The most popular Open Source firewall is the Netfilter/Iptables (http://www.netfilter.org)-based firewall.
• Intrusion detection systems (IDS) that are used to find out if someone has gotten into or is trying to get into your network. The most popular IDS is Snort, which is available at http://www.snort.org.
• Vulnerability assessment tools that are used to find and plug security holes present in your network. Information collected from vulnerability assessment tools is used to set rules on firewalls so that these security holes are safeguarded from malicious Internet users. There are many vulnerability assessment tools including Nmap (http://www.nmap.org) and Nessus (http://www.nessus.org).
These tools can work together and exchange information with each other. Some products provide complete systems consisting of all of these products bundled together. Snort is an open source Network Intrusion Detection System (NIDS) which is available free of cost. NIDS is the type of Intrusion Detection System (IDS) that is used for scanning data flowing on the network. There are also host-based intrusion detection systems, which are installed on a particular host and detect attacks targeted to that host only. Although all intrusion detection methods are still new, Snort is ranked among the top quality systems available today.
The book starts with an introduction to intrusion detection and related terminology. You will learn installation and management of Snort as well as other products that work with Snort. These products include MySQL database (http://www.mysql.org) and Analy-sis Control for Intrusion Database (ACID) (http://www.cert.org/kb/acid). Snort has the capability to log data collected (such as alerts and other log messages) to a database. MySQL is used as the database engine where all of this data is stored. Using Apache web server (http://www.apache.org) and ACID, you can analyze this data. A combina-tion of Snort, Apache, MySQL, and ACID makes it possible to log the intrusion detec-tion data into a database and then view and analyze it later, using a web interface.
This book is organized in such a way that the reader will be able to build a com-plete intrusion detection system by going through the following chapters in a step-by-step manner. All step-by-steps of installing and integrating different tools are explained in the book as outlined below.
Chapter 2 provides basic information about how to build and install Snort itself. Using the basic installation and default rules, you will be able to get a working IDS. You will be able to create log files that show intrusion activity.
3
is very important, as writing good rules is the key to building a detection system. The chapter also explains different rules that are part of Snort distribution.
Chapter 4 is about input and output plug-ins. Plug-ins are parts of the software that are compiled with Snort and are used to modify input or output of the Snort detec-tion engine. Input plug-ins prepare captured data packets before the actual detecdetec-tion process is applied on these packets. Output plug-ins format output to be used for a par-ticular purpose. For example, an output plug-in can convert the detection data to a Sim-ple Network Management Protocol (SNMP) trap. Another output plug-in is used to log Snort output data into databases. This chapter provides a comprehensive overview of how these plug-ins are configured and used.
Chapter 5 provides information about using MySQL database with Snort. MySQL plug-in enables Snort to log data into the database to be used in the analysis later on. In this chapter you will find information about how to create a database in MySQL, con-figure a database plug-in, and log data to the database.
Chapter 6 describes ACID, how to use it to get data from the database you config-ured in Chapter 5, and how to display it using Apache web server. ACID is a very important tool that provides rich data analysis capabilities. You can find frequency of attacks, classify different attacks, view the source of these attacks and so on. ACID uses PHP (Pretty Home Page) scripting language, graphic display library (GD library) and PHPLOT, which is a tool to draw graphs. A combination of all of these results in web pages that display, analyze and graph data stored in the MySQL database.
Chapter 7 is devoted to information about some other useful tools that can be used with Snort.
The system that you will build after going through this book is displayed in Figure 1-1 with different components.
As you can see, data is captured and analyzed by Snort. Snort then stores this data in the MySQL database using the database output plug-in. Apache web server takes help from ACID, PHP, GD library and PHPLOT package to display this data in a browser window when a user connects to Apache. A user can then make different types of queries on the forms displayed in the web pages to analyze, archive, graph and delete data.
In essence, you can build a single computer with Snort, MySQL database, Apache, PHP, ACID, GD library and PHPLOT. A more realistic picture of the system that you will be able to build after reading this book is shown in Figure 1-2.
Figure 1-1 Block diagram of a complete network intrusion detection system consisting of Snort, MySQL, Apache, ACID, PHP, GD Library and PHPLOT.
What is Intrusion Detection? 5
1.1 What is Intrusion Detection?
Intrusion detection is a set of techniques and methods that are used to detect suspi-cious activity both at the network and host level. Intrusion detection systems fall into two basic categories: signature-based intrusion detection systems and anomaly detec-tion systems. Intruders have signatures, like computer viruses, that can be detected using software. You try to find data packets that contain any known intrusion-related signatures or anomalies related to Internet protocols. Based upon a set of signatures and rules, the detection system is able to find and log suspicious activity and generate alerts. Anomaly-based intrusion detection usually depends on packet anomalies present in protocol header parts. In some cases these methods produce better results compared to signature-based IDS. Usually an intrusion detection system captures data from the network and applies its rules to that data or detects anomalies in it. Snort is primarily a rule-based IDS, however input plug-ins are present to detect anomalies in protocol headers.
Snort uses rules stored in text files that can be modified by a text editor. Rules are grouped in categories. Rules belonging to each category are stored in separate files. These files are then included in a main configuration file called snort.conf. Snort reads these rules at the start-up time and builds internal data structures or chains to apply these rules to captured data. Finding signatures and using them in rules is a tricky job, since the more rules you use, the more processing power is required to process captured data in real time. It is important to implement as many signatures as you can using as few rules as possible. Snort comes with a rich set of pre-defined rules to detect intrusion activity and you are free to add your own rules at will. You can also remove some of the built-in rules to avoid false alarms.
1.1.1 Some Definitions
Before we go into details of intrusion detection and Snort, you need to learn some definitions related to security. These definitions will be used in this book repeatedly in the coming chapters. A basic understanding of these terms is necessary to digest other complicated security concepts.
1.1.1.1 IDS
Intrusion Detection System or IDS is software, hardware or combination of both used to detect intruder activity. Snort is an open source IDS available to the general public. An IDS may have different capabilities depending upon how complex and sophisticated the components are. IDS appliances that are a combination of hardware and software are available from many companies. As mentioned earlier, an IDS may use signatures, anomaly-based techniques or both.
1.1.1.2 Network IDS or NIDS
NIDS are intrusion detection systems that capture data packets traveling on the network media (cables, wireless) and match them to a database of signatures. Depend-ing upon whether a packet is matched with an intruder signature, an alert is generated or the packet is logged to a file or database. One major use of Snort is as a NIDS.
1.1.1.3 Host IDS or HIDS
What is Intrusion Detection? 7
1.1.1.4 Signatures
Signature is the pattern that you look for inside a data packet. A signature is used to detect one or multiple types of attacks. For example, the presence of “scripts/iisad-min” in a packet going to your web server may indicate an intruder activity.
Signatures may be present in different parts of a data packet depending upon the nature of the attack. For example, you can find signatures in the IP header, transport layer header (TCP or UDP header) and/or application layer header or payload. You will learn more about signatures later in this book.
Usually IDS depends upon signatures to find out about intruder activity. Some vendor-specific IDS need updates from the vendor to add new signatures when a new type of attack is discovered. In other IDS, like Snort, you can update signatures your-self.
1.1.1.5 Alerts
Alerts are any sort of user notification of an intruder activity. When an IDS detects an intruder, it has to inform security administrator about this using alerts. Alerts may be in the form of pop-up windows, logging to a console, sending e-mail and so on. Alerts are also stored in log files or databases where they can be viewed later on by security experts. You will find detailed information about alerts later in this book.
Snort can generate alerts in many forms and are controlled by output plug-ins. Snort can also send the same alert to multiple destinations. For example, it is possible to log alerts into a database and generate SNMP traps simultaneously. Some plug-ins can also modify firewall configuration so that offending hosts are blocked at the firewall or router level.
1.1.1.6 Logs
The log messages are usually saved in file. By default Snort saves these messages under /var/log/snort directory. However, the location of log messages can be changed using the command line switch when starting Snort. Log messages can be saved either in text or binary format. The binary files can be viewed later on using Snort or tcpdump program. A new tool called Barnyard is also available now to analyze binary log files generated by Snort. Logging in binary format is faster because it saves some formatting overhead. In high-speed Snort implementations, logging in binary mode is necessary.
1.1.1.7 False Alarms
and tune different default rules. In some cases you may need to disable some of the rules to avoid false alarms.
1.1.1.8 Sensor
The machine on which an intrusion detection system is running is also called the sensor in the literature because it is used to “sense” the network. Later in this book if the word sensor is used, it refers to a computer or other device where Snort is running.
1.1.2 Where IDS Should be Placed in Network Topology
Depending upon your network topology, you may want to position intrusion detection systems at one or more places. It also depends upon what type of intrusion activities you want to detect: internal, external or both. For example, if you want to detect only external intrusion activities, and you have only one router connecting to the Internet, the best place for an intrusion detection system may be just inside the router or a firewall. If you have multiple paths to the Internet, you may want to place one IDS box at every entry point. However if you want to detect internal threats as well, you may want to place a box in every network segment.
In many cases you don’t need to have intrusion detection activity in all network segments and you may want to limit it only to sensitive network areas. Note that more intrusion detection systems mean more work and more maintenance costs. Your deci-sion really depends upon your security policy, which defines what you really want to protect from hackers. Figure 1-4 shows typical locations where you can place an intru-sion detection system.
What is Intrusion Detection? 9
As you can see from Figure 1-4, typically you should place an IDS behind each of your firewalls and routers. In case your network contains a demilitarized zone (DMZ), an IDS may be placed in that zone as well. However alert generation policy should not be as strict in a DMZ compared to private parts of the network.
1.1.3 Honey Pots
Honey pots are systems used to lure hackers by exposing known vulnerabilities deliberately. Once a hacker finds a honey pot, it is more likely that the hacker will stick around for some time. During this time you can log hacker activities to find out his/her actions and techniques. Once you know these techniques, you can use this information later on to harden security on your actual servers.
There are different ways to build and place honey pots. The honey pot should have common services running on it. These common services include Telnet server (port 23), Hyper Text Transfer Protocol (HTTP) server (port 80), File Transfer Protocol (FTP) server (port 21) and so on. You should place the honey pot somewhere close to your production server so that the hackers can easily take it for a real server. For example, if your production servers have Internet Protocol (IP) addresses 192.168.10.21 and 192.168.10.23, you can assign an IP address of 192.168.10.22 to the honey pot. You can also configure your firewall and/or router to redirect traffic on some ports to a honey pot where the intruder thinks that he/she is connecting to a real server. You should be care-ful in creating an alert mechanism so that when your honey pot is compromised, you are notified immediately. It is a good idea to keep log files on some other machine so that when the honey pot is compromised, the hacker does not have the ability to delete these files.
So when should you install a honey pot? The answer depends on different criteria, including the following:
• You should create a honey pot if your organization has enough resources to track down hackers. These resources include both hardware and personnel. If you don’t have these resources, there is no need to install a honey pot. After all, there is no need to have data if you can’t use it.
• A honey pot is useful only if you want to use the information gathered in some way.
Ideally a honey pot should look like a real system. You should create some fake data files, user accounts and so on to ensure a hacker that this is a real system. This will tempt the hacker to remain on the honey pot for a longer time and you will be able to record more activity.
To have more information and get a closer look at honey pots, go to the Honey Pot Project web site http://project.honeynet.org/ where you will find interesting material. Also go to the Honeyd web site at http://www.citi.umich.edu/u/provos/honeyd/ to find out information about this open source honey pot. Some other places where you can find more information are:
• South Florida Honeynet Project at http://www.sfhn.net
• Different HOWTOs at http://www.sfhn.net/whites/howtos.html
1.1.4 Security Zones and Levels of Trust
Some time ago people divided networks into two broad areas, secure area and unsecure area. Sometimes this division also meant a network is inside a firewall or a router and outside your router. Now typical networks are divided into many different areas and each area may have a different level of security policy and level of trust. For example, a company’s finance department may have a very high security level and may allow only a few services to operate in that area. No Internet service may be available from the finance department. However a DMZ or de-militarized zone part of your net-work may be open to the Internet world and may have a very different level of trust.
Depending upon the level of trust and your security policy, you should also have different policies and rules for intruder detection in different areas of your network. Network segments with different security requirements and trust levels are kept physi-cally separate from each other. You can install one intrusion detection system in each zone with different types of rules to detect suspicious network activity. As an example, if your finance department has no web server, any traffic going to port 80 in the finance department segment may come under scrutiny for intruder activity. The same is not true in the DMZ zone where you are running a company web server accessible to everyone.
1.2 IDS Policy
IDS Policy 11
• Who will monitor the IDS? Depending on the IDS, you may have alerting mechanisms that provide information about intruder activity. These alerting systems may be in the form of simple text files, or they may be more complicated, perhaps integrated to centralized network management systems like HP OpenView or MySQL database. Someone is needed to monitor the intruder activity and the policy must define the responsible person(s). The intruder activity may also be monitored in real time using pop-up windows or web interfaces. In this case operators must have knowledge of alerts and their meaning in terms of severity levels.
• Who will administer the IDS, rotate logs and so on? As with all systems, you need to establish routine maintenance of the IDS.
• Who will handle incidents and how? If there is no incident handling, there is no point in installing an IDS. Depending upon the severity of the incident, you may need to get some government agencies involved.
• What will be the escalation process (level 1, level 2 and so on)? The escalation process is basically an incident response strategy. The policy should clearly describe which incidents should be escalated to higher management.
• Reporting. Reports may be generated showing what happened during the last day, week or month.
• Signature updates. Hackers are continuously creating new types of attacks. These attacks are detected by the IDS if it knows about the attack in the form of signatures. Attack signatures are used in Snort rules to detect attacks. Because of the continuously changing nature of attacks, you must update signatures and rules on your IDS. You can update signatures directly from the Snort web site on a periodic basis or on your own when a new threat is discovered.
• Documentation is required for every project. The IDS policy should describe what type of documentation will be done when attacks are detected. The documentation may include a simple log or record of complete intruder activity. You may also need to build some forms to record data. Reports are also part of regular documentation.
1.3 Components of Snort
Snort is logically divided into multiple components. These components work together to detect particular attacks and to generate output in a required format from the detec-tion system. A Snort-based IDS consists of the following major components:
• Packet Decoder • Preprocessors • Detection Engine
• Logging and Alerting System • Output Modules
Figure 1-5 shows how these components are arranged. Any data packet coming from the Internet enters the packet decoder. On its way towards the output modules, it is either dropped, logged or an alert is generated.
Components of Snort 13
A brief introduction to these components is presented in this section. As you go through the book and create some rules, you will become more familiar with these com-ponents and how they interact with each other.
1.3.1 Packet Decoder
The packet decoder takes packets from different types of network interfaces and prepares the packets to be preprocessed or to be sent to the detection engine. The inter-faces may be Ethernet, SLIP, PPP and so on.
1.3.2 Preprocessors
Preprocessors are components or plug-ins that can be used with Snort to arrange or modify data packets before the detection engine does some operation to find out if the packet is being used by an intruder. Some preprocessors also perform detection by finding anomalies in packet headers and generating alerts. Preprocessors are very important for any IDS to prepare data packets to be analyzed against rules in the detec-tion engine. Hackers use different techniques to fool an IDS in different ways. For example, you may have created a rule to find a signature “scripts/iisadmin” in HTTP packets. If you are matching this string exactly, you can easily be fooled by a hacker who makes slight modifications to this string. For example:
• “scripts/./iisadmin”
• “scripts/examples/../iisadmin” • “scripts\iisadmin”
• “scripts/.\iisadmin”
To complicate the situation, hackers can also insert in the web Uniform Resource Identifier (URI) hexadecimal characters or Unicode characters which are perfectly legal as far as the web server is concerned. Note that the web servers usually understand all of these strings and are able to preprocess them to extract the intended string “scripts/ iisadmin”. However if the IDS is looking for an exact match, it is not able to detect this attack. A preprocessor can rearrange the string so that it is detectable by the IDS.
receiving systems are capable of reassembling these smaller units again to form the original data packet. On IDS, before you can apply any rules or try to find a signature, you have to reassemble the packet. For example, half of the signature may be present in one segment and the other half in another segment. To detect the signature correctly you have to combine all packet segments. Hackers use fragmentation to defeat intrusion detection systems.
The preprocessors are used to safeguard against these attacks. Preprocessors in Snort can defragment packets, decode HTTP URI, re-assemble TCP streams and so on. These functions are a very important part of the intrusion detection system.
1.3.3 The Detection Engine
The detection engine is the most important part of Snort. Its responsibility is to detect if any intrusion activity exists in a packet. The detection engine employs Snort rules for this purpose. The rules are read into internal data structures or chains where they are matched against all packets. If a packet matches any rule, appropriate action is taken; otherwise the packet is dropped. Appropriate actions may be logging the packet or generating alerts.
The detection engine is the time-critical part of Snort. Depending upon how pow-erful your machine is and how many rules you have defined, it may take different amounts of time to respond to different packets. If traffic on your network is too high when Snort is working in NIDS mode, you may drop some packets and may not get a true real-time response. The load on the detection engine depends upon the following factors:
• Number of rules
• Power of the machine on which Snort is running • Speed of internal bus used in the Snort machine • Load on the network
When designing a Network Intrusion Detection System, you should keep all of these factors in mind.
Note that the detection system can dissect a packet and apply rules on different parts of the packet. These parts may be:
• The IP header of the packet.
Components of Snort 15
• The application layer level header. Application layer headers include, but are not limited to, DNS header, FTP header, SNMP header, and SMTP header. You may have to use some indirect methods for application layer headers, like offset of data to be looked for.
• Packet payload. This means that you can create a rule that is used by the detection engine to find a string inside the data that is present inside the packet.
The detection engine works in different ways for different versions of Snort. In all 1.x versions of Snort, the detection engine stops further processing of a packet when a rule is matched. Depending upon the rule, the detection engine takes appropriate action by logging the packet or generating an alert. This means that if a packet matches criteria defined in multiple rules, only the first rule is applied to the packet without looking for other matches. This is fine except for one problem. A low priority rule generates a low priority alert, even if a high priority rule meriting a high priority alert is located later in the rule chain. This problem is rectified in Snort version 2 where all rules are matched against a packet before generating an alert. After matching all rules, the highest priority rule is selected to generate the alert.
The detection engine in Snort version 2.0 is completely rewritten so that it is a lot faster compared to detection in earlier versions of Snort. While Snort 2.0 is still not in release at the time of writing this book, earlier analysis shows that the new detection engine may be up to eighteen times faster.
1.3.4 Logging and Alerting System
Depending upon what the detection engine finds inside a packet, the packet may be used to log the activity or generate an alert. Logs are kept in simple text files, tcp-dump-style files or some other form. All of the log files are stored under /var/log/ snort folder by default. You can use –l command line options to modify the location of generating logs and alerts. Many command line options discussed in the next chapter can modify the type and detail of information that is logged by the logging and alerting system.
1.3.5 Output Modules
• Simply logging to /var/log/snort/alerts file or some other file • Sending SNMP traps
• Sending messages to syslog facility
• Logging to a database like MySQL or Oracle. You will learn more about using MySQL later in this book
• Generating eXtensible Markup Language (XML) output • Modifying configuration on routers and firewalls.
• Sending Server Message Block (SMB) messages to Microsoft Windows-based machines
Other tools can also be used to send alerts in other formats such as e-mail mes-sages or viewing alerts using a web interface. You will learn more about these in later chapters. Table 1-1 summarizes different components of an IDS.
1.4 Dealing with Switches
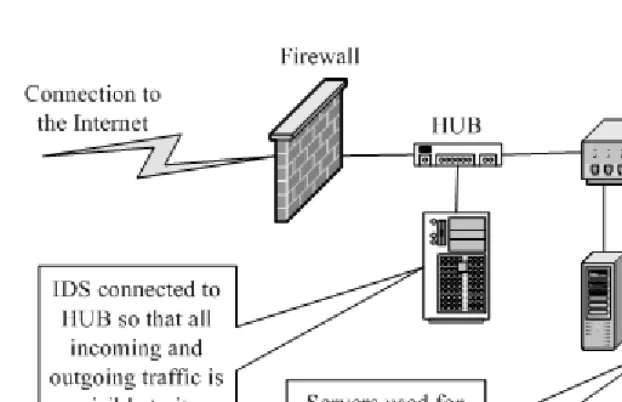
Depending upon the type of switches used, you can use Snort on a switch port. Some switches, like Cisco, allow you to replicate all ports traffic on one port where you can attach the Snort machine. These ports are usually referred to as spanning ports. The best place to install Snort is right behind the firewall or router so that all of the Internet traf-fic is visible to Snort before it enters any switch or hub. As an example, if you have a firewall with a T1 connection to the Internet and a switch is used on the inside, the typ-ical connection scheme will be as shown in Figure 1-6.
Table 1-1 Components of an IDS
Name Description
Packet Decoder Prepares packets for processing.
Preprocessors or Input Plugins Used to normalize protocol headers, detect anomalies, packet re-assembly and TCP stream re-re-assembly.
Detection Engine Applies rules to packets. Logging and Alerting System Generates alert and log messages.
Dealing with Switches 17
If the switch you are using has a spanning port, you can connect the IDS machine to the spanning port as shown in Figure 1-7. All network traffic, including internal data flowing among company servers and the Internet data, will be visible to the IDS.
You can also connect the IDS to a small HUB or a Network TAP right behind the firewall, i.e., between firewall and the switch. In this case all incoming and outgoing traffic is visible to the IDS. The scheme is shown in Figure 1-8.
Figure 1-6 A typical connection scheme with one firewall and switched network.
Note that when the IDS is connected as shown in Figure 1-8, data flowing among the company servers is not visible to the IDS. The IDS can see only that data which is coming from or going to the Internet. This is useful if you expect attacks from outside and the internal network is a trusted one.
1.5 TCP Stream Follow Up
A new preprocessor named Stream4 has been added to Snort. This preprocessor is capa-ble of dealing with thousands of simultaneous streams and its configuration will be dis-cussed in Chapter 4. It allows TCP stream reassembly and stateful inspection of TCP packets. This means that you can assemble packets in a particular TCP session to find anomalies and attacks that use multiple TCP packets. You can also look for packets coming to and/or originating from a particular server port.
1.6 Supported Platforms
Snort is supported on a number of hardware platforms and operating systems. Currently Snort is available for the following operating systems:
• Linux • OpenBSD
How to Protect IDS Itself 19
• FreeBSD • NetBSD
• Solaris (both Sparc and i386) • HP-UX
• AIX • IRIX • MacOS • Windows
For a current list of supported platforms, refer to the Snort home page at http:// www.snort.org.
1.7 How to Protect IDS Itself
One major issue is how to protect the system on which your intrusion detection soft-ware is running. If security of the IDS is compromised, you may start getting false alarms or no alarms at all. The intruder may disable IDS before actually performing any attack. There are different ways to protect your system, starting from very general rec-ommendations to some sophisticated methods. Some of these are mentioned below.
• The first thing that you can do is not to run any service on your IDS sensor itself. Network servers are the most common method of exploiting a system. • New threats are discovered and patches are released by vendors. This is almost
a continuous and non-stop process. The platform on which you are running IDS should be patched with the latest releases from your vendor. For example, if Snort is running on a Microsoft Windows machine, you should have all the latest security patches from Microsoft installed.
• Configure the IDS machine so that it does not respond to ping (ICMP Echo-type) packets.
• If you are running Snort on a Linux machine, use netfilter/iptable to block any unwanted data. Snort will still be able to see all of the data.
• You should use IDS only for the purpose of intrusion detection. It should not be used for other activities and user accounts should not be created except those that are absolutely necessary.
1.7.1 Snort on Stealth Interface
You can run Snort on a stealth interface which only listens to the incoming traffic but does not send any data packets out. A special cable is used on the stealth interface. On the host where Snort is running, you have to short pins 1 and 2. Pins 3 and 6 are con-nected to same pins on the other side. Please see Snort FAQ at http://www.snort.org/ docs/faq.html for more information on this arrangement.
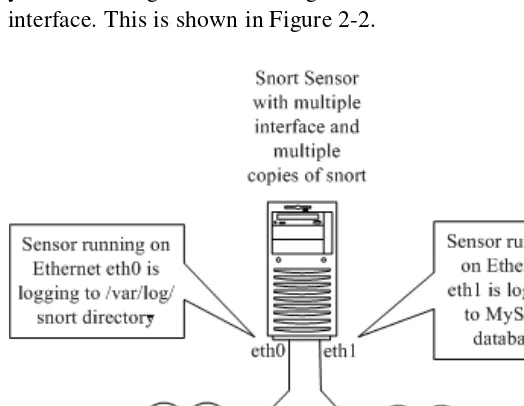
1.7.2 Snort with no IP Address Interface
You can also use Snort on an interface where no IP address is assigned. For exam-ple, on a Linux machine, you can bring up interface eth0 using command “ifconfig eth0 up” without assigning an actual IP address. The advantage is that when the Snort host doesn’t have an IP address itself, nobody can access it. You can configure an IP address on eth1 that can be used to access the sensor itself. This is shown in Figure 1-9. On Microsoft Windows systems, you can use an interface without binding TCP/IP to the interface, in which case no IP address will be assigned to the interface. Don’t for-get to disable other protocols and services on the interface as well. In some cases it has been noted that winpcap (library used on Microsoft Windows machines to capture packets) does not work well when no IP address is assigned on the interface. In such a case, you can use the following method.
References 21
• Enable TCP/IP on the network interface that you want to use in the stealth mode. Disable everything other than TCP/IP.
• Enable DHCP client. • Disable DHCP service.
This will cause no address to be assigned to the interface while the interface is still bound to TCP/IP networking.
1.8 References
1.Intrusion detection FAQ at http://www.sans.org/newlook/resources/IDFAQ/ ID_FAQ.htm
2.Honey Pot Project at http://project.honeynet.org/ 3.Snort FAQ at http://www.snort.org/docs/faq.html
4.Honeyd Honey Pot at http://www.citi.umich.edu/u/provos/honeyd/ 5.Winpcap at http://winpcap.polito.it/
6.Cisco systems at http://www.cisco.com
7.Checkpoint web site at http://www.checkpoint.com 8.Netscreen at http://www.netscreen.com
9.Netfilter at http://www.netfilter.org 10.Snort at http://www.snort.org
11.The Nmap tool at http://www.nmap.org 12.Nessus at http://www.nessus.org
13.MySQL database at http://www.mysql.org 14.ACID at http://www.cert.org/kb/acid
23
C
H A P T E R2
Installing Snort and
Getting Started
Snort installation may consist of only a working Snort daemon or of a complete Snort system with many other tools. If you install only Snort, you can capture intrusion data in text or binary files and then view these files later on with the help of a text editor or some other tool like Barnyard, which will be explained later in this book. With this simple installation you can also send alert data to an SNMP manager, like HP OpenView or OpenNMS, in the form of SNMP traps. Alert data can also be sent to a Microsoft Windows machine in the form of SMB pop-up win-dows. However, if you install other tools, you can perform more sophisti-cated operations on the intrusion data, such as logging Snort data to a database and analyzing it through a web interface. Using the web inter-face, you can view all alerts generated by Snort. The analysis tools allow you to make sense of the captured data instead of spending lots of time with Snort log files.
Other tools that can be used with Snort are listed below. Each of them has a specific task. A comprehensive working Snort system utilizes these tools to provide a web-based user interface with a backend database.
• MySQL is used with Snort to log alert data. Other databases like Ora-cle can also be used but MySQL is the most popular database with Snort. In fact, any ODBC-compliant database can be used with Snort.
• Apache acts as a web server.
• PHP is used as an interface between the web server and MySQL data-base.
• ACID is a PHP package that is used to view and analyze Snort data using a web browser.
• GD library is used by ACID to create graphs.
• PHPLOT is used to present data in graphic format on the web pages used in ACID. GD library must be working correctly to use PHPLOT.
• ADODB is used by ACID to connect to MySQL database.
2.1 Snort Installation Scenarios
Typical Snort installations may vary depending upon the environment where you are installing it. Some of the typical installation schemes are listed below for your refer-ence. You can select one of these depending on the type of network you have.
2.1.1 Test Installation
A simple Snort installation consists of a single Snort sensor. Snort logs data to text files. These log files can then be viewed later on by the Snort administrator. This arrangement is suitable only for test environments because the cost of data analysis is very high in the production environment. To install Snort for this purpose, you can get a pre-compiled version from http://www.snort.org and install it on your system. For RedHat Linux, you can download the RPM package. For Microsoft Windows systems, download executables and install on your system.
2.1.2 Single Sensor Production IDS
A production installation of Snort with only one sensor is suitable for small net-works with only one Internet connection. Putting the sensor behind a router or firewall will enable you to detect the activity of intruders into the system. However, if you are really interested in scanning all Internet traffic, you can put the sensor outside the fire-wall as well.
Snort Installation Scenarios 25
In a production installation, you also need to implement startup and shutdown pro-cedures so that Snort automatically starts at boot time. If you are installing a precom-piled version for Linux, the installation procedure with RPM will take care of it. On Microsoft Windows systems, you can start Snort as a service or put a batch file in the startup group. Issues related to Microsoft Windows are covered in Chapter 8. The log-ging is done in text or binary files and tools like SnortSnarf can be used to analyze data. SnortSnarf is discussed in Chapter 6 in detail.
2.1.3 Single Sensor with Network Management System Integration
In a production system, you can configure Snort to send traps to a network man-agement system. There are a variety of network manman-agement systems used in the enter-prise. The most popular commercial systems are from Hewlett-Packard, IBM and Computer Associates.
Snort integration into these network management systems is done through the use of SNMP traps. When you go through the compilation process of Snort later in this chap-ter, you will learn how to build SNMP capability into Snort. Chapter 4 provides more information about configuring SNMP trap destinations, community names and so on.
2.1.4 Single Sensor with Database and Web Interface
The most common use of Snort should be with integration to a database. The data-base is used to log Snort data where it can be viewed and analyzed later on, using a web-based interface. A typical setup of this type consists of three basic components:
1.Snort sensor
2.A database server
3.A web server
Snort logs data into the database. You can view the data using a web browser con-nected to the sensor. This scheme is shown in Figure 1-1 in Chapter 1. All three compo-nents can be present on the same system as shown in Figure 1-2 in Chapter 1.
Different types of database servers like MySQL, PostgresSQL, Oracle, Microsoft SQL server and other ODBC-compliant databases can be used with Snort. PHP is used to get data from the database and to generate web pages.
the host name. You have to build database logging capability into Snort at the compile time, which will be described later in this chapter. Configuring Snort to use the database is discussed in Chapter 4, 5 and 6.
2.1.5 Multiple Snort Sensors with Centralized Database
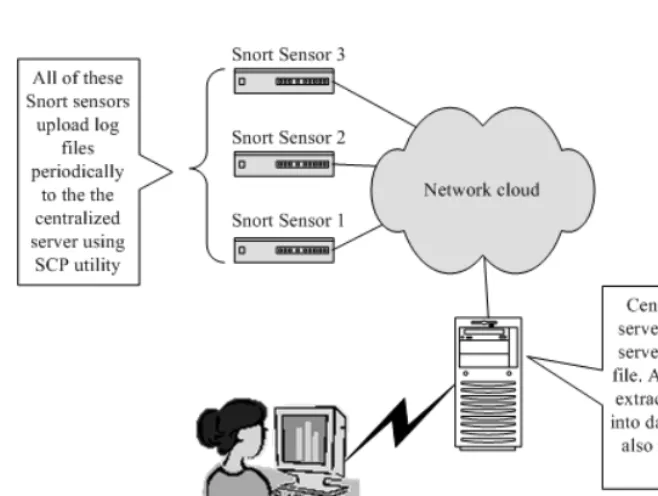
In a corporate environment, you probably have multiple locations where you would like to install Snort sensors. Managing all of these sensors and analyzing all data collected by these sensors separately is a very difficult job. There are multiple ways to setup and install Snort in the enterprise as a distributed IDS.
One method is shown in Figure 1-3 in Chapter 1 where multiple sensors connect to the same centralized database. All data generated by these sensors is stored in the database. You run a web server like Apache (http://www.apache.org). A user then uses a web browser to view this data and analyze it.
However there are some practical problems with this setup.
• All of the sensors must have access to the database at the time you start Snort. If Snort is not able to connect to the database at the start time, it dies.
• The database must be available all of the time to all sensors. If any of the network links are down, data is lost.
• You have to open up additional ports for database logging in firewalls if a firewall lies between the database server and any of the sensors. Sometime this is not feasible or against security policy.
You can come up with some alternate mechanisms where Snort sensors do not have a direct connection to the database server. The sensors may be configured to log to local files. These files can then be uploaded to a centralized server on a periodic basis using utilities like SCP. The SCP utility is a secure file transfer program that uses Secure Shell (SSH) protocol. Firewall administrators usually allow SSH port (port 22) to pass through. You can run certain utilities like Snort itself,1 Barnyard or some other tool to extract data from these log files and put it into the database server. You can use the usual web interface to view this data later on. The only problem with this approach is that the data in the database is not strictly “real-time”. There is a certain delay which depends upon frequency of uploading data using SCP to the centralized database server. This arrangement is shown in Figure 2-1.
Note that this centralized server must be running SSH server so that SCP utility is able to upload files to this server.
Snort Installation Scenarios 27
As mentioned in Chapter 1, the ultimate objective of this book is to help you install Snort and to make all of these packages work with each other. When you go through this book, you will see how these components act with each other to build a complete working intrusion detection system. The website for this book http:// authors.phptr.com/rehman/ contains all of these packages in the source code form. You will also find scripts on the site that are very helpful in installing these packages on a new system with no hassle. In fact, by using the scripts on the site as discussed in this book, you should be able to have a working IDS by just using a few commands as the root user. If you use a version newer than that discussed in this book, the latest versions of the scripts that support new Snort versions can be downloaded from http:// www.argusnetsec.com/downloads.
This books details the installation of these components on a RedHat Linux version 7.3 machine. But the process is similar on other platforms and other versions of RedHat Linux. All components are installed under /opt directory for the purpose of this book. However, when a pre-compiled package is used, the location of files may be different. When you use the scripts in the book or from the website, files will be installed under
this directory. In this chapter, you will learn how to install Snort as a standalone prod-uct. Later chapters will focus on other components.
Snort is available in both source code and binary forms. Pre-compiled binary packages are fine for most installations. As mentioned earlier, if you want to add or remove certain features of Snort, you need to download the source code version and then compile it yourself. For example, someone may be interested in SMB alerts while another may consider it unsecure. If you want to build Snort without support for SMB alerts, you may want to build it yourself. The same is true of other features like SNMP traps, MySQL and so on. Another reason to compile the source code yourself may be when a new version is released but binaries are not yet available. You may also need to compile the Snort package if you take a snapshot of the code under development. This chapter will provide a step-by-step guide to installing Snort.
The basic installation procedure is simple because you have plenty of predefined rules available with Snort that cover most of the known intrusion signatures. However, customization of your installation may require a lot of work.
Version 1.9.0 is used in this chapter, but the installation procedure is similar for other versions of the software. After installation, basic information for getting started with Snort is also provided, including basic Snort concepts, logging and alerting and some information about Snort modes of operation.
2.2 Installing Snort
In this section you will learn how to install precompiled version of Snort as well as how to compile and install it by yourself. Installation of the pre-compiled RPM package is very easy and requires only a few steps. However if you get Snort in source code for-mat, the installation process may take some time and understanding.
2.2.1 Installing Snort from the RPM Package
The installation procedure of Snort from the RPM package involves the following steps.
2.2.1.1 Download
Download the latest version from Snort web site (http://www.snort.org). At the time of writing this book, the latest binary file is snort-1.9.0-1snort.i386.rpm.
2.2.1.2 Install
Run the following command to install Snort binaries:
Installing Snort 29
This command will perform the following actions:
• Create a directory /etc/snort where all Snort rule files and configuration files are stored.
• Create a directory /var/log/snort where Snort log files will be stored.
• Create a directory /usr/share/doc/snort-1.9.0 and store Snort documentation files in that directory. You will see files like FAQ (Frequently Asked Questions), README and other files in this directory.
• Create a file snort-plain in /usr/sbin directory. This is the Snort daemon. • Create a file /etc/rc.d/init.d/snortd file which is startup and shutdown script. On
RedHat Linux, this is equivalent to /etc/init.d/snortd.
Basic installation is complete at this point and you can start using Snort. The ver-sion of Snort installed this way is not compiled with database support, so you can use it only for logging to files in the /var/log/snort directory.
2.2.1.3 Starting, Stopping and Restarting Snort
To run Snort manually, use the following command:
/etc/init.d/snortd start
This command will start Snort and you can run the Snort daemon using the “ps –ef” command. You should see a line like the following in the output of this com-mand:
root 15999 1 0 18:31 ? 00:00:01 /usr/sbin/ snort -A fast -b -l /var/log/snort -d -D -i eth0 -c /etc/ snort/snort.conf
Note that you have to start Snort manually each time you reboot the machine. You can automate this process by creating links to this file, which will be explained later in this chapter.
To stop Snort, use the following command:
/etc/init.d/snortd stop
To restart Snort, use this command:
/etc/init.d/snortd restart
2.2.2 Installing Snort from Source Code
the latest version of Snort from its web site (http://www.snort.org/). Just look for the “download” link and grab the latest version of the software. At the time of writing this book, the latest version was 1.9.0. The downloadable file name is snort-1.9.0.tar.gz, which can be saved in the /opt directory on the Linux box. Note that the installation method is similar for other versions which may be available by the time you read this book.
N O T E You must have libpcap installed on your UNIX machine or WinPcap if you are using Microsoft Windows. You can get WinPcap from http://winpcap.polito.it/. Lib-pcap is available from http://www-nrg.ee.lbl.gov/.
2.2.2.1 Unpacking
The first step after downloading is unpacking the source code. Use the following command to unpack it:
tar zxvf snort-1.9.0.tar.gz
This will create a directory /opt/snort-1.9.0, assuming that you have downloaded the file in /opt directory and have run the tar command in this directory. In case of other versions of Snort, the directory name will be different and will reflect the ver-sion number. After unpacking you can see the directory tree created by the tar com-mand using the tree command. The following is a snapshot of directories present under /opt/snort-1.9.0 directory.
[root@conformix opt]# tree -d snort-1.9.0 snort-1.9.0
Installing Snort 31
| | `-- mysql | `-- WIN32-Prj `-- templates
21 directories
[root@conformix opt]#
A brief list of the contents of these directories is listed below:
• The contrib directory contains utilities which are not strictly part of Snort itself. These utilities include ACID, MySQL database creation scripts and other things.
• The doc directory contains documentation files, as is evident from the name of the directory.
• The etc directory contains configuration files. • The rules directory contains predefined rule files. • All source code is present under the src directory.
• The templates directory is useful only for people who want to write their own plug-ins. It has no significance for general Snort users.
2.2.2.2 Compiling and Installation
The compilation and installation process consists of three steps as listed below:
1.Running the configure script.
2.Running the make command.
3.Running the make install command.
[root@conformix snort-1.9.0]# ./configure --help Usage: configure [options] [host]
Options: [defaults in brackets after descriptions] Configuration:
--prefix=PREFIX install architecture-independent files in PREFIX
[/usr/local]
--exec-prefix=EPREFIX install architecture-dependent files in EPREFIX
--sharedstatedir=DIR modifiable architecture-independent data in DIR
[PREFIX/com]
--localstatedir=DIR modifiable single-machine data in DIR [PREFIX/var]
--libdir=DIR object code libraries in DIR [EPREFIX/lib]
--includedir=DIR C header files in DIR [PREFIX/include]
--oldincludedir=DIR C header files for non-gcc in DIR [/usr/include]
Installing Snort 33
--program-suffix=SUFFIX append SUFFIX to installed program names
--enable-FEATURE[=ARG] include FEATURE [ARG=yes] --with-PACKAGE[=ARG] use PACKAGE [ARG=yes]
--without-PACKAGE do not use PACKAGE (same as --with-PACKAGE=no)
--x-includes=DIR X include files are in DIR --x-libraries=DIR X library files are in DIR --enable and --with options recognized:
--enable-debug enable debugging options
(bugreports and developers only) --enable-profile enable profiling options
(developers only)
--with-libpcap-includes=DIR libcap include directory --with-libpcap-libraries=DIR libcap library directory --with-mysql=DIR support for mysql
--with-odbc=DIR support for odbc --with-postgresql=DIR support for postgresql --with-oracle=DIR support for oracle --with-snmp support for snmp --with-openssl=DIR support for openssl
--enable-sourcefire Enable Sourcefire specific build options
--enable-perfmonitor Enable perfmonitor preprocessor --enable-smbalerts SMB alerting capaility via Samba --enable-flexresp Flexible Responses on hostile connection attempts
[root@conformix snort-1.9.0]#
Options values listed in square brackets indicate that if that particular option is not selected, the value mentioned in the square bracket will be used by default. For exam-ple, the following three lines show that if the with-prefix option is not used on the command line for the configure script, /usr/local value will be used as PREFIX
--prefix=PREFIX install architecture-independent files in PREFIX
[/usr/local]
A typical session with the configure scripts may be as follows. Output is trun-cated after displaying the initial output line to save space. Note the options that have been enabled on the command line.
[root@conformix snort-1.9.0]# ./configure --prefix=/opt/snort --enable-smbalerts --enable-flexresp --with-mysql --with-snmp --with-openssl
loading cache ./config.cache
checking for a BSD compatible install... (cached) /usr/bin/ install -c
checking whether build environment is sane... yes checking whether make sets ${MAKE}... (cached) yes checking for working aclocal... found
checking for working autoconf... found checking for working automake... found checking for working autoheader... found checking for working makeinfo... found checking for gcc... (cached) gcc
checking whether the C compiler (gcc ) works... yes
checking whether the C compiler (gcc ) is a cross-compiler... no
checking whether we are using GNU C... (cached) yes checking whether gcc accepts -g... (cached) yes
checking for gcc option to accept ANSI C... (cached) none needed
checking for ranlib... (cached) ranlib
Output is truncated at the end because the configure script may create a lot of information. The prefix option on the command line is used to tell the configure
script the location of final installation directory. Other options are used to enable the following components of Snort:
• Support of MySQL database. • Support of SNMP traps.
• Support of SMB alerts. SMB alerts are used to send pop-up windows to Microsoft Windows machines.
Installing Snort 35
have libnet installed. You can download libnet from http:// www.securityfocus.net. I have used version 1.0.2a for this installation.2
After running the configure script, you can run the following two commands to compile and install Snort files.
make
make install
The first command may take some time to complete depending upon how powerful your machine is. When you run the second command, files are installed in the appropriate directories. The make install command installs Snort binaries in /opt/snort
directory as you selected --prefix=/opt/snort on the command line for the
configure script.
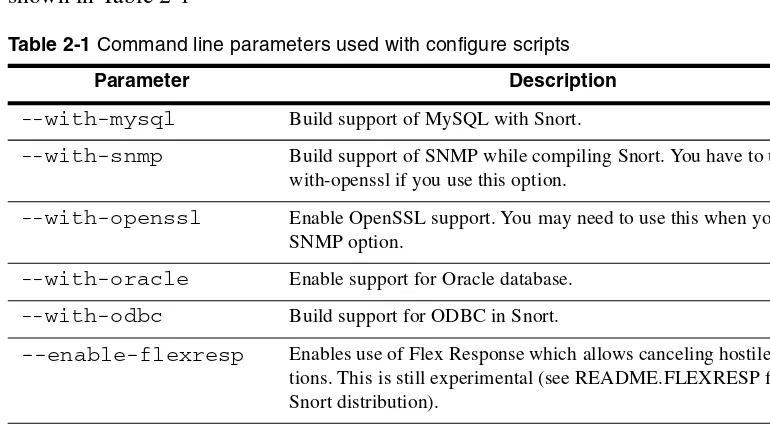
Useful command line parameters that can be used with the configure script are shown in Table 2-1
2. The installation procedure for libnet is found in the accompanying README file. Basically it con-sists of four steps:
• Untar the file using tar zxvf libnet-1.0.2a.tar.gz
• Change to directory Libnet-1.0.2a and run the ./configure command. • Run make command.
• Run make install command.
Table 2-1 Command line parameters used with configure scripts
Parameter Description
--with-mysql Build support of MySQL with Snort.
--with-snmp Build support of SNMP while compiling Snort. You have to use – with-openssl if you use this option.
--with-openssl Enable OpenSSL support. You may need to use this when you use SNMP option.
--with-oracle Enable support for Oracle database.
--with-odbc Build support for ODBC in Snort.
--enable-flexresp Enables use of Flex Response which allows canceling hostile connec-tions. This is still experimental (see README.FLEXRESP file in Snort distribution).
--enable-smbalerts Enable SMB alerts. Be careful using this as this invokes smbclient user space process every time it sends an alert.
You can also run the “make check” command before running the “make install” command to make sure that Snort is built properly.
After installing, run Snort to see if the executable file is working. Using the above mentioned procedure, Snort binary is installed in the /opt/snort/bin directory. The following command just displays the basic help message of the newly built snort
and command line options.
[root@conformix snort]# /opt/snort/bin/snort -? Initializing Output Plugins!
-*> Snort!
<*-Version 1.9.0 (Build 209)
Installing Snort 37
<Filter Options> are standard BPF options, as seen in TCPDump [root@conformix snort]#
If you see this message, you have built Snort properly. In the next section, you will learn how to configure and run Snort.
2.2.2.3 After Installation Processes
Now that you have built Snort binary, you have to do few things before you can start using Snort. These include:
1.Create directory /var/log/snort where Snort creates log files by default.
2.Create a directory to save configuration files. I have created /opt/snort/ etc. You can create a directory of your own.