Table of Contents
Linux Network Servers...1
Foreword...2
Acknowledgments...2
Introduction...4
Who Should Buy This Book...5
How This Book Is Organized...5
Part 1: The Basics...6
Chapter 1: The Boot Process...6
Chapter 2: The Network Interface...6
Part 2: Internet Server Configuration...6
Chapter 3: Login Services...6
Chapter 4: Linux Name Services...6
Chapter 5: Configuring a Mail Server...7
Chapter 6: The Apache Web Server...7
Chapter 7: Network Gateway Services...7
Part 3: Departmental Server Configuration...7
Chapter 8: Desktop Configuration Servers...7
Chapter 9: File Sharing...7
Chapter 10: Printer Services...7
Chapter 11: More Mail Services...8
Part 4: Maintaining a Healthy Server...8
Chapter 12: Security...8
Chapter 13: Troubleshooting...8
Part 5: Appendices...8
Appendix A: Installing Linux...8
Appendix B: BIND Reference...8
Appendix C: The m4 Macros for sendmail...9
Conventions...9
Help Us Help You...10
Part I: The Basics...11
Chapter List...11
Part Overview...11
Featuring:...11
Chapter 1: The Boot Process...12
Overview...12
Loading the Boot Sector...12
Loading Linux with GRUB...14
Loading the Kernel with LILO...17
LILO Configuration Options...17
The Linux Boot Prompt...21
Hardware Device Driver Initialization...24
Loading Linux Services—The init Process...25
Understanding Runlevels...26
Special−Purpose Entries...28
Startup Scripts...29
Table of Contents
Chapter 1: The Boot Process
Runlevel Initialization...30
Controlling Scripts...31
The rc.local Script...33
Loadable Modules...33
Listing the Loaded Modules...33
In Sum...35
Chapter 2: The Network Interface...36
Overview...36
Configuring an Ethernet Interface...36
Loadable Ethernet Drivers...36
The ifconfig Command...39
Network Interface Configuration Tools...42
The Serial Interface...43
Connecting through the Serial Interface...44
Running TCP/IP Over a Serial Port...46
Installing PPP...46
The PPP Kernel Module...47
The PPP Daemon...48
Configuring a PPP Server...49
PPP Dial−Up Server Configuration...49
PPP Security...51
PPP Client Configuration...53
chat Scripts...54
Using an X Tool to Configure a PPP Client...55
In Sum...57
Part II: Internet Server Configuration...58
Chapter List...58
Part Overview...58
Featuring:...58
Chapter 3: Login Services...59
Overview...59
Starting Services On−Demand...60
Protocol and Port Numbers...60
Configuring inetd...63
Configuring xinetd...65
Creating User Accounts...70
The Steps to Creating a User Account...70
The passwd File...70
Tools to Create User Accounts...75
Additional FTP Configuration...80
The ftpaccess File...82
In Sum...84
Chapter 4: Linux Name Services...86
Overview...86
Table of Contents
Using the Host Table with DNS...124
In Sum...127
Chapter 5: Configuring a Mail Server...128
Overview...128
Chapter 6: The Apache Web Server...154
Table of Contents
Chapter 6: The Apache Web Server
Defining Where Things Are Stored...165
Server Options for Documents and Directories...172
Directory−Level Configuration Controls...174
Converting IP Addresses to Ethernet Addresses...194
Table of Contents
Mapping User IDs and Group IDs...265
The exportfs Command...267
Configuring an NFS Client...268
The mount Command...269
The umount Command...270
Using fstab to Mount NFS Directories...270
Table of Contents
Chapter 10: Printer Services
Managing lpd...301
Sharing Printers with Samba...304
Defining Printers in the smb.conf File...304
Printers Share Section...305
Running the POP and IMAP Daemons...314
Using POP or IMAP from a Client...315
Stopping Spam E−Mail...316
Don't Be a Spam Source...317
Using sendmail to Block Spam...319
Filtering Out Spam at the Mailer...324
In Sum...331
Part IV: Maintaining a Healthy Server...332
Table of Contents
Chapter 13: Troubleshooting...372
Overview...372
Configuring the Linux Kernel...372
Configuring the Kernel with xconfig...373
Compiling and Installing the Kernel...377
Troubleshooting a Network Server...378
Diagnostic Tools...379
Checking the Network Interface...380
Checking an Ethernet Interface...381
Resolving Address Conflicts...384
Checking a PPP Interface...388
Testing the Connection...390
The Message of a Successful ping...390
The Message of a Failed ping...391
Testing Routing...392
Using traceroute...392
Analyzing Network Protocols...394
Checking Socket Status with netstat...394
Watching the Protocols with tcpdump...397
Testing Services...399
Testing DNS with nslookup...400
Testing DNS with host...402
Testing DNS with dig...403
In Sum...404
Appendices...405
Appendix List...405
Appendix A: Installing Linux...406
Overview...406
Installation Planning...407
Hardware Information...407
Network Information...408
Software Considerations...409
Selecting an Installation Method...409
Making a Boot Disk...410
Booting the Installation Program...411
Partitioning the Disk...413
Partition Planning...414
Partitioning with Disk Druid...417
Partitioning with fdisk...421
Installing the Boot Loader...424
Configuring the Ethernet Adapter...425
Configuring the Firewall...426
Installing the Software...429
X Windows...429
The Boot Floppy...431
Table of Contents
Appendix B: BIND Reference...433
Overview...433
named.conf Commands...433
The options Statement...433
The logging Statement...440
The zone Statement...442
The server Statement...445
The key Statement...446
The acl Statement...447
The trusted−keys Statement...447
The controls Statement...448
BIND 9 view Statement...449
Appendix C: The m4 Macros for sendmail...450
Overview...450
define...452
FEATURE...461
OSTYPE...465
DOMAIN...467
MAILER...470
Local Code...471
DAEMON_OPTIONS...472
LDAP Mail Routing...473
List of Figures...474
List of Tables...476
List of Listings...478
Linux Network Servers
Craig Hunt
Associate Publisher: Neil Edde
Acquisitions and Developmental Editor: Maureen Adams
Editor: Nancy Sixsmith
Production Editor: Kylie Johnston
Technical Editor: Matthew Miller
Book Designer: Bill Gibson
Graphic Illustrator: Tony Jonick
Electronic Publishing Specialists: Judy Fung, Nila Nichols
Proofreaders: Dave Nash, Laurie O'Connell, Nancy Riddiough
Indexer: Ted Laux
Cover Designer: Ingalls & Associates
Cover Illustrator/Photographer: Ingalls & Associates
Copyright © 2002 SYBEX Inc., 1151 Marina Village Parkway, Alameda, CA 94501. World rights reserved. No part of this publication may be stored in a retrieval system, transmitted, or reproduced in any way, including but not limited to photocopy, photograph, magnetic, or other record, without the prior agreement and written permission of the publisher.
An earlier version of this book was published under the title Linux Network Servers 24seven © 1999 SYBEX Inc.
Library of Congress Card Number: 2002104868 ISBN: 0−7821−4123−4
SYBEX and the SYBEX logo are either registered trademarks or trademarks of SYBEX Inc. in the United States and/ or other countries.
TRADEMARKS: SYBEX has attempted throughout this book to distinguish proprietary trademarks from descriptive terms by following the capitalization style used by the manufacturer.
The author and publisher have made their best efforts to prepare this book, and the content is based upon final release software whenever possible. Portions of the manuscript may be based upon pre−release versions supplied by software manufacturer(s). The author and the publisher make no representation or warranties of any kind with regard to the completeness or accuracy of the contents herein and accept no liability of any kind including but not limited to performance, merchantability, fitness for any particular purpose, or any losses or damages of any kind caused or alleged to be caused directly or indirectly from this book.
Manufactured in the United States of America 10 9 8 7 6 5 4 3 2 1
Foreword
The Craig Hunt Linux Library is a series of technical books dedicated to providing professional Linux system administrators with the information they need to do a tough job effectively. The goal of the library is to provide highly technical books that are clear, accurate, and complete. The library currently includes eight titles, with Linux Network Servers being the latest addition. Most of the books in this series focus in great depth on a single subject, and a glance at titles such as Linux Apache Web Server Administration and Linux DNS Server Administration shows that most of the books in the Craig Hunt Linux Library focus on network services.
No matter what your involvement in networking, the Craig Hunt Linux Library has the right book for you. Starting with Linux System Administration, which has one chapter on TCP/IP networking, through Linux Network Servers, which has one chapter on each networking topic, to books such as
Linux Sendmail Administration that dedicate an entire book to a single network topic, the level of detail that you need is provided by the books in this library.
The important roles that Linux plays supporting network services is not only obvious from the titles of books in this library, it is clear from industry reports that show the strong and growing role of Linux as a network server. The partnership of Apache and Linux has long been acknowledged by professional web masters, but the range of network service provided by Linux goes far beyond support for the leading web server software. Linux provides a full range of network services, and
Linux Network Servers covers them all.
I am very pleased that Linux Network Servers has now become part of the Craig Hunt Linux Library. This book fits nicely into the mission of this library, rounds out the selection of titles, and adds a book of highly acclaimed quality. If you know Linux, you know Alan Cox. For the uninitiated, Alan Cox is the person that the Linux Journal called "the Linux community's own Mr. Wizard." In his review of a previous version of this book, he said:
"If I had to pick a reference book for a new Linux administrator or to have as a reference guide to Linux administration in the office, this would be it."
Enough said! Craig Hunt August 2002
Acknowledgments
This book again brought together Neil Edde and Maureen Adams, the team that first introduced me to Sybex. Neil, who is associate publisher for the Craig Hunt Linux Library, first proposed the idea of adding this book to the library. Maureen Adams, as the acquisitions editor for this series, got me pointed in the right direction and gave me the kick−start needed to get this book underway. Both of these fine people have my thanks.
The Sybex production team are consummate professionals. Thanks to Judy Fung and Nila Nichols, the compositors; Amey Garber, Dave Nash, Laurie O'Connell, and Nancy Riddiough, the proofreaders; Tony Jonick, the illustrator; and Ted Laux, the indexer.
I'd also like to thank Karen Ruckman of KJR Design in Washington D.C. Karen is a professional photographer and designer. I can attest to the fact that she is one of the best. Only the best of photographers could make my mug look presentable enough for the cover of a book.
Introduction
Linux is the perfect choice for an operating system on which to build a network server. Much of the fame of Linux as a server system comes from its widespread use as a system on which Apache web servers are built. But the power and reliability of Linux does more than provide a stable platform for the world's most popular web server. Linux provides all of the most important network services in a single low−cost package.
Low cost, reliability, and power are propelling the continued growth of Linux as a server system. Linux has proven to be a cost−effective alternative to high−cost Unix servers. And it has proven itself to be more powerful and reliable than any proprietary desktop operating system trying to recast itself as a server operating system. Sales people might lust after the vast desktop market, but as professional system administrators, we know that the real technical action is with the server systems.
The tremendous range of network services provided by Linux means that it can be used for all of your network server needs. In this book, servers are categorized as "Internet servers" and "departmental servers." This somewhat arbitrary division is done to organize the discussion of the various services in a rational way. We define Internet services as those services that are often offered to the world at large or that are used to connect an organization to the worldwide Internet. The services that are covered in this category are:
Domain Name System (DNS) services
Login services such as FTP, Telnet, and SSH
•
Routing protocols through Zebra and gated
•
Network Address Translation (NAT)
•
Departmental services are those services that are usually limited to usage on the internal network. The services that are covered under this category are:
Dynamic Host Configuration Protocol (DHCP)
In addition to these specific topics, this book contains general information on configuring network interfaces, and important chapters on security and troubleshooting.
Linux Network Servers grew out of my earlier book, Linux Network Servers 24seven. This new book, however, is more than a second edition. Although the character and content that drew high praise for the original book remains, the new book has been completely reworked for the professional system administrators who rely on the Craig Hunt Linux Library. (Much of the praise for
Who Should Buy This Book
You should! Linux Network Servers is for anyone who wants to learn how to build a departmental server or an Internet server using Linux. The book doesn't assume that you know everything about Linux. But it does assume that you have a good understanding of computers and IP networks, and a basic understanding of Linux commands and Linux system administration. If you feel that you need to brush up on these topics, start with Linux System Administration (Stanfield and Smith, Sybex, 2002). It is an excellent introduction to Linux system administration, and will give Linux users all the background they need. If you're coming to Linux from a Windows NT background, you may want to start with Linux for Windows NT/ 2000 Administrators (Minasi, York, and Hunt, Sybex, 2000).
Linux Network Servers does not provide yet another review of the basics. Instead, it provides insight into how to get network service up and running quickly with information designed for professional system administrators.
Linux growth is making sharp inroads into the currently installed base of Unix servers. If you're a Unix professional retraining for a job as a Linux system administrator, this book is for you. You'll benefit from the detailed information on Linux−specific commands. Additionally you'll be pleased by the tremendous similarity between the two systems. This book may be all the information you need to move from Unix to Linux.
Linux system administrators will find this book invaluable as their primary resource for information on network services. Even administrators of servers dedicated to specific tasks, such as web servers or DNS servers, will find this book a useful companion text. Although such an administrator may rely on Linux Apache Web Server Administration or Linux DNS Server Administration as a primary resource, this book provides the insights into how other services work and how they are configured, which are helpful to anyone running a Linux server.
This book is not simply a reference to network server configuration options. Instead, it provides insight into how real servers are actually configured. This book helps you understand how things really work so that you can make intelligent configuration decisions that relate to your environment. No book, no matter how well−thought−out or how long, can provide accurate examples for every possible situation. This book strives to provide you with the information you need to develop the correct solution for your situation on your own.
How This Book Is Organized
Although this book is intended to be read as a whole, I understand that many system administrators simply do not have the time to read an entire text. They must go to the topic in question and get a reasonably complete picture of the "why" as well as the "how" of that topic. To facilitate that understanding, necessary background material is summar−ized where the topic is discussed, and it is accompanied by pointers to the part of the text where the background material is more thoroughly discussed.
This book is divided into five parts: The Basics, Internet Server Configuration, Departmental Server Configuration, Maintaining a Healthy Server, and Appendices. The five parts are composed of thirteen chapters and three appendices.
spans Chapter 4 and Appendix B. However, most topics are covered in a single chapter.
Although individual chapters can be read alone (for example, you could jump directly to Chapter 6 to read about the web server configuration file), the book was designed as a unit. Most chapters reference material covered in other chapters. When such a reference is made, it contains a pointer to the chapter that covers the referenced material. If you have a specific task to study, such as setting up a Samba server, feel free to jump directly to that topic. But, if like many system administrators, you need to support the entire range of Linux network services, you will benefit from reading the entire text.
Part 1: The Basics
All network services depend on the underlying operating system and the network hardware. In this part, we look at how the network hardware is configured, and the role that the startup process plays in initializing the hardware and starting the desired network services. Part 1 contains two chapters.
Chapter 1: The Boot Process
A description of the boot process is provided, including a description of Linux runlevels. This chapter describes the two most widely used Linux boot loaders (LILO and GRUB) and the lilo.conf and grub.conf files used to configure them. The role of the kernel in initializing hardware devices and the role of init in starting all of the system services are covered. init and the inittab configuration files are described, with emphasis on the key startup files that a network server administrator needs to understand.
Chapter 2: The Network Interface
An interface to the physical network is required for every network server. This chapter covers the installation and configuration of an Ethernet interface. Linux systems can also provide network support through the serial interface. The serial interface is described, along with the getty and login processes that support serial communications. TCP/IP can also be supported over serial line by PPP software. Both client and server PPP configurations are covered.
Part 2: Internet Server Configuration
Part 2 covers the configuration of the server side of traditional Internet services. The services covered in this part include Telnet, FTP, DNS, sendmail, Apache, gated, Zebra, and NAT. Part 2 is composed of five chapters.
Chapter 3: Login Services
Linux provides the complete range of traditional services that allow users to remotely log in to the server. Users with valid user accounts can log in remotely using telnet and ftp, if those services are running. Services such as telnet and ftp are started through inetd or xinetd. This chapter describes how users are given valid login accounts, and how inetd and xinetd are configured to start services on demand. Optional configuration for the WU−FTPD server is also touched on.
Chapter 4: Linux Name Services
tested DNS server software available. This chapter provides detailed information on configuring the new BIND version 9 DNS software. It also covers the host table and how DNS and the host table are used together.
Chapter 5: Configuring a Mail Server
The most powerful and complex system for handling Internet mail service is sendmail. Most Linux distributions bundle sendmail as part of the system. This chapter shows you how to simplify a sendmail configuration by concentrating on what is important and how to create your own custom configuration.
Chapter 6: The Apache Web Server
The Apache web server, which is the most widely used web server in the world today, is included as part of the Linux distribution. This chapter explains the installation and configuration of a secure, reliable web service.
Chapter 7: Network Gateway Services
All internets require routers. Linux provides a full range of both static and dynamic routing. Various Linux distributions include the full−featured gateway daemon (gated) and the new Zebra suite of routing protocols. The configuration of both Zebra and gated are covered. Strengths and weaknesses of the RIP, RIPv2, OSPF, and BGP routing protocols offered by these packages are discussed. In addition to routing, the use of network address translation, which is available for Linux as "address masquerading," is described, and the way it is configured with iptables is covered.
Part 3: Departmental Server Configuration
Part 3 describes the configuration of services that are essential for a departmental server that supports desktop clients. DHCP, Samba, NFS, LPR/LPD, POP, IMAP, and procmail are covered in this part of the text. Part 3 contains four chapters.
Chapter 8: Desktop Configuration Servers
Configuring a TCP/IP client can be complex. A configuration server relieves your users of this task. Linux provides configuration servers for both Windows and Unix desktops through the Dynamic Host Configuration Protocol (DHCP) server. A Linux system can also act as a DHCP client. This chapter covers the configuration of both Linux client and server DHCP software.
Chapter 9: File Sharing
The most important feature of a departmental network is that it allows desktop computers to transparently share files. Linux provides this capability through the SAMBA server that provides native file sharing for Windows systems and through the NFS server that provides file sharing for Unix clients. This chapter provides detailed information about both of these services and about the Linux file system.
Chapter 10: Printer Services
and configure local printers.
Chapter 11: More Mail Services
Most desktop systems cannot directly receive Internet mail. They rely on a mailbox server to collect and hold the mail for them until they are ready to read it. Linux includes two techniques for providing this service. Post Office Protocol (POP), the traditional mailbox protocol, is still widely used. Internet Message Access Protocol (IMAP) has advanced features that make it very popular. Chapter 11 covers the installation, configuration, and administration of both services.
Part 4: Maintaining a Healthy Server
Part 4 focuses on tasks that are essential for maintaining a secure and reliable server, even if the tasks are not specifically linked to network services. Part 4 contains two chapters that cover security and troubleshooting.
Chapter 12: Security
A sad fact of life on the Internet is that there are people out there who will do you harm if they have the chance. To run a reliable server, you must run a secure server. This chapter tells you how to keep up−to−date on security issues, how to take advantage of the exceptionally good security features included in Linux, how to monitor your system for security problems, and how to add extra security features if you need them.
Chapter 13: Troubleshooting
Things can and will go wrong. When they do, you need to locate and fix the problem. Chapter 13 helps you test and debug the network, and analyze and resolve problems. It discusses when you need to upgrade your Linux kernel and how you can do it. It also describes the tools used to analyze network problems.
Part 5: Appendices
Part 5 concludes the book with a series of three appendices.
Appendix A: Installing Linux
This appendix provides information about installing Linux. Red Hat Linux is used as an example. This appendix is intended to provide installation information to those readers moving to Linux from Unix or Windows NT/2000.
Appendix B: BIND Reference
Appendix C: The
m4
Macros for
sendmail
This appendix provides a summary of the m4 macros that are available to build a custom sendmail configuration.
Conventions
This book uses certain typographic styles to help you quickly identify important information and to avoid confusion over the meaning of words. This introduction shows an example of this in the use of a monospaced font when referring specifically to Linux commands. The following conventions are used throughout this book:
A normal, proportionally spaced font is used for the bulk of the text in the book.
•
Italicized text indicates technical terms that are introduced for the first time in a chapter. (Italics are also used for emphasis.)
•
Monospaced text is used for listings and examples; and to identify the Linux commands, filenames, and domain names that occur within the body of the text.
•
Italicized monospaced text is used in command syntax to indicate a variable for which you must provide the value. For example, a command syntax written as HelpFile=path means that the variable name path must not be typed as shown; you must provide your own value for path.
•
Bold monospaced text is used to indicate something that must be typed as shown. This might be user input in a listing, a recommended command line, or fixed values within the syntax of a command. For example, a command syntax written as HelpFile=path means that the value HelpFile= must be typed exactly as shown.
•
The square brackets in a command's syntax enclose an item that is optional. For example,
ls [–l] means that –l is an optional part of the ls command.
•
A vertical bar in a command's syntax means that you should chose one keyword or the other. For example, true|false means choose true or false.
•
In addition to these text conventions, which can apply to individual words or entire paragraphs, a few conventions are used to highlight segments of text:
NoteA Note indicates information that's useful or interesting, but that's somewhat peripheral to the main discussion. A Note might be relevant to a small number of networks, for instance, or refer to an outdated feature.
TipA Tip provides information that can save you time or frustration, and that may not be entirely obvious. A Tip might describe how to get around a limitation, or how to use a feature to perform an unusual task.
Warning Warnings describe potential pitfalls or dangers. If you fail to heed a Warning, you may end up spending a lot of time recovering from a bug, or even restoring your entire system from scratch.
Sidebars
Help Us Help You
Part I: The Basics
Chapter List
Chapter 1: The Boot Process Chapter 2: The Network Interface
Part Overview
Featuring:
The role that the ROM BIOS, MBR, and loader play in booting the system
•
GRUB and LILO configuration
•
How and why the kernel is passed parameters at boot time
•
System runlevels and how they are configured by the inittab file
•
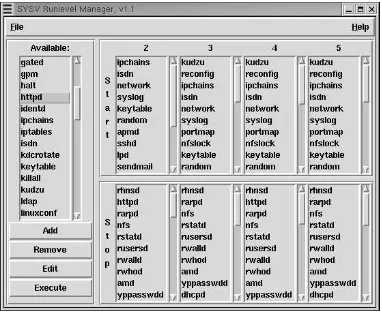
The chkconfig and tksysv tools that control the startup scripts
•
Loadable kernel modules and the tools that manage them
•
How Ethernet device drivers are loaded and configured
•
Configuring a network interface with ifconfig and the Red Hat Network Configuration tool
•
How serial ports function and how they are used for networking
•
PPP configuration and security
•
Creating chat scripts
Chapter 1: The Boot Process
Overview
This chapter looks at what happens during a Linux boot. It examines the processes that take place and the configuration files that are read. Booting is a critical part of the operation of a server. The boot process brings all of the network hardware online and starts all of the network daemon processes when the system is powered−up. If the server will not boot, it is unavailable to all of the users and computers that depend on it. For this reason, it is essential that the administrator of a network server understand the boot process and the configuration files involved in that process. After all, you're the person who maintains those configuration files and who is responsible for recovering the system when it won't boot.
The term boot comes from bootstrap loader, which in turn comes from the old saying "pull yourself up by your bootstraps." The meaning of this expression is that you must accomplish everything on your own without any outside help. This is an apt term for a system that must start from nothing and finish running a full operating system. When the boot process starts, there is nothing in RAM—no program to load the system. The loader that begins the process resides in non−volatile memory. On PC systems, this means that the loader is part of the ROM BIOS.
Booting a Linux PC is a multistep procedure. It involves basic PC functions as well as Linux processes. This complex process begins in the PC ROM BIOS; it starts with the ROM BIOS program that loads the boot sector from the boot device. The boot sector either contains or loads a Linux boot loader, which then loads the Linux kernel. Finally, the kernel starts the init process, which loads all of the Linux services. The next few sections discuss this process in detail.
NoteTwo Linux loaders, LILO and GRUB, are covered in this chapter. LILO is given the bulk of the coverage because it is the default for most Linux distributions. GRUB is covered because it is the default loader for Red Hat Linux 7.2.
Loading the Boot Sector
The ROM BIOS is configured through the BIOS setup program. Setup programs vary among different BIOS versions, but all of them allow the administrator to define which devices are used to boot the system and the order in which those devices are checked. On some PC systems, the floppy drive and the first hard drive are the boot devices, and they are checked in that order. Systems that permit booting from the CD−ROM usually list the CD−ROM as the first boot device, followed by the first hard drive.
For an operational Linux server, set the ROM BIOS to check the floppy first and then the hard drive, even if you used a bootable CD−ROM for the initial installation. The reason for this is simple: The floppy is used to reboot an operational system when the hard drive is corrupted; the CD−ROM is only booted to install or upgrade the system software. During an installation, the system is offline, and you have plenty of time to fiddle with a BIOS setup program. But during an outage of an operational server, time is critical. You want to be able to reboot Linux and fix things as quickly as possible.
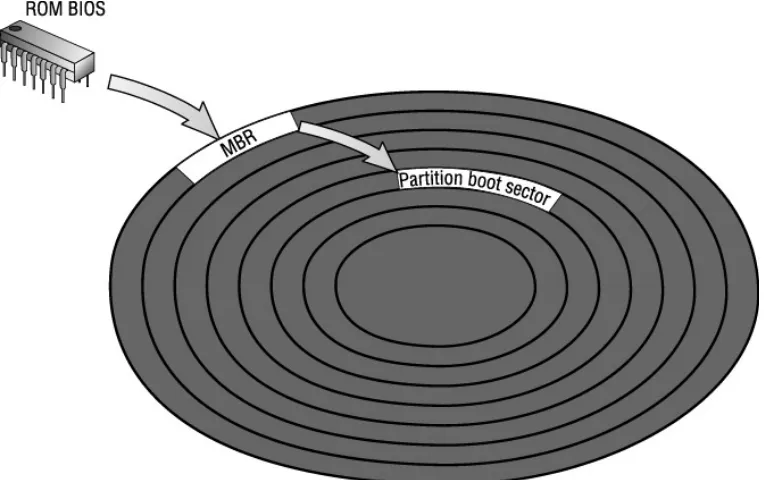
Floppy disks have only one boot sector, but hard disks may have more than one because each partition on a hard drive has its own boot sector. The first boot sector on the entire hard disk is called the master boot record (MBR). It is the only boot sector loaded from the hard drive by the ROM BIOS. The MBR contains a small loader program and a partition table. If the standard DOS MBR is used, it loads the boot sector from the active partition and then passes control to the boot sector. Thus, both the MBR and the active partition's boot sector are involved in the boot process. Figure 1.1 shows how the boot process flows from the BIOS to the MBR and then to the partition's boot sector. This figure assumes a DOS MBR and a Linux loader in the boot sector of the active partition. Alternatively, the Linux loader can be installed in the MBR to eliminate one step in the boot process.
Figure 1.1: The boot process flow
Note Appendix A, "Installing Linux," discusses the pros and cons of placing the Linux loader in the MBR.
The BIOS may introduce some limitations into the Linux boot process. The Linux kernel can be installed anywhere on any of the disks available to the system, but if it is outside of those limits, the system might not be able to boot. The Linux loader depends on BIOS services. Some versions of BIOS only permit the loader to access the first two IDE hard drives: /dev/hda and /dev/ hdb. Additionally, in some cases, only the first 1024 cylinders of these disks can be used when booting the system. These limitations are at their worst on old systems. New systems have two IDE disk controllers that provide access to four disk drives, and these controllers address up to 8GB of disk storage within the 1024−cylinder limit. A very old system might address only 504MB in 1024 cylinders!
For a server installation, this is not a real problem. Because servers do not dual−boot, everything can be removed from the disk, and the Linux boot files can be installed in the first partition without difficulty.
Install the Linux boot loader in the MBR of the first disk, and install the Linux boot partition in the first 1024 cylinders of the second disk.
•
Use LOADLIN, SYSLINUX, System Commander, or a similar product to boot Linux from DOS instead of booting the system directly to Linux.
•
Make a complete backup of Microsoft Windows, and repartition the disk so that both Windows and Linux are in the first 1024 cylinders. This, of course, requires a complete reinstallation of Windows.
•
Create a Linux boot directory within the Windows directory structure that contains the Linux kernel and all of the files from the /boot directory.
•
Upgrade the BIOS. This is not as difficult as it may sound. Most systems allow the BIOS to be upgraded, and many motherboard manufacturers and BIOS manufacturers have BIOS upgrades on their websites. However, don't undertake this lightly! A problem during the upgrade can leave the system unusable, and send you scurrying to the computer store to buy a replacement BIOS chip.
•
Make a boot floppy or CD−ROM, and use that to start Linux. This is frequently the easiest option.
•
Don't be overly concerned about this potential problem. It is not a concern for servers, and even on clients it is rare. I have installed many Linux systems and have only had this problem once. In that case, it was a very old system that could directly address only 504MB per disk drive. My solution was to give the user a 250MB drive from my junk drawer as a second disk. (I never throw anything away.) I installed LILO in the MBR of his first disk and Linux on the second disk. The user was happy, Linux was installed, and I had less junk in my drawer.
Even though there are several options for loading Linux, only a few are widely used. Most systems use the Linux loader LILO. The Red Hat Linux 7.2 system defaults to using GRUB. This chapter covers both of these commonly used loaders. We start with a close look at the default GRUB configuration generated by the Red Hat installation program.
Loading Linux with GRUB
During the installation of Red Hat Linux 7.2, you're asked to select which boot loader should be used. By default, Red Hat uses the Grand Unified Bootloader (GRUB), and creates a GRUB configuration based on the values you select during the installation. Listing 1.1 shows the GRUB configuration generated by the Red Hat installation program for a desktop client. A dual−boot client configuration is used as an example because it is slightly more complex than a server configuration (servers do not usually dual−boot).
Listing 1.1: The Default GRUB Configuration
[root]# cat /etc/grub.conf
# grub.conf generated by anaconda #
# Note that you do not have to rerun grub after making changes to this file # NOTICE: You do not have a /boot partition. This means that
password −−md5 $1$LºÒCX≤˪$qgeIevUEDvvQAmrm4jCd31
title Red Hat Linux (2.4.7−10) root (hd0,2)
kernel /boot/vmlinuz−2.4.7−10 ro root=/dev/hda3 initrd /boot/initrd−2.4.7−10.img
title DOS
rootnoverify (hd0,0) chainloader +1
The GRUB configuration is stored in grub.conf, which is a simple text file. Lines that begin with # are comments, and the Red Hat installation program inserts several comments at the beginning of the file.
The first active command line in this configuration is default=0. This command identifies which operating system should be booted by default in a dual−boot configuration. The operating systems that are available to GRUB are defined at the end of the configuration. Each operating system is assigned a number, sequentially starting from 0. Thus, the first operating system defined is 0, the second is 1, the third is 2, and so on. This configuration defines two operating systems: Red Hat Linux and DOS. Red Hat Linux is listed first; therefore, it is operating system 0, and it is the operating system that will be booted by default. In this case, the command default=0 is not really required because default is set to 0 whenever the default command is not included in the configuration. However, including the command makes a clean, self−documenting configuration. The second active line, timeout=10, also relates to the default boot. The timeout command sets the number of seconds the operator has to interrupt the boot process before GRUB automatically loads the default operating system. In this example, the operator has 10 seconds to select the alternate operating system before Red Hat Linux is automatically booted. Even for systems that do not dual−boot, set a value for timeout because this allows the operator to interrupt the boot process if it is necessary to pass arguments to the kernel. Providing kernel input at the boot prompt is covered later in this chapter.
The splashimage command points to a file that contains the background image displayed by GRUB. During the timeout period, GRUB displays a boot menu. The splashimage file is the background displayed behind that menu.
During the initial installation of Red Hat Linux 7.2, you have an opportunity to enter a GRUB password. The password entered at that time is stored in the grub.conf file using the password command. The password "Wats?Watt?" was entered during the installation of our sample system. Note that the password is not stored as clear text. The password is encrypted, and the −−md5 option on the password command line lets us know that the password is encrypted with the Message Digest 5 (MD5) algorithm. The operator must enter the correct password to gain access to the full range of GRUB features. The operator can boot any of the operating systems listed in the GRUB menu without entering the password; however, optional input, such as kernel parameters, cannot be entered without the correct password. If the password command is not included in the grub.conf file, a password is not required to access any GRUB features.
The title command defines the exact text that will be displayed in the GRUB menu to identify an operating system. The commands that follow a title command and occur before the next title command describe an operating system to the boot loader. The sample configuration defines the following two operating systems:
kernel /boot/vmlinuz−2.4.7−10 ro root=/dev/hda3 initrd /boot/initrd−2.4.7−10.img
title DOS
rootnoverify (hd0,0) chainloader +1
The first title command defines the menu text Red Hat Linux (2.4.7–10). The next three lines define the operating system that is booted when that item is selected from the GRUB menu:
root (hd0,2) Defines the physical location of the filesystem root for this operating system. The values defined for the root command are the disk device name and the partition number. Notice that GRUB device names are slightly different from normal Linux device names. GRUB calls the first hard disk hd0. Additionally, GRUB counts partitions differently than Linux does. GRUB counts from 0, whereas Linux counts from 1. Thus, the GRUB value hd0,2 on a Linux system that boots from an IDE drive is the same as the Linux value hda,3—partition number 3 on the first IDE drive.
kernel /boot/vmlinuz−2.4.7−10 ro root=/dev/hda3 Identifies the file that contains the operating system that is to be started, and defines any arguments passed to that operating system at run time. In this case, GRUB will load the Linux kernel stored in vmlinuz−2.4.7−10, and it will pass the Linux kernel the arguments ro root=/dev/hda3, which tell the kernel where the filesystem root is located, and that it should be mounted as read−only. The ro option causes Linux to mount the root read−only during the initial phase of the boot. (Later, the rc.sysinit script changes it to read−write after successfully completing the filesystem checks.)
initrd /boot/initrd−2.4.7−10.img Identifies a ramdisk file for Linux to use during the boot. Red Hat uses the ramdisk to provide Linux with critical modules that the kernel might need to access the disk drives.
The last title command defines the DOS menu entry. Two commands define the operating system loaded when DOS is selected from the menu:
rootnoverify (hd0,0) Like the root command, defines the physical location of the filesystem root for this operating system. But rootnoverify tells GRUB that the filesystem found at this location does not comply with the multiboot standards, and thus cannot be validated.
chainloader +1 Emulates the function of the DOS MBR by simply loading the specified sector and passing boot responsibilities to the loader found there. The value +1 is a blocklist value, which defines the sector address of the loader relative to the partition defined by the rootnoverify command. +1 means the first sector of the partition. Taken together, the rootnoverify command and the chainloader command from our sample mean that GRUB will pass control to the loader found in the first sector of the first partition on the first IDE drive when DOS is selected from the GRUB menu. In this example, that partition contains the DOS boot loader that will be responsible for loading DOS.
The grub.conf file on your system will be very similar to the one in this example. The location of files may be different, and a server system's configuration usually won't define multiple operating systems, but the commands will be essentially the same.
with Linux—or even the most popular Linux boot loader. Red Hat, prior to 7.2, used LILO, and most other versions of Linux still do. The next section takes a close look at LILO configuration.
Loading the Kernel with LILO
Although GRUB is a newer tool, LILO, the Linux loader, is still a versatile tool that can manage multiple boot images; and can be installed on a floppy disk, in a hard disk partition, or as the master boot record. As with GRUB, this power and flexibility comes at the price of complexity, which is illustrated by the large number of LILO configuration options.
LILO Configuration Options
Most of the time, you don't need to think about the complexity of LILO; the installation program will lead you through a simple LILO installation. It is for those times when the default installation doesn't provide the service you want that you need to understand the intricacies of LILO.
LILO is configured by the /etc/lilo.conf file. Listing 1.2 is the lilo.conf file created by a Linux installation program on a desktop client that is configured to dual−boot. Its function is very similar to the GRUB sample shown in Listing 1.1.
Listing 1.2: A Sample lilo.conf File
# global section boot=/dev/hda3 map=/boot/map
install=/boot/boot.b prompt
timeout=50
message=/boot/message default=linux
# The Linux boot image image=/boot/vmlinuz−2.4.7−10 label=linux
read−only root=/dev/hda3 # additional boot image other=/dev/hda1
optional label=dos
With this configuration, the user has five seconds to select either dos to boot Microsoft Windows or linux to boot Linux. If the user does not make a selection, LILO boots Linux after the five seconds have expired. The following section examines each line in this file to see how LILO is configured.
A Sample lilo.conf File
A lilo.conf file starts with a global section that contains options that apply to the entire LILO process. Some of these entries relate to the installation of LILO by /sbin/lilo, and are only indirectly related to the boot process.
loader.
Comments in the lilo.conf file start with a sharp sign (#). The first active line of the global section in the sample file identifies the device that contains the boot sector. The option boot=/dev/hda3 says that LILO is stored in the boot sector of the third partition of the first IDE disk drive. This tells us two things: where LILO is installed and where it isn't installed. LILO is not installed in the MBR of this system; it is installed in hda3, which must be the active partition.
The configuration option map=/boot/map defines the location of the map file, which contains the physical locations of the operating system kernels in a form that can be read by the LILO boot loader. (GRUB does not require a map file because it can read Linux filesystems directly.) /boot/ map is the default value for the map option, so, in this case, it does not really need to be explicitly defined in the sample configuration file.
The install=/boot/boot.b line defines the file that /sbin/lilo installs in the boot sector. (boot.b is the LILO boot loader.) In this case, the line is not actually required because /boot/boot.b is the default value for install.
The prompt option causes the boot prompt to be displayed. If the prompt option is not included in the lilo.conf file, the user must press a Shift, Ctrl, or Alt key; or set the Caps Lock or Scroll Lock key to get the boot prompt. The message displayed at the boot prompt is contained in the file identified by the message option. In the example, message points to a file named /boot/ message that contains a full−screen display. If the message option is not used, the default boot prompt boot: is used.
The timeout entry defines how long the system should wait for user input before booting the default operating system. The time is defined in tenths of seconds. Therefore, timeout=50 tells the system to wait five seconds.
Warning Don't use prompt without timeout. If the timeout option is not specified with the prompt option, the system will not automatically reboot. It will hang at the boot prompt, waiting for user input, and will never time out. This could be a big problem for an unattended server.
If the timeout is reached, the default kernel is booted. The default option identifies the default kernel. In Listing 1.2, the operating system that has the label "linux"is the one that will be started by default. To boot Microsoft Windows as the default operating system, simply change the default option to default=dos. The remainder of this configuration file provides the information that LILO needs to find and boot either Linux or Windows.
The image statement specifies the location of the Linux kernel, which is /boot/vmlinuz−2.4.7−10 in this example. The image option allows you to put the Linux kernel anywhere and name it anything. The ability to change the name of the kernel comes in very handy when you want to do a kernel upgrade, which is discussed in Chapter 13, "Troubleshooting."
There are several "per−image" options used in the configuration file, some of which are specific to kernel images. The label=linux option defines the label that is entered at the boot prompt to load this image. Every image defined in the sample file has an associated label entry; if the operator wants to boot an image, they must enter its label.
This protects the root filesystem during the boot and ensures that the filesystem check (fsck) runs reliably. Later in the startup process, the root will be re−mounted as read/write after fsck completes. See the discussion of rc.sysinit later in this chapter.
The root=/dev/hda3 option is also kernel−specific. It defines the location of the root filesystem for the kernel. The lilo.conf file should have a root option associated with the kernel image. If it is not defined here, the root filesystem must be defined separately with the rdev command. However, don't do that; define the root in the LILO configuration.
The last three lines in the sample file define the other operating system that LILO is able to boot. The other OS is located in partition 1 of the first IDE drive, other=/dev/hda1. As the label=dos entry indicates, it is Microsoft Windows. The optional command tells /sbin/lilo, which is called the mapper, that when it builds the map file, it should consider this operating system optional. That means that /sbin/lilo should complete building the map file, even if this operating system is not found.
Whenever you modify the LILO configuration, invoke /sbin/lilo to install the new configuration. Until /sbin/lilo is run and maps the new configuration options, they have no effect. The grub.conf file, on the other hand, does not require any special processing. Changes to the GRUB configuration take effect immediately.
Only Linux and one other operating system appear in the sample file, which is the most common case for desktop clients. However, LILO can act as the boot manager for up to 16 different operating systems. It is possible to see several other and image options in a lilo.conf file. Multiple image options are used when testing different Linux kernels. The most common reason for multiple other options is a training system in which users boot different OSs to learn about them. In an average operational environment, only one operating system is installed on a server, and no more than two operating systems are installed on a client.
lilo.conf Hardware Options
There are many more lilo.conf configuration options than those described previously, but you won't need to use most of them. The sample configuration file in Listing 1.2 is almost identical to the one built by the installation program on any other system. Basically, the small subset of options just described includes the options used to build 99 percent of all LILO configuration files.
The one percent of systems that cannot be configured with the usual commands are often those systems with hardware difficulties. The lilo.conf file provides several options for dealing with hardware problems.
The lba32 option is used when the boot partition is placed above the 1024−cylinder limit. This option requires a BIOS that supports 32−bit Logical Block Addresses (LBA32) for booting. The Red Hat installation program displays a "Force use of LBA32" check box in the boot loader installation screen. If this is available in your BIOS, it is the simplest way to boot from beyond the 1024−cylinder barrier.
The linear option forces the system to use linear sector addresses—sequential sector numbers— instead of traditional cylinder, head, and sector addresses. This is sometimes necessary to handle large SCSI disks. It is even possible to manually define the disk geometry and linear addresses of the partitions directly in the LILO configuration file. For example:
heads=32 cylinders=827 partition=/dev/hda1 start=63
partition=/dev/hda2 start=153216 partition=/dev/hda3 start=219744
This example defines the geometry for the first disk drive, which normally has the BIOS address of hexadecimal 80. The sectors, heads, and cylinders of the disk are defined. In the example, the linear address for the start of each partition is also given. This is an extreme example of defining the disk drive for the system; I have never had to do this.
The append command is another LILO option related to defining hardware. (I have used this one.) The append option passes a configuration parameter to the kernel. The parameter is a kernel−specific option used to identify hardware that the system failed to automatically detect. For example:
append = "ether=10,0x210,eth0"
This sample command tells the kernel the nonstandard configuration of an Ethernet card. This particular option line says that the Ethernet device eth0 uses IRQ 10 and I/O port address 210. (The format of the parameters that can be passed to the kernel is covered in "The Linux Boot Prompt," later in this chapter.)
Linux is very good at detecting the configuration of Ethernet hardware, and software−configurable cards are good at reporting their settings. Additionally, new PCI cards do not require all of these configuration values. By and large, kernel parameters are not needed to boot the system. However, this capability exists for those times when you do need it.
LILO Boot Security
Two LILO configuration commands enhance the security of a network server. If the server is in an unsecured area, it is possible for an intruder to reboot the system and gain unauthorized access. For example, an intruder could reboot the server into single−user mode and essentially have password−free root access to part of the system. (More about single−user mode later. For now, just take my word that this can be done.)
To prevent this, add the password and the restricted options to the lilo.conf file. The password option defines a password that must be entered to reboot the system. The password is stored in the configuration file in an unencrypted format, so make sure the lilo.conf file can be read only by the root user. The restricted option softens the security a little. It says that the password is required only when passing parameters to the system during a boot. For example, if you attempt to pass the parameter single to the system to get it to boot into single−user mode, you must provide the password.
The following example includes restricted password protection for booting the Linux kernel. The example is based on the lilo.conf file you saw earlier, with a few lines removed that contain default values to show that you can remove those lines and still boot without a problem. Listing 1.3 uses cat to list the new configuration file and lilo to process it.
Listing 1.3: Adding Password Protection to LILO
[root]# cat lilo.conf
# global section boot=/dev/hda3 prompt
timeout=50
message=/boot/message default=linux
# the Linux boot image image=/boot/vmlinuz−2.4.2−2 label=linux
read−only root=/dev/hda3 password=Wats?Watt? restricted
# additional boot images other=/dev/hda1
optional label=dos [root]# lilo
Added linux * Added dos
After running /sbin/lilo, reboot. Note that you don't have to enter the password at the boot prompt because the configuration includes the restrict option. However, if you attempt to boot the system and provide optional input at the boot prompt, you will be asked for the password.
The Linux Boot Prompt
The LILO and GRUB processes are modified through their configuration files. The kernel boot process is modified through input to the boot prompt. As with the LILO append option and the GRUB kernel command, the boot prompt is used to pass parameters to the kernel. The difference, however, is that the boot prompt is used to manually enter kernel parameters, whereas the append and kernel commands are used to automate the process when the same parameters must be passed to the kernel for every boot. Use the boot prompt for special situations, such as repairing a system or getting an unruly piece of equipment running; or to debug input before it is stored in the lilo.conf or grub.conf file.
You rarely need to pass parameters to the kernel through the boot prompt. When you do, it is either to change the boot process or to help the system handle a piece of unknown hardware. The kernel command from the grub.conf file shown in Listing 1.1 is an example of using boot input to change the boot process:
kernel /boot/vmlinuz−2.4.7−10 ro root=/dev/hda3
select an optional menu item, or interrupt the boot process. Interrupt the boot by pressing the Escape key. If a password is defined in the grub.conf file, press P, and enter the GRUB password. Then, press C for command mode, and a command line prompt appears. This is the boot prompt that allows arguments to be sent to the kernel using the kernel command interactively. The format of the kernel command is
kernel file arguments
where kernel is the command, file is the name of the file that contains the Linux kernel, and
arguments are any optional arguments you wish to pass to the kernel. In the preceding kernel command example, ro root=/dev/hda3 are arguments that change the default boot behavior so that the root filesystem is mounted read−only. The possible arguments depend on the kernel, not on whether GRUB or LILO is used to control the boot process. Any of the kernel arguments described in this section can be sent to the kernel in this manner on a system that uses GRUB. The LILO boot prompt is different, but the function is the same.
When the system is booted by LILO, the string boot: is displayed as the boot prompt. The operator can boot any operating system defined in the lilo.conf file by entering its name at the prompt (for example, linux, or dos). Arguments are passed to the selected operating system by placing them on the command line after the operating system name. An example of passing kernel parameters on a system booted by LILO is
boot: linux panic=60
In this example, boot: is the prompt, linux is the kernel name, and panic=60 is the parameter passed to that kernel. The keyword linux is the label assigned to the Linux kernel in the LILO configuration. Use the label to tell LILO which kernel should receive the parameter. The panic argument changes the boot behavior after a system crash. It is possible for the Linux kernel to crash from an internal error, called a kernel panic. If the system crashes from a kernel panic, it does not automatically reboot—it stops at the boot prompt waiting for instructions.
Normally, this is a good idea. The exception is an unattended server. If you have a system that does not have an operator in attendance and that remote users rely on, it might be better to have it try an automatic reboot after it crashes. The example shown previously tells the system to wait 60 seconds and then reboot.
NoteThis might surprise Windows administrators, but I have never had a Linux system crash. In fact, I had one specialized system (collecting network measurement data, and providing Web access to that data) that ran continuously for more than a year without a single problem. In a normal boot process, the kernel starts the /sbin/init program. Using the init argument, it is possible to tell the kernel to start another process instead of /sbin/init. For example, init=/bin/sh causes the system to run the shell program, which then can be used to repair the system if the / sbin/init program is corrupted.
Handling undetected hardware is the second reason for entering data at the boot prompt, and it is the most common reason for doing so during the initial installation. Sometimes, the system has trouble detecting hardware or properly detecting the hardware's configuration. In those cases, the system needs your input at the boot prompt to properly handle the unknown hardware.
A large number of the boot input statements pass parameters to device driver modules. For example, there are about 20 different SCSI host adapter device drivers that accept boot parameters. In most cases, the system detects the SCSI adapter configuration without a problem. But if it doesn't, booting the system may be impossible. An example of passing kernel parameters to Linux to identify an undetected SCSI adapter device is
boot: linux aha152x=0x340,11,7
All hardware parameters begin with a driver name. In this case, it is the aha152x driver for Adaptec 1520 series adapters. The data after the equal sign is the information passed to the driver. In this case, it is the I/O port address, the IRQ, and the SCSI ID.
Another boot argument that is directly related to the configuration of device drivers is the reserve argument. reserve defines an area of I/O port address memory that is protected from auto−probing. To determine the configuration of their devices, most device drivers probe those regions of memory that can be legitimately used for their devices. For example, the 3COM EtherLink III Ethernet card is configured to use I/O port address 0x300 by default, but it can be configured to use any of 21 different address settings from 0x200 to 0x3e0. If the 3c509 driver did not find the adapter installed at address 0x300, it could legitimately search all 21 base address regions. Normally, this is not a problem. On occasion, however, auto−probing can return the wrong configuration values. In extreme cases, poorly designed adapters can even hang the system when they are probed. I have never personally seen an adapter hang the system, but some years ago I had an Ethernet card that returned the wrong configuration. In that case, I combined the reserve argument with device driver input, as in this example:
boot: linux reserve=0x210,16 ether=10,0x210,eth0
This boot input prevents device drivers from probing the 16 bytes starting at memory address 0x210. The second argument on this line passes parameters to the ether device driver. It tells that driver that the Ethernet adapter uses interrupt 10 and I/O port address 0x210. This specific adapter will be known as device eth0, which is the name of the first Ethernet device. Of course, you'll want to use the Ethernet adapter every time the system boots. Once you're sure this boot input fixes the Ethernet problem, store it as a kernel−specific option in the lilo.conf file. For example:
image = /boot/vmlinuz−2.2.5−15 label = linux
root = /dev/hda3 read−only
append = "reserve=0x210,16 ether=10,0x210,eth0"
The ether argument is also used to force the system to locate additional Ethernet adapters. Suppose that the system detects only one Ethernet adapter, and you have two Ethernet devices installed: eth0 and eth1. Use this boot input to force the system to probe for the second device:
ether=0,0,eth1
modules for device drivers. If your Ethernet card is not recognized during the boot, it may be that its module is not loaded. The first step is to check the module's configuration.
NoteSee the "Loadable Modules" section later in this chapter for information about managing modules and for specific examples of loadable modules used for Ethernet device drivers. This section has barely touched upon the very large number of arguments that can be entered at the boot prompt. See the "BootPrompt−HOWTO" document, by Paul Grotmaker, for the details of all of them. Most Linux systems include the HOWTO documents in /usr/doc.
Hardware Device Driver Initialization
When the system boots, several things happen. You have already seen the part that LILO and GRUB play in loading the operating system, but that is only the beginning. These loaders start the Linux kernel running, and then things really begin to happen.
The kernel is the heart of Linux. It loads into memory and initializes the various hardware device drivers. Most of the possible boot prompt arguments are intended to help the kernel initialize hardware, and the messages the kernel displays during startup help you determine what hardware is installed in the system and whether it is properly initialized.
Use the dmesg command to display the kernel startup messages; combine it with the less command or with grep to examine the startup messages more effectively. less allows you to scroll through the messages, one screenful at a time; grep permits you to search for something specific in the dmesg output. For example, combine dmesg and grep to locate kernel messages relating to the initialization of the Ethernet device eth0:
$ dmesg | grep eth0
loading device 'eth0'...
eth0: SMC Ultra at 0x340, 00 00 C0 4F 3E DD, IRQ 10 memory 0xc8000−0xcbfff.
This message clearly shows the type of Ethernet adapter used (SMC Ultra) and the Ethernet MAC address assigned to the adapter (00 00 C0 4F 3E DD). Additionally, because the SMC Ultra is an ISA bus adapter, the bus interrupt (IRQ 10), the adapter memory address (0xc8000−0xcbfff), and the I/O port address (0x340) are shown. All of this information is useful for debugging a hardware configuration problem.
Most systems use Ethernet for all network communications, although some use other devices, such as serial ports for this purpose. When the kernel initializes the serial ports, it displays the device name, I/O port address, and IRQ of each serial port. It also displays the model of Universal Asynchronous Receiver Transmitter (UART) that is used for the serial interface. Old systems used 8250 UARTs, which are inadequate for use with modems and a problem for systems that need to run PPP. As this example shows, current systems use the faster 16550A UARTs:
ttyS00 at 0x03f8 (irq = 4) is a 16550A ttyS02 at 0x03e8 (irq = 4) is a 16550A
NET4: Linux TCP/IP 1.0 for NET4.0 IP Protocols: ICMP, UDP, TCP, IGMP
IP: routing cache hash table of 1024 buckets, 8Kbytes TCP: Hash tables configured (established 16384 bind 16384) Linux IP multicast router 0.06 plus PIM−SM
NET4: Unix domain sockets 1.0/SMP for Linux NET4.0.
Reading the kernel messages helps you understand what occurs when the system starts up. Don't read these messages word for word—too many details will just bog you down. What you should do is look at the messages to gain a sense of how the system works. Of course, there are slight variations among the messages displayed on various systems, but the messages give you a very good idea of what is going on as the kernel initializes the hardware.
After the kernel concludes its portion of the boot process, the kernel starts the init program, which controls the rest of the startup.
Loading Linux Services—The
init
Process
The init process, which is process number one, is the mother of all processes. After the kernel initializes all of the devices, the init program runs and starts all of the software. The init program is configured by the /etc/inittab file. Listing 1.4 shows the inittab file that comes with Red Hat 7.2: Listing 1.4: The inittab File
#
# inittab This file describes how the INIT process should set up # the system in a certain run−level.
#
# Author: Miquel van Smoorenburg, <[email protected]> # Modified for RHS Linux by Marc Ewing and Donnie Barnes #
# Default runlevel. The runlevels used by RHS are: # 0 − halt (Do NOT set initdefault to this) # 1 − Single user mode
# 2 − Multiuser, without NFS (The same as 3, if you do not have networking) # 3 − Full multiuser mode
# 4 − unused # 5 − X11
# 6 − reboot (Do NOT set initdefault to this) #
id:5:initdefault:
# System initialization.
si::sysinit:/etc/rc.d/rc.sysinit
l0:0:wait:/etc/rc.d/rc 0 l1:1:wait:/etc/rc.d/rc 1 l2:2:wait:/etc/rc.d/rc 2 l3:3:wait:/etc/rc.d/rc 3 l4:4:wait:/etc/rc.d/rc 4 l5:5:wait:/etc/rc.d/rc 5 l6:6:wait:/etc/rc.d/rc 6
# Things to run in every runlevel. ud::once:/sbin/update
ca::ctrlaltdel:/sbin/shutdown −t3 −r now
# When our UPS tells us power has failed, schedule a shutdown for 2 minutes. pf::powerfail:/sbin/shutdown −f −h +2 "Power Failure; System Shutting Down"
# If power was restored before the shutdown, cancel it.
pr:12345:powerokwait:/sbin/shutdown −c "Power Restored; Shutdown Cancelled"
# Run gettys in standard runlevels 1:2345:respawn:/sbin/mingetty tty1
# xdm is now a separate service x:5:respawn:/etc/X11/prefdm −nodaemon
NoteThe comments in this sample file were edited slightly to better fit on a book page. They are a reduced version of the actual comments from the Red Hat inittab file.
Understanding Runlevels
To understand the init process and the inittab file, you need to understand runlevels, which are used to indicate the state of the system when the init process is complete. There is nothing inherent in the system hardware that recognizes runlevels; they are purely a software construct. init and inittab are the only reasons why the runlevels affect the state of the system. Because of this, the way runlevels are used varies from distribution to distribution. This section uses Red Hat Linux as an example. The Linux startup process is very similar to the startup process used by System V Unix. It is more complex than the initialization on a BSD Unix system, but it is also more flexible. Like System V, Linux defines several runlevels that run the full gamut of possible system states from not−running (halted) to running multiple processes for multiple users. The comments at the beginning of the sample inittab file describe the runlevels:
Runlevel 0 causes init to shut down all running processes and halt the system.
•
Runlevel 1 is used to put the system in single−user mode. Single−user mode is used by the system administrator to perform maintenance that cannot be done when users are logged in. This runlevel may also be indicated by the letter S instead of the number 1.
•
Runlevel 2 is a special multiuser mode that supports multiple users but does not support file sharing.
•
Runlevel 3 is used to provide full multiuser support with the full range of services. It is the default mode used on servers that use the "text only" console logon.
•
Runlevel 4 is unused by the system. You can design your own system state and implement it through runlevel 4.
•
Runlevel 5 initializes the system as a dedicated X Windows terminal. This runlevel is widely used as an alternative for systems configured to launch an X desktop environment at startup. In fact, runlevel 5 is the default runlevel for most Red Hat systems because most systems are desktop clients that use an X Windows console logon.
•
Runlevel 6 causes init to shut down all running processes and reboot the system.
•