Jacob Habgood
and
Mark Overmars
Foreword by Phil Wilson,
the producer of the highly anticipated Xbox 360™ game
Crackdown
.
The
Game Maker’s
Apprentice
Game Development
for Beginners
Create PC games the easy way using
Game Maker’s simple drag-and-drop interface
Learn essential game design theory
Make your games more fun!
TECHNOLOGY IN ACTION
™INCLUDES CD WITH
GAME MAKER SOFTWARE
AND EVERYTHING Y OU NEED
TO CREATE 9 GAMES!
INCLUDES CD WITH
GAME MAKER SOFTWARE
AND EVERYTHING Y OU NEED
Jacob Habgood
Mark Overmars
The Game Maker’s
Apprentice
The Game Maker’s Apprentice: Game Development for Beginners Copyright © 2006 by Jacob Habgood and Mark Overmars
All rights reserved. No part of this work may be reproduced or transmitted in any form or by any means, electronic or mechanical, including photocopying, recording, or by any information storage or retrieval system, without the prior written permission of the copyright owner and the publisher.
In purchasing this book, the authors and publisher grant you permission to use the electronic resources from the accompanying CD for commercial or noncommercial use in your own games made with Game Maker. However, redistribution of the original games or their resources is prohibited and the authors retain full copyright of all the original game concepts and the intellectual property associated with them. ISBN-13 (pbk): 978-1-59059-615-9
ISBN-10 (pbk): 1-59059-615-3
Printed and bound in China 9 8 7 6 5 4 3 2 1
Trademarked names may appear in this book. Rather than use a trademark symbol with every occurrence of a trademarked name, we use the names only in an editorial fashion and to the benefit of the trademark owner, with no intention of infringement of the trademark.
Lead Editor: Chris Mills
Development Editor: Adam Thomas
Technical Reviewer/Additional Material: Sean Davies
Editorial Board: Steve Anglin, Ewan Buckingham, Gary Cornell, Jason Gilmore, Jonathan Gennick, Jonathan Hassell, James Huddleston, Chris Mills, Matthew Moodie, Dominic Shakeshaft, Jim Sumser, Keir Thomas, Matt Wade
Game Artists: Kevin Crossley, Matty Splatt and Ari Feldman Cover Designer: Kurt Krames
Manufacturing Director: Tom Debolski
Distributed to the book trade worldwide by Springer-Verlag New York, Inc., 233 Spring Street, 6th Floor, New York, NY 10013. Phone 1-800-SPRINGER, fax 201-348-4505, e-mail [email protected], or visit http://www.springeronline.com.
To halcyon days with a frog,
a parrot,
Contents at a Glance
Foreword
. . . xivAbout the Authors
. . . xviAbout the Technical Reviewer
. . . xviiAbout the Illustrator
. . . xviiiAcknowledgments
. . . xixIntroduction
. . . xxPART 1
■ ■ ■
Getting Started
■
CHAPTER 1
Welcome to Game Maker
. . . 3■
CHAPTER 2
Your First Game: Devilishly Easy
. . . 9PART 2
■ ■ ■
Action Games
■
CHAPTER 3
More Actions: A Galaxy of Possibilities
. . . 41■
CHAPTER 4
Target the Player: It’s Fun Being Squished
. . . 65■
CHAPTER 5
Game Design: Interactive Challenges
. . . 85PART 3
■ ■ ■
Level Design
■
CHAPTER 6
Inheriting Events: Mother of Pearl
. . . 101■
CHAPTER 7
Maze Games: More Cute Things in Peril
. . . 127■
CHAPTER 8
Game Design: Levels and Features
. . . 149PART 4
■ ■ ■
Multiplayer Games
■
CHAPTER 9
Cooperative Games: Flying Planes
. . . 169■
CHAPTER 10
Competitive Games: Playing Fair with Tanks
. . . 191■
CHAPTER 11
Game Design: Balance in Multiplayer Games
. . . 211PART 5
■ ■ ■
Enemies and Intelligence
■
CHAPTER 12
GML: Become a Programmer
. . . 225■
CHAPTER 13
Clever Computers: Playing Tic-Tac-Toe
. . . 245■
CHAPTER 14
Intelligent Behavior: Animating the Dead
. . . 259■
CHAPTER 15
Final Words
. . . 291■
BIBLIOGRAPHY
. . . 297■
INDEX
. . . 299Contents
Foreword
. . . xivAbout the Authors
. . . xviAbout the Technical Reviewer
. . . xviiAbout the Illustrator
. . . xviiiAcknowledgments
. . . xixIntroduction
. . . xxPART 1
■ ■ ■
Getting Started
■
CHAPTER 1
Welcome to Game Maker
. . . 3Installing the Software
. . . 3Registration
. . . 5The Global User Interface
. . . 6Running a Game
. . . 6How to Get More Information
. . . 8What’s Next?
. . . 8■
CHAPTER 2
Your First Game: Devilishly Easy
. . . 9Designing the Game: Evil Clutches
. . . 9Sprites
. . . 10Objects
. . . 13The Boss Object
. . . 13Events and Actions
. . . 14The Dragon Object
. . . 18Rooms
. . . 20Save and Run
. . . 22Instances and Objects
. . . 24Demons, Baby Dragons, and Fireballs
. . . 24The Fireball Object
. . . 24The Demon Object
. . . 27Summoning Demons
. . . 30The Baby Dragon Object
. . . 31Backgrounds and Sounds
. . . 33A Background Image
. . . 33Background Music
. . . 34Sound Effects
. . . 35Congratulations
. . . 36PART 2
■ ■ ■
Action Games
■
CHAPTER 3
More Actions: A Galaxy of Possibilities
. . . 41Designing the Game: Galactic Mail
. . . 41Sprites and Sounds
. . . 42Moons and Asteroids
. . . 45Flying Around
. . . 50Winning and Losing
. . . 56An Explosion
. . . 56Scores
. . . 57Levels
. . . 58Finishing Touches
. . . 60A Title Screen
. . . 60Winning the Game
. . . 61Adding Some Visual Variety
. . . 62Help Information
. . . 62Congratulations
. . . 63■
CHAPTER 4
Target the Player: It’s Fun Being Squished
. . . 65Designing the Game: Lazarus
. . . 65An Animated Character
. . . 66A Test Environment
. . . 72Falling Boxes
. . . 73Finishing Touches
. . . 78No Way Out!
. . . 78Adding a Goal
. . . 79Starting a Level
. . . 80Sounds, Backgrounds, and Help
. . . 81Levels
. . . 82Congratulations
. . . 83■C O N T E N T S
■
CHAPTER 5
Game Design: Interactive Challenges
. . . 85What Makes a Good Game?
. . . 85Game Mechanics
. . . 86Interactive Challenges
. . . 87Game Genres
. . . 87Challenges
. . . 88Difficulty
. . . 88Goals
. . . 89Rewards
. . . 90Subgoals
. . . 92Interactivity
. . . 92Choices and Control
. . . 93Control Overload!
. . . 93Unfair Punishment
. . . 94Audio Feedback
. . . 95Summary
. . . 96PART 3
■ ■ ■
Level Design
■
CHAPTER 6
Inheriting Events: Mother of Pearl
. . . 101Designing the Game: Super Rainbow Reef
. . . 101A Game Framework
. . . 103The Front-End
. . . 103The Completion Screen
. . . 106Bouncing Starfish
. . . 107Biglegs
. . . 113Parent Power
. . . 116Lives
. . . 117Blocks
. . . 120Normal Blocks
. . . 120Solid Blocks
. . . 120Special Blocks
. . . 121Polishing the Game
. . . 123Sound Effects
. . . 123Saving Games and Quitting
. . . 123A Slower Start
. . . 124Creating the Levels
. . . 125Congratulations
. . . 126■
CHAPTER 7
Maze Games: More Cute Things in Peril
. . . 127Designing the Game: Koalabr8
. . . 127The Basic Maze
. . . 128The Game Framework
. . . 129A Moving Character
. . . 131Save the Koala
. . . 136Creating Hazards
. . . 137Tiles
. . . 140Adding Additional Hazards
. . . 143Locks and Switches
. . . 143A Detonator
. . . 144Rocks
. . . 145Finishing the Game
. . . 147Congratulations
. . . 148■
CHAPTER 8
Game Design: Levels and Features
. . . 149Selecting Features
. . . 149Pie in the Sky
. . . 150Do You Have That in Blue?
. . . 151Starting an Arms Race
. . . 152One-Trick Ponies
. . . 152Emerging with More Than You Expected
. . . 153Designing Levels
. . . 154The Game Maker’s Apprentice
. . . 155Learning Curves
. . . 156Difficulty Curves
. . . 158Saving the Day
. . . 160Applying It All
. . . 160Features
. . . 160Emerging Springs
. . . 161Training Missions
. . . 161Dividing Levels
. . . 162Summary
. . . 163■C O N T E N T S
PART 4
■ ■ ■
Multiplayer Games
■
CHAPTER 9
Cooperative Games: Flying Planes
. . . 169Designing the Game: Wingman Sam
. . . 169Variables and Properties
. . . 170The Illusion of Motion
. . . 173Flying Planes
. . . 174Enemies and Weapons
. . . 176Dealing with Damage
. . . 179Time Lines
. . . 182More Enemies
. . . 184End Boss
. . . 186Finishing Touches
. . . 188Congratulations
. . . 189■
CHAPTER 10
Competitive Games: Playing Fair with Tanks
. . . 191Designing the Game: Tank War
. . . 191Playing with Tanks
. . . 192Firing Shells
. . . 195Secondary Weapons
. . . 199Views
. . . 205Congratulations
. . . 210■
CHAPTER 11
Game Design: Balance in Multiplayer Games
. . . 211Competition and Cooperation
. . . 211Independent Competition
. . . 211Dependent Competition
. . . 212Independent Cooperation
. . . 213Dependent Cooperation
. . . 213Mix and Match
. . . 213Balanced Beginnings
. . . 214Equivalent Characters
. . . 214Balancing Differences
. . . 214Balanced Choice
. . . 218Weighting Choices
. . . 218Cyclic Relationships
. . . 218Balanced Computer Opponents
. . . 220Artificial Stupidity
. . . 220Summary
. . . 221PART 5
■ ■ ■
Enemies and Intelligence
■
CHAPTER 12
GML: Become a Programmer
. . . 225Hello World
. . . 226Variables
. . . 228Functions
. . . 230Conditional Statements
. . . 232Repeating Things
. . . 234Arrays
. . . 237Dealing with Other Instances
. . . 239Scripts As Functions
. . . 240Debugging Programs
. . . 242Congratulations
. . . 244■
CHAPTER 13
Clever Computers: Playing Tic-Tac-Toe
. . . 245Designing the Game: Tic-Tac-Toe
. . . 245The Playing Field
. . . 246Let the Computer Play
. . . 251A Clever Computer Opponent
. . . 254Adaptive Gameplay
. . . 256Congratulations
. . . 257■
CHAPTER 14
Intelligent Behavior: Animating the Dead
. . . 259Designing the Game: Pyramid Panic
. . . 259The Basic Framework
. . . 260Creating the Maze and the Explorer
. . . 263Expanding Our Horizons
. . . 265Reactive Behavior
. . . 267Time for Treasure!
. . . 269■C O N T E N T S
Movable Blocks
. . . 270Rule-Based Behavior
. . . 271Walking Around
. . . 273Moving Toward the Explorer
. . . 275Dealing with States
. . . 277Scarabs
. . . 280Let There Be Light
. . . 284Looking to the Future
. . . 289■
CHAPTER 15
Final Words
. . . 291Creating Resources
. . . 291Artwork: The GIMP
. . . 291Music: Anvil Studio
. . . 292Sound Effects: Audacity
. . . 294The Game Maker Community
. . . 294Note to Teachers
. . . 295Good Luck
. . . 296■
BIBLIOGRAPHY
. . . 297■
INDEX
. . . 299Foreword
W
ay back when Mario was still a mere twinkling in Miyamoto’s eye, I was the proud ownerof a state-of-the-art Commodore 64 microcomputer. It came with a game development sys-tem called “The Quill,” which allowed anyone to create their own text-based adventure games. It may have been incredibly crude, but it suddenly put at my fingertips the thrill of entertain-ing my nearest and dearest by devisentertain-ing “interactive challenges” of my own. Unfortunately, I knew little about game design, and rather than easing my players into a new and alien world, I treated them as opponents that had to be defeated before they could reach the end. Their spir-its crushed, they left, never to return . . .
It took me years of playing a variety of good (and bad) games to eventually learn how to treat the player to the game-playing experience that their investment of time and money deserved. It took just hours of reading this book to wish I’d had its invaluable guidelines and the accompanying Game Maker tool to help me take my own first steps into game develop-ment all those years ago.
Two decades later, I now work for Real Time Worlds as the producer of Crackdown, an imminent Xbox 360 title developed exclusively for Microsoft. Crackdown is the result of over three years of development from a team that’s now nearly 70 strong in Dundee (Scotland), with many more contributors across North America and Eastern Europe. This game has cost millions of pounds to create, and already consists of over two and half million lines of program-ming code! Blood, sweat, and tears have been poured into this title to provide cutting-edge graphics technology, stunning art assets, and dramatic surround sound. We’ve spent days (and nights) wrestling with new technologies to provide the player with a “playground” and “toy set” that was previously only the stuff of dreams.
Nonetheless, once you strip away the gloss, Crackdown boils down to a handful of game-play linchpins, or what we term the “pillars of game-play.” Take it from me that when charged with building such a grand gaming monument, it is vitally important to have absolute faith in the basic foundations! I was therefore very pleased to see that this book encourages you to iden-tify these pillars (or game mechanics) and discover how a system of simple rules can combine in unique and compelling ways to create a spellbinding experience.
As you progress through the book you’ll build a series of excellent games that you might never have even dreamed you could be capable of creating right now. The instructions are clear and concise, but also encourage you to experiment with your own designs. For example, your version of the captivating and original Koalabr8 game (Chapter 7) will almost certainly be a unique piece of software. The crazy devices you invent, and the way you lay out your levels, will certainly differ from mine. Watch out for Lazarus too (Chapter 4)—it may interest you to know that this eponymous hero first appeared in Jacob’s student portfolio, and was partly responsible for securing his first programming job in the industry!
Mark and Jacob have brought together decades of game development expertise in this book. As well as being a professor of computing, and the creator of Game Maker, Mark first cut his game-programming teeth creating versions of games like Super Breakout for the Atari ST. Jacob has a string of titles to his name, and his in-depth knowledge of “the craft” consistently yields outstanding results. Never more so was this the case than when I had the pleasure of working with him on the team that created the PlayStation hit Hogs of War (also mentioned in this book). Where Jacob differs from his peers is in his mastery of all four of the fundamental game development disciplines: programming, sound, art, and, of course, design. Now, thanks to Mark’s Game Maker software, you can find out what it feels like in their world!
One of the key messages I hope you’ll take away from this book is that there’s a world of difference between having a great idea for a game and being a great game designer. The initial idea is simply the seed from which the game grows, or the stone from which the pillars are hewn. The role of a designer is to fully realize the vision: conceiving and continually refining the various supporting mechanisms to make them mesh like the components of a Swiss time-piece. As is repeatedly stated in these pages, there is no correct solution to game design—only a great idea, well executed and injected with personal flair and enthusiasm. Even if you’re struggling to pin down that idea right now, I’m sure you will have wrestled it onto the screen and into the hands of friends and family before finishing the final chapter of The Game Maker’s Apprentice.
Good luck!
Phil Wilson Producer, Real Time Worlds
Crackdown
About the Authors
■JACOB HABGOODis 30 years old and has been writing computer games since he was 10. He wanted to be a psychologist when he grew up, but somehow he ended up with a computer science degree and went into the games industry instead. He worked as a professional game developer for seven years, programming console games for Gremlin Interactive and Info-grames/Atari in the north of England. During this time he contributed to a range of successful titles and led the programming teams on Micro Machines (PlayStation 2, Xbox, and Nintendo GameCube) and Hogs of War (PlayStation).
Jacob is now a doctoral student at the University of Nottingham, researching the educa-tional potential of computer games. As part of this research, Jacob runs clubs and work-shops teaching children and teenagers how to make their own computer games and provides free teaching resources through his website: gamelearning.net. All being well, this work will soon earn him a Ph.D. from Nottingham’s Department of Psychology so that he can finally consider himself grown up.
■MARK OVERMARSis a full professor in computer science at Utrecht University in the Netherlands. There he heads the research center for Advanced Gaming and Simulation (www.gameresearch.nl) in which researchers from different disciplines collaborate on all aspects of gaming and simulation. One of Mark’s prime research domains is computer games. He is also one of the founders of the Utrecht Platform for Game Education and Research (www.upgear.nl), a collaboration of different game-related educational programs in the Netherlands. For many years he has taught courses on computer game design at Utrecht University, and has given lectures on game design to many types of people (high school kids, teachers, researchers, and politicians). Mark is the author of a number of popular software packages, in particular, the Game Maker software package used as the development tool in this book.
About the Technical Reviewer
■SEAN DAVIESis 28 years old and has been fascinated by computer games from an early age. He grew up fairly certain that he would become a novelist—or possibly a rock star, but eventually came to a number of important realizations:
1. He’s probably never going to be a rock star.
2. Game programming is quite cool, though.
3. Badgers are just really big weasels (the exchange rate is approximately 20 weasels to the badger if you’re interested).
4. Any attempts to construct a serious calculus of the family Mustelidae are probably best kept to yourself—people think you’re strange (see above).
Having made these startling realizations at such an early stage, the rest of his career path was pretty much decided. After graduating with a degree in computer science, he joined Info-grames in Sheffield, UK, and has worked in the games industry ever since. When InfoInfo-grames Sheffield closed its doors in 2002, he joined Sumo Digital, where he still is today. Sean is cur-rently Xbox platform lead on Outrun 2006: Coast to Coast, which Sumo is developing for SEGA, and is looking forward to working on some next-generation console programming in the near future. He currently has no intention at all of ever becoming properly grown up.
Outrun 2006: Coast to Coast
About the Illustrator
T
he first things Kev Crossleyremembers drawing as a child were some Daleks and the Incredible Hulk, and he knew from that point on that he would grow up to be one or the other. When Kev was five, his dad brought home the videogame Pong, and Kev has been trying to come to grips with it ever since. Nonetheless, he has managed to get through a couple of Zelda games and has spent many a happy hour blasting the head off one of this book’s authors with a Rail Gun.Kev spent some time in a university, but eventually realized that an art degree was not going to give him access to Time Lords or gamma rays, so he decided to work in a bakery instead. Eventually he got sick of eating coconut macaroons and biscuits and applied for a job making videogames for a little green monster. For the next third of his life, he had a great time producing graphics and animation for over 20 titles—some of which were quite good.
These days Kev is a concept artist at Core Design in Derby, UK, where he has occasionally been known to hang out with women obsessed with tombs. He has also done copious amounts of freelance illustration and writing for publishers all over the world, including a series of instructional drawing books and sequential work for Rebellion’s sci-fi comic 2000AD. His one regret is that he can’t ride a skateboard, because a cross between the Daleks and Tony Hawk would be unstoppable.
Acknowledgments
B
y rights, this book really shouldn’t exist, because it’s required far too much effort from far too many people to make it a profitable endeavor. Nonetheless, it does exist, and as a result there are a lot of people who need to receive our heartfelt thanks in helping us to realize this labor of love.First and foremost, we need to thank all those people closest to the individuals directly involved in bringing this book into existence. Their influence may not be obvious to the reader, but projects like this could never happen without the support and understanding of the wives, girlfriends, and families of all the people involved in this book. In particular, Jacob would like to thank Jenny, Fiona, Michelle, and Amelia, all of whose names should adorn the credits of many a videogame for the sacrifices that they regularly make to indulge the creative passions of their loved ones.
The next biggest thanks should go to Matty Splatt, who has shied away from a full billing in the “About the” sections but did a fantastic job of bringing Koalabr8 and Pyramid Panic to life with his comical and beautifully polished graphics. We would also like to give a special thanks to Ari Feldman for allowing us to use and modify his game sprites for the Wingman Sam game.
More thanks go to Jenny and Marguerite Habgood for their grammatical critiques, and the following people for all their comments and input into the project: Sarah Peacock, Judy Robertson, John Sear, and Phil Wilson. Additional thanks goes to all the staff and students at Sheffield West City Learning Centre, who suffered the book’s instruction in its earliest form.
Quick thanks also to everyone who enthusiastically play-tested the games in the book, including Gail Clipson, Fiona Crossley, Katie Fraser, Giulia Gelmini, Jasmin Habgood, Martijn Overmars, Ronald Overmars, and Stuart Reeves.
Finally, we would like to thank everyone at Apress for their support, and for sticking with us even after it became plainly obvious that both authors were far too busy to write a book!
Introduction
W
ho wouldn’t want to make computer games? It’s creative, rewarding, and these days evenpretty darn cool too. You can make them to share with your school friends, your work col-leagues, your grandchildren, or even the entire gaming world. This book is not specifically for the young or old, but anyone who loves computer games and wants to have a go at making them for themselves. We’ve all painted a picture, written a story, and made a wobbly piece of pottery at some point in our lives, so it’s now time to embrace the art form of the future and try making computer games too.
This book provides a collection of engaging tutorials that introduce you to the Game Maker tool and teach you how to use it. The first four parts of the book take you step by step through seven different projects using Game Maker’s simple drag-and-drop programming sys-tem. By the time you’ve finished making Evil Clutches, Galactic Mail, Lazarus, Super Rainbow Reef, Koalabr8, Wingman Sam, and Tank War, you’ll have a well-rounded experience of making games with Game Maker. Parts 2, 3, and 4 also end with game design chapters that encourage you to stand back from your creations and consider how principles of game design can be used to make them more fun. Moreover, we don’t just talk about it, but we provide new ver-sions of the games with improved features so that you can experience for yourself how solid game design can lead to good gameplay.
Game Maker provides a simple environment that allows complete beginners to quickly start building games, using an icon-based system of events and actions (see Figure 1). This drag-and-drop programming technique provides an easy way to learn about game development and allows you to create complete games without going near a traditional programming language.
Figure 1.Game Maker’s simple drag-and-drop system uses iconic events and actions to program computer games.
However, once you become more experienced, traditional languages can provide a more powerful way to program games. Consequently, Game Maker also provides the Game Maker Language (GML), which underpins Game Maker and makes it such a powerful tool (see Figure 2). The last part of the book uses several simple examples to introduce you to GML, before we demonstrate how you can use it to create artificial intelligence for undead creatures in the Pyramid Panic game.
Figure 2.Game Maker Language (GML) provides extra power for advanced users.
The example games in this book have been brought to life with graphics and illustrations by real games industry artists. Furthermore, you can use all the professional resources pro-vided on the CD in your own Game Maker projects with the blessing of the publisher and authors. We only ask that you share your creations with the online Game Maker community so that we can see what you have created with them. We want you to enjoy the creative journey ahead and hope that it will help you to share in our passion and enthusiasm for creating computer games!
Getting Started
W
elcome to the world of game development. Playing games can be a lot of fun, but
you’re about to discover why making them is so much better!
Welcome to Game Maker
I
f you’re looking for an enjoyable way to learn how to make computer games, then this is the book for you. You don’t need a degree in computer science and you won’t have to read a book the size of a telephone directory—everything you need is right here. As long as you can use Windows without breaking into a cold sweat, you have all the qualifications you need to start making your own games. In the chapters ahead, we’ll show you how to make nine complete games and pass on some of our hard-earned professional experience in game design along the way. Already, you are just two chapters away from completing your first game and have taken your first step along the path of the game maker’s apprentice!Every trade has its tools, and every tradesman knows how to choose the right tool for the job. In this book we will be creating all the games using a software tool for Windows called Game Maker. Game Maker is ideal for learning game development as it allows you to start making games without having to study a completely new language. This makes the whole learning experience a lot easier and allows you to concentrate on creating great game designs rather than getting bogged down with the technicalities of programming. Nonetheless, pro-gramming languages can offer many advantages to experienced users and so Game Maker also includes its own language, which is there for you to discover when you feel ready to use it.
You’ll be pleased to hear that there is a free version of Game Maker included on the CD accompanying this book. All the games can be made using this free version; however, there are some special effects in the later chapters that will only work with a registered version of Game Maker. If you want to register your version for this, or any of the other extra features that it unlocks, then it can be obtained from the Game Maker website for a very small fee (currently US $20): www.gamemaker.nl.
Installing the Software
You can’t begin making the games in this book until you have the Game Maker software installed on your PC. You’ll find the install program in the Programfolder on the CD, so insert the disc, navigate to the Programfolder, and start the program called gmaker_inst.exe. The form shown in Figure 1-1 should then appear on the screen.
3
Figure 1-1.Install Game Maker by following the instructions on the screen.
Click Nextand follow the instructions as they appear. We strongly recommend installing the program in the default directory.
■
Note
Game Maker requires a fairly modern PC running Windows 98SE, Me, 2000, or XP—although Windows XP is preferable. You’ll need a DirectX-compatible graphics card with at least 32MB of memory and DirectX 8 or later installed on your machine. A DirectX-compatible sound card is also required for sound and music. If your machine does not meet these requirements, you might have problems running Game Maker or the games created with it. Don’t worry if all this techno-babble makes no sense—just try it out because you’re not likely to have any problems unless your PC is very old. See the readmefile in the Programfolder on the CD for further details.Game Maker should start automatically once the installation has completed. You can also launch it directly from the Windows Start menu or by double-clicking the Game Maker icon on your desktop. The first time you run Game Maker on a new computer, you will be asked if you want to run the program in Advanced mode (see Figure 1-2). Click Noas it will be easier to stick with the Simple mode for the time being—we’ll show you how to switch to Advanced mode later on.
C H A P T E R 1 ■ W E L C O M E TO G A M E M A K E R
Figure 1-2.Click No at the prompt, as we want to start by using Simple mode.
Registration
The free version of Game Maker provided with this book is fine for learning how to make all the games in this book, but some of Game Maker’s more exciting features are disabled unless you register the program. Registering will also allow you to create more professional-looking games by removing the Game Maker pop-up message that appears at the start of any game. Until you register, a reminder message will appear from time to time like the one shown in Figure 1-3. Clicking Close this Formwill make it disappear, but if you use Game Maker a lot we strongly encourage you to register it. Registration will support the further development of Game Maker and ensure that everyone who uses it can continue to enjoy making games for years to come. Information about registration can be obtained by clicking Go to Registration Webpageor by simply visiting the Game Maker website at www.gamemaker.nl.
Figure 1-3.Select Close this Form to start working with Game Maker or Go to Registration Webpageto learn more about registration.
The Global User Interface
If everything has gone according to plan, then you should now be looking at the window shown in Figure 1-4. If not, consult the readmefile in the Programfolder on the CD for possible causes and further instructions.
Figure 1-4.This is Game Maker’s main window.
We’ll describe the user interface in more detail in the next chapter, but for the moment just notice that there’s a standard-looking menu and toolbar at the top of the screen, and a folder treeon the left-hand side. This tree is where we will add all the different game resources that are used to make Game Maker games. More about resources later, but first let’s make sure Game Maker is working properly by running a simple game.
Running a Game
Loading and running a game that has been created using Game Maker couldn’t be simpler. Just complete the following instructions.
C H A P T E R 1 ■ W E L C O M E TO G A M E M A K E R
Running the sample game:
1. Click the Filemenu and select Openfrom the drop-down menu. This will bring up the standard Windows file requester.
2. Make sure the CD is in your CD drive. Navigate to the Games/Chapter01folder on the CD and look for bouncing.gm6(all Game Maker files end with this .gm6extension). Select this file and click Open.
It may not seem as if anything has changed, but if you look carefully, there are now plus signs in front of the different folders on the left-hand side. Clicking these plus signs will open up the folders to show the resources that they contain.
Let’s run the game. Don’t expect too much, though; this is just a simple demo to check whether Game Maker works correctly on your machine. Click the green play button on the toolbar. The Game Maker window should disappear and the image in Figure 1-5 will appear. This is the pop-up that is only shown in the free version of the program and can be removed by registering your copy of Game Maker.
Figure 1-5.This pop-up message appears in the free version of Game Maker.
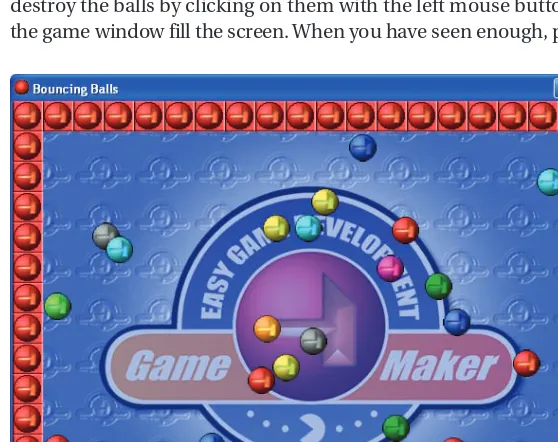
After a short pause, a game window should appear like the one in Figure 1-6. You should hear music and see a number of balls bouncing around the screen. If you like, you can try to destroy the balls by clicking on them with the left mouse button, or you can press F4 to make the game window fill the screen. When you have seen enough, press the Esc key to end the game.
Figure 1-6.In the bouncing ball demo, you can try to destroy the balls by clicking on them with the left mouse button.
If something went wrong (for example, you got an error message or you didn’t hear the music), then consult the readmedocument in the Programfolder on the CD for possible causes and further instructions. You can now close Game Maker by choosing Exitfrom the Filemenu.
How to Get More Information
This book will show you how to make some cool games with Game Maker,but it is not a
com-plete manual for everything that Game Maker can do. Fortunately, the Game Maker help file contains all the facts, and you can access it at any time through the program’s Helpmenu or the Windows Start menu. A copy of this document is also available in the Documentsfolder on the CD.
You are also strongly advised to check out the official Game Maker website at
www.gamemaker.nl. Here you’ll find the latest version of the program and lots of games that have been created with it—as well as additional resources and documents. The website also gives you access to the Game Maker user forum. This is a very active forum and a great place to get help from other users or just to exchange ideas and games.
What’s Next?
Now that the boring stuff is out of the way, so I think it’s about time we made our first game. You’re probably thinking your first game will be pretty dull—something with more bouncing balls, perhaps? Not likely!
C H A P T E R 1 ■ W E L C O M E TO G A M E M A K E R
Your First Game:
Devilishly Easy
L
earning something new is always a little daunting at first, but things will start to become familiar in no time. In fact, by the end of this chapter, you’ll have completed your very first gaming masterpiece!Designing the Game: Evil Clutches
Before you start making a game, it’s a good idea to have an idea of what you’re aiming for. Commercial game developers usually prepare long design documents before they start creat-ing a game. Nonetheless, writcreat-ing documents isn’t a fun way to learn how to make games, so we’ll keep our designs as short as possible. We’re calling the game in this chapter Evil Clutches, and this is its design:
You play a mother dragon who must rescue her hatchlings from an unpleasant band of demons that have kidnapped them. The band’s boss sends a stream of demons to destroy the dragon as the hatchlings make their escape. The mother can fend off the boss’s minions by shooting fireballs, but must be careful not to accidentally shoot the hatchlings!
The arrow keys will move the dragon up and down and the spacebar will shoot fireballs. The player will gain points for shooting demons and rescuing young dragons, but will lose points for any hatchlings that accidentally get shot. The game is over if the dragon is hit by a demon, and a high-score table will be displayed. Figure 2-1 shows an impression of what the final game will look like.
Using this description, we can list all the different elements needed to create our game: a dragon, a boss, demons, hatchlings, and fireballs. Making the game will require pictures of each of these as well as a background image, some sound effects, and music. We call all these different parts that make up the game resources, and the resources for this game have already been created for you in the Resources/Chapter02folder on the CD. For the remainder of the chapter, we will learn how to put these resources together into a game and bring them to life.
9
Figure 2-1.Here’s the Evil Clutches game in action.
Sprites
In Game Maker, pictures of dragons, demons, and other game objects are all called sprites. Sprites are one kind of resource used in games, and they can be made from images that have been created in art packages or downloaded from the Internet. Game Maker includes a simple sprite editor for drawing your own sprites, but you can use any drawing package you like for this purpose. However, creating sprites is time consuming, so we’ve already provided profes-sionally drawn sprites for each game.
If you’ve not done so already, start up Game Maker. Figure 2-2 shows the (rather empty) main window that appears.
■
Note
If your window doesn’t look exactly the same as shown in Figure 2-2, then you’re probably running Game Maker in Advanced mode. To switch to Simple mode, choose Advanced Modefrom the Filemenu and the checkmark beside it will disappear.C H A P T E R 2 ■ YO U R F I R S T G A M E : D E V I L I S H LY E A S Y
Figure 2-2.In the main window of Game Maker (in Simple mode), the menu and toolbar runs along the top of the window and a list of resources down the left side.
The left side of the window shows the different types of resources that make up the game: sprites, backgrounds, sounds, and so forth. These are currently empty, but the names of new resources will appear here as they are added to the game. The menu bar along the top of the window contains all the commands that allow us to work with resources—although most common tasks can also be accessed using the buttons on the toolbar. We’ll begin by using the Create Spritecommand to create a new sprite.
Creating a new sprite resource for the game:
1. From theResourcesmenu, choose Create Sprite. The Sprite Properties form appears, like the one shown in Figure 2-3.
Figure 2-3.Open the Sprite Properties form for a new sprite.
2. Click the Namefield, where it currently says sprite0. This is the default name created by Game Maker for the new sprite, but you should rename it to sprite_dragon.
3. Click the Load Spritebutton. This opens the standard Windows file requester.
4. Select the required image using the file requester. The image for the dragon is called Dragon.gif, and you’ll find it in the Resources/Chapter02folder on the CD. Your Sprite Properties form should now look like Figure 2-4.
■
Note
Always avoid using spaces and punctuation in names for resources as they will confuse Game Maker when you try to use some of its more advanced functions later on. You can use the underscore (_) symbol instead of spaces, which is usually found on the same key as the minus symbol (press Shift and the minus key).Figure 2-4.The Sprite Properties form looks like this after we load the dragon sprite.
5. Click OKto close the form. You have now created a sprite.
The dragon sprite should now have been added to the list of sprites in the resource list. If you ever need to change a resource, you can reopen its properties form by double-clicking on its name in the resource list. Do this now and take another look at the dragon sprite’s proper-ties (Figure 2-4).
The form shows that there are six subimages to this sprite. Sprites often consist of several images shown one after the other to create the illusion of movement. If you move through the subimages using the blue arrow button, you will notice that there are actually only two differ-ent images for this sprite. The extra copies make sure that the dragon doesn’t flap its wings too quickly when it’s animating.
The checkmark next to the Transparentproperty means that the background of the
dragon sprite is see-through. Most sprites are set to transparent so that the surrounding rec-tangle won’t be drawn when the sprite appears in the game. Figure 2-5 shows the difference that the Transparentoption makes—the advantages are obvious to see!
C H A P T E R 2 ■ YO U R F I R S T G A M E : D E V I L I S H LY E A S Y
Figure 2-5.Here’s the dragon sprite with the Transparent option set (left) compared to the same dragon without the Transparent option (right).
■
Note
Game Maker works out which color to make transparent based on the color in the bottom leftmost corner of each image. This is worth remembering when you want to create your own sprites.Okay, let’s create the other sprites for the game in the same way.
Creating the remaining Evil Clutches sprites:
1. From the Resourcesmenu, chooseCreate Sprite.
2. In the Namefield in the Sprite Properties form, type the name sprite_boss.
3. Click the Load Spritebutton and choose the file Boss.gif.
4. Click OKto close the Sprite Properties form.
5. Now create a demon sprite, baby sprite, and fireball sprite using the Demon.gif, Baby.gif, and Fireball.giffiles in the same way. Give each sprite an appropriate name (using only letters and the underscore symbol).
This completes all the sprites needed to create the Evil Clutches game.
Objects
Sprites don’t do anything on their own; they just store pictures of the different elements in the
game. Objectsare the parts of the game that control how these elements move around and
react to each other. We’ll begin by creating our first object to tell Game Maker how we want the demon boss to behave.
The Boss Object
The following steps create a new object and assign it a sprite so that Game Maker knows how it should look on the screen.
Creating a new object and assigning it a sprite:
1. From the Resourcesmenu, choose Create Object. An Object Properties form like the one in Figure 2-6 appears.
Figure 2-6.Open the Object Properties form for your new object.
2. In the Namefield, give the object a name. You should call this one object_boss.
3. Click the icon at the end of the sprite field and a list of all the available sprites will appear. Select the sprite_bosssprite.
■
Caution
Always make sure that you give your object resources names that are different from your sprite resources. Ending up with an object and a sprite both called “dragon,” or two objects called “demon,” can confuse Game Maker when you try to use its more advanced functions later on. Adding prefixes like “sprite_” or “object_” to names is a good way to achieve this without having to think of new names.Events and Actions
Game Maker usesevents and actionsto specify how objects should behave. Eventsare impor-tant things that happen in the game, such as when objects collide or when the player presses a key on the keyboard. Actionsare things that happen in response to an event, such as changing an object’s direction, setting the score, or playing a sound. Game Maker games are basically just a collection of objects with actions to tell them how they should react to different events. Therefore, to set the behavior of an object in Game Maker you must define which events the object should react to and what actions they should perform in response.
The boss object’s lists of events and actions are currently empty. We’re going to begin by adding an event and action that will start the boss moving up the screen at the beginning of C H A P T E R 2 ■ YO U R F I R S T G A M E : D E V I L I S H LY E A S Y
the game. This will be complemented by an action that reverses the vertical direction of the boss in the event that it collides with the edge of the screen. As a result, the boss will continu-ally move up and down between the top and bottom of the screen.
Adding a create event for the boss object:
1. Click the Add Eventbutton. The Event Selector appears, as shown in Figure 2-7.
Figure 2-7.Click Add Eventto open the Event Selector pop-up form.
2. Click the Createevent to add it to the list of events. A new event is automatically selected (with a blue highlight) in the event list, as shown in Figure 2-8. This means we’re already looking at this event’s Actionslist alongside it (which is currently empty).
Figure 2-8.This is how the Object Properties form should look once the name, sprite, and
Createevent have been added.
3. Next you need to include the Move Fixedaction in the list of actions. To do this, press and hold the left mouse button on the action image with eight red arrows, drag it to the empty Actionslist box, and release the mouse button. An action form will then pop up asking for particular information about this action (see Figure 2-9).
Figure 2-9.Here’s the action form for the Move Fixedaction.
■
Note
Whenever we use an action in the instructions, that action’s image is shown in the left margin to help you find the correct one.4. Select the up arrow and enter a value of 8for the Speed. This will make the object move vertically 8 pixels (the tiny squares that make up a monitor display) for every step that it takes.
5. Press OKto close the action form and it will be included in the list of actions.
■
Note
All of Game Maker’s actions are organized into tabbed pages of icons on the right of the Actionslist. Browse through the different action tabs to see all the various actions and hold your mouse over one to reveal its name.
This event should start the boss moving upward. Now we’ll add an event to reverse an object’s vertical direction when it collides with the edge of the screen. This event is called the Intersect Boundary event because it gets called when the object’s sprite intersects the screen’s boundary by being partly in and partly out of the screen.
Adding an intersect boundary event for the boss object:
1. Click the Add Eventbutton.
2. Choose Otherfrom the Event Selector pop-up form and select Intersect boundary from the drop-down menu that appears. This action will then be added and selected in the list of events.
C H A P T E R 2 ■ YO U R F I R S T G A M E : D E V I L I S H LY E A S Y
3. Include the Reverse Vertical action in the list of actions for this event. You’ll now see the form shown in Figure 2-10.
Figure 2-10.The action form for the Reverse Directionaction looks like this.
4. Nothing needs changing on this form, so just click OK. The Object Properties form for the boss object now looks like the one shown in Figure 2-11.
Figure 2-11.In the Object Properties form for the boss object, we’ve added two events, along with their corresponding actions.
These are all the events and actions we need for the boss right now. You can switch between the different events by clicking on them in the Eventslist. The selected event is highlighted in blue and the actions for that event are then shown in the Actionslist. You can edit the properties of each action by double-clicking on them, but we’re done with the boss object for now.
5. Click OKat the bottom left of the form to close it.
The Dragon Object
Now let’s turn our attention to the heroine of the game. We’ll begin by creating an object for the dragon in the same way as for the boss.
Creating a dragon object:
1. From the Resourcesmenu, chooseCreate Object.
2. Give the object a name by entering object_dragonin the Namefield.
3. Select the sprite_dragonsprite from the drop-down sprite menu.
The dragon also needs actions to make it move up and down the screen, but this time only when the appropriate keys are pressed on the keyboard. We do this by using keyboard events.
Adding keyboard events for the dragon object:
1. Click the Add Eventbutton.
2. Choose a Keyboardevent and select <Up>from the pop-up menu (to indicate the up arrow key).
3. Include the Move Fixedaction in the Actionslist.
4. In the action form, select the upward direction and set Speedto 16.
5. Repeat the previous process to add a Keyboardevent for the <Down>key that
includes a Move Fixedaction with a downward direction and a speed of 16. The Object Properties form should now look like the one shown in Figure 2-12.
We just need one more event and action to make the dragon’s movement work correctly. Our Keyboardevents will start the dragon moving when the player presses the arrow keys, but there are currently no events to stop it from moving again when the keys are no longer being pressed. We use the Keyboard, <no key> event to test for when the player is no longer pressing any keys.
C H A P T E R 2 ■ YO U R F I R S T G A M E : D E V I L I S H LY E A S Y
Figure 2-12.The Object Properties form for the dragon looks like this once we add the <Up>and
<Down>events.
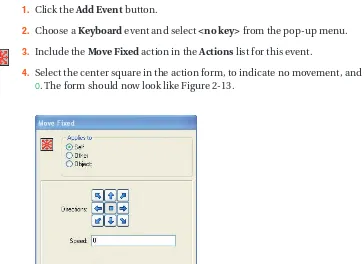
Adding a no key event for the dragon object:
1. Click the Add Eventbutton.
2. Choose a Keyboardevent and select <no key>from the pop-up menu.
3. Include the Move Fixed action in the Actionslist for this event.
4. Select the center square in the action form, to indicate no movement, and set Speedto 0. The form should now look like Figure 2-13.
5. That’s all the actions we need to make our dragon move up and down, so click OKto close the Object Properties form for the dragon object.
Figure 2-13.These settings stop the movement of the dragon.
■
Caution
When setting a Move Fixedaction with a speed of 0, you must also select the center square of the direction grid. If no direction square is selected at all, then the action is ignored!Rooms
Our dragon and boss objects are all ready to go now, but in order to see them we need to put them into a level. Levels in Game Maker are made using rooms, and putting objects into a room defines where they will appear at the start of the game. However, not all objects need to be there at the start of the game, and they can be created on the fly as well (fireballs, for exam-ple). Let’s create a new room.
Creating a new room resource:
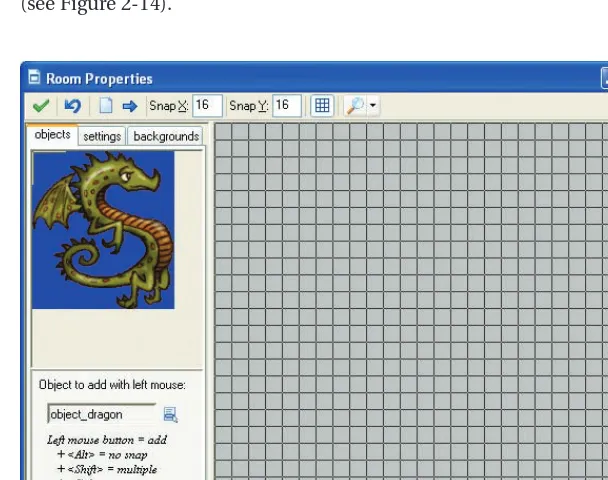
1. SelectCreate Roomfrom the Resourcesmenu. A Room Properties form will appear
(see Figure 2-14).
Figure 2-14.The Room Properties form for a new room opens.
■
Note
If there are sliders along the edges of the room grid, then the window is not currently large enough to see the entire room. Maximize the Game Maker window and the Room Properties form to see more of the room, or use the sliders to scroll around the entire room.C H A P T E R 2 ■ YO U R F I R S T G A M E : D E V I L I S H LY E A S Y
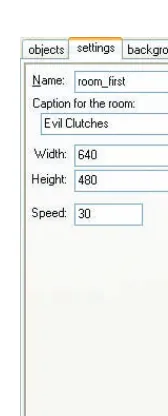
2. Click the settings tab in the top left of the form.
3. Enter a name for the room in the Namefield. Call this one room_first.
4. Enter a caption for the title bar of the window when the game is running. “Evil Clutches” seems appropriate for this game. The room settings should now look like Figure 2-15.
Now we can place our objects in the new room.
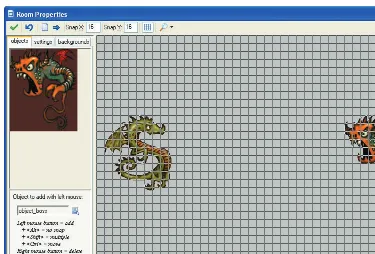
Adding a dragon and boss to the room:
1. Click the objectstab in the top left of the form. You should see that the dragon object is already selected as the object “to add with left mouse.”
2. Click on the room grid with the left mouse button. An instance of the dragon object will be placed with its top-left corner at the point at which you click. The position you place the dragon becomes its starting position in the game, so put just one dragon close to the left boundary of the room area. If you add it in the wrong place, use the right mouse button to remove it again.
3. Click on the dragon’s image on the objectstab (or on the image of the pop-up menu next to where it says object_dragon) and select the boss object from the menu that appears.
4. Place an instance of the boss close to the right edge of the room, but make sure that the whole of his sprite is completely inside the room—otherwise his events will not work correctly! The room should now look something like Figure 2-16.
Figure 2-15.Here’s the settingstab of the Room Properties form, with the name and caption filled in.
Figure 2-16.The room with the dragon and the boss looks like this.
Our very first version of the game is now ready. Click the green checkmark in the top-left corner of the form to close it and you can see the results of your labor . . .
■
Tip
You can also click and hold the mouse button to move instances within a room.Save and Run
It’s always a good idea to save your work as often as possible—just in case your computer crashes. In case you haven’t already worked it out for yourself, then the steps for this process are given here. However, in the future you’ll have to remember to save your work regularly yourself! This works in the same way as most programs.
Saving your work and running the game:
1. Choose Savefrom the Filemenu (or click the disk icon).
2. The first time you save the game, you will be prompted for a location and filename in the normal way. Note that Game Maker files always end with the extension .gm6. Save this game in a place where you can easily find it again (on the desktop, for example). C H A P T E R 2 ■ YO U R F I R S T G A M E : D E V I L I S H LY E A S Y
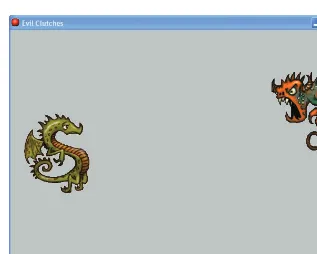
3. To run the game, select Run Normallyfrom the Runmenu. After a brief pause, a game window should appear, like the one shown in Figure 2-17.
Figure 2-17.Here’s the first version of the Evil Clutches game in action.
You should now be able to move the dragon up and down using the arrow keys, and the boss should float up and down by itself. If your game doesn’t work in this way, then you might want to check through all your steps in the previous sections. You may also need to ensure that your game window is selected (by clicking on it with the mouse) before your keyboard input has any effect. All games we make in the book are stored on the CD in stages, and the current version of the game can be found on the CD in the file Games/Chapter02/evil1.gm6.
Although we now have a running game, it’s not much fun to play yet as there are no goals or challenges. We’ll spend the remainder of the chapter turning it into a playable game. Press Esc to stop the game.
■
Tip
Pressing F4 while the game is running will maximize the game to fill the entire screen. Press F4 again to return to the windowed version.Instances and Objects
So far we have two object resources in our game and two characters appearing on the screen. However, there is an important distinction to be made between object resources and instances of objects that appear on screen. It may seem odd, but now that we have made dragon and boss objects, we can put as many instancesof dragons and bosses on the screen as we like. Try it—go back and place more dragons and bosses in the room. If you run the game, you will find that they all behave in exactly the same way as the original instances! (Don’t forget to remove them again afterward using the right mouse button.) A good way to think of the relationship between objects and instances is to think of objects as jelly molds and instances as the jellies that you make with them. You only need one mold to make any number of jellies, yet the mold defines the appearance of all of them (see Figure 2-18). From now on we will talk about instances and objects in this way, so it is important that you appreciate the difference.
Figure 2-18.Object resources are like jelly molds, and they can be used to create any number of object instances on the screen at once.
Demons, Baby Dragons, and Fireballs
To create some challenges and goals, we’re going to need to bring our remaining objects into the game. Let’s start by giving the dragon the ability to breathe fireballs—as dragons often do!
The Fireball Object
To create the fireball object you’ll need the fireball sprite. If you didn’t get around to doing this earlier, then quickly flick back a few pages and add it in the way that was described in the “Sprites” section. You should remember the basic steps required to making a new object by now, but here they are one more time, just in case.
C H A P T E R 2 ■ YO U R F I R S T G A M E : D E V I L I S H LY E A S Y
Creating the fireball object:
1. Select Create Objectfrom the Resourcesmenu.
2. Call the object object_fireball.
3. Select the fireball sprite.
We now need to think about how we want fireballs to behave. When the dragon creates a fireball, we want it to move across the screen toward the boss and get destroyed when it reaches the other side of the screen.
Adding the fireball object’s events:
1. Click the Add Eventbutton and choose the Createevent.
2. Include the Move Fixedaction in the Actionslist. Select the right arrow to indicate the direction and set Speedto 32(fireballs fly fast!).
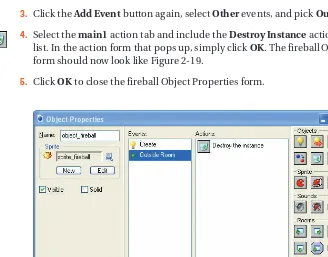
3. Click the Add Eventbutton again, select Otherevents, and pick Outside room.
4. Select the main1action tab and include the Destroy Instanceaction in the Actions list. In the action form that pops up, simply click OK. The fireball Object Properties form should now look like Figure 2-19.
5. Click OKto close the fireball Object Properties form.
Figure 2-19.The properties form for the fireball object should now look like this.
■
Caution
It is always a good idea to make sure that instances are deleted when they’re not needed any more (when they go off the edge of the screen, for example). Even though you can’t see them, Game Maker still has to spend time updating them, and too many instances will eventually slow down the program.Now we need to tell the dragon object to create instances of the fireball object when the player presses the spacebar. We do this in a similar way to the events that make the dragon move, but this time using a Key Pressevent rather than a Keyboardevent. Keyboardevents happen as long as the player continues to hold down the key, but Key Press events happen only once when the key is first pressed. Using a Keyboardevent for the fireballs would create a continuous stream of fireballs and make the game too easy, so that’s why we’re using Key Pressinstead.
Creating a Key Press event for the dragon object:
1. Double-click the dragon object in the resource list (not the dragon sprite). This will bring back the Object Properties form for the dragon object.
2. Click the Add Eventbutton. Select the Key Press event and then choose <Space> from the pop-up menu.
3. Select the main1action tab and include the Create Instanceaction in the Actionslist.
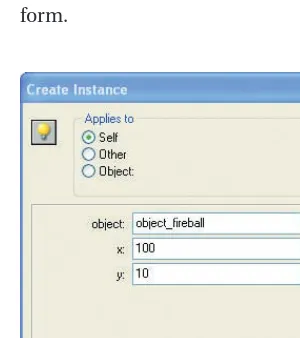
4. In the action form that appears, we need to specify which type of instance to create and where on the screen it should be created. Select the fireball object from the menu, enter a value of 100into Xand 10into Y, and select the Relativecheckbox. Figure 2-20 shows what the completed action form should look like.
5. Click OKto close the action form and click OKagain to close the Object Properties form.
Figure 2-20.Note that we checked the Relativeproperty to make the fireball appear relative to the position of the dragon.
The x and y values you just entered are screen coordinates, which are used to indicate positions on the game screen. Screen coordinates are measured in pixels (the tiny squares that make up a monitor display), with x values indicating the number of pixels horizontally, and y values indicating the number of pixels vertically.
C H A P T E R 2 ■ YO U R F I R S T G A M E : D E V I L I S H LY E A S Y
We need to select the Relativeoption because the fireball needs to be created on the screen in front of the dragon, in other words, relativeto the dragon’s position. However, the dragon’s position is measured from the top-left corner of its sprite—just above its wings—and this would be a crazy place for the fireball to appear! Giving an x-coordinate of 100 moves the fireball across 100 pixels to the right (to just above its head) and a y-coordinate of 10 brings it 10 pixels down. This creates the fireball right in front of the dragon’s mouth and exactly where we need it (see Figure 2-21). Test the game now to check that you can use the spacebar to shoot fireballs, and that they appear in the correct position.
Figure 2-21.The fireball needs to appear from the dragon’s mouth, which is 100 pixels across and 10 pixels down from the origin of the dragon’s sprite.
The Demon Object
The demon object will work in the same way as the fireball, except that demons fly from right to left and are created by the boss. Also, to make demons a bit more interesting, we’ll start some moving diagonally as well as horizontally. Those that head diagonally for the top or bottom of the screen will need to reverse their vertical direction when they intersect the boundary—like the boss object does. We’ll also need to destroy demons when they go outside the room, like the fireball. Next we provide the steps you need to do all of this; notice that we’ve started to shorten the steps that you should be familiar with by now.
Creating the demon object:
1. Create a new object called object_demonand give it the demon sprite.
2. Add a Create event and include the Move Fixedaction.
3. Select all three left-pointing direction arrows and set Speedto 12. Selecting more than one direction causes Game Maker to randomly choose between them when an instance is created. The action form should now look like Figure 2-22.
4. Add an Intersect boundaryevent (in the Otherevents) and include the Reverse Vertical action in it.
5. Add an Outside roomevent (also in the Otherevents) and include a Destroy Instance action in it.
The demons will now bounce back and forth between the top and the bottom of the screen, but we also need them to react to collisions with other instances. For this we use a collision event, which happens when two sprites of different objects overlap on the screen. The first collision event we need is for when a demon collides with a fireball. This event should destroy the demon, and reward the player by increasing their score. There are a number of dif-ferent actions dealing with scores, health, and lives in the scoreactions tab. As soon as the score changes, it will automatically be displayed in the game window caption.
Adding an event to the demon object for colliding with the fireball:
1. Click the Add Event button, choose the Collisionevent, and select the fireball object from the pop-up menu.
2. Include the Destroy Instanceaction from the main1action tab.
3. Also include a Set Score action from the scoretab. This should automatically appear below the Destroy Instance action in the Actions list. Lists of actions like this are carried out one after another, starting from the top of the list and working down.
4. Enter a value of 100in the Set Scoreaction form, and click the Relativeproperty. This property makes the action set the score relativeto the current score, so 100 will be added to the score rather than setting the score to 100. See Figure 2-23.
If a demon collides with the dragon, then the game is over. When this happens, we want to bring up a high-score table and (when appropriate) let the player enter their name. After showing the high-score table, we want to restart the game. Conveniently, Game Maker pro-vides a Show Highscoreevent that handles most of this automatically.
Figure 2-22.In the move action for the demon, note that all three arrows to the left are pressed, so a random direction out of the three is selected for each demon created. C H A P T E R 2 ■ YO U R F I R S T G A M E : D E V I L I S H LY E A S Y