Oracle E-Business
Suite R12 Integration
and OA Framework
Development and
Extension Cookbook
A practical step-by-step guide to develop end-to-end
extensions to Oracle E-Business Suite Release 12,
with detailed illustrations and explanations
Andy Penver
BIRMINGHAM - MUMBAI
Oracle E-Business Suite R12 Integration and
OA Framework Development and Extension
Cookbook
Copyright © 2013 Packt Publishing
All rights reserved. No part of this book may be reproduced, stored in a retrieval system, or transmitted in any form or by any means, without the prior written permission of the publisher, except in the case of brief quotations embedded in critical articles or reviews.
Every effort has been made in the preparation of this book to ensure the accuracy of the information presented. However, the information contained in this book is sold without warranty, either express or implied. Neither the author, nor Packt Publishing, and its dealers and distributors will be held liable for any damages caused or alleged to be caused directly or indirectly by this book.
Packt Publishing has endeavored to provide trademark information about all of the companies and products mentioned in this book by the appropriate use of capitals. However, Packt Publishing cannot guarantee the accuracy of this information.
First published: March 2013
Production Reference: 1140313
Published by Packt Publishing Ltd. Livery Place
35 Livery Street
Birmingham B3 2PB, UK.
ISBN 978-1-84968-712-6
www.packtpub.com
Cover Image by Neha Rajappan ([email protected])
About the Author
Andy Penver
currently lives and works in the U.K. as a solution architect for a large public sector client. He studied at Christ Church (University of Kent). He has over 18 years of experience in working with Oracle E-Business Suite. He has worked in both the private and public sectors, and has a strong technical background. He has led and managed teams of consultants through the full project lifecycles on some very large programs throughout the U.K. and Europe. Andy has been heavily involved in two large-scale, award-winning implementations of a shared service centre.Andy is currently the Managing Director of his own consultancy, NU-TEKK Limited.
Andy has previously authored and published a book called Oracle E-Business Suite R12 Core Development and Extension Cookbook.
I would like to thank my parents, my wife and three children, SJ, James, and Jack for their understanding and support while I spent many hours and late nights on the book. I would also like to thank my colleagues for their help in reviewing and commenting on the material in the book. In particular, I would like to thank Brian Badenhorst, Steve Phillips, and Parvez who all have helped me in some way to produce this book.
About the Reviewers
Parvez Achhwa
has more than 22 years of experience in information systems technologies, with the last 17 years in Oracle Apps 11i/12i (CRM and Financials)implementation, BI, Business Process Automation, and management of large-scale projects. He is a rare breed to possess both functional and technical skills at various landscapes. In recent years, he has also developed Siebel implementation skills.
Presently, he is working with DAMAC Holding as Oracle ERP Manager.
I would like to thank Andy for giving me the opportunity to review this book.
Brian Badenhorst
works as an Oracle E-Business Consultant and has over 10 years of experience in designing and developing robust solutions for a range of clients in both the UK private and public sectors. Backed by an engineering background, he has theability to put forward strategic solutions and he has significant experience in fulfilling
bespoke requirements.
Brian works as a freelance consultant and is the Managing Director of his own business.
This is the first book that Brian has been involved in.
Stephen Phillips
was born in London in 1959 and moved to Australia in 1969 when his family emigrated. He studied Computer Science at the University of Melbourne and has worked in IT in both Australia and the U.K. for over 30 years. He began his career at the Government Computing Service (GCS) in Melbourne, Australia in 1981, working on Burroughs mainframes. Since that time he has worked in all scales of equipment and on projects ranging from large-scale implementations of Oracle HRMS to small PC-based systems for a single client.Stephen has worked extensively with Oracle software since 1989 and moved back to London in 1994 in order to broaden his experience.
Since his return to the U.K. he has worked for a number of prestigious clients, including Oracle UK, Reuters, Lloyds TSB, Walkers Snack Foods, The John Lewis Partnership, and the Ministry of Justice. Stephen has worked on Data Migration projects with a number of these clients, as part of their implementation of Oracle HRMS/Payroll.
In 2003, Stephen completed the MSc degree with the Open University. The major
area of his dissertation was artificial intelligence, as applied to the compiling of
public transport timetables.
www.PacktPub.com
Support files, eBooks, discount offers and more
You might want to visit www.PacktPub.com for support files and downloads related to your book. Did you know that Packt offers eBook versions of every book published, with PDF and ePub files
available? You can upgrade to the eBook version at www.PacktPub.com and as a print book customer, you are entitled to a discount on the eBook copy. Get in touch with us at service@ packtpub.com for more details.
At www.PacktPub.com, you can also read a collection of free technical articles, sign up for a range of free newsletters and receive exclusive discounts and offers on Packt books and eBooks.
TM
http://PacktLib.PacktPub.com
Do you need instant solutions to your IT questions? PacktLib is Packt’s online digital book library. Here, you can access, read and search across Packt’s entire library of books.
Why Subscribe?
f Fully searchable across every book published by Packt
f Copy and paste, print and bookmark content
f On demand and accessible via web browser
Free Access for Packt account holders
If you have an account with Packt at www.PacktPub.com, you can use this to access PacktLib today and view nine entirely free books. Simply use your login credentials for immediate access.
Instant Updates on New Packt Books
Get notified! Find out when new books are published by following @PacktEnterprise on Twitter, or the Packt Enterprise Facebook page.
Table of Contents
Preface 1
Chapter 1: Personalizing OA Framework Pages
13
Introduction 14 Getting started with personalizations 14Setting the personalization profile options 22
Discovering information about a page 26
Clearing the cache 29
Creating a user-level personalization 30
Adding tool tips 34
Creating an item 41
Re-ordering items on a page 45
Adding a button to a page 47
Hiding a button on a page 50
Making a field required 53
Adding a flexfield to a page 55
Using SPEL to trigger personalizations 60
Deactivating personalizations 64
Deleting personalizations 66
Chapter 2: Getting Started with OA Framework Pages
69
Introduction 70 Getting started with OA Framework 70 Installing the database objects 74 Setting up our development environment 77 Setting the environment variables 80
Transferring the DBC file from the application server 82
Creating a shortcut to JDeveloper 83 Creating an EBS user and assigning responsibilities 83 Adding database connections in JDeveloper 85
ii
Table of Contents
Setting the OC4J settings and project properties 88
Running a page 92
Creating a new project 93
Creating the model layer for a query page 96
Creating the view layer for a query page 106
Chapter 3: Creating a Master Detail Page in OA Framework
117
Introduction 117 Creating the model layer for a master detail page 118Creating a master region 138
Creating a detail region 149
Deploying a page to EBS 163
Chapter 4: Adding a Creation Page and LOV Region in OA Framework 175
Introduction 175Creating a page to insert and update records 176
Passing the parameters 207
Creating a list of values 209
Adding a link to a region 222
Running a page in the debug mode 228
Chapter 5: Advanced OA Framework
231
Introduction 231
Navigating between OA Framework pages 232
Updating records 242
Adding a validation to the page 249
Calling PL/SQL from the OAF page 253
Adding a decision message 258
Partial Page Rendering 262
Viewing a page from EBS 264
Transferring the files 266
Chapter 6: BI Publisher
275
Introduction 275
Generating XML output using a concurrent program 276
Making a concurrent program available to a user 282
Using Oracle BI Publisher Desktop software to create a rich
text format (RTF) template 289
Creating a Data Definition 299
Defining a template 301
Running a BI Publisher report 303 Generating PDF and Excel output using an RTF template 305 Implementing BI Publisher Bursting (e-mail) 308
Implementing BI Publisher Bursting (file system) 314
iii
Table of Contents
Chapter 7: Desktop Integration
317
Introduction 317 Installing the database objects 318
Getting started with desktop integration 319
Configuring the browser and MS Office settings 324
Registering a table and its columns within Oracle E-Business Suite 328
Creating a custom integrator 332
Creating a function for an integrator 350
Adding an integrator to a menu 352
Adding advanced features to an integrator 354
Defining the importer 356
Chapter 8: Utilities
359
Introduction 359
Setting the environment variables 359
Starting and stopping an environment 361
Creating a custom schema 365
Index 377
Preface
Extending Oracle E-Business Suite
This book is about the ways in which we can extend Oracle E-Business Suite (EBS) and focuses on more recent tools and technology. Its primary focus is to show how we can integrate with EBS, personalize and develop OA Framework pages with EBS, and to show how we can use BI Publisher to create and mail merge documents within EBS. The book has many detailed examples to work through with tips and explanations about how various
components can be configured and how we can extend standard functionality and the various ways in which we can do it. It complements my first book, Oracle E-Business Suite R12 Core Development and Extension Cookbook, which focuses on writing concurrent programs,
the personalization and development of professional forms, creating workflows, and using
common utilities and scripts within EBS.
This book is aimed at developers who are new to E-Business Suite, or those who are strong in one particular area and need to expand their knowledge in other areas. Experienced developers may also use the book to brush up on their skills, or to pick up tips that may help them. The book focuses on the newer technologies being used in the more recent releases of EBS. There are plenty of detailed screenshots throughout each chapter giving clear instructions. This helps to provide a clear and full understanding of what we are doing and why. Each topic will develop a solution to a scenario, and will show how we need to set up our development tools right through to deploying it within EBS.
At the end of each chapter, the reader should have developed a good understanding of the topic and will be able to take away the knowledge gained and start using it in practice. The book also comes with complete, fully-tested code and scripts that can be downloaded. The examples have been developed using a Vision instance of Oracle E-Business Suite Release 12 (12.1.1). It would be helpful to know some SQL, PL/SQL, XML, and Java, but it is not essential, as the code is already written and fully documented. We will be going through each chapter example step-by-step, so you will not be expected to write any code that is not detailed in the book.
2
If you are new to Oracle EBS or a consultant who has worked with Oracle E-Business Suite before, you will be aware that there are many technical components to consider; there are many features using a range of different tools and the footprint seems to be expanding all
the time. One of the key features of EBS is its flexibility. Not all organizations are the same and there are many ways you can configure EBS to make it specific to an organization’s
needs. Whenever possible, an organization should always attempt to use standard functionality to meet their requirements. However, there are occasions where business requirements cannot be met using the standard Oracle-provided functionality, and this can be anything from renaming a label on a screen, to automating a process that would take many hours for someone to process manually.
There are various ways in which you can change behavior in Oracle EBS. The simplest
way to change behavior is through configuration. For example, extending Oracle through profile options, value sets, descriptive flexfields are ways to extend applications through configuration. In addition, Oracle also gives us the ability to change Oracle OA Framework
pages through personalization. It is a powerful feature that allows us to change behavior without needing to change any standard objects. These are mechanisms provided by Oracle to change how the application looks, or how the application behaves. On the other hand, there are some extensions that require writing code, creating new objects, or even extending or replacing existing objects. These types of extensions are in addition to the code or objects that Oracle delivers.
A powerful feature of Oracle is the ability to extend EBS, but when doing this, there is a strict set of development standards that must be adhered to. There are two primary ways to modify
Oracle EBS; the first is customization by extension, as we have just described, and the second is customization by modification. Customization by modification is where standard objects are
changed, meaning that the change needs to be reapplied when a newer version of the object is released by Oracle.
Customizations by modification are not supported by Oracle and should always be avoided. There are rarely occasions where there is a real business justification for a customization by modification. There are often alternatives, such as exploring other solutions or looking at
ways to change the requirements or processes. It is important to understand the difference
between customization by extension and customization by modification, as the two terms
are often used loosely. When we extend Oracle EBS by supported methods, the standard functionality is still supported by Oracle as it has not been amended by the extension, whereas customization by modifying a standard object means the standard object also becomes unsupported by them.
3 A worthwhile feature of Oracle EBS is that it uses a common toolset and also has a vast amount of documentation written about the supported ways in which you can extend the
product. The first place to start would be the Oracle Release 12 Documentation Library.
This provides many documents, all relating to Oracle EBS. Another essential resource is Oracle Support (previously known as Metalink), which is a portal provided by Oracle for support, documentation, white papers, and patches among many other things related to EBS. To access the portal, you need to register and you also need to provide a support
identifier, which is only provided when there is a support contract with Oracle Support. So, if you are new to EBS or if you have been around for a while, you can nearly always find examples or documentation relating to your specific requirement. There are nearly always
numerous business processes and solutions available to satisfy it. The best way to provide a solution is to have an understanding of what options are available. Having knowledge of the various ways in which we can extend EBS will give us a much better chance of coming up with better solutions. This book will provide recipes that will cover some simple and some more complex solutions. It will utilize a majority of the Oracle toolset and will, hopefully, broaden your knowledge. Expanding our knowledge of the toolset will allow us to provide a more varied set of solutions, resulting in having a better chance of providing a better, more robust solution for a given problem.
Understanding the EBS architecture
Before we really get into the book it is important to understand the E-Business Suite
architecture in Release 12. We need to understand where the files are kept and how it
is installed. If you are a beginner, you will need this information to understand some key concepts and pick up some terminology that is often used when we discuss Oracle EBS.
In Release 12, there has been a significant change in the file system when it is installed. The change quite simply is used to segregate code, data, and configuration. This makes
maintenance much easier. There will be a number of terms that you will encounter regularly
when we discuss EBS. A server is a term for a number of processes that provide specific
functionality on a single machine. A tier is a term used to describe a logical group of services, which can be on one or more physical machine. A machine is used to describe a computer or group of computers. A node is a group of computers that work closely together as a cluster.
Essentially, there are three tiers per instance of EBS. The Database Tier (DB Tier), the Application Tier (APPS Tier), and the Desktop Tier. The desktop tier is the client interface
where users will connect to Oracle EBS through a web browser. When Oracle is first used,
the browser will install a J2SE plugin which will use Oracle’s own Java Virtual Machine (JVM) rather than the browser's own JVM. The application tier (also known as the middle tier) processes all of the business logic. It comprises of three servers or service groups. These are Web Services which process requests from the desktop client. Then there are the Forms services which manage all of the listening and secure requests for Oracle forms. Then there is the concurrent processing server, which processes concurrent requests that are submitted.
4
When Oracle EBS is installed on all variants of UNIX, the install is performed by the root user. However, as part of the installation process there will be two OS users. One that will own the
application node file system (the applmgr user) and the other will own the database node file system (the oracle user). When installed on Windows, there is one OS user that owns the file
system. The following diagram shows the basic architecture:
Oracle EBS Release12
The directory structure of the Application Tier and Database Tier will help to understand where
the files are stored. The following directory structure should help to understand where various files are stored within EBS:
Scripts, log
Oracle Homes for the applications tech stack
5 The following shows the directory structures of some core directories on the Applications Tier:
Profile Directory Description
APPL_TOP /apps_st/appl This directory is
the base directory where all forms are stored.
COMMON_TOP /apps/apps_st/comn This is the base
directory for scripts, log files, output files, and HTML files.
ORACLE_HOME /apps_st/10.1.2 This is the directory
structure for the forms' server files. iAS_ORACLE_HOME /apps_st/10.1.3 This is the directory
structure for the web server files. INSTANCE_TOP /inst/apps/<CONTEXT_NAME> This is the top
directory for the admin scripts are stored to start and stop services.
The following table describes where the files are stored on the Database Tier:
Profile Directory Description
ORACLE_HOME /db/tech_st/10.2.0 This directory is the base directory where all of the database files are stored. Data Files /db/apps_st/data This directory is the base directory where all of the data files are stored.
6
Within EBS, each product has its own database user within Oracle. The user will own the objects that store data, such as tables. This is in the form of an abbreviation of the product (AP for Account Payables and HR for Human Resources for example) and is referred to as a schema. The passwords are, by default, the same as the schema name, but this is nearly
always changed after install. On the file system on the APPS tier, each product has its own file system. The file system has the same root directory as the product \ user name in Oracle.
For example, there will be a directory structure for Payables (AP) that has a root directory of AP_TOP. There is one very important schema called the APPS schema. The apps schema owns all of the code, such as packages, triggers, views, java classes. Each product user has grants providing access to the APPS schema for all of its objects. Therefore, the APPS schema has access to all of the objects, that is the code and the objects owned by the product schemas. It is important that as a developer, you can access the APPS database schema. All objects that you will require access to are accessible from this schema. When we create custom objects, we need to create a custom schema and all of the data storing objects will reside in this schema. Usually, an on-site DBA will perform this task, but we will go through this in one of the recipes we have.
If you would like to understand more relating to the core concepts of EBS, you can get more detailed information from the Oracle Applications Concepts Release 12 from the Release12 Documentation Library. You can get the documentation from Oracle by following this link http://docs.oracle.com/cd/B53825_08/current/html/docset.html.
Before we start
One final word before we get into the recipes. Hopefully, you will find the book extremely
useful. There are thousands of pages written about how to extend and customize Oracle E-Business Suite. This book is not going to cover every solution to every problem. In fact, it will not even come close. The recipes are designed to take us through the different features of the tools and extensions that you may need to utilize in your own solutions. Use the book to get a feel for how each tool and product can be used. It will provide a core understanding of how things can be done and the standards that we need to adhere to. You will need to expand on what you learn here and apply the knowledge you gain to design a solution or solutions to your own scenarios. I personally am a great believer of learning through practice. Expanding your knowledge by understanding the fundamentals is essential to providing the best solutions. Oracle uses many tools and technologies in its suite of applications, of which there is too much to cover in this book.
7
What this book covers
Chapter 1, Personalizing OA Framework Pages, looks at some recipes that will implement personalizations to an OA framework page. We will look at a number of different types of personalization and the levels at which we can create personalizations. At the end of the chapter, readers will have an understanding of how we can personalize OA framework pages in EBS. Readers will understand which responsibilities are used to administer personalizations
and which profile options need to be changed to view the personalization links. Throughout the
chapter, we will be creating a variety of different examples that will give a broad understanding of what we can achieve through personalizing OA framework pages.
Chapter 2, Getting Started with OA Framework Pages, deals with the creation of OA
Framework pages. We start off by looking at the architecture of OA Framework pages as it is important to understand this before we start any development. Further, we will go through the process of setting up our development environment and what we will need to do to get up and running. Towards the end of the chapter readers will have an understanding of the components required to develop and test an OA Framework page.
Chapter 3, Creating a Master Detail Page in OA Framework, will explain the process of creating a master detail page in the OA Framework. Readers will have an understanding of how we can create master detail pages in the OA framework. Finally, we will go through the process of deploying our page in Oracle E-Business Suite (EBS) and running it through the application.
Chapter 4, Adding a Creation Page and LOV Region in OA Framework, explains how to make changes to the OA Framework pages we have created. This chapter gives the readers an understanding of how they can create pages that interact with the database. We will also know how to use the debugger that is provided in JDeveloper.
Chapter 5, Advanced OA Framework, helps in learning some more advanced features of OA Framework pages which includes a lot more coding. The chapter will continue to develop the pages we have worked on so far.
Chapter 6, BI Publisher, looks at recipes that will explain how BI Publisher integrates with E-Business Suite to allow us to generate formatted data with a very feature rich output. We will look at how it integrates with commonly used desktop applications, such as Microsoft Word and Excel. At the end of the chapter, readers will understand how to set up our development environments. We will learn to create our report templates, and how to generate the XML data that the template requires to produce a report output in a number of different formats. We will look at how the report mail merges the data with Word documents, and how we can use a feature called Bursting to send formatted documents out by e-mail.
8
Chapter 7, Desktop Integration, looks at how we can integrate with E-Business Suite using the desktop integrator. Oracle E-Business Suite provides a framework that allows us to integrate
with Microsoft Office-based tools. It is called Web ADI (Application Desktop Integrator). Users tend to be in favor of using the tools, as it integrates with the Microsoft Office tools we are all
used to working with. At the end of this chapter readers will learn how we can use Excel-based spreadsheets to view and upload data to EBS. We will understand how data can be validated, and how we can include structured data entry methods, such as lists of values and drop down lists to spreadsheets. We will understand how we can create a new integrator to upload data and how to assign an integrator to a responsibility.
Chapter 8, Utilities, looks at a number of utilities that you will find extremely useful. We will
show how to create a custom schema and how to configure it on EBS. We will also look at
ways to use common utilities, which will reduce risk and save enormous amounts of time.
Usually, the biggest reason for problems when migrating extensions or configuration is when
there are human tasks. We will also look at how to start and stop an environment.
What you need for this book
Oracle uses many great tools to develop extensions. The tools we will mostly focus on in this book are the following:
f Oracle JDeveloper with OA Extension
f SQL Developer
f BI Publisher
f Microsoft Excel
Microsoft Word
Other utility programs we will be using are:
f WinSCP — a windows based FTP frontend
f PuTTY — a UNIX command line window
f JAD - a Java decompiler
Developing code in EBS
There are a number of languages used for programming and writing scripts that Oracle supports. We are going to primarily focus on the following in this book:
f PL/SQL
f Java
f SQL
f XML
9
UNIX shell scripting
Other languages are also less commonly used within EBS and fall outside the scope of this book.
Who this book is for
This book is written for individuals who want to learn how to develop extensions in Oracle E-Business Suite. If you are involved in development or supporting an E-Business Suite
implementation, you should find this book very useful. The book gives detailed explanations,
so minimal technical expertise is required. It is suitable for beginners who have little experience, or developers who may want to use the book to brush up on their skills.
Conventions
In this book, you will find a number of styles of text that distinguish between different kinds
of information. Here are some examples of these styles, and an explanation of their meaning.
Code words in text are shown as follows: “You may also notice that there is also a ZIP file
called oafch2.zip provided in the code bundle.”
A block of code is set as follows:
SELECT flv.lookup_code, flv.meaning
FROM fnd_lookup_values flv
WHERE flv.lookup_type = ‘XXHR_SOCIETY_LOV’
Any command-line input or output is written as follows:
$JAVA_TOP/<customFolder>/oracle/apps/<ApplicationShortName>/<moduleName>/ <subModuleName>/webui
New terms and important words are shown in bold. Words that you see on the screen, in menus or dialog boxes for example, appear in the text like this: “Obtain the version of EBS you are on. To do this, log on to EBS and click on the About this Page link.”.
Warnings or important notes appear in a box like this.
Tips and tricks appear like this.
10
Reader feedback
Feedback from our readers is always welcome. Let us know what you think about this book—what you liked or may have disliked. Reader feedback is important for us to develop titles that you really get the most out of.
To send us general feedback, simply send an e-mail to [email protected], and mention the book title via the subject of your message.
If there is a topic that you have expertise in and you are interested in either writing or contributing to a book, see our author guide on www.packtpub.com/authors.
Customer support
Now that you are the proud owner of a Packt book, we have a number of things to help you to get the most from your purchase.
Downloading the example code
You can download the example code files for all Packt books you have purchased from your
account at http://www.packtpub.com. If you purchased this book elsewhere, you can visit http://www.packtpub.com/support and register to have the files e-mailed directly to you.
Errata
Although we have taken every care to ensure the accuracy of our content, mistakes do
happen. If you find a mistake in one of our books—maybe a mistake in the text or the code—
we would be grateful if you would report this to us. By doing so, you can save other readers
from frustration and help us improve subsequent versions of this book. If you find any errata,
please report them by visiting http://www.packtpub.com/submit-errata, selecting your book, clicking on the erratasubmissionform link, and entering the details of your
errata. Once your errata are verified, your submission will be accepted and the errata will
be uploaded on our website, or added to any list of existing errata, under the Errata section of that title. Any existing errata can be viewed by selecting your title from http://www. packtpub.com/support.
11
Piracy
Piracy of copyright material on the Internet is an ongoing problem across all media. At Packt, we take the protection of our copyright and licenses very seriously. If you come across any illegal copies of our works, in any form, on the Internet, please provide us with the location address or website name immediately so that we can pursue a remedy.
Please contact us at [email protected] with a link to the suspected pirated material.
We appreciate your help in protecting our authors, and our ability to bring you valuable content.
Questions
You can contact us at [email protected] if you are having a problem with any aspect of the book, and we will do our best to address it.
1
Personalizing OA
Framework Pages
In this chapter we will cover:
f Getting started with personalizations
f Setting the personalization profile options f Discovering information about a page
f Clearing the cache
f Creating a user-level personalization
f Adding tool tips
f Creating an item
f Re-ordering items on a page
f Adding a button to a page
f Hiding a button on a page
f Making a field required f Adding a flexfield to a page
f Using SPEL to trigger personalizations
f Deactivating personalizations
f Deleting personalizations
14
Introduction
OA Framework pages have been implemented using an object-oriented design approach
that allows us to be pretty flexible when it comes to making changes to the user interface.
The objects that we see on each page are made up of smaller objects that are stored independently in a repository called Meta Data Service (MDS).
In this chapter, we will discuss how to make changes to the user interface through personalization. When we personalize a page, we are altering the declaration of a page's interface. At runtime, objects are loaded from the repository and are rendered in a browser. What we see is determined by the metadata definition, which specifies how objects are displayed on the page. We can create a personalization at multiple levels such as site,
function, organization, or responsibility. The good thing is that they can be configured
directly from the UI page and are likely to survive an upgrade, as opposed to extensions. One thing you cannot modify with personalizations is the business logic.
At the end of this chapter, readers will have an understanding of how we can personalize OA Framework pages in EBS. Readers will understand which responsibilities are used
to administer personalizations and which profile options need to be changed to view
the personalization links. Throughout this chapter, we will be creating a variety of different examples that will give a broad understanding of what we can achieve through personalizing OA Framework pages.
Getting started with personalizations
It is important that we understand some common terminology and gain an understanding of how an OA Framework page is constructed before we get started. Let's start off by
understanding that OA Framework has been developed by Oracle and is based upon a Model View Controller (MVC) architecture developed using Java 2 Platform, Enterprise Edition (J2EE).
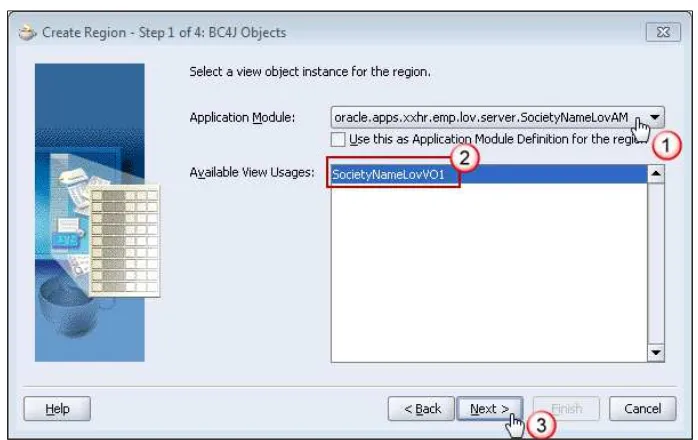
f Model: A model can be thought of as the data and is implemented using Oracle Business Components for Java (BC4J). This comprises three layers, which are the entity object (EO), view object (VO), and application module (AM).
Entity object: This is based upon a database table and all of the database
transactions will go through the EO.
View object: This is based upon any number of entity objects or it can be
an SQL statement, if the page is read only.
Application module: This is a container for the view object and it
manages transactions that occur. Each page has a root AM to maintain the transaction context.
f View: A view defines a user interface that is rendered as an HTML page. This is implemented with user interface XML (UIX).
15
f Controller: A controller is java code that handles events when they occur at runtime. There are two methods that are called when the page runs.
In this recipe, we are going to set up some records that we will use throughout the chapter. We are going to demonstrate our personalizations in the manager self-service screens. We will need to perform the following tasks before we get started with personalizing OA Framework pages:
f Creating a custom responsibility
f Creating a new user
f Creating an employee record
f Assigning a manager
f Attaching an employee to a user record
Creating a custom responsibility
Now to create our new responsibility that we will use to access core HR screens, we will create a test employee record and ensure that the employee is a manager of other employees. This will be used to access some of the self-service screens where we will create some personalizations in the upcoming recipes.
How to do it...
Perform the following steps to create a new responsibility called XX Test HRMS Manager:
1. Log in to Oracle E-Business with the System Administrator responsibility.
2. Navigate to Security | Responsibility | Define and the Responsibilities window will open.
3. Enter the required data as given in the following table:
Item name Item value
Responsibility Name XX Test HRMS Manager
Application Human Resources
Responsibility Key XXTESTHRMSMGR
Description XX Test HRMS Manager
Data Group
Name Standard
Application Human Resources
Menu GLB HRMS Navigator
Request Group
Name HR Reports and Processes
16
4. Click on the Save button in the toolbar (or press Ctrl + S) to save the record. 5. The Responsibilities screen should now appear as shown in the following
screenshot:
6. Now create a test manager self-service responsibility.
7. Click on the new record icon.
8. Enter the required data as given in the following table:
Item name Item value
Responsibility Name XX Test Manager Self-Service
Application Human Resources
Responsibility Key XXTESTMGRSS
Description XX Test Manager Self-Service
Data Group
Name Standard
Application Human Resources
Menu Manager Self Service
Request Group
Name
17
9. Click on the Save button in the toolbar (or press Ctrl + S) to save the record. 10. Exit the form.
How it works...
We have now created a new responsibility where we can access the HRMS screens.
Creating a new user
We are going to create a user called XXUSER that we will use throughout the chapter for our personalizations. We will add the responsibilities, that we will use throughout the chapter. Also, the user will be assigned an employee record so that when we access the manager self-service screens, there is relevant data available for our personalizations that we are going to create.
How to do it...
To create the user, perform the following steps:
1. Log in to Oracle and select the System Administrator responsibility. 2. Navigate to Security | User | Define.
3. Enter XXUSER in the User Name field.
4. Enter a password in the Password field and press the Tab key. 5. Enter the password again and press the Tab key.
6. Set Password Expiration to None.
18
7. Navigate to the Direct Responsibilities tab. 8. Add the following responsibilities:
Application Developer Functional Administrator Manager Self-Service System Administrator XX Test HRMS Manager XX Test Manager Self-Service
The Users screen should now appear as shown in the following screenshot:
9. Save the form.
How it works...
We have now created our user called XXUSER. The user has access to the responsibilities, which we are going to need throughout the chapter.
19
Creating an employee record
Now we are going to create an employee called Employee Manager, which we will use throughout the chapter for our personalizations. As suggested by the name, this employee will be the manager of other employees.
How to do it...
To create the employee, perform the following steps:
1. Log in to Oracle with the XX Test HRMS Manager responsibility.
2. Navigate to People | Enter and Maintain.
3. When the Find Person screen opens, click on the New button. 4. Enter the required data as given in the following table:
Item name Item value
6. Save the record, and when prompted, click on the Correction button.
7. Click on OK, when prompted with the message The original hire date will be updated to be the same as the start date.
8. Make a note of the employee number that has been automatically generated.
If the employee number has not been automatically generated, type one manually and save the record as a Correction.
20
The data entered should look similar to the following screenshot:
How it works...
We have now created an employee record that we will configure as the manager of other employees. We need to do this so that the self-service screens we are going to personalize will have some data returned in them and we can complete some of the upcoming recipes.
Assigning a manager
We are now going to update the assignment record of an existing employee so that the employee we have just created is the manager of an existing hierarchy and when we perform some personalizations, there is some data returned in the forms we are going to personalize.
How to do it...
To assign a manger, perform the following steps:
1. In the Enter and Maintain person screen, click on the Find Person (torch) icon in the toolbar.
2. Enter 1197 for the employee number.
21
3. Click on the Assignment button. 4. Click on the Supervisor tab.
5. Enter our employee number in the Worker Number field. (The employee number
is 2110 for the employee that was created in the preceding recipe. It may be a different number on the environment you are using.)
6. Tab out of the field and select the Correction button, if prompted.
7. The Name fields will automatically populate to Manager, Employee, and so on (our test employee), when we tab out of the Worker Number field.
8. Save the form and close it.
How it works...
We have assigned our employee as a manager of another employee. This means that we will then inherit the hierarchy of the employee we became the manager of and hence we will have data in the self-service screens that we are going to personalize.
Attaching an employee to a user record
We are going to associate the employee we have just created to our user called XXUSER. When we log in as the XXUSER responsibility, the self-service screen will display data on the screens appropriate to the employee record that we have associated with our user. As we have assigned our employee record as the manager of other employees, we will see the data of the employees in the screens we are going to access in manager self-service.
How to do it...
To create the user, perform the following steps:
1. Select the System Administrator responsibility. 2. Navigate to Security | User | Define.
We have now associated our employee with our user. Therefore, when we log in as our user XXUSER, we will be able to access the self-service screens as a manager of other employees.
22
Setting the personalization profile options
There are three profile options that allow us to personalize self-service screens. The threeprofile options are as follows:
f Personalize Self-Service Defn: When set to Yes, a Personalize Page link will appear at the top of each self-service page
f FND: Personalization Region Link Enabled: When set to Yes, a Personalize Region
link will appear on each region of a self-service page
f FND: Diagnostics: When set to Yes, an About this Page link will appear at the bottom of each self-service page
How to do it...
To set the three profile options, perform the following steps:
1. Log in to Oracle with XXUSER and select the Functional Administrator responsibility. 2. Navigate to Core Services | Profiles.
3. In the Name field of the Search screen, type Personalize%. 4. Click on the Go button.
You will see that the Personalize Self-Service Defn profile option value is set to No at site level, as shown in the following screenshot (circled):
23
We are now going to update the profile option to Yes at user level for the XXUSER user:
1. Click on the Update Value (pencil) icon.
2. Click on the User tab and click on the Add Another Row button:
3. In the User field, enter the name of our user, XXUSER. 4. Navigate to the Valuefield and click on the list icon.
5. Click on the Go button.
6. Click on the Quick Select icon for the Yes value as shown in the following screenshot:
24
7. When you are returned to the Profiles screen, click on the Update button and wait
for the confirmation that the record has been saved.
8. Now navigate to Core Services | Profiles to return to the profiles screen.
We will now check to see if the value has been set. To do this, perform the following steps:
1. In the Name field of the Search screen, type Personalize%. 2. In the Access Levels region, enter XXUSER in the User field.
3. Click on the Go button.
The value we set for our user will be displayed as shown in the following screenshot. We can see that there is a Personalize Page link that has now appeared as a result of setting the
profile option to Yes.
We are now going to set the values for the other two profiles options at user level in the
same way.
25
Repeat these steps but this time set the FND: Personalization Region Link Enable profile
option to Yes.
We can now see that the personalize region links are now displayed in the self-service page, as shown in the following screenshot:
We are now going to set the value of the FND: Diagnostics profile option at site level in the same way:
1. In the Name field of the Search region, enter FND: Diagnostics. 2. Click on the Go button.
3. Click on the Update Value (pencil) icon.
4. Under the Site tab, set the Site Value field to Yes.
5. Click the Update button and wait for the confirmation that the record has
been saved.
6. Now navigate to Core Services | Profiles to return to the Profiles screen. 7. In the Name field of the Search screen, type FND: Diagnostics. 8. Click on the Go button.
26
We can now see that the About this Page link is now displayed in the self-service page, as shown in the following screenshot:
How it works...
We have set the profile options that enable links on self-service pages. This will provide access to the required links on the screen so that we can create our personalizations.
Discovering information about a page
The About this Page link is used to find key information about the objects and the structure
of the page. It is essential when we want to create personalizations and also if we need to extend a page.
How to do it...
To look at the information available on the About this Page link, perform the following steps:
1. Log in to Oracle with the XXUSER and select the Functional Administrator
responsibility.
2. Navigate to Core Services | Profiles.
3. Scroll to the bottom of the page and select the About this Page link.
If we look at the page, we can identify some key information as shown in the following screenshot:
27
4. Click on the Expand All link and scroll down the page.
We can see the objects that are displayed on the page such as items and buttons. We can also see the view object used for the table, as shown in the following screenshot:
28
Now if we click on the FndProfileSearchVO link, we can see the following query behind the view object, as shown in the following screenshot:
How it works...
We used the About this Page link to discover information about a self-service page. This will be a very common feature that will be used when we personalize pages.
29
Clearing the cache
When we make changes to a screen in self-service, the page is often stored in the cache. We might therefore not see the changes that we make on the screen. When this occurs, we will need to clear the cached page so that we will see the changes we have made to a page through personalization. We will need to clear the cache when we add some of the personalizations in the recipes in this chapter. When we are required to clear the cache, we can perform the following tasks.
How to do it...
To clear the cache, perform the following steps:
1. Log in to Oracle with XXUSER and select the Functional Administrator responsibility. 2. Navigate to Core Services | Caching Framework.
3. Click on the Global Configuration link from the left-hand side navigation pane.
4. In the Global Cache Configuration screen, click on the Clear All Cache button as shown in the following screenshot:
30
5. When prompted with the warning shown in the following screenshot, click on the
Yes button:
How it works...
We have now cleared the cache so that changes we have made will now become visible as the page is re-cached when we access the page we have personalized. Remember that the entire cache is cleared out when we do this for all of the self-service pages.
Creating a user-level personalization
We will now create a user-level personalization. This feature allows end users to save a search they commonly use. However, not all search pages have this feature.
How to do it...
To create a user-level personalization, perform the following steps:
1. Log in to Oracle with XXUSER and select the XX Test Manager Self-Service
responsibility.
2. Navigate to Absence Management.
3. Click on the Advanced Search link as shown in the following screenshot:
31
4. In the Advanced Search screen, select the Show table data when any condition is met radio button.
5. From the Add Another drop-down list, select Department. 6. Click on the Add button.
7. Enter Services-West in the Department condition as shown in the following screenshot:
8. Click on the Save Search button.
32
9. In the View Name field shown in the following screenshot, enter XXX Services-West Report:
10. In the Column Properties region, shift the Employee Number and Location columns to the Columns Displayed list.
11. Shift Employee Number up in the list so that it is just after the Name field.
12. In the Sort Settings region, set the First Sort column to Name. 13. Set Sort Order to ascending.
33
The steps performed here are summarized in the following screenshot:
14. Click on the Apply button.
We will now see the view, which we created in the list of personalized views, in the following screenshot:
34
15. Click on the Apply button and we will return to the Advanced Search region. 16. Click on the View button.
17. Select XXX Services-West Report and click on the Go button.
We can see that the view we created returns the records we would expect, given the restrictions we made.
How it works...
XXUSER can now select this view whenever he/she logs in and navigates to Advanced Search |Views and selects the user view that we have created.
Adding tool tips
A tool tip is used to add text to a screen to provide information about a region or item. In this recipe, we are going to add some tips to the screen. We will be adding a simple tool tip to a page and we will also add text that we retrieve from a message stored in the message repository. We will also show the difference between a short tip type and a long tip type. We will perform the following tasks in this recipe:
f Adding a tool tip to a page
f Creating new messages
f Adding a short tip type
f Adding a long message tip type
35
Adding a tool tip to a page
We are now going to add a tool tip to a page. It could relate to anything and really does depend on what we are trying to achieve. Common uses for tool tips are providing information about a region and instructions about an item on a page.
How to do it...
To add a tooltip, perform the following steps:
1. Log in to Oracle with XXUSER and select the XX Test Manager Self-Service responsibility.
2. Navigate to Absence Management. 3. Click on the Action icon.
4. Click on the Personalize Page link at the top-right corner of the page. 5. Click on the Complete View radio button.
6. Click on the Expand All link.
7. On the top line of the page (Page Layout: Oracle Self Service Human Resources: Absence Management), select the Create Item icon as shown in the following screenshot:
8. From the Level drop-down list, select Site. 9. From the Item Style drop-down list, select Tip.
36
10. Complete the properties of the item as per the following table:
Property Value
ID XX_ABS_TIP
Text XX Absence Management region
tip
11. Click on the Apply button.
12. Scroll down to the bottom of the application and click on the Return to Application link.
How it works...
We have just added a tip to a page and can see the results in the following screenshot:
37
Creating new messages
We can also use the message dictionary to use as a tip. This will allow us to modify the
screen tip or merge data into the message, if required. We will now define two messages in
Oracle EBS, which we will use to create a short tip and a long tip on a page. Each message, by default, displays this text before each message: APP:<application short name>-<Number>
unless the number field is null or 0.
How to do it...
To create a message, perform the following steps:
1. Log in to Oracle with the Application Developer responsibility.
2. Navigate to Application | Messages and the Messages window will open. 3. Create a new message with the following data:
Item name Item value
Name XX_ABS_TYPE_ST
Language US
Application Application Object Library
Number 0
Current Message Text Absence Type Short Tip
4. Save the form.
5. Create the second message with the following data:
Item name Item value
Name XX_ABS_TYPE_LT
Language US
Application Application Object Library
Number 0
Current Message Text This is a longer tip that may span multiple lines.
6. Save and exit the form.
38
The form should appear as shown in the following screenshot (the image has been amended to remove blank lines):
How it works...
We have now configured our message that we will use to create our short and long tip personalizations.
Adding a short tip type
We are now going to create a personalization that will add a short tip to a self-service screen. The short tip called XX_ABS_TYPE_ST will reference the message that we have just created.
How to do it...
To add a short tooltip on an item, perform the following steps:
1. Log in to Oracle with XXUSER and select the XX Test Manager Self-Service responsibility.
2. Navigate to Absence Management. 3. Click on the Action item.
4. Under the Absence Summary tab, click on the Personalize Search link in the Search region.
5. Click on the Personalize icon for the Message Choice: Absence Type item. 6. Click on the Choose Levels Displayed button.
7. Shift all of the items other than Site and Responsibility back to the Available Levels
side as summarized in the following screenshot:
39
8. Click on the Apply button.
9. Set Tip Message Name at responsibility level of XX_ABS_TYPE_ST. 10. Set Tip Type at the Responsibility level to shortTip as shown in the
following screenshot:
11. Click on the Apply button.
12. Click on the Return to Application link.
40
How it works...
We can see that the message is displayed as a tip underneath the Absence Type field
as shown in the following screenshot:
Adding a long message tip type
We are now going to create a personalization that will add a long tip to a self-service screen. The short tip will reference the message we have just created called XX_ABS_TYPE_LT. We will see the difference between the tips we have created and how they are displayed on the screen.
How to do it...
To add a long tool tip on an item, perform the following steps:
1. Log in to Oracle with XXUSER and select the XX Test Manager Self-Service
responsibility.
2. Navigate to Home | Absence Management. 3. Click on the Action icon for an employee record.
4. Under the Absence Summary tab, click on the Personalize "Search" link in the Search region.
5. Click on the Personalize icon for the Message Choice: Absence Type item. 6. Click on the Choose Levels Displayed button.
7. Shift all of the items other than Site and Responsibility back to the
Available Levels side. 8. Click on the Apply button.
9. Set Tip Message Name to the responsibility level XX_ABS_TYPE_LT.
41
10. Set Tip Type to the responsibility level longMessage, as shown in the following screenshot:
11. Click on the Apply button.
12. Click on the Return to Application link.
How it works...
We can see an icon next to the Absence Type field and when clicked, it opens a new window
with the message text from the XX_ABS_TYPE_LT message we created earlier, as shown in the following screenshot:
Creating an item
Okay, in this recipe we are going to add an item to a screen. We can add an item to a screen
without extending a page as long as the field exists in the view object of the region we are extending. A view object will nearly always contain many more data items than are visible
on the screen. To find out the items that are in the view object, we need to do a little bit of investigation into the view object. Once we have checked the available items, we can personalize the page to make the items visible on the screen. We can also order the items in the region we are displaying them.
42
How to do it...
To add an item to a page, perform the following steps:
1. Log in to Oracle with XXUSER and select the XX Test Manager Self-Service
responsibility.
2. Navigate to Home | Personal Information. 3. Click on the Action icon for an employee record.
We are going to add a new item to the Basic Details region. This item will specify the employee original start date after the Full Name field.
However, before we add the item, we need to find out some information about the
page as we need to know the view object that is used by the Basic Details region and the name of the attribute for the original start date item.
4. Scroll down to the bottom of the page and click on the About this Page link. 5. Then, click on the Expand All link.
6. Scroll down until you see the details for the Basic Details region. We can see that the view object for this region is BasicDetailsCurrentVO.
43
7. Scroll down and expand the Business Component References Details section. 8. Click on oracle.apps.per.selfservice.personalinformation.server.
BasicDetailsCurrentVO for the basic details view object.
9. If we look at the attributes returned by the view object, we will notice that the
original start date field is called OriginalDateOfHire:
44
Now that we have the information about the item we want to add, we can create the item through personalization:
1. Scroll to the bottom of the page and click on the Return to About Page link. 2. Scroll down to the bottom of the next page and click on the Return to Page:
Personal Information link.
3. In the Personal Information page, click on the Personalize "Basic Details" link. 4. In the Personalize Region: Basic Details screen, click on the Create Item
icon for the Default Single Column: Basic Details object as shown in the following screenshot:
5. From the Item Style list, select MessageStyledText to add a display only field.
6. Set the values of the following properties:
Property Value
ID XXOrigHireDate
Prompt Orig. Hire Date
View Attribute OriginalDateOfHire
View Instance BasicDetailsCurrentVO
7. Click on the Apply button.
45
How it works...
We have now added the item, but note that we need to move the item just next to the Full Name field and also the font for the item's data is not the same as the other data. We are
going to reorder the item in the region in the next recipe.
Re-ordering items on a page
We will now re-order the items in the region and we will also set the CSS Class property of the item so that the font matches the other items in the region.
How to do it...
To re-order items in a region, perform the following steps:
1. Navigate to Home | XX Test Manager Self-Service | Personal Information. 2. Click on the Action icon.
3. Click on the Personalize "Basic Details" link. 4. Click on the Complete View radio button. 5. Click on the Expand All link.
6. For the Default Single Column: Basic Details object, click on the Reorder icon, as shown in the following screenshot:
46
7. In the Function table, click on the up arrow icon until the Orig. Hire Date field is in the desired location, as shown in the following screenshot:
8. Click on the Apply button.
9. Click on the Update Item icon for the Message Styled Text: Orig. Hire Date field, as
shown in the following screenshot:
10. Set the CSS Class property to OraDataText. 11. Click on the Apply button.
12. Click on the Return to Application link.
47
How it works...
We have now moved the item so that it is just below the Full Namefield and we have set the
property to use the Oracle CSS Class so that the font for the data is the same as the other data items.
Adding a button to a page
We are now going to add a button to a page that is going to link to a website when the button is clicked. The link will go to the Google Search page, but this link could easily be a link to a new page that we have created.
How to do it...
To add a button to the Basic Details page, perform the following steps:
1. Log in to Oracle with XXUSER and select the XX Test Manager Self-Service
responsibility.
2. Navigate to Home | Personal Information. 3. Click on the Action icon.
4. Click on the Personalize "Basic Details" link. 5. Click on the Complete View radio button. 6. Click on the Expand All link.
7. In the Personalize Region: Basic Details screen, click on the Create Item icon for
Default Single Column: Basic Details as shown in the following screenshot:
48
8. In the Create Item page, select Button from the Item Style drop-down list. 9. Complete the details of the following property items as per the table:
Property Value
ID XX_BasicDetails_Btn
Destination URI http://google.com
Prompt Google
10. Click on the Apply button.
11. Click on the Return to Application link.
How it works...
We have now created a button in the Basic Details region. The button will open the URL that we have entered in the Destination URI property. We can see this in the following screenshot:
There's more...
Okay, well what if we want to go to another OA Framework page? We can do this too. We will now update the button to call another OA Framework page, but first we must gather some information to get the URL of the page we want to navigate to. Let's get the information for the My Employee Information page:
1. Navigate to Home | My Employee Information. 2. Click on the About this Page link.
3. Click on the Page Context tab. 4. Click on the Expand All link.
5. Scroll down to the (JSP) My Employee Information line.
49
You will notice that the page has lots of information on it. Now that we have clicked on the Expand All link, a quick way to find the information we require would be to bring up the browser search page facility and search for the name of the page we want the information for as shown in the following screenshot. To activate the search facility in a browser window, press CTRL + F. We can then type in the characters we want to search for. We can use this to help speed up our fact finding as often there is a lot of information on a page we need to sift through. In this example, we can see that the My Employee Information page has a function of HR_MGR_VIEWS_SS and a destination URL of OA.jsp?page=/oracle/apps/per/selfservice/mgrviews/ webui/ManagerViewsPG&OAFunc=HR_MGR_VIEWS_SS.
6. Navigate back to Home | Personal Information. 7. Click on the Action icon.
8. Click on the Personalize "Basic Details" link. 9. Click on the Complete View radio button. 10. Click on the Expand All link.
11. In the Personalize Region: Basic Details screen, click on the Update Item icon for the Button: Google item we created earlier, as shown in the following screenshot:
50
12. Update the details of the following property items as per the table:
Property Value
14. Click on the Return to Application link. 15. Now click on the My Employee Info button.
You should now have opened the My Employee Information page as shown in the following screenshot:
Hiding a button on a page
To perform this recipe, we will use the button created in the Adding a button to a page recipe.
Getting ready
Now, we are going to show how we can hide a button. We are going to show the button on the page for our custom responsibility, but hide it for other users. We can do this by setting the Rendered property of the button to False at the Site level and set it to True at the
Responsibility level for our custom responsibility.
51
How to do it...
To hide a button on a page, perform the following steps:
1. Log in to Oracle with XXUSER and select the XX Test Manager Self-Service responsibility.
2. Navigate to Home | Personal Information. 3. Click on the Action icon.
4. Click on the Personalize "Basic Details" link. 5. Click on the Complete View radio button. 6. Click on the Expand All link.
7. Click on the Personalize icon for the Button: My Personal Info object. 8. Click on the Choose Levels Displayed button.
9. Shift all levels other than the Site and Responsibility levels to the left-hand side as shown in the following screenshot:
10. Click on the Apply button.
11. Set the Rendered property at the Site level to False.
52
12. Set the Rendered property at the Responsibility level to True:
13. Click on the Apply button.
14. Click on the Return to Application link.
You will see that in the Personal Information page, the My Personal Info button is still available.
15. Navigate to the Home page.
16. Change the responsibility to Manager Self-Service. 17. Navigate to the Personal Information page. 18. Click on the Action icon.
53
How it works...
We can now see that the button is no longer displayed for other responsibilities. We can set the Rendered property to False, when we do not want an item to be displayed.
Making a field required
We can also change the Required property of an item to make users enter data. At this stage, you should be getting the idea about changing properties of items and getting a feel for what can be achieved. To gain a better understanding, it would be a good idea to investigate what properties can be changed and what effect it has on the item. Next, we will make a
field required.
How to do it...
To make a field required on a page, perform the following steps:
1. Log in to Oracle with XXUSER and select the XX Test Manager Self-Service responsibility.
2. Navigate to Home | Personal Information. 3. Click on the Action icon.
4. In the Basic Details region, click on the Update button.
5. Select the Correct or complete the current details radio box and click on Next.
6. Click on the Personalize "Basic Details" link. 7. Click on the Complete View radio button. 8. Click on the Expand All link.