www.nixtrain.com Page i
Kata Pengantar
Segala puji dan syukur penulis panjatkan kepada Allah S.W.T yang telah melimpahkan
karunia-Nya, serta atas pencerahan dan hidayah-Nya lah, penulis dapat menyelesaikan buku ini yang
berjudul “CCNA Lab Guide: 1
stEdition”.
Melalui buku ini, saya ingin mengucapkan terima kasih kepada guru-guru saya : Achmad
Mardiansyah, Andry M. Hartawan, Dedi Gunawan, Danu Wiyoto, Fathur Ridho, Miftah Rahman,
Wahyu M. Sun, Deny Juliants dan masih banyak yang lainnya.. dan juga teman-teman di group
facebook Nixtrain, Road to CCNA, dan Komunitas Cisco Bandung atas dukungan dan motivasinya
sehingga saya bisa menyelesaikan karya buku ini.
Latar belakang penulisan buku ini diawali untuk membantu penulis dalam menyampaikan materi
lab di training center Nixtrain. Penulis mengucapkan terima kasih atas saran dan masukkannya
kepada team Nixtrain : Toni, Rama, Sufyan. You are my best team.. (y)
Untuk menggunakan buku ini cukup memakai Packet Tracer atau GNS3 sebagai tool
nge-labnya..didesain dengan ulasan yang sistematis dan terdapat pesan tersembunyi, sehingga
mengharuskan pembaca teliti dalam mengikuti petunjuk dibuku ini.. pembaca akan diuji dengan
pertanyaan review disetiap akhir lab.
Semoga buku ini membawa manfaat buat pembaca dalam mempelajari basic networking. Apabila
terdapat kesalahan dalam penulisan atau ingin memberikan saran/feedback, silahkan kirimkan
kepada penulis melalui email :
Jika ada kesulitan dalam mengerjakan lab-nya dan ingin mendapatkan support gratis, silahkan
bergabung di group facebook Road to CCNA. Kami dengan senang hati akan membantu kesulitan
pembaca.
Selamat belajar dan ikuti perkembangan terupdate tentang penulisan buku edisi selanjutnya di
group facebook Road to CCNA.
Sebagai penutup kata pengantar ini, penulis menyadari masih terdapat banyak kekurangan
disana-sini dalam penulisan buku ini. Oleh karena itu, penulis tetap mengharapkan kritik dan masukan
bagi perbaikan buku ini.
Bandung, Januari 2015
www.nixtrain.com Page ii
Daftar Lab
Kategori Lab Nama Lab Halaman
Basic Router
1 Basic Router Configuration 1
2 Remote Access Telnet Router 5
3 Managing Router Configuration 9
Routing
4 Static Routing 15
5 Static Default Route 24
6 RIPv2 32
7 EIGRP 40
8 OSPF 50
ACL
9 ACL Standar 65
10 ACL Extended 72
NAT
11 NAT Static 80
12 NAT Dynamic 87
13 NAT Dynamic Overload (PAT) 93
14 NAT Dynamic Overload (PAT with Exit-Interface) 99
Basic Switch 15 Basic Switch Configuration 104
Switching
16 VLAN 111
17 VLAN Trunking 120
18 InterVLAN Routing 126
19 STP 132
HA
20 EtherChannel 139
21 HSRP 146
IP Services 22 DHCP 150
www.nixtrain.com Page 1
Lab 1. Basic Router Configuration
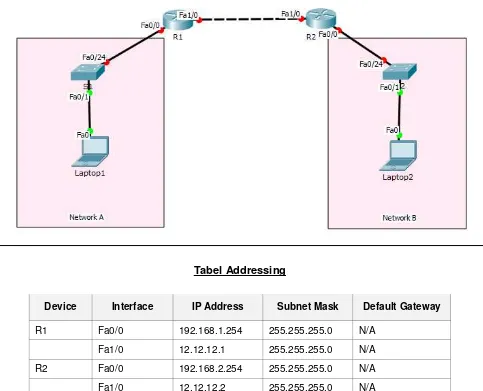
Topologi
Tabel Addressing
Device Interface IP Address Subnet Mask Default Gateway
R1 Fa0/0 192.168.1.254 255.255.255.0 N/A
Fa1/0 12.12.12.1 255.255.255.0 N/A
R2 Fa0/0 192.168.2.254 255.255.255.0 N/A
Fa1/0 12.12.12.2 255.255.255.0 N/A
S1 N/A VLAN 1 N/A N/A
S2 N/A VLAN 1 N/A N/A
Laptop1 NIC 192.168.1.1 255.255.255.0 192.168.1.254
Laptop2 NIC 192.168.2.1 255.255.255.0 192.168.2.254
Tujuan
Setting basic router
Konsep Dasar
Router memiliki 6 mode :
1. Setup mode
Router masuk setup mode jika NVRAM kosong alias tidak memiliki konfigurasi.
Biasanya kondisi ini terjadi ketika kita mengaktifkan router baru atau setelah
melakukan reset konfigurasi.
www.nixtrain.com Page 2
Hanya terdapat beberapa command untuk monitoring
Command show terbatas, ping dan traceroute
Ditandai dengan :
Router>3. Privileged mode
Terdapat beberapa command monitoring dan troubleshooting
Terdapat semua command show, ping, trace, copy, erase
Ditandai dengan :
Router#4. Global Configuration mode
Untuk mensetting keseluruhan router misalnya hostname, konfigurasi routing
Semua konfigurasi yang kita inputkan berefek global di router
Ditandai dengan :
Router(config)#5. Interface mode
Untuk konfigurasi interface secara spesifik, misal Interface fa0/0, Interface Fa0/1
6. Rommon mode
Untuk recovery password
Jika lupa password console dan telnet, atau lupa password enable maka gunakan
rommon mode untuk melakukan recovery password dengan mengubah nilai confreg
Konektivitas Console
Untuk koneksi router menggunakan console, membutuhkan kabel console dan converter DB-9 to
USB. Proses remote console dapat dilakukan dengan aplikasi putty atau hyperterminal untuk
sistem operasi Windows. Sedangkan di Linux dapat menggunakan
minicom
–
s
.
Konfigurasi
Untuk mensetting basic router R1 dan R2, gunakan akses console dari Laptop1 dan Laptop2.
Setelah itu, ketikkan command basic router dibawah ini di R1 dan R2.
a. Setelah login telnet ketikkan enable privileged EXEC mode.
Router> enable Router#
b. Masuk global configuration mode.
Router# config terminal Router(config)#
c. Memberikan nama device router.
Router(config)# hostname R1
d. Disable DNS lookup untuk mencegah router melakukan translasi command yang salah
ketik.
R1(config)# no ip domain-lookup
e. Setting semua password dengan minimum karakter 6.
R1(config)# security passwords min-length 6
f. Setting password privilege terenkripsi ciscosec
R1(config)# enable secret ciscosec
g. Setting password console
ciscocon.
Aktifkan timeout command sehingga jika selama 5
menit 0 second tidak ada aktifitas maka akan logout sendiri.
R1(config)# line consonle 0
www.nixtrain.com Page 3
R1(config-line)# exec-timeout 5 0 R1(config-line)# login
h. Setting password vty
ciscovty. Aktifkan timeout command sehingga jika selama 5 menit 0
second tidak ada aktifitas maka akan logout sendiri.
R1(config)# line vty 0 4
R1(config-line)# password ciscovty R1(config-line)# exec-timeout 5 0 R1(config-line)# login
i. Enable enkripsi clear text passwords.
R1(config)# service password-encryption
j. Buat banner yang memberikan informasi kepada user yang tidak memiliki otorisasi dilarang
login router.
R1(config)# banner motd #Unauthorized access prohibited!#
k. Setting IP address dan interface description. Aktifkan interface router dengan sub-command
no-shutdown
.
R1(config)# int fa1/0
R1(config-if)# description Connection to R2
R1(config-if)# ip address 12.12.12.1 255.255.255.0
R1(config-if)# no shutdown
R1(config-if)# exit
R1(config)# exit
R1#
l. Setting clock di router; contoh seperti dibawah:
R1# clock set 10:00:00 3 Jan 2015
m. Simpan konfigurasi file running-configuration ke startup-configuration.
R1# copy running-config startup-config Destination filename [startup-config]? Building configuration...
[OK] R1#
Ketika kita mensetting router, maka konfigurasi akan disimpan sementara di file
running-configuration (RAM), oleh karena itu proses menyimpan penting untuk dilakukan agar saat
router reboot atau shutdown file konfigurasi router masih tetap disimpan di
startup-configuration (NVRAM).
Note: ulangi langkah yang sama diatas untuk mensetting basic router R2 dan setting IP
interface router yang belum disetting di R1 maupun R2
Verifikasi
Setelah mensetting basic router R1 dan R2, langkah selanjutnya lakukan verifikasi bahwa
konfigurasi yang kita inputkan sudah benar dengan command
show running-configdan
show ip interface brief.
Lakukan tes Ping :
www.nixtrain.com Page 4
Pastikan tes Ping diatas berhasil semua. Gunakan CMD di Laptop untuk tes Ping, caranya klik
LaptopX -> pilih tab Desktop -> pilih Command Prompt -> ketikkan ping IP_Tujuan (Enter).
Menampilkan informasi full konfigurasi router
R1#
show running-config
Building configuration...
Current configuration : 1742 bytes !
version 15.2
service timestamps debug datetime msec service timestamps log datetime msec service password-encryption
!
hostname R1 !
boot-start-marker boot-end-marker !
!
security passwords min-length 6
enable secret 4 3mxoP2KRPf3sFHYl6Vm6.ssJJi9tOJqqb6DMG/YH5No !
no aaa new-model !
(skip)
Gunakan tombol Enter untuk menampilkan per baris
Gunakan tombol Space untuk menampilkan per screen
Gunakan tombol q untuk exit dari tampilan konfigurasi router
Cek konfigurasi yang sudah diinputkan apakah ada yang salah atau tidak.
Menampilkan informasi interface
R1# show ip interface brief
Interface IP-Address OK? Method Status Protocol FastEthernet0/0 192.168.1.254 YES manual up up
FastEthernet1/0 12.12.12.1 YES manual up up
Dari tampilan informasi interface, cek apakah IP yang sudah diconfig sudah sesuai tabel
addressing atau belum.
Tes konektivitas antar router R1 dan R2
Lakukan tes Ping dari R1 ke R2 dan sebaliknya. Ping pertama success rate masih 80%.
R1#ping 12.12.12.2
Type escape sequence to abort.
Sending 5, 100-byte ICMP Echos to 12.12.12.2, timeout is 2 seconds: .!!!!
Success rate is 80 percent (4/5), round-trip min/avg/max = 0/986/3944 ms
Ulangi tes Ping sampai success rate 100%.
Review
www.nixtrain.com Page 5
Lab 2. Remote Access Telnet Router
Topologi
Tabel Addressing
Device Interface IP Address Subnet Mask Default Gateway
R1 Fa0/0 192.168.1.254 255.255.255.0 N/A
Fa1/0 12.12.12.1 255.255.255.0 N/A
R2 Fa0/0 192.168.2.254 255.255.255.0 N/A
Fa1/0 12.12.12.2 255.255.255.0 N/A
S1 N/A VLAN 1 N/A N/A
S2 N/A VLAN 1 N/A N/A
Laptop1 NIC 192.168.1.1 255.255.255.0 192.168.1.254
Laptop2 NIC 192.168.2.1 255.255.255.0 192.168.2.254
Tujuan
Remote access R1 dan R2 menggunakan telnet dari Laptop1 dan Laptop2
Konsep Dasar
Untuk mensetting router menggunakan command line dapat kita lakukan dengan tiga cara yaitu :
Console
Koneksi membutuhkan kabel console dan tidak memerlukan settingan IP address pada sisi
router maupun Laptop
www.nixtrain.com Page 6
Koneksi membutuhkan kabel UTP dan memerlukan settingan IP address pada sisi router
maupun Laptop. Komunikasi telnet bersifat clear-text protocol, sehingga masih ada
kekurangan dari sisi keamanan yaitu password dapat dengan mudah dilihat menggunakan
packet sniffer.
SSH
Koneksi membutuhkan kabel UTP dan memerlukan settingan IP address pada sisi router
maupun Laptop. Komunikasi SSH bersifat encrypted protocol (enkripsi), sehingga lebih
aman dibandingkan dengan telnet.
Konfigurasi
Untuk mensetting telnet di router, berikut ini command yang diperlukan :
R1(config)#line vty 0 4
R1(config-line)#password <password> R1(config-line)#login
Agar kita dapat melakukan akses telnet ke router, command
enable passwordatau
enable secretharus disetting terlebih dahulu.
Pada settingan gambar topologi diatas, R1 dan R2 diasumsikan sudah disetting akses telnet
dengan password
ciscovty
dan
enable secret ciscosec (Lihat Lab 1-Basic Cisco Configuration)
. Oleh
karena itu, kita langsung dapat meremote telnet R1 dan R2.
Akan tetapi, sebelum Laptop1 dan
Laptop2 meremote router mengguakan telnet, Laptop1 dan Laptop2 harus disetting IP addressnya
sesuai dengan tabel addressing diatas. Kemudian lakukan tes Ping dari Laptop1 ke R1 dan
Laptop2 ke R2 dan pastikan berhasil tes konektivitasnya antara Laptop dan router.
Setting IP address Laptop1
www.nixtrain.com Page 7
Verifikasi
Setelah disetting IP address Laptop1, kemudian lakukan tes Ping dari Laptop1 ke interface Fa0/0
R1 menggunakan command prompt. Interface Fa0/0 R1 berfungsi sebagai gateway Laptop1.
Tampilkan konfigurasi Laptop1
Laptop1>ipconfig
FastEthernet0 Connection:(default port)
Link-local IPv6 Address...: FE80::201:43FF:FE3A:AEC2 IP Address...: 192.168.1.1
Subnet Mask...: 255.255.255.0 Default Gateway...: 192.168.1.254
Dan hasil tes Ping tampil reply seperti dibawah ini.
Laptop1>ping 192.168.1.254
Pinging 192.168.1.254 with 32 bytes of data:
Reply from 192.168.1.254: bytes=32 time=1ms TTL=255 Reply from 192.168.1.254: bytes=32 time=0ms TTL=255 Reply from 192.168.1.254: bytes=32 time=0ms TTL=255 Reply from 192.168.1.254: bytes=32 time=0ms TTL=255
Ping statistics for 192.168.1.254:
Packets: Sent = 4, Received = 4, Lost = 0 (0% loss), Approximate round trip times in milli-seconds:
Minimum = 0ms, Maximum = 1ms, Average = 0ms
Telnet dari Laptop1 ke R1
Setelah berhasil terhubung ke service telnet router, inputkan password telnet
ciscovtydan
ketikkan command
enable, kemudian inputkan password
ciscosec.
Laptop1>telnet 192.168.1.254 Trying 192.168.1.254 ...Open
Unauthorized access prohibited!
User Access Verification
Password: R1>enable Password: R1#
Muncul login access dan banner yang isinya
“Unauthorized access prohibited!”.
www.nixtrain.com Page 8
Note: ulangi langkah yang sama diatas untuk meremote telnet R2 dari Laptop2.
Review
www.nixtrain.com Page 9
Lab 3. Managing Router Configuration
Topologi
Tabel Addressing
Device Interface IP Address Subnet Mask Default Gateway
R1 Fa0/0 192.168.1.254 255.255.255.0 N/A
Fa1/0 12.12.12.1 255.255.255.0 N/A
R2 Fa0/0 192.168.2.254 255.255.255.0 N/A
Fa1/0 12.12.12.2 255.255.255.0 N/A
S1 N/A VLAN 1 N/A N/A
S2 N/A VLAN 1 N/A N/A
Laptop1 NIC 192.168.1.1 255.255.255.0 192.168.1.254
Laptop2 NIC 192.168.2.1 255.255.255.0 192.168.2.254
TFTP-Srv1 NIC 192.168.1.11 255.255.255.0 192.168.1.254
TFTP-Srv2 NIC 192.168.2.11 255.255.255.0 192.168.1.254
Tujuan
Setting SSH di R1 dan R2
Backup dan restore konfigurasi router
Menampilkan informasi hardware dan software router
Konsep Dasar
www.nixtrain.com Page 10
Setelah kita mensetting basic router dan router sudah berjalan operasional, langkah selanjutnya
yaitu melakukan backup konfigurasi. Untuk menyimpan hasil backup ini dibutuhkan server TFTP.
Proses backup tidak hanya untuk file konfigurasi, namun bisa juga dilakukan untuk backup Cisco
IOS. Keuntungan melakukan backup yaitu jika suatu saat konfigurasi missing atua Cisco IOS
corrupt, maka kita bisa dengan mudah melakukan restore konfigurasi atau Cisco IOS yang sudah
kita simpan di server TFTP sebelumnya.
Agar tidak terjadi kehilangan konfigurasi router, biasakan setelah mensetting router untuk
menjalankan command
copy run start
atau
write memory
untuk menyimpan konfigurasi.
Untuk mengetahui informasi hardware dan software router kita bisa menggunakan beberapa
command, contohnya
show versionatau
show interface. Hasil output command tersebut
berupa informasi Ethernet cable, RAM, NVRAM, dan masih banyak lainnya.
Konfigurasi
Login console ke R1 atau R2 untuk mempraktikkan
Lab 3-Managing Router Configuration
.
Setting SSH di router R1 dan R2.
Langkah mengaktifkan SSH di router:
1. Setting domain router
2. Setting username dan password login
3. Setting transport input ssh di line vty
4. Generate crypto rsa key 1024
R1>enable
R1#configure terminal
Enter configuration commands, one per line. End with CNTL/Z. R1(config)#ip domain-name NIXTRAIN.com
R1(config)#username admin secret ciscossh R1(config)#line vty 0 4
R1(config-line)#transport input ssh R1(config-line)#login local
R1(config-line)#exit
R1(config)#crypto key generate rsa [ENTER] The name for the keys will be: R1.NIXTRAIN.com
Choose the size of the key modulus in the range of 360 to 2048 for your General Purpose Keys. Choosing a key modulus greater than 512 may take a few minutes.
How many bits in the modulus [512]: 1024
% Generating 1024 bit RSA keys, keys will be non-exportable...[OK]
R1(config)#exit
*Mar 3 2:27:58.564: %SSH-5-ENABLED: SSH 1.99 has been enabled R1#
Backup konfigurasi R1
Sebelum proses backup dilakukan, pastikan konektivitas antara router R1 dan TFTP-Srv1 tidak ada
masalah. Untuk mengeceknya gunakan tes Ping.
www.nixtrain.com Page 11
Ketikkan command backup berikut di R1 :
R1#copy running-config tftp
Address or name of remote host []? 192.168.1.11 Destination filename [R1-confg]?
Writing running-config....!! [OK - 828 bytes]
828 bytes copied in 3.005 secs (275 bytes/sec)
Backup Cisco IOS R1
Tampilkan lokasi penyimpanan Cisco IOS yang akan dibackup
R1#show flash
System flash directory: File Length Name/status
3 5571584 pt1000-i-mz.122-28.bin 2 28282 sigdef-category.xml 1 227537 sigdef-default.xml
[5827403 bytes used, 58188981 available, 64016384 total] 63488K bytes of processor board System flash (Read/Write)
Proses Backup Cisco IOS R1
R1#copy flash tftp
Source filename []? pt1000-i-mz.122-28.bin
Address or name of remote host []? 192.168.1.11 Destination filename [pt1000-i-mz.122-28.bin]?
Writing
pt1000-i-mz.122-28.bin...!!!!!!!!!!!!!!!!!!!!!!!!!!!!!!!!!!!!!!!!!!!!!!!!!!!!!!!!!!!!!!!!!!!!!!! !!!!!!!!!!!!!!!!!!!!!!!!!!!!!!!!!!!!!!!
[OK - 5571584 bytes]
5571584 bytes copied in 0.29 secs (4402126 bytes/sec)
Note: ulangi langkah yang sama untuk backup config dan Cisco IOS di R2.
Restore konfigurasi R1
Perbedaan proses backup dan restore, kalo backup menyimpan konfigurasi router ke TFTP,
sedangkan restore yaitu download konfigurasi dari TFTP ke router.
Misalkan kita ingin mengconfig router dengan konfigurasi yang identik, maka kita bisa
menggunakan konfigurasi yang sudah disimpan di TFTP. Dengan mensetting koneksi TFTP dan
router, maka kita bisa mendownload config di TFTP diarahkan ke router dan mengubah settingan
yang berbeda kemudian disesuaikan dengan konfigurasi yang sudah direncanakan.
www.nixtrain.com Page 12
Command restore di R1
R1#copy tftp running-config
Address or name of remote host []? 192.168.1.11 Source filename []? R1-confg
Destination filename [running-config]?
Accessing tftp://192.168.1.11/R1-confg... Loading R1-confg from 192.168.1.11: ! [OK - 828 bytes]
828 bytes copied in 0.001 secs (828000 bytes/sec) R1#
Note: ulangi langkah yang sama untuk restore config R2.
Untuk melihat hasil backup Cisco IOS dan R1-confg, klik TFTP-Srv1 -> pilih tab Services -> pilih
TFTP
Gunakan scroll kebawah untuk melihat hasil backup terbaru
Verifikasi
Remote login SSH ke R1 dan R2
Setelah mensetting SSH di router R1 dan R2, gunakan putty untuk melakukan koneksi SSH ke
router dari Laptop1 dan Laptop2 jika menggunakan real device.
www.nixtrain.com Page 13
Klik Open
Remote Akses SSH dari Laptop1 ke R1
Laptop1>ipconfig
FastEthernet0 Connection:(default port)
Link-local IPv6 Address...: FE80::201:43FF:FE3A:AEC2 IP Address...: 192.168.1.1
Subnet Mask...: 255.255.255.0 Default Gateway...: 192.168.1.254
Laptop1>ssh -l admin 192.168.1.254 Open
Password:
Unauthorized access prohibited!
R1#show users
Line User Host(s) Idle Location 0 con 0 idle 00:01:49
*134 vty 0 admin idle 00:00:00
Interface User Mode Idle Peer Address R1#
admin
pada command SSH adalah username yang dibuat sebelumnya dan juga
password
nya.
www.nixtrain.com Page 14
Menampilkan informasi hardware dan software R1
Gunakan command
show version R1#show versionCisco Internetwork Operating System Software
IOS (tm) PT1000 Software (PT1000-I-M), Version 12.2(28), RELEASE SOFTWARE (fc5) Technical Support: http://www.cisco.com/techsupport
Copyright (c) 1986-2005 by cisco Systems, Inc. Compiled Wed 27-Apr-04 19:01 by miwang
Image text-base: 0x8000808C, data-base: 0x80A1FECC
ROM: System Bootstrap, Version 12.1(3r)T2, RELEASE SOFTWARE (fc1) Copyright (c) 2000 by cisco Systems, Inc.
ROM: PT1000 Software (PT1000-I-M), Version 12.2(28), RELEASE SOFTWARE (fc5)
System returned to ROM by reload
System image file is "flash:pt1000-i-mz.122-28.bin"
PT 1001 (PTSC2005) processor (revision 0x200) with 60416K/5120K bytes of memory .
Processor board ID PT0123 (0123)
PT2005 processor: part number 0, mask 01 Bridging software.
X.25 software, Version 3.0.0.
4 FastEthernet/IEEE 802.3 interface(s)
2 Low-speed serial(sync/async) network interface(s) 32K bytes of non-volatile configuration memory. 63488K bytes of ATA CompactFlash (Read/Write)
Configuration register is 0x2102
R1#
Dari output diatas kita bisa mengetahui versi Cisco IOS, jumlah RAM, FastEthernet cable, Serial
cable, NVRAM, Flash, confreg, dsb.
Note: ulangi langkah yang sama untuk
show versiondi R2.
Review
1. Coba lakukan akses telnet dari Laptop1 ke R1 dan Laptop2 ke R2, apakah berhasil atau
tidak?
www.nixtrain.com Page 15
Lab 4. Static Routing
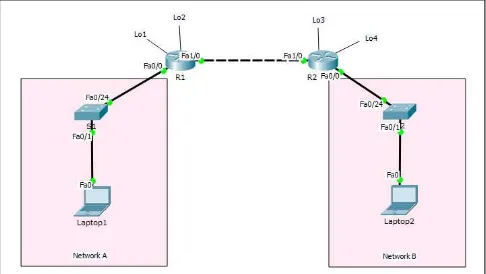
Topologi
Tabel Addressing
Device Interface IP Address Subnet Mask Default Gateway
R1 Fa0/0 192.168.1.254 255.255.255.0 N/A
Fa1/0 12.12.12.1 255.255.255.0 N/A
Lo1 172.16.1.1 255.255.255.0 N/A
Lo2 172.16.2.2 255.255.255.0 N/A
R2 Fa0/0 192.168.2.254 255.255.255.0 N/A
Fa1/0 12.12.12.2 255.255.255.0 N/A
Lo3 172.16.3.3 255.255.255.0 N/A
Lo4 172.16.4.4 255.255.255.0 N/A
S1 N/A VLAN 1 N/A N/A
S2 N/A VLAN 1 N/A N/A
Laptop1 NIC 192.168.1.1 255.255.255.0 192.168.1.254
Laptop2 NIC 192.168.2.1 255.255.255.0 192.168.2.254
Tujuan
www.nixtrain.com Page 16
Konsep Dasar
Routing
Forwarding paket dari satu network ke network lainnya dengan memilih jalur yang terbaik
dari routing table
Routing memungkinkan dua network atau lebih dapat berkomunikasi dengan network
lainnya
Routing table hanya terdiri dari jalur terbaik untuk masing-masing network destination
Static routing
Konfigurasi routing dilakukan secara manual
Membutuhkan informasi network destination
Setiap network destination disetting manual
Digunakan oleh organisasi kecil
Memiliki administrative distance 0 atau 1
Konfigurasi
Login console ke R1 atau R2 untuk mempraktikkan
Lab 4-Static Routing
.
Setting interface loopback di R1
Ketikkan command berikut di R1
R1>enable
R1#configure terminal R1(config)#interface lo1
R1(config-if)#ip address 172.16.1.1 255.255.255.0 R1(config-if)#
R1(config-if)#interface lo2
R1(config-if)#ip address 172.16.2.2 255.255.255.0 R1(config-if)#
R1(config-if)#end
Interface loopback secara default tidak ada, untuk membuat interface loopback gunakan command
diatas. Fungsi interface loopback ini seperti logical interface untuk merepresentasikan sebuah
subnet. Manfaat lain interface loopback untuk testing. Jika memiliki keterbatasan resources untuk
membuat LAN saat ngelab, gunakan interface loopback sebagai LAN. Interface loopback sudah UP
secara otomatis, sehingga tidak perlu memberikan sub-command
no shutdown
.
Note: ulangi langkah yang sama diatas untuk pembuatan interface loopback di R2.
Tampilkan interface yang sudah disetting di R1
Untuk melakukan verifikasi apakah IP address yang sudah kita setting apakah sudah sesuai atau
belum. Gunakan command dibawah ini.
R1#show ip interface brief
www.nixtrain.com Page 17
Loopback2 172.16.2.2 YES manual up up R1#
Tampilkan interface yang sudah disetting di R2
R2#show ip interface brief
Interface IP-Address OK? Method Status Protocol FastEthernet0/0 192.168.2.254 YES manual up up FastEthernet1/0 12.12.12.2 YES manual up up Loopback0 172.16.3.3 YES manual up up
Loopback1 172.16.4.4 YES manual up up R2#
Pastikan status interface UP UP semua.
Tampilkan routing table di R1
R1#show ip route
Codes: C - connected, S - static, I - IGRP, R - RIP, M - mobile, B - BGP D - EIGRP, EX - EIGRP external, O - OSPF, IA - OSPF inter area
N1 - OSPF NSSA external type 1, N2 - OSPF NSSA external type 2 E1 - OSPF external type 1, E2 - OSPF external type 2, E - EGP
i - IS-IS, L1 - IS-IS level-1, L2 - IS-IS level-2, ia - IS-IS inter area * - candidate default, U - per-user static route, o - ODR
P - periodic downloaded static route
Gateway of last resort is not set
12.0.0.0/24 is subnetted, 1 subnets
C 12.12.12.0 is directly connected, FastEthernet1/0 172.16.0.0/24 is subnetted, 2 subnets
C 172.16.1.0 is directly connected, Loopback1 C 172.16.2.0 is directly connected, Loopback2
C 192.168.1.0/24 is directly connected, FastEthernet0/0 R1#
Dari output routing table R1 dapat dilihat :
Routing table diatas yang ditampilkan hanya network directly connected (jaringan yang
terhubung langsung) ditandai dengan kode C (Connected).
Secara default, router tidak mengetahui network yang tidak terhubung langsung dan itulah
alasan mengapa Network A dan Network B tidak bisa berkomunikasi (Jawaban Review
Lab
1. Basic Router Configuration
)
Untuk mengatasi hal tersebut, maka dibutuhkanlah routing protocol dengan berbagai tipe
contohnya static routing atau dynamic routing.
Setting static routing di R1
Untuk mensetting static routing dapat dilakukan dengan dua cara:
1. Next-hop IP address
2. Exit-interface
Istilah lain static routing :
www.nixtrain.com Page 18
Konfigurasi static routing:
R1(config)#ip route <network-destination> <subnet-mask network-destination> <next-hop ip address>
R1(config)#ip route <network-destination> <subnet-mask network-destination> <exit-interface>
network destination: network tujuan yang tidak terhubung langsung (remotely connected network)
next-hop ip address: ip address yang terletak didepan router lokal menuju network destination
exit-interface: interface yang ada di router lokal untuk menuju network destination
Dari R1, untuk menuju network Fa0/0 R2, yang menjadi
next-hop ip address
yaitu IP address
Fa1/0 R2.
Dari R1, untuk menuju network Fa0/0 R2, yang menjadi
exit-interface
yaitu interface Fa1/0
R1.
Setting static routing di R1
R1(config)#
R1(config)#ip route 192.168.2.0 255.255.255.0 12.12.12.2 R1(config)#ip route 172.16.3.0 255.255.255.0 12.12.12.2 R1(config)#ip route 172.16.4.0 255.255.255.0 12.12.12.2 R1(config)#
Setting static routing di R2
R2(config)#
R2(config)#ip route 192.168.1.0 255.255.255.0 12.12.12.1 R2(config)#ip route 172.16.1.0 255.255.255.0 12.12.12.1 R2(config)#ip route 172.16.2.0 255.255.255.0 12.12.12.1 R2(config)#
Verifikasi
www.nixtrain.com Page 19
Tampilkan routing table R1
R1#show ip route
Codes: C - connected, S - static, I - IGRP, R - RIP, M - mobile, B - BGP D - EIGRP, EX - EIGRP external, O - OSPF, IA - OSPF inter area
N1 - OSPF NSSA external type 1, N2 - OSPF NSSA external type 2 E1 - OSPF external type 1, E2 - OSPF external type 2, E - EGP
i - IS-IS, L1 - IS-IS level-1, L2 - IS-IS level-2, ia - IS-IS inter area * - candidate default, U - per-user static route, o - ODR
P - periodic downloaded static route
Gateway of last resort is not set
12.0.0.0/24 is subnetted, 1 subnets
C 12.12.12.0 is directly connected, FastEthernet1/0 172.16.0.0/24 is subnetted, 4 subnets
C 172.16.1.0 is directly connected, Loopback1 C 172.16.2.0 is directly connected, Loopback2 S 172.16.3.0 [1/0] via 12.12.12.2
S 172.16.4.0 [1/0] via 12.12.12.2
C 192.168.1.0/24 is directly connected, FastEthernet0/0 S 192.168.2.0/24 [1/0] via 12.12.12.2
R1#
Dari output command static routing yang kita inputkan diatas, akan tampil kode S di routing table,
artinya routing yang aktif yaitu static routing.
S 192.168.2.0/24 [1/0] via 12.12.12.2
Penjelasan baris routing table diatas:
Dari output routing table diatas, dibagi menjadi 4 kolom :
Kolom 1 = S : kode static routing, untuk menuju network destination digunakan static
routing, atau routing protocol yang aktif di routing table adalah static routing.
Kolom 2 =
192.168.2.0/24 :network destination, alamat network destination yang akan
dituju oleh router. Network destination tampil di routing table setelah kita mengaktifkan
routing protocol.
Kolom 3 = [1/0] : 1 menyatakan nilai Administrative Distance (AD), 0 menyatakan nilai
metric.
Kolom 4 = via 12.12.12.2 : next-hop ip address yang akan digunakan oleh router local untuk
memforward paket ke network destination
Administrative Distance
(AD) menyatakan tingkat prioritas routing protocol ketika router
menjalankan lebih dari satu routing protocol secara bersamaan. AD dengan nilai terkecil yang akan
di pilih oleh router. Misalkan kita mengaktifkan protocol routing dynamic OSPF dan RIP, maka yang
akan dipilih oleh router yaitu OSPF karena memiliki nilai AD lebih kecil (110), sedangkan RIP
memiliki nilai AD lebih besar (120).
www.nixtrain.com Page 20
AD untuk membandingkan prioritas routing protocol yang satu dengan yang lainnya, sedangkan
Metric untuk membandingkan value (nilai perhitungan) di dalam routing protocol tertentu.
Cisco default administrative distances
Routing protocol or source
Administrative distance
Connected interface
0
Static route
1
EIGRP summary route
5
External BGP
20
Internal EIGRP
90
IGRP
100
OSPF
110
IS-IS
115
RIP
120
EGP
140
ODR
160
External EIGRP
170
Internal BGP
200
www.nixtrain.com Page 21
Ping dari Laptop1 ke Laptop2
Laptop1>ping 192.168.2.1
Pinging 192.168.2.1 with 32 bytes of data:
Reply from 192.168.2.1: bytes=32 time=1ms TTL=126 Reply from 192.168.2.1: bytes=32 time=0ms TTL=126 Reply from 192.168.2.1: bytes=32 time=0ms TTL=126 Reply from 192.168.2.1: bytes=32 time=1ms TTL=126
Ping statistics for 192.168.2.1:
Packets: Sent = 4, Received = 4, Lost = 0 (0% loss), Approximate round trip times in milli-seconds:
Minimum = 0ms, Maximum = 1ms, Average = 0ms
Ping berhasil dari Laptop1 ke Laptop2.
Tampilkan routing table R2
R2#show ip route
Codes: C - connected, S - static, I - IGRP, R - RIP, M - mobile, B - BGP D - EIGRP, EX - EIGRP external, O - OSPF, IA - OSPF inter area
N1 - OSPF NSSA external type 1, N2 - OSPF NSSA external type 2 E1 - OSPF external type 1, E2 - OSPF external type 2, E - EGP
i - IS-IS, L1 - IS-IS level-1, L2 - IS-IS level-2, ia - IS-IS inter area * - candidate default, U - per-user static route, o - ODR
P - periodic downloaded static route
Gateway of last resort is not set
12.0.0.0/24 is subnetted, 1 subnets
C 12.12.12.0 is directly connected, FastEthernet1/0 172.16.0.0/24 is subnetted, 4 subnets
S 172.16.1.0 [1/0] via 12.12.12.1 S 172.16.2.0 [1/0] via 12.12.12.1
C 172.16.3.0 is directly connected, Loopback0 C 172.16.4.0 is directly connected, Loopback1 S 192.168.1.0/24 [1/0] via 12.12.12.1
www.nixtrain.com Page 22
Ping dari Laptop2 ke Laptop1
Laptop2>ping 192.168.1.1
Pinging 192.168.1.1 with 32 bytes of data:
Reply from 192.168.1.1: bytes=32 time=1ms TTL=126 Reply from 192.168.1.1: bytes=32 time=0ms TTL=126 Reply from 192.168.1.1: bytes=32 time=12ms TTL=126 Reply from 192.168.1.1: bytes=32 time=10ms TTL=126
Ping statistics for 192.168.1.1:
Packets: Sent = 4, Received = 4, Lost = 0 (0% loss), Approximate round trip times in milli-seconds:
Minimum = 0ms, Maximum = 12ms, Average = 5ms
Lakukan trace route dari Laptop1 ke Laptop2
Untuk mengetahui jalur mana yang dilewati, bisa kita cek dengan command
tracertdi Laptop.
Laptop1>tracert 192.168.2.1
Tracing route to 192.168.2.1 over a maximum of 30 hops: 1 7 ms 1 ms 0 ms 192.168.1.254
2 0 ms 0 ms 0 ms 12.12.12.2 3 1 ms 0 ms 0 ms 192.168.2.1 Trace complete.
Dari output diatas, untuk menuju Laptop2 dari Laptop1 melewati 3 hop.
Note: ulangi langkah yang sama diatas untuk traceroute dari Laptop2 ke Laptop1.
192.168.1.254 12.12.12.2www.nixtrain.com Page 23
Review
1. Setelah mengetahui static routing dengan next-hop ip address, sekarang coba kerjakan
static routing menggunakan exit-interface di R1 dan R2?
www.nixtrain.com Page 24
Lab 5. Static Default Route
Topologi
Tabel Addressing
Device Interface IP Address Subnet Mask Default Gateway
R1 Fa0/0 192.168.1.254 255.255.255.0 N/A
Fa1/0 12.12.12.1 255.255.255.0 N/A
Lo1 172.16.1.1 255.255.255.0 N/A
Lo2 172.16.2.2 255.255.255.0 N/A
R2 Fa0/0 192.168.2.254 255.255.255.0 N/A
Fa1/0 12.12.12.2 255.255.255.0 N/A
Lo3 172.16.3.3 255.255.255.0 N/A
Lo4 172.16.4.4 255.255.255.0 N/A
S1 N/A VLAN 1 N/A N/A
S2 N/A VLAN 1 N/A N/A
Laptop1 NIC 192.168.1.1 255.255.255.0 192.168.1.254
Laptop2 NIC 192.168.2.1 255.255.255.0 192.168.2.254
Tujuan
www.nixtrain.com Page 25
Konsep Dasar
Static default route adalah static route dengan network address destination 0.0.0.0 dan subnet
mask 0.0.0.0. Dikenal juga sebagai “quad zero” route. Static default route melakukan identifikasi
gateway yang akan digunakan oleh router untuk mengirimkan semua paket IP untuk network
destination yang tidak diketahui di routing table, sehingga akan diforward ke route 0.0.0.0/0.
Untuk konfigurasi static default route dapat menggunakan next-hop ip address atau exit-interface.
Router(config)# ip route 0.0.0.0 0.0.0.0 {ip-address or exit-intf}
Static default route:
Default route dapat digunakan ketika network destination tidak diketahui (Internet)
Default route dapat digunakan ketika hanya ada satu jalur keluar untuk semua network
destination
Dapat mengurangi ukuran routing table
Jika router tidak menemukan entry network destination di routing table, maka router akan
memforward paket ke default route
Menjadi route pilihan terakhir di routing table
Konfigurasi
Login console ke R1 atau R2 untuk mempraktikkan
Lab-5 Static Default Route
.
Setelah mengerjakan Lab 4, gunakan kembali topologi Lab 4 beserta solutionnya untuk
mempraktikkan Lab 5.
Untuk mensimulasikan default route di R1, hapus terlebih dahulu static route di R1 sedangkan R2
masih seperti semula. Setelah disetting static default route di R1 kemudian tes Ping dari Laptop1
ke Laptop2. Sebaliknya, untuk mencoba default route di R2, hapus static route di R2 dan setting
ulang static route di R1 seperti di Lab 4. Kemudian tes Ping dari Laptop2 ke Laptop1.
Hapus static route di R1
R1(config)#
R1(config)#no ip route 192.168.2.0 255.255.255.0 12.12.12.2 R1(config)#no ip route 172.16.3.0 255.255.255.0 12.12.12.2 R1(config)#no ip route 172.16.4.0 255.255.255.0 12.12.12.2 R1(config)#
Setting static default route di R1
Command untuk mensetting static default route menggunakan next-hop ip address.
R1(config)#
R1(config)# ip route 0.0.0.0 0.0.0.0 12.12.12.2 R1(config)#
Command untuk mensetting static default route menggunakan exit-interface
R1(config)#
www.nixtrain.com Page 26
Pilih salah satu command diatas apakah ingin menggunakan next-hop ip address atau
exit-interface.
Tampilkan routing table di R1
R1#show ip route
Codes: C - connected, S - static, I - IGRP, R - RIP, M - mobile, B - BGP D - EIGRP, EX - EIGRP external, O - OSPF, IA - OSPF inter area
N1 - OSPF NSSA external type 1, N2 - OSPF NSSA external type 2 E1 - OSPF external type 1, E2 - OSPF external type 2, E - EGP
i - IS-IS, L1 - IS-IS level-1, L2 - IS-IS level-2, ia - IS-IS inter area * - candidate default, U - per-user static route, o - ODR
P - periodic downloaded static route
Gateway of last resort is 12.12.12.2 to network 0.0.0.0
12.0.0.0/24 is subnetted, 1 subnets
C 12.12.12.0 is directly connected, FastEthernet1/0 172.16.0.0/24 is subnetted, 2 subnets
C 172.16.1.0 is directly connected, Loopback1 C 172.16.2.0 is directly connected, Loopback2
C 192.168.1.0/24 is directly connected, FastEthernet0/0 S* 0.0.0.0/0 [1/0] via 12.12.12.2
Tanda
S* menandakan static default route. Setiap network destination yang tidak diketahui
dirouting table akan diforward ke 12.12.12.2. Lihat juga pada bagian Gateway of last resort yang
menyatakan bahwa untuk menuju network 0.0.0.0 gunakan gatewaynya 12.12.12.2.
Tes Ping dari Laptop1 ke Laptop2
Laptop1>ping 192.168.2.1
Pinging 192.168.2.1 with 32 bytes of data:
Reply from 192.168.2.1: bytes=32 time=1ms TTL=126 Reply from 192.168.2.1: bytes=32 time=1ms TTL=126 Reply from 192.168.2.1: bytes=32 time=0ms TTL=126 Reply from 192.168.2.1: bytes=32 time=0ms TTL=126
Ping statistics for 192.168.2.1:
Packets: Sent = 4, Received = 4, Lost = 0 (0% loss), Approximate round trip times in milli-seconds:
Minimum = 0ms, Maximum = 1ms, Average = 0ms
Traceroute dari Laptop1 ke Laptop2
Laptop1>tracert 192.168.2.1
Tracing route to 192.168.2.1 over a maximum of 30 hops:
1 1 ms 0 ms 0 ms 192.168.1.254 2 0 ms 0 ms 0 ms 12.12.12.2 3 0 ms 0 ms 0 ms 192.168.2.1
www.nixtrain.com Page 27
Lab static default route di R1 sudah berhasil. Konfigurasi eksisting saat ini R1 menggunakan static
default route dan R2 menggunakan static route.
Tampilan routing table di R2
R2#show ip route
Codes: C - connected, S - static, I - IGRP, R - RIP, M - mobile, B - BGP D - EIGRP, EX - EIGRP external, O - OSPF, IA - OSPF inter area
N1 - OSPF NSSA external type 1, N2 - OSPF NSSA external type 2 E1 - OSPF external type 1, E2 - OSPF external type 2, E - EGP
i - IS-IS, L1 - IS-IS level-1, L2 - IS-IS level-2, ia - IS-IS inter area * - candidate default, U - per-user static route, o - ODR
P - periodic downloaded static route
Gateway of last resort is not set
12.0.0.0/24 is subnetted, 1 subnets
C 12.12.12.0 is directly connected, FastEthernet1/0 172.16.0.0/24 is subnetted, 4 subnets
S 172.16.1.0 [1/0] via 12.12.12.1 S 172.16.2.0 [1/0] via 12.12.12.1
C 172.16.3.0 is directly connected, Loopback0 C 172.16.4.0 is directly connected, Loopback1 S 192.168.1.0/24 [1/0] via 12.12.12.1
C 192.168.2.0/24 is directly connected, FastEthernet0/0
Dari tampilan diatas dapat dilihat bahwa R2 menggunakan static route dengan kode S. Sedangkan
di R1 static default route dengan kode S*. Perhatikan perbedaannya ada * di R1.
Sekarang kita akan mencoba static default route di R2, berarti di R1 harus disetting static route
terlebih dahulu dan hapus konfigurasi static default route yang ada. Cek kembali solution Lab 4.
Default route
www.nixtrain.com Page 28
Hapus static default route di R1
Command untuk menghapus settingan static default route menggunakan next-hop ip address.
R1(config)#
R1(config)#no ip route 0.0.0.0 0.0.0.0 12.12.12.2 R1(config)#
Command untuk menghapus settingan static default route menggunakan exit-interface
R1(config)#
R1(config)#no ip route 0.0.0.0 0.0.0.0 fa1/0 R1(config)#
Setting static route di R1
R1(config)#
R1(config)#ip route 192.168.2.0 255.255.255.0 12.12.12.2 R1(config)#ip route 172.16.3.0 255.255.255.0 12.12.12.2 R1(config)#ip route 172.16.4.0 255.255.255.0 12.12.12.2 R1(config)#
Sebelum melanjutkan langkah berikutnya, hapus terlebih dahulu static route di R2. Dan tampilkan
hasilnya menggunakan
show ip route, pastikan hanya C saja yang masih ada di routing table R2.
Setting static default route di R2
Command untuk mensetting static default route menggunakan next-hop ip address.
R2(config)#
R2(config)# ip route 0.0.0.0 0.0.0.0 12.12.12.1 R2(config)#
Static route
www.nixtrain.com Page 29
Command untuk mensetting static default route menggunakan exit-interface
R2(config)#
R2(config)# ip route 0.0.0.0 0.0.0.0 fa1/0 R2(config)#
Pilih salah satu command diatas apakah ingin menggunakan next-hop ip address atau
exit-interface.
Tampilkan routing table di R2
R2#show ip route
Codes: C - connected, S - static, I - IGRP, R - RIP, M - mobile, B - BGP D - EIGRP, EX - EIGRP external, O - OSPF, IA - OSPF inter area
N1 - OSPF NSSA external type 1, N2 - OSPF NSSA external type 2 E1 - OSPF external type 1, E2 - OSPF external type 2, E - EGP
i - IS-IS, L1 - IS-IS level-1, L2 - IS-IS level-2, ia - IS-IS inter area * - candidate default, U - per-user static route, o - ODR
P - periodic downloaded static route
Gateway of last resort is 12.12.12.1 to network 0.0.0.0
12.0.0.0/24 is subnetted, 1 subnets
C 12.12.12.0 is directly connected, FastEthernet1/0 172.16.0.0/24 is subnetted, 2 subnets
C 172.16.3.0 is directly connected, Loopback0 C 172.16.4.0 is directly connected, Loopback1
C 192.168.2.0/24 is directly connected, FastEthernet0/0 S* 0.0.0.0/0 [1/0] via 12.12.12.1
R2#
Tanda
S* menandakan static default route. Setiap network destination yang tidak diketahui
dirouting table akan diforward ke 12.12.12.1. Lihat juga pada bagian Gateway of last resort yang
menyatakan bahwa untuk menuju network 0.0.0.0 gunakan gatewaynya 12.12.12.1.
Tes Ping dari Laptop2 ke Laptop1
Laptop2>ping 192.168.1.1
Pinging 192.168.1.1 with 32 bytes of data:
Reply from 192.168.1.1: bytes=32 time=0ms TTL=126 Reply from 192.168.1.1: bytes=32 time=1ms TTL=126 Reply from 192.168.1.1: bytes=32 time=11ms TTL=126 Reply from 192.168.1.1: bytes=32 time=0ms TTL=126
Ping statistics for 192.168.1.1:
Packets: Sent = 4, Received = 4, Lost = 0 (0% loss), Approximate round trip times in milli-seconds:
www.nixtrain.com Page 30
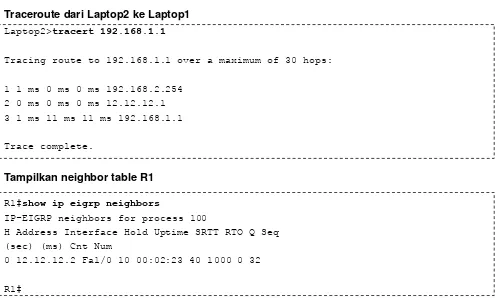
Traceroute dari Laptop2 ke Laptop1
Laptop2>tracert 192.168.1.1
Tracing route to 192.168.1.1 over a maximum of 30 hops:
1 1 ms 0 ms 0 ms 192.168.2.254 2 0 ms 0 ms 0 ms 12.12.12.1 3 1 ms 11 ms 11 ms 192.168.1.1
Trace complete.
Note: langkah diatas harus dijalankan secara bergantian agar bisa mensimulasikan static
default route di R1 maupun R2.
Verifikasi
Proses konfigurasi diatas sekaligus dilakukan proses verifikasi. Untuk melihat hasil settinggan,
gunakan command
show running-config
.
Tampilkan routing table R2
R2#show ip route
Codes: C - connected, S - static, I - IGRP, R - RIP, M - mobile, B - BGP D - EIGRP, EX - EIGRP external, O - OSPF, IA - OSPF inter area
N1 - OSPF NSSA external type 1, N2 - OSPF NSSA external type 2 E1 - OSPF external type 1, E2 - OSPF external type 2, E - EGP
i - IS-IS, L1 - IS-IS level-1, L2 - IS-IS level-2, ia - IS-IS inter area * - candidate default, U - per-user static route, o - ODR
P - periodic downloaded static route
Gateway of last resort is 12.12.12.1 to network 0.0.0.0
12.0.0.0/24 is subnetted, 1 subnets
C 12.12.12.0 is directly connected, FastEthernet1/0 172.16.0.0/24 is subnetted, 2 subnets
C 172.16.3.0 is directly connected, Loopback3 C 172.16.4.0 is directly connected, Loopback4
C 192.168.2.0/24 is directly connected, FastEthernet0/0 S* 0.0.0.0/0 [1/0] via 12.12.12.1
Dari output diatas ditampilkan full routing table di R2. Jika ingin menampilkan misalnya yang
connected atau static saja, gunakan tambahan sub-command
connectedatau
static.
Tampilkan routing table static R2
R2#show ip route static
www.nixtrain.com Page 31
Tampilkan routing table connected R2
R2#show ip route connected
C 12.12.12.0/24 is directly connected, FastEthernet1/0 C 172.16.3.0/24 is directly connected, Loopback3
C 172.16.4.0/24 is directly connected, Loopback4
C 192.168.2.0/24 is directly connected, FastEthernet0/0 R2#
Opsi menampilkan routing table
Ada beberapa pilihan untuk menampilkan routing table, apakah ingin menampilkan static saja atau
yang lainnya. Gunakan tanda ? untuk melihat opsi yang tersedia.
R2#show ip route ?
WORD Network to display information about or hostname bgp Border Gateway Protocol (BGP)
connected Connected
eigrp Enhanced Interior Routing Protocol (EIGRP) ospf Open Shortest Path First (OSPF)
rip Routing Information Protocol (RIP) static Static routes
summary Summary of all routes <cr>
R2#
Review
1. Static default route cocok untuk network tipe stub-network, jelaskan apa yang di maksud
tipe stub-network?
www.nixtrain.com Page 32
Lab 6. RIPv2
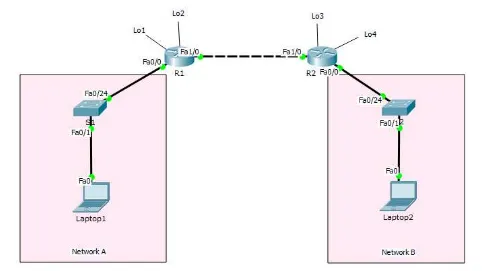
[image:35.595.59.541.118.389.2]Topologi
Tabel Addressing
Device Interface IP Address Subnet Mask Default Gateway
R1 Fa0/0 192.168.1.254 255.255.255.0 N/A
Fa1/0 12.12.12.1 255.255.255.0 N/A
Lo1 172.16.1.1 255.255.255.0 N/A
Lo2 172.16.2.2 255.255.255.0 N/A
R2 Fa0/0 192.168.2.254 255.255.255.0 N/A
Fa1/0 12.12.12.2 255.255.255.0 N/A
Lo3 172.16.3.3 255.255.255.0 N/A
Lo4 172.16.4.4 255.255.255.0 N/A
S1 N/A VLAN 1 N/A N/A
S2 N/A VLAN 1 N/A N/A
Laptop1 NIC 192.168.1.1 255.255.255.0 192.168.1.254
Laptop2 NIC 192.168.2.1 255.255.255.0 192.168.2.254
Tujuan
Setting RIPv2
Debug RIPv2
www.nixtrain.com Page 33
Konsep Dasar
Keuntungan menggunakan dynamic routing dibandingkan static routing:
Tidak perlu tahu network destination
Perlu melakukan advertise network yang terhubung langsung
Update perubahan topologi secara dinamis
Pekerjaan network admin jadi berkurang
Digunakan di industri besar
Neighbor router melakukan pertukaran informasi routing dan membangun routing table
secara otomatis
Lebih mudah dibandingkan menggunakan static routing
RIPv2
Open standar protocol (Cisco atau non-Cisco)
Classless routing protocol (support default atau sub-networks)
Mendukung VLSM
Mendukung Autentikasi
Menggunakan multicast address 224.0.0.9
Administrative distance: 120
Metric: hop count (terbaik = yang paling kecil)
Hop ke-16 unreachable
Load balancing 4 equal path
Digunakan untuk organisasi kecil
Update secara periodic dan pertukaran keseleruhan informasi routing tabel setiap 30
second
Dua langkah mudah setting routing protocol dinamis secara umum:
1. Pilih routing protocol
2. Advertise directly connected network (jaringan yang terhubung langsung dengan router)
Router(config)#
router rip
Router(config-router)#
version 2
Router(config-router)#
network <Network ID>
Router(config-router)#
no auto-summary
network <Network-ID> :
untuk advertise network yang terhubung langsung dengan router
(directly connected network).
Keuntungan RIPv2
Mudah dikonfigurasi
Tidak memerlukan design seperti OSPF
Tidak kompleks
Less overhead
Kerugian RIPv2
Utilisasi bandwidth sangat tinggi karena diperlukan untuk broadcast setiap 30 second
(RIPv1)
Terbatas pada jumlah hop (bukan bandwidth)
Tidak scalable, hop count hanya 15
Konvergensi rendah
www.nixtrain.com Page 34
Konfigurasi
Login console ke R1 atau R2 untuk mempraktikkan
Lab 6-RIPv2
.
Tampilkan routing table sebelum disetting RIPv2 di R1
R1#sh ip route
Codes: C - connected, S - static, I - IGRP, R - RIP, M - mobile, B - BGP D - EIGRP, EX - EIGRP external, O - OSPF, IA - OSPF inter area
N1 - OSPF NSSA external type 1, N2 - OSPF NSSA external type 2 E1 - OSPF external type 1, E2 - OSPF external type 2, E - EGP
i - IS-IS, L1 - IS-IS level-1, L2 - IS-IS level-2, ia - IS-IS inter area * - candidate default, U - per-user static route, o - ODR
P - periodic downloaded static route
Gateway of last resort is not set
12.0.0.0/24 is subnetted, 1 subnets
C 12.12.12.0 is directly connected, FastEthernet1/0 172.16.0.0/24 is subnetted, 2 subnets
C 172.16.1.0 is directly connected, Loopback1 C 172.16.2.0 is directly connected, Loopback2
C 192.168.1.0/24 is directly connected, FastEthernet0/0 R1#
Tampilkan routing table sebelum disetting RIPv2 di R2
R2#show ip route
Codes: C - connected, S - static, I - IGRP, R - RIP, M - mobile, B - BGP D - EIGRP, EX - EIGRP external, O - OSPF, IA - OSPF inter area
N1 - OSPF NSSA external type 1, N2 - OSPF NSSA external type 2 E1 - OSPF external type 1, E2 - OSPF external type 2, E - EGP
i - IS-IS, L1 - IS-IS level-1, L2 - IS-IS level-2, ia - IS-IS inter area * - candidate default, U - per-user static route, o - ODR
P - periodic downloaded static route
Gateway of last resort is not set
12.0.0.0/24 is subnetted, 1 subnets
C 12.12.12.0 is directly connected, FastEthernet1/0 172.16.0.0/24 is subnetted, 2 subnets
C 172.16.3.0 is directly connected, Loopback0 C 172.16.4.0 is directly connected, Loopback1
www.nixtrain.com Page 35
Setting RIPv2 di R1
Command untuk mensetting RIPv2.
R1(config)#router rip
R1(config-router)#version 2
R1(config-router)#network 12.12.12.0 R1(config-router)#network 172.16.1.0 R1(config-router)#network 172.16.2.0 R1(config-router)#network 192.168.1.0 R1(config-router)#no auto-summary R1(config-router)#
Setting RIPv2 di R2
Command untuk mensetting RIPv2.
R2(config)#router rip R2(config-router)#version 2
R2(config-router)#network 12.12.12.0 R2(config-router)#network 172.16.3.0 R2(config-router)#network 172.16.4.0 R2(config-router)#network 192.168.2.0 R2(config-router)#no auto-summary R2(config-router)#
Verifikasi
Tampilkan routing table setelah disetting RIPv2 di R1
R1#show ip route
Codes: C - connected, S - static, I - IGRP, R - RIP, M - mobile, B - BGP D - EIGRP, EX - EIGRP external, O - OSPF, IA - OSPF inter area
N1 - OSPF NSSA external type 1, N2 - OSPF NSSA external type 2 E1 - OSPF external type 1, E2 - OSPF external type 2, E - EGP
i - IS-IS, L1 - IS-IS level-1, L2 - IS-IS level-2, ia - IS-IS inter area * - candidate default, U - per-user static route, o - ODR
P - periodic downloaded static route
Gateway of last resort is not set
12.0.0.0/24 is subnetted, 1 subnets
C 12.12.12.0 is directly connected, FastEthernet1/0 172.16.0.0/16 is variably subnetted, 5 subnets, 2 masks
R 172.16.0.0/16 [120/1] via 12.12.12.2, 00:00:55, FastEthernet1/0 C 172.16.1.0/24 is directly connected, Loopback1
C 172.16.2.0/24 is directly connected, Loopback2
R 172.16.3.0/24 [120/1] via 12.12.12.2, 00:00:02, FastEthernet1/0 R 172.16.4.0/24 [120/1] via 12.12.12.2, 00:00:02, FastEthernet1/0 C 192.168.1.0/24 is directly connected, FastEthernet0/0
www.nixtrain.com Page 36
Note: ulangi langkah yang sama diatas untuk menampilkan routing table di R2
Tes Ping dari Laptop1 ke Laptop2
Laptop1>ping 192.168.2.1
Pinging 192.168.2.1 with 32 bytes of data:
Reply from 192.168.2.1: bytes=32 time=1ms TTL=126 Reply from 192.168.2.1: bytes=32 time=1ms TTL=126 Reply from 192.168.2.1: bytes=32 time=0ms TTL=126 Reply from 192.168.2.1: bytes=32 time=0ms TTL=126
Ping statistics for 192.168.2.1:
Packets: Sent = 4, Received = 4, Lost = 0 (0% loss), Approximate round trip times in milli-seconds:
Minimum = 0ms, Maximum = 1ms, Average = 0ms
Ping dari Laptop1 ke Laptop2 berhasil.
Traceroute dari Laptop1 ke Laptop2
Laptop1>tracert 192.168.2.1
Tracing route to 192.168.2.1 over a maximum of 30 hops:
1 1 ms 0 ms 0 ms 192.168.1.254 2 0 ms 0 ms 0 ms 12.12.12.2 3 0 ms 0 ms 0 ms 192.168.2.1
Trace complete.
Untuk menuju Laptop2 dari Laptop1 membutuhkan 3 hop.
Tes Ping dari Laptop2 ke Laptop1
Laptop2>ping 192.168.1.1
Pinging 192.168.1.1 with 32 bytes of data:
Reply from 192.168.1.1: bytes=32 time=0ms TTL=126 Reply from 192.168.1.1: bytes=32 time=1ms TTL=126 Reply from 192.168.1.1: bytes=32 time=11ms TTL=126 Reply from 192.168.1.1: bytes=32 time=0ms TTL=126
Ping statistics for 192.168.1.1:
Packets: Sent = 4, Received = 4, Lost = 0 (0% loss), Approximate round trip times in milli-seconds:
Minimum = 0ms, Maximum = 11ms, Average = 3ms
www.nixtrain.com Page 37
Traceroute dari Laptop2 ke Laptop1
Laptop2>tracert 192.168.1.1
Tracing route to 192.168.1.1 over a maximum of 30 hops:
1 1 ms 0 ms 0 ms 192.168.2.254 2 0 ms 0 ms 0 ms 12.12.12.1 3 1 ms 11 ms 11 ms 192.168.1.1
Trace complete.
Tampilkan informasi routing protocol yang digunakan di R1
R1#show ip protocols
Routing Protocol is "rip"
Sending updates every 30 seconds, next due in 12 seconds Invalid after 180 seconds, hold down 180, flushed after 240 Outgoing update filter list for all interfaces is not set Incoming update filter list for all interfaces is not set Redistributing: rip
Default version control: send version 2, receive 2 Interface Send Recv Triggered RIP Key-chain
FastEthernet1/0 2 2 Loopback1 2 2
Loopback2 2 2
FastEthernet0/0 2 2
Automatic network summarization is not in effect Maximum path: 4
Routing for Networks: 12.0.0.0
172.16.0.0 192.168.1.0
Passive Interface(s):
Routing Information Sources: Gateway Distance Last Update 12.12.12.2 120 00:00:15 Distance: (default is 120)
Note: ulangi langkah yang sama diatas untuk menampilkan routing information di R2
www.nixtrain.com Page 38
Debug RIP di R1
Dengan mengaktifkan fitur debug, kita bisa tahu apakah RIP sudah berjalan atau belum.
R1#debug ip rip
RIP protocol debugging is on R1#
RIP: received v2 update from 12.12.12.2 on FastEthernet1/0 172.16.3.0/24 via 0.0.0.0 in 1 hops
172.16.4.0/24 via 0.0.0.0 in 1 hops 192.168.2.0/24 via 0.0.0.0 in 1 hops
RIP: sending v2 update to 224.0.0.9 via FastEthernet1/0 (12.12.12.1) RIP: build update entries
172.16.1.0/24 via 0.0.0.0, metric 1, tag 0 172.16.2.0/24 via 0.0.0.0, metric 1, tag 0 192.168.1.0/24 via 0.0.0.0, metric 1, tag 0
RIP: sending v2 update to 224.0.0.9 via Loopback1 (172.16.1.1) RIP: build update entries
12.12.12.0/24 via 0.0.0.0, metric 1, tag 0 172.16.2.0/24 via 0.0.0.0, metric 1, tag 0 172.16.3.0/24 via 0.0.0.0, metric 2, tag 0 172.16.4.0/24 via 0.0.0.0, metric 2, tag 0 192.168.1.0/24 via 0.0.0.0, metric 1, tag 0 192.168.2.0/24 via 0.0.0.0, metric 2, tag 0
RIP: sending v2 update to 224.0.0.9 via Loopback2 (172.16.2.2) RIP: build update entries
12.12.12.0/24 via 0.0.0.0, metric 1, tag 0 172.16.1.0/24 via 0.0.0.0, metric 1, tag 0 172.16.3.0/24 via 0.0.0.0, metric 2, tag 0 172.16.4.0/24 via 0.0.0.0, metric 2, tag 0 192.168.1.0/24 via 0.0.0.0, metric 1, tag 0 192.168.2.0/24 via 0.0.0.0, metric 2, tag 0
RIP: sending v2 update to 224.0.0.9 via FastEthernet0/0 (192.168.1.254) RIP: build update entries
12.12.12.0/24 via 0.0.0.0, metric 1, tag 0 172.16.1.0/24 via 0.0.0.0, metric 1, tag 0 172.16.2.0/24 via 0.0.0.0, metric 1, tag 0 172.16.3.0/24 via 0.0.0.0, metric 2, tag 0 172.16.4.0/24 via 0.0.0.0, metric 2, tag 0 192.168.2.0/24 via 0.0.0.0, metric 2, tag 0
Dari output debug RIP, kita bisa lihat bahwa RIP sudah running di router R1. Untuk menghentikan
output debug, gunakan command
undebug ip rip
atau
undebug all
.
www.nixtrain.com Page 39
Setting passive-interface di R1
Untuk menghentikan routing updates yang dikirimkan ke Network A, maka aktifkan command
passive-interface
di interface fa0/0 R1 yang menuju Network A. Hal ini tidak mempengaruhi
advertise Network A. Jadi, Network A masih tetap dikenali oleh R2 dan masih tampil di routing table
R2. Di routing protocol RIPv2, mengaktifkan
passive-interface
mencegah multicast update
melalui interface spesifik dan masih bisa mendapatkan update dari RIP neighbor yang lain.
R1(config)#router rip
R1(config-router)#passive-interface fa0/0 R1(config-router)#
Tampilkan routing information di R1
R1#show ip protocols
Routing Protocol is "rip"
Sending updates every 30 seconds, next due in 3 seconds Invalid after 180 seconds, hold down 180, flushed after 240 Outgoing update filter list for all interfaces is not set Incoming update filter list for all interfaces is not set Redistributing: rip
Default version control: send version 2, receive 2 Interface Send Recv Triggered RIP Key-chain
FastEthernet1/0 2 2 Loopback1 2 2
Loopback2 2 2
Automatic network summarization is not in effect Maximum path: 4
Routing for Networks: 12.0.0.0
172.16.0.0 192.168.1.0
Passive Interface(s): FastEthernet0/0
Routing Information Sources: Gateway Distance Last Update 12.12.12.2 120 00:00:08 Distance: (default is 120) R1#
Passive-interface fa0/0 R1 sudah berhasil kita setting.
Note: ulangi langkah yang sama diatas untuk setting passive-interface di R2
Review
1. Jelaskan fungsi dari
no-auto summary
pada sub-command RIPv2?
2. Command apa yang berfungsi untuk mengaktifkan passive-interface RIPv2 di semua
interface R1 hanya dengan satu input command saja?
www.nixtrain.com Page 40
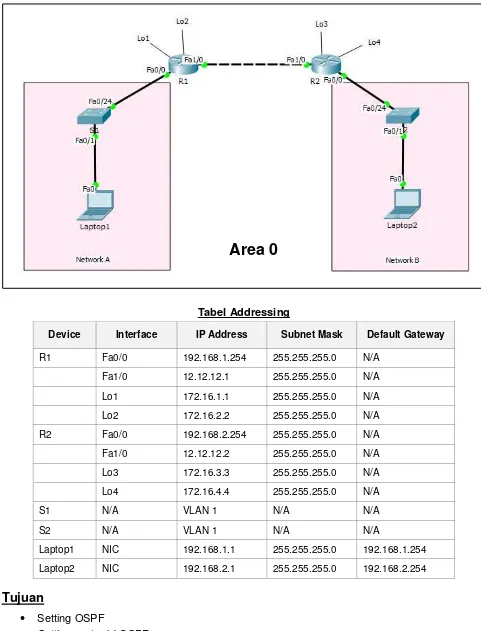
Lab 7. EIGRP
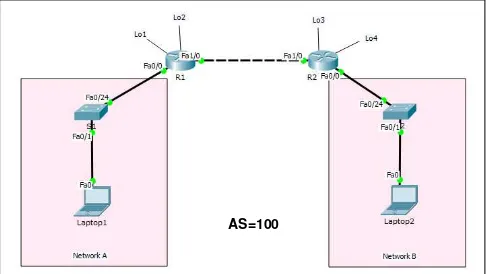
[image:43.595.58.544.114.388.2]Topologi
Tabel Addressing
Device Interface IP Address Subnet Mask Default Gateway
R1 Fa0/0 192.168.1.254 255.255.255.0 N/A
Fa1/0 12.12.12.1 255.255.255.0 N/A
Lo1 172.16.1.1 255.255.255.0 N/A
Lo2 172.16.2.2 255.255.255.0 N/A
R2 Fa0/0 192.168.2.254 255.255.255.0 N/A
Fa1/0 12.12.12.2 255.255.255.0 N/A
Lo3 172.16.3.3 255.255.255.0 N/A
Lo4 172.16.4.4 255.255.255.0 N/A
S1 N/A VLAN 1 N/A N/A
S2 N/A VLAN 1 N/A N/A
Laptop1 NIC 192.168.1.1 255.255.255.0 192.168.1.254
Laptop2 NIC 192.168.2.1 255.255.255.0 192.168.2.254
Tujuan
Setting EIGRP
Debug EIGRP
Setting passive-interface EIGRP
www.nixtrain.com Page 41
Konsep Dasar
EIGRP disebut juga sebagai routing protocol distance vector, terkadang disebut juga advanced
distance vector atau routing protocol hybrid.
Berikut ini beberapa fitur dari EIGRP :
Cisco open standar protocol (sebelumnya proprietary)
Termasuk classless routing protocol
Update perubahan topologi secara dinamis
Metric (32 bit) : Composite Metric (BW + Delay + Load + MTU + Reliability)
Administrative Distance: 90
Update menggunakan multicast: 224.0.0.10
Jumlah maksimum hop count: 255 (default 100)
Mendukung protocol IP, IPX, Apple Talk
Hello packet dikirim setiap 5 second (dead interval 15 second)
Konvergensi cepat
Menggunakan algoritma DUAL (Diffusing Update Algorithm)
Mendukung equal dan unequal cost load balancing
EIGRP memaintain tiga tabel
1. Neighbor table
-
Menampilkan informasi directly connected router
-Command:
show ip eigrp neighbor2. Topology table
-
Menampilkan semua best route yang dipelajari dari masing-masing neighbor
-
Command:
show ip eigrp topology3. Routing table
-
Menampilkan best route menuju network destination
-Command:
show ip routeNotes EIGRP
EIGRP menggunakan autonomous system number (ASN) untuk mengidentifikasi
router-router yang sharing informasi route
Hanya router yang memiliki ASN sama yang bisa sharing informasi route
Dua step menggunakan routing protocol dinamis secara umum:
1. Pilih routing protocol
2. Advertise directly connected network (jaringan yang terhubung langsung dengan router)
Konfigurasi EIGRP
Router(config)#
router eigrp 100
Router(config-router)#
network <Network ID>
Router(config-router)#
network <Network ID>
<Wildcard Mask>
Router(config-router)#
no auto-summary
network <Network-ID> :
untuk advertise network yang terhubung langsung dengan router
(directly connected network).
Keuntungan EIGRP
Terdapat backup route jika best route down (successor=primary, feasible
successor=backup)
www.nixtrain.com Page 42
Konfigurasi
Login console ke R1 atau R2 untuk mempraktikkan
Lab 7-EIGRP.
Tampilkan routing table sebelum disetting EIGRP di R1
R1#sh ip route
Codes: C - connected, S - static, I - IGRP, R - RIP, M - mobile, B - BGP D - EIGRP, EX - EIGRP external, O - OSPF, IA - OSPF inter area
N1 - OSPF NSSA external type 1, N2 - OSPF NSSA external type 2 E1 - OSPF external type 1, E2 - OSPF external type 2, E - EGP
i - IS-IS, L1 - IS-IS level-1, L2 - IS-IS level-2, ia - IS-IS inter area * - candidate default, U - per-user static route, o - ODR
P - periodic downloaded static route
Gateway of last resort is not set
12.0.0.0/24 is subnetted, 1 subnets
C 12.12.12.0 is directly connected, FastEthernet1/0 172.16.0.0/24 is subnetted, 2 subnets
C 172.16.1.0 is directly connected, Loopback1 C 172.16.2.0 is directly connected, Loopback2
C 192.168.1.0/24 is directly connected, FastEthernet0/0 R1#
Tampilkan routing table sebelum disetting EIGRP di R2
R2#show ip route
Codes: C - connected, S - static, I - IGRP, R - RIP, M - mobile, B - BGP D - EIGRP, EX - EIGRP external, O - OSPF, IA - OSPF inter area
N1 - OSPF NSSA external type 1, N2 - OSPF NSSA external type 2 E1 - OSPF external type 1, E2 - OSPF external type 2, E - EGP
i - IS-IS, L1 - IS-IS level-1, L2 - IS-IS level-2, ia - IS-IS inter area * - candidate default, U - per-user static route, o - ODR
P - periodic downloaded static route
Gateway of last resort is not set
12.0.0.0/24 is subnetted, 1 subnets
C 12.12.12.0 is directly connected, FastEthernet1/0 172.16.0.0/24 is subnetted, 2 subnets
C 172.16.3.0 is directly connected, Loopback0 C 172.16.4.0 is directly connected, Loopback1
C 192.168.2.0/24 is directly connected, FastEthernet0/0 R2#
www.nixtrain.com Page 43
Setting EIGRP di R1
Command untuk mensetting EIGRP.
R1(config)#router eigrp 100
R1(config-router)#network 12.12.12.0 R1(config-router)#network 172.16.1.0 R1(config-router)#network 172.16.2.0 R1(config-router)#network 192.168.1.0 R1(config-router)#no auto-summary R1(config-router)#
Setting EIGRP di R2
Command untuk mensetting EIGRP.
R2(config)#router eigrp 100
R2(config-router)#network 12.12.12.0 R2(config-router)#network 172.16.3.0 R2(config-router)#network 172.16.4.0 R2(config-router)#network 192.168.2.0 R2(config-router)#no auto-summary R2(config-router)#
Verifikasi
Tampilkan routing table setelah disetting EIGRP di R1
R1#show ip route
Codes: C - connected, S - static, I - IGRP, R - RIP, M - mobile, B - BGP D - EIGRP, EX - EIGRP external, O - OSPF, IA - OSPF inter area
N1 - OSPF NSSA external type 1, N2 - OSPF NSSA external type 2 E1 - OSPF external type 1, E2 - OSPF external type 2, E - EGP
i - IS-IS, L1 - IS-IS level-1, L2 - IS-IS level-2, ia - IS-IS inter area * - candidate default, U - per-user static route, o - ODR
P - periodic downloaded static route
Gateway of last resort is not set
12.0.0.0/24 is subnetted, 1 subnets
C 12.12.12.0 is directly connected, FastEthernet1/0 172.16.0.0/24 is subnetted, 4 subnets
C 172.16.1.0 is directly connected, Loopback1 C 172.16.2.0 is directly connected, Loopback2
D 172.16.3.0 [90/156160] via 12.12.12.2, 00:00:17, FastEthernet1/0 D 172.16.4.0 [90/156160] via 12.12.12.2, 00:00:17, FastEthernet1/0 C 192.168.1.0/24 is directly connected, FastEthernet0/0
D 192.168.2.0/24 [90/30720] via 12.12.12.2, 00:00:17, FastEthernet1/0 R1#
www.nixtrain.com Page 44
Tes Ping dari Laptop1 ke Laptop2
Laptop1>ping 192.168.2.1
Pinging 192.168.2.1 with 32 bytes of data:
Reply from 192.168.2.1: bytes=32 time=1ms TTL=126 Reply from 192.168.2.1: bytes=32 time=1ms TTL=126 Reply from 192.168.2.1: bytes=32 time=0ms TTL=126 Reply from 192.168.2.1: bytes=32 time=0ms TTL=126
Ping statistics for 192.168.2.1:
Packets: Sent = 4, Received = 4, Lost = 0 (0% loss), Approximate round trip times in milli-seconds:
Minimum = 0ms, Maximum = 1ms, Average = 0ms
Ping dari Laptop1 ke Laptop2 berhasil.
Traceroute dari Laptop1 ke Laptop2
Laptop1>tracert 192.168.2.1
Tracing route to 192.168.2.1 over a maximum of 30 hops:
1 1 ms 0 ms 0 ms 192.168.1.254 2 0 ms 0 ms 0 ms 12.1