InTouch for Terminal Services
Deployment Guide
Planning and Implementation Guidelines
Revision: 1.0
© 2013 Invensys Systems, Inc. All rights reserved.
No part of the material protected by this copyright may be reproduced or utilized in any form or by any means, electronic or mechanical, including photocopying, recording, broadcasting, or by any information storage and retrieval system, without permission in writing from Invensys Systems, Inc.
Invensys, Wonderware, ArchestrA, InTouch, ActiveFactory, InControl, and Factelligence are trademarks and registered trademarks of Invensys plc, its subsidiaries and affiliated companies. All other brands and product names may be the trademarks or service marks of their respective owners.
Wonderware, a business unit of Invensys 26561 Rancho Parkway South
Table of Contents
ACKNOWLEDGEMENTS ... 6
AUTHORING AND TESTING: ... 6
REVIEW AND DISTRIBUTION ... 6
WELCOME TO INTOUCH FOR TERMINAL SERVICES ... 7
TERMINOLOGY ... 7
ASSUMPTIONS ... 8
TECHNICAL SUPPORT ... 8
USING TERMINAL SERVICES ... 9
RUNNING A MANAGED INTOUCH APPLICATION WITH TERMINAL SERVICES ... 10
INTRODUCTION TO INTOUCH FOR TERMINAL SERVICES ... 16
INTOUCH FOR TERMINAL SERVICES ... 16
INTOUCH IN THE TERMINAL SERVICES ENVIRONMENT ... 16
Why was Terminal Services renamed to “Remote Desktop Services” In Windows Server 2008 R2? ... 17
How the /admin switch behaves ... 17
Remote Desktop Services (Role) ... 19
Using Remote Desktop Services ... 20
Remote Desktop Services (Role services) ... 21
INSTALLING REMOTE DESKTOP SERVICES ... 23
Install Remote Desktop Services (Role) ... 23
Install Specific Remote Desktop Services ... 25
INTOUCH FOR TERMINAL SERVICES ... 28
Why InTouch for Terminal Services? ... 28
Terminal Services Benefits for InTouch ... 28
Remote Control ... 33
GETTING STARTED WITH INTOUCH FOR TERMINAL SERVICES ... 34
UNDERSTANDING INTOUCH FOR TERMINAL SERVICES ... 34
Key Points ... 34
RUNNING INTOUCH APPLICATIONS IN A TERMINAL SERVICES ENVIRONMENT ... 35
Standalone InTouch for Terminal Services configuration created using Wonderware WindowMaker. ... 35
Running a Managed InTouch Application with Terminal Services ... 35
Running a Published InTouch Application with Terminal Services ... 37
TYPES OF INTOUCH FOR TERMINAL SERVICES ... 37
WINDOWS 2008/R2 ... 38
TERMINAL SERVICES BEHAVIOR IN WINDOWS SERVER 2008 ... 38
ACPTHIN MANAGER ... 39
How ThinManager Works ... 40
SYSTEM REQUIREMENTS ... 41
WORKING WITH NETWORK LOAD BALANCING ... 43
About the Network Load Balancing Feature ... 43
About Remote Desktop Connection Broker ... 43
About Managed InTouch Applications with Network Load Balancing... 44
SETTING UP A NETWORK LOAD BALANCING CLUSTER ... 46
Topology 1: Leveraging Network Load Balancing by Configuring Remote Desktop Connection Broker on One of the NLB Cluster Nodes ... 47
Topology 2: Leveraging Network Load Balancing by Configuring Remote Desktop Connection Broker on a Separate Node ... 49
INSTALLING REMOTE DESKTOP SERVICES ... 51
Installing Network Load Balancing ... 57
Adding a Remote Desktop Session Host Server ... 59
Creating a Network Load Balancing Cluster ... 61
CONFIGURING REMOTE DESKTOP CONNECTION BROKER SETTINGS ... 69
DISCONNECTING FROM AND CONNECTING TO A REMOTE DESKTOP SESSION ... 73
Viewing Connected Sessions ... 73
WONDERWARE LICENSING ... 76
LICENSE TYPES ... 76
HOW WONDERWARE SOFTWARE USES LICENSES ... 77
Wonderware CAL (Client Access License) ... 78
When You Need a CAL... 78
InTouch Runtime TSE License file ... 78
Installing the InTouch for Terminal Services License ... 81
Remote Desktop Licensing ... 82
PLANNING SECURITY IN A TERMINAL SERVICES ENVIRONMENT ... 83
DEFINING SECURITY ... 83
Physical Security... 83
Application Security ... 84
Session Security ... 84
Assign Group Privileges ... 88
User Account Management ... 88
Securing the RDP connection ... 91
Security Layer ... 91
ENCRYPTION LEVEL ... 92
NETWORK LEVEL AUTHENTICATION ... 93
Disable the ability to switch users through the Group Policy interface ... 93
NEW WINDOWS SERVER 2008R2SECURITY FEATURES ... 95
AppLocker ... 96
New features in User Account Control ... 97
New Features in Windows Security Auditing ... 97
Using Auditing... 98
I/O IN A TERMINAL SERVICES ENVIRONMENT ... 99
ALARMS IN A TERMINAL SERVICES ENVIRONMENT ... 106
APPENDIX 1: RETRIEVING INFORMATION ABOUT THE INTOUCH CLIENT SESSION USING SCRIPTS ... 108
APPENDIX 2: TECH NOTE 538 INTOUCH© TSE VERSION 10.0 APPLICATION CONFIGURATION: MANAGED, PUBLISHED AND STANDALONE METHODS ... 110
INTRODUCTION ... 110
Application Version ... 110
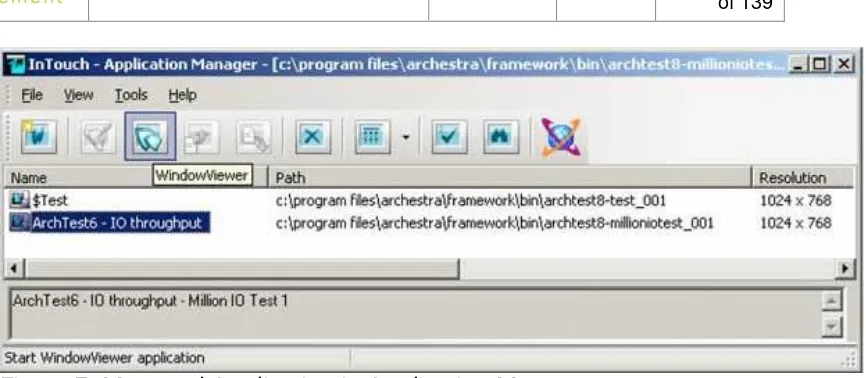
MANAGED APPLICATIONS ... 110
Creating an InTouch for Terminal Services Managed Application Environment with Application Server 3.0 and InTouch 10.0 ... 111
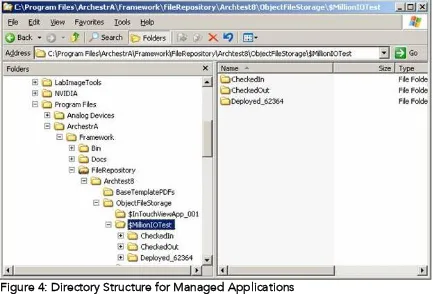
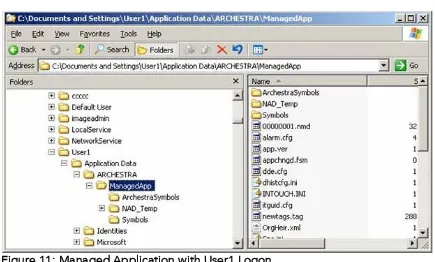
Managed Applications File Locations ... 113
Managed Application: Edit File Locations ... 113
MANAGED APPLICATION:DEPLOYED FILE LOCATIONS ... 114
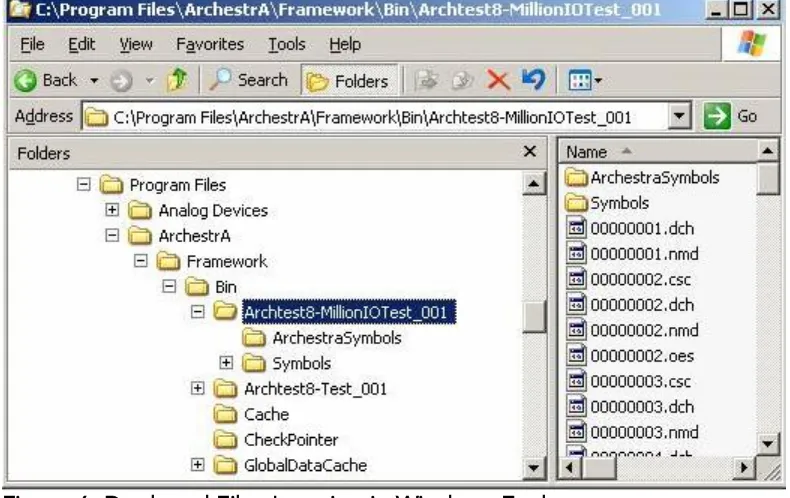
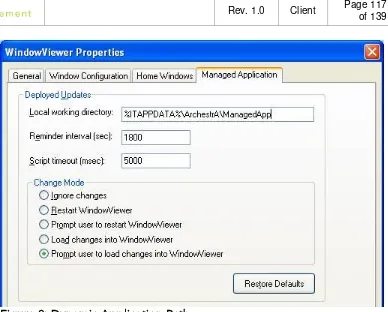
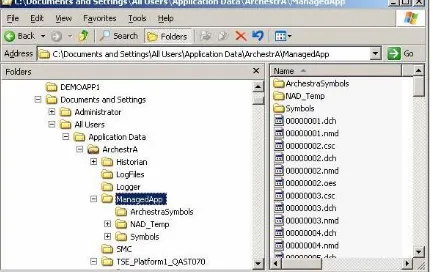
MANAGED APPLICATION:LOCAL WORKING DIRECTORY FILE LOCATIONS ... 116
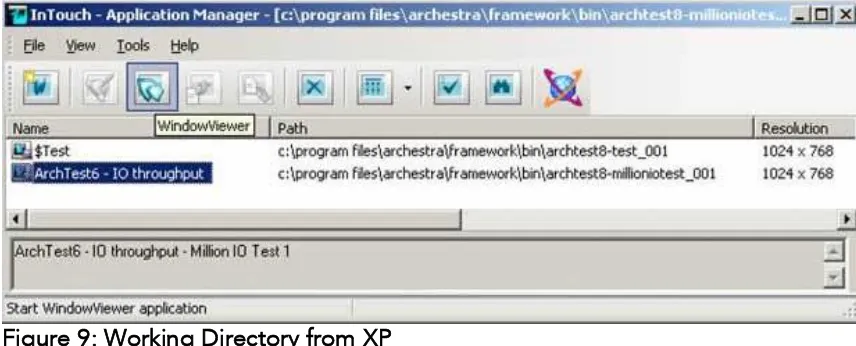
MANAGED APPLICATION:FILE LOCATIONS WHEN EXECUTED FROM THE CONSOLE ... 118
PUBLISHED APPLICATIONS ... 121
STANDALONE APPLICATIONS ... 123
APPENDIX 3: INTOUCH LICENSING ... 124
USING THE LICENSE UTILITY ... 124
Install Remote Desktop Services Client Access Licenses by Using a Web Browser ... 136
Install Remote Desktop Services Client Access Licenses by Using the Telephone ... 136
CLIENT LICENSING ... 137
ADDITIONAL RESOURCES ... 138
ACKNOWLEDGEMENTS
This Deployment Guide was authored, tested and reviewed by an I.O.M. Global Customer Support team, which includes the following people:
A
UTHORING AND TESTING:
Alicia Rantos (GCS Lake Forest) Nagat Mahmoud (GCS Cairo) Mohamed Salah (GCS Cairo) Ragaei Mahmoud (GCS Cairo)
Mohamed AbouELSoud (GCS Cairo) Amr Shebl (GCS Cairo)
R
EVIEW ANDD
ISTRIBUTION Ray Norman (Application Engineering Lake Forest) Marco Siscovich (GCS Italy)
Denis Lebrun (Wonderware France) John Krajewski (Lake Forest)
WELCOME TO INTOUCH FOR TERMINAL SERVICES
Before You Begin
The InTouch for Terminal Services Deployment Guide is intended to help you efficiently plan, deploy and run InTouch applications on Windows 2008 R2 Remote Desktop Services (formally Terminal Services).
As a complement to the InTouch for Terminal Services User’s Guide, it provides greater detail in architecture design, hardware selection, and how to leverage the features of Terminal Services in an industrial environment. It specifically addresses the RDP protocol. Additional information on RDP and related protocols are available at the following websites:
Microsoft Terminal Services Overview
http://technet.microsoft.com/en-us/library/cc755053(WS.10).aspx
Remote Desktop Services Overview http://technet.microsoft.com/en-us/library/cc725560.aspx
Remote Desktop Services http://technet.microsoft.com/en-us/windowsserver/ee236407.aspx
Automation Control Products (ACP) http://www.acpthinclient.com
Note: Adding ACP ThinManager™ increases the available client types to non -Windows-based workstations, including UNIX, Linux, and industrial display panels. Consult your vendor to verify Wonderware support for a particular non-Windows-based operating system.
T
ERMINOLOGY Console: This is the normal desktop experience on the computer that has Terminal Services installed.
RDP: Remote Desktop Protocol. The default connection protocol installed with Windows Terminal Services.
RDS: Remote Desktop Services
Session: A log-on instance where 100 percent of the resources
(processing, memory, and hard disk) are managed under a virtual user account, referred to as a Session ID.
Thin Client: (a.k.a. Terminal) A device that allows you to send commands to another computer. At a minimum, this usually means a keyboard, a display screen, and some simple circuitry.
A
SSUMPTIONSThis manual assumes you are:
„
Familiar with the Windows 2008 R2 operating system working environment.„
Knowledgeable of how to use of a mouse, Windows menus, select options, and accessing online Help.„
Experienced with a programming or macro language. For best results, you should have an understanding of programming concepts such as variables, statements, functions and methods.T
ECHNICALS
UPPORTWonderware Technical Support offers a variety of support options to answer any questions on Wonderware products and their implementation.
Prior to contacting technical support, please refer to the relevant chapter(s) in your InTouch for Terminal Services Deployment Guide for a possible solution to any problem you may have with your system. If you find it necessary to contact technical support for assistance, please have the following information available:
1. Your software serial number.
2. The version of InTouch you are running.
3. The type and version of the operating system you are using. For example, Microsoft Windows 2008 R2 SP1 (or later) workstation.
4. The exact wording of system error messages encountered.
5. Any relevant output listing from the Wonderware Logger, the Microsoft Diagnostic utility (MSD), or any other diagnostic applications.
6. Details of the attempts you made to solve the problem(s) and your results.
7. Details of how to recreate the problem.
USING TERMINAL SERVICES
Terminal Services is a configurable service included in the Microsoft Windows Server operating systems that runs Windows-based applications centrally from a server. In Terminal Services, client computers access the server node, where multiple instances of InTouch software applications run simultaneously. The Terminal Services environment has three main parts:
Terminal Services Server: The server manages the computing resources for each client session and provides client users with their own unique environment. The server receives and processes all keystrokes and mouse actions performed at the remote client, then directs all display output for both the operating system and applications to the appropriate client. All Terminal Services application processing occurs on the server.
Remote Desktop Protocol (RDP): A Remote Desktop Protocol (RDP) client application passes the input data, such as keystrokes and mouse
movements, to the server.
R
UNNING AM
ANAGEDI
NT
OUCHA
PPLICATION WITHT
ERMINALS
ERVICESYou can run managed InTouch applications in a Terminal Services environment. The benefit of using Terminal Services is that it allows you to run multiple, autonomous InTouch applications simultaneously on a Terminal Server.
KEY POINTS
In a typical Terminal Services architecture, application development, deployment, and client visualization are placed on separate computers. You must deploy each InTouch application to the server running InTouch
for Terminal Services.
You run each managed InTouch application in a separate terminal-services client session.
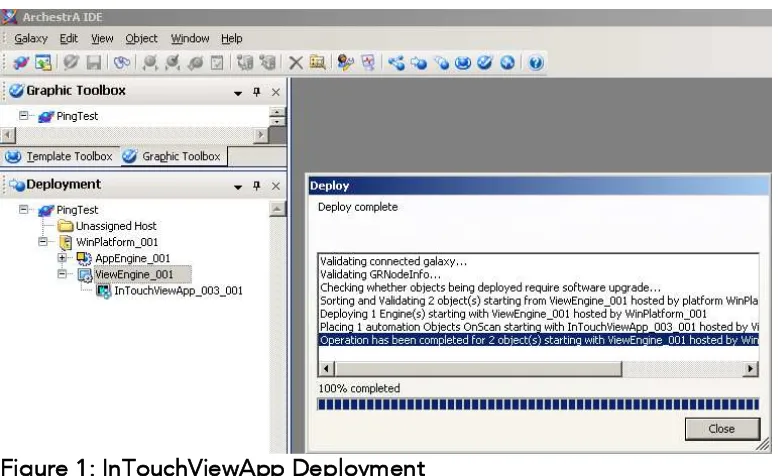
D
EPLOYING THEI
NT
OUCHV
IEWA
PPO
BJECT IN AT
ERMINALS
ERVICESE
NVIRONMENTYou can run managed InTouch applications in a Terminal Services environment. The main advantage of this architecture is that you can run multiple InTouch applications on one computer at the same time.
To do this, you must:
„
Install InTouch 10.x or later on a computer with Remote Desktop Services (RDS) installed.„
Run each managed InTouch application on its own terminal Server Node.„
Run each InTouch View client in a separate Terminal Services clientsession.
C
ONFIGURE HISTORICAL LOGGING ONI
NT
OUCH FORT
ERMINALS
ERVICESWe recommend using one historical logging file for all the clients.
Configure Historical Logging using the $HistoricalLogging tagname. Create an Application Startup script using TSEQueryRunningOnClient().
Code Example (from above figure):
Client = TseQueryRunningOnClient(); IF client == 1
THEN
IOSAccessName["Tagserver","davidu6","View","Tagname"]; $HistoricalLogging = 0;
C
ONFIGURINGA
UTOMATICS
TARTUPM
ISCELLANEOUSL
IMITATIONS IN AT
ERMINALS
ERVICESE
NVIRONMENTThe following table describes the limitations and suggested solutions to run applications on a terminal server.
Feature Supported? Comment
WindowViewer Yes WindowViewer is not supported running as a service under Terminal Services.
DDE to an I/O Device or MS Office (for example, Excel)
No Use a tag server (console or separate computer). This includes DDE QuickScripts:
WWExecute(), WWPoke() and WWRequest(). DDE from MS Office (for
example, Hot-link configured in Excel)
Yes Excel and the InTouch HMI must be running in the same session.
Historical Trending Yes Use a tag server or NAD to log values.
Multiple sessions may read the same historical files, but only a console can write to historical files.
InTouch Alarm DB Logger Yes -- MEM OLE Automation No -- Printing Alarms No --
Retentive tags Yes Must use NAD or Managed Application. SPC Pro No Not supported
SQL Access (ODBC) Yes Database should be on a separate computer. SuiteLink to an I/O Device
or another InTouch application.
Yes When communicating to another view session, include the Terminal Server node name and append the IP address of the desired session to the application name. For example,
view10.103.25.6.
I/O Servers are not supported in client sessions.
INTRODUCTION TO INTOUCH FOR TERMINAL SERVICES
This section provides an overview of InTouch for Terminal Services. It also presents business and industrial scenarios to help you determine if a server-centric strategy is appropriate for your particular application.
I
NT
OUCH FORT
ERMINALS
ERVICESInTouch for Terminal Services is a variation of the regular InTouch version and is intended for computers running server versions of Windows with Terminal Services enabled.
You can use InTouch for Terminal Services to run InTouch on one central server and supply InTouch functionality to multiple client computers without imposing any further software or hardware requirements on the client computers. In this environment, the hardware and software requirements for the server are
relatively high and those for the clients relatively low.
I
NT
OUCH IN THET
ERMINALS
ERVICESE
NVIRONMENTTerminal Services is a configurable service included in the Microsoft Windows Server operating systems that runs Windows-based applications centrally from a server. In Terminal Services, client computers access the server node, where multiple instances of InTouch software applications run simultaneously.
Internet
External RD Clients
RD Se to view the InTouch session
InTouch Application
RD Terminal Server
2008 R2
WHY WAS TERMINAL SERVICES RENAMED TO “REMOTE DESKTOP SERVICES”IN WINDOWS
SERVER 2008R2?
In Windows Server 2008 and Windows Server 2008 R2, the /console switch functionality is no longer needed:
Improved application compatibility guarantees that legacy applications that have to communicate with services in session 0 are installed and are run in sessions other than session 0. Additionally, if the service that is associated with an application tries to display UI elements in session 0, a built-in capability in Windows Server 2008, Windows Server 2008 R2 and in Windows Vista enables you to view and to interact with the session 0 UI from your session. Windows Server 2008/Windows Server 2008 R2
session 0 is an interactive session that is reserved for services. Therefore, there is no need for you to explicitly connect to this session.
Because the physical console session is never session 0, you can always reconnect to your existing session on the physical console. The Restrict Terminal Services users to a single remote session Group Policy setting determines whether you can connect to your existing physical console session. This setting is available in the
Computer Configuration\Administrative Templates\Windows
Components\Terminal Services\Terminal Server\Connections node of the Local Group Policy Editor. You can also configure this setting in Terminal Services Configuration. The Restrict each user to a single session setting appears in Edit settings in the General section.
HOW THE /ADMIN SWITCH BEHAVES
You can run the RDC 6.1 client (Mstsc.exe) together with the /admin switch to remotely administer a Windows Server 2008-based server that has or does not have Terminal Server installed. However, if you are trying to remotely administer a Windows Server 2008-based server that does not have the Terminal Server role service installed, you do not have to use the /admin switch. In this case, the same connection behavior occurs with or without the /admin switch.
Two active remote administration sessions can run at any point in time. To start a remote administration session, you must be a member of the Administrators group on the server to which you are connecting.
Session 0
Application 1
Application 2
Application 3
Service 1
Service 2
Service 3
Session 1
Application 4
Application 5 Application 6
Application 7
Application 8 Application 9 Session 2
Session 0
Service 1 Service 2
Service 3
Session 1
Application 1
Application 2 Application 3
Application 4
Application 5 Application 6 Session 2
Application 7
Application 8 Application 9 Session 3
In this graphic, three users are logged on to the system. However, only services run in Session 0. The first user logs on to Session 1, and Sessions 2 and 3
represent subsequent users.
REMOTE DESKTOP SERVICES (ROLE)
Remote Desktop Services (formerly Terminal Services), is a server role in
USING REMOTE DESKTOP SERVICES
You can access an RD Session Host server from within a corporate network or from the Internet.
Remote Desktop Services lets you efficiently deploy and maintain software in an enterprise environment.
You can easily deploy programs from a central location.
Because you install the programs on the RD Session Host server and not on the client computer, programs are easier to upgrade and to maintain. When a user accesses a program on an RD Session Host server, the
program runs on the server. Each user sees only their individual session. The session is managed transparently by the server operating system and is independent of any other client session.
When you deploy a Windows Application on an RD Session Host server instead of on each device, you have the following benefits:
Application deployment: You can quickly deploy Windows-based programs to computing devices across an enterprise. Remote Desktop Services is especially useful when you have programs that are frequently updated, infrequently used, or difficult to manage.
Application consolidation: Programs are installed and run from an RD Session Host server, eliminating the need for updating programs on client computers. This also reduces the amount of network bandwidth that is required to access programs.
REMOTE DESKTOP SERVICES (ROLE SERVICES)
Remote Desktop Services is a server role that consists of several role services. In Windows Server 2008 R2, Remote Desktop Services consists of the following role services:
RD Session Host: Remote Desktop Session Host (RD Session Host), formerly Terminal Server, enables a server to host Windows-based programs or the full Windows desktop. Users can connect to an RD Session Host server to run programs, to save files, and to use network resources on that server.
RD Web Access: Remote Desktop Web Access (RD Web Access), formerly TS Web Access, enables users to access RemoteApp and Desktop
Connection through the Start menu on a computer that is running Windows 7 or through a Web browser.
RemoteApp and Desktop Connection provide a customized view of RemoteApp programs and virtual desktops to users.
RD Licensing: Remote Desktop Licensing (RD Licensing), formerly TS Licensing, manages the Remote Desktop Services client access licenses (RDS CALs) that are required for each device or user to connect to an RD Session Host server.
You use RD Licensing to install, issue, and track the availability of RDS CALs on a Remote Desktop license server.
RD Gateway: Remote Desktop Gateway (RD Gateway), formerly TS
Gateway, enables authorized remote users to connect to resources on an internal corporate network, from any Internet-connected device.
RD Connection Broker: Remote Desktop Connection Broker (RD Connection Broker), formerly TS Session Broker, supports session load balancing and session reconnection in a load-balanced RD Session Host server farm.
RD Connection Broker is also used to provide users access to RemoteApp programs and virtual desktops through RemoteApp and Desktop
Internet Terminal Services 2008 R2
Remote Desktop Services
I
NSTALLINGR
EMOTED
ESKTOPS
ERVICESInstalling Remote Desktop Services is accomplished by completing the following tasks:
INSTALL REMOTE DESKTOP SERVICES (ROLE)
1. To begin the installation, click Start/Administrative Tools/Server Manager
(It’s assumed that a dedicated Windows 2008 R2 server has been setup).
2. Click Roles in the left navigation pane and then click Add Roles in the right pane. The Add Roles Wizard appears.
4. Click Next. The Remote Desktop Services wizard appears.
INSTALL SPECIFIC REMOTE DESKTOP SERVICES
1. On the Select Server Roles panel, click Remote Desktop Services and then Next to select the specific services required.
A warning message appears and recommends that any applications intended to be accessed by remote desktop users not be installed until the Remote Desktop Services role has been installed.
2. Click Next to proceed to the authentication selection screen.
Click Require Network Level Authentication to prevent users running on older operating systems without Network Level Authentication from accessing Remote Desktop Services. Network Level Authentication
essentially performs authentication before the remote session is established.
If less strict authentication is acceptable, or some users are running older operating systems, they do not require Network level Authentication. This option must be selected before clicking Next.
The Specify Licensing Mode screen allows you to define the licensing method.
to be used without providing licenses. This means you must provide licensing within 120 days.
For Per Device mode, you are allowed a specified number of devices to connect to the service at any one time regardless of who the users are. The Per User option restricts access to the specified users, regardless of the device from which they are connecting.
3. Select the Configure later option and click Next.
Next, specify the users and groups allowed to access the RD Session Host. Users can be added and removed at any time by changing the members of the Remote Desktop Users Group. Click Add to add additional users. The final wizard allows you to define the user experience. This wizard
essentially controls whether or not audio, video and desktop effects (such as the Aero user interface) are enabled on the users’ remote desktops.
These features are not enabled by default because they consume
Unless you need users to be able to stream audio (both to and from the session host) and video to the remote desktops and use the latest graphics-intensive desktop effects, it is recommended that these features remain disabled:
4. Click Next. You see the Confirmation screen. Read any warnings carefully. The wizard typically recommends any currently-installed applications should be re-installed before remote access is provided to users.
5. Click Install to begin the installation process.
You must restart the Windows Server 2008 R2 system partway through the installation. After the reboot, be sure to log in as the same administrative user to complete the Remote Desktop Services configuration process. Once the process is complete, the Installation Results window appears (following figure).
I
NT
OUCH FORT
ERMINALS
ERVICESInTouchfor Terminal Servicesallows you to leverage the benefits of Windows 2008 Terminal Services in an industrial environment. With Terminal Services, InTouch processing is moved completely off the operator's workstation and onto a centralized server.
WHY INTOUCH FOR TERMINAL SERVICES?
InTouchfor Terminal Servicesallows InTouch to run in a multi-user environment. For organizations wanting to increase flexibility in process visualization and to control operator workstation management costs, the InTouch for Terminal Services architecture offers an important enhancement to the traditional two- or three-tier client-server architecture.
TERMINAL SERVICES BENEFITS FOR INTOUCH
Beyond cost and scalability improvements, InTouchfor Terminal Servicesalso provides many technological advantages. For example, you can remotely control an InTouch application for quick troubleshooting and operator training. Using Microsoft's new Remote Desktop Gateway (RD Gateway) you can view your process over the web for a super-thin client, full InTouch experience. You can also provide roaming operators with real-time information and control by using wireless Ethernet.
Lastly, using InTouch for Terminal Services with Windows CE and Mobile
provides a full desktop experience on hardware that would otherwise be unable to support such operating systems.
Centralized InTouch Management
By running InTouch applications on a terminal server, you only need one InTouch runtime program to be installed. Service packs, upgrades, and other related maintenance requirements are also done only once ‟ on the terminal server. All operators are ensured that they are using the current version of InTouch.
Accordingly, the costs and challenges of updating workstation machines, especially for remote workstations, are significantly reduced. You can also reduce labor costs associated with software maintenance since only one
computer (configured as a terminal server) requires InTouch and its applications to be installed.
New operator interfaces can be Windows-based Terminals or other thin client computers.
Beyond viewing the process, you can also remotely modify applications by connecting to the terminal server-based WindowMaker. Maintaining the same application version among different repositories is no longer necessary.
WindowMaker does not currently support multiple users.
Note: Only one person can edit an application at any one time. If another person launches WindowMaker for the same application at the same time, it may become corrupt and/or unpredictable machine operation may result. Reduced Hardware Costs
Terminal Services Clients (RDP Client) run on the following Microsoft platforms Windows XP SP3
Vista SP2 Windows 7
RDP clients are also available for Windows CE and Windows Mobile.
With the integration of InTouch and Terminal Services, you can deploy the latest applications in a fully server-centric mode. By removing the processing and data storage tasks from the client machine, you can greatly extend the life of your existing hardware.
InTouch for Terminal Services and 3rd party industrial panel displays can also provide an economical alternative for process visualization in harsh
environments. The increased cooling requirements and stronger construction typically make industrial panel displays more expensive than their desktop counterparts.
With Terminal Services, industrial hardware costs are reduced because you no longer need high-powered processors, extra memory, floppy or CD-ROM drives. Many industrial panel displays now provide the ability to boot and connect to a terminal server from memory, and therefore do not require the added expense of a hard drive. The lack of moving parts also extends the life of hardware. If you need more robust hardware to replace the control panels, you can install industrial-grade computers. These machines only require the minimum
components to run the emulation software, and therefore, can be purchased at a significantly reduced price.
Remote Access
Operators and other end-users gain access to a terminal server over any
Transmission Control Protocol/Internet Protocol (TCP/IP) connection, including Remote Access, Ethernet, the Internet, wireless, wide area network (WAN), or virtual private network (VPN).
Due to the reduced bandwidth requirements of the RDP/ICA protocol, Terminal Services extends the capabilities of InTouch to users who would otherwise be unable to access Wonderware applications.
Wireless networks have traditionally been unable to support the large amount of process information for real-time monitoring and control. With InTouch for Terminal Services, applications can run with the same response time and performance as their counterparts that are directly connected to the local area network (LAN). You can therefore support real-time monitoring and control for their mobile operators. The client terminals need only the emulation software to connect to the terminal server. You can then simply launch WindowViewer to monitor the operation of choice.
Internet Access
Using Microsoft's new RD Gateway (introduced in Windows Server 2008), remote users can access a terminal server over the Internet. A Remote Desktop Gateway (RD Gateway) server is a type of gateway that enables authorized users to connect to remote computers on a corporate network from any computer with an Internet connection.
RD Gateway is based on the RDP feature set. RD Gateway uses the Remote Desktop Protocol (RDP) along with the HTTPS protocol to help create a secure, encrypted connection.
In earlier versions of Remote Desktop Connection, people couldn't connect to remote computers across firewalls and network address translators because port 3389†the port used for Remote Desktop connections†is typically blocked to enhance network security. However, an RD Gateway server uses port 443, which transmits data through a Secure Sockets Layer (SSL) tunnel.
The RD Gateway server provides these benefits:
Enables Remote Desktop connections to a corporate network from the Internet without having to set up virtual private network (VPN) connections. Enables connections to remote computers across firewalls.
Allows you to share a network connection with other programs running on your computer. This enables you to use your ISP connection instead of your corporate network to send and receive data over the remote connection. You can therefore support real-time monitoring and control for their mobile operators with either the Terminal Services Client software or by simply
Network Load Balancing (NLB) and Availability with Terminal Services NLB distributes traffic across several servers by using the TCP/IP networking protocol. You can use NLB with a terminal server farm to scale the performance of a single terminal server by distributing sessions across multiple servers. Remote Desktop Connection Broker (RD Connection Broker), formerly Terminal Services Session Broker (TS Session Broker), included in Windows Server® 2008 Standard, Windows Server 2008 Enterprise, and Windows Server 2008
Datacenter, keeps track of disconnected sessions on the terminal server farm, and ensures that users are reconnected to those sessions.
Additionally, RD Connection Broker enables you to load balance sessions between terminal servers in a farm. This functionality is provided by the RD Connection Broker Load Balancing feature. However, this session-based load balancing feature requires a front-end load balancing mechanism to distribute the initial connection requests to the terminal server farm.
You can use a load balancing mechanism such as DNS round robin, NLB or a hardware load balancer to distribute the initial connection requests. By
REMOTE CONTROL
Remote Control is a Terminal Services feature that provides the ability to take control of another workstation in the event of a client hardware failure. Remote Control also provides an easy way to train operators and monitor operations without being physically next to the terminal.
You can therefore be confident that even though failures may occur, their impact on production will be a minimum. Remote Control enables a workstation to immediately take over another that has failed. By adding a second server and installing Network Load Balancing, all the sessions are protected.
Internet
Terminal Services for InTouch
Benefits
Terminal Services for InTouch
Benefits Application Management
Manage Network Load Balancing (NLB) and Availability
Note: Wonderware strongly recommends that you consult a Microsoft
GETTING STARTED WITH INTOUCH FOR TERMINAL SERVICES
U
NDERSTANDINGI
NT
OUCH FORT
ERMINALS
ERVICESInTouch for Terminal Services is a variation of the regular InTouch version and is intended for computers running server versions of Windows with Terminal Services enabled.
You can use InTouch for Terminal Services to run InTouch on one central server and supply InTouch functionality to multiple client computers without imposing any further software or hardware requirements on the client computers.
In this environment, the hardware and software requirements for the server are relatively high and those for the clients relatively low. This results in lower total cost of ownership (TCO) and lower ongoing operating expenses.
KEY POINTS
„
InTouch for Terminal Services uses the Remote Desktop Protocol (RDP) to communicate between clients and the InTouch Terminal Server.„
Each client computer runs an individual InTouch session on the Terminal Server without interacting with other client sessions.„
You can run an application that is developed for standard InTouch with InTouch for Terminal Services. No application changes are necessary.„
You can use the Distributed Alarm system with InTouch for TerminalServices. Using the alarm client, you can select the alarm data and how to show it from WindowViewer for each Terminal Services session.
When an alarm is acknowledged in a Terminal Services environment, the Operator Node that gets recorded is the name of the client computer where the respective operator established the Terminal Services session. In a typical Terminal Services architecture, application development,
deployment, and client visualization are placed on separate computers. It is recommended that you deploy a SINGLE Engine to the Remote
Desktop Server, even if it is hosting different InTouch applications.
You must deploy each InTouch application to the server running InTouch for Terminal Services.
R
UNNINGI
NT
OUCHA
PPLICATIONS IN AT
ERMINALS
ERVICESE
NVIRONMENTYou can run InTouch applications in Terminal Services Environment in the following ways.
STANDALONE INTOUCH FOR TERMINAL SERVICES CONFIGURATION CREATED USING
WONDERWARE WINDOWMAKER.
These are tag-based applications, contain no ArchestrA Graphic Symbols, and are not deployed. Client nodes running a Standalone application do not require an Application Server Platform.
InTouch for Terminal Services is a variation of the regular InTouch version and is intended for computers running server versions of Windows with Terminal
Services enabled.
You can use InTouch for Terminal Services to run InTouch on one central server and supply InTouch functionality to multiple client computers without imposing any further software or hardware requirements on the client computers. In this environment, the hardware and software requirements for the server are
relatively high and those for the clients relatively low.
We highly recommend the use of Network Application Distribution (NAD) when running standalone InTouch applications in a Terminal Services environment. Note: Configure NAD in Node Properties for each user that connects to InTouch for Terminal Services.
RUNNING A MANAGED INTOUCH APPLICATION WITH TERMINAL SERVICES
A Managed InTouch Application is an application that is created, edited and managed in the IDE and deployed to a Platform with a View Engine. Managed Applications can access Galaxy data as well as tag data and can contain
ArchestrA Graphics. This is the recommended method for running an InTouch for Terminal Services environment in version 10.x.
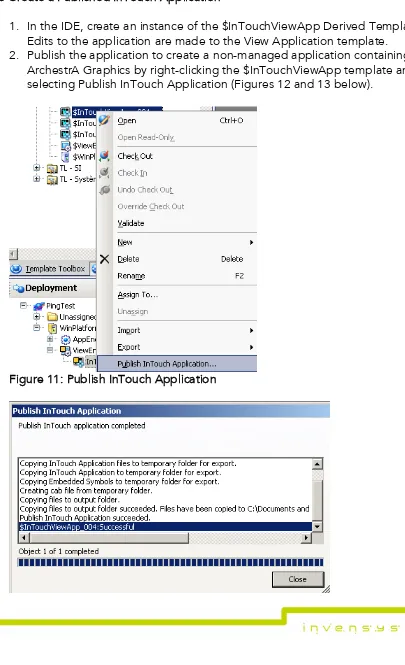
RUNNING A PUBLISHED INTOUCH APPLICATION WITH TERMINAL SERVICES
Published Applications are traditional InTouch for Terminal Services
configurations, but are created and managed using the IDE and can include ArchestrA Graphic Symbols. Published applications are published, not deployed, and the client nodes running the published applications do not require an Application Server Platform.
Note: See Tech Note 538 at the end of this document for complete details.
Internet
Available client computers range from desktop replacements to industrial display panels. They all connect to terminal server using a small client program installed on disk or in firmware. The choice of which client platform to use depends on the install-base and operator interface needs.
Your client computer must be able to communicate to terminal server using the RDP or ICA protocol. ACP-Enabled Thin Clients embed a version of ICA.
ACP ThinManager™ increases the available client types to non-Windows-based
W
INDOWS2008/R2
Windows Server 2008 R2: Remote Desktop Services (formerly Terminal Services), is a server role in Windows Server® 2008 R2. This server role provides
technologies which enable users to access Windows-based programs installed on a Remote Desktop Session Host (RD Session Host) server, or to access the full Windows desktop. With Remote Desktop Services, you can access an RD
Session Host server from within a corporate network or from the Internet.
RD Clients running Remote InTouch App
Corporate Network
Remote Desktop Services lets you efficiently deploy and maintain software in an enterprise environment. You can easily deploy programs from a central location. Because you install the programs on the RD Session Host server and not on the client computer, programs are easier to upgrade and to maintain.
T
ERMINALS
ERVICESB
EHAVIOR INW
INDOWSS
ERVER2008
In a change from Windows Server 2003, Windows Server 2008 no longer supports the /console switch as a means of starting the remote desktop (RDP) client, also known as Session 0 or Terminal Server Console session.
In Windows Server 2008, Session 0 is no longer an interactive session, and is reserved only for Windows services. Windows Server 2008 treats all remote connections as remote RDP sessions regardless of /console, /admin, or any other switches used to make the connection.
This impacts InTouch functionality such as Alarm Manager that depends on the Terminal Server Console session. Refer to the InTouch 10.1 SP2 Readme for further information about InTouch applications running in the Terminal Server Console.
system, which permits only one alarm provider. While both Application Server and InTouch can be configured as alarm providers, only one alarm provider is supported.
ACP
T
HINM
ANAGERACP ThinManager offers a centralized management solution for the modern factory & office by simplifying management of application and visual sources.
InTouch can be delivered via ACP ThinManager
ACP ThinManager
Server
Thin Clients running Remote InTouch App Corporate Network
InTouch Application
This allows unprecedented control and security in a sustainable and scalable platform. ThinManager's thin client architecture allows for deployment of less expensive hardware while giving users the applications and tools familiar to them in a format that reduces management costs and increases security. ThinManager lets you configure, maintain, upgrade and replace client devices on your network quickly and efficiently. Its intuitive Windows Explorer-like interface provides At-A-Glance Management of all connected ThinManager-Ready Thin Clients and Terminal Servers.
HOW THINMANAGER WORKS
Display Clients can be generated by a traditional session running on a Terminal Server, a shadowed thin client, an image from an IP camera or VMWare® virtual machines. The sources of these displays are referred to as Display Servers. ThinManager's MultiSession core technology allows you to view multiple Display Clients with a single thin client. Using session tiling you can even view up to 25 Display Clients on a single monitor.
TermSecure extends this functionality even more by allowing you to link Display Clients to a user instead of to a particular thin client. Users can then access their own displays simply by authenticating to any ThinManager-Ready thin client. ThinManager renders display clients through a number of different types of thin client hardware available from multiple manufacturers.
PLANNING
CONSIDERATIONS
FORTERMINAL
SERVER
APPLICATIONS
S
YSTEMR
EQUIREMENTSThe following system specifications are supported. The following information was derived from the specific test plan and is not intended as a limitation. TSE Platforms (10 Platforms)
Hardware: 2.8 GHz with 2 GB RAM, 1 GB network switch Software: Distributed (refer to the following graphic) Windows Server 2003 SP2 (32 and 64-bit version) Windows 7 and SP1
Windows Server 2008 R2 and SP1
In Wonderware tests, the TSE Platforms were used for client connection only. The Platforms did not have App Engines. Each Platform was configured to be an alarm provider and was filtered to subscribe to eleven Areas. Each Platform was deployed to a Terminal Services machine. The ten Platforms serviced ten client connections each.
Client Nodes (10 Nodes with 100 Client Connections)
Hardware: 2.8 GHz CPU with 1 GB RAM, 1 GB network switch Software: Distributed (refer to the following graphic)
Windows XP SP3 (32-bit only) Windows Vista SP2 (32/64-bit)
Windows Server 2003 SP2 Standard and Enterprise (32-bit version) Windows 7 and SP1
Important: We recommend that you install applications on a test server before you deploy them in your production environment.
Before you install Terminal Services, make sure the following checklist is complete:
Identify the client applications (for example, Wonderware InTouch) that you need to install on the server.
Identify the hardware requirements for your clients.
Determine the server configuration required to support clients. Identify the licenses required for Terminal Services as well as other
applications that you will be running.
W
ORKING WITHN
ETWORKL
OADB
ALANCINGNetwork Load Balancing (NLB) distributes traffic across several servers by using the TCP/IP networking protocol. You can use NLB with a terminal server farm to scale the performance of a single terminal server by distributing sessions across multiple servers.
ABOUT THE NETWORK LOAD BALANCING FEATURE
The NLB feature in Windows Server 2008 R2 enhances the availability and scalability of Internet server applications such as those used on Web, FTP,
firewall, proxy, virtual private network (VPN), and other mission-critical servers. A single computer running Windows Server 2008 R2 provides a limited level of server reliability and scalable performance. However, by combining the resources of two or more computers running one of the products in Windows Server 2008 R2 into a single virtual cluster, an NLB can deliver the reliability and performance that Web servers and other mission-critical servers need.
ABOUT REMOTE DESKTOP CONNECTION BROKER
Remote Desktop Connection Broker keeps track of user sessions in a load-balanced Remote Desktop Session Host server farm. The Remote Desktop Connection Broker database stores session information, (including the name of the Remote Desktop Session Host server where each session resides), the session state for each session, the session ID for each session; and the user name associated with each session.
Remote Desktop Connection Broker uses this information to redirect a user who has an existing session to the Remote Desktop Session Host server where the
user’s session resides.
Remote Desktop Connection Broker is also used to provide users with access to RemoteApp and Desktop Connection. RemoteApp and Desktop Connection provide a customized view of RemoteApp programs and virtual desktops. Remote Desktop Connection Broker supports load balancing and reconnection to existing sessions on virtual desktops accessed by using RemoteApp and Desktop Connection. To configure the Remote Desktop Connection Broker server to support RemoteApp and Desktop Connection, use the Remote Desktop Connection Manager tool. For more information, see the Remote Desktop Connection Manager Help in Windows Server 2008 R2.
Remote Desktop Connection Broker that is used in an NLB setup is included in Windows Server® 2008 R2 Standard, Windows Server 2008 R2 Enterprise and Windows 2008 R2 Datacenter.
You need a Microsoft TS license for managing the remote desktop terminal server sessions.
ABOUT MANAGED INTOUCH APPLICATIONS WITH NETWORK LOAD BALANCING
The features provided by Remote Desktop are made available through the Remote Desktop Protocol (RDP). RDP is a presentation protocol that allows a Windows-based terminal (WBT), or other Windows-based clients, to
communicate with a Windows-based Terminal Server. RDP is designed to provide remote display and input capabilities over network connections for Windows-based applications running on your Windows XP Professional desktop. In this topology, clients can access the InTouch System Platform node via
Remote Desktop. Whenever a new connection is requested to the InTouch System Platform Node, a new session is created. So all the traffic goes to the system platform node and degrades the performance of the InTouch node. The following figure displays a topology without Network Load Balancing (NLB):
Domain Network
Client Machine Client Machine Client Machine
InTouch Node
Connects to the InTouch Node via Remote Desktop
Network Load Balancing distributes IP traffic to multiple copies (or instances) of a TCP/IP service, such as a Web server, each running on a host within the cluster.
The following figure displays a topology with Networking Load Balancing:
Domain Network
Client Machine Client Machine Client Machine
Connects to the NLB Cluster Node via Remote Desktop Domain Network
InTouch Node
InTouch Node NLB Cluster
Remote Session Broker Node
To configure an NLB for managed InTouch application
1. Configure one VM or Physical machine with Wonderware Application Server 2. On both the NLB cluster nodes, install InTouch TS with Terminal Server
license.
3. Configure an NLB cluster as explained below.
4. On Wonderware Application Server node, develop managed InTouch application and deploy it on each of the NLB Cluster node.
Configuring an NLB for InTouch System Platform nodes allows you to combine application servers to provide a level of scaling and availability that is not possible with an individual server.
NLB distributes incoming client requests to InTouch System Platform nodes among the servers in the cluster to more evenly balance the workload of each InTouch System Platform server and prevent overload on any InTouch System Platform server. To client computers, the NLB cluster appears as a single server that is highly scalable and fault tolerant.
S
ETTINGU
P AN
ETWORKL
OADB
ALANCINGC
LUSTERTo setup an NLB:
1. Prepare two VM nodes that are remote desktop-enabled and have Windows Server 2008 R2 Operating System.
2. Assign static IPs to both nodes.
TOPOLOGY 1:LEVERAGING NETWORK LOAD BALANCING BY CONFIGURING REMOTE
DESKTOP CONNECTION BROKER ON ONE OF THE NLBCLUSTER NODES
You can configure an NLB cluster configuring the Remote Desktop Connection Broker on one of the NLB cluster nodes.
Domain Network
Client Machine Client Machine Client Machine
Connects to the NLB Cluster Node via Remote Desktop Domain Network
InTouch Node
To configure NLB with Topology 1
1. On each of the cluster nodes install Remote Desktop Services. For more information, refer to "Installing Remote Desktop Services" in the ArchestrA System Platform in a Virtualized Environment Implementation Guide on WDN.
Note: On the Select Role Services screen, select Remote Desktop Session Host and Remote Desktop Connection Broker on one of the Cluster Nodes to configure it as NLB Cluster node as well as RD connection broker node. On the other NLB Cluster node, select only Remote Desktop Session Host. 2. On each of the cluster nodes, install Network Load Balancing. For more
information, refer to "Installing Network Load Balancing" in the ArchestrA System Platform in a Virtualized Environment Implementation Guide on WDN.
3. On the NLB cluster node which is configured as RD connection broker as well, add a Remote Desktop Session Host Server. For more information, refer to "Adding a Remote Desktop Session Host Server" in the ArchestrA System Platform in a Virtualized Environment Implementation Guide on WDN.
4. On each of the cluster nodes, create a Network Load Balancing Cluster. For more information, refer to "Creating a Network Load Balancing Cluster" in the ArchestrA System Platform in a Virtualized Environment Implementation Guide on WDN.
TOPOLOGY 2:LEVERAGING NETWORK LOAD BALANCING BY CONFIGURING REMOTE
DESKTOP CONNECTION BROKER ON A SEPARATE NODE
Instead of configuring the Remote Desktop Connection Broker on one of the NLB cluster nodes, you can also configure the Remote Desktop Connection Broker on a separate node.
Domain Network
Client Machine Client Machine Client Machine
Connects to the NLB Cluster Node via Remote Desktop Domain Network
InTouch Node
InTouch Node NLB Cluster
To configure NLB with Topology 2
On the NLB Cluster nodes, do the following:
1. Install Remote Desktop Services. For more information refer to "Installing Remote Desktop Services" in the ArchestrA System Platform in a Virtualized Environment Implementation Guide on WDN.
Note: In the Select Role Services screen, select Remote Desktop Session Host on the NLB Cluster nodes.
2. Install Network Load Balancing. For more information, refer to "Installing Remote Desktop Services" in the ArchestrA System Platform in a Virtualized Environment Implementation Guide on WDN.
3. Create a Network Load Balancing Cluster. For more information, refer to "Creating a Network Load Balancing Cluster" in the ArchestrA System Platform in a Virtualized Environment Implementation Guide on WDN.
4. Configure remote desktop connection broker settings. For more information, refer to "Configuring Remote Desktop Connection Broker Settings" in the ArchestrA System Platform in a Virtualized Environment Implementation Guide on WDN.
On the Remote Desktop Connection Broker Node do the following:
1. Install Remote Desktop Services. For more information, refer to "Installing Remote Desktop Services" in the ArchestrA System Platform in a Virtualized Environment Implementation Guide on WDN.
Note: On the Select Role Services screen, select only Remote Desktop Connection Broker on the Remote Desktop Connection Broker Node. 2. Add a Remote Desktop Session Host Server. For more information, refer to
I
NSTALLINGR
EMOTED
ESKTOPS
ERVICESRemote Desktop Services, earlier called Terminal Services, provides technologies that enable access to session-based desktops, VM-based
desktops, or applications in the datacenter from both within a corporate network and the Internet. Remote Desktop Services enables a rich-fidelity desktop or application experience, and helps to securely connect remote users from managed or unmanaged devices.
To install Remote Desktop Services 1. Open the Server Manager window.
2. On node 1, click Start, point to Administrative Tools, and then click Server Manager.
The Server Manager window appears.
3. Add the required role services.
a. On the Server Manager window, click Roles. The Roles area appears.
c. Click Next. The Select Server Roles screen appears.
d. Click the Remote Desktop Services check box, and then click Next.
e. Click Next. The Select Role Services screen appears.
g. Click Next. The Specify Authentication Method for Remote Desktop Session Host screen appears.
i. Click the Per User option or Per Device option based on license availability, and then click Next. The Select User Groups Allowed Access To This Remote Desktop Session Host Server screen appears.
This means you can choose to acquire a Windows CAL for every device (used by any user) accessing your servers, or you can choose to acquire a Windows CAL for every named user accessing your servers (from any device).
4. Confirm the details you entered, and install the services.
a. On the Select User Groups Allowed Access To This Remote Desktop Session Host Server screen, click Next. The Configure Client Experience screen appears (see page 582 of the
INSTALLING NETWORK LOAD BALANCING
You need to install an NLB on the network adapter that you want to use for the Remote Desktop Protocol (RDP) connection.
To install an NLB
1. Open the Server Manager window.
2. Click Start, point to Administrative Tools, and then click Server Manager. The Server Manager window appears.
3. On the Server Manager window, click Features. The Features pane appears. 4. Click Add Features. The Select Features screen in the Add Features Wizard
5. Click the Network Load Balancing item, and then click Next. The Confirm Installation Selections screen appears.
ADDING A REMOTE DESKTOP SESSION HOST SERVER
A Remote Desktop Session host (RD Session Host) server hosts Windows-based programs or the full Windows desktop for Remote Desktop services client. You can connect to a Remote Desktop Session Host server to run programs, save files, and use network resources on this server.
You can access a Remote Desktop Session Host server by using Remote Desktop Connection or RemoteApp.
You can add a Remote Desktop Session Host server to the connection broker
computers’ local group.
To add an RD Session Host server 1. Open the Server Manager window.
2. Click Start, point to Administrative Tools, and then click Server Manager. The Server Manager window appears.
Add a group to the Remote Desktop Session Host server.
4. Right-click the Session Broker Computers group, and then click Properties. The Properties window for the selected group appears.
6. Click Object Types. The Object Types window appears.
7. Select Computers, then click OK. The node names of the computer appear in the Select Users, Computers, or Groups window.
8. Click OK to add the computer account for the Remote Desktop Session Host server.
CREATING A NETWORK LOAD BALANCING CLUSTER
To configure an NLB cluster, you need to configure the following parameters: Host parameters that are specific to each host in an NLB cluster.
Cluster parameters that apply to an NLB cluster as a whole. Port rules
Note: You can also use the default port rules to create an NLB cluster. To create an NLB cluster
1. Open the Network Load Balancing Manager window.
2. On node 1 of the required VM with NLB, click Start, point to Administrative Tools, and then click Network Load Balancing Manager. The Network Load Balancing Manager window appears.
The New Cluster : Connect window appears.
5. Under Interfaces available for configuring a new cluster, select the interface to be used with the cluster, and then click Next. The Host Parameters section in the New Cluster window appears.
6. Type the relevant details and create the new cluster.
Note: The value in the Priority box is the unique ID for each host. The host with the lowest numerical priority among the current members of the cluster handles the entire cluster's network traffic that is not covered by a port rule. You can override these priorities or provide load balancing for specific ranges of ports by specifying the rules on the Port rules tab of the Network Load Balancing Properties window.
8. Click Add to add a cluster IP address. The Add IP Address window appears. 9. Click the Add IPv4 address option.
11.Click OK to close the window. The IP address appears on the Cluster IP Addresses section of the New Cluster window.
12.Click Next. The Cluster Parameters section for the New Cluster window appears.
13.Type the name of the new cluster. 14.Click the Multicast option.
Note: When you click the Unicast option, NLB instructs the driver that belongs to the cluster adapter to override the adapter's unique, built-in network address and change its MAC address to the cluster's MAC address. Nodes in the cluster can communicate with addresses outside the cluster subnet. However, no communication occurs between the nodes in the cluster subnet.
When you click the Multicast option, both network adapter and cluster MAC addresses are enabled. Nodes within the cluster are able to communicate with each other within the cluster subnet, and also with addresses outside the subnet.
16.Click Finish to create the cluster and close the window. The Network Load Balancing Manager window appears (below).
Add another host to the cluster.
1. Right-click the newly-created cluster and then click Add Host to Cluster.
2. In the Host field, type the name of node 2, then click Connect.
3. Under Interfaces available for configuring a new cluster, click the interface name to be used with the cluster, then click Next. The New Cluster : Host Parameters window appears.
The Port Rules section of the Add Host to Cluster window appears. 5. Click Finish to add the host and close the window. The Network Load
Balancing Manager window appears.
The statuses of both the hosts are displayed.
To add users to the Remote Desktop Users group to access Network Load Balancing Cluster
2. Under Remote Desktop, click the relevant option to specify the remote desktop versions you want to allow access to.
3. Click Select Users to provide access to the system. The Remote Desktop Users window appears.
4. Select the users you want to allow access to, click Add, and then OK. Note: The users can be local users and need not be domain
users/administrators. If the users are local users they should be added on both the NLB cluster nodes with same user name and password.
C
ONFIGURINGR
EMOTED
ESKTOPC
ONNECTIONB
ROKERS
ETTINGSRemote Desktop Connection Broker, earlier called Terminal Services Session Broker (RD Connection Broker), is a role service that enables you to do the following:
„
Reconnect to existing sessions in a load-balanced Remote Desktop Session Host server farm. You cannot connect a different RemoteDesktop Session Host server with a disconnected session and start a new session
„
Evenly distribute the session load among Remote Desktop Session Host servers in a load-balanced Remote Desktop Session Host server farm.„
Access virtual desktops hosted on Remote Desktop Virtualization hostservers and RemoteApp programs hosted on Remote Desktop Session Host servers through RemoteApp and Desktop Connection.
1. Open the Remote Desktop Session Host Configuration window.
2. Click Start, Administrative Tools, Remote Desktop Services, then Remote Desktop Session Host Configuration. The Remote Desktop Session Host Configuration window appears.
3. In the Edit settings area, under Remote Desktop Connection Broker, double-click Member of farm in RD Connection Broker.
4. Click Change Settings.
The RD Connection Broker Settings window appears.
6. In the RD Connection Broker server name box, type the node name where the RD Connection Broker is installed.
7. In the Farm Name box, type the farm name that you want to join in the Remote Desktop Session Broker, and then click OK.
8. In the Properties window, click Participate in Connection Broker Load Balancing.
9. Type the value for the Relative weight of this server in the farm.
By assigning a relative weight value, you can distribute the load between more powerful and less powerful servers in the farm. By default, the weight of each server is 100. You can modify this value as required.
10.Under Select IP addresses to be useful for reconnection, click IP address you provided while creating the cluster, and then click OK.
Repeat this procedure on Node 2. Ensure that you enter the same details in each step for Node 2 as you did for Node 1. In the Farm Name box, type the same Farm Name used while configuring Node 1.
D
ISCONNECTINGF
ROM ANDC
ONNECTINGT
O AR
EMOTED
ESKTOPS
ESSIONIf you disconnect from a session (whether intentionally or because of a network failure), the applications you were running will continue to run. When you reconnect, the Remote Desktop Connection Broker is queried to determine whether you had an existing session, and if so, on which Remote Desktop Session Host server. If there is an existing session, Remote Desktop Connection Broker redirects the client to the Remote Desktop Session Host server where the session exists.
With Remote Desktop Connection Broker Load Balancing, if you do not have an existing session and you connect to a Remote Desktop Session Host server in the load-balanced Remote Desktop Session Host server farm, you will be
redirected to the Remote Desktop Session Host server with the fewest sessions. If you have an existing session and you reconnect, you will be redirected to the Remote Desktop Session Host server where your existing session resides. To distribute the session load between more powerful and less powerful servers in the farm, you can assign a relative server weight value to a server.
VIEWING CONNECTED SESSIONS
You can use Remote Desktop Services Manager to view sessions connected to each node of the NLB cluster, and view information and monitor users and processes on Remote Desktop Session host (RD Session Host) servers. To view sessions connected to each node of the cluster
On any node of NLB, open the Remote Desktop Services Manager window. 1. Click Start, point to Administrative Tools/Remote Desktop Services, and then
click Remote Desktop Services Manager. The Remote Desktop Services Manager window appears.
3. Type a name for the group and click OK to close the window. The name can be anything.
Add the required computers to the group.
1. In the left pane, right-click the newly created group, and then click Add Computer. The Select Computer window appears.
2. Click the Another Computer option.
3. In the Another computer box, type the computer name, and then click OK.
The Remote Desktop Services Manager window appears.
WONDERWARE LICENSING
Licenses for Wonderware products are maintained in license files or on a license server. The license file contains one or more license components, which are lines of information that specify licensing for an individual product.
Each license component is assigned a unique part number and contains information such as the:
Product name Serial number
Type and duration of license
Number of seats and other information.
L
ICENSET
YPESThere are two kinds of licenses, unserved and served. For this document, only unserved licenses are included, since InTouch does not use Served (server-based) licensing.
Information about the license Type appears with the license name and license components when you view it in the ArchestrA License Manager.
Products can have a demonstration period, which allows you to run the specified application for a defined period when the license is not available. Licenses can also define a grace period, which is entered when a license is unavailable. The grace period is a limited time period tracked by the application. The application determines what happens during the grace period.
H
OWW
ONDERWARES
OFTWAREU
SESL
ICENSESWhen a Wonderware application starts, it looks for an unserved license on the same computer in the background. If no license is found locally, the application searches all license servers specified in ArchestrA License Manager for the computer.
When a license file is found, the application checks that this version is licensed for use. If more than one license is found, the order in which licenses are acquired by applications is:
Unserved licenses Named device licenses Named user licenses Concurrent licenses
Unserved (locally installed) Licenses (WWSuite.lic and ArchestrA.lic)
Locally installed Server Licenses
ArchestrAServer.lic (not used by InTouch)