1. Foreword
2. Preface
1. Conventions Used in This Book
2. Using Code Examples
3. Safari® Books Online
4. How to Contact Us
3. 1. Bootcamp: Introducing Spring Boot
1. Getting Started with the Spring Tool Suite
1. Installing Spring Tool Suite
2. Spring Boot Starters
3. Getting Started with the Spring Initializr
1. Generating Spring Boot applications
4. The Spring Guides
5. Auto-Configuration
1. Spring Boot Configuration
4. 2. The Cloud Native Application
1. Platforms
1. Building Platforms
2. The Patterns
3. Netflix’s Story
1. Splitting the Monolith
2. Netflix OSS
4. The Twelve Factors
5. 3. 12-Factor Application Style Configuration
1. The Confusing Conflation of “Configuration”
2. Support in Spring framework
1. The PropertyPlaceholderConfigurer
2. The Environment Abstraction and @Value
3. Profiles
3. Bootiful Configuration
4. Centralized, Journaled Configuration with the Spring Cloud Configuration Server
1. Security
5. Refreshable Configuration
6. Next Steps
6. 4. Testing
1. Testing in Spring Boot
2. Integration Testing
1. Test Slices
2. Mocking in Tests
3. Testing Annotations
3. End-to-end Testing
2. Consumer-driven Contract Testing
3. Spring Cloud Contracts
4. Continuous Integration
5. Functional Testing
4. Behavior-driven Testing
7. 5. REST APIs
1. Leonard Richardson’s Maturity Model
2. Simple REST APIs with Spring MVC
3. Content Negotiation
1. Reading and Writing Binary Data
2. Using Google Protocol Buffers
4. Error Handling
5. Hypermedia
1. Media Type and Schema
6. API Versioning
7. Documenting REST APIs
8. The Client Side
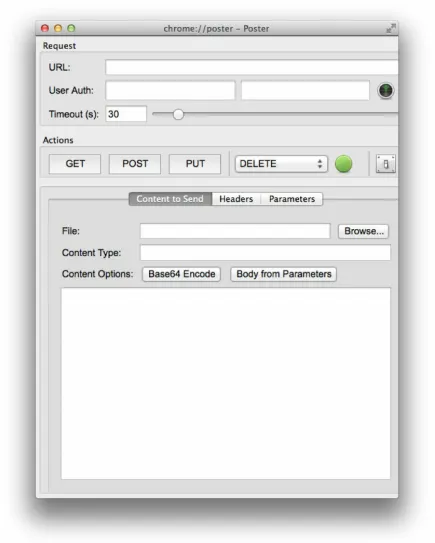
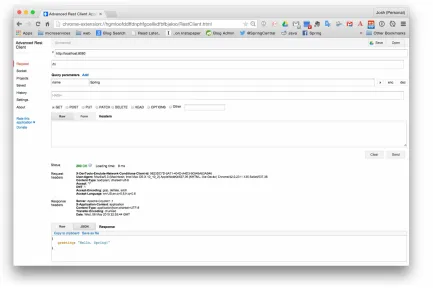
1. REST Clients for Ad-Hoc Exploration and Interaction
2. The RestTemplate
1. Structure of a Spring Data Application
2. Domain Class
3. Repositories
4. Organizing Java Packages for Domain Data
3. Auto-configuration
4. Bootstrapping Datasource Dependencies
1. Datasource Connections
5. JDBC Template
6. Spring Data Examples
7. Spring Data JPA
8. Spring Data MongoDB
9. Spring Data Neo4j
1. Caching
11. Next Steps
9. 7. Data Integration
1. Distributed Transactions
2. The Saga Pattern
3. Batch workloads with Spring Batch
4. Scheduling
5. Isolating Failures and Graceful Degradation
6. Task Management
7. Process-Centric Integration with Workflow
8. Event Driven Architectures with Spring Integration
1. Messaging Endpoints
2. From Simple Components, Complex Systems
9. Message Brokers, Bridges, the Competing Consumer Pattern and Event-Sourcing
10. Spring Cloud Stream
1. A Stream Producer
2. A Stream Consumer
11. Spring Cloud Data flow
1. Streams
2. Tasks
12. Next Steps
10. 8. Using Spring Boot with Java EE
1. Compatibility and Stability
2. Dependency Injection with JSR 330 (and JSR 250)
3. Building REST APIs with JAX-RS (Jersey)
4. JTA and XA Transaction Management
1. Resource-Local Transactons with Spring’s PlatformTransactionManager
2. Global Transactions with the Java Transaction API (JTA)
5. Deployment in a Java EE Environment
6. Final Word
11. 9. Service Brokers
1. Cloud Foundry
2. Services Marketplace
1. Creating Services
3. Cloud Foundry Service Brokers
3. Cloud Controller
4. Service Broker API
5. Implementing a Service Broker with Spring Boot
1. Amazon S3 Service Broker
2. The Service Catalog
3. Service Instances
4. Service Bindings
6. Deploying the Service Broker
1. Releasing with BOSH
2. Releasing with Cloud Foundry
3. Consuming Service Instances
4. Extending Spring Boot
12. 10. The Forklifted Application
1. The Contract
2. Migrating Application Environments
1. the Out-of-the-Box Buildpacks
2. Customizing Buildpacks
3. Containerized Applications
3. Soft-Touch Refactoring to get your application into the cloud
1. Talking to Backing Services
2. Achieving Service Parity with Spring
4. Next Steps
13. 11. The Observable System
1. The New Deal
2. Visibility and Transparency
14. 12. Push vs. Pull Observability and Resolution
1. Capturing an Application’s Present Status with Actuator
2. Metrics
3. Identifying Your Service with the /info Endpoint
4. Health Checks
5. Application Logging
6. Distributed Tracing
1. Finding Clues with Spring Cloud Sleuth
2. How Much Data is Enough?
3. OpenZipkin: a Picture is worth a Thousand Traces
7. Dashboards
1. Monitoring Potentially Risky Service Calls with the Hystrix Dashboard
2. Codecentric’s Spring Boot Admin
3. Ordina Microservices Dashboard
8. Remediation
9. Next Steps
15. 13. The Application Centric Cloud
1. Portable Applications
2. Cattle
3. Containerized Workloads
1. Scheduler
2. Service Discovery
4. The Application Framework
1. Spring Boot
2. Spring Cloud
16. 14. Continuous Delivery
1. Start Here
2. Every Build is a Release Candidate
3. Version Control Everything
17. 15. Edge Services
1. Greetings
2. A Simple Edge Service
3. Netflix Feign
4. Reactive Programming
5. Proxies with Netflix Zuul
1. A Custom Zuul Filter
6. Security on the Edge
1. OAuth
2. Building an OAuth Authorization Server
3. Building an Implicit OAuth Client with Angular.js
4. Building a Social OAuth Authorization Server
18. 16. Routing
1. Locational Decoupling with Service Registration and Discovery
2. The DiscoveryClient Abstraction
3. Cloud Foundry Route Services
Cloud Native Java
First Edition
Designing Resilient Systems with Spring Boot, Spring Cloud, and Cloud Foundry
Cloud Native Java
by Josh Long, Kenny Bastani
Copyright © 2016 Josh Long, Kenny Bastani. All rights reserved. Printed in the United States of America.
Published by O’Reilly Media, Inc., 1005 Gravenstein Highway North, Sebastopol, CA 95472.
O’Reilly books may be purchased for educational, business, or sales promotional use. Online editions are also available for most titles (http://safaribooksonline.com). For more information, contact our corporate/institutional sales department: 800-998-9938
or [email protected]. Editor: Brian Foster
Revision History for the First
Edition
2015-11-15: First Early Release 2015-12-14: Second Early Release 2016-01-21: Third Early Release 2016-03-01: Fourth Early Release 2016-04-20: Fifth Early Release 2016-05-13: Sixth Early Release 2016-05-31: Seventh Early Release 2016-09-23: Eighth Early Release 2016-10-31: Ninth Early Release
See http://oreilly.com/catalog/errata.csp?isbn=9781449370787 for release details.
The O’Reilly logo is a registered trademark of O’Reilly Media, Inc. Cloud Native Java, the cover image, and related trade dress are trademarks of O’Reilly Media, Inc.
While the publisher and the authors have used good faith efforts to ensure that the information and instructions contained in this work are accurate, the publisher and the authors disclaim all responsibility for errors or omissions, including without limitation responsibility for damages resulting from the use of or reliance on this work. Use of the information and instructions contained in this work is at your own risk. If any code samples or other technology this work contains or describes is subject to open source licenses or the
intellectual property rights of others, it is your responsibility to ensure that your use thereof complies with such licenses and/or rights.
Foreword
Conventions Used in This Book
The following typographical conventions are used in this book: Italic
Indicates new terms, URLs, email addresses, filenames, and file extensions.
Constant width
Used for program listings, as well as within paragraphs to refer to program elements such as variable or function names, databases, data types, environment variables, statements, and keywords.
Constant width bold
Shows commands or other text that should be typed literally by the user.
Constant width italic
Shows text that should be replaced with user-supplied values or by values determined by context.
Tip
This element signifies a tip or suggestion.
Note
This element signifies a general note.
Warning
Using Code Examples
Supplemental material (code examples, exercises, etc.) is available for download at https://github.com/oreillymedia/title_title.
This book is here to help you get your job done. In general, if example code is offered with this book, you may use it in your programs and
documentation. You do not need to contact us for permission unless you’re reproducing a significant portion of the code. For example, writing a program that uses several chunks of code from this book does not require permission. Selling or distributing a CD-ROM of examples from O’Reilly books does require permission. Answering a question by citing this book and quoting example code does not require permission. Incorporating a significant amount of example code from this book into your product’s documentation does require permission.
We appreciate, but do not require, attribution. An attribution usually includes the title, author, publisher, and ISBN. For example: “Book Title by Some Author (O’Reilly). Copyright 2012 Some Copyright Holder, 978-0-596-xxxx-x.”
Safari® Books Online
Note
Safari Books Online is an on-demand digital library that delivers expert
content in both book and video form from the world’s leading authors in technology and business.
Technology professionals, software developers, web designers, and business and creative professionals use Safari Books Online as their primary resource for research, problem solving, learning, and certification training.
Safari Books Online offers a range of plans and pricing for enterprise,
government, education, and individuals.
Members have access to thousands of books, training videos, and
prepublication manuscripts in one fully searchable database from publishers like O’Reilly Media, Prentice Hall Professional, Addison-Wesley
Professional, Microsoft Press, Sams, Que, Peachpit Press, Focal Press, Cisco Press, John Wiley & Sons, Syngress, Morgan Kaufmann, IBM Redbooks, Packt, Adobe Press, FT Press, Apress, Manning, New Riders, McGraw-Hill, Jones & Bartlett, Course Technology, and hundreds more. For more
How to Contact Us
Please address comments and questions concerning this book to the publisher:
O’Reilly Media, Inc.
1005 Gravenstein Highway North Sebastopol, CA 95472
800-998-9938 (in the United States or Canada) 707-829-0515 (international or local)
707-829-0104 (fax)
We have a web page for this book, where we list errata, examples, and any additional information. You can access this page at
http://www.oreilly.com/catalog/0636920038252.
To comment or ask technical questions about this book, send email to
For more information about our books, courses, conferences, and news, see our website at http://www.oreilly.com.
Find us on Facebook: http://facebook.com/oreilly
Follow us on Twitter: http://twitter.com/oreillymedia
Chapter 1. Bootcamp: Introducing
Spring Boot
Spring Boot provides a way to create production-ready Spring applications with minimal setup time. The primary goals behind the creation of the Spring Boot project are central to the idea that users should be able to get up and running quickly with Spring. Spring Boot also takes an opinionated view of the Spring platform and third-party libraries.
An opinionated view means that Spring Boot lays out a framework of abstractions that are common to all Spring projects. This opinionated view provides the plumbing that all projects need but without getting in the way of the developer. By doing this, Spring Boot makes it simple to swap
components when project requirements change.
This chapter will introduce you to building Spring Boot applications. The topics we will go over are:
The Spring Tool Suite Spring Initializr
Getting Started with the Spring
Tool Suite
Installing Spring Tool Suite
Let’s get started with downloading and installing the Spring Tool Suite, available from http://www.spring.io.
Go to https://spring.io/tools/sts
Choose Download STS
Download, extract, and run STS
After you have downloaded, extracted, and have run the STS program, you will be prompted to choose a workspace location.
Figure 1-1. Choose your desired workspace location
Choose your desired workspace location and click OK. If you plan to use the same workspace location each time you run STS, click on the option "Use this as the default and do not ask again“.
Figure 1-2. The STS dashboard
Your first Spring Boot application
Let’s now use STS to create our first Spring Boot application. We’re going to create a simple Hello World web service using the Spring Boot starter project for web.
Figure 1-3. Create a new Spring Boot Starter Project
Figure 1-4. Configure your new Spring Boot Starter Project
You can configure your options, but for the purposes of this simple
walkthrough, let’s use the defaults and click Next. After clicking Next, you will be provided with a set of Spring Boot Starter projects that you can
Figure 1-5. Choose your Spring Boot Start Project
From the list of sections, choose Web to expand its list of options. Now from the Web section, choose the option Web and click Finish. After you click Finish, your Spring Boot application with the Spring Boot Starter Web project dependency will be created.
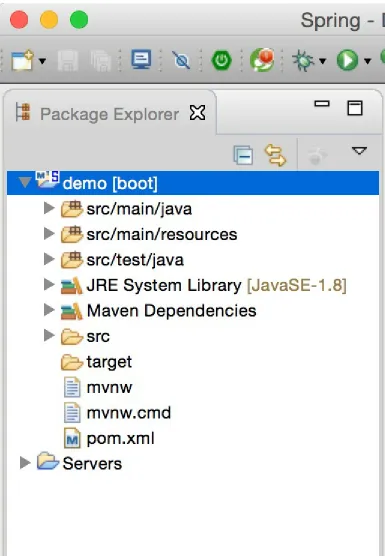
Figure 1-6. Expand the demo project from the package explorer
contents as shown in the screenshot above. From the expanded project files, navigate to src/main/java/com/example/DemoApplication.java.
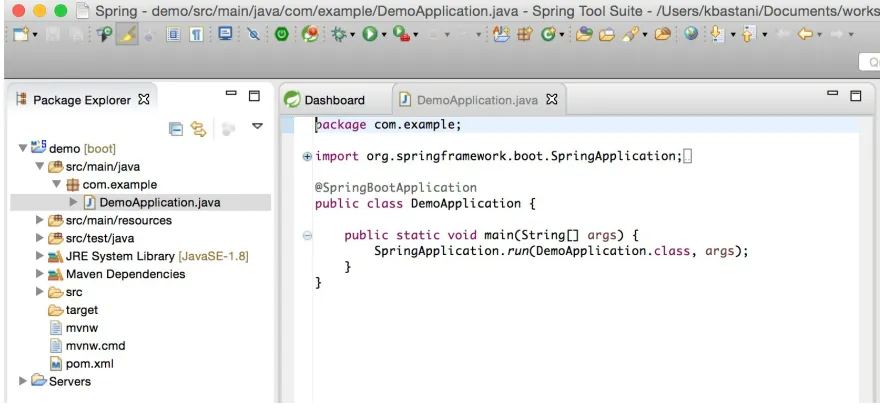
Figure 1-7. Navigate to DemoApplication.java
This is your main application class for your new Spring Boot application. STS has configured this project as a Spring Boot starter project with the
spring-boot-starter-web dependency. If you navigate to your pom.xml file in your Package Explorer you will find that the following dependencies have been added.
<dependencies>
<dependency>
<groupId>org.springframework.boot</groupId>
<artifactId>spring-boot-starter-web</artifactId> </dependency>
<dependency>
<groupId>org.springframework.boot</groupId>
<artifactId>spring-boot-starter-test</artifactId> <scope>test</scope>
</dependency> </dependencies>
A starter project for unit testing
Now that we understand the makeup of our Spring Boot application, let’s create our first RESTful service by modifying DemoApplication.java. In DemoApplication.java, modify the contents so that it looks like the following example.
package com.example;
import org.springframework.boot.SpringApplication;
import org.springframework.boot.autoconfigure.SpringBootApplication import org.springframework.web.bind.annotation.RequestMapping;
import org.springframework.web.bind.annotation.RequestParam; import org.springframework.web.bind.annotation.RestController; @SpringBootApplication
public class DemoApplication {
public static void main(String[] args) {
SpringApplication.run(DemoApplication.class, args); }
@RestController
public static class Hello {
@RequestMapping(value = "/hello") public String hello(
@RequestParam(value = "name", defaultValue = "World") return "Hello, " + name;
} } }
Annotates a class as a Spring Boot application
Annotates a class as a REST controller
This maps a URL route to a controller method
This method has a query string parameter with a default value
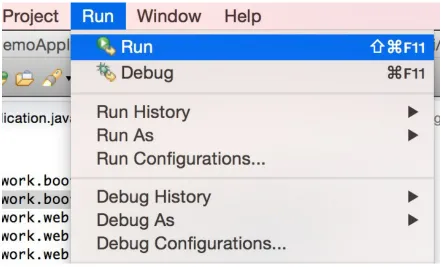
Now that we have our code for a basic RESTful web service, let’s go ahead and run the application. Run the application from the Run > Run menu.
Figure 1-8. Run the Spring Boot application
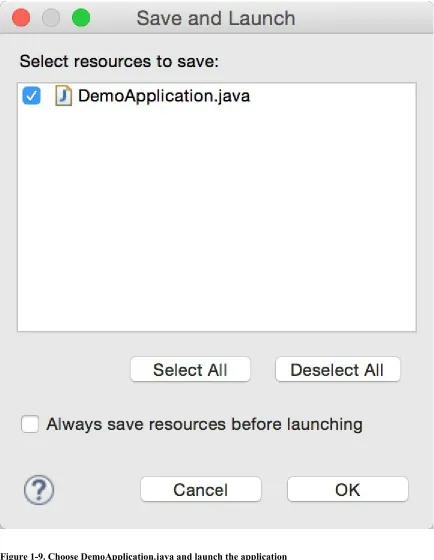
Figure 1-9. Choose DemoApplication.java and launch the application
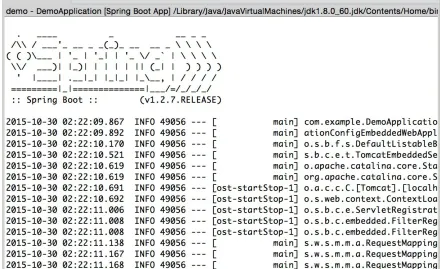
be seen here. You’ll see that an embedded Tomcat server is being started up and launched on the default port of 8080. You can access your Spring Boot web service from http://localhost:8080.
Figure 1-10. See the Spring Boot log output in the STS console
Now let’s issue a curl request to our new web service from the command line.
Tip
If you do not have curl installed, you can install it from
http://curl.haxx.se/download.html. We will be using curl extensively throughout the book to test our Spring Boot web applications.
From a command line interface, issue the following curl request: curl -X GET -i http://localhost:8080/hello
HTTP/1.1 200 OK
Server: Apache-Coyote/1.1
Content-Type: text/plain;charset=UTF-8 Content-Length: 12
Date: Fri, 30 Oct 2015 09:29:40 GMT Hello, World
Now try appending a query string for name at the end of your request URL. curl -X GET -i http://localhost:8080/hello?name=Kenny
HTTP/1.1 200 OK
Server: Apache-Coyote/1.1
Content-Type: text/plain;charset=UTF-8 Content-Length: 12
Date: Fri, 30 Oct 2015 09:32:20 GMT Hello, Kenny
Spring Boot Starters
Spring Boot uses Starter Projects to help developers compose the ingredients that are needed for their applications. If we were to create a Spring
application from scratch, we would need to worry about including a reference to each of the project dependencies for each of the features we need from the Spring ecosystem of libraries. Further, we’d have to define compatible
versions for each of these dependencies, which can often cause problems due to transitive dependencies having a versioning conflict.
Spring Boot provides an easy way to declaratively choose a set of specific starters that we need for our applications.
Let’s take a look at what a Spring Boot application’s pom.xml file might look like for a Maven project that needs to use the following Spring projects.
Spring Data JPA Spring MVC
Here we would like to create a Spring Boot application that uses Spring Data’s repository-based data management capabilities for a relational
database. We’ll also need to create a REST controller interface to expose an API for managing data over HTTP. We’ll create a pom.xml that looks like
Example 1-1.
Example 1-1. A example Maven project’s pom.xml for a Spring Boot application
<?xml version="1.0" encoding="UTF-8"?>
<project xmlns="http://maven.apache.org/POM/4.0.0" ...> <modelVersion>4.0.0</modelVersion>
<!-- Project Metadata -->
<packaging>jar</packaging>
<!-- Spring Boot Starter Parent BOM --> <parent>
<!-- Spring Boot Starter Dependencies --> <dependencies>
The Spring Boot release version for all referenced starters
The starter that includes Spring Data JPA
The starter that includes Spring MVC
Getting Started with the Spring
Initializr
Spring Initializr is an open source project and tool in the Spring ecosystem that helps you create ready-to-go project templates as Spring Boot
applications. Spring Boot is an opinionated framework that reduces the
resistance of on-boarding new applications by giving developers an easy way to compose the various modules provided by the Spring Framework project and other ecosystem projects, such as Spring Data, Spring Security, Spring Cloud, and others.
When building microservices, it is essential that the friction of on-boarding new applications is reduced to a minimum. If I am a lead developer who has been tasked with the creation of a new microservice, either by decomposing functionality from an existing monolith, or as a green field project, the amount of time spent to support the new application as a part of the existing architecture can be quite costly if a process is not in place to minimize it. Let’s assume that we are a developer tasked with creating a new microservice in an online banking application that will be decomposed from an existing service.
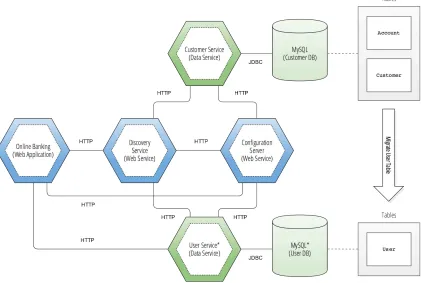
Figure 1-11. Spring Boot services for online banking
We also see in Figure 1-11 that we have two other Spring Boot applications, the Configuration Server and the Discovery Service. These two services were recently added by the platform team in a push to start building cloud native applications. The platform services will help our new microservice
communicate with other services and vice versa. We also will be able to source the configurations for the new microservice in the environment that it is deployed to. This means that we will not store configurations for different environments in the source code of the new service, they will instead be sourced from the environment.
The last component of the diagram is a MySQL database, named the
Customer DB. We can see that the Customer Service has a dependency on the Customer DB and is using a JDBC connection. We also see that there are a set of tables that have been added to the Customer DB. We see in the list of tables we have: Account, Customer, and User.
Over time, the Customer Service has served as the full backend for our application. The development teams working on these different features are starting to collide and there is increased coordination that is delaying the frequency of releases. We can consider the Customer Service to be a
Figure 1-12. Decomposing the User table into a new microservice
In Figure 1-12 we can see the updated architecture, which illustrates a new service, called the User Service, which has decomposed a part of the
Customer Service into a separate application. When choosing which
functionality to decompose into a new microservice, it’s often a process of concerted analysis in order to make the right decision. We see here that the User table was migrated to a new User DB and out of the Customer DB. We can assume that features requiring changes to functionality that depend on the User table make it a good candidate to move into a new microservice.
Generating Spring Boot applications
Let’s take a deeper look at what dependencies from the Spring Boot starter projects we’ll need to create the User Service from Figure 1-12.
Table 1-1. Spring Boot Starters for the User Service Spring Project Starter Projects
Spring Data JPA JPA
Spring Data REST REST Repositories
Spring Security Security
Spring Cloud Netflix Eureka Discovery, Config Client
Spring Framework (MVC) Web
H2 Embedded SQL DB H2
MySQL JDBC Driver MySQL
Figure 1-13. The Spring Initializr website
Figure 1-14. Selecting starter dependencies
We’ll also be sure to select the type of project we would like, which can be either Maven or Gradle. We’ll choose Maven for this application. Also, we’ll need to choose the version of Spring Boot we would like to target, in this case we’ll choose Spring Boot 1.3.2 release. Finally, we’ll rename the artifact from demo to user-service.
Now we are ready to generate the project. We can go ahead and click the Generate Project button and our project will be downloaded as a
compressed file named user-service.zip. After downloading the project, uncompress and extract the contents to a location on your machine.
Now let’s take a look at the project structure of the Spring Boot application that was generated.
. In Example 1-2 we can see the directory structure of our generated User Service application. The Spring Initializr will provide a wrapper, either Maven or Gradle, as a part of the contents of the generated project. You can use this wrapper to build and run the project. For Maven, we can start up the application using the Maven wrapped command ./mvnw <command> from the command line. The following command will run a clean installation of the Maven project, downloading and caching the dependencies from the pom.xml in the process.
$ ./mvnw clean install
To run the Spring Boot application from the command line, we can use the provided Spring Boot Maven plugin, which is referenced in the pom.xml. To use this plugin, we can run the following command.
$ ./mvnw spring-boot:run
After running the command, the Spring Boot application will start up and can be accessed as a web application from http://localhost:8080.
Example 1-3. The pom.xml dependencies of the User Service
In Example 1-3 we can see each of the dependencies that were added as Spring Boot starter projects by the Spring Initializr. Each of these starter projects will help us go forward to customize the application as we refactor the functionality related to user management of the Customer Service into our new User Service.
If we take a closer look at these dependencies, we can see that there are two database libraries which are not starter projects: h2 and mysql-connector-java. Later in the book, in Chapter 6, we’ll explore how to use two different data sources to run our unit tests against an embedded SQL database, while still using an external MySQL JDBC connection when running the
application from a different profile.
The Spring Guides
When getting started with Spring Boot and the many projects in the Spring ecosystem, it can be very useful to see working samples and tutorials to help you understand best practices and how to put the tools to use for your own use cases. For this purpose, the Spring community has a comprehensive set of contributed guides. The Spring Guides are a collection of sample applications that are focused on demonstrating a specific feature of a Spring project.
These guides are mostly contributed from the engineers on the Spring team, but are also contributed by active members of the open source community who are focused on Spring.
Each Spring guide takes the same approach to providing a comprehensive yet consumable guide that you should be able to get through within 15-30
minutes. These guides are one of the most useful resources when getting started with Spring Boot.
Figure 1-15. The Spring Guides website
Figure 1-16. Exploring the Spring Guides
In Figure 1-16 I’ve entered the search term spring boot, which will narrow down the list of guides to those that focus on Spring Boot.
As a part of each Spring Guide, we’ll find the following familiar features. Getting started
Table of contents What you’ll build What you’ll need
How to complete this guide Walkthrough
Link to GitHub repository
Figure 1-17. Building an Application with Spring Boot guide
In Figure 1-17 we see the basic anatomy of a Spring Guide. Each guide is structured in a familiar way to help you move through the content as
effectively as possible. At the top of each guide, we’ll see a brief introduction of the problem that the guide solves. You’ll also be presented with a set of requirements for the guide, such as the length of the guide, the tools used. To the right of the page, you’ll find a section to download the sample as a
compressed ZIP file. Similar to the Spring Initializr, you’ll be provided with a working Spring Boot application that is the subject of the guide. You’ll also find a table of contents, just under the download section, which will help you navigate the contents of the guide.
Tip
Auto-Configuration
When using Spring Boot you’ll often find that dependencies that you’ve added from the list of starter projects are automatically configured as Spring beans. Spring Boot uses a technique called Auto-Configuration to bootstrap dependencies using default configuration properties. When adding a
dependency to the classpath of a Spring application, the dependency may use auto-configuration by default, and will be initialized using default properties if you have not chosen to configure it manually.
Earlier in this chapter we generated a User Service from Spring Initializr. In the generated project we chose two database libraries, which were added to the classpath of the application.
Example 1-4. Dependency section of a pom.xml with two database libraries
<dependency>
for spring-jdbc which in turn activates certain conditions in Spring Boot’s
org.springframework.boot.autoconfigure.jdbc.DataSourceAutoConfiguration This auto-configuration contains nested auto-configuration,
JdbcTemplateConfiguration.
Example 1-5. JdbcTemplateConfiguration class
@Configuration
@Conditional(DataSourceAutoConfiguration.DataSourceAvailableCondition protected static class JdbcTemplateConfiguration {
@Autowired(required = false)
The @Conditional annotation scans for a DataSourceAvailableCondition class
The @ConditionalOnMissingBean annotation initializes the JdbcTemplate bean if absent
In Example 1-5 we see the contents of the JdbcTemplateConfiguration class, which will be used to automatically configure JdbcTemplate using the configured DataSource bean. As a part of the parent
classpath is configurable as an embedded database, which in this case h2 is supported, the DataSource bean will be initialized to connect to the embedded H2 database.
Auto-configuration in Spring Boot will scan the classpath and make a best guess at what the intention is by the developer for automatically configuring dependencies. For example, I’ve specified two database connectors, one for MySQL and one for H2. The h2 library will take precedence over the mysql-connector-java library in the case that the configuration properties for JPA does not specify a database. If we change the configuration property in the application.yml to use the MySQL driver and specify a JDBC connection URL, the embedded H2 database will not be configured.
Example 1-6. The application.yml can override the targeted datasource driver from H2 to MySQL
spring:
datasource:
driverClassName: com.mysql.jdbc.Driver url: jdbc:mysql://localhost/test
Overrides the DataSource auto-configuration to use a non-embedded JDBC connection
We must specify a JDBC URL to override the auto-configured H2 connection
In Example 1-6 we are choosing to override the default auto-configuration properties that will be configured for the embedded H2 database, because it takes precedence over the MySQL dependency for auto-configuration. If we only configured the value of the
database, in this case it would look like Example 1-7.
Example 1-7. Exception connecting to an embedded H2 database with a MySQL driver
java.sql.SQLException: Driver:com.mysql.jdbc.Driver@27cc341d returned
Spring Boot Configuration
Now that we’ve looked at some of the basics of building and running Spring Boot applications, let’s now explore how to configure Spring Boot for cloud-native applications. As we talked about earlier on in Chapter 2, twelve-factor applications use a specific pattern for developing applications that are
Chapter 2. The Cloud Native
Application
The patterns for how we develop software, both in teams and as individuals, are always evolving. The open source software movement has provided the software industry with somewhat of a Cambrian explosion of tools,
frameworks, platforms, and operating systems—all with an increasing focus on flexibility and automation. A majority of today’s most popular open source tools focus on features that give software teams the ability to continuously deliver software faster than ever before possible.
In the span of two decades, starting in the early 90s, an online bookstore headquartered in Seattle, called Amazon.com, grew into the world’s largest online retailer. Known today simply as Amazon, the company now sells far more than just books. In 2015, Amazon surpassed Walmart as the most valuable retailer in the United States. The most interesting part of Amazon’s story of unparalleled growth can be summarized in one simple question: How did a website that started out as a simple online bookstore transform into one of the largest retailers in the world—doing so without ever opening a single retail location?
It’s not hard to see how the world of commerce has been shifted and reshaped around digital connectivity, catalyzed by ever increasing access to the
internet from every corner of the globe. As personal computers became smaller, morphing into the ubiquitous smart phone and tablets we use today, we’ve experienced an exponential increase in accessibility to distribution channels that are transforming the way the world does commerce.
Amazon’s CTO, Werner Vogels, oversaw the technical evolution of Amazon from a hugely successful online bookstore into one of the world’s most
company’s continued growth.
A large part of Amazon.com’s technology evolution has been driven to enable this continuing growth, to be ultra-scalable while maintaining availability and performance.
Werner Vogels, ACM Queue, Volume 4 Issue 4, A Conversation with Werner Vogels
Vogels goes on to state that in order for Amazon to achieve ultra-scalability it needed to move towards a different pattern of software architecture. Vogels mentions in the interview that Amazon.com started as a monolithic
application. Over time, as more and more teams operated on the same
application, the boundries of ownership of the codebase began to blur. “There was no isolation and, as a result, no clear ownership.” said Vogels.
Vogels went on to pinpoint that shared resources, such as databases, were making it difficult to scale-out the overall business. The greater the number of shared resources, whether it be application servers or databases, the less control teams would have when delivering features into production.
You build it, you run it.
Werner Vogels, CTO, Amazon
Vogels touched on a common theme that mostly all cloud native applications share, the idea of ownership of what you are building. He goes on to say that “the traditional model is that you take your software to the wall that separates development and operations, and throw it over and then forget about it. Not at Amazon. You build it, you run it.”
In what has been one of the most reused quotes by prominent keynote speakers at some of the world’s premier software conferences, the words "you build it, you run it" would later become a slogan of a popular movement we know today simply as DevOps.
microservices can be tied back to the ideas that Vogels introduced over a decade ago. While ideas like these were being developed at large internet companies similar to Amazon, the tooling around these ideas would take years to develop and mature into a service offering.
In 2006 Amazon launched a new product named Amazon Web Services (AWS). The idea behind AWS was to provide a platform, the same platform that Amazon used internally, and release it as a service to the public. Amazon was keen to see the opportunity to commodotize the ideas and tooling behind the Amazon.com platform. Many of the ideas that Vogels introduced were already built into the Amazon.com platform. By releasing the platform as a service to the public, Amazon would enter into a new market called the public cloud.
The ideas behind the public cloud were sound. Virtual resources could be provisioned on-demand without needing to worry about the underlying infrastructure. One could simply rent a virtual machine to house their
applications without needing to purchase or manage the infrastructure. This approach was a low-risk self-service option that would help to grow the appeal of the public cloud, with AWS leading the way in terms of adoption. It would take years before AWS would mature into a set of services and patterns for building and running applications that are designed to be
operated on a public cloud. While many developers flocked to these services for building new applications, many companies with existing applications still had concerns with migrations. Existing applications were not designed for portability. Also, many applications were still dependent on legacy workloads that were not compatible with the public cloud.
Platforms
Platform is an overused word today.
When we talk about platforms in computing, we are generally talking about a set of capabilities that help us to either build or run applications. Platforms are best summarized by the nature in which they impose constraints on how developers build applications.
For example, when we build Java applications, we are building applications on the Java platform. The Java platform, in turn, is a set of components that are essential for staging and running your Java applications. The platform takes care of translating Java source code into Java bytecode, and provides a runtime environment, the JVM, for executing that bytecode.
As is the case with Java, platforms may be written on top of other platforms. The JVM is considered to be cross-platform, designed to run on separate operating platforms.
Let’s consider another example. You are a lead developer on a new software project and have been asked to provide a sizing estimate on the effort
necessary to build a new application. You begin to carefully break down a list of business requirements into a technical design. In the process, you will need to make many technology choices. Now let’s assume that many of these
technology choices have already been made, decided upon by a team of software architects at your company.
Let’s assume that the architecture team regularly meets to maintain and revise a list of approved technologies for building applications. Now because of this, a set of prescribed standards will act to constrain the technology choices you are able to make during your sizing estimate. These constraints will greatly reduce the time spent evaluating options at each decision point. This makes it far simpler to size the effort needed to implement just the business logic of the application. Platforms in the same way are able to impose
and operate applications.
Building Platforms
When we build platforms, we are creating a tool that automates a set of repeatable practices. Practices are formulated from a set of constraints that translate valuable ideas into a plan. These constraints take the form of opinions on how valuable ideas can be executed into a repeatable practice, automated by a platform.
Figure 2-1. The hierarchy of concerns for building platforms
What are our core ideas of the platform and why are they valuable? Constraints
What are the constraints necessary to transform our ideas into practices?
Practices
How do we automate constraints into a set of repeatable practices? At the core of every platform are simple ideas, that when realized, increase differentiated business value through the use of an automated tool.
Let’s take for example the Amazon.com platform. Werner Vogels stated that by increasing isolation between software components, teams would have more control over features they delivered into production.
Idea:
By increasing isolation between software components, we are able to deliver parts of the system both rapidly and independently.
By using this idea as the platform’s foundation, we are able to fashion it into a set of constraints. Constraints take the form of an opinion about how a core ideal will create value when automated into a practice. The following
statements are opinionated constraints about how isolation of components can be increased.
Constraints:
Software components are to be built as independently deployable services.
All business logic in a service is encapsulated with the data it operates on.
Services are to publish a web interface that allows access to its business logic from other services.
With these constraints, we have taken an opinionated view on how isolation of software components will be increased in practice. The promises of these constraints, when automated into practices, will provide teams with more control over how features are delivered to production. The next step is to describe how these constraints can be captured into a set of repeatable practices.
Practices that are derived from these constraints should be stated as a collection of promises. By stating practices as promises we maintain an
expectation with the users of the platform on how they will build and operate their applications.
Practices:
A self-service interface is provided to teams that allows for the provisioning of infrastructure required to operate applications.
Applications are packaged as a bundled artifact and deployed to an environment using the self-service interface.
Databases are provided to applications in the form of a service, and are to be provisioned using the self-service interface.
An application is provided with credentials to a database as
environment variables, only after declaring an explicit relationship to the database as a service binding.
Each application is provided with a service registry that is used as a manifest of where to locate external service dependencies.
Each of the practices listed above takes on the form of a promise to the user. In this way, the intent of the ideas at the core of the platform are realized as constraints imposed on applications.
the time spent performing undifferentiated heavy lifting.
When AWS was first released to the public, Amazon did not force its users to adhere to the same constraints that they used internally for Amazon.com. Staying true to the name, Amazon Web Services, AWS is not itself a cloud platform, but rather it is a collection of independent infrastructure services that can be composed into automated tooling resembling a platform of
promises. Years after the first release of AWS, Amazon would begin to offer a collection of managed platform services, with use cases ranging from IoT (Internet of Things) to machine learning.
If every company needs to build their own platform from scratch, the amount of time delivering value in applications is delayed until the platform is fully assembled.
Companies who were early adopters of AWS would have needed to assemble together some form of automation resembling a platform. Each company would have had to bake-in a set of promises that captured the core ideas of how to develop and deliver software into production.
More recently, the software industry has converged on the idea that there are a basic set of common promises that every cloud platform should make. These promises will be explored throughout this book using the open source Platform-as-a-Service (PaaS), named Cloud Foundry. The core idea behind Cloud Foundry is to provide a platform that encapsulates a set of common promises for building and operating highly available and fault tolerant applications. Cloud Foundry makes these promises while still providing portability between multiple different cloud infrastructure providers. The subject of much of this book is how to build cloud native Java
applications. We’ll focus largely on tools and frameworks that help to reduce undifferentiated heavy lifting, by taking advantage of the benefits and
The Patterns
New patterns for how we develop software are enabling us to think more about the behavior of our applications in production. Both developers and operators, together, are placing more emphasis on understanding how their applications will behave in production, with fewer assurances of how complexity will unravel in the event of a failure.
As was the case with Amazon.com, software architectures are beginning to move away from large monolithic applications. Architectures are now focused on achieving ultra-scalability without sacrificing performance and availability. By breaking apart components of a monolith, engineering organizations are taking efforts to decentralize change management, providing teams with more control over how features make their way to production. By increasing isolation between components, software teams are starting to enter into the world of distributed systems development, with a focus of building smaller more singularly focused services with independent release cycles.
Cloud native applications take advantage of a set of patterns that make teams more agile in the way they deliver features to production. As applications become more distributed, a result of increasing isolation necessary to provide more control to the teams that own applications, the chance of failure in the way application components communicate becomes an important concern. As software applications turn into complex distributed systems, operational
failures become an inevitable result.
Netflix’s Story
Today, Netflix is one of the world’s largest on-demand streaming media services, operating their online services in the cloud. Netflix was founded in 1997 in Scotts Valley, California by Reed Hastings and Marc Randolph. Originally, Netflix provided an online DVD rental service that would allow customers to pay a flat-fee subscription each month for unlimited movie rentals without late fees. Customers would be shipped DVDs by mail after selecting from a list of movie titles and placing them into a queue using the Netflix website.
In 2008, Netflix had experienced a major database corruption that prevented the company from shipping any DVDs to its customers. At the time, Netflix was just starting to deploy its streaming video services to customers. The streaming team at Netflix realized that a similar kind of outage in streaming would be devastating to the future of its business. Netflix made a critical decision as a result of the database corruption, that they would move to a different way of developing and operating their software, one that ensured that their services would always be available to their customers.
As a part of Netflix’s decision to prevent failures in their online services, they decided that they must move away from vertically scaled infrastructure and single points of failure. The realization stemmed from a result of the database corruption, which was a result of using a vertically scaled relational database. Netflix would eventually migrate their customer data to a distributed NoSQL database, an open source database project named Apache Cassandra. This was the beginning of the move to become a “cloud native” company, a decision to run all of their software applications as highly distributed and resilient services in the cloud. They settled on increasing the robustness of their online services by adding redundancy to their applications and databases in a scale out infrastructure model.
re-architect their applications while moving away from an on-premise data center to a public cloud. In 2009, Netflix would begin its move to Amazon Web Services (AWS), and they focused on three main goals: scalability, performance, and availability.
By the start of 2009, the subscriptions to Netflix’s streaming services had increased by nearly 100 times. Yuri Izrailevsky, VP Cloud Platform at Netflix, gave a presentation in 2013 at the AWS reinvent conference. “We would not be able to scale our services using an on-premise solution,” said Izrailevsky.
Furthermore, Izrailevsky stated that the benefits of scalability in the cloud became more evident when looking at its rapid global expansion. “In order to give our European customers a better low-latency experience, we launched a second cloud region in Ireland. Spinning up a new data center in a different territory would take many months and millions of dollars. It would be a huge investment.” said Izrailevsky.
As Netflix began its move to hosting their applications on Amazon Web Services, employees of the company would chronicle their learnings on Netflix’s company blog. Many of Netflix’s employees were advocating a move to a new kind of architecture that focused on horizontal scalability at all layers of the software stack.
John Ciancutti, who was then the Vice President of Personalization
Technologies at Netflix, said on the company’s blog in late 2010 that, “cloud environments are ideal for horizontally scaling architectures. We don’t have to guess months ahead what our hardware, storage, and networking needs are going to be. We can programmatically access more of these resources from shared pools within Amazon Web Services almost instantly.”
What Ciancutti meant by being able to “programmatically access” resources, was that developers and operators could programmatically access certain management APIs that are exposed by Amazon Web Services in order to give customers a controller for provisioning their virtualized computing
Note
Providing management services to control virtualized computing
infrastructure is one of the primary concepts of cloud computing, called Infrastructure as a Service, commonly referred to as IaaS.
Izrailevsky goes on to say “As we become a global company, we have the benefit of relying on multiple Amazon Web Services regions throughout the world to give our customers a great interactive experience no matter where they are.”
The economies of scale that benefited Amazon Web Services’s international expansion also benefited Netflix. With AWS expanding availability zones to regions outside of the United States, Netflix expanded its services globally using only the management APIs provided by AWS.
Izrailevsky quoted a general argument of cloud adoption by enterprise IT, “Sure, the cloud is great, but it’s too expensive for us.” His response to this argument is that “as a result of Netflix’s move to the cloud, the cost of
operations has decreased by 87%. We’re paying 1/8th of what we used to pay in the data center.”
Splitting the Monolith
There are two cited major benefits by Netflix of moving to a distributed systems architecture in the cloud from a monolith: agility and reliability. Netflix’s architecture before going cloud native comprised of a single
monolithic JVM application. While there were multiple advantages of having one large application deployment, the major drawback was that development teams were slowed down due to needing to coordinate their changes.
When building and operating software, increased centralization decreases the risk of a failure at an increased cost of needing to coordinate. Coordination takes time. The more centralized a software architecture is, the more time it will take to coordinate changes to any one piece of it.
Monoliths also tend not to be very reliable. When components share
resources on the same virtual machine, a failure in one component can spread to others, causing downtime for users. The risk of making a breaking change in a monolith increases with the amount of effort by teams needing to
coordinate their changes. The more changes that occur during a single release cycle also increase the risk of a breaking change that will cause downtime. By splitting up a monolith into smaller more singularly focused services, deployments can be made with smaller batch sizes on a team’s independent release cycle.
Netflix OSS
As Netflix transitioned to become a cloud native company, they also started to participate actively in open source. In late 2010, Kevin McEntee, then the VP of Systems & Ecommerce Engineering at Netflix, announced in a blog post about the company’s future role in open source.
McEntee stated that “the great thing about a good open source project that solves a shared challenge is that it develops its own momentum and it is sustained for a long time by a virtuous cycle of continuous improvement.” In the years that followed this announcement, Netflix open sourced over 50 of their internal projects, each of which would become a part of the Netflix OSS brand.
Key employees at Netflix would later clarify on the company’s aspirations to open source many of their internal tools. In July 2012, Ruslan Meshenberg, Netflix’s Director of Cloud Platform Engineering, published a post on the company’s technology blog. The blog post, titled Open Source at Netflix, explained why Netflix was taking such a bold move to open source so much of its internal tooling.
Meshenberg wrote in the blog post, on the reasoning behind its open source aspirations, that “Netflix was an early cloud adopter, moving all of our
streaming services to run on top of AWS infrastructure. We paid the pioneer tax – by encountering and working through many issues, corner cases and limitations.”
In the advent of what has been referred to as the era of the cloud, we have seen that its pioneers are not technology companies such as IBM or
Microsoft, but rather they are companies that were born on the back of the internet. Netflix and Amazon are both businesses who started in the late 90s as dot-com companies. Both companies started out by offering online
services that aimed to compete with their brick and mortar counterparts. Both Netflix and Amazon would in time surpass the valuation of their brick and mortar counterparts. As Amazon had entered itself into the cloud
computing market, it did so by turning its collective experience and internal tooling into a set of services. Netflix would then do the same on the back of the services of Amazon. Along the way, Netflix open sourced both its
experiences and tooling, transforming themselves into a cloud native company built on virtualized infrastructure services provided by AWS by Amazon. This is how the economies of scale are powering forward a revolution in the cloud computing industry.
The Twelve Factors
The twelve-factor methodology is a popular set of application development principles compiled by the creators of the Heroku cloud platform. The Twelve Factor App is a website that was originally created by Adam Wiggins, a co-founder of Heroku, as a manifesto that describes Software-as-a-Service applications that are designed to take advantage of the common practices of modern cloud platforms.
On the website, which is located at http://12factor.net, the methodology starts out by describing a set of core foundational ideas for building applications.
Example 2-1. Core ideas of the 12-factor application
Use declarative formats for setup automation, to minimize time and cost for new developers joining the project;
Have a clean contract with the underlying operating system, offering maximum portability between execution environments;
Are suitable for deployment on modern cloud platforms, obviating the need for servers and systems administration;
Minimize divergence between development and production, enabling continuous deployment for maximum agility;
And can scale up without significant changes to tooling, architecture, or development practices.
Example 2-2. The practices of a twelve-factor application
Codebase — One codebase tracked in revision control, many deploys Dependencies — Explicitly declare and isolate dependencies
Config — Store config in the environment
Backing services — Treat backing services as attached resources Build, release, run — Strictly separate build and run stages Processes — Execute the app as one or more stateless processes Port binding — Export services via port binding
Concurrency — Scale out via the process model
Disposability — Maximize robustness with fast startup and graceful shutdown
Dev/prod parity — Keep development, staging, and production as similar as possible
Logs — Treat logs as event streams
Admin processes — Run admin/management tasks as one-off processes The twelve factors, each listed in Example 2-2, describe constraints that help to build applications that take advantage of the ideas in Example 2-1. The twelve factors are a basic set of constraints that can be used to build cloud native applications. Since the factors cover a wide range of concerns that are common practices in all modern cloud platforms, building 12-factor apps are a common starting point in cloud native application development.
all, of the twelve factors out-of-the-box.
We’ll be using the twelve-factor methodology throughout this book to
describe how certain features of Spring projects were implemented to satisfy this style of application development. For this reason, it’s important that we summarize each of the factors here.
Codebase
One codebase tracked in revision control, many deploys
Source code repositories for an application should contain a single application with a manifest to its application dependencies.
Dependencies
Application dependencies should be explicitly declared and any and all dependencies should be available from an artifact repository that can be downloaded using a dependency manager, such as Apache Maven.
Twelve-factor applications never rely on the existence of implicit system-wide packages required as a dependency to run the application. All
dependencies of an application are declared explicitly in a manifest file that cleanly declares the detail of each reference.
Config
Store config in the environment
Application code should be strictly separated from configuration. The configuration of the application should be driven by the environment.
Application settings such as connection strings, credentials, or host names of dependent web services, should be stored as environment variables, making them easy to change without deploying configuration files.
Backing services
Treat backing services as attached resources
A backing service is any service that the twelve-factor application consumes as a part of its normal operation. Examples of backing services are databases, API-driven RESTful web services, SMTP server, or FTP server.
Backing services are considered to be resources of the application. These resources are attached to the application for the duration of operation. A deployment of a twelve-factor application should be able to swap out an embedded SQL database in a testing environment with an external MySQL database hosted in a staging environment without making changes to the application’s code.
Build, release, run
The twelve-factor application strictly separates the build, release, and run stages.
Build stage — The build stage takes the source code for an application and either compiles or bundles it into a package. The package that is created is referred to as a build.
Release stage — The release stage takes a build and combines it with its config. The release that is created for the deploy is then ready to be operated in an execution environment. Each release should have a
unique identifier, either using semantic versioning or a timestamp. Each release should be added to a directory that can be used by the release management tool to rollback to a previous release.
Run stage — The run stage, commonly referred to as the runtime, runs the application in the execution environment for a selected release. By separating each of these stages into separate processes, it becomes impossible to change an application’s code at runtime. The only way to change the application’s code is to initiate the build stage to create a new release, or to initiate a rollback to deploy a previous release.
Processes
Execute the app as one or more stateless processes
Twelve-factor applications are created to be stateless in a share-nothing architecture. The only persistence that an application may depend on is through a backing service. Examples of a backing service that provide persistence include a database or an object store. All resources to the application are attached as a backing service at runtime. A litmus test for testing whether or not an application is stateless is that the application’s execution environment can be torn down and recreated without any loss of data.
Port bindings
Export services via port binding
Twelve-factor applications are completely self-contained, which means that they do not require a webserver to be injected into the execution environment at runtime in order to create a web-facing service. Each application will
expose access to itself over an HTTP port that is bound to the application in the execution environment. During deployment, a routing layer will handle incoming requests from a public hostname by routing to the application’s execution environment and the bound HTTP port.
Note
Josh Long, one of the co-authors of this book, is attributed with popularizing the phrase "Make JAR not WAR" in the Java community. Josh uses this
phrase to explain how newer Spring applications are able to embed a Java application server, such as Tomcat, in a build’s JAR file.
Concurrency
Scale out via the process model
Applications should be able to scale out processes or threads for parallel execution of work in an on-demand basis. JVM applications are able to handle in-process concurrency automatically using multiple threads.
Applications should distribute work concurrently depending on the type of work that is used. Most application frameworks for the JVM today have this built in. Some scenarios that require data processing jobs that are executed as long-running tasks should utilize executors that are able to asynchronously dispatch concurrent work to an available pool of threads.
possible to handle heavier workloads by scaling applications horizontally across multiple nodes.
Disposability
Maximize robustness with fast startup and graceful shutdown
The processes of a twelve-factor application are designed to be disposable. An application can be stopped at any time during process execution and gracefully handle the disposal of processes.
Processes of an application should minimize startup time as much as possible. Applications should start within seconds and begin to process incoming requests. Short startups reduce the time it takes to scale out application instances to respond to increased load.
If an application’s processes take too long to start, there may be reduced availability during a high-volume traffic spike that is capable of overloading all available healthy application instances. By decreasing the startup time of applications to just seconds, newly scheduled instances are able to more quickly respond to unpredicted spikes in traffic without decreasing availability or performance.
Dev/prod parity
Keep development, staging, and production as similar as possible The twelve-factor application should prevent divergence between
development and production environments. There are three types of gaps to be mindful of.
Time gap — Developers should expect development changes to be quickly deployed into production
Tools gap — Each environment should mirror technology and
framework choices in order to limit unexpected behavior due to small inconsistencies
Logs
Treat logs as event streams
Twelve-factor apps write logs as an ordered event stream to stout.
Applications should not attempt to manage the storage of their own log files. The collection and archival of log output for an application should instead be handled by the execution environment.
Admin processes
Run admin/management tasks as one-off processes
It sometimes becomes the case that developers of an application need to run one-off administrative tasks. These kinds of tasks could include database migrations or running one-time scripts that have been checked into the application’s source code repository. These kinds of tasks are considered to be admin processes. Admin processes should be run in the execution
The Confusing Conflation of
“Configuration”
Let’s establish some vocabulary. When we talk about configuration in Spring, we’ve usually talked about the inputs into the Spring framework’s various ApplicationContext implementations that help the container
understand how you want beans wired together. This might be an XML file to be fed into a ClassPathXmlApplicationContext, or Java classes annotated
a certain way to be fed into an AnnotationConfigApplicationContext.
Indeed, when we talk about the latter, we refer to it as Java configuration. In this chapter, however, we’re going to look at configuration as it is defined in 12-Factor app style configuration page. Such configuration avoids
constants embedded in the code. The page provides a great litmus test for whether configuration has been done correctly: could the codebase of an application be open-sourced at any moment without exposing and
Support in Spring framework
Spring has supported Twelve-Factor-style configuration since the
PropertyPlaceholderConfigurer class was introduced. Once an instance is
defined, it replaces literals in the XML configuration with values that it resolved in a .properties file. Spring’s offered the
PropertyPlaceholderConfigurer since 2003. Spring 2.5 introduced XML
namespace support and with it XML namespace support for property
placeholder resolution. This lets us substitute bean definition literal values in the XML configuration for values assigned to keys in a (external) property file (in this case simple.properties which may be on the class path or external to the application).
The
PropertyPlaceholderConfigurer
Let’s look at an example using the PropertyPlaceholderConfigurer, Spring XML bean definitions, and an externalized .properties file. We simply want to print out the value in the property file, which looks like this: configuration.projectName = Spring Framework
This is a Spring ClassPathXmlApplicationContext so we use the Spring context XML namespace and point it to our some.properties file. Then, in the bean definitions, use literals of the form ${configuration.projectName} and Spring will replace them at runtime with the values from our property file.
<context:property-placeholder location="classpath:some.properties" <bean class="classic.Application">
<property name="configurationProjectName" value="${configuration.projectName}" </bean>
A classpath: location refers to a file in the current compiled code unit (.jar, .war, etc.). Spring supports many alternatives, including file: and url:, that would let the file live external to the compiled unit. Finally, here’s a Java class to pull it all together:
package classic;
import org.springframework.context.support.ClassPathXmlApplicationContext public class Application {
public static void main(String[] args) {
new ClassPathXmlApplicationContext("classic.xml"); }
public void setConfigurationProjectName(String pn) {