E SS E N T I A L E F F E C T S
Water, Fire, Wind, and More
by
© 2018 by Taylor & Francis Group, LLC
CRC Press is an imprint of Taylor & Francis Group, an Informa business
No claim to original U.S. Government works
Printed on acid-free paper
International Standard Book Number-13: 978-1-138-10107-4 (Paperback) 978-1-138-19692-6 (Hardback)
This book contains information obtained from authentic and highly regarded sources. Reasonable efforts have been made to publish reliable data and information, but the author and publisher cannot assume responsibility for the validity of all materials or the consequences of their use. The authors and publishers have attempted to trace the copyright holders of all material reproduced in this publication and apologize to copyright holders if permission to publish in this form has not been obtained. If any copyright material has not been acknowledged please write and let us know so we may rectify in any future reprint.
Except as permitted under U.S. Copyright Law, no part of this book may be reprinted, reproduced, transmitted, or utilized in any form by any electronic, mechanical, or other means, now known or hereafter invented, including photocopying, microfilming, and recording, or in any information storage or retrieval system, without written permission from the publishers.
For permission to photocopy or use material electronically from this work, please access www.copyright.com (http://www.copyright.com/) or contact the Copyright Clearance Center, Inc. (CCC), 222 Rosewood Drive, Danvers, MA 01923, 978-750-8400. CCC is a not-for-profit organization that provides licenses and registration for a variety of users. For organizations that have been granted a photocopy license by the CCC, a separate system of payment has been arranged.
Trademark Notice: Product or corporate names may be trademarks or registered trademarks, and are used only for identification and explanation without intent to infringe.
Library of Congress Cataloging-in-Publication Data Names: Maressa, Mauro, author.
Title: Essential effects : water, fire, wind, and more / Mauro Maressa.
Description: Boca Raton : Taylor & Francis, a CRC title, part of the Taylor & Francis imprint, a member of the Taylor & Francis Group, the academic
division of T&F Informa, plc, [2017]
Identifiers: LCCN 2017004029| ISBN 9781138196926 (hardback : alk. paper) | ISBN 9781138101074 (pbk. : alk. paper)
Subjects: LCSH: Computer animation. | Physical geography--Computer simulation. | Cinematography--Special effects.
Classification: LCC TR897.7 .M3747 2017 | DDC 777/.7--dc23 LC record available at https://lccn.loc.gov/2017004029
I am very honored to have been asked to write this foreword to Mauro’s book on traditional effects in animation. I was fortunate to have had Mauro come to work with me at my studio back in the late eighties and early nineties. He added class to the commercials we produced and raised the quality level above most commercials being done back then. I was always thrilled at what he added to our work. When you read about the golden age of animation, when they started taking effects animation seriously, making it a special department at the Disney studio, you realize that the research that went into the development of the different effects was astounding. Mauro would think and attack individual problems on a project with the same attention to detail, and his work showed it.
Personally, I’ve always been in awe of animated effects, probably because I have no idea how they do it. I’m a character animator by trade and I’m always amazed that when an animated film does well, it’s the lead character animators who are interviewed about their part in the film. Being a character animator, you’d think I’d be okay with that. But throughout my entire career I have admired everyone behind the scenes, all the unsung heroes of these films. If it wasn’t for the visual development people, the layout people, the voice talent, and so many others, I wouldn’t have had a stage to perform on or a voice to inspire me. But it’s the effects animators who create the surrounding elements of the world of the film and bring it to life. Traditional effects animators don’t copy reality, as is often the case with computer animation today; they capture the essence of what we feel when we see water or flames or smoke. They create effects as a design that audiences accept readily, an impression of these elements. Effects, sometimes, become characters themselves.
Frank Thomas and Ollie Johnston expressed this quite well in their book The Illusion of Life when they said, “The Effects Animator is a special kind of artist: he has a curiosity about the way things work, a feel for the mechanical, and usually sees great beauty in the patterns of nature … creating spirit in the movement of water and lava, drama in fires and storms, and astonishing loveliness in the handling of falling leaves and snow.” In the hands of someone like Mauro, when the characters of Pacha and Kuzco fall into the water in The Emperor’s New Groove, as stylized as the water is, you feel wet. Their work feels seamless; it doesn’t jump out at you as the main feature of the scene but enhances it. Effects animators like Mauro know when it should be in the background, or when it should be the main focus but always supporting the scene, so that we tend to take their work for granted, as perhaps we should.
animated effects, started by some of the legendary effects animators in the business.
As a traditional effects animator, in order to animate, I need to use all the resources available to me. I draw with my right hand, which I call the artist. I use my left, which I call the technology, to flip and roll my animation drawings. If I use only my right hand, it may result in a nice drawing and potentially a great standalone piece of art. If I only use my left hand to flip the drawing I will end up with a very wrinkled piece of paper. The brain is in the middle to reason out timing, volumes, composition, arcs, action, design, and so on. In order for me to animate properly, I need all the resources available to me to work in unison. While my hands do the physical work, it is my mind that needs to recall the stored information that I have accumulated through study and observation. Without that stored information, you are going to be stumbling along hoping you’re going in the right direction. The rolling of the animation drawings is my playback machine, which allows me to view the action of my animation four to five drawings at a time. Today’s technology allows us to animate in a computer, but we are missing the direct physical connection with the drawing. That tangible association is what I miss most. The network that is the brain to hand to paper, the direct current of creating a piece of animation from my mind through my hand to the paper, is a joy I can’t imagine not experiencing. That’s why I think the use of a stylus on a tablet is more palpable to me. While the computer is an incredible tool, I have to use a number of commands for it to do what I want it to do, and then I may have to go to another program and another set of commands to continue to create my animation. I guess I just don’t have the mindset. I envy how some people can use the computer and their amazing accomplishments. It’s a tool that I would encourage every artist to learn how to use. But remember that the tool does not dictate the art! It is the artist who must incorporate his tools with his art, be they a pencil or a computer.
What I hope to impart to you in this book is a series of basics lessons and examples on which you can build a foundation for animating effects. These are techniques that a tech-savvy animator can also use and really should know and use in his or her animation. When I’m teaching, I try to get my students to understand that in order to build a strong foundation for a career in effects animation, you must pay attention to basics. You want a strong foundation when you build a house so that it will stand for a long time. You don’t want to build a career that flounders and collapses. Too often I’ve seen young animators who want to step in and animate the most complex of scenes and who get frustrated when they have to do things over and over again without reaching the desired results simply because their process and techniques fall short from lack of a basic understanding of how things work or physical theory. While I can admire their desire and passion to jump in and attack a challenge, I can’t help but shake my head at their unwillingness to work at learning all they need to, so that they can attempt to combine all the little intricacies that make up the more elaborate and complex ones.
There is a certain poetry of sorts in animating effects. The ebb and flow of a design within the context of an environment created in a film. The way water flows and smoke rises to the sky or is specifically designed for that environment that lets the viewers accept the veracity of the scene without hitting them over the head with the effects. I have often said to people who want to know what I did in a film, “If I do my job right you will never notice what I did, but if I muck it up, it may take the viewer out of the picture and disturb the flow of the storyline!”
More often than not, the effects are a minor character, often playing a minor role, that accompanies the characters through their journey in the film. It is a specialized field within the specialized media of animation. It has been an incredible experience for me that has been both gratifying and rewarding in more ways than I can say. Animation has been a joy for me. I would jump out of bed every morning eager to start my day. Imagine, they paid me a salary to draw all day and make a living doing it and to work with some of the most interesting and talented people I have ever known! Don’t get me wrong, it’s a lot of hard work and can be grueling and repetitive at times, but it has also been greatly satisfying and worth the hard work. I’ll wager that anyone you ask about their animation careers will say the same thing. It has been a tremendous journey that I don’t foresee ending for me any time soon in the future. All that I have learned along the way has and will still help me in whatever new challenges I may encounter in my later years. I’m certain you will feel the same way about it.
I was born in Italy and moved to the United States with my family in 1959. My father preceded my mother and the three children by 3 years, establishing himself before having the rest of us come join him. We moved to Milford, Massachusetts, where my brother and sister and I grew up. My father worked as a tailor for a couple of different companies, while my mother worked as a seamstress. After a few years, they had saved enough to buy a house with a storefront, from which they operated their tailor shop until their retirement in the late 1980s. My brother showed promise as a fashion designer, and after attending school in Boston and New York became successful in that profession until his sudden and untimely death in 1999. My younger sister attended college and later on would marry and have two children. After high school, I went to art school and studied fine arts at the New England School of Art in Boston and then went on to the University of Massachusetts at Amherst to get my BFA.
I started teaching art in the Milford school system that year. It was the same year I would meet my future wife, Cynthia. We got married 2 years later and decided that, since I had the summers off from teaching, it would be great to take a cross-country trip for our honeymoon. So we drove through 36 states in our van. Along the way, as we drove through Los Angeles, because I was a big fan of Disney I decided to try my luck at the studio in Burbank. I didn’t think anything of it at that time, but something like that is not possible today. I parked on the street across from the main entrance and walked to the security offices, where I asked if I could get an interview for the animation department. The nice lady instructed me to have a seat, and 20 minutes later I was interviewed by a nice gray-haired man who looked at my portfolio and was very positive. Knowing that I lived in Massachusetts, he told me that if I ever decided to move to Los Angeles I should try the studio again. When I got back to the van and Cindy waiting patiently inside, I told her about the interview and discussed the possibility of moving to Los Angeles for the rest of the trip home. We moved to Los Angeles 6 months later!
working on such Saturday morning cartoons as Godzilla, SuperFriends, Fred and Barney, The Smurfs, and Scooby-Doo and Scrappy-Doo. It was an incredible learning experience for me and indeed for all of us young animators who were in the early stages of our careers and soon to go on to be a part of the renaissance of traditional animation of the late 1980s throughout the 1990s! We all worked under the mentorship of animators who had started their careers in the 1930s and were still going strong, animators like Irv Spence, Hal Ambro, Volus Jones, Ken Muse, Ed Barge, Dave Tendlar, Ed Aardal, Oliver “Lefty” Callahan, Charlie Downs, Rudi Cataldi, and so many others. They were animators who all started working at such studios as MGM, Disney, Fleischer, and UPA, and all had notable careers. My immediate supervisors were Bill Kile and Bob Goe. After settling in at Hanna-Barbera, I kept going to Bill and Bob for test animation assignments that I could work on at home in the evenings, which they would then look at and critique. I had set up a rig on my drawing desk at home with a hole cut in the center and a piece of Plexiglas with floating pegs for my animation paper. I did this for the next 6–7 months almost every night, working on animation of people and animal characters from the shows we were working on at the studio that Bill or Bob would make up for me until Bill surprised me one day and gave me a production scene to work on. It was on SuperFriends and it was a character riding a metal horse crossing railroad tracks and getting stuck in the tracks. After that Bill would give me a scene to work on regularly until he promoted me to animator (see Figure I.1).
Hanna-Barbera began working on an animation feature called Heidi’s Song, and Bob Taylor would be the director. Bob gave me the opportunity to come work on that feature, and I worked closely under Hal Ambro, Irv Spence, and Charlie Downs as well as regularly talking with other people, whom I was constantly asking for pointers. All the animators at the studio animated their characters as well as any effects that might be part of those scenes.
that had both characters and effects! Charlie Downs broke his wrists while roller skating one day and was not able to work for a while. He recommended that I take over working on some of his scenes of the Man Mountain character in the film and was given a great opportunity (see Figure I.2).
While we were working on Heidi’s Song at Hanna-Barbera, I picked up freelance work from Heavy Metal: The Movie. I was part of the L.A. crew that worked on the “Taarna” sequence of that picture in 1980. After completing Heidi’s Song, we started on preproduction work for another feature at Hanna-Barbera, but in 1981 I got the opportunity to go to work for Ralph Bakshi on his feature Fire and Ice. The idea of working alongside with Frank Frazetta was a chance I could not pass up, so I left Hanna-Barbera. I worked on many of the characters in Fire and Ice, but the last 2 weeks of that project had me working on the destruction of Nekron’s fortress and the lava sequence. I animated all the lava by using grease pencil on clear celluloid sheets in order to expedite the process, avoiding the Xerox process and going to ink and paint directly, where all they had to do was paint the cels (see Figure I.3).
After Fire and Ice, I returned to Disney as an effects animator on the Tokyo Disneyland pavilion called “Meet the World” and later went on to The Black Cauldron as an assistant
FIG I.2 Nightmare Mountain from the dream sequence in Heidi’s Song.
Poltergeist II, I spent a few months at Filmation Studios in the interim working on He-Man, She-Ra: Princess of Power, and Pinocchio and the Emperor of the Night. Then I started working at Boss, which was a live-action special effects studio headed up by multi-Oscar-winning special effects wizard Richard Edlund, ASC. I worked off and on for Boss over the next 8 years on a number of films: Poltergeist II, The Monster Squad, Big Trouble in Little China, and Solarbabies and as animation supervisor for Far and Away, Solar Crisis, Batman Returns, and Alien 3. In that same period of time, I also worked at another live-action effects house called Perpetual Motion Picture with Barry Nolan on Bill and Ted’s Excellent Adventure and served as animation supervisor on Warlock then as well.
I returned to traditional animation in 1992 at Baer Animation Studios, working with animator Dale Baer and his small group of hard-working and talented artists. We worked on a number of commercials and Disney’s The Prince and the Pauper, which was outsourced to Baer Studios at the time. I then returned to Disney again in February of 1993 to start animating effects on Pocahontas. As that film was not yet ready for a full crew, I was put on the “B” picture called The Lion King. Everyone was anxious to work on Pocahontas at the time, as that was supposed to be the next blockbuster. No one thought that The Lion King would amount to much since it was about a bunch of cute animal characters and would not appeal to many people! 6 or 7 months into production, the crew was invited into the screening room to see the trailer that would be released soon to advertise The Lion King. That was the opening sequence of the film! Needless to say, everyone walked out of that screening room 20 minutes later with a renewed sense of energy that lifted the spirits of the entire studio. We all knew we had a hit on our hands! The Lion King was a great success and that creative energy carried over to Pocahontas and The Hunchback of Notre Dame. Even though these films would not be as successful as The Lion King, the quality and the artistry on all the films that followed was magnificent! The artists excelled at every level of production.
At this time, Disney Feature Animation was riding a wave of hits, so the studio built a brand-new facility for the Animation Department that would be located next to the main studio in Burbank. A few of us in the Effects Department were some of the first to move into the new building. This was around the time we were working on The Hunchback of Notre Dame. The studio had two other feature animation units as well as the Burbank main studio. One was in Orlando, Florida, and one in Paris, France. I was fortunate to get the opportunity to visit each of these studios over a 1 year period to help in the training of the effects departments in each of those studios. They needed very little training, as the artists in both studios were very good.
would be interested in heading up the Effects Department on that film. I gave it a great deal of thought and pondered all the possibilities of such a task that would be awaiting me and after an intense 2 seconds, I said yes!
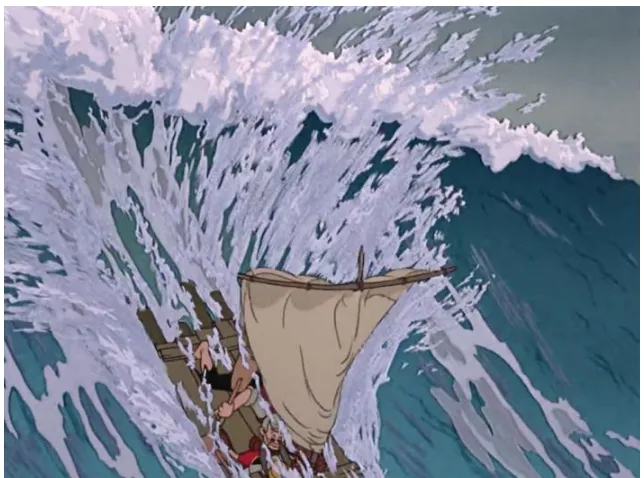
I began work on Hercules as soon as I returned to the studio in Burbank. There was already a group of effects animators working on designs for the film. So it wasn’t long before the art director and directors picked the look they liked for the effects on the film. With the complexity of the design of the water, smoke, fire, and the sheer volume of the number of effects that needed to be done, we needed help from our friends and colleagues in scene planning to fashion techniques to alleviate some of the pressure. Hercules was an extremely heavy-effects movie. We not only had a large crew in the Burbank studio but the effects departments in Florida and Paris were also helping us as well. This was true for the other departments on the film, and credit must be given to the coordinated efforts of all the people whose job was to keep track of the hundreds of scenes and thousands of animation drawings. Throughout the production, I found myself repeating, “We’re going to need a bigger boat!” Such was the volume of work pouring into the department. But I had a great team of animators and assistants that made it all look easy!
I would be remiss if I didn’t mention one of the key animators on my crew, Dorse Lanpher. Dorse was a calming element within the vortex of that production and a great sounding board for me. He had started his animation career in the 1950s at Disney and had
experienced and seen just about all there was to see. I was very fortunate to have him as one of my animators and a friend. His astuteness and advice helped me through some rough times in dealing with personalities and the rigors of production. I will be eternally grateful to him. Sadly Dorse passed away in his home in 2011, several years after his retirement, leaving a great many of us that had worked alongside him very sad. He was a mentor to many of us who worked with him and has been sorely missed by us all.
Another key member in the Effects Department was our assistant production manager, Kim Gray. She was an incredibly efficient manager and a great cheerleader who kept things constantly moving forward. The fact that we had crews working in three different time zones, on two continents, and it all fell neatly into place every week was due to the collaborative efforts of a lot of people, and it was good to know you could always depend on everyone knowing their job and carrying it out efficiently. I’m very proud of the people I worked with on my crew and what a great job they all did on a film I am extremely proud of! In 1997, I was honored to receive an Annie Award from ASIFA for my work on Hercules and it would not have been possible without the concerted effort of that marvelous crew I had the pleasure of working with!
My next film was to be called Kingdom of the Sun—this would eventually become The Emperor’s New Groove after several rewrites. The artistic leads were sent to research the Inca-based story line. We spent 2 weeks traveling around Peru taking in as much of the culture as possible, then returned to LA and started on the production. The original story was going to be much more ambitious. The original concept of the director, Roger Allers (The Lion King), was a bit darker and more mystical story with plenty of special effects. The story went through a rewrite (a common occurrence in the animation world) and a change of leadership. It’s a story documented in a film called Sweatbox, done by Trudie Styler, wife of the singer–songwriter Sting who was doing the music for Kingdom. The effects crew ended up being considerably smaller than originally thought.
comedy. Under the new Director, Mark Dindal (Cats Don't Dance), the production went into high gear and was finished in time to meet the scheduled release date that had been set for the original Kingdom film—a tribute to Mark’s leadership.
My first foray into digitally animated features was Chicken Little, again working with Mark Dindal. I started out designing the effects and then later animating effects. I mostly animated cars and spaceships in Maya® for that film. My effects designs were for reference for the digital animators and programmers to try and emulate the digital effects into the more cartoony look the director wanted for the film, which they did quite successfully. The second digitally animated film I worked on was Meet the Robinsons and on this film my role was purely as an animator, mostly props and vehicles and a bit of elemental effects (and bubbles).
Around this time, it was clear that the studio was going 100% digital. Although there had been massive layoffs a few years before after the traditionally animated feature Home on the Range in 2004, a great many more were laid off in 2007, and I was one of them. I returned about 9 months later to work on what would be the last two-dimensional traditionally animated feature that Disney would do to this date, The Princess and the Frog. The great part of working on Princess was that we worked on Cintiq® tablets with styluses and produced our effects on the tablets. We were able to do our own manipulation of the effects using the Toon Boom Harmony program, so that we were able to hand over a nearly finished effects element to color model. The art director could then make his final tweaks with a minimum of effort as the basics of the elements were already blocked out, allowing the art director to concentrate on the fine-tuning of the effects to his liking.
A History of Effects in Animation
I only went out for a walk and finally concluded to stay out till sundown, for going out, I found, I was really going in.
—John Muir
Early on in animation, the animators did all their own effects as well as the character animation that may have been called for in the scenes they were working on. Often, the effects were more or less an afterthought to the gags the characters were acting out. Therefore the effects were usually haphazard and simplistic interpretations of the particular effect. Water was a flat mass with possibly some lines in it to indicate a directional flow that broke up like bits of torn paper when it hit a character. Smoke was a cycle of round shapes rising upward or covering the screen, the simplest and most elementary of designs. This was not a slight on the part of character animators. During the silent era, animators were cranking out one film per week. This left very little time for study or experimentation for improving the quality of effects in those shorts. The effects were done simply to convey the idea of fire, or water, or smoke, or whatever the gag called for, and the effect was usually on the same level as the characters, so there was very little chance of utilizing any camera effects, like diffusion or opacity.
Another early pioneer was Emile Cohl, who in 1908 produced Fantasmagorie, which had stick figures morphing into other figures. This has been credited as the first fully animated film. Camera effects started getting more creative (see Figure 1.2).
Windsor McCay produced perhaps his most famous film in 1914, Gertie the Dinosaur. But he also produced The Sinking of the Lusitania in 1918. The effects that McCay was able to imagine and achieve are, in my opinion, the best that had been done at the time—they would not be matched until the mid- to late-1930s. He truly was head and shoulders ahead of everyone else at the time (see Figure 1.3).
FIG 1.1 J. Stuart Blackton’s Humorous Phases of Funny Faces.
A typical animation desk setup was used in the early days of the animation process until the early 1920s. Windsor McCay set up his animation process like this, using tracing paper and transparent bond, so he could trace his backgrounds with each succeeding drawing (see Figure 1.4). Two holes punched in the paper would hold the paper in place, while the cross marks on the four corners were used to make certain all the drawings would line up as you animated each of the successive ones. You could use one method or the other, or both at once.
Meanwhile, within the industry there were advances in the way animation was being handled that advanced the medium. A French Canadian by the name of Raoul Barré and his partner Bill Nolan introduced the “peg” system. This would make it possible to register all drawings in exact alignment with each preceding and succeeding drawing, eliminating any shaking or giggling. The Barré–Nolan team also developed the long horizontal and vertical backgrounds. This would give the characters more freedom to move about the scenes without the need to trace the backgrounds onto each of the character drawings. It made it possible to use multiple layers of animated subjects and to incorporate effects in ways previously not possible, along with the introduction of the “cel system,” attributed to John Randolph Bray and Earl Hurd, who patented the process in 1914. (The cel system consisted of clear celluloid sheets onto which drawings were traced on the front in ink and later painted on the back, filling in the interiors of the silhouetted characters.) Bray is also credited with the system for breaking down the work—the assembly line, if you will, of the layout department, background, animator, assistant, and so on. These innovations, along FIG 1.3 Windsor McCay’s The Sinking of the Lusitania.
with the invention of the glass disk in the center of the animator’s drawing board by Vernon George Stallings in the 1920s, further advanced the creative possibilities for animators. Now they could use a back light to see multiple levels at once and get precise one-to-one registration between characters as well as the effects around them (see Figure 1.5).
After further innovations to the animation disk, it evolved into the more familiar-looking round disk that the animator could turn and adjust for a more comfortable drawing position. The animation disk had only top pegs until the mid- to late 1930s; the addition of bottom pegs came later and gave the animators the ability to plot pans (see Figures 1.6 and 1.7).
FIG 1.5 1920s animation desk with glass disk and box light.
Animation started to rise to greater heights during the golden age of animation, roughly 1928–1967. Not only did the process get more sophisticated but also the stories got more complex in the telling and the visuals got more intricate. As the character animation became more sophisticated, the effects needed to rise to the occasion if they were to look and feel as if they belonged in the same environment as the characters, in order for the audience to believe that both effects and characters lived in the same environment. Otherwise the contrast would confuse the viewer and undermine the storytelling. In the mid- to late 1930s, a few effects specialists rose out of the character animation ranks. It was the Fleischer Studios and Walt Disney Studios that put more emphasis on the effects in their films. Disney led the way by using the series of shorts he made during that time. Silly Symphonies and the short The Old Mill used some ground-breaking innovations, such as the multiplane camera, that made for some truly memorable imagery. Disney not only used the shorts to train his character animators but also began training a small group of specialists with a knack for special effects. Early on, the Effects Department consisted of two animators and one assistant between them. Cyrus Young and Ugo D’orsi used their unique talents for animating effects to produce some of the best animated special effects ever done (see Figures 1.8 and 1.9).
FIG 1.7 My modern-day animation desk at Disney.
These men, along with Josh Meador, who arrived in 1939 and who animated a lot of the water from the Monstro sequence in Pinocchio, raised the bar for effects done in Disney films. With the establishment of a department dedicated solely to doing effects in films, the character animators were given some breathing room and were free to fully concentrate their talents on character development and the acting aspects of their characters. The effects animators began studying film and high-speed photography of water, fire, mud, and anything related to the natural phenomenon that would be of use to them in producing realistic effects. This was done not for copying but for the study of patterns and design and the improvement of the overall quality of animated effects. Just as the character animators were studying anatomy and acting to improve their skills, the effects specialists studied all aspects of effects to prepare for the films that Walt Disney was planning.
Along with their realistic effects, they began experimenting with caricaturization of the effects to work not only with realistic effects for films like Bambi but cartoony films like Dumbo. The idea was that there needed to be a marriage of characters and effects so that each style could be represented in the same world environment. Whether the effect was realistic or cartoony, however, it needed to follow real-world physics. This was true even when it was comically employed in a scene as a caricatured representation of itself or as stylized as a Mary Blair design or even the more contemporary films from the second golden age of animation, roughly 1989–1999 (see Figures 1.10 through 1.12).
For a long time it was always pencil on paper and those drawings would then be
transferred, using pen and ink, onto celluloid sheets and painted on the backside of those cels in black and white. Three-strip Technicolor was introduced in 1932 in Disney’s Flowers and Trees. Later, in the late 1950s, Ub Iwerks at Disney applied the use of the xerography process, by which the drawing are copied onto the cels and then painted on the back of the cels. Today’s digital tools have given us another option where the drawings done on paper are scanned into a digital file and painted on computers using an ink and paint program to color and manipulate those elements. Another new option given to the artist today is the use of a stylus by which the artist can now draw directly on a digital tablet and replace the pencil and paper steps.
FIG 1.10 Disney’s Johnny Appleseed.
FIG 1.11 Disney’s Aladdin.
Being able to do the drawings as well as the backgrounds digitally has given filmmakers another tool to produce films. Focus and diffusion or intensity of color or the blending and combining multiple levels of characters and effects within a shot is now pretty much a one-stop process (see Figure 1.13).
The same process that used to be done in an optical printer with numerous strips of film for each element is now fully completed on a computer, giving filmmakers a faster process by which to composite shots with multiple elements and a myriad of special effects tools. The process is essentially the same. The tools may be different, but it still all has to start with the artist and the drawing!
What Exactly Is a Traditionally
Animated Effect?
It’s not what you look at that matters, it’s what you see!
—Henry David Thoreau
Traditionally, effects animation in a film would be anything that is not a character— everything from a stick being kicked by a character to the water that the stick falls into and the splash that it causes. A flood, a tornado, smoke, fire, snow, or magical effects. The shadows from a character on the ground as well as the tones that emphasize that character’s volume and form! An effects animator is a specialist within the specialized field of animation—someone who possesses a good understanding of how things work in the physical world and of natural phenomena. He or she should also have a pretty good understanding of physics and analytic skills, which will help in breaking down the how and the why of an effect and then interpreting that effect into a drawing that gives the illusion of being a real splash of water or smoke rising from a campfire and so on.
We have all seen these things in our lifetimes and some have paid more attention to them than others. You just have to train yourself to recall what you’ve witnessed and build on that information utilizing those memories as well as your imagination in your animation. Reflections on a wall cast from the sun bouncing off a puddle of water and the rhythms they impart on your senses is a memory you can call upon when you need to add a little ambiance to a shot where a couple of lovers are looking soulfully into each other’s eyes, to add to the tender moment and enhance the romantic atmosphere. This is all part of an animator’s visual recall, ready to be used whenever the need may arise. All that is required is for you to remember what you’ve seen and when and where to apply it.
It would behoove you to study and familiarize yourself with these natural phenomena, which may give you more insight into the forces you will be dealing with as you animate effects and will assure that the effects will follow the natural principals of the real world. No matter what the design or art direction of the film is, effects need to act and feel as if they are acting under real-world principles!
• Physics: The natural science that involves the study of matter and its motion through space and time.
• Energy: A property of objects, transferable among them via fundamental interactions, which can be converted into different forms but not created or destroyed.
• Force: An interaction that tends to change the motion of an object. A force can cause a mass to change its velocity.
• Inertia: The resistance of any physical object to any change in its state of motion, including change in its speed and direction. The tendency of an object to move in a straight line at a constant velocity.
• Gravity: Gives weight to physical objects and causes them to fall toward one another. A natural phenomenon by which physical bodies attract each other.
• Trajectory: The path followed by a projectile under the action of a given force. • Momentum: The mass and velocity of an object. The momentum of an object remains
constant unless acted upon by an outside force. • Friction: Surface resistance to relative motion.
• Perspective: The art of drawing solid objects on a two-dimensional surface so as to give the right impression of the height, width, depth, and position in relation to each other when viewed from a particular point.
Knowledge of the forces that are prominent in nature is required as an effects animator. Why? Understanding why gravity, for instance, plays a part in the trajectory of an object traveling through the air, as do friction and inertia, helps you to animate it in a realistic fashion! A ball thrown across a field is carried through the air because of the momentum at which it was thrown. Inertia keeps it going until gravity pulls on it and friction in the air slows it down, causing the ball to follow an arc in its path in the air across the field (see Figure 2.1).
What Does It Take to Become
an Effects Animator?
The more we study the more we discover our ignorance!
—Percy Bysshe Shelley
Let me start off by first saying that no matter how long and how hard you work at your craft, you will never know everything! This is not meant to discourage you but to make you understand that no matter what it is that you want to master, you never will. There will always be new ideas, newer technology, newer or better techniques! They will come from people like you and how much you push your particular envelope. So make sure you never stop pushing yourself and that you challenge yourself in all your endeavors. Settling on one way of doing things will only serve to stymie the creative process. Besides, it’s not as much fun that way!
Water should flow like water and not honey, and mud should flow and have the consistency and weight that is associated with a thick dirt and water mix and not plain water. What does that mean in terms of animating those elements? It’s all in the timing of the thing as well as the design of it. This is learned through observation and practice, practice, practice— applying what you have observed and studied!
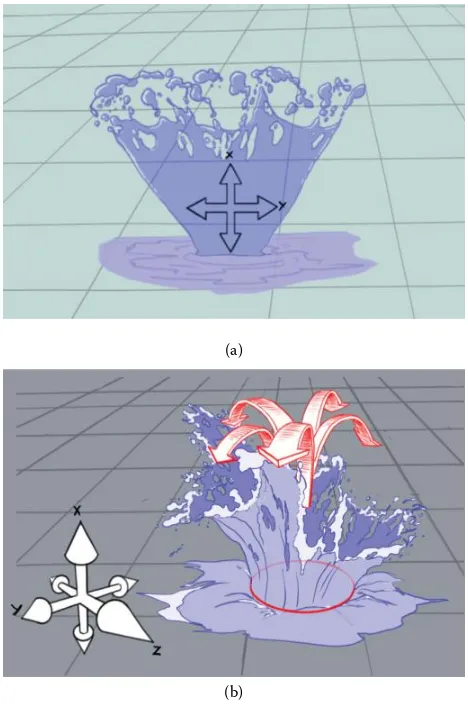
You should strive for simplicity in design and to animate volume and mass, not just lines that delineate the element from a two-dimensional point of view. You need to concern yourself with how a splash looks and feels in three dimensions as a volume and a mass of water, not just a flat drawing that doesn’t indicate that the splash is not only radiating up and down but coming toward you as well as away from you. Hence this is why it is important to understand perspective. Draw in all axes, x, y, and z, relative to the background setting. Figure 3.1a is flat and two-dimensional, concerned only with the x and y axes. Figure 3.1b is a fuller dimensional drawing, staying true to the perspective and clearly delineating all x, y, and z axes.
Even though water is transparent, it has mass and volume. A splash that occurs when a pebble is dropped into a pool of water will not only look different from a boulder falling into a pool of water but will move with different timing due to the volume and mass of the amount of water being displaced.
(a)
(b)
The more attention given to these details will mean the difference between a successful effect and a failed one! (see Figure 3.2).
So, what am I asking you to do in order to be a successful effects animator? Draw and study what you observe! The more you draw, the easier it will be for you to animate the effect you’re striving for.
Knowing what it is that you are going to animate and what you want the desired effect to do should be the hard part; the drawing of it is the easy part if your draftsmanship is good. So, perfect your drawing!
Draw each and every day! How do you do that? Easy! Carry a sketchbook with you at all times. You never know what you will come in contact with or what events you will be witness to. Draw anything and everything! Landscapes or details of textures, such as the bark of a tree or stone walls. The more you know the easier it will be to recall and duplicate. Pay attention to the details and how they work and fit in context to the surroundings. Sketching also forces you to study the element that you’re drawing. Keep it loose and gestural, keeping in mind the movement and timing that you’re witnessing. Jot down notes next to your sketches. More than a few animated effects have failed due to poor draftsmanship. Don’t let that be you—draw! Remember, if you understand the problem you will also have the solution. The more you practice, the more you draw, the more you fill those memory banks in your brain, the easier it will be for you to solve problems in the future. Greater knowledge of your discipline will make your problem-solving a cinch. Stumbling blocks will most definitely crop up as you animate! It’s always best to be prepared for the unexpected issues by expecting them.
Effects are part of the environment, in a scene, helping to establish the ambiance within that setting. The knowledge accumulated over a lifetime of observation of all things around you will make you able to produce whatever is required in a scene. But observation is key! Notice that I keep bringing that up. It must be important! No worries, it’s all out there for you to study, for free. All you have to do is observe.
When you go out and draw, draw from life as much as possible! There is nothing wrong with drawing while watching TV or from the Internet, but there are factors that you experience when drawing from life that cannot be duplicated in a video file. The rumbling under your feet as the waves come crashing onto shore and the spray washes across your face. These are sensations that you can’t get through your TV or computer screen. The heat radiating from a fire and the smell of wood burning and crackling. All these and more are sensations that your senses are privy to that you can’t get from a book filled with photographs of fire. These sensations will play a part as you animate them on paper, recalling those sensations will add a dimension to those drawings that would be missed if you had not lived that experience of sketching from life. That said, I will not diminish the great part that video and
(a) (b)
film references play in animation! Study all you can and store it all in your head so that you can bring up those files in your mind’s eye whenever the need arises.
Caricaturing the effect is an important practice while animating your effects. “Keep it simple” is something to keep in mind: Never fall in love with a pretty drawing of water, fire, or smoke! The important thing is to animate the effect, not to spend 3 months on a splash getting every single detail of that splash. The audience doesn’t need to see every single highlight or droplet of a splash, so be objective in the details. If that “pretty” drawing hinders the overall flow of your animation, it becomes superfluous and you need to pull it! Go ahead and mount and frame it if you want, but it has no place in your animation if it is out of place with the rest of your animation. Think in terms of what is important in the scene. You have to learn to be your own editor. Determine what will work and what won’t.
How much detail is enough or too much? This will play a big role as you come to understand about deadlines and time management. Give your element a history—what was it doing before your scene and what will happen to it next? Make sure you know the story line, the scene before yours, and the one that follows so that all the scenes work smoothly and consistently throughout. All the effects should look like they are from the same universe and relate to all the other effects in the film.
A musician practices scales and timing every day, until it’s part of his system and he doesn’t even have to think about it because it becomes second nature, especially if he wants to get better at his art. There is no substitute for this! Learn everything you can and practice. Keeping all that in mind, an effects animator should know certain basic things that eventually become second nature as you animate. Here are some things to keep in mind that you will want to study and perfect as you move forward in your pursuit of becoming an effects animator.
• Design: When designing, start out with simple gesture drawings! You should never be happy with your first drawing/design, even if that’s the one you eventually settle on. Remember, the basic principles of animation apply—squash and stretch, overlapping action, drag, and follow-through for the animation phase to come later on. Take into account the forces that will be affecting the element you’re going to animate—the surface lines indicating the surface or texture, the density, shading, or color separations. The more thought you put into your initial designs, the stronger and more successful your design will be. The hard part comes when you break it down to the basic shapes and simplification of the element in order to bring it to a more favorable design that can be more convenient to animate and still keep the integrity of your design! And always remember that you need to coordinate with the art director on the film to be sure of maintaining a cohesion of design throughout the look of the film. Of course, final approval will come with the director (see Figure 3.3).
• Timing: Whether you intend your timing to be realistic or to caricature it for comedic reasons, or even when “cartooning” an effect, such as giving the effect a character-like personality, may give you some freedom, always keep the “natural principles” or real-world physics laws in the back of your mind. Timing and the perfection of it will come with time and experience! This will take patience and practice. So don’t pass over this discipline too lightly. Timing in animation is critical! Understand that not everything you’re animating happens all at the same time. Especially when animating natural or environmental effects—fire, water, smoke, lava—this is where overlapping action, drag, and follow-through are critical. While some parts of an element are going up vertically, others may be starting to travel down or horizontally. Even timing is not very pleasing to look at. Nothing in nature moves uniformly! It seems that a certain level of asymmetry in the design and timing of an effect always makes it more pleasing to look at, at least in my humble opinion. Remember, even timing is boring! I’ll be going over further timing points later on.
• Perspective: Construction of your effects to fit your layout or background is important in whatever you’re doing. Whether you are animating a box, a rock, or a splash, if your perspective is flawed that element will fail. Everything works in relation to everything else around it.
If your perspective is faulty and your ellipses are wrong while doing a splash effect, it won’t “fit” right in your background. The greater your understanding and mastering of perspective, the more successful your drawings and the quality of your work will be.
• Volumes: Maintain the same proportions of an object or an effect throughout the duration of a shot.
• Silhouette: Clearly define believable shapes in the element you’re animating. The clear use of positive and negative shapes while staging your drawings against your layout will further serve to clearly define what it is you are portraying. Use of straight and curved lines will also help to define the dynamics of your drawings. Make sure to never lose sight of the construction of your drawing. The shapes and line work should be consistent throughout. If you start out using thick and thin lines, make sure your line work is consistent. Don’t fluctuate from thick and thin to a flat and even line (see Figure 3.4).
Common Terminology
I will be covering these more in depth later on but here is some terminology to keep in mind.
• Extremes, Breakdowns, and Inbetweens: Step-by-step progression in the animation process.
• Arcs: The curve of a path of action along which an object travels.
• Thumbnails: Small, rough drawings that help you stage and plan your animation. • Straight Ahead and Pose to Pose: Methods of animating an action.
• Primary Action: The dominant or initial action of an animation.
• Secondary Action: The minor actions that follow those of a primary action.
• Exposure Sheet: The worksheet containing production number, sequence, scene number, director notes, dialogue, camera, layout, frame count, and animation drawings exposure. In other words, an accounting of everything concerning a scene that accompanies all layout and animation drawings throughout the production pipeline.
• Overlap: The action that occurs when the primary action of a mass or volume overruns the primary action once it has reached the apex of its action or changes direction.
• Follow-Through: The continuation of an action that results once the primary action has changed direction.
• Drag: The very tip, or most extreme ends, of those shapes that arc behind the path of action described by the primary and secondary action.
• Flipping: The technique of flipping between two animation drawings with the third or “inbetween” drawing in the topmost position in order to check whether the movement is correct. The first drawing (1) is placed on the bottom, the third (3) on top of the first, and the inbetween drawing (2) on the top; flip them in the order 1–2–3–2–1–2–3–2–1 and keep that rhythm until you’re satisfied that the action is correct.
• Rolling Drawings: The technique of using your non–drawing hand to check the animation of four to five drawings at a time. Rolling the animation paper in a smooth rolling action from the first drawing on the bottom through each successive drawing stacked on top of each other (1, 2, 3, 4, 5), the animator is able to determine whether the movement in the animation is following through properly to the action that is desired and whether the arcs are smooth and true to the animation.
• Tones: The shadowed areas on a character that defines its volume and shape using a key light source from the background lighting to determine the placement.
• Tone for Rim: The use of a tone to extract a rim light or highlight on a character. • Cast Tone: A shadow cast onto a character from another character or an object. • Highlight or Rim Light: Again, using a prominent key light source from the background
painting (usually a strong back light) to determine a highlight or rim light on a character. • Drop Shadow: The shadow cast from a character onto the ground plane directly below him. • Cast Shadow: The shadow cast from a character onto the ground at an angle.
• Truck: A camera move involving “pushing in or out or laterally” in a shot, maintaining focus on a character or an effect.
• North–South Move: A camera move in a shot that involves travel up or down in the x-axis. • East–West Move: A camera move in a shot that involves travel left or right in the y-axis. • Top and Bottom Pegs: Peg bars located at the top and bottom of an animation disk.
They can work independently of each other to move horizontally left or right. These are used when an animated character or effect move across the screen. By synchronizing the move of the top pegs (the background) and the bottom pegs (the character/effect), this technique prevents the “sliding” that occurs when the background moves at a greater increment from frame to frame than does the animated element. The animated element is normally drawn on the bottom pegs.
• Dissolve: Fading in or out of a scene, usually by fading one shot out while simultaneously fading in the next scene.
• Wipe: Transitioning from one scene to another by using a negative matte and moving it across the screen left or right, diagonally, or north or south.
Thumbnails
Plan your work and work your plan!
—Unknown
Before you start to animate, think about your shot! First, are there continuity issues? Do you need to match with the shot that comes before or after yours? Check out those scenes on the storyboards or the story reel. Talk to the director or the lead person that passed the scene to you to animate. What instructions did you get? Take notes if you have to. Do you need to see the animator that did the other scenes? Once you’ve answered all those questions and are clear as to any particular design specifications, then you can start! (see Figure 4.1).
(a) (b)
Where do you start? First, you think! What is involved? Are there characters involved where you have to be aware of registration? What about scale? Thumbnail the action out, paying attention to your composition. Do as many thumbnails as you need to cover the shot from start to finish. These are quick little gesture drawings to plan the staging of your shot and your animation; there is no need to make finished, detailed drawings (see Figure 4.2).
Don’t settle for your first plan! Are there other ways you can do the shot? Try them out in your thumbnails. The more time spent on your planning, the more easily the animation will go. Scribble down some notes on the sketches of what you want to be doing in the shot. It doesn’t hurt to jot down ideas, especially if you’re like me and have a great idea that you forget 10 minutes later! (see Figure 4.3).
While staging your shot, decide on your primary and secondary actions. Can the animation be done in different layers so you can separate the levels for ease of animation by doing them one at a time? This can be a huge time saver in the long run! (see Figure 4.4).
FIG 4.2 Thumbnails.
(c)
(a)
(b)
FIG 4.3 (a) Thumbnail version 1 (simple). (b) Thumbnail version 2 (more design).
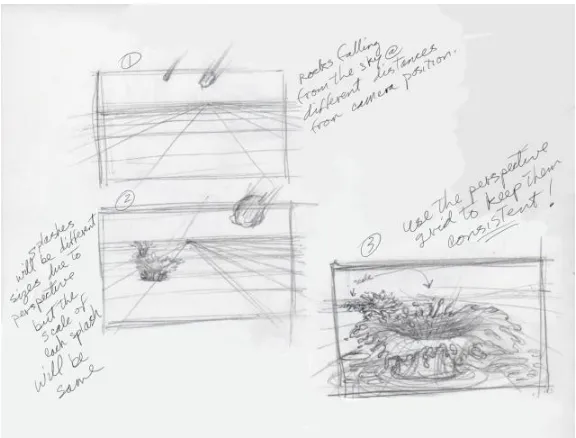
What is the perspective in your shot and how will it affect the animation of foreground and background effects elements? What should you animate first? Thumbnails are a great planning tool that should be utilized in planning your effects animation (see Figure 4.5).
You should also look at your thumbnails as a road map, one that shows you many ways to arrive at your final destination. The directions may change as you do your animation, and you should be open to navigating in a new direction if the animation drives you there. Thumbnails should be an approximation of where to start and where you want to go with you effects. But again, the animation may take a turn or a twist as you’re animating. Things may present themselves that, although purely accidental, can work to your advantage and you may want to go in that direction. At least be open to it and don’t be afraid to try something new (see Figure 4.6).
FIG 4.5 Thumbnails (perspective considerations).
Caricaturing of an Effect
Simplicity is the glory of expression.
—Walt Whitman
To caricature something or someone is simply to exaggerate its characteristics or to distort and imitate it. How can we caricature an effect? We must first start with what it really looks like, then bend and distort its most prominent features. A cartoonist would exaggerate the features of a man or woman’s face by drawing a large nose, large eyes, or a receding hairline that recedes much further than it actually does or by exaggerating a tall and skinny frame to stick-like legs and a tiny torso to emphasize those areas, and so on. The caricature could end up wearing pants that are too short and baggy for him and having drooping shoulders because he always has to bend down to speak with people much shorter than he. But the cartoonist does something else: he takes those features that stand out on that person and simplifies them and eliminates all the other details. Such is the case of caricaturing an effect. A splash of water could have overly large shapes and drops.
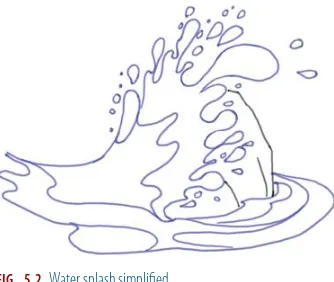
Now let’s redraw over the original drawing and simplify it. Use the existing silhouette and remove some of those detail to minimize the intricacies of the realistic-looking water. You simplify without losing the feel of your animation, retaining the impression that this is still water (see Figure 5.2).
Once you’ve done that, go over it again. Remember, never be satisfied with only one or two examples! Keep removing the detail that makes it a realistic-looking drawing of water— use only the bare essentials and keep the dynamics that keep it flowing over the rock and splashing upward. Combine many of the small details, such as the drops, into larger globs and remove the rest (see Figure 5.3).
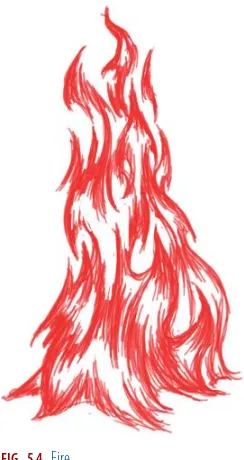
Let’s try the same thing with fire. We can give it a personality—fire can suddenly develop legs and start chasing another character around the room, lashing out with a lick of flames
FIG 5.3 Water splash simplified more. FIG 5.1 Water splash.
that resemble arms. So let’s start once again with what might appear a realistic-looking fire (Figure 5.4).
Now let’s simplify that and go even further. Figure 5.5 gives the fire a much simpler color scheme, with blocks of color and no blending or rendering on the flames.
When you have to animate an effect that may have to look like it has arms and legs, don’t overthink it! Start with a simple stick figure (Figure 5.6a); no details are needed at this point. If the “fire demon” is chasing someone, draw a simple character running, then go over that stick figure and encase him in fire (Figure 5.6b). Make sure that fire casing maintains a consistent volume. While you can have licks of flames coming off the creature, you don’t want him to change his volume from one drawing to another. Finally, remove the stick figures to reveal your final image (Figure 5.6c).
FIG 5.4 Fire.
(a) (b)
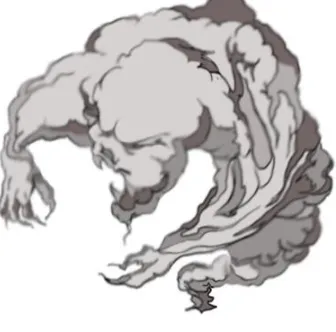
Can we not do the same with smoke? Let’s give the smoke arms with which to engulf a character in a scene (see Figure 5.7).
Now take that smoke from Figure 5.8 and alter him to give him arm-like appendages, but keep him anchored to the fire source on the ground.
It’s just a matter of using your imagination and portraying the effect with a particular personality that gives emphasis to the nature of the elements involved or simplifying to the simplest basic shapes without losing the identity of what it is and what it does.
(a) (b) (c)
FIG 5.6 (a) Stick figures running. (b) Fire with legs and arms; (c) Final Image.
FIG 5.7 Smoke.
Of course, all of this is led by the story and by how the art director and director want to tell it. If it’s a cartoon that treats the effects as personalities, you as an effects animator may be given a lot of freedom with the design and how the effects are animated.
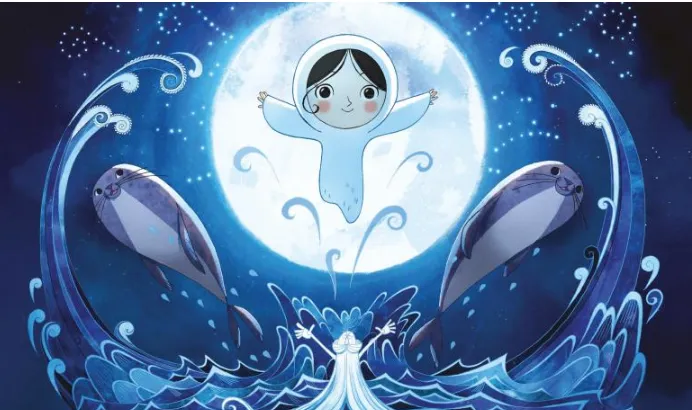
In films like Aladdin and Hercules, the effects were complex, pulling design elements from the calligraphy of the region or the amphora of the time. A more recent film, Song of the Sea, had a much simpler and more childlike look in the design of the backgrounds, characters, and of course the effects. Everything came together to make a cohesive, visually stunning film with the charm of a beautifully illustrated children’s book (see Figure 5.9).
Perspective
What is once well done, is done forever.
—Henry David Thoreau
Perspective is the art of drawing solid objects on a two-dimensional surface so as to give the impression of their height, width, depth, and position in relation to each other when viewed from a particular point. In other words, it’s a way of showing depth or distance in a drawing or painting by making objects that are further from the viewer smaller and those that are closer, larger (Google and Merriam-Webster). Why is it important to know? Read the above once again!
This goes back to the need to draw well in order to be a good animator, whether an effects or character animator. But why do you need to know it and know it well as an effects animator? Let’s take a scene that may come to you from the layout department that requires you to animate a truck on a road traveling toward camera. The scene comes to the effects department before going to the character animator, because the truck needs to be animated first so that the character can be animated inside the vehicle. Usually the layout would have a rough indication of the vehicle’s first and final position. It would then be your job to animate the truck from the first pose to the last, with all the characteristics of a truck going over a road. If the layout has no perspective grid for you to work with, it’s up to you to draw one for your reference. This is important so that the truck moves in proper scale from its first to last position. You need to be able to keep the truck size consistent throughout the animation. The best way to do this is by making a guide that sets up the path that the truck will travel and then animating to that path.
The first step is to set up the horizon line. On a separate piece of paper laid on top of the layout drawing, find the horizon and draw a line on your paper all the way across. Use a T-square, triangle, and straight edge to be as accurate as possible if you can. Also using the bottom of the tires of the truck as a guide, draw a line (a) to the horizon line to find the vanishing point number (1). Now draw a line (b) from where the front tires touch the ground to the horizon line to get the vanishing point number (2). You may need to use an extension on your paper to find this! (see Figure 6.2).
Do the same now using the top of the truck roof (c and d). Then, drawing two perpendicular lines from the intersecting points of those lines, you can now find the front plane of the truck (e and f) (see Figure 6.3).
FIG 6.1 Layout with key truck positions.
FIG 6.2 Horizon line and vanishing points.
On the front plane drawing, draw two diagonal lines from the top and bottom corners to find the center of the rectangle and further define the plane (see Figure 6.4).
The center point can now be used to draw another line (g) to the vanishing points (1) and (2) (see Figure 6.5).
Now draw a perpendicular line through that same center point of the plane (h) (see Figure 6.6). FIG 6.4 Detail path and size guide.
FIG 6.5 Front plane with diagonals and center line.
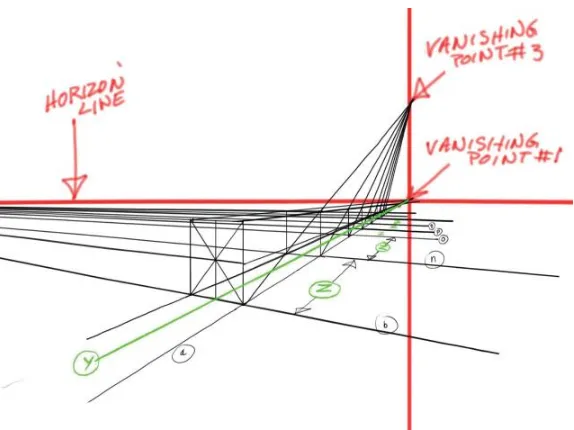
You now need to draw a vertical line that intersects the horizontal line at a 90-degree angle at vanishing point (1) to help establish vanishing point (3). Using the rear corners of the truck, draw two perpendicular lines (i and j) that intersect the lines drawn from the top and bottom of the truck to the vanishing point (1). Now draw a diagonal line (k) through the corners of the newly formed rectangle all the way to the new vertical line. Where these intersect will be your new vanishing point (3). From here on, draw a perpendicular line from the point of intersection of each line (d) and the diagonals (l) you draw in the succeeding diagonals and perpendicular lines (m) drawn to vanishing point (3) (see Figure 6.7).
Continue doing this as far back as Position 1 of your truck layout or for as many as may be needed for the shot (see Figure 6.8).
Next, draw a line from where line (j) intersects line (a) to the vanishing point (2). The distance described in z is the length of the truck. Do the same with each perpendicular line you draw using the diagonals to line (a). See lines (n, o, p, q, and r). The final thing you need to do is draw a line (y) from the center vertical line (h) on the front plane to the vanishing point (1). This will be your ground plane to which you animate the truck, assuring you that the truck will travel in a straight line down through its projected path (see Figure 6.9).
FIG 6.7 Establish vanishing point (3) for scale.
Each cube represents the size of the truck, height, width, and length. Now you will be able to animate that truck knowing that it will work properly and in the correct perspective for your shot (see Figure 6.10).
Many people have their own ways of drawing out perspective grids and I have mine. It’s no better or worse than any other way, and there are many books on the market that you can pick up and learn more precise methods. I’ll show you how I do it, and what has worked for me. Try as many methods as you can until you find the easiest and best way that works for you. But don’t skimp on learning perspective! This is a “must know.” You will see how important it is as you read on in this book for many effects issues. Here, I’ll give you a more common example showing how easy it is to make perspective mistakes, especially with the misuse of ellipses, and how I’ve learned to resolve the problem.
FIG 6.9 Scale established with ground plane.
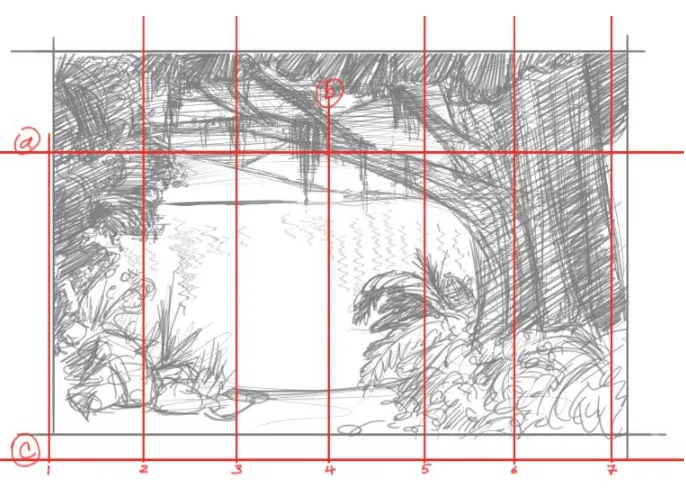
Let’s say one day you get a scene deposited on your desk of a lake where fish are jumping out of the water at varying distances from shore. You will need to animate those splashes so the fish that are jumping out of the water in the distance will have splashes that will relate properly to their scale (no pun intended), as will the splashes of the fish that are closer to camera (see Figure 6.11).
The fish are all approximately the same size but are at varying distances from shore, and the splashes they make in their acrobatic efforts would be essentially the same scale. You want to draw a perspective grid over the water surface from shore to the horizon so that you’ll be able to draw your ellipses correctly, as you set about animating the splashes so that they and the fish are at the same scale.
Again, you start by drawing the horizon line (a) (usually at eye level), a perpendicular line (b) that’s at 90 degrees to the horizon line, and a horizontal line (c) at the bottom of the picture parallel to the horizon line. Be as accurate as possible using a T-square and triangle (see Figure 6.12).
FIG 6.11 Lake layout.
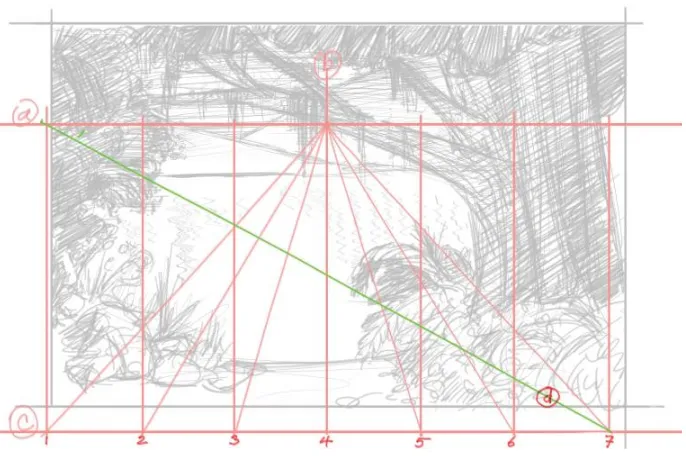
On the bottom line (c), make marks of equal spacing from the center line (b); in this case I have them marked as numbers 1 through 7 (see Figure 6.13).
Now, using those marks draw vertical lines, top to bottom (see Figure 6.14).
Using the point where lines (a) and (b) cross as your vanishing point, draw perspective lines to the points marked 1 through 7 on line (c) (see Figure 6.15).
FIG 6.13 Equal spacers.
Now draw a diagonal line (d) from Point 7 on line (c) to where line (a) and vertical line 1 meet (see Figure 6.16).
As accurately as you can, draw a horizontal line (e) from where the diagonal line (d) crosses the perspective line 6 parallel to lines (c) and (a) (see Figure 6.17).
FIG 6.15 Diagonal lines to the vanishing point.
Continue drawing horizontal lines, using the points where the diagonal line (d) crosses the perspective lines of 5, 4, 3, 2, and 1 (see Figure 6.18).
Looks like we’re running out of room, but have no fear! Using the vanishing point, where lines (a) and (b) intersect, continue drawing the perspective line to where vertical line 1 is intersected by the horizontal lines you have just drawn, so that you can finish your grid (see Figure 6.19).
FIG 6.17 Draw horizontal lines.
Finish drawing horizontal lines using the points where line (d) intersects with your newly drawn perspective lines, to the far side of the lake shore of your layout drawing (see Figure 6.20).
Now that our grid is complete, we can start on the fun stuff. Laying a new piece of animation paper on top of our grid drawing and the animated fish one by one in sequential order we can start animating our water splash effects. We start with laying down rough ellipses at the point of the fish jumping out of the water or splashing back into it (see Figure 6.21).
After drawing your rough perspective grid, draw the rough ellipses (see Figure 6.22).
Should the positions of the fish and the grid not line up to make it easy to draw the ellipses within the grids, have no fear. With the grid in place, roughly draw lines parallel to the lines on the grid as close to the areas affected with fish jumping out of or into the water as possible.
Now sit back and look at your overall perspective grid and determine whether the ellipses work together (see Figure 6.23).
FIG 6.21 Fit ellipses in grid.
FIG 6.22 Rough ellipses.
If the ellipses work, then you can begin designing the water splashes and start animating (see Figure 6.24).
Your final animation now works with your background (see Figure 6.25).
Before ending this chapter, I want to go over something that will help you in drawing ellipses from a perspective grid, once you have your perspective established (see Figure 6.26).
FIG 6.26 Ellipses.
FIG 6.24 Layout effects design.
You can draw your ellipses within your grid by first dissecting the shapes you’ve drawn out in your grid. First, draw diagonal lines (a to c, b to d) from the four corners to get the center in your figure (see Figure 6.27).
Now dissect the shape with vertical and horizontal lines (e and f) (see Figure 6.28).
Now draw lines to connect points e to f, creating a diamond shape (see Figure 6.29). FIG 6.27 Ellipses.
FIG 6.28 Ellipses.