Windows PowerShell
Best Practices
Published with the authorization of Microsoft Corporation by: O’Reilly Media, Inc.
1005 Gravenstein Highway North Sebastopol, California 95472 Copyright © 2013 by Ed Wilson
All rights reserved. No part of the contents of this book may be reproduced or transmitted in any form or by any means without the written permission of the publisher.
ISBN: 978-0-7356-6649-8 1 2 3 4 5 6 7 8 9 LSI 8 7 6 5 4 3
Printed and bound in the United States of America.
Microsoft Press books are available through booksellers and distributors worldwide. If you need support related to this book, email Microsoft Press Book Support at [email protected]. Please tell us what you think of this book at http://www.microsoft.com/learning/booksurvey.
Microsoft and the trademarks listed at http://www.microsoft.com/about/legal/ en/us/IntellectualProperty/Trademarks/EN-US.aspx are trademarks of the Microsoft group of companies. All other marks are property of their respec-tive owners.
The example companies, organizations, products, domain names, email ad-dresses, logos, people, places, and events depicted herein are fictitious. No association with any real company, organization, product, domain name, email address, logo, person, place, or event is intended or should be inferred. This book expresses the author’s views and opinions. The information con-tained in this book is provided without any express, statutory, or implied warranties. Neither the authors, O’Reilly Media, Inc., Microsoft Corporation, nor its resellers, or distributors will be held liable for any damages caused or alleged to be caused either directly or indirectly by this book.
Acquisitions and Developmental Editor: Michael Bolinger Production Editor: Christopher Hearse
This book is dedicated to Teresa. You make each day feel like it is
filled with infinite possibilities.
Contents at a glance
Foreword xix
Introduction xxi
PART I UNDERSTANDING THE BASICS OF WINDOWS POWERSHELL
ChaPtEr 1 Survey of Windows PowerShell capabilities 3
ChaPtEr 2 Using the CIM cmdlets 27
PART II PLANNING FOR SCRIPTING
ChaPtEr 3 Using the active Directory module 45
ChaPtEr 4 Identifying scripting opportunities 73
ChaPtEr 5 Configuring the script environment 111
ChaPtEr 6 avoiding scripting pitfalls 151
ChaPtEr 7 tracking scripting opportunities 195
PART III DESIGNING THE SCRIPT
ChaPtEr 8 Designing the script 233
ChaPtEr 9 Designing help for scripts 277
ChaPtEr 10 Designing modules 311
ChaPtEr 11 handling input and output 339
ChaPtEr 12 handling errors 397
ChaPtEr 13 testing scripts 433
ChaPtEr 14 Documenting scripts 475
PART IV DEPLOYING THE SCRIPT
ChaPtEr 15 Managing the execution policy 491
ChaPtEr 16 running scripts 507
ChaPtEr 17 Versioning scripts 521
ChaPtEr 18 Logging results 531
ChaPtEr 20 Using the Windows PowerShell ISE 605
ChaPtEr 21 Using Windows PowerShell remoting and jobs 615
ChaPtEr 22 Using Windows PowerShell Workflow 643
ChaPtEr 23 Using the Windows PowerShell DSC 659
Index 675
What do you think of this book? We want to hear from you!
Microsoft is interested in hearing your feedback so we can continually improve our books and learning resources for you. to participate in a brief online survey, please visit:
Contents
Foreword xix
Introduction xxi
PART I
UNDERSTANDING THE BASICS OF WINDOWS
POWERSHELL
Chapter 1 Survey of Windows PowerShell capabilities
3
Understanding Windows PowerShell . . . 3 Installing Windows PowerShell . . . 6 Deploying Windows PowerShell . . . 7
Using cmdlets 7
Using command-line utilities . . . 9 Security issues with Windows PowerShell . . . 11 Controlling execution of Windows PowerShell cmdlets 11
Confirming commands 12
Suspending confirmation of cmdlets 12
Working with Windows PowerShell . . . 13
Accessing Windows PowerShell 14
Configuring Windows PowerShell 15
Supplying options for cmdlets . . . 16 Working with the help options . . . 17
Updating help information 17
Discovering information in help 21
Chapter 2 Using the CIM cmdlets
27
Using the CIM cmdlets to explore WMI classes . . . 27
Using the classname parameter 27
Finding WMI class methods 29
Filtering classes by qualifier 30
Retrieving WMI instances . . . 33
Reduce returned properties and instances 33
Clean up output from the command 34
Working with Association classes . . . 35 Additional resources . . . 41
PART II
PLANNING FOR SCRIPTING
Chapter 3 Using the Active Directory module
45
Understanding the Active Directory module . . . 45
Installing the Active Directory module 47
Getting started with the Active Directory module 47 Using the Active Directory module . . . 48
Finding the FSMO role holders 50
Documenting Active Directory 56
Renaming Active Directory sites 59
Managing users 60
Creating a user 63
Finding and unlocking AD user accounts 64
Finding disabled users 66
Finding unused user accounts 68
Additional resources . . . 72
Chapter 4 Identifying scripting opportunities
73
Automating routine tasks . . . 73 Automation interface . . . 75
Using RegRead to read the registry 77
Using intrinsic Windows PowerShell techniques 79 Structured requirements . . . 83
Security requirements 83
Detecting the current user 84
Detecting the user role 96
.NET Framework version requirements 100
Operating system requirements 102
Application requirements 106
Module requirements 108
Additional resources . . . 109
Chapter 5
Configuring the script environment
111
Configuring a profile . . . 111
Creating aliases 112
Creating functions 116
Passing multiple parameters 120
Creating variables 126
Creating PSDrives 133
Enabling scripting 139
Creating a profile . . . 141
Choosing the correct profile 141
Creating other profiles 143
Accessing functions in other scripts . . . 147
Creating a function library 147
Using an include file 148
Additional resources . . . 150
Chapter 6 Avoiding scripting pitfalls
151
Lack of cmdlet support . . . 151 Complicated constructors . . . 153 Version compatibility issues . . . 155
Working with objects and namespaces . . . 163 Listing WMI providers . . . 168 Working with WMI classes . . . 169
Changing settings 173
Modifying values through the registry 175
Lack of .NET Framework support . . . 179
Use of static methods and properties 180
Version dependencies 182
Lack of COM support 182
Lack of external application support 189
Additional resources . . . 193
Chapter 7 Tracking scripting opportunities
195
Evaluating the need for the script . . . 195
Reading a text file 196
Export command history 203
Fan-out commands 205
Query Active Directory 208
Just use the command line 214
Calculating the benefit from the script . . . 217 Repeatability 219 Documentability 223 Adaptability 225 Script collaboration . . . 229 Additional resources . . . 230
PART III
DESIGNING THE SCRIPT
Chapter 8 Designing the script
233
Understanding functions . . . 233 Using functions to provide ease of code reuse . . . 244
Using two input parameters 248
Using functions to encapsulate business logic . . . 259
Using functions to provide ease of modification . . . 261
Understanding filters . . . 270
Additional resources . . . 276
Chapter 9 Designing help for scripts
277
Adding help documentation to a script with single-line comments . . . 277Working with temporary folders 285 Using multiple-line comment tags in Windows PowerShell 4.0 . . . 287
Creating multiple-line comments with comment tags 287 Creating single-line comments with comment tags 288 Using comment-based help . . . 289
The 13 rules for writing effective comments . . . 295
Update documentation when a script is updated 295 Add comments during the development process 296 Write for an international audience 297 Consistent header information 298 Document prerequisites 299 Document deficiencies 300 Avoid useless information 302 Document the reason for the code 303 Use of one-line comments 303 Avoid end-of-line comments 304 Document nested structures 305 Use a standard set of keywords 306 Document the strange and bizarre 307 Additional resources . . . 310
Chapter 10 Designing modules
311
Understanding modules . . . 311Install modules . . . 319
Creating a modules folder 319
Working with the $modulePath variable 322
Creating a module drive 324
Checking for module dependencies 326
Using a module from a share 330
Creating a module . . . 331 Additional resources . . . 338
Chapter 11 Handling input and output
339
Choosing the best input method . . . 340
Reading from the command line 340
Using the Param statement 348
Working with passwords as input 362
Working with connection strings as input 372
Prompting for input . . . 373 Choosing the best output method . . . 374
Output to the screen 376
Output to file 382
Splitting the output to both the screen and the file 383
Output to email 387
Output from functions 388
Additional resources . . . 395
Chapter 12 Handling errors
397
Handling missing parameters . . . 398 Creating a default value for the parameter 398
Making the parameter mandatory 399
Limiting choices . . . .400 Using PromptForChoice to Limit Selections 401 Using ping to identify accessible computers 402 Using the −contains Operator to examine the contents
Handling missing rights . . . 408
Attempting and failing 410
Checking for rights and exiting gracefully 412
Using #Requires 413
Handling missing WMI providers . . . 415 Incorrect data types . . . 423 Out of bounds errors . . . 429
Using a boundary checking function 429
Placing limits on the parameter 430
Additional resources . . . 431
Chapter 13 Testing scripts
433
Using basic syntax checking techniques . . . 433
Looking for errors 438
Running the script 440
Documenting what you did 442
Conducting performance testing of scripts . . . .444
Using the store and forward approach 445
Using the Windows PowerShell pipeline 446
Evaluating the performance of different versions of a script 450 Using standard parameters . . . 460
Using the debug parameter 460
Using the Verbose parameter 462
Using the whatif parameter 464
Using Start-Transcript to produce a log . . . 468 Advanced script testing . . . 470 Additional resources . . . 473
Chapter 14 Documenting scripts
475
PART IV
DEPLOYING THE SCRIPT
Chapter 15 Managing the execution policy
491
Selecting the appropriate script execution policy . . . 491
The purpose of script execution policies 492
Understanding the different script execution policies 492
Understanding the Internet zone 493
Deploying the script execution policy . . . 495
Modifying the registry 495
Using the Set-ExecutionPolicy cmdlet 496
Using Group Policy to deploy the script execution policy 499 Understanding code signing . . . 504 Additional resources . . . 505
Chapter 16 Running scripts
507
Logon scripts . . . 507
What to include in logon scripts 509
Methods of calling the logon scripts 512
Script folder . . . 515
Deploy locally 515
Deploy an MSI package locally 515
Stand-alone scripts . . . 515 Diagnostics 516
Reporting and auditing 516
Help desk scripts . . . 517
Avoid editing 517
Provide a good level of help interaction 517
Additional resources . . . 520
Chapter 17 Versioning scripts
521
Why version control? . . . 521
Avoid introducing errors 522
Maintain a master listing 523 Maintain compatibility with other scripts 523
Internal version number in the comments 525
Version control software . . . 529 Additional resources . . . 530
Chapter 18 Logging results
531
Logging to a text file . . . 531
Designing a logging approach 532
Text location 542
Networked log files 548
Logging to the event log . . . 552
Using the Application log 554
Creating a custom event log 555
Logging to the registry . . . 556 Additional resources . . . 558
Chapter 19 Troubleshooting scripts
559
Understanding debugging in Windows PowerShell . . . 559
Working with syntax errors 560
Working with runtime errors 560
Working with logic errors 564
Using the Set-PSDebug cmdlet . . . 567
Tracing the script 568
Stepping through the script 572
Enabling strict mode 581
Debugging scripts . . . 585
Setting breakpoints 587
Responding to breakpoints 596
Listing breakpoints 597
Enabling and disabling breakpoints 599
Chapter 20 Using the Windows PowerShell ISE
605
Running the Windows PowerShell ISE . . . 605
Navigating the Windows PowerShell ISE 606
Working with the script pane 608
Tab expansion and IntelliSense 610
Working with Windows PowerShell ISE snippets . . . 611 Using Windows PowerShell ISE snippets to create code 611 Creating new Windows PowerShell ISE snippets 612 Removing user-defined Windows PowerShell ISE snippets 613
Additional resources . . . 614
Chapter 21 Using Windows PowerShell remoting and jobs
615
Understanding Windows PowerShell remoting . . . 615
Classic remoting 615
WinRM—Windows Remote Management 626
Using Windows PowerShell jobs . . . 634 Additional resources . . . 641
Chapter 22
Using Windows PowerShell Workflow
643
Why use Windows PowerShell Workflow . . . 643
Workflow requirements 644
A simple workflow 644
Parallel PowerShell . . . 645 Workflow activities . . . .648
Windows PowerShell cmdlets as activities 649
Disallowed core cmdlets 650
Non-automatic cmdlet activities 650
Parallel activities 651
Checkpointing a Windows PowerShell workflow . . . 652
Understanding checkpoints 652
Placing checkpoints 652
Adding checkpoints 653
Chapter 23 Using the Windows PowerShell DSC
659
Understanding Desired State Configuration . . . 659The DSC process 660
Configuration parameters 663
Setting dependencies 665
Configuration data 666
Controlling configuration drift . . . 671
Additional resources . . . 673
Index 675
What do you think of this book? We want to hear from you!
Foreword
I
n April 2003, Microsoft’s Jeffrey Snover gave me an early peek at PowerShell or, as it was known in its beta days, “Monad.” I must admit that, while I fell in love with PoSH at first sight, I was just too darned busy with other work to really get my hands dirty with it for an-other five years, and I soon realized that boy, had I missed a few memos. “Objects in a pipe-line? Is that anything like snakes on a plane?” “Hash tables? Can I get mine with a fried egg?”Yup, there was a lot to learn, and I nearly wore out Google looking up PoSH-y things. Just about every one of those searches, however, seemed to lead me to the same place: the Hey, Scripting Guy! Blog. I quickly noticed that the blog delivered new articles daily, and so I was very surprised to see that the vast majority of those articles were penned by one guy: Ed Wilson. Since then, I’ve gotten to know Ed personally, and trust me, he’s even funnier and more entertaining in person than he is in print, which brings me to this volume.
If you’re a Windows admin, learning Windows PowerShell is an essential (as in you need to do this if you want to remain a Windows admin) task. It’s not always an easy one, though, and you will often find yourself wishing for the “answers in the back of the book” so to speak. Well, Ed’s written that book, and you’re holding the latest edition. Work your way through Windows PowerShell Best Practices, actually take the time to try out the examples, and soon you, too, will be automating, scripting, and workflow-ing like mad. Happy PowerShelling!
Introduction
W
elcome to Windows PowerShell Best Practices, a book that was developed together with the Microsoft Windows PowerShell product group to provide in-depth information about Windows PowerShell and best practices based on real-life experiences with the product in use in different environments. Numerous sidebars are also included that detail experiences from skilled industry professionals such as Enterprise Admins and Windows PowerShell Most Valuable Professionals (MVPs).The book is largely based on Windows PowerShell 4.0 as it exists on Windows 8.1 and on Windows Server 2012 R2. Because Windows PowerShell introduced Desired State Configuration in Windows PowerShell 4.0, Chapter 23, “Using the Windows PowerShell DSC,” must be run on a computer with Windows PowerShell 4.0 installed on it. Nearly all of the material in the other chapters will work without modification on Windows PowerShell 3.0 (on Windows 8 or on Windows Server 2012). A large part of the book also applies to Windows PowerShell 2.0 running on any version of Windows that it installs upon.
Who is this book for?
Microsoft Windows PowerShell Best Practices is for anyone tasked with designing, implement-ing or managimplement-ing enterprise products. This includes Active Directory Domain Services, System Center, Exchange, and SharePoint products. In addition, it is designed for anyone who either teaches or trains others on Windows PowerShell or even for the MCSE track of courseware. Lastly, power users who want to automate their desktops will also benefit from the explana-tions, scenarios, and sample scripts.
How is this book organized?
This book is organized into four parts:
■ Part I: Understanding the basics of Windows PowerShell ■ Part II: Planning for scripting
■ Part III: Designing the script ■ Part IV: Deploying the script
any-The second part of the book discusses identifying scripting opportunities, the scripting en-vironment, and avoiding scripting pitfalls. This part is also ideal for people learning Windows PowerShell, but it is also a great section for admins experienced with the fundamentals of Windows PowerShell but who need to write new scripts.
The third section of the book talks about how you actually design a script—how you plan for inputs and outputs to the script and how you document your scripts. This is a more advanced section, and it is appropriate for advanced students and for people who write scripts that others are expected to utilize.
The last section of the book talks about deploying scripts—how you run them; how you handle versioning; and how you use remote, workflow, and DSC capabilities in your script. This is appropriate for enterprise admins who are firmly entrenched in DevOps.
System requirements
This book is designed to be used with the following Exchange 2010 software: ■ Windows Server 2008 or Windows Server 2008 R2
■ 1 GB of RAM
■ x64 architecture-based computer with Intel or AMD processor that supports 64 bit ■ 1.2 GB of available disk space
■ Display monitor capable of 800 × 600 resolution
The following list details the minimum system requirements needed to run the content in the book’s companion website:
■ Windows XP with the latest service pack installed and the latest updates from Micro-soft Update Service
■ Display monitor capable of 1024 × 768 resolution ■ CD-ROM drive
The companion website
This book features a companion website that makes available to you additional information such as job aids, quick reference guides, and additional Windows PowerShell resources. These elements are included to help you plan and manage your Windows PowerShell organization and apply the book’s recommended best practices. The companion website includes the fol-lowing:
■ Job Aids Additional documents on most of the chapters that help you to collect and structure your work through the book.
■ Quick Reference Guides These guides provide an overview of all best practice recommendations in the book as well as a collection of all Internet links referenced in the book.
You can download these files from the companion website, which is located at http://gallery.technet.microsoft.com/scriptcenter/PowerShell-40-Best-d9e16039.
Acknowledgements
A book of this scope does not happen without assistance. First I must thank my wife, Teresa Wilson, aka the Scripting Wife. She not only coordinated the acquisition of sidebars, but she also read the entire book at least three times. My technical reviewer, Microsoft PFE Brian Wilhite, was great at catching things that would have made me look silly. He also made numerous suggestions for improving not only the clarity of the writing, but in some cases the accuracy of the code. Brian absolutely rocks. Luckily, the Windows PowerShell community is very enthusiastic and as a result was receptive for my call for sidebars. The high quality of the sidebars, and the diversity of content was fun to read, and in the end makes for a much better book. If you run across one of the authors of the sidebars, make sure you tell them "hi." Lastly, I want to thank Jeffrey Snover, Ken Hansen and the rest of the Windows PowerShell team. They made an awesome product that just keeps getting better and better each year. Win-dows PowerShell for the win!
Support & feedback
Errata
We have made every effort to ensure the accuracy of this book. If you do find an error, please report it on our Microsoft Press site at oreilly.com:
http://aka.ms/PowershellBestPractices/errata
You will find additional information and services for your book on its catalog page. If you need additional support, please e-mail Microsoft Press Book Support at mspinput@ microsoft.com.
Please note that product support for Microsoft software is not offered through the addresses above.
We want to hear from you
At Microsoft Press, your satisfaction is our top priority, and your feedback our most valuable asset. Please tell us what you think of this book at:
http://www.microsoft.com/learning/booksurvey
The survey is short, and we read every one of your comments and ideas. Thanks in advance for your input!
Stay in touch
PA R T I
Understanding the
basics of Windows
PowerShell
CHAPTER 1 Survey of Windows PowerShell capabilities 3
C H A P T E R 1
Survey of Windows
PowerShell capabilities
■ Understanding Windows PowerShell ■ Installing Windows PowerShell ■ Deploying Windows PowerShell ■ Using command-line utilities
■ Security issues with Windows PowerShell ■ Working with Windows PowerShell ■ Supplying options for cmdlets ■ Working with the help options ■ Additional resources
Understanding Windows PowerShell
Perhaps the biggest obstacle for a Windows network administrator in migrating to Windows PowerShell 4.0 is understanding what the PowerShell actually is. In some respects, it is like a replacement for the venerable CMD (command) shell. In fact, on Windows Server 2012 R2 running in core mode, it is possible to replace the CMD shell with Windows PowerShell so that when the server boots up it uses Windows PowerShell as the interface. As shown in the following code example, after Windows PowerShell launches, you can use cd to change the working directory and then use dir to produce a directory listing in exactly the same way you would perform these tasks from the CMD shell.
Windows PowerShell
Copyright (C) 2013 Microsoft Corporation. All rights reserved.
PS C:\Users\ed.IAMMRED> cd c:\ PS C:\> dir
Directory: C:\
d---- 9/8/2013 9:15 PM myprocess d---- 8/22/2013 11:22 AM PerfLogs d-r-- 8/22/2013 3:11 PM Program Files d-r-- 8/27/2013 8:19 PM Program Files (x86) d---- 9/8/2013 10:12 PM ScriptFolder d---- 9/8/2013 7:22 PM server1Config d---- 9/8/2013 10:46 PM ServerConfig d---- 9/8/2013 9:22 PM StartBits d-r-- 8/27/2013 8:06 PM Users d---- 8/27/2013 7:52 PM Windows
PS C:\>
You can also combine “traditional” CMD interpreter commands with other utilities such as fsutil. This is shown here:
PS C:\> md c:\test
Directory: C:\
Mode LastWriteTime Length Name ---- --- --- ---- d---- 9/9/2013 3:31 PM test
PS C:\> fsutil file createnew c:\test\mynewfile.txt 1000 File c:\test\mynewfile.txt is created
PS C:\> cd test PS C:\test> dir
Directory: C:\test
Mode LastWriteTime Length Name ---- --- --- ----
-a--- 9/9/2013 3:31 PM 1000 mynewfile.txt
PS C:\test>
NOTES FROM THE FIELD
Jason helmick, Senior technologist
Concentrated Technology
I
t’s amazing to think that, in a few short years, Windows PowerShell has grown from a couple hundred cmdlets to thousands—covering a wide variety of Microsoft products. this means that there is probably something lurking out in the Windows PowerShell universe that you haven’t discovered and which might be very helpful to you. Using the discovery capabilities of Get-Help is the important and practical way to discover cmdlets—but it’s not the only way.the Windows PowerShell community is strong and vibrant, with MVPs, gurus, and
aficionados all blogging, tweeting, and using forums to discover, discuss, and share
new revelations when solving real-world problems. Getting involved in the com-munity is a great way to extend and expand your Windows PowerShell skills—but again, it’s not the only way.
I learn the most about Windows PowerShell when I’m working on a project with other admins who are also using PowerShell. When working with someone else, I’ve noticed that they might do a particular task differently than me—often in a way I hadn’t thought of or using a technique or cmdlet I wasn’t familiar with. Let me give you an example that happened to me recently.
I was getting my virtual machines ready for a live presentation, discussing how to get started learning Windows PowerShell. this was a very special presentation, and one that I really didn’t want to screw up. In the process of getting my VMs loaded, I needed to check some IP addresses so that my co-host could remotely connect to the VMs, an easy enough task to solve using the Windows native command
IPConfig.exe (which of course runs like a dandy in the Windows PowerShell console).
I happened to mention this to my co-host for the presentation, saying something
like “Let me get you the outside IP address; let me just run IPconfig and….”
My co-host responded before I could start typing with, “Have you used gip?” I was
a little stunned—I’d never heard of gip. after noticing my confused look, he smiled and said: “I learn something new about Windows PowerShell almost every day—try
it.” So I did. It turns out that gip is an alias for Get-NetIPConfiguration, which
produces a better-looking and easier-to-read result than the old IPConfig.exe. In
Oh, who was my co-host who introduced me to something new? It was the inventor of Windows PowerShell, Distinguished Engineer Jeffrey Snover. If he can still learn something new about Windows PowerShell, so can I, and so can you. Work with your friends and share.
Installing Windows PowerShell
Windows PowerShell 4.0 comes with Windows 8.1 client and Windows Server 2012 R2. You can download the Windows Management Framework 4.0 package containing updated WinRM, WMI, and Windows PowerShell 4.0 from the Microsoft Download center (Microsoft.Com/Downloads). The package allows you to install on Windows 7 and Windows Server 2008 R2—both of which must be running at least Service Pack 1 and the Microsoft .NET Framework 4.5. You can also install on Windows 8 and Windows Server 2012.
To prevent frustration during the installation, it makes sense to use a script that checks for the operating system, service pack level, and .NET Framework 4.5. A sample script that will check for the prerequisites is Get-PowerShellRequirements.ps1, which follows.
Get-PowerShellrequirements.ps1
Param([string[]]$computer = @($env:computername, "LocalHost")) foreach ($c in $computer)
{
$o = Get-WmiObject win32_operatingsystem -cn $c switch ($o.version)
{
{$o.version -gt 6.2} {"$c is Windows 8 or greater"; break} {$o.version -gt 6.1}
{
If($o.ServicePackMajorVersion -gt 0){$sp = $true} If(Get-WmiObject Win32_Product -cn $c |
where { $_.name -match '.NET Framework 4.5'}) {$net = $true }
If($sp -AND $net) { "$c meets the requirements for PowerShell 3" ; break} ElseIF (!$sp) {"$c needs a service pack"; break}
ELSEIF (!$net) {"$c needs a .NET Framework upgrade"} ; break}
{$o.version -lt 6.1} {"$c does not meet standards for PowerShell 3.0"; break} Default {"Unable to tell if $c meets the standards for PowerShell 3.0"} }
Deploying Windows PowerShell
After Windows PowerShell is downloaded from http://www.Microsoft.com/downloads, you can deploy Windows PowerShell to your enterprise by using any of the standard methods you currently use. A few of the methods some customers have used to accomplish Windows PowerShell deployment include the following:
1. Create a Microsoft Systems Center Configuration Manager package, and advertise it to the appropriate Organizational Unit (OU) or collection.
2. Create a Group Policy Object (GPO) in Active Directory Domain Services (AD DS), and link it to the appropriate OU.
3. Approve the update in Software Update Services (SUS).
If you are not deploying to an entire enterprise, perhaps the easiest way to install Windows PowerShell is to download the package and step through the wizard.
NOTE to use a command-line utility in Windows PowerShell, launch Windows PowerShell by using Start | run | PowerShell. at the PowerShell prompt, type in the command to run.
Using cmdlets
NOTES FROM THE FIELD
David Moravec, Microsoft PowerShell MVP
Mainstream Technologies
O
ne of the nice new features of Windows PowerShell 4.0 is the ability to countfile hashes natively with the Get-FileHash cmdlet. In the past, if you wanted to count hashes, you had to use the System.Security.Cryptography.HashAlgorithm class. It was fine if you used it locally, but when you shared your scripts, you also
had to deliver your function, which created hashes. that is not so anymore.
From my experience, the most frequent method for hash creation is MD5. It’s quick and easy, and every tool can create this type of hash. If you run Get-FileHash in its
default configuration, you receive the following:
PS C:\Users\Makovec> Get-FileHash .\myFile.exe | fl * Path : C:\Users\Makovec\myFile.exe
Type : System.Security.Cryptography.SHA256Managed Hash : p/a6HFn9QkCFQWiaQMo8hVILmCHCPMuaNrRn2DKJKVM=
You can see that the method used is SHA256. You can specify MD5 by using an
Algorithm parameter.
PS C:\Users\Makovec> Get-FileHash .\myFile.exe -Algorithm MD5 | fl * Path : C:\Users\Makovec\myFile.exe
Type : System.Security.Cryptography.MD5CryptoServiceProvider Hash : L1uabH1YgDx/WSR4e2SIgw==
Possible values for Algorithm are: SHA1, SHA256, SHA384, SHA512, MACTripleDES, MD5, and RIPEMD160. Unfortunately Get-FileHash doesn’t accept pipeline input,
so you have to use the following method when you have more files to check:
PS C:\Users\Makovec> dir myfile* |% { Get-FileHash -FilePath $_.FullName } | ft Path, Hash -auto
Path Hash ---- ---- C:\Users\Makovec\myFile.exe p/
a6HFn9QkCFQWiaQMo8hVILmCHCPMuaNrRn2DKJKVM= C:\Users\Makovec\myFile1.txt
hvEVE3TDmfnYS9Hr0weNDTt2YJjXNfPIjKIn0KNYp8g= C:\Users\Makovec\myFile10.txt
MDOlqpQP8CWfY9RFrhJRFXf6tBRUUl8QhUBsEBZzTg0=
C:\Users\Makovec\myFile2.txt PrLYwFUSFV6ffc+pOPk5voQWlDOjPeK/ DY3071VFFCQ=
C:\Users\Makovec\myFile4.txt 9ipYmXXKSmRPa/ pxgGZII5HKt6iz8gmuQnSky8DJXe0=
C:\Users\Makovec\myFile5.txt
Pt95mm1rElr0N7zPmkZ8ntffRmmbN6q22bnIlgzJaJk= C:\Users\Makovec\myFile6.txt
dJXh7cLZb2hf87DtJCRrTAjDLhXJolopRBQYNGt7CPc=
C:\Users\Makovec\myFile7.txt O0AHHQebMbTxQv1QEKYkd63bF8J8jqHHh0zgA4rFG/ A=
C:\Users\Makovec\myFile8.txt EEXKqgV/KXSesD6x8HVmF/ jZTN4DzyjCEWjRuM5R7dI=
C:\Users\Makovec\myFile9.txt jdhlfHvSJ5RJSZ62MOc+J5ujM3fMzzWXwDndZ8V0L 4s=
If you want to have MD5 as the default on your computer, you can specify it
$PSDefaultParameterValues. Be careful—if you modify this in your profile, your
script will probably have a different result on other PCs. But for a quick-and-dirty
local check, it’s OK. Honestly, I added the following two lines to my profile:
Set-Alias -Name md5 -Value Get-FileHash
$PSDefaultParameterValues = @{'Get-FileHash:Algorithm'='MD5'}
and still the following two lines show the same result:
PS C:\Users\Makovec> Get-FileHash .\myFile.exe -Algorithm MD5 PS C:\Users\Makovec> md5 .\myFile.exe
Path Type Hash
---- ---- ----
C:\Users\Makovec\myFile.exe System.Security.Cryptography. MD5Cryp... L1uabH1YgDx/WSR4e2SIgw==
Using command-line utilities
Use the following steps to run ipconfig commands:
1. Start Windows PowerShell by searching on PowerShell from the Windows Start page. The PowerShell prompt will open by default at the root of your Documents folder. 2. Enter the command ipconfig /all as follows:
PS C:\> ipconfig /all
3. Pipe the result of ipconfig / to a text file. This is illustrated here: PS C:\> ipconfig /all >ipconfig.txt
4. Use Notepad to view the contents of the text file, as shown here: PS C:\> notepad ipconfig.txt
Typing a single command into Windows PowerShell is useful, but at times, you might need more than one command to provide troubleshooting information or configuration details to assist with setup issues or performance problems. This is where Windows PowerShell really shines. In the past, one would have to either write a batch file or type the commands manually.
This is seen in the TroubleShoot.bat script that follows.
troubleShoot.bat
ipconfig /all >C:\tshoot.txt route print >>C:\tshoot.txt hostname >>C:\tshoot.txt
net statistics workstation >>C:\tshoot.txt
Of course, if you typed the commands manually, you had to wait for each command to complete before entering the subsequent command. In that case, it was always possible to lose your place in the command sequence or to have to wait for the result of each command. Windows PowerShell eliminates this problem. You can now enter multiple commands on a single line and then leave the computer or perform other tasks while the computer produces the output. No batch file needs to be written to achieve this capability.
Security issues with Windows PowerShell
As with any tool as versatile as Windows PowerShell, there are bound to be some security concerns. However, security was one of the design goals in the development of Windows PowerShell.
When you launch Windows PowerShell, it opens in your Documents folder; this ensures that you are in a directory where you will have permission to perform certain actions and activities. This is far safer than opening at the root of the drive or even opening in system root.
To change to a directory, you cannot automatically go up to the next level; you must explicitly name the destination of the change directory operation (although you can use the CD .. command to move up one level).
The running of scripts is disabled by default and can be easily managed through group policy. It can also be managed on a per-user and per-session basis.
Controlling execution of Windows PowerShell cmdlets
Have you ever opened a CMD interpreter prompt, typed in a command, and pressed Enter so that you could see what it does? What if that command happened to be Format C:\? Are you sure you want to format your C drive? In this section, we will look at some arguments that can be supplied to cmdlets that allow you to control the way they execute. Although not all cmdlets support these arguments, most of those included with Windows PowerShell do. The three arguments we can use to control execution are -whatif, -confirm, and suspend. Suspend is not really an argument that is supplied to a cmdlet but rather an action that you can take at a confirmation prompt, and it is therefore another method of controlling execution.NOTE to use -whatif in a Windows PowerShell prompt, enter the cmdlet and type the -whatif parameter after the cmdlet. this works only for cmdlets that change system state. therefore, there is no –whatif parameter for cmdlets such as Get-Process, which display only information.
Windows PowerShell cmdlets that change system state (such as Set-Service) support a prototype mode that can be entered using the -whatif parameter. The implementation of -whatif can be decided on by the person developing the cmdlet; however, it is the recom-mendation of the Windows PowerShell team that developers implement –whatif when a cmdlet changes system state. The following command illustrates using –whatif:
PS C:\> Set-Service -Name bits -StartupType 'manual' -WhatIf
Confirming commands
As we saw in the preceding section, we can use -whatif to prototype a cmdlet in Windows PowerShell. This is useful for seeing what a command would do; however, if we want to be prompted before the execution of the command, we can use the -Confirm argument. The use of the –Confirm parameter is shown here:
PS C:\> Get-Process -Name notepad | Stop-Process -Confirm
Confirm
Are you sure you want to perform this action?
Performing operation "Stop-Process" on Target "notepad (4148)". [Y] Yes [A] Yes to All [N] No [L] No to All [S] Suspend [?] Help (default is "Y"):y
Suspending confirmation of cmdlets
The ability to prompt for confirmation of the execution of a cmdlet is extremely useful and at times can be vital to assisting in maintaining a high level of system uptime. There are times when you have typed in a long command and then remember that you need to do some-thing else first. For such eventualities, you can tell the confirmation you would like to suspend execution of the command. The great thing is that while the executing command suspends, you have access to the Windows PowerShell shell and can therefore run other commands. In the example here, there are several instances of Notepad running. The first uses – confirm when stopping Notepad. The first instance stops, and then the command is suspended. This provides a chance to use Get-Process to find out information about the other running processes.
PS C:\> 1..5 | % notepad PS C:\> 1..5 | % {notepad}
PS C:\> Get-Process -Name notepad | Stop-Process -Confirm
Confirm
Are you sure you want to perform this action?
Performing operation "Stop-Process" on Target "notepad (3552)". [Y] Yes [A] Yes to All [N] No [L] No to All [S] Suspend [?] Help (default is "Y"):y
Confirm
Are you sure you want to perform this action?
Performing operation "Stop-Process" on Target "notepad (5404)". [Y] Yes [A] Yes to All [N] No [L] No to All [S] Suspend [?] Help (default is "Y"):s
PS C:\>> get-process notepad
81 9 1676 11364 98 0.05 6868 notepad 81 9 1680 11312 98 0.00 7092 notepad
PS C:\>> exit
Confirm
Are you sure you want to perform this action?
Performing operation "Stop-Process" on Target "notepad (5404)". [Y] Yes [A] Yes to All [N] No [L] No to All [S] Suspend [?] Help (default is "Y"):a
PS C:\>
Working with Windows PowerShell
Windows PowerShell can be used as a replacement for the CMD interpreter. Its many built-in cmdlets allow for large number of activities. These cmdlets can be used built-in a stand-alone fashion, or they can be run together as a group.
NOTES FROM THE FIELD
Bill Mell, MCSE Infrastructure Manager
DAV
I
have been using Windows PowerShell for more than five years. I got my start thanks to Ed Wilson’s Windows PowerShell book. It has been invaluable in helping me understand the program’s capabilities. Windows PowerShell has been a tremen-dous help with simplifying what would normally be complex, time-consuming tasks. For example, we use it to pull detailed information, such as service tag and serial number info, about the servers in our environment. We have well over 200 and growing. to obtain this information manually would be a several day or week-long task. With Windows PowerShell, it can be done in a matter of minutes. another wel-come addition to the framework are the active Directory cmdlets. Over the years, these have allowed me to automate mundane tasks such as creating large numbers of users and groups. What used to take hours/days now takes only minutes. Inaddi-tion to this, it seems that more and more companies are catching on to the benefits
accessing Windows PowerShell
After Windows PowerShell is installed, it becomes available for immediate use. However, using the Windows flag key on the keyboard and pressing the letter r to bring up a run com-mand prompt, or “mousing around” and using Start | Run | Windows PowerShellall the time, becomes somewhat less helpful. (It is not quite as big a problem on Windows 8; just type PowerShell on the Start screen). On Windows 8.1, I pin both Windows PowerShell and the Windows PowerShell ISE to the Start screen and to the taskbar. On Windows Server 2012 R2 in core mode, I replace the CMD prompt with the Windows PowerShell console. For me, this is ideal. In fact, this was so useful that I wrote a script to do this. This script can be called through a logon script to automatically deploy the shortcut on the desktop. On Windows 8.1, the script adds both the Windows PowerShell ISE and the Windows PowerShell console to the Start screen and the taskbar. On Windows 7, it adds both the Windows PowerShell ISE and the Windows PowerShell Console to the taskbar and to the Start area of the Start menu. The script works only for English. To make it work in other languages, change the value of $pinTo-Start or $pinToTaskBar to the equivalent values in the target language.
NOTE Using Windows PowerShell scripts is covered in Chapter 16, “running scripts.”See that chapter for information about how the script works and how to actually run the script.
The following script is called PinToStartAndTaskBar.ps1.
PintoStartandtaskBar.ps1
$pinToStart = "Pin to Start" $pinToTaskBar = "Pin to Taskbar"
$file = @((Join-Path -Path $PSHOME -childpath "PowerShell.exe"), (Join-Path -Path $PSHOME -childpath "powershell_ise.exe") ) Foreach($f in $file)
{$path = Split-Path $f
$shell=New-Object -com "Shell.Application" $folder=$shell.Namespace($path)
$item = $folder.parsename((Split-Path $f -leaf)) $verbs = $item.verbs()
foreach($v in $verbs)
{if($v.Name.Replace("&","") -match $pinToStart){$v.DoIt()}} foreach($v in $verbs)
Configuring Windows PowerShell
Many items can be configured for Windows PowerShell. These items can be stored in a PSConsole file. To export the Console configuration file, use the Export-Consolecmdlet, as shown here:
PS C:\> Export-Console myconsole
The PSConsole file is saved in the current directory by default and has an extension of psc1. The PSConsole file is saved in an XML format. A generic console file is shown here:
<?xml version="1.0" encoding="utf-8"?> <PSConsoleFile ConsoleSchemaVersion="1.0"> <PSVersion>3.0</PSVersion>
<PSSnapIns /> </PSConsoleFile>
NOTES FROM THE FIELD
Jeff truman, Platform Engineer
Serve by American Express
I
was pulled into a meeting with very little warning, because of the scripting evan-gelism that I had been doing at my company. the request for the ad hoc script was an interesting one. We needed to get the latest network device backups and zipthem up to provide to a partner. Our internal solution for network config manage -ment is SolarWinds Network Configuration Manager. The software does a nightly
backup of the running configs of each network device and stores it in a folder on
the central server.
that doesn’t seem too tough, so let’s take a look at the requirements. I log in to the server. I open up the ISE and start digging through the directories, ending up at Data Drive\ Solarwinds\NCM\Backups. OK, that makes sense. Now what do I see?
Over 100 folders with names of network devices. Hmm…OK. I open up the first one,
and I see 25+ folders that are named via a date stamp. I open one of these folders,
and I see the config I need. Here is the small gotcha to all of this: Not every device
is backed up each day. I have no way of knowing what the latest time stamp will be in each recursive directory. For mere mortals, this would seem to be a showstopper, but for us PowerShell Peeps, we scoff and giggle. here’s the code:
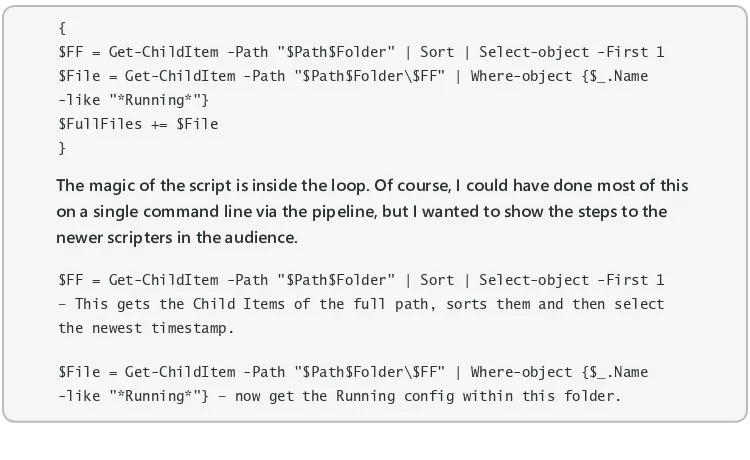
$Path = "D:\Program Files (x86)\SolarWinds\Orion\NCM\Config-Archive\" $Folders = Get-ChildItem $Path
$FullFiles
{
$FF = Get-ChildItem -Path "$Path$Folder" | Sort | Select-object -First 1 $File = Get-ChildItem -Path "$Path$Folder\$FF" | Where-object {$_.Name -like "*Running*"}
$FullFiles += $File }
the magic of the script is inside the loop. Of course, I could have done most of this on a single command line via the pipeline, but I wanted to show the steps to the newer scripters in the audience.
$FF = Get-ChildItem -Path "$Path$Folder" | Sort | Select-object -First 1 – This gets the Child Items of the full path, sorts them and then select the newest timestamp.
$File = Get-ChildItem -Path "$Path$Folder\$FF" | Where-object {$_.Name -like "*Running*"} – now get the Running config within this folder.
Supplying options for cmdlets
One of the useful features of Windows PowerShell is the standardization of the syntax in working with cmdlets. This vastly simplifies the learning of the new shell and language. Table 1-1 lists the common parameters. Keep in mind that all cmdlets will not implement these parameters. However, if these parameters are used, they will be interpreted in the same manner for all cmdlets because it is the Windows PowerShell engine itself that interprets the parameter.
TABLE 1-1 Common parameters
Parameter Meaning
-whatif Instructs the cmdlet to not execute but to tell you what would happen if the cmdlet were to run.
-confirm Instructs the cmdlet to prompt before executing the command.
-verbose Instructs the cmdlet to provide a higher level of detail than a cmdlet not using the ver-bose parameter.
-debug Instructs the cmdlet to provide debugging information.
-ErrorAction Instructs the cmdlet to perform a certain action when an error occurs. Allowed actions are continue, stop, silentlyContinue, and inquire.
-ErrorVariable Instructs the cmdlet to use a specific variable to hold error information. This is in addition
to the standard $error variable.
-Outvariable Instructs the cmdlet to use a specific variable to hold the output information.
NOTE to get help on any cmdlet, use the Get-Helpcmdletname cmdlet. For example, use
Get-Help Get-Process to obtain help with using the Get-Process cmdlet.
Working with the help options
One of the first commands to run when opening Windows PowerShell for the first time is the Update-Help cmdlet. This is because Windows PowerShell does not ship help files with the product. This does not mean that no help presents itself—it does mean that help beyond simple syntax display requires an additional download.
A default installation of Windows PowerShell 4.0 contains numerous modules that vary from installation to installation, depending on the operating system features and roles selected. For example, Windows PowerShell 4.0 installed on a Windows 7 worksta-tion contains far fewer modules and cmdlets than are available on a similar Windows 8.1 workstation. However, this does not mean all is chaos, because the essential Windows PowerShell cmdlets—the core cmdlets—remain unchanged from installation to installation. The difference between installations is because additional features and roles often install additional Windows PowerShell modules and cmdlets. (For more information about which roles install which specific modules, consult the role- and feature-specific information at technet.microsoft.com.)
Updating help information
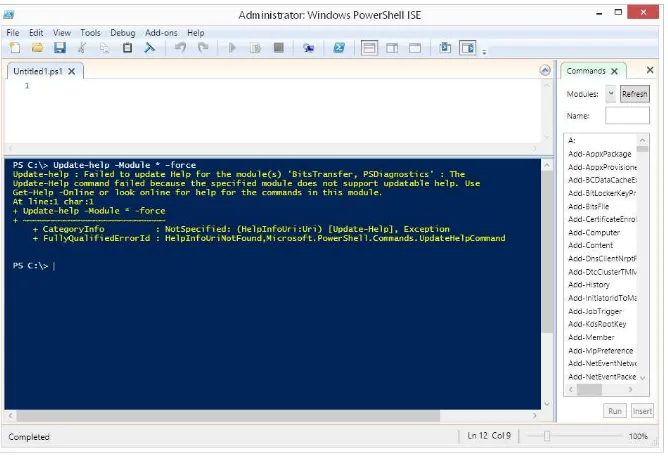
The modular nature of Windows PowerShell requires additional consideration when updating help. Simply running Update-Help does not update all of the modules loaded on a particular system. In fact, some modules might not support updatable help at all—these generate an error when you attempt to update help. The easiest way to ensure that you update all pos-sible help is to use both the module parameter and the force switched parameter. The com-mand to update help for all installed modules (that support updatable help) is shown here: Update-Help -Module * -Force
FIGURE 1-1 Errors appear when attempting to update help files that do not support updatable help. One way to update help and not receive a screen full of error messages is to run the Update-Help cmdlet and suppress the errors all together, as shown here:
Update-Help -Module * -Force -ea 0
The problem with this approach is that you can never be certain that you actually received updated help for everything you wanted to update. A better approach is to hide the errors during the update process and also to display errors after the update completes. The advan-tage to this approach is the ability to display cleaner errors. The UpdateHelpTrackErrors.ps1 script illustrates this technique. The first thing that the UpdateHelpTrackErrors.ps1 script does is to empty the error stack by calling the clear method. Next it calls the Update-Help module with both the module parameter and the force switched parameter. In addition, it uses the ErrorAction parameter (ea is an alias for this parameter) with a value of 0. The value 0 means not to display any errors when the command runs. The script concludes by using a For loop to walk through the errors and display the error exceptions. The UpdateHelpTrackErrors.ps1 script appears here.
UpdatehelptrackErrors.ps1
#requires -version 4.0
#Requires -RunAsAdministrator Update-Help -Module * -Force -ea 0
For ($i = 0 ; $i -le $error.Count ; $i ++) { "'nerror $i" ; $error[$i].exception }
When the UpdateHelpTrackErrors script runs, a progress bar displays, indicating the prog-ress as the updatable help files update. After the script completes, any errors appear in order. The script and associated errors are shown in Figure 1-2.
FIGURE 1-2 Cleaner error output from updatable help, generated by the UpdateHelpTrackErrors script.
NOTES FROM THE FIELD
Jan Egil ring, Microsoft PowerShell MVP, Lead architect
Crayon, Norway
A
good practice concerning the updatable help system, which was introducedwith Windows PowerShell 3.0 or 4.0, is keeping the help files up to date.
For one-time updates, simply running Update-Help from an elevated Windows
has created an rSS-feed where you can stay updated with new releases:
http://sxp.microsoft.com/feeds/msdntn/PowerShellHelpVersions.
as with other tasks in PowerShell, automation is key. For updating your own com-puter, you could simply leverage the new PSScheduledJob module introduced in Windows PowerShell 3.0 to create a job that will invoke Update-Help—for example, once a week—without you having to remember it.
the following is an example of how to do this:
Register-ScheduledJob -Name Update-Help -ScriptBlock {Update-Help -Module *} -Trigger (New-JobTrigger -DaysOfWeek Monday -Weekly -At 8AM) -ScheduledJobOption (New-ScheduledJobOption -RequireNetwork)
I have a list of things that I configure when I reinstall or configure a new computer
for myself, and this is one of the items on that list.
In a corporate environment, there are more things to consider. For example, there is a Group Policy setting called “Set the default source path for Update-Help,” which you can read more about here: http://go.microsoft.com/fwlink/?LinkId=251696. this
setting allows you to download the updated help files from a single computer, while the domain-joined computers download the help files from an internal UNC-path specified by either the Group Policy setting or by using the – SourcePath parameter of Update-Help.
One reason for doing this might be that some of the computers on the network are
not allowed access to the Internet and thus will need to get the help files from an
internal network location.
On the computer managing the download of the help files, you can leverage the
Save-Help cmdlet to save the help files to the internal UNC-path. An enhancement
made to the Save-Help cmdlet in Windows PowerShell 4.0 makes it possible to
download help files for Windows PowerShell modules not installed on the computer running the cmdlet. This can be accomplished by using the –Module parameter of
Save-Help. this parameter allows wildcards, so the following example will download
the help-files for all modules available:
Save-Help -Module * -DestinationPath \\server\share
Some might say that help files do not need to be updated on servers, because administrators should administer the servers remotely and use the help files on the
Update-Help on a scheduled basis. the following is an example of the path and arguments that can be used for the scheduled task:
Path: C:\Windows\System32\WindowsPowerShell\v1.0\powershell.exe Arguments: -Command "& {if (($PSVersionTable.PSVersion).Major -ge 3) {Update-Help -SourcePath '\\server\share\PowerShell\Help-files'}}"
Discovering information in help
Windows PowerShell has a high level of discoverability; that is, to learn how to use PowerShell, you can simply use PowerShell. Online help serves an important role in assist-ing in this discoverability. The help system in Windows PowerShell can be entered by several methods. To learn about using Windows PowerShell, use the Get-Help cmdlet as follows: Get-Help Get-Help
This command prints out help about the Get-Help cmdlet. The output from this cmdlet is illustrated here:
NAME Get-Help
SYNOPSIS
Displays information about Windows PowerShell commands and concepts.
SYNTAX
Get-Help [[-Name] <String>] [-Category <String>] [-Component <String>] [-Full [<SwitchParameter>]] [-Functionality <String>] [-Path <String>] [-Role <String>] [<CommonParameters>]
Get-Help [[-Name] <String>] [-Category <String>] [-Component <String>] [-Functionality <String>] [-Path <String>] [-Role <String>] -Detailed [<SwitchParameter>] [<CommonParameters>]
Get-Help [[-Name] <String>] [-Category <String>] [-Component <String>] [-Functionality <String>] [-Path <String>] [-Role <String>] -Examples [<SwitchParameter>] [<CommonParameters>]
Get-Help [[-Name] <String>] [-Category <String>] [-Component <String>] [-Functionality <String>] [-Path <String>] [-Role <String>] -Online [<SwitchParameter>] [<CommonParameters>]
Get-Help [[-Name] <String>] [-Category <String>] [-Component <String>]
Get-Help [[-Name] <String>] [-Category <String>] [-Component <String>] [-Functionality <String>] [-Path <String>] [-Role <String>] -ShowWindow [<SwitchParameter>] [<CommonParameters>]
DESCRIPTION
The Get-Help cmdlet displays information about Windows PowerShell concepts and commands, including cmdlets, providers, functions, aliases and scripts.
Get-Help gets the help content that it displays from help files on your computer. Without the help files, Get-Help displays only basic information about commands. Some Windows PowerShell modules come with help files. However, beginning in Windows PowerShell 3.0, the modules that come with Windows PowerShell do not include help files. To download or update the help files for a module in Windows PowerShell 3.0, use the Update-Help cmdlet. You can also view the help topics for Windows PowerShell online in the TechNet Library at http://go.microsoft.com/fwlink/?LinkID=107116http://go.microsoft.com/fwlink /?LinkID=107116.
To get help for a Windows PowerShell command, type "Get-Help" followed by the command name. To get a list of all help topics on your system, type "Get-Help*".
Conceptual help topics in Windows PowerShell begin with "about_", such as "about_Comparison_Operators". To see all "about_" topics, type "Get-Help about_*". To see a particular topic, type "Get-Help about_<topic-name>", such as "Get-Help about_Comparison_Operators".
You can display the entire help topic or use the parameters of the Get-Help cmdlet to get selected parts of the topic, such as the syntax, parameters, or examples. You can also use the Online parameter to display an online version of a help topic for a command in your Internet browser.
If you type "Get-Help" followed by the exact name of a help topic, or by a word unique to a help topic, Get-Help displays the topic contents. If you enter a word or word pattern that appears in several help topic titles, Get-Help displays a list of the matching titles. If you enter a word that does not appear in any help topic titles, Get-Help displays a list of topics that include that word in their contents.
In addition to "Get-Help", you can also type "help" or "man", which displays one screen of text at a time, or "<cmdlet-name> -?", which is identical to Get-Help but works only for cmdlets.
For information about the symbols that Get-Help displays in the command syntax diagram, see about_Command_Syntaxhttp://go.microsoft.com/fwlink/?LinkID=113215. For information about parameter attributes, such as Required and Position, see about_Parametershttp://go.microsoft.com/fwlink/?LinkID=113243.
RELATED LINKS
Online Version: http://go.microsoft.com/fwlink/?LinkID=113316 Get-Command
about_Command_Syntax about_Comment_Based_Help about_Parameters
REMARKS
To see the examples, type: "Get-Help Get-Help -examples". For more information, type: "Get-HelpGet-Help -detailed". For technical information, type: "Get-Help Get-Help -full". For online help, type: "Get-Help Get-Help -online"
NOTES FROM THE FIELD
Sean Kearney, Microsoft PowerShell MVP, Senior Solutions architect
Cistel Technology Inc.
I
barely remember my life before using Windows PowerShell, because life with it afterwards has become so wonderful.My first foray into using this technology showed me not only its ease of use but also its raw power by deleting files by Date and Time. Because of Windows PowerShell, I
got to go home early by two hours on a Friday and began singing a song of praise.
(That was the beginning of the song that I wrote called Highway to PowerShell.)
the song introduced me to Jeffrey Snover, the architect of Windows PowerShell
(by way of a blog post that almost scared him). I discovered a community of people
within and outside of Microsoft who were incredibly passionate about building on and improving this technology. this community ran their own podcasts, built their own tools, and actively engaged Microsoft to make Windows PowerShell better. this group of people, including Microsoft staff on the Windows PowerShell team, Microsoft MVPs, and other community experts, were part of the inspiration to grow beyond who I was.
It was during this same process, on the PowerScripting Podcast that I first encoun
-tered Mr. Ed “Hey Scripting Guy” Wilson. I think I even wrote a small tune about him at the time and gained a friend on that day.
Not soon afterwards, I found myself working for a Fortune 15 Corporation, using Windows PowerShell to migrate active Directory and Exchange Users. I found
that it was the best way to quickly unlock accounts and disable users (as a Single Administrator for a growing division). It also became my tool of choice for quarterly
With Windows PowerShell, I gained the power held by VBScript but also the ease of use and the ability to interact and play directly with the command prompt. I now had a tool that would leverage and interact with older systems—a new technol-ogy that would help bring console applications and VBScript into newer and more powerful tools.
It was a tool that cost nothing to leverage and actually allowed me to get home at a decent hour. I was blown away!
I now work for a Microsoft Gold Partner living in the world of automation and Systems Center 2012. I am excited each day to go to work. Whenever somebody
looks as me and asks, “Can you do this?” I immediately start thinking of how it can
be done with Windows PowerShell, because the answers are usually quick and easy. they are simple to repeat.
thank you, Windows PowerShell and all those involved in its existence. I am forever grateful. You rock!
The good thing about help with the Windows PowerShell is that it not only displays help about commands, which you would expect, but also has three levels of display: normal, detailed, and full. Additionally, you can obtain help about concepts in Windows PowerShell. This last feature is equivalent to having an online instruction manual. To retrieve a listing of all the conceptual help articles, use the Get-Help about* command as follows:
Get-Help about*
Suppose you do not remember the exact name of the cmdlet you want to use, but you remember it was a get cmdlet? You can use a wildcard character, such as an asterisk (*), to obtain the name of the cmdlet, as shown here:
Get-Help get*
This technique of using a wildcard operator can be extended further. If you remember that the cmdlet was a get cmdlet and that it started with the letter p, you can use the following syntax to retrieve the desired cmdlet:
Get-Help get-p*
However, suppose that you know the exact name of the cmdlet, but you cannot exactly remember the syntax. For this scenario, you can use the -examples argument. For example, for the Get-PSDrive cmdlet, you would use Get-Help with the -examples argument, as follows: Get-Help Get-PSDrive -examples
more.comutility. This causes output to display one page at a time in the Windows PowerShell console. This is useful if you want to avoid scrolling up and down to see the help output.
NOTE Keep in mind that in the Windows PowerShell ISE the pager does not work, and therefore you will see no difference in output from Get-Help or from Help. In the ISE, both
Get-Help and Help behave the same way. however, it is likely that if you are using the Windows PowerShell ISE, you will use Show-Command for your help instead of relying on
Get-Help.
This formatted output is shown in Figure 1-3.
FIGURE 1-3 Using help to display information one page at a time.
Getting tired of typing Get-Help all the time? After all, it is eight characters long, and one of them is a dash. The solution is to create an alias to the Get-Help cmdlet. An alias is a shortcut keystroke combination that will launch a program or cmdlet when typed. In creating an alias for the Get-Help cmdlet procedure, we will assign the Get-Help cmdlet to the gh key combination as shown here:
New-Alias gh Get-Help
NOTE To create an alias for a cmdlet, confirm there is not already an alias for the cmdlet